
M-56 IP - Système Hi-Fi MUSE - Notice d'utilisation et mode d'emploi gratuit
Retrouvez gratuitement la notice de l'appareil M-56 IP MUSE au format PDF.


| Type de produit | Système Hi-Fi |
| Marque | MUSE |
| Modèle | M-56 IP |
| Dimensions (L x H x P) | 430 x 150 x 350 mm (approx.) |
| Poids | 5 kg (approx.) |
| Alimentation | 230 V ~ 50 Hz |
| Puissance de sortie | 100 W RMS |
| Connectivité sans fil | Wi-Fi, Bluetooth |
| Connectivité filaire | USB, AUX (3,5 mm), entrée optique |
| Fonctions principales | Lecture CD, radio FM, streaming internet, lecture USB, haut-parleurs intégrés |
| Écran | Écran LCD rétroéclairé |
| Télécommande | Fournie |
| Entretien et nettoyage | Nettoyer avec un chiffon doux et sec. Débrancher avant nettoyage. |
| Sécurité | Ne pas exposer à l'humidité ou à des températures extrêmes. Ne pas ouvrir l'appareil. |
| Pièces détachées et réparabilité | Télécommande et câble d'alimentation disponibles. Réparation par un professionnel. |
| Informations générales | Système Hi-Fi polyvalent pour la maison. Garantie 2 ans. |
FOIRE AUX QUESTIONS - M-56 IP MUSE
Questions des utilisateurs sur M-56 IP MUSE
0 question sur cet appareil. Repondez a celles que vous connaissez ou posez la votre.
Poser une nouvelle question sur cet appareil
Téléchargez la notice de votre Système Hi-Fi au format PDF gratuitement ! Retrouvez votre notice M-56 IP - MUSE et reprennez votre appareil électronique en main. Sur cette page sont publiés tous les documents nécessaires à l'utilisation de votre appareil M-56 IP de la marque MUSE.
MODE D'EMPLOI M-56 IP MUSE
MUSE
M-56 IP
User Manual
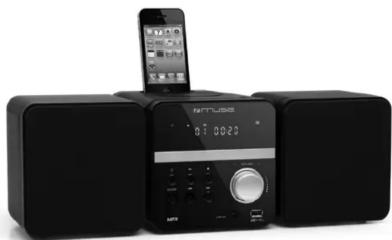
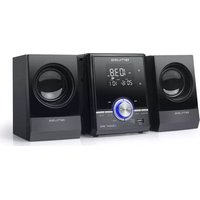
MICRO SYSTEM WITH DOCKING FOR iPod/iPhone
natural_image
Black audio recording device with two speakers and a digital display (no visible text or symbols)iPod/iPhone not included
Please read the instruction carefully before operating the unit.
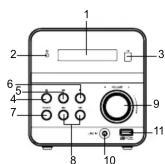
LOCATION OF CONTROLS


English
SPEAKER CONNECTION
Connect the speaker wire of the speaker box to the speaker terminal on back of unit.
POWER SUPPLY
This set operates on AC 100-240V\~50/60Hz.
Connect the power cord to a convenient AC wall outlet.
AUDIO CONTROLS
-
Press ⏻ STANDBY button to turn on the unit.
-
The function is selected by pressing SOURCE button repeatedly: CD, USB, FM RADIO, LINE IN (AUX IN) and iPod.
VOLUME
Turn VOLUME-/+ control to adjust the sound to comfortable level. The volume level will be displayed for a few seconds.
MUTE
To cut off the sound from the speakers temporarily, press MUTE button on remote control. The "MUTE" icon is shown on the display. Press MUTE button again to cancel Mute mode and restore the sound from the speakers.
EQ
Press EQ button on remote control to toggle among the different sound effects (FLAT /CLASSIC /ROCK /POP / JAZZ). The selection will show on display for few seconds.
DISC OPERATION
-
Press ⏻ STANDBY button to turn on the unit.
-
Open the CD door by pushing the CD door Open button ▲
-
Place the CD with label side up inside the CD compartment and close the CD door.
- Press the SOURCE button to select CD function. The "CD" icon is displayed. Playback starts automatically.
BASIC OPERATION
Play/pause
Press ▶II to pause playback. Press again to resume.
Select a track
-By /
Press ◀◀/▶▶ to select a track.
GB - 3
- LED display
- ⏻ Standby indicator
- Remote sensor
- ⏻ Standby button
- ▶ II PLAY/PAUSE button
- ■ STOP button
- SOURCE button
- 📄, 📋 buttons: Skip / search / Tuning
- VOLUME: control
- VOLUME+/- control
-
LINE IN inch
-
LINE IN JACK
11.USB port
12. ▲Disc door open button
13.Disc compartment
14.iPod/iPhone dock
15. VIDEO OUT
16.FM antenna
17.AC cord
18.Speaker terminal 19.Speaker box
19.Speaker box 20.Speaker win
GB-1
-By number buttons 10+, 0-9
Use the number buttons to input the track number, and it will start playback from the selected track automatically.
If you want to input the track number bigger than 9, use the 10+, 0-9 buttons.
Example 1, to select the 10th track, firstly press 10+ button once. “_ _” appears on display, then press number button 1 & 0.
Example 2, to select the 25th track, firstly press 10+ button once. “_ _” appears on display, then press number button 2 & 5.)
Fast search backward/forward
Press and hold 🐎/▶ to search quickly within a track.
Select a folder (mp3 only)
- Press ALB+ on remote control to select the first track of next folder of your current disc or USB.
- Press ALB- on remote control to select the first track of previous folder of your current disc or USB.
USB OPERATION
-
Press ⏻ STANDBY button to turn on the unit.
-
Connect an USB device to the USB port on unit
-
Press SOURCE button to select USB mode. Playback starts automatically.
Notes:
- Do not put anything other than a USB device to the port of this unit. Other objects may damage the USB mechanism.
- The USB socket must not be connected to the computer directly, for that may damage the unit.
- There are many USB devices in the market. We cannot guarantee to support all different models. Please try another USB device if your device is not supported.
RADIO
Listening to the radio
-
Press ⏻ STANDBY button to turn on the unit.
-
Press SOURCE button to select Radio (FM) mode. "FM" appears on display.
-
Tune to a desired station with 🏠/▶ on unit or TUN-/+ on remote control.
Note:
- For a better reception in FM, extend the antenna.
-If a stereo broadcast is received, "ST" is displayed. Press ST/MONO button on remote control to switch between Mono and Stereo mode.
GB-4
REMOTE CONTROL
R1. ⏻ Standby bu
R2. MUTE button
R3. 0-9,10+ number buttons
R4. MENU/PROG button: To access iPod menu;
To program playback sequences.
R5. ALB-/+ buttons : Folder down /up
R6. ▲ button: To move up in iPod menu
R7. ▼ button: To move down iPod menu
R8. /M-(MEMORY-) button:
Skip / search / Preset down
R9. ▶/▶/M+ (MEMORY +) button:
Skip / search / Preset up B10 ENTER button
R10. ENTER button R11. TUN / buttons: Tuning
RT1. YON-/+ buttons. Tuning R12. VOL+/- buttons
R12. VOL+/+ buttons R13. ▶IL PLAY/PAI
R13. ▶ FLAT/FAOSE button R14. SOURCE button
R14. SOURCE button R15. INTRO button
R16. REPEAT butt
R17. RANDOM button
R18. AUTO/STOP button
R19. SLEEP button
R20. EQ button
R21. MEMORY/VIDEO SELECT button
R22. ST/MONO button

Installing Battery
Insert 2 "AAA/ UM4" batteries to the remote control prior to use. Make sure to match their polarities (+/-) to the markings inside the compartment.

Before throwing any batteries away, consult your distributor who may be able to take them back for specific recycling.
NOTES:
- Never recharge the batteries, apply heat to them or take them apart.
- If the remote control is not going to be used for a long time, remove the battery to
avoid damage caused by battery leakage corrosion
- Attention should be drawn to the environmental aspects of battery disposal. Do not throw batteries in fire!
- Do not throw batteries in fire!
- Battery shall not be exposed to excessive heat such as sunshine, fire of the like.
CAUTION: Danger of explosion if battery is incorrectly replaced. Replace only with the same or equivalent type.
GB-2
Presetting radio stations
The unit can store up to 20 FM stations in its memory.
Manual preset
-
Tune to a desired station.
-
Press MEMORY button on remote control. "01" flashes on display.
-
Press M-/+ on remote control to select a desired preset location. Press MEMORY
again to save the radio station as the selected preset station
- Repeat above steps to preset a maximum of 20 stations.
Auto preset
In FM mode, press AUTO on remote control to start automatic preset programming. Radio frequencies will be browsed and radio stations stored automatically. When all the available radio stations are stored or all memory locations are full, the auto preset programming function will stop.
Retrieving the preset stations
In radio mode, press M-/+ on remote control to access a preset station.
PLAY MODES(CD/MP3 ONLY)
Intro playback
During playback, press INTRO button on remote control and "INTRO" appears on display. It will start to play the first 10 seconds of each track. Press INTRO button again to cancel this function and "INTRO" disappears on display.
Repeat playback
Press REPEAT button on remote control repeatedly to select a play mode:
- Repeat One : display shows "REP"
- Repeat folder :display shows "REP ALB". (MP3 only)
- Repeat All : display shows "REP ALL".
To cancel repeat playback, press REPEAT button repeatedly until repeat indicator disappears.
Random playback
Press RANDOM button on remote control and "RDN" appears on display. It will play all tracks in random order. Press RANDOM button again to cancel this function and "RDN" disappears.
Program playback
-
In stop mode, press PROG button on remote control. The display will show "P01" and flashing "00" ("000" for MP3).
-
Use number buttons to input the track number and press PROG button to conform.
-
Repeat above steps to program up to 32 tracks.
-
Press ▶II to start program playback.
-
Press ■ button to stop the program playback and cancel this function.
GB - 5

LINE IN (AUXILIARY INPUT)
-
Connect your auxiliary source (e.g mp3 player) to the LINE IN jack on unit
-
Press ⏻ button to turn on the unit.
-
Press SOURCE to select LINE IN mode.
-
Start playback from your auxiliary source.
-
Adjust the volume to desired level.
-
To stop playback, disconnect your auxiliary source from the LINE IN jack
LISTENING TO YOUR iPod/iPhone
IMPORTANT
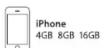
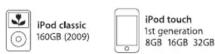
The docking station in this system follows the Apple "Universal Dock" design. This system can be fitted to different iPod or iPhone models.
Play your iPod/iPhone on main unit
-
Press ⏻ button to turn the unit on
-
Connect your iPod/iPhone to the socket of the unit.
-
Press SOURCE to select iPod mode. "iPod" appears on display. Unit will start to play the song in your iPod/iPhone automatically.
-
Press ▶II to pause playback. Press again to resume.
-
Long press ▶II for 3 seconds to enter iPod/iPhone sleep mode. Press ▶ again to resume playback.
-
Select desired track with ◀◀ / ▶▶
-
Adjust the volume level with VOLUME-/+
Other iPod/iPhone functions: MENU, ENTER, ▲(UP) and ▼(DOWN) are
performed by the remote control
MENU button: Press to return to previous page of menu.
▲ or ▼ button: press to select a menu item.
ENTER button: press to confirm a selection (open a folder or start playing a selected track).
Phone call pick up
When phone call coming in, the music from the docking iPhone will pause automatically.
-
Incoming call ring comes out from the unit speaker.
-
You can take iPhone from the unit and pick up phone call.
-
After finish your call, connect back the iPhone to the socket, it will resume the playback of iPhone.
Charge your iPod/ iPhone
While your iPod/iPhone is docked on the system, its battery will be recharged automatically until fully charged.
GB -6
SLEEP FUNCTION
In sleep mode, the unit will turn off automatically after a specified time. You can select duration in minutes before the unit turns off automatically.
- Press SLEEP button on remote control repeatedly to select 90-80-70-60-50-40-30-20-10-OFF. Release SLEEP button. "SL" icon remains on display.
Notes
- Sleep time can only be set when the unit is turned ON.
- The sleep function is cancelled when "OFF" is selected, and "SL" icon disappears.
-
Press SLEEP button to check the remaining sleep time
-
If you want to switch off the radio before sleep ends, press ⏻ STANDBY button.
MAINTENANCE
Cleaning
WARNING: Disconnect the unit from the mains supply before cleaning.
- Use a soft, dry, clean cloth. Regularly dust the vents at the back or sides
- Using solvents, abrasive or alcohol-based products risks damaging the appliance. -If an object or liquid enters inside the appliance, unplug it immediately and have it checked by an authorized engineer.
Notes on disc
* Do not use irregular shape CDs (example: heart-shaped, octagonal ones). It may result in malfunctions.
* Do not place more than one disc in the disc compartment.
* Do not try to open the disc compartment during playing.
* Do not touch the lens. Doing so may cause malfunction. *If there is a scratch, dirt or fingerprints on the disc, it may cause tracking error. Before playing, clean the disc with a cleaning cloth. Wipe the disc from the center out. Don't store discs in places with high temperatures or high humidity, they can become warped. After playing, store the disc in its case.
Important Note
- Before transporting the unit, remove the disc from the disc compartment.
SPECIFICATION
Power supply: AC 100-240V\~50/60Hz
Power consumption : 20W
Speaker: 8 ohms

Made for iPod iPhone
"Made for iPod" and "Made for iPhone" mean that an electronic accessory has been designed to connect specifically to iPod or iPhone respectively, and has been certified by the developer to meet Apple performance standards. Apple is not responsible for the operation of this device or its compliance with safety and regulatory standards. Please note that the use of this accessory with iPod or iPhone may affect wireless performance. iPhone and iPod are trademarks of Apple Inc., registered in the U.S. and other countries.




VIDEO OUT
Connection
Use an video cable (not supplied) to connect your micro system with the TV or Monitor.
GB -7
MORE INFORMATION

CAUTION: To reduce the risk of electric shock, do not remove the cover (or back). There are no user serviceable parts inside the unit. Refer all servicing to qualify personnel.

The lightening flash with arrowhead symbol within the triangle is a warning sign alerting the user of "dangerous voltage" inside the unit.

The exclamation point within the triangle is a warning sign alerting the user of important instructions accompanying the product.
WARNING: TO PREVENT FIRE OR SHOCK HAZARD, DO NOT EXPOSE THIS APPLIANCE TO RAIN OR MOISTURE.
CAUTION: Invisible laser radiation when open and interlocks defeated. Avoid exposure to beam. Class 1 laser product.

CLASS 1 LASER PRODUCT
IMPORTANT!
-The ventilation should not be impeded by covering the ventilation openings with items such as newspapers, table-cloths, curtains, etc.
-No naked flame sources, such as lighted candles, should be placed on the apparatus. -The use of apparatus in moderate climates.
-The apparatus should not be exposed to dripping or splashing.
-Ensure a minimum distance of 5cm around the apparatus for sufficient ventilation. Do not place objects filled with liquids, such as vaces, on the apparatus.
-Do not place objects filled with liquids, such as v -The marking plate is located on the back of unit.
-Mains plug is used as the disconnect device and it shall remain readily operable. To be completely disconnected the power input, the mains plug of the apparatus shall be disconnected from the mains completely. The mains plug should not be obstructed or should be easily accessed during intended use.
-Under the influence of electrical fast transient or/and electrostatic phenomenon, the product may malfunction and require user to power reset.


MICRO SYSTEM
The video signal cannot be transferred to TV/Monitor simultaneously while the iPod(video) /iPhone is playing the video file on its own display. Follow procedures below to transfer video signal to the TV/Monitor.
-
Select the folder or icon for Video files in your iPod(video) / iPhone. The content list is displayed
-
Press VIDEO SELECT button on remote control. Select an video file in the content list of your iPod(video) / iPhone with ▲/▼ on remote control, then press ENTER to start playback. The video is playing on TV or monitor.
-
Press VIDEO SELECT button again to cut the video signal from TV or monitor. Your iPod(video)/ iPhone will show the content list again. Select an video file in the content list of your iPod(video) / iPhone with ▲/▼ on remote control, then press ENTER to start playback. This time the video is playing on your iPod(video) / iPhone.
GB-8

If at any time in the future you should need to dispose of this product please note that Waste electrical products should not be disposed of with household waste. Please recycle where facilities exist. Check with your Local Authority or retailer for recycling advice.(Waste Electrical and Electronic Equipment Directive).
Note: Design and specification are subject to change without notice.


GB - 10
GB-9


- MUSE
- M-56 IP
- User Manual
- MICRO SYSTEM WITH DOCKING FOR iPod/iPhone
- English
- SPEAKER CONNECTION
- POWER SUPPLY
- AUDIO CONTROLS
- VOLUME
- MUTE
- EQ
- DISC OPERATION
- BASIC OPERATION
- Select a track
- Fast search backward/forward
- Select a folder (mp3 only)
- USB OPERATION
- Notes:
- RADIO
- Listening to the radio
- Note:
- REMOTE CONTROL
- Installing Battery
- Presetting radio stations
- Auto preset
- Retrieving the preset stations
- PLAY MODES(CD/MP3 ONLY)
- Intro playback
- Repeat playback
- Random playback
- Program playback
- LINE IN (AUXILIARY INPUT)
- LISTENING TO YOUR iPod/iPhone
- IMPORTANT
- Play your iPod/iPhone on main unit
- Phone call pick up
- Charge your iPod/ iPhone
- SLEEP FUNCTION
- MAINTENANCE
- Cleaning
- Notes on disc
- Important Note
- SPECIFICATION
- Made for iPod iPhone
- VIDEO OUT
- Connection
- MORE INFORMATION
- CLASS 1 LASER PRODUCT
- IMPORTANT!
Marque : MUSE
Modèle : M-56 IP
Catégorie : Système Hi-Fi