
SA360QM - Guitare IBANEZ - Notice d'utilisation et mode d'emploi gratuit
Retrouvez gratuitement la notice de l'appareil SA360QM IBANEZ au format PDF.


| Type de produit | Guitare électrique |
| Marque | Ibanez |
| Modèle | SA360QM |
| Série | SA |
| Forme du corps | Superstrat |
| Matériau du corps | Tilleul avec table en érable quilté |
| Manche | Érable, vissé |
| Touche | Palissandre, 22 frettes |
| Configuration micros | HSS (humbucker + 2 simple bobinages) |
| Micro chevalet | Ibanez Infinity R (humbucker) |
| Micro central | Ibanez Infinity RS (simple) |
| Micro manche | Ibanez Infinity RS (simple) |
| Sélecteur micros | 5 positions |
| Vibrato | Ibanez Standard tremolo |
| Mécaniques | Ibanez moulées sous pression |
| Longueur totale | Environ 98 cm |
| Largeur du corps | Environ 33 cm |
| Épaisseur du corps | Environ 4,5 cm |
| Poids | Environ 3,5 kg |
| Alimentation | Passive (aucune pile requise) |
| Entretien et nettoyage | Essuyer avec un chiffon doux et sec. Utiliser un polish pour guitare non abrasif pour le corps. Nettoyer les frettes avec de la laine d'acier fine. |
| Entretien des cordes | Changer les cordes régulièrement pour une meilleure sonorité. Nettoyer les cordes après chaque utilisation. |
| Sécurité | Ne pas exposer à l'humidité extrême ou à la lumière directe du soleil. Utiliser un étui rigide pour le transport. |
| Pièces détachées et réparabilité | Pièces disponibles chez les revendeurs agréés Ibanez. Réparation par un luthier professionnel recommandée. |
| Accessoires inclus | Non inclus (vendu séparément : étui, sangle, médiators) |
FOIRE AUX QUESTIONS - SA360QM IBANEZ
Questions des utilisateurs sur SA360QM IBANEZ
0 question sur cet appareil. Repondez a celles que vous connaissez ou posez la votre.
Poser une nouvelle question sur cet appareil
Téléchargez la notice de votre Guitare au format PDF gratuitement ! Retrouvez votre notice SA360QM - IBANEZ et reprennez votre appareil électronique en main. Sur cette page sont publiés tous les documents nécessaires à l'utilisation de votre appareil SA360QM de la marque IBANEZ.
MODE D'EMPLOI SA360QM IBANEZ
DISTRIBUTED BY
Ibanez
CE
This is to certify that the aforementioned equipments fully conform to protection requirements of the following EC council directives. DIRECTIVES : 89/336/EEC Electromagnetic compatibility
Printed in Japan MAR00316 ©Copyright 2000

ELECTRONICS
SWITCH FUNCTIONS
Ibanez Instruments are unique in the simplicity and versatility of our switching systems. Each model was designed to allow the maximum amount of useful pickup positions with the simplest operations.
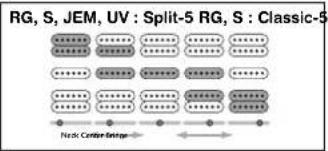

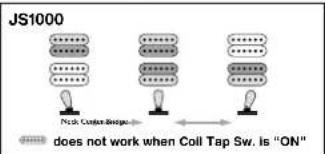

flowchart
graph TD
    A["JS900 : Standard-3"] --> B["Layer 1: Top Layer"]
    A --> C["Layer 2: Middle Layer"]
    A --> D["Layer 3: Bottom Layer"]
    B <--> E["Neck Collartr Bridge"]
    C <--> E
    D <--> E
JS1000 : HIGH PASS FILTER SWITCH The push/pull switch on the volume control in the up position engages the high pass filter system. This setting allows the volume to be rolled back without losing the high frequencies.

natural_image
Illustration of a hand holding a cylindrical object with an upward arrow, no text or symbols presentCONTROLS

flowchart
graph TD
    subgraph_JS1000["1V, 1T JS1000"]
        A["Volume"] --> B["5way Pickup Selector"]
        C["Tone"] --> D["..."]
    end
    subgraph_JS1000["3way Pickup Selector"]
        E["Volume"] --> F["w/High Pass On/Off Sw."]
        G["Tone"] --> H["w/Coil Tap On/Off Sw."]
    end
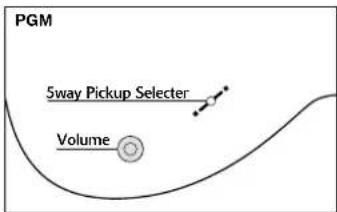
flowchart
graph TD
    A["5way Pickup Selector"] --> B["Volume"]
    B --> C["PGM"]
BRIDGE INFORMATION
STRING GAUGES
All guitars are set up at the factory with light gauge 009"-042" strings (7-string 009"-054"). Different gauges of strings can result in the need for string height, neck curvature, tremolo spring and intonation readjustments.
ADJUSTMENT
Ibanez guitars feature four styles of locking tremolos. To identify which tremolo is used on your guitar, locate the logo stamped either on the bridge plate or the bridge tremolo block.
*Both Lo-Pro Edge and Edge tremolos have the "Edge" logo on the tremolo blocks.
*Adjustment of the 7-string tremolo is the same as the corresponding 6-string tremolo.


INTONATION
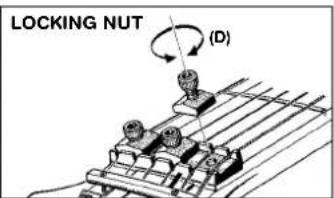
Loosen the Pressure pad screw (D) on the locking nut and loosen the string to be adjusted. Loosen the Saddle lock screws (E) on the saddle to be adjusted and adjust the saddle forward or backward.
Tighten the Saddle lock screw (E) and tune the string. After rechecking the intonation, tighten the Pressure pad screw (D).
On the base plate there are two holes for each Saddle lock screw (C). These allow the user to change string gauges while allowing the maximum saddle movement. If the intonation cannot be adjusted because the saddle needs to be set back further, remove the intonation screw and insert it into the hole located further back on the bridge plate.
REPLACING THE STRINGS
Lo-Pro Edge / Edge / Lo-TRS / TRS101
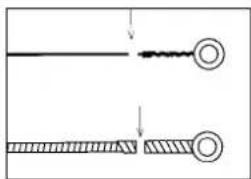
In the case of locking tremolos, replace the strings one by one. Removing all the old strings at once will release the tension on the tremolo and change the tremolo angle "up-pull." Loosen the Pressure pad screw (D) on the locking nut and loosen the string to be replaced. Loosen the String stopper screw (F) and remove the string from the
natural_image
Pure mechanical diagram showing two components with arrows indicating motion, no text or symbols presentsaddle. Cut off the ball end of new string as shown on the illustration and insert the cut side of new string between the saddle and the String holder block. Tighten the String stopper screw (F) and tune the string. After checking the intonation, tighten the Pressure pad screw (D) on the locking nut.
TRS505
In the case of TRS505 tremolo, replace the strings one by one. Removing all the old strings at once will release the tension on the tremolo and change the tremolo angle "up-pull."
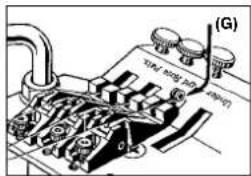
Loosen the Pressure pad screw (D) on the locking nut and loosen the string to be replaced. Remove the string through the String holder hook (G). Thread new string through the String holder hook (G) and tune it. After checking the intonation, tighten the Pressure pad screw (D) on the locking nut.
TREMOLO ARM
Edge / Lo-Pro Edge
The tremolo arm can be inserted and removed very easily. Insert the tremolo arm into the arm socket and firmly push down until the arm snaps into place. Both bushings should be completely hidden. The rotation torque of the arm can be adjusted by
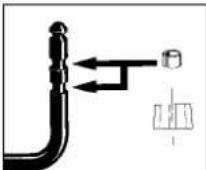
removing the bushings. To further reduce the torque, remove both bushings. To replace the bushings, open the new bushings at the sp them into place on the arm.

*After some time and use, it may impossible to secure the arm even when both bushings are in place. If this happens, replace the arm bushings with new ones.
Lo-TRS / TRS101 / TRS505
Insert the tremolo arm into the arm socket and turn it clockwise until it stops. The rotation torque of the arm can be adjusted by turning the arm counterclockwise.
Lo-TRS and TRS tremolos are equipped with a arm stop position screw located on the bottom of the tremolo block and can be adjusted by tightening the screw.

natural_image
Mechanical assembly diagram showing a screwdriver inserted into a housing with threaded components (no text or labels)FINE TUNING
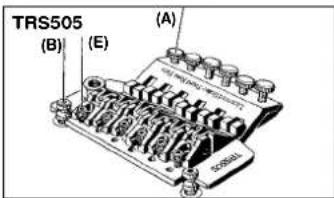
After locking the top lock, fine tuning the instrument can be done by turning the fine tuning screws (A).
*To allow maximum fine tuning adjustment, it is recommended that the fine tuners be set to the middle position before locking the nut.
STRING HEIGHT
The height adjustment of the tremolo can be raised or lowered by adjusting the pivot studs(B) that the tremolo mounts on. These are located at either side of the front of the bridge. Clockwise lowers the tremolo and counter clockwise raises the tremolo.
In the case of Edge and Lo-Pro Edge tremolos, the Pivot studs(B) are locked internally by the Stud lock screws(C). Always loosen the Stud lock screws (C) before tightening the Pivot studs(B). After adjusting the string height, tighten the Stud lock screws(C).

TREMOLO SPRING
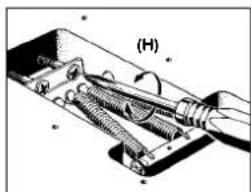
The tremolo springs adjust the tremolo angle by tightening or loosening the tremolo tension. To adjust tremolo angle, locate the adjustment screws in the rear tremolo cavity. The tremolo system when in tune should sit parallel to the surface of the guitar.
If the tremolo system is not sitting parallel to the surface of the guitar, remove the tremolo cavity cover plate and tighten the
Tremolo tension adjustm
natural_image
Mechanical assembly diagram showing a tool inserted into a housing with threaded components (no text or symbols)
natural_image
Mechanical assembly diagram showing a pin inserted into a component with motion arrows indicating rotation (no text or symbols)ent screws (H) if the tremolo is forward dumped. Loosen the screws (H) if the tremolo is up-pulled. Retune the strings to the proper pitch and check the angle.
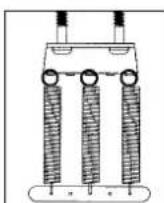
Edge and Lo-Pro Edge tremolos have the Block Lock System to lock the tremolo springs on the tremolo block. Remove the Block Lock when replacing the springs. Choose the number and placement of the tremolo springs according to the string gauge and the tremolo angle as follows.




Marque : IBANEZ
Modèle : SA360QM
Catégorie : Guitare