
AS73G-NT - Guitare IBANEZ - Notice d'utilisation et mode d'emploi gratuit
Retrouvez gratuitement la notice de l'appareil AS73G-NT IBANEZ au format PDF.


| Type de produit | Guitare électrique semi-acoustique |
| Marque | Ibanez |
| Modèle | AS73G-NT |
| Finition | Natural (acajou satiné) |
| Longueur totale | 100 cm |
| Largeur de caisse | 40 cm |
| Épaisseur de caisse | 50 mm |
| Poids | 3,5 kg |
| Alimentation | Passive (aucune pile requise) |
| Micros | 2 humbuckers Ibanez Classic Elite |
| Sélecteur de micros | 3 positions (manche, les deux, chevalet) |
| Commandes | 2 volumes, 2 tonalités |
| Chevalet | ART-1 (flottant, cordes traversantes) |
| Manche | Acajou, profil C, 22 frettes |
| Touche | Palissandre |
| Cordes | 6 cordes, calibre .010 - .046 |
| Entretien | Nettoyer avec un chiffon doux sec ; changer les cordes régulièrement |
| Sécurité | Éviter l'humidité excessive et les chocs |
| Pièces détachées | Cordes, potards, micros, chevalet |
| Réparabilité | Réglages et changements de pièces possibles par un luthier |
| Pays de fabrication | Indonésie |
| Garantie | 2 ans (selon revendeur) |
FOIRE AUX QUESTIONS - AS73G-NT IBANEZ
Questions des utilisateurs sur AS73G-NT IBANEZ
0 question sur cet appareil. Repondez a celles que vous connaissez ou posez la votre.
Poser une nouvelle question sur cet appareil
Téléchargez la notice de votre Guitare au format PDF gratuitement ! Retrouvez votre notice AS73G-NT - IBANEZ et reprennez votre appareil électronique en main. Sur cette page sont publiés tous les documents nécessaires à l'utilisation de votre appareil AS73G-NT de la marque IBANEZ.
MODE D'EMPLOI AS73G-NT IBANEZ
Maintenance >>
Our congratulations and deepest thanks on making Ibanez your choice of instrument.
Ibanez standards are second to none. All Ibanez instruments are set up to our strict quality control standards before shipping. The purpose of this manual is to explain how to maintain your instrument's finish and to keep your guitar playing as well as it did when it left our factory.
CLEANING
Regular cleaning of your guitar is one the most important ways you can maintain the finish and lengthen string life. After playing, wipe down your instrument to remove any perspiration from the

Instrument. Perspiration can actually contain acids that can be corrosive to the strings and metal parts of the guitar. Gross finish guitars should be polished with polish contaminated specifically for musical instruments, and a salt, treated guitar cloth or a cotton rag. Abcessive rags such as polyester can scratch the finish. Oil finished guitars should be wiped clean immediately after playing with a dry cotton rag only. If your guitar has become discovered due to extended use or heavy perspiration, factory appearance, see a qualified guitar repel person about methods in restore the oil finish to its original factory appearance.
STRINGS AND TUNING MACHINES
If strings became dirty, discolored, or produce a dull sound or buzz, replace the strings with new ones. For best results we require removing one string at a time, this will help to avoid removing the string tension from the neck. When replacing strings with strings and strings without any other means of tension, the string tension is noted. (We requirement only qualified technicians perform this) instruments that have tremolo systems installed may need to be adjusted after string replacement as changes in string tension can cause the tremolo to raise or lower, fusez gullars and busses are factory equipped with the following string gauces. Please follow the instructions below for your particular model. (We should not use any other means of string tension machines from top to bottom with 2 to 3 string swaps around the point. In the case of an unwound guitar strings, the ends of the string should be prepared as shown in the diagram to prevent exceptional stripage from the posts, in the case of tuning machines, where the string ends are inserted into the posts, the string can be cut to length in advance using a pair of string collents. If the tuning machine set forth on the ground they get into the collents, then the corresponding lines are set up. The tuning machine is adjustment stresses that can be tightened with a small Phillips head screwdriver to increase the tension.
The use of a series of queries that be used to perform the field and with a stamp. It follows to all other key states taking in the Canadian station. We can that the new charges are smooth and free from any other before installation.
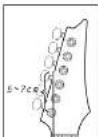


STRING CHANGES
[Unreadable]
010-046
The Ground Truth image displays a single, solid horizontal line. According to Rule 2 (UNDERSCORE & LINE RULES), this is a stylistic or background line, not a placeholder underscore. Therefore, the OCR result must ignore it and output nothing or only meaningful text. The provided OCR content is "____", which consists of four underscores. This is an incorrect interpretation of the line as a placeholder, violating the rule that stylistic lines must be ignored. The OCR has hallucinated underscores where none should exist based on the GT's visual context. Hence, the OCR result is inconsistent with the Ground Truth.
NECK
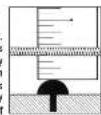
Ibanese steel string models are equipped with adjustable truss rods. The purpose of a truss rod is to adjust the neck to counteract string tension. There are many reasons for truss rod adjustments. One of the most frequent reasons is changing string gauges or tuning pitch which can effect string tension. String tension changes may affect the string height and cause feet buzz or notes that don't ring true. To adjust the truss rod, locale the truss rod nut and adjust it by inserting the correct wrench into the nut and tightening (clockwise) or loosening (number clockwise) the rod. Truss rod tension can be measured by installing a capo at the first het the holding the strings down at the first position where the neck joins the body. Insert a thickness gauge between the string and the first at the ill firm. There should between 0.3 mm to 0.5mm clearance. That clearance is referred to as "neck relief." Too much neck relief can cause the neck to have higher action in the middle of the neck causing poor intention and uncomfortable playability. No neck relief can cause test buzz. ^1

ACTION
Ibanez guitar and bass string action is set at the factory. However there are many reasons that an instrument's string height can change. Instruments can be affected by changes in temperature and moisture. High string action can make the guitar difficult to play. If the string action is too low, fret buzz or unclear notes can occur. To remedy this, follow the instructions for the particular type of bridge installed. In the case of
string action, make sure the guitar is in lune and the luss rod is adjusted properly. Ibanez action is set at the 14th frct (Basses: 12th frct). The action may also need to be readjusted after the neck has been adjusted or strings have been changed to a different gauge. Follow the instructions in the relevant bridge manual to make adjustments.
“I don’t know that I’m like to be a good deal, and it’s not to be a good deal. It is also the best of the “I don’t know”
- 2018年1月1日
Lenn 23mm
20nm 25nm
INTONATION
Intonation adjustment is the operation of adjusting the location of the string at the saddle to compensate for different string gauges or different bunings. Follow
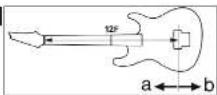
the instructions of the particular bridge intonation below. Intonation is properly set when the 12th fret note and the 12th fret harmonic are exactly the same note. This is the center point of the scale and the most accurate way of setting a standard scale length. With the harmonic note as the standard, if the fretted note is flat move the bridge saddle forward toward the headstock (a) to decrease the string length. If the fretted note is sharp, move it back away from the headstock (b) to increase the string length intonation adjustments.
"opcensia lnd sitigans can be made when the media been used, you have been the drug in the making of a network."
PICKUPS
The output level of the instrument as well as the quality of the signal can be affected by the pickup height. Pickup height should be adjusted until the volume of neck and bridge pickups are almost equal with both volumes wide open. The volume may drop drastically if the pickup height is too low. As the pickups are magnetic, fret buzzing and distortion may occur if the pickup is too close small screwdriver to make adjustments to raise or lower
from the following table provides an original table with a single

Vintage Vibrato >>

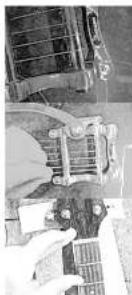
For best results we recommend replacing one string at a time. This will help to avoid removing the string tension from the neck and keep the vibrato spring under tension.
To replace the strings on the V8X00 and V8S80, thread the new string under the front tailpiece retainer bar (A). On VBF70 there is no front retainer bar.
The ball end of the string should be threaded over and around the rear tapepiece retainer bar (B). The ball end of the string's hole is inserted into the rear tapepiece retainer bar pin and the string should be pulled tight towards the headstock. Releasing the string tension from the tapepiece may cause the ball end to slip off the pin. Keeping string tension on the string by pulling it towards the headstock will alleviate this problem.
Thread the string through the machine head and white keeping tension on the string, wind the string around the post. Make sure that the string lands on the proper string saddle on the bridge. Once tight, tune the string to pitch. Repeat this process for the other strings.
Bridge >>
ART1,2 BRIDGE
The intonation can be adjusted by moving the saddle forward or backward using a Slot head (-) screwdriver on the adjustment screw. String height is controlled by raising or lowering the two-height adjustment studies or spinners on either side of the bridge (A).

CB3, GIBRALTAR III BASS
REPLACING THE STRINGS : CB30 install strings by inserting them from the front of the bridge.
The intonation can be adjusted by moving the saddle forward or backward using an Allen wrench on the adjustment screw at the rear of the bridge (A). String height is controlled by raising or lowering the two height adjustment studs on either side of the bridge (B).

Tailpiece >>
QUICKCHANGE III / QUICKCHANGE III BASS
The height adjustment of the tailpiece can be raised or lowered using the two height adjustment studies on either side of the tailpiece (A).

Bridge >>
FXB-50
The strings are installed by putting the ball end into the slot (A) and hooking the ball end below the string catch (B).

To raise or lower the string action. Insert the correct Allen wrench into the screw (A) at the saddle. To raise the saddle turn the wrench clockwise and to lower the saddle turn the wrench counter clockwise.
Intonation adjustments can be made by adjusting the intonation screws (E) at the rear of the bridge clockwise to move the saddle back and counter clockwise to move the saddle forward.

ADJUSTABLE ARCH-TOP
The string height of an arch top bridge can be adjusted by turning the thumb wheel screws located on either side of the bridge. Clockwise lowers the string action; counter clockwise raises the string action.
As the bridge is not fixed to the body,
Information can be adjusted by closing the strings and moving the location of the bridge forward or backward.

Bridge Location >>
Below is the standard location of the bridge for AF, AFS and AG guitars. Adjust the location to obtain proper isolation.
AF, AFS, AK
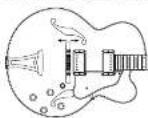
AG

Controls >>
SWITCHING FUNCTION

CONTROLS

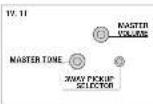
ACT TRMOLO
REPLACING THE STRINGS
ACT tremolo allow two styles of string installation.
1) The strings are installed by putting the ball end into the string slot and hooking the ball end below the string catch at the rear of the tremula unit. (Figure 1)
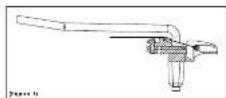
2) The strings are installed by putting the ball end into the string slot and hooking the ball end in the string catch at the bottom of the tremula unit. This increases string tension and adds sustain. (Figure 2)

TREMOLO ARM INSTALLATION
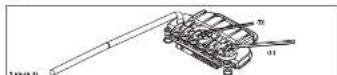
The tremolo arm can be inserted and removed very easily. Insert the arm into the armhole on the tremolo base plate. Pull up on the arm to remove it.
ARM ROTATION TORQUE
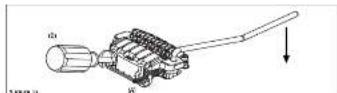
The rotation torque of the arm can be adjusted by raising the tremolo and inserting a 2.0mm Allen wrench in the screw (Figure 3, (A)) on the tremolo block. Turning this screw clockwise will tighten the arm torque and turning the screw counter clockwise will loosen the arm torque.
ADJUSTING THE TREMOLO SPRINGS
ACT Tremolo is designed to function optimally when it is installed approximately parallel with the surface of the guitar body. The angle at which the tremolo is attached can be adjusted by changing the length of the tremolo springs under the tremolo unit. Use a Phillips (+) screwdriver to turn the tremolo tension adjustment screws to adjust the length of the tremolo springs. (Figure 3, (B)) if the tremolo is tilted forward toward the neck of the guitar, turn the screws clockwise to tighten the springs. Conversely, if the tremolo is tilted backward away from the neck, turn the screws counter-clockwise to loosen the springs. Tune the guitar actually, re-check the angle of the tremolo, and repeat the adjustment until the tremolo angle is correct.
ADJUSTING THE ACTION
To adjust the entire tremolo unit up or down, use a 3.0mm Allen wrench to turn the stud bolt (Figure 4, (C)) located at the left and right of the tremolo unit. (This cannot be adjusted for each individual string.)
ADJUSTING THE INTONATION
Use a 2.1mm Allen wrench to loosen the saddle lock screws (Figure 4, (U)) of each saddle, and move the saddle. Firmly tighten the saddle lock screws, tune the guitar, and then check the intonation. Repeat these adjustments until the intonation is correct.

资料来源:新华社
There is only that found research on the property of a research environment is also following E. Constructions. DIRECTIVES, PATRIGERS, Electromagnetic cooperation by
CE


- Maintenance >>
- CLEANING
- STRINGS AND TUNING MACHINES
- NECK
- ACTION
- INTONATION
- PICKUPS
- Vintage Vibrato >>
- Bridge >>
- ART1,2 BRIDGE
- CB3, GIBRALTAR III BASS
- Tailpiece >>
- QUICKCHANGE III / QUICKCHANGE III BASS
- FXB-50
- ADJUSTABLE ARCH-TOP
- Bridge Location >>
- AF, AFS, AK
- AG
- Controls >>
- SWITCHING FUNCTION
- CONTROLS
- ACT TRMOLO
Marque : IBANEZ
Modèle : AS73G-NT
Catégorie : Guitare