
Seamaster Ploprof - Montre OMEGA - Notice d'utilisation et mode d'emploi gratuit
Retrouvez gratuitement la notice de l'appareil Seamaster Ploprof OMEGA au format PDF.


| Type de produit | Montre bracelet de plongée professionnelle |
| Marque | Omega |
| Modèle | Seamaster Ploprof |
| Mouvement | Automatique mécanique |
| Étanchéité | 1200 mètres (120 ATM) |
| Diamètre du boîtier | 55 mm environ |
| Épaisseur du boîtier | 17 mm environ |
| Matière du boîtier | Acier inoxydable |
| Matière du verre | Saphir antireflet |
| Bracelet | Acier inoxydable ou caoutchouc selon version |
| Fermoir | Déploiant avec extension de plongée |
| Fonctions principales | Heures, minutes, secondes, date, lunette tournante unidirectionnelle |
| Fonction plongée | Lunette graduée 60 minutes, valve à hélium |
| Alimentation | Remontage automatique par mouvement du poignet |
| Réserve de marche | Environ 48 heures |
| Fréquence du balancier | 28 800 alternances/heure (4 Hz) |
| Poids approximatif | 200 grammes (selon bracelet) |
| Entretien et nettoyage | Rincer à l'eau douce après usage en mer, nettoyer avec un chiffon doux |
| Sécurité | Couronne vissée, fond vissé, boucle de sécurité |
| Réparabilité | Pièces détachées disponibles auprès du service après-vente Omega |
| Garantie | 5 ans internationale (sous conditions) |
FOIRE AUX QUESTIONS - Seamaster Ploprof OMEGA
Questions des utilisateurs sur Seamaster Ploprof OMEGA
0 question sur cet appareil. Repondez a celles que vous connaissez ou posez la votre.
Poser une nouvelle question sur cet appareil
Téléchargez la notice de votre Montre au format PDF gratuitement ! Retrouvez votre notice Seamaster Ploprof - OMEGA et reprennez votre appareil électronique en main. Sur cette page sont publiés tous les documents nécessaires à l'utilisation de votre appareil Seamaster Ploprof de la marque OMEGA.
MODE D'EMPLOI Seamaster Ploprof OMEGA
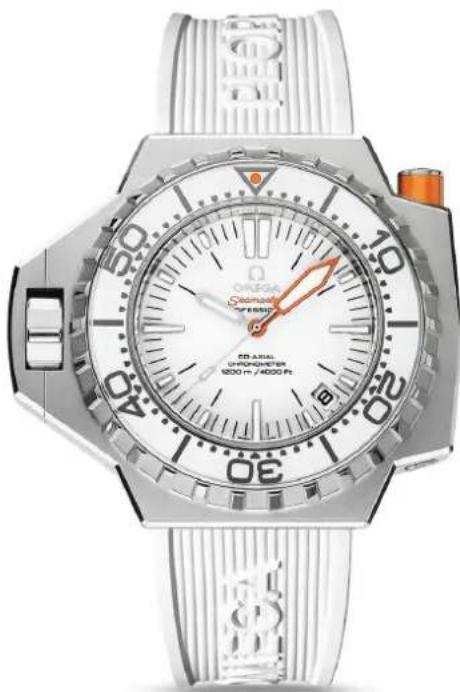
Ω OMEGA
SEAMASTER
PLOPROF 1200 M OMEGA CO-AXIAL 55 X 48 MM
Steel on rubber strap
Caliber 8500
224.32.55.21.04.001
Co-Axial escapement
Automatic
ccsc Chronometer
Time zone function
Sapphire crystal
(AA) Anti-reflective treatment on both sides
② Screw-in crown
Helium escape valve
4-year International Warranty
Water-Resistant to a relative pressure of 120 bar (1200 metres/4000 feet)
natural_image
Close-up of a sleek, silver watch with visible branding and orange dial (no readable text or symbols beyond brand name)WATCH FUNCTIONS
The crown has 3 positions:
- Normal position (wearing position): when the crown is positioned against the case, the crown ensures that the watch is water-resistant.
Occasional winding: if the watch has not been worn for 60 hours or more, wind it up with the crown in position 1.
- Setting the time zone and correcting the date: pull the crown out to position 2. Turn the crown forwards or backwards, and the hour hand will move forwards or backwards by 1-hour intervals. By passing the hour hand over midnight, the date can be changed forwards or backwards. Push the crown back to position 1.
NB: when changing the time zone backwards, it is necessary to move the hour hand back past 7 pm to ensure the date changes.
- Time setting: hours – minutes – seconds. Pull the crown out to position 3. The seconds hand will stop. Turn the crown forwards or backwards. Synchronise the seconds by pushing the crown back to position 1 to coincide with a given time signal.
AUTOMATIC HELIUM ESCAPE VALVE
Your watch is equipped with an automatic helium escape valve, no manipulation is required.

PLOPROF BEZEL AND CROWN
Using the rotating bezel (fig. 4): keep the pusher A pressed down to turn the bezel.
Using the crown (fig. 4): the crown B must be unscrewed before it can be used, when the crown protection C will slide without turning. After use, push the crown to position 1, then press and screw the crown down again (to ensure the water resistance of the case).
Note: the crown is located at 9 o'clock, but its functions are identical to the crown normally placed at 3 o'clock.

FOLDOVER CLASPS
Using the fine length adjuster (fig. 5)

natural_image
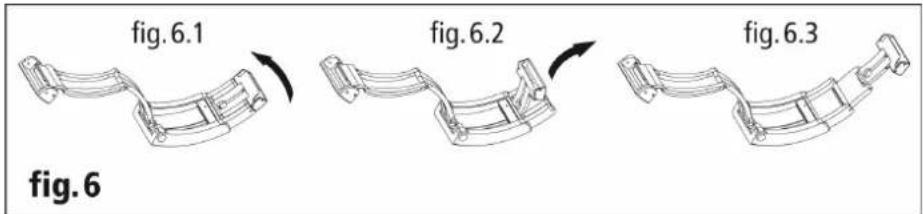
Technical line drawing of two mechanical brackets with arrows indicating motion, labeled 'fig. 5' (no text or symbols on the diagrams)Using the diving extension (fig. 6)
Note: to fold the diving extension away, it is important to proceed according to fig. 6.2 (with the diving extension perpendicular to the cover of the clasp).


Marque : OMEGA
Modèle : Seamaster Ploprof
Catégorie : Montre