
LE BLENDER - Blender MAGIMIX - Notice d'utilisation et mode d'emploi gratuit
Retrouvez gratuitement la notice de l'appareil LE BLENDER MAGIMIX au format PDF.

| Type de produit | Blender |
| Marque | Magimix |
| Modèle | Le Blender |
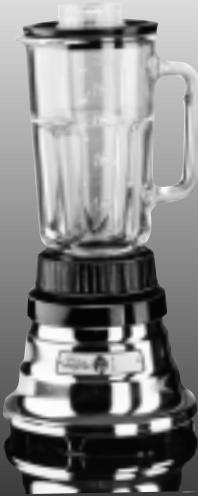
| Capacité du bol | 1 litre (estimation) |
| Vitesses | 2 (19 000 tr/min pour mixage normal, 22 000 tr/min pour émulsion fine) |
| Alimentation | Tension secteur (vérifier sur la base) |
| Commande | Interrupteur 2 positions |
| Fonctions principales | Mixage et émulsion fine |
| Utilisation recommandée | Ajouter les liquides en premier, toujours avec couvercle |
| Utilisation avec liquides chauds | Volume max 250 ml, retirer le bouchon doseur, démarrer en vitesse 1 |
| Sécurité | Disjoncteur thermique avec réarmement manuel (bouton rouge sous la base) |
| Matériau du bol | Verre |
| Nettoyage du bol et accessoires | Lave-vaisselle (sauf base moteur) |
| Nettoyage de la base moteur | Essuyer avec un chiffon humide |
| Entretien courant | Après chaque utilisation |
| Réparabilité | Contacter un service agréé |
| Accessoires fournis | Bouchon doseur, couvercle |
| Service client | Magimix UK, 115 A High Street, Godalming, Surrey GU7 1AQ, tél. 0483 427411 |
| Précautions | Ne pas immerger la base, ne pas utiliser avec cordon endommagé, garder mains et ustensiles hors du bol en fonctionnement |
FOIRE AUX QUESTIONS - LE BLENDER MAGIMIX
Questions des utilisateurs sur LE BLENDER MAGIMIX
0 question sur cet appareil. Repondez a celles que vous connaissez ou posez la votre.
Poser une nouvelle question sur cet appareil
Téléchargez la notice de votre Blender au format PDF gratuitement ! Retrouvez votre notice LE BLENDER - MAGIMIX et reprennez votre appareil électronique en main. Sur cette page sont publiés tous les documents nécessaires à l'utilisation de votre appareil LE BLENDER de la marque MAGIMIX.
MODE D'EMPLOI LE BLENDER MAGIMIX
magimix®
Le Blender
MODE D'EMPLOI ET RECETTES P.2
GEBRUIKSAANWIJZING DE RECEPTEN P.13
INSTRUCTION NOTICE AND RECIPES P.24
Le Blender
Electrical Instructions
WARNING : a plug with bared flexible cord is hazardous if engaged in a live socket. If the fitted plug has been cut from the power supply cord, it should be destroyed and replaced with an appropriate three pin plug in accordance with the following code : BLUE : neutral
BROWN : live
GREEN/YELLOW : earth
The wire which is coloured BLUE must be connected to the terminal in the plug which is marked with the letter "N" or coloured BLUE or BLACK.
The wire which is coloured BROWN must be connected to the terminal in the plug which is marked with the letter "L" or coloured BROWN or RED.
The wire which is coloured YELLOW should be connected to the terminal marked with the letter "E", or by the earth symbol or coloured GREEN or GREEN/YELLOW.
ELECTRICAL INSTRUCTIONS
- Before using your Blender ensure that the voltage indicated on the base corresponds with the mains voltage in your home.
- Before starting, make sure that the Blender switch is in off position "O".
Before placing the jug on the motor base, make sure that the motor is turned off and it is at a complete stop. Place the jug assembly on the base so that it is firmly seated and not tilted to one side.
Do not place the jug on the base or take it off while the motor is running. To do so may damage the drive shaft or blending assembly.
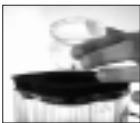
Put ingredients into the jug and put the lid on. Always add liquids ingredients first. Hold jug handle with one hand while blending. Use the special measuring cap opening for introducing ingredients when the machine is in use.
Always operate Blender with lid in place.
The Blender is fitted with a 2 speed control switch. Use speed "1" for all normal blending preparations and use high speed "2" when a fine emulsion is required.
Speed 1 (19.000 rpm) for normal work
Speed 2 (22.000 rpm) for a fine emulsion
Hot blending instructions. To minimize possibility of spillage it is recommended that you limit the volume to one-half pint, completely remove the measuring-cap from the lid (this will allow expanding air present inside jug) and always start blending on lowest speed 1, then progress to desired speed 2.
IMPORTANT
When blending hot liquids, remove measuring cap.
- Always operate the Blender with lid in place.
- To protect against electrical hazards, do not immerse the motor base in water or in other liquid.
- Unplug from socket when not in use.
- Do not operate with a damaged cord or plug or after the unit malfunctions. Return it to the nearest authorized service facility for repair. Special tools are needed.
- Do not use outdoors.
- Keep hand and ustensils out of jug while blending.
- Handle the blade carefully.
HOW TO DISASSEMBLE AND CLEAN
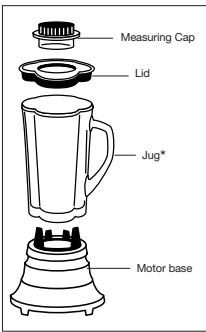
The blade can not be removed from the bowl. Parts marked "..." are dishwasher safe, others must be hand washed. After cleaning and drying, reassemble as shown on drawing.
To clean the motor base, unplug the power cord, wipe the surface with a damp cloth first, then with a dry cloth.
CIRCUIT BREAKER OPERATION
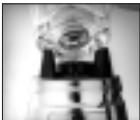
You will find a small, square, red plastic button located on the underside of the motor base of some models.
This is the reset button for a circuit breaker which prevents the motor from overheating in the case of an overload.
If an overload occurs, the circuit breaker will shut off the motor and cause the red button to protrude slightly from its normal position.
To reset the circuit breaker, and resume operation, do the following :
1 - Set the power switch to its off (O) position.
2 - Unplug the power cord from electrical outlet.
3 - Determine the reason for the overload, and eliminate the cause (for example : reduce the amount of material being processed).
4 - Push the red reset button back in to its normal position.
5 - Plug the power cord back into electrical outlet.
6 - Resume normal operation.
UNITED KINGDOM AND IRELAND
115 A High Street
Godalming, Surrey GU7 1AQ
Telephone: 0483 427411 - Fax: 0483 427414


Marque : MAGIMIX
Modèle : LE BLENDER
Catégorie : Blender