
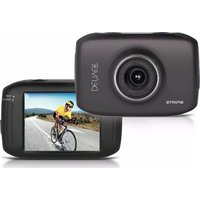
ACT-1013 - Caméscope DENVER - Notice d'utilisation et mode d'emploi gratuit
Retrouvez gratuitement la notice de l'appareil ACT-1013 DENVER au format PDF.


| Type de produit | Caméscope numérique |
| Marque | Denver |
| Modèle | ACT-1013 |
| Dimensions approximatives | 120 x 60 x 40 mm |
| Poids approximatif | 200 g |
| Alimentation | Batterie lithium-ion rechargeable 3,7 V |
| Fonctions principales | Enregistrement vidéo HD, appareil photo numérique, zoom numérique, écran LCD, microphone intégré, haut-parleur, sortie micro-USB, support carte mémoire SD |
| Stockage | Carte mémoire SD (non fournie) jusqu’à 32 Go |
| Résolution vidéo | 720p (1280x720) ou 480p selon réglage |
| Résolution photo | 12 Mégapixels interpolés |
| Entretien et nettoyage | Nettoyer avec un chiffon doux et sec, éviter l’humidité et les produits abrasifs |
| Sécurité | Tenir hors de portée des enfants, ne pas exposer à l’eau ou à des températures extrêmes |
| Pièces détachées et réparabilité | Contacter le service client Denver pour les pièces détachées |
| Informations générales | Caméscope numérique compact, idéal pour un usage domestique, fabriqué en Chine |
FOIRE AUX QUESTIONS - ACT-1013 DENVER
Questions des utilisateurs sur ACT-1013 DENVER
0 question sur cet appareil. Repondez a celles que vous connaissez ou posez la votre.
Poser une nouvelle question sur cet appareil
Téléchargez la notice de votre Caméscope au format PDF gratuitement ! Retrouvez votre notice ACT-1013 - DENVER et reprennez votre appareil électronique en main. Sur cette page sont publiés tous les documents nécessaires à l'utilisation de votre appareil ACT-1013 de la marque DENVER.
MODE D'EMPLOI ACT-1013 DENVER
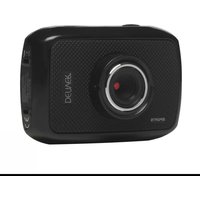
ACT-1013 Quick Start Guide
Appearance and Buttons Introduction

2. Use Storage Card
- L—According to the recessed reminder beside the storage card slot, push the TF Car completely into the end.
2.2. Gently press the rear part of the storage card, and it will automatically pop out
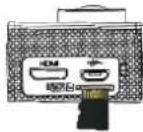
Please notice: UHS (ultra highspeed) cards doesn't work, as they are not 100% backward compatible
Note: There is no built-in memorizer for this camera. Please insert a storage card when using the camera. (High-quality TF Card is recommended.)
3. Start up/Shut Down
3.1 Start up: Keep pressing MODE button for 3s, the display screen will be on, and the camera enters Start-up status.
3.2. Shut down: Under idle mode, press MODE button and hold on 3s to shut the camera down.
3.3. Automatic Shutdown of Screen: When the camera's idle time is due, the screen will be automatically shut down for caving water, and the screen shutdown light will be on
3.4. Shutdown due to Low Power: When its power is extremely low, LCD will display the icon "C", and the User shall conduct charging for the camera immediately. When the icon is red and flickering, the camera will automatically shot down.
4. Function Mode Switch
This Camera has 3 modes including video recording mode, photo mode and playback mode. When it is on, press MODE to switch different modes.
5. Indicator
Work Indicator (Red): When the camera is working (such as recording a video, taking a photo, shutdown and automatic shutdown of screen etc.), the work indicator will flicker.
Charging Indicator (Blue): During the charging process, this indicator will be on; when the camera is fully charged, it will automatically go out.
Product introduction
◆ This product is compact in size, and very easy for installation:
◆ The camera supports FHD (1920x1080 25FPS) recording;
◆ Support high-speed USB2.0;
◆ Support 32GB Min SD Card at most:
| System Requirements | ||
| Operating System | PC Camera Mode (PCCAM)Removable DiscMode (MSDC) | Microsoft System: Microsoft Windows XPSP3, Vista, 7, 8 iOS system: MAC OS X Version 10.8.0 or latest version: Microsoft System: Microsoft Windows 2000, XP, Vista, 7, 8 iOS system: MAC OS X Version 10.0.0 or latest version |
| CPU | Intel Pentium 1GHz or CPU with equivalent performance | |
| Internal Memory | More than 1GB | |
| Sound card and Graphic card | Support DirectX or advanced versions. | |
| CD Driver | Is or quicker | |
| Hard Disk | Remain more than 2GB memory space | |
| Others | USB1.1 or USB2.0 port | |
This product supports video output with playback function; it also supports HD picture.
Initial Use
- Charge External Lithium Battery

Connect the camera with PC for charging, and the charging indicator (blue) will be on. The indicator will be off when the charging is completed. Generally, it takes 2-4 hours to fully charge the camera.
leo Recording Mode
When it is powered on, DV will directly enter video recording mode, under the preview status, press OK button and it will start to record a video, press OK button again, and it will stop video recording. However, video recording will automatically step when the storage card is full or the power is extremely low.
1 Mode Icon to indicate Video Recording Mod
2 It means Video resolution, and FHD 1080P
HD 72DP(30EPS) / VGA (30EPS)
3 Recording Time, meaning how much time left for Video recording.
4 It means that TF Card is inserted.
5 Battery Icon means current power status.
6 E/V (Exposure Value).
7 It means that White Balance is automatic
8 Charging Indicator.
9 Work Indicator.
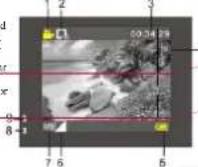
(With maximum 29 minutes video recording per sequence)
7. Photo Mode:
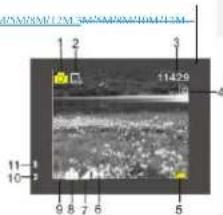
When it is on, press MODE Button to enter Photo Mode; under the preview status, press OK button to take a photo:
1 Mode Icon to indicate current Photo Mode.
2. Picture size: click this icon to choose 1M/2M/3M/5M/8M/12M 3A/5A/8M/10A/12M
_3 Counter, meaning the quantity of photo which can be taken.
4 It means that TF Card is inserted.
5 Battery Power Icon.
- It means current sharpness.
7 E/V (Exposure Value).
8 It means that the picture quality is Fine.
9 It means that White Balance is automatic.
10 Charging Indicator.
11 Work Indicator.
Formateret: Venstre: 1 cm, Højre: 1 cm, Bund: 1 cm
Formateret: Skrifttype: 9 pkt
Formateret: Indrykning: Förste linje: 0 ch
Formateret: Skriftfarve: Rød
Formateret: Skriftfarve: Rød
Formateret: Skriflarve: Sort
Formateret: Skriftfarve: Sort
Formateret: Indrykning: Venstre: 0 cm, Hængende: 1,5 ch. Første linje: -1,5 ch
8. Playback Mode:
8.1 Under the preview status, press MODE button twice, and switch to Playback Mode: enter
Playback Mode, and select the file you want to play back in the menu, as shown in the following Figure:
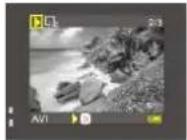

There are different menus under every work mode, and the following Menus are for your
reference:
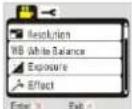
Video Recording Mode Menu

Photo Mode Mena

Playback Mode Menu

System Setting Mode Menu
Operation: Press OK button for a while, and LCD will display relevant Mode Menu; press OK cursor to select a Menu, and then press T or W button to move the cursor up or down; press OK again for confirmation, and press Power button to go back or quit the Menu Mode. Chosen item in the menu will be emphasized with background color.
Connect to HD TV:
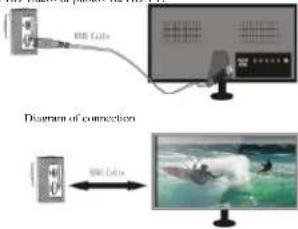
It is possible to connect the camera to HD TV via HDMI Cable (as shown in the following figure), and the display signal of the camera will be automatically transmitted to HD TV, allowing the user to view HD videos or photos via HD TV.
Technical Parameters
| Image Sensor | 1.0 2 CMOS |
| Function Mode | Video Recording, Photo and Playback Mode |
| Lens | F2.4 f=3.0mm |
| LCD | 1.77 inches LCD |
| Picture Resolution | 12M, 8M, 5M, 3M, 2M, and 1M |
| Video Resolution | FID: 1920x1080(25fps) Interpolation, IID: 1280x720(30fps), VGA: 640x480(30fps) |
| File Formats | Video AVI |
| Picture JPG | |
| Storage Medium | TF Card (32GB at most) |
| USB Port | High-speed USB 2.0 port |
| Power Supply | External 3.7V chargeable lithium battery 40CinAh |
| Dimensions | 59x41x24.5mm |
Warning
• Lithium battery inside!
- Do not try to open the product!
- Do not expose to heat, water, moisture, direct sunlight!

CAUTION!
Formateret: Skriftfarve: Rød
ALL RIGHTS RESERVED, COPYRIGHT DENVER ELECTRONICS A/S
DENVER®
www.denver-electronics.com
Electric and electronic equipment and included batteries contains materials, components and substances that can be hazardous to your health and the environment, if the waste material (discarded electric and electronic equipment and batteries) is not handled correctly.
Electric and electronic equipment and batteries is marked with the crossed out trash can symbol, seen below. This symbol signifies that electric and electronic equipment and batteries should not be disposed of with other household waste, but should be disposed of separately.
As the end user it is important that you submit your used batteries to the appropriate and designated facility. In this manner you make sure that the batteries are recycled in accordance with legislature and will not harm the environment.
All cities have established collection points, where electric and electronic equipment and batteries can either be submitted free of charge at recycling stations and other collection sites, or be collected from the households. Additional information is available at the technical department of your city.
Hereby, Inter Sales, A/S, declares that this product is in compliance with the essential requirements and other relevant provisions of Directive 1999/3/E.C. A copy of the Declaration of conformity may be obtained at:
The following table
Sachengyayi
Denmark
Imported by:
DENVER ELECTRONICS A/S
Stavneagervej 22
DK-8250 Egaa
Denmark
www.facebook.com/denverelectronics
Formateret: Skriftfarve: Reid
Formateret: Skriftfarve: Rød
Formateret: Skriftfarve: Rød
Formateret: Skriftfarve: Rød
Formateret: Skriftfarve: Rød

- ACT-1013 Quick Start Guide
- Use Storage Card
- Please notice: UHS (ultra highspeed) cards doesn't work, as they are not 100% backward compatible
- Start up/Shut Down
- Function Mode Switch
- Indicator
- Product introduction
- Initial Use
- leo Recording Mode
- (With maximum 29 minutes video recording per sequence)
- Photo Mode:
- Playback Mode:
- Connect to HD TV:
- Warning
- DENVER®
Marque : DENVER
Modèle : ACT-1013
Catégorie : Caméscope