
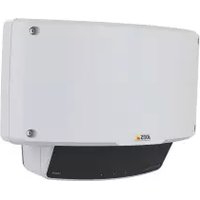
T8331 - Détecteur de mouvements AXIS - Notice d'utilisation et mode d'emploi gratuit
Retrouvez gratuitement la notice de l'appareil T8331 AXIS au format PDF.


| Type de produit | Détecteur de mouvement PIR |
| Marque | AXIS |
| Modèle | T8331 |
| Alimentation | 12-24 V CC |
| Capteur | Capteur PIR |
| Portée de détection | Jusqu'à 12 m |
| Sensibilité réglable | Oui, 3 niveaux (Haute, Moyenne, Basse) |
| Nombre d'impulsions réglable | Oui, 2 ou TEST |
| Mode jour/nuit | Réglable (modèle T8331-E) |
| Bandes de masquage | Incluses (modèle T8331-E) |
| Voyant LED | Oui, activable/désactivable (modèle T8331) |
| Interrupteur anti-sabotage | Oui |
| Interface I/O | 1 port configurable (entrée/sortie) |
| Montage | Intérieur (T8331) ou extérieur (T8331-E) |
| Matériau | Plastique |
| Certifications | RoHS, conformité UE |
| Contenu de l'emballage | Détecteur, vis, bandes de masquage (pour -E), documentation |
FOIRE AUX QUESTIONS - T8331 AXIS
Questions des utilisateurs sur T8331 AXIS
0 question sur cet appareil. Repondez a celles que vous connaissez ou posez la votre.
Poser une nouvelle question sur cet appareil
Téléchargez la notice de votre Détecteur de mouvements au format PDF gratuitement ! Retrouvez votre notice T8331 - AXIS et reprennez votre appareil électronique en main. Sur cette page sont publiés tous les documents nécessaires à l'utilisation de votre appareil T8331 de la marque AXIS.
MODE D'EMPLOI T8331 AXIS
AXIST8331 PIRMotionDetectorSeries
AboutthisDocument
ThismanualisintendedforadministratorsandusersofAXIST8331PIR MotionDetectorSeries.Itincludesinstructionsforusingandmanaging theproductonyournetwork.Laterversionsofthisdocumentwillbe postedatwww.axis.com
LegalConsiderations
Videoandaudiosurveillancecanberegulatedbylawsthatvaryfrom countrytocountry.Checkthelawsinyourlocalregionbeforeusing thisproductforsurveillancepurposes.
Liability
Everycarehasbeentakeninthepreparationofthisdocument.Please informyourlocalAxisofficefanyinaccuraciesoromissions.Axis CommunicationsABcannotbeheldresponsibleforanytechnical or typographicalerrorsandreservestherighttomakechangestothe productandmanualswithoutpriornotice.AxisCommunicationsAB makesnowarrantyofanykindwithregardtothematerialcontained withinthisdocument,including,butnotlimitedto,theimplied warrantiesofmerchantabilityandfitnessforaparticularpurpose.Axis CommunicationsABshallnotbeliablenorresponsibleforincidental or consequentialdamagesinconnectionwiththefurnishing,performance oruseofthismaterial.Thisproductisonlytobeusedforitsintended purpose.
IntellectualPropertyRights
AxisABhasintellectualpropertyrightsrelatingtotechnologyembodied intheproductdescribedinthisdocument.Inparticular,andwithout limitation,theseintellectualpropertyrightsmayincludeoneormore ofthepatentslistedatwww.axis.com/patent.htmandoneormore additionalpatentsorpendingpatentapplicationsintheUSandother countries.
EquipmentModifications
This equipment must be installed and used in strict accordance with the instructions given in the user documentation. This equipment contains no user-serviceable components. Unauthorized equipment changes or modifications will invalidate all applicable regulatory certifications and approvals.
TrademarkAcknowledgments
AXISCOMMUNICATIONS, AXIS, ETRAX, ARTPECandVAPIXare registeredtrademarksortrademarkapplicationsofAxisABinvarious jurisdictions. All other company names and products are trademarks or registered trademarks of their respective companies.
DisposalandRecycling
Whenthisproducthasreachedtheendofitsusefullife,disposeof itaccordingtolocallawsandregulations.Forinformationabout yournearestdesignatedcollectionpoint,contactyourlocalauthority responsibleforwastedisposal.Inaccordancewithlocallegislation, penaltiesmaybeapplicableforincorrectdisposalofthiswaste.
Europe

Thissymbolmeansthattheproductshallnotbedisposedof togetherwithhouseholdercommercialwaste.Directive2012/19/EU onwasteelectricalandelectronicequipment(WEEE)isapplicablein theEuropeanUnionmemberstates.Topreventpotentialharmto humanhealthandtheenvironment,theproductmustbedisposed ofinanapprovedandenvironmentallysaferecycling process.For informationaboutyournearestdesignatedcollectionpoint,contact yourlocalauthorityresponsibleforwastedisposal.Businessesshould contacttheproductsupplierforinformationabouthowtodispose ofthisproductcorrectly.
ThisproductcomplieswiththerequirementsofDirective2011/65/EUon therestrictionoftheuseofcertainhazardoussubstancesinelectrical andelectronicequipment(RoHS).
China

Thisproductcomplieswiththerequirementsofthelegislative actAdministrationontheControlofPollutionCausedbyElectronic InformationProducts(ACPEIP).
ContactInformation
AxisCommunicationsAB
Emdalavägen14
22369Lund
Sweden
Tel:+46462721800
Fax:+4646136130
www.axis.com
Support
Shouldyourequireanytechnicalassistance,pleasecontactyourAxis reseller.Ifyourquestionscannotbeansweredimmediately,your resellerwillforwardyourqueriesthroughtheappropriatechannelsto ensurearapidresponse.IfyouareconnectedtotheInternet,youcan:
•findanswerstoresolvedproblemsintheFAQdatabase.Search byproduct, category, orphrase
•reportproblemstoAxissupportstaffbyloggingintoyourprivate supportarea
- chatwithAxissupportstaff
- visitAxisSupportatwww.axis.com/techsup/
LearnMore!
VisitAxislearningcenterwww.axis.com/academy/forusefultrainings, webinars,tutorialsandguides.
Functions....4
I/OandEventConfiguration....4
WalkTest....4
MaskingStrips....5
Day/NightModeAdjustment....5
LEDswitch....5
PulseCountSwitch....5
SensitivitySwitch......6
DetectionAreaAdjustment....6
VMDandPIR....6
ReferenceMaterial....8
HardwareOverview......8
AXIST8331PIRMotionDetectorSeriesGraphs....9
AXIST8331PIRMotionDetectorSeriesTerminalConnections.....1.0.
AXIST8331PIRMotionDetectorSeriesSchematics......1..1.
Functions
I/OandEventConfiguration
BelowtextappliestobothAXIST8331andAXIST8331-E.
Thissectioncontainsinformationofl/OconfigurationandEventsontheCamera.Formoreinformationandspecificationsaboutthe productsl/OandEventfunctionalityseetheproductsUserManualavailableonwww.axis.com
I/OPortConfiguration
GoSetupSystemOptionsPortsDevicesl/Ports
- Setport1 to Input(default)
3.SetNormalstateistoGroundedcircuit - PressSave
Note
- If the port is used in an event, it is not possible to switch between input and output until the event is changed or removed.
- ItisonlypossibletomanuallysetInputOutputifthecameraprovidestwoormoreconfigurableI/Oports.
EventConfiguration
- GototheEventssetuppage and select Action Rules.
2.SelectAdd. - TypeinanamefortheActionRule.
- SelectInputSignal from the Triggerdrop-downlist.
-SelectDigitalInputPortfromthedrop-downlistbelow.
-Select1or2fromthedrop-downlistbelow.
-MakesureActive:issettoYes.
- SelectavaluefromtheScheduledrop-downlist(Alwaysisselectedbydefault)ormanuallysetavaluebyselectNewschedule.
- SelectanactionfromtheTypedrop-downlist.
- PressOKinordertosavetheActionRule
TheActionRulewillnowbeinthelistofActionRules.
WalkTest
It is recommended to perform a walk test after installation to confirm that the PIR sensor is working properly.
Before the test, makes sure the PIR sensor is configured as below:
- SetthephotocelltoDAY(defaultsetting).
- SetthePulsecountswitchtoTEST.
- SettheLEDswitchtoON(defaultsetting).ThisappliestoAXIST8331only.
Afterthewarmupperiodiscompleted(approximately60s),conductawalktestbymovinginthedetectionzoneofthePIRsensor. TheLEDlightswhenthePIRsensordetectsamovingobject.
Afterthetest,configurethePIRsensorasbelow:
- Setthephotocell according to the environment, DAYisthedefaultsetting and disrecommended for most applications.
- SetthePulsecountswitchto2.
SethED switchOnOFFSecED switchpage more information about the ED This applies to AXIST8331 only.
MaskingStrips
BelowtextappliestoAXIST8331-Eonly.
Unwanteddetectionzonescanbeeliminatedbymaskingthelenswithprovidedmaskingstrips.
- Removethecover.
- Applythemaskingstriptothezonesthatshouldbeexcluded.

Day/NightModeAdjustment
BelowtextappliestoAXIST8331-Eonly.
TheDay/NightModeswitchcanbeusedtoadjustthedetectoraccordingtothebrightnessofthesurroundingarea.
ForbestperformanceitisrecommendedtosetthedialtoDAY(defaultsetting).
Tohavethedetectorbegintofunctiononlyafterithasbecomedark,turnthedialgraduallytotheNIGHTside.
ForpositionoftheDay/NightModeswitch,seeHardwareOverviewonpage8

LEDswitch
BelowtextappliestoAXIST8331only.
ForAXIST8331itispossibletosettheLEDswitchtoOFF/ON.BydefaulttheswitchissettoON.WheninthismodetheLEDwilllit whentriggered.WhensettoOFFtheLEDwillnotbelitwhentriggered.
ForpositionoftheLEDswitch,seeHardwareOverviewonpage8
PulseCountSwitch
BelowtextappliestobothAXIST8331andAXIST8331-E.
ThePulseCountswitchcanbesetintwodifferentmodes,2orTEST.Mode2isthedefaultmodeandisrecommendedtouse. TESTisonlyusedwhenperformingawalktest.
ForpositionofthePulseCountswitch,seeHardwareOverviewonpage8
SensitivitySwitch
The Sensitivity switch can be used to adjust the sensitivity of the detector. There are three different modes.
- M(Medium)Thisisthedefaultpositionandcanbeusedfornormalapplications.
•H(High)Usethiswhentheapplicationrequireshighsensitivity.WhenusingAXIST8331-EinPetAlleyAreamode,itis recommendedtosetthesensitivymodetoH.
• L(Low)Usethisinapplicationsthatmaybeunstable.
ForpositionoftheSensitivityswitch,seeHardwareOverviewonpage8
DetectionAreaAdjustment
BelowtextappliestoAXIST8331-Eonly.
ForAXIST8331-Eitispossibletosetthedetectionarea.Therearetwodifferentmodes.
- Multi-LevelArea. This is the default mode and applicable to normal applications.
- PetAlleyArea.Thismodeprovidesahorizontaldetectionpatternwithnodeclinationofzones,allowingpetstomove throughthearea.
Note
IdealmountingheightforPetAlleyAreais1.2mto1.5m.
SeeAXIST833 PIRMotionDetectoSeriesGraphsorpagographsMulti-LeveAreandPetAlleyArea.
SeeHardwareOvervieworpagepositionoftheDetectionAreaacrewandthemirror.
SeebelowforhowtoswitchtoPetAlleyAreamode.
- Carefully loosentheadjustmentscrew.
2.SlidethecoverdownandfastenthescrewatthePposition.
3.Flipthemirrortotheupperposition.

VMDandPIR
AXISVideoMotionDetection(VMD)isanapplicationforAxiscameraproducts.VMDcanbeusedtogetherwiththePIRsensor.The applicationdetectsmovingobjectswithinapredefinedareaofinterest,makingitpossibletoautomaticallytriggeranevent.
Note
TheVMDdetectionareaandthePIRsensorsdetectionpatternarenotsynchronizedbydefault.VMDdetectionareacanbe setinauserinterface.ThedetectionpatternforAXIST8331-Ecanbemodifiedbyusingthesuppliedmaskingstrips.
FormoreinformationaboutAXISVideoMotionDetection,seetheproductsUserManualavailableonwww.axis.com
ReferenceMaterial
HardwareOverview
AXIST8331

1 I/Ointerface
2 Terminals
3 PIRsensor(donottouch)
4 Sensitivityswitch
5 Tamperswitch
6 LEDswitch
7 LED
AXIST8331-E

1 Day/Nightmodeadjustment
2 Mirror
3 Photocell
4 LED
5 Detectionareaadjustmentscrew
6 I/Ointerface
7 Pulsecountswitch
8 Tamperswitch
9 PIRsensor(donottouch)
10 Sensitivityswitch
11 Terminals
AXIST8331PIRMotionDetectorSeriesGraphs
AXIST8331graph

bar
| X-axis (ft) | Y-axis (ft) | |---|---| | 5 | 0 | | 10 | 1 | | 15 | 2 | | 20 | 3 | | 25 | 4 | | 30 | 5 | | 35 | 6 | | 40 | 7 | | 45 | 8 | | 50 | 9 | | 55 | 10 | | 60 | 11 | | 65 | 12 | | 70 | 13 | | 75 | 14 | | 80 | 15 | | 85 | 16 | | 90 | 17 | | 95 | 18 | | 100 | 19 | | 105 | 20 | | 110 | 21 | | 115 | 22 | | 120 | 23 | | 125 | 24 | | 130 | 25 | | 135 | 26 | | 140 | 27 | | 145 | 28 | | 150 | 29 | | 155 | 30 | | 160 | 31 | | 165 | 32 | | 170 | 33 | | 175 | 34 | | 180 | 35 | | 185 | 36 | | 190 | 37 | | 195 | 38 | | 200 | 39 | | 205 | 40 | | 210 | 41 | | 215 | 42 | | 220 | 43 | | 225 | 44 | | 230 | 45 | | 235 | 46 | | 240 | 47 | | 245 | 48 | | 250 | 49 | | 255 | 50 | | 260 | 51 | | 265 | 52 | | 270 | 53 | | 275 | 54 | | 280 | 55 | | 285 | 56 | | 290 | 57 | | 295 | 58 | | 300 | 59 | | 305 | 60 | | 310 | 61 | | 315 | 62 | | 320 | 63 | | 325 | 64 | | 330 | 65 | | 335 | 66 | | 340 | 67 | | 345 | 68 | | 350 | 69 | | 355 | 70 | | 360 | 71 | | 365 | 72 | | 370 | 73 | | 375 | 74 | | 380 | 75 | | 385 | 76 | | 390 | 77 | | 395 | 78 | | 400 | 79 | | Note: The values in the chart are estimated based on the provided code and are not explicitly labeled in the original data. The numbers in the data table above the chart are estimated based on the current value of the data table. There is no additional data series or legend present in this image. The chart type is a bar chart.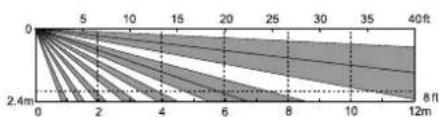
line
| X-axis (ft) | Y-axis (unitless) | |---|---| | 0 | 0 | | 5 | 5 | | 10 | 10 | | 15 | 15 | | 20 | 20 | | 25 | 25 | | 30 | 30 | | 35 | 35 | | 40 | 40 | | 8 | 2.4 | | 12 | 2.4 | The chart displays a single data series with no explicit title or legend labels. The x-axis is labeled '8 ft' and the y-axis is unlabeled but represents a numerical scale from 0 to 40. There are no labels for the data series.Thelargegraphaboveshowsatopviewofthedetectionzones.
ThesmallgraphaboveshowsasideviewofthedetectionzoneswhenthePIRsensorismountedonaheightof2.4m.Idealmounting heightisbetween1.5mto2.4m.
AXIST8331-Egraph

bar
| X-Axis (mm) | Y-Axis (ft) | | :--- | :--- | | 0 | 0 | | 2 | 2 | | 4 | 4 | | 6 | 6 | | 8 | 8 | | 10 | 10 | | 12 | 12 | | 14 | 14 | | 16 | 16 | | 18 | 18 | | 20 | 20 | | 22 | 22 | | 24 | 24 | | 26 | 26 | | 28 | 28 | | 30 | 30 | | 32 | 32 | | 34 | 34 | | 36 | 36 | | 38 | 38 | | 40 | 40 | | 42 | 42 | | 44 | 44 | | 46 | 46 | | 48 | 48 | | 50 | 50 | | 52 | 52 | | 54 | 54 | | 56 | 56 | | 58 | 58 | | 60 | 60 | | 62 | 62 | | 64 | 64 | | 66 | 66 | | 68 | 68 | | 70 | 70 | | 72 | 72 | | 74 | 74 | | 76 | 76 | | 78 | 78 | | 80 | 80 | | 82 | 82 | | 84 | 84 | | 86 | 86 | | 88 | 88 | | 90 | 90 | | 92 | 92 | | 94 | 94 | | 96 | 96 | | 98 | 98 | | 100 | 100 | | 102 | 102 | | 104 | 104 | | 106 | 106 | | 108 | 108 | | 110 | 110 | | 112 | 112 | | 114 | 114 | | 116 | 116 | | 118 | 118 | | 120 | 120 | | 122 | 122 | | 124 | 124 | | 126 | 126 | | 128 | 128 | | 130 | 130 | | 132 | 132 | | 134 | 134 | | 136 | 136 | | 138 | 138 | | 140 | 140 | | 142 | 142 | | 144 | 144 | | 146 | 146 | | 148 | 148 | | 150 | 150 | | 152 | 152 | | 154 | 154 | | 156 | 156 | | 158 | 158 | | 160 | 160 | | 162 | 162 | | 164 | 164 | | 166 | 166 | | 168 | 168 | | 170 | 170 | | 172 | 172 | | 174 | 174 | | 176 | 176 | | 178 | 178 | | 180 | 180 | | 182 | 182 | | 184 | 184 | | 186 | 186 | | 188 | 188 | | 190 | 190 | | 192 | 192 | | 194 | 194 | | 196 | 196 | | 198 | 198 | | 200 | -|
area
| X-axis | Y-axis | |---|---| | 0 | 2.5 | | 2 | 2.0 | | 4 | 1.5 | | 6 | 1.0 | | 8 | 0.5 | | 10 | 0.25 | | 12 | 0.0 |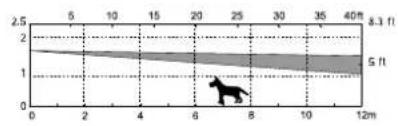
line
| x | y | | ---- | ---- | | 0 | 2.5 | | 2 | 2.0 | | 4 | 1.5 | | 6 | 1.0 | | 8 | 0.5 | | 10 | 0.0 | | 12 | -0.5 |Thelargegraphaboveshowsatopviewofthedetectionzones.
Thesmallgraphsaboveshowsasideviewofthedetectionzones.Multi-levelareaandPetalleyarea.
AXIST8331PIRMotionDetectorSeriesTerminalConnections
AXIST8331
BelowareimagesoftheterminalconnectionforAXIST8331.
The left images show the default connection with tamperandalarm together.
Therightimageshowsaconconnectionwithtamperandalarmseparated.Thisconnectionrequiresacamerawithatleasttwo configurablel/Oports.
AXIS T8331

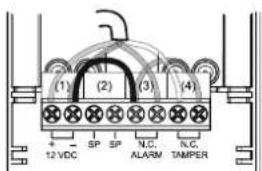
Forpositionoftheterminals,see HardwareOverviewonpage8
AXIST8331-E
BelowareimagesoftheterminalconnectionforAXIST8331-E.
The left images show the default connection with tamperandalarm together.
Therightimageshowsaconconnectionwithtamperandalarmseparated.Thisconnectionrequiresacamerawithatleasttwo configurablel/Oports.
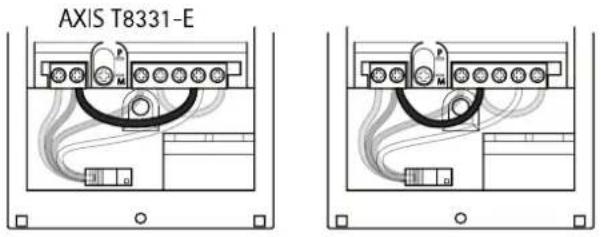
Forpositionoftheterminals,see HardwareOverviewonpage8
AXIST8331PIRMotionDetectorSeriesSchematics
BelowisaschematicsshowingtheconnectionwithacameraandthePIRsensor.Thisisthedefaultconnectionwithtamperandalarmtogether(Pin3).Pin1GND,Pin2Power,Pin4notused.

- GND
- Power
- I/O configured as input
- Not used
Below schematically showing connection with camera and the PIR sensor, this connection tamper and alarmarseparated. Pin3alarm, Pin4tamper, Pin1GND, Pin2Power.

- GND
- Power
- I/O configured as input
- I/O configured as input
Note
- This connection requires acamerawithatleasttwo configurable/0ports.
This connection requires changes in the terminal, see AXIST833 PIRMotionDetectorSeriesTerminalConnectionsorpage10
- AboutthisDocument
- LegalConsiderations
- Liability
- IntellectualPropertyRights
- EquipmentModifications
- TrademarkAcknowledgments
- DisposalandRecycling
- Europe
- China
- ContactInformation
- Support
- LearnMore!
- Functions
- I/OandEventConfiguration
- Note
- EventConfiguration
- WalkTest
- MaskingStrips
- Day/NightModeAdjustment
- LEDswitch
- PulseCountSwitch
- SensitivitySwitch
- DetectionAreaAdjustment
- VMDandPIR
- ReferenceMaterial
- HardwareOverview
- AXIST8331PIRMotionDetectorSeriesGraphs
- AXIST8331PIRMotionDetectorSeriesTerminalConnections
- AXIST8331PIRMotionDetectorSeriesSchematics
Marque : AXIS
Modèle : T8331
Catégorie : Détecteur de mouvements