
Fuzzy RZ-DMA18Y - Cuiseur à riz HITACHI - Notice d'utilisation et mode d'emploi gratuit
Retrouvez gratuitement la notice de l'appareil Fuzzy RZ-DMA18Y HITACHI au format PDF.


| Marque | Hitachi |
| Modèle | Fuzzy RZ-DMA18Y |
| Type de produit | Cuiseur à riz |
| Capacité | Environ 1,8 L (10 tasses de riz cru) |
| Dimensions (L x P x H) | Environ 26 x 28 x 25 cm |
| Poids | Environ 3,2 kg |
| Alimentation | 220-240 V ~ 50/60 Hz |
| Puissance | Environ 650 W |
| Type de chauffage | Plaque chauffante avec capteur de température |
| Technologie | Logique floue (Fuzzy Logic) pour ajustement automatique de la cuisson |
| Fonctions principales | Cuisson du riz blanc, riz complet, riz sushi, cuisson vapeur, maintien au chaud |
| Programmateur différé | Oui, minuterie jusqu'à 12 heures |
| Maintien au chaud automatique | Oui, jusqu'à 12 heures |
| Cuve | Amovible, revêtement antiadhésif |
| Accessoires inclus | Cuve, couvercle, cuillère à riz, verre doseur, panier vapeur |
| Entretien et nettoyage | Cuve et accessoires lavables à l'eau savonneuse ; corps extérieur essuyer avec un chiffon humide |
| Sécurité | Arrêt automatique, protection contre la surchauffe, verrouillage du couvercle |
| Informations générales | Cuiseur à riz intelligent avec écran LCD et touches tactiles |
FOIRE AUX QUESTIONS - Fuzzy RZ-DMA18Y HITACHI
Questions des utilisateurs sur Fuzzy RZ-DMA18Y HITACHI
0 question sur cet appareil. Repondez a celles que vous connaissez ou posez la votre.
Poser une nouvelle question sur cet appareil
Téléchargez la notice de votre Cuiseur à riz au format PDF gratuitement ! Retrouvez votre notice Fuzzy RZ-DMA18Y - HITACHI et reprennez votre appareil électronique en main. Sur cette page sont publiés tous les documents nécessaires à l'utilisation de votre appareil Fuzzy RZ-DMA18Y de la marque HITACHI.
MODE D'EMPLOI Fuzzy RZ-DMA18Y HITACHI

FUZZY RICE COOKER
INSTRUCTION MANUAL
Model : RZ-DMA18Y
HOUSEHOLD

natural_image
Black-and-white photo of a banana cake with sliced bananas and shredded cheese, served on a checkered plate (no text or symbols visible)
natural_image
Black-and-white photo of a rice dish topped with chopped vegetables and herbs, served on a plate with a fork (no text or symbols visible)Brown rice casserole seafood with sauce XO
Before Using
Important Safeguards 2
Parts Identification 4
Before Cooking Rice
Hints and tips for tasty rice 5
Preparation for cooking....6
How to Cook Rice
How to cook rice (Jasmine Rice/Japanese
Rice) 7
How to cook rice (White Rice/Sticky Rice
Brown Rice/Porridge (Thick, Thin)) ..... 8
How to bake a cake 9
How to Slow Cook 10
How to steam (Sticky Rice and Other) .. 11
How to use the Timer.... 12
Maintenance
Clean and Care....13
Problems and Solutions .... 14
Specifications.... 15
This product is for household use only. Do not use for industrial purpose.
 WARNING WARNING | Indicate hazard that possibility causes death or injury when a user ignores it and mishandles the product. |
 CAUTION CAUTION | Indicate hazard that possibility causes human damage or property damage only when a user ignores it and mishandles the product. |
About marks
Various marks are used in this instruction manual and product itself in order to ensure the users can use the product properly and to prevent from hazard to you and other people or loss damage to your properties.
The marks and their meanings are on your right.
Please make sure you understand them and read the instruction.

WARNING
Do not remove or change any parts of this appliance.  Service such as repairing should be performed only by an authorized service representative. Do not disassembleIt may cause fire, electric shock or burn hazards.In case of service, contact the store where you purchased or customer service department of Hitachi company. Service such as repairing should be performed only by an authorized service representative. Do not disassembleIt may cause fire, electric shock or burn hazards.In case of service, contact the store where you purchased or customer service department of Hitachi company. | Use this product with a AC plug rated 7 A or higher alone. Do not use with another plug.  When used with other appliances, abnormally heated branching part may cause fire hazards. When used with other appliances, abnormally heated branching part may cause fire hazards. |
Do not attempt to use pin, cord, wire or any other metal particles.  It may cause electric shock or injury hazards due to malfunction. It may cause electric shock or injury hazards due to malfunction. | Always keep the AC plug clean.It may cause fire.  |
Always keep cooker out of reach of children.  It may cause electric shock, burn or injury hazards. It may cause electric shock, burn or injury hazards. | Make sure the plug fits fully to the socket.It may cause electric shock, short-circuit, smoke or fire hazards.  |
Do not operate any appliance with a damage cord or plug.  It may cause electric shock, short-circuit or fire hazards. It may cause electric shock, short-circuit or fire hazards. | Use the product with 220, 230, 240, 220-240V AC outlet only.  It may cause electric shock or fire hazards. It may cause electric shock or fire hazards. |
Do not attempt to damage a cord in any manner and cord should not be attached near heating source.  Damaged cord may cause electric shock or fire hazards. Damaged cord may cause electric shock or fire hazards. | Avoid immersing the main body in water or putting water in any part of the body.  It may cause electric shock or short-circuit hazards. Avoid water It may cause electric shock or short-circuit hazards. Avoid water |
Avoid using wet hands to plug in or unplug.  It may cause electrocution. No wet hands It may cause electrocution. No wet hands | |
Do not open the lid while cooking.  It may cause burn hazards. It may cause burn hazards. | Do not touch the steam vent while using.  It may cause burn hazards. Keep cooker out of reach of children. Do not touch It may cause burn hazards. Keep cooker out of reach of children. Do not touch |
Mark example

This mark indicates cautions (including dangers or warnings). Concrete descriptions are inside of or next to the mark.

This mark indicates "prohibition". Concrete descriptions are inside of or next to the mark.

This mark indicates "compelling". Concrete descriptions are inside of or next to the mark.
 CAUTION CAUTION | |
Never use near water or fire.It may cause electric shock or electric leakage.  | Unplug from the socket when not in use.It may cause electric shock, electric leakage, burn or injury due to degraded insulating.  Unplug Unplug |
Do not place the cooker on unstable surface or flammable surface such as a carpet or tablecloth.It may cause fire.  | Remove the plug from the plug socket by pulling on the plug itself, rather than on the cord.It may cause electric shock, short-circuit, burn hazards.  |
Use only the dedicated inner pot.It may cause heating or malfunction.  | Holding the plug while removing the cord.Pulling the cord can cause skin injury.  |
Do not touch lid release button when moving the cooker.  Opening lid may cause injury or burn hazards. Opening lid may cause injury or burn hazards. | Maintenance should be done after the cooker cooled down.  Touching hot part may cause burn hazards. Touching hot part may cause burn hazards. |
Do not place the cooker close to house wall or any other furniture. Do not place the cooker inside kitchen storage cabinet because it may cause accumulated steam.Steam or heat may damage such as discoloration or deformation of wall or furniture.  | Do not touch hot parts such as inner pot or steam vent while using or cooking.It may cause burn hazards.  Do not touch Do not touch |
| ATTENTION | |
| Do not place a damp cloth on the cooker.It may cause discoloration, deformation or malfunction. | Eliminate any foreign object at the bottom of inner pot, or on heating plate or temperature sensor.It may cause malfunction or improper cooking. |
| Do not stand the handle or move the cooker while cooking.Steam may cause burn hazards. | Bottom of inner pot  Heating plate temperature sensor Heating plate temperature sensor |
| Avoid direct light or oil.It may cause discoloration, deformation. | Do not put the inner pot in contact with fire or use it in a microwave oven.It may damage coated surface. |
Parts Identification
Parts identification for rice cooker model RZ-DMA18Y
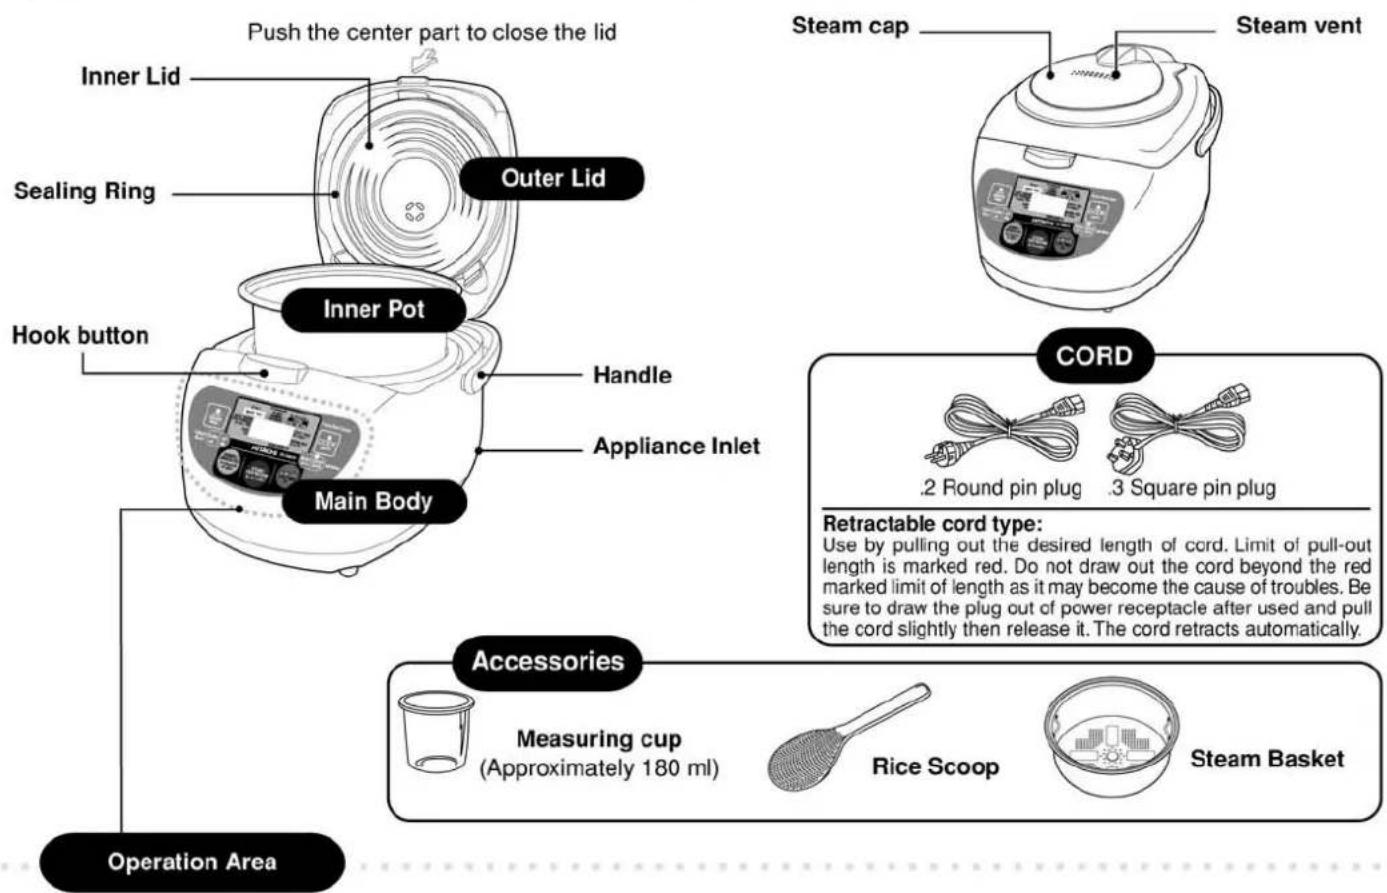
Operation Area
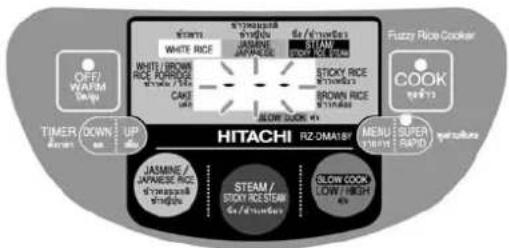
![[OFF/WARM] button (Warm light) Push to keep rice warm, Warm light will turn on. And push again to stop cooker's operation, Warm light will turn off. [DOWN/UP] button for timer setting (TIMER) ⇒ page 12 [JASMINE/JAPANESE RICE] button Push to select Jasmine or Japanese Rice ⇒ page 7 LCD display (Illustrated with all the lights on for easier understanding) WHITE RICE JASINE STICKY RICE STEM 19:00 STICKY RICE M BROWN RICE COOK SLOW COOK RZ-OMAISY MENU SUPER RADI [SLOW COOK] button Push to select slow cook Low slow cook / High slow cook [HITACHI] COOK] button (Cook light) [MENU] button/ [SUPER RAPID] button Push to select menus such as Sticky Rice, Brown Rice, Cake, Porridge (Thick, Thin), White Rice (Super Rapid light) ⇒ page 7](/content/2026/06/1267358/images/05e1f0ce5622e1632b865993d9e3bec3b9c25845ecf73f7c6ae36b4e3c4129c0.jpg)
Remark
Cook button has ▶ convex marks for vision impaired people.
Hints and tips for tasty rice
To cook rice with good taste
Measure rice correctly
- Please use the attached measuring cup to measure rice.
• Measuring rice bins may measure differently from the attached measuring cup in some cases.
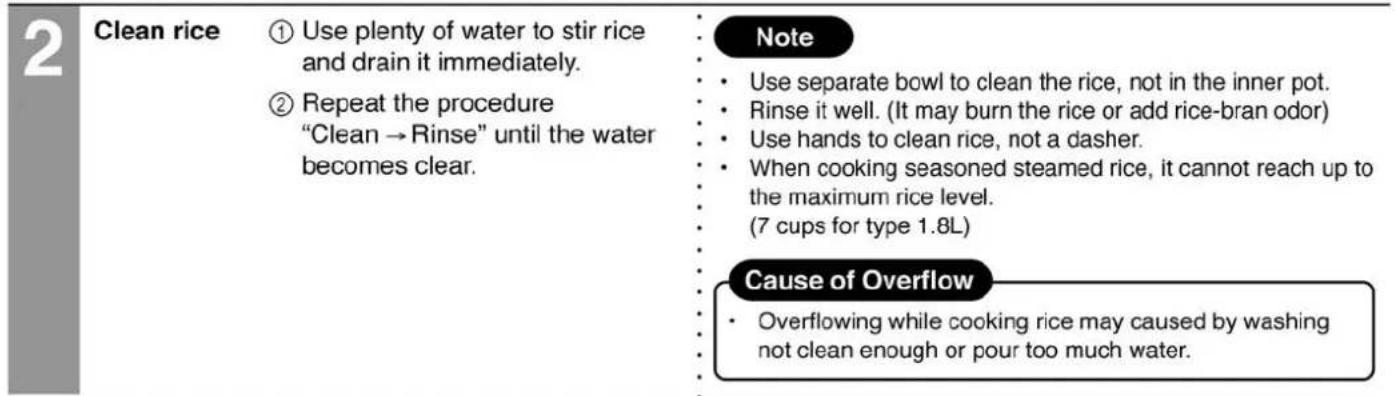
Clean rice quickly and adequately
- Rice absorbs the first water quickly. Drain the first rinse water immediately so that the rice doesn't smell like rice-bran.
• After cleaning, rinse the rice until water becomes clear.
Stir rice after cooking
- Stir the rice at the bottom of inner pot without pressuring it. This will evaporate extra water and make it tasty.
- You should stir rice even if you want keep it warm after cooked.
Warming up the rice with good taste
Avoid the followings in order to warm up the rice with good taste
• Warm the cooked rice over 12 hours
• Re-warm cold rice again or add rice
• Warm up rice with a rice scoop inside
- Warm up other rice than rice cook (including sticky rice, brown rice, porridge (thick, thin))
• Warm up the cooked rice without cleaning well
Small amount of rice
- When only small amount of rice is left, pile it at the center of inner pot. (This will prevent the rice from being dry or wet)
Note
- When you keep rice cook warm over 12 hours, or for other kinds of rice, you can keep the rice tasty by wrapping it with plastic wrap and warm it with microwave oven every time.
- Stirring the rice occasionally during keeping warm can keep it tasty.
- When warming the rice cooked by other appliances, push Warm button to warm the inner pot before putting the rice in.
Knowledge for Rice
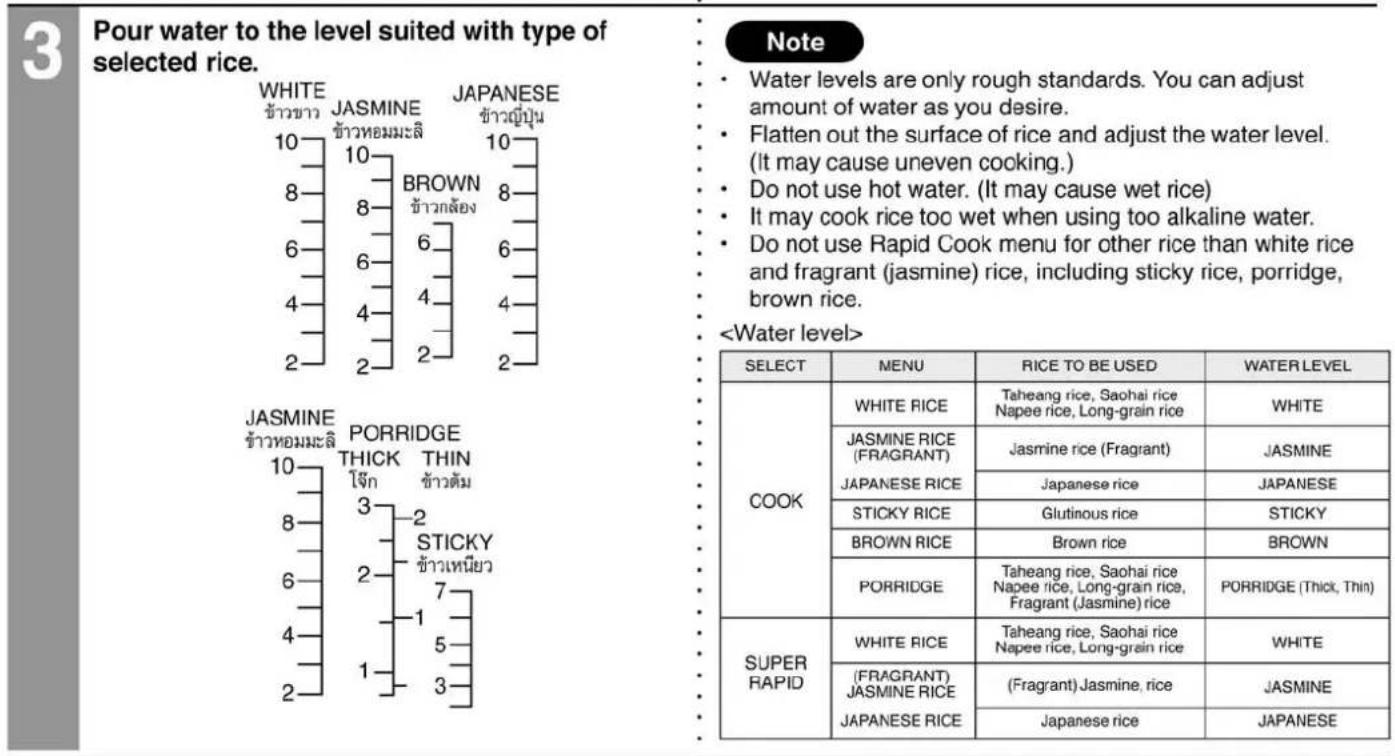
Water amount and different kinds of rice
• Fill water to suit each kind of rice and the way you like
| KIND OF RICE | WATER LEVEL | MENU |
| Fragrant (Jasmine) riceJapanese rice | According to the scale of Jasmine rice (Fragrant) | JASMINE RICE (FRAGRANT)JAPANESE RICE |
| According to the scale of Japanese rice | ||
| Tahaeng riceSaohai riceChacwang rice | According to the scale of white rice | WHITE RICE |
- Super Rapid is the menu to cook in shorter time, within 22 minutes and less than 2 cups of rice. Heating and steaming time is set shorter than regular cooking time; the rice may be slightly harder or less tasty. We recommend using Cook Program unless you are in a hurry.
Why cooked rice is burned?
Ripen rice should be pour water off for good scent and taste. If you prefer not to have burn, clean the rice very well so that it does not have any rice-bran left on the surface. White rice and other kinds of rice (not fragrant (jasmine) rice) tend to have burnt part more often.
Preparation for cooking
Example : When cooking 3 cups of rice in Rice Cook menu
 |
 |
 |
 |
 |
Cooking time
* Power supply 220, 230, 240, 220-240V, Room temperature 25°C, Water temperature 25°C.
* Cooking time depends on voltage, room temperature, water temperature and water level including type of rice.
Cooking time (approximately in maximum minute)
| White rice | Jasmine rice/Japanese Rice | Sticky rice | Brown rice | Porridge | Super Rapid cook |
| 35~55 | 25~45 | 45~55 | 90~120 | 35~60 | 22(Up to 2 cups of rice) |
Note: For Super Rapid cook program with rice more than 2 cups, cooking time may increase.
| 1 | Push [JASMINE/JAPANESE RICE] button to select the menu. | ■ When plug is in, current menu setting will be displayed. ■ Each time is pushed, — mark will show JASMINE RICE/JAPANESE RICE. |
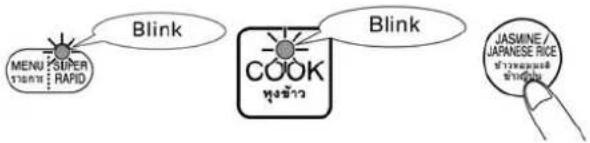 | The cooker always starts initial setting with WHITE RICE menu.The cooker will not remember the setting when you select JASMINE RICE/JAPANESE RICE, STICKY RICE, BROWN RICE, SLOW COOK, PORRIDGE or CAKE menu. It will be set back to WHITE RICE next time. |
2
There are 2 cooking method selections as following:
2.1 Normal cooking
- Push [COOK] button
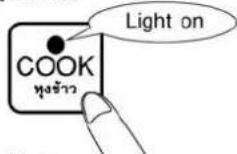
2.2 Super rapid cooking
- Push [SUPER RAPID] button

You will hear melody and it will start cooking.
* (Normal cooking and super rapid cooking have different melodies.)
■ When [COOK] or [SUPER RAPID] button is pushed, the time will not be shown. You will hear the melody and it will start cooking. (Normal cooking and super rapid cooking have different melodies.) At steaming stage, the time left (min.) will be displayed as below and will count down by a minute.
| Type\Method | Normal cooking | Super Rapid cooking |
| JASMINE RICEJAPANESE RICE | 15 | 5 |
3
Stir the rice as soon as it is cooked and you hear the melody.
Keeping warm
- Though it could keep the rice warm over 12 hours. It is not recommended to do so, because it may cause odor and discoloration.
- Warming may cause dew drops accumulation inside of lid, inner lid or inner pot. This prevents the rice from getting dried, it is not the cooker's malfunction.
■ Warm light will be on and warming system will automatically work. Please enjoy the rice as soon as possible after it is cooked.
- LCD display will show passed warming time from 0 h to 12 h. (When it reaches the 13 ^th hour, it will be displayed same as when cooking is started.)


- If the rice is not stirred properly, it may absorb steam and become too glutinous or hard.
- You may see a slight dimple in the center of cooked rice, or white and soft rice where it contacts the inner pot.
| 1 | Push [MENU] button to select menu. | ■ When plug is in, current menu setting will be displayed. ■ Every time is pushed, Menu selection mark will be shown with this order: STICKY RICE → BROWN RICE → CAKE → PORRIDGE → WHITE RICE. ■ will also be shifted one menu at a time. | |||
| 2 | Push [COOK] button. You will hear melody and it will start cooking. • (STICKY RICE, BROWN RICE, CAKE, PORRIDGE cooking have same melodies.)※ Porridge have Thick water level and Thin water level of inner pot. You can choose your favourite water quantity. You will hear melody and it will start cooking. • (STICKY RICE, BROWN RICE, CAKE, PORRIDGE cooking have same melodies.)※ Porridge have Thick water level and Thin water level of inner pot. You can choose your favourite water quantity. | ■ When [COOK] button is pushed, the time will not be shown. You will hear the melody and it will start cooking. At steaming stage, the time left (min.) will be displayed as below and will count down by a minute. | |||
| STICKY RICE | BROWN RICE | PORRIDGE | WHITE RICE | ||
| 10 | 10 | 5 | 10 | ||
| Note for White rice cooking• Every time after plugging, you could select cooking method immediately by pushing button for normal cooking and pushing button for super rapid cooking. | |||||
| 3 | Stir the rice as soon as it is cooked and you hear the melody. Keeping warm• Do not warm Porridge (Thick, Thin). It will become thick and sticky if you keep it warm for a long time. | ■ Warm light will be on and warming system will automatically work. Please enjoy the rice as soon as possible after it is cooked. |  | ||
| Note for Porridge cooking• It is recommended to use broken rice for cooking. And after it is cooked, you should open the and stir it well before serving.• If you use brown rice to cook porridge, it is recommended to use broken brown rice only. Otherwise the rice will be hard. | |||||
| STICKY RICE | BROWN RICE | PORRIDGE | WHITE RICE |
| 10 | 10 | 5 | 10 |
Note for White rice cooking
3
Stir the rice as soon as it is cooked and you hear the melody.
Keeping warm
Note for Porridge cooking
When rice is cooked, it will be automatically switched to warming operation. If you do not want to warm, push ⇒ button and unplug.
How to bake a cake
| 1 | Prepare the ingredients for a cake, the amount depends on size of the cooker which indicated in Cook Book attached with the cooker. | |
| 2 | Pour the ingredients into the inner pot. | |
| 3 | Place the inner pot into the cooker. | Dry the inside and the bottom of inner pot and wipe any foreign objects.Make sure that the inner pot contact directly with the heating plate. Keep turning slightly until it fits. |
| 4 | Close the lid and plug in the cord. | Make sure that the inner lid and steam cap are attached.Close the lid slowly until you hear clicking sound. |
| 5 | Push [MENU] button to select “CAKE”. | Every time is pushed, Menu selection mark will be shown with this order: STICKY RICE → BROWN RICE → CAKE. I will be shifted one menu at a time until it reaches CAKE. |
| 6 | Push [DOWN/UP] button to set the time for cake. | Each time you push [UP] button, time will increase 5 min. or each time you push [DOWN] time will decrease 5 min. For the above example, timer is set to 40 min for cake. |
| 7 | Push [COOK] button. | You will hear melody and cooking light will be on. Then it will start baking cake with the amount of time as setting.LCD will show time left which decrease by one minute.During baking, do not open the lid, the cake will be uncooked.NoteApproximation of baking duration: Refer to the attached Cooking Book. |
| 8 | When the cake is cooked, you will hear melody. Cooking light will be off, Warm light will be on instead. Push button to cancel cooking operation. Then open the lid immediately. |  |
| 9 | Unplug the cord and keep it well. |  |
| 10 | Lift up the inner pot from the cooker and left until it is cooled down, around 3-5 min. Then put the pot upside down on a tray or any prepared vessel. | To remove a cake from the inner pot, you should wear heat-protection gloves or use a piece of cloth to carry the inner pot.  |
| 11 | Decorate the cake as your desire. |
How to Slow Cook
| 1 | Prepare the ingredients for slow cooking, the amount depends on size of the cooker which some menus are described in Cook Book attached with the cooker. | |
| 2 | Pour the ingredients into the inner pot. | |
| 3 | Place the inner pot into the cooker. | Dry the inside and the bottom of inner pot and wipe any foreign objects.Make sure that the inner pot contact directly with the heating plate. Keep turning slightly until it fits. |
| 4 | Close the lid and plug in the cord. | Make sure that the inner lid and steam cap are attached.Close the lid slowly until you hear clicking sound. |
| 5 | Push [SLOW COOK] button to select “slow cook”. | Every time is pushed, Menu selection mark will show “SLOW COOK”.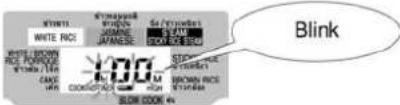 And “COOKING TIMER” message will be shown and time setting for slow cooking will be blinked with cook light blinking while setting time.NoteThere are two types of slow cook (You can select by pushing [SLOW COOK] button.)- High slow cook- Low slow cook And “COOKING TIMER” message will be shown and time setting for slow cooking will be blinked with cook light blinking while setting time.NoteThere are two types of slow cook (You can select by pushing [SLOW COOK] button.)- High slow cook- Low slow cook |
| 6 | Push [DOWN/UP] button to set the time for slow cooking.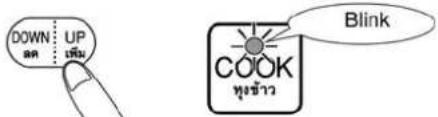 | Each time you push [UP] button, time will increase 30 min. or each time you push [DOWN] time will decrease 30 min. For the above example, timer is set to 2 hours 30 min for slow cooking. NoteSlow cooking time depends on each kind of food. NoteSlow cooking time depends on each kind of food. |
| 7 | Push [COOK] button. | You will hear melody and cooking light will be on. Then it will start slow cooking with the amount of time as setting.LCD will show time left which decrease by one minute. When slow cooking reaches the setting time, cooking light will be off, warm light will be on and there will be buzzer sound to show cooking is finished. When slow cooking reaches the setting time, cooking light will be off, warm light will be on and there will be buzzer sound to show cooking is finished. |
| 8 | Unplug the cord. | After slow cooking is finished, do not open the lid immediately. Please wait for 2-3 minutes.After using the cooker, always push [OFF/WARM] buttonand unplug for safety. |
How to steam (Sticky Rice and Other)
| 1 | Steaming Other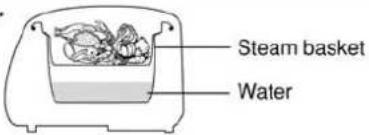 | Fill water into the inner pot.: 1.8 L at water level 4 cups (JASMINE RICE)Put the steam basket in the inner pot.Put vegetable or food in the steam basket.How to place the inner pot. (See details page 6) | |
| 2 | Steaming Sticky RicePreparation of steaming Sticky RiceMeasure the sticky rice with supplied measuring cup. | Fill with enough water, rinse the rice. Then pour the water immediately.Repeat the process “rinse → pour” until the water is clear.Soak the rice in the clean water for 1 hour. | |
| 3 | Steaming Sticky Rice ※ Before cooking, soak the Sticky Rice in water for 1 hour. ※ Before cooking, soak the Sticky Rice in water for 1 hour. | Fill water into the inner pot: 1.8 L at water lever 4 cups (JASMINE RICE)Place the damp cheesecloth into the steam basket and put the steam basket in the inner pot.Put the soaked rice into the steam basket.Fold the ends of cheesecloth over the rice and close the lid.(If do not use the cheesecloth, cannot cook Sticky Rice well.) | |
| 4 | Plug into the socket. | Every time you plug in, markwill be at WHITE RICE position. | |
| 5 | Push [STEAM/STICKY RICE STEAM] button. | Push [STEAM/STICKY RICE STEAM] button. mark will be at STEAM/STICKY RICE STEAM position. Cooking light will blink.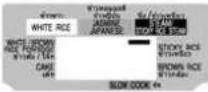 "COOKING TIMER" message will be shown and time setting for slow cooking will be blinked with cook light blinking while setting time. "COOKING TIMER" message will be shown and time setting for slow cooking will be blinked with cook light blinking while setting time. | |
| 6 | Push [DOWN/UP] button to set the time for steaming. | Each time you push [UP] button, time will increase 1 minute or each time you push [DOWN] button, time will decrease 1 minute. For the above example, the steaming time is set for 30 minutes. | |
| 7 | Push [COOK] button. | You will hear melody and cooking light will be on. The show time for steaming will stop blinking. Then it will start steaming.At the time of water in inner pot is boiled, setting timer starts. And LCD will show time left which decrease by one minute. When steaming reaches the setting time, cooking light will be off, warm light will be on and the buzzer sounds to show that steaming is finished. When steaming reaches the setting time, cooking light will be off, warm light will be on and the buzzer sounds to show that steaming is finished. | |
| 8 | Unplug from the socket. | After steaming is finished, do not open the lid immediately. Please wait for 2-3 minutes.After using the cooker, always push [OFF/WARM] button and unplug for safety. | |
How to use the Timer
When you set the time to finish (Programmed Cooking)
You can program the time within the maximum 12 hour 30 min.
Note
- Programmed Cooking can be used for WHITE RICE, JASMINE RICE, JAPANESE RICE, STICKY RICE, BROWN RICE AND PORRIDGE (THICK, THIN).
- Please do not use Programmed Cooking for seasoned steamed rice or rice mixed with other ingredients, since they may not be properly cooked or not appetizing.
(Example) Current time is 7.00 PM. We want to finish Programmed Cooking for tomorrow at 6.30 AM. Therefore, timer should be set to 11 hours 30 min. according to time difference between time to finish and current time.
1
Push [DOWN/UP] button according to time difference.

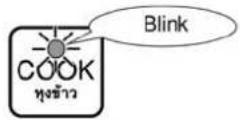
■ Select menu
■ Each time you push [DOWN] button, time will decrease 30 min. Or each time you push [UP] button, time will increase 30 min. For the above example, timer is set to 11 hours 30 min.
- Cook button light and LCD display will blink while timer is setting.
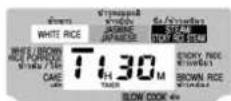
2
Push [COOK] button.
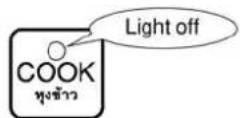
■ Push 📊 button, timer will start working. Cooking light will be off and there will be buzzer sound.
■ LCD will show time left which decrease by one minute.
■ When rice is cooked, warm light will be on and there will be buzzer sound to show cooking is finished.
Tips
Note
- You could not program cooking unless you push button to turn on the cooker.
- Push button to cancel programmed setting.
- Unplugging after setting timer will cancel the setting and timer will return to initial setting.
- Finishing time may slightly different from the set time depending on water temperature, room temperature, voltage or water level.
Cleaning method for rice cooker model RZ-DMA18Y
• Make sure that you unplug cooker and the body is cold for maintenance.
- Avoid using benzene, thinner, polishing powder or scrub brush to clean the cooker. (It may damage the surface.)
Body/Lid
Wipe with damp cloth.
Rice Scoop/Measuring Cup/Steam Basket
Wash with soft material such as sponge by using dish soap.

natural_image
Line drawing of a rice cooker with control panel and display (no text or symbols)Steam Cap
Remove from main body to wash with soft material such as sponge
by using dish soap.
■ How to remove
① Push steam button
② Remove it from main body
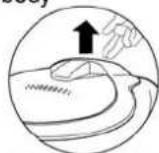
③ Hold as illustrated below. Turn cap body counterclockwise and align ▲ mark on cap body with ▼ mark on cover to detach it.

■ How to attach
① Insert Steam packing under nails of the cover.

② Match ▲ mark on cap body. After that, turn cap body clockwise to attach to the cover.
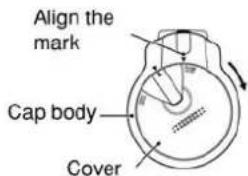
③ Insert the claw and lock it into place.
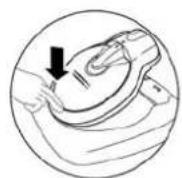
④ Press STEAM BUTTON while pushing down the steam cap until it stops.

Dew drops should be wiped after every usage.
Heating Plate Temperature Sensor
If there is rust on heating plate or temperature sensor, use fine sandpaper (No. 600) to rub it off and then wipe with damp cloth.

Remove rice or stickiness from the inner lid, since it may cause rice being dried out while warming.
Inner Lid
Remove from the lid and wash with soft material such as sponge by using dish soap, then dry.
How to remove

r Lid Push levers (both sides) toward the arrows to remove
■ How to attach

Note
- Do not disassemble lid heater protector plate. (Do not pull the inner lid with strong hand)
- Avoid using hair dryer or dishwashing machine with this product.
Inner Pot
Wash with soft material such as sponge.
When it doesn't get cleaned, use mild detergent (Dish detergent).
Note
- It may not cook properly if the inner pot is deformed. To avoid that, handle it with care.
• To avoid damaging fluorine coating, - Use attached rice scoop
Do not wash it with spoons or bowls in
Do not use vinegar - Do not scrub inside with polishing powder or scrubbing brush
- Clean rice in another container
- Fluorine coating will be worn by repetitive use, handle it with care.
While using inner pot, no-evenly coloring may occur, which will not effect with rice cooking or your health.
Problems and Solutions
Please check the following points before contacting for the repair service.
| Problem\Check points/When... | Amount of rice or water level is wrong | Did not rinse rice | The bottom inner pot is deformed, or foreign objects are attached to temperature sensor | Rice is stuck to the rim or inner pot or inner lid | Did not clean inner pot or inside of the lid | Forgot to attach steam cap | Select a wrong menu | Open the lid while cooking | Power failed | Used starburst connection, or extension cord | Did not stir rice well | Warmed rice over 12 hours or warmed other rice than rice cook | Unplug or push Off button while cooking | ||
| Page to refer | 5,6 | 5,6 | 6,12 | 6,13 | 13 | 6 | 7,8 | 6 | - | - | 7 | 5,7 | - | ||
| Cooked rice | Is too hard | ● | ● | ● | ● | ● | ● | ● | ● | ||||||
| Is half-cooked | ● | ● | ● | ● | ● | ● | ● | ● | ● | ||||||
| Is too soft | ● | ● | ● | ● | ● | ● | ● | ||||||||
| Has odor | ● | ● | |||||||||||||
| Badly burned | ● | ● | ● | ● | |||||||||||
| Boiled over | ● | ● | ● | ● | ● | ● | ● | ● | |||||||
| Steam leaks from the place other than steam vent | ● | ||||||||||||||
| Warm rice | Has odor | ● | ● | ● | ● | ● | ● | ||||||||
| Is yellow | ● | ● | ● | ● | ● | ● | ● | ||||||||
| Hardened | ● | ● | ● | ● | ● | ● | |||||||||
| Warming temperature is too low | ● | ||||||||||||||
| Too much dew drops | ● | ● | ● | ||||||||||||
| Water overflowing while cooking | ● | ● | |||||||||||||
| Cannot operate with buttons | · Is it fully plugged? → Insert a plug into outlet· Isn't Warm light on? → Push and operate with buttons again | ||||||||||||||
| The cooker makes sounds when in use | · It may make clicking sound while cooking, soaking or warming. It is not malfunction.· Steam makes sound occasionally while cooking. It is not malfunction. | ||||||||||||||
| It has odor while cooking | · It may have odor after you purchased the product until you really cook for the first time. It will vanish as you use it. | ||||||||||||||
| Lid is impossible/hard to close | · Make sure there is not rice stuck to the rim of inner pot or inner lid.· Make sure lid heating plate is properly installed. → See p.13 | ||||||||||||||
■ After checking all the points above and you still experience problems, please contact the store Where you purchased the product.
■ If inner pot is deformed or its fluorine coating is damaged, please purchase new one.
■ If H1\~H7 shown on the LCD display, please contact the store where you purchased the product.
When a power failure occurs
① When a power failure occurs while cooking or warming rice, the Rice Cooker will stop working and the LCD display will go OFF. (nothing showing in the display)
② When power returns, a flashing “- --” mark will inform you that there was a power failure and the Rice Cooker had stopped.
③ The “- --” mark will disappear if you push the “OFF/WARM” button.
④ If the rice is not cooked yet, push "COOK" button to start cooking again.
⑤ If the rice is already cooked and you want to keep the rice warm, push "OFF/WARM" button once and warm light will turn on.
Note :
※1. When rice is not cooked well, check the LCD display every time. If “--” mark is flashing, Rice Cooker is functioning normally by signaling a power failure.
※2. In case of long period of power failure and when the temperature of rice is low, the “- -” mark may not appear.
Therefore, any time the rice is not cooked well, try cooking again.
flowchart
graph TD
    A["White Rice"] --> B["Sticky Rice"]
    B --> C["Brown Rice"]
    C --> D["HITACHI RZ-DA18Y"]
    D --> E["Menu Navigation"]
    E --> F["SUPER RAPID"]
    F --> G["Fuzzy Rice Cooker"]
    G --> H["COOK"]
    H --> I["TIMER/DOWN UP"]
    I --> J["UP/UP"]
    J --> K["OFF/WASM Group"]
    K --> L["STRAW/STEAM/LOW HIGH 4V"]
Specifications
| Model | RZ-DMA18Y | |
| Cooking capacity | 0.36 ~ 1.8 L | |
| Power supply | 220, 230, 240, 220-240 V AC | |
| Frequency | 50/60 Hz | |
| Power consumption | During cooking | 1000 W |
| During warming | 40 Wh* | |
| Cord length | 1.2 m | |
| Dimensions (Approximately) | Width | 30 cm |
| Depth | 38 cm | |
| Height | 27 cm | |
| Weight (Approximately) | 4.3 kg | |
| Safety system (Thermal fuse) | 152 °C | |
* The average power consumption per hour of keep warm at a room temperature of 25°C.
• Power consumption in Off status per hour is approximately 1 W.


- FUZZY RICE COOKER
- INSTRUCTION MANUAL
- Before Using
- Before Cooking Rice
- How to Cook Rice
- Maintenance
- About marks
- WARNING
- Mark example
- Parts Identification
- Operation Area
- Hints and tips for tasty rice
- To cook rice with good taste
- Measure rice correctly
- Clean rice quickly and adequately
- Stir rice after cooking
- Warming up the rice with good taste
- Avoid the followings in order to warm up the rice with good taste
- Small amount of rice
- Note
- Knowledge for Rice
- Water amount and different kinds of rice
- Why cooked rice is burned?
- Preparation for cooking
- Cooking time
- 2
- There are 2 cooking method selections as following:
- 3
- Stir the rice as soon as it is cooked and you hear the melody.
- Keeping warm
- Note for White rice cooking
- Note for Porridge cooking
- How to bake a cake
- How to Slow Cook
- How to steam (Sticky Rice and Other)
- How to use the Timer
- When you set the time to finish (Programmed Cooking)
- 1
- Tips
- Cleaning method for rice cooker model RZ-DMA18Y
- Body/Lid
- Rice Scoop/Measuring Cup/Steam Basket
- Steam Cap
- ■ How to attach
- Heating Plate Temperature Sensor
- Inner Lid
- Inner Pot
- Problems and Solutions
- When a power failure occurs
- Note :
- Specifications
Marque : HITACHI
Modèle : Fuzzy RZ-DMA18Y
Catégorie : Cuiseur à riz