HB-202CE - Machine à pain GOLDSTAR - Notice d'utilisation et mode d'emploi gratuit
Retrouvez gratuitement la notice de l'appareil HB-202CE GOLDSTAR au format PDF.

Questions des utilisateurs sur HB-202CE GOLDSTAR
0 question sur cet appareil. Repondez a celles que vous connaissez ou posez la votre.
Poser une nouvelle question sur cet appareil
Téléchargez la notice de votre Machine à pain au format PDF gratuitement ! Retrouvez votre notice HB-202CE - GOLDSTAR et reprennez votre appareil électronique en main. Sur cette page sont publiés tous les documents nécessaires à l'utilisation de votre appareil HB-202CE de la marque GOLDSTAR.
MODE D'EMPLOI HB-202CE GOLDSTAR
GoldStar
"Please visit our web page for other product information. http://www.lgeus.com"
Automatic Breadmaker
INSTRUCTIONS & COOKING GUIDE
MODEL : HB-202CE

natural_image
Breakfast table with heart-shaped jam, bread slices, and orange slices (no text or symbols visible)PLEASE READ THESE INSTRUCTIONS THOROUGHLY AND CAREFULLY BEFORE OPERATING THIS BREADMAKER
TABLE OF CONTENTS
IMPORTANT SAFEGUARDS....3
BEFORE YOUR FIRST USE ....4
SPECIFICATIONS....4
BREAD MACHINE INTRODUCTION....5
- Parts ....5
- Control Panel....5
- Program Specifications....6
CLEANING INSTRUCTIONS....7
INGREDIENTS 7
OPERATION....9
- Programming Bread ....9
- Programming Dough ....10
- Programming Cake....10
- Programming The Delay Timer (Bread or Dough)....11
- Baking Control (Bread) 11
BEFORE CALLING FOR SERVICE....12
- Questions and Answers....12
- Check List....13
COOKING GUIDE 14
IMPORTANT SAFEGUARDS
When using electrical appliances, basic safety precautions should always be followed to reduce the risk or fire, electric shock and injury to persons, including the following:
- Read all instructions before using this appliance.
- To protect against electric shock do not immerse cord, plug, or appliance in water or other liquid (see instructions for cleaning).
- Do not touch hot surfaces. Always use oven mitts when handling the hot bread pan or bread.
- Close supervision is necessary when this appliance is used near children.
- This appliance is not for use by children. Keep out of reach of children.
- Unplug from outlet when not in use and before cleaning. Allow to cool before attaching or removing parts.
- Avoid touching moving parts. Do not remove the bread pan or insert hand into the bread pan during operation. Stop pad must be pressed if bread pan is to be removed before completion.
- Do not operate the appliance with a damaged cord or plug, or after the appliance malfunctions, or has been dropped or damaged in any manner. Return appliance to the nearest authorized service facility for examination, repair, electrical or mechanical adjustment.
- Do not use outdoors or while standing in damp area.
- Do not let cord hang over edge of table or counter or touch hot surfaces.
- Do not place on or near hot gas or electric burner or in a heated oven.
- To unplug with unit switched off, grip the plug and pull out from the wall outlet. Never pull on the cord.
- Do not use appliance for other than intended use.
- This product is intended for household use only.
- Do not clean with metal scouring pads. Pieces can break off the pad and touch electrical, creating a risk of electrical shock.
- Bread machine must be placed at least 4 inches (10.2 cm) from walls and edge of counter.
- Do not cover bread machine with anything which would prevent the steam escaping. This may cause warpage, discoloration, malfunction or even fire.
SAVE THESE INSTRUCTIONS
THIS PRODUCT FOR HOUSEHOLD USE ONLY.
CAUTION: A short power supply cord is provided to reduce the risk of personal injury resulting from becoming entangled in or tripping over a longer cord. Extension cords are available from local hardware stores and may be used if care is exercised in their use. If an extension cord is required, special care an caution is necessary. Also the cord must be: (1) marked with an electrical rating of 125 V, and at least 13 A., 1625 W., and (2) the cord must be arranged so that it will not drape over the countertop or tabletop where it can be pulled on by children or tripped over accidentally.
ELECTRIC POWER : If electric circuit is overloaded with other appliances, your bread machine may not operate properly. The bread machine should be operated on a separate electrical circuit from other operating appliances.
POLARIZED PLUG : This appliance has a polarized plug, (one blade is wider than the other). As a safety feature to reduce the risk of electrical shock, this plug is intended to fit in polarized outlet only one way. If the plug does not fit fully into the outlet, reverse the plug. If it still does not fit, contact a qualified electrician. Do not attempt to defeat this safety feature.
BEFORE YOUR FIRST USE
Carefully unpack the bread machine and remove all packaging materials. To remove any dust that may have accumulated during packaging, Wipe the bread pan and kneading blade. Do not immerse. (See cleaning instruction on page 7.) Wipe the outside of the bread machine with a damp cloth. Do not use harsh or abrasive cleaners on any part of the bread machine.
Place the bread machine on a dry, stable surface away from burners and away from areas where cooking grease or water may splatter onto it.
Plug the bread machine into a 120V\~60Hz outlet
IMPORTANT SAFETY TIPS
- Unplug unit and allow to cool. Remove any flour, bread crumbs or other materials from the inside of the inner case using a damp sponge, cloth or a small, portable vacuum cleaner.
- The bread machine will bake up to a 2 pound loaf of bread. Do not put a larger quantity of ingredients into the bread pan than recommended. If you do so, the bread may not mix or bake correctly and the bread machine may be damaged. the maximum amount of flour to be used is as follows:
BAKE settings – approximately 4 cups
Prepackaged bread mixes – approximately 4 cups
DOUGH setting – approximately 4 14 cups
- Handle the bread pan with care. Remove the bread pan by pulling straight up in the handle. Do not turn or shake the bread pan while taking it out. If the bread pan is damaged or bent, the temperature sensor will not work properly. Handle hot bread pan using pot holders or oven mitts.
SPECIFICATIONS
| Power supply | 120 V ~ 60 Hz | |
| Power Consumption | Heater | 550 W |
| Kneading Motor | 100 W | |
| Dimension (W × D × H) | 350 × 230 × 350 mm | |
| Weight | Approx. 6.7kg | |
| Timer | 13 hours digital timer | |
| Cord | APPROX. 3' 3.4"(1.0M) | |
| Thermal Fuse | Main Heater Protector | 291°F / 144°C |
| Kneading Motor Protector | 248°F / 120°C | |
BREAD MACHINE INTRODUCTION
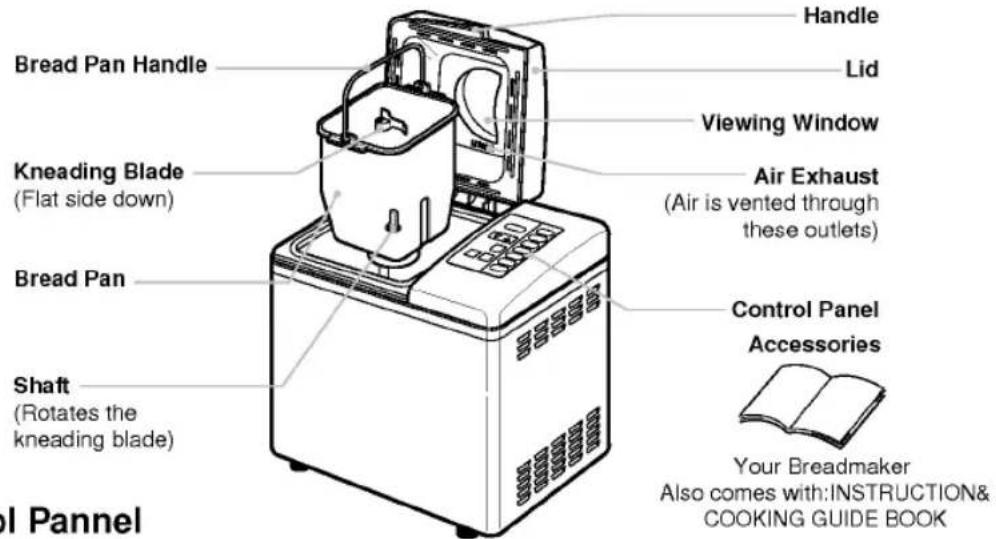
Parts
text_image
Handle Bread Pan Handle Lid Viewing Window Kneading Blade (Flat side down) Air Exhaust (Air is vented through these outlets) Bread Pan Control Panel Accessories Shaft (Rotates the kneading blade) Your Breadmaker Also comes with:INSTRUCTION& COOKING GUIDE BOOK I Pannel■ Control Pannel
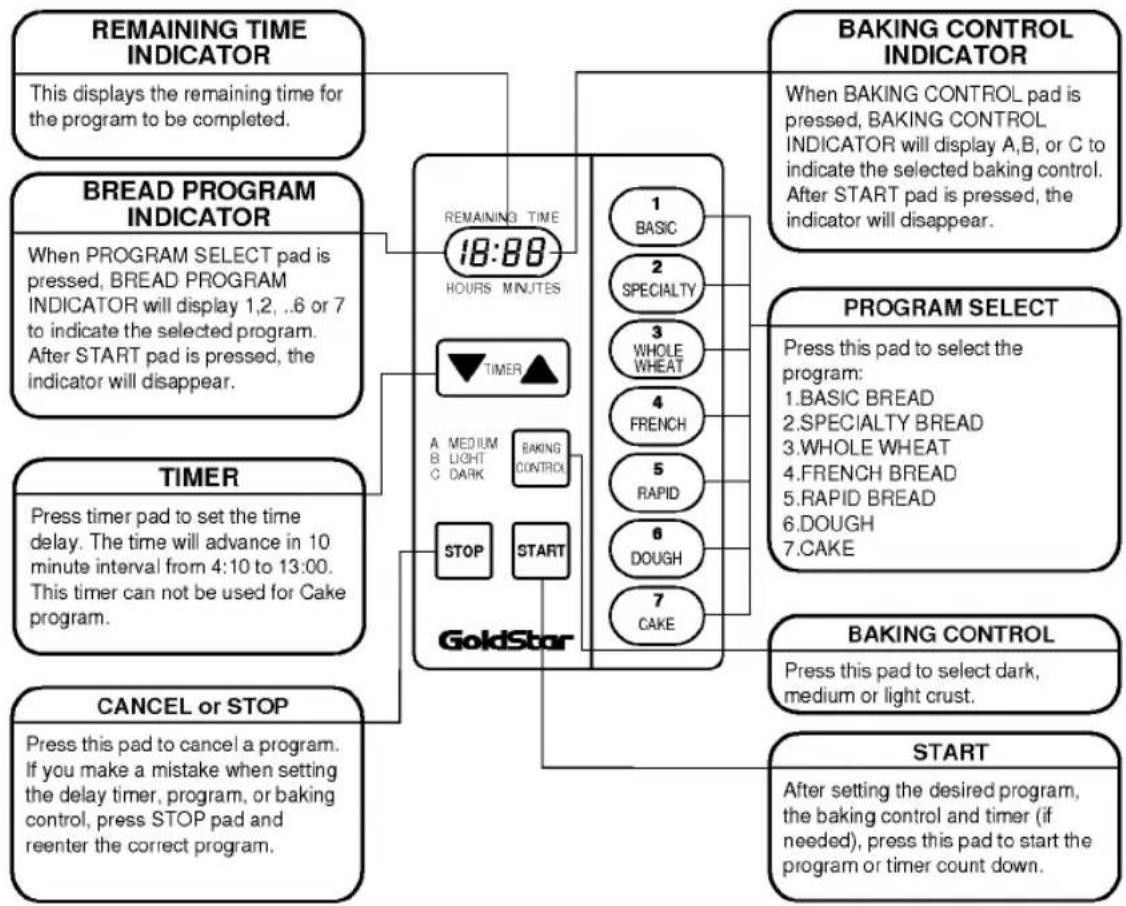
flowchart
graph TD
    A["Remaining Time Indicator"] --> B["18:88 Hours Minutes"]
    C["Bread Program Indicator"] --> D["TIMER"]
    E["TIMER"] --> F["STOP"]
    G["CANCEL or STOP"] --> H["STOP"]
    I["GoldStar"] --> J["START"]
    K["BAKING CONTROL INDICATOR"] --> L["1 BASIC"]
    K --> M["2 SPECIALTY"]
    K --> N["3 WHOLE WHEAT"]
    K --> O["4 FRENCH"]
    K --> P["5 RAPID"]
    K --> Q["6 DOUGH"]
    K --> R["7 CAKE"]
    S["Program Select"] --> T["Press this pad to select the program:"]
    U["BAKING CONTROL"] --> V["Press this pad to select dark, medium or light crust."]
    W["START"] --> X["After setting the desired program, the baking control and timer (if needed), press this pad to start the program or timer count down."]
NOTE : If you want to cancel the selected program, press the STOP pad for more than 1 second at any time during the cycle.
■ Program Specifications
| ProgramProcess | Basic | Specialty | Whole Wheat | French | Rapid | Dough | Cake |
| Timer Set | 4:10-13:00 | 4:10-13:00 | 4:10-13:00 | 4:10-13:00 | 4:10-13:00 | 4:10-13:00 | - |
| Pre-heat | - | - | 20 min | 20 min | - | - | - |
| 1st knead | 7 min | 7 min | 13 min | 13 min | 7 min | 6 min | - |
| Rest | 5 min | 5 min | 50 min | 50 min | 5 min | 5 min | - |
| 2nd knead | 12 min | 12 min | 12 min | 12 min | 7 min | 12 min | - |
| 1st rise | 40 min | 40 min | 20 min | 20 min | 13 min | 40 min | - |
| Punch/shape | 4 sec | 4 sec | 4 sec | 4 sec | 4 sec | 4 sec | - |
| 2nd rise | 26 min | 26 min | 15 min | 15 min | - | - | - |
| Punch/shape | 4 sec | 4 sec | 4 sec | 4 sec | - | - | - |
| 3rd rise | 60 min | 60 min | 40 min | 40 min | 52 min | - | - |
| Baking | 50 min | 50 min | 50 min | 50 min | 35 min | - | 60 min |
| Cool | 20 min | 20 min | 20 min | 20 min | - | - | 10 min |
| Hold Warm | 3 hours | 3 hours | 3 hours | 3 hours | 3 hours | - | 3 hours |
| End | End | End | End | End | End | End | End |
| TOTAL | 3:40 | 3:40 | 4:00 | 4:00 | 1:59 | 1:03 | 1:10 |
| - The Specialty Program contains an audible signal (8 beeps) which sounds 9 minutes before the end of second kneading. The display will show 3:25.The Whole Wheat Bread Program contains an audible signal (8 beeps) which sounds 9 minutes before the end of the second kneading. The display will show 2:34.The French Bread Program contains an audible signal (8 beeps) which sounds 9 minutes before the end of the second kneading. The display will show 2:34.The Rapid Program contains an audible signal (8 beeps) which sounds 5 minutes before the end of second kneading. The display will show 1:45.This signal tells you to add the additional ingredients (i.e. raisin, nuts, or vegetables, etc.) required in the specialty bread recipes.- The beeper sounds 8 times at the end of cooling process to indicate the bread is done. | |||||||
CLEANING INSTRUCTIONS
CLEANING (Always unplug unit)
ANY SERVICING REQUIRING DISASSEMBLY, OTHER THAN THE CLEANING DESCRIBED BELOW, SHOULD BE PERFORMED BY AN AUTHORIZED SERVICE REPRESENTATIVE.
- Avoid using any cleaning agent other than dish detergent.
- Do not use steel wool or other abrasive materials.
- Do not wash the removable any parts in the dishwasher.
- Do not immerse the bread pan in water. Wipe clean with a damp cloth, then dry thoroughly. otherwise the kneading process will not operate or noise will be occurred during kneading.
- Wipe the shaft with a soft cloth or sponge to prevent damage to the seal packing.
- Allow to dry before storing the pan inside the bread machine.
- It is not necessary to remove the kneading blade for cleaning. But if you wish to, it must be removed after each use.
- Wipe the exterior with a damp dishcloth after each use. Do not immerse in or splash with water.
• After using, cool and wipe out the oven interior with a damp dishcloth or plastic scouring pad.
• To remove, the kneading blade fill the pan with hot soapy water and allow it to soak for 20 minutes. Wash it with a soft brush or cloth and dry thoroughly.

text_image
SHAFT SEAL PACKING
text_image
KNEADING BLADE- Do not use metal utensils inside the machine. They will damage the non-stick coating. If the bread sticks to the lid, use a plastic pancake turner to clean.
NOTE : The non-stick coating may change color over time. This is caused by moisture and steam and in no way affects performance.
STORING
- Be sure bread machine is completely cooled before storing.
- All removable parts should be thoroughly cleaned and dried.
- Store bread machine with lid closed.
INGREDIENTS
Measure accurately for successful bread machine bread loaves. Mis-measuring, even slightly, can make a big difference in your results. Measure each ingredient precisely before placing it into the bread pan.
- To measure liquids, use a clear glass or plastic liquid measuring cup. Read the measurement at eye level.
- To measure flour, spoon into a standard dry ingredient measuring cup and level with a straight edge. Do not sift flour or pack in measuring cup.
- Use standard measuring spoons and level with a straight edge.

text_image
1/4 CUP 1/3 CUP 1/2 CUP 1/2 tsp 1 tsp MEASURING CUP 1 CUP GRADUATED MEASURING CUPS 1 TBL GRADUATED MEASURING SPOONS■ Yeast is a live plant is the essence of yeast bread. When activated by warm liquid and fed by sugar or starch, yeast releases tiny bubbles of carbon dioxide gas, which makes dough rise. For best performance, yeast needs adequate amounts of liquid (at the right temperature) and other bread ingredients. Also, be sure to check the expiration date of the yeast you are using. Yeast products can be found in the baking or refrigerated section of the supermarket.
Active Dry Yeast or Bread Machine Yeast can be used in the GoldStar Automatic Breadmaker.
This can be purchased in small packets, jars, cans, or in bulk at a health food store. Cake yeast cannot be used. Because yeast can grind against itself and become very fine, it is packaged by weight and not by volume. A 14 oz. package of yeast contains approximately 2 14 level teaspoons of yeast. The activity of yeast will deteriorate when it is exposed to oxygen, moisture, or warmth.
Therefore, yeast needs to be stored airtight, refrigerated or frozen. Yeast is granular and comes to room temperature very quickly. Be sure to check the expiration date on the yeast since aged yeast usually performs poorly. Measure yeast accurately for best results and follow the quantities given in each individual recipe.
■ Flour: Bread Flour is Essential
All types of flour are affected by many factors, such as milling grades, moisture content, length of storage, and manufacturing processes. adjustments to the recipes may need to be made to compensate for climatic changes in different regions to ensure an excellent loaf.
Bread flour is a definite necessity. Milled from hard winter or spring wheat, it has a higher protein content that makes it more durable than all-purpose flour. The protein, when mixed with liquid, becomes gluten. When kneaded, gluten becomes elastic and gives the breads better structured contrast, all-purpose flour, milled from a combination of soft and hard wheat, becomes elastic too easily for use in a bread machine and quickly loses its ability to stretch well. As a result, bread made from all-purpose flour will be small and dense. Several well known mills now market bread flour. It is labeled bread flour on the package and is available at grocery stores.
■ Sweeteners provide food for the yeast to work. Sweeteners, including sugar, honey and molasses, also add flavor and help the crust to brown. Sweeteners vary in flavor intensity and dissolving rate and may cause the dough to mix differently when substituted. Artificial sweeteners are not recommended for yeast baling because they do not feed the yeast like regular sweeteners do.
■ Salt helps control yeast growth to prevent overriding, which is cause the bread to collapse. Salt also adds flavor to breads.
■ Fat such as shortening, margarine, butter or oil, adds tenderness and flavor to breads.
■ Liquids: Activate The Yeast And Bind The Dough
"Liquid" means all the wet ingredients used in the recipe. When yeast is used in a bread machine, the liquid temperature must be 80^ / 27^ . With this temperature, the yeast activates gradually to accommodate the program of the machine. When higher temperatures are used, not only does the yeast activate too quickly, but also the entire dough becomes too warm.
When the machine is set on the delay timer, reduce the amount of liquid in most recipes by 1-2 teaspoons depending on the recipe and size or loaf.
Eggs are also considered part of the total liquid amount. Eggs need to be at room temperature. If taken directly from the refrigerator, place in a bowl of warm water to take off the chill before using.
DO NOT USE EGGS OR ANY PERISHABLE FOODS WITH THE DELAYED SETTING.
■ Programming Basic, Specialty, Whole Wheat, French, and Rapid Bread
- Open the lid and remove the bread pan. pull straight up, using the handle.
- Mount the kneading blade on the shaft.
- Place all ingredients in the bread pan. Make sure not to omit any ingredients.

text_image
YEAST DRY INGREDIENTS WATER OR LIQUIDSNOTE: Particularly when using the timer, add the yeast on top of the flour and away from the liquid. This is critical for good results.
- Place the bread pan in the bread maker.
- Close the lid slowly and tightly using the handle. Plug in the breadmaker.
-
Select the desired Program and Baking Control(light, medium, or dark crust). The program and baking control indicator should light up in the display window.
-
Press the START pad.
Notice that the time left for the bread to be finished is displayed 3:40 and counts down(1:59 for Rapid Bread). For the Whole Wheat and the French cycle, the time displayed will be 4:00 and the first 20 minutes will be pre-heat time to warm the ingredients and allow the flour time to absorb water.
NOTE: For the Specialty program, about 15 minutes from the start(and 9 minutes before the second kneading is finished), 8 beeps indicate the time to add any additional ingredients, such as raisins, nuts, cheese, etc. The indicator panel will show 3:25.
For the Whole Wheat and the French program, about 1 hour and 26 minutes from the start (and 9 minutes before the second kneading is finished), 8 beeps indicate the time to add any additional ingredients such as raisins, nuts, etc. The indicator panel will show 2:34.
For the Rapid program, about 14 minutes from the start(and 5 minutes before the second kneading is finished), 8 beeps indicate the time to add any additional ingredients such as raisins, nuts, etc.
The indicator panel will show 1:45 Open the lid and add ingredients quickly and evenly over the dough. Opening the lid at this time will not stop the kneading, so be careful. Close the lid. The unit will continue through the remaining stages automatically.
CAUTION: Do not touch the breadmaker, because it is very hot during baking. Do not open the lid during the rise or bake cycles.
Heat will escape and final result may be affected.
- The beeper will sound 8 times indicating the bread is done and cooled. After bread is done if you do not take the bread out of the breadmaker immediately, the bread is kept warm for 3 hours, [:H]is displayed. After 3 hours, [END]is displayed.
The Rapid, Dough, and Cake programs do not have the cool feature. The Dough program dose not have the hold-warm feature.
NOTE: The beeper sounds 4 times when baking is complete. Cooling then begins. If you want to
serve bread that has just been baked, press the STOP pad and remove the bread pan. (Be sure to use oven mitts, because the pan is very hot.) Dissipate heat by placing a towel or other cloth under the bread before cutting. Turn the loaf on its side and with a serrated knife.
-
Press the STOP pad and remove the bread pan using oven mitts.
-
Turn the Bread Pan several times to release the bread.
Place the bread on a wire rack to cool and allow the sream to escape. Be sure to remove the kneading blade from the blade.
CAUTION: The bread pan, kneading blade, and bread will be very hot.
Always unplug the breadmaker after each use.
■ Programming Dough
F( )H  | 1. First choose a recipe from the Recipe Section and add all ingredients in the pan. Place pan into machine close the lid. |
| 2. Press the Dough pad | |
| 3. Press START pad. The REMAINING TIME displays 1:03 and the breadmaker will start to knead. | |
| 4. After an hour and 3 minutes, the beeper will sound indicating it is time to remove the dough. | |
| 5. Follow your recipe direction for completing the dough. |
■ Programming Cake
The Delay Timer cannot be used for the cake program.
| [F (TATG)] | 1. This machine makes delicious SNACK CAKES. |
| 2. Prepare the cake mix according to the directions on the box if using a commercial cake mix. Otherwise, follow the recipe in this manual, If you use a cake mix, we recommend a 6-ounce package. You should put only half of the batter in the bread pan. If you put too much batter in the bread pan, the cake will be raw on the inside. | |
| 3. Press CAKE, then press START. The cake will be done in 1 hour and 10 minutes. | |
| 4. Frost if desired, or enjoy as is. | |
| 5. Remember, the cake will be smaller than a loaf of bread because cake does not contain yeast to make it rise. |
■ Programming The Delay Timer (Bread or Dough)
| Set the program and crust color. Before pressing START, set the timer for however long you want to wait before the bread is done. 4:10 to 13 hours. | ||
| EXAMPLE : It is 9:00 p.m. now. The bread is to be ready at 6:30 a.m. the next morning.Set the timer for 9:30, because there are 9 hours and 30 minutes between 9:00 p.m. and 6:30 a.m. | ||
 | 1. When pressed, the time will advance in 10 minute increments. | NOTE : The bread machine will start when the timer reaches the time of the pro-gram selected. |
 | 2. When constant pressure is applied to the pad, the time will advance quickly. | |
 | 3. Press the START pad. The timer is set, and the colon blinks. After one minute, 9:29 is displayed, and the timer continues to count down in 1 minute increments. |  |
■ Baking Control (Bread)
| The Baking Control function is used to select the color of the crust. It can be baked medium, light or dark. It is not necessary to press the control when medium is desired. | |
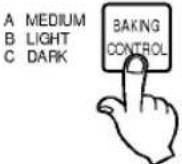 | The Baking Control function will advance as the pad is pressed. |
POWER OUTAGE
If your bread machine loses power before the second rise, you can try starting the machine at the beginning of the cycle again. This may not always produce an acceptable loaf. If you are not sure when the outage occurred, remove the dough ball from the bread pan and place in an oven-safe baking container. Allow to double in size and place in a preheated 350° oven for 30-45 minutes or until done.
The bread should hollow when tapped on the top of the loaf after done.
If the bread has already begun to bake when the outage occurs, you must begin with new ingredients.
BEFORE CALLING FOR SERVICE
■ Questions and Answers
| Questions | Answers |
| 1 Why does the height and shape of bread differ in each loaf? | The height and shape of bread may differ depending on the ingredients, room temperature and length of the timer cycle. Also accurate measurement of ingredients is essential to make delicious bread. |
| 2 The bread has an unusual aroma. Why? | Stale ingredients may have been used or top much yeast may have been used. Always use fresh ingredients. Accurate measurements are essential to make delicious bread. |
| 3 The kneading blade comes out with the bread. | This can happen as the kneading blade is detachable. Use a non-metal utensil to remove it.Caution : The kneading blade will be hot. |
| 4 The bread has a floured corner. | Sometimes flour in the corner of the bread pan may not have been completely kneaded into the dough. Scrape it off with a knife. |
| 5 Why can the timer not be set for more than 13 hours? | Longer delay times could alter the baking results. |
| 6 Can ingredients be halved or doubled? | No. If there is too little in the bread pan, the kneading blade cannot knead well enough. If there is too much, bread swells out of the bread pan. |
| 7 Can fresh milk be used in place of dry milk? | Yes. Be sure to deduct the same measurement of water to equal liquid substitution. Fresh milk is not recommended when using the timer, because it may spoil while sitting in the bread pan. |
Check List
| BAKING RESULTS:Please check the following: | Breadmaker does not operate | Smoke emitted from steamvent. Burning smell | Sides of bread collapse and bottom is damp | Bread rises too much | Collapsed after over-rising | Bread doesn't rise enough | Unleavened or not leavened enough | Underbaked | Slices unevenly and is sticky | ||||||
| Top of bread floured | Underbrowned | Browned and floured sides, and raw | Sides flour coated bottom | ||||||||||||
| OPERATIONAL ERRORS | Unplugged | ○ | |||||||||||||
| Oven area is too hot (display H1). | ○ | ||||||||||||||
| Ingredients spilled on heating element | ○ | ||||||||||||||
| CANCEL pad was pressed after starting | ○ | ○ | |||||||||||||
| Top lid was open during operation | ○ | ||||||||||||||
| Program selection was wrong (Dough mode was chosen) | ○ | ||||||||||||||
| Bread left in bread pan too long after baking | |||||||||||||||
| Bread sliced just after baking (Steam was not allowed to escape) | ○ | ○ | |||||||||||||
| Water added after kneading flour | ○ | ||||||||||||||
| Kneading blade not installed properly in pan | ○ | ||||||||||||||
| INGREDIENT PROBLEMS | MEASUREMENT ERRORS | Water | Not enough | ○ | |||||||||||
| Too much | ○ | ||||||||||||||
| Yeast | Not enough | ○ | |||||||||||||
| Too much | ○ | ○ | |||||||||||||
| No yeast | ○ | ||||||||||||||
| Flour | Not enough | ○ | |||||||||||||
| Too much | ○ | ○ | ○ | ||||||||||||
| No sugar or molasses | ○ | ||||||||||||||
| Ingredients used other than prescribed | ○ | ○ | |||||||||||||
| Flour | Old flour used | ○ | |||||||||||||
| Wrong type of flour used | ○ | ○ | |||||||||||||
| Yeast | Yeast touched water before kneading | ○ | |||||||||||||
| Old yeast used | ○ | ||||||||||||||
| Wrong type of yeast used | ○ | ||||||||||||||
| Temperature of water either too hot or too cold | ○ | ||||||||||||||
COOKING GUIDE
INDEX
BREADS
WHITE BREAD 16
BUTTERMILK BREAD 16
CINNAMON RAISIN BREAD 17
CORN BREAD 17
DILL BREAD 17
EGG BREAD 18
FRENCH BREAD 18
HONEY GRANOLA BREAD 18
LIGHT RYE BREAD 19
LIMPA BREAD 19
MILK BREAD 19
OATMEAL BREAD 20
ONION BREAD 20
ORANGE BREAKFAST BREAD 20
POPPY BREAD 21
POTATO BREAD 21
PUMPERNICKEL BREAD 21
HOLIDAY BREAD 22
SESAME BREAD 22
SQUAW BREAD 22
RYE BREAD 23
WHOLE WHEAT BREAD 23
WHOLE WHEAT BREAD WITH GLUTEN 23
DOUGHS
BAGELS 24
BUTTERMILK ROLLS 25
CHEEZY MONKEY BREAD 26
CINNAMON ROLLS 26
DINNER ROLLS 27
PIZZA DOUGH 27
CAKES
CHOCOLATE SNACK CAKE 28
COCONUT SNACK CAKE 28
RISE AND SHINE COFFEE CAKE 29
GINGER MOLASSES SNACK CAKE 29
POPPY SEED SNACK CAKE 30
LOAF OF GOLD SNACK CAKE 30
QUICK BANANA BREAD 31
WHITE CAKE 31
PREPARED CAKE, CORN BREAD AND MUFFIN MIXES 31
GENERAL ADVICE
- BE SURE you select the right program for your breadmaker! Measure ingredients carefully! Follow the recipe directions!
- Be sure to set controls correctly.
- Use Bread Flour instead of Regular Flour for better result.
- Don't use fresh dairy products when you use the timer delay. Something could spoil.
- Don't try to halve or double a recipe. It won't work.
- You may have to adjust the recipes slightly to account for variables, such as altitude, humidity, moisture content of your flour, etc.
- In the event your bread doesn't turn out to please you, see the suggestions, solutions, and troubleshooting chart in the owner's manual.
* Be sure to keep the Bread Machine Yeast fresh.
* Experimentation regarding yeast amounts may be necessary due to altitude variations or different types of yeast.
* 1TBL = 1Tablespoon = 15ml 1 tsp = 1 Teaspoon = 5ml
BREADS
WHITE BREAD
WHITE BREAD
| Ingredients | 1 lb. | 1^1/2 lb. | 2 lb. |
| Water | 3^3/_4 cup + 2 TBL | 1^1/4 cup | 1^1/2 cup |
| Bread Flour | 2 cups | 3^1/3 cups | 4^1/3 cups |
| Salt | 1 tsp | 1^1/2 tsp | 2 tsp |
| Sugar | 1^1/2 TBL | 2 TBL | 2^1/2 TBL |
| Nonfat Dry Milk | 1 TBL | 2 TBL | 3 TBL |
| Butter | 1 TBL | 2 TBL | 2 TBL |
| Bread Machine Yeast | 1 tsp | 1^1/2 tsp | 2 tsp |
| Program | 1A | 1A | 1A |
Method
- Remove bread pan and place kneading blade on shaft in bread pan.
- Place ingredients in order listed.
- Insert straight bread pan in machine.
- Press "BASIC" pad.
- Using baking control, select crust color. "MEDIUM" is recommended for first loaf.
- Press "START".
- At the end of cycle, remove bread using oven mitt.
BUTTERMILK BREAD
BUTTERMILK BREAD
| Ingredients | 1 12 lb. | 2 lb. |
| Buttermilk | 1 14 cup | 1 12 cup + 1 TBL |
| Bread Flour | 3 cups | 4 14 cups |
| Salt | 1 tsp | 1 12 tsp |
| Sugar | 3 TBL | 3 TBL |
| Baking Soda | 14 tsp | 12 tsp |
| Bread Machine Yeast | 1 12 tsp | 1 34 tsp |
| Program | 1A | 1A |
CINNAMON RAISIN BREAD
CINNAMON RAISIN BREAD
| Ingredients | 1 lb. | 1^1/2 lb. | 2 lb. |
| Water | 3/4 cup | 1 cup + 1 TBL | 1^1/4 cup |
| Bread Flour | 2 cups | 3 cups | 4^1/4 cups |
| Salt | 3/4 tsp | 1 tsp | 1 tsp |
| Brown Sugar | 2 TBL | 3 TBL | 3 TBL |
| Nonfat Dry Milk | 1 TBL | 2 TBL | 2 TBL |
| Butter | 1 TBL | 1^1/2 TBL | 2 TBL |
| Cinnamon | 1 tsp | 2 tsp | 1 TBL |
| Bread Machine Yeast | 1^1/4 tsp | 1^1/2 tsp | 1^3/4 tsp |
| Walnuts* | 1/4 cup | 1/3 cup | 1/2 cup |
| Raisin* | 1/4 cup | 1/3 cup | 1/2 cup |
| Program | 2A | 2A | 2A |
* add at the beep
CORN BREAD
CORN BREAD
| Ingredients | 1 12 lb. | 2 lb. |
| 1Egg Plus Enough | 1 cup | 1 cup + 2 TBL |
| Water to Equal | ||
| Bread Flour | 3 cups | 4 cups |
| Corn Meal | 12 cup | 34 cup |
| Salt | 1 tsp | 112 tsp |
| Nonfat Dry Milk | 112 TBL | 2 TBL |
| Vegetable Oil | 3 TBL | 3 TBL |
| Lemon Juice | 1 tsp | 112 tsp |
| Honey | 3 TBL | 3 TBL |
| Bread Machine Yeast | 112 tsp | 2 tsp |
| Program | 1A | 1A |
DILL BREAD
DILL BREAD
| Ingredients | 1 lb. | 1^1/2 lb. | 2 lb. |
| Water | 3/4 cup | 1 cup + 2 TBL | 11/2 cup |
| Bread Flour | 2 cups | 3 cups | 41/3 cups |
| Salt | 1 tsp | 11/2 tsp | 2 tsp |
| Sugar | 2 TBL | 3 TBL | 31/2 TBL |
| Nonfat Dry Milk | 2 TBL | 2 TBL | 3 TBL |
| Butter | 1 TBL | 11/2 TBL | 2 TBL |
| Dried Dill Weed | 2 tsp | 1 TBL | 1 TBL |
| Dried Minced Onion | 2 tsp | 1 TBL | 1 TBL |
| Bread Machine Yeast | 2 tsp | 2 tsp | 2 tsp |
| Program | 5C | 5C | 5C |
EGG BREAD
EGG BREAD
| Ingredients | 1 12 lb. | 2 lb. |
| 1Egg Plus Enough | 1 cup + 2 TBL | 1 12 cup |
| Water to Equal | ||
| Bread Flour | 3 cups | 4 13 cups |
| Salt | 1 12 tsp | 1 12 tsp |
| Sugar | 2 TBL | 2 12 TBL |
| Nonfat Dry Milk | 2 TBL | 3 TBL |
| Butter | 1 12 TBL | 1 12 TBL |
| Bread Machine Yeast | 2 tsp | 2 14 tsp |
| Program | 5A | 5A |
FRENCH BREAD
FRENCH BREAD
| Ingredients | 1 lb. | 1^1/2 lb. | 2 lb. |
| Water | 3/4 cup + 2 TBL | 1 cup + 2 TBL | 1^1/2 cup + 1 TBL |
| Bread Flour | 2 cups | 3 cups | 4^1/3 cups |
| Salt | 1 tsp | 1^1/2 tsp | 2 tsp |
| Sugar | 1 TBL | 1^1/2 TBL | 2^1/2 TBL |
| Bread Machine Yeast | 1^1/4 tsp | 2 tsp | 2^1/4 tsp |
| Program | 4A | 4A | 4A |
HONEY GRANOLA BREAD
HONEY GRANOLA BREAD
| Ingredients | 2 lb. |
| Water | 1^1/2 cups |
| Bread Flour | 2^1/2 cups |
| Whole Wheat Flour | 1^1/2 cup |
| Granola | 1 cup |
| Nonfat Dry Milk | 2 TBL |
| Salt | 2 tsp |
| Honey | 1/4 cup |
| Butter | 3 TBL |
| Bread Machine Yeast | 2 tsp |
| Chopped Walnuts* | 1/2 cup |
| Program | 2A |
* add at the beep
LIGHT RYE BREAD
LIGHT RYE BREAD
| Ingredients | 2 lb. |
| Water | 1 13 cup |
| Bread Flour | 3 cups |
| Rye Flour | 1 14 cup |
| Corn Meal | 13 cup |
| Nonfat Dry Milk | 2 TBL |
| Salt | 2 tsp |
| Brown Sugar | 14 cup |
| Butter | 2 TBL |
| Caraway Seeds | 2 TBL |
| Bread Machine Yeast | 2 14 tsp |
| Program | 3A |
LIMPA BREAD
LIMPA BREAD
| Ingredients | 2 lb. |
| Water | 1 cup |
| Bread Flour | 2 cups |
| Rye Flour | 1 cup |
| Cocoa | 1 TBL |
| Brown Sugar | 2 TBL |
| Salt | 1 tsp |
| Vegetable Oil | 2 TBL |
| Molasses | 2 TBL |
| Orange Rind | 1 TBL |
| Anis Seed | 1 tsp |
| Caraway Seed | 1 tsp |
| Bread Machine Yeast | 1^3/_4 tsp |
| Program | 1A |
MILK BREAD
MILK BREAD
| Ingredients | 1 12 lb. | 2 lb. |
| Milk | 1 14 cup | 1 12 cup + 3 TBL |
| Bread Flour | 3 14 cups | 4 13 cups |
| Salt | 1 12 tsp | 2 tsp |
| Sugar | 1 12 TBL | 2 12 TBL |
| Bread Machine Yeast | 1 34 tsp | 2 14 tsp |
| Program | 1A | 1A |
OATMEAL BREAD
OATMEAL BREAD
| Ingredients | 2 lb. |
| Water | 1^1/2 cup + 1 TBL |
| Bread Flour | 4 cups |
| Salt | 2 tsp |
| Butter | 2 TBL |
| Nonfat Dry Milk | 2 TBL |
| Old Fashioned Oats | 1 cup |
| Bread Machine Yeast | 2 tsp |
| Program | 1A |
ONION BREAD
ONION BREAD
| Ingredients | 2 lb. |
| Water | 1 14 cup |
| Whole Wheat Flour | 4 13 cups |
| Brown Sugar | 3 TBL |
| Butter | 3 TBL |
| Instant Onion Soup-(1 Oz PACKAGE) | 1 PACKAGE |
| Bread Machine Yeast | 2 14 tsp |
| Program | 5A |
ORANGE BREAKFAST BREAD
ORANGE BREAKFAST BREAD
| Ingredients | 2 lb. |
| Water | 1 12 cup |
| Bread Flour | 4 13 cups |
| Sugar | 1 12 TBL |
| Salt | 2 tsp |
| Nonfat Dry Milk | 3 TBL |
| Butter | 3 TBL |
| Orange Marmalade | 13 cup |
| Lemon Juice | 3 TBL |
| Orange Peel | 2 tsp |
| Lemon Peel | 2 tsp |
| Bread Machine Yeast | 2 14 tsp |
| Program | 5C |
POPPY BREAD
POPPY BREAD
| Ingredients | 2 lb. |
| Water | 1 13 cup |
| Bread Flour | 4 cups |
| Nonfat Dry Milk | 2 TBL |
| Salt | 2 tsp |
| Vegetable Oil | 2 TBL |
| Honey | 3 TBL |
| Lemon Peel | 3 TBL |
| Poppy Seed | 13 cup |
| Lemon Flavoring | 1 12 tsp |
| Bread Machine Yeast | 1 34 tsp |
| Program | 5C |
POTATO BREAD
POTATO BREAD
| Ingredients | 2 lb. |
| Water | 1 14 cup |
| Vegetable Oil | 3 TBL |
| Lemon Juice | 2 TBL |
| Bread Flour | 4 13 cups |
| Instant Potatoes | 12 cup |
| Salt | 2 tsp |
| Sugar | 14 cup |
| White Pepper | 12 tsp |
| Dried Green Onions | 2 TBL |
| Bread Machine Yeast | 2 tsp |
| Program | 5C |
PUMPERNICKEL BREAD
PUMPERNICKEL BREAD
| Ingredients | 2 lb. |
| Water | 1^3/_4 cup |
| Bread Flour | 1^1/_2 cup |
| Whole Wheat Flour | 1^1/_3 cup |
| Rye Flour | 1^1/_2 cup |
| Salt | 2 tsp |
| Molasses | 1/_3 cup |
| Vegetable Oil | 2 TBL |
| Cocoa | 1/_4 cup |
| Instant Coffee | 1 tsp |
| Caraway Seeds | 2 TBL |
| Bread Machine Yeast | 2^1/_4 tsp |
| Program | 3A |
HOLIDAY BREAD
HOLIDAY BREAD
| Ingredients | 2 lb. |
| 1Egg Plus Enough Water To Equal | 1^3/_4 cup |
| Bread Flour | 4^1/_3 cups |
| Salt | 1^1/_2 tsp |
| Honey | 3 TBL |
| Nonfat Dry Milk | 3 TBL |
| Nutmeg | 1/_2 tsp |
| Vanilla | 2 tsp |
| All Bran Cereal | 1 cup |
| Bread Machine Yeast | 2^1/_4 tsp |
| Program | 5C |
SESAME BREAD
SESAME BREAD
| Ingredients | 2 lb. |
| Water | 1^1/2 cup |
| Bread Flour | 2^1/4 cups |
| Whole Wheat Flour | 2 cups |
| Honey | 3 TBL |
| Salt | 2 tsp |
| Sesame Oil | 3 TBL |
| Sesame Seed | 3^3/4 cup |
| Bread Machine Yeast | 2^1/2 tsp |
| Program | 3A |
SQUAW BREAD
SQUAW BREAD
| Ingredients | 2 lb. |
| Water | 1 13 cup |
| Bread Flour | 2 14 cups |
| Whole Wheat Flour | 1 12 cup |
| Rye Flour | 1 cup |
| Brown Sugar | 1 13 cup |
| Vegetable Oil | 3 TBL |
| Honey | 3 TBL |
| Salt | 2 tsp |
| Bread Machine Yeast | 2 tsp |
| Program | 1A |
RYE BREAD
RYE BREAD
| Ingredients | 1 12 lb. |
| Water | 1 cup + 2 TBL |
| Bread Flour | 2 34 cups |
| Rye Flour | 3/4 cup |
| Salt | 1 12 tsp |
| Nonfat Dry Milk | 2 TBL |
| Brown Sugar | 1/4 cup |
| Butter | 1 12 TBL |
| Cornmeal | 1/4 cup |
| Caraway Seeds | 2 TBL |
| Bread Machine Yeast | 2 tsp |
| Program | 3A |
WHOLE WHEAT BREAD
WHOLE WHEAT BREAD
| Ingredients | 1 lb. | 1^1/_2 lb. | 2 lb. |
| Water | 3/4 cup + 2 TBL | 1 cup + 3 TBL | 1^1/_2 cup + 1 TBL |
| Whole Wheat Flour | 2 cups | 3 cups | 4 cups |
| Salt | 1 tsp | 1^1/_2 tsp | 1^1/_2 tsp |
| Brown Sugar | 2 TBL | 1/4 cup | 1/3 cup |
| Nonfat Dry Milk | 1 TBL | 2 TBL | 3 TBL |
| Butter | 1 TBL | 2 TBL | 2 TBL |
| Bread Machine Yeast | 1^1/_2 tsp | 2^1/_4 tsp | 2^1/_2 tsp |
| Program | 3A | 3A | 3A |
WHOLE WHEAT BREAD WITH GLUTEN
WHOLE WHEAT BREAD WITH GLUTEN
| Ingredients | 1 lb. | 1 12 lb. | 2 lb. |
| Water | 3/4 cup + 2 TBL | 1cup | 1 12 cup + 1 TBL |
| Whole Wheat Flour | 2 cups | 3 14 cups | 4 cups |
| Salt | 1 tsp | 1 12 tsp | 1 12 tsp |
| Brown Sugar | 2 TBL | 3 TBL | 1/3 cup |
| Nonfat Dry Milk | 1 TBL | 2 TBL | 3 TBL |
| Butter | 1 TBL | 2 TBL | 2 TBL |
| Gluten | 1 12 tsp | 2 tsp | 2 tsp |
| Bread Machine Yeast | 1 12 tsp | 1 34 tsp | 2 tsp |
| Program | 3A | 3A | 3A |
DOUGHS
NOTE : These recipes were developed in USA, using American flour and ingredients. Use dry yeast.
BAGELS
BAGELS
| Ingredients | Amount |
| Water | 1 14 cup |
| Bread Flour | 4 cups |
| Salt | 2 tsp |
| Sugar | 3 TBL |
| Yeast | 2 12 tsp |
- Remove bread pan and place kneading blade on shaft in bread pan.
- Place ingredients in bread pan in order listed. Insert straight bread pan in machine. Close lid.
- Select #6 on PROGRAM SELECT.
- Press Start.
- When dough has completed its cycle, remove it from bread machine. Place in a well oiled bowl and let rise until double in size.
- Form dough into about 18.2-inch in diameter balls. Flatten the balls slightly and use your thumb or finger to punch a hole into the middle of each bagel.
- Place the bagels on a greased cookie sheet. Cover with a cloth and let rise for about 30 minutes, or until doubled in size.
- While bagels are rising, bring 2 quarts of water with 1 tablespoon of sugar to a boil. Adjust heat so water stays at slow, steady boil.
- Place bagels, one at a time, in boiling water. While water continues to boil, turn each bagel frequently and boil for 2 1/2 to 5 minutes. The longer you boil the bagel the chewier the crust will be.
- Drain Bagel well on a clean dish towel, turning once to drain both sides.
- Replace bagels on well greased cookie sheet, coated with cornmeal or flour.
- Brush each bagel with egg wash. Sprinkle with cornmeal, kosher salt, poppy seeds or minced garlic if desired.
- Place in 400°F(200°C) oven 20 to 25 minutes, or until golden brown.
BUTTERMILK ROLLS
BUTTERMILK ROLLS
| Ingredients | Amount |
| Butter Milk | 1^1/2 cups |
| Honey | 1/4 cup |
| Bread Flour | 2^1/4 cups |
| Whole Wheat Flour | 2 cups |
| Wheat Germ | 1/2 cup |
| Salt | 2 tsp |
| Baking Soda | 1/4 tsp |
| Butter | 4 TBL |
| Yeast | 2^1/2 tsp |
-
Remove bread pan and place kneading blade on shaft in bread pan.
-
Place ingredients in bread pan in order listed. Insert straight bread pan in machine. Close lid.
-
Select #6 on PROGRAM SELECT.
-
Press Start.
-
When dough cycle is complete, remove dough from inner pot and place in a lightly greased bowl; Covered, until doubled in size.
-
Divide into 24 pieces. Make into even sized balls, and place in a greased pan.
-
Let rise until doubled in size.
-
Bake in 375°F(190°C) oven for 12 to 15 minutes. Makes 24 rolls
CHEEZY MONKEY BREAD
CHEEZY MONKEY BREAD
| Ingredients | Amount | |
| Water plus 1 Egg to Equal | 1^1/3 cups | Topping : |
| Bread Flour | 4^5/8 cups | Parmesan cheese : 1/2 cup |
| Salt | 2 tsp | finely minced garlic : 1/4 cup |
| Sugar | 1/2 cup | melted butter : 3/4 cup |
| Butter | 8 TBL | |
| Yeast | 2^1/2 tsp | |
-
Remove bread pan and place kneading blade on shaft in bread pan.
-
Place ingredients in bread pan in order listed. Insert straight bread in machine. Close lid.
-
Select #6 on PROGRAM SELECT.
-
Press Start.
-
When dough cycle is complete, remove dough from inner pot and place in a lightly greased bowl; Covered, until doubled in size.
-
Divide into 18 equal sized pieces.
-
Combine Parmesan cheese and garlic. Dip dough in melted butter, roll in cheese-garlic mixture and arrange in layers in a greased pan, or 9 × 13-inch single layer. Cover and let rise until double.
-
Bake in preheated 350^ F(180°C) oven 45 minutes, or until golden brown. Serves 8.
CINNAMON ROLLS
CINNAMON ROLLS
| Ingredients | Amount | ||
| Water plus 1 Egg to Equal | 1^1/_4 cups | Filling : | Glaze : |
| Bread or All Purpose Flour | 4^1/_4 cups | butter, softened : 12 cupbrown sugar : 12 cupcinnamon : 3 TBLwalnuts, finely : 13 cupchoppedraisins(optinal) : 13 cup | powdered sugar : 23 cupmilk : 14 cupbutter, melted : 1 TBLvanilla : 1 tsp |
| Sugar | 12 cup | ||
| Salt | 2 tsp | ||
| Nonfat Dry Milk | 2 TBL | ||
| Butter | 5 TBL | ||
| Yeast | 2^1/_2 tsp | ||
-
Remove bread pan and place kneading blade on shaft in bread pan.
-
Place ingredients in bread pan in order listed. Insert straight bread pan in machine. Close lid.
-
Select #6 on PROGRAM SELECT.
-
Press Start.
-
When dough cycle is complete, remove dough from inner opt and place in a lightly greased bowl; Covered, until doubled in size.
-
Place on a lightly floured bread board and roll into a 16 × 24-inch rectangle. Spread with the softened butter. Combine remaining filling ingredients and sprinkle over butter. Poll-up jelly roll style and cut into 1-inch pieces.
-
Place in two greased 9 × 13-inch baking pan about 1/2-inch apart. Let stand in warm, draft-free place for about an hour, or until doubled in size.
-
Bake in preheated 350°F(180°C) oven for 25 to 30 minutes, or until golden brown.
-
Mix together Glaze ingredients until smooth and drizzle over top of warm rolls. Makes 18 rolls.
DINNER ROLLS
DINNER ROLLS
| Ingredients | Amount |
| Water plus Egg to Equal | 1 14 cups |
| Bread Flour | 4 14 cups |
| Salt | 2 tsp |
| Sugar | 14 cup |
| Nonfat Dry Milk | 4 TBL |
| Butter | 10 TBL |
| Yeast | 2 12 tsp |
- Remove bread pan and place kneading blade on shaft in bread pan.
- Place ingredients in bread pan in order listed. Insert straight bread pan in machine. Close lid.
- Select #6 on PROGRAM SELECT.
- Press Start.
- When dough cycle is complete, remove dough from inner pot and place in a lightly greased bowl; Covered, until doubled in size.
- Divide dough into 24 large or 36 medium size pieces and shape into balls. Place on baking sheet, and let stand in warm, draft-free place, about 45 minutes, until double in size.
- Bake in preheated 375^ F(190°C) oven for 20 to 25 minutes, or until golden brown. 24 rolls.
PIZZA DOUGH
PIZZA DOUGH
| Ingredients | Amount |
| Water | 1 cup |
| Bread Flour | 3 cups |
| Salt | 1 tsp |
| Sugar | 1 TBL |
| Olive Oil | 2 TBL |
| Yeast | 1^3/_4 tsp |
- Remove bread pan and place kneading blade on shaft in bread pan.
- Place ingredients in bread pan in order listed. Insert straight bread pan in machine. Close lid.
- Select #6 on PROGRAM SELECT.
- Press Start.
- When dough cycle is complete, remove dough from inner pot and press into 14-inch pizza pan, shaping edges of dough to form a ridge. If you have trouble making the dough reach the edge of the pan, let rest 10 minutes before reshaping.
- Let stand 20 minutes, before topping with your favorite pizza sauce and toppings.
- Bake in preheated 425°F(220°C) oven for 35 to 45 minutes, or until crust is golden brown. Makes 1 14-inch pizza.
CAKES
CHOCOLATE SNACK CAKE
CHOCOLATE SNACK CAKE
| Ingredients | Amount |
| Cake Flour | 1^1/2 cup |
| Salt | 1/2 tsp |
| Soda | 3/4 tsp |
| Sugar | 1 cup |
| Cocoa | 1/2 cup |
| Softened Shortening | 1/2 cup |
| Milk | 3/4 cup |
| Vanilla | 1 tsp |
| Vinegar | 1 TBL |
| Egg | 2 EA |
-
Spray bread pan with non-stick vegetable spray.
-
In a small size bowl, combine cake flour, salt, soda, sugar and cocoa.
-
In a medium size bowl, using an electric mixer, mix shortening to soften. Add eggs, mixing well. Add dry ingredients, 1/2 cup milk, vanilla and vinegar. Mix until dampened. Beat 2 minutes at low speed or if doing by hand beat 200 times, Add remaining milk and beat 1 minute longer, until light.
-
Pour batter into bread pan.
-
Set bread machine on "CAKE" cycle.
-
Push "START".
COCONUT SNACK CAKE
COCONUT SNACK CAKE
| Ingredients | Amount |
| All Purpose Flour | 1 12 cup |
| Salt | 14 tsp |
| Baking Powder | 1 tsp |
| Sugar | 12 cup |
| Butter | 14 cup |
| Egg | 2 EA |
| Milk | 13 cup |
| Coconut Flavoring | 1 tsp |
| Lemon Peel | 112 tsp |
| Shredded Coconut | 12 cup |
-
Spray bread pan with non-stick vegetable spray.
-
In a small bowl, combine the flour, salt and baking powder.
-
In a medium size bowl, with an electric mixer, combine butter, eggs and sugar. Mix until light. Alternately add flour mixture and milk until well mixed. Add coconut flavoring, lemon peel and shredded coconut, mixing well.
-
Pour batter into bread pan.
-
Set bread machine on "CAKE" cycle.
-
Push "START".
RISE AND SHINE COFFEE CAKE
RISE AND SHINE COFFEE CAKE
| Ingredients | Amount | |
| All Purpose Flour | 1^1/_2 cup | Topping : |
| Salt | 1/2 tsp | |
| Baking Powder | 1^1/_2 tsp | Flour : 1/3 cupBrown Sugar : 1/4 cupButter : 2 TBL |
| Sugar | 1/2 cup | |
| Softened Butter | 1/4 cup | Cinnamon : 2 tsp |
| Egg | 2 EA | |
| Milk | 1/2 cup | |
- Spray bread pan with non-stick vegetable spray.
- In a small size mixing bowl, combine flour, salt and baking powder.
- In a medium size bowl, mix sugar, butter, and egg thoroughly. Stir in milk, Slowly and the dry ingredients, stirring well. Batter will be thick.
- In a small bowl, combine topping ingredients until well mixed. Sprinkle half of the topping on the bottom of the bread pan. Pour in coffee cake batter. Sprinkle remaining on top.
- Set bread machine for "CAKE" cycle.
- Push "START".
GINGER MOLASSES SNACK CAKE
GINGER MOLASSES SNACK CAKE
| Ingredients | Amount |
| Brown sugar | 1/3 cup |
| Molasses | 1/3 cup |
| Vegetable Oil | 2 TBL |
| Egg, Lightly Beaten | 1 EA |
| Minced Crystallized Ginger | 1 TBL |
| Brandy Flavoring | 1^1/_2 tsp |
| All Purpose Flour | 1^3/_4 cup |
| Baking Powder | 1^1/_2 tsp |
| Baking Soda | 1/4 tsp |
| Ground Ginger | 1^1/_2 tsp |
| Ground White Pepper | 1/4 tsp |
| Boiling Water | 2/3 cup |
| Powdered Sugar | 2 tsp |
-
Spray bread pan with non-stick vegetable spray.
-
In a medium size bowl, combine sugar, molasses and oil. Beat at medium speed of electric mixer until smooth. Add egg and beat well. Add crystallized ginger and brandy flavoring, mixing well.
-
In a small bowl, combine flour, baking soda, ginger and white pepper. Add to molasses mixture alternately with boiling water. Mix well after each addition.
-
Pour batter into bread pan and place bread machine.
-
Set on "CAKE" cycle.
-
Push "START".
POPPY SEED SNACK CAKE
POPPY SEED SNACK CAKE
| Ingredients | Amount |
| All Purpose Flour | 1^1/2 cup |
| Salt | 1/4 tsp |
| Baking Powder | 1 tsp |
| Sugar | 1/2 cup |
| Vegetable Oil | 1/4 cup |
| Egg | 2 EA |
| Milk | 1/2 cup |
| Lemon Extract | 1 tsp |
| Orange Rind | 1 tsp |
| Poppy Seed | 1/3 cup |
-
Spray bread pan with non-stick vegetable spray.
-
In a small bowl, mix flour, salt and baking powder.
-
In a medium size bowl, using an electric mixer, combine sugar and vegetable oil, mixing until light. Add eggs and mix well. Alternately add flour mixture and milk until well mixed. Add lemon extract, orange rind and poppy seeds, mixing well.
-
Pour batter into bread pan.
-
Set machine on "CAKE" cycle.
-
Push "START".
LOAF OF GOLD SNACK CAKE
LOAF OF GOLD SNACK CAKE
| Ingredients | Amount |
| Flour | 1 14 cup |
| Salt | 14 tsp |
| Baking Powder | 1 tsp |
| Sugar | 23 cup |
| Butter | 14 cup |
| Egg | 2 EA |
| Milk | 23 cup |
| Vanilla | 2 tsp |
-
Spray bread pan with non-stick vegetable spray.
-
In a medium size bowl, combine flour, salt, baking powder and sugar. Add butter, egg, milk and vanilla. Beat on medium speed for 2 minutes or for 200 strokes by hand.
-
Pour batter into bread pan.
-
Place in bread machine and set on "CAKE" cycle.
-
Push "START".
QUICK BANANA BREAD
QUICK BANANA BREAD
| Ingredients | Amount |
| Sugar | 1/2 cup |
| Butter, Softened | 1 TBL |
| Egg | 1 EA |
| Milk | 1/2 cup |
| All Purpose Flour | 2/3 cup |
| Salt | 3/4 tsp |
| Baking Soda | 3/4 tsp |
| Medium Mashed Banana | 2 EA |
| Walnut | 1/3 cup |
-
Spray bread pan with non-stick vegetable spray.
-
In a medium size bowl, mix sugar, butter and egg thoroughly. Stir in milk. Blend dry ingredients together; stir into milk mixture. Blend in mashed bananas and walnuts.
-
Pour batter into bread pan.
-
Place in bread machine and set on "CAKE" cycle.
-
Push "START".
WHITE CAKE
WHITE CAKE
| Ingredients | Amount |
| Flour | 2/3 cup |
| Baking Powder | 1/2 tsp |
| Melted Butter | 1/4 cup |
| Sugar, Separated | 2/3 cup |
| Egg White | 3 EA |
| Egg Yolk | 3 EA |
| Salt | 1/2 tsp |
-
Spray bread pan with non-stick vegetable spray.
-
In a small bowl, combine flour and baking powder.
-
In a medium size bowl, using an electric mixer, beat the egg whites, slowing adding 1/3 cup sugar, 1 tablespoon at a time, until stiff.
-
In a small bowl, mix together the egg yolk, 1/3 cup sugar and salt. Alternately add to stiffened egg whites with flour mixture, mixing well.
-
Pour batter into bread pan.
-
Put into bread machine, setting "CAKE" cycle.
-
Push "START".
PREPARED CAKE, CORN BREAD AND MUFFIN MIXES
-
To make a 18-ounce to 20-ounce prepared cake mix, you must divide the dry mix in half. Prepare only half the box. Pour batter into bread pan sprayed with non stick vegetable spray. Set on "CAKE" cycle. Push "START".
-
To make a 6-ounce to 9-ounce prepared package mix, prepare according to package directions. Pour batter into bread pan sprayed with non stick vegetable spray. Set on "CAKE" cycle. Push "START".
GOLDSTAR BREADMAKER LIMITED WARRANTY
LG Electronics U.S.A., Inc. will repair or at its option replace, without charge, your product which proves to be defective in material or workmanship under normal use, during the warranty period listed below from the date of original purchase. This warranty is good only to the original purchaser of the product during the warranty period as long as it is in the U.S. including Alaska, Hawaii and U.S. Territories.
WARRANTY PERIOD:
| MODEL # | LABOR | PARTS | HOW SERVICE IS HANDLED |
| HB-020E | 1Year | 1Year | Call 1-800-243-0000, Option # 1 24 hrs a day, |
| HB-026E | 1Year | 1Year | 7 days per week, please have your product type |
| HB-036E | 1Year | 1Year | (monitor,tv, vcr) and zip code ready. |
| HB-152CE | 1Year | 1Year | |
| HB-202CE | 1Year | 1Year |
No other express warranty is applicable to this product. THE DURATION OF ANY IMPLIED WARRANTIES, INCLUDING THE IMPLIED WARRANTY OF MERCHANTABILITY, IS LIMITED TO THE DURATION OF THE EXPRESS WARRANTY HEREIN. LG ELECTRONICS U.S.A., INC. SHALL NOT BE LIABLE FOR THE LOSS OF THE USE OF THE PRODUCT, INCONVENIENCE, LOSS OR ANY OTHER DAMAGES, DIRECT OR CONSEQUENTIAL, ARISING OUT OF THE USE OF, OR INABILITY TO USE, THIS PRODUCT OR FOR ANY BREACH OF ANY EXPRESS OR IMPLIED WARRANTY, INCLUDING THE IMPLIED
WARRANTY OF MERCHANTABILITY APPLICABLE TO THIS PRODUCT.
Some states do not allow the exclusion or limitation of incidental or consequential damages or limitations on how long an implied warranty lasts; so these limitations or exclusions may not apply to you. This warranty gives you specific legal rights and you may also have other rights which vary from state to state.
THE ABOVE WARRANTY DOES NOT APPLY:
● To damages or problems which result from delivery or improper installation.
- To damages or problems which result from misuse, abuse, accident, alteration, or incorrect electrical current or voltage.
- To service calls, which do not involve defective workmanship or material, such as head cleaning and explaining the operation of the unit.
Therefore these costs are paid by the consumer.
CUSTOMER ASSISTANCE NUMBERS:
To Prove Warranty Coverage:
To Obtain Product, Customer or Service Assistance:
To Obtain Nearest Authorized Service Center, Parts Distributor or Sales Dealer:
→ Retain your Sales Receipt to prove date of purchase.
→ Copy of your Sales Receipt must be submitted at the time warranty service is provided.
→ Call 1-800-243-0000 (Mon-Fri 7am-7pm CST) Push appropriate menu code.
→ Call 1-800-243-0000, Push option # 1 24 hrs a day, 7 days per week, please have your product type (monitor,tv, vcr) and zip code ready.
