button to select a language.
If there is no database (scan result) in the portable DVB-T, it will start at Installation page when booting.
Set the country for Auto Scan, Manual Scan and Time Zone. Change the
Country Setting will automatically change the default Time Zone value
Country Setting also has default Frequency and Bandwidth for Auto Scan.
How to receive the programs?
Scan the possible frequency and bandwidth to receive the programs.
(1) Press button to Auto Scan or Manual Scan at installation page.
Auto Scan
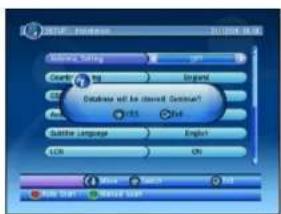
Auto Scan will erase the database first, and scan default frequency and bandwidth by Country Setting. Follow the step(1) at front section.
(2) Press button to be confirmed to clear the database.
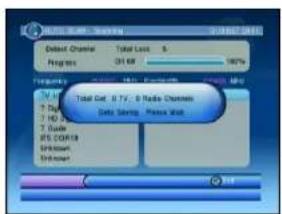
(3) Press button to confirm the database will be cleared and start Auto Scan. It costs time to do Auto Scan, user can press to exit at anytime. See Figure below.
text_image
Audio: Function
Audio: Setting
Query: 100
English
Database will be installed. English?
Auto: 0.5
Ctrl
Buffer Language
English
LCN
OK
More
Search
Add
Save Start
Named User
Clear database message
text_image
Windows 8.0.1.2007
Default Chancial Total Load S
Regms 361 KB 100%
Frequency Total Cut: 8.7V; 9 Radio Channels
Data Savings, Privacy Quick
W: 1
T: 1
T: 100%
T: Guide
W: COM/18
Unknown
Unknown
Auto Scan Page
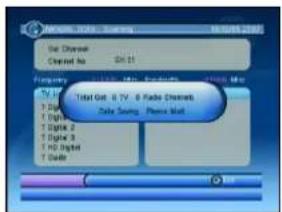
Manual Scan
Manual Scan adds the scanning results into database, it doesn't erase the database. But User has to know the Frequency and Bandwidth for scanning. If user scans the same Frequency and Bandwidth more than once, the programs will be duplicated. Follow the step (1).
(2) Press button to enter Manual Scan Page.
(3) Press button to select Frequency option.
(4) Press <0\~9> button to input the Frequency value.
(5) Press button to select Bandwidth option.
(6) Press button to set Bandwidth value.
(7) Press button to start scan or exit.
See Figure .below

text_image
CHANNEL 2016
CHANNEL 2016
Channel %
0x - 21
Frequency
4 MHz, per
Bandwidth
8 Mio
Width
30 %
Quality
91 %
Sound
More
Lamp
Out
Manual Scan Page
text_image
Mobile Phone Options
Set Channels
Closer No: 01.21
Frequency: 100 MHz
Type: Radio
V1
T Digital
T Optics
T Optics 2
T Optics 3
T HD Optics
T Guide
Total Get: 8 TV - 6 Radio Channels
Data Swing: Phone Wall
Manual Scan Result
TV Setup
Setup the display mode for TV.1 is the most diaphanous for OSD transparency. Set Banner displays time for banner display time. Banner doesn't disappear when setting "Always". It displays at watching program. User can set flesh tone or black /white expansion for video enhancement. See Figure below.

text_image
12 Format
023 Transparency
General Display Time
Video Enhancement
027
Wave
Solder
Edit
TV Setup Page

text_image
674.21
Live your
you're
20:30
2019
New Daily
Hillg Street
Banner page
Password
Set various lock of portable DVB-T.User work main menu by input correct password when Setup Menu Lock has been turned on. User can choose to lock or don't lock program for Channel Lock.Lock the program by password and censorship threshold for Censorship Lock.
User can change password here. The default PIN Code is 8888.
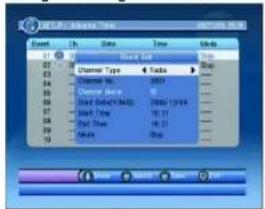
Advance Timer
User can set event(s) for watching the program(s) by date, time and frequency. When setting date and start time is up, portable DVB-T will automatically switch to program user sets. Setting here, the start time and end time depend on current system time.
(1) Press button to enter event edit page
(2) Press button to select Event row user wants to set or modify.
(3) Press button to change the data.
(4) Press button to save.
If conflict with itself or other event, it displays conflict message. If the date and time in the event are up, portable DVB-T will automatically switch to setting program in event.
User can delete the event while it isn't at running. See Figure below.

text_image
EVENT: Arrival Time 21
Event Cs Date Time Mate
81 ----- ----- ----- -----
82 ----- ----- ----- -----
83 ----- ----- ----- -----
84 ----- ----- ----- -----
85 ----- ----- ----- -----
86 ----- ----- ----- -----
87 ----- ----- ----- -----
88 ----- ----- ----- -----
89 ----- ----- ----- -----
90 ----- ----- ----- -----
91 ----- ----- ----- -----
进度(%): 100%
Advance timer
text_image
01.23
Event
Ch
Date
Time
Units
01
Channel Type
Radio
02
Channel Name:
03
Start Time:
04
Start Time:
05
Stop
06
Stop Time:
07
Stop Time:
08
Stop Time:
09
Stop Time:
10
Stop Time:
11
Stop Time:
12
Stop Time:
13
Stop Time:
14
Stop Time:
15
Stop Time:
16
Stop Time:
17
Stop Time:
18
Stop Time:
19
Stop Time:
20
Stop Time:
21
Stop Time:
22
Stop Time:
23
Stop Time:
24
Stop Time:
25
Stop Time:
26
Stop Time:
27
Stop Time:
28
Stop Time:
29
Stop Time:
30
Stop Time:
31
Stop Time:
32
Stop Time:
33
Stop Time:
34
Stop Time:
35
Stop Time:
36
Stop Time:
37
Stop Time:
38
Stop Time:
39
Stop Time:
40
Stop Time:
41
Stop Time:
42
Stop Time:
43
Stop Time:
44
Stop Time:
45
Stop Time:
46
Stop Time:
47
Stop Time:
48
Stop Time:
49
Stop Time:
50
Stop Time:
51
Stop Time:
52
Stop Time:
53
Stop Time:
54
Stop Time:
55
Stop Time:
56
Stop Time:
57
Stop Time:
58
Stop Time:
59
Stop Time:
60
Stop Time:
61
Stop Time:
62
Stop Time:
63
Stop Time:
64
Stop Time:
65
Stop Time:
66
Stop Time:
67
Stop Time:
68
Stop Time:
69
Stop Time:
70
Stop Time:
71
Stop Time:
72
Stop Time:
73
Stop Time:
74
Stop Time:
75
Stop Time:
76
Stop Time:
77
Stop Time:
78
Stop Time:
79
Stop Time:
80
Stop Time:
81
Stop Time:
82
Stop Time:
83
Stop Time:
84
Stop Time:
85
Stop Time:
86
Stop Time:
87
Stop Time:
88
Stop Time:
89
Stop Time:
90
Stop Time:
91
Stop Time:
92
Stop Time:
93
Stop Time:
94
Stop Time:
95
Stop Time:
96
Stop Time:
97
Stop Time:
98
Stop Time:
99
Stop Time:
100
Event edit page
SW Update
Update the software by built-in card reader or USB port. User select .ssu file to update.
Set Default
Reset portable DVB-T to factory default. All settings by user has been operated will be reset default, and database will be erased at the same time.
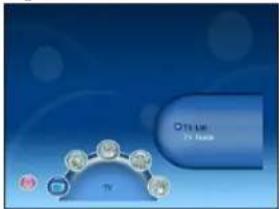
TV/RADIO
There are two types of program. One is TV and the other is Radio. The operation of the List and Guide at TV and Radio are the same. Here using TV to be example. See Figure below.
text_image
On Use
TV Make
Main Menu - TV

text_image
Video
File: Image Book
Color:
RGB 527-8001
RGB 527-8001
RGB 527-8001
RGB 527-8001
No Signa
RGB 527-8001
RGB 527-8001 - 4.000
RGB 527-8001
RGB 527-8001
RGB 527-8001
RGB 527-8001
RGB 527-8001
RGB 527-8001
RGB 527-8001
RGB 527-8001
RGB 527-8001
RGB 527-8001
TV List
List
User can operate some functions on the List. The result of operating will be displayed.
(1) Press button to select Tool (operation).
(2) Press button to select the program.
(3) Press button to operate. Buttons depend on operation. See Figure TV List.
Favorites
User can quickly channel up/down the favorite programs by favorite filter. There are 8 kinds of favorite for user setting. They are News, Sport, Movie, Music, Shopping, Travel, Boy, and Girl.
(1) Press button to select the program.
(2) Press button to select Favorites option.
(3) Press <1\~8> button to set the kind of favorite.
(4) Press button to confirm the operation and save the result. Program status is changed after operating. And press button will confirm and save. See Figure favorite page.

text_image
Track
Track Name
Track Value
Track Time
Track Position
Track Date
Track Time
Track Position
Track Time
Track Position
Track Time
Track Position
Track Time
Track Position
Track Time
Track Position
Track Time
Track Position
Track Time
Track Position
Track Time
Track Position
Track Time
Track Position
Track Time
Track Position
Track Time
Track Position
Track Time
Track Position
Track Time
Track Position
Track Time
Track Position
Track Time
Track Position
Track Time
Track Position
Track Time
Track Position
Track Time
Favorite page
text_image
Track Name
Track Time
Track Position
Track Position
Track Position
Track Position
Track Position
Track Position
Track Position
Track Position
Track Position
Track Position
Track Position
Track Position
Track Position
Track Position
Track Position
Track Position
Track Position
Track Position
Track Position
Track Position
Track Position
Track Position
Track Position
Track Position
Track Position
Track Position
Track Position
Track Position
Track Position
Track Position
Track Position
Track Position
Track Position
Track Position
Lock page
Lock
Lock will confirm password before watching this program when Channel Lock is turned on.
(1)Press button to select the program.
(2) Press button to select Lock option.
(3) Press button to set lock status.
(4) Press button to confirm the operation and save the result.
Program status is changed after operating. And press button will confirm and save. See Figure Lock page.
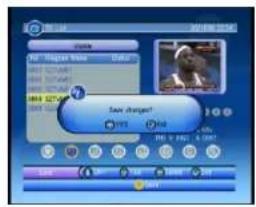
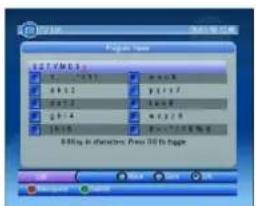
Edit
User can use Edit to edit the program name, maximum length is 16 characters.
(1) Press button to select the program.
(2) Press button to select Edit option.
(3) Press button to display program info page.
(4) Press button to edit program name.
(5) Press button to select the character.
(6) Press button on "Save" button to return program info page.
(7) Press button to save the editing and return to List
If press button at step (7), it returns to List without saving.
See Figure below.
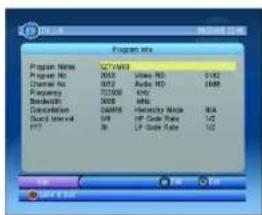
text_image
Program Title
Program Name: 327MB3
Project No: 0003
Status No: 0002
Frequency: 72000
BreakUp: 5008
Cancellation: 16498
Cust Interval: 148
PPT: 16
Volume NO: 1/162
Audio NO: 1648
ENO: 1/162
MPS: 1/162
Hertzicity Mode: 164
HP Color Mode: 1/2
LP Color Mode: 1/2
Edit Select
text_image
Project name
SET / VME 1
1 - 201
2 - 3.5
3 - 4.5
4 - 5.5
5 - 6.5
6 - 7.5
7 - 8.5
8 - 9.5
80% in characters, Press 36 to fragment
Edit Editing
Skip
Skip will skip the program by channel up/down when watching program.
Delete
Delete will delete the program perpetually from database. User must rescan to recover it.
Search
User can search the program name by partial keyword or character(s)
Guide
Guide is also named as EPG (Electronic Program Guide). Display program info and events. TV and Radio Guide are the same. See Figure below.
(1) Press button to select program.
(2) Press button to change date.

text_image
File Edit View Help
Mode
No Signet
000 5271M3
000 5271M3
000 5271M3
000 5271M3
Name: No Signet
Name: No DTC Event
TV Guide
text_image
My Music
My Music
My Music
Multi-Twitter
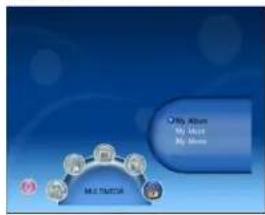
Multimedia
Multimedia must be used with built-in card reader or USB. Enter My Album My Music and My Movie. See Figure Multimedia.
My Album
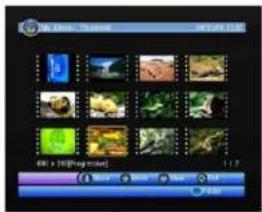
My Album can display JPG photo and operate it. If there is no photo in device root folder, it will start at Thumbnail mode. Or it will start at Folder mode.
Thumbnail
It displays JPG file info (Width, Height and Date) of selected photo. See Figure Thumbnail mode.
- Press button to change selected photo or page.
- Press button to browse folders and files (photos).
text_image
My Black: Traditional
01/26/12
File 14 [Image files]
My Black: Traditional
01/26/12
Thumbnail mode
text_image
Flash 15 photos
Bosch (RGB)
BYMP
P30
P3000-1
SLA2VY3
SLNEM
HAPP
DHF101
FUSGAG
MFGG
J4896-1
DSI
DSI
DSI
DSI
DSI
DSI
DSI
DSI
DSI
DSI
DSI
DSI
DSI
DSI
DSI
DSI
DSI
DSI
DSI
DSI
DSI
DSI
DSI
DSI
DSI
DSI
DSI
DSI
DSI
DSI
DSI
DSI
DSI
DSI
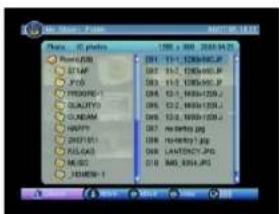
Folder mode
Folder
User can browse folders and files. It also displays JPG file info of selected photo. See Figure Folder mode.
- Press button to browse folders or files.
- Press button to view the selected photo.
- Press button to return Thumbnail mode with photos in current folder, or return Main Menu.
Zoom
View and zoom the photo at 100% from Thumbnail or Folder mode.
- Press button to select MP3 for playing.
- Press button to zoom the photo.
- Press /button to mirror.
- Press button to display next or previous photo.
- Press button to rotate the photo.
- Press button to enter slide show.
User can zoom the photo with 25%, 50%, 100%, 150%, 200%. If zooming greater than 100%, press button can move the photo. See Figure z .oom page

natural_image
Illustration of a park scene with colorful circular markers under a blue sky with white clouds (no text or symbols)
Zoom page
Slide Show
Slide all photos in current folder from zoom mode.
- Press button to play or pause.
- Press button to select mp3 for playing at slide show.
- Press button to set repeat or once.
- Press button to set the time interval between current and next photo. There are three ways: fast, medium and slow.
- Press button to next or previous photo right away. See slide-show page.
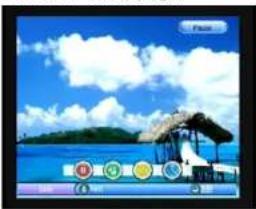
natural_image
Scenic tropical beach scene with a thatched hut, green lights, and blue sky (no text or symbols)
Slide-show page
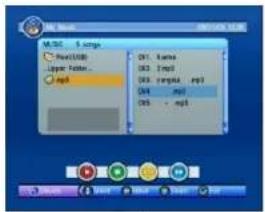
text_image
M32 - 5 images
NewBook
Layer New...
Map
01: name
02: map
03: map
04: map
05: map
06: map
07: map
music page
My Music
My Music can play Mp3.
- Press button to browse folders and files (MP3).
- Press button to play MP3 file.
- Press button to play or pause MP3 file.
- Press button to stop MP3 file.
- Press button to repeat selected MP3 file only.
- Press button to fast play MP3 file in current folder.
- Press button to adjust volume while playing the MP3 file.
- Press button to mute.
While playing the MP3, it displays progress, current playing time, and total time. See Figure music page
My Movie
My Movie can play AVI/MPG file.
GAME
There are three items in Game, Gomoku, Calendar and Calculator.
Message
There are some messages to inform user the current condition.
No Signal : portable DVB-T can't get signal, for example, cable is disconnected.
No Service: Program doesn't have any content to play.
Service Scrambled: Program is scrambled for payment, contact the content provider to know how to descramble it.
Antenna Overload: The power of antenna is overload.
HDTV not support : This portable DVB-T doesn't support HDTV. If the program content is HDTV, portable DVB-T will display this message.
Locked : Program is locked by setting lock and turning on password setting. User must input correct password to watch program.
Device is removed: When no device or device is removed, portable DVB-T will display this message.
Automatic Power Off
You can set automatic power off function on the installation page. When the function is set ON, and the unit is working with power adaptor, if there is no operation within four hours, the unit will power off automatically. When the unit is going to power off, it will remind user by showing "power off in 10 minutes without any operation". If you want to turn on the unit, you have to slide the ON/OFF switch to ON position again. To cancel this function, set it as OFF on the installation page.
Specification
LCD Screen Parameters
LCD screen: 9'
LCD screen scale: 16:9/4:3
Capability Parameters
Video input: 1Vp-p/759hm
Receiving frequency range:177.5MHZ-226.5MHZ
474MHZ-858MHZ
Power supply: AC adaptor(AC input 100-240V 50/60Hz, DC output
9V/1A); Car adaptor(DC 12V1.5A)
Connection terminals: DC input/Earphone jack/USB port
SD/MMC card
Audio Output (analog Audio):2.0V(rms)
S/N Ration: 80dB
Dynamic Range: 60dB
Operation Condition: Temperature 00\~40 ℃
Power Consumption: 10W
Dimension: 290(L)X164(W)X28(D)mm
Net weight: 0.78Kg
Troubleshooting
| Symptom | Remedy |
| No picture and sound | Check the power supply.Check the power switch and make sure it is at the ON position. |
| No picture | Make sure the channel is properly selected.External antenna is used for poor reception area. |
| No sound | Check whether the volume is switched to low level or muted?Headphone is inserted? |
| Picture is unstable | Adjust the direction, length of the antenna.Signal is too weak. |
| Double image | Antenna angle is not correct.Signal rebound from adjacent building etc. |
| "Snowy" on the screen | Power interference. |
| No colour | Make sure the system settings are correct. |
Sommaire
| Sommaire | 1 |
| Précautions de sécurité | 2 |
| Fonctions | 3 |
| Appareil | 3 |
| Télécommande | 4 |
| Connexions | 5 |
| Illustration connexions | 5 |
| Installation rapide | 6 |
| Menu principal | 6 |
| Réglages | 6 |
| Installation | 6 |
| Comment capter les émetteurs | 6 |
| Recherche automatique | 7 |
| Recherche manuelle | 7 |
| Réglage TV | 8 |
| Mot de passe | 8 |
| Chrono programmation | 8 |
| Update logiciel | 9 |
| Réglage standard | 9 |
| TV/radio | 9 |
| Liste | 9 |
| Préférences | 9 |
| Blocage | 10 |
| Edit | 10 |
| Sauter (skip) | 11 |
| Annuler | 11 |
| Recherche | 11 |
| Guide | 11 |
| Multimédia | 11 |
| Mon album | 11 |
| Thumbnail | 11 |
| Folder | 12 |
| Zoom | 12 |
| Présentation dia | 13 |
| Ma musique | 13 |
| Mon film | 13 |
| Jeux | 13 |
| Messages | 14 |
| Mise hors fonction automatique | 14 |
| Spécifications | 15 |
| En cas de problèmes | 15 |
Précautions de sécurité
Merci d'avoir choisi ce lecteur portable DVB-T. L'appareil contient la toute dernière technologie électronique haut-de-gamme et est développé pour utilisation à la maison, à l'hôtel, au bureau. Le format compact permet un transport et une installation facile. Lisez attentivement le manuel d'utilisation avant d'utiliser l'appareil et gardez-le pour consultation ultérieure.

text_image
Pour avertir l'utilisateur d'être prudent pour éviter des chocs électriques!
Avertissement : pour éviter le risque d'incendie ou des chocs électriques, ne pas exposer cet appareil à la pluie ou à l'humidité.
1) Lissez attentivement le manuel d'utilisation et suivez toutes les instructions pour une opération sûre.
2) Ne pas utiliser l'appareil à côté d'eau. Ne pas placer un objet rempli d'une liquide au-dessus de l'appareil.
3) Ne pas placer l'appareil à côté d'une source de chaleur telles que des radiateurs ou des appareils qui produisent du chaleur (y compris un amplificateur).
4) Déconnectez la prise courant secteur pendant des orages ou quand vous n'utilisez pas l'appareil pendant un certain temps.
5) Nettoyage : déconnectez le système et utilisez un chiffon légèrement humide. Ne pas utiliser des détergents ou des aérosols.
6) Utilisez uniquement les accessoires recommandées par le fabriquant.
7) Contactez un service après-ventes dans les cas suivants : quand l'appareil est endommagé, quand le câble courant secteur est endommagé, quand une liquide a pénétré l'appareil, quand un objet est tombé sur l'appareil, quand l'appareil a été exposé à l'humidité ou quand il ne fonctionne pas bien. N'essayez pas de réparer vous-même l'appareil à cause des hauts voltages et le risque d'un choc électrique.
Fonctions
Appareil

text_image
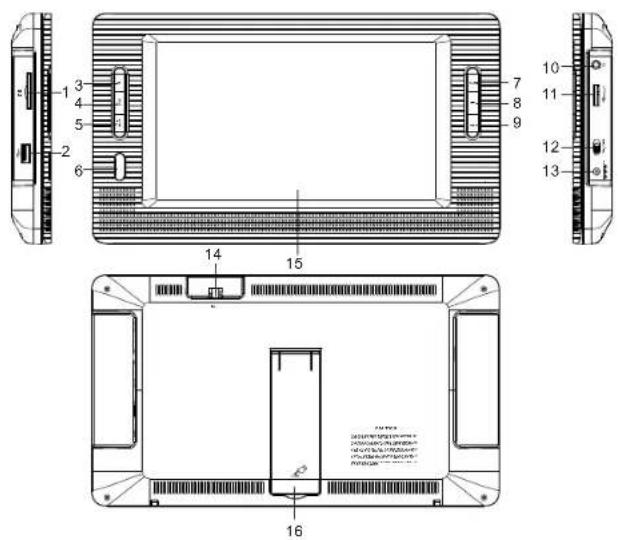
Technical diagram of a device front panel with numbered components and labeled parts
-
Ouverture Carte SD
-
Porte USB
3.Bouton OK
4.CH+/
5.CH-/↓
- Récepteur infrarouges
7.Bouton MENU
-
←
-
→
-
Prise pour casque d'écoute
-
Réglage volume
-
EN/HORS FONCTION
-
Entrée DC 9-12 V
-
Prise antenne
15.Ecran LCD
- Support
Télécommande
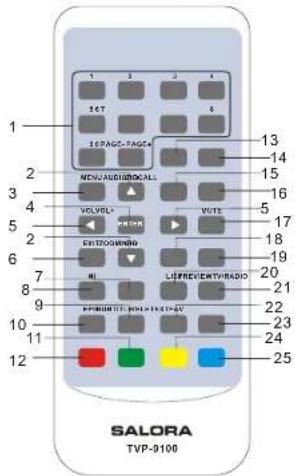
text_image
1
2
3
4
5
6
7
8
9
10
11
12
13
14
15
16
17
18
19
20
21
22
23
24
25
SALORA
TVP-9100
- Boutons numériques 0-9
- ▲/▼ CH+/CH-
3.MENU
4.ENTRER
5.◄/► VOL-/VOL+
6.SORTIR
7.TV/RADIO
- ▶ Lecture/pause
9.FAV, filtre pour préférences
10.EPG
11.Bouton vert
12.Bouton rouge
13.PAGE-, page vers le bas
14.PAGE+, page vers le haut
15.AUDIO
16.RECALL, pour retourner à l'émetteur
précédent
17.MUTE
18.ZOOM
19.INFO, informations émetteur
- LISTE
21.PREVIEW
22.SOUS TITRES, réglage des sous titres
23.TELETEXTE, réglage télétexte
24.Bouton jaune
25.Bouton bleu
Utilisation de la télécommande
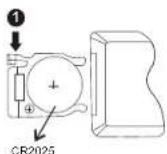
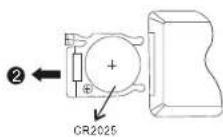
Insérez la pile dans la télécommande comme illustré ci-dessou.


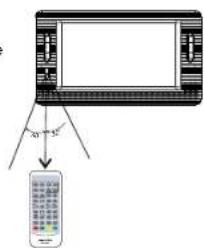
Quand vous utilisez la télécommande, dirigez-la vers le récepteur infrarouges de l'appareil.
La distance entre l'appareil et la télécommande ne peut pas dépasser 3 mètres. Voyez
illustration à droite.

text_image
20
32
Remarque
- Evitez que la télécommande tombe ou qu'elle soit utilisée dans un endroit humide.
- Le récepteur à infrarouges ne peut pas être exposé à la lumière directe du soleil.
- Remplacez la pile quand la télécommande ne fonctionne plus bien.
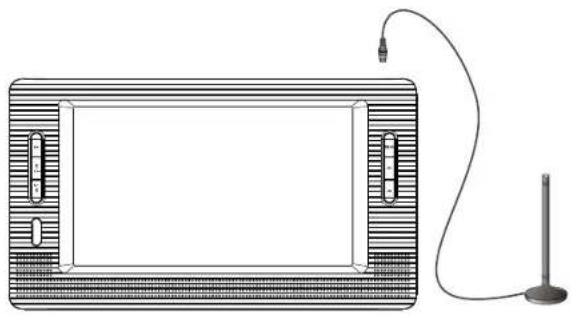
Connexions
Illustration connexions
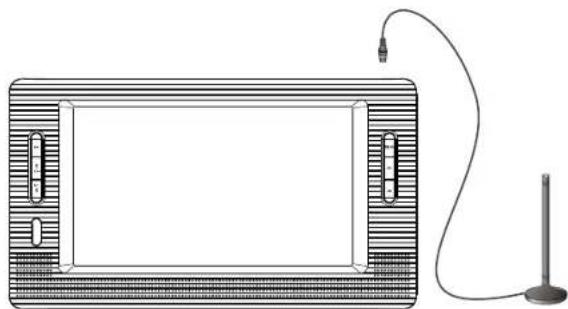
natural_image
Diagram of a rectangular device with side panels and a connected cable, no text or symbols present
Installation rapide
Le menu principal permet de commander un grand nombre de fonctions.
(1) Poussez