PhoneEasy 520 - Téléphone mobile DORO - Notice d'utilisation et mode d'emploi gratuit
Retrouvez gratuitement la notice de l'appareil PhoneEasy 520 DORO au format PDF.

Questions des utilisateurs sur PhoneEasy 520 DORO
0 question sur cet appareil. Repondez a celles que vous connaissez ou posez la votre.
Poser une nouvelle question sur cet appareil
Téléchargez la notice de votre Téléphone mobile au format PDF gratuitement ! Retrouvez votre notice PhoneEasy 520 - DORO et reprennez votre appareil électronique en main. Sur cette page sont publiés tous les documents nécessaires à l'utilisation de votre appareil PhoneEasy 520 de la marque DORO.
MODE D'EMPLOI PhoneEasy 520 DORO
DoroPhoneEasy ^® 520X
English

text_image
doro 3G 09:30 Menu Name A B 1 2 ABC 3 DEF 4 GHI 5 JKL 6 MNO 7 PQRS 8 TUV 9 WXYZ On 0 #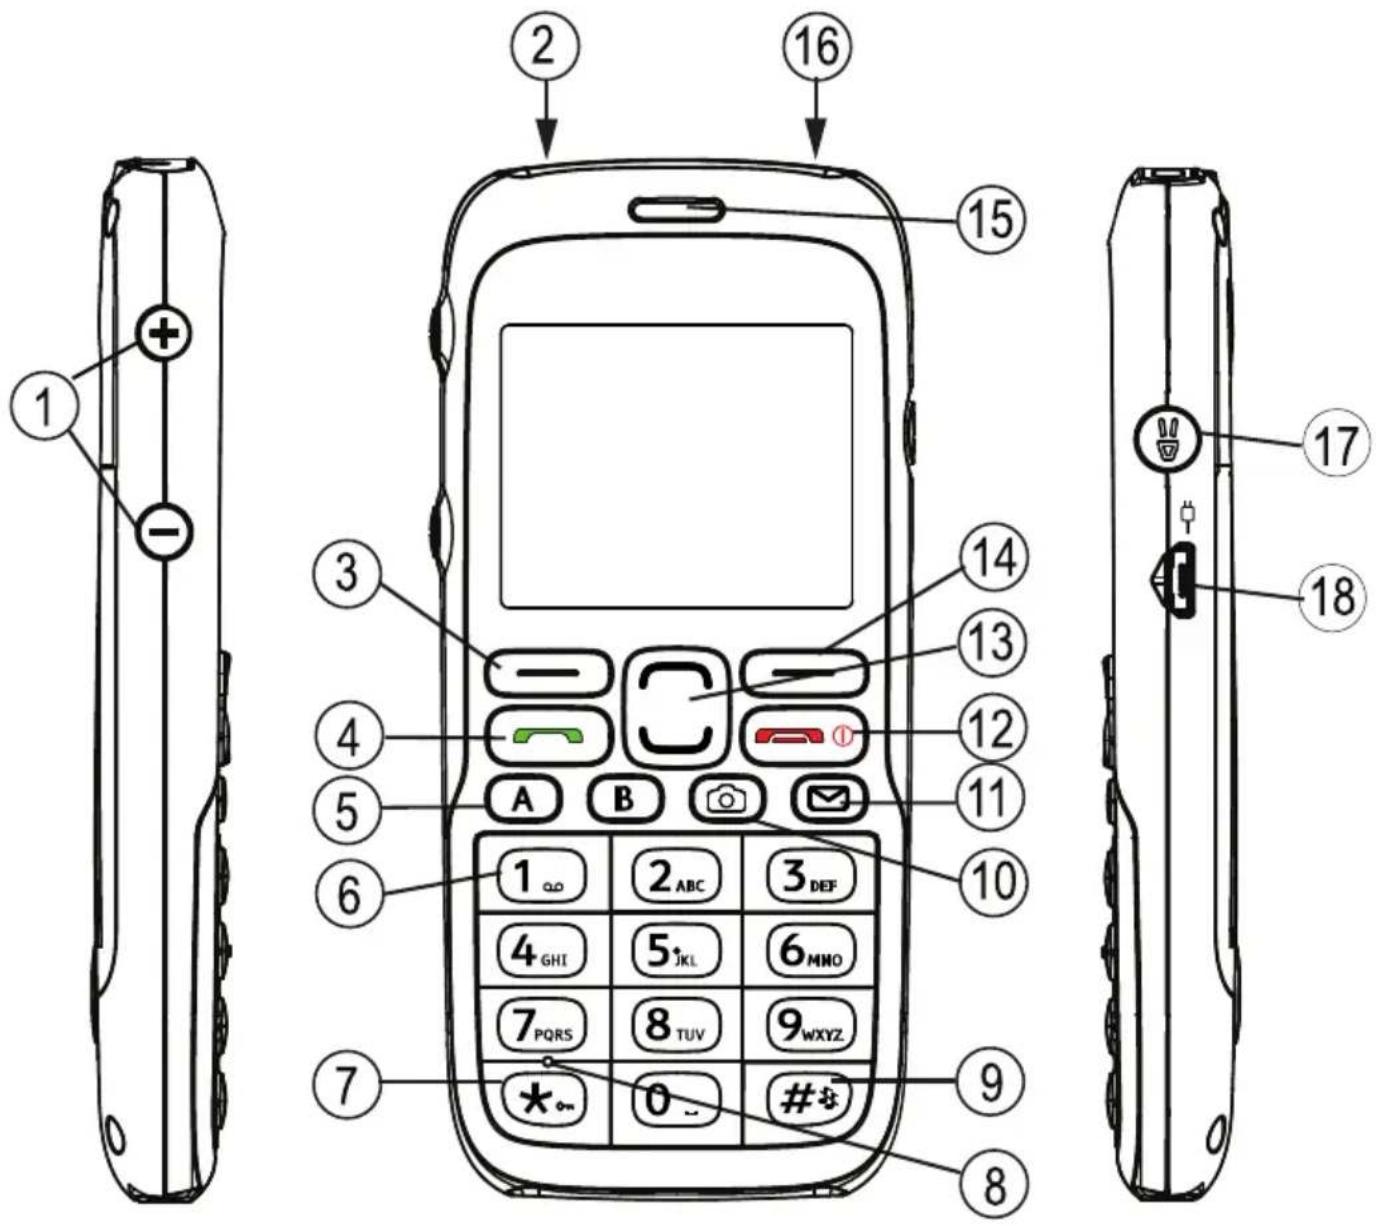
text_image
Diagram of a mobile phone with numbered parts and function keys, including front, side, and back views.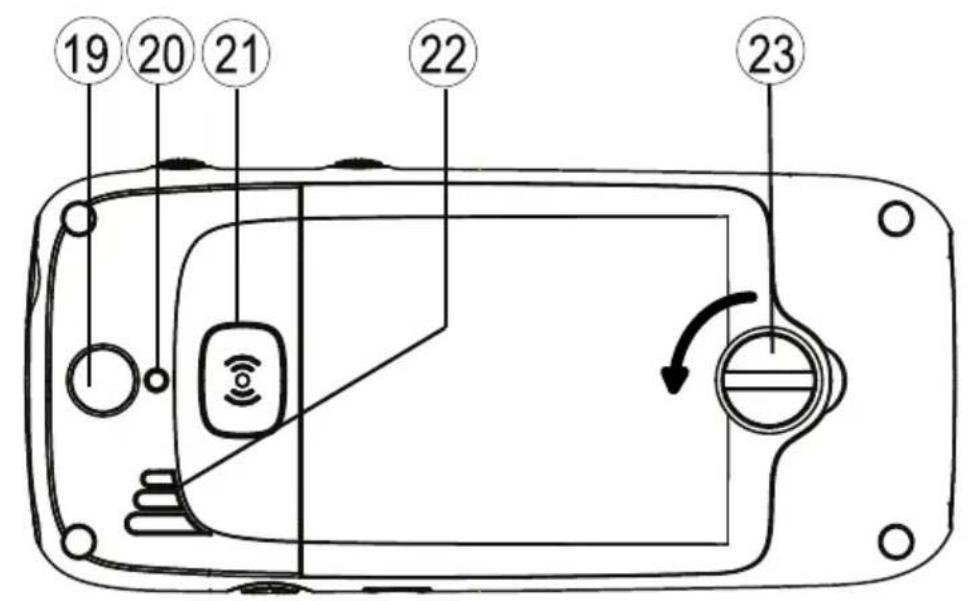
text_image
19 20 21 22 23English
- Volumecontrol 14. Rightselectionbutton
2.Headsetsocket 15.Earpiece
3.Leftselectionbutton 16.Torch
4.Callbutton 17.Torchbutton
5.Speeddial 18.Chargingsocket
6.Voicemail 19.Cameralens
7.Keylock 20.Cameraflash
8.Microphone 21.Assistancebutton
9.Silent/Inputmethod 22.Loudspeaker
10.Camerashortcut 23.Batterycover/lock
11.SMSshortcut 24.Lanyard
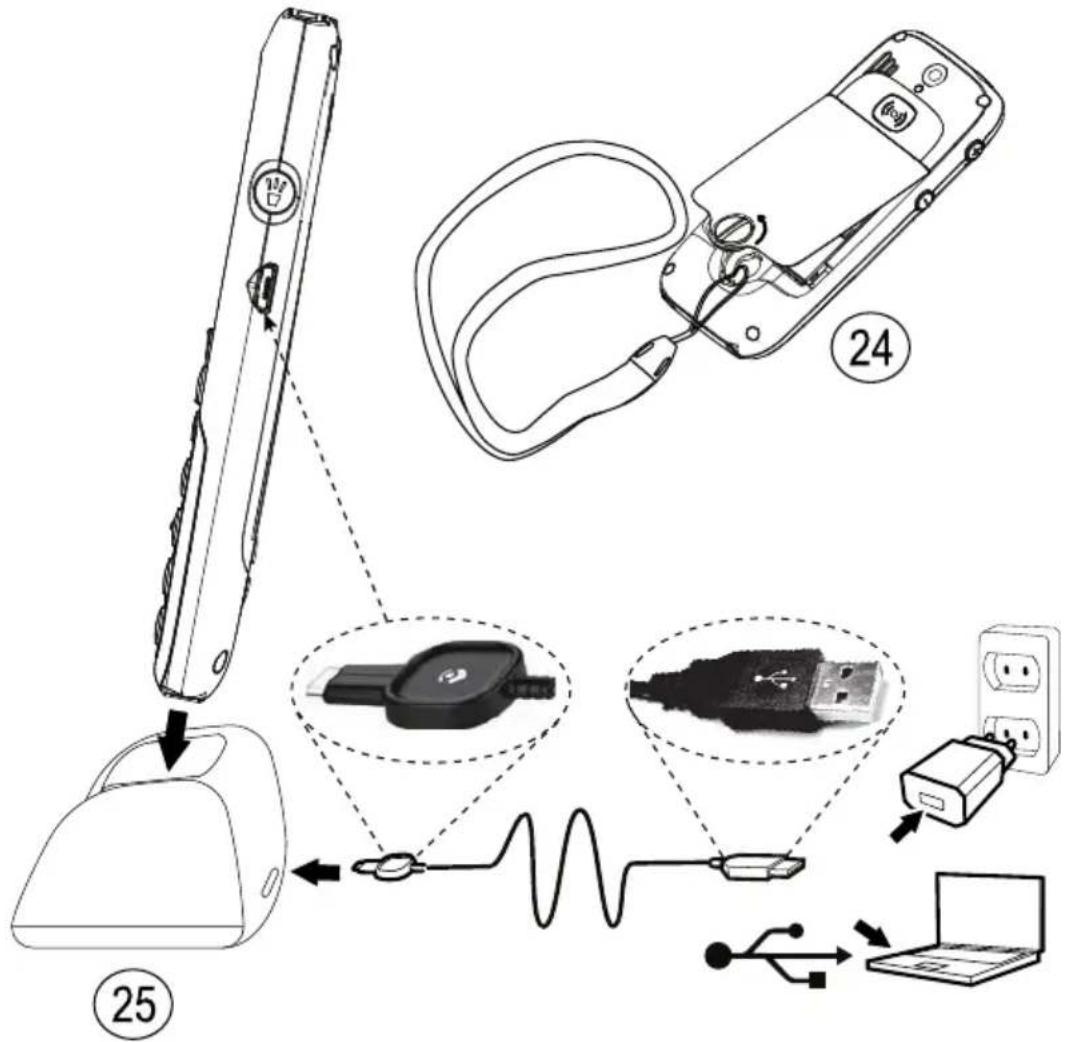
12.Endcall/Poweron/off 25.Chargingstand - Arrowbuttons
text_image
Diagram illustrating the assembly of a device with labeled parts including a cable, connector, and power supply connections.Contents
Installation....1
InstallingtheSIMcard, memorycardandthebattery......1
Charging....2
Symbols....3
Assistivefunctions....3
Displaystatus symbols....3
Displaymainsymbols....4
Operation....5
Activating the phone....5
Makingacall....6
MakingacallfromthePhonebook......6
Receivingacall....6
Volumecontrol....6
Enteringtext 6
Calloptions....7
Callwaiting....8
Callinformation....8
Speeddial 9
Keylock....9
Silent....9
Headset....9
SOScalls....9
Assistancebutton + 10
Phonebook....12
Creatingaphonebookentry....12
CreatingICEentry(InCaseofEmergency) + 12
Managingphonebookentries....12
ICE(InCaseofEmergency) + 14
Messages....15
CreatingandsendingSMS....15
Creatingandsendingvoicemessage....16
CreatingandsendingMMS....16
Inbox,Sent,Outbox....17
Calllog....19
Retrievinganddialling....19
Camera(takephotos)....19
Camera,options....20
Cameraadjustments....20
Imageviewer....20
Imageviewer,options....21
Connectingthephonetoacomputer....22
Draganddropcontentbetweenphoneandacomputer......22
DisconnecttheUSBcablesafely....23
Settings....23
General....23
Sound....27
Display....29
Calls....30
Messages....35
Camera....38
Assistance + 39
Bluetooth ^® 41
Security....42
Filemanager....45
Additionalfunctions....47
Alarm....47
Organizer....47
Calculator....48
FMradio....49
Status....51
InstructionsfortheREMOTEUSER....51
Troubleshooting....55
Safetyinstructions....56
Networkservicesandcosts....57
Operatingenvironment....57
Medicalunits....57
Areaswithexplosionrisk....58
Li-ionbattery....58
Protectyourhearing....58
Emergencycalls....59
Vehicles....59
Careandmaintenance....60
Warranty....60
Specifications....60
Hearingaid....61
SpecificAbsorptionRate(SAR)....61
DeclarationofConformity....61
Installation
IMPORTANT!
Turnoff the phone and disconnect the charger before removing the battery cover.
InstallingtheSIMcard, memorycardandthebattery
TheSIMandmemorycardholder'sarelocatedinsidethebattery compartment.
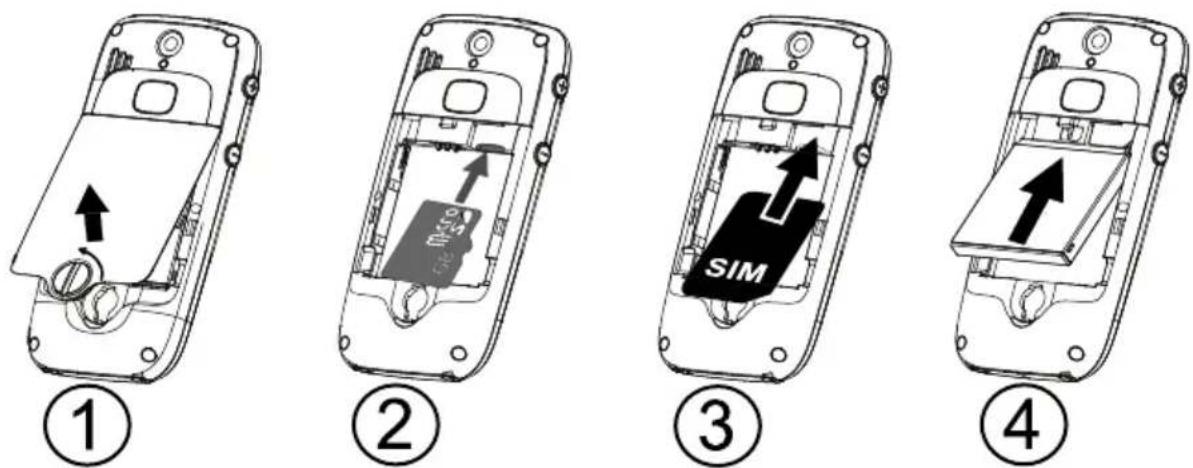
- Removethebatterycoverandthebatteryifitisalreadyinstalled. Unlockthebatterycoverbyturningthescrewaquarterofaturn counterclockwise.
2.Optional:InsertthememorycardintotheslotundertheSIM cardholder.Makesurethatthememorycardcontactsarefacing inwardsandpushthecardin,untilyouhearaclick.Takecare nottoscratchorbendthecontactsonthecard.Toremoveor replacethecard,pushthecardinuntilyouhearaclickand thenpullthecardout. - InserttheSIMcardbygentlyslidingitintotheholder. Makesure thattheSIMcard'scontactsarefacinginwardsandthatthecut offcornerispointingdownwards.Takecarenottoscratchor bendthecontactsontheSIMcard.
- Insert the battery by sliding into the battery compartment with the contacts facing upward to the left. Replace the battery cover and lock it by turning the screw quarter of a turn clockwise.
IMPORTANT!
Useonlycompatiblememorycardsforusewiththisdevice.Compatible cardtype: microSD, microSDHC. Incompatiblecardsmaydamagethecarditself, thedeviceandcorrupt datastoredonthecard. Dependingonthemarketsomephonesmay haveapre-installedmemorycard.
Charging

CAUTION
Onlyusebatteries,chargerandaccessoriesthathavebeenapprovedfor usewiththisparticularmodel.Connectingotheraccessoriesmaybe dangerousandmayinvalidatethephonestypeapprovalandguarantee.
Whenthebatteryisrunninglow, isdisplayedandawarningsignal isheard.Tochargethebattery,connectthemainsadaptertoawall socketandtothechargingsocket—□=.
- isdisplayedbrieflywhenthechargerisconnectedtothephone, and - whenitisdisconnected.Thebatterychargeindicatorwill beanimatedwhilecharging.Ittakesapproximately3hourstofully chargethebattery.
isdisplayedonthescreenwhenchargingiscompleted. If the phoneisturnedoffwhenthechargerisconnectedtothephoneonly thebatterychargeindicatorwillbeshownonthedisplay.
Note!
TosavepowertheLCDbacklightgoesoffafterawhile. Pressanybutton toilluminatethedisplay.Fullbatterycapacitywillnotbereacheduntil thebatteryhasbeencharged3–4times. Batteriesdegradeovertime, whichmeansthatcalltimeandstandbytimewillnormallydecrease withregularuse.
Saveenergy
When you have fully charged the battery and disconnected the charger from the device, unplug the charger from the wall outlet.
Symbols
Assistivefunctions
The following symbols indicate information in the manual about assistive functions for:
| Seeing Handling | |||
| Hearing Safety | + |
Displaystatussymbols
 | Signalstrength |  | Nonetworkcoverage |
 | Ringonly |  | UnreadmessageinInbox |
 | Ring+vibration Alarmactive |  | |
| - | |||
 | Vibrationonly |  | Batterylevel |
 | Silent Callforwardactivated |  | |
 | Roaming(inothernetwork) |  | Bluetoothon,visibleto others |
 | Missedcall |  | Bluetoothon,invisibleto others |
| - | |||
 | Headsetconnected Bluetooth |  ected ected | |
 | Voicemailmessage received |
Displaymainsymbols
 | Mute |  | Chargerconnect |
 | Messagesendingsuccess Charge |  | moved |
 | Messagesendingfailed Headset |  | |
 | Error Headsetout |  | |
 | Warning Speakeron |  | |
 | Query Speakeroff |  | |
 | Done(confirmed) Incominggal |  | |
 | Newmessage |  | Outgoingcall |
 | Batterylevelow |  | Callended |
 | Searching |  | Missedcall.PressReadto seethemissedcalls. |
 | Emergencycall |  | Callon-hold |
 | vCardmessage SOScallsonly |  | |
 | Volumecontrol |  | Processing,pleasewait |
Operation
Activating the phone
Pressandholdtheredbutton ConfirmwithYestopoweroff.

onthephonetoturniton/off.
If the SIM cardisvalid but protected with a PIN code (Personal Identification Number), PIN is displayed. Enter the PIN code and press OK (≡ upper left corner of keypad). Delete with Clear (upperright corner of keypad).

Note!
IfPINandPUKcodeswerenotprovidedwithyourSIMcard,please contactyourserviceprovider.
Attempts:#showsthenumberofPINattemptsleft.Whennomore attemptsremain, PINblockedisdisplayed.TheSIMcardmustnow beunlockedwiththePUKcode(PersonalUnblockingKey).
- EnterthePUKcodeandconfirmwithOK.
2.EnteranewPINcodeandconfirmwithOK. - Re-enternewPINcode and confirm with OK.
Start-upwizard
When starting the telephone for the first time, you can use the Start-up wizard to set some basic settings.
PressYeschangeNoyoudo not want change.
Tip:
YoucanruntheStart-upwizardlaterifyouwant,seeStart-upwizard, p.24.
Standby(Idlemode)
Whenthephoneisreadytouse, and you havenotkeyedinany characters, the phone is instandby.
LeftselectionbuttoninstandbyisMenu.
RightselectionbuttoninstandbyisName.
Tip:
Youcanalwayspress toreturntostandby.
Changingthelanguage, timeanddate
ThedefaultlanguageisdeterminedbytheSIMcard.SeeGeneral, p.23onhowtochangelanguage,timeanddate.
Makingacall
- Enter the phonenumber including the areacode. Deletewith Clear.
- Press 📞 todial. Press Aborttocanceldialling.
- Press toendthecall.
Tip:
Forinternationalcalls,alwaysuse+beforethecountrycodeforbest operation.Press ☀ twicefortheinternationalprefix+.
MakingacallfromthePhonebook
- PressNametoopenthephonebook.
- Usethearowbuttons / toscrollthroughthephonebook,or quicksearchbypassingthekeycorrespondingtothefirstletter oftheentry,see Enteringtext ,p.6.
PresCalldiathelectedentryopressBack.
Receivingacall
-
Press toanswer, or press Silenttoswitchofftheringsignal and then Rejecttorejectthecall(busysignal). Alternatively, press torejectthecalldirectly.
-
Press toendthecall.
Volumecontrol
Use the side buttons / to adjust sound volume during call. The volume level is indicated on the display. If you use hearing aid or have hearing difficulties when using the telephone in noisy environment, you can customize the phone's audio settings, see Audio setup 📞, p.27.
Enteringtext

Pressanumericalkeyrepeatedlyuntilthedesiredcharacterisshown. Waitafewsecondsbeforeenteringthenextcharacter.
Press * foralistofspecialcharacters.Selectthedesiredcharacter with √/andpressOKtoenterit.
Usethesidekeys+/-or √/tomovethecursorwithinthetext.
Press # tocycleuppercase,lowercaseandnumerals.
Pressandhold # tochangeinputlanguage.
Enteringtextwithpredictivetext
InsomelanguagesyoucanusetheSmartABC(eZiType™)input methodwhichusesadictionarytosuggestwords.SeePredictivetext

,p.35onhowtoactivatepredictivetext.
Presseachkeyonce, even if the displayed character is not the one you want. The dictionary will suggest words based on the keys you have pressed.
-
Towritetheword "Fred", press 3, 7, 3, 3. Complete the word before looking at the suggestions.
-
Use /təviewthesuggestedwords.
-
PressSelectandcontinuewiththenextword. Alternatively, press 0 to continuewiththenextword.
If noneofthesuggestedwordsarecorrect,usemanualinputmode.
Theicononthetopleftofthedisplayindicatestheinputmode:
√ Abc Sentencecasewithpredictivetext
ABC UPPERCASEwithpredictivetext
√ abc lowercasewithpredictivetext
Abc Sentencecase
ABCUPPERCASE
abclowercase
123 Numerals
Calloptions
Duringacalltheselectionbuttons ^1 (☐)giveaccesstoadditional functions:
- selectionbuttonshavemultiplefunctions. The current key function is shown above these selection button on the display.
Options(leftselectionbutton)
Amenuwiththefollowingoptionsisdisplayed:
| Holdsingle call/Retrieve single | Hold/retrievethecurrentcall. |
| Endsingle call | Endthecurrentcall(sameas ). |
| Newcall | Callanothernumber(Conference). |
| Phonebook | Searchthephonebook. |
| Messages | WriteorreadSMSmessages. |
| Mute | Disablethemicrophone. |
SPKon(rightselectionbutton)
Activateshandsfreemode, which allowsyoutspeakwithoutholding thephone. Speak clearly into themicrophone at a maximum distance of mUsethe sidekeys/-tadjustcloudspeakervolumePress
SPKofftoreturntonormalmode.
Note!
Thehandsfreefunctionallowsonlyonepersonatatimetotalk. Switchingbetweentalk/listenistriggeredbythesoundoftheperson talking.Loudnoises(music,etc.)inthebackgroundmayinterfere withthefunction.
Callwaiting
Analerttonewillbeheardifthereisanincomingcallwhiletalking. Toputthecurrentcallonholdandanswertheincomingcall,press OptionsselectAnswerandherOK.
Tip:
Callwaitingmustbeactivated, see Callsetup, p. 33.
Callinformation
Duringacall, the outgoing or incoming phonenumber and the elapsed call time is displayed. If the identity of the caller is withheld, Unknown is displayed.
Speeddial

Youcanusekeys A and B and youcanalsousethenumericalkeys 0 and 2–9. Tospeeddialanentryfromstandby, pressandhold thecorrespondingkey. See Speeddial , p.31.
Keylock
Youcanlockthekeypadtopreventthekeysbeingaccidentally pressed,forexample,whenyourphoneisinyourhandbag.
Pressandhold ☐ tolock/unlockthekeypad.
Incomingcallscanbeansweredbypassing evenifthekeypad islocked. Duringthecall, thekeypadisunlocked. Whenthecallis endedorrejected, thekeypadislockedagain. See Keypadlock, p. 43.
Note!
Theemergencynumbercanbedialledwithoutunlockingthekeypad.
Silent
SilentisafixedprofilewithKeypadtone, MessagetoneandRingtone disabled,whileVibration,TasksandAlarmareunchanged.
Tip:
Pressandholdshortcutbutton
# toactivate/deactivateSilent.
Headset
Whenaheadsetisconnected, the internal microphone in the phone is automatically disconnected.
When receiving acally you can us the an answer key on the headset cable (ifithasone) to answer and end calls.

CAUTION
Usingaheadsetathighvolumemaydamageyourhearing.Adjustthe volumelevelcarefullywhenusingaheadset.
SOScalls
Aslongasthephoneisswitchedon,itisalwayspossibletoplace anSOScallbyenteringthemainlocalemergencynumberforyour presentlocationfollowedby
Somenetworksacceptcallstoemergencynumberswithoutavalid SIMcard.Contactyourserviceproviderformoreinformation.
Assistancebutton

IMPORTANT!
AlwaysinformrecipientsintheNumberlistthattheyarelistedasyour assistancecontacts.

CAUTION
Whenanassistancecallisactivatedthephoneispre-setto handsfree/speakerphonemode.Donotholdthedevicenearyourear whenthehandsfreemodeisinuse,becausethevolumemaybe extremelyloud.
The Assistance button allows easy access to contact your predefined help numbers (Numberlist) should you need help. The Assistance function may need to be activated before use. See Assistance

p.39onhowtoactivateasdescribedorwith3buttonpresses,howto enterrecipientsinthenumberslist,andhowtoeditthetextmessage.
- PressandholdtheAssistancebuttonfor3seconds,orpressit twicewithin1second.Theassistancecallbeginsafterdelayof 5seconds.Inthistimeyoucanpreventapossiblefalsealarm bypassing
- AnassistanceSMSissenttoallrecipients.
- Thefirstrecipientsinthelistisdialled. Ifthecallisnot answered within 25 seconds, thenextnumberisdialled. Dialling is repeated 3 times or until thecallis answered, or until ispressed.
- The assistance function may be configured so that there receiver of the call must press "O" (zero) to confirm, in order to stop the alarm sequence. If there is a risk that the assistance call will be answered by avocemail/answeringservice, please activate the function Confirm with HO See Confirm with HO "p. 40.

Note!
Someprivatesecuritycompaniescanacceptautomaticcallsfromtheir clients.Alwayscontactthesecuritycompanybeforeusingtheirphone number.
IMPORTANT!
Informationtothereceiver_ofanassistancecall,whenConfirmwith "0"isactivated:
- Afterreceivingtheassistancemessage, eachnumberinthe Numberlistwillbecalledsequentially.
•Toconfirmtheassistancecall,thereceiver ____ needstopress 0. - Ifthereceiver _ doesn'tpress 0 within60seconds(after answering)thecallwillbedisconnectedandthenextnumberinsequencewillbecalled.
- Ifthereceiver ____ presses 0 within60seconds, thecallis confirmedandnofurthercallattemptswillbemade (assistance sequenceinterrupted).
Phonebook
Thephonebookcanstore300entrieswith3phonenumber sineach entry.
Creatingaphonebookentry
- PressMenu, scroll to

andpressOK.
SelectNewcontactanpressAdd.
- Entera

Name the contact see Enteringext
DeletewithClear.

- Use

tselect


thephonenumber(s)includingtheareacode.
- Select cont

PictureandpressEdittoassociateapicturetothe
Thispicturewillbedisplayedwhenthecorrespondningcontactiscallingyouandmayalsobevisibleinthephonebook,seePhonebookpicture,p.27.
Select Takpicturenpress OKousinghe camerao takeapicture.
Select Mypictures and press OK to select existing picture.
- PressSave.
Tip:
Forinternationalcalls,alwaysuse+beforethecountrycodeforbest operation.Press ✪ twicefortheinternationalprefix+.
CreatingICEentry(InCaseofEmergency)

Withthisadditionalinformationandmedicalinformation,first responderscanaccessthisinformationfromthevictim'sphonein caseofemergency.Intheeventofatrauma,itiscriticaltohavethis informationasearlyaspossiblewhichcanincreasethechancesof survival.Allfieldsareoptional,butthemoreinformationprovidedthe better.SeeICE(InCaseofEmergency) + ,p.14onhowtoconfigure yourICEinformation.
Managingphonebookentries
- PressMenu, scroll to

andpressOK.
- SelectacontactandpressOptions.
- SelectoneofthefollowingoptionsandpressOK.
View
Showdetailsfortheselectedcontact.
Edit
- Use √/tomovethecursor.DeletewithClear.
- PressSave.
Add
See Creatingaphonebookentry, p. 12.
Call
PressOKtocallthecontact.
Top10
PressOKtosettheentryasoneofthefirst10contactslistedinthe phonebook,see Top10 📋, p.31.
SendSMS
PresOKwriteSMSmessageseeCreatingandendingSMS, p.15.
SendMMS
PresOKwriteMMSmessageseeCreatingandendingMMS, p.16.
Delete
Press OK delete the selected phone book entry. Press Yes confirm or Notoabort.
Deleteall
SelectFromSIMFromphoneandpressOKdeletealphonebook entriesfromtheSIMcardorphonememory.
EnterthephonecodeandpressOKtoconfirm. Thedefaultphone codeis1234.
Copyall
SelectFromSIMandpressOKcopyalphonebookentriesfromtheSIMcardthephonememoryPressYesconfirmNoabort.
Select From phone and press OK copy phone book entries from the phone memory of the SIM card press Yes confirm No abort.
SendvCard
SelectSend by SMS and press OK send the selected phonebook entryasavCardviaSMS.Enter the phonenumber of therecipient. Alternatively usethearrowkeys / to scroll through the phonebook, or quicksearch bypassing the key corresponding to the first letter of the entry, see Enteringtext , p. 6. Press OK to send.
SelectSendbyMMS and pressOK send the selected phonebook entryasavCardviaMMS. Typeyourmessage, thenpressOptions. Add items you message from the option Add subject and Add picture Add recipients with T and Send where ready.
Select Send Bluetooth and Pres OK send the selected phonebookentryasavCardviaBluetooth ^ . See Bluetooth ^ , p. 41 on howtoconnectwithBluetooth.
ICE(InCaseofEmergency)

Firstresponderscanaccessadditionalinformationsuchasmedical informationfromthevictim'sphoneincaseofemergency.Inthe eventofatrauma,itiscriticaltohavethisinformationasearlyas possibletoincreasesthechancesofsurvival.Allfieldsareoptional, butthemoreinformationprovidedthebetter.
- PressMenu, scroll to
andpressOK. - Select +ICE andpressOK, thenuse / toserothelistof entries.
PresEditaddedinformationreachentryseeEntering text pDeletewithClearPresSave Herdone.

Name: Yourownname.
Yourd Biethbirth.
| Height:Yourheight. | |
| Weight:Yourweight. | |
| Language:Yourlanguage. | |
| Insurance: | Yourinsuranceproviderandpolicynumber. |
| Contact1:Contact2:Doctor: | PresOptionsandherOKAddDeletecontactfromthephonebook,orSavetoacceptthecurrententry.lfpossible,addyourrelationshiptoyourICEcontactsinthephonebook,suchas“ICEWifeMarySmith”. |
| Condition:Anymedicalconditions/medicaldevices(e.g.diabetic,pacemaker). | |
| Allergies:Anyknowallergies(e.g.penicillin,beestings). | |
| Bloodtype:Yourbloodtype. | |
| Vaccination:Anyrelevantvaccination. | |
| Medication:Anymedicationthatyouaretreatedwith. | |
| Otherinfo:Otherinformation(e.g.organdonor,livingwill,consenttotreat). | |
Messages
CreatingandsendingSMS
Note!
BeforeyoucansendanySMS,youneedtosaveyourmessagecentre number.Thenumbertoyourservicecentreissuppliedbyyourservice providerandisusuallysetontheSIMcardfnot,youcanenterthe numberyourself.SeeProfileset,p.35.
Presshortcubutton OK.


SelecSMSanφresOK.
Bype you messages see Enteringext
pthenpressTo.
Select recipient from Phonebook an press OK. Alternatively select Entenumber an press OK and recipient manually and press Done.
SelectAddadmoreecipienbselecSendsendand thenpressOK.
Youcanalsomodifytherecipientsbyselectingoneandpress OptionsEditDeleteEdit.
Note!
If you choose to add multiplerecipients, you will be charged for each recipient (maximum 10). For international calls, always use + before
thecountrycodeforbestoperation.Press prefix+.
* twicefortheinternational
Creatingandsendingvoicemessage
AvoicemessageusethesametechnologyasaMMS.Bothyouand therecipientmusthavesubscriptionsthatsupportMMS.Thesettings forMMSissuppliedbyyourserviceproviderandcanbesentto youautomaticallyviaSMS.Ifnot,seeMMSsettings,p.36onhow tosetyourMMSprofile.
- Pressshortcutbutton OK.
orpressMenu,scrollto andpress
SelectVoicemessagenfresOK.
- Recordingwillstartimmediately.PressStopwhendoneand pressYestosave.
Select already added recipient from Phonebook and press OK. Alternatively select Entenumber and press OK and recipient manually and press Done.
SelecAddadmoreecipienbselecSendsendand thenpressOK.
- You can also modify the recipients by selecting one and press Options Edit Delete Delet all.
Note!
If you choose to add multiplerecipients, you will be charged for each recipient (maximum 10). For international calls, always use + before
thecountrycodeforbestoperation.Press prefix+.
twicefortheinternational
CreatingandsendingMMS
AMMSmessagecancontaintextandmediaobjectssuchaspictures, soundrecordingsandvideo.Bothyouandtherecipientmusthave subscriptionsthatsupportMMS.ThesettingsforMMSissuppliedby yourserviceproviderandcanbesenttoyouautomaticallyviaSMS.If not,seeMMSsettings,p.36onhowtosetyourMMSprofile.
- Pressshortcutbutton orpressMenu, scroll to and press OK.

SelecMMSanφresOK.
- Typeyourmessage, see Enteringtext Options.
, p. 6, thenpress
SelectAdpictureaddtem\$youmessage#selecAdd subjecttoentersubject.
AddecipientswithT and Sendwhemeady.
Addpicture
SelecAdpictureanspresOK.
-
SelectMypicturesandpressOK AlternativelyselectTakepictureandpressOKusinghe cameratotakeapicture.
-
SelectafileandpressOK.
Addsubject
SelecAddubjectanφresOK.
- Typeyoursubject, thenpressDone.
Addrecipients(To)
Select Tanpress OK selectecipienfromPhonebook and press OK. Alternatively selecEntenumberanpress OK addrecipient manuallyandpressDone.
SelectAddadmoreecipienbselectSendsendand thenpressOK.
- You can also modify the recipients by selecting one and press Options Edit Delete Delete all.
Inbox, Sent, Outbox
| SMS/MMSunread | SMS/MMSsent | ||
| SMS/MMSread | SMS/MMSunsent |
Pres Menu scrolto

Selectnbox/Sent/OutboxanφresOK.
- SelectamessageandpressRead. Use √/tscrollthemessageup/down.
ar
- PressOptionsforthefollowingoptions:
View(MMSonly)
Toviewthemessage.
Call
PressOKtocallthecontact.
Resend
Sendagaintothesamereceiver.
Reply
Typeyourreply, thenpressSend. Themessagewillbesent immediately.
Delete
PresYesdeletethenessageNoreturn.
Download/Canceldownload
Ifthemessageisnotdownloadyet, pressDownload.
Edit
Editthemessage, thenpressSend.
Forward
Forwardamessage.Editthemessage(ifdesired), thenpressSend.
Usenumber
Displaysallphonenumberscontainedinthemessageaswellasthe sender'snumber.
| CallCalltheselectednumber. | |
| SaveSavethenumberinthePhonebook. | |
| SendSMSWriteanewSMSmessage. | |
| SendMMSWriteanewMMSmessage. |
Saveobjects(MMSonly)
Tosavetextandmediaobjectssuchaspictures,soundrecordings andvideo.
Details(MMSonly)
Toviewdetailsofthemessage.
Calllog
Received, missed, and dialled calls a resaved in a combined call log.
20callsofeachtypecanbestoredinthelog.Formultiplecalls relatedtothesamenumber,onlythemostrecentcallissaved.
Retrievinganddialling
1. Press
Alternatively, pressMenu, scrollto

andpressOK.
2. Use √/tescrollthroughtheCalllog.

Receivedcall

Dialledcall

Missedcall
3. Press to dialthenumberorpressOptionsforthefollowing settings:
| ViewShowdetailsfortheselectedcall. | |
| DeleteDeletethecall. | |
| Deleteall | DeleteallcallsintheCalllog. |
| SaveSavethenumberinthePhonebook. | |
Camera(takephotos)
Togetsharpphotos,wipethelenscleanwithadrycloth.
- Pressshortcut

opressMenuscrolto

- Press
PresOptionsBackiyoudo not make any selection the pictureissaved).
Camera,options
Send
Selectanoption, thenpressOK:
| Sendby MMS | SendasMMSPressOKcreateamessage,eeCreating andsendingMMS,p.16. |
| Sendby Bluetooth | SendtootherBluetoothdevices,seeBluetooth ^ ,p.41. |
Delete
PressOKdeleteselectedimage.PresYesconfirmNo return.
Use
Selectanoptionfromthelist,thenpressOK.
| Wallpaper | Saveasdisplaybackground.PressOK |
| Phonebook picture | Saveasphonebookcontact.PressOK. |
Cameraadjustments
- Use /tozoominandout.
Use sides buttons + /tadjusEV/Lightsensitivity.
Note!
Zoommayreduceimagequality.
Formorecamerasettings,see Camera,p.38.
Imageviewer
Viewyoursavedimages.
- PressMenu, scroll to
andpressOK. - Selectanimage, thenpressOptions.
- SelectoneofthefollowingoptionsandpressOK.
Imageviewer, options
View
Singleview.PressBackwhendone.
Send
Selectanoption, thenpressOK:
| Sendby MMS | SendimageasMMS.PressOKtocreateamessage,see CreatingandsendingMMS,p.16. |
| Sendby Bluetooth | SendimagetotherBluetoothdevices,seeBluetooth®, p.41. |
Delete
Press OK delete selected image. Press Yes confirm No return.
Use
Selectanoptionfromthelist, thenpressOKtoconfirm.
| Wallpaper | Saveasdisplaybackground.PressOK. |
| Phonebook picture | Saveasphonebookcontact.PressOK. |
Details
Viewdetailedinformationaboutthefile,e.g.date,size,copyright.
Rename
RenameImageDeletewithCleanAndPressDoneConfirm.
Browsestyle
Youcanchangeimageview.DefaultisLarge, youcanalsoselectListorMedium.
InListthefilename, thedateandthesizeoftheimageisshown.
Sortby
SelectfowantsoryouimagesbyNameTime.
Storage
Selectwherethephoneshouldsavefilesifyouhavememorycard installed.
Deleteall
PresOKdeleteImagesPressYesconfirmNoreturn.
Connectingthephonetoacomputer
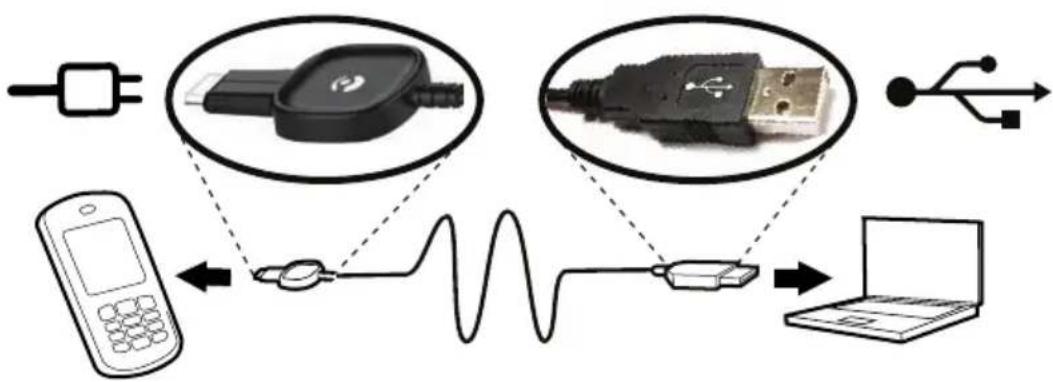
flowchart
graph LR
    A["Mobile Phone"] --> B["Wireless Device"]
    B --> C["USB Port"]
    C --> D["Laptop"]
    style A fill:#f9f,stroke:#333
    style B fill:#ccf,stroke:#333
    style C fill:#cfc,stroke:#333
    style D fill:#fcc,stroke:#333
Connectthephonetoacomputerandstarttransferringpictures, musicandotherfiletypes.AllyouhavetodoisconnectaUSBcable between the phone and computer.From your computer's file explorer, you candrag and drop content between your phone and the computer.
Note!
Youmightnotbeabletotransfersomecopyright-protectedmaterial.
Draganddropcontentbetweenphoneandacomputer
- Connect your phoneto a computer using a USB cable.
- Wait until the phone/memory card appears as external disks in the file explorer.
- Draganddropselectedfilesbetween the phone and the computer.
Note!
Whenthephone/memorycardismountedtothecomputer, thephone cannotaccessthememorycard. Somefunctionalityandapplicationsin thephone, suchasthecamera, maynotbeaccessible.
YoucantransferfilesbyusingaUSBcableonmostdevicesandoperatingsystemssupportingaUSBMassStorageinterface.
DisconnecttheUSBcablesafely
- Makesuretoenablethehardwaretobesafelyremoved.
- Disconnect the USB cable.
Note!
DonotdisconnecttheUSBcablewhentransferringcontentasthis maycorruptthecontent.
Computerinstructionsmayvarydependingonyouroperatingsystem.
Seethedocumentationofyourcomputer'soperatingsystemformore information.
Settings
Note!
Thesettingsdescribedinthischapterarecarriedoutinstandbymode.
Press toreturntostandbymode.
General
Time&date
Settingthetimeanddate
- PressMenu, scroll to
SelecGeneraAnfressOK.
SelectTim&datenφresOK.
SelecSetimenpressOK. - Enterthetime(HH:MM), thenpressOK.
Selec SedatenpresOK. - Enterthedate(DD/MM/YYYY), thenpressOK.
andpressOK.
Settingthetime/dateformat
- PressMenu, scroll to
SelecGeneraAnφresOK.
SelectTim&datenφresOK.
SelecSeformainpresOK.
Select Time format and pres OK.
Select 12 hours 24 hours and pres OK.
SelecDatformatanpresOK.
- Select the desired date format and press OK.


andpressOK.
SettingAutotimeon/off
- PressMenu, scroll to
SelecGenerainpressOK.
SelectTim&datenφresOK.
SelecAutdimenøpresOK.
SelecOn/OffanpressOK.

andpressOK.
Tosetthephonetoautomaticallyupdatethetimeanddateaccording tothecurrenttimezone,selectOn.Automaticupdateofdateand timedoesnotchangethetimeyouhavesetforthealarmclockorthe calendar.Theyareinlocaltime.Updatingmaycausesomealarmsyou havesettoexpire.Dependingonnetworksupportandsubscription.
Language
Thedefaultlanguageforthephonemenus, messagesetc.is determinedbytheSIMcard.Youcanchangethistoanyother languagesupportedbythephone.
- PressMenu, scroll to

andpressOK.
SelecGenerainpresOK.
SelectLanguageAndPresOK.
- Scroll √/toselectalanguage, thenpressOK.
Start-upwizard
Use the Start-up wizard to set some basic settings.
PresYeschangeNofoudon'twantchange.
•Language
•Time&date
- DisplaysettingssuchasThemes,TextsizeorWallpaper.
- SoundsettingssuchasRingtone,Volume,orAudiosetup.
- MessagesettingssuchasPredictivetextandWritespeed.
Ownernumber
ThephonenumbersassignedtoyourSIMcardaresavedinOwner numberifthisisallowedbythecard.
Toview/editorthenumbers:
Pres Menu scrolto

SelecGeneraAnφresOK.
SelecOwnenumbeanpressOK.
See Phonebook, p. 12 on how to add names/numbers.
Toeditordeleteanexistingentry,selectitandpressOptions,then selecEditDeleteandpresOK.
Blockfunction

Youcandisablefunctionstosimplifyuseofthephone.
- PressMenu, scroll to

andpressOK.
SelecGeneraAnφresOK.
SelecBlockfunctionandpressOK.
-
SelecteachfunctionyouwanttodisableandpressOff.
-
PressDonetoconfirm.
Networksetup
Yourphoneautomaticallyselectsyour(serviceprovider's)home networkifthisiswithinrange.Ifnotwithinrange,youmayuse anotheretwork,providedyournetworkoperatorhasanagreement thatallowsyoutodoso.Thisiscalledroaming.Contactyourservice providerformoreinformation.
- PressMenu, scroll to

andpressOK.
SelecGeneraAnøpresOK.
SelecNetworksetupanpressOK.
- SelectoneofthefollowingoptionsandpressOKtoconfirm.
Newsearch
Performnewsearchifconnectionislost.
Selectnetwork
Toviewavailablenetwork, pressSelectnetwork.Alistofavailable network operators is displayed(afterashortdelay).Selectdesired operator and press OK.
Networkmode
Toselectanothernetwork, selectNetworkmode and thenselectone of the following options.
| Automatic Network | workisselectedautomatically. |
| Manual | Networkisselectedmanually.UseSelectnetworkto selectdesiredoperator. |
Services
Thismenumaycontainpre-programmedservicesfromyournetwork provider. Dependingonnetworksupportandsubscription.
- PressMenu, scroll to

andpressOK.
SelecGenerainφresOK.
SelecServiceanφresOK.
Torch
Settheautomaticswitchofftimeforthebuiltintorch.
- PressMenu, scroll to

andpressOK.
SelecGenerainfresOK.
SelectTorclanφresOK.
- SelectoneofthefollowingoptionsandpressOK.
| 1minTurnsoffa | automaticallyafter1min |
| 2minTurnsoffa | automaticallyafter2min |
| NolimitNoautomaticturnoff | |
Note!
Thetorchwilldrainthebatteryveryquickly.Remembertoturnoff thetorchafteruse.
Phonebookstorage
- PressMenu, scroll to

andpressOK.
SelecGenerainφresOK.
SelectPhonebookstoragepressOK.
- SelectoneofthefollowingoptionsandpressOK.
| SIM1phonenu | mberpercontact.Numberandlengthofthephonenumberst/contactsthatcanbestoredwillvarydependingonSIMcard/serviceproviderpreferences. |
| Phone | 300contactswith3phonenumberseachMobile,HomeorOffice. |
Phonebookpicture
Youcanchangethephonebookviewmode.SelectOntoseethecontactassociatpicture(Picture)oselecOffdisplayonly the namesofcontacts.
- PressMenu, scroll to

andpressOK.
SelecGenerainpressOK.
SelecPhoneboolpictureandpresOK.
SelectOnOffAndPressOK.
Sound
Note!
Silentneed\$bsetOffAccessTonsetupVolumeAlertype andExtratone.SeeSilent,p.28.
Audiosetup

If you use a hearing aid or have hearing difficulties when using the telephone in nanoisy environment, you can customize the phone's audiosettings.
- PressMenu, scroll to

andpressOK.
SelecSoundanpressOK.
SelecAudisetupanφresOK.
- SelectoneofthefollowingoptionsandpressOK.
| Normal | Fornormalhearinginnormalconditions. |
| MediumFormil | dhearingimpairmentorusageinnoisy environment. |
| HighFormoderate | atehearingimpairmentorusageinverynoisy environment. |
Tonesetup

Pres Menu scrolto
SelecSoundnφresOK.
Select TonsetupnφresOK.
Selec Ringonenpress OK.
- Scroll / toselectoneoftheavailablemelodies,themelody will be played Press OK confirm Back discard changes.
ar
StephAlarmMessageoneKeypadonePowerand Poweroffinthesameway.
Ringtonevolume

Pres Menu scrolto
SelecSoundanφresOK.
SelecVolumenφresOK.
- Scroll √/techangetheringvolume,thenpressOK.

ar
Silent
- PressMenu, scrollto
SelecSoundanφresOK.
SelecSilentanøpresOK.
SelectOnOffAndPressOK.

andpressOK.
Tip:
Pressandholdshortcutbutton
# toactivate/deactivateSilent.
Alerttype

Incomingcallscanbesignalledbyaringtoneand/orvibration.
- PressMenu, scroll to

andpressOK.
SelecSoundanpresOK.
SelecAlertypenφresOK.
- Scroll / toselectsignallingmode, thenpressOK.
| RingonlyRingtoneonly. | |
| Vib.onlyVibrationonly. | |
| Vib.andringVibrationandringtone. | |
| Vib.then ring | Startswithvibrationandaddsringtoneafterashort while. |
| Silencorvibration,thedisplaylightislit. | |
Extratone
Warninganderrortonesareusedtoalertyouoflowbatterypower, phoneandSIMcarderrors,etc.
- PressMenu, scroll to

andpressOK.
SelecSoundanφresOK.
SelecExtràonenφresOK.
SelectWarningAndPressOn/OffEnable/disable.
SelecErroanfressOn/Offenable/disable.
- PressDonetosave.
Display
Wallpaper
Youcanselectdifferentdisplaybackgrounds.
- PressMenu, scroll to

andpressOK.
SelecDisplayanφresOK.
SelecWallpapeanφresOK.
- Scroll √/todisplayavailablewallpapers.
PresOKconfirmoBackdiscar changes.
Textsize

Youcancustomizethetextsizeformessagesandthephonebook.
- PressMenu, scroll to

andpressOK.
SelecDisplaynφresOK.
Select TextizenpressOK.
SelectNormalLargenpressOK.
Idledisplay
Instandbymodethedisplaycanshowclockonly,clockandthe serviceprovider,orallinformation.
- PressMenu, scroll to

andpressOK.
SelecDisplaynφresOK.
Selectd1displaynφresOK.
SelectClockonlyClockOperatorAlInfandpressOK.
Themes

You can select different themestopersonalisethephone's texts and background.
- PressMenu, scroll to

andpressOK.
SelecDisplayanφresOK.
SelectThemesAndPresOK.
- Scroll / toselectatheme.
PresOKconfirmoBackdiscar changes.
LCDbacklight

Selectthedelaytimeforthedisplaybacklight.
- PressMenu, scroll to

andpressOK.
SelecDisplaynφresOK.
Select LCDacklight and press OK.
Select 15sec.30sec/minandpresOK.
Brightness
Youcancustomizethephone'sbrightnesssettings.
- PressMenu, scroll to

andpressOK.
SelecDisplaynφresOK.
SelecBrightnessøpresOK.
SelectLevel-LevelBanpressOK.
Calls
Voicemail
If your subscription includes an answering service, callers can leave avocemail message when you cannot answer a call. Voicemail is anetworkservice and you may need to subscribe to first. For more information and for the voicemail number, contact your service provider.
- PressMenu, scroll to

andpressOK.
SelecCallsanφresOK.
SelecVoicenaianfresOK.
SelecEmptyAndPressAdd.
- SelectPhonebooktoaddacontactfromthePhonebook.
Alternativelypress Manual See Phonebookp.12 how add names/numbers.
- PressOK.
Toeditordeleteanexistingentry,selectitandpressOptions,then selecEditDeleteanfresOK.
Callvoicemail
Press Menu scrolto

SelecCallsanφresOK.
SelecVoicenaianpresOK.
SelecOptionsanφresOK.
SelecCalVoicemailandpressOKcalthevoicemailbox.
ar
Tip:
Pressandholdshortcutbutton 1 tocallyourvoicemail. IfactivatedreminderintheMessagessettings,aremindersignalwillbe heardafter10minutesifnotlisteningtothevoicemailmessage.
Speeddial

A, B, and thenumerical keys dialling.
0 and 2–9 canbeusedforspeed
Addingspeeddialnumbers
- PressMenu, scroll to

SelecCallanφresOK.
SelectSpeedianpressOK.
-
Select A andpressAdd.
-
SelectanentryfromthephonebookandpressOK.
6.Repeattoaddspeeddialentriesforbuttons
B, 0, 2-9.
Tochangecontact, selectanexistingentryandpressOptions, then selecEditDeleteandpressOK.
Tospeeddialanentryfromstandby, pressandholdcorresponding button.
Youcaneditthecontactinformationforthededicatedspeeddial buttons A and B.
- Presscorrespondingbutton. Use thenumber, thenpressEdit.
√/tehighlightthenameor
PresOKconfirmDeletewithClear.
Top10

Settheentryasoneofthefirst10contactslistedinthe phonebook.
Pres Menu scrolto
SelecCallanφresOK.
Select Top 10 and press OK.

- SelectoneoftheemptyentriesandpressAdd.
- Use //tescrollthroughthephonebook,orquicksearchby pressingthekeycorrespondingtothefirstletteroftheentry.
PresOKsaveheselectentryopresBackoliscard changes.
TodeleteaTop10entry,selecttheentryintheTop10listandpress Options,thenDelete.
Tip:
Youcanalsoadd entryfromthephonebook.Selectthecontactand pressOptions,thenTop10andpressOK.
Calltime
Duringacall, the duration of the call is shown. You can check the duration of your calls.
- PressMenu, scroll to

andpressOK.
SelecCallanφresOK.
SelecCallimenφresOK.
- SelectoneofthefollowingoptionsandpressOK.
| Lastcall | Showtheelapsedtimeofthemostrecentcall. |
| Outgoing calls | Showtheelapsedtimeofalldialledcalls. |
| Received calls | Showtheelapsedtimeofallreceivedcalls. |
| Resetall | PressYesresethæimeroNodiscar changes. |
Anykey
SelecAnkeyanpresOKşelecOranpresOKbableo
answerincomingcallsbypassinganybutton(exemption

Callsetup
Dependingonnetworksupportandsubscription.Contactyourservice providerformoreinformation.
CallerID
Displayorhideyourphonenumberontherecipient'sphonewhen youcall.
- PressMenu, scroll to

andpressOK.
SelecCallanφresOK.
SelecCalsetupanpresOK.
SelecCallerDanfressOK.
- SelectoneofthefollowingoptionsandpressOK.
| Setby network | Usedefaultsettingbythenetwork. |
| HideID | Nevershowyournumber. |
| SendID | Alwaysshowyournumber. |
Callwaiting
Youcanhandlemorethanonecallatatime.Analerttonewillbe heardifthereisanincomingcallwhiletalking.Toputthecurrent callonholdandanswertheincomingcall,pressOptions,select AnswerandthenOK.
- PressMenu, scrollto

andpressOK.
SelecCallanfresOK.
SelecCalsetupanpresOK.
Select CalWaiting and press OK.
- SelectoneofthefollowingoptionsandpressOK.
| ActivateEnable | scallwaiting. |
| DeactivateDis | blescallwaiting. |
| Querystatus | displaysifcallwaitingisactiveornot. |
Calldivert
Youcandivertcallistoanansweringservice,ortoanotherphone number.Setupwhichcallsshouldbediverted.Selectacondition anpressOK,therselecActivateDeactivateQuerystatus(see Callwaiting,p.33)foreach.
Pres Menu scrolto
SelecCallanφresOK.
SelecCalSetupanφresOK.
SelecCaldiveranfresOK.

- SelectoneofthefollowingoptionsandpressOK.
| VoicecallsDivertsallvoicecalls. | |
| Unreachable | Divertsincomingcallsifthephoneisturnedofforoutofrange. |
| Noreply | Divertsincomingcallsifunanswered. |
| IfbusyDivertsincomingcallsifthelineisbusy. | |
| Canceldiverts | Donotdivertcalls. |
Callbarring
Yourphone can be restricted to disallow certainty types of calls.
Note!
ApasswordisneededtoapplyCallbarring.Contactyourservice providertogetthepassword.
Press Menu scrolto

SelecCallanφresOK.
SelecCalSetupanφresOK.
SelecCalbarringnφresOK.
- SelectoneofthefollowingoptionsandpressOK.
| Outgoing calls | PressOKthenselect: |
| Allcalls | Usercananswerincomingcallsbutnotdialout. |
| Internat.calls | Usercannotcallinternationalnumbers. |
| Int.excep home | Usercannotcallinternationalnumbersexcepttothe countryassociatedwiththeSIMcard. |
| Incoming calls | PressOKthenselect: |
| Allcalls | Usercandialoutbutnotreceiveincomingcalls. |
| When roaming | Usercannotreceiveincomingcallswhileroaming (operatinginothernetworks). |
| CancelallCancelallcallbarring(passwordneeded). | |
Messages
- PressMenu, scroll to
andpressOK.
SelecMessagesanφresOK. - SelectoneofthefollowingoptionsandpressOK.

Predictivetext

SelectOnAndPresOKenablePredictivext/eZiType Enteringtext ≈, p.6.
^TM see
Writespeed

Youcanchangethespeedatwhichkeypadcharactersrepeat(before thecursormovesontothenextcharacter).
SelectFastNormabSlowanφresOK.
SMSsettings
Memorystatus
Display the percentage of memory space used on the SIM card and in the phonememory. Phonememory can store up to 200 messages.
Storage
SelectSIMdefaultstoremessagesintheSIMcardoPhone tostoremessagesinthephonememory.
- PressOK.
Profileset
Thisnumberisneededtousethemessagefunction.Thenumberto yourservicecentreissuppliedbyyourserviceproviderandisusually setontheSIMcard.IftheservicecentrenumberissavedontheSIM carditisshown.Ifnot,youcanenterthenumberyourself.Contact yourserviceproviderformoreinformation.
Press Ediantentethservicecentrenumber.PresCleato delete.
- PressOKtosavethenewnumber.
Cellinformation
You can receive messages on various topics from your service provider, such as weather or traffic conditions in a particular region. For available channels and relevant channel settings, contact your service provider. Cell broadcast messages cannot be received when the device is roaming.
SelecCellInformationanpressOKothefollowingsettings:
| Functionon/off | TøurninformationOnOff. |
| Readmessages | PressOKtoreadthemessage. |
| Languages | SelectanguageOn/Off and pressDone. |
| Channelsettings | Selectfromwhichchannelsyouwanttoreceive/subscribe messages. UsetheoptionsSubscribe, Cancel subscription, AddEdit and Deleted your channels. |
MMSsettings
Memorystatus
Display the percentage of memory space used in the phonememory.
MMSprofile
ThesesettingsareneededtousetheMMSfunction. Thesettings forMMSissuppliedbyyourserviceproviderandcanbesentto youautomatically.
SelectMMprofilanφresOK.
- Select your service provider and press Options.
SelecActivatenpressOK.
If your service provider is not in the list, do the following:
SelectMM\$profilanφresOK.
Select Add and pres OK to the following settings: Enter the settings for your service provider. The correct settings can be obtained from the service provider.
| Account name | Addaccountname. |
| APN | AddAPN(AccessPointName). |
| UsernameAdd | username. |
| PasswordAdd | password. |
| HomepageAdd | dhomepage. |
| Connection type | Usethesidebuttons+/-toselectconnectiontype HTTPorWAP. |
| Proxy address | Addproxyaddress. |
| ProxyportAdd | proxyport. |
| UsernameAdd | proxyusername. |
| PasswordAdd | proxypassword. |
BresOKanpresYessaveNoexitwithoutsaving.
- Select your new profile and press Options.
SelecActivatenfressOK.
Youcanalsoactivate/modifyaMMSprofilebyselectingoneandpress OptionsActivate/Edit/Delete account.
Note!
Someserviceprovider'srequireyoutosendanMMSmessagebefore youwillbeabletoreceiveone.SendaMMSwithtextonlytoactivate theservice.Someserviceprovider'srequirethatyoucontactthem beforeenablingMMSforyouraccount.Contactyourserviceprovider's CustomerServices.Press duringsetuptoexitwithoutsaving.
Reminder
TheSMSreminderalertsyouonceifyouhaven'tcheckedyourtext messageorlistenedtoyourvoicemailwithin10minutesfromreceipt. Ifnotificationenvelopeisremovedbypassing ,noreminder willbeheard.
Select Reminde and pres On/Off enable/disable.
Vibration
TheSMSvibrationalertisseveralshortvibrationsthatcontinuesfor eitheShort4seconds)Long(12 seconds).
Note!
IfAlerttypeissettoRingonlythephonewillnotvibrate.
Deliveryreport
YoucanselectifyouwantthephonetonotifyyouwhenyourSMS hasreachedthereceiver.
SelectDeliveryreportandpressOKSelectDmOffenable/disable. PressOKtosave.
Note!
Iyou choose Deliveryreport=On some operators will charge you for that message.
Delete
SelectnboxdeleteAllmessage\$InboxPressYesconfirmNo todiscardchanges.
SelecOutboxdeleteAlmessage\$InOutbox.PressYesconfirm orNotodiscardchanges.
Select delete messages Sent Press Yes confirm No to discard changes.
SelecDeleteAlldeletallmessagesathsamePresYes confirmorNotodiscardchanges.
Camera
- PressMenu, scroll to SelectCameraandpressOK.

andpressOK.
- SelectoneofthefollowingoptionsandpressOK.
EVinformation
EV/Lightsensitivitycanbeadjustedbypushingvolumekeysup&downwhenincameramode.
Flash
Select the following options AutoOffOn Red-eye reduction.
Imagesize
Select the following options Wallpaper(lowestquality), MP, 2MP or 3MP (highest quality).
Note!
With higher quality(moremegapixels), less pictures can be stored in memory.
Shuttersound
Select the following option Off Low High.
Assistance

SettingsfortheAssistancebuttonfunction.
- PressMenu, scroll to

andpressOK.
Select Assistance and press OK to the following settings:
Activation
SelectoneofthefollowingoptionsandpressOK.
| OnNormalToactivate,pressandholdbuttonforapproximately3 seconds,orpress2timeswithin1second. |
| On(3)Toactivate,pressbutton3timeswithin1second. |
| OffAssistancebuttondisabled. |
Numberlist
The list of number that will be called when the Assistance button is pressed.
SelecEmptynφresAdd.
- SelectPhonebooktoaddacontactfromthephonebook.
Alternativelypress Manual See Phonebookp.12 on how add names/numbers.
- PressOK.
Repeatuntilyouhave5contacts(maximum).
Toeditordeleteanexistingentry,selectitandpressOptions,then selecEditDeleteandpresOK.
SMS
Themessagetobesenttothecontactsinnumberslistwhenthe Assistancebuttonispressed.
Activation
SelectoneofthefollowingoptionsandpressOK.
| OnThephonesendsatextmessagebeforedialling. | |
| OffThephoned | alswithoutsendingamessagefirst. |
Message
PresEditantethemessagandhenpressOKconfirm.
Note!
YoumustwriteamessageifyyouactivatetheSMSfunction.
Confirmwith"0"
SelectoneofthefollowingoptionsandpressOK.
| OffThephonew | willdialthefirstnumberonthelist.Ifthecallisnotansweredwithin25seconds,thenextnumberisdialled.Diallingisrepeated3timesoruntilthecallisanswered,oruntil ispressed. |
| OnThefunction | willworkasaboveAND:Ifthereceiverdoesn'tpress 0 within60secondsthecallwillbedisconnectedandthenextnumberinsequencewillbecalled.Ifthereceiverpresses 0 within60seconds,thecallisconfirmedandnofurtherecallattemptswillbemade(assistancesequenceinterrupted). |
Signaltype
Adjustmentofthesignaltypefornotificationoftheassistance sequence.
SelectoneofthefollowingoptionsandpressOK.
| HighLoudsignals(default). | |
| Low | Onelowsignal. |
| SilentNosound | indication,likeanormalcall. |
Alarminfo
Pleasereadthisimportantsafetyinformationbeforeenablingthe assistancefunction:
Becarefulaboutincludingnumberswithautomaticansweringinthe calllist,asthealarmsequencestopsoncethecallisanswered.
Note!
ThisinformationisnotapplicableConfirmwithOfIsetOn.
Bluetooth®
IMPORTANT!
When you are not using Bluetooth connectivity, select Function on/off/Off/Visibility Off Doopain with unknown device.
YoucanconnectwirelesstootherBluetoothcompatibledevicessuchasheadsets.
- PressMenu, scroll to

andpressOK.
SelectBluetoothAndPressOKothefollowingsettings:
Functionon/off
SelectOn/OffanpressOKenable/disableBluetooth.
Visibility
SelecOn/Offmake you phone visible/invisible to the devices.
Note!
Topreventotherdevicesfromfindingyourdevice,selectOff.Evenif youselectOff,paireddeviscanstilldetectyourdevice.
Devicename
EnterthenameyourphoneshouldappearwithforotherBluetooth devicesandpressOK.
Searchdevice
SearchforavailableBluetoothaudiodevices. If Bluetooth is not enabled you can enable it now bypassing Yes.
-
SelectfromthelistofdevicesandpressBondtoconnect.
-
When connecting to another Bluetooth device you need a shared password. Enter the password and press OK.
Mydevice
Listssaveddevicesandenablesyoutoaddnewdevices.Selectdevice fromthelistandpressOptions.
| Connect/Disconnect | Connect/disconnectselecteddevice.Selectrequired profile,usuallyaheadset. |
| SetdefaultSelect | cttheconnecteddeviceasdefault. |
| Rename | Changethenameofthedevice. |
| Delete | Deletethedevicefromthelist. |
| Deleteall | Deletealldevicesfromthelist. |
Audiopath
SelectoneofthefollowingoptionsandpressOK.
| Phone | Incomingcallsareansweredwiththephone. |
| ForwardBT | IncomingcallsareforwardedtoBluetoothdevice. |
Security
- PressMenu, scroll to SelectSecurity and press OK.

andpressOK.
SIMlock
TheSIMcardisprotectedwithaPINcode(PersonalIdentification Number). ThephonecanbesettoaskforthePINcodeonstartup.
SelectoneofthefollowingoptionsandpressOK.
| OnPINcodeactivated,youneedtoenterthePINcodeevery timethephoneisstarted. | |
| OffPINcodeactivated.Warning,ifSIMcardislost/stolen itisunprotected. | |
| Automatic | YoudonotneedtoenterthePINcodewhenthephone isstarted,thephoneremembersitautomatically.IfSIM cardismovedtoanotherphone(lost/stolen),thePIN codeneedstobeenteredtounlock. |
Note!
YouneedtoinputthecurrentPINcodetodisable/enableSIMlock.
Phonelock
SelecOn/Off anpress OK enable/disable.
Note!
YouneedtoinputthecurrentPhonecodetodisable/enablePhonelock.
ThedefaultPhonecodeis1234.
Keypadlock
SelectoneofthefollowingoptionsandpressOK.
| Autokeylock | Selectthetimedelayforautomatickeypadlocking.Press OKtoconfirm. |
| Unlockmode | SelectSinglekeytounlockthekeypadwith ☐ orDualkey tolock/unlockwithrightselectionbutton(Name/Unlock) and ☐.PressOKtoconfirm. |
Autokeylock
SelecOn/OffanpressOK.
Remoteconfiguration

Allowpersonsthatyoutrust,usuallyafamilymemberorfriend,to sendinformationtoyourDoroPhoneEasy ^® 520X.Youcanreceive phonebookcontactsandcontactsforspeeddialkeys,calendartasks andsettingsfortheAssistancebutton.Whenactivated,youdon'thave todoanything,it'stheotherpersonthatsendsinformationtoyou.
Select Remote configuration press OK to the following settings:
Activation
SelectActivateRemoteConfigurationAndPresOK.
| OnRemoteconfigurationenabled. | |
| OffRemoteconfigurationdisabled. |
Numberlist
Youneedtoaddthenameandnumberofthepeoplewhoareallowed tosendinformationfromtheirphonetoyourDoroPhoneEasy 520X.
SelectNumbelistanpresOK.
SelecEmptynφresAdd.
- SelectPhonebooktoaddacontactfromthePhonebook.
Alternatively, pressManual.
- Press √.
5.EnterthenumberandpressOK.
Repeatuntilyouhave5contacts(maximum).
Toeditordeleteanexistingentry,selectitandpressOptions,then selectViewEditDeleteandpresOK.
Fixeddial(FDN)
YoucanlimitcallstocertainnumberssavedontheSIMcard. Thelist ofallowednumbersisprotectedbyyourPIN2-code.
| Mode | SelecOn/OffanpresOKEntePIN2PresOKo confirm. |
| Fixed numbers | PressAddtoenterthefirstallowednumber.Alternatively, selectanentryandpressOptionsforthefollowing settingsAddEditDeleteanpresOKEntePIN2.PressOKtoconfirm. |
Note!
Youcansavepartsofphonenumbers. Forexample, ifyousave01234, allowscallstoallnumbersstartingwith01234. Itispossibletoplace anSOScallbyenteringthemainlocalemergencynumberfollowedby
evenwhenfixeddialisactivated.Whenfixeddialisactivatedyou arenotallowedtoviewormanageanyphonenumberssavedontheSIM card.YouarenotabletosendanySMSeither.
Passwords(changeyour passwords)
To change the PINPIN2th Phonecode passwords:
- Enter the current code and confirm with OK.
2.EnteranewcodeandconfirmwithOK. - EnterthenewcodeagainandconfirmwithOK.
Resetsettings
If you select Reset settings, the changest that you have made to the phones settings will be reset default settings. Input the phone password and press OK to reset.
Resetall
If you select ResetAll, your phone's settings and content, such as contacts, number lists and messages, will be deleted in phone memory (SIM memory is not affected). Input the phone password and press OK to reset.
Note!
ThedefaultPhonecodeis1234.
Filemanager
Managethecontentsandpropertiesoffiles.Youcanopen,delete, move,copyandrenamefiles.
Supportedimageformat:BMP/GIF/JPG/PNG.Photostakenwiththe builtincameraaresavedasJPG.
Supportedaudioformat: WAV/AMR/MIDI/MP3/AAC/AAC+. Recordings madewiththebuiltinsoundrecorderaresavedasAMR.
Supportedvideoformat:MP4/3GPP.Onlyplaybackispossible.
- PressMenu, scroll to

andpressOK.
SelecFilemanager,therpressOK.
SelectPhone/MemorycardnprofresOpen.
Select foldereg PhotosandpressOpen.
- SelectafileandpressOptionsforthefollowingoptions:
Play(audio/video/music)
Playfile.Use whendone.


tStop playback.PresB
View(photos/images)
Singleview.PressBackwhendone.
Send
Selectanoption, thenpressOK:
| Sendby MMS | SendbyMMS.PressOKtocreateamessage,see CreatingandsendingMMS,p.16. |
| Sendby Bluetooth | SendtootherBluetoothdevices,seeBluetooth ^® ,p.41. |
Details
Viewdetailedinformationaboutthefile,e.g.date,size, copyright-protection.
Use
Selectanoptionfromthelist,thenpressOK.
| Wallpaper | Saveasdisplaybackground.PressOK. |
| Phonebook picture | Sendtoaphonebookcontact.PressOK. |
Rename
Rename the file Delete with Cleanpress Done confirm.
Delete
PresOKdeleteselectedilePressYesconfirmNoreturn.
Deleteall
PresOKdeleteafilesselectedolderPresYesconfirm orNotoreturn.
Sortby
SelectyouwantsoryoufileNameTime.
Copy/Move
Tocopyormoveafiletoanotherfolder:
SelecCopy/MovanpressOK.
SelectPhone/MemorycardnpressOptions.
SelecOperanφresOK.
Select foldereg Photos and press Options.
SelecPastenφresOK.
Additionalfunctions
Alarm
- PressMenu, scroll to
SelecOranφresOK.
- Enterthealarmtimeusingthekeypad, thenpressOK.
FosingleoccurrenceselecSinglenfresOK.
For repeated alarm select Repeated press OK Scroll through the last weekdays and press On/Off enable/disable the alarm foreach weekday, then press Done.
BediaralarmpressEditthenpresOK.
- Tostopthealarm, pressOff. Thealarmisnowdeleted.
Note!
Thealarmwillworkevenwhenthephoneisswitchedoff.Donotpress
Yestopoweronifwirelessphoneuseisprohibitedorwhenitmay causeinterferenceordanger.
Whenthealarmgoesoffasignalwillsound. PressStoptoturnoffthe alarmorpressSnoozetorepeatthealarmafter9minutes.
Organizer
-
PressMenu, scroll to
-
SelectoneofthefollowingoptionsandpressOK.

andpressOK.
21 Calendar
View
Showtasksfortheselecteddate.
Addtask
- Enterdateforthetask, thenpress
- Entertimeforthetask, thenpress
- Entersubject.
- PressOK.
Jumptodate
EnterthedateandpressOK.


Viewall
SelectataskandpressOptionsforthefollowingoptions:
| EditEditselectedtask. | |
| DeleteDeleteselectedtask. | |
| DeleteallDeletealltasks. |
Note!
The calendar will work even when the phone is switched off. Donot press Yestopoweron if wireless phone use is prohibited or when it may cause interference or danger.

Dailyreminder
- Entertimeforthetask, thenpress
- Entersubject.
- PressOKtosavethetask.
Note!
Worksevenwhenthephoneisswitchedoff.DonotpressYestopower onifwirelessphoneuseisprohibitedorwhenitmaycauseinterference ordanger.
Whenthealarmgoesoffasignalwillsound. PressStoptoturnoffthe alarmorpressSnoozetorepeatthealarmafter9minutes.

Notes
Writedownnotesasyouwouldonanotepad.
- SelectAddtoenteryournoteusingthekeypad.
- PressSavetosavethenote.
SelectanoteandpressOptionsforthefollowingoptions:
| AddAddnewnote. | |
| EditEditselectednote. | |
| DeleteDeleteselectednote. | |
| DeleteallDeleteallnotes. |
Calculator
The calculator can perform basic mathematical operations.
Pres Menu scrolto

anq
2.Enterthefirstnumber.Use
toenterdecimalpoints.
- Usethearrowbuttonstoselectanoperation(+,-,x,÷)and pressOK.
- EnterthenextnumberandpressOK.
- Repeatsteps2–4 as necessary. Select an expres OK calculate the result.
FMradio
TheFMradiohasafrequencyrangefrom87.5to108.0MHz and 9presetchannels.
Turningtheradioon
- Connecttheheadsettotheheadsetsocket

- PressMenu, scroll to

andpressOK. Theradioisturnedon.
Thetunedfrequencyisdisplayed.Selectchannelusing^.Usethesidekeys+/-toadjustthevolume.

- Press toreturntostandbymode.Theradiowillcontinue toplay.
Loudspeaker
- Connecttheheadsettotheheadsetsocket

- PressMenu, scroll to

andpressOK.
-
SelectOptionsthenLoudspeakerandpressOK
-
SelectOntoactivatetheloudspeakers. Usethesidebuttons +/- toadjustthesoundvolume.
-
Toturnoff, selectOff.
Savefrequency
- PressMenu, scroll to

andpressOK.
- Selectchannelusing

or
- Whenastationhasbeenfound,selectOptions.
Selec SavéfrequencynφresOK.
5.Enteranameforthenewchannel,seeEnteringtext ,p.6.

- PressSave.
Switchoff
Pres Menu scrolto

PresOptionstherpresSwitchoff.
ar
Tip:
Disconnectingtheheadsetwillalsoturnofftheradio.
Channellist(editingthechannellist)
- PressMenu, scroll to

andpressOK.
- SelectOptions.
SelecChannelistanpresOK.
Select the channel you wish to find an press options. Add.
- SelectoneofthefollowingoptionsandpressOK.
| PlayPlaytheselectedchannel. | |
| Delete | DeleteChannelPressYesconfirmNoreturn tothechannellist. |
| EditEditthechannelname,thenpress toeditthe frequency,use # toenterthedecimalpoint.PressSave. | |
Selectingchannels
Presskeys 1-9 to quick-selectapresetchannelwhiletheradio is playing.
Manualinput(changingsearchmode)
Press Menu scrolto

- SelectOptions.
SelecManualInputnøpresOK.
- SelectoneofthefollowingoptionsandpressOK.
| FinetuneManu | altuningwith or . √ ∧ |
| Autosearch | Automaticstationsearchwith √ or ∧ . |
ar
Autosave
Note!
Thiswilloverwriteallpreviouslysavedchannels!
Press Menu scrolto

ar
2. SelectOptions.
SelectAutsaveAndpresOKautomaticallyinstalavailable
radiostationsinchannels 1-9.
Status
Scrollthestatuslisttogetfurtherinformationabouttheiconsshownontopofyourdisplay.Iconsshownonthedisplayvariesdependingonyourphonestatus.
i andpressOK.
- PressMenu, scroll to
- Use √ or to scroll the list.
- PressBacktoreturntostandbymode.
InstructionsfortheREMOTEUSER
Sendingremotecontrolcommandsbytextmessage.
ActivationmustbesettoOnandtheremoteusermustbeenteredin
NumberlistontheDoroPhoneEasy ^® 520X.
Menu → ↗ → Security ↗ Remoteconfig.
AllcontactssenttoDoroPhoneEasy ^® 520XbyremoteconfigurationarestoredinthePhone(evenifstorageissettoSIM).
3phonenumbersforeachcontact
Mobile, Homeor Office.
Note!
SMSformatmustbe*#Command#, otherwisetheSMScannotbe identifiedasaremotecontrolcommand.
Parametersarethecontentyouwanttosendandyoumustuse#sign toseparatetwoparameters.IntablesP=Parameters.
Settingacontactinthephonebook
| CommandP1P | 2P3 | P4 | ||
| phonebook | name max. length=30 | mobile max. length=40 | home | office |
Example:
YouwanttosendJeffJackson'smobilenumber,homenumberand hisofficenumbertoDoroPhoneEasy ^® 520X.Themobilenumberis:0700-393939.Homenumber:046-2805011.Officenumber:046-2805083.
*#phonebook#JeffJackson#0700393939#0462805011#0462805083#
Thenumberwillbesavedinthe520XPhonebookas:

JeffJackson
0700393939
0462805011
0462805083
Note!
Onlyusenumeralsforparameters2,3and4. Ifyouuselettersinthese parametersitwillbestoredasempty/blankinthePhonebook. ContactsalreadysavedinthePhonebook, willnotbereplaced. They willbeduplicated. Thisistoavoidunintentionalremovalofcontacts fromthePhonebook.
Tip:
Whenstoringinternationalnumbers,alwaysuse+beforethecountry codeforbestoperation.Enterthephonenumberincludingthearea code.
Settingtheassistancefunction
| CommandP1P | 2P3 | P | ||
| alert | aactivation | 0/1/20=Off1=OnNormal2=On(3) | ||
| alert | nnumber | 1-5locationinNumberlist | Namemax.length=30 | numbermax.length=40 |
| alert | mmessage | 0/10=Off1=On | Textmax.length=70 | |
| alert | cconfirmwith“0” | 0/10=Off1=On | ||
| alert | ssignaltype | 0/1/20=High1=Low2=Silent |
Example:
Youwanttoactivatetheassistancefunction.
*#alert#a#1#
YouwantJeffJacksontobestoredinNumberlistinpositionone(1) withphonenumber:0700-393939.
*#alert#n#1#JeffJackson#0700393939#
YouwanttheSMSmessageobesentoutwhentheAssistancebutton ispressed.Exampleofcontentintextmessage:Thisisanassistance message.Pleasetakeappropriateactions.
*#alert#m#1#Thisisanassistancemessage.Pleasetakeappropriate actions.#
YouwanttoturnonthefunctionConfirmwith"0".
*#alert#c#1#
YouwanttosettheSignaltypetolow.
*#alert#s#1#
Tip:
Remembertowritedownthepositionsyousend. Thiswayitiseasier foryoutolatersendchanges.
Settingtheonetouchmemories
| CommandP1P2P3 | |||
| memorykey | aAkey | Namemaxlength=30 | numbermaxlength=40 |
| memorykeyb | Bkey | Namemaxlength=30 | numbermaxlength=40 |
| memorykey | cCkey | Namemaxlength=30 | numbermaxlength=40 |
Example:
YouwanttosetJeffJackson'smobilenumberinmemorykeyAin DoroPhoneEasy ^® 520X.
Martha Thomson memory key and Steve Lewis memory key.
*#memorykey#a#JeffJackson#0700393939#
*#memorykey#b#MarthaThomson#0768991014#
*#memorykey#c#SteveLewis#0709441819#
Addtasktocalendar
| CommandP1P2P3 | |||
| taskyyyymmdd | Date | hhmmTime | notedescriptionoftask.max.length=35 |
Example1:
YouwanttosendanewcalendartasktoDoroPhoneEasy foradentistappointmentinDecember1,2010at10:30.
® 520X.Itis
*#task#20101201#1030#dentistappointment#
Troubleshooting
Phonecannotbeswitchedon
| Batterychargelow | Connectthepoweradapterandchargethe batteryfor3hours.Fullbatterycapacityis reachedafterthebatteryhasbeencharged 3–4times. |
| Batteryincorrectly installed | Checktheinstallationofthebattery. |
Failuretochargethebattery
| Batteryorcharger damaged | Checkthebatteryandcharger. |
| Batteryshouldonlybe chargedintemperatures between0°Cand40°C | Improvethechargingenvironment. |
| Chargerincorrectly connectedtophoneor powersocket | Checkthechargerconnections. |
Standbytimedecreases
| Batterychargecapacity toolow | Installanewbattery. |
| Toofarfrombase station,phoneis constantlysearching forsignal | Searchingthenetworkconsumesbattery power.Findaplacewithastrongersignal,or temporarilyturnoffthephone. |
Failuretoplaceorreceivecalls
| CallbarringactivatedDeactivatecallbarring.Ifthisdoesnotsolve theproblem,contactyourserviceprovider. |
PINcodenotaccepted
| WrongPINcodeentered toomanytimes | EnterthePUKcodetochangethePINcode, orcontactyourserviceprovider. |
SIMcarderror
| SIMcarddamagedCheckth | econditionoftheSIMcard.Ifitis damaged,contactyourserviceprovider. |
| SIMcardincorrectly installed | ChecktheinstallationoftheSIMcard.Remove thecardandreinstallit. |
| SIMcarddirtyordampWipe | thecontactsurfacesoftheSIMcardwith acleancloth. |
Failuretoconnecttonetwork
| SIMcardinvalidContactyourserviceprovider. | |
| NocoverageofGSM service | Contactyourserviceprovider. |
Weaksignal
| ToofarfrombasestationTry | againfromanotherlocation. |
| NetworkcongestionTrycall | ingatalatertime. |
Echoornoise
| Regionalproblemfrom badnetworkrelay | Hangupandredial.Thismayswitchto anothernetworkrelay. |
Failuretoaddacontact
| PhonebookmemoryfuDelete | econtactstofreeupmemory. |
Failuretosetafunction
| Functionnotsupported or subscribed from network | Contactyourserviceprovider. |
Safetynstructions

CAUTION
TheunitandtheaccessoriescancontainsmallpartsKeepallofthe equipmentoutofthereachofsmallchildren. Themainsadapteristhedisconnectdevicebetweentheproductand mainspower.Themainssocketoutletmustbeclosetotheequipment andeasilyaccessible.
Networkservicesandcosts
YourdeviceisapprovedforuseontheWCDMA900/2100MHz,GSM 900/1800/1900MHznetworks.Tousethedevice,youneedasubscriptionwith aserviceprovider.
Usingnetworkservicesmayresultintrafficcosts. Someproductfeaturesrequire supportfromthenetwork, andyoumayneedtosubscribetothem.
Operatingenvironment
Followtherulesandlawsthatapplywhereveryouare,andalwaysturnofftheunit wheneveritsuseisprohibitedorcancauseinterferenceorhazards.Onlyusethe unitinitsnormaluserposition.
Thisunitcomplieswithguidelinesforradiationwhenitisusedeitherinanormal positionagainstyourear,orwhenitisatleast1.5cmfromyourbody.Iftheunit iscarriedclosetoyourbodyinacase,beltholderorotherholder,theseholders shouldnotcontainanymetal,andtheproductshouldbeplacedatthedistance fromyourbodyspecifiedabove.Makesurethatthedistanceinstructionsaboveare followeduntillthetransferiscomplete.
Partsoftheunitaremagnetic.Theunitcanattractmetalobjects.Donotkeep creditcardsorothermagneticmedianeartheunit.Thereisariskthatinformation storedonthemcanbeerased.
Medicalunits
Theuseofequipmentthattransmitsradiosignals,forexample,mobilephones,can interferewithinsufficientlyprotectedmedicalequipment.Consultadoctororthe manufactureroftheequipmenttodetermineifithasadequateprotectionagainst externalradiosignals,orifyouhaveanyquestions.Ifnoticeshavebeenputupat healthcarefacilitiesinstructingyoutoturnofftheunitwhileyouarethere,you shouldcomply.Hospitalsandotherhealthcarefaciliessometimesuseequipment thatcanbesensitivetoexternalradiosignals.
Pacemakers
TheHealthIndustryManufacturersAssociationrecommendsthataminimum separationof15cmbemaintainedbetweenahandheldwirelessphoneanda pacemakertoavoidpotentialinterferencewiththepacemaker.Personswith pacemakers:
- Shouldalwayskeepthephonemorethan 15cmfromtheirpacemakerwhen thephoneisturnedon.
- Shouldnotcarrythephoneinabreastpocket.
- Shouldusetheearoppositethepacemakertominimizethepotentialfor interference.
If you have any reason to suspect that interference is taking place, turn the phone off immediately.
Areaswithexplosionrisk
Alwaysturnofftheunitwhenyouareinanareawherethereisariskofexplosion. Followallsignsandinstructions.Thereisariskofexplosioninplacesthatinclude areaswhereyouarenormallyrequestedtoturnoffyourcarengine.Intheseareas, sparkscancauseexplosionorfirewhichcanleadtopersonalinjuryorevendeath.
Turnofftheunitatfillingstations, and any other placethathasfuelpumps and autorepairfacilities.
Followtherestrictionsthatapplytotheuseofradioequipmentnearplaceswhere fuelisstoredandsold,chemicalfactoriesandplaceswhereblastingisinprogress.
Areaswithriskforexplosionareoften—butnotalways—clearlymarked. This also appliestobelowdecksonships; thetransportorstorageofchemicals; vehiclesthat useliquidfuel(suchaspropaneorbutane); areaswheretheaircontainschemicals orparticles, suchasgrain, dustormetalpowder.
Li-ionbattery
ThisproductcontainsaLi-ionbattery.Thereisariskoffireandburnsifthebattery packishandledimproperly.

WARNING
Dangerofexplosionifbatteryisincorrectlyreplaced. Toreducerisk offireorburns, donotdisassemble, crush, puncture, shortexternal contacts, exposetotemperatureabove60°C(140°F), or dispose of infireorwater. Recycleordisposeofusedbatteriesaccordingtothe localregulationsorreferenceguidesuppliedwithyourproduct.
Protectyourhearing
This device has been tested to comply with the Sound Pressure Level requirement laid down in the applicable EN50332-1 and/or EN50332-2 standards.


WARNING
Excessiveexposureoloudsoundscancausehearingdamage. Exposuretoloudsoundswhiledrivingmaydistractyour attentionandcauseanaccident.Listentoaheadstata moderatelevel,anddonotholdthedevicenearyourearwhen theloudspeakerisinuse.
Note!
ForFrance, mobileheadphonesorearphonesforthisdevicehavebeen testedtocomplywiththeSoundPressurerequirementlaiddonein theapplicableNFEN50332-1:2000and/orNFEN50332-2:2003 standardsasrequiredbyFrenchArticleL.5232-1. Apleinepuissance, l'écouteprolongéedubaladeurpeutendommager l'oreilledel'utilisateur.
Emergencycalls
IMPORTANT!
Mobilephonesuseradiosignals,themobilephonenetwork,the terrestrialnetworkanduser-programmedfunctions.Thismeansthat connectioncannotbeguaranteedinallcircumstances.Therefore,never relyonlyonamobilephoneforveryimportantcallssuchasmedical emergencies.
Vehicles
Radiosignalscanaffectelectronicsystemsinmotorvehicles(forexample,electronic fuelinjection,ABSbrakes,automaticcruisecontrol,airbagsystems)thathavebeen incorrectlyinstalledorareinadequatelyprotected.Contactthemanufacturerorits representativeformoreinformationaboutyourvehicleoranyadditionalequipment.
Donotkeeportransportflammableliquids,gasesorexplosivestogetherwiththe unitoritsaccessories.Forvehiclesequippedwithairbags:Rememberthatair bagsfillwithairwithconsiderableforce.
Donotplaceobjects,includingfixedorportableradioequipmentintheareaabove theairbagortheareawhereitmightexpand.Seriousinjuriesmaybecausedifthe mobilephoneequipmentisincorrectlyinstalledandtheairbagfillswithair.
Itisprohibitedtousetheunitinflight.Turnofftheunitbeforeyouboardaplane. Usingwirelesstelecomunitsinsideaplanecanposeriskstoairsafetyandinterfere withtelecommunications.Itmayalsobeillegal.
Careandmaintenance
Yourunitisatechnicallyadvancedproductandshouldbetreatedwiththegreatest care.Negligencemayvoidthewarranty.
- Protecttheunitfrommoisture.Rain/snowfall,moistureandalltypesof liquidcancontainsubstancesthatcorrodetheeelectroniccircuits.Iftheunit getswet,youshouldremovethebatteryandallowtheunittodrycompletely beforeyoureplaceit.
- Donotuseorkeeptheunitindusty,dirtyenvironments.Theunit'smoving partsandelectroniccomponentscanbedamaged.
- Donotkeeptheunitinwarmplaces. Hightemperaturescanreducethelifespan forelectronicequipment, damagebatteriesanddistortormeltcertainplastics.
- Donotkeeptheunitincoldplaces. Whentheunitwarmsuptonormal temperature, condensation can form on the insidewhichcandamagethe electroniccircuits.
- Donottrytoopentheunitinanyotherwaythanthatwhichisindicatedhere.
- Donotdroptheunit.Donotknockorshakeiteither.Ifitistreatedroughlythe circuitsandprecisionmechanicscanbebroken.
- Donotusestrongchemicalstocleantheunit.
The advice appliestotheunit, battery, mainsadapterandotheraccessories. If the phone is not working as it should, please contact the place of purchase for service. Don't forget thereceptor or copy of the invoice.
Warranty
Thisproductisguaranteedforaperiodof12monthsfromthedateofpurchase. Intheunlikelyeventofafaultoccurringduringthisperiod,pleasecontactthe placeofpurchase.Proofofpurchaseisrequiredforanyserviceorsupportneeded duringtheguaranteeperiod.
Thisguaranteewillnotapplytoafaultcausedbyanaccidentorasimilarincidentordamage, liquidingress, negligence, abnormalusage, non-maintenanceoranyothercircumstancesontheuser'spart. Furthermore, thisguaranteewillnotapplytoanyfaultcausedbyathunderstormoranyothervoltagefluctuations. Asamatterofprecaution, werecommenddisconnectingthechargerduringathunderstorm.
Batteriesareconsumablesandarenotincludedinanyguarantee.
ThisguaranteedoesnotapplyifbatteriesotherthanDOROoriginalbatteriesare used.
Specifications
Network: WCDMA900/2100MHz, GSM900/1800/1900MHz
Dimensions:118mmx53mmx13mm
Weight:93g(includingbattery)
Battery: 3.7V/800mAhLi-ionbattery
Bluetooth ^® isaregisteredtrademarkofBluetoothSIG,inc.
eZiType™ isattrademarkofZiCorporation.
vCardisatrademarkoftheInternetMailConsortium.
Hearingaid
This device should work with most hearing aidequipment in the market. However, full compatibility with all equipment cannot be promised.
SpecificAbsorptionRate(SAR)
Thisdevicemeetsapplicableinternationalsafetyrequirementsforeexposuretoradio waves.DoroPhoneEasy ^® 520Xmeasures0.721W/kgmeasuredover10gtissue.
ThemaximumlimitaccordingtoWHOis2.0W/kgmeasuredover10gtissue.
DeclarationofConformity
DoroherebydeclaresthatDoroPhoneEasy ^® 520Xconformstotheessential requirementsandotherrelevantregulationscontainedintheDirectives1999/5/EC (R&TTE)and2002/95/EC(RoHS).AcopyoftheDeclarationofConformityis availableatwww.doro.com/dofc
English
Version1.2
©2012DoroAB.Allrightsreserved.
www.doro.com
