
Safari Chef LP - Barbecue CADAC - Notice d'utilisation et mode d'emploi gratuit
Retrouvez gratuitement la notice de l'appareil Safari Chef LP CADAC au format PDF.

| Type de produit | Barbecue à gaz portable |
| Marque | CADAC |
| Modèle | Safari Chef LP |
| Alimentation | Gaz butane ou propane (cartouche jetable 220/445 g ou bouteille rechargeable) |
| Catégorie d'appareil | I3+ (28-30/37 mbar) ou I3B/P (30/50 mbar) |
| Puissance nominale brute | 1,92 kW (buse 71H) / 2,68 kW (buse 68H) |
| Consommation nominale (butane) | 140 g/h (buse 71H) / 195 g/h (buse 68H) |
| Fonctions de cuisson | Barbecue, grill, poêle, bouillir, wok, four (avec dôme) |
| Accessoires inclus | Plaque de cuisson réversible, grille métallique, dôme/wok, déflecteurs supérieur et inférieur, pot support, sac de transport |
| Distance de sécurité minimale | Au-dessus : 1,2 m ; arrière et côtés : 600 mm |
| Entretien et nettoyage | Nettoyage avec détergent doux non abrasif ; certaines pièces (plaque, grille, dôme) vont au lave-vaisselle ; le corps ne doit pas être immergé |
| Sécurité | Utilisation exclusivement en extérieur ; ne pas utiliser en espace non ventilé ; vérifier les fuites avec de l'eau savonneuse |
| Pièces détachées et réparabilité | Buse jet (n°71H ou 68H), plaque réversible, joints ; changement de buse possible |
| Homologations | BS EN 498:1998 |
| Garantie | Non spécifiée |
FOIRE AUX QUESTIONS - Safari Chef LP CADAC
Questions des utilisateurs sur Safari Chef LP CADAC
0 question sur cet appareil. Repondez a celles que vous connaissez ou posez la votre.
Poser une nouvelle question sur cet appareil
Téléchargez la notice de votre Barbecue au format PDF gratuitement ! Retrouvez votre notice Safari Chef LP - CADAC et reprennez votre appareil électronique en main. Sur cette page sont publiés tous les documents nécessaires à l'utilisation de votre appareil Safari Chef LP de la marque CADAC.
MODE D'EMPLOI Safari Chef LP CADAC


ADVENTURE TO GO

natural_image
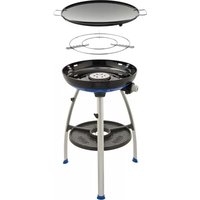
Black and white photo of a portable stove with a circular top and metal legs, no visible text or symbols.C∈0063
BQ/5588
CAUTION
Provide ample ventilation. This gas appliance consumes air (oxygen). Do not use this appliance in an unventilated space to avoid endangering your life. If still more gas appliances and/or occupants using gas are added to the space, additional ventilation must be provided.
IMPORTANT
Read these instructions carefully so as to familiarise yourself with the appliance before use. Retain these instructions for future reference.

1. Introduction
• This Appliance complies with BS EN 498:1998.
Appliance category: I 1-28,30(37) (BE, ES, FR, IE, IT, PT, GB, CH)
- For use with Butane using a 28-30 mbar supply pressure regulator or Propane using a 37mbar supply pressure regulator. Appliance category: Iup(30) (DK, FI, NO, NL, SE, AT, DE)
• For use with Butane or Propane gas at a regulated supply pressure of 30mBar.
• This product is factory fitted with a Cadac No. 71H jet.
- Nominal usage: Butane 140 grams per hour, gross nominal heat input 1.92 kW. Appliance category: I _3BP (50) (AT, DE)
• For use with Butane or Propane gas at a regulated supply pressure of 50mBar.
• To use this appliance on a 50mBar supply it will be necessary to fit the supplied Cadac No.68H jet. For details on how to change the jets follow the instructions for replacing a blocked jet (see section 10)
• Nominal usage: Butane 195 grams per hour, gross nominal heat input 2.68 kW.
• This appliance shall only be used with an approved hose and regulator, connected to:
a) a CADAC 445g or 220g Disposable Cartridge, Model CA445 or CA220 or the same type threaded re-sealable cartridge complying with EN 417, or
b) a refillable cylinder complying with the local regulation in force.
• The gas cartridge/refillable cylinder is to be used only in the upright position.
• Gas appliances require ventilation for efficient performance and to ensure the safety of users and other persons in close proximity.
• Use Outdoors Only.
2. Safety Information
• The hose must be checked for wear or damage before every use and before connecting to the gas container.
• Do not use the appliance if it has a damaged or worn hose. Replace it.
• Do not use an appliance that is leaking, damaged or which does not operate properly.
- Ensure the appliance is used away from flammable materials. Minimum safe distances are: Above the appliance 1.2m. At the rear and sides 600mm. (See Fig. 1)
- Ensure that the gas container is fitted or changed outdoors, away from any sources of ignition, such as naked flames, pilots, electric fires and away from other people.
- Keep gas containers away from heat and flame. Do not place on a stove or any other hot surface.
• Ensure that the assembled product is stable and does not rock.
- In the event of light back (where the flame burns back and ignites at the jet), immediately turn off the gas supply by closing the control valve on the gas container and then the appliance valve. After the flame is extinguished remove the regulator and check the condition of its seal. Replace the seal, if in doubt. Re-light the appliance as described in section 4 below. Should the flame persistently light back, return the product to your authorised CADAC repair agent.
• If there is a leak on your appliance (smell of gas), take it outside immediately into a flame free location where the leak may be detected and stopped. If you wish to check for leaks on your appliance, do it outside. Do not try to detect leaks using a flame; use soapy water.
• The correct way is to smear the joints e.g. where the stem fits into the cylinder, with soapy water.
- If bubbles form, then there is a gas leak. Immediately turn off the gas supply by closing the control valve on the gas container and then the appliance valve. Check that all the connections are properly fitted. Re-check with soapy water.
• If a gas leak persists, return the product to your CADAC dealer for inspection / repair.
• Use Outdoors Only

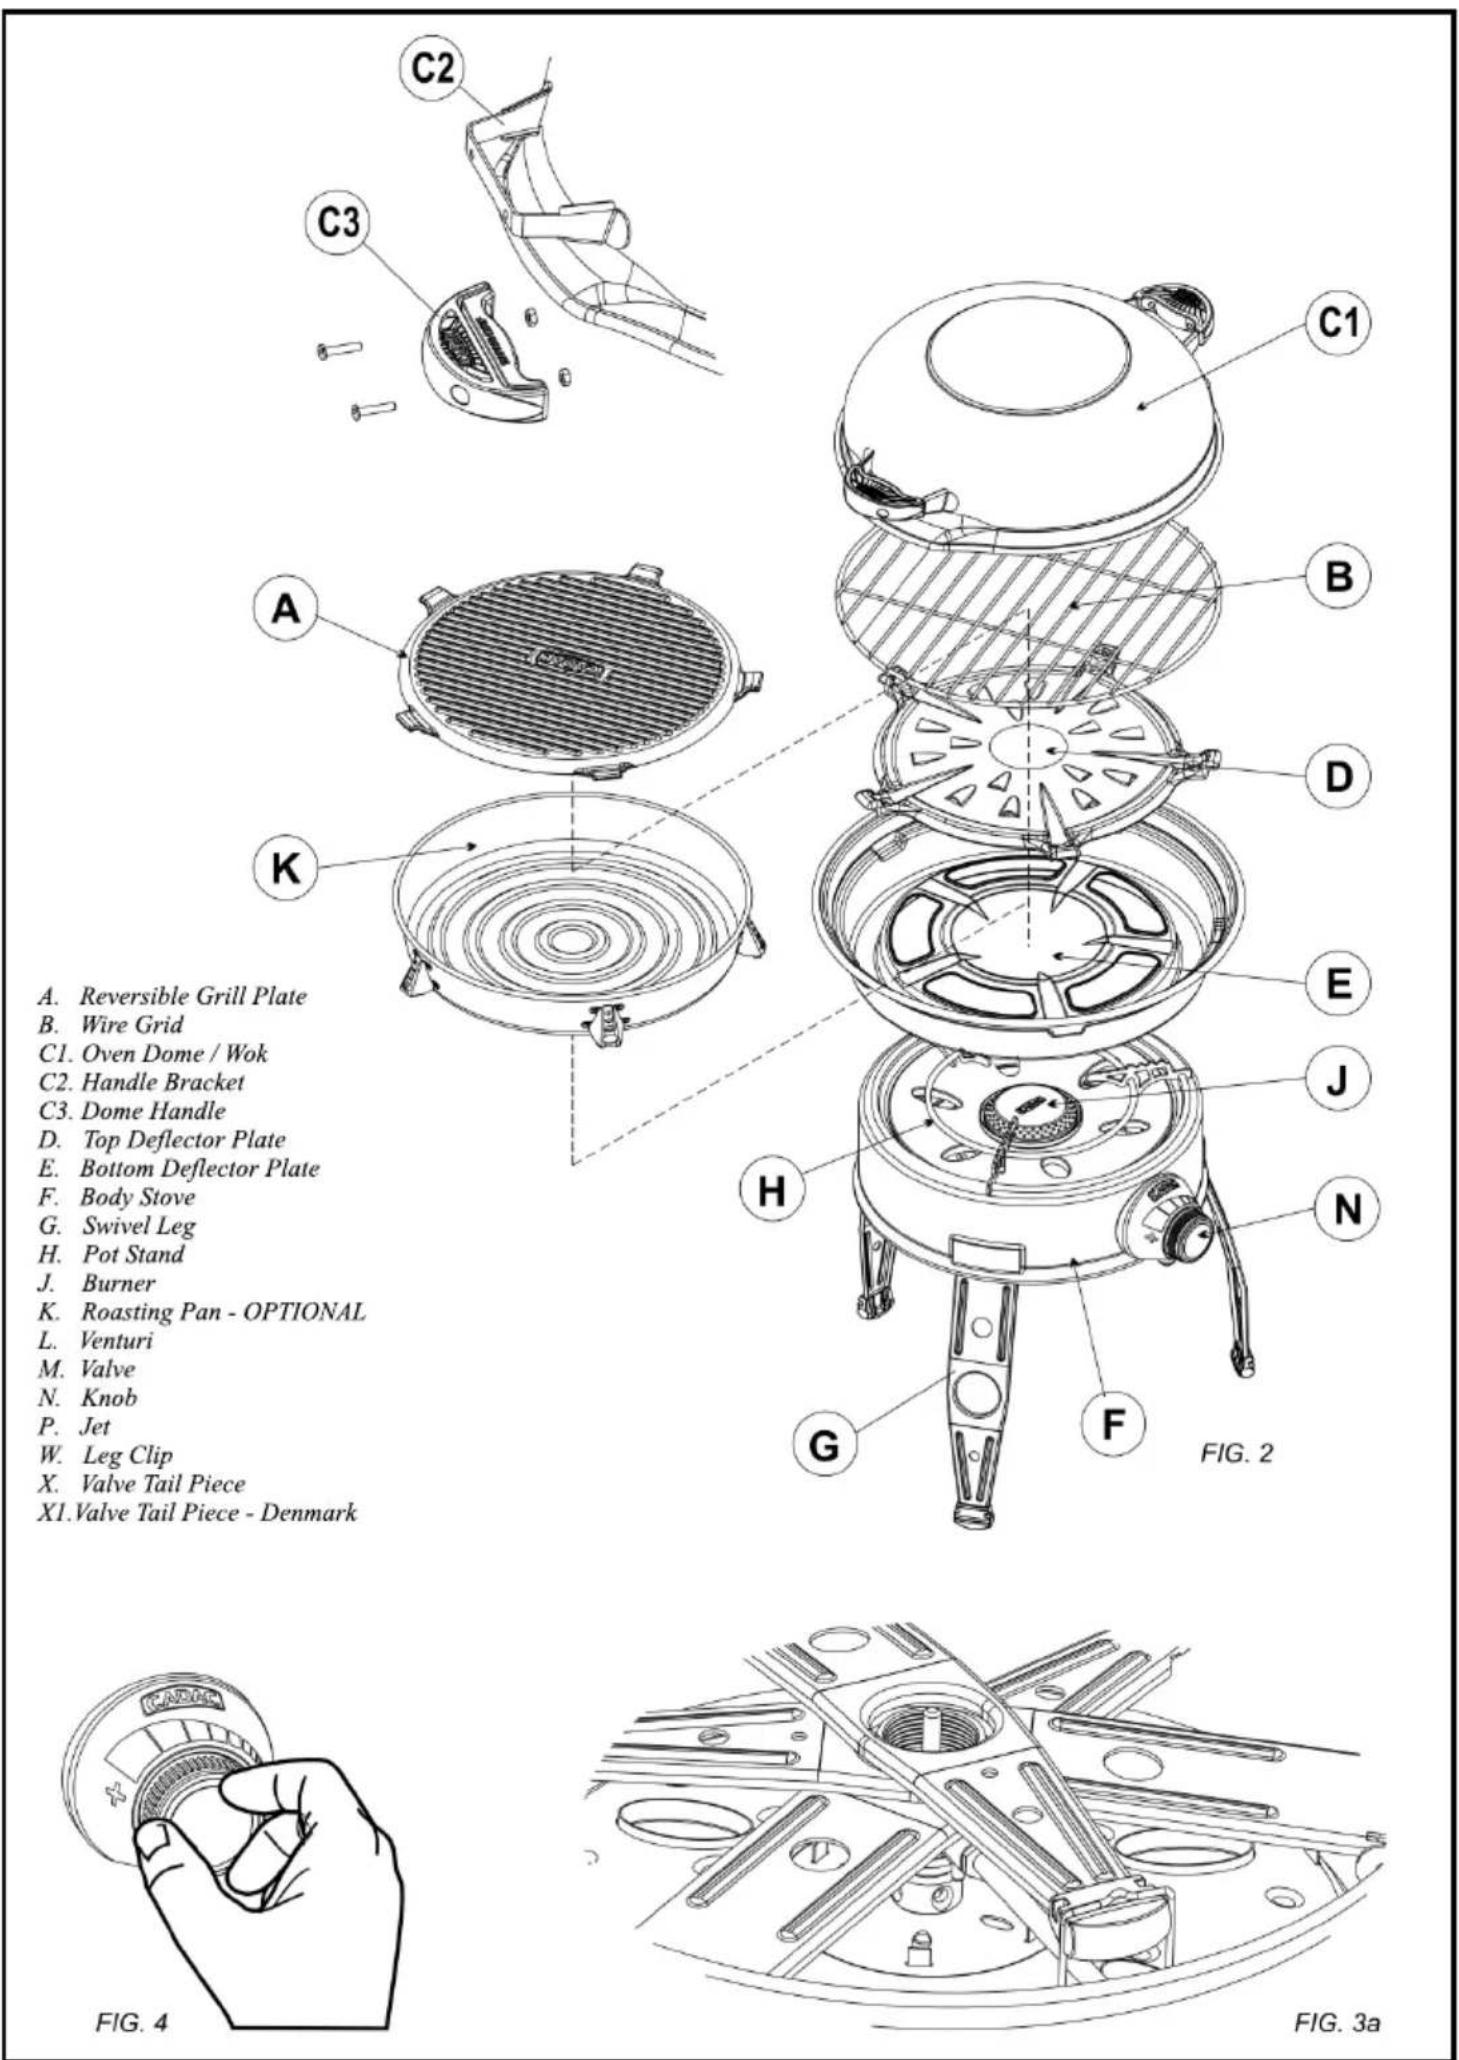
A. Reversible Grill Plate
B. Wire Grid
C1. Oven Dome / Wok
C2. Handle Bracket
C3. Dome Handle
D. Top Deflector Plate
E. Bottom Deflector Plate
F. Body Stove
G. Swivel Leg
H. Pot Stand
J. Burner
K. Roasting Pan - OPTIONAL
L. Venturi
M. Valve
N. Knob
P. Jet
W. Leg Clip
X. Valve Tail Piece
X1. Valve Tail Piece - Denmark
3. Assembly Instructions
• Fit the Handles (C3) to the Dome/Wok (C1) by pushing the Handles over the Handle Brackets (C2) and fastening them using the screws and nuts supplied. (See Fig. 2)
• To open the legs, turn the unit upside-down and hold the legs down while releasing the Leg Clip (W).
- WARNING: The legs are spring loaded and will spring open once the Clip has been released. Hold down the legs and release them in a controlled manner to avoid personal injury or damage to your Safari Chef
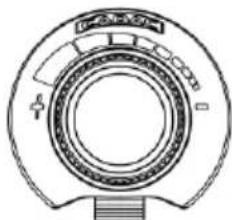
- Before connecting the gas supply, firstly check that the appliance valve is in the off position by turning the knob (N) clockwise to its stop (See Fig. 4).
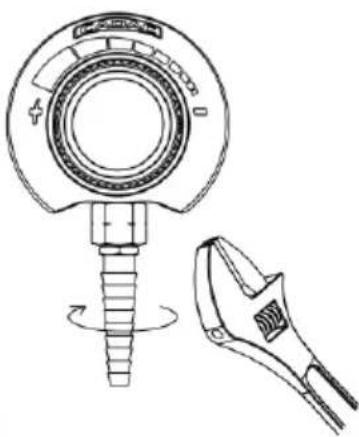
- I 3B/P (30) and I 3+ (28-30/37) Appliance categories: Fit the Valve Tailpiece (X) onto the Valve (M) (Fig.3b) by screwing it on in an anti-clockwise direction. Push an 8mm inside diameter Hose onto the Valve Tailpiece (X) until it is properly seated. On the other end attach a suitable 30mbar low-pressure (I 3B/P (30) and I 3+ (28-30/37) Butane configurations) or 37mBar low-pressure regulator
• (13+ (28-30/37) Propane configuration), again making sure that the hose is well seated. The hose used must comply with BS 3212:1991 / SABS 1156-2 or equivalent.
• Note: For Denmark fit Valve Tailpiece (X1). (Fig.3c)
- I 3B/P (50) Appliance category: Screw a Hose with the correct threaded fittings on each end, onto the left hand 14 " BSP thread of the Valve (M) (Fig.3d). Attach a suitable 50mbar low-pressure regulator on the other end of the hose. The hose used must comply with DIN 4815 part 2 or equivalent.
• Note: The hose and regulator are not supplied with the Safari Chef. For details, contact your local stockist.
- The hose length should be no less than 800 mm and shall not exceed 1.5 m. Check the expiry date on the hose and replace when necessary or when national conditions require it.
• Do not twist or pinch hose.
• Your appliance is now ready for use.

FIG. 3b

natural_image
Technical line drawing of a mechanical component with a pliers and a rotating shaft (no text or symbols)FIG. 3c
natural_image
Technical line drawing of a mechanical bearing assembly (no text or symbols)FIG. 3d
4. Using the Appliance
• When in use, protect from wind for optimum performance.
• Do not move the unit whilst hot. The use of protective gloves is recommended.
• CAUTION: Accessible parts may become very hot. Keep young children away from the appliance.
• To pack away, let the unit cool. After cleaning, place the appliance in the protective Carry Bag.
- Keep the appliance in the protective Carry Bag when not in use, as this will prevent the ingress of dirt or insects which may affect the gas flow.
- When attempting to light the appliance, make sure that the gas supply from the cylinder is open prior to turning on the gas supply to the appliance.
• To light the appliance, light a match or barbecue lighter, turn on the appliance gas valve by turning the valve Knob (N) in an anticlockwise direction to the open position and light the appliance Burner (J) (see Figs.4).
- Use the control knob to adjust the flame intensity to the desired level by turning the knob clockwise to decrease the flame and anti clockwise to increase the flame.
- If flaring occurs, firstly check that the Venturi (W) is not blocked (See Fig. 6). Flaring may also occur if food with a high fat content is cooked with the heat setting too high. In this instance, reduce the heat setting by adjusting the control knob.
• When not in use disconnect the appliance from the gas supply.
5. Fitting and Changing the Gas Container
• Before fitting the regulator to a gas container, ensure that the seal on the regulator is in position and in good condition. This should be done on every connection.
- Ensure that the gas container is fitted or changed outdoors, away from any source of ignition, such as naked flames or electric fires and away from other people.
- Making sure that the gas container is kept upright, screw the regulator onto the gas container until it is fully engaged. Do not over tighten.
- If there is a leak on your appliance (smell of gas), take immediately into a flame-free location where the leak may be detected and stopped. If you wish to check for leaks on your appliance, do it outside using soapy water only, which is applied to the joints. A formation of bubbles will indicate a gas leak.
- Check that all the connections are securely fitted and re-check with soapy water. If you cannot rectify the gas leak, do not use the appliance. Contact your local CADAC stockist for assistance.
- When changing a gas container close the container valve (if fitted) and then the appliance Valve (M) (see Figs.4 and 6). Making sure the flame is extinguished, unscrew the regulator. Re-fit a full gas container following the same precautions as described above.
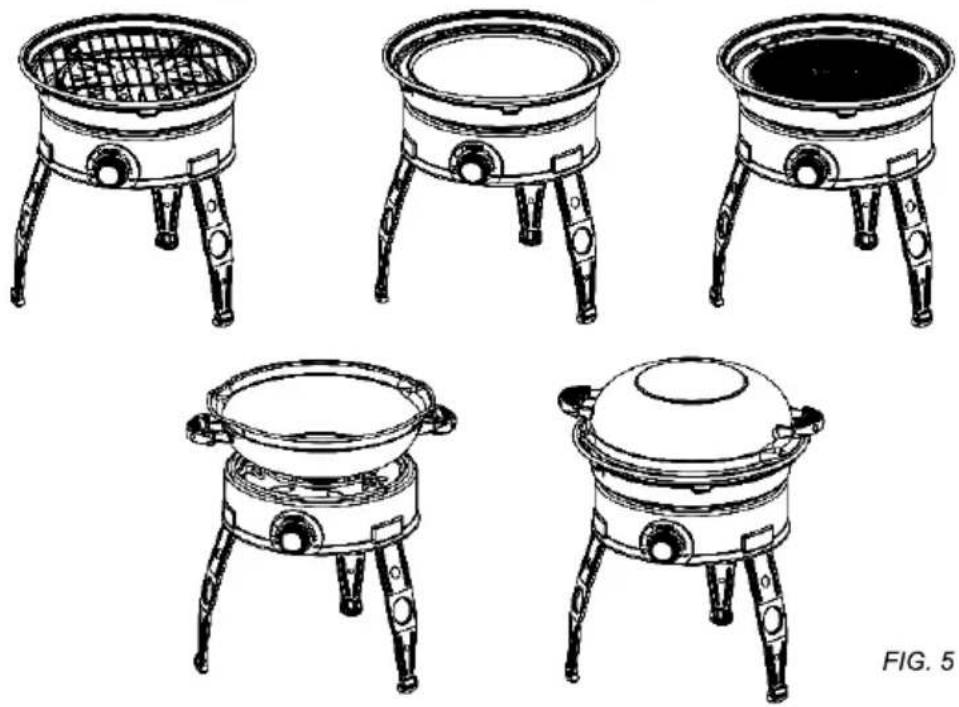
6. Cooking Options (See Fig. 5)
There are five available cooking options with your Safari Chef appliance. These are:
- Barbecuing: This cooking option is ideal for fat-free barbecuing of chicken, sausages, chops, kebabs, fish or vegetables. For this type of cooking, use the BBQ option. Place the Bottom deflector plate (E) concentrically onto the outer ring of the Potstand (H) ensuring that it is properly seated. Place the Top Deflector Plate (D) on the Bottom Deflector Plate (E) and then place the Wire Grid (B) in the recess on the inside rim of the Bottom Deflector Plate (E).
Caution: Please note that when cooking fatty meats some fat will drip onto the unit which may cause flare-ups. Please use caution when handling such meats. The cooking temperatures are easily adjusted to suit your own requirements by turning the Valve Knob (N) to regulate the degree of heat.
- Grilling: This cooking option is best suited for sumptuous cuts of meat, chicken, fish or vegetables. Meat cooked in this manner will have the blackened lines as on professionally grilled steaks. For this type of cooking, use the Mini BBQ option (as above) but with the Wire Grid (B) and the Top deflector Plate (D) removed. Place the non-stick Reversible Grill Plate (A), with the ribbed side of the Grill Plate face up, securely in the recess in the Bottom Deflector Plate (E). For optimum results, turn the grill to medium heat by adjusting the gas flow. The non-stick surface allows for healthier cooking using less fat. Cook only for a few minutes per side. Adjust the cooking time and temperature depending on personal preferences for rare, medium or well done.
- Frying: This option is ideal for stir-fries, fish, breakfast, pancakes, prawns and vegetables. For this type of cooking, use the same setup as described for the Grilling option but with the non-stick Reversible Grill Plate (C1) reversed so that the flat surface is face up. Please note that being a shallow pan, it is not suitable for deep-frying. The easy clean surface encourages the minimum use of fat for healthy cooking.
- Boiling: For this type of cooking, use the Body (F) with the Pot Stand (H). Place a suitable pot (not less than 150mm diameter and not more than 230mm diameter) or the Safari Chef Dome (C) on the Pot Stand (H). One liter of water will boil in approximately 6 minutes depending on the conditions, size of pot used, etc. Note: When using small sized pots do not attempt to use pots with plastic handles.
• Oven Dome / Wok: The dome can be used as a wok, a lid to create an oven on the BBQ, or a saucepan
• For wok-style cooking, place the Wok (C1) directly onto the Pot stand (H) and use to prepare stir-fries, pasta dishes or paella.
• To use the Dome as an Oven lid place the Lid (C1) over a meal cooking on the BBQ option for convection style cooking. This is ideal for roasting chicken, lamp, beef or pork.
• The Dome can also be used as a saucepan, to heat sauces, marinades, boil water, cook rice, pasta etc. Place the saucepan (C1) directly onto the Pot Stand (H)
• Roasting Pan: The Roasting Pan (K) is also available as an optional accessory that will allow you to roast chicken, vegetable etc.
7. Care of the Reversible Grill Plate
- The Reversible Grill Plate is coated with a tough durable non-stick coating that has been used with great success on some of the best cookware in the world. Nevertheless, taking care of it can help you to enjoy extra years of healthy, easy, non-stick cooking. Here's what to do:
• Before the first use, lightly rub cooking oil onto the surface and leave the Safari Chef on medium heat for two or three minutes. When it cools, rinse in warm water with a mild detergent.
• Use only low or medium heat settings to help retain the valuable nutrients in the food and maintain the non-stick surface.
• Whilst the non-stick coating is very durable, use only plastic or wooden utensils when cooking.
• Do not overheat the Grill Plate and always add a little cooking oil to the surface before use.
• Always allow the Grill Plate to cool before immersing it in water. - The Grill Plate is perfectly safe in the dishwasher, but the non-stick surface is so easy to clean that a quick handwash does the trick. The use of abrasive detergents is not recommended as this will permanently damage the non-stick surface.
- If burned grease or food residue collects on the surface, it can usually be removed with warm water and a mild, non-abrasive detergent. In an extreme case, it can be removed by a thorough cleaning with a mixture of 3 tablespoons of bleach, 1 tablespoon of liquid detergent and 1 cup of water. Apply to the cooking surface with a sponge or plastic scrubbing pad.
• After cleaning recondition the surface with a light wipe of oil.
8. Cleaning the Barbecue Unit
• To clean the Deflector Plates and the Wire Grid, wash in warm water with a non-abrasive detergent after first wiping off any excess fat left after cooking.
• To Clean the Dome, wash in warm water with a non-abrasive detergent.
• Do not use an abrasive cleaner on any part, as this will damage its surface coating.
• These parts are perfectly safe to clean in the dishwasher after removing any excess fat.
9. Cleaning the Body / Leg Unit
- This is best cleaned by using a soft damp cloth and a mild non-abrasive detergent. Do not place in a dishwasher as this may allow water into the valve or burner ports, which will cause the unit to malfunction.
- When cleaning the body/leg unit the pot stand may need to be removed. This can be done by holding down the body and firmly lifting the pot stand by the outer ring adjacent to one of its support legs to unclip it and then lifting the entire unit clear.
10. Maintenance
• Replacing a blocked jet:
• Your Cadac Safari Chef is fitted with a specific size Jet (P) to correctly regulate the flow of gas (See Fig.6).
• If the Jet becomes blocked, it should be replaced. Do not attempt to clean the jet as this may damage the orifice.
• To replace the Jet (P), turn the unit upside down. Loosen & remove the 4 screws holding the valve bracket to the body. remove the Valve Cover assembly from the body. The jet is now accessible. Use a suitable size spanner to remove the jet. Do not use pliers to remove the jet as this may damage it, making it impossible for it to be removed from the valve.
• To fit the new jet, reverse the above procedure making sure that the Jet (P) and Venturi (W) mate correctly before tightening the screws. Do not over-tighten the jet.
• Replacement of Hose:
• Fitting of a hose is described in section 3, Assembly Instructions.
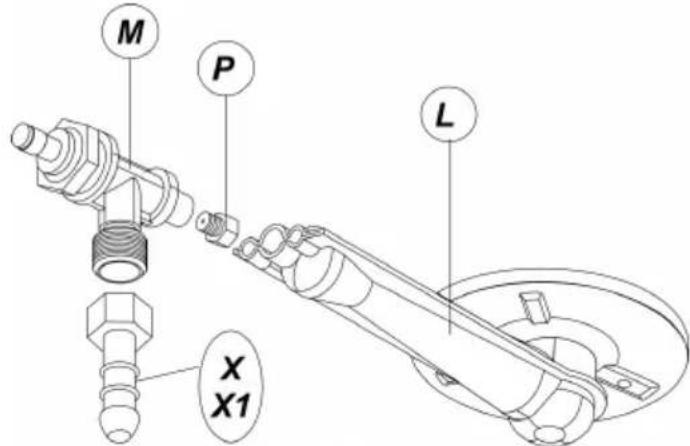
FIG. 6
11. Spares and Accessories
- Spare jets and seals are available from your CADAC distributor.
• Use only genuine CADAC branded spares and accessories.
| Appliance category:13+ (28-30/37) and 13 b/p (30) | Jet No. 71H | 6527-11 |
| Appliance category:13 b/p (50) | Jet No. 68H | 6528-11 |
| Reversible Grill Plate | 6503 |
12. Returning the Appliance for Repair or Service
- Do not modify the appliance. If you cannot rectify a fault by following these instructions, contact your local CADAC distributor for details on how to return the product for repair

Manufactured by:
CADAC
PO Box 43196
Industria
2042
South Africa
Tel: ++27 11 473 8600
Fax: ++27 11 474 3875
E-mail: info@cadac.co.za
Distributed by:
Rekri8
Unit 34, Meadow Industrial Estate
Water Street
Stockport, Chesire
SK1 2BU England
Tel: +44 161 477 3330
Fax: +44 161 477 1130
E-mail: info@rekri8.co.uk
Distributed by:
CADAC EUROPE
Ratio 26
6921 RW
Duiven
Netherlands
Tel: +31 26 319 7740
Fax: +31 26 319 7743
E-mail: info@cadaceurope.nl
Web site: www.cadac.co.za

Fabricado por:
CADAC
PO Box 43196
Industria
2042
South Africa
Tel: ++27 11 473 8600
Fax: ++27 11 474 3875
E-mail: info@cadac.co.za
Distribuido por:
Rekri8
Unit 34, Meadow Industrial Estate
Water Street
Stockport, Chesire
SK1 2BU England
Tel: +44 161 477 3330
Fax: +44 161 477 1130
E-mail: info@rekri8.co.uk
Distribuido por:
CADAC EUROPE
Ratio 26
6921 RW
Duiven
Netherlands
Tel: +31 26 319 7740
Fax: +31 26 319 7743
E-mail: info@cadaceurope.nl
Página Web: www.cadac.co.za

Prodotto da:
CADAC
PO Box 43196
Industria
2042
South Africa
Tel: ++27 11 473 8600
Fax: ++27 11 474 3875
E-mail: info@cadac.co.za
Distribuito da:
Rekri8
Unit 34, Meadow Industrial Estate
Water Street
Stockport, Chesire
SK1 2BU England
Tel: +44 161 477 3330
Fax: +44 161 477 1130
E-mail: info@rekri8.co.uk
Distribuito da:
CADAC EUROPE
Ratio 26
6921 RW
Duiven
Netherlands
Tel: +31 26 319 7740
Fax: +31 26 319 7743
E-mail: info@cadaceurope.nl
Sito Web: www.cadac.co.za

Producent:
CADAC
PO Box 43196
Industria
2042
Zuid-Afrika
Tel: +27 11 473-8600
Fax: +27 11 474-3875
E-mail: info@cadac.co.za
Distributeur:
Rekri8
Unit 34, Meadow Industrial Estate
Water Street
Stockport, Cheshire
SK3 2BU Engeland
Tel: +44 161 477-3300
Fax: +44 161 477-1100
E-mail: info@rekri8.co.uk
Distributeur:
CADAC EUROPE
Ratio 26
6921 RW
Duiven
Nederland
Tel: +31 26 319 7740
Fax: +31 26 319 7743
E-mail: info@cadaceurope.nl
Website: www.cadac.co.za

Hergestellt von:
CADAC
PO Box 43196
Industria
2042
Zuid-Afrika
Tel: +27 11 473-8600
Fax: +27 11 474-3875
E-mail: info@cadac.co.za
Vertrieben durch:
Rekri8
Unit 34, Meadow Industrial Estate
Water Street
Stockport, Cheshire
SK3 2BU Engeland
Tel: +44 161 477-3300
Fax: +44 161 477-1100
E-mail: info@rekri8.co.uk
Vertrieben durch:
CADAC EUROPE
Ratio 26
6921 RW
Duiven
Nederland
Tel: +31 26 319 7740
Fax: +31 26 319 7743
E-mail: info@cadaceurope.nl
Website: www.cadac.co.za

Fabriqué par:
CADAC
PO Box 43196
Industria
2042
South Africa
Tel: ++27 11 473 8600
Fax: ++27 11 474 3875
E-mail: info@cadac.co.za
Distribué par:
Rekri8
Unit 34, Meadow Industrial Estate
Water Street
Stockport, Chesire
SK1 2BU England
Tel: +44 161 477 3330
Fax: +44 161 477 1130
E-mail: info@rekri8.co.uk
Distribué par:
CADAC EUROPE
Ratio 26
6921 RW
Duiven
Netherlands
Tel: +31 26 319 7740
Fax: +31 26 319 7743
E-mail: info@cadaceurope.nl
Web site: www.cadac.co.za


- CAUTION
- IMPORTANT
- Introduction
- Safety Information
- Assembly Instructions
- Using the Appliance
- Fitting and Changing the Gas Container
- Cooking Options (See Fig. 5)
- Care of the Reversible Grill Plate
- Cleaning the Barbecue Unit
- Cleaning the Body / Leg Unit
- Maintenance
- Spares and Accessories
- Returning the Appliance for Repair or Service
Marque : CADAC
Modèle : Safari Chef LP
Catégorie : Barbecue