
Safari Chef 2 Lite HP - Barbecue CADAC - Notice d'utilisation et mode d'emploi gratuit
Retrouvez gratuitement la notice de l'appareil Safari Chef 2 Lite HP CADAC au format PDF.


| Type de produit | Barbecue à gaz portable |
| Marque | Cadac |
| Modèle | Safari Chef 2 Lite HP |
| Nombre de brûleurs | 2 |
| Type de gaz | Butane ou propane (bouteille standard) |
| Puissance totale | Environ 4 kW (2 x 2 kW) |
| Dimensions (L x P x H) | Environ 45 x 35 x 30 cm |
| Poids | Environ 6 kg |
| Surface de cuisson | Grille en acier chromé, diamètre environ 30 cm |
| Alimentation | Cartouche de gaz ou bouteille avec détendeur (non inclus) |
| Fonctions principales | Grillage, cuisson à couvert, rôtissage |
| Entretien et nettoyage | Nettoyer la grille après usage, vider le bac à graisse régulièrement |
| Sécurité | Dispositif de sécurité sur les brûleurs (coupe-gaz en cas d'extinction) |
| Pièces détachées et réparabilité | Grille de cuisson, bac à graisse, brûleurs, détendeur disponibles |
| Informations générales | Barbecue nomade, livré sans bouteille de gaz. Usage extérieur uniquement. |
FOIRE AUX QUESTIONS - Safari Chef 2 Lite HP CADAC
Questions des utilisateurs sur Safari Chef 2 Lite HP CADAC
0 question sur cet appareil. Repondez a celles que vous connaissez ou posez la votre.
Poser une nouvelle question sur cet appareil
Téléchargez la notice de votre Barbecue au format PDF gratuitement ! Retrouvez votre notice Safari Chef 2 Lite HP - CADAC et reprennez votre appareil électronique en main. Sur cette page sont publiés tous les documents nécessaires à l'utilisation de votre appareil Safari Chef 2 Lite HP de la marque CADAC.
MODE D'EMPLOI Safari Chef 2 Lite HP CADAC

LIVE THE BRAAI LIFE
SAFARI CHEF 2
MODEL No 6540H0, 6540HI
High Pressure
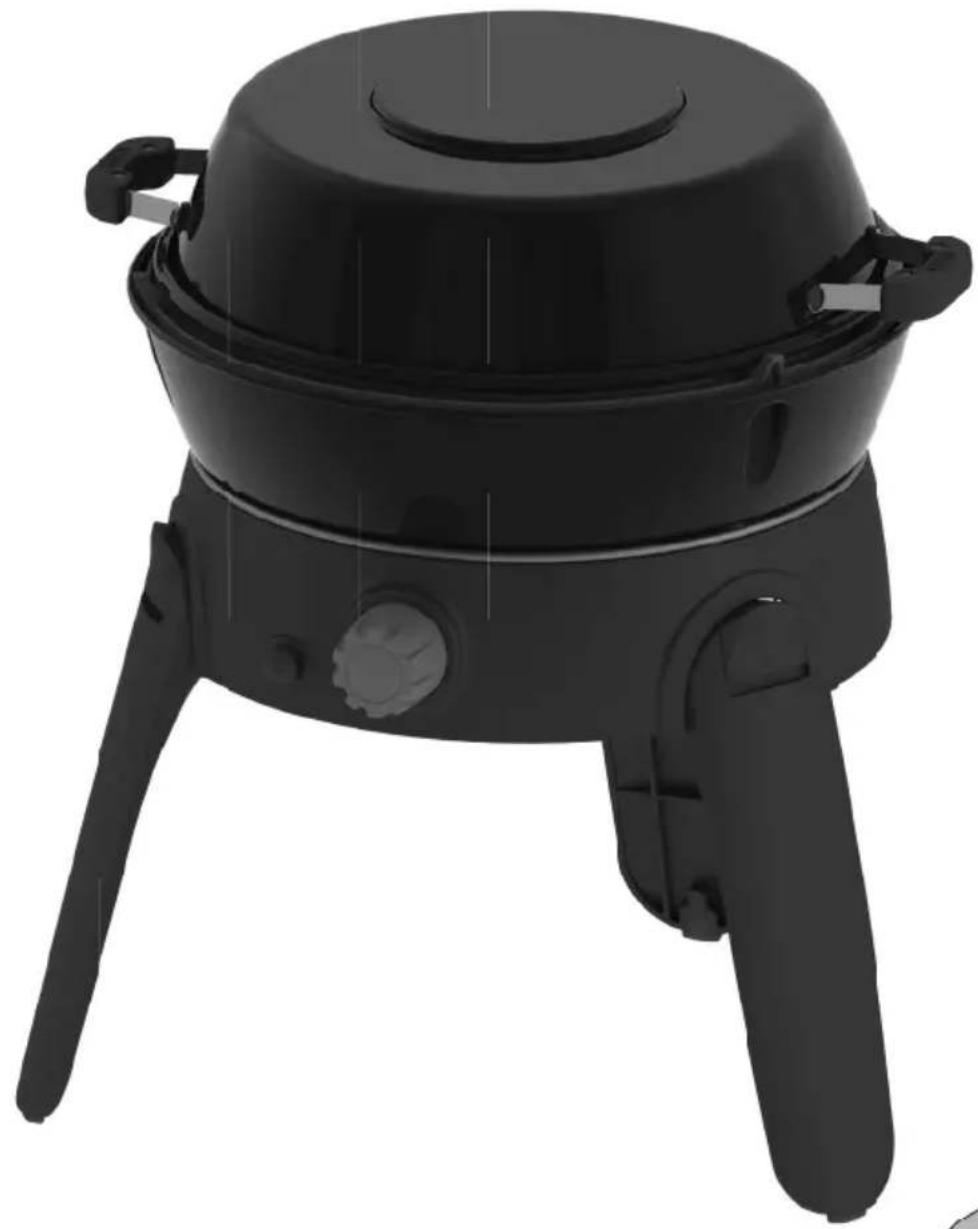
natural_image
Black portable grill with a dome-shaped top and three legs (no visible text or symbols)

USER INSTRUCTIONS
CAUTION
For Outdoor use only!
This appliance may not be used in an exterior enclosed balcony, porch or entertainment area!
IMPORTANT
Read these instructions for use carefully so as to familiarize yourself with the appliance before connecting it to its gas container. Keep these instructions for future reference.
1. General information
- This appliance has been designed to be used for outdoor cooking, specifically for people who go camping to enjoy outdoor life and it can also be used at home on your patio.
- Various food types can be prepared on this appliance. The Safari Chef 2 is designed to utilise various cooking surfaces.
- Gas is supplied to the unit via a disposable cartridge. A high pressure hose and regulator can be connected to gas a cylinder, (South Africa ONLY - Not Supplied with the appliance)
- The unit is easy to switch on, and to operate (Section 6) and the user can control the heat input with an adjustable valve.
- The unit is supplied with a convenient carry bag.
• This appliance complies with EN521:2006 and SANS 1539:2012 - This appliance may only be used with a CADAC 500g, 445g, or 220g Disposable Threaded Resealable Gas Cartridge (Model CA500, CA445 or CA220) or the same type threaded resealable cartridges complying with EN417
• The gas supply is to be used only in an upright position. - Warning: Accessible parts may be very hot. Keep young children away.
- Gas appliances require ventilation for efficient performance and to ensure the safety of users and other persons in close proximity, therefor do not use the appliance in an unventilated area. It is intended for use outdoors only.
Read these instructions carefully before using the appliance.
• Use outdoors only!
| 6540H0, 6540H1 | ||||
| Country of Use | BE, CH, CY, CZ, ES, FR, GB, GR, IE, IT, LT, LU, LV, PT, SK & SI | PL | BE, CY, DK, EE, FR, FI, HU, IT, LT, NL, NO, SE, SI, SK, RO, HR, TR, BG, IS, LU, MT, & ZA | AT, CH, DE & SK |
| Allowable gasses Butane | ||||
| Gas Pressure Vapour Pressure | ||||
| Jet Number 0.25 | ||||
| Nominal Usage 132g/hr | ||||
| Gross nom. heat input 1.82kW | ||||
| Country Name and Abbreviations | ||||
| AE = United Arab Emirates | AL = Albania AT = Austria | BE = Belgium CH = Switzerland | ||
| CZ = Czech Republic | DE = Germany | DK = Denmark | ES = Spain | FI = Finland |
| FR = France | GB = United Kingdom | GR = Greece | HR = Croatia | IT = Italy |
| JP = Japan | KR = Korea | NL = Netherlands | NO = Norway | PL = Poland |
| PT = Portugal | RO = Romania | RU = Russia | RS = Serbia | SI = Slovenia |
| SK = Slovakia | SE = Sweden | TR = Turkey | ZA = South Africa | |
2. Safety Information
- Do not use the appliance if it has damaged or worn seals. Do not use an appliance which is leaking, damaged or which does not operate properly. Always operate the appliance on a firm level surface.
- Do not use an appliance that is leaking, damaged or which does not operate properly.
- This appliance must be kept away from flammable materials during use. Minimum safe distances are: Above the appliance 1.2m. At the rear and sides 600mm. (See Fig. 2)
- Ensure that the gas container is fitted or changed outdoors, away from any sources of ignition, such as naked flames, pilots, electric fires and away from other people.
- Keep gas containers away from heat and flame. Do not place on a stove or any other hot surface.
- Ensure that the assembled product is stable and does not rock.
- In the event of light back (where the flame burns back and ignites at the jet), immediately turn off the gas supply by closing the control valve on the appliance valve. After the flame has extinguished, remove the cartridge and check the condition of the seal. Should the flame persistently light back, return the product to your authorised CADAC repair agent.
2. Safety Information (continued)
- If there is a leak on your appliance (smell of gas), close the appliance valve immediately, and take it into a flame free location where the leak may be detected and stopped. If you wish to check for leaks on your appliance, do it outside. Do not try to detect leaks using a flame; use soapy water.
- The correct way is to smear the joints e.g. where the cartridge screws onto the appliance, with soapy water.
- If bubbles form, then there is a gas leak. Immediately remove the gas cartridge from the appliance. Check that all the connections are properly fitted. Check that the seal is in place and in good condition before connecting a gas cartridge(Fig. 4b). Re-check with soapy water after refi tting the cartridge.
- If a gas leak persists, return the product to your CADAC dealer for inspection / repair.
• Use Outdoors Only.
3. Assembly Instructions
- WARNING: The legs are spring loaded. Opening and closing of the legs must be done in a controlled manner to avoid personal injury or damage to your Safari Chef 2.
- To open the legs, turn the unit upside-down and hold the legs down while lifting each leg individually. You will hear a "click" if the leg(s) has located correctly.
- To fold the legs back, securely hold the leg and push the Leg Release Clip down. Then push the legs in-ward to its closed position (Fig 5). This needs to be done sequentially to optimise space. First the Right front leg (1), Then the Left front leg (2), and lastly the rear Leg (3) (Fig 3b).
- Before connecting the gas supply, firstly check that the appliance valve is in the off position by turning the control knob fully clockwise (See Fig. 1).
- To fit the Gas Container, first check that the appliance valve is in the off position by turning the control knob clockwise to its stop (See Fig. 1).
Making sure that the Gas Container is kept upright, screw the container onto the valve in a clockwise direction until it is fully engaged, hand-tighten only. If the container is over-tightened, it may damage the container valve.
- Your appliance is now ready for use.


natural_image
Close-up of a mechanical component with internal cavities and a central hub, labeled Fig. 3a (no text or symbols on the object itself)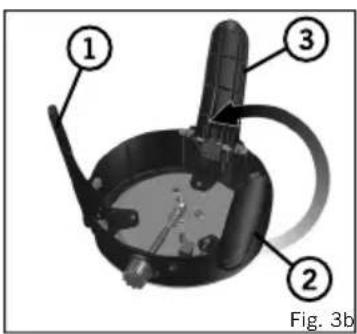

natural_image
Two views of a mechanical device with rotating components, showing internal mechanisms (no text or symbols)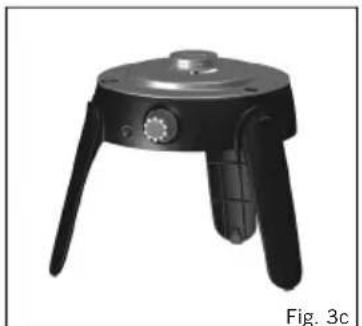
natural_image
Black mechanical device with three legs and a central hub, labeled Fig. 3c (no text or symbols on the device itself)
natural_image
Close-up of a handheld device with a curved arrow indicating rotation (no text or symbols)
4. Fitting and Changing the Gas Supply
- Check that the burner is extinguished before disconnecting the gas container.
• To disconnect the gas container unscrew the container from the valve. (See Fig 4a) - Check the Seal before replacing the gas container.
• Change the gas container outdoors and away from other people. - To refit a previously used gas container, refer to instructions in Section 3 above. Apply the same care and checking procedures as if fitting a new gas container.
5. Component List
Safari Chef 2 - High Pressure

| A | B | C | D | E | F | G | H | I | |
| 6540HO-10 | |||||||||
| 6540HI-10 | |||||||||
| 6540HI-20 | |||||||||
| 6540HI-21 | |||||||||
| 6540HI-25 |
6. Using the Appliance
• This appliance must be used outdoors only!
- When in use, protect from wind for optimum performance.
- Do not move the unit whilst hot. The use of protective gloves is recommended.
- CAUTION: Do not subject the non-stick cooking surfaces without food on / in it for extended periods as the heat may damage the non stick coatings.
- CAUTION: Accessible parts may become very hot. Keep young children away from the appliance.
• To pack away, let the unit cool. After cleaning, Fold the appliance as described is section 3 above.
Place the pot / dome at the bottom of the bag. Next, place the pot stand upside down into the pot.
Place the Fat Pan over the Pot and Pot Stand upside down. Then place the appliance upside down over the fat pan.
Place the Grid and Flat Pan into their separate holders located in the lid of the bag, and zip them closed. Fold over the lid of the bag, and zip it closed. (Fig 7)
- Keep the appliance in its Carry Bag when not in use, as this will prevent the ingress of dirt or insects which may affect the gas flow.
- When attempting to light the appliance, make sure that the gas supply from the cylinder is open prior to turning on the gas supply to the appliance.
- To light the appliance using the piezo ignition, open the control valve on the appliance by slowly turning it in an anti-clockwise direction and press the piezo button in rapid succession to ignite the burner. If the burner fails to ignite, press the piezo button again continuously whilst increasing the gas fl burner does not ignite in the fi rst 5 seconds, close the valve and wait 30 se
- To light the appliance manually, apply a flame to the burner using a BBQ Lighter, turn the appliance control knob slowly in an anticlockwise direction until the burner lights (Fig. 1).
- Use the control knob to adjust the flame intensity to the desired level by turning the knob clockwise to decrease the flame and anticlockwise to increase the flame.
- When not in use disconnect the appliance from the gas supply.
- WARNING: Do not use any cooking surfaces on a high flame setting for more than 10 minutes as this can damage the non-stick coatings.

natural_image
Exploded view of a cooking appliance showing internal components and a pan (no text or symbols visible)7. Cooking Options
- There are fi ve available cooking options (the 5th is an optional accessory) with your Safari Chef 2 appliance. These are:
Barbecuing: This cooking option is ideal for fat-free barbecuing of chicken, sausages, chops, kebabs, fish or vegetables.
For this type of cooking, place the Fat Pan onto the heat shield. Place the BBQ Grid onto the locators of the Fat Pan.
Caution: Please note that when cooking fatty meats some fat will drip onto the unit which may cause fl are-ups. Please use caution when handling such meats. The cooking temperatures are easily adjusted to suit your own requirements by turning the Valve Knob to regulate the degree of heat.
Erying: This option is ideal for stir-fries, fish, breakfast, pancakes, prawns, paella and vegetables. For this type of cooking, place the Fat Pan onto the heat shield. Place the Flat Pan onto the locators of the Fat Pan. Please note that being a shallow pan, it is not suitable for deep-frying. The easy clean surface encourages the minimum use of fat for healthy cooking.
Oven Dome / Wok: The dome can be used as a wok, a lid to create an oven on the BBQ, or a saucepan. For wok-style cooking, place the dome upside-down directly onto the Pot stand and use to prepare stir-fries, pasta dishes or paella. To use the Dome as an Oven lid place the dome over a meal cooking on the BBQ option for convection style cooking. This is ideal for roasting chicken, lamp, beef or pork. The Dome can also be used as a saucepan, to heat sauces, marinades, boil water, cook rice, pasta etc. Place the dome upside-down directly onto the Pot Stand.
Boiling: For this type of cooking, place the Pot stand in its locator grooves on the heat shield ensuring that it is properly seated. Place a suitable pot (not less than 150mm diameter and not more than 230mm diameter) or the Safari Chef 2 Dome on the Pot Stand. The Fat Pan is designed to be placed onto the dome to act as a lid for the dome to boil food. One litre of water will boil in approximately 6 minutes depending on the conditions, size of pot used, etc. Note: When using small sized pots do not attempt to use pots with plastic handles. Pot stand can also be used in the fat pan.
Pizza Baking (Optional Accessory): For this type of cooking, place the pot stand into the fat pan. The fat pan has been designed in such a way that it can also be used as a windshield. Place the pizza stone onto the pot stand. Pre-heat your pizza stone before use. Ensure that food is at room temperature before placing it onto the pizza stone, DO NOT put frozen food onto a heated pizza stone. Put the dome on to create an oven effect for better heat distribution. For cooking methods when using the pizza stone, please refer to the pizza stone user manual.

natural_image
Barbecue grater with three legs and a side grille (no text or symbols visible)
natural_image
Black frying pan with three legs and a circular top, labeled 'Frying' (no other text or symbols)
natural_image
Illustration of a cooking pot with three legs and a pan, labeled 'Oven Dome / Wok' (no other text or symbols)
natural_image
Two identical black-and-white photos of a portable stove with a lid, labeled 'Boiling' above (no additional text or symbols)
natural_image
Black cooking pot with lid and side legs, labeled 'Pizza Baking' (no other text or symbols)8. Cleaning
BBQ Unit
- To clean the Fat Pan, Flat Pan, and BBQ Grid, wash in warm water with a non-abrasive detergent after first wiping off any excess fat left after cooking.
• To Clean the Dome, wash in warm water with a non-abrasive detergent. - Do not use an abrasive cleaner on any part, as this will damage its surface coating.
• These parts are perfectly safe to clean in the dishwasher after removing any excess fat.
Body / Leg Unit
- This is best cleaned by using a soft damp cloth and a mild non-abrasive detergent. Do not place in a dishwasher as this may allow water into the valve or burner ports, which will cause the unit to malfunction.
- When cleaning the body/leg unit the pot stand may need to be removed. This can be done lifting the pot stand out of the locator groove in the heat shield.
9. General Maintenance
• The onus of maintaining this appliance solely rests on the consumer from date of purchase.
• This appliance does not require scheduled maintenance.
- After prolonged storage, inspect the Air Holes under the unit and the inlet of the venturi for insects such as spiders, etc which could affect gas flow. After checking, refi t all components into the prescribed position.
Replacing a Blocked Jet:
- Your Safari Chef 2 is fitted with a specific size jet to regulate the correct amount of gas.
- Should the hole in the Jet become blocked, this may result in a small flame or no flame at all. Do not attempt to clean the Jet with a pin or other such device as this may damage the orifice, which could make the appliance unsafe.
- To replace the Jet: Remove the Fat pan (Fig. 8). Gently unscrew the burner assembly (Fig. 9). Remove the three screws from the heat shield plate and remove the Heat Shield (Fig. 10), taking care not to damage the piezo electrode. The Jet can now be removed using a suitable spanner (Fig. 11). Do not use pliers on the jet as this may damage the jet, making it unusable or impossible to remove. Screw the new jet into the valve. Do not over-tighten as this may damage the jet.
- Reverse the above procedure to re-assemble the unit.

natural_image
Illustration of a portable stove with two upward arrows indicating heating or ventilation (no text or symbols)
natural_image
Mechanical device with rotating knob and three legs, showing rotational motion (no text or symbols)
natural_image
Two identical black circular devices with three legs and three handles, each with upward arrows indicating motion or force (no text or symbols on the devices themselves)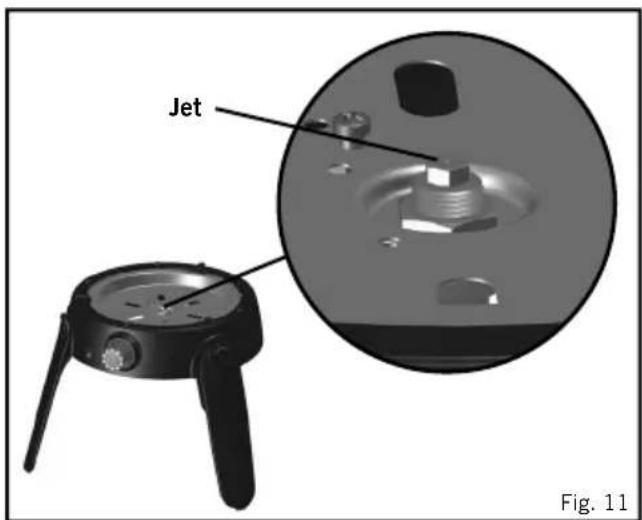
10. Returning the appliance for repair or service.
- Do not modify the appliance, as this could be dangerous.
- If you cannot rectify a fault by following these instructions, contact your local CADAC distributor for details on how to return the product for attention.
- Your CADAC Safari Chef 2 is guaranteed by CADAC for a period of 2 years against factory fault.
11. Spares and Accessories
• Always use genuine CADAC spares as they have been designed to give optimum performance.




- SAFARI CHEF 2
- USER INSTRUCTIONS
- CAUTION
- For Outdoor use only!
- IMPORTANT
- General information
- Safety Information
- Safety Information (continued)
- Assembly Instructions
- Fitting and Changing the Gas Supply
- Component List
- Using the Appliance
- Cooking Options
- Cleaning
- BBQ Unit
- Body / Leg Unit
- General Maintenance
- Replacing a Blocked Jet:
- Returning the appliance for repair or service.
- Spares and Accessories
Marque : CADAC
Modèle : Safari Chef 2 Lite HP
Catégorie : Barbecue