
IMOVIE - Logiciel de montage vidéo APPLE - Notice d'utilisation et mode d'emploi gratuit
Retrouvez gratuitement la notice de l'appareil IMOVIE APPLE au format PDF.

| Type de produit | Logiciel de montage vidéo |
| Marque | Apple |
| Modèle | iMovie |
| Version du manuel | Français |
| Nombre de pages | 10 |
| Fonctions principales | Montage vidéo, ajout de titres, transitions, effets spéciaux, piste audio, voix off, exportation iDVD |
| Vues disponibles | Clip viewer, Timeline viewer |
| Panneaux | Clips, Photos, Audio, Titres, Transitions, Effets, iDVD |
| Formats d'importation | Vidéo brute, images iPhoto, musique iTunes, effets sonores |
| Effets audio | Réglage volume, fondu, atténuation, waveforms |
| Effets vidéo | Ken Burns (panoramique/zoom), noir et blanc, ajustements luminosité/contraste, effets ludiques |
| Exportation | Projet iDVD, QuickTime |
| Configuration minimale recommandée | Environ 2 Go d'espace disque libre |
| Entretien | Vider la corbeille régulièrement, libérer de l'espace disque si nécessaire |
| Sécurité | Aucune mesure de sécurité spécifique |
| Pièces détachées | Non applicable (logiciel) |
| Réparabilité | Mise à jour via App Store |
FOIRE AUX QUESTIONS - IMOVIE APPLE
Questions des utilisateurs sur IMOVIE APPLE
0 question sur cet appareil. Repondez a celles que vous connaissez ou posez la votre.
Poser une nouvelle question sur cet appareil
Téléchargez la notice de votre Logiciel de montage vidéo au format PDF gratuitement ! Retrouvez votre notice IMOVIE - APPLE et reprennez votre appareil électronique en main. Sur cette page sont publiés tous les documents nécessaires à l'utilisation de votre appareil IMOVIE de la marque APPLE.
MODE D'EMPLOI IMOVIE APPLE
"iMovie at a Glance" introduces you to the controls in the iMovie window. You use these controls to create your own movies. Take a look at these pages even if you don't plan to do the tutorial, because you'll need to know the names of the iMovie controls to follow instructions in iMovie Help.
The pages that follow introduce you to the main iMovie window, the timeline and clip viewers, and the different panes you use to add professional polish to your movie.
iMovie Window
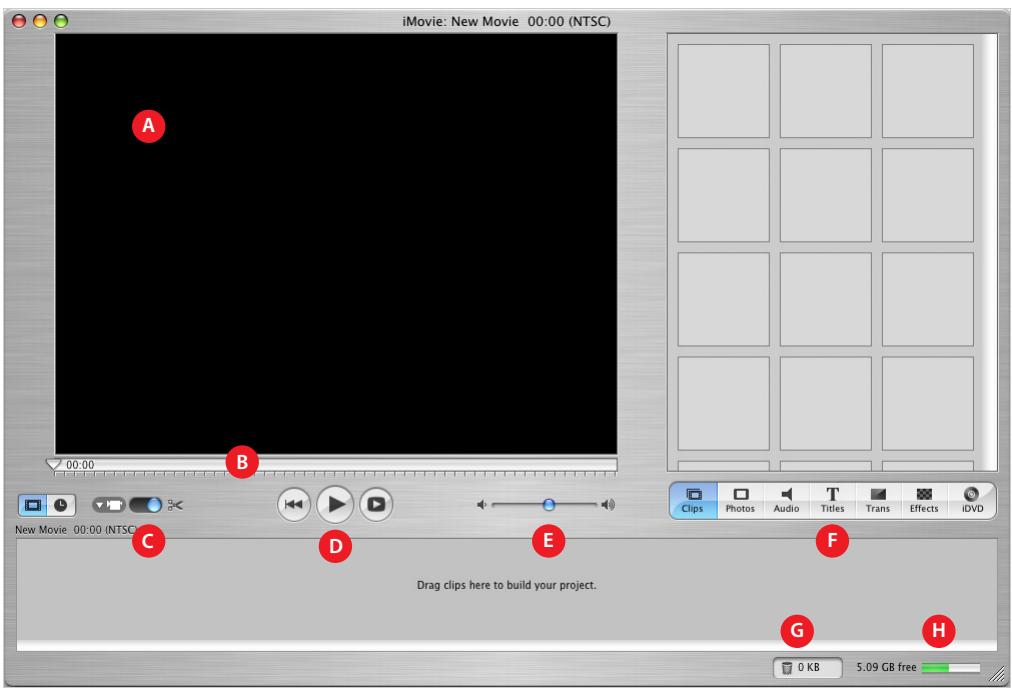
A iMovie monitor: Watch your clips play in this window. You can play clips that are in the Clips pane or the clip viewer.
B Scrubber bar: Drag the playhead along the scrubber bar to move through a clip frame by frame. The number near the playhead indicates how far (minutes:seconds:frames) the selected frame is into the movie.
C Mode switch: Click to switch between camera mode and edit mode. Use camera mode to choose an input device and transfer your raw video into the computer. Use edit mode to work on your movie.
D Playback controls: Use these controls to skip to the beginning of a selected clip, play the clip in the iMovie monitor, or play the clip full screen on your computer's monitor.
E Volume slider: Slide this control to change the volume of the computer's speaker while you work in iMovie. This won't change the volume levels in your video or audio clips.
F Pane buttons: Click these buttons to see the different panes of the iMovie window. See a description of each pane later in this document.
G Trash: Drag unwanted clips to the Trash icon to delete them. You can restore cropped video and audio from the iMovie Trash if you haven't emptied it.
H Disk space indicator: Monitor your free disk space as you work. You should always have about 2 GB free disk space for optimal performance of iMovie. When this bar turns yellow, you are starting to run low on disk space. When it turns red, you must free up some space to continue working on your movie.
Clip Viewer
Use the clip viewer, shown below, to add clips to your movie and arrange them in the order you want them to appear in your movie. When you create titles and transitions, or add photographs from your iPhoto library, drag them to the clip viewer.
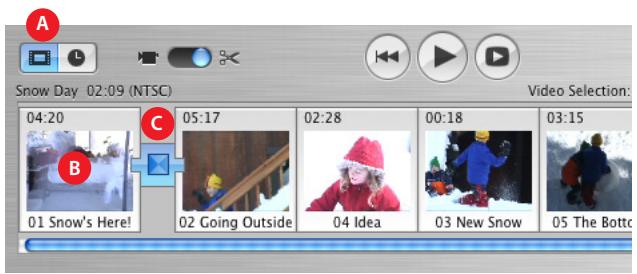
A Clip viewer button: Click the clip viewer button to switch from the timeline viewer.
B Clip: Each section of video footage and any still images you import are called clips.
C Transition marker: Transition markers indicate that two clips are linked by a transition.
Timeline Viewer
Use the timeline viewer, shown below, to work with audio clips, synchronize your audio with video, and to adjust the timing of your movie.
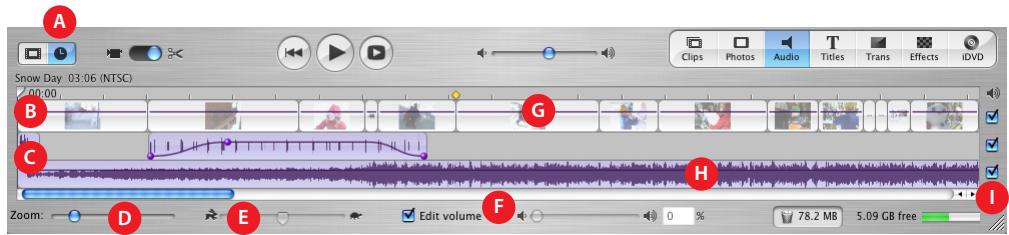
A Timeline viewer button: Click the timeline viewer button to switch from the clip viewer.
B Video track: Select clips in this track to add motion effects.
C Audio tracks: Place and arrange audio clips in these tracks to synchronize audio and video clips. Deselecting the checkbox to the right of the track mutes all the audio clips in that track.
D Zoom slider: Move the slider to make clips appear larger or smaller in the timeline.
E Clip speed slider: Select a video clip and drag this slider to make the clip play faster or slower.
F Edit Volume: Select this checkbox to see the volume level bar for all clips. Move the slider to raise or lower the volume of a selected clip or clip segment.
G Volume level bar: Click this bar to add markers, then drag the markers to adjust the volume for sections of audio clips. You can use this to make audio fade in or fade out.
H Audio waveforms: Representations of audio intensity. Use audio waveforms to align video to audio events such as a certain drumbeat or the exact beginning or end of the audio.
Audio checkboxes: Select a checkbox to hear the audio in its track. Deselect it to mute the track.
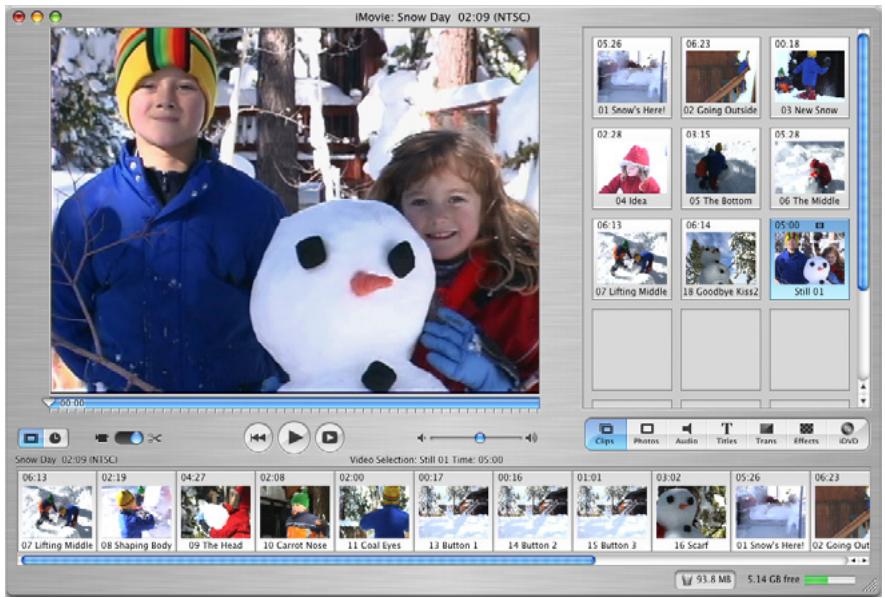
Clips Pane
Click the Clips button to open the Clips pane. The video footage and still images you import into iMovie are stored here.
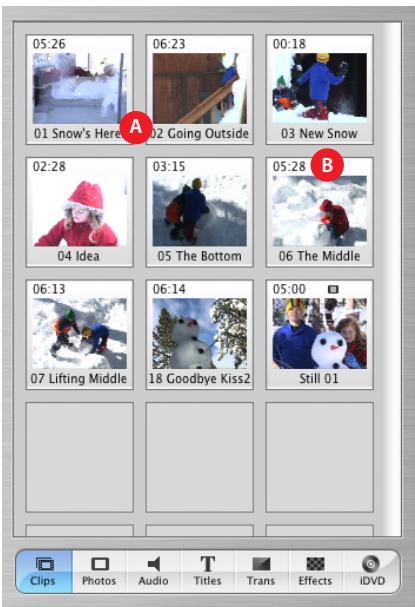
A Clip name: Each clip is assigned a unique filename. Double-click the name to change it to something more meaningful to you. You can drag a clip from the Clips pane to the clip viewer to add it to your movie.
B Duration: The length of a video or audio clip is read as minutes:seconds:frames. For example, 01:08:15 is 1 minute, 8 seconds, and 15 frames into the movie.
Photos Pane
Click the Photos button to open the Photos pane. You can import an image directly from your iPhoto library, add pan and zoom effects to it, and choose how long you want the photo to show in your movie.
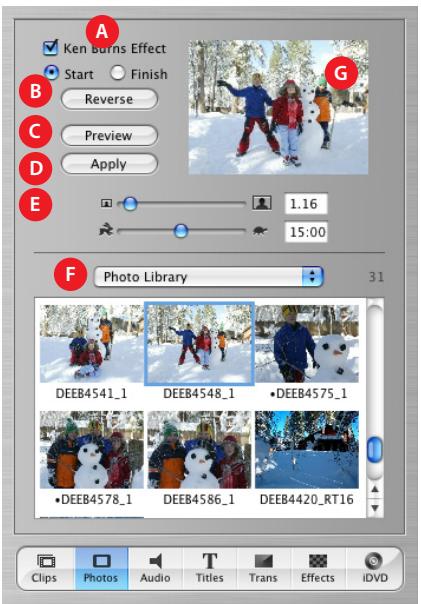
A Ken Burns Effect: Use these controls to set up pan and zoom effects for your photographs. Turn the effect off or on by selecting or deselecting the Ken Burns Effect checkbox. Click Start and Finish to set which part of the photo is showing at the beginning and end of the effect. Use the Zoom slider to set the zoom.
B Reverse: Click to reverse the direction of the pan and zoom effect.
C Preview: Click to see how the effect looks in the preview monitor.
D Apply: When you have the effect the way you want, click this button to apply the effect to the photograph. This creates a new clip in the Clips pane that you can add to your movie.
E Duration: Move the slider to set how many seconds the photograph remains in view.
F iPhoto pop-up menu: Choose your iPhoto library or an iPhoto album from this menu to view and select photographs. You can drag a photograph from the Photos pane to the clip viewer to add it to your movie.
G Preview monitor: Use this monitor to set up and preview effects for a selected photograph.
Audio Pane
Click the Audio button to open the Audio pane. You can add sound effects, record a voiceover, or import music from a CD or your iTunes music library.
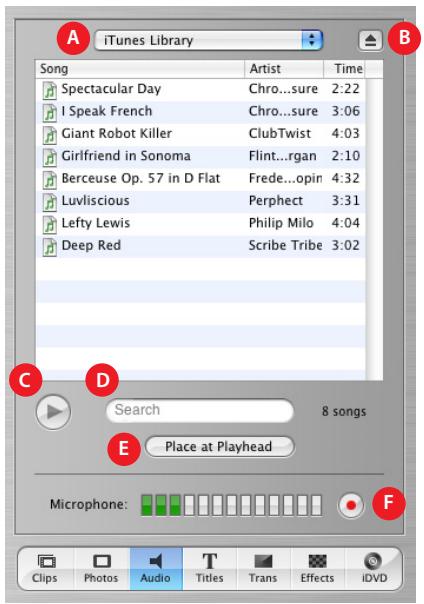
A Audio pop-up menu: Choose the source from which you want to import music or audio. You can choose a track from your iTunes library or a music CD, or an iMovie sound effect. You can drag a sound effect or iTunes track from the list to the timeline viewer to add it to your movie.
B Eject button: Click the button to eject a CD from the optical drive.
C Play: Click the button to play or pause a selected track.
D Search field: Type some words from a title to search for a particular audio file in your iTunes library. You can search by title or artist.
E Place at Playhead: Click the button to import a selected track into your movie. The imported track appears in one of the audio tracks in the timeline viewer.
F Record/Stop: Click the button to record a voiceover or other sound through your computer's built-in microphone or an external microphone. The input meter displays the sound level; sound quality is best if it stays within the yellow range.
Titles Pane
Click the Titles button to open the Titles pane. You can add opening titles, rolling commentary, or end credits. You can also choose a title style, font, and text color.
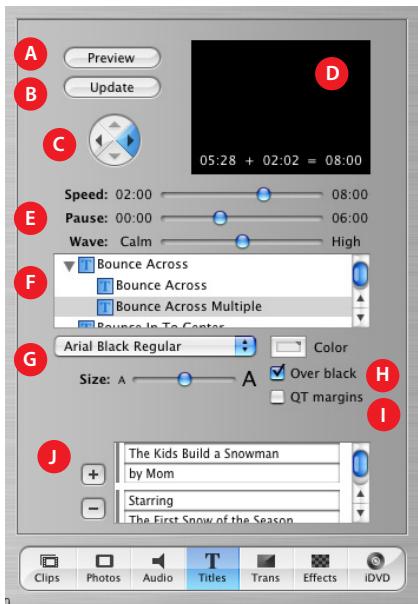
A Preview: Click to see how the title will look.
B Update: Click to apply changes to a title you've already added to your movie.
C Arrow buttons: For some titles you can click the arrow button to set the direction you want the title to move.
D Preview monitor: Use this monitor to view title styles and preview your settings.
E Timing controls: Move the sliders to set how quickly you want the titles to appear and how long to pause before disappearing. Other options may be available, depending on the title style.
F Titles list: Select a title style for the text you want to add to your movie. Click the arrow next to a title to see more titles in that category. When you're done setting options for the title, drag the title style from this list to the timeline viewer to place the title in your movie.
G Font controls: Choose a font, then move the slider left or right to adjust the font size. Choose a font color using the color box.
H Over Black: Select this option if you want the title to appear over a black video clip instead of one of your video clips.
QT Margins: Select this option if you plan to export the movie to QuickTime. Deselect it if you want to show the movie on a television screen.
J Text fields: Type your text in these text fields. If the style you choose allows more lines of text, use the plus and minus buttons to add or remove lines of text.
Transitions Pane
Click the Transitions button to open the Transitions pane. You can add transitions to move smoothly between the scenes in your movie.
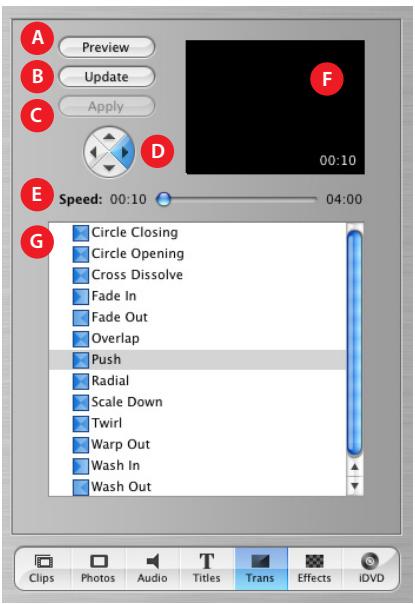
A Preview: Click to see how the transition will look in the iMovie monitor.
B Update: Click to apply changes to a transition you've already added to your movie.
C Apply: Click to apply the transition to multiple selected clips in your movie.
D Arrow buttons: For some transitions, you can click an arrow button to set the direction you want the transition to move.
E Timing controls: Move the sliders to set the speed of the transition and make other adjustments, depending on the transition style.
F Preview monitor: View a selected video clip and transition here.
G Transitions list: Select a transition in this list. When you're done setting options for the transition, drag the transition from this list to where you want it to appear in the clip viewer.
Effects Pane
Click the Effects button to open the Effects pane, where you can add special effects to change the look of your movie clips. For example, you can change color video to black and white, adjust the image brightness and contrast, or add playful effects like fairy dust or rain.
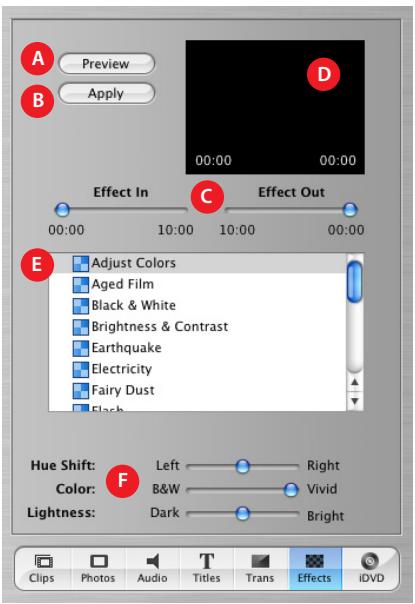
A Preview: Click to see how the effect will appear in the selected clip.
B Apply: Click to apply the effect to the selected clip in your movie.
C Effect In/Effect Out: Move these sliders to the points in the selected clip where you want the effect to appear and disappear.
D Preview monitor: Use this monitor to preview the effects you set up.
E Effects list: Select an effect in this list to change the appearance of clips in your movie.
F Appearance controls: Move these sliders to make adjustments to the selected effect. These options will vary, depending on the effect you choose.
iDVD Pane
Click the iDVD button to open the iDVD pane. You can add chapter markers to your movie and export it to iDVD.
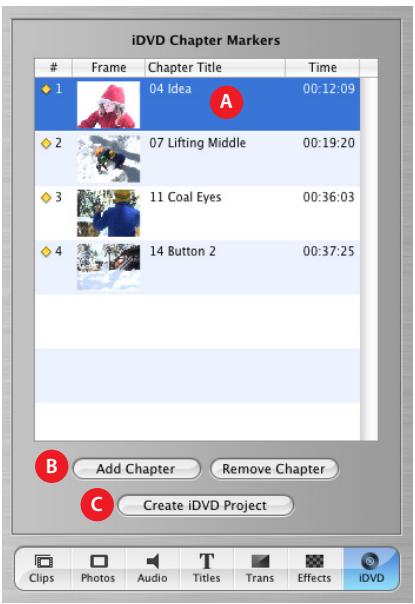
A Chapter titles: A new chapter appears in the list each time you add a marker. Type a name for each chapter that you want to use in your iDVD scene selection menu.
B Add Chapter/Remove Chapter: Click to add or remove a chapter marker in your movie. If you export your movie to iDVD to create a DVD, the markers you add are used to create scene selection menus in iDVD.
Create iDVD Project: Click to export your movie directly to iDVD. This opens iDVD version 3 or later and your movie appears as a project in the iDVD window. If you don't have iDVD version 3 or later on your computer or you don't have a supported DVD drive, this button is not available.