
IDVD - Logiciel de création de DVD APPLE - Notice d'utilisation et mode d'emploi gratuit
Retrouvez gratuitement la notice de l'appareil IDVD APPLE au format PDF.

| Type de produit | Logiciel de création de DVD |
| Marque | Apple |
| Modèle | iDVD |
| Catégorie | Logiciel multimédia |
| Fonctions principales | Création de menus DVD, diaporamas, ajout de musique, personnalisation des thèmes, prévisualisation, gravure |
| Formats d'import | Vidéos, photos (iPhoto), musique (iTunes) |
| Formats de sortie | DVD vidéo (lisible sur ordinateur et lecteurs DVD de salon) |
| Langues de l'interface | Anglais (autres langues selon version) |
| Compatibilité système | Mac OS X |
| Taille du projet maximale | Limitée par la capacité du DVD (4,7 Go pour simple couche) |
| Nombre maximum de diaporamas | 99 |
| Nombre maximum de sous-menus | 99 |
| Durée maximale des animations des menus | 15 minutes |
| Nombre maximum de pistes audio | 99 |
| Inclus dans | Suite iLife (historiquement) |
| Manuel utilisateur | Notice PDF téléchargeable, 10 pages |
FOIRE AUX QUESTIONS - IDVD APPLE
Questions des utilisateurs sur IDVD APPLE
0 question sur cet appareil. Repondez a celles que vous connaissez ou posez la votre.
Poser une nouvelle question sur cet appareil
Téléchargez la notice de votre Logiciel de création de DVD au format PDF gratuitement ! Retrouvez votre notice IDVD - APPLE et reprennez votre appareil électronique en main. Sur cette page sont publiés tous les documents nécessaires à l'utilisation de votre appareil IDVD de la marque APPLE.
MODE D'EMPLOI IDVD APPLE
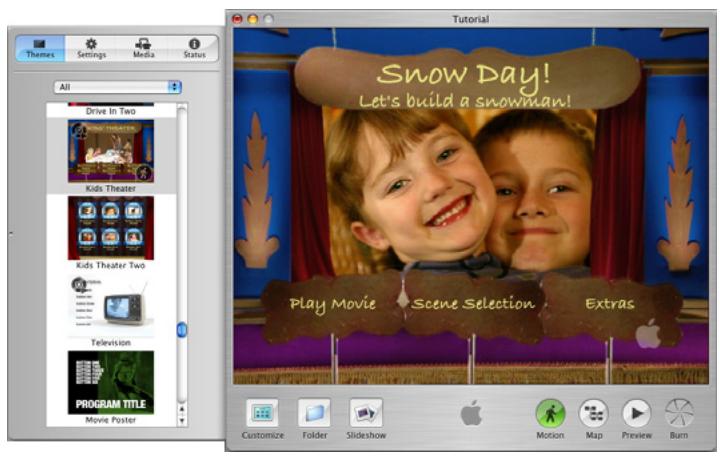
Use iDVD to create DVDs containing your own movies and slideshows, along with attractive and easy-to-navigate DVD menus, just like professional DVDs. Discs burned using iDVD can be played in computers with DVD drives and in most set-top DVD players.
To create an iDVD project, select a theme from the list in the Themes pane. iDVD provides several fun and elegant themes to use for your DVD menus. Customize the theme by adding your own background music, photos, or video loops. Then add buttons that link to your movies and slideshows. You can create several levels of menus to organize your movies and slideshows on a single DVD.
As you design a DVD menu, you can see your project presented in different ways in the main iDVD window; this makes it easier to work on different parts of the menu. You use the controls and options in the Customize drawer to add or change items in your DVD menus.
The pages that follow introduce you to the different views and controls in the iDVD window and the panes in the Customize drawer. Looking at these pages will help you learn the names of your iDVD controls, so you can easily follow the instructions in iDVD Help.
Main Window
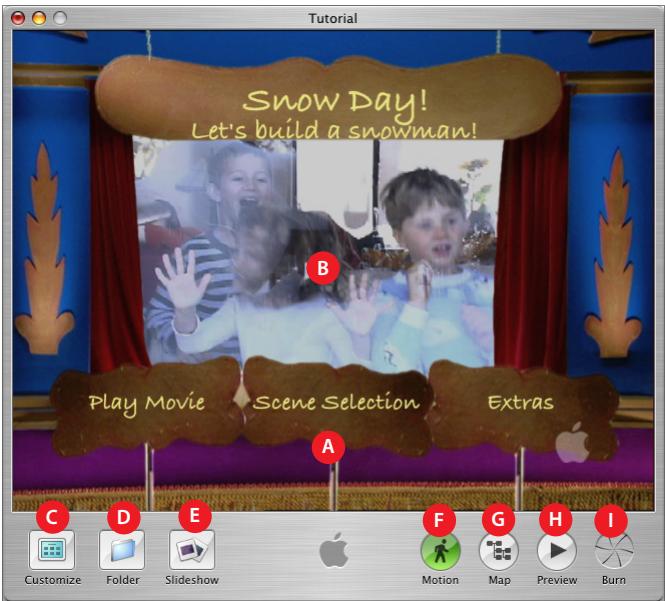
A iDVD menu: This is where you see the DVD menu you are creating as you build it. Drag movies, pictures, and audio files into this area to create buttons or change the look and sound of the background.
B Drop zone: Some themes include special areas called drop zones where you can place still pictures or a short movie loop that plays as part of the background.
C Customize: Click this button to open the Customize drawer. The Customize drawer contains all of the tools you will need to customize your DVD menu. The different panes of the Customize drawer are detailed in See "CustomizeDrawer" on page 3.
D Folder: Click this to create a submenu button on your DVD. A submenu is an additional menu where you can put more slideshows, movies, and text on the same DVD.
E Slideshow: Click this to create a slideshow button on your DVD.
F Motion: Click this to turn the motion and sound on or off while you work. This makes it easier to work on motion menus. (Motion menus are DVD menu designs that include slideshows, background audio, or video loops on buttons or in the background.)
G Map: Click this to open the map view of your DVD. The map view helps you navigate more easily through your iDVD project and is shown in more detail on page 10.
H Preview: Click this to preview your DVD. In preview mode, a DVD player remote control appears on screen, and you can use it to navigate through the menus and play the slideshows and movies as though you were viewing them on a set-top DVD player.
Burn: Click this twice to burn your DVD disc when you are finished with your iDVD project.
CustomizeDrawer
The Customize drawer contains all the tools you'll need to select and customize a menu theme, add your own media to your project, and keep track of how you are using your media resources as you work.
Themes Pane
The Themes pane is where you select a theme for the menu. When you select a theme from the themes list, it appears in the iDVD main window.
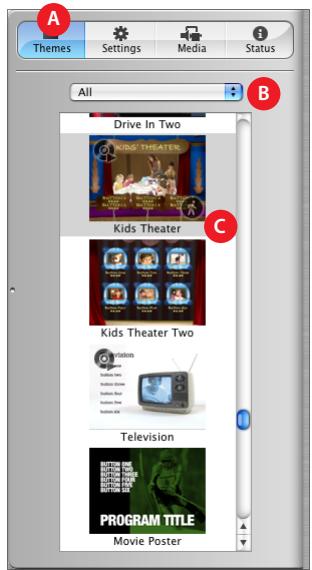
A Pane selection buttons: Click these buttons to switch between the Themes, Settings, Media, and Status panes. Each of these panes is described in more detail in the following pages.
B Theme sets: Choose a set of themes to preview or choose All to view all the themes at once. No themes appear in the Favorites list until you have customized your own theme and saved it as a favorite in the Settings pane. (For information about the Settings pane, See "Settings Pane" on page 4.
C Themes list: Scroll through the themes that appear in this list to select one for the menu you are creating. Click a theme to select it.
Settings Pane
Use the controls in the Settings pane to customize the look and sound of your DVD menu. Here you can add background video or sound, change the shape of the menu buttons, and change the font and color of the menu text.
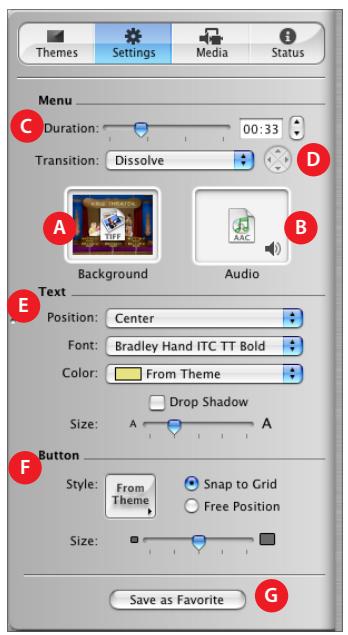
A Background image/movie well: Drag images or movies into this well to make them appear as the background of your DVD menu.
B Audio well: Drag sound files here to make them play as the background music for your DVD menu.
Duration slider: Drag this slider to choose how much of the background movie and music you want to play as a loop. The duration you set applies to both background movies and audio, as well as the video in motion buttons. Your DVD can contain a total of 15 minutes of menu motion.
D Transition pop-up menu: Select a transition that moves the viewer between the menu and the action that follows it, such as playing a movie. With some transitions, you can pick a direction for the transition to play using the arrow buttons to the right of the pop-up menu.
E Text controls: Use these controls to customize the look of the text in menu titles, buttons, and text elements. Choose a font from the Font pop-up menu and a color from the Color pop-up menu. Drag the Size slider to the right to make the text larger. Choose a text alignment from the Position pop-up menu. For example, you can choose to have the text appear directly beneath menu buttons, or offset to the left or right, or you can select no text. Different themes provide different text position options.
F Button controls: Use these controls to set the shape, size, and position of the buttons on the DVD menu. Choose a shape from the Style pop-up menu. Different themes provide different button shape options. Selecting Free Position allows you to move the buttons anywhere you like on the menu, rather than having them aligned to an invisible grid. Drag the Size slider to the right to make the buttons larger.
G Save as Favorite: Click this to save a theme you have customized with your favorite media and settings. If you do, it will appear in the Favorites list in the Themes pane so you or others can use it again.
Media Pane
The Media pane gives you easy access to the movies that are stored on your computer, as well as all the photos in your iPhoto library and all the music in your iTunes library.
Movies View
Here you can locate the movies that are stored on your computer. Movies stored in the Movies folder on your hard disk appear automatically. If you store your movies in other folders, you can make them appear here, too.
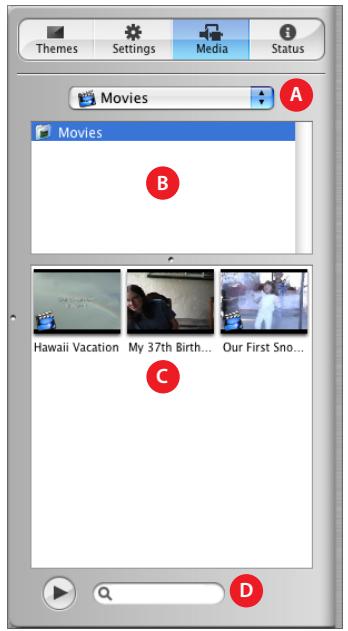
A Media pop-up menu: Use this pop-up menu to choose whether you want to look at your movies, photos, or music.
B Movie folders list: You can add any folders where you store movies to this list by making selections in the iDVD Preferences window.
C Movies list: Drag a movie from here to a menu to create a movie button. Drag it to a drop zone to create a video loop in the drop zone. To make the movie the full motion background of a menu, drag it up to the Settings button to switch to the Settings pane, and then drop the movie in the Background movie well. The movies that are stored in the selected folder appear in this list. If there are too many to fit in the window, a scroll bar appears.
D Search field: If you have too many movies to easily find what you are looking for, you can type the movie name in the search field to locate it.
Photos View
Here you can find all of the photos in your iPhoto library.
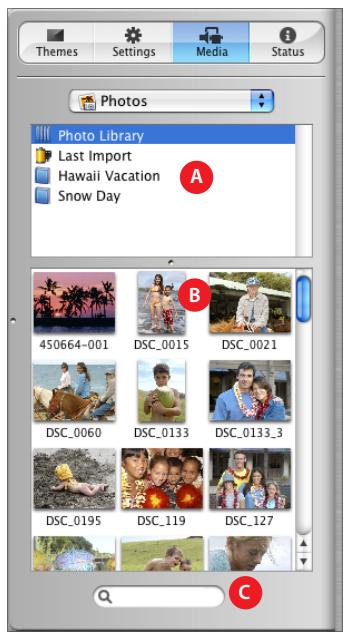
A iPhoto albums list: Select the iPhoto album that contains the photos you want to use. Drag an album to the main iDVD window to create a slideshow button that links to a slideshow containing all of the photos in that album. Drag an album with up to 30 photos to a drop zone to create a slideshow in the drop zone.
B Photos list: Scroll to see thumbnails of all your photos. Drag a photo or a group of photos to a drop zone to place a still image in the drop zone. To make a photo the full background of a menu, drag it to the menu or drag it up to the Settings button to switch to the Settings pane, and then drop it into the Background image well.
C Search field: If you have too many photos to easily find what you are looking for, you can type the photo's name in the search field to locate it.
Audio View
Here you can see all the music in your iTunes library.
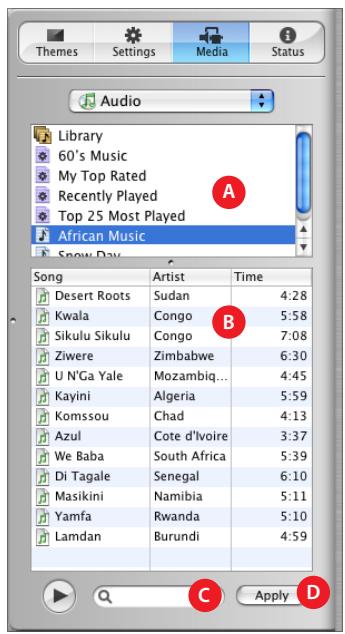
A iTunes playlists: Select the playlist that contains the music you want to use or select Library to see all the songs in your iTunes library.
B Songs list: Drag a song or playlist from here to a menu to set the menu background music. Drag it to the Audio well in the slideshow editor to set the background music for a slideshow. Scroll to see all your music. To learn more about the slideshow editor, see See "Slideshow Editor" on page 9.
C Search field: If you have too much music to easily find what you are looking for, you can type a song name in the search field to locate it.
D Apply button: Select a song or playlist and then click Apply to make the selection the background music for a menu or slideshow (if you are in the slideshow editor).
Status Pane
Use the Status pane to keep an eye on your iDVD project resources as you work.

A DVD Capacity: Check here to see how much space is left in your iDVD project. The project's size is limited by the size of the DVD.
B Motion Menus: Check here to see how much time you can still use for video and audio loops in motion menu backgrounds and motion buttons. You can have a total of 15 minutes of looping video and audio for any iDVD project.
C Tracks: Look here to see how many audio tracks and slideshows you can still add to your DVD. Each iDVD project can accommodate up to 99 slideshows and audio tracks.
D Menus: Check here to see how many more submenus you can add to your iDVD project. Each project can include up to 99 submenus.
E Asset list: Look here to see the names of the movies you have added to your iDVD project. The Status column to the right indicates whether the movie has been "encoded." All the movies must be encoded before the project is ready to burn to a DVD disc. (If you press the Burn button at any time, iDVD will finish encoding the movies before burning the disc.)
Slideshow Editor
The slideshow editor displays a list of all the photos in the selected slideshow and provides controls for you to set up how you want the slideshow to play.
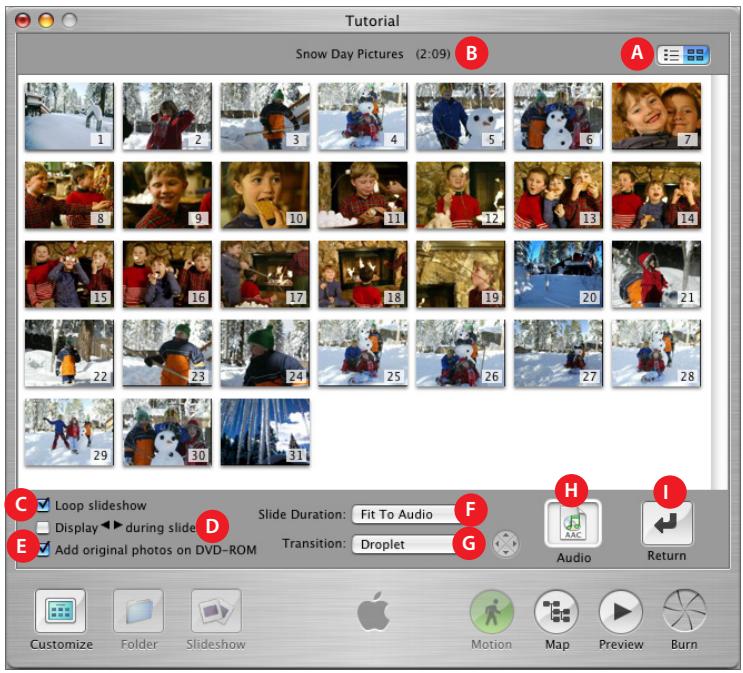
A Photo list or thumbnails: Click these buttons to switch between a list of the slides in the selected slideshow, or a thumbnail view. Scroll through the list to see the photos in this slideshow.
B Slideshow length: Look here to see how long the slideshow will last in minutes and seconds.
C Loop slideshow: Select this checkbox to make the slideshow automatically repeat when it reaches the end.
D Display < > during slideshow: Select this checkbox to add Back and Forward buttons to the slideshow.
E Add original photos on DVD-ROM: Select this checkbox to include a copy of all the photos in the slideshow on the part of the disc reserved as DVD-ROM space. This way, viewers can copy the photos from the DVD-ROM portion of the disc to their own hard disk.
F Slide Duration: Choose how long each slide should appear when the slideshow plays. By default, each slide appears for 3 seconds.
G Transition: Choose a transition to move from slide to slide. With some transitions you can pick a direction for the transition to play using the arrow buttons to the right of the pop-up menu.
H Audio well: Drag a song or iTunes playlist to this well to play it in the background while the slideshow plays. If you hold the pointer over the sound file icon in the Audio well, you can see the song's title and length (or the title of the first song in a playlist).
Return button: Click this button to exit the slideshow editor.
Map View
The map view shows you a graphic representation of all the parts of your iDVD project. This way, you can keep track of where all your submenus, slideshows, and movies are located. Double-clicking one of the icons in the map takes you directly to that item in the iDVD project so that you can edit it. You can scroll the map horizontally and vertically by pressing the mouse button so the pointer turns into a hand, and then dragging.
Below is a sample of how an iDVD project map might look. In this example, there is one slideshow, one movie with chapter markers, and one submenu.
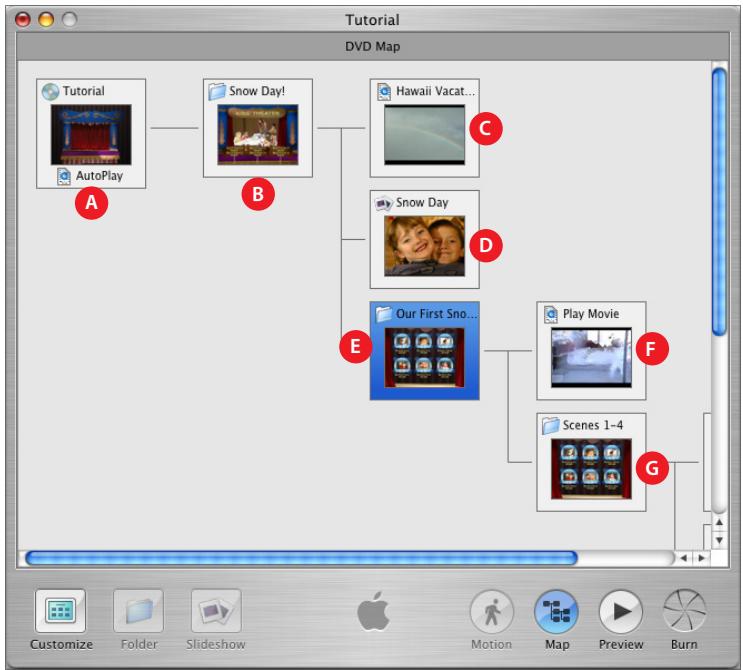
A Autplay movie well: Drag a movie here to make it play before the menus appear on the DVD. Double-click here to play the autplay movie.
B Main menu: This is the menu viewers will see first when they watch your DVD. Double-click here to open the main menu.
C A movie: A movie that's available from the main menu. Double-click here to play the movie.
D Slideshow: A slideshow that's accessible from the disc's main menu. Double-click here to go to the slideshow editor for that slideshow.
E A submenu: This line leads to a submenu that's available from the main menu of the disc. Double-click here to go the submenu.
F Play Full Movie: A full movie with chapter markers that is available from the submenu (E). Double-click here to play the movie.
G Scene Selection Submenu: The submenu that lists the scenes viewers can play in the movie with chapter markers. Double-click here to go to the scene selection submenu.
Marque : APPLE
Modèle : IDVD
Catégorie : Logiciel de création de DVD