
YVN200S - Instrument de musique YAMAHA - Notice d'utilisation et mode d'emploi gratuit
Retrouvez gratuitement la notice de l'appareil YVN200S YAMAHA au format PDF.

| Type d'instrument | Violon |
| Matériau du corps | Bois |
| Nombre de cordes | 4 |
| Type de cordes | Non précisé |
| Accessoires inclus | Archet, étui, colophane |
| Finition | Vernis naturel |
| Dimensions | Non précisé |
| Poids | Non précisé |
| Type de chevalet | Standard |
| Type de cordier | Standard |
| Type de touche | Ebène ou bois dur |
| Âge recommandé | Non précisé |
| Utilisation | Débutant à professionnel |
| Origine | Non précisé |
| Entretien | Nettoyage régulier, éviter l'humidité |
FOIRE AUX QUESTIONS - YVN200S YAMAHA
Questions des utilisateurs sur YVN200S YAMAHA
0 question sur cet appareil. Repondez a celles que vous connaissez ou posez la votre.
Poser une nouvelle question sur cet appareil
Téléchargez la notice de votre Instrument de musique au format PDF gratuitement ! Retrouvez votre notice YVN200S - YAMAHA et reprennez votre appareil électronique en main. Sur cette page sont publiés tous les documents nécessaires à l'utilisation de votre appareil YVN200S de la marque YAMAHA.
MODE D'EMPLOI YVN200S YAMAHA
Violin
Owner's Manual
Thank you for purchasing this fine Yamaha instrument.
Before You Start...
In order to maximize performance, and to ensure safety at all times, we recommend you read through this manual thoroughly before playing your instrument.
Taking Care of Your Instrument
Please follow the guidelines set out below to prolong the lifetime of your violin.
- Be careful when transporting the instrument. Make sure the instrument is handled with care and is not subjected to any rough treatment, like bumping against other objects or dropping the instrument.
- Only use the violin and bow indoors.
-
Exposing the instrument to certain environments, particularly sudden changes of temperature, may cause severe damage. Please take the necessary precautions to protect your instrument against the following:
-
Direct sunlight.
- Excessively high or low temperatures.
- Excessively high or low humidity.
-
Excessive dust or strong vibration.
-
Avoid leaving the instrument in a car for any extended period of time. Extreme temperatures, such as during the summer and winter months, can be harmful to the instrument.
-
Make sure you regularly clean your instrument with a soft, dry cloth. Never use benzene, alcohol, or thinner. Never use aerosol cans, or any other sprays within the vicinity of the instrument. These will damage the lacquer and general condition of the instrument.
- Prior to shipping the instrument has been adjusted and is ready for use. However, should you feel that additional adjustments are needed please contact your local Yamaha dealer, as some alterations require specialist skills.
- Do not attempt to modify or alter the instrument. It may make repair impossible.
Cautions Relating to the Instrument
The instrument's body is made from natural woods (spruce, maple, ebony, etc.) that are held together with glue. For this reason, there may be some cases in which sudden changes in temperature or humidity cause the glue to fail, or tuning or performance related problems. Please pay close attention to the environment and manner in which you use the instrument.
- In summer or winter seasons, wait until the instrument has adjusted to room temperature before playing.
- Make sure you wipe the rosin dust off from the instrument after you finish playing.
The violin is a very delicate instrument. Any of the following can lead to damage and should be avoided.
- Playing or leaving the instrument where it is exposed to direct sunshine.
- Playing or leaving the instrument in places with high humidity.
- Playing or leaving the instrument close to heat sources such as heaters, etc.
- Playing or leaving the instrument where it is in direct contact with cold air coming from air conditioners, etc.
Plated parts such as the adjusters, metal brackets on the chin rest, etc., may tarnish over time due to the makeup of the metal plating. This, however, will have no influence on the performance of these parts. When tarnish first appears, normal maintenance and cleaning may be enough to remove the tarnish. (If the tarnish progresses normal cleaning may not be sufficient.)
As the instrument and many of its parts are made of natural wood, there may be some cases, where objects that come in contact with the wood (hands, parts of the body, cleaning cloth, etc.) may become discolored. Color on body parts is not harmful to your health but you should wash and remove it with water. We can not be held responsible for discoloration of clothing, etc., or the discoloration of the wood.

- Part shapes may differ according to the model (model no.).
- Design and specifications are subject to change without notice.
Before Playing the Instrument
About the Bridge
The instrument is shipped from the workshop with its bridge properly set and aligned on the instrument's top.
After confirming that the bridge is in proper alignment, tune the instrument.
- Four notches in the bridge provide proper spacing between the strings.
Make sure that each string is set in its corresponding groove as shown in the illustration below.
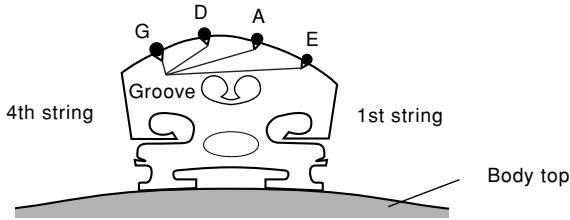
[Looking from the tailpiece]
- Using the notches in the left and right side f holes as a guide, refer to the diagram below and make sure that the bridge is properly positioned. If the bridge is not properly positioned, place the instrument on a stable surface, slightly loosen the strings, then gently position the bridge using both hands. Also, make sure that each string is set in its groove.
[On the YVN100G/200G/500G]
The center of the bridge should be aligned with a line running between the two f hole notches that face the center of the violin.
[On the YVN100S/200S/500S]
The side of the bridge with the trademark (the side facing the tailpiece, the vertical side) should be aligned with a line running between the two f hole notches that face the center of the violin.
![YAMAHA YVN200S - [On the YVN100S/200S/500S] - 1](/content/2025/01/114895/images/1c7a16bee718b8e22b86352d2bcf4dce5c61c5d779bc8bdea95fd683d0e4666a.jpg)
![YAMAHA YVN200S - [On the YVN100S/200S/500S] - 2](/content/2025/01/114895/images/e3a964bc325be07c40027e57ba8104f1959fe896698e871196f2f1da78743c06.jpg)
Caution
-
To obtain the best tone quality and performance from the YVN100S/200S/500S, it is important that the bridge is properly set as shown in the diagram above. Refer to the illustrations above when adjusting the bridge.
-
Make sure that the side of the bridge facing the tailpiece is standing at a right angle to the top of the instrument. If the bridge is leaning either direction, place the instrument on a stable surface, slightly loosen the strings then using both hands, gently adjust the bridge's angle. Make sure that the strings do not come out of their notches.
-
Playing with a poorly aligned bridge can result in poor sound quality, and deformation or damage to the bridge.
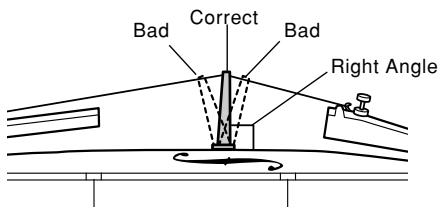
The side of the bridge facing the tailpiece should be at a right angle to the body of the instrument.
[Bridge is placed vertically]
Tuning
- The strings are tuned to the following pitches; The 1st string is tuned to E, the 2nd string to A, the 3rd string to D, and the 4th string to G. Use a piano, tuning fork, tuner, etc., and adjust the pitch of each string using the tuning pegs. When rotating the peg, apply firm pressure towards the peg box.
- After tuning is complete, make sure that the tailpiece side of the bridge is still properly aligned. If the bridge is leaning in either direction, slightly loosen the strings and carefully re-align the bridge using both hands.
- The fine tuner on the 1st string can be used for fine tuning the pitch of the string.
Caution
- When tuning the strings, do not over loosen or over tighten the fine tuner. Doing so may result in damage to the instrument, or cause noise during performance.
-
Please note that the fine tuner can come into contact with the body and cause damage if the bridge is removed from the instrument.
-
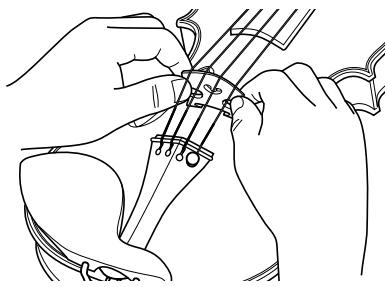
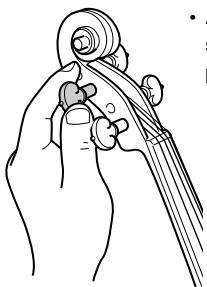
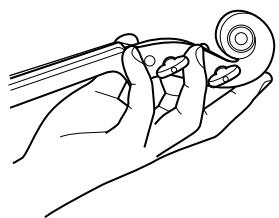
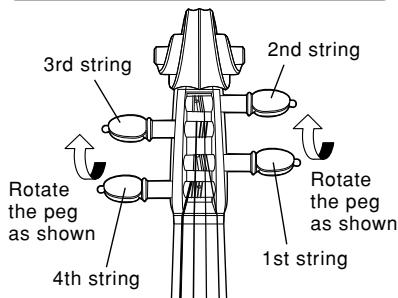
Periodic tuning during performance or practice may be necessary. Please tune the instrument in the following manner.
[Holding the Pegs]
The 3rd String [D]
- Avoid contact or putting pressure on the 4th string (G) tuning peg with your thumb.
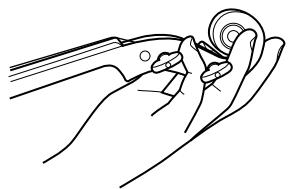
The 2nd String (A)
- Avoid contact or putting pressure on the 1st string (E) tuning peg with your thumb.
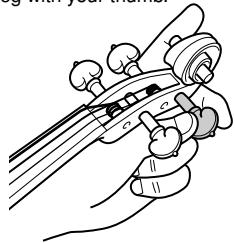
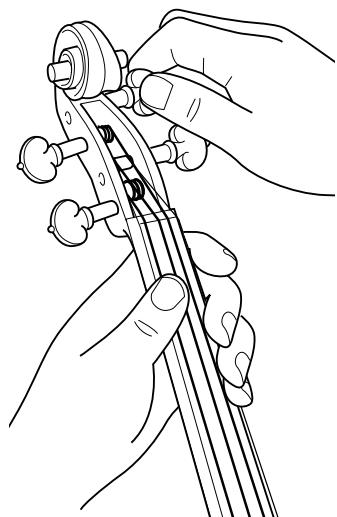
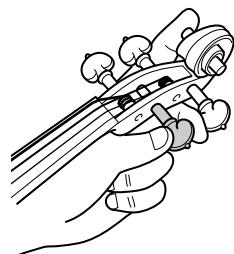
The 4th String (G)
- Avoid contact or putting pressure on the 3rd string (D) tuning peg with your index finger.
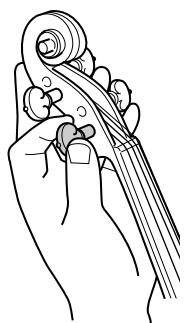
The 1st String (E)
- Avoid contact or putting pressure on the 2nd string (A) tuning peg with your index finger.
As the strings get old, sound quality will gradually decrease, and it will become difficult to tune the instrument.
Change the strings as soon as you think they are getting old.
Always change strings one at a time, even when changing all of the strings.
Caution
- The end of the strings are sharp and can cut fingers. Use caution when changing strings.
- When changing or adjusting strings, do not put your face close to the instrument. The string may suddenly break resulting in eye or other unexpected injuries.
1 Use a piano, tuning fork, tuner, etc., and adjust the pitch of each string using the tuning pegs. Before you string the instrument, set the fine tuner so that it is in the middle of its adjustment range. (1st string only)

The fine tuner should be set to the middle of its adjustment range.
2 Setting the Strings in the Tailpiece.
- Insert the ball ends of the 4th (G), 3rd (D) and 2nd (A) strings into the hole on the tailpiece from above (or thread the string through the hole from underneath the tailpiece), then slide the string into the narrow notch and pull up.
[Attaching the 4th (G), 3rd (D), and 2nd Strings (A)]
- Inserting the string from the top.
![YAMAHA YVN200S - [Attaching the 4th (G), 3rd (D), and 2nd Strings (A)] - 1](/content/2025/01/114895/images/fb9c9cc9938a3d4988f58383abf151470f0230bb83dc166596e4332995d0d273.jpg)
- Threading the string from underneath.
![YAMAHA YVN200S - [Attaching the 4th (G), 3rd (D), and 2nd Strings (A)] - 2](/content/2025/01/114895/images/5d72e7dce1de70638bcb7700d97d186ff0e5ab37e5fcbef4a13cca349e8f7d14.jpg)
- Looking from the underside of the tailpiece.
![YAMAHA YVN200S - [Attaching the 4th (G), 3rd (D), and 2nd Strings (A)] - 3](/content/2025/01/114895/images/ef819b3b55e0d56f872a0a8a40844b4d40fc92604ab20b646c6c361ba15e56e3.jpg)
- Hook the loop end of the 1st string (E) onto the hook on the fine tuner.
![YAMAHA YVN200S - [Attaching the 4th (G), 3rd (D), and 2nd Strings (A)] - 4](/content/2025/01/114895/images/9c11e4f5f9e2ca8f7b174139d16d184d39450bc56e42809509eeabe050b3ef25.jpg)
[Attaching the 1st String (E)]
![YAMAHA YVN200S - [Attaching the 4th (G), 3rd (D), and 2nd Strings (A)] - 5](/content/2025/01/114895/images/a52cff02aef0f0e1a560b70b21ab6bae670d5c0b1df09fc128a91e85c8a54e05.jpg)
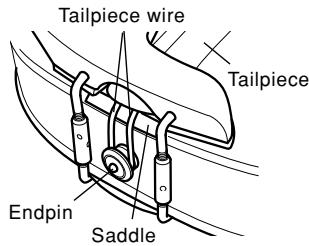
Caution
- Make sure that the endpin is inserted completely into the violin.
- Make sure that the tailpiece wire is properly hooked onto the endpin.
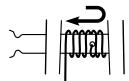
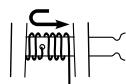
3 Insert the other end of the string into the hole on the peg, then wrap the string onto the peg.
- On the 1st (E) and 2nd (A) strings, make two windings to the left of the hole, then the remaining windings to the right as shown in the illustration on the far right.
- On the 3rd (D) and 4th (G) strings, make two windings to the right of the hole, then the remaining windings to the left as shown in the illustration on the left.
Next, make sure that the bridge does not fall over as you wind the strings. Ensure that the strings pass over the corresponding grooves on the top of the bridge.
(Make sure that the tailpiece side of the bridge is standing vertical to the violin top.)
Winding the 3rd and 4th strings
Winding the 1st and 2nd strings
If the 1st string (E) is fitted with a protective tube, either remove the tube or position the tube so that it does not hinder string vibration as shown in the illustration below.
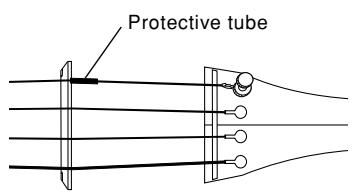
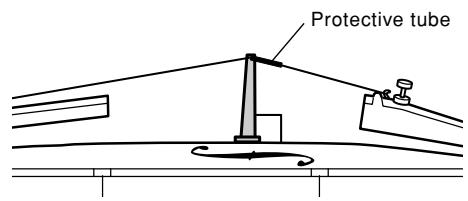
[Positioning the protective tube on the bridge]
4 Use a piano, tuning fork, tuner, etc., and adjust the pitch of each string using the tuning pegs.
5 The fine tuned can be used to adjust the pitch of the 1st string.
Warning!
-
When tuning the strings, do not over loosen or over tighten the fine tuner. Doing so may result in damage to the instrument, or cause noise disturbances during performance.
-
When the instrument is not going to be used for an extended period of time, loosen the strings until the pitch drops a whole tone.