MODE D'EMPLOI AJ3016 PHILIPS
text_image
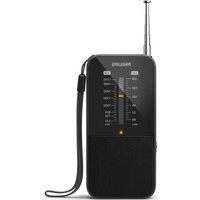
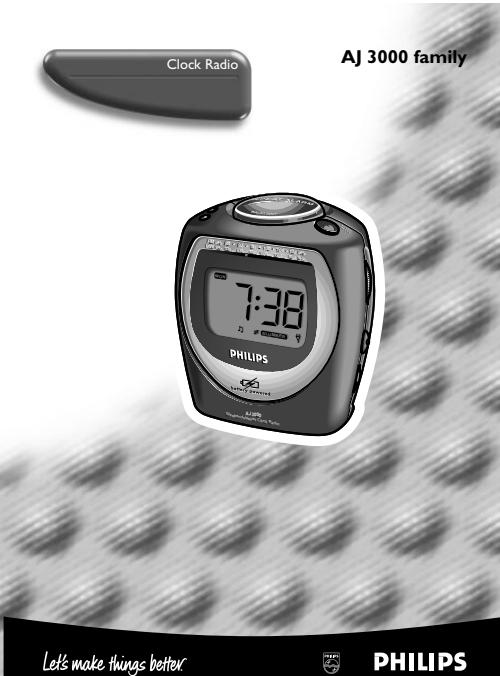
Clock Radio
AJ 3000 family
7:38
PHILIPS
Let's make things better
PHILIPS
AJ 3000 family - Clock radio


Meet Philips at the Internet http://www.philips.com
TC text/RR/9843
text_image
1
2
3
4
5
6
7
8
9
10
11
12
13
14
15
16
A33000
Weekend/Summer Clock Radio
BOTTER/Powered
7:38
MON
S
S
GREEN WITH
BMW 300 500 800 1000 1300 1600 MHz
SPEED ALAM
Green GTV
English
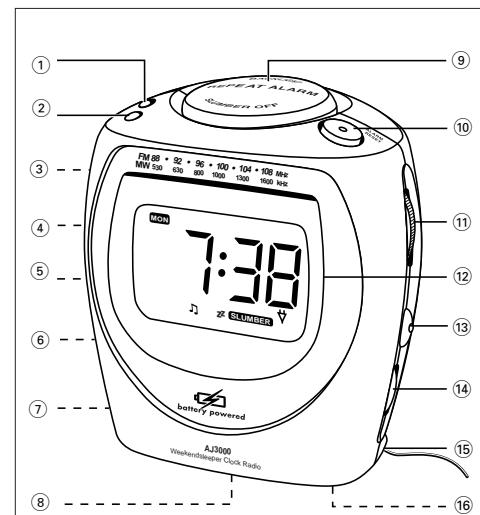
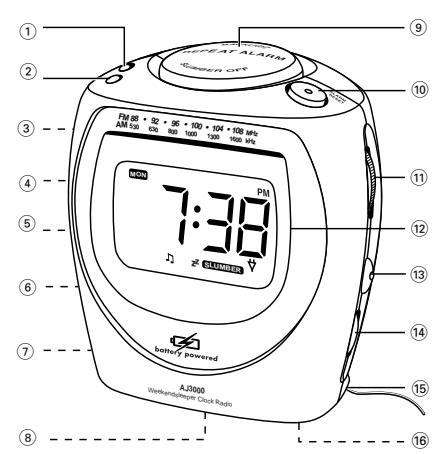
FUNCTIONAL OVERVIEW
① SLUMBER - to play the radio for a preset period of time
② RADIO ON/OFF - to switch on/off radio
③ ALARM MODE/OFF - to switch on/off alarm(s) by buzzer, radio or both
④ WEEKENDSLEEPER Z ^2 MODE•OFF- to switch off the alarm function during the
weekend
⑤ ALARM/TIME/DAY SET
- to set time for the buzzer alarm;
- to set time for the radio alarm;
- to set clock time;
- to set the day
⑥ UP ▲ DOWN ▼
- to adjust both the hours and minutes for clock/alarm times:
- to select the day of the week
- to select the alarm mode
- to select the alarmweekend sleeper mode
⑦ Socket for AC/DC 7.5V,adan
① Socket for He/De He
② Battery compartment
⑧ Battery compartin
⑨ REPEAT ALARM
⑨ REPEAT ALARM
- to switch off the alarm for a 5 minute period
- to switch display backlight on/off
- to switch off slumber
⑩ 24-hour ALARM RESET - to automatically reset the alarm for the same time next
day
⑪ TUNING - to tune to radio stations
⑫ Display - to show the clock/alarm times and status of the set
⑬ BAND - to select FM/MW waveband
⑭ VOLUME - to adjust the sound level
15 Pigtail - aerial for FM reception
⑩ Reset to reset the clock data
(二) 2017年1月1日
AC POWER SUPPLY
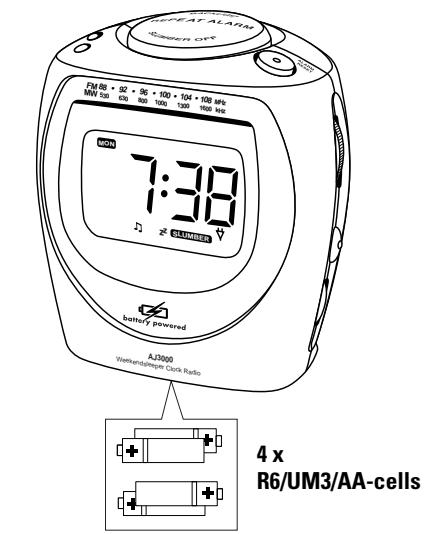
Batteries (not included)
1 Open battery door and insert four batteries (preferably PHILIPS POWER LIFE or alkaline*), type R6, UM3 or AA as indicated in the compartment.
2 Remove the batteries from the set if they are exhausted or not be used for a long time.
- When the batteries are running low, appears in the display. The radio and backlight will not function, but the display and power saving buzzer alarm will continue to operate**.
- When replacing batteries, the clock time, day and alarm settings will be stored by the self-powered back-up for 3 minutes (See 'Self-Powered Back-Up').
• Make sure the radio is switched off to save battery energy
Battery lifetime (based on PHILIPS POWER LIFE or alkaline batteries) *Total battery lifetime - 9 months minimum
* new batteries = 3 months, using 15 minutes of radio and 2 minutes of buzzer alarm a day.
** battery low mode = 6 months using 2 minutes of power-saving alarm a day.
Batteries contain chemical substances, so they should be disposed of properly.
Mains adapter (included with AJ 3005 only)
1 If your adapter is equipped with a voltage selector make sure the setting corresponds with your local mains voltage. The 3.5 mm adapter plug's 1.3 mm centre pin must also be connected to the positive pole ⊕.
2 Connect the mains adapter to the set's DC socket and to the power socket. indicates that the set is now adapter operated.
• Make sure your adapter is properly connected to save battery energy
3 Always disconnect the mains adapter if you are not using the set. → ∇ indicator goes out.
Note: To avoid damage to the set, only use the adapter supplied!
FUNCTIONAL OVERVIEW
① SLUMBER - to play the radio for a preset period of time
② RADIO ON/OFF - to switch on/off radio
③ ALARM MODE/OFF - to switch on/off alarm(s) by buzzer, radio or both
④ WEEKENDSLEEPER Z ^Z MODE•OFF- to switch off the alarm function during the
weekend
⑤ ALARM/TIME/DAY SET
- to set time for the buzzer alarm
- to set time for the radio alarm;
- to set clock time:
- to set the day.
⑥ UP ▲ DOWN ▼
- to adjust both the hours and minutes for clock/alarm times:
- to select the day of the v
- to select the alarm mode
- to select the alarmweekend sleeper mode
⑦ Socket for AC/DC 7.5 V adaptor
⑦ Socket for A3/26 A4
⑧ Battery compartment
① REPEAT ALARM
to switch off the alarm for a 5 minute period
to switch on the alarm for a 5 mm to switch display highlight or/off
- to switch display backlight on/on
- to switch off slumber
⑯ 24-hour ALARM RESET - to automatically reset the alarm for the same time next
uay
⑪ TUNING - to tune to radio stations
⑫ Display - to show the clock/alarm times and status of the set
⑬ BAND - to select FM/MW waveband
⑭ VOLUME - to adjust the sound level
⑮ Pigtail - aerial for EM reception
⑯ Reset - to reset the clock data
AC POWER SUPPLY
Batteries (not included)
1 Open battery door and insert four batteries (preferably PHILIPS POWER LIFE or alkaline*), type R6, UM3 or AA as indicated in the compartment.
2 Remove the batteries from the set if they are exhausted or not be used for a long time
- When the batteries are running low, appears in the display. The radio and
backlight will not function, but the display and power saving buzzer alarm will continue to operate**.
- When replacing batteries, the clock time, day and alarm settings will be stored by the self-powered back up for 2 minutes (See 'Self Powered Back Up').
• Make sure the radio is switched off to save battery energy
- Power flux: (1) m ^-1 - PHURO POWER LIFE - (2) m ^-1 - PLUGATE
Battery lifetime (based on PHILIPS POWER LIFE of alkaline batteries)
*Total battery lifetime = 9 months minimum.
*new batteries = 3 months, using 15 minutes of radio and 2 minutes of buzzer alarm a day.
** battery low mode = 6 months using 2 minutes of power saving alarm a day.
Batteries contain chemical substances, so they should be disposed of properly.
1. If your adapter is equipped with a voltage selector make sure the setting
corresponds with your local mains voltage. The 3.5 mm adapter plug's 1.3 m centre pin must also be connected to the positive pole ⊕.
2. Connect the mains adapter to the set's DC socket and to the power socket.
→ ≡ indicates that the set is now adapter operated
• Make sure your adapter is properly connected to save battery energy!
3. Always disconnect the mains adapter if you are not using the set
→ ∅ indicator goes out
Note: To avoid damage to the set, only use the adapter supplied!
Mains adapter (included with AJ 3005 only)
FUNCTIONAL OVERVIEW
① SLUMBER - to play the radio for a preset period of time
② RADIO ON/OFF - to switch on/off radio
③ ALARM MODE/OFF - to switch on/off alarm(s) by buzzer, radio or both
④ WEEKENDSLEEPER Z ^2 MODE•OFF- to switch off the alarm function during the weekend
⑤ ALARM/TIME/DAY SET
- to set time for the buzzer alarm
to set time for the radio alarm:
to set clock time:
to set the day.
⑥ UP ▲ DOWN ▼
to adjust both the hours and minutes for clock/alarm times;
to select the day of the week
to select the alarm mode
to select the alarmweekend sleeper mode
ocket for AC/DC 7.5 V adapter
⑧ Battery compartment
⑨ REPEAT ALARM
- to switch off the alarm for a 5 minute period
to switch display backlight on/off
- to switch off slumber
⑩ 24-hour ALARM RESET - to automatically reset the alarm for the same time next day
⑪ TUNING - to tune to radio stations
⑫ Display - to show the clock/alarm times and status of the set
⑬ BAND - to select FM/MW waveband
⑭ VOLUME - to adjust the sound level
⑮ Pintail - aerial for FM reception
⑯ Reset - to reset the clock data
AC POWER SUPPLY
Batteries (not included)
1 Open battery door and insert four batteries (preferably PHILIPS POWER LIFE or alkaline*), type R6, UM3 or AA as indicated in the compartment.
2 Remove the batteries from the set if they are exhausted or not be used for a long time.
- When the batteries are running low, appears in the display. The radio and backlight will not function, but the display and power saving buzzer alarm will continue to operate**.
- When replacing batteries, the clock time, day and alarm settings will be stored by the self-powered back up for 2 minutes (See 'Self-Powered Back Up').
• Make sure the radio is switched off to save battery energy.
Battery lifetime (based on PHILIPS POWER LIFE or alkaline batteries)
Battery lifetime (based on FYE 3 POWER LIFE of alkaliene batteries)
*Total battery lifetime = 9 months minimum.
*new batteries = 3 months, using 15 minutes of radio and 2 minutes of buzzer alarm a day.
** battery low mode = 6 months using 2 minutes of power-saving alarm a day.
Batteries contain chemical substances, so they should be disposed of properly.
1.2
Mains adapter (included with AJ 3005 only)
If your adapter is equipped with a voltage selector make sure the setting corresponds with your local mains voltage. The 3.5 mm adapter plug's 1.3 mm contro pin must also be connected to the positive pole.
- Connect the mains adapter to the set's DC socket and to the power socket
→ ∇ indicates that the set is now adapter operated.
• Make sure your adapter is properly connected to save battery energy!
3 Always disconnect the mains adapter if you are not using the set
→ ∇ indicator goes out
Note: To avoid damage to the set, only use the adapter supplied!
AJ 3000 family - Clock radio
SELF-POWERED BACK-UP
The self-powered back-up conveniently allows your day, alarm and clock time settings to be stored for up to 3 minutes when there is a power interruption e.g. AC power failure or when changing batteries.
The complete clock radio and backlight illumination will be switched off. As soon as the power supply returns the display will indicate the correct time.
- If power supply returns after 3 minutes, the demo mode appears and you will need to re-enter all clock settings.
GENERAL FEATURES
Reset
Should you receive external interference e.g. static electricity from carpets, thunderstorms, etc. which affects the display and electronic functions of your set, RESET allows you to clear all previous settings and start up again.
- Use a ballpoint pen to press RESET, found on the bottom of the se
Demo mode
When the set is first connected to a power supply or has been reset, 'PHILIPS' will scroll continuously across the demonstration display until the time and day settings are entered. In Demo mode only the ALARM/TIME/DAY SET control will function.
Display backlight
The use of the backlight depends on whether the set is battery or adapter operated. 1 Press REPEAT ALARM once to activate the backlight.
→ The backlight goes out after 2 seconds if the set is battery operated
→ The display remains lit if the set is adapter operated
2 Press REPEAT ALARM again if you want to:
— Re-activate the backlight if the set is battery operated.
– Switch off the backlight if adapter operated.
NOTE: During an alarm call, the REPEAT ALARM will only operate for the repeat alarm function.
This product complies with the radio interference requirements of the European Community
The typeplate and production number are located inside the battery compartment
SETTING THE TIME & DAY
The clock and alarm times and the day need to be entered separately
Setting the clock
The time is displayed using the 24 hour clock
1 Press ALARM/TIME/DAY SET once or more until the display shows SET TIME.
2 As soon as SET TIME is shown, press UP ▲ or DOWN ▼ to set and adjust both the hours and minutes:
– with your finger held down on UP▲ or DOWN▼ respectively, the time will increase/decrease rapidly and continuously from minutes to hours.
- if necessary, press UP ▲ or DOWN ▼ briefly and repeatedly to adjust the time slowly, minute by minute.
3 Release UP▲ or DOWN▼ when you have reached the correct setting →SET TIME goes out after 5 seconds and the clock time is set.
Setting the day
Setting the day enables you to set the WEEKENDSLEEPER
(See WEEKENDSLEEPER.)
1 Press ALARM/TIME/DAY SET once or more until the displays shows SET
2 As soon as the day(s) of the week start to blink, press UP▲ or DOWN▼ briefly and repeatedly until you find the correct day: MON, TUE, WED, THU, FRI, SAT or SUN. →SET goes out after 5 seconds and the day is set.
RADIO
RADIO
You can use this set solely as a radio!
1 Press RADIO ON/OFF to switch on the radio
2 Adjust the BAND switch to select your waveband.
3 Use TUNING to find your station
To improve reception:
FM: Extend the pigtail at the back of the set fully for optimum reception
AM (MW): Uses a built-in aerial. Direct the antenna by adjusting the position of your set.
4 Adjust the sound using VOLUME
5 Press RADIO ON/OFF to switch off the radio.
→The display shows OFF briefly
SELF-POWERED BACK-UP
The self-powered back-up conveniently allows your day, alarm and clock time settings to be stored for up to 3 minutes when there is a power interruption e.g. AC power failure or when changing batteries.
The complete clock radio and backlight illumination will be switched off. As soon as the power supply returns the display will indicate the correct time.
- If power supply returns after 3 minutes, the demo mode appears and you will need to re-enter all clock settings.
GENERAL FEATURES
Reset
Should you receive external interference e.g. static electricity from carpets, thunderstorms, etc. which affects the display and electronic functions of your set, RESET allows you to clear all previous settings and start up again.
- Use a ballpoint pen to press RESET, found on the bottom of the se
Demo mode
When the set is first connected to a power supply or has been reset, 'PHILIPS' will scroll continuously across the demonstration display until the time and day settings are entered. In Demo mode only the ALARM/TIME/DAY SET control will function.
Display backlight
The use of the backlight depends on whether the set is battery or adapter operated.
1 Press REPEAT ALARM once to activate the backlight.
→ The backlight goes out after 2 seconds if the set is battery operated
→ The display remains lit if the set is adapter operated.
2 Press REPEAT ALARM again if you want to
– Re-activate the backlight if the set is battery operated.
– Switch off the backlight if adapter operated.
NOTE: During an alarm call, the REPEAT ALARM will only operate for the repeat alarm function.
SETTING THE TIME & DAY
The clock and alarm times and the day need to be entered separately
Setting the clock
The time is displayed using the 24 hour clock
1 Press ALARM/TIME/DAY SET once or more until the display shows SET
2 As soon as SET TIME is shown, press UP▲ or DOWN▼ to set and adjust both the hours and minutes:
- with your finger held down on UP ▲ or DOWN ▼ respectively, the time will
increase/decrease rapidly and continuously from minutes to hours
- if necessary, press UP ▲ or DOWN ▼ briefly and repeatedly to adjust the time slowly, minute by minute.
3 Release UP▲ or DOWN▼ when you have reached the correct setting.
→SET TIME goes out after 5 seconds and the clock time is set.
Setting the day
Setting the day enables you to set the WEEKENDSLEEPER
(See WEEKENDSLEEPEF
1 Press ALARM/TIME/DAY SET once or more until the displays shows SET.
2 As soon as the day(s) of the week start to blink, press UP▲ or DOWN▼ briefly and repeatedly until you find the correct day: MON, TUE, WED, THU, FRI, SAT or SUN. →SET goes out after 5 seconds and the day is set.
TABLE
RADIO
You can use this set solely as a radio!
1 Press RADIO ON/OFF to switch on the radio
2 Adjust the BAND switch to select your waveband.
3 Use TUNING to find your station.
To improve reception:
FM: Extend the pigtail at the back of the set fully for optimum reception.
AM (MW): Uses a built-in aerial. Direct the antenna by adjusting the position of your set.
4 Adjust the sound using VOLUME
5 Press RADIO ON/OFF to switch off the radio
→The display shows OFF briefly.
SELF-POWERED BACK-UP
The self-powered back-up conveniently allows your day, alarm and clock time settings to be stored for up to 3 minutes when there is a power interruption e.g. AC power failure or when changing batteries.
The complete clock radio and backlight illumination will be switched off. As soon as the power supply returns the display will indicate the correct time.
- If power supply returns after 3 minutes, the demo mode appears and you will need to re-enter all clock settings.
GENERAL FEATURES
Reset
Should you receive external interference e.g. static electricity from carpets, thunderstorms, etc. which affects the display and electronic functions of your set, RESET allows you to clear all previous settings and start up again.
- Use a ballpoint pen to press RESET, found on the bottom of the se
Demo mode
When the set is first connected to a power supply or has been reset, 'PHILIPS' will scroll continuously across the demonstration display until the time and day settings are entered. In Demo mode only the ALARM/TIME/DAY SET control will function.
Display backlight
The use of the backlight depends on whether the set is battery or adapter operated. 1 Press REPEAT ALARM once to activate the backlight.
→ The backlight goes out after 2 seconds if the set is battery operated
→ The display remains lit if the set is adapter operated
2 Press REPEAT ALARM again if you want to:
– Re-activate the backlight if the set is battery operated.
- Switch off the backlight if adapter operated.
NOTE: During an alarm call, the REPEAT ALARM will only operate for the repeat alarm function.
SETTING THE TIME & DAY
The clock and alarm times and the day need to be entered separately.
Setting the clock
The time is displayed using the 24 hour clock.
1 Press ALARM/TIME/DAY SET once or more until the display shows SET TIME.
2 As soon as SET TIME is shown, press UP ▲ or DOWN ▼ to set and adjust both hours and minutes;
with your finger held down on UP ▲ or DOWN ▼ respectively, the time wi
increase/decrease rapidly and continuously from minutes to hours
if necessary, press UP ▲ or DOWN ▼ briefly and repeatedly to adjust the
slowly, minute by minute
3 Release UP ▲ or DOWN ▼ when you have reached the correct setting
→SET TIME goes out after 5 seconds and the clock time is set.
Setting the day
Setting the day enables you to set the WEEKENDSLEEPER
(See WEEKENDSLEEPER.
1 Press ALARM/TIME/DAY SET once or more until the displays shows SET.
2 As soon as the day(s) of the week start to blink, press UP▲or DOWN▼briefly a repeatedly until you find the correct day: MON, TUE, WED, THU, FRI, SAT or SUI
SET goes out after 5 seconds and the day is set.
RADIO
You can use this set solely as a radio!
1 Press RADIO ON/OFF to switch on the radio
2 Adjust the BAND switch to select your waveband.
3 Use TUNING to find your station.
To improve reception:
FM: Extend the pigtail at the back of the set fully for optimum reception. AM (MW): Uses a built-in aerial. Direct the antenna by adjusting the position of your set.
-
Adjust the sound using VOLUME
-
Press RADIO ON/OFF to switch off the radio
→The display shows OFF briefly
USING THE ALARM
FUNCTIONAL OVERVIEW
SLUMBER - to play the radio for a preset period of time
① RADIO ON/OFF - to switch on/off radio
③ ALARM MODE/OFF - to switch on/off alarm(s) by buzzer, radio or both
WEEKENDSLEEPER Z ^2 MODE•OFF- to switch off the alarm function during the
weekend
ALARM/TIME/DAY SET
- to set time for the buzzer alarm
- to set time for the radio alarm;
- to set clock time;
- to set the day
6) UP ▲, DOWN ▼
- to adjust both the hours and minutes for clock/alarm times;
- to select the day of the week
- to select the alarm mode
- to select the alarmweekend sleeper mode
Socket for AC/DC 7.5 V adapter
Battery compartment
① REPEAT ALARM
- to switch off the alarm for a 5 minute period
- to switch display backlight on/off
- to switch off slumber
© 24-hour ALARM RESET - to automatically reset the alarm for the same time next correspo
day centre pr
① TUNING
© Display - to show the clock/alarm times and status of the set
① RAND to select FM/MW waveband
① VOLUME - to adjust the sound level
- Pictail, serial for EM reception
- Figtain - achnar for HIV reception
- Recent treatment schedule
③ reset - to reset the clock data
AC POWER SUPPLY
Batteries (not included)
1 Open battery door and insert four batteries (preferably PHILIPS POWER LIFE or
alkaline ^* ), type R6, UM3 or AA as indicated in the compartment.
2 Remove the batteries from the set if they are exhausted or not be used for a long
time.
- When the batteries are running low, appears in the display. The radio and
backlight will not function, but the display and power saving buzzer alarm wil
continue to operate**.
- When replacing batteries, the clock time, day and alarm settings will be stored by
the self-powered back-up for 3 minutes (See 'Self-Powered Back-Up').
• Make sure the radio is switched off to save battery energy.
Battery lifetime (based on PHILIPS POWER LIFE or alkaline batteries)
*Total battery lifetime = 9 months minimum.
*new batteries = 3 months, using 15 minutes of radio and 2 minutes of buzzer
alarm a day.
** battery low mode = 6 months using 2 minutes of power-saving alarm a day
Batteries contain chemical substances, so they should be disposed of
properly
,
Mains adapter (included with AJ 3005 only)
1 If your adapter is equipped with a voltage selector make sure the setting
corresponds with your local mains voltage. The 3.5 mm adapter plug's 1.3
centre pin must also be connected to the positive pole ⊕
2 Connect the mains adapter to the set's DC socket and to the power socket
→ Y Indicates that the set is now ad
• Make sure your adapter is properly connected to save battery energy!
3 Always disconnect the mains adapter if you are not using the set.
→ ∇ indicator goes out
Note: To avoid damage to the set, only use the adapter supplied!
FUNCTIONAL OVERVIEW
① SLUMBER - to play the radio for a preset period of time
② RADIO ON/OFF - to switch on/off radio
③ ALARM MODE/OFF - to switch on/off alarm(s) by buzzer, radio or both
④ WEEKENDSLEEPER 7 ^2 MODE•OFF- to switch off the alarm function during the
weekend
⑤ ALARM/TIME/DAY SET
- to set time for the buzzer alarm
- to set time for the radio alarm
- to set clock time
- to set the day.
⑥ UP ▲ DOWN ▼
- to adjust both the hours and minutes for clock/alarm times;
- to select the day of the wee
- to select the alarm mode
- to select the alarmweekend sleeper mode
⑦ Socket for AC/DC 7.5 V adapte
⑧ Battery compartment
⑨ REPEAT ALARM
- to switch off the alarm for a 5 minute period
- to switch display backlight on/off
- to switch off
⑩ 24-hour ALARM RESET - to automatically reset the alarm for the same time next
day
⑪ TUNING
⑫ Display - to show the clock/alarm
⑬ BAND - to select EM/MW waveband
⑭ VOLUME - to adjust the sound level
① Pedielle is adjusted to sound.
② Diptail, serial for EM reception
⑮ Pigtani - dhaul for HM reception
⑯ Reset - to reset the clock data
⑩ Reset to reset the clock data
SELF-POWERED BA
The self-powered back-up conveniently allows your day, alarm and clock time settings
to be stored for up to 3 minutes when there is a power interruption e.g. AC power
failure or when changing batteries.
The complete clock radio and backlight illumination will be switched off. As soon as the
power supply returns the display will indicate the correct time.
- If power supply returns after 3 minutes, the demo mode appears and you will need to
re-enter all clock
GENERAL FEATURES
Reset
Should you receive external interference e.g. static electricity from carpets,
thunderstorms, etc. which affects the display and electronic functions of your set,
RESET allows you to clear all previous settings and start up again
- Use a ballpoint pen to press RESET, found on the bottom of the set.
Demo mode
When the set is first connected to a power supply or has been reset, 'PHILIPS' will
scroll continuously across the demonstration display until the time and day settings are
entered. In Demo mode only the ALARM/TIME/DAY SET control will function.
Display backlight
The use of the backlight depends on whether the set is battery or adapter operated
1 Press REPEAT ALARM once to activate the backlight
→ The backlight goes out after 2 seconds if the set is battery operated.
→ The display remains fit in the set is adap
2 Fless REPEAT ALARM again if you want to.
- He-activate the backlight if the set is battery operated. Switch off the backlight if adaptor operated
Switch off the backlight if adapter operated.
NOTE: During an alarm call, the REPEAT ALARM will only operate for the repeat alarm
function.
[Non-Text]
[Non-Text]
[Non-Text]
[Non-Text]
USING THE ALARM
General
You can set your alarm by radio, buzzer or both.
- The buzzer is at a fixed volume and cannot be adjusted
- The power-saving-buzzer automatically replaces the radio alarm if battery supply is low.
Setting the alarm by radio or buzzer
1 Press ALARM/TIME/DAY SET once or more until the display shows SET ALARM and
the radio ♪ or buzzer 🔒 symbol flashes.
2 Press UP ▲ or DOWN ▼ to set and adjust both the hours and minutes:
- with your finger held down on UP ▲ or DOWN ▼ respectively, the time will
increase/decrease rapidly and continuously from minutes to hours.
- If necessary, press UP ▲ or DOWN ▼ briefly and repeatedly to adjust the time
slowly, minute by minute.
3 Release UP ▲ or DOWN ▼ when you have reached the correct setting
→ The display reverts to the clock display after 5 seconds.
4 Press ALARM MODE/OFF once or more to select radio ♪, buzzer ♦ or both to
activate your choice of an
to review the alarm time
1 Press ALARM/TIME/DAY once or more until the display shows SET ALARM and ♪
or ↓.
π
→ The display reverts to the clock display after 5 seconds.
IMPORTANT! If you want the radio alarm to wake you up, FIRST CHECK if you have
tuned to a station and adjusted the volume loud enough
SWITCHING OFF THE ALARM
There are three ways of switching off the alarm. Unless you cancel the alarm
completely, the 24-hour ALARM RESET will be automatically selected after 30 minutes.
from the time your alarm first goes off.
24-hour alarm reset
If you want the alarm mode to be stopped immediately but also wish to retain the same
alarm setting for the
AC POWER SUPPLY
Batteries (not included)
1 Open battery door and insert four batteries (preferably PHILIPS POWER LIFE or
alkaline ^* ), type R6, UM3 or AA as indicated in the compartment.
2 Remove the batteries from the set if they are exhausted or not be used for a long
time.
- When the batteries are running low, appears in the display. The radio and
backlight will not function, but the display and power saving buzzer alarm will
continue to operate**.
- When replacing batteries, the clock time, day and alarm settings will be stored by
the self-powered back-up for 3 minutes (See 'Self-Powered Back-Up').
• Make sure the radio is switched off to save battery energy
Battery lifetime (based on PHILIPS POWER LIFE or alkaline batteries)
*Total battery lifetime = 9 months minimum.
*new batteries = 3 months, using 15 minutes of radio and 2 minutes of buzzer
alarm a day.
** battery low mode = 6 months using 2 minutes of power-saving
Batteries contain chemical substances, so they should be disposed of
properly
Mains adapter (included with A L 2005 only)
- If your adapter is equipped with a voltage selector make sure the setting
- If your adapter is equipped with a voltage selector, make sure the setting corresponds with your local mains voltage. The 3.5 mm adapter plug's 1.3 mm
centre pin must also be connected to the positive pole ⊕
- Connect the mains adapter to the set's DC socket and to the power socket
→ ∅ indicates that the set is now adapter operated
• Make sure your adapter is properly connected to save battery energy!
3 Always disconnect the mains adapter if you are not using the set.
→ ∇ indicator goes out
Note: To avoid damage to the set, only use the adapter supplied!
FUNCTIONAL OVERVIEW
① SLUMBER - to play the radio for a preset period of time
② RADIO ON/OFF - to switch on/off radio
③ ALARM MODE/OFF - to switch on/off alarm(s) by buzzer, radio or both
④ WEEKENDSLEEPER Z ^Z MODE•OFF- to switch off the alarm function during the
weekend
⑤ ALARM/TIME/DAY SET
- to set time for the buzzer alarm
- to set time for the radio alarm:
- to set clock tim
- to set the day.
⑥ UP ▲ DOWN ▼
- to adjust both the hours and minutes for clock/alarm times;
- to select the day of the week
- to select the alarm mode
- to select the alarmweekend sleeper mode
⑦ Socket for AC/DC 7.5 V adapter
⑧ Battery comparti
⑨ REPEAT ALARM
- to switch off the alarm for a 5 minute period
- to switch display backlight on/off
- to switch off slumber
⑩ 24-hour ALARM RESET - to automatically reset the alarm for the same time next
day
⑪ TUNING - to tune to radio stations
⑫ Display - to show the clock/alarm times and status of the set
⑬ BAND - to select FM/MW waveband
⑭ VOLUME - to adjust the sound level
⑮ Pigtail - aerial for FM reception
⑯ Reset - to reset the clock data
The Ground Truth image displays a single, solid horizontal line. According to Rule 2 (UNDERSCORE & LINE RULES), this is a stylistic or background line, not a placeholder underscore. Therefore, the OCR result must ignore it and output nothing or only meaningful text. The provided OCR content is "____", which consists of four underscores. This is an incorrect interpretation of the line as a placeholder, violating the rule that stylistic lines must be ignored. The OCR has hallucinated underscores where none should exist based on the GT's visual context. Hence, the OCR result is inconsistent with the Ground Truth.
SELF-POWERED BACK-UP
The self-powered back-up conveniently allows your day, alarm and clock time settings
to be stored for up to 3 minutes when there is a power interruption e.g. AC power
failure or when changing batteries.
The complete clock radio and backlight illumination will be switched off. As soon as the
power supply returns the display will indicate the correct time.
- If power supply returns after 3 minutes, the demo mode appears and you will need to
re-enter al
GENERAL FEATURES
Reset
Should you receive external interference e.g. static electricity from carpets,
thunderstorms, etc. which affects the display and electronic functions of your set,
RESET allows you to clear all previous settings and start up again
- Use a ballpoint pen to press RESET, found on the bottom of the set
Demo mode
When the set is first connected to a power supply or has been reset, 'PHILIPS' wi
scroll continuously across the demonstration display until the time and day settings are
entered. In Demo mode only the ALARM/TIME/DAY SET control will function.
Display backlight
The use of the backlight depends on whether the set is battery or adapter operated
1 Press REPEAT ALARM once to activate the backlight.
→ The backlight goes out after 2 seconds if the set is battery operated.
→ The display remains lit if the set is adapter operated.
2 Press REPEAT ALARM again if you want to:
– Re-activate the backlight if the set is battery operated
- Switch off the backlight if adapter operated.
NOTE: During an alarm call, the REPEAT ALARM will only operate for the repeat alarm
functi
[Non-Text]
[Non-Text]
[Non-Text]
AC POWER SUPPLY
Batteries (not included)
1 Open battery door and insert four batteries (preferably PHILIP
alkaline*), type R6, UM3 or AA as indicated in the compartment
2 Remove the batteries from the set if they are exhausted or not be used for a long
time.
- When the batteries are running low, appears in the display. The radio and
backlight will not function, but the display and power saving buzzer alarm will
continue to operate
- When replacing batteries, the clock time, day and alarm settings will be stored by
the self-powered back-up for 3 minutes (See 'Self-Powered Back-Up')
• Make sure the radio is switched off to save battery energy.
Battery lifetime (based on PHILIPS POWER LIFE or alkaline batteries)
*Total battery lifetime = 9 months minimum.
*new batteries = 3 months, using 15 minutes of radio and 2 minutes of buzzer
alarm a day.
** battery low mode = 6 months using 2 minutes of power-saving alarm a day
Batteries contain chemical substances, so they should be disposed of
properly.
Mains adapter (included with AJ 3005 only)
1 If your adapter is equipped with a voltage selector make sure the setting
corresponds with your local mains voltage. The 3.5 mm adapter plug's 1.3 mm
centre pin must also be connected to the positive pole ⊕
2 Connect the mains adapter to the set's DC socket and to the power socket
→ ∇ indicates that the set is now adapter operated.
• Make sure your adapter is properly connected to save battery energy!
3 Always disconnect the mains adapter if you are not using the set.
→ Y Indicator goes out.
Note: To avoid damage to the set, only use the adapter supplied!
text_image
WHEAT ALAIN
Comfort On
PM 88 + 92 + 96 + 100 + 104 + 108 MPG
AM 500 120 500 1000 1300 1600 MPG
7:38 PM
BANUMBER
batter/powered
AJ3000
Weekend/Session Clock Radio
text_image
REPEAT ALARM
Cyclical OFF
FM 80 + 52 + 96 + 100 + 104 + 108 9½
MW 500 60 80 1000 1300 1500 160
7:38
J = SULUMBER
battery powered
AJ3000
Wierheidogree Clark Radio
4 x
R6/UM3/AA-cells
This product complies with the radio interference requirements of the European Community
The typeplate and production number are located inside the battery compartment
The following table provides the information in English:
This product complies with the radio interference requirements of the European Community
The typeplate and production number are located inside the battery compartment
[Non-Text]
This product complies with the radio interference requirements of the European
Community
The typeplate and production number are located inside the battery compartment
This product complies with the radio interference requirements of the European
Community
The typeplate and production number are located inside the battery compartment
[Non-Text]
This product complies with the radio interference requirements of the European
Community
The typeplate and production number are located inside the battery compartment
SELF-POWERED BACK-UP
The self-powered back-up conveniently allows your day, alarm and clock time settings to be stored for up to 3 minutes when there is a power interruption e.g. AC power failure or when changing batteries.
The complete clock radio and backlight illumination will be switched off. As soon as the power supply returns the display will indicate the correct time.
- If power supply returns after 3 minutes, the demo mode appears and you will need to re-enter all clock settings.
GENERAL FEATURES
Reset
Should you receive external interference e.g. static electricity from carpets, thunderstorms, etc. which affects the display and electronic functions of your set
RESET allows you to clear all previous settings and start up again.
- Use a ballpoint pen to press RESET, found on the bottom of the set.
Demo mode
When the set is first connected to a power supply or has been reset, 'PHILIPS' will scroll continuously across the demonstration display until the time and day settings are entered. In Demo mode only the ALARM/TIME/DAY SET control will function.
Display backlight
The use of the backlight depends on whether the set is battery or adapter operated
1 Press REPEAT ALARM once to activate the backlight