PVNP30BT - Plateau tournant Pyle - Gratis bruksanvisning og manual
Finn enhetens veiledning gratis PVNP30BT Pyle i PDF-format.

Brukerspørsmål om PVNP30BT Pyle
0 spørsmål om dette apparatet. Svar på dem du kjenner, eller still ditt eget.
Still et nytt spørsmål om dette apparatet
Last ned instruksjonene for din Plateau tournant i PDF-format gratis! Finn veiledningen din PVNP30BT - Pyle og ta den elektroniske enheten tilbake i hendene. På denne siden er alle dokumenter som er nødvendige for bruken av enheten din publisert. PVNP30BT av merket Pyle.
BRUKSANVISNING PVNP30BT Pyle
- Phono function
Turn the "Function" Knob (1) to Phono. Place the record onto the turntable (18). Select the turntable speed by sliding the "33/45/78 rpm" switch (23) on the right side of the turntable. Unlock the tone arm (21) by release the lock (25), then lift up the tone arm and gently place the tone arm onto the record to play. If want to stop, lift up the tone arm and place it back to the arm rest (25).
Re-mark
-
If you want the turntable mechanism stop at the end of the record, select "Auto Stop" selector switch (26) at "On" position. If the record stops playing before the end of the record, select "Auto Stop" selector switch (24) "Off" position. The turntable mechanism will continuous to spin.
-
Place the 45rpm adaptor (19) t the centre before placing 45 rpm record onto the turntable.
-
Bluetooth function
Turn the "Function" Knob (1) to Line In. It will automatically assign to Bluetooth function and will sound. Also, there is a Red/blue led light located at the bottom of the dial scale will flash alterively. Activate your Bluetooth device and search for ID(Speaker) and connect. Once the unit is connected with the Bluetooth device, the led light location on the bottom of the dial scale will flash in only blue color. Then select songs by control your Bluetooth device.
- Line in function
Turn the "Function" Knob (1) to Line In. It will automatically assign to Bluetooth function. Plug in the Aux-in cable into the "Line-in Jack"(9), it will change to line-in function. Connect the other end of the Aux-in cable to other external audio source to start playback.
- RCA (L/R) Output Function
Using the RCA Cable to connect the RCA (L/R) output jack (28) at the rear of the unit to any external amplifier RCA input jack to play music from external source.
WARNING:
TO PREVENT FIRE OR SHOCK HAZARD, DO NOT EXPOSE THIS APPLIANCE TO RAIN OR MOISTURE. DO NOT REMOVE COVER. PILOT LAMPS SOLDERED IN PLACE. NO USER SERVICEABLE PARTS INSIDE, REFER SERVICING TO QUALIFIED SERVICE PERSONNEL.

SPECIFICATION
Frequency Range
POWER SOURCE
SPEAKER OUTPUT
SPEAKER SIZE
SPEAKER WATT
: AM:540-1700kHz (AM = MW)
FM 88-108MHz
120V AC
1.5W
40x90mm, 8ohm 3W x 2
2×3W

IMPORTANT SAFEGUARDS FOR AUDIO PRODUCTS
PLEASE READ CAREFULLY THE FOLLOWING IMPORTANT SAFEGUARDS THAT ARE APPLICABLE TO YOUR EQUIPMENT.
-
Read Instructions – All the safety and operating instructions should be read before the appliance is operated.
-
Retain Instructions – The safety and operating instructions should be retained for future reference.
-
Heed Warnings – All warnings on the appliance and in the operating instructions should be adhered to.
-
Follow instructions – All operating and use instructions should be followed.
-
Water and Moisture – The appliance should not be used near
water-for example, near a bathtub, washbowl, kitchen sink, laundry tub, in a wet basement, or near swimming pool and the like.
- Carts and Stands – The appliance should be used only with a cart or stan that is recommended by the manufacturer.
6A. An appliance and cart combination should be moved with care. Quick stops, excessive force, and uneven surfaces may cause the appliance and cart combination to overturn.
- Wall or Ceiling Mounting – The appliance should be mounted to a wall or ceiling only as recommended by the manufacturer.
B. Ventilation – The appliance should be situated so that its location or position does not interfere with its proper ventilation. For example, the appliance should not be situated on a bed, sofa, rug, or similar surface that may block the ventilation openings; or placed in a built-in installation, such as a bookcase or cabinet that may impede the flow of air through the ventilation openings.
-
Heat – The appliance should be situated away from heat sources such as radiators, heat registers, stoves, or other appliances (including amplifiers) that produce heat.
-
Power Sources – The appliance should be connected to a power supply only of the type described in the operating instructions or a marked on the appliance.
-
Grounding or Polarization – Precautions should be taken so that the grounding or polarization means of an appliance in not impeded.
-
Power – Cord Protection – Power-supply cords should be routed so that they are not likely to be walked on or pinched by items placed upon or against them, paying particular attention to cords at plugs, and the point where they exit from the appliance.
-
Cleaning – The appliance should be cleaned only as recommended by the manufacturer.
-
This product is designed for use with the antenna attached and should not be connected to any other external antennas.
-
Nonuse Periods – The power cord of the appliance should be unplugged from the outlet when left unused for a long period of time.
-
Object and Liquid Entry – Care should be taken so objects do not fall and liquids are not spilled into the enclosure through openings.
-
Damage Requiring Service – The appliance should be serviced by qualified service personnel when:
A. The power-supply cord the plug has been damaged; or
B. Objects have fallen, or liquid has been spilled into the appliance; or
C. The appliance has been exposed to rain; or
D. The appliance does not appear to operate normally, or exhibits a marked change inperformance:
E. The appliance has been dropped. Or the enclosure damaged.
- Servicing – The user should not attempt to service the appliance beyond that described in the operating instructions. All other servicing should be referred to qualified service personnel.

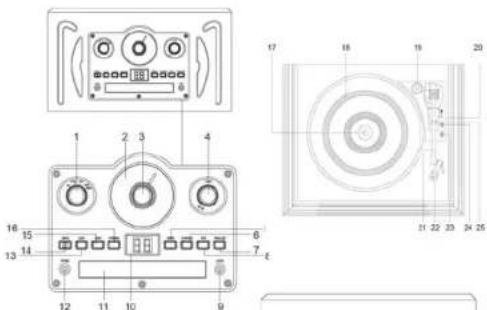
Location of Parts
-
Function Knob
-
Dial Scale
-
Tuning Knol
-
Power On/Off Volume K
-
Folder/Repeat Button
-
Play/Pause Button
-
Stop Button
-
CD Door Open/Close B
-
3.5mm Line-in Jack
-
CD Led Display
-
CD Pass
-
CD Door 12. Earphone
-
Earphone jack
-
B. Skin Button
-
Am/Fm Band Sy
-
F. Skip Button
-
Program Butto
-
Turntable Shaft
-
Tumtable Platter
-
45 rpm adaptor
-
Lift Lever
-
Tone Ann
-
Cartridge
-
33-1/3, 45 and 78 rpm selector switch
-
Auto/Manual Stop selection switch
-
Tone Arm Rest
-
Speaker
-
Air Hole
-
RCA(LR) Line-Out Jack
-
FM Antenna
-
AC cord
-
AC BORD
-
Main Bo
-
MAIN POWER OFF-CO BUTION

Power up the unit
Insert the AC power cord (30) into the AC socket. Turn the Power On/Off Volume Knob (4) clock-wise to turn on the unit.
- Radio/Tuner function
Turn the "Function" knob (1) to Radio, then select Am/Fm channel by sliding the "Am/Fm" slide switch (14). To select radio station, adjust the Tuning knob (3) at the centre of the unit to select your favorite station. In order to achieve better FM reception, extend the FM antenna (29).
- CD function
Turn the "Function" Knob (1) to USB/CD, then press "Open/Close" button (7) to place CD into CD tray. Press again to close the CD door. The CD Led Display will show the total number of tracks and then start to play. Press "Play/Pause" button (6) to enter pause mode. Press "Play/Pause" button one more time to resume playback. Press "B. Skip" (13) or "F. Skip" (15) to select your ideal track. Press "Stop" button (8) to stop playing. For repeat function, press "Repeat button" (5) once to repeat one single track and press one more time to repeat all tracks. Press again to cancel repeat function. To program the tracks, press "Program Button" (16), then press "B. Skip" (13) or "F. Skip" (15) button to select your ideal track and press "Program button". The unit can program up to 20 tracks.
Remark: Program function does not work during playback.
- USB function
Turn the "Function" Knob (1) to USB/CD, the display will flash for CD function. Press the USB/CD button on the side of the unit to switch to USB mode. The display will show USB for few seconds and will start playback automatically. Press "Play/Pause" button (6) to enter pause mode. Press "Play/Pause" button one more time to resume playback. Press "B," Skip" (13) or "F," Skip" (15) to select your ideal track. Press "Stop" button (8) to stop playing. For repeat function, press "Repeat button" (5) once to repeat one single track and press one more time to repeat one single folder. Press again to repeat all folders and Press again to cancel repeat function.