CL-ENC50052 - Dockingstasjon Syba - Gratis bruksanvisning og manual
Finn enhetens veiledning gratis CL-ENC50052 Syba i PDF-format.

Brukerspørsmål om CL-ENC50052 Syba
0 spørsmål om dette apparatet. Svar på dem du kjenner, eller still ditt eget.
Still et nytt spørsmål om dette apparatet
Last ned instruksjonene for din Dockingstasjon i PDF-format gratis! Finn veiledningen din CL-ENC50052 - Syba og ta den elektroniske enheten tilbake i hendene. På denne siden er alle dokumenter som er nødvendige for bruken av enheten din publisert. CL-ENC50052 av merket Syba.
BRUKSANVISNING CL-ENC50052 Syba
Connectland
DOCKING STATION FOR SATA HDD INSTALLATION GUIDE
Thank you for buying this product which will respond to your storage needs. Read carefully this manual and keep it in safe place before using this product. This docking station uses the latest technology USB v3.0 which is up to 10 times faster than USB v2.0. You will be able to install 2.5"/3.5" SATA hard disk in 1.5/36 Gb/s to backup your precious data. Moreover it has eSATA plug. It supports also USB v1.1 and USB v2.0 modes.
Package contents
• 1 docking station
• 1 user's manual
• 1x12V power supply unit
Technical specifications
• Simple to install and to use, easy election of the hard disk
• Supports USB v3.0, SATA 1.5/3/6 Gb/s
• Supports eSATA, USB v2.0, USB v1.1
- Compliant with 2.5"/3.5" SATA 1.5/3/6 Gb/s hard disks from 10 Gb to 2 Te, SWR
- Compatible with Hot plug: allows unplugging the device without rebooting your computer.
- OTB function with Windows system via backup button
• Data transfer USB v3.0 up to 5 Gb/s, USB v2.0 up to 480 Mb/s
Bata transfer USDA up to 3 Gbvs
Minimum system required
PC computer or notebook with USB v3.0 port and eSATA plug Windows XP/VISTA/7 in 32/64 bits, MAC OS 10 or superior
Hardware installation
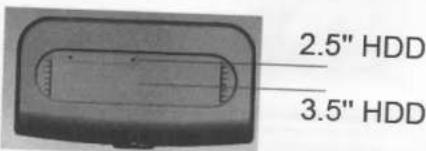
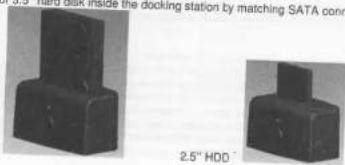
Insert the 2.5" or 3.5" hard disk inside the docking station by matching SATA connectors.
natural_image
Two black rectangular electronic components inside a docking station, one with a 2.5-inch HDD label (no other text or symbols visible)3.5" HDD
Connect the docking station to your computer USB v3.0 port. Connect the power supply to the mains and to the docking station.
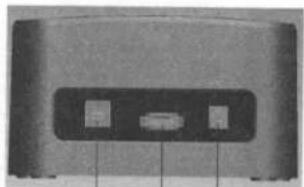
natural_image
Close-up of a black rectangular electronic device with two internal slots and a central display (no visible text or symbols)USB v3
eSATA
DC Jack
Press on POWER button. A LED POWER will light and remains blue during the docking utilization. Boot up your computer.
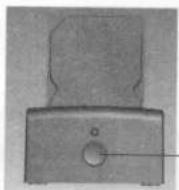
Power & Access LED
Hard disk ejection
To remove the hard disk unit, wait a while that the hard disk cools down. Then pull out the hard disk. Take care of the hard disk unit. Do not let it drop.
Caution: do not shake the hard disk once it has been inserted in the docking station in order to avoid to damage the hard disk unit. When you insert the hard disk in the docking station, check that SATA connectors match with each other, otherwise the hard disk will not be recognized.
eSATA connection
You can not use simultaneously eSATA port and USB port. If you use eSATA interface, you may have to reboot your system in order that the hard disk is recognized by the system. Your SATA motherboard chipset has to be compliant with the hot plugging function to detect the hard disk without rebooting. By example the SILICON IMAGE SIL 3132 chipset is hot plugging. Consult the handbook of your motherboard to know if it is hot plugging. You will need eSATA cable to connect the docking station to your computer eSATA port. If your computer has no eSATA port, you can add bracket eSATA to SATA. If your notebook has no eSATA port, you can add EXPRESS CARD eSATA port.
Windows driver installation
The system will automatically detect and install the driver of the docking station. It is driverless. An icon will appear below the task box. You can start to use the docking station.
MAC OS driver installation
The system will automatically detect and install the driver if you have MAC OS 10 or above.
Safe removal of the docking station
To remove safely the docking station, click on the green arrow below the left taskbar.
Click on Safely Remove Hardware.
If you cannot manage to safely remove, close My computer, all windows and all applications.
Then click again on Safely remove Hardware.
A window will validate under WINDOWS the possibility to safely disconnect the docking station.
You can unplug the USB cable from the computer and shut down the docking station before removing
If you pull out the docking station or unplug its power adapter cable, you can have some trouble through a warning message which can lead to a computer crash and the loss of your precious data.
If you disconnect brutally the docking station, you might have a computer crash and lose your data. Moreover, the electronic parts of the docking station may be subjected to overload peaks which can lower its life span. Do not forget to remove the power supply unit.
Hard disk initialization
-For a brand new hard disk, you should proceed as follow:
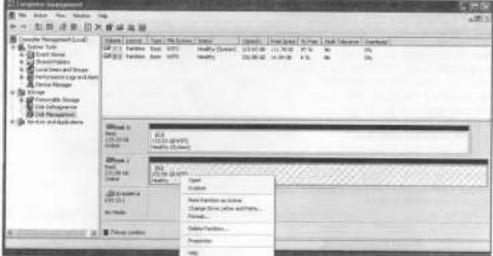
If you install un-partitioned or un-formatted new drive, it does not automatically appear in "My Computer" the first time. Please follow these steps: right click on "My computer", choose "Manage" then choose "Disk management" in "Storage". The operating interface will show on the computer,
Subarray Format following the operating interface
Go to "My Computer", locate the removable disk, right click on it, and select "Format" from the drop-down list, follow the instructions to complete the formatting process.
Once the hard disk has been formatted and activated, you can use it.
By this method to format your drive it will result in a single partition in largest drive capacity, which is
also highly recommended
-For a hard disk which had already been formatted:
Go to "My computer", you should see the removable disk. Warning: backup your data before
formatting the hard disk. Right click and choose "Format", follow the instructions on screen.
After the reboot, there will be a new letter assigned to the hard disk.
Utilization
-You can not use simultaneously eSATA port and USB port.
The POWER Led lights blue when the docking station is functioning. Reader/Writer Led is flashing in red whenever there is data transfer.
-Do not touch the edge of the power supply connector cable with your computer case
Connect the docking station directly to your motherboard USB port. If you connect to front USB port, check that it supplies enough power.
-Place the docking station on stable ground.
-If you plan to not use the docking station for a long time, pull out the power supply unit.
- Do not power off the docking station and do not pull off the hard disk if you are traveled on a ship.
the Reader/Writer LED is blinking.
- If you install a 750 Go hard disk or more, you should power down the docking station after hours of continuous use because this kind of hard disk tends to test.
-When you intend to not using the docking station for a long time, remove the power supply from the
11.01.15
- Manipulate carefully the docking station. If you drop it, the hard disk and the external enclosure might be defective.
-This docking station is not compliant with Windows 95/NT4/98SE/ME because it has no driver for
these operating systems.
If you use USB v2.0 or USB v1.1, the data transfer will be lower than with USB v3.0 port.
If you will host in coXTA, you may have to rebuild the system to enable the management of the docking station and its hard disk if your motherboard SATA chipset is not hot planning.
"You can insert 2.5" or 3.5 " hard disk. It can support 1 To 2.5" hard disk unit and 3 To
unit and even more.
FAQs
Q: I can't find the drive under my computer.
A: Please make sure your drive is correctly installed, and if it is formatted
Check that you have connected the USB cable. Unplug and plug again the external enclosure.
Q: After plugging the USB port, the drive is not ongoing at all.
A: This usually means the AC adapter is not connected out, so there
Q: After installing the drive. Why it is still recognized as "Unknown device"
A: Pull out the hard disk and reconnect it. Disconnect the docking station and connect it again. Check
that your HDD is formatted. Otherwise check if your HDD is not defective.
A: Yes, USB hub works in the com
(1) 2023 had words in the same way as the computer USB ports. Check that it is powerful to
Q: My computer doesn't have USB v3.0 port. Can I use USB v2.0 host devices.
A: USB v3.0 host adapter works in the same way as the built-in USB pods
Q: I do not have eSATA port ?
A: Use eSATA bracket by connecting to motherboard SATA port or you can add EXPRESS CARD
DATA port to your notebook computer

This product is in compliance with the essential requirements of the European Directives for which it is concerned.
Full call download declaration of conternity on the website : http://www.connectland.eu
Copyright © 2012. CONNECTLAND. All rights reserved