Ixus SD4000 IS - Kamera CANON - Gratis bruksanvisning og manual
Finn enhetens veiledning gratis Ixus SD4000 IS CANON i PDF-format.

Brukerspørsmål om Ixus SD4000 IS CANON
0 spørsmål om dette apparatet. Svar på dem du kjenner, eller still ditt eget.
Still et nytt spørsmål om dette apparatet
Last ned instruksjonene for din Kamera i PDF-format gratis! Finn veiledningen din Ixus SD4000 IS - CANON og ta den elektroniske enheten tilbake i hendene. På denne siden er alle dokumenter som er nødvendige for bruken av enheten din publisert. Ixus SD4000 IS av merket CANON.
BRUKSANVISNING Ixus SD4000 IS CANON
Software Guide
for Windows
- ZoomBrowser EX
- PhotoStitch
Special Features
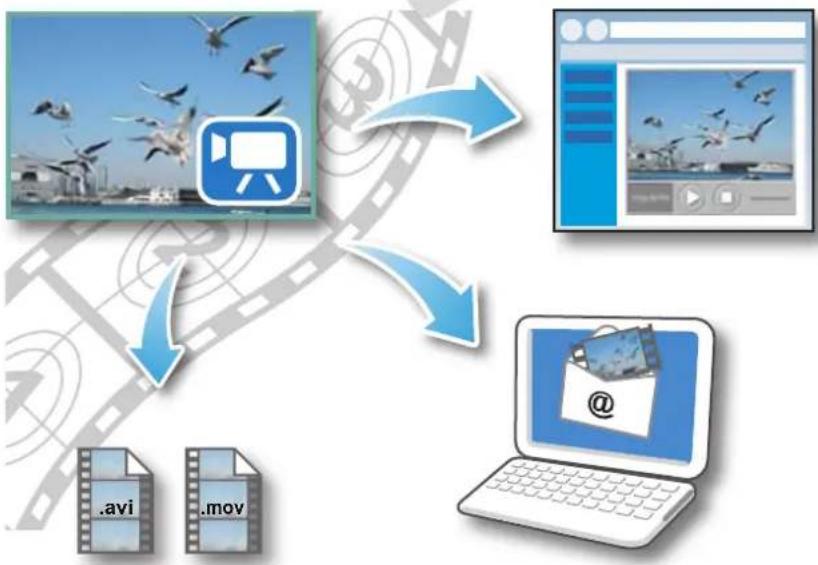
Transfer Images and Movies

natural_image
Illustration of a camera and a laptop with a purple flower image, no text or symbols present.Insert Text Save Still Images

natural_image
Garden scene with a stone sculpture and greenery under a clear blue sky (no text or symbols visible)From Movies
Edit Movies

text_image
Image showing a sequence of small images with a music note and label 'A' pointing to the final image.Print Images Back Up to a CD Attach Images to

natural_image
Composite image showing a landscape photo and a CD/DVD icon (no text or symbols)
text_image
Icon showing an email envelope with a house and sky background, accompanied by Chinese text below.Plus many other useful features
About this Manual
Notation Conventions
The contents of this manual are classified according to the following symbols.

IMPORTANT
- The "Important" sections contain operating precautions or important topics. Ensure that you read them.

HINT
- The "Hint" sections contain procedural suggestions and tips for your convenience. Read them as necessary.
Operating Environment
- This manual uses Windows Vista screen shots and procedures in the explanations. The screen shots and procedures may appear slightly different if you are using another version of Windows.
- The displayed screens and procedures may also differ slightly from the examples depending upon the camera or printer model in use.
- The explanations in this guide are based on the premise that a Canon compact digital camera will be used with the software.
- Some functions may not be available depending on the camera model.
Word Searches
This document is provided as an Adobe Reader document. Use Adobe Reader's Search functions to find specific words or phrases that you recall but cannot find. To access this function, in Adobe Reader click the [Edit] menu and select the [Search] option.
If you are using Adobe Reader 8 or later, you can also perform searches with the [Find] function right on the toolbar.

text_image
Adobe Reader File Edit View Document Tools Window Help 1 / 59 100% Find Input search text herePrecautions for Connecting the Camera to the Computer
- When connecting the camera to the computer with an interface cable, make sure to connect the cable directly to the computer's USB port. The connection may not operate correctly if you attach the camera to the computer via a USB hub.
- The connection may not operate correctly if you are using other USB devices, excluding USB mice or keyboards, at the same time as the camera. If this occurs, disconnect the other devices from the computer and try reconnecting the camera.
- Do not connect two or more cameras at the same time to the same computer. The connections may not operate correctly.
- Do not allow the computer to go into sleep (standby) mode while a camera is connected via the USB interface cable. If this does happen, do not disconnect the interface cable. Try to awaken the computer with the camera in the connected state. Some computers will not awaken properly if you disconnect the camera while they are in sleep (standby) mode. Please refer to your computer manual for instructions regarding the sleep (standby) mode.
- Do not disconnect the camera from the computer if CameraWindow is displayed on the screen.

IMPORTANT
- You are recommended to use an AC adapter (sold separately) when connecting to a computer. Ensure that you use fully charged batteries if you cannot use an AC adapter.
• See the Camera User Guide for procedures on connecting the camera to the computer.
Table of Contents
About this Manual 2
Precautions for Connecting the Camera to the Computer 3
Things to Remember....6
The Two ZoomBrowser EX Windows....6
Windows That Communicate With the Camera and Manage Images 6
Main Window....7
How to Display the Main Window 7
Names of the Main Window Parts....7
How to Perform Tasks....8
Selecting Tasks and Task Window Procedures 8
Mastering the Basics 9
Transferring Images 9
Transferring Images by Connecting the Camera to a Computer 9
Printing....12
Printing a Single Image on a Single Page 12
Index Print....14
How to Use CameraWindow.... 16
First Menu Screen to Open.... 16
Image Transfer Screen 17
Organize Images Screen 18
How to Use the Main Window.... 19
Main Window 19
Display Modes 20
Display Control Panel 20
Browser Area Tasks....21
Properties Window 22
Viewer Window 23
More Advanced Techniques 24
Editing Images....24
Red Eye Correction 24
Auto Adjustment 24
Color/Brightness Adjustment 25
Adjusting Sharpness–Emphasizing Outlines 25
Trimming-Cropping a Portion of an Image 26
Inserting Text 26
Using Other Editing Software....27
Attaching Sounds....28
Creating Panoramic Images-PhotoStitch 29
Editing Movies 30
Converting RAW Images-Digital Photo Professional 31
Exporting 33
Changing Image (Stills) Sizes and Types 33
Changing Movie Sizes and Types 33
Extracting Stills from Movies.... 34
Exporting Shooting Information 34
Creating Computer Screen Saver Images 35
Creating Computer Wallpaper Images.... 35
Saving to CDs 36
Uploading Movies to YouTube 37
Uploading to YouTube 37
Email....38
Attaching Images to Email 38
Slide Shows.... 39
Viewing Images in Slide Shows.... 39
Image Management 40
Changing File Names in Batches 40
Sorting Images into Folders by Shooting Date 40
Configuring Image Information Settings 41
Setting Star Ratings 41
Inserting Comments....41
Assigning Keywords....42
Searching, Filtering and Sorting Images.... 43
Searching Images 43
Filtering Images 44
Sorting Images 44
Comparing Images 45
Comparing Multiple Images.... 45
My Camera Settings 46
Changing the Shutter Sound and Start-Up Image.... 46
Transferring Images 48
Transferring Images to a Camera.... 48
CANON iIMAGE GATEWAY 49
About CANON iIMAGE GATEWAY (for U.S.A. customers only).... 49
Registering 49
Available Services....50
Preference Settings 51
Customizing ZoomBrowser EX....51
Customizing the Task Buttons....51
Appendices 52
List of Available Functions.... 52
Supported Image Types 54
Uninstalling the Software 55
Memory Card Folder Structure 56
Troubleshooting 57
The Two ZoomBrowser EX Windows
Windows That Communicate With the Camera and Manage Images
The following two windows are the main ones used for ZoomBrowser EX procedures.
Transfer window, which opens when a camera is connected.
CameraWindow
text_image
Current Options Configuration BC Main Load Capacity: 100 MB / 1.0 GB Selected Images: 209 / 209 Model Name: Camera 2033516334 Package Version: 2002 Class's Name: Ability Camera: Full Import Integrated Box Camera Aggregate Image on C-Frame Used Image From Camera Camera SettingsYou can transfer all or a selection of images from the connected camera.
CameraWindow closes and the screen changes after the images are transferred from the camera.


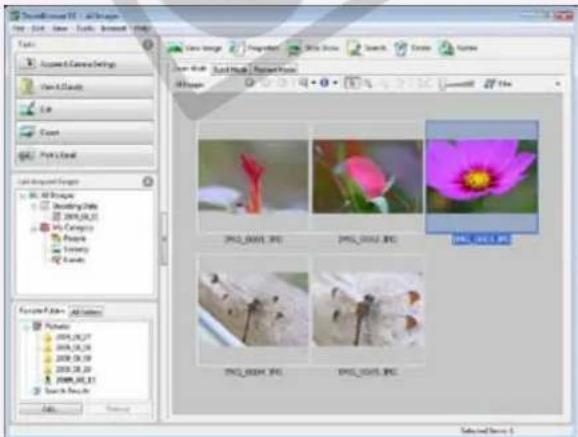
Organizing window for transferred images. Main Window
text_image
Scamell Image 1. All-Images File Edit View Tools About Window Help Tools Account & Camera Settings View All-Images Edit Export Paste & Print All-Printed Image All Image Audioing Tools 2008.04.25 My Currency Properties Treasury Search & Print Add... Remove... Save Image Properties Show Show Search Create Browse View Book Book Book / Project Image All Images 2003_0001.JPG 2003_0002.JPG 2003_0013.JPG 2003_0014.JPG 2003_0015.JPG Selected Save 5You can view, edit and print the images in the computer.

Double-click an image.

ZoomBrowse EX
Double-click this icon on the desktop.
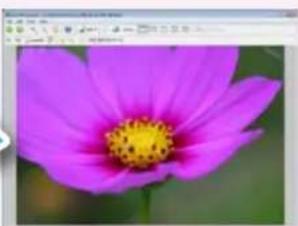
natural_image
Close-up of a vibrant pink cosmos flower with a yellow center, set against a blurred green background (no text or symbols visible)The Viewer Window that appears when you view an image.

HINT
Use the Help Function
The ☐ (Help) button or Help menu is available in most CameraWindow and ZoomBrowser EX windows. It is there for when you are unsure how to proceed.
Main Window
How to Display the Main Window
Main Window will appear after the camera images are transferred and CameraWindow closes. You can also display it by double-clicking the ZoomBrowser EX icon on the desktop.
Names of the Main Window Parts
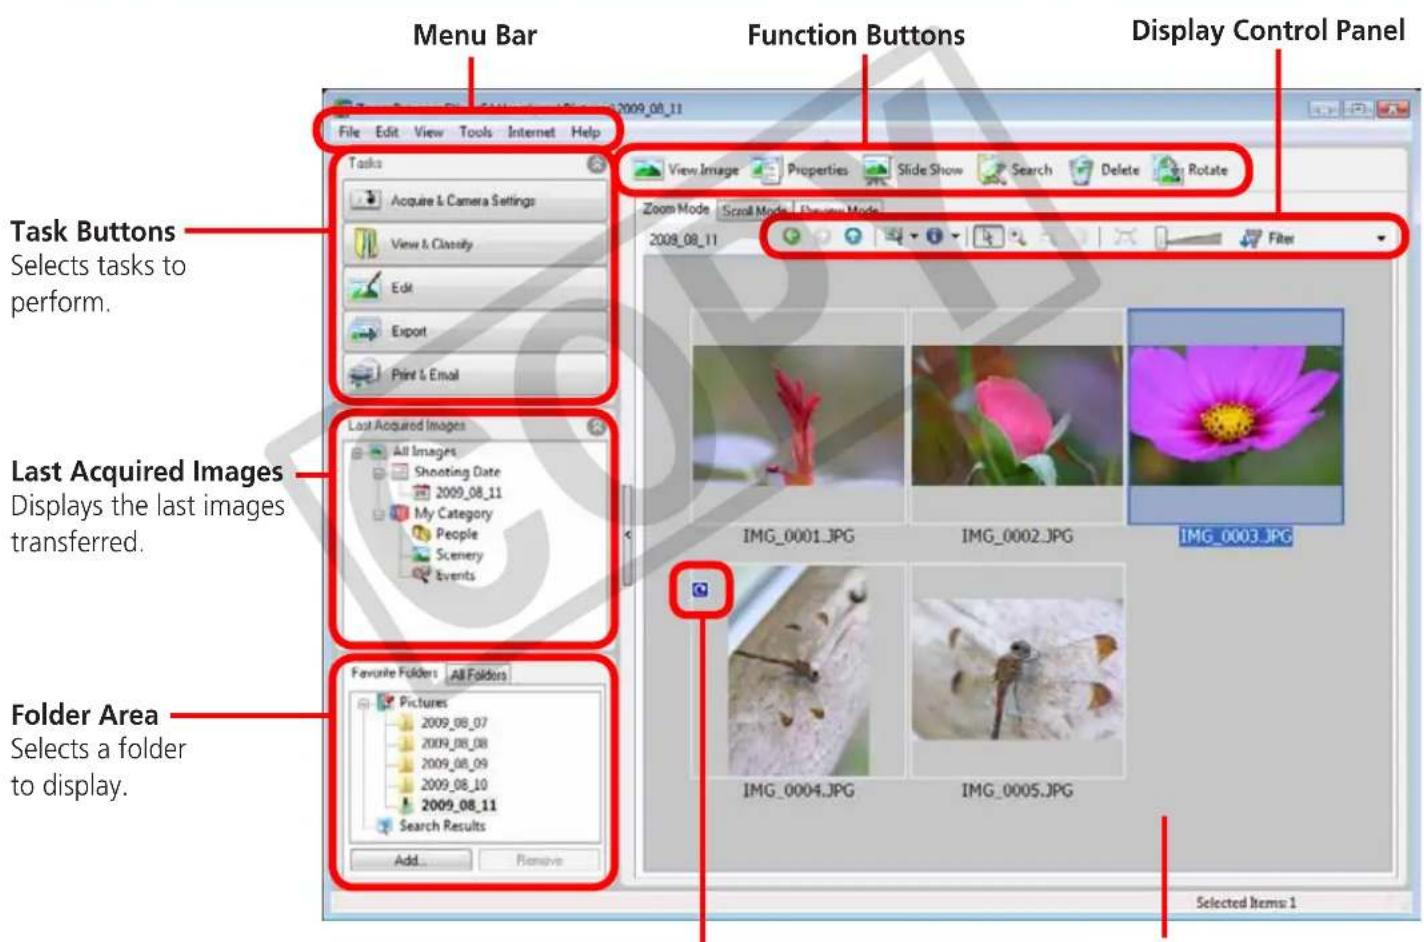
text_image
Menu Bar File Edit View Tools Internet Help Tasks Acquire & Camera Settings View & Classify Edit Export Print & Email Last Acquired Images All Images Shooting Date 2009_08_11 My Category People Scenery Events Favorite Folders All Folders Pictures 2009_08_07 2009_08_08 2009_08_09 2009_08_10 2009_08_11 Search Results Add... Remove Function Buttons Zoom Mode Scroll Mode Display Control Panel View Image Properties Slide Show Search Delete Rotate Filter Last Acquired Images Displays the last images transferred. Folder Area Selects a folder to display. Selected Items 1Properties Icon (Displays image properties)
: Image recorded using the camera's Stitch Assist mode
: RAW image


Browser Area
Icons that indicate image properties display around images, as shown on the left.
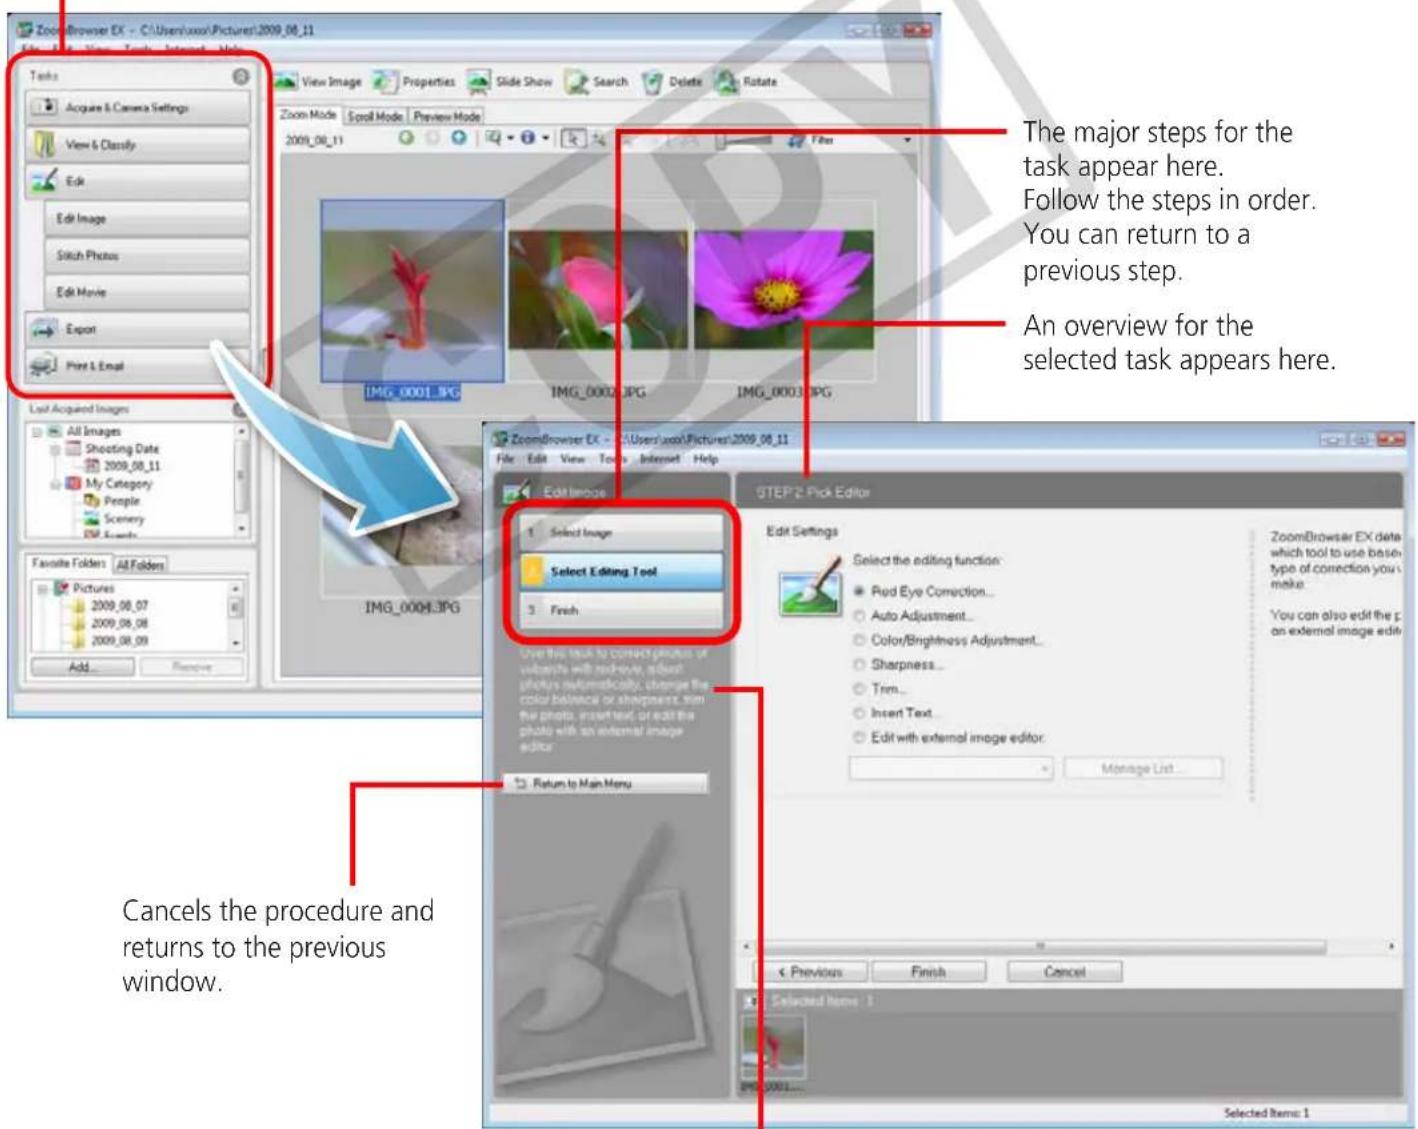
How to Perform Tasks
Selecting Tasks and Task Window Procedures
Many ZoomBrowser EX functions can be accessed by selecting a task in the Main Window and following the instructions in the guidance section of the new window. For further details on the functions, refer to "List of Available Functions" in the appendix.
1
Select a task.
text_image
ZoomBrowser EX - C:\Users\xxx\Pictures\2009_08_11 File Edit View Tools Insert Tools Tasks Acquire & Camera Settings View & Classify Edit Edit Image Stitch Photos Edit Movie Export Print & Email Last Acquired Images All Images Shooting Date 2009_08_11 My Category People Scenery IMG_Foorts Favorite Folders All Folders Pictures 2009_08_07 2009_08_08 2009_08_09 Add... Remove ZoomBrowser EX - C:\Users\xxx\Pictures\2009_08_11 File Edit View Tools Internet Help Edit Image Select Editing Tool 3 Finish STEP2: Pick Editor Edit Settings Select the editing function: ● Pud Eye Correction... ○ Auto Adjustment... ○ Color/Brightness Adjustment... ○ Sharpness... ○ Trim... ○ Insert Text... ○ Edit with external image editor: Manage List... ZoomBrowser EX data which tool to use base type of correction you's make. You can also edit the p on external image edit. Previous Finish Cancel Selected Items 1 Selected Items 12
Follow the instructions to perform the task.
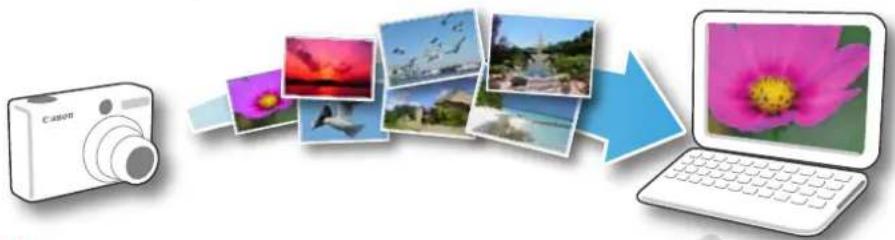
Transferring Images
Transferring Images by Connecting the Camera to a Computer
Transfer the camera images to the computer.
flowchart
graph LR
    A["Cancen"] --> B["Photo collage"]
    B --> C["Photo collage"]
    C --> D["Laptop with pink flower image"]
    D --> E["Output image"]

IMPORTANT
- The instructions in this software manual assume that you have correctly installed the software. See the Camera User Guide for software installation procedures.
- For details on how to connect the camera to a computer, refer to Camera User Guide Please also refer to "Precautions for Connecting the Camera to the Computer".
- With some versions of Microsoft Windows, CameraWindow nya not open when the camera is connected. In this case, double-click the ZoomBrowser EX icon on the desktop to start ZoomBrowser EX and open the Main Window. Click the [Acquire & Camera Settings] task button, followed by [Connect to Camera].
1 Connect the camera to the computer with the supplied interface cable.
2 Turn on the camera power, set it to playback mode and prepare it to communicate with the computer.
3 When a window similar to the one at the right appears, click [Downloads Images From Canon Camera using Canon CameraWindow].
With Windows XP, click [Canon CameraWindow] then [OK] in the AutoPlay window.
For Windows 7, use the following steps to display CameraWindow.
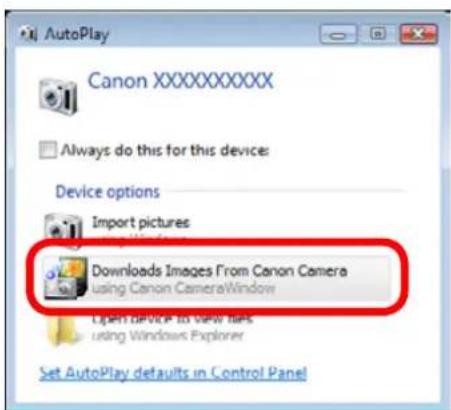
text_image
AutoPlay Canon XXXXXXXXX Always do this for this device: Device options Import pictures Downloads Images From Canon Camera using Canon CameraWindow Open dialog to view files using Windows Explorer Set AutoPlay defaults in Control Panel- Click on the task bar.
- In the screen that appears, click think to modify the program.
- Click [Downloads Images From Canon Camera using Canon CameraWindow], the click [OK].
- Double click.
4
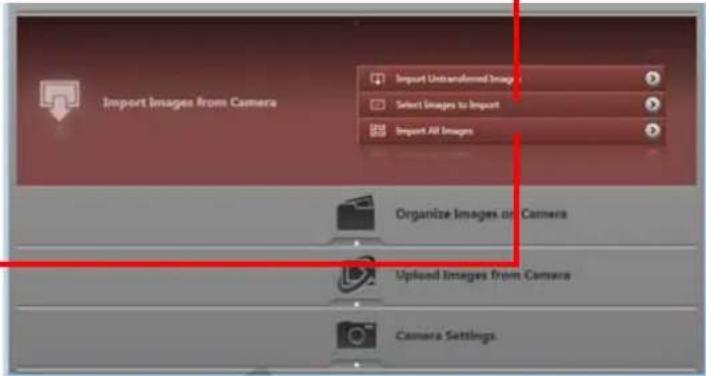
Click [Import Images from Camera], and then click [Import Untransferred Images].
Only images that have not yet been transferred will start to transfer.
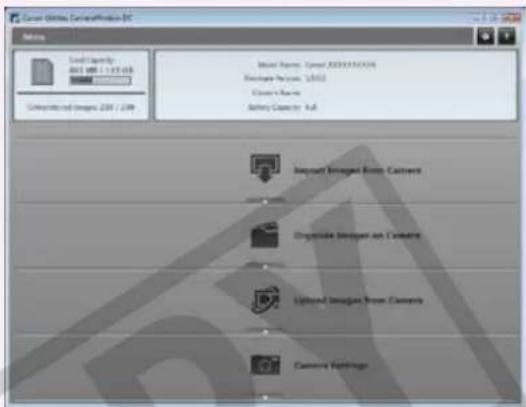
CameraWindow (Menu Screen)
![CANON Ixus SD4000 IS - Click [Import Images from Camera], and then click [Import Untransferred Images]. - 1](/content/2026/06/1165393/images/7c813b609d653ae96a351dafdde8a3fd128592ed0db1c6c97fab796f6ce43854.jpg)
text_image
Canon Utilities CameraWindow DC Menu Card Capacity: 663 MB / 1.83 GB Untransferred Images: 236 / 238 Model Name: Canon XXXXXXXXXX Premise Version: 12.0.0 Owner's Name: Battery Capacity: Full Import Untransferred Images Import Images From Camera Import All Images Organize Images on Camera Upload Images from Camera Camera SettingsAfter you click [OK] in the dialog that indicates the transfer is complete and close the CameraWindow screen, the transferred images will display in the Main Window.
You can select the newly transferred images by their shooting dates or My Category (select models only) classification.
![CANON Ixus SD4000 IS - Click [Import Images from Camera], and then click [Import Untransferred Images]. - 2](/content/2026/06/1165393/images/c07900299fc2a2b393635bb86505de97f21cb6721569115f6f1d5b6e0b110065.jpg)
text_image
Soundbrowser 5.0 - All Images File Edit Tools Tools Insert Help Tools Acrylic & Camera Settings View & Security List Export Print & Print Last-Imported Images All Images Voccurring Time 2009_08_13 My Category People Scene Events Fluency Folders All Folders Pictures 2009_08_07 2009_08_06 2009_08_10 2009_08_11 Search Results Value Image Properties Slide Show Search Delete Rotate Clash Move Local Mode Preview Mode All Images IMG_0001.JPG IMG_0002.JPG IMG_0003.JPG IMG_0004.JPG IMG_0005.JPG Selected Items 3![CANON Ixus SD4000 IS - Click [Import Images from Camera], and then click [Import Untransferred Images]. - 3](/content/2026/06/1165393/images/ad2e93a39c31199e134171f960436a050566316869f07f519217861e64e775e9.jpg)
: Folders containing vly acquired images
- Images from memory cards with large numbers of images (more than 1,000) may not transfer correctly. If this happens, please use a memory card reader to transfer. For details on transferring images from a memory card reader, refer to "Transferring Images Using a Memory Card Reader".
- Movie files take time to transfer since the files are large.
![CANON Ixus SD4000 IS - Click [Import Images from Camera], and then click [Import Untransferred Images]. - 4](/content/2026/06/1165393/images/dbe285d30f951433915b9132ed3e666c61fd59af1f0e33504c2ad9bedf4f9b92.jpg)
HINT
Changing the Transfer Destination Folder
The default settings save transferred images into the [Pictures] or [My Pictures] folders. To change the destination folder, click the 🎨 button shown on the right in Step 4 as described above, then click the [Import] button. In the [Folder Settings] tab, click [Browse] to complete settings in the screen currently displayed.
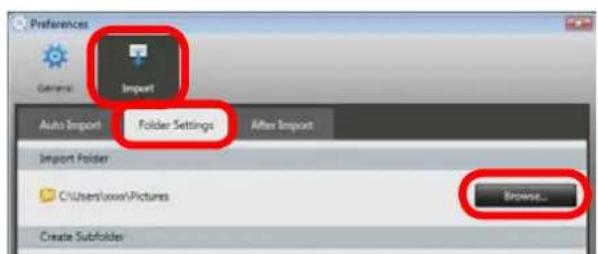
text_image
Preferences General Import Auto Import Folder Settings After Import Import Folder C:\Users\xxx\Pictures Browse... Create Subfolder
HINT
Select Images to Import
To transfer only a selection of images from the camera, click [Import Images from Camera] in CameraWindow (menu screen), then select images in the image transfer screen, and click the ▼(Import) button. For details, refer to "Image Transfer Screen".
Import All Images
To transfer all images on the camera, click [Import Images from Camera] in CameraWindow (menu screen) then, [Import All Images].
Automatically Transferring Images on ZoomBrowser EX Start-Up
To automatically transfer images when CameraWindow starts up, click the button shown on the right in CameraWindow (menu screen), then click the [Import] button, and the [Auto Import] tab. Add a checkmark to [Start importing images automatically when this software is launched.].
text_image
Import Images from Camera Import Untransformed Image Select Images to Import Import All Images Organize Images on Camera Upload Images from Camera Camera Settings
text_image
Canon Utility Camera/Window DC Ming Card Capacity 602 MB / 1.83 GB Untransferred Images 238 / 238 Model Name: Canon XXXXXXXXXX Firmware Version: 12000 Owner's Name: Battery Capacity: FullTransferring Images Using a Memory Card Reader
An action selection window will open when you insert a memory card into the memory card reader. If you select [View/Download Images Using Canon ZoomBrowser EX], ZoomBrowser EX will start and display the following window. Use this window to perform the transferring procedures.
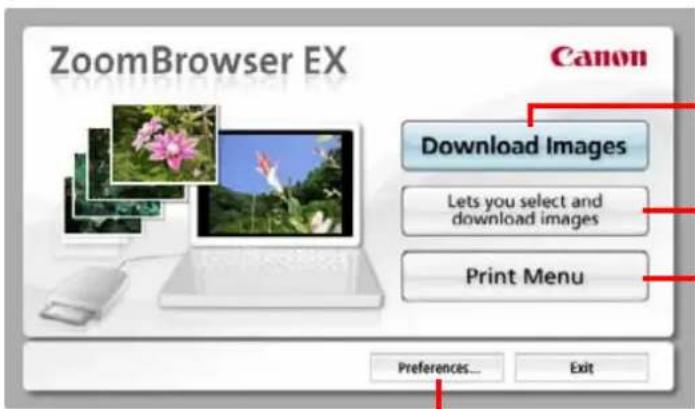
text_image
ZoomBrowser EX Canon Download Images Lets you select and download images Print Menu Preferences... ExitTransfers all images that have not yet been transferred.
Allows you to select and transfer images.
Prints images.
Configures the transfer folder and other settings.
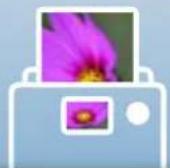
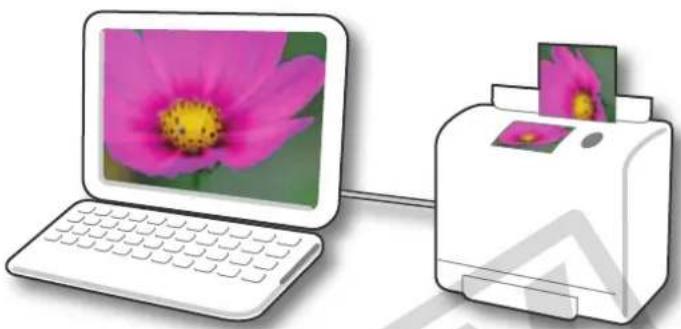
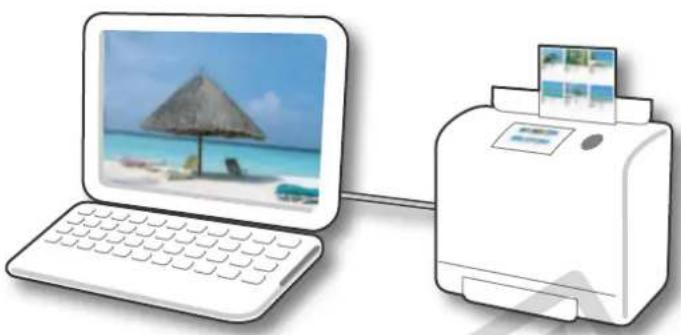
Printing
Printing a Single Image on a Single Page
Prints one image per page.
natural_image
Illustration of a laptop with a pink flower image being placed next to a printer (no text or symbols present)
HINT
Printing Movies
Movies cannot be printed, but you can extract still images from movies, and print them after they have been saved. For details on how to save still images from movies, refer to "Extracting Stills from Movies".
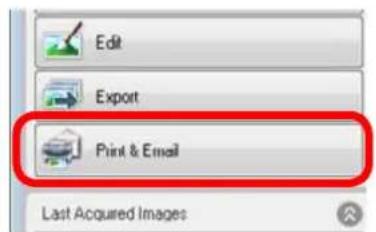
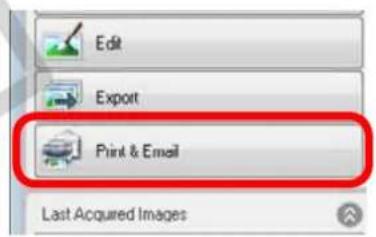
1 Click the [Print & Email] task button in the Main Window.
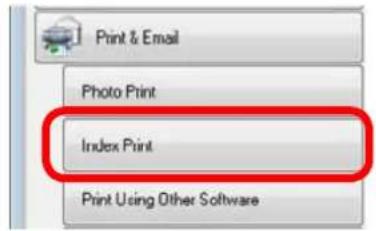
2 Click [Photo Print].
3 Confirm that [1. Select Images] is chosen and select images for printing.
text_image
Edit Export Print & Email Last Acquired Images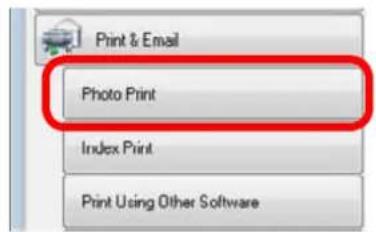
text_image
Print & Email Photo Print Index Print Print Using Other Software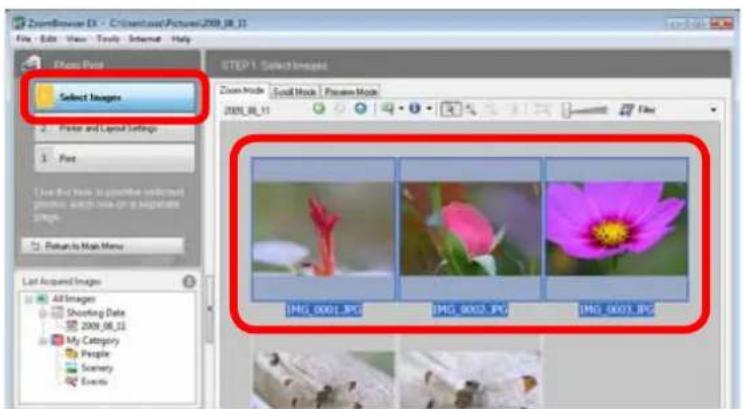
text_image
ZoomBrowser EX - C:\Users\Movie\2009_08_13 File Edit View Tools Internet Help Photo Data STEP 1. Select Images Zoom Mode Social Mode Preview Mode 2009_08_13 File Select Images Printer and Layout Settings Fire I love the mode to provide information glasses, which uses print as a picture image. Return to Main Menu Last Acquired Images All Images Shooting Date 2009_08_13 My Category People Scene Events IMG_0001.JPG IMG_0002.JPG IMG_0003.JPG4
Click [2. Printer and Layout Settings] and set the categories as desired.
![CANON Ixus SD4000 IS - Click [2. Printer and Layout Settings] and set the categories as desired. - 1](/content/2026/06/1165393/images/ccf672308ac393604e4314a8f3354ceaf1340fe7a8e6f27cc25a4d7c3d126519.jpg)
text_image
Sets the printer, paper size and borderless printing settings. Click here to crop and print a portion of an image. Click here to insert text onto an image and print. Photo Settings and Preview Printer Name: XXXXXXXXX Properties... Media Type: Plain Paper Paper Size: Letter Borderless Shooting Date/Time Date/Time Properties Photo: 1/3 Copies: 1 Total: 3 pages << Previous Print Cancel Selected Item: 3Sets the shooting date/time imprint settings.
5
Click [3. Print].
Printing will start.
![CANON Ixus SD4000 IS - Click [3. Print]. - 1](/content/2026/06/1165393/images/b99d2984aef4ac33f3657e8d3b1d2c3f298443f97f2aa1fc93d26e610aa5e987.jpg)
HINT
Printing Using Other Software
If you have specialized printing software installed on the computer, you can also use it to print the images. Click the [Print & Email] task button in the Main Window, followed by [Print Using Other Software].
Index Print
Prints an index of the images.
natural_image
Illustration of a laptop connected to a printer with a beach scene and photo inset (no text or symbols)1 Click the [Print & Email] task button in the Main Window.
text_image
Edit Export Print & Email Last Acquired Images2 Click [Index Print].
text_image
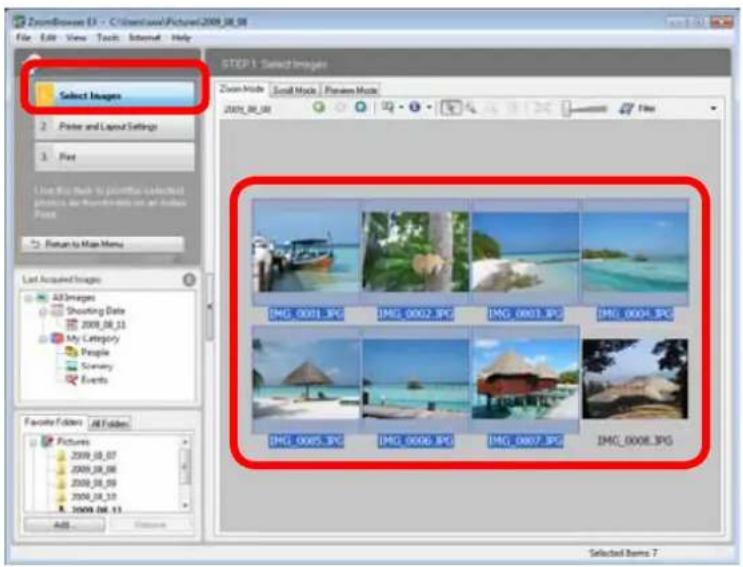
Print & Email Photo Print Index Print Print Using Other Software3 Confirm that [1. Select Images] is chosen and select images for printing.
text_image
ZoomBrowse 53 - C:\Users\box\Pictures\2009_08_08 File Edit View Tools Internet Help Select Images Zoom Mode Social Mode Power Mode 2009_08_08 File Last Acquired Images All Images Shooting Date 2009_08_11 My Category People Scenario Events Focality Editors All Folders Pictures 2009_08_07 2009_08_08 2009_08_09 2009_08_10 2009_08_11 Add... Selected Items 7 STEP 1 Select Images IMG_0001.JPG IMG_0002.JPG IMG_0003.JPG IMG_0004.JPG IMG_0005.JPG IMG_0006.JPG IMG_0007.JPG IMG_0008.JPG4
Click [2. Printer and Layout Settings] and set the categories as desired.
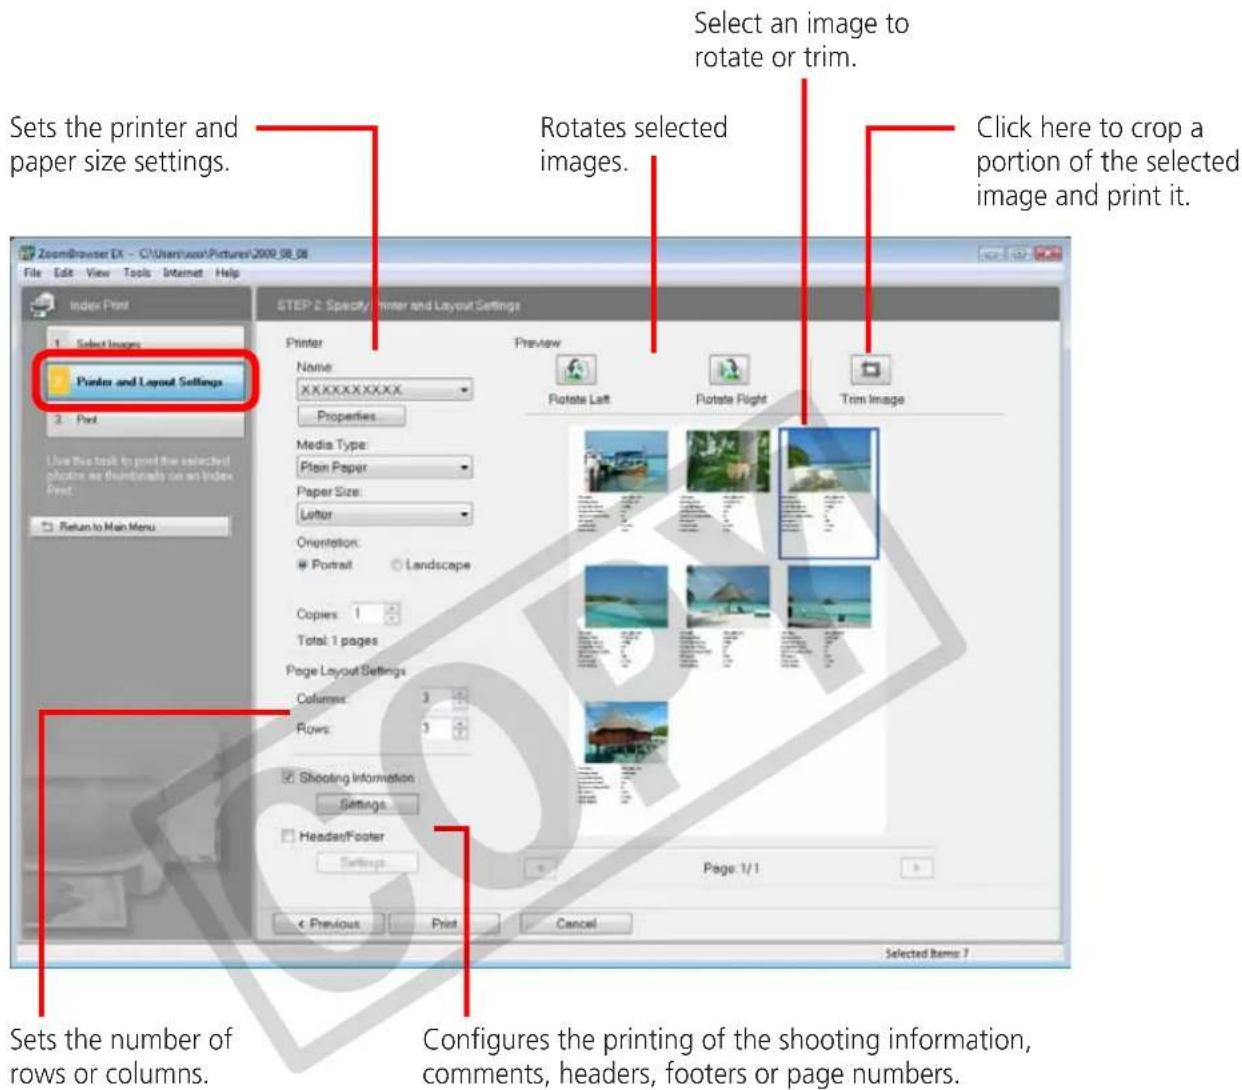
text_image
ZoomBrowser EX - C:\Users\wood\Pictures\2009_08_08 File Edit View Tools Internet Help Index Print 1. Select Images Printer and Layout Settings 2. Post Use this tool to print the selected photo as successfully print any Index Print. Return to Main Menu STEP 2: Specify Printer and Layout Settings Printer Name: XXXXXXXXXX Properties Media Type: Plain Paper Paper Size: Letter Orientation: Portrait Landscape Copies 1 Total: 1 pages Page Layout Settings Columns: 3 Rows: 3 Shooting Information Settings Header/Footer Settings Print Cancel Select an image to rotate or trim. Rotates selected images. Click here to crop a portion of the selected image and print it. Sets the number of rows or columns. Configures the printing of the shooting information, comments, headers, footers or page numbers. Selected Items 75
Click [3. Print]. Printing will start.
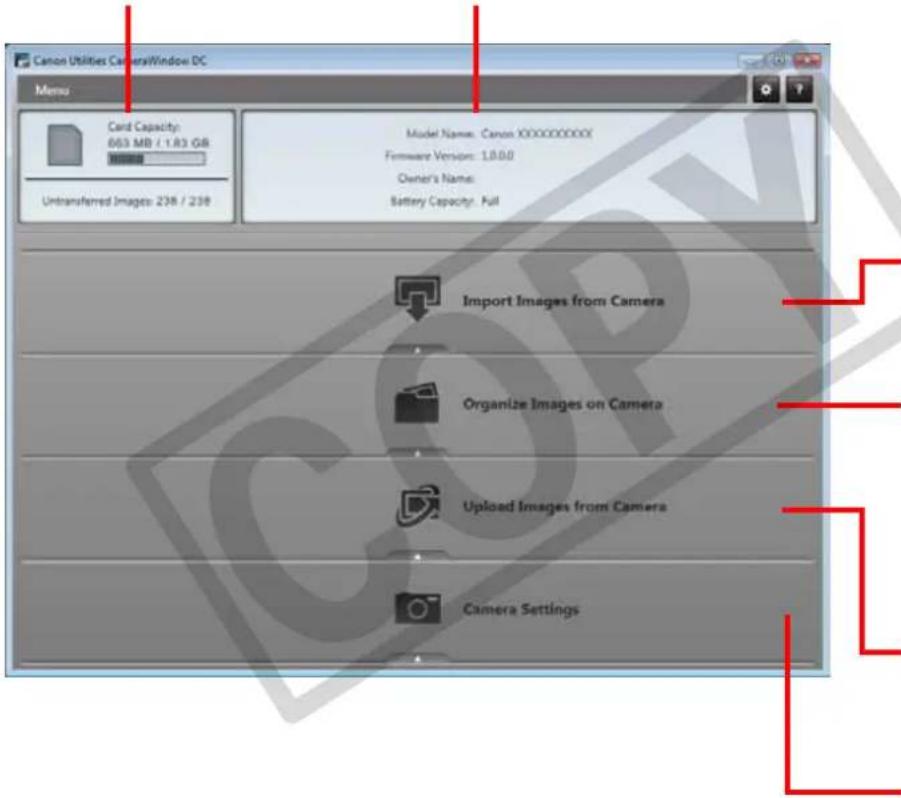
How to Use CameraWindow
First Menu Screen to Open
This screen appears when the camera is connected to your computer. Click each button to display the available options.
Displays in-camera memory card information.
Displays camera information.
text_image
Canon Utilities Camera/Window DC Menu Card Capacity: 663 MB / 1.83 GB Untransferred Images: 238 / 238 Model Name: Canon XXXXXXXXXX Firmware Version: 1.0.0 Owner's Name: Battery Capacity: Full Import Images from Camera Organize Images on Camera Upload Images from Camera Camera SettingsStarts operations for transferring images from the camera to your computer.
Starts operations for protecting, rotating, and deleting images on the camera. Also transfers images from your computer to the camera.
Starts operations for uploading movies on the camera to web services.
Starts operations for setting the camera start-up screen, start-up sound, and various camera sounds. For details, refer to "My Camera Settings" in "More Advanced Techniques". This menu may not appear depending on your camera model.

HINT
Customizing CameraWindow Functions
If you click the ⚙ button as shown in the upper right of the screen, you can customize various functions to make CameraWindow easier to use. You can change the automatic transfer settings, the start-up screen that appears when starting CameraWindow, and the transfer destination folder.
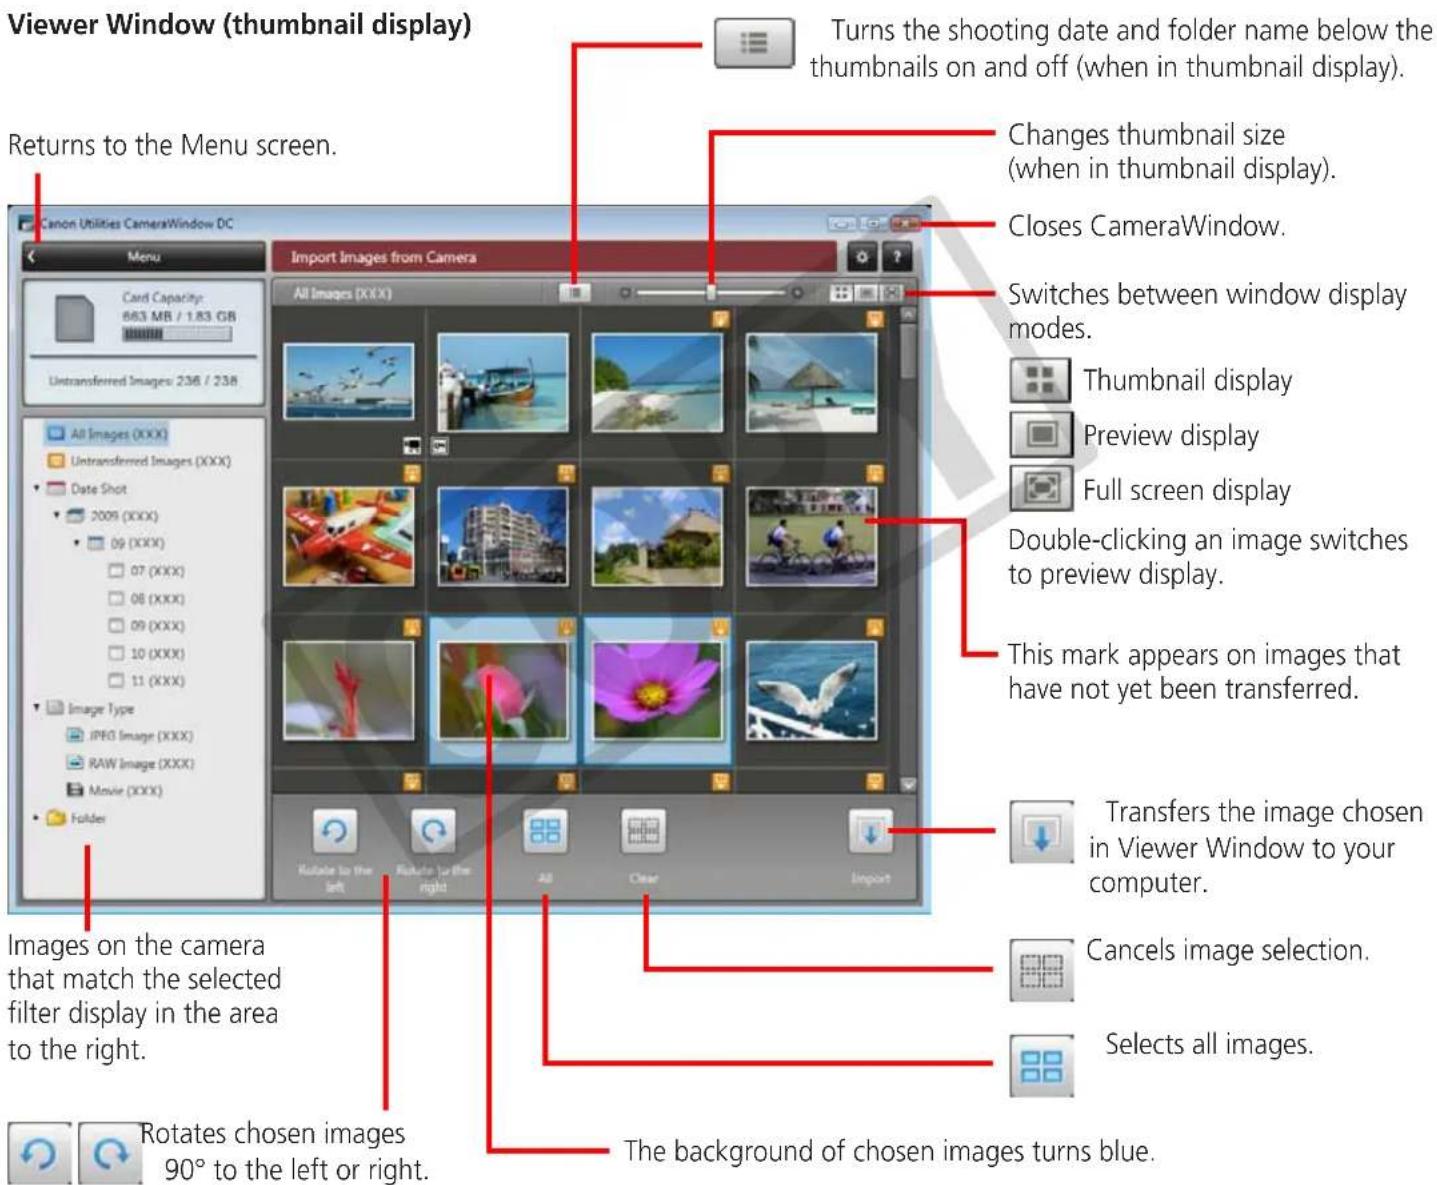
Image Transfer Screen
This screen appears when you click [Import Images from Camera] on the Menu screen, then click [Select Images to Import]. Select the image you want to transfer and click the button to transfer the image to y.our computer.
text_image
Viewer Window (thumbnail display) Returns to the Menu screen. Canon Utilities CameraWindow DC Menu Card Capacity: 663 MB / 1.83 GB Untransferred Image: 236 / 238 All Images (XXX) Untransferred Images (XXX) Date Shot 2009 (XXX) 09 (XXX) 07 (XXX) 08 (XXX) 09 (XXX) 10 (XXX) 11 (XXX) Image Type JPEG Image (XXX) RAW Image (XXX) Movie (XXX) Folder Import Images from Camera Turns the shooting date and folder name below the thumbnails on and off (when in thumbnail display). Changes thumbnail size (when in thumbnail display). Closes CameraWindow. Switches between window display modes. Thumbnail display Preview display Full screen display Double-clicking an image switches to preview display. This mark appears on images that have not yet been transferred. Transfers the image chosen in Viewer Window to your computer. Cancels image selection. Selects all images. Images on the camera that match the selected filter display in the area to the right. Rotates chosen images 90° to the left or right. The background of chosen images turns blue.
IMPORTANT
- The functions (buttons) that display will differ depending on the camera model.
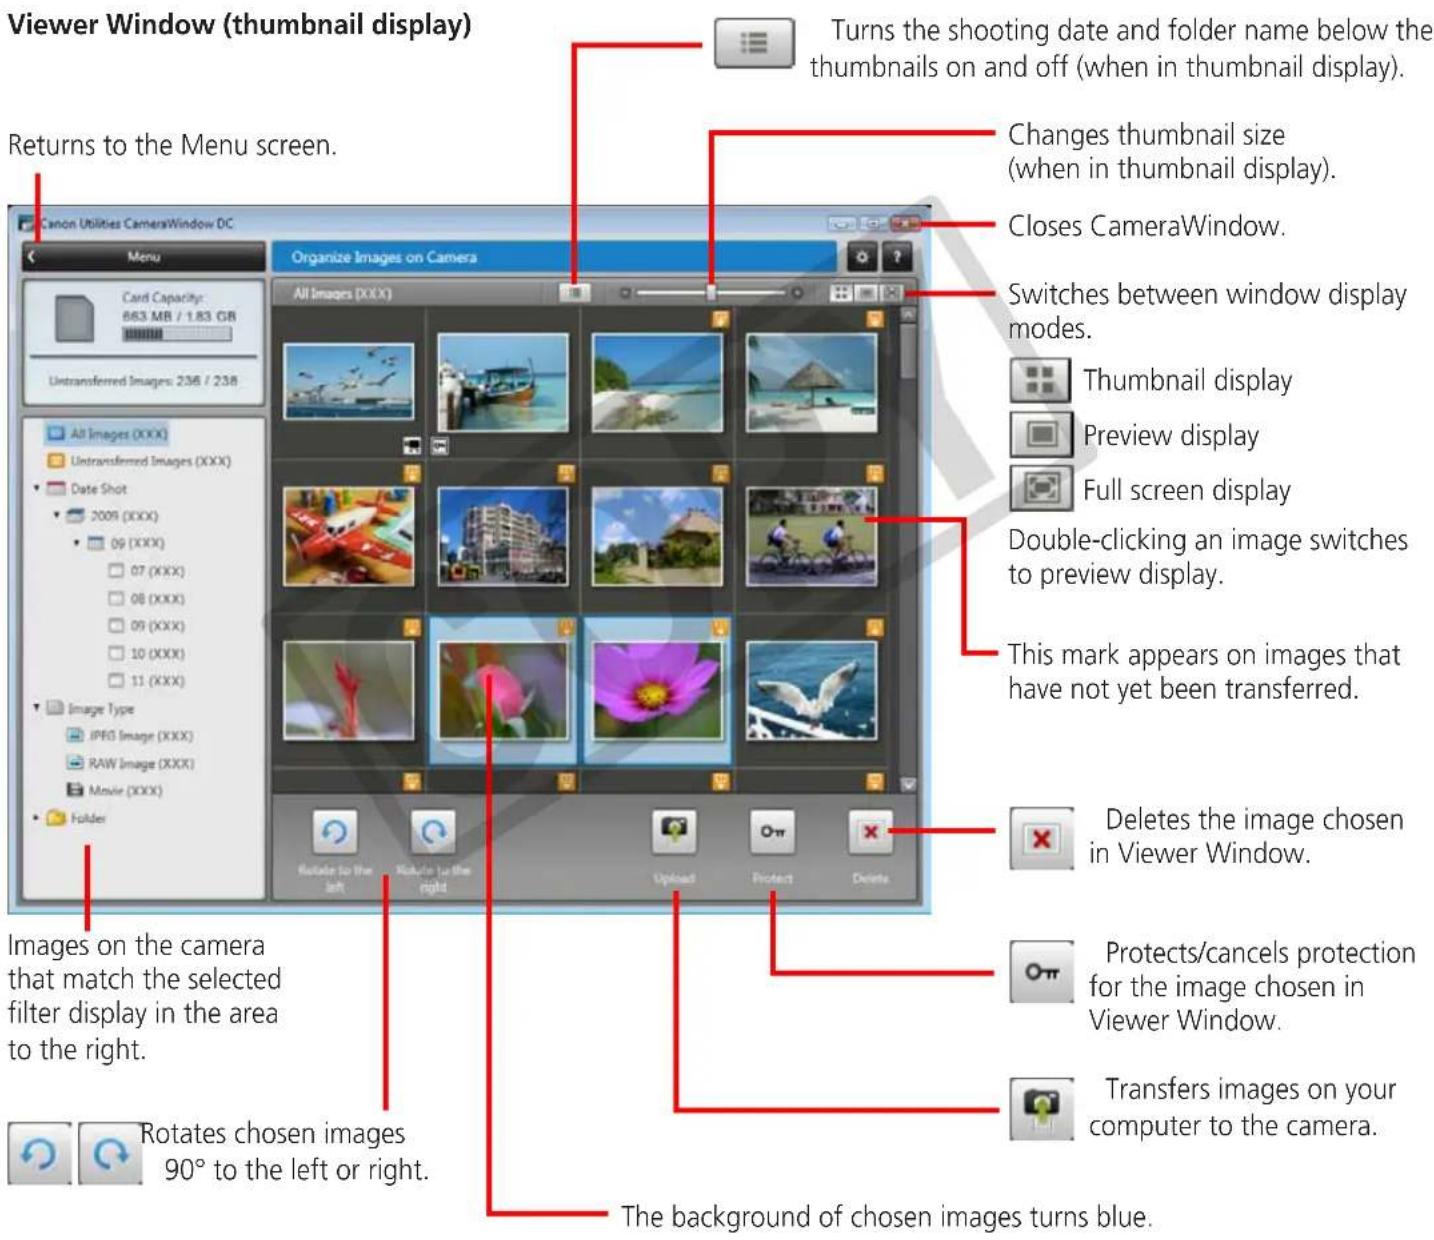
Organize Images Screen
This screen appears when you click [Organize Images on Camera] on the Menu screen, then click [Organize Images]. Clicking a folder on the left will display all images within the folder as thumbnails (small images) on the right of the screen.
text_image
Viewer Window (thumbnail display) Returns to the Menu screen. Canon Utilities CameraWindow DC Organize Images on Camera Turns the shooting date and folder name below the thumbnails on and off (when in thumbnail display). Changes thumbnail size (when in thumbnail display). Closes CameraWindow. Switches between window display modes. Thumbnail display Preview display Full screen display Double-clicking an image switches to preview display. This mark appears on images that have not yet been transferred. Deletes the image chosen in Viewer Window. Images on the camera that match the selected filter display in the area to the right. Protects/cancels protection for the image chosen in Viewer Window. Transfers images on your computer to the camera. Rotates chosen images 90° to the left or right. The background of chosen images turns blue.
IMPORTANT
- The functions (buttons) that display will differ depending on the camera model.
- Clicking the × (Delete) button will delete the image from the camera. Exercise adequate caution, as you cannot retrieve the deleted images.
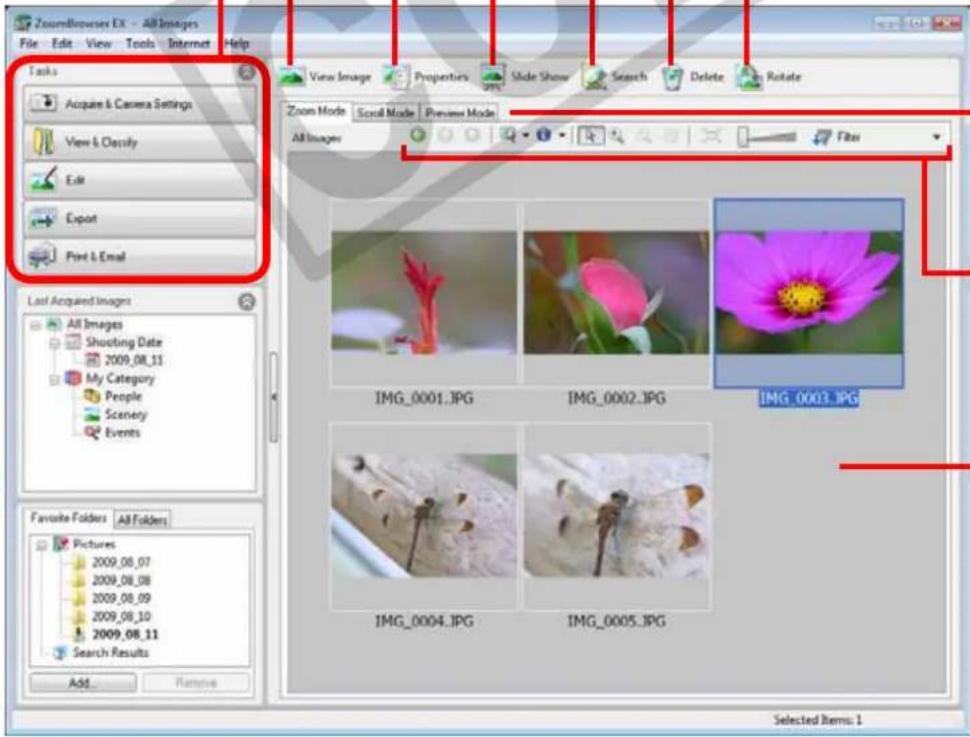
How to Use the Main Window
Main Window
This is the main window for performing tasks in ZoomBrowser EX.
Slide Show
Displays the selected images in succession in the window.
Properties
Displays information about a selected image.
View Image
Displays the selected image in the Viewer Window.
Task Buttons
Selects a task to perform.
Last Acquired Images
You can check images by shooting date or My Category.
Search
Performs searches on images.
Delete
Deletes the selected images or folders.
- Deleted images are sent to the Recycle Bin on the desktop.
- The association between a sound memo and an image cannot be recovered from a file restored from the Recycle Bin.
Rotate
Rotates a selected image.
- Click the [Edit] menu and select [Rotate According to Rotation Information] to rotate the original image as well in the displayed direction.
text_image
ZoomBrowser EX - All Images File Edit View Tools Internet Help Tasks Acquire & Camera Settings View & Classify Edit Export Post & Email Last Acquired Images All Images Shooting Date 2009.08.11 My Category People Scenery Events Favorite Folders All Folders Pictures 2009.08.07 2009.08.08 2009.08.09 2009.08.10 2009.08.11 Search Results Add Remove View Image Properties Slide Show Search Delete Rotate Zoom Mode Scroll Mode Preview Mode All Images Filter IMG_0001.JPG IMG_0002.JPG IMG_0003.JPG IMG_0004.JPG IMG_0005.JPG Selected Items: 1Display Mode
Selects a display mode for the Browser Area.
Display Control Panel
Configures the settings for displaying images in the Browser Area.
Browser Area
Displays the images in an index list.
Folder Area
Selects a folder to display.
- You can register folders you use often as Favorite Folders (❤️). Register by clicking [Add]. To delete a folder in the Favorite Folders area, select a folder and click the [Remove] button.
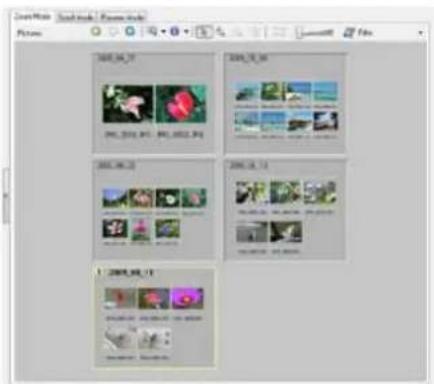
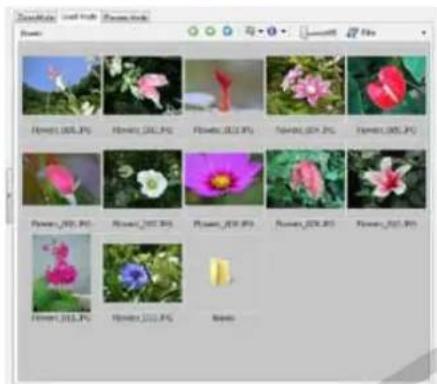
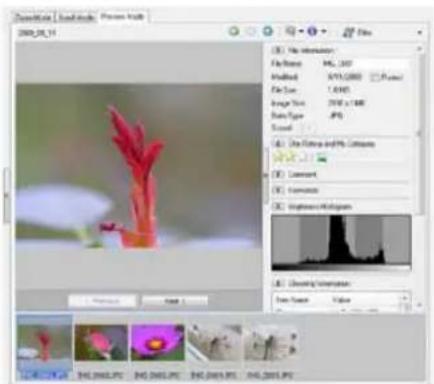
Display Modes
Select a browser area display mode to fit your purposes.
text_image
2001.04.27 2001.04.28 2001.04.29 2001.04.30 2001.04.31 2001.05.11 2001.05.12 2001.06.11 2001.06.12 2001.07.11 2001.08.11Zoom Mode: suited for surveying many images.
text_image
Photo Flower_005.JPG Flower_002.JPG Flower_001.JPG Flower_003.JPG Flower_004.JPG Flower_005.JPG Flower_006.JPG Flower_007.JPG Flower_008.JPG Flower_009.JPG Flower_010.JPG Flower_011.JPG Flower_012.JPG Flower_013.JPG Flower_014.JPG Flower_015.JPG Flower_016.JPG Flower_017.JPG Flower_018.JPG Flower_019.JPG Flower_020.JPG Flower_021.JPG Flower_022.JPG Flower_023.JPG Flower_024.JPG Flower_025.JPG Flower_026.JPG Flower_027.JPG Flower_028.JPG Flower_029.JPG Flower_030.JPG Flower_031.JPG Flower_032.JPG Flower_033.JPG Flower_034.JPG Flower_035.JPG Flower_036.JPG Flower_037.JPG Flower_038.JPG Flower_039.JPG Flower_040.JPGScroll Mode: allows thumbnails to be viewed at a size suited for easy viewing.
text_image
Davelling | Local Style: Flowers Help 2008.06.19 File Edit View File Format: 95% (RGB) Modified: 97% (RGB) Image File Type: 1.0 MB Image Size: 200 x 100 Face Shape: JPEG Sound One Picture and 9% Candles Comment Transformers Lightness/Dimensity Cloning Perspective Face Texture Value OK OK OK OK OK OK OK OK OK OK OK OK OK OK OK OK OK OK OK OK OK OK OK OK OK OK OK OK OK OK OK OK OK OK OK OK OK OK OK OK OK OK OK OK OK OK OK OK OK OK OK OK OK OK OK OK OK OK OK OK OK OK OK OK OK OK OK OK OK OK OK OK OK OK OK OK OK OK OK OK OK OK OK OK OK OK OK OK OK OK OK OK OK OK OK OK OK OK OK OK OK OknPreview Mode: allows the image information to be read while viewing the image.

HINT
Magnify Thumbnails to Check Images
In zoom mode or scroll mode, positioning the mouse pointer over a thumbnail causes the image to appear at a higher magnification in a Mouse Over window. You can also set the Mouse Over window to not show in the (Show Information) menu.
Display Control Panel
This panel adjusts the display settings for the Browser Area.
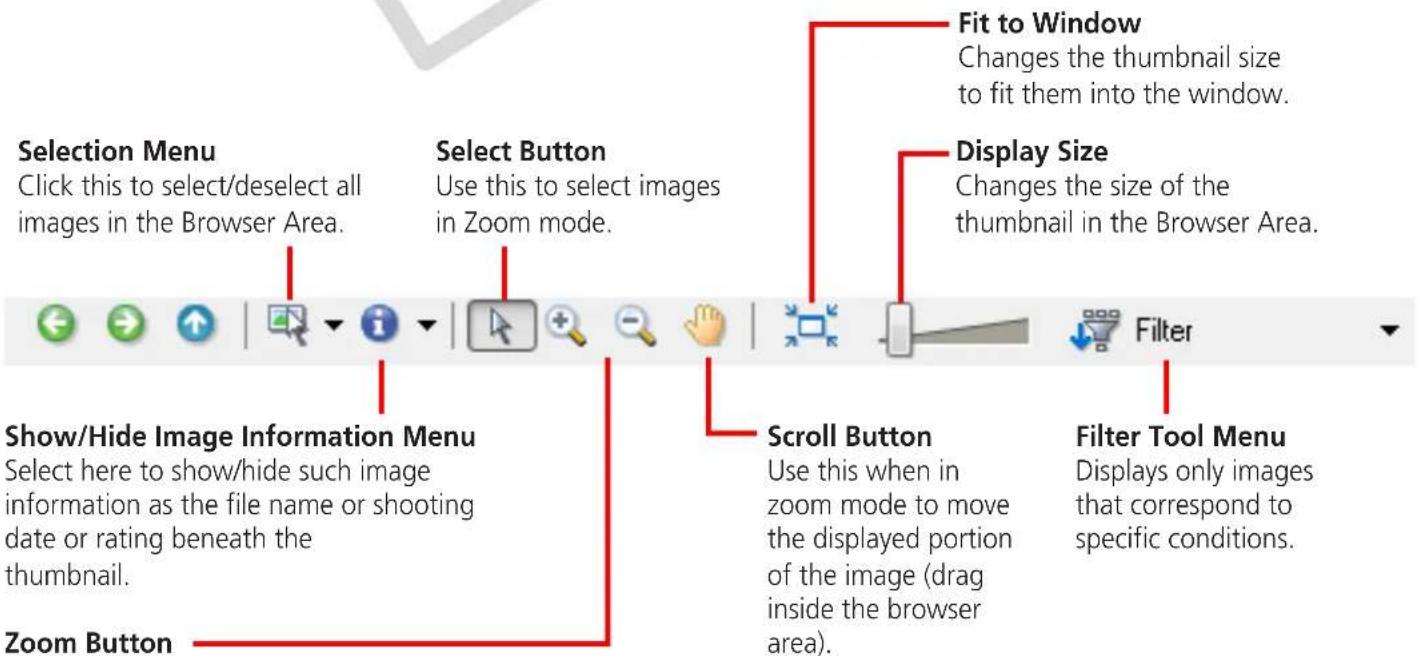
text_image
Selection Menu Click this to select/deselect all images in the Browser Area. Select Button Use this to select images in Zoom mode. Fit to Window Changes the thumbnail size to fit them into the window. Display Size Changes the size of the thumbnail in the Browser Area. Show/Hide Image Information Menu Select here to show/hide such image information as the file name or shooting date or rating beneath the thumbnail. Zoom Button Scroll Button Use this when in zoom mode to move the displayed portion of the image (drag inside the browser area). Filter Tool Menu Displays only images that correspond to specific conditions.Use this to zoom in and out on an image.

Table of Contents

Browser Area Tasks
Change the Folder Level
The level of folder displayed can be changed with the following procedures.
- In Zoom mode, position the mouse cursor over the folder and click the icon when it displays.
• In Scroll or Preview mode, double-click the icon.
• To advance to a higher folder level, click the icon.
Change the Display Size
You can change the display ratio (Zoom mode) or thumbnail size (Scroll mode) with the slider.

text_image
Zoom Mode Scroll Mode Preview Mode Pictures 2009_08_07 2009_08_08 2009_08_09 2009_08_10 2009_08_11Create New Folder
To create a new folder in the Browser Area, click the [File] menu and select [New Folder].
Select Images
Clicking an image in the Browser Area selects that image. To select multiple images, hold down the [Ctrl] key while clicking images, or hold down the [Shift] key and click a starting and ending image to select a range of adjacent images.
Display Images
Double-clicking an image in the Browser Area (or selecting the image and clicking View Image), displays it in the Viewer Window.
Move, Copy Images
To move an image between folders, drag it over the destination folder and release the mouse button. To copy an image, hold the [Ctrl] key while releasing the mouse button as above.
You can also use the same procedures to copy images between Windows Explorer and the Main Window.

HINT
Right-Click Context Menus
Right-clicking over a window or image displays contextual menus. These menus contain the functions available in the current context as well as other convenient functions. Use the right-click menus to increase your efficiency.
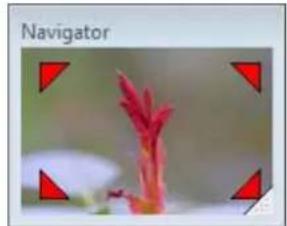
Using the Navigator
If you change the displayed zoom factor in Zoom Mode, a Navigator Window that shows the current position will appear. In the Navigator Window you can change the position by dragging [ ] or clicking inside the window.
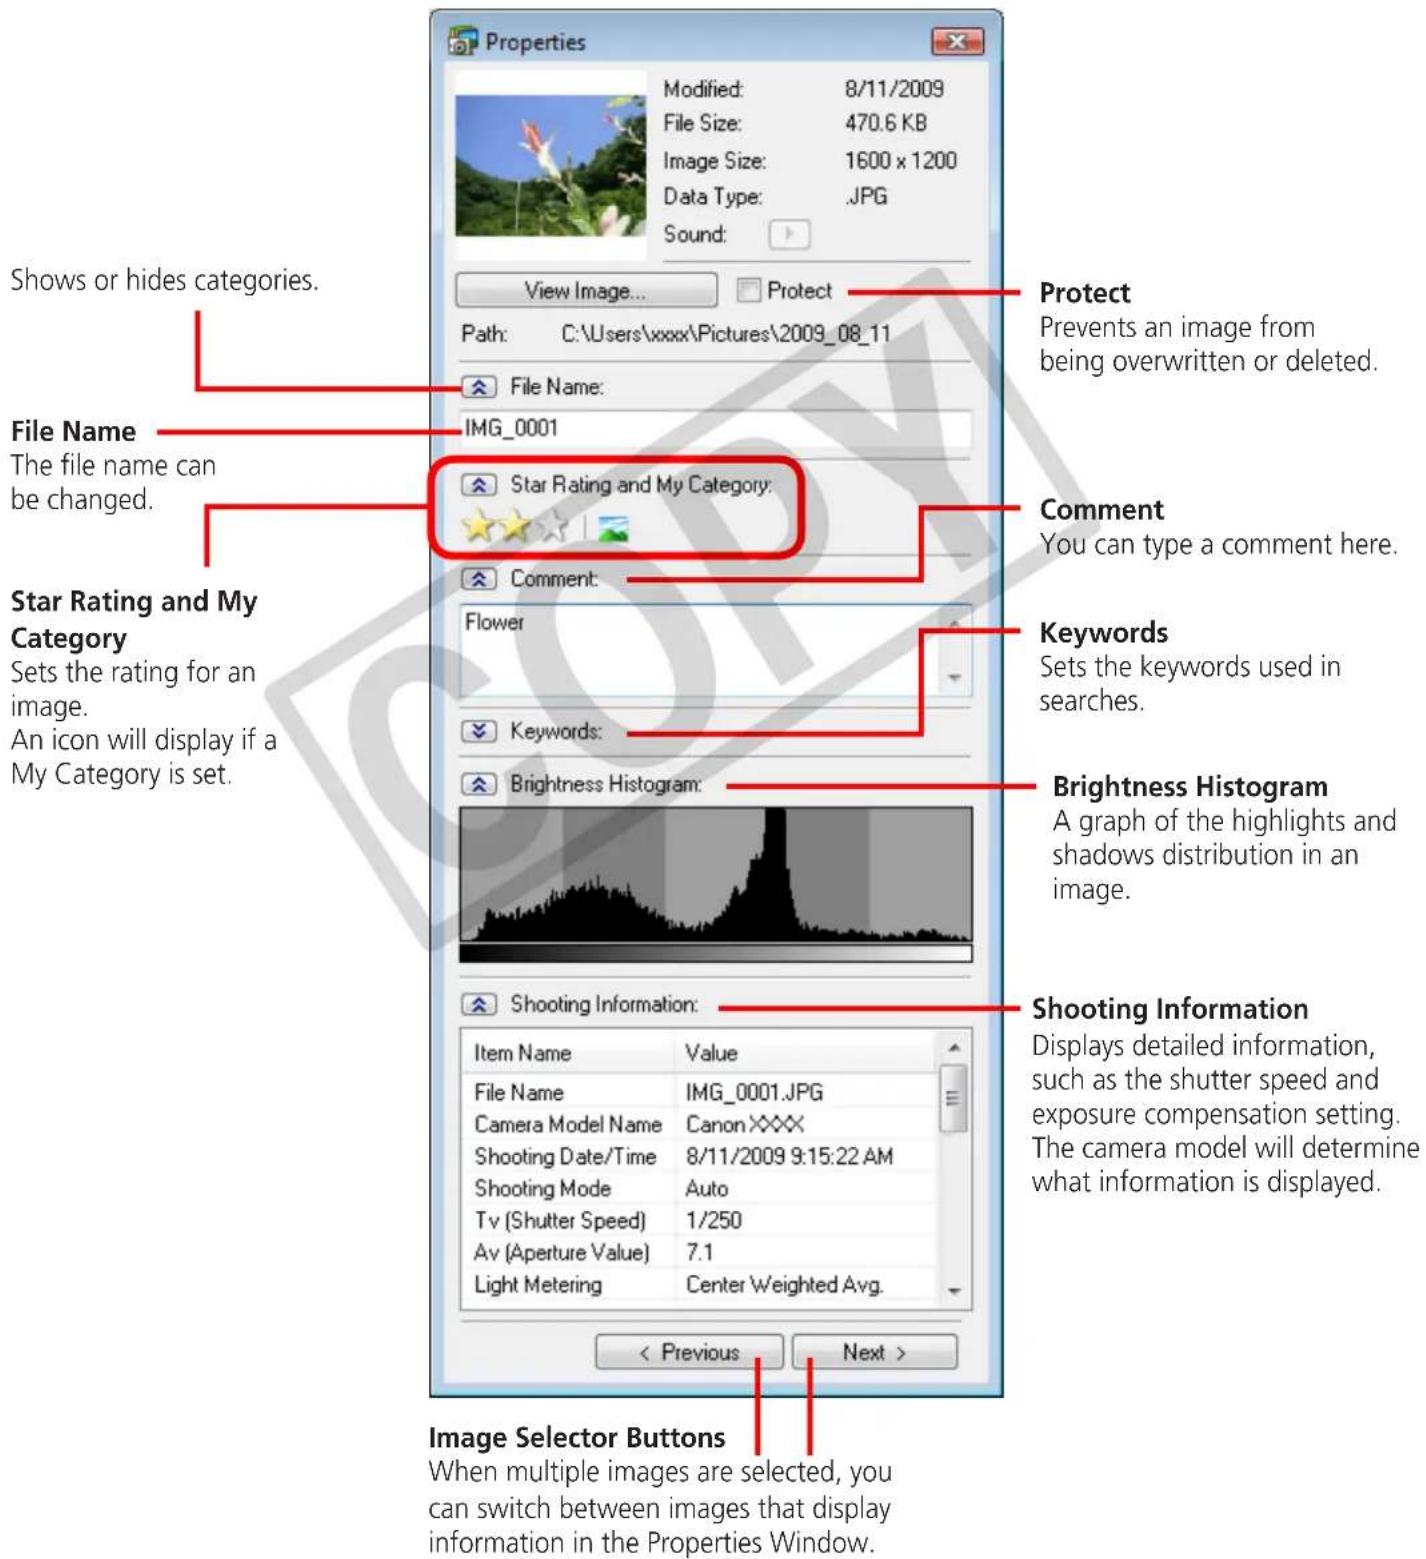
Properties Window
The Properties Window displays when you select an image in the Browser Area and click the Properties button. The Properties Window does not display in the Preview Mode.
text_image
Properties Modified: 8/11/2009 File Size: 470.6 KB Image Size: 1600 x 1200 Data Type: .JPG Sound: View Image... Protect Path: C:\Users\xxxx\Pictures\2009_08_11 File Name: IMG_0001 Star Rating and My Category: Comment: You can type a comment here. Comment: Flower Keywords: Set the keywords used in searches. Keywords: Brightness Histogram: A graph of the highlights and shadows distribution in an image. Brightness Histogram Shooting Information: Item Name Value File Name IMG_0001.JPG Camera Model Name CanonXXXX Shooting Date/Time 8/11/2009 9:15:22 AM Shooting Mode Auto Tv (Shutter Speed) 1/250 Av (Aperture Value) 7.1 Light Metering Center Weighted Avg. < Previous Next > Image Selector Buttons When multiple images are selected, you can switch between images that display information in the Properties Window.Viewer Window
Double-clicking an image in the Main Window displays it in this window.
Change the display magnification. Zooming in displays the Navigator window to show the relative position on the image.
natural_image
Close-up of a red flower bud with white background, no visible text or symbolsDisplay at full screen size.
Set the Star Rating.

text_image
Zoom Ratio: 40%Display multiple images side by side.
Shooting information
- The [Display Original Image] button will display beneath RAW images in the Viewer Window. Click this button to display the converted image in the Viewer Window.
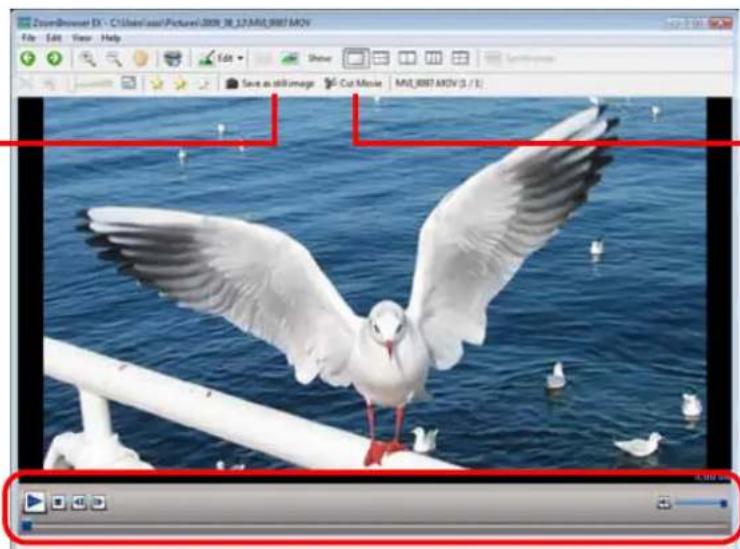
- The following window will appear when a movie is displayed.
You can extract stills from movies.
natural_image
Seagull standing on a ship deck over the ocean, wings fully extended, with other seagulls visible below (no text or symbols)You can cut portions at either end of a movie clip.
You can control movie playback and sound volume.
Editing Images

IMPORTANT
- The original image will be overwritten after an image is edited unless the file name is changed before saving it. To preserve the original image intact, change the file name when saving the edited image.
- This section introduces the procedures started by clicking the Edit task button. Images can also be edited in a similar way by clicking the [Edit] button in the Viewer Window.
Red Eye Correction
Restores eye appearance to the original color when light reflected from the flash makes them appear red.
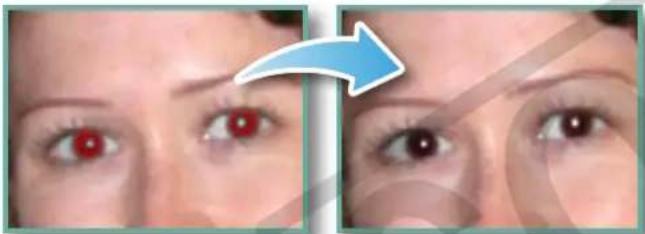
natural_image
Close-up of a person's eyes with red iris, showing a blue arrow pointing to the eyebrow (no text or symbols present)- Click [Start] when Auto mode is selected.
- Switch to Manual mode if Auto mode cannot correct the image, and select the location of the eye to correct.

Procedures
1 Select a task from the left side of the window: [Edit] and [Edit Image].
2 Select an image.
3 [2. Select Editing Tool]
4 [Red Eye Correction]
5 [3. Finish]
• Movies and RAW images cannot be edited.
Auto Adjustment
Automatically adjusts the image color balance and brightness.
natural_image
Two-panel image showing pink flowers in natural setting, one with blue arrow pointing to a green plant (no text or symbols)
Procedures
7 Select a task from the left side of the window: [Edit] and [Edit Image].
2 Select an image.
3 [2. Select Editing Tool]
4 [Auto Adjustment]
5 [3. Finish]
• Movies and RAW images cannot be edited.
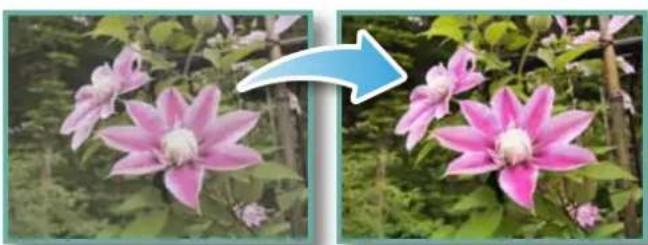
Color/Brightness Adjustment
You can adjust image color balance and brightness using a variety of methods.
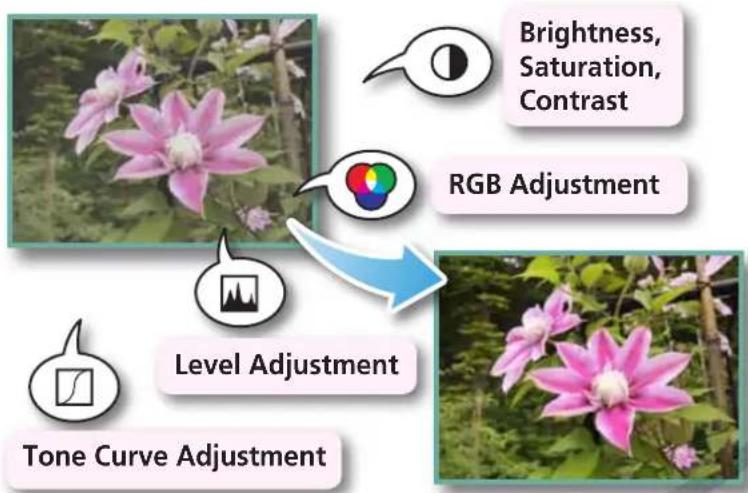
flowchart
graph TD
    A["Brightness, Saturation, Contrast"] --> B["RGB Adjustment"]
    C["Level Adjustment"] --> D["Tone Curve Adjustment"]
    B --> E["Green Phone Icon"]
    D --> F["Pink Flower Image"]

Procedures
1 Select a task from the left side of the window: [Edit] and [Edit Image].
2 Select an image.
3 [2. Select Editing Tool]
4 [Color/Brightness Adjustment]
5 [3. Finish]
• Movies and RAW images cannot be edited.
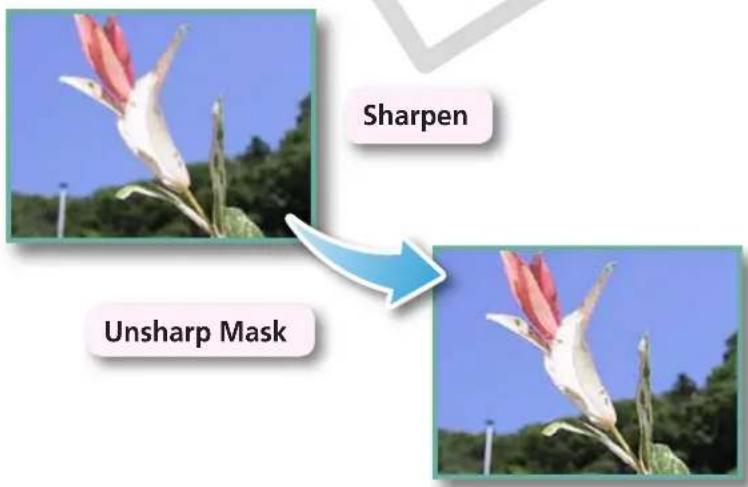
Adjusting Sharpness–Emphasizing Outlines
Makes images appear sharper by emphasizing the outlines of subjects, such as people and objects.
text_image
Sharpen Unsharp Mask
Procedures
1 Select a task from the left side of the window: [Edit] and [Edit Image].
2 Select an image.
3 [2. Select Editing Tool]
4 [Sharpness]
5 [3. Finish]
- The Unsharp Mask [Radius] is the size at which the outline is detected and the [Threshold] is the standard value at which the outline is determined.
• Movies and RAW images cannot be edited.
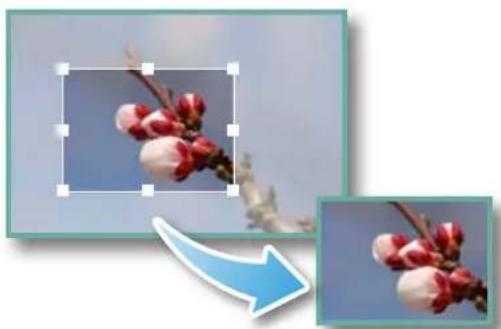
Trimming-Cropping a Portion of an Image
Use this to delete unnecessary portions of the image and leave only the necessary portions.
natural_image
Close-up of a blooming plum branch with red buds, accompanied by a blue arrow pointing to its edge (no text or symbols)
Procedures
1 Select a task from the left side of the window: [Edit] and [Edit Image].
2 Select an image.
3 [2. Select Editing Tool]
4 [Trim]
5 [3. Finish]
- You can also input values or an aspect ratio to specify the trim area.
• Movies and RAW images cannot be edited.
Inserting Text
Use this to insert text onto the image.
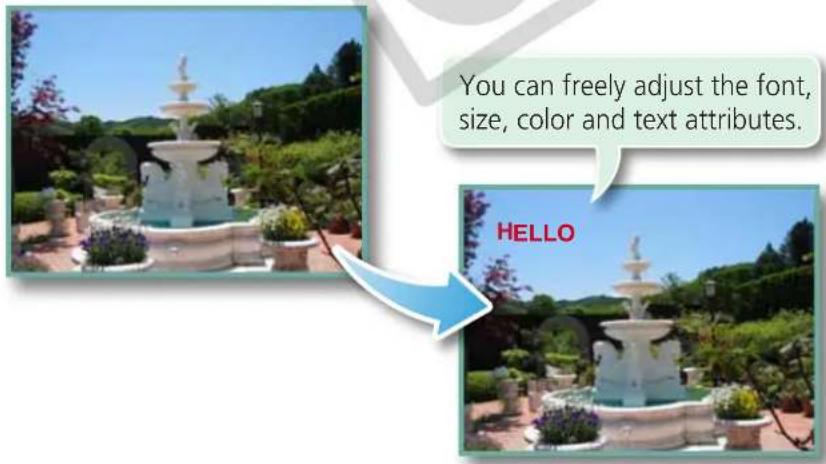
text_image
You can freely adjust the font, size, color and text attributes. HELLO
Procedures
1 Select a task from the left side of the window: [Edit] and [Edit Image].
2 Select an image.
3 [2. Select Editing Tool]
4 [Insert Text]
5 [3. Finish]
- Placing a checkmark in the [Antialias] box causes the text edges to blend in with the underlying image.
• Movies and RAW images cannot be edited.
Using Other Editing Software
If you register another image editing program with ZoomBrowser EX in advance, you can use that software to edit an image selected in ZoomBrowser EX.
Registering an Editing Program
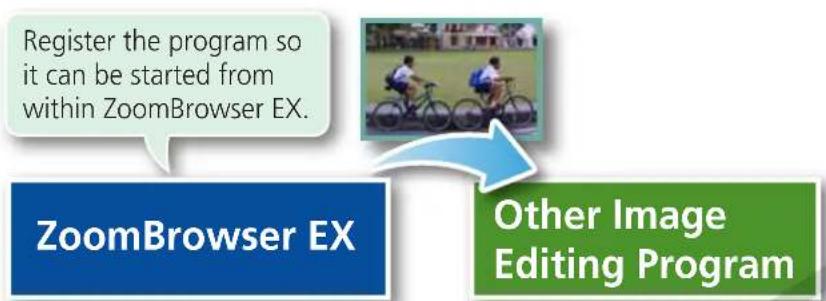
flowchart
graph TD
    A["Register the program so it can be started from within ZoomBrowser EX."] --> B["Other Image Editing Program"]
    B --> C["ZoomBrowser EX"]

Procedures
1 Select a task from the left side of the window: [Edit] and [Edit Image].
2 Select an image.
3 [2. Select Editing Tool]
4 [Edit with external image editor]
5 [Manage List]
Editing Images with a Registered Editing Program
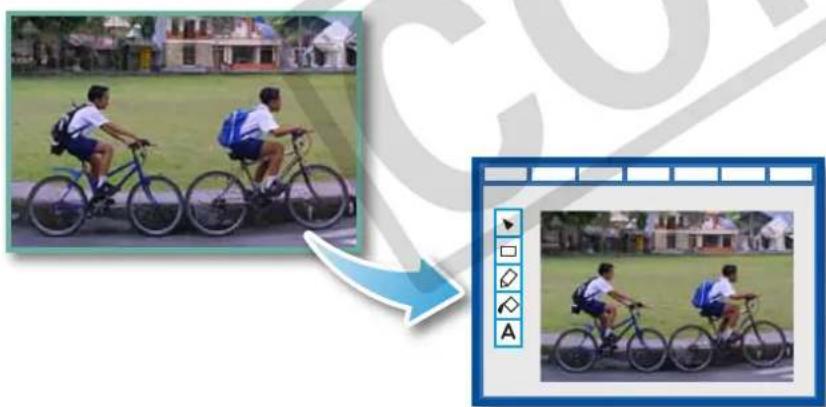
natural_image
Two children riding bicycles on a school playground, with a blue arrow pointing to the image of the same scene (no text or symbols visible)
Procedures
1 Select a task from the left side of the window: [Edit] and [Edit Image].
2 Select an image.
3 [2. Select Editing Tool]
4 [Edit with external image editor]
5 [3. Finish]
- The shooting information may be lost from images recorded with the camera and then processed and saved with another image editing program.
• Movies and RAW images cannot be edited.
Attaching Sounds
You can add sound effects or background music to images and play back the sounds.
Adding Sound


natural_image
Seagull in flight against a clear blue sky, with a green musical note icon and upward arrow (no text or symbols on the bird or background)Symbol displayed on image thumbnails to which sound files have been added.

Procedures
1 Select an image.

text_image
ZoomBrowser EX - C:\Users\xxxx\Pictures File Edit View Tools Internet Help[Edit] and [Add/Remove Sound].
- WAVE type sound files (extension ".wav") can be attached to images.
- Attaching a sound file to an image results in the selected sound file being copied into the same folder as the image file.
Playing an Image Sound File

natural_image
Illustration of a laptop displaying a bird in flight against a blue sky, with musical notes and a speech bubble nearby (no text or symbols on the main image)
Procedures
1 Select an image.

text_image
ZoomBrowser EX - C:\Users\xxxx\Pictures File Edit View Tools Internet Help[Edit] and [Play Sound].
Creating Panoramic Images-PhotoStitch
You can create wide panoramic images by moving the camera slightly when recording a series of images and merging them into one image.
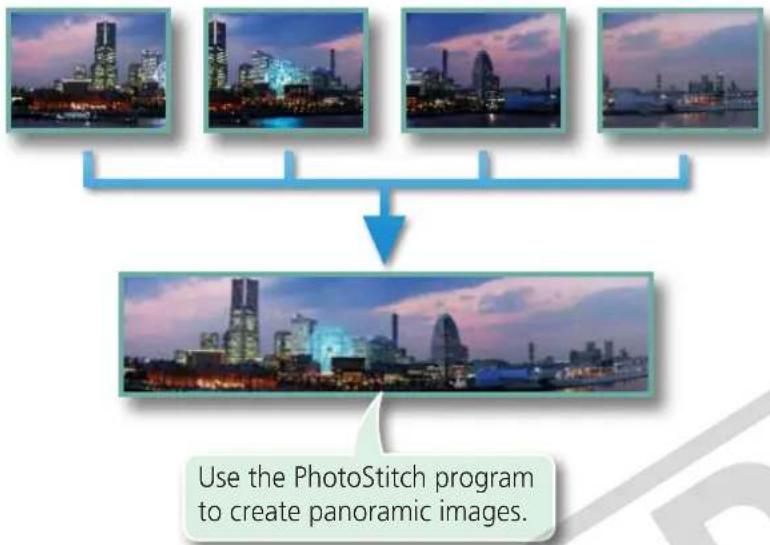
flowchart
graph TD
    A["Image 1"] --> D["Panoramic Image"]
    B["Image 2"] --> D
    C["Image 3"] --> D
    E["Image 4"] --> D
    D --> F["Use the PhotoStitch program to create panoramic images."]

Procedures
7 Select a task from the left side of the window: [Edit] and [Stitch Photos].
• Movies and RAW images cannot be edited.

HINT
Using the Stitch Assist Mode
If you use the camera's Stitch Assist mode to record the images, PhotoStitch can automatically detect the image order and merge direction, making it easier to merge the images. (Some camera models may not feature the Stitch Assist mode.)

IMPORTANT
- If a message appears, notifying you that the computer has insufficient memory, try one of the following methods to solve the problem.
- Close all other applications other than PhotoStitch.
- Reduce the size or number of images to combine.
- In the [Save] tab, select [Adjust image...], then in "Saved Image Size" reduce the size.
Editing Movies
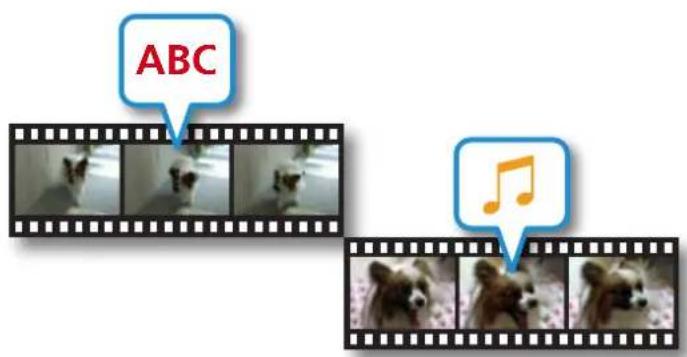
You can create original movies by linking movie clips and still images.
You can even add titles and other text, background music and various special effects to the movie.
text_image
ABC
Procedures
7 Select a task from the left side of the window: [Edit] and [Edit Movie].

HINT
Recordable Movie Length
- The length of movies you can save is shown at right. A message will appear if you try to save a longer movie. Reduce the length or size of the movie if this happens.
| Movie Size Max. Length |
| 1920x1080Under 10 minutes |
| 1280x720Under 20 minutes |
| 640x480Under 30 minutes |
| 320x240 Under 60 minutes |

IMPORTANT
• Movies edited with this function cannot be transferred back to the camera.
- Saving movies takes time, especially MOV type movies selected with [Save image type] takes a considerable amount of time.
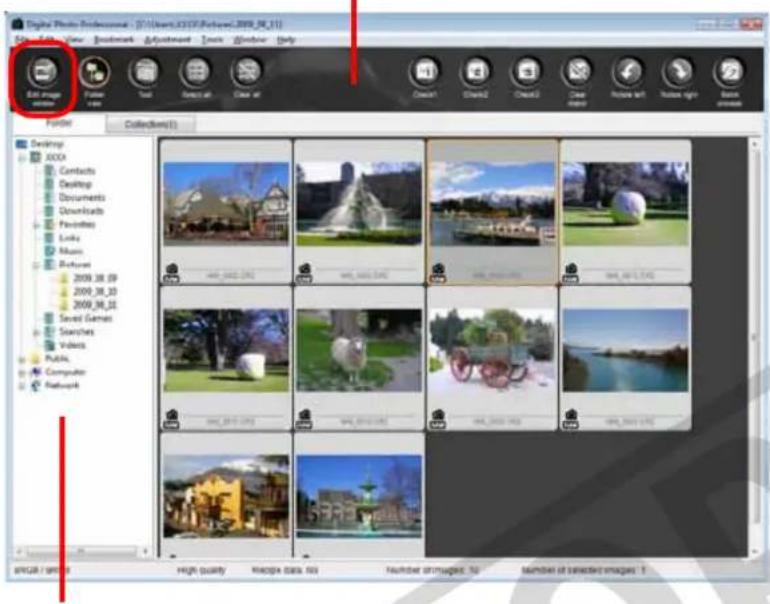
Converting RAW Images-Digital Photo Professional
You can convert RAW images to JPEG and TIFF images.
Digital Photo Professional's Main Window
text_image
Digital Photo Professional - [01] (User1,CCS2F,Photo1,2009_08_11) File Edit Image File Edit View Bookmark Adjustment Tools Window Help Folder Collection(S) Desktop XDXA Contacts Desktop Documents Downloads Favorites Looks Music Pictures 2009.08.09 2009.08.10 2009.08.11 Saved Games Searches Videos Public Computer Network High quality Sketch data, 50 Number ignored, 50 Number of selected images: TSelects folders containing images.
Digital Photo Professional's Tool Palette
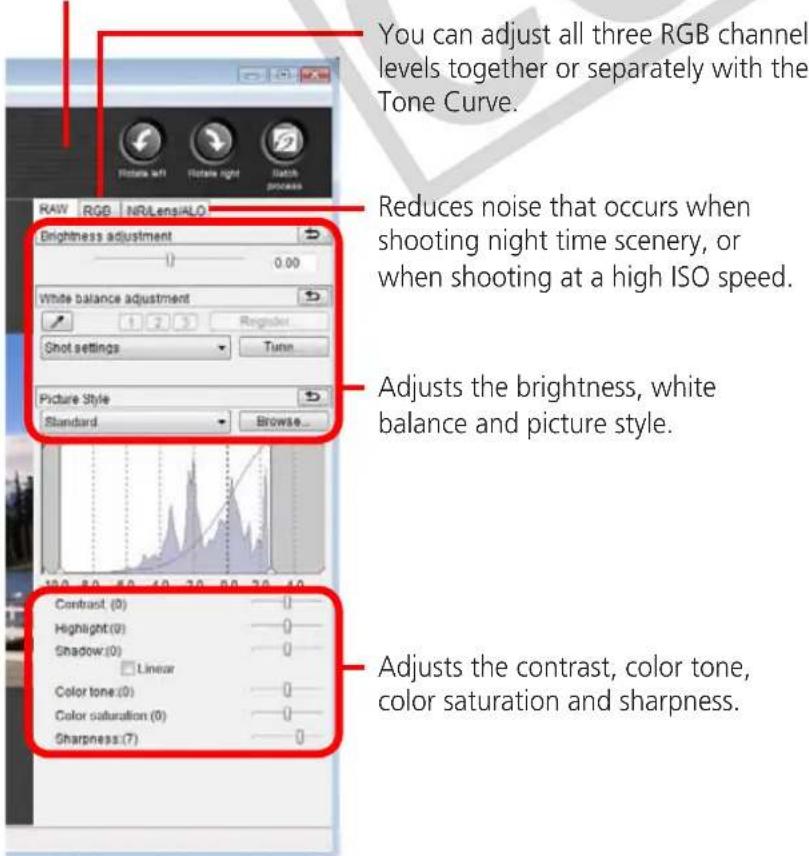
text_image
You can adjust all three RGB channel levels together or separately with the Tone Curve. Reduces noise that occurs when shooting night time scenery, or when shooting at a high ISO speed. Adjusts the brightness, white balance and picture style. Adjusts the contrast, color tone, color saturation and sharpness.
Procedures
1 Select a task from the left side of the window: [Edit] and [Digital Photo Professional Process RAW Images].
2 Select a RAW image in Digital Photo Professional's Main Window.
3 Click Edit image window. (Edit image window).
4 Adjust the image brightness and white balance in the tool palette.
- The modified contents (the information for image processing requirements) are saved along with the image as a "recipe".
- With Digital Photo Professional, you can adjust images to achieve the best results for your desired scene or subject by specifying a picture style.
- The items available to be modified differ depending on the camera model.
5 [File] and [Convert and save].
• After setting the file type, size, and destination folder, click [Save].
- Only RAW images compatible with Digital Photo Professional can be processed.
- Ensure that you use the RAW image conversion software included with your camera.
To print, using Digital Photo Professional, select an image in the Main Window, then click the [File] menu and select the print function. Digital Photo Professional offers the following printing methods.
| Printing Method Description | |
| Single Print Automatically sets the layout for printing a single image on a single page. | |
| Detailed Setting | Gives you the freedom to set the layout, add titles, or print with shooting information. |
| Contact Sheet | Prints a line-up of multiple images on one page (also allows you to select the number of images, layout, and add titles). |
![CANON Ixus SD4000 IS - [File] and [Convert and save]. - 1](/content/2026/06/1165393/images/0cd48c90b87187e65cd6911d8beac47dc1bd5d007fc15e2cb18f08f0aa2c9be7.jpg)
IMPORTANT
- RAW images can only be captured on certain camera models that list "RAW" as one of the data types included in the "Specifications" section of the Camera User Guide.
- Only RAW images compatible with Digital Photo Professional can be processed. Check the "Data Type" item of the "Specifications" section of the Camera User Guide for compatibility.
- For a more detailed explanation of operating procedures, download the Digital Photo Professional manual (PDF format) from the Canon website.

HINT
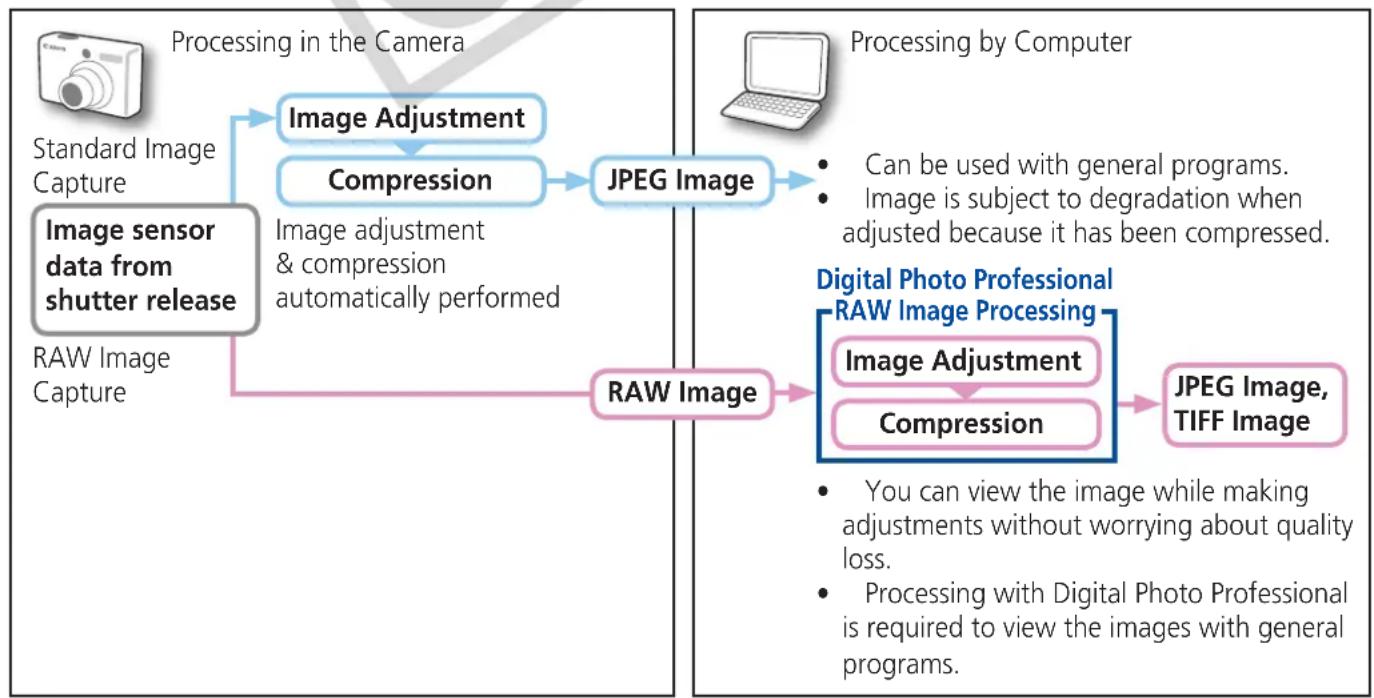
About RAW Images
RAW images contain the data captured by the camera's image sensor without modification. Since they contain raw data that differs from the usual JPEG images by not having any image adjustment or compression processing performed in the camera, they can be converted on a computer with a lossless process.
flowchart
graph TD
    A["Camera Image"] --> B["Image Sensor Data from Shutter Release"]
    B --> C["Raw Image Capture"]
    C --> D["Image Adjustment"]
    D --> E["Compression"]
    E --> F["JPEG Image"]
    F --> G["Processing by Computer"]
    G --> H["Digital Photo Professional RAW Image Processing"]
    H --> I["Image Adjustment"]
    I --> J["Compression"]
    J --> K["JPEG Image, TIFF Image"]
    style A fill:#f9f,stroke:#333
    style B fill:#ccf,stroke:#333
    style C fill:#cfc,stroke:#333
    style D fill:#fcc,stroke:#333
    style E fill:#cff,stroke:#333
    style F fill:#ffc,stroke:#333
    style G fill:#fcc,stroke:#333
    style H fill:#ffc,stroke:#333
    style I fill:#cff,stroke:#333
    style J fill:#ffc,stroke:#333
    style K fill:#fcc,stroke:#333
Exporting
Changing Image (Stills) Sizes and Types
You can change an image's size and format when exporting it so that it can be published on the Internet or attached to an email message.

flowchart
graph TD
    A["Document"] --> B["Web Page"]
    B --> C["Laptop"]
    C --> D["Email"]
    D --> E["File Transfer"]
    E --> A

Procedures
1 Select a task from the left side of the window: [Export] and [Export Still Images].
- You will lose the shooting information if you save images as a type other than JPEG.
Changing Movie Sizes and Types
You can change a movie's size and format when exporting it so that it can be published on the Internet or attached to an email message.
flowchart
graph TD
    A["Video"] --> B["Media"]
    B --> C["Email"]
    C --> D["Laptop"]
    D --> E["Internet"]
    style A fill:#f9f,stroke:#333
    style B fill:#ccf,stroke:#333
    style C fill:#cfc,stroke:#333
    style D fill:#fcc,stroke:#333
    style E fill:#ffc,stroke:#333

Procedures
1 Select a task from the left side of the window: [Export] and [Export Movies].
- You can also use this function to rotate movies.

IMPORTANT
- Exporting movies may take a considerable amount of time.
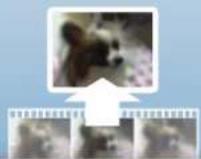
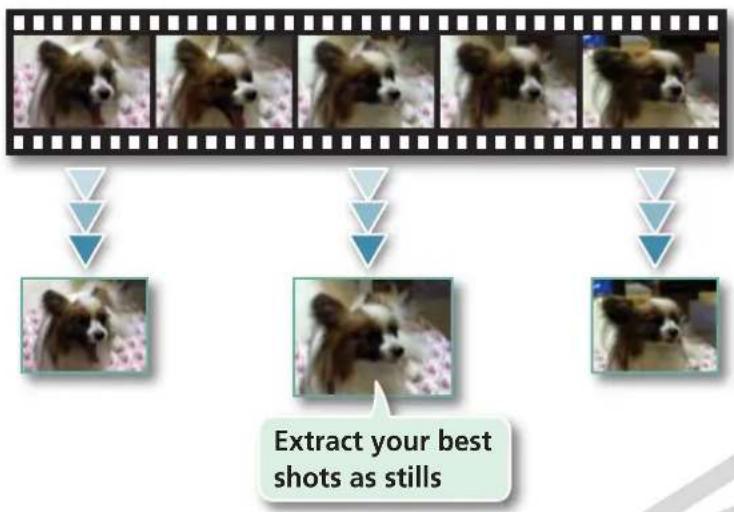
Extracting Stills from Movies
You can extract and save stills from your favorite frames recorded in a movie.
flowchart
graph TD
    A["First Step"] --> B["Step 1: Dog"]
    B --> C["Step 2: Dog"]
    C --> D["Step 3: Dog"]
    D --> E["Step 4: Dog"]
    E --> F["Step 5: Dog"]
    F --> G["Step 6: Dog"]
    G --> H["Step 7: Dog"]
    H --> I["Step 8: Dog"]
    I --> J["Step 9: Dog"]
    J --> K["Step 10: Dog"]
    K --> L["Step 11: Dog"]
    L --> M["Step 12: Dog"]
    M --> N["Step 13: Dog"]
    N --> O["Step 14: Dog"]
    O --> P["Step 15: Dog"]
    P --> Q["Step 16: Dog"]
    Q --> R["Step 17: Dog"]
    R --> S["Step 18: Dog"]
    S --> T["Step 19: Dog"]
    T --> U["Step 20: Dog"]
    U --> V["Step 21: Dog"]
    V --> W["Step 22: Dog"]
    W --> X["Step 23: Dog"]
    X --> Y["Step 24: Dog"]
    Y --> Z["Step 25: Dog"]
    Z --> AA["Step 26: Dog"]
    AA --> AB["Step 27: Dog"]
    AB --> AC["Step 28: Dog"]
    AC --> AD["Step 29: Dog"]
    AD --> AE["Step 30: Dog"]

Procedures
7 Select a task from the left side of the window: [Export] and [Extract frames from a movie].
Exporting Shooting Information
You can export the shooting information recorded with an image, such as the shutter speed and exposure, as a text file.
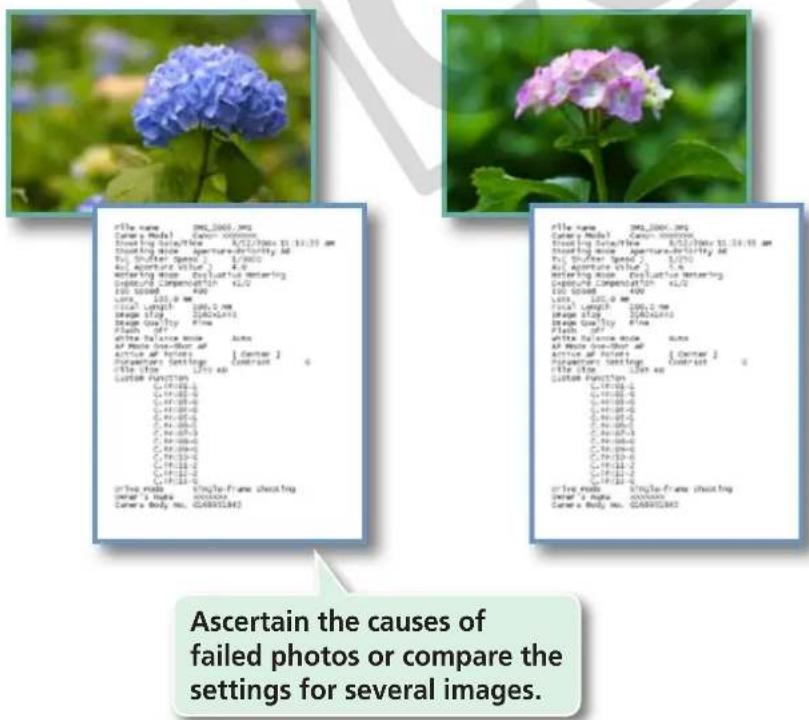
text_image
File name: 2001.2001.mg Camera Model: Camera-000000 Standing Date/Time: 4/17/2001 to 11:33 am Standing Mode: Aperture-Definitely All By: Shutter Speed: 1.0/00 At: Aperture Value: 4.0 Entering mode: Evaluation metering Capture Compensation: 4.0/ ISO Speed: 4.0 Latz: 100.0 mm Total Length: 100.0 mm Image Style: 500x500x5 Image Only by: Fine Flash: 69 File Balance Mode: Auto of Photo One-Block all Active at https://www.hir.com/ Duration Settings: [Center] Date Time: 15 to 68 Custom Function: G:\F\F\F\F\F G:\F\F\F\F\F G:\F\F\F\F\F G:\F\F\F\F\F G:\F\F\F\F\F G:\F\F\F\F\F G:\F\F\F\F\F G:\F\F\F\F\F G:\F\F\F\F\F G:\F \F\F\F\F G:\F\F\F\F\F G:\F\F\F\F\F G:\F\F\F\F\F G:\F\F\F\F\F G:\F\F\F\F\F G:\F\F\F\F\F G:\F\F\F\F\F G:\F\F\F \ F G:\F\F\F\F G:\F\F\F\F G:\F\F\F\F G:\F\F\F\F G:\F\F\F\F G:\F\F\F\F G:\F\F\F\F G:\F\F\F\E G:\F\F\F\E G:\F\F\F\E G:\F\F\E G:\F\F\E G:\F\E G:\E ASCertain the causes of failed photos or compare the settings for several images. File name: 2001.2001.mg Camera Model: Camera-000000 Standing Date/Time: 4/17/2001 to 11:33 am Standing Mode: Aperture-Definitely All By: Shutter Speed: 1.0/00 At: Aperture Value: 4.0 Entering mode: Evaluation metering Capture Compensation: 4/17/2001 ISO Speed: 4.00 Latz: 100.0 mm Total Length: 100.0 mm Image Style: 500x500x500x500x500x500x500x500x500x500x500x500x500x500x500x500x500x500x500x500x500x500x500x500x500x500mgs Capture Control: None ISO Speed: 4.00 File Balance Mode: Auto All Photo One-Block all Active at https://www.hir.com/ Duration Settings: [Center] Date Time: 15 to 68 Custom Function: G:\F\F\F\F G:\E\S\S\S\S\S\S\S\S\S\S\S\S\S\S\S\S\S\S\S\S\S\S\S\S\S\S\S\S\S\S\S\S\S\S\S\S\S\S\S\S\S\S\S\S\S\S\S\S\S\S\S\S\S\S\S\S\S\S\S\S\S\S\S\S\S\S\S\S\S\S\S\S\S\S\S\S\S\S\S\S\S\S\S\S\S\S\S\S\S\S\S\S\S\S\S\S\S\S\S\S/S&S File name: SingleFrame shooting Camera Body No.: G248823832 File name: SingleFrame shooting Camera Body No.: G248823832
Procedures
1 Select a task from the left side of the window: [Export] and [Export Shooting Properties].
Creating Computer Screen Saver Images
You can export images to serve as computer screen savers.

text_image
ZZZ
Procedures
7 Select a task from the left side of the window: [Export] and [Export as a Screen Saver].
Creating Computer Wallpaper Images
You can export images to serve as computer wallpaper images.

natural_image
Illustration showing a beach scene with a thatched umbrella and lounge chairs, connected to a laptop displaying beach photos (no text or symbols)
Procedures
1 Select a task from the left side of the window: [Export] and [Export as a Wallpaper].
Saving to CDs
You can save images along with their shooting information to CD-R/RW discs.
natural_image
Collage of tropical destinations including a small boat, overwater bungalows, and a beach with palm trees (no visible text or symbols)
natural_image
Yellow CD or DVD disc with blue arrow indicating rotation (no text or symbols)Back up important images or distribute your vacation photos on discs.

Procedures
7 Select a task from the left side of the window: [Export] and [Backup to CD].

IMPORTANT
- This function can only be used with computers that satisfy the following requirements:
• Equipped with a CD-R/RW drive as standard equipment
- Writing to the CD-R/RW drive operates correctly with Windows
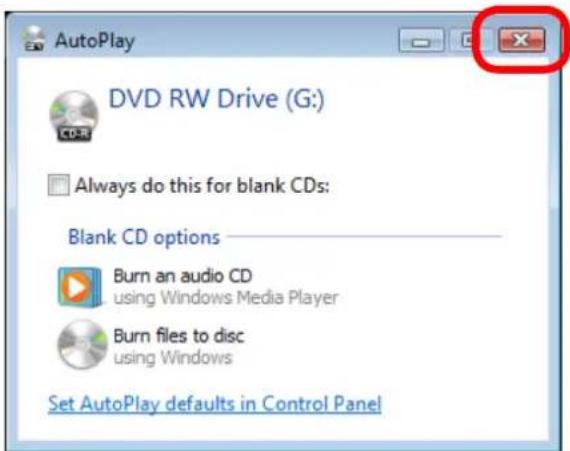
- If a window similar to that shown to the right appears when a new CD-R/RW disc is placed in the drive, click X(>|Cancel|) when using Windows XP) to close the window.
text_image
AutoPlay DVD RW Drive (G:) CD-R Always do this for blank CDs: Blank CD options Burn an audio CD using Windows Media Player Burn files to disc using Windows Set AutoPlay defaults in Control PanelUploading Movies to YouTube
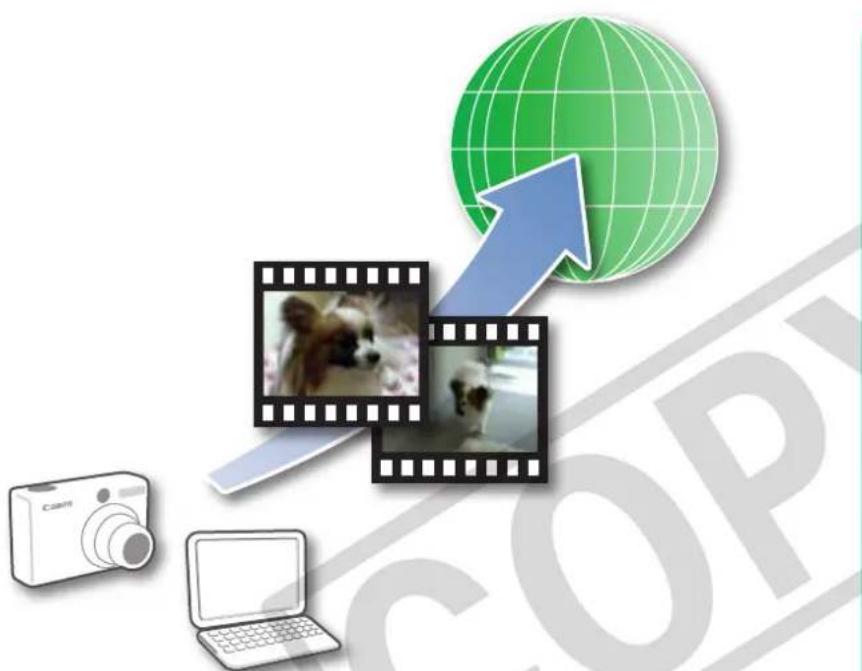
Uploading to YouTube
You can upload movies you have shot to YouTube. You can upload movies saved on the camera or a computer.
natural_image
Illustration of digital media icons including a globe, filmstrip, camera, laptop, and a dog, with no readable text or symbols.
Procedures
1 Connect the camera to a computer to start CameraWindow.
- For details, refer to steps 1-3 in "Transferring Images".
2 [Upload Images from Camera]
3 [Upload Movies to YouTube]
4 Select movies.
5 Click (Next).
6 Input a title and description, then click 📄 (Upload).
7 Enter your YouTube username and password, and sign in.

HINT
Uploading Movies Saved on a Computer
Click the [Start] menu at the bottom left of the screen and select [All Programs] or [Programs] followed by [Canon Utilities], [CameraWindow], [Movie Uploader for YouTube] and [Movie Uploader for YouTube]. Click [Add] in the screen that appears, then after adding movies to the upload list, click the (Upload) button.

IMPORTANT
- Depending on YouTube specifications, or future changes to specifications, this function cannot be guaranteed.
- The maximum length for uploadable movies is less than 10 minutes, and the maximum file size is less than 1 GB.
• Movies that have been edited on a computer cannot be uploaded. - Internet access is required to upload movies (You must already have an account with an Internet service provider (ISP), browser software installed and an Internet connection).
- Any ISP account charges and access fees must be paid separately.
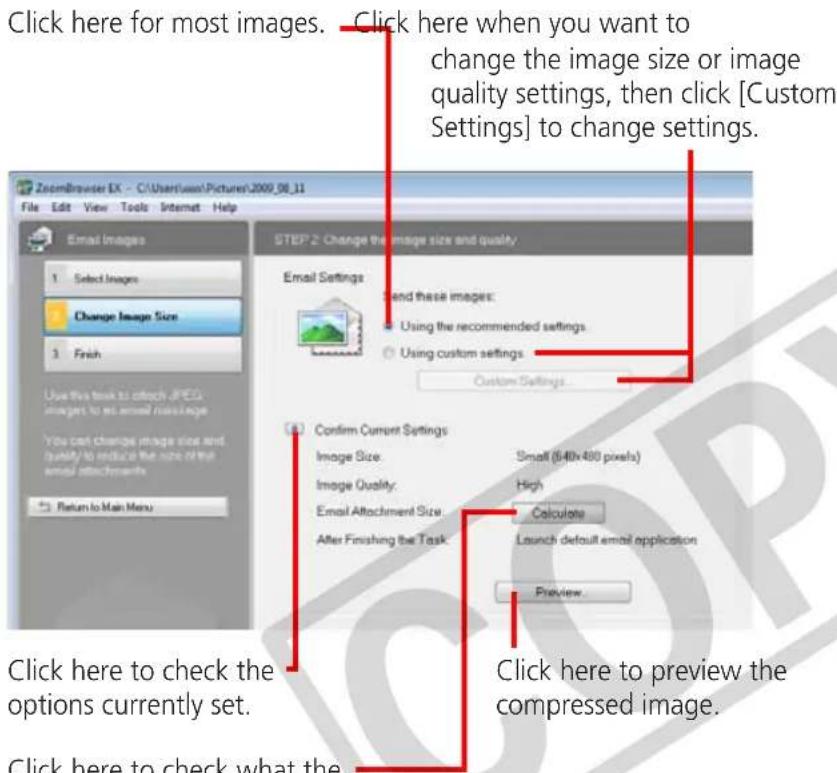
Attaching Images to Email
You can send images as email file attachments.
text_image
Click here for most images. Click here when you want to change the image size or image quality settings, then click [Custom Settings] to change settings. Email Images 1 Select Image Change Image Size 3 Fresh Use this link to check JPEG images to set email image You can change image size and quality to reduce the size of the email attachments Return to Main Menu STEP 2: Change the image size and quality. Email Settings Send these images: Using the recommended settings Using custom settings Custom Settings Confirm Current Settings Image Size Image Quality: Email Attachment Size After Finishing the Task Small (640x480 pixels) High Calculate Launch default email application Preview Click here to check the options currently set. Click here to check what the Click here to preview the compressed image.Click here to check what the actual compressed file size will be.

Procedures
1 Select a task from the left side of the window: [Print & Email] and [Email Images].
2 Select an image to send.
- You can also select multiple images or all images in a folder.
3 Click [2. Change Image Size]
- You can change the image size and quality settings.
4 Click [3. Finish]
- The mail software will start, and the send screen will appear. The selected image will appear as an attached file.
- In [Custom Settings], if [Save to Folder] is selected in "After Finishing the Task", the selected images will be saved in the indicated destination folder.

HINT
Automatic Start-up Settings for E-mail Software
- When using Windows 7, you must pre-install an e-mail program. When changing settings, set the default program in the Control Panel.
- When using Windows Vista, configure the settings in your e-mail software. For example, you can configure Windows e-mail by starting e-mail, then clicking the [Tools] menu, followed by [Options], [Default Messaging Programs], [This application is not the default Mail handler], and [Make Default].
- When using Windows XP, settings can be configured by starting the Internet Explorer program, and clicking the [Tools] menu, followed by [Internet Options], [Programs] tab, and the [E-mail] pull-down menu.

IMPORTANT
- The e-mail's MAPI client must be preset for the e-mail software to start automatically.
- If the e-mail software does not start automatically, first save the images to your computer, then start your e-mail software to attach and send the images. The destination folder for saved images can be set with [Custom Settings].
Slide Shows
Viewing Images in Slide Shows
A multiple selection of images can be shown at full size on the screen in succession as a slide show.
You can freely configure the transition effects, information displayed and display time settings.

natural_image
Illustration of a laptop with a keyboard and collage of photo frames (no text or symbols)
Procedures
7 Select a task from the left side of the window: [View & Classify] and [View as a Slide Show].

HINT
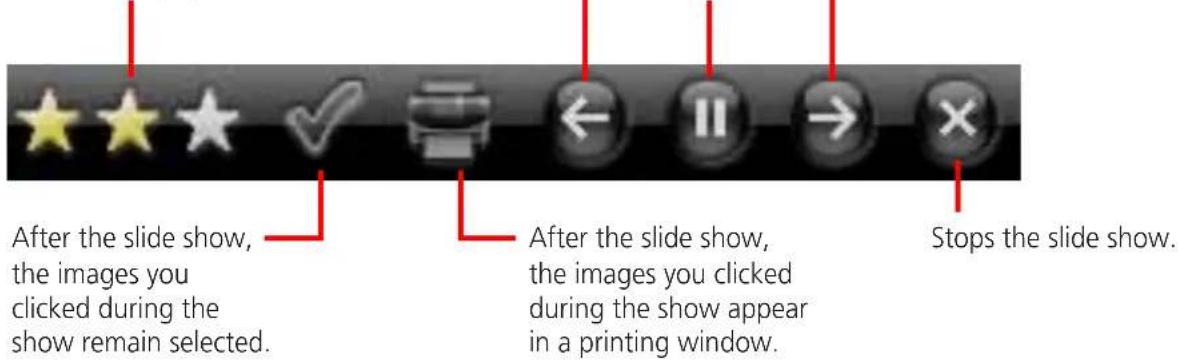
Slide Show Button Functions
The following buttons appear at the bottom of the screen while a slide show is playing.
You can set the Star Rating for an image while it is displayed.
text_image
After the slide show, the images you clicked during the show remain selected. After the slide show, the images you clicked during the show appear in a printing window. Stops the slide show.Image Management
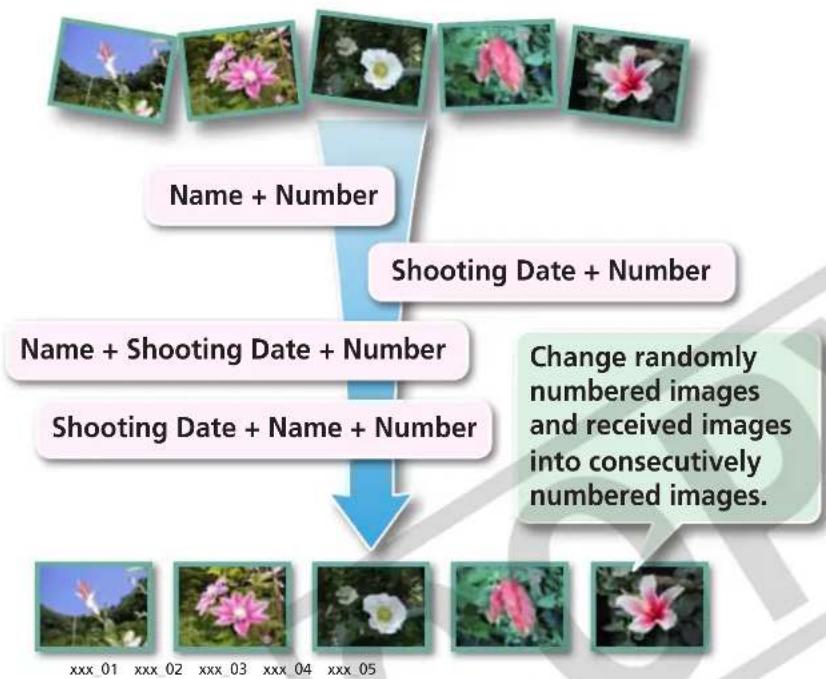
Changing File Names in Batches
You can change the file names of multiple images in one procedure.
flowchart
graph TD
    A["Input Image"] --> B["Name + Number"]
    B --> C["Shooting Date + Number"]
    C --> D["Name + Shooting Date + Number"]
    D --> E["Shooting Date + Name + Number"]
    E --> F["Change randomly numbered images and received images into consecutively numbered images."]

Procedures
1 Select a task from the left side of the window: [View & Classify] and [Rename Multiple Files].
- You can change individual file and folder names by clicking the [File] menu and selecting [Rename] or by clicking on the file name in Preview mode.
- Changing the image name in ZoomBrowser EX also changes the actual file name on the disk.
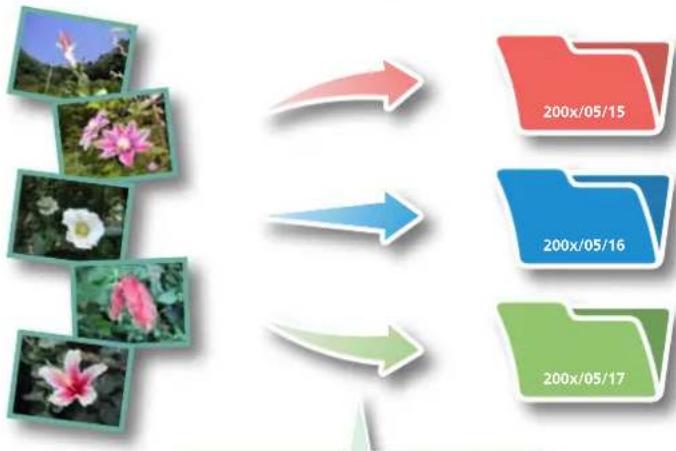
Sorting Images into Folders by Shooting Date
You can sort images into folders by their shooting dates.
flowchart
graph TD
    A["Photo"] --> B["200x/05/15"]
    A --> C["200x/05/16"]
    A --> D["200x/05/17"]
Images predating your use of ZoomBrowser EX can also be managed together.

Procedures
7 Select a task from the left side of the window: [View & Classify] and [Classify into Folder].
Configuring Image Information Settings
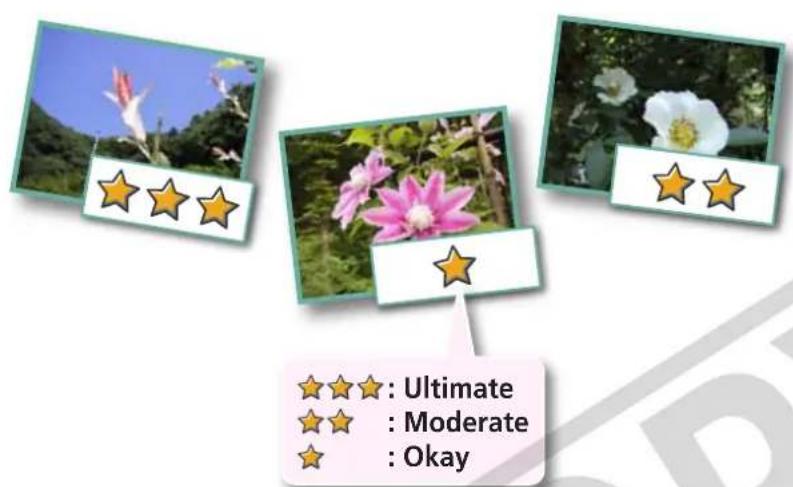
Setting Star Ratings
You can set the Star Ratings used in searching and displaying images in the index list.
text_image
★★★: Ultimate ★★ : Moderate ★★ : Okay
Procedures
1
Zoom Mode
Scroll Mod
Preview Mode
Switch to [Preview Mode].
2 Set [Star Rating].
- You can also set the Star Ratings by accessing the [Edit] menu, the Properties Window or the Viewer Window.
Inserting Comments
You can freely insert your choice of text as Comments.
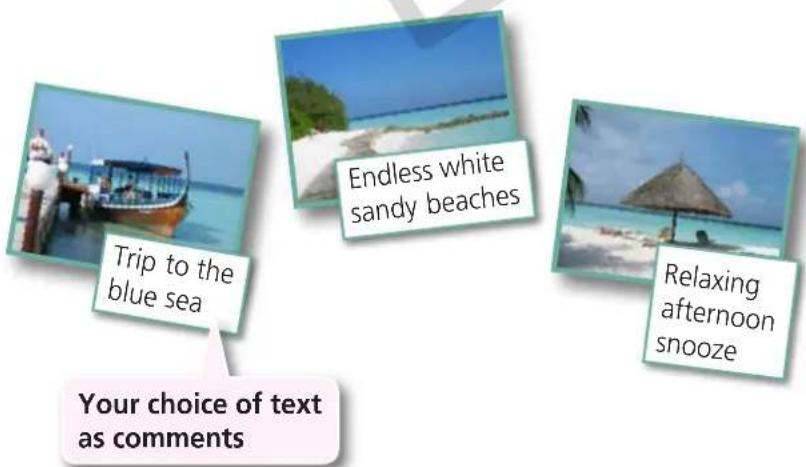
text_image
Trip to the blue sea Endless white sandy beaches Relaxing afternoon snooze Your choice of text as comments
Procedures
7
Zoom Mode
Scroll Mod
Preview Mode
Switch to [Preview Mode].
2 Insert [Comment].
- Comments can also be managed in the Properties Window.
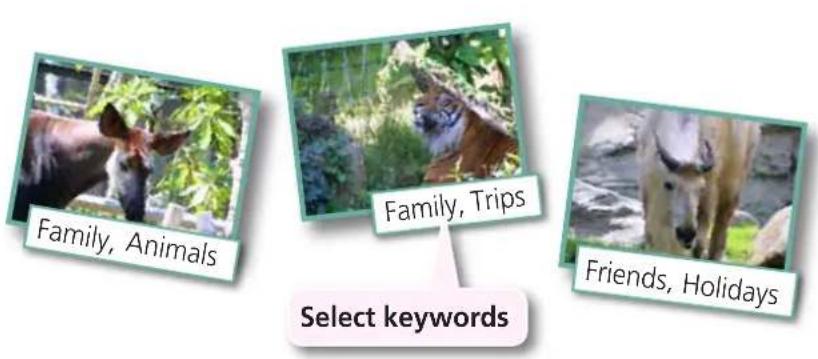
Assigning Keywords
You can set Keywords for use in image searches.

Procedures
1
Zoom Mode
Scroll Mod
Preview Mode
Switch to [Preview Mode].
2 Insert [Keywords].
- Keywords can also be managed from the [Tools] menu or Properties Window.
• To add keywords, click the [Tools] menu and select [Manage Keywords].
![CANON Ixus SD4000 IS - Insert [Keywords]. - 1](/content/2026/06/1165393/images/5c0f814248fb05d941f6d4eacd2d78f2dcb13484b3f1f5b38f3c1e57c6fd22b2.jpg)
HINT
About Image Information
This chart shows the information other than shooting information that can be added to images.
| Information Type My Category Star Ratings Comments Keywords | ||||
| Content | Categories such as People, Scenery, etc. | Categorized on a basis of 3 rankings: ★, ★★ ★★★ | Text input without restriction regarding the shooting circumstances or associated memories. | Selections are made from a list (editable) of keywords, such as the photographic subject, place or action. |
| Configuration Method | Configured in Camera | Configured in ZoomBrowser EX | ||
| Used in Searches —○ ○ ○ | ||||
| Used as Filter Criteria | ○ ○ — | |||
| Display beneath Thumbnail | ○ ○ ○ — | |||
Categories displayed beneath thumbnails can be selected by clicking i in the Display Control Panel.
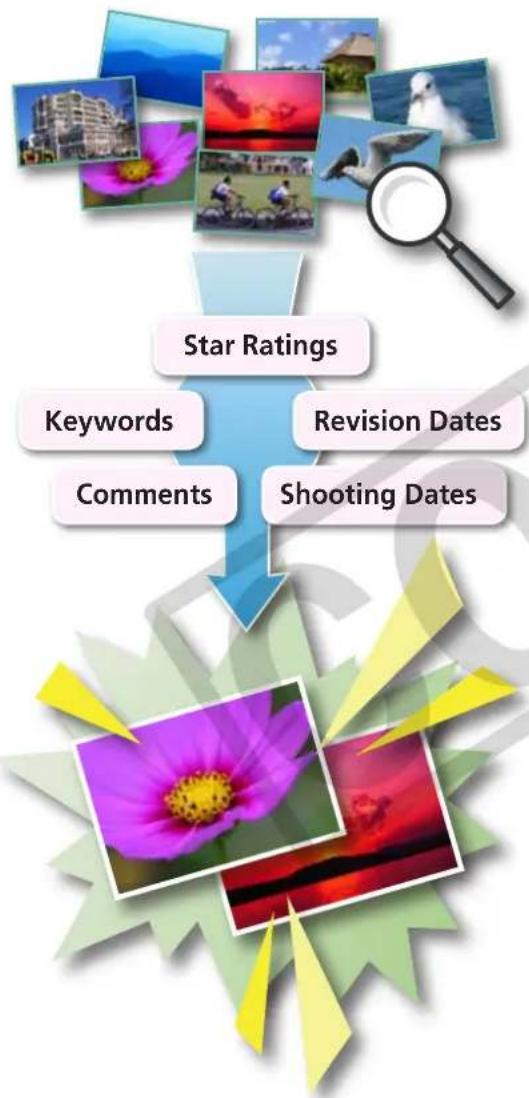
Searching, Filtering and Sorting Images
Searching Images
You can search images using parameters extracted from the information associated with them.
flowchart
graph TD
    A["Star Ratings"] --> B["Keywords"]
    A --> C["Comments"]
    A --> D["Revision Dates"]
    A --> E["Shooting Dates"]

Procedures
7 Select a task from the left side of the window: [View & Classify] and [Search].
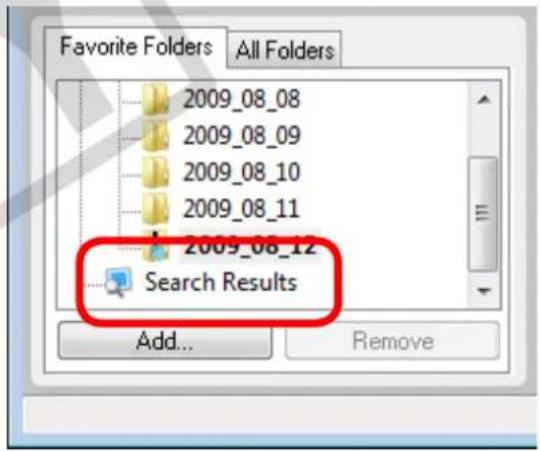
• After a search, the correlated images display in the [Search Results] folder.
text_image
Favorite Folders All Folders 2009_08_08 2009_08_09 2009_08_10 2009_08_11 2009_08_12 Search Results Add... Remove
HINT
Tasks Related to Search Results
You can select images in the [Search Results] folder and perform operations on them, such as printing or copying them to other folders.

IMPORTANT
- Please note that deleting an image from the [Search Results] folder deletes the original image. Use caution in deleting items from this folder.
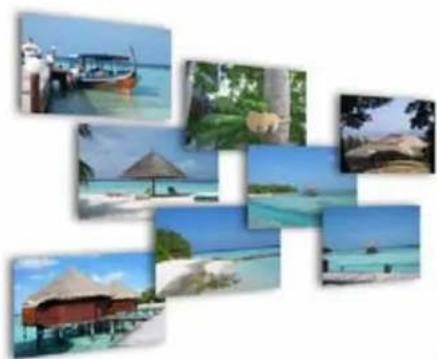
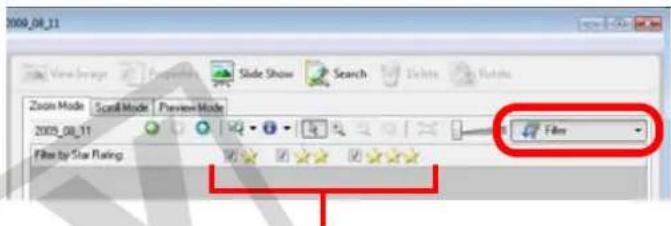
Filtering Images
You can use filters to display only images meeting the selected parameters in the Browser Area.
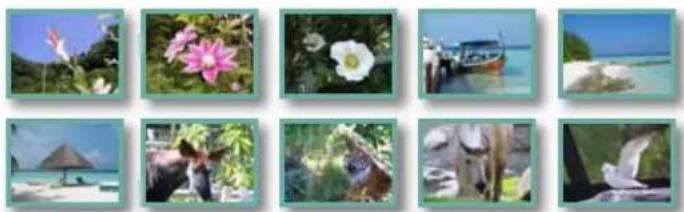
natural_image
Grid of nine nature and tourism photos including flowers, a boat, a dog, and birds (no text or symbols)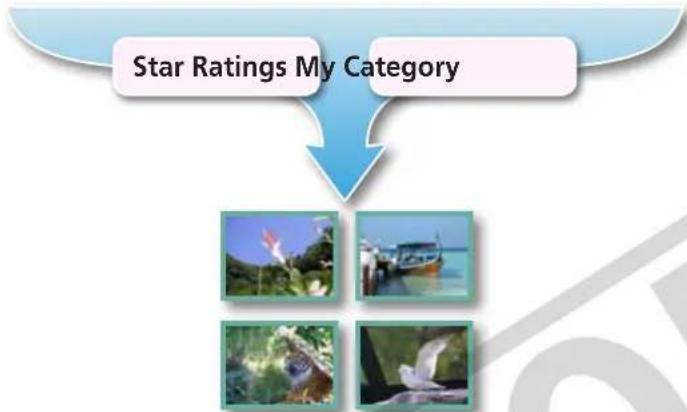
flowchart
graph TD
    A["Star Ratings My Category"] --> B["Image 1"]
    A --> C["Image 2"]
    A --> D["Image 3"]
    A --> E["Image 4"]

Procedures
1

Filter

[Filter]
text_image
0008_08_11 Zoom Mode Scroll Mode Preview Mode 2005_08_11 Fills by Star Rating 47 FilesThis section is used to specify the filter criteria.
Sorting Images
You can sort images in the Browser Area based on the specified parameters.
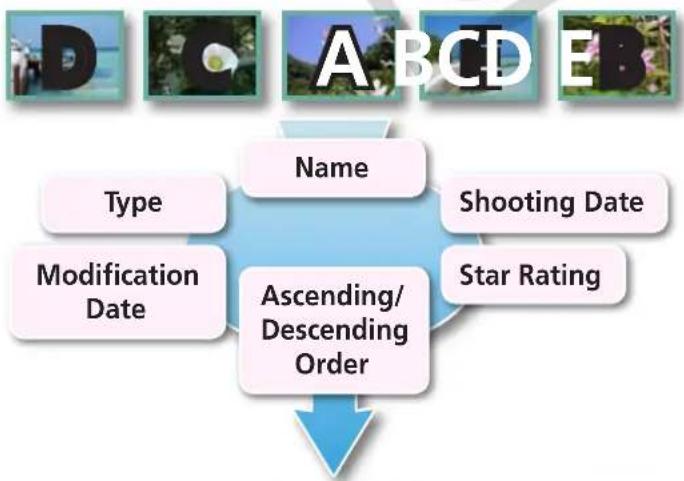
flowchart
graph TD
    A["Name"] --> B["Ascending/Descending Order"]
    C["Type"] --> B
    D["Modification Date"] --> B
    E["Shooting Date"] --> B
    F["Star Rating"] --> B

text_image
A B C D E D E
Procedures
1
text_image
ZoomBrowser EX - C:\Users\xxxx\Pictures File Edit View Tools Internet Help[View] and [Sort by].
Comparing Images
Comparing Multiple Images
When a good photo opportunity arises, you can shoot the same subject using different shutter speeds and exposures. In ZoomBrowser EX, it is easy to compare images so that minute differences can be detected.
natural_image
Close-up of a flower with yellow stamens on magenta petals, separated by a blue double-headed arrow (no text or symbols)
Procedures
1 Select several images to compare.
2 Click [View Image].
3 Select or in the Viewer Window.
4 Click [Synchronize].

text_image
ZoomBrowser EX - C:\Users\Asia\Picture\2008_58_11\BAG_0003.JPG File Edit View Help Browse Synchronize BAS_0003.JPG ( 1 / 2 ) BAS_0003_2.JPG ( 2 / 2 ) Navigator File System Zoom Ratio: 66%Actions performed on an image, such as scrolling or changing the magnification, are performed on the other image as well.
- Selecting [Synchronize] causes actions such as increasing/reducing the magnification level or scrolling around the image to apply to all of the selected images in lock step, making it easy to check minute details of focus, coloring and other image characteristics.
My Camera Settings
Changing the Shutter Sound and Start-Up Image
You can select from dedicated screens to register to the start-up screen that appears when turning the camera on, and dedicated sounds to register to various camera operation sounds (My Camera Settings).
flowchart
graph TD
    A["Laptop with flower image"] --> B["Camera with musical note"]
    C["Digital camera with music icon"] --> B
    style A fill:#f9f,stroke:#333
    style B fill:#bbf,stroke:#333
    note1["My Camera Settings"] --> note2["Start-up Image"]
    note2 --> note3["Start-up Sound"]
    note3 --> note4["Shutter Sound"]
    note4 --> note5["Operation Sound"]
    note5 --> note6["Selftimer Sound"]

Procedures
1 Connect the camera to a computer to start CameraWindow.
- For details, refer to steps 1-3 in "Transferring Images".
2 [Camera Settings]
text_image
Import Images from Camera Recognize Images on Camera Hybrid Images from Camera Camera Settings On Image Image Set Sound On PaperSelect the desired item from the following and make settings.
▶ [Set Start-up Image]
▶ [Set Sounds]
▶ [Set Theme]

IMPORTANT
- My Camera Settings are only available on certain models, when [Camera Settings] displays in CameraWindow.
You can register the start-up image, start-up sound, shutter sound, operation sound and self-timer sound collectively if you select [Theme].
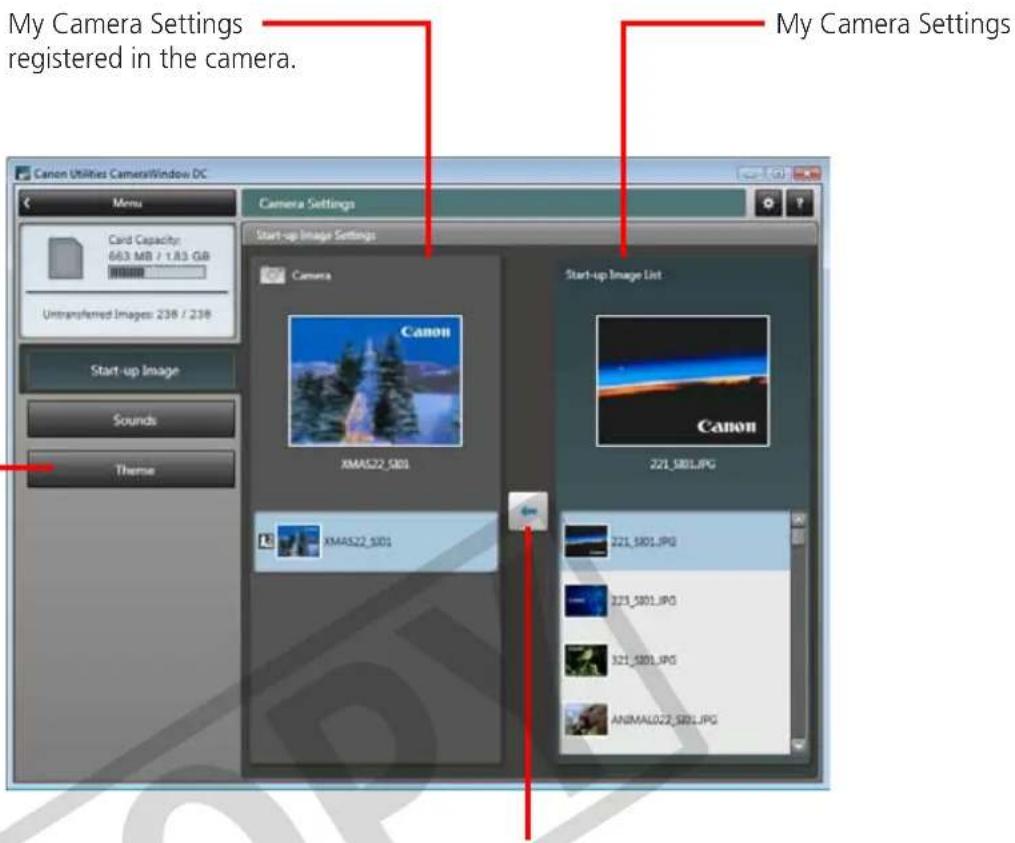
text_image
My Camera Settings registered in the camera. Canon Utilities CameraWindow DC Menu Card Capacity: 663 MB / 1.83 GB Untransferred Images: 238 / 238 Start-up Image Sounds Theme Camera Settings Start-up Image Settings Camera Canon XMAS22_5001 Start-up Image List Canon XMAS22_5001 221_5001.JPG 221_5001.JPG 221_5001.JPG ANIMAL022_5001.JPGAfter choosing a My Camera Settings file from the left-hand list, select a My Camera Settings file to replace in the right-hand list and click this button to register it in the camera.

HINT
Downloading My Camera Settings Files
You can also download various files to use in My Camera Settings from CANON iIMAGE GATEWAY.
Transferring Images
Transferring Images to a Camera
Images transferred once to a computer can be transferred back to the camera.
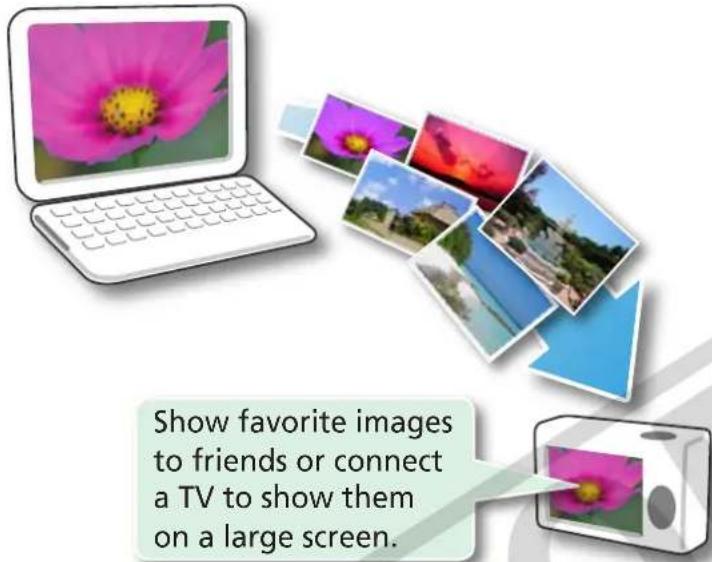
text_image
Show favorite images to friends or connect a TV to show them on a large screen.
Procedures
1 Connect the camera to a computer to start CameraWindow.
- For details, refer to steps 1-3 in "Transferring Images".
2 [Organize Images on Camera]
3 [Organize Images]
4 (Upload)
5 Select images.
- If the Main Window is open when the camera is connected (directly after transferring for instance), open the CameraWindow (menu screen) by clicking the [Acquire & Camera Settings] task button, followed by [Connect to Camera].

IMPORTANT
- Cameras that use the "MOV" data type can play back movies transferred back to the camera if movies were taken with that camera. Refer to the "Data Type" item in "Specifications" near the end of the Camera User Guide to see if the camera uses the "MOV" data type. You may not be able to play back movies taken with another camera.
- Only still images compliant with Design rule for Camera File system standards can be transferred to your camera's memory card.
- You may not be able to transfer images back to the camera if they have been edited on a computer, or if the image information has been modified.
CANON iIMAGE GATEWAY
About CANON iIMAGE GATEWAY (for U.S.A. customers only)
CANON iIMAGE GATEWAY is an online photo service for the purchasers of this product. Registering online allows you to use the various services.

IMPORTANT
- Internet access is required to use CANON iIMAGE GATEWAY (You must already have an account with an Internet service provider (ISP), browser software installed and an Internet connection).
• See the homepage for information regarding browser versions (Microsoft Internet Explorer, etc.) and settings to best connect to CANON iIMAGE GATEWAY online photo services. - Any ISP account charges and access fees must be paid separately.
Registering
First, register as a CANON iMAGE GATEWAY member.
Register

natural_image
Green globe with grid lines and a blue arrow pointing downward (no text or symbols)CANON
iMAGE
GATEWAY

Procedures
7 Select [CANON iIMAGE GATEWAY] from tasks on the left of the window, then select [Register/Add Product].
- You can register online using the supplied CD-ROM. To do this, in the installer panel, click [Register] underneath CANON iIMAGE GATEWAY.
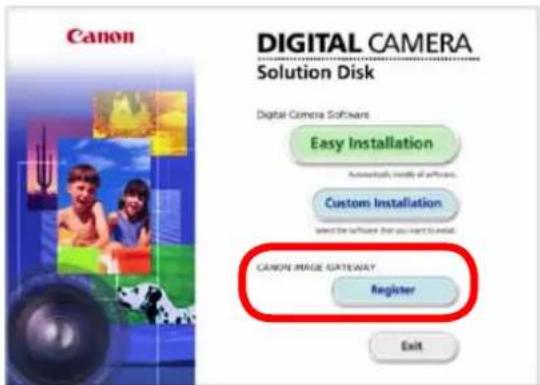
text_image
Canon DIGITAL CAMERA Solution Disk Digital Camera Software Easy Installation Automatically install of software. Custom Installation Select the software for you want to install. CANON IMAGE GATEWAY Register ExitAvailable Services
CANON iIMAGE GATEWAY offers a variety of convenient and useful services.
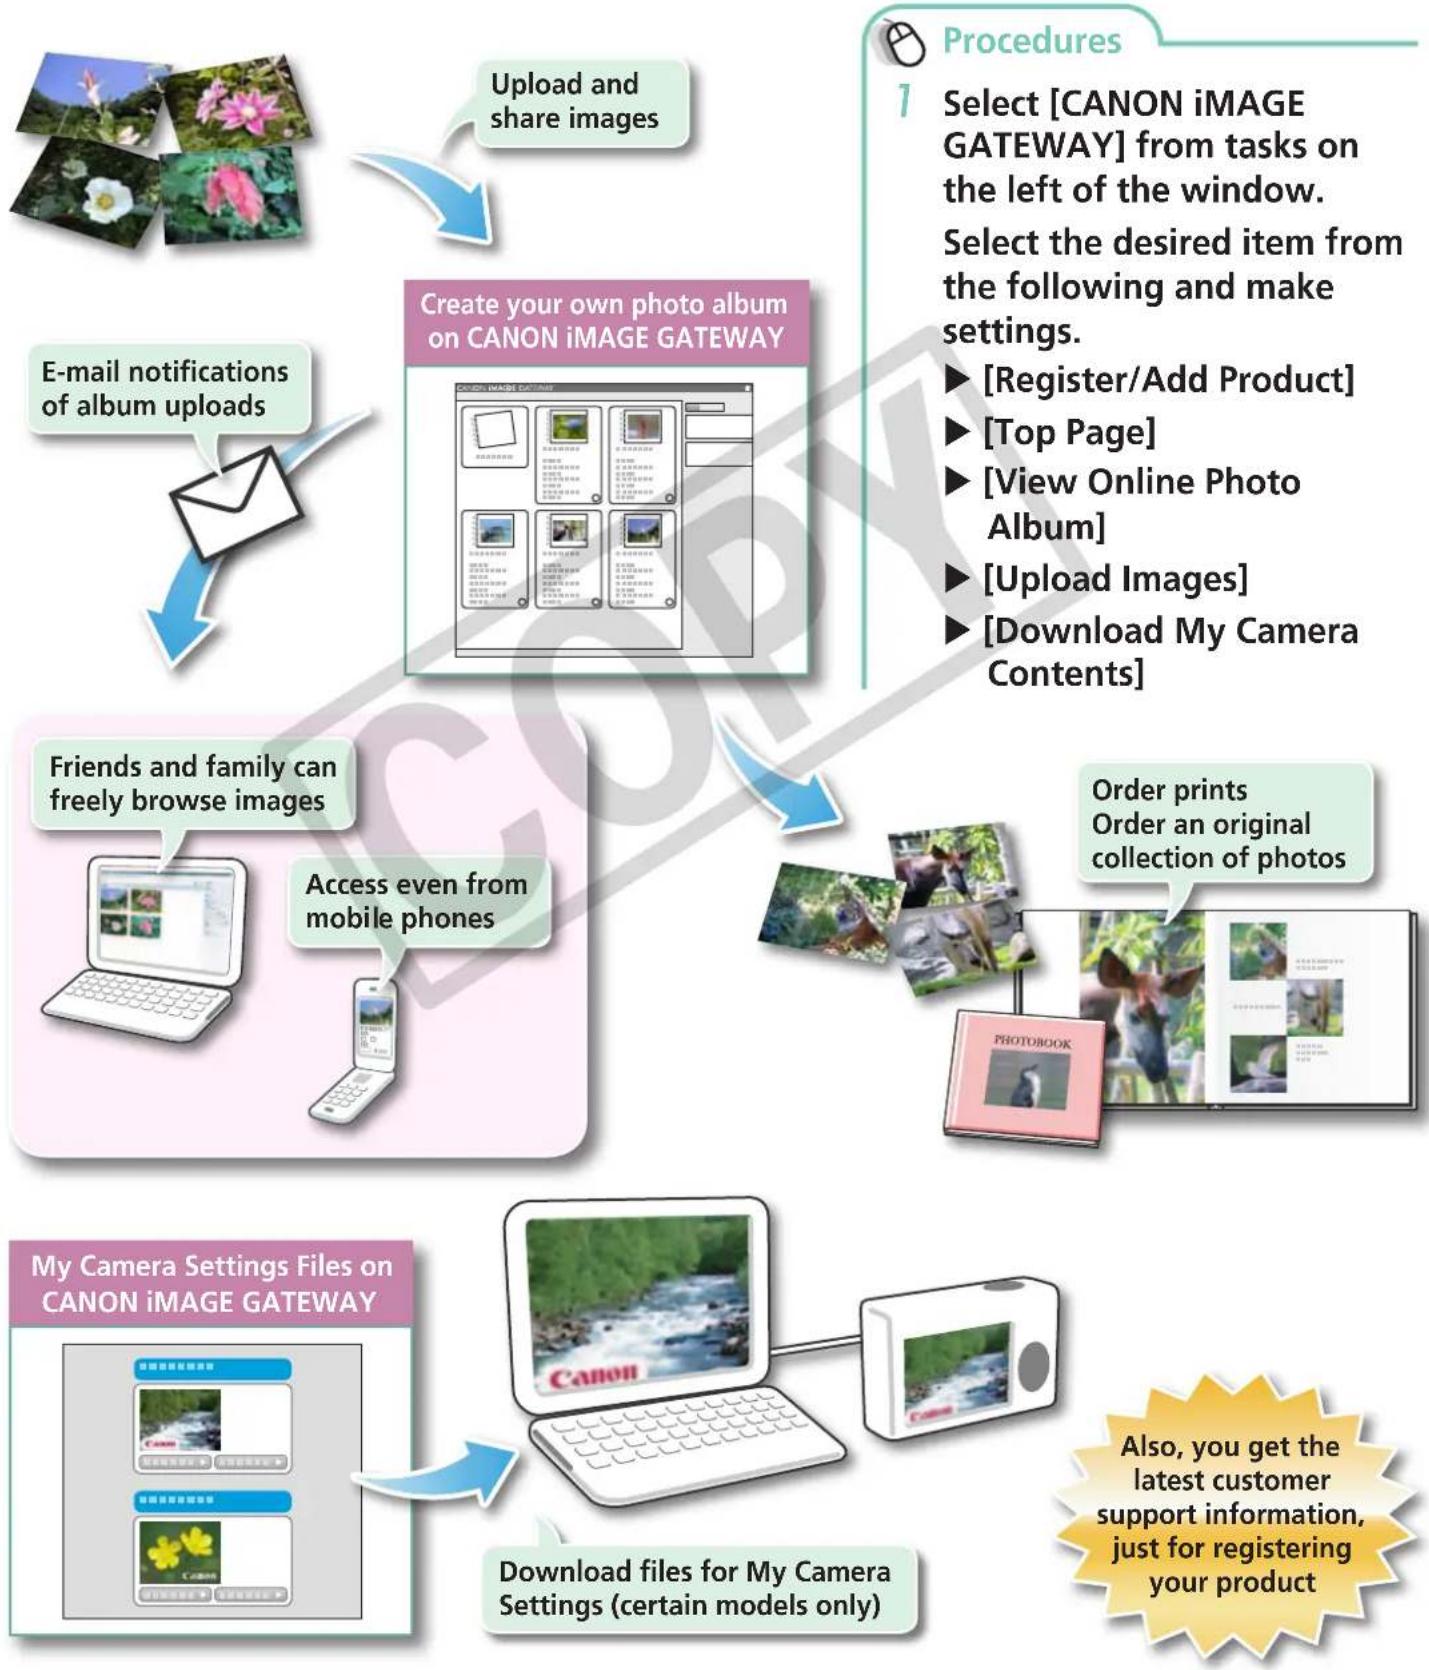
flowchart
graph TD
    A["Upload and share images"] --> B["Create your own photo album on CANON iIMAGE GATEWAY"]
    C["E-mail notifications of album uploads"] --> B
    D["Friends and family can freely browse images"] --> E["Access even from mobile phones"]
    F["My Camera Settings Files on CANON iIMAGE GATEWAY"] --> G["Download files for My Camera Settings (certain models only)"]
    H["Procedures"] --> I["Select [CANON iIMAGE GATEWAY"] from tasks on the left of the window. Select the desired item from the following and make settings. ► [Register/Add Product] ► [Top Page] ► [View Online Photo Album] ► [Upload Images] ► [Download My Camera Contents]]
    I --> H
    H --> I
    I --> J["Order prints Order an original collection of photos"]
Preference Settings
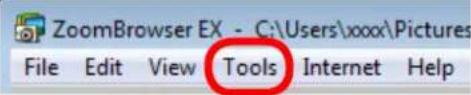
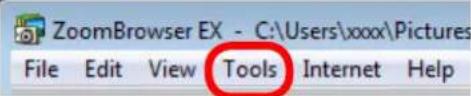
Customizing ZoomBrowser EX
You can configure ZoomBrowser EX to operate according to your preferences.
natural_image
Illustration of a laptop displaying a yellow hammer and sickle symbol on screen, with no visible text or symbols on the device itself.• Overall themes, such as window appearances
• Processing methods for images shot with the camera on end
• Categories of shooting information displayed
• Show/hide messages
- Print settings
- Zoom speed

Procedures
7
text_image
ZoomBrowser EX - C:\Users\xxxx\Pictures File Edit View Tools Internet Help[Tools] and [Preferences].
Customizing the Task Buttons
You can hide items that you do not usually use to streamline the task buttons.

text_image
ZoomBrowser EX - C:\Users\box\Pictures\2009_08_11 File Edit View Tools Internet Help Acquire & Camera Settings View & Classify Edit Edit Image Stitch Photos Export Print & Email Last Acquired Images All Images Zoom Mode Scroll Mode Preview Mode 2008_08_11 IMG_0001.JPG
Procedures
1
text_image
ZoomBrowser EX - C:\Users\xxxx\Pictures File Edit View Tools Internet Help[Tools] and [Customize].
List of Available Functions
CameraWindow Functions
| Function Names | Description of Function | |
| Import Images from Camera | Import Untransferred Images | Only transfers images from the camera that have not yet been transferred. |
| Select Images to Import Only transfers chosen images from the camera. | ||
| Import All Images Transfers all images from the camera. | ||
| Organize Images on Camera | Organize Images | Protect, rotate, and delete images on the camera. Also transfers images back to the camera from your computer. |
| Upload Images from Camera | Upload Movies to YouTube Uploads movies on the camera to YouTube. | |
| Camera Settings | Set Start-up Image Sets the camera start-up screen. | |
| Set Sounds | Sets camera sound effects (start-up sound, shutter sound, operation sounds, self-timer sound). | |
| Set Theme | Sets the camera start-up screen and sound effects in My Camera Settings. | |
| Preferences | General (General/Connected Camera) | Sets the camera owner name, and start-up screen when CameraWindow starts. |
| Import (Auto Import/Folder Settings/After Import) | Sets the automatic transfer settings and destination folder. | |
ZoomBrowser EX Functions
| Task Button Names Description of Function | ||
| Acquire & Camera Settings | Connect to Camera | Connects to the camera to open CameraWindow (menu screen), and use CameraWindow functions. |
| Acquire Images from Memory Card | Transfers images from a memory card. You can also select images on the memory card and print them. | |
| Transfer Images to Memory Card | Transfers images from the computer to a memory card. | |
| View & Classify | View as a Slide Show Starts a slide | de show of the images selected in the Browser Area. |
| Rename Multiple Files Changes the file names of the selected images in a single pass. | ||
| Classify into Folder Classifies images and saves them into a specified folder. | ||
| Search | Performs image searches using criteria such as the Star Rating, modification date, shooting date, comments or keywords. Star Ratings, comments and keywords can be set in the image information column in the Preview Mode or in the Properties Window. | |
| Edit | Edit Image | Allows you to perform image editing, such as cropping, image correction, inserting comments, and red-eye correction. You can also use it to start other image editing programs. |
| Stitch Photos | Merges multiple images and creates a single large panoramic image. | |
| Edit Movie | Edits movies or still images strung together. You can add text as titles, or background music, and apply various effects. | |
| Digital Photo Professional Process RAW Images | Converts RAW images into JPEG or TIFF images. You can adjust the image brightness, contrast and color balance among other attributes during conversion. | |
| Export | Export Still Images | Allows you to change the image size or type, and export it as a new image. |
| Export Movies | Allows you to change the movie size or type, and export it as a new movie. | |
| Extract frames from a movie | Extracts still images from movies over a specified interval and saves them as image files. | |
| Export Shooting Properties | Allows you to select the necessary data from the shooting information and export it as a text file. | |
| Export as a Screen Saver Exports | the image as a screen saver file. | |
| Export as a Wallpaper Exports the image as a wallpaper file. | ||
| Backup to CD Copies images to a CD-R/RW disk for backup. | ||
| Print & Email | Photo Print Prints one image per page. You can print "photos" easily. | |
| Index Print | Lines up small versions of the images in rows and prints. | |
| Print Using Other Software Select the software to use and then print. | ||
| Email Images | Converts the selected images to the appropriate size for transmission by e-mail. You can also use it to automatically start an e-mail program after conversion. | |
| CANON iIMAGE GATEWAY | Register/Add Product | Connects to CANON iIMAGE GATEWAY and opens the registration page. |
| Top Page | Connects to CANON iIMAGE GATEWAY and goes to the top of the page. | |
| View Online Photo Album | Connects to CANON iIMAGE GATEWAY and displays albums created. | |
| Upload Images Connects to CANON iIMAGE GATEWAY and uploads images. | ||
| Download My Camera Contents | Connects to CANON iIMAGE GATEWAY and downloads images and sounds for use with My Camera Settings. | |
Supported Image Types
The following is a list of image types supported by ZoomBrowser EX.
JPEG (.JPG)
Most cameras use this image type. It compresses at very high ratios, taking advantage of the characteristics of the human eye. However, because it is an irreversible compression method (part of the data is lost during compression), if you process and save an image repeatedly using this method, the image may become rougher.
RAW (.CRW/.CR2)
This is a proprietary image type provided by Canon. It saves the output of the image pixels from a digital camera without any deterioration in the quality of the image. Some cameras might not support this image type.
Windows bitmap (.BMP)
This image type comes standard with Windows. Most Windows programs support it.
TIFF (.TIF)
This is a relatively popular image type. It is widely supported by non-Windows programs (such as Macintosh).
PhotoCD (.PCD)
This is the image type used for Photo CDs.
AVI (.AVI)
Standard Windows movie type. The movie thumbnail and a movie icon show in ZoomBrowser EX's Browser Area.
MOV (.MOV)
Movie type. The movie thumbnail and a movie icon show in ZoomBrowser EX's Browser Area.
Uninstalling the Software
The procedures for uninstalling the software are only required when you wish to delete the programs from your computer or when reinstallation is required to fix corrupted files.

IMPORTANT
- Computer administrator status is required to perform the following operation.
This explanation uses ZoomBrowser EX to demonstrate how to uninstall a program. You can remove other programs with the same procedures.
1
Click the Windows [Start] menu and select [All Programs] or [Programs], followed by [Canon Utilities], [ZoomBrowser EX] and [ZoomBrowser EX Uninstall].
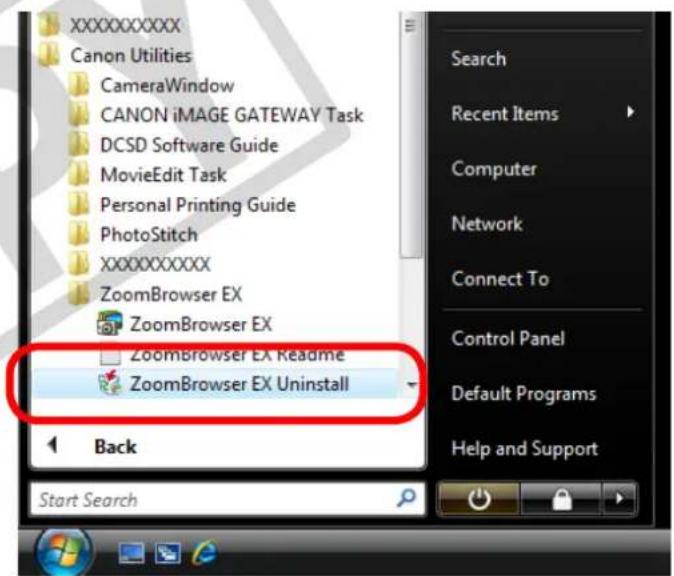
text_image
XXXXXXXXX Canon Utilities CameraWindow CANON iIMAGE GATEWAY Task DCSD Software Guide MovieEdit Task Personal Printing Guide PhotoStitch XXXXXXXXX ZoomBrowser EX ZoomBrowser EX ZoomBrowser EX Readme ZoomBrowser EX Uninstall Back Start Search Search Recent Items Computer Network Connect To Control Panel Default Programs Help and SupportThe uninstall utility will start and remove ZoomBrowser EX.
Memory Card Folder Structure
Images on the memory card are in either the [DCIM] folder's [xxx__mm] folder, or the [xxx_mmdd] folder (xxx: numbers 100 to 999, mm: shooting month, dd: shooting day).
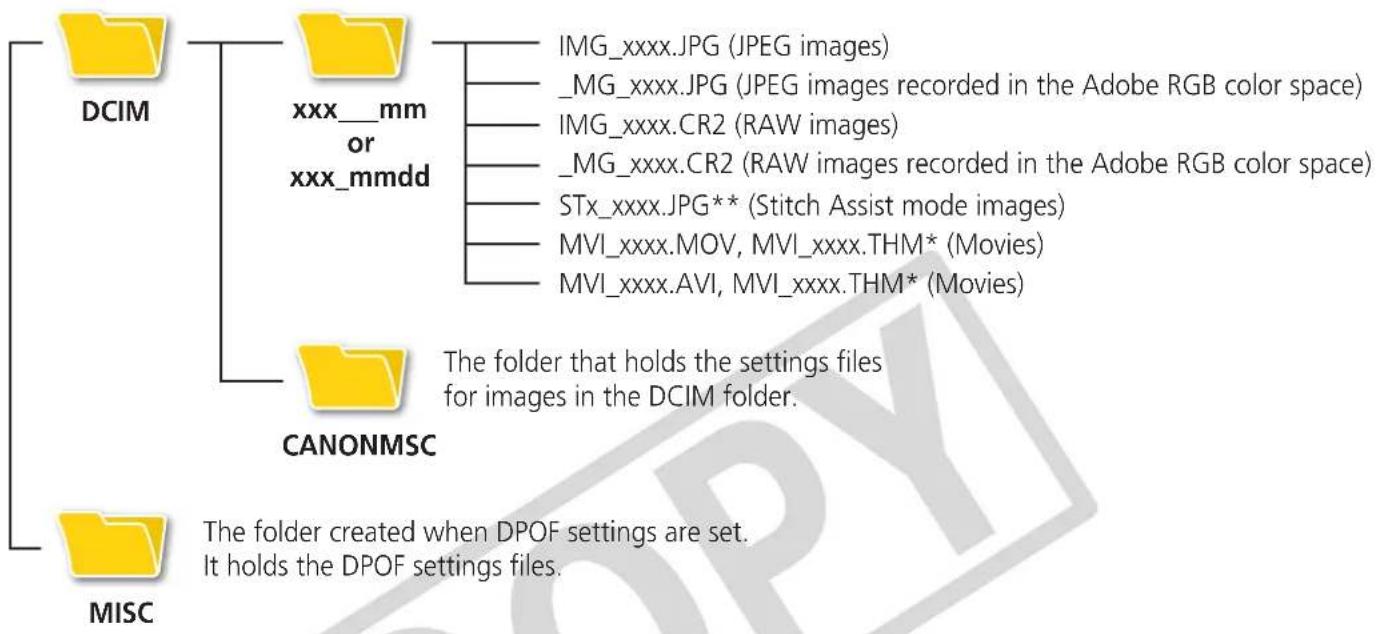
text_image
DCIM xxx__mm or xxx_mmdd IMG_xxxx.JPG (JPEG images) _MG_xxxx.JPG (JPEG images recorded in the Adobe RGB color space) IMG_xxxx.CR2 (RAW images) _MG_xxxx.CR2 (RAW images recorded in the Adobe RGB color space) STx_xxxx.JPG** (Stitch Assist mode images) MVI_xxxx.MOV, MVI_xxxx.THM* (Movies) MVI_xxxx.AVI, MVI_xxxx.THM* (Movies) CANONMSC The folder that holds the settings files for images in the DCIM folder. MISC The folder created when DPOF settings are set. It holds the DPOF settings files.- * These files are the thumbnail image files for the camera's index replay mode. If you delete these files, you will be unable to transfer movies to the camera from a computer.
- The "xxxx" in file names represent four-digit numbers.
- ** Each successive file shot in Stitch Assist mode is assigned a letter starting from "A," which is inserted as the third digit in the name. i.e. [STA_0001.JPG], [STB_0002.JPG], [STC_0003.JPG]...
- All folders except the "xxx__mm" or "xxx_mmdd" folders contain image settings files. Do not open or delete them.
- Depending on the camera, some data types cannot be recorded.
Troubleshooting
Please read this section if you encounter a problem using the software.
Start by Checking This
Investigate the following points first if you encounter a problem.
Does your computer satisfy the requirements listed in the System Requirements section?
See "System Requirements" in the Camera User Guide.
Is the camera correctly connected to the computer?
See the Camera User Guide for the correct connection procedures. Also check to ensure that you are using the correct cable and that it is securely attached at both ends.
Are the camera and computer in the correct modes to transfer data?
Some models require the camera to be set to the playback mode to transfer data. See the Camera User Guide for details.
Is the battery sufficiently charged?
Check the battery charge if you are powering the camera with a battery. You are recommended to use an AC adapter (sold separately) to power the camera when it is connected to a computer.
Problems
Try the suggested solutions to the common problems listed below.
You can't find transferred images.
Refer to "Changing the Transfer Destination Folder" to confirm where the destination folder is.
Add New Hardware Wizard displays when the camera is connected to the computer with an interface cable.
Click [Cancel] to close the window. Temporarily disconnect the camera from the computer. Next, read Start by Checking This on the previous page and resolve the problem.
Camera not detected, Events dialog/AutoPlay/Device Stage won't display or images will not transfer to the computer (when camera is connected to the computer via an interface cable).
The camera may have been recognized as another device.
Solution:
Delete the device with the following procedures.

IMPORTANT
- Computer administrator status is required to perform the following operation.
1 Display the [Device Manager] dialog.
Windows 7, Windows Vista:
Click the [Start] menu, [Control Panel], [System and Maintenance], [System], and [Device Manager].
Windows XP:
Click the [Start] menu, [Control Panel], [Performance and Maintenance], [System], [Hardware] tab, and the [Device Manager] button.
2 Click the [+] symbol beside the [Other devices], [Portable Devices] and/or [Imaging devices] category.
Your camera model name or [Canon Camera] will display in these categories if it is being recognized as an "other" device.
![CANON Ixus SD4000 IS - Click the [+] symbol beside the [Other devices], [Portable Devices] and/or [Imaging devices] category. - 1](/content/2026/06/1165393/images/692da40e4fbe5c615019ed9901d31ddb095ce4ade18b46166f3f1e14864dfe52.jpg)
text_image
Device Manager File Action View Help XXXXX Computer Disk drives Display adapters DVD/CD-ROM drives Floppy disk drives Floppy drive controllers Human Interface Devices IDE ATA/ATAPI controllers Keyboards Mice and other pointing devices Monitors Network adapters Portable Devices Canon XXXXXXXXXX Processors Sound, video and game controllers Storage controllers System devices Universal Serial Bus controllers![CANON Ixus SD4000 IS - Click the [+] symbol beside the [Other devices], [Portable Devices] and/or [Imaging devices] category. - 2](/content/2026/06/1165393/images/85ee1f45732ebf0561f638ae1b76cfc8f0483b5b2e3cab289767b511cde2259e.jpg)
text_image
Device Manager File Action View Help + Computer + Disk drives + Display adapters + DVD/CD-ROM drives + Floppy disk controllers + Floppy disk drives + Human Interface Devices + IDE ATA/ATAPI controllers + IEEE 1394 Bus host controllers - Imaging devices CanonXXXXXXXXX + Keyboards + Mice and other pointing devices + Monitors + Network adapters + Ports (COM & LPT) + Processors + Sound, video and game controllers +.Storage volumes + System devices + Universal Serial Bus controllersThere are other potential reasons for the problem if the [Other devices], [Portable Devices] or [Imaging devices] categories do not appear or your camera model name or [Canon Camera] does not appear. Proceed to Step 5, and temporarily quit the procedures.
3 Select your camera model name or [Canon Camera], right-click and select [Delete].
4 Click [OK] in the confirmation dialog.
Delete all instances of your camera model name or [Canon Camera] if it appears in one or more places in the [Other devices] or [Imaging devices] categories.
5 Close [Device Manager] or [System Properties].
Software Guide Windows (ZoomBrowser EX, PhotoStitch)
Disclaimer
- While every effort has been made to ensure that the information contained in this guide is accurate and complete, no liability can be accepted for any errors or omissions. Canon reserves the right to change the specifications of the hardware and software described herein at any time without prior notice.
- No part of this guide may be reproduced, transmitted, transcribed, stored in a retrieval system, or translated into any language in any form, by any means, without the prior written permission of Canon.
- Canon makes no warranties for damages resulting from corrupted or lost data due to a mistaken operation or malfunction of the camera, the software, memory cards, personal computers, peripheral devices, or use of non-Canon memory cards.
CDP-E088-010 © CANON INC. 2010