GEBRUIKSAANWIJZING ROADsight 10 Osram
OSRAM
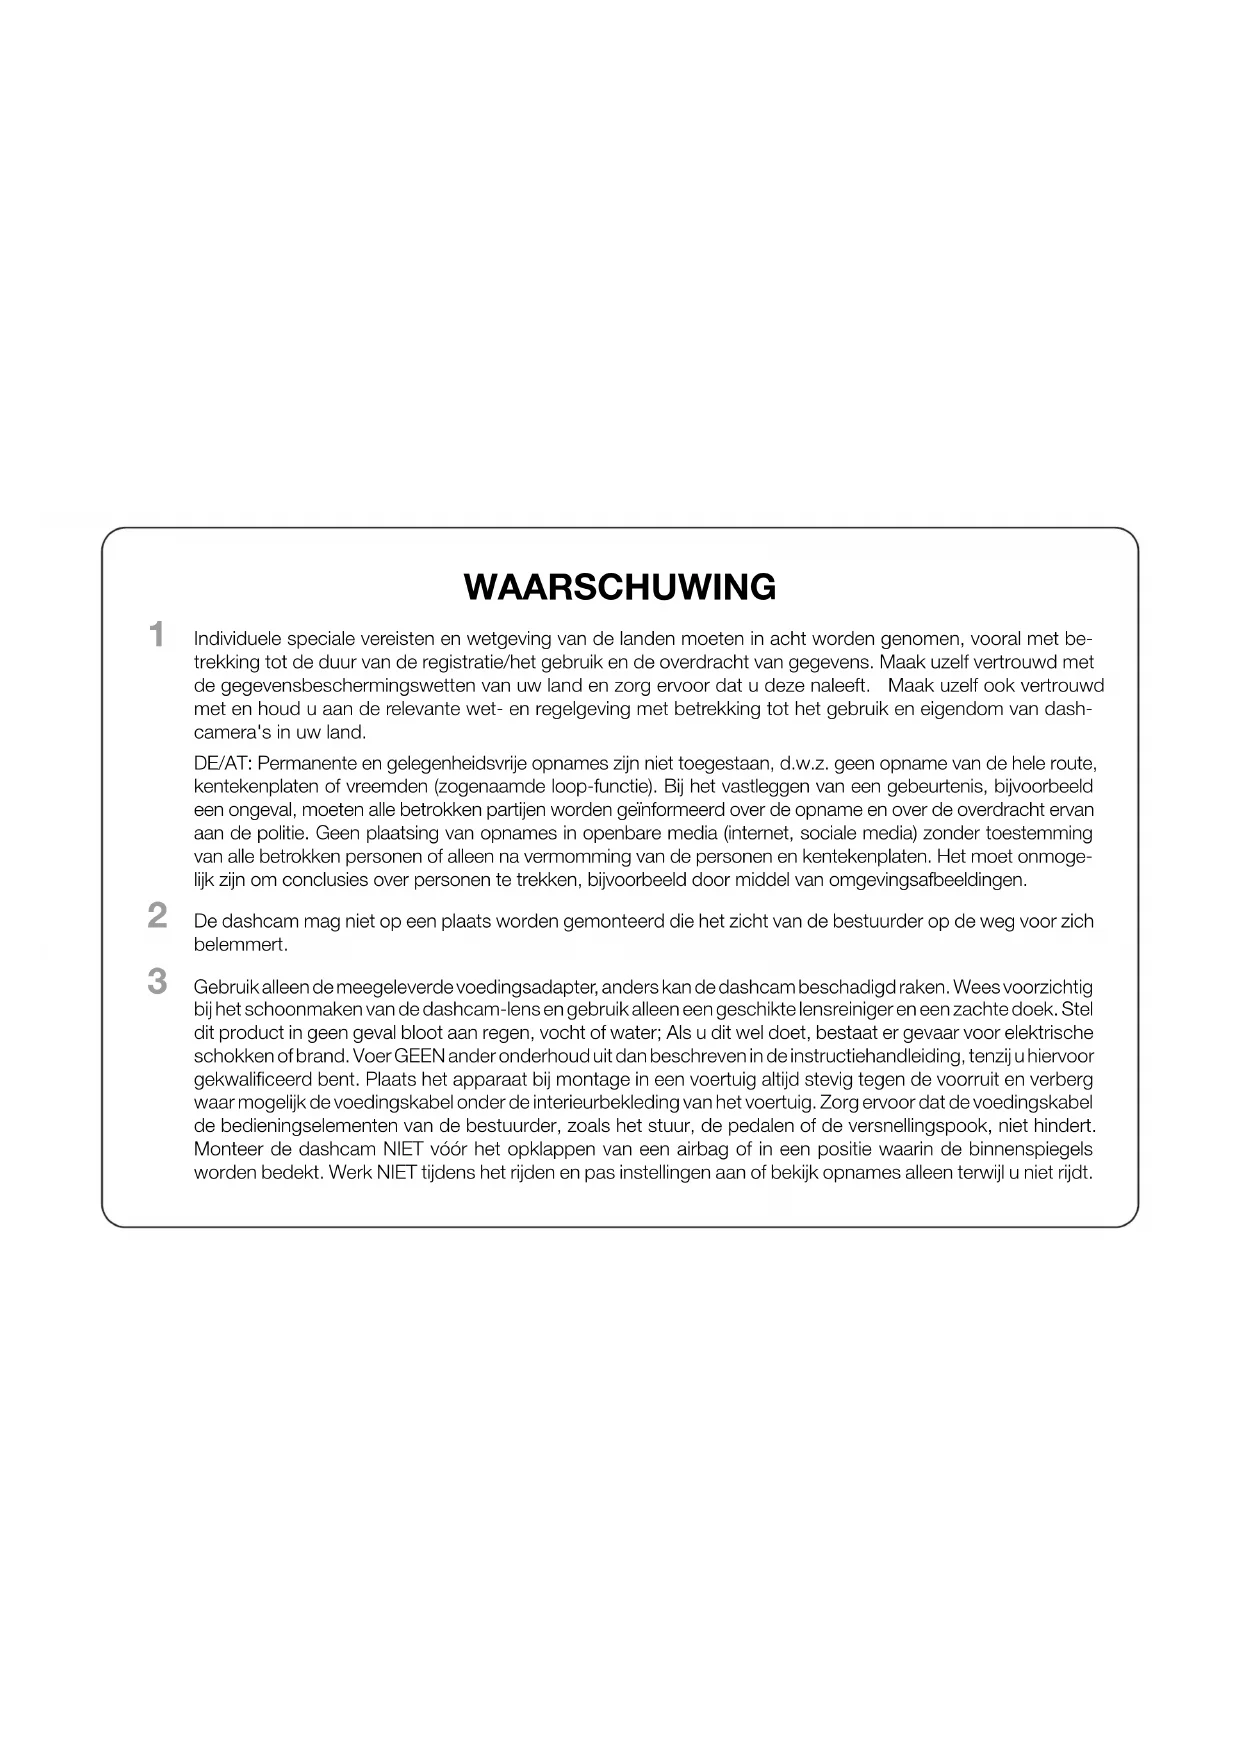
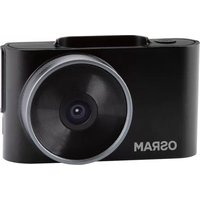
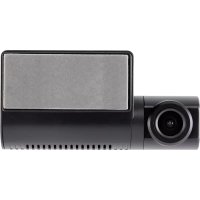
ROADsight 10
Dashcam HD 1080p
English
Deutsch
Français
Español
Italiano
Dutch
Polski
natural_image
Line drawing of a camera body with no text or symbols
WARNING
1 Individual special requirements and legislation of the countries must be observed, especially concerning the duration of the records/use and the transfer of data. Please make yourself familiar with the data protection laws of your country and ensure that you comply with them. Please also familiarize yourself and comply with the relevant laws and regulations regarding the use and ownership of dash cameras in your country.
DE/AT: Permanent and occasion-free recordings are not permitted, i.e. no recording of the entire route, license plates or strangers (so-called loop function). When recording an event, e.g. an accident, all parties involved must be informed about the recording and about its transfer to the police. No posting of recordings in public media (Internet, social media) without the consent of all persons concerned or only after disguising the persons and license plates. It must be impossible to draw conclusions about persons, e.g. through pictures of the surroundings.
2 The dashcam must not be fitted in a position which obscures the driver's view of the road behind.
3 Only use the supplied power adapter, otherwise damage may occur to the dashcam. Take care when cleaning the dashcam lens and only use a suitable lens cleaner and a soft cloth. Do NOT expose this product to rain, moisture or water under any circumstances; doing so may result in the risk of electric shock or fire. Do NOT perform servicing other than that contained in the instruction manual, unless you are qualified to do so. When installing in a vehicle, always place the device securely against the windscreen and where possible conceal the power cable under the vehicles interior trim. Make sure that the power cable doesn't interfere with the driver's controls such as the steering wheel, pedals or gear lever. Do NOT mount the dashcam in front of an airbag deployment area or in a position to obscure any interior mirrors. Do NOT operate while driving and only adjust settings or review recordings while not driving.
BEFORE YOU BEGIN
If you haven't already downloaded the app, do so now to get the most from your dashcamera.
As the OSRAM ROADsight 10 rear camera needs to be paired with the OSRAM ROADsight 50 dashcam to operate, please download the app by searching for OSRAMconnect in the App Store (iPhone) or Google Play (Android).
2 Open the app, follow the setup process shown and enable all necessary settings when prompted.

Download on the
App Store
GET IT ON

Google play
OSRAM
text_image
9:09
DASH CAMERA
ROADsight 50
ALBUM
TIPS
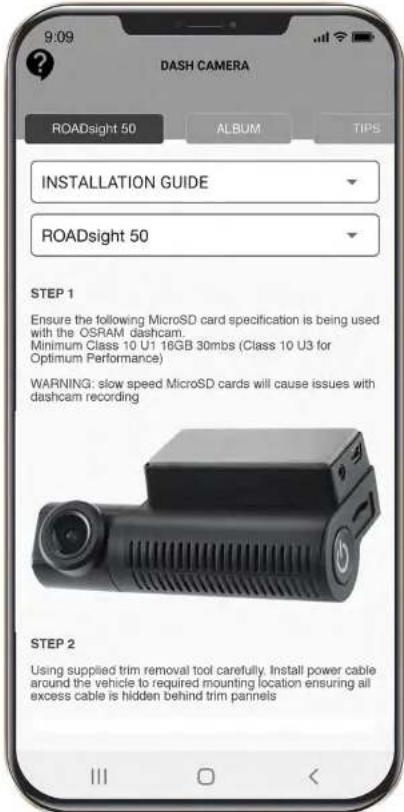
INSTALLATION GUIDE
ROADsight 50
STEP 1
Ensure the following MicroSD card specification is being used
with the OSRAM dashcam.
Minimum Class 10 U1 16GB 30mbs (Class 10 U3 for
Optimum Performance)
WARNING: slow speed MicroSD cards will cause issues with
dashcam recording
STEP 2
Using supplied trim removal tool carefully. Install power cable
around the vehicle to required mounting location ensuring all
excess cable is hidden behind trim pannels
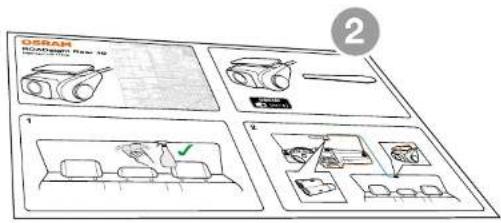
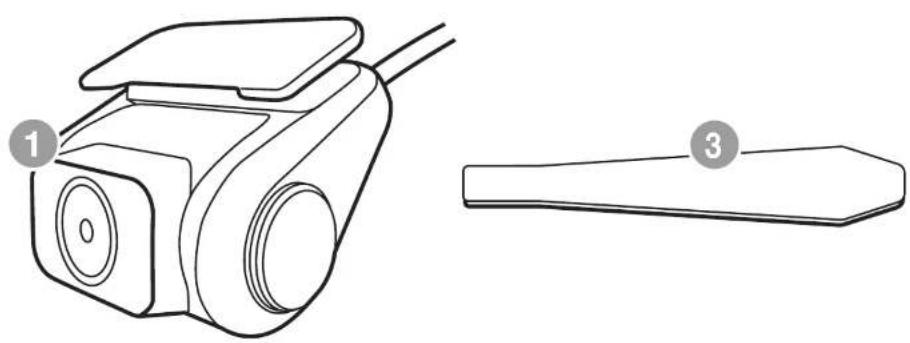
PACKAGE CONTENTS
1 Rearcam
2 Quick Start Guide
3 Trim Removal Tool
4 Window Sticker
text_image
2
ORAN
RATIANTIN
10
1
2
natural_image
Line drawing of a camera module and its 3D view (no text or symbols)
4
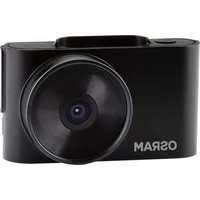
PAIR WITH DASHCAM OSRAM ROADsight 50
The OSRAM ROADsight 10 rear camera needs to be paired with the OSRAM ROADsight 50 dashcam to operate.
Compatible only with the OSRAM ROADsight 50 dashcam.
INSTALL GUIDE
natural_image
Line drawing of a camera body with no text or symbols
+
natural_image
Technical line drawing of a cylindrical mechanical component with mounting holes and a flat plate (no text or symbols)
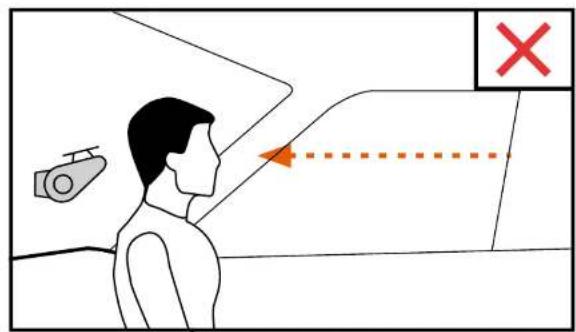
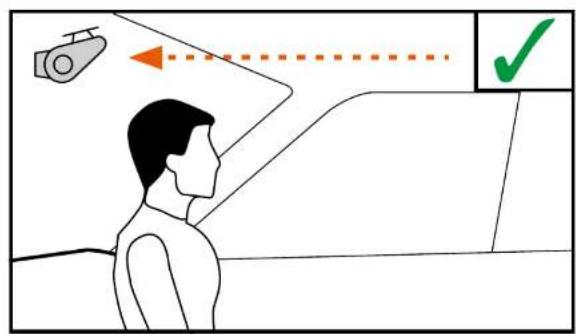
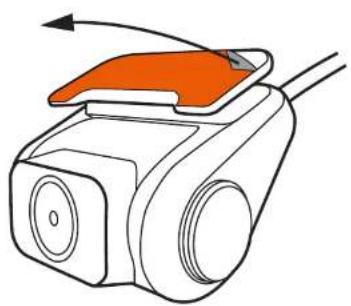
PLACING REAR CAMERA
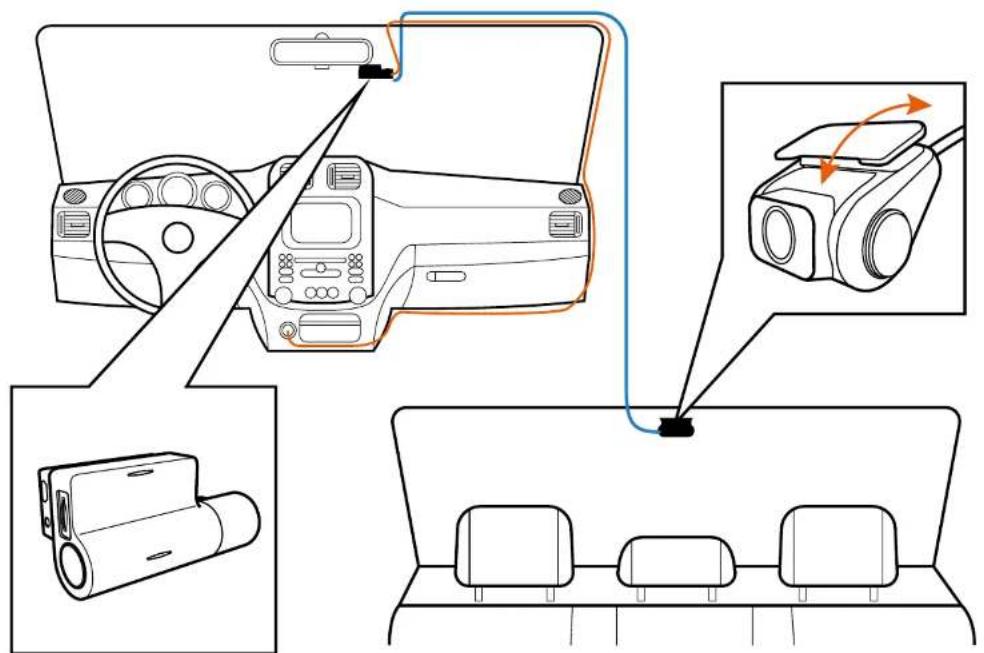
To ensure a proper viewing angle of the road behind your vehicle place the rear camera towards the top of your rear window. Giving the rear camera an unobstructed view of the road.
text_image
Diagram showing a person observing a vehicle with an orange arrow and a red 'X' symbol, possibly indicating absence or error.
text_image
Diagram showing a person observing a camera with an orange arrow and dotted line, alongside a green checkmark.
INSTALLING REAR CAMERA
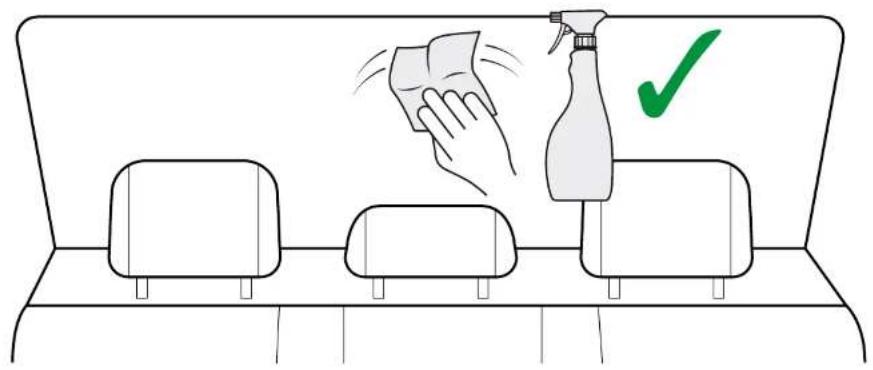
ATTENTION! Choose the installation location in advance, as the adhesive tape on the mount is of single use.
1 Ensure glass is dirt, dust and grease free.
2 Warm adhesive pad part of mount in hands to ensure strong adhesion to glass.
text_image
Diagram showing cleaning process with hand, spray bottle, and checkmark indicating inspection
natural_image
Diagram of a camera with an orange sensor mounted on a device, showing motion direction (no text or symbols)
To power the device, connect the power cable to the OSRAM ROADsight 50 dashcam mount. When the vehicle's engine starts, the device turns on automatically.
text_image
Diagram showing car interior components with labeled parts and directional arrows indicating movement or navigation.
OSRAM ROADsight 50
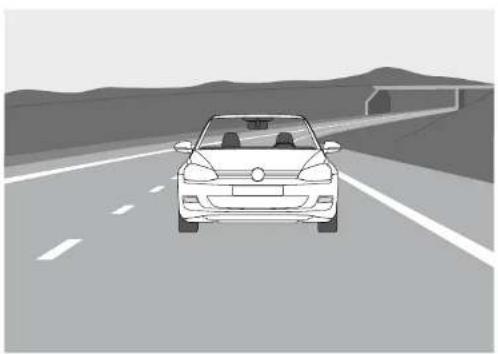
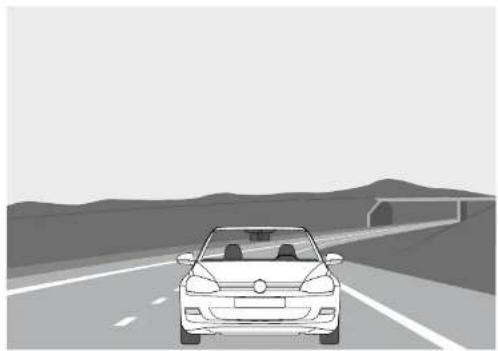
ADJUSTING VIEWING ANGLE
ATTENTION! Adjusting the viewing angle can only be done along the vertical axis, so be sure to position the device correctly on the windshield along the horizontal axis as close as possible to the windshield's center.
While pulling or pushing the device in the holder, ensure that the camera captures the image in proportions of 30% sky / 70% road.
natural_image
Front view of a car driving on a multi-lane road with hills in the background (no text or symbols visible)
Good Bad
natural_image
Front view of a car driving on a highway with a tunnel entrance (no text or symbols visible)
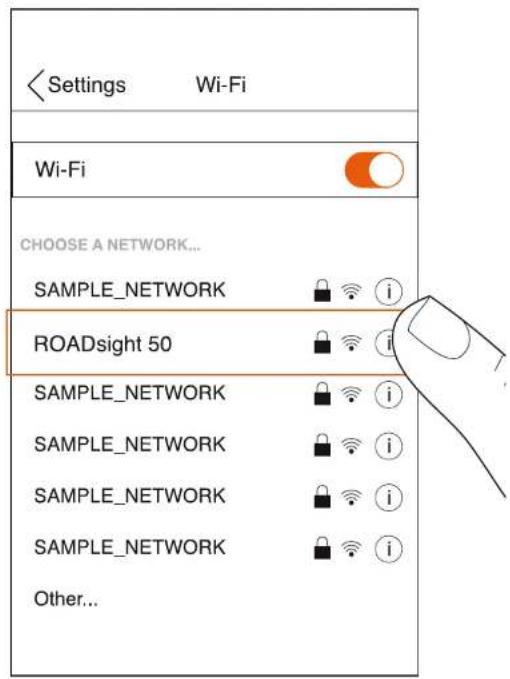
CONNECTING TO MOBILE
1 Switch on dashcam.
2 Your camera automatically broadcasts a Wi-Fi network.
3 Open your phone's Settings.
4 Tap on Wi-Fi or Connections.
5 Select the dashcam hotspot and enter the password "12345678".
6 You are now connected to your device.
natural_image
Line drawing of a cylindrical mechanical component with mounting holes (no text or symbols)
text_image
FAILURE TO PHOTOGRAPH / RECORD VIDEO
Check if there is enough free space on the micro SD card.
RECORDING HAS STOPPED
Too many video files stored. Only use at least class 10 U1 high-speed micro SD cards by proven manufacturers.
When you try to view a photo/play a video file, the “wrong file” message appears.
File writing failure due to micro SD card file system error. Format the micro SD card.
BLURRED IMAGE
Ensure removal of lens sticker. Check for dirt on the lens. If there is any, wipe the lens with a soft cloth before use (it is recommended to use special care products for the optics in order not to damage the surface of the lens).
POWER REQUIREMENTS

ATTENTION! Once there is no external power input, the battery cannot support recording for a long time, please make sure power supply is connected when recording.
Input voltage: 5V DC, 1.5A
Charging input voltage: 12-24V DC
Auxiliary cable for Power
OPERATING TEMPERATURES (all models)
Storage temperature: -20^ C to 70^ C
Operating temperature: -10^ C to 60^ C
PLEASE RECYCLE YOUR SPENT BATTERIES
Batteries should not be disposed of in unsorted municipal waste, but separately collected to facilitate the correct treatment and recycling of the substances they contain. The recycling of batteries ensures the recovery of these valuable materials and prevents any potentially harmful effects upon both the environment and human health.
OSRAM
ROADsight 10
Dashcam HD 1080p
Deutsch

natural_image
Line drawing of a camera body with no text or symbols
WARNUNG
1 Individuelle besondere Anforderungen und Rechtsvorschriften der Länder sind zu beachten, insbesondere hinsichtlich der Dauer der Aufzeichnungen/Verwendung und der Übermittlung von Daten. Bitte machen Sie sich mit den Datenschutzgesetzen Ihres Landes vertraut und stellen Sie sicher, dass Sie diese einhalten. Bitte machen Sie sich auch mit den einschlägigen Gesetzen und Vorschriften in Bezug auf die Verwendung und den Besitz von Dashcams in Ihrem Land vertraut.
DE/AT: Dauerhafte und anlasslose Aufzeichnungen sind nicht erlaubt, d.h. keine Aufzeichnung der gesamten Strecke, der Kennzeichen oder von Fremden (sog. Loop-Funktion). Bei der Aufzeichnung eines Ereignisses, z. B. eines Unfalls, müssen alle Beteiligten über die Aufzeichnung und deren Übermittlung an die Polizei informiert werden. Keine Veröffentlichung von Aufnahmen in öffentlichen Medien (Internet, Social Media) ohne Zustimmung aller betroffenen Personen oder nur nach Unkenntlichmachung der Personen und Nummernschilder. Es muss unmöglich sein, Rückschlüsse auf Personen zu ziehen, z. B. durch Bilder der Umgebung.
2 Die Dashcam darf nicht in einer Position montiert werden, die die Sicht des Fahrers auf die Straße verdeckt.
3 Verwenden Sie nur das mitgelieferte Netzteil, da sonst die Dashcam beschädigt werden kann. Seien Sie beim Reinigen des Dashcam-Objektivs vorsichtig und verwenden Sie nur einen geeigneten Objektivreiniger und ein weiches Tuch. Setzen Sie dieses Produkt unter keinen Umständen Regen, Feuchtigkeit oder Wasser aus. Andernfalls besteht die Gefahr eines Stromschlags oder eines Brandes. Führen Sie KEINE anderen als die in der Bedienungsanleitung enthaltenen Wartungsarbeiten durch, es sei denn, Sie sind dafür qualifiziert. Platzieren Sie das Gerät bei der Installation in einem Fahrzeug immer sicher an der Windschutzscheibe und verlegen Sie das Netzkabel nach Möglichkeit unter der Innenverkleidung des Fahrzeugs. Stellen Sie sicher, dass das Netzkabel die Bedienelemente des Fahrers wie Lenkrad, Pedale oder Schalthebel nicht beeinträchtigt. Montieren Sie die Dashcam NICHT vor einem Airbag-Auslösebereich oder in einer Position, in der Innenspiegel verdeckt sind. Arbeiten Sie NICHT während der Fahrt und passen Sie die Einstellungen an oder sehen Sie sich die Aufzeichnungen nur an, während Sie nicht fahren.
VOR DEM START
Wenn Sie die App noch nicht heruntergeladen haben, tun Sie dies jetzt, um Ihre Dashcamera optimal zu nutzen.
1 Da die OSRAM ROADsight 10-Rückfahrkamera für den Betrieb mit der OSRAM ROADsight 50-Dashcam gekoppelt werden muss, laden Sie die App herunter, indem Sie im App Store (iPhone) oder bei Google Play (Android) nach OSRAMconnect suchen.
2 Öffnen Sie die App, folgen Sie dem angezeigten Setup-Vorgang und aktivieren Sie alle erforderlichen Einstellungen, wenn Sie dazu aufgefordert werden.

Download on the
App Store

text_image
GET IT ON
Google play
OSRAM

text_image
9:09
DASH CAMERA
ROADsight 50
ALBUM
TIPS
INSTALLATION GUIDE
ROADsight 50
STEP 1
Ensure the following MicroSD card specification is being used
with the OSRAM dashcam.
Minimum Class 10 U1 16GB 30mbs (Class 10 U3 for
Optimum Performance)
WARNING: slow speed MicroSD cards will cause issues with
dashcam recording
STEP 2
Using supplied trim removal tool carefully. Install power cable
around the vehicle to required mounting location ensuring all
excess cable is hidden behind trim pannels
LIEFERUMFANG
1 Rückfahrkamera
2 Kurzanleitung
3 Trimmentfernungswerkzeug
4 Fensteraufkleber

text_image
2
COOKING
RICHENING RIN 10
COOKING
COOKING
COOKING
COOKING
COOKING
COOKING
COOKING
COOKING
COOKING
COOKING
COOKING
COOKING
COOKING
COOKING
COOKING
COOKING
COOKING
COOKING
COOKING
COOKING
COOKING
COOKING
COOKING
COOKING
COOKING
COOKIN
COOKIN
COOKIN
COOKIN
COOKIN
COOKIN
COOKIN
COOKIN
COOKIN
COOKIN
COOKIN
COOKIN
COOKIN
COOKIN
COOKIN
COOKIN
COOKIN
COOKIN
COOKIN
COOKIN
COOKIN
COOKIN
COOKIN
COOKIN
COOKIN
COOK IN
COOK IN
COOK IN
COOK IN
COOK IN
COOK IN
COOK IN
COOK IN
COOK IN
COOK IN
COOK IN
COOK IN
COOK IN
COOK IN

natural_image
Line drawing of a camera module and its 3D view (no text or symbols)

4
KOPPLUNG MIT DASHCAM OSRAM ROADsight 50
Die OSRAM ROADsight
10-Rückfahrkamera muss für
den Betrieb mit der OSRAM
ROADsight 50-Dashcam
gekoppelt sein.
Kompatibel nur mit der
OSRAM ROADsight 50
Dashcam.
Installationsanleitung für Benutzer

natural_image
Line drawing of a camera body with no text or symbols
+

natural_image
Technical line drawing of a cylindrical mechanical component with mounting holes and a flat plate (no text or symbols)
HINTERE KAMERA PLATZIEREN
Um einen korrekten
Betrachtungswinkel der
Straße hinter Ihrem Fahrzeug
zu gewährleisten, platzieren
Sie die Rückfahrkamera oben
auf Ihrer Heckscheibe. Geben
Sie der Rückfahrkamera einen
freien Blick auf die Straße.

text_image
Diagram showing a person facing a device with an orange arrow and a red 'X' symbol, possibly indicating absence or error.

text_image
Diagram showing a person observing a camera with an orange arrow and a green checkmark, likely illustrating a vision or navigation instruction.
EINSETZEN DER RÜCKKAMERA

ACHTUNG! Wählen Sie den Installationsort im Voraus, da das Klebeband auf der Halterung zum einmaligen Gebrauch bestimmt ist.
1 Stellen Sie sicher, dass das Glas frei von Schmutz, Staub und Fett ist.
2 Erwärmen Sie das Klebepadteil der Halterung in den Händen, um eine starke Haftung auf Glas zu gewährleisten.

text_image
Diagram showing cleaning process with hand, spray bottle, and checkmark indicating inspection

natural_image
Diagram of a camera with an orange sensor mounted on a device, showing motion direction (no text or symbols)
Schließen Sie das Netzkabel an die OSRAM ROADsight 50-Dashcam-Halterung an, um das Gerät mit Strom zu versorgen. Wenn der Motor des Fahrzeugs startet, schaltet sich das Gerät automatisch ein.

text_image
Diagram illustrating car interior components with labeled parts and directional arrows indicating movement or navigation.
OSRAM ROADsight 50
EINSTELLEN DES BETRACHTUNGSWINKELS

ACHTUNG! Die Einstellung des Betrachtungswinkels kann nur entlang der vertikalen Achse erfolgen. Achten Sie daher darauf, dass Sie das Gerät entlang der horizontalen Achse so nah wie möglich an der Mitte der Windschutzscheibe positionieren.
Stellen Sie beim Ziehen oder Drücken des Geräts in der Halterung sicher, dass die Kamera das Bild in Proportionen von 30 % Himmel / 70 % Straße aufnimmt.

natural_image
Front view of a car driving on a multi-lane road with hills in the background (no text or symbols visible)

natural_image
Front view of a car driving on a road with distant buildings (no text or symbols visible)
Gut Schlecht
ANSCHLUSS AN MOBIL
1 Schalten Sie die Dashcam ein.
2 Ihre Kamera sendet automatisch ein WLAN-Netzwerk.
3 Öffnen Sie die Einstellungen Ihres Telefons.
4 Tippen Sie auf Wi-Fi-Verbindungen.
5 Wählen Sie den
Dashcamhotspot aus und
geben Sie das Passwort
„12345678“ ein.
6 Sie sind jetzt mit Ihrem Gerät verbunden.

natural_image
Technical line drawing of a cylindrical mechanical component with mounting holes (no text or symbols)

text_image
FEHLER BEI FOTOGRAFIE/VIDEOAUFNAHME
Überprüfen Sie, ob auf der Micro-SD-Karte genügend freier Speicherplatz vorhanden ist.
DIE AUFNAHME WURDE GESTOPPT
Zu viele Videodateien gespeichert. Verwenden Sie mindestens U1-Hochgeschwindigkeits-Micro-SD-Karten der Klasse 10 von bewährten Herstellern.
Wenn Sie versuchen, ein Foto anzuzeigen / eine Videodatei abzuspielen, wird die Meldung "Falsche Datei" angezeigt.
Fehler beim Schreiben der Datei aufgrund eines Systemfehlers der Micro-SD-Kartendatei. Zum Formatieren der Micro-SD-Karte:
BILD UNSCHARF
Stellen Sie sicher, dass der Objektivaufkleber entfernt wird. Überprüfen Sie das Objektiv auf Schmutz. Wenn vorhanden, wischen Sie das Objektiv vor dem Gebrauch mit einem weichen Tuch ab (es wird empfohlen, spezielle Pflegeprodukte für die Optik zu verwenden, um die Oberfläche des Objektivs nicht zu beschädigen).
ANFORDERUNGEN AN DAS STROMNETZ

ACHTUNG! Wenn kein externer Stromeingang vorhanden ist, kann der Akku die Aufnahme für längere Zeit nicht unterstützen. Stellen Sie bitte sicher, dass die Stromversorgung bei der Aufnahme angeschlossen ist.
Eingangsspannung: 5 V DC, 1,5 A.
Ladeeingangsspannung: 12-24V DC
Hilfskabel für die Stromversorgung
BETRIEBSTEMPERATUREN (alle Modelle)
Lagertemperatur: -20 °C bis 70 °C.
Betriebstemperatur: -10 °C bis 60 °C.
BITTE RECYCELN SIE IHRE VERBRAUCHTEN BATTERIEN
Batterien sollten nicht im unsortierten Siedlungsabfall entsorgt, sondern separat gesammelt werden, um die korrekte Behandlung und das Recycling der enthaltenen Stoffe zu ermöglichen. Das Recycling von Batterien gewährleistet die Rückgewinnung dieser wertvollen Materialien und verhindert potenziell schädliche Auswirkungen auf die Umwelt und die menschliche Gesundheit.
OSRAM
ROADsight 10
Caméra de bord HD 1080p
Français

natural_image
Line drawing of a camera body with no text or symbols
MISE EN GARDE
Les exigences et la législation particulières individuelles des pays doivent être respectées, notamment en ce qui concerne la durée des enregistrements/l'utilisation et le transfert des données. Veuillez vous familiariser avec les lois sur la protection des données de votre pays et assurez-vous de les respecter. Veuillez également vous familiariser et vous conformer aux lois et réglementations en vigueur concernant l'utilisation et la propriété des caméras de tableau de bord dans votre pays.
DE/AT : les enregistrements permanents et sans occasion ne sont pas autorisés, c'est-à-dire aucun enregistrement d'itinéraire complet, de plaques d'immatriculation ou d'étrangers (fonction dite de boucle). Lors de l'enregistrement d'un événement, par ex. un accident, toutes les parties concernées doivent être informées de l'enregistrement et de son transfert à la police. Pas de publication d'enregistrements dans les médias publics (Internet, médias sociaux) sans le consentement de toutes les personnes concernées ou seulement après avoir déguisé les personnes et les plaques d'immatriculation. Il doit être impossible de tirer des conclusions sur des personnes, par ex. à travers des images de l'environnement.
2 La caméra de bord ne doit pas être installée dans une position qui masque la vue du conducteur sur la route derrière lui.
3 N'utilisez que l'adaptateur secteur fourni, sinon la caméra de bord pourrait être endommagée. Faites attention lorsque vous nettoyez la lentille de la caméra de bord et utilisez uniquement un nettoyant pour lentille approprié et un chiffondoux. N'exposez PAS ce produit à la pluie, à l'humidité ou à l'eau en aucune circonstance ; cela pourrait entraîner un risque d'électrocution ou d'incendie. N'effectuez PAS de maintenance autre que celle contenue dans le manuel d'instructions, sauf si vous êtes qualifié pour le faire. Lorsque vous l'installez dans un véhicule, placez toujours l'appareil en position sûre contre le pare-brise et, dans la mesure du possible, cachez le câble d'alimentation sous la garniture intérieure du véhicule. Assurez-vous que le câble d'alimentation n'interfère pas avec les commandes du conducteur telles que le volant, les pédales ou le levier de vitesses. N'installez PAS la caméra de bord devant une zone de déploiement d'airbag ou dans une position pour masquer les rétroviseurs intérieurs. N'utilisez PAS en conduisant et ajustez les paramètres ou consultez les enregistrements uniquement lorsque vous ne conduisez pas.
AVANT DE COMMENCER
Si vous n'avez pas encore téléchargé l'application, faites-le maintenant pour tirer le meilleur parti de votre caméra de bord.
La caméra arrière OSRAM ROADsight 10 devant être couplée avec la caméra de bord OSRAM ROADsight 50 pour fonctionner, veuillez télécharger l'application en recherchant OSRAMconnect dans l'App Store (iPhone) ou Google Play (Android).
2 Ouvrez l'application, suivez le processus de configuration indiqué et activez tous les paramètres nécessaires lorsque vous y êtes invité.

Download on the
App Store

text_image
GET IT ON
Google play
OSRAM

text_image
9:09
DASH CAMERA
ROADsight 50
ALBUM
TIPS
INSTALLATION GUIDE
ROADsight 50
STEP 1
Ensure the following MicroSD card specification is being used
with the OSRAM dashcam.
Minimum Class 10 U1 16GB 30mbs (Class 10 U3 for
Optimum Performance)
WARNING: slow speed MicroSD cards will cause issues with
dashcam recording
STEP 2
Using supplied trim removal tool carefully. Install power cable
around the vehicle to required mounting location ensuring all
excess cable is hidden behind trim pannels
CONTENU DE L'EMBALLAGE
1 Caméra arrière
2 Guide de démarrage rapide
3 Outil de retrait de garniture
4 Autocollant de fenêtre

text_image
OSRAM
HOMATO (Rear 10)
②

natural_image
Line drawing of a camera module and its 3D view (no text or symbols)

4
ASSOCIER AVEC CAMÉRA DE BORD
La caméra arrière OSRAM ROADsight 10 doit être associée à la caméra de bord OSRAM ROADsight 50 pour fonctionner.
Compatible uniquement avec la caméra de bord OSRAM ROADsight 50.
OSRAM ROADsight 50
GUIDE D'INSTALLATION

natural_image
Line drawing of a camera body with no text or symbols
+

natural_image
Technical line drawing of a cylindrical mechanical component with mounting holes (no text or symbols)
PLACER LA CAMÉRA ARRIÈRE
Pour assurer un bon angle de vision de la route derrière votre véhicule, placez la caméra arrière vers le haut de votre lunette arrière. Donnant à la caméra arrière une vue dégagée sur la route.

text_image
Diagram showing a person facing a device with an orange arrow and a red 'X' symbol, possibly indicating absence or error.

text_image
Diagram showing a person observing a camera with an orange arrow and a green checkmark, likely illustrating a vision or navigation instruction.
INSTALLATION DE LA CAMÉRA ARRIÈRE

ATTENTION ! Choisissez à l'avance l'emplacement d'installation, car le ruban adhésif sur la fixation est à usage unique.
1 Assurez-vous que le verre est exempt de saleté, de poussière et de graisse.
2 Chauffez la partie du tampon adhésif de la fixation dans les mains pour assurer une forte adhérence au verre.

text_image
Diagram showing cleaning process with hand, spray bottle, and checkmark indicating inspection

natural_image
Diagram of a camera with an orange sensor mounted on a device, showing motion direction (no text or symbols)
Pour alimenter l'appareil, connectez le câble d'alimentation à la fixation de caméra de bord OSRAM ROADsight 50. Lorsque le moteur du véhicule démarre, l'appareil s'allume automatiquement.

text_image
Diagram illustrating camera navigation and driving process with labeled components and directional arrows
OSRAM ROADsight 50
RÉGLAGE DE L'ANGLE DE VUE

ATTENTION ! Le réglage de l'angle de vue ne peut être effectué que le long de l'axe vertical, assurez-vous donc de positionner correctement l'appareil sur le pare-brise le long de l'axe horizontal aussi près que possible du centre du pare-brise.
Tout en tirant ou en poussant l'appareil dans le support, assurez-vous que la caméra capture l'image dans des proportions de 30 % ciel / 70 % route.

natural_image
Front view of a car driving on a multi-lane road with hills in the background (no text or symbols visible)

natural_image
Front view of a car driving on a road with distant buildings (no text or symbols visible)
Bon Mauvais
CONNEXION AU TÉLÉPHONE PORTABLE
1 Allumez la caméra de bord.
2 Votre caméra diffuse automatiquement un réseau Wi-Fi.
3 Ouvrez les paramètres de votre téléphone.
4 Appuyez sur Wi-Fi ou connexions.
5 Sélectionnez le hotspot de la caméra de bord et entrez le mot de passe « 12345678 ».
6 Vous êtes maintenant connecté à votre appareil.

natural_image
Technical line drawing of a cylindrical mechanical component with mounting holes (no text or symbols)

text_image
ÉCHEC DE LA PHOTOGRAPHIE / ENREGISTREMENT DE LA VIDÉO
Vérifiez s'il y a suffisamment d'espace libre sur la carte micro SD.
L'ENREGISTREMENT S'EST ARRÊTÉ
Trop de fichiers vidéo stockés. N'utilisez qu'au moins des cartes micro SD haute vitesse de classe 10 U1 de fabricants reconnus.
Lorsque vous essayez de visualiser une photo/lire un fichier vidéo, le message « Mauvais fichier » apparaît.
Échec d'écriture de fichier en raison d'une erreur du système de fichier de la carte micro SD. Formater la carte Micro SD
IMAGE FLOUE
Assurez-vous de retirer l'autocollant d'objectif. Vérifiez la présence de saletés sur la lentille. S'il y en a, essuyez l'objectif avec un chiffon doux avant utilisation (il est recommandé d'utiliser des produits d'entretien spéciaux pour l'optique afin de ne pas endommager la surface de l'objectif).
EXIGENCES DE PUISSANCE

ATTENTION ! Une fois qu'il n'y a pas d'entrée d'alimentation externe, la batterie ne peut pas prendre en charge l'enregistrement pendant une longue période, veuillez vous assurer que l'alimentation est connectée lors de l'enregistrement.
Tension d'entrée : 5 V CC, 1,5 A
Tension d'entrée de charge : 12-24 V CC
Câble auxiliaire pour l'alimentation
TEMPÉRATURES DE FONCTIONNEMENT (tous modèles)
Température de stockage : -20°C à 70°C
Température de fonctionnement : -10°C à 60°C
VEUILLEZ RECYCLER VOS BATTERIES USÉES
Les batteries ne doivent pas être jetées dans les déchets municipaux non triés, mais collectées séparément pour faciliter le traitement et le recyclage corrects des substances qu'elles contiennent. Le recyclage des batteries assure la récupération de ces matériaux précieux et évite tout effet potentiellement nocif sur l'environnement et la santé humaine.
OSRAM
ROADsight 10
Cámara para salpicadero HD 1080p
Español

natural_image
Line drawing of a camera body with no text or symbols
ATENCIÓN
1 Deben respetarse los requisitos especiales y la ley de cada país, especialmente en lo relativo a la duración de los registros/uso y la transferencia de datos. Familiarícese con las leyes de protección de datos de su país y asegúrese de cumplirlas. Además, familiarícese y cumpla con las leyes y reglamentos correspondientes sobre el uso y la propiedad de las cámaras de salpicadero («dashcams») en su país.
DE/AT: No están permitidas las grabaciones permanentes ni ocasionales, es decir, no se puede grabar todo el recorrido, matrículas ni desconocidos (la llamada función de bucle o «loop»). Cuando se graba un suceso, por ejemplo, un accidente, se debe informar a todas las partes implicadas sobre la grabación y sobre su cesión a la policía. Se prohíbe la publicación de grabaciones en medios públicos (Internet, redes sociales) sin el consentimiento de todas las personas afectadas o únicamente tras difuminar las personas y las matrículas. Debe ser imposible extraer conclusiones sobre las personas, por ejemplo, a través de imágenes del entorno.
2 La cámara de salpicadero no debe instalarse en una posición que impida al conductor ver la carretera por detrás.
3 Utilice únicamente el adaptador de corriente suministrado. De no hacerlo, se podría dañar la cámara de salpicadero. Tenga cuidado al limpiar la lente de la cámara de salpicadero y utilice únicamente un limpiador de lentes adecuado y un paño suave. NO exponga este producto a la lluvia, la humedad o el agua bajo ninguna circunstancia; si lo hace, puede correr el riesgo de sufrir una descarga eléctrica o un incendio. NO realice ningún otro tipo de mantenimiento que no esté incluido en el manual de instrucciones, a menos que esté cualificado para ello. Cuando se instale en un vehículo, coloque siempre el dispositivo de forma segura contra el parabrisas y, en la medida de lo posible, oculte el cable de alimentación bajo el revestimiento interior del vehículo. Asegúrese de que el cable de alimentación no interfiere con los mandos del conductor, como el volante, los pedales o la palanca de cambios. NO instale la cámara de salpicadero delante de la zona de despliegue del airbag o en una posición que oculte cualquier espejo interior. NO la utilice mientras conduce y únicamente ajuste los ajustes o revise las grabaciones mientras no conduce.
ANTES DE COMENZAR
Si aún no ha descargado la aplicación, hágalo ahora para sacar el máximo partido a su cámara de salpicadero.
1 Como la cámara trasera OSRAM ROADsight 10 necesita estaremparejada con lacámarade salpicadero OSRAM ROADsight 50 para funcionar, descargue la aplicación OSRAMconnect en la App Store (iPhone) o Google Play (Android).
2 Abra la aplicación, siga el proceso de configuración mostrado y active todos los ajustes necesarios cuando se le solicite.

Download on the
App Store

text_image
GET IT ON
Google play
OSRAM

text_image
9:09
DASH CAMERA
ROADsight 50
ALBUM
TIPS
INSTALLATION GUIDE
ROADsight 50
STEP 1
Ensure the following MicroSD card specification is being used
with the OSRAM dashcam.
Minimum Class 10 U1 16GB 30mbs (Class 10 U3 for
Optimum Performance)
WARNING: slow speed MicroSD cards will cause issues with
dashcam recording
STEP 2
Using supplied trim removal tool carefully. Install power cable
around the vehicle to required mounting location ensuring all
excess cable is hidden behind trim pannels
CONTENIDO DEL PAQUETE
1 Cámara trasera
2 Guía de inicio rápido
3 Herramienta para tapicería
4 Etiqueta de la ventana

text_image
OSRAM
HOTATO (Rear 10)
②

natural_image
Line drawing of a camera module and its 3D view (no text or symbols)

4
EMPAREJAR CON CÁMARA DE SALPICADERO
La cámara trasera OSRAM ROADsight 10 necesita estar emparejada con la cámara de salpicadero OSRAM ROADsight 50 para poder funcionar.
Compatible solo con la cámara de salpicadero OSRAM ROADsight 50.
OSRAM ROADsight 50
GUÍA DE INSTALACIÓN

natural_image
Line drawing of a camera body with no text or symbols
+

natural_image
Technical line drawing of a cylindrical mechanical component with mounting holes and a flat plate (no text or symbols)
COLOCACIÓN DE LA CÁMARA TRASERA
Para garantizar un ángulo de visión adecuado de la carretera detrás de su vehículo, coloque la cámara trasera hacia la parte superior de la ventana trasera. La cámara trasera debe ofrecer una visión despejada de la carretera.

text_image
Diagram showing a person observing a vehicle with an orange arrow and a red 'X' symbol, possibly indicating absence or error.

text_image
Diagram showing a person observing a camera with an orange arrow and dotted line, alongside a green checkmark.
INSTALACIÓN DE LA CÁMARA TRASERA

¡ATENCIÓN! Elija el lugar de instalación con antelación, ya que la cinta adhesiva de la montura es de un solo uso.
1 Asegúrese de que el cristal no tenga suciedad, polvo y grasa.
2 Caliente la parte de la almohadilla adhesiva con las manos para asegurar una sólida adhesión al cristal.

text_image
Diagram showing cleaning process with hand, spray bottle, and checkmark indicating inspection

natural_image
Diagram of a camera with an orange sensor mounted on a device, showing motion direction (no text or symbols)
Para encender el dispositivo, conecte el cable de alimentación al soporte de la cámara de salpicadero OSRAM ROADsight 50. Cuando el motor del vehículo se pone en marcha, el dispositivo se enciende automáticamente.
OSRAM ROADsight 50
AJUSTE DEL ÁNGULO DE VISIÓN

¡ATENCIÓN! El ajuste del ángulo de visión solo puede hacerse a lo largo del eje vertical, por lo que debe asegurarse de colocar el dispositivo correctamente en el parabrisas a lo largo del eje horizontal, lo más cerca posible del centro del parabrisas.
Mientras ajusta el dispositivo en el soporte, asegúrese de que la cámara capta la imagen en las siguientes proporciones: 30 % de cielo y 70 % de carretera.

natural_image
Front view of a car driving on a multi-lane road with hills in the background (no text or symbols visible)
Bien Mal

natural_image
Front view of a car driving on a road with distant buildings (no text or symbols visible)
CONEXIÓN CON EL MÓVIL
1 Encienda la cámara de salpicadero.
2 La cámara emite automáticamente una red wifi.
3 Abra los Ajustes del teléfono.
4 PulseWifi o Conexiones.
5 Seleccione el punto de acceso de la cámara de salpicadero e introduzca la contraseña «12345678».
6 Ahora está conectado a su dispositivo.

natural_image
Technical line drawing of a cylindrical mechanical component with mounting holes (no text or symbols)

text_image
PROBLEMAS AL HACER FOTOS / GRABAR VÍDEOS
Compruebe si hay suficiente espacio libre en la tarjeta micro SD.
LA GRABACIÓN SE HA DETENIDO
Demasiados archivos de vídeo almacenados. Utilice solo tarjetas micro SD de alta velocidad como mínimo de clase 10 U1 de fabricantes reconocidos.
Cuando intenta ver una foto/reproducir un archivo de vídeo, aparece el mensaje «archivo incorrecto».
Fallo de escritura de archivos debido a un error del sistema de archivos de la tarjeta micro SD. Formatee la tarjeta micro SD.
IMAGEN BORROSA
Asegúrese de quitar la etiqueta adhesiva de la lente. Compruebe si hay suciedad en la lente. Si la hubiera, limpie la lente con un paño suave antes de utilizarla (se recomienda utilizar productos especiales para el cuidado de la óptica con el objetivo de no dañar la superficie de la lente).
REQUISITOS DE ENERGÍA

¡ATENCIÓN! Cuando no hay entrada de energía externa, la batería no puede soportar la grabación durante mucho tiempo. Asegúrese de que la fuente de alimentación está conectada cuando grabe.
Voltaje de entrada: 5 V CC, 1,5 A
Voltaje de entrada de carga: 12-24 V CC
Cable auxiliar de alimentación
TEMPERATURAS DE FUNCIONAMIENTO (todos los modelos)
Temperatura de almacenamiento: -20 °C a 70 °C
Temperatura de funcionamiento: -10 °C a 60 °C
RECICLE LAS PILAS GASTADAS
Las pilas no deben depositarse en la basura municipal sin clasificar, sino que deben recogerse por separado para facilitar el correcto tratamiento y reciclaje de las sustancias que contienen. El reciclaje de las pilas garantiza la recuperación de estos valiosos materiales y evita cualquier efecto potencialmente perjudicial tanto para el medioambiente como para la salud humana.
OSRAM
ROADsight 10
Dashcam HD 1080p
Italiano

natural_image
Line drawing of a camera body with no text or symbols
AVVERTENZA
1 Devono essere osservati i requisiti speciali individuali e la legislazione dei paesi, in particolare per quanto riguarda la durata della registrazione/l'utilizzo e il trasferimento dei dati. Acquisire familiarità con le leggi sulla protezione dei dati del proprio paese e assicurarsi di rispettarle. Si prega inoltre di acquisire familiarità con, e di rispettare le leggi e le normative pertinenti relative all'uso e al possesso delle dashcam nel proprio paese.
DE/AT: non sono consentite registrazioni permanenti e non occasionali, vale a dire nessuna registrazione dell'intero percorso, targhe o estranei (cosiddetta funzione loop). Durante la registrazione di un evento, ad esempio un incidente, tutte le parti coinvolte devono essere informate della registrazione e del suo trasferimento alla polizia. Nessuna pubblicazione di registrazioni su media pubblici (Internet, social media) senza il consenso di tutte le persone interessate o solo dopo aver mascherato le persone e le targhe. Deve essere impossibile trarre conclusioni sulle persone, ad esempio attraverso immagini dell'ambiente circostante.
2 La dashcam non deve essere montata in una posizione che ostruisce la visuale della strada davanti al conducente.
3 Utilizzare solo l'adattatore di alimentazione in dotazione, altrimenti si potrebbe danneggiare la dashcam. Fare attenzione quando si pulisce l'obiettivo della dash cam e utilizzare solo un detergente per lenti adatto e un panno morbido. NON esporre questo prodotto a pioggia, umidità o acqua in nessuna circostanza; ciò potrebbe provocare il rischio di scosse elettriche o incendi. NON eseguire interventi di manutenzione diversi da quelli contenuti nel manuale di istruzioni, a meno che non si sia qualificati per farlo. Durante l'installazione su un veicolo, posizionare sempre saldamente il dispositivo contro il parabrezza e, ove possibile, nascondere il cavo di alimentazione sotto il rivestimento interno del veicolo. Assicurarsi che il cavo di alimentazione non interferisca con i comandi del conducente come il volante, i pedali o la leva del cambio. NON montare la dashcam davanti a un'area di apertura degli airbag o in una posizione tale da nascondere la visuale degli specchietti interni. NON operare durante la guida e regolare le impostazioni o rivedere le registrazioni solo mentre non si guida.
PRIMA DI INIZIARE
Se non si è già scaricata l'app, farlo ora per ottenere il massimo dalla dashcam.
1 Poiché la fotocamera posteriore OSRAM ROADsight 10 deve essere accoppiata con la dashcam OSRAM ROADsight 50 per funzionare, scaricarel'app cercando OSRAMconnect nell'App Store (iPhone) o in Google Play (Android).
2 Aprire l'app, seguire la procedura di configurazione mostrata e abilitare tutte le impostazioni necessarie quando richiesto.

Download on the
App Store

text_image
GET IT ON
Google play
OSRAM

text_image
9:09
DASH CAMERA
ROADsight 50
ALBUM
TIPS
INSTALLATION GUIDE
ROADsight 50
STEP 1
Ensure the following MicroSD card specification is being used
with the OSRAM dashcam.
Minimum Class 10 U1 16GB 30mbs (Class 10 U3 for
Optimum Performance)
WARNING: slow speed MicroSD cards will cause issues with
dashcam recording
STEP 2
Using supplied trim removal tool carefully. Install power cable
around the vehicle to required mounting location ensuring all
excess cable is hidden behind trim pannels
CONTENUTO DELLA CONFEZIONE
1 Fotocamera posteriore
2Guidarapida per iniziare
3Strumento
di rimozione del
rivestimento
4 Adesivo
per finestrino

text_image
O'BRAN
(No. 10)
2

natural_image
Line drawing of a camera module and its 3D view (no text or symbols)

4
ABBINAMENTO CON DASHCAM
La fotocamera posteriore OSRAM ROADsight 10 deve essere abbinata alla dashcam OSRAM ROADsight 50 per funzionare.
Compatibile solo con la dashcam OSRAM ROADsight 50.
OSRAM ROADsight 50
GUIDA ALL'INSTALLAZIONE

natural_image
Line drawing of a camera body with no text or symbols
+

natural_image
Technical line drawing of a cylindrical mechanical component with mounting holes and a flanged base (no text or symbols)
POSIZIONAMENTO DELLA FOTOCAMERA POSTERIORE
Per garantire un angolo di visione corretto della strada dietro il veicolo, posizionare la fotocamera posteriore verso la parte superiore del lunotto. Dare alla fotocamera posteriore una visuale libera della strada.

text_image
Diagram showing a person observing a vehicle with an orange arrow and a red 'X' symbol, possibly indicating absence or error.

text_image
Diagram showing a person observing a camera with an orange arrow and dotted line, alongside a green checkmark.
INSTALLAZIONE DELLA FOTOCAMERA POSTERIORE

ATTENZIONE! Scegliere in anticipo la posizione di installazione, poiché il na-
stro adesivo sul supporto è monouso.
1 Assicurarsi che il vetro sia privo di sporco, polvere e grasso.
2 Riscaldare con le mani la parte di adesivo del supporto per garantire una forte ade-
sione al vetro.

text_image
Diagram showing cleaning process with hand, spray bottle, and checkmark indicating inspection

natural_image
Diagram of a camera with an orange sensor mounted on a device, showing motion direction (no text or symbols)
Per alimentare il dispositivo, collegare il cavo di alimentazione al supporto per dashcam OSRAM ROADsight 50. Quando il motore del veicolo si avvia, il dispositivo si accende automaticamente.

text_image
Diagram illustrating car interior navigation and camera movement, showing dashboard, rearview, and camera setup with Chinese annotations.
OSRAM ROADsight 50
REGOLAZIONE DELL'ANGOLO DI VISIONE

ATTENZIONE! La regolazione dell'angolo di visione può essere eseguita solo lungo l'asse verticale, quindi assicurarsi di posizionare correttamente il dispositivo sul parabrezza lungo l'asse orizzontale il più vicino possibile al centro del parabrezza.
Mentre si tira o si spinge il dispositivo nel ritegno, assicurarsi che la fotocamera acquisisca l'immagine in proporzioni del 30% di cielo /70% di strada.

natural_image
Front view of a car driving on a multi-lane road with hills in the background (no text or symbols visible)
Giusto Sbagliato

natural_image
Front view of a car driving on a road with distant buildings (no text or symbols visible)
CONNESSIONE CON IL CELLULARE
1 Accendere la dashcam.
2 La fotocamera trasmette automaticamente una rete Wi-Fi.
3 Aprire le Impostazioni del telefono.
4 ToccareWi-Fi o Connessioni.
5 Selezionarel'hotspot dashcam e immettere la password "12345678".
6 Ora si è connessi con il dispositivo.

natural_image
Technical line drawing of a cylindrical mechanical component with mounting holes (no text or symbols)

text_image
MANCATA FOTOGRAFIA/REGISTRAZIONE VIDEO
Controllare se c'è abbastanza spazio libero sulla scheda microSD.
LA REGISTRAZIONE È STATA INTERROTTA
Troppi file video memorizzati. Utilizzare solo schede microSD ad alta velocità che siano almeno di classe 10 U1 di produttori affermati.
Quando si tenta di visualizzare una foto/riprodurre un file video, viene visualizzato il messaggio "file sbagliato".
Errore di scrittura del file a causa di un errore del file system della scheda microSD. Formattare la scheda microSD.
IMMAGINE SFOCATA
Assicurarsi che sia stato rimosso l'adesivo dall'obiettivo. Verificare se è presente dello sporco sulla lente. Se presente, pulire l'obiettivo con un panno morbido prima dell'uso (si consiglia di utilizzare prodotti per la cura speciale dell'ottica per non danneggiare la superficie dell'obiettivo).
REQUISITI DI ALIMENTAZIONE

ATTENZIONE! Se non è presente un'alimentazione esterna, la batteria non può supportare la registrazione per un lungo periodo, assicurarsi che l'alimentazione sia collegata durante la registrazione.
Tensione di ingresso: 5 V CC, 1,5 A.
Tensione di ingresso di ricarica: 12-24 V CC
Cavo ausiliario per alimentazione
TEMPERATURE DI FUNZIONAMENTO (tutti i modelli)
Temperatura di immagazzinamento: da -20 °C a 70 °C
Temperatura d'esercizio: da -10 a +60 °C
RICICLARE LE BATTERIE USATE
Le batterie non devono essere smaltite nei rifiuti urbani indifferenziati, ma raccolte separatamente per facilitare il corretto trattamento e riciclaggio delle sostanze in esse contenute. Il riciclaggio delle batterie garantisce il recupero di questi preziosi materiali e previene eventuali effetti potenzialmente dannosi sia sull'ambiente che sulla salute umana.
OSRAM
ROADsight 10
Dashcam HD 1080p
Dutch

natural_image
Line drawing of a camera body with no text or symbols
WAARSCHUWING
1 Individuele speciale vereisten en wetgeving van de landen moeten in acht worden genomen, vooral met betrekking tot de duur van de registratie/het gebruik en de overdracht van gegevens. Maak uzelf vertrouwd met de gegevensbeschermingswetten van uw land en zorg ervoor dat u deze naleeft. Maak uzelf ook vertrouwd met en houd u aan de relevante wet- en regelgeving met betrekking tot het gebruik en eigendom van dash-camera's in uw land.
DE/AT: Permanente en gelegenheidsvrije opnames zijn niet toegestaan, d.w.z. geen opname van de hele route, kentekenplaten of vreemden (zogenaamde loop-functie). Bij het vastleggen van een gebeurtenis, bijvoorbeeld een ongeval, moeten alle betrokken partijen worden geïnformeerd over de opname en over de overdracht ervan aan de politie. Geen plaatsing van opnames in openbare media (internet, sociale media) zonder toestemming van alle betrokken personen of alleen na vermomming van de personen en kentekenplaten. Het moet onmogelijk zijn om conclusies over personen te trekken, bijvoorbeeld door middel van omgevingsafbeeldingen.
2 De dashcam mag niet op een plaats worden gemonteerd die het zicht van de bestuurder op de weg voor zich belemmert.
3 Gebruik alleen de meegeleverde voedingsadapter, anders kan de dashcam beschadigd raken. Wees voorzichtig bij het schoonmaken van de dashcam-lens en gebruik alleen een geschikte lensreiniger en een zachte doek. Stel dit product in geen geval bloot aan regen, vocht of water; Als u dit wel doet, bestaat er gevaar voor elektrische schokken of brand. Voer GEEN ander onderhoud uit dan beschreven in de instructiehandleiding, tenzij u hiervoor gekwalificeerd bent. Plaats het apparaat bij montage in een voertuig altijd stevig tegen de voorruit en verberg waar mogelijk de voedingskabel onder de interieurbekleding van het voertuig. Zorg ervoor dat de voedingskabel de bedieningselementen van de bestuurder, zoals het stuur, de pedalen of de versnellingspook, niet hindert. Monteer de dashcam NIET vóór het opklappen van een airbag of in een positie waarin de binnenspiegels worden bedekt. Werk NIET tijdens het rijden en pas instellingen aan of bekijk opnames alleen terwijl u niet rijdt.
VOORDAT U BEGINT
Als u de app nog niet hebt gedownload, doe dit dan nu om het meeste uit uw dashcamera te halen.
1 De OSRAM ROADsight 10 achteruitrijcamera moet gekoppeld worden met de OSRAM ROADsight 50 dashcam om te kunnen werken. Download daarom de app door te zoeken naarOSRAMconnect in de App Store (iPhone) of Google Play (Android).
2 Open de app, volg het getoonde installatieproces en schakel alle benodigde instellingen in wanneer daarom wordt gevraagd.

Download on the
App Store

text_image
GET IT ON
Google play
OSRAM

text_image
9:09
DASH CAMERA
ROADsight 50
ALBUM
TIPS
INSTALLATION GUIDE
ROADsight 50
STEP 1
Ensure the following MicroSD card specification is being used
with the OSRAM dashcam.
Minimum Class 10 U1 16GB 30mbs (Class 10 U3 for
Optimum Performance)
WARNING: slow speed MicroSD cards will cause issues with
dashcam recording
STEP 2
Using supplied trim removal tool carefully. Install power cable
around the vehicle to required mounting location ensuring all
excess cable is hidden behind trim pannels
INHOUD VAN DE VERPAKKING
1 Achtercamera
2 Snelstartgids
3Gereedschapvoor
het verwijderen van
afwerkstukjes
4 Raamsticker

text_image
OKING
2
OSRAM
RICHENING Box 10
1
2

natural_image
Line drawing of a camera module and its 3D view (no text or symbols)

4
KOPPELEN MET DASHCAM OSRAM ROADsight 50
De OSRAM ROADsight
10-camera aan de
achterkant moet worden
gekoppeld met de OSRAM
ROADsight 50-dashcam
om te kunnen werken.
Alleen compatibel met de
OSRAM ROADsight 50
dashcam.
INSTALLATIEGIDS

natural_image
Line drawing of a camera body with no text or symbols
+

natural_image
Technical line drawing of a cylindrical mechanical component with mounting holes and a flat plate (no text or symbols)
HET PLAATSEN VAN DE ACHTERCAMERA
Om een goede kijkhoek van de weg achter uw voertuig te garanderen, plaatst u de achteruitrijcamera richting de bovenkant van uw achterruit. Hierdoorheeft de camera aan de achterzijde een onbelemmerd zicht op de weg.

text_image
Diagram showing a person facing a device with an orange arrow and a red 'X' symbol, possibly indicating absence or error.

text_image
Diagram showing a person observing a camera with an orange arrow and a green checkmark, likely illustrating a vision or navigation instruction.
HET INSTALLEREN VAN DE ACHTERCAMERA

LET OP! Kies van tevoren de montageplaats, want de plaktape op de houder is voor eenmalig gebruik.
1 Zorg ervoor dat het glas vuil-, stof- en vetvrij is.
2 Warm zelfklevend kussentje van de houder in de handen dient om een sterke hechting op glas te garanderen.

text_image
Diagram showing cleaning process with hand, spray bottle, and checkmark indicating inspection

natural_image
Diagram of a camera with an orange sensor mounted on a device, showing motion direction (no text or symbols)
Om het apparaat van stroom te voorzien, sluit u de voedingskabel aan op de OSRAM ROADsight 50 dashcam-houder. Wanneer de motor van het voertuig start, wordt het apparaat automatisch ingeschakeld.

text_image
Diagram illustrating car interior navigation and camera movement, showing dashboard, rear seats, and camera assembly with directional arrows.
OSRAM ROADsight 50
DE KIJKHOEK AANPASSEN

LET OP! Het aanpassen van de kijkhoek is alleen mogelijk langs de verticale as, dus zorg ervoor dat u het apparaat correct op de voorruit plaatst langs de horizontale as, zo dicht mogelijk bij het midden van de voorruit.
Terwijl u het apparaat in de houder trekt of duwt, moet u ervoor zorgen dat de camera het beeld vastlegt in een verhouding van 30% lucht / 70% weg.

natural_image
Front view of a car driving on a multi-lane road with hills in the background (no text or symbols visible)

natural_image
Front view of a car driving on a road with distant buildings (no text or symbols visible)
Goed Slecht
MET MOBIEL VERBINDEN
1 Schakel de dashcam in.
2 Uw camera zendt automatisch een wifi-netwerk uit.
3 Open de instellingen van uw telefoon.
4 Tikop
Wifi-verbindingen.
5 Selecteer de hotspot voor de dashcam en voer het wachtwoord "12345678" in.
6 U bent nu verbonden met uw apparaat.

natural_image
Technical line drawing of a cylindrical mechanical component with mounting holes (no text or symbols)

text_image
FOTO/VIDEO OPNEMEN MISLUKT
Controleer of er voldoende vrije ruimte is op de micro SD-kaart.
DE OPNAME IS GESTOPT
Er zijn te veel videobestanden opgeslagen. Gebruik minimaal klasse 10 U1 high-speed micro SD-kaarten van deugdelijk gebleken producenten.
Wanneer u een foto probeert te bekijken/een videobestand probeert af te spelen, wordt het bericht "verkeerde bestand" weergegeven.
Fout bij het schrijven van bestanden vanwege een fout in het bestandssysteem van de micro SD-kaart. Formatteer de micro SD-kaart.
WAZIG BEELD
Zorg ervoor dat de lenssticker is verwijderd. Controleer of er vuil op de lens zit. Als dat het geval is, veeg de lens dan voor gebruik af met een zachte doek (het wordt aanbevolen om speciale verzorgingsproducten voor de optiek te gebruiken om het oppervlak van de lens niet te beschadigen).
STROOMVEREISTEN

LET OP! Als er geen externe voedingsingang is, kan de batterij lange tijd geen opname ondersteunen. Zorg ervoor dat de voeding is aangesloten tijdens het opnemen.
Ingangsspanning: 5V DC, 1.5A
Laadingangsspanning: 12-24V DC
Hulpkabel voor stroomvoorziening
BEDRIJFSTEMPERATUREN (alle modellen)
Opslagtemperatuur: -20 °C tot 70 °C
Bedrijfstemperatuur: -10 °C tot 60 °C
RECYCLE UW GEBRUIKTE BATTERIJEN
Batterijen mogen niet bij het ongesorteerde huisvuil worden weggegooid, maar moeten apart worden ingezameld om de juiste behandeling en recycling van de stoffen die ze bevatten, te vergemakkelijken. Het recyclen van batterijen zorgt voor het terugwinnen van deze waardevolle materialen en voorkomt mogelijke schadelijke effecten op zowel het milieu als de menselijke gezondheid.
OSRAM
ROADsight 10
Kamera samochodowa HD 1080 p
Polski

natural_image
Line drawing of a camera body with no text or symbols
OSTRZEŻENIE
1 Należy bezwzględnie przestrzegać indywidualnych, specjalnych wymagań i przepisów obowiązujących w poszczególnych krajach, szczególnie odnośnie do czasu rejestracji/użytkowania i przesyłania danych. Zapoznaj się z przepisami dotyczącymi ochrony danych w Twoim kraju i upewnij się, że się do nich ściśle stosujesz. Ponadto, zapoznaj się i przestrzegaj odpowiednich przepisów dotyczących użytkowania kamer samochodowych w Twoim kraju i praw własności w kontekście aspektów prawnych.
DE/AT: Ciągłe i niezwiązane z żadnym celem nagrywanie jest niedozwolone, tzn. nie wolno nagrywać całej trasy, tablic rejestracyjnych ani osób nieznajomych (tzw. funkcji pętli). Podczas nagrywania zdarzenia, np. wypadku, wszystkie uczestniczące strony muszą zostać poinformowane o nagraniu i o przekazaniu go policji. Obowiązuje zakaz publikowania nagrań w mediach publicznych (w internecie, mediach społecznościowych) bez uzyskania na to zgody wszystkich zainteresowanych. Dopuszcza się jedynie nagrania, na których nie są wyraźnie widoczne twarze osób ani tablice rejestracyjne. Uniemożliwione musi być wyciąganie wniosków na temat osób, np. na podstawie przypadkowych zdjęć otoczenia.
2 Nie wolno montować kamery samochodowej w miejscu zasłaniającym kierowcy drogę za samochodem.
3 Aby nie dopuścić do uszkodzenia kamery samochodowej, używaj wyłącznie dostarczonego wraz z kamerą zasilacza. Obiektyw kamery samochodowej oczyszczaj ostrożnie, używając do tego miękkiej szmatki i odpowiedniego środka czyszczącego. Nigdy NIE wystawiaj tego produktu na działanie deszczu, wilgoci lub wody, gdyż może to spowodować ryzyko porażenia prądem lub pożaru. Jeśli nie masz odpowiednich kwalifikacji, NIE wykonuj czynności serwisowych innych niż opisane w instrukcji. Zamontuj kamerę w bezpieczny sposób, na przedniej szybie i w miarę możliwości ukryj przewód zasilający pod tapicerką pojazdu. Upewnij się, że przewód zasilający nie koliduje z elementami sterującymi kierowcy, takimi jak kierownica, pedały lub dźwignia zmiany biegów. NIE montuj kamery samochodowej przed obszarem wystrzelenia poduszki powietrznej lub w miejscu zasłaniającym widok lusterek wewnętrznych. NIE obsługuj kamery podczas jazdy, dostosowuj jej ustawienia lub przeglądaj nagrania tylko wtedy, gdy nie prowadzisz samochodu.
PRZED ROZPOCZĘCIEM UŻYTKOWANIA
Jeśli jeszcze nie pobrałeś aplikacji, zrób to teraz, aby móc w pełni wykorzystać swoją kamerę samochodową.
1 Ponieważ kamera tylna OSRAM ROADsight 10 wymaga sparowania z kamerą samochodową OSRAM ROADsight 50, aby móc ją obsługiwać, pobierz aplikację, wyszukując OSRAMconnect w App Store (iPhone) lub Google Play (Android).
2 Otwórz aplikację, postępuj zgodnie z przedstawionym procesem konfiguracji i po wyświetleniu monitu uaktywnij wszystkie niezbędne ustawienia.

Download on the
App Store
GET IT ON

Google play
OSRAM

text_image
9:09
DASH CAMERA
ROADsight 50
ALBUM
TIPS
INSTALLATION GUIDE
ROADsight 50
STEP 1
Ensure the following MicroSD card specification is being used
with the OSRAM dashcam.
Minimum Class 10 U1 16GB 30mbs (Class 10 U3 for
Optimum Performance)
WARNING: slow speed MicroSD cards will cause issues with
dashcam recording
STEP 2
Using supplied trim removal tool carefully. Install power cable
around the vehicle to required mounting location ensuring all
excess cable is hidden behind trim pannels
ZAWARTOŚĆ ZESTAWU
1 Kamera tylna
2 Skrócona instrukcja obsługi
3 Narzędzie do usuwania zadziorów
4 Naklejka na szybę

text_image
OBRAN
2

natural_image
Line drawing of a camera module and its 3D view (no text or symbols)

4
SPARUJ Z KAMERA SAMOCHODOWA
Kamera tylna OSRAM ROADsight 10 musi zostać sparowana z kamerą samochodową OSRAM ROADsight 50, aby możliwe było jej działanie i obsługa.
Kompatybilna tylko z kamerą
samochodową OSRAM ROADsight 50.
OSRAM ROADsight 50
PODREÇZNIK INSTALACJI

natural_image
Line drawing of a camera body with no text or symbols
+

natural_image
Technical line drawing of a cylindrical mechanical component with mounting holes and a flat plate (no text or symbols)
UMIEJSCOWIENIE KAMERY TYLNEJ
Aby zapewnić właściwy kąt widzenia na drogę za pojazdem, umieść tylną kamerę w górnej części szyby tylnej. Zapewni to niezakłócony widok na drogę z kamery tylnej.

text_image
Diagram showing a person facing a device with an orange arrow and a red 'X' symbol, possibly indicating absence or error.

text_image
Diagram showing a person observing a camera with an orange arrow and a green checkmark, likely illustrating a vision or navigation instruction.
INSTALOWANIE KAMERY TYLNEJ

UWAGA! Wybierz wcześniej miejsce instalacji, ponieważ taśma klejąca na uchwycie jest przeznaczona tylko do jednorazowego użytku.
1 Upewnij się, że szyba jest wolna od brudu, kurzu i tłuszczu.
2 Ogrzej w dłoniach samoprzylepną część uchwytu, aby zapewnić jego mocne przyleganie do szkła.

text_image
Diagram illustrating cleaning or disinfection process with hand, spray bottle, and checkmark indicating inspection

natural_image
Diagram of a camera with an orange sensor mounted on a device, showing motion direction (no text or symbols)
Aby zasilić urządzenie, podłącz przewód zasilający do uchwytu kamery samochodowej OSRAM ROADsight 50. Urządzenie włącza się automatycznie w momencie uruchomienia silnika pojazdu.

text_image
Diagram illustrating car interior components with labeled parts and directional arrows indicating movement or navigation.
OSRAM ROADsight 50
REGULACJA KATA WIDZENIA

UWAGA! Regulację kąta widzenia można przeprowadzić tylko wzdłuż osi pionowej, dlatego musisz prawidłowo ustawić urządzenie na przedniej szybie wzdłuż osi poziomej, jak najbliżej środka szyby.
Pociągając lub popychając urządzenie w uchwycie upewnij się, że kamera rejestruje obraz w proporcji: 30% nieba / 70% drogi.

natural_image
Front view of a car driving on a multi-lane road with distant hills and a tunnel entrance (no text or symbols visible)
Dobrze Žle

natural_image
Front view of a car driving on a road with distant buildings (no text or symbols visible)
ŁĄCZENIE Z TELEFONEM KOMÓRKOWYM
1 Włącz kamerę samochodową.
2 Kameraautomatycznie wyszukuje sieć Wi-Fi.
3 Otwórz ustawienia telefonu.
4 Stuknij w Wi-Fi lub Połączenia
5 Wybierz hotspot kamery samochodowej i wprowadź hasło „12345678”.
6 Masz teraz połączenie ze swoim urządzeniem.

natural_image
Technical line drawing of a cylindrical mechanical component with mounting holes (no text or symbols)

text_image
ZROBIENIE ZDJĘCIA / NAGRANIE WIDEO NIE POWIODŁO SIE
Sprawdź, czy na karcie microSD jest wystarczająco dużo wolnego miejsca.
NAGRYWANIE ZOSTAŁO ZAKOŃCZONE
Zapisano zbyt wiele plików wideo. Używaj wyłącznie szybkich kart micro SD klasy co najmniej 10 U1, pochodzących od sprawdzonych producentów.
Podczas próby obejrzenia zdjęcia/odtworzenia pliku wideo pojawia się komunikat „plik nieprawidłowy”.
Błąd zapisu pliku spowodowany błędem systemu plików na karcie micro SD. Sformatuj kartę micro SD.
ROZMYTY OBRAZ
Sprawdź, czy z soczewki została usunięta naklejka. Sprawdź, czy soczewka nie jest zabrudzona. Jeśli na soczewce występują plamy, przed użyciem przetrzyj ją miękką szmatką (aby nie uszkodzić powierzchni soczewki, zaleca się stosowanie specjalnych środków do pielęgnacji układów optycznych).
WYMAGANIA DOTYCZĄCE ZASILANIA

UWAGA! W przypadku braku zewnętrznego źródła zasilania bateria nie może obsługiwać nagrywania przez długi czas. Upewnij się, że podczas nagrywania podłączone jest zasilanie.
Napięcie wejściowe: 5 V DC, 1,5 A.
Napięcie wejściowe ładowania: 12-24 V DC
Kabel pomocniczy do zasilania
TEMPERATURY ROBOCZE (wszystkie modele)
Temperatura przechowywania: od -20°C do 70°C
Temperatura robocza: od -10°C do 60°C
ODDAWAJ ZUŻYTE BATERIE DO RECYKLINGU
Baterii nie należy wyrzucać wraz z niesortowanymi odpadami komunalnymi, lecz gromadzić je oddzielnie, aby ułatwić prawidłowe przetwarzanie i recykling zawartych w nich substancji. Recykling baterii zapewnia odzysk cennych materiałów i zapobiega potencjalnie szkodliwym skutkom zarówno dla środowiska, jak i dla zdrowia ludzi.