bestätigen. Es stehen folgende Profile zur Verfügung:
Kraftvoll / Klar / Hell / Warm / Ausgegelichen
16.2 Interneteinstellungen
16.2.1 Netzwerkassistent
Der Netzwerkassistent hilft beim Verbinden des Radios mit dem Internet. Um ihn aufzurufen, gehen Sie bitte wie folgt vor:
Wählen Sie im Menü „Systemeinstellungen“ die „Interneteinstellungen“ aus und bestätigen danach „Netzwerkassistent“. Das Radio startet nun einen Suchlauf nach verfügbaren WLAN-Verbindungen und listet diese im Anschluss auf. Mit den Tasten oder sowie dem Regler können die verschiedenen Netzwerke auswählt werden. Am Ende der Liste gibt es die Möglichkeit „[Neuer Suchlauf]“ oder „[Manuelle Konfig]“ auszuwählen.
16.2.2 Drahtlose Netzwerkverbindung (WLAN)
Abhängig vom Netzwerk haben Sie verschiedene Optionen zur Auswahl, um die Verbindung mit dem Netzwerk herzustellen. Netzwerke, welche eine WPS-Verbindung (Wi-Fi Protected Setup) unterstützen, werden in der Liste durch die vorangestellte Bezeichnung „[WPS ...]“ gekennzeichnet. Bei anderen Verbindungen handelt es sich um offene Netzwerke oder um Verbindungen, welche durch das PSK-Verfahren = Pre-Shared-Key (vorher vereinbarter Schlüssel) geschützt sind.
Hinweis: Eine aktive Netzwerkverbindung wird durch ein weißes Symbol unten rechts im Display angezeigt. Ist keine Verbindung aktiv, so ist dieses Symbol rot durchgestrichen.
16.2.3 WPS- / PSK- / Offene Verbindung
Eine WPS-Verbindung ermöglicht eine einfache und trotzdem geschützte Verbindung des Radios mit Ihrem Netzwerk. Dabei stehen zwei Möglichkeiten zur Verfügung. Die Einrichtung der Verbindung durch
PBC = Push-Button-Configuration (Konfiguration durch Knopfdruck) oder durch das PIN-Verfahren, bei dem Sie vom Webinterface Ihres Routers aufgefordert werden, eine zufällig generierte Zahlenfolge einzugeben.
16.2.4 Einrichtung mittels PBC
Wählen Sie das gewünschte Netzwerk „[WPS...]“ aus. Anschließend mit „WPS-Menü“ die Option „Taste drücken“ auswählen und bestätigen. Drücken Sie nun die WPS-Taste an Ihrem Router oder Access-Point (AP). Entnehmen Sie bitte die genaue Vorgehensweise der Bedienungsanleitung Ihres Routers oder APs. Alternativ lässt sich der Vorgang auch im Menü „Interneteinstellungen“ unter „PBC Wlan Aufbau“ starten. Folgen Sie dabei den Anweisungen auf dem Display.
16.2.5 Einrichtung mittels PIN
Wählen Sie das gewünschte Netzwerk „[WPS...]“ aus. Anschließend mit „WPS-Menü“ die Option „PIN“ auswählen und bestätigen. Das Radio generiert nun einen 8-stelligen Code, den Sie bitte mit der Taste bestätigen und die Zahl anschließend über die Benutzeroberfläche des Routers oder APs eingeben. Weitere Informationen dazu entnehmen Sie bitte dem Handbuch von Router oder AP.
16.2.6 WPS überspringen / Einrichtung mittels PSK (Pre-Shared-Key)
Wählen Sie „WPS überspringen“ um die Verbindung durch Netzwerkschlüssel herzustellen. Bei Netzwerken ohne WPS-Unterstützung gelangen Sie direkt in die Eingabemaske. Geben Sie nun den Schlüssel ein und bestätigen diesen mit der Schaltfläche „OK“. Ist die Eingabe korrekt, so verbindet sich das Radio mit Ihrem Netzwerk und stellt eine Internetverbindung her.
16.2.7 Offene Verbindung
Wir empfehlen Ihnen keine Verbindung zu einem offenen Netzwerk herzustellen. Sollte das von Ihnen gewählte Netzwerk nicht verschlüsselt sein, so können Sie dieses mit der Taste bestätigen. Danach wird die Internetverbindung hergestellt.
16.2.8 Manuelle Einrichtung der Netzwerkverbindung
Bei aktivem DHCP gehen Sie bitte wie folgt vor:
Wählen Sie bitte die Menüs „Interneteinstellungen“ -> „Manuelle Einstellungen“ -> „Drahtlos“ -> „DHCP aktiv“ aus. Geben Sie anschließend die vollständige SSID (Netzwerkname) ein und bestätigen diese auf der Schaltfläche „OK“. Wählen Sie nun die entsprechende Verschlüsselungsmethode.
Diese entnehmen Sie bitte der Konfiguration des Routers oder APs. Je nach gewählter Methode wird nun der Netzwerkschlüssel eingegeben und auf der Schaltfläche „OK“ bestätigt.
16.2.9 Bei inaktivem DHCP gehen Sie bitte wie folgt vor:
Wählen Sie bitte die Menüs „Interneteinstellungen“ -> „Manuelle Einstellungen“ -> „Drahtlos“ -> „DHCP inaktiv“ aus. Geben Sie nun die Informationen zu „IP-Adresse“, „Subnet-Maske“, „Gateway-Adresse“, „Primär DNS“ und „Sekundär DNS“ ein. Mit den Tasten oder auf der Fernbedienung, oder dem Regler können die Werte eingestellt werden. Mit den Tasten , oder können Sie die einzelnen Zahlenblöcke zur Einstellung auswählen. Anschließend gehen Sie weiter vor, wie unter „DHCP aktiv“ beschrieben.
16.3 Netzwerkeinstellungen anzeigen
In diesem Menü finden Sie alle Einstellungen des aktuell verwendeten Netzwerkprofils. Wählen Sie dazu im Menü „Interneteinstellungen“ das Menü „Einstellungen anzeigen“ aus. Mit den Tasten oder auf der Fernbedienung, oder dem Regler können die Werte angezeigt werden.
16.4 NetRemote PIN-Setup
In diesem Menü können Sie eine 4-stellige PIN einstellen, die bei der ersten Einrichtung der UNDOK-App (siehe Kapitel 24) abgefragt wird. Voreingestellt ist hier „1234“. Die PIN sollte sofort geändert werden.
16.5 Netzwerkprofil
Hier sehen Sie die Liste der im Radio gespeicherten Netzwerkprofile. Sollten Sie mehrere Profile angelegt haben, so wählen sie das mit geringsten Distanz zum entsprechenden Router oder AP.
Sie können nicht mehr benötigte Netzwerkprofile löschen, indem Sie den Tasten oder auf der Fernbedienung, oder dem Regler das zu lösche Profil anwählen und mit der Taste bestätigen. Das aktive Netzwerkprofil wird mit „*“ gekennzeichnet.
Hinweis: Das aktive Netzwerkprofil kann nicht gelöscht werden.
16.6 Lösche Netzwerkeinstellungen
In diesem Menü können Sie die Netzwerkeinstellungen des aktuellen Profils löschen. Wählen Sie dazu die Schaltfläche „JA“ aus, und bestätigen Sie die Eingabe mit der Taste . Durch Wählen der Schaltfläche „NEIN“ wird der Vorgang abgebrochen.
16.7 Halten Netzwerkverbindung
In diesem Menü wird eingestellt, ob die WLAN-Verbindung zum Netzwerk im Standby-Modus aufrechterhalten werden soll. Dadurch können Sie das Radio per UNDOK-App (siehe Seite 27) einschalten. Der Stromverbrauch im Standby-Modus ist im vernetzten Modus geringfügig höher. Wählen Sie zur Einstellung die Schaltfläche „JA“ oder „NEIN“ aus, und bestätigen Sie die Eingabe mit der Taste .
17. Zeiteinstellungen
Im Menü „Zeiteinstellungen“ können Einstellungen für Zeit und Datum vorgenommen werden. Dabei stehen folgende Optionen zur Verfügung:
17.1 Menü „Zeit-/Datumseinst.“
Hier können Zeit und Datum manuell eingestellt werden. Mit den Tasten oder auf der Fernbedienung, oder dem Regler können die Werte verändert werden. Mit den Tasten , oder werden die einzelnen Zahlenblöcke ausgewählt und die Werte auch gespeichert.
17.2 Menü „Autom. Update“
Hier können Sie festlegen aus welcher Quelle Uhrzeit und Datum aktualisiert werden sollen. Folgende Optionen stehen zur Auswahl:
Update von DAB: Zeit und Datum werden über DAB aktualisiert.
Update von FM: Zeit und Datum werden über UKW aktualisiert.
Update von NET: Zeit und Datum werden vom Netzwerk aktualisiert.
Kein Update: Zeit und Datum müssen manuell eingestellt werden.
Die aktuell ausgewählte Option ist mit „*“ gekennzeichnet.
In diesem Menü können Sie festlegen ob die Anzeige der Uhr im 12- oder 24-Stunden Format erfolgen soll. Auswählen mit den Tasten oder , die Bestätigung erfolgt mit der Taste . Die aktuell ausgewählte Option ist mit „*“ gekennzeichnet.
18. Sprache
Im Menü „Sprache“ können Sie die Menüsprache des Radios festlegen. Falls Sie das Gerät mit dem
Einrichtungsassistenten in Betrieb genommen haben, so wurde dort bereits die Gerätesprache eingestellt. Zum Auswählen einer Sprache benutzen Sie bitte die Tasten oder und bestätigen diese durch Drücken der Taste . Alternative kann die Auswahl auch mit dem Regler vorgenommen werden.
Folgende Sprachen stehen zur Auswahl:
Dänisch, Deutsch, Englisch, Finnisch, Französisch, Italienisch, Niederländisch, Norwegisch, Polnisch, Portugiesisch, Schwedisch, Spanisch, Türkisch
19. Werkseinstellung
Um das Radio in den Auslieferungszustand zurückzusetzen, wählen Sie bitte „JA“ im Menü „Werkseinstellung“. Achtung: Alle zuvor vorgenommenen Einstellungen werden gelöscht.
Bei der Auswahl von „NEIN“ wird der Vorgang abgebrochen.
Hinweis: Setzen Sie das Radio auf jeden Fall auf den Auslieferungszustand zurück, bevor Sie es weitergeben (z.B. verkaufen, verschenken oder entsorgen).
20. Softwareupdate
In diesem Menü können Sie prüfen, ob für das Radio ein Softwareupdate zur Verfügung steh.
Wenn Sie „Auto-Update“ auswählen, prüft das Radio automatisch regelmäßig die Verfügbarkeit neuer Softwareupdates.
Wählen Sie den Menüpunkt „Jetzt prüfen“ um nach einer neuen Version zu suchen. Wird eine neuere Software gefunden, so wählen Sie bitte „JA“ aus um diese zu installieren, oder „NEIN“ um das Update abzubrechen. Bei „JA“ startet das Radio neu, um den Vorgang auszuführen.
Danach wird die Software heruntergeladen, und Sie werden dann mit „Proceed“ gefragt, ob das Update durchgeführt werden soll. Bitte wählen Sie „YES“ bei Zustimmung oder „NO“ um das Update abzubrechen.
Abwechselnd blinkt „Warning: do not remove power“ und die zu installierende Softwareversion. Ist der Vorgang abgeschlossen, so steht „Update completed“ im Display und Sie können den Vorgang mit der Taste bestätigen.
Die Versionsnummer der installierten Software können Sie Menü „Systemeinstellungen“ unter dem Punkt „Info“ abfragen.
Achtung!
Achten Sie darauf, dass eine stabile Stromversorgung besteht, bevor Sie ein Softwareupdate starten. Eine Unterbrechung während eines Updates kann irreparable Schäden am Radio hervorrufen!
21. Einrichtungsassistent
Im Menü „Einrichtungsass.“ können Sie den Einrichtungsassistenten erneut starten. Gehen Sie dazu vor, wie unter dem Punkt „3.8 Start des Einrichtungsassistenten“ beschrieben.
22. Info
In diesem Menü finden Sie unter anderem die Versionsnummer der aktuellen Firmware. Halten Sie diese bereit, falls Sie mit dem Kundendienst in Kontakt treten wollen.
23. Datenschutz
Bitte lesen Sie die dort aufgeführten Datenschutzbestimmungen oder rufen Sie diese Webseite auf: www.frontiersmart.com/privacy
24. Beleuchtung
Die Display-Beleuchtung kann in 3 Helligkeitsstufen programmiert werden. Folgende Einstellungen können im Menü „Beleuchtung“ vorgenommen werden:
„Zeitabschaltung“: Zeit, bis das Display auf die Beleuchtungsstufe „Dim-Einstellung“ geregelt wird. Auswahlmöglichkeiten: „Ein / 10 / 20 / 30 / 45 / 60 / 90 / 120 / 180 Sekunden“ „Ein“ bedeutet, dass das Radio immer in der Helligkeitsstufe der „An-Einstellung“ bleibt.
„An-Einstellung“: Helligkeit des Displays wenn das Radio eingeschaltet wird. Auswahlmöglichkeiten: „Hoch“ / „Mittel“ / „Niedrig“
„Dim-Einstellung“: Helligkeitseinstellung für Betrieb und Standby. Auswahlmöglichkeiten: „Mittel“ / „Niedrig“ / „Niedrig“ / „Aus“
25. UNDOK – Steuerung des Radios per App
Die von Frontier Silicon entwickelte UNDOK-Applikation (App) bringt Ihnen die volle Kontrolle von Radios und Speakern auf Ihr Smartphone.
Egal ob bei der Ersteinrichtung des Gerätes, den Konfigurationen von Equalizer oder bei der Verwaltung Ihrer Lieblingssender – UNDOK bietet Ihnen alle Features auf dem Smartphone oder Tablet und bietet Ihnen damit noch mehr Komfort. Laden Sie die UNDOK-App im Google Play Store oder im Apple App Store herunter.
Ersteinrichtung des Gerätes mit UNDOK
Beim ersten Einschalten, oder nachdem das Radio auf Werkseinstellungen gesetzt wurde, ist das Radio im SETUP-Modus und es wird sogenannter Micro-Access-Point (eigenes WLAN-Netz) erzeugt. Dadurch kann sich Ihr Smartphone oder Tablet mit dem Radio verbinden.
Einrichten mit Android
Stellen Sie sicher, dass sich das Radio im SETUP-Modus befindet. Öffnen Sie die UNDOK-APP auf Ihrem Smartphone oder Tablet, und wählen Sie dort den Menüpunkt „Audiosystem einrichten“.
Drücken Sie „WEITER“ und wählen Sie den Menüpunkt „WÄHLEN SIE DEN ZUGANGSPUNKT“ aus.
Es öffnet Sich das WLAN-Menü des Endgerätes, wählen Sie dort das Netzwerk „M-9000S“ aus. Nach dem Verbinden steht „Verbunden mit M-9000S“ in der App. Folgen Sie den weiteren Anweisungen der App zur vollständigen Einrichtung des Radios. Abschließend verbindet sich das Radio mit dem Netzwerk und Sie können durch Drücken von „Mein Audiosystem verwenden“ das Gerät nun mit der UNDOK-APP bedienen.
Einrichten mit iOS
Stellen Sie sicher, dass sich das Radio im SETUP-Modus befindet. Öffnen Sie die UNDOK-APP auf Ihrem iPhone oder iPad, und wählen Sie dort den Menüpunkt „Audiosystem einrichten“.
Drücken Sie „WEITER“ und wählen Sie den Menüpunkt „WÄHLEN SIE DEN ZUGANGSPUNKT“ aus.
Es öffnet Sich das WLAN-Menü des Endgerätes, wählen Sie dort das Netzwerk „M-9000S“ aus. Nach dem Verbinden steht „Verbunden mit M-9000S“ in der App. Folgen Sie den weiteren Anweisungen der App zur vollständigen Einrichtung des Radios. Abschließend verbindet sich das Radio mit dem Netzwerk und Sie können durch Drücken von „Mein Audiosystem verwenden“ das Gerät nun mit der UNDOK-APP bedienen.
26. Störungsbehebung
Bitte überprüfen Sie bei Fehlfunktionen die folgenden Punkte:
Kein Ton
→ Stecken Sie das Steckernetzteil ordnungsgemäß ein.
Das System reagiert nicht auf Tastendruck
→ Ziehen Sie das Steckernetzteil ab und schließen Sie es wieder an.
Probleme beim Radioempfang
→ Richten Sie die Antenne neu aus.
Es kann keine Netzwerkverbindung hergestellt werden
→ Überprüfen Sie die WLAN-Funktion, vergewissern Sie sich, dass das Passwort korrekt ist.
27. Wartung und Pflege
Reinigung des Gehäuses
Benutzen Sie ein mit einem milden Reinigungsmittel leicht angefeuchtetes Tuch. Benutzen Sie keine Reinigungsmittel, die Alkohol, Ammoniak oder Scheuermittel enthalten.
Vorsichtshinweise zur Kondensationsbildung
Kondensation (Tau) kann sich im Innern des Geräts bilden, wenn zwischen der Temperatur des Geräts und der Umgebungstemperatur ein wesentlicher Unterschied besteht. Sollte im Innern des Geräts Kondensation auftreten, ist eine einwandfreie Funktion nicht mehr gewährleistet. In diesem Fall muss einige Stunden gewartet werden; nachdem die Feuchtigkeit getrocknet ist, kann das Gerät wieder verwendet werden.
Besondere Vorsicht ist unter den folgenden Umständen geboten
Wenn das Gerät von einem Ort zu einem anderen bewegt wird, der eine wesentlich höhere oder niedrigere Temperatur aufweist, oder wenn sich die Luftfeuchtigkeit am Aufstellort des Geräts erhöht, usw.
Handhabung von CDs
Halten Sie die CD so, dass Sie die Signaloberfläche nicht berühren. (Die unbedruckte Seite ist die Abspielseite.)
Verwenden Sie ausschließlich CDs mit der disc Markierung. Eine CD ohne diese Markierung kann u. U. nicht ordnungsgemäß wiedergegeben werden.
Wissenswertes über USB-Geräte
Hinweise zur Verwendung eines USB-Gerätes
Dieses Gerät ist in der Lage, auf einem Flash-Speicher oder digitalen Audio-Player gespeicherte Audiodateien wiederzugeben, wenn diese Geräte über einen USB-Port verfügen (in diesem Dokument werden diese Geräte als USB-Geräte bezeichnet).
Bezüglich der verwendbaren USB-Geräte gelten folgende Einschränkungen:
Verwendbare USB-Geräte
USB-Geräte, die zur USB-Massenspeicherklasse gehören.
USB-Geräte, deren maximale Stromaufnahme bei höchstens 500 mA liegt.
USB-Massenspeicherklasse : USB-Geräte, die der PC als externen Speicher erkennt, ohne dass ein spezieller Treiber oder eine spezielle Anwendungsoftware erforderlich wäre.
Konsultieren Sie bitte Ihren Händler, wenn Sie sich nicht sicher sind, ob Ihr USB-Gerät den Spezifikationen für die USB-Massenspeicherklasse entspricht.
Die Verwendung eines USB-Gerätes, das nicht unterstützt wird, kann zu einer fehlerhaften Wiedergabe oder Anzeige der Audio-Datei führen.
Selbst wenn Sie ein USB-Gerät verwenden, das den oben aufgeführten Spezifikationen entspricht, können Audio- Dateien je nach Typ oder Zustand des USB-Gerätes u. U. nicht ordnungsgemäß wiedergegeben werden.
28. Entsorgung
Entsorgung von gebrauchten elektrischen und elektronischen Geräten und Batterien.
Das Symbol (durchgestrichene Mülltonne) auf dem Produkt oder seiner Verpackung weist darauf hin, dass dieses Produkt nicht als normaler Haushaltsabfall behandelt werden darf, sondern an einer Annahmestelle für das Recycling von elektrischen und elektronischen Geräten und Batterien abgegeben werden muss. Durch Ihren Beitrag zur korrekten Entsorgung dieses Produktes schützen Sie die Umwelt und die Gesundheit Ihrer Mitmenschen. Unsachgemässe oder falsche Entsorgung gefährden Umwelt und Gesundheit. Weitere Informationen über das Recycling dieses Produktes erhalten Sie von Ihrer Gemeinde oder den kommunalen Entsorgungsbetrieben. Achtung: Das Zeichen „Pb“ unter dem Symbol für Batterien zeigt an, dass diese Batterie Blei enthält.
Der Endnutzer ist selbst dafür verantwortlich, Daten auf dem Altgerät mittels des Menüpunktes „Werkseinstellung“ vor der Entsorgung zu löschen (siehe Kapitel 18).
Die Bluetooth ^® Wortmarke und Logos sind eingetragene Marken von Bluetooth SIG Inc. und jegliche Verwendung dieser Marken durch die JVCKENWOOD Corporation erfolgt unter Lizenz. Andere Marken und Handelsnamen sind die ihrer jeweiligen Eigentümer.
Technische Daten M-9000S
Spannungsversorgung Wechselspannung 100 – 240 V Eingangswechselstromfrequenz 50/60 Hz Aufnahmeleistung 40 Watt Aufnahmeleistung im Bereitschaftsbetrieb 0,8 Watt Aufnahmeleistung im vernetzten Bereitschaftsbetrieb 0,8 W Watt Tuner UKW/DAB+ DAB-Abstimmbereich BAND III 174,928 MHz – 239,200 MHz UKW-Abstimmbereich 87,50 MHz – 108,00 MHz CD-Betrieb Signal-Rauschabstand (A-Filter) ≥ 65 dB Dynamikumfang ≥ 60 dB Netzwerkverbindung (WLAN) Unterstützte Netzwerke WIFI IEEE 802.11a/b/g/n Unterstützte Frequenzbereiche WiFi : 2.412 - 2.472 GHz, 5.18 - 5.32 GHz, 5.50 - 5.70GHz, 5.745 – 5.825GHz Maximale Sendeleistung WIFI 2.4 G: 13,6 dBm / WIFI 5G: 13,6 dBmWIFI 5.8G: 13,6 dBm Unterstützte Verschlüsselungen WEP, WPA, WPA2 (PSK), WPS Unterstützte Streamingformate MP3, AAC/AAC+ (bis zu 48 kHz, 16 Bit) USB Geräte Abspielbare Dateien: MP3Kompatibel mit USB1.1 Full-Speed, FAT16, FAT32Max. 500 mA, Bitraten: 32 kBit/s bis 320 kBit/s BLUETOOTH BLUETOOTH Version V4.2 Leistungsklasse Klasse 1 Maximale Sendeleistung 4,3 dBm Reichweite ca. 10 Meter (kann je nach Umgebung abweichen) Frequenzbereich 2,402 GHz – 2,480 GHz BLUETOOTH Profile A2DP (Advanced Audio Distribution Profile, AVRCP (Audio/Video Remote Control Profile) Line-In 3,5 mm Klinkenbuchse Verstärkerteil Ausgangsleistung 2 x 50 Watt / 6 Ohm Frequenzbereich 60 Hz - 20 kHz Maße und Gewichte Haupteinheit (B x H x T) 260 x 115 x 260 mm / 2,0 kg Lautsprecher (B x H x T) 173 x 263 x 240 mm / 2,4 kg je Stk. Temperaturbereich 0°C bis 35°C
30. Garantie
Sehr geehrter Kunde,
wir danken Ihnen für den Kauf dieses Kenwood-Produkts. Sollte dieses Produkt unter normalen Betriebsbedingungen Material- oder Verarbeitungsmängel aufweisen, werden wir diese in Übereinstimmung mit den nachfolgenden Garantiebestimmungen kostenlos beseitigen, bzw. das Gerät umtauschen.
Bitte bewahren Sie diese Garantiekarte sorgfältig auf.
Kenwood gewährt auf dieses Gerät eine Garantie von zwei Jahren ab Kaufdatum laut Rechnung oder Kaufbeleg des Kenwood-Händlers. Diese Garantie erstreckt sich auf Material- und Verarbeitungs-Mängel. Wir behalten uns das Recht vor, das Produkt umzutauschen, falls eine wirtschaftliche Instandsetzung nicht mehr möglich ist. Kosten für Verpackung und Installation sowie Kosten und Risiken im Zusammenhang mit der eigentlichen Instandsetzung sind nicht in der Garantieleistung enthalten und werden in Rechnung gestellt.
Bedingungen
A. Zur Geltendmachung von Garantieansprüchen sind zusätzlich zur Vorlage dieser Garantiekarte folgende Angaben erforderlich:
(a) Ihr Name mit vollständiger Anschrift
Kenwood behält sich das Recht vor, Garantieleistungen abzulehnen, wenn die vorgenannten Informationen fehlen oder wenn seit Ersterwerb Veränderungen am Produkt vorgenommen wurden.
B. Zum Zeitpunkt der Auslieferung an den Handel erfüllt dieses Produkt alle im Bestimmungsland gültigen Normen und Sicherheitsvorschriften. Erforderliche Modifikationen zum Betrieb des Gerätes in Ländern außerhalb des Bestimmungslandes fallen nicht unter die vorgenannten Garantiebestimmungen. Außerdem übernehmen wir keinerlei Haftung für Arbeiten in diesem Zusammenhang oder für Beschädigungen des Produktes, die durch solche Arbeiten entstehen.
Wird das Produkt in einem Land benutzt, für das dieses nicht konzipiert und hergestellt worden ist, dann werden Garantiearbeiten nur dann ausgeführt, wenn die Kosten für Umrüstung des Gerätes auf national gültige Normen und Sicherheitsvorschriften vom Benutzer getragen werden. Unterscheidet sich außerdem das Produkt von den durch den offiziellen Importeur vertriebenen Produkten und sollten für die Reparatur dieses Produktes Eratzteile nicht verfügbar sein, muß der Benutzer die Kosten für Hin- u. Rücktransport des Gerätes in das Kaufland tragen.
Gleiches gilt, wenn im betreffenden Land aus anderen berechtigten Gründen keine Garantieleistungen angeboten werden können.
C. Ausgenommen von den Garantieleistungen sind:
(a) Veränderungen am Produkt, sowie normale Wartungs und Justage-Arbeiten, einschließlich der in der in der Bedienungsanleitung erwähnten regelmäßigen Kontrollen.
Diese Garantie kann von allen Personen beansprucht werden, die das Produkt legal erworben haben.
In der Übereinstimmung mit den vorgenannten Garantiebedingungen, wird das Produkt kostenlos instandgesetzt oder umgetauscht. Dieses Recht beeinträchtigt in keiner Weise sonstige Rechte des Benutzers im Rahmen der gültigen rechtlichen Bestimmungen.
Instandsetzung oder Austausch bewirken keine Verlängerung der Garantiezeit.
Weitergehende Ansprüche sind ausgeschlossen, insbesondere solche auf Wandelung, Minderung oder Schadenersatz.
Kontaktadresse:
JVCKENWOOD DEUTSCHLAND GmbH
Konrad-Adenauer-Allee 1-11, 61118 Bad Vilbel
Tel. 06101-4988 0, www.kenwood.de
KENWOOD
KENWOOD
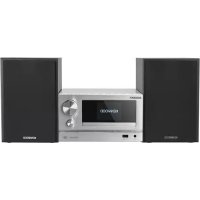
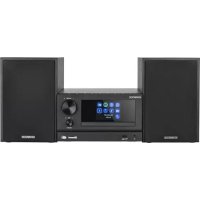
Smart Micro HiFi-System
M-9000S
OPERATING INSTRUCTIONS
JVCKENWOOD Corporation
Table of contents
Content
Page
Before switching on the power supply 3
Start-up 6
Components and functions 7
Main menu 10
Internet radio 11
Podcasts 12
Spotify 14
CD Player 15
USB player 16
Digital radio DAB+ 16
FM Radio 18
Bluetooth Audio 19
Analogue connections 20
Sleep 20
Alarm clock 20
System settings 21
Time settings 24
Language 25
Factory reset 25
Software update 25
Setup wizard 26
Info 26
Provicy policy 26
Backlight 26
UNDOK App 27
Troubleshooting 28
Maintenance and care 28
Disposal 29
Technical specifications 30
Guarantee notice 31
Due to the 5 GHz frequency range of the built-in WLAN module, use is only permitted inside buildings in the following countries.
AT BE BG CZ DK EE FR DE IS IE IT EL ES CY LV LI LT LU HU MT NL NO PL PT RO SL SK TR FI SE CH UK HR
AT=Austria, BE=Belgium, BG=Bulgaria, CZ=Czech Republic, DK=Denmark, EE=Estonia, FR=France, DE=Germany, IS=Iceland, IE=Ireland, IT=Italy, EL=Greece, ES=Spain, CY=Cyprus, LV=Latvia, LT=Lithuania, LU=Luxembourg, HU=Hungary, MT=Malta, NL=Netherlands, NO=Norway, PL=Poland, PT=Portugal, RO=Romania, SL=Slovenia, SK=Slovakia, TR=Turkey, FI=Finland, SE=Sweden, CH=Switzerland, UK=United Kingdom, HR=Croatia
1. Before switching on the power supply
IMPORTANT SAFETY INSTRUCTIONS
Attention: Read this page carefully to ensure safe operation of the device.
Read instructions carefully!
– Follow all safety and operating instructions when using this product.
Keep the instructions in a safe place!
- You should keep the safety and operating instructions for future reference.
Follow the warning instructions!
- You should strictly follow all warnings provided on the product and listed in the operating instructions.
1.1 Clean only with a dry cloth!
– Pull out the mains plug of this device from the mains power socket before cleaning this product. Never use liquid cleaning detergents or cleaning sprays. Use only a damp cloth for cleaning.
1.2 Accessories
– Use only the accessories specified by the manufacturer.
1.3 Do not use this device near water
- The device should never be exposed to water droplets or water splashes, such as those found near a bathtub, wash basin, kitchen sink, washing machine, wet basement or swimming pool. Never place containers filled with liquids, such as e.g. flower vases, on the device.
1.4 Ventilation
- Slots and openings in the housing are used to ventilate the device to ensure reliable operation of the device and to protect the device from overheating and possible autoignition. Do not block the ventilation holes. Install the device according to the manufacturer's instructions. Never block the ventilation holes by placing the device on a bed, sofa, rug, or similar soft surfaces. This device should not be installed in a bookshelf or built-in wardrobe unless adequate ventilation is ensured.
1.5 Power supply
- This device may connected only to the mains voltage indicated on the device. If you are unsure about the type of power supply in your home, contact your specialised dealer or power company.
1.6 Power cord
- Make sure that you can not trip over the power cable or that it is disconnected in the immediate vicinity of a power outlet, including auxiliary sockets. The power cable must not be squeezed under any circumstances even when exiting the device.
As the mains plug is used as the disconnect device, it shall remain at the power cable and be kept readily accessible.
1.7 Thunderstorm
– The device should be disconnected from the mains during thunderstorms and if it is not used for a long time.
1.8 Overload
- Never overload mains sockets, extension cords or multiple sockets, otherwise there is a risk of fire or electric shock.
1.9 Penetration of foreign material and liquid
- Be careful not to allow foreign material or liquid to enter this device through ventilation holes, otherwise it may come into contact with high voltage components or short circuit resulting in a fire or electric shock. Never spill liquids of any kind on this device.
1.10 Maintenance
- Never attempt to carry out the maintenance of this device yourself, because live parts can be exposed through the openings or by removing covers, contacting which can be hazardous. Leave all maintenance to qualified service personnel.
1.11 Damage requiring repair
- Maintenance and repair work should only be carried out by a qualified customer service. Maintenance/repair is required if the device has been damaged (e.g. the power cable or plug), if liquid has spilled into the device, if objects have penetrated the device, if the device has been exposed to rain or moisture, if it no longer works properly or has fallen down.
1.12 Spare Parts
- If replacement parts are required, make sure that the customer service technician uses spare parts specified by the manufacturer or that have the same characteristics as the original parts. Unauthorised parts may cause fire, electric shock or other accidents.
1.13 Safety test
- After completing service or repair of this device, ask the customer service technician to perform a safety test to determine if the equipment is in good working order.
1.14 Heat
- Do not install the device near hot surfaces, such as radiators, fan heaters, stoves or other devices (including amplifiers) that can be hot. Never place objects with open flame, such as candles or lanterns, on or near the device. The installed batteries should not be exposed to excessive heat such as direct sunlight, fire or the like.
1.15 Batteries
- If you do not use the radio for a month or more, remove the batteries from the battery compartment of the remote control to prevent it from leaking. Immediately dispose of leaking batteries properly and observe all relevant legal regulations. Leaking batteries can cause injury and damage the device. Never mix batteries of different types or old and new batteries.
To minimise the risk of electric shock, fire, etc.
- do not remove screws, covers or body parts.
- the power button does not completely disconnect the power supply in any position.
In order to completely disconnect the device from the power supply, please pull the mains plug out of the socket.
1.16 Risks associated with high volume
- To prevent possible hearing damage, do not listen at high volume for long periods.
1.17 Network connection
- Please make sure that the firewall function is activated at your network access point (router). Consult your router's instruction manual.
- If you do not want to set up a network connection, please do not run the setup wizard (see 3.8).
1.18 Remote Control
- Exposing the remote control sensor to direct sunlight or high-frequency fluorescent light may cause malfunction. In such cases, you should move the system to a different location to avoid such malfunction.
- The supplied batteries are intended for functional testing and may have a limited lifetime. If the range of the remote control decreases, replace the old battery with a new one.
Caution!
Danger of explosion if the battery is replaced by a incorrect type;
high or low extreme temperatures to which a battery may be exposed during use, storage or transport;
low air pressure at high altitude;
the replacement of a battery by an incorrect type that can bypass a fuse (for example, some lithium battery types);
the disposal of a battery in fire or a hot oven, or the mechanical crushing or cutting of a battery;
leaving a battery in an extremely high temperature environment that may cause an explosion or leakage of flammable liquids or gases;
a battery that is exposed to extremely low air pressure, which may cause an explosion or leakage of flammable liquids or gases.
1.19 Automatic energy saving function
The model is equipped with an automatic energy saving function. This switches the device to standby mode within 15 minutes if it is played at a very low volume or if the radio is muted. This setting cannot be changed.
IMPORTANT FOR LASER PRODUCTS
CLASS 1 LASER PRODUCT
CAUTION: Do not open the casing. The device contains no user serviceable parts; Maintenance should only be carried out by qualified personnel.
Hereby, JVCKENWOOD Corporation declares that the radio equipment type M-9000S complies with Directive 2014/53/EU. The full text of the EU Declaration of Conformity is available at the following Internet address: http://www.kenwood.com/cs/eudoc/
Manufacturer:
JVCKENWOOD Corporation
3-12. Moriyacho, Kanagawa-ku, Yokohama-shi, Kanagawa 221-0022, JAPAN
Authorised Representative (EU):
JVCKENWOOD EUROPE B.V.
Amsterdamseweg 37, 1422 AC UITHOORN, THE NETHERLANDS
2. Start-up
2.1 Unpacking
Carefully unpack the device and make sure all accessories are present:
• Infrared remote control
2.2 Connect
- Open the battery compartment of the remote control and insert the batteries w. correct polarity. The specified polarity (+/-) is marked in the battery compartment.
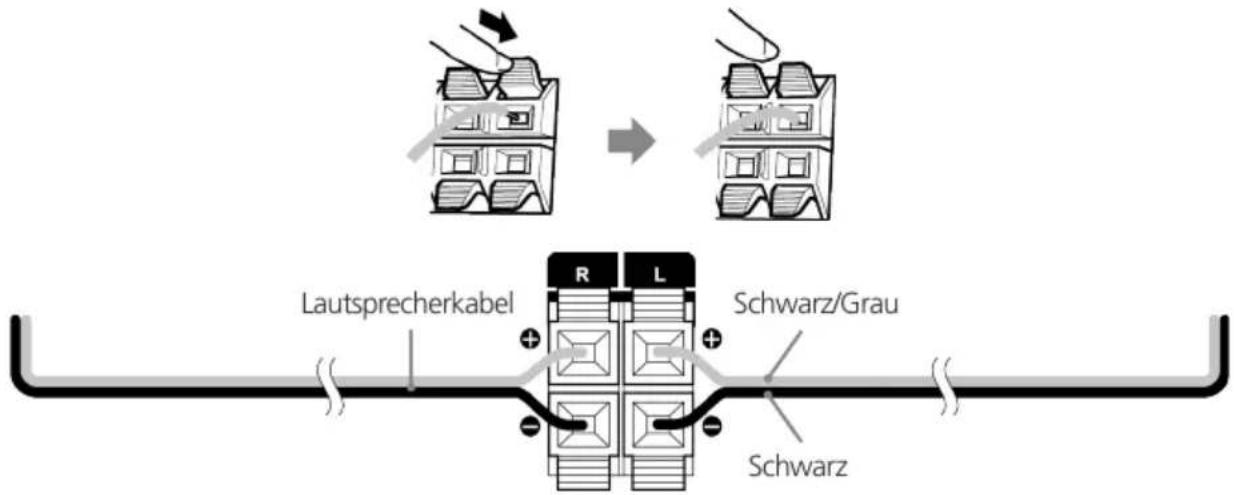
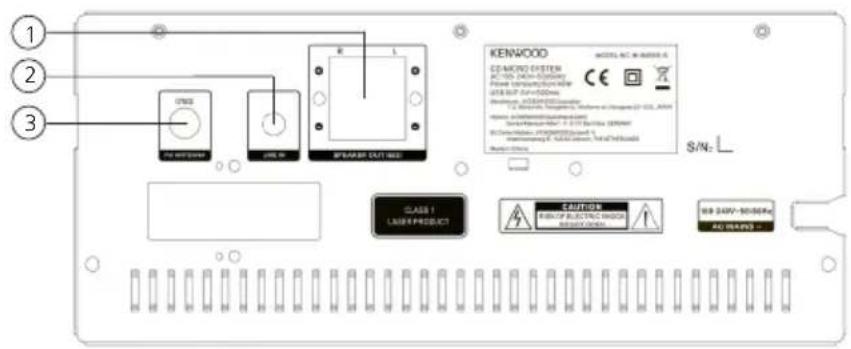
Connect the left and right speakers to the connection (Speaker Out) on the rear of the device. To do this, press the spring clips and insert the loose cable ends into the openings provided. Connect the black wire with the black spring clamp. The other wire is connected to the red terminal in the same way.
text_image
Speaker cable
R L
Black/grey
Black
- Finally, connect the power plug to an AC outlet. Since the mains plug is used to completely disconnect it from the power grid, the socket must always be accessible.
2.3 DAB+ / FM antenna connection
Connect the wire antenna to [FM ANTENNA 75Ω] socket.
Find the place where the best reception is achieved.
Fix the antenna.
The antenna supplied with the system is a simple wire antenna. It is recommended to use an outdoor antenna (commercially available) for stable signal reception.
To connect an outdoor antenna, first pull out the indoor antenna.
The reception of radio stations from the cable network cannot be guaranteed.
2.4 Network connection
In order to receive Internet radio, the radio must be integrated into a network. To do this, the router must be switched on and connected to the Internet. Make sure that the WLAN connection of the router is activated. You can also consult the router's operating instructions.
3. Components and functions
text_image
MODE MENU ALARM SHUFFLE
BEET PAIR
EQ VOL
OK
(SCAN)
1 2 3
ABC DEF
4 5 6
GHI JKL MNO
7 8 9
PQRS TUVWXYZ
PROG 0 INFO
FAV INTRO
KENWOOD
Standby On/Off, alarm off
Open/Close CD Tray (Eject)
MODE Mode selection
MENU Menu
ALARM Set alarm clock
SHUFFLE / REPEAT Music: Random/repeat selection
▶ Start, pause playback
▶▶/▶▶ Skip Track/Search Track/FM station search forwards
Skip Track/Search Track/FM station search backwards
BTPAIR Bluetooth pairing, stop playback
▲ High; FM: Set frequency
▼ Down; FM: Set frequency
Left; Step back, Preset memory backwards
Right; next step, preset memory forwards
OK Confirm input; FM: Search;
Radio image, slide show in full screen mode
EQ Select equalizer preset
Mute, Unmute
VOL-/+ Volume decrease / increase
(0-9) Numeric input of the preset memory, input of the track number
PROG FAV Track programming, use preset memory
INFO
INTRO Switching screen information; during playback 10 seconds intro of each track
3. Component and function continuation
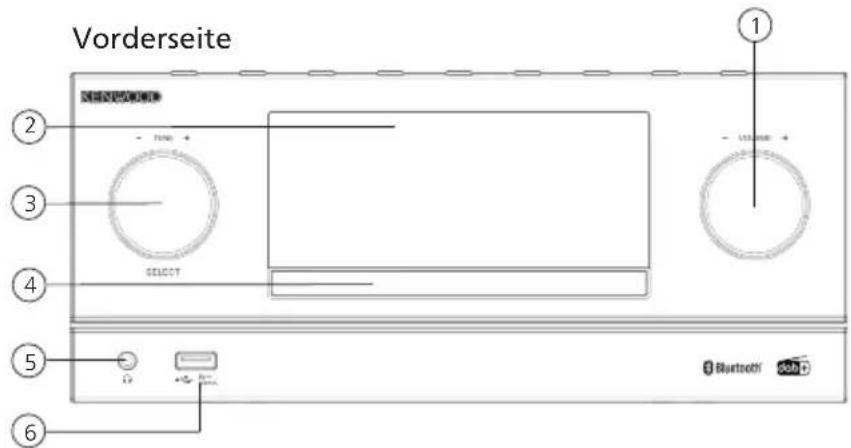
1 - Volume
text_image
Front side
①
②
③
SELECT
④
⑤
Bluetooth Sub
1 - Standby
Top view
flowchart
graph TD
    A["+"] --> B["1"]
    C["="] --> D["2"]
    E["..."] --> F["3"]
    G["="] --> H["4"]
    I["•"] --> J["5"]
    K["..."] --> L["6"]
    M["..."] --> N["7"]
    O["★"] --> P["8"]
    Q["±"] --> R["9"]
1 - Speaker connection
Backside
text_image
①
②
③
U100
MAX 100000
MAX 100000
SPRANGE CUT-SEE
KENWOOD
CO-MICRO SYSTEM
AC: 150, CIN: 200000
Power consumption kW
USB: 8.5V, 3V=320Hz
S/N: L_
CLASS 1
Laser Product
CAUTION
LED OF ELECTRIC SWITCH
REDADED
USB 24W-260MHz
AC: 150MHz
3.1 Switching On / Off (standby)
Press the button on the remote control or on the device to switch on the radio. Press the button again to put the device into standby mode. To switch it off completely, disconnect it from the power supply.
You can navigate through the menus by pressing the buttons on the remote control. Pressing once on the button confirms the selection. These operating steps can also be carried out on the device using the knob. Turn the knob to navigate through the menus, confirm a menu item by pressing the knob.
3.3 Entering passwords, search texts, etc.
Use the to select the corresponding numbers and/or letters individually and confirm the selection by pressing . To correct an incorrect entry, please go to the field and confirm with the button on the remote control. This will delete the last entry. Use the "CANCEL" field to cancel the entry completely. If your selection is complete, please navigate to the "OK" field and confirm the selection by pressing the button.
3.4 Adjusting volume and "Mute"
You can adjust the volume by pressing the and buttons on the remote control or by turning the knob on the device. Pressing the button mutes the radio. Another pressing of the button restores the original volume.
By repeatedly pressing the button, depending on the source and station, additional information can be displayed:
Description
Name of the station, the current program, content, topics, etc.
Genre
The program style (genre) of the station is displayed.
Bit rate
In the "FM radio" and "DAB+ Digital radio" modes, information on reception strength, stereo mode, RDS signal (only FM) and preset memory is available on the lower right edge of the Display. If the corresponding display is missing, the information is not available.
3.6 Setup wizard
At the first Start the Setup Wizard starts automatically.
The setup wizard runs in English.
You can skip the wizard and call it up again later in German.
At the first start-up all available menu languages are listed. Select the desired language with the button and confirm with .
3.8 Starting the setup wizard
For a simple and quick initial start-up (setting the time and date, setting up the internet connection, etc.), we recommend that you run the setup wizard. To do this, please select "YES". If you want to skip the setup wizard, select "NO".
All settings that are made using the setup wizard can later be made individually via the system settings. Alternatively, the setup wizard can be run again at any time. Then select "YES" or "NO" to run the setup wizard automatically or not to run the next time the radio is started. Then you are at the Main menu.
- Date/Time
12/24 Hour format
• Automatic update (time & date)
Update from DAB or FM (recommended)
With automatic updates via the FM/DAB/DAB+ radio network, the time and date are provided by the broadcasters. When adjusting via these sources, the time is set correctly even after a power failure. This means that set wake-up times can also be observed.
- Update from NET
When this option is selected, the time and date are automatically set via the Internet connection. In addition, the time zone and summer/winter time can be adjusted.
- No update
Time and date must be set manually.
- Keep network connection
The network configuration is discussed in more detail in Section "System Settings".
4. Main menu
The Main menu contains the various audio sources and setting options:
Internet radio
Podcasts
Spotify
USB
Bluetooth
Line-in
Sleep
Alarms
System settings
With the audio source selected, press on the
button on the remote control or on the device and select "Main menu".
5. Internet radio
The internet radio offers a huge selection of different offers around the world. You can select the stations in a variety of ways. To do this, please select the "Internet radio".
5.1 Station search
The radio offers various options for searching for the desired station.
Navigate within the menu items and options. Once you have found the desired station, confirm your selection with the button. Internet radio playback can be stopped by pressing the button on the remote control. Another pressing of the button reloads the station.
5.1.1 Search for countries and regions
To search for stations from certain continents, countries and regions, press the
button to call up the "Station list". Confirm the selection.
Select the "Countries" menu to select a country or region.
5.1.2 Search by genre
To search for stations with specific music styles or themes, proceed as follows:
Press the
button to call up the "Station list". After confirming the selection, navigate to the "Discover" menu. After confirmation, you can further narrow down your search according to the origin or language of the station.
5.1.3 Search by name
If you know the name of the desired station, you can search for it specifically:
Press the
button to call up the "Station list". After confirming the selection, navigate to the "Search" menu. Enter all or part of the station name in the input mask and select the "OK" field to start the search. You will receive a list of all stations whose names contain the text you are looking for.
5.1.4 Popular stations
You can find a selection of the most popular stations as follows:
Press the
button to call up the "Station list". After confirming the selection, navigate to the "Popular" menu and select the desired station.
5.1.5 Local stations
To specifically search for stations from the country of the current location of the radio, please proceed as follows:
Press the
button to call up the "Station list". After confirming the selection, navigate to the menu with the country name of the current location (e.g. "Germany").
Within this local limit, you can also search for genres, local or popular stations.
5.2 Favourites (memory locations)
40 memory locations (favourites) are available for storing your favourite stations. You can assign these favourites to stations from the sources "Internet radio" and "Podcasts". To call up saved stations on the main unit, please press the <*> button and select the desired memory location by turning the knob. To load the station, press .
5.2.1 Storing stations with the remote control:
Memory locations 1–10 can be assigned using the number buttons on the remote control. To do this, select the desired station and press a number key on the remote control until "Preset stored" appears on the display. The memory locations can now be called up by pressing the remote control briefly.
5.2.2 Saving stations in memory locations 11 - 40:
Select the desired station and hold down the button on the remote control. Now select a memory location from the list of station memories and confirm the selection with the button on the radio. The "Preset stored" appears on the display. You can easily call up the station list by briefly pressing the <*> button on the radio or on the remote control (PROG button). Use the buttons or the knob to select a station and press to confirm.
Note: The memory locations cannot be deleted, but can only be overwritten with other stations.
6. Podcasts
Podcasts are available articles on various topics, e.g. Information broadcasts, news and much more. As with internet radio, here you can filter Podcasts or search for a Podcast in the entire database. To do this, please select the source "Podcasts" in the main menu.
6.1 Finding podcasts
The radio offers various options for searching for podcasts. Navigate within the menu items and options. Once you have found the podcast you are looking for, confirm your selection with the button. Playback of podcasts can be paused and restarted by pressing the button on the remote control. By pressing the you can fast forward and rewind within the podcast at increasing speed (max. 32 times). Brief pressing of the button you can jumps to the beginning of the podcast.
6.1.1 Search for countries and regions
To search for podcasts from specific continents, countries and regions, press the
button to call up the "Podcast list". Confirm the selection.
Select the "Countries" menu to select a country or region.
6.1.2 Search by genre
To find podcasts with specific content or topics, proceed as follows:
Press the
button to call up the "Podcast list". After confirming the selection, navigate to the "Discover" menu. After confirmation, you can further narrow down the search according to the origin or language of the podcasts.
6.1.3 Search by name
If you know the name of the podcast you want, you can search for it:
Press the
button to call up the "Podcast list". After confirming the selection, navigate to the "Search" menu. Enter all or part of the podcast name in the input mask and select the "OK" field to start the search. You will receive a list of all podcasts or episodes whose names contain the text you are looking for.
6.1.4 Popular podcasts
In order to search for popular podcasts from the country of the current location of the radio, please proceed as follows:
Press the
button to call up the "Podcast list". After confirming the selection, navigate to the menu with the country name of the current location (e.g. "Germany"). Within this local limit, you can also search for genres, local or popular podcasts.
6.2 Favourites (memory locations)
40 storage spaces (favourites) are available for storing podcasts. You can assign these favourites to stations from the sources "Internet radio" and "Podcasts". To call up saved podcasts on the main unit, please press the <> button and select the desired memory location by turning the knob. To load the podcast, press .
6.2.1 Saving podcasts with the remote control:
Memory locations 1–10 can be assigned using the number buttons on the remote control. To do this, select the desired podcast and press a number key on the remote control until "Preset stored" appears on the display. The memory locations can now be called up by pressing the remote control briefly.
6.2.2 Saving podcasts on memory locations 11 - 40:
Select the desired podcast and hold down the button on the remote control. Now select a memory location from the list of station memories and confirm the selection with the button on the radio. The "Preset stored" appears on the display. You can easily call up the memory locations by briefly pressing the <*> button on the radio or on the remote control.
Use the buttons or the knob to select a podcast and press to confirm.
Note: The memory locations cannot be deleted, but can only be overwritten with other podcasts.
7. Spotify
Use your phone, tablet or computer as a remote control for Spotify. Go to spotify.com/connect to learn how. The Spotify Software is subject to third party licenses found here:
www.spotify.com/connect/third-party-licenses.
For this you need a Spotify account (information at www.spotify.de)
Install the Spotify App on your Android/iOS device. You can download it from the Play Store or from the Apple App Store. After installation, start the App and log in with your access data or register. The radio and the Android/iOS device with the Spotify App must be in the same network.
7.1 Use
Please select the source "Spotify" in the main menu and start playing Spotify on your smartphone as usual. The Spotify Connect logo and "Available devices" are displayed at the bottom of the phone. Press "Available devices" to display a list of the devices available on the network. Now select "M-9000S" and the playback will take place on the radio. A successful connection is indicated by green script. After a successful first connection, you can also connect the smartphone to the radio as follows: Select the source "Spotify" in the main menu and press . The "Press Play ..." now appears in the display. Press the button on the remote control to establish the connection and start playing the current Playlist. You can also use the remote control to jump between the tracks in the current list.
7.2 Favourites (memory locations)
10 memory locations (favourites) are available for storing playlists.
7.2.1 Saving playlists with the remote control:
Memory locations 1–10 can be assigned using the number buttons on the remote control. To do this, select the desired playlist and press a number key on the remote control until "Saved" appears on the display. The memory locations can now be called up by pressing the remote control briefly. Individual tracks that are not in playlists can also be saved.
Note: The memory locations cannot be deleted, but can only be overwritten with other playlists/tracks.
8. CD Player
You can use this source to play audio CDs and MP3 CDs. To do this, please select the source "CD" in the main menu. Open the CD tray by pressing the button on the main unit or on the remote control. Insert the CD and close the tray by pressing . Playback begins automatically with the first track on the CD. You can briefly play the tracks on the CD by pressing the button on the remote control. Pressing the button again ends this function.
For audio CDs, information about the number of tracks and total playing time is displayed as follows:
TXX XX:XX
The first number block stands for the number of tracks and the second for the total playing time of the CD.
8.1 Playing MP3 files
Select the desired folder or track from the menu, the music playback is started with the . You can use the buttons to navigate through the folder structures. With the <PLAY/
PAUSE> buttons, playback is paused and continued. By continuously pressing the buttons you can fast forward and rewind within the track with increasing speed (max. 32 times).
Brief pressing of the takes you to the beginning of the track or to the previous Track.
For CDs that contain MP3 files, the number of available folders and files is displayed as follows:
FXX TXXX
The number behind "F" stands for the number of folders and the second block of numbers for the total number off "T" files.
8.2 Repeat and random playback
To play tracks from a CD or MP3 files in a folder in random order, or to repeat the playback of the files, please proceed as follows:
Press the
button and select "Repeat" and/or "Shuffle". The functions are switched on or off with the button. Alternatively, you can also use the button on the remote control.
Repeated presses activate the functions as follows:
Press once: Repeat one / press twice: Repeat folder (only for MP3)
Press thrice: Repeat all / press 4 times: Random playback / press 5 times: All off
9. USB player
You can use this source to play MP3 files (16 bit/48kHz) from a USB stick. To do this, please select the source "USB" in the main menu.
9.1 Playing MP3 files
Select the desired folder or track from the menu, the music playback is started with the . You can use the buttons to navigate through the folder structures. With the buttons, playback is paused and continued. By continuously pressing the buttons you can fast forward and rewind within the track with increasing speed (max. 32 times). Brief pressing of the takes you to the beginning of the track or to the previous Track.
9.2 Repeat and random playback
To play MP3 files in a folder in random rows, or to repeat the playback of the files, please proceed as follows:
Press the
button and select "Repeat" and/or "Shuffle". The functions are switched on or off with the button. Alternatively, you can also use the button on the remote control. Repeated presses activate the functions as follows:
Press once: Repeat one / press twice: Repeat folder
Press thrice: Repeat all / press 4 times: Random playback / press 5 times: All off
10. Digital radio DAB+
To receive the digital radio DAB+, please switch to the source "DAB Radio" in the main menu. When switching for the first time, an automatic station search is started. The "Scanning" appears on the display, as well as the number of stations found so far and a corresponding progress bar. Some stations offer additional information as a so-called Slideshow.
To display these on the radio display in large format, press the button on the remote control or on the radio. Pressing the button again switches the display back.
10.1 Station search
To search for receivable stations, you can start an automatic search. To do this, use the
button to open the menu and select "Scan". The "Scanning" appears on the display, as well as the number of stations found so far and a corresponding progress bar. The stations are then saved in alphabetical order.
Stations that were found during a previous search but cannot currently be received are shown in the station list with a "?" in front of the station name.
10.2 Manual setting
You can also set ensembles manually. To do this, use the
button to call up the menu and select "Manual tune". Then select the desired station and confirm with . Now information about the ensemble and the signal strength are displayed. Another pressing of the button selects the corresponding stations in the list.
10.3 Station list
Press the
button and confirm "Station list" with . Use the buttons or the knob to select a station and press to confirm. The device starts playing automatically.
Note: The reception quality of a station depends on factors such as weather, installation location and antenna orientation. If a station from the station list cannot be received, change the orientation of the antenna or the location of the radio. Stations that can no longer be received can be removed from the station list.
10.4 Delete stations that can no longer be received
Stations that can no longer be received can be deleted from the list. To do this, press the
button and select "Prune invalid". With "This removes all invalid stations, continue?" select "Yes" and these stations will be deleted. Selecting "NO" takes you back into the menu without deleting the stations.
10.5 Favourites (memory locations)
20 memory locations (favourites) are available for storing DAB+ stations. To call up saved stations on the main unit, please press the <*> button and select the desired memory location by pressing .
10.5.1 Storing DAB+ stations with the remote control:
Memory locations 1–10 can be assigned using the number buttons on the remote control. To do this, select the desired station and press a number key on the remote control until "Preset stored" appears on the display. The memory locations can now be called up by pressing the remote control briefly.
10.5.2 Saving DAB+ stations in memory locations 11 - 20:
Select the desired station and hold down the button on the radio or on the remote control. Now select a memory location from the list of station memories and confirm the selection with the button on the radio. The "Preset stored" appears on the display. You can easily call up the memory locations by briefly pressing the on the remote control. Use the buttons or the knob to select a station and press to confirm.
Note: The memory locations cannot be deleted, but can only be overwritten with other stations.
10.6 DRC (Dynamic Range Control):
Some DAB+ stations support DRC, which reduces the difference between loud and soft tones. The following settings are possible:
DRC high:
Strong compression of the different volumes. The dynamic is greatly reduced.
DRC low:
Low compression without much loss of dynamics.
DRC off:
There is no compression.
To make the settings, proceed as follows:
Press the
button and select "DRC". The settings for DRC can be changed in the following menu. The current setting is indicated by "*".
10.7 Station order
By default, the radio sorts the stations in alphabetical order. The stations can also be sorted by ensembles.
To make the settings, proceed as follows:
Press the
button and "Station order". The settings can be changed in the following menu.
11. FM Radio
Select "FM RADIO" in the main menu to switch to FM reception.
11.1 Station search
You can automatically search for FM stations. To start the automatic station search, please press the button on the remote control or on the radio. The search stops at the next station found and the radio starts playing.
11.2 Search settings
You can use this function to determine whether only stations with a strong reception signal are taken into account. To do this, press the
, button and select "Scan setting". In the following menu "FM station scan" you can now answer the question "Strong stations only" with "YES" or "NO". The current setting is identified by "*".
11.3 Audio Settings
For stations with poor reception, a slight quality improvement can be achieved by switching to mono reception. To do this, press the
button and select "Audio setting". In the following menu "FM weak reception" you can now answer the question "Listen in Mono only" with "YES" or "NO". The current setting is identified by "*".
11.4 Favourites (memory locations)
20 memory locations (favourites) are available for storing FM stations. To call up saved stations on the main unit, please press the <> button and select the desired memory location by pressing
11.4.1 Storing FM stations with the remote control:
Memory locations 1–10 can be assigned using the number buttons on the remote control. To do this, select the desired station and press a number key on the remote control until "Preset stored" appears on the display. The memory locations can now be called up by pressing the remote control briefly.
11.4.2 Saving FM stations in memory locations 11 - 20:
Select the desired station and hold down the on the remote control. Now select a memory location from the list of station memories and confirm the selection with the button on the radio. The "Preset stored" appears on the display. You can easily call up the memory locations by briefly pressing the on the remote control. Use the buttons or the knob to select a station and press to confirm.
Note: The memory locations cannot be deleted, but can only be overwritten with other stations.
12. Bluetooth Audio
The BLUETOOTH function enables the wireless transmission of music files (audio streaming) to the radio. Smartphones, tablets or similar devices can be paired. To do this, select the source "Bluetooth Audio" in the main menu.
12.1 Pairing Bluetooth devices for the first time (pairing)
Make sure that the terminal device to be paired is switched on and Bluetooth is activated. Select the source "Bluetooth Audio" in the main menu. The "Loading" appears on the display. Now open the Bluetooth settings on the terminal device to be paired and start searching for available Bluetooth devices there. Select "M-9000S" and start the pairing process. After successful pairing, "Connected" appears on the display. Now the music playback can be controlled via the terminal. To do this, use the music App of your choice.
Basic operation of play/pause and skip forward/backward is possible using the corresponding buttons on the remote control.
Note: Some terminal devices require a PIN code when connecting, then enter "0000".
12.2 Automatic connection after pairing has already taken place
If the source switches "Bluetooth Audio" or the radio is switched off, the Bluetooth connection is disconnected. If the radio is switched on again or switched back to the "Bluetooth Audio" source, an automatic connection is established.
Note: If an automatic connection is not possible, please proceed as follows:
Press the
button and select "View details". Then open the "Paired Device List", to select and pair the desired terminal device. Press the button to establish the connection and "Connected" appears briefly on the display.
12.3 Pair another terminal device
To connect another terminal device to the radio, please press the
button and select "Set up Bluetooth". This will disconnect the current connection.
Now proceed as when you first connect a terminal device. Afterwards, this terminal device is also saved in the list of paired devices and can be selected via the corresponding menu (see above). A maximum of 8 devices can be saved.
12.4 Interrupting the Bluetooth connection
If you want to interrupt the connection to a paired device, please press the button on the remote. The radio then switches back to pairing mode.
13. Analogue connections
13.1 Line-In
External devices such as MP3 players, DVD players or game consoles can be connected to the line-in connection to play music. To do this, please select the source "Line-In" in the main menu.
14. Sleep
With this function you can switch the radio to standby mode automatically after a set period of time. You can choose between 15, 30, 45 or 60 minutes, "Sleep off" deletes the previously set period of time. To do this, press the
button while the audio source is selected and select "Main menu". Use the or to navigate in the menu and select "Sleep". Use the or button in the "Set sleep time" menu to select the desired time period and confirm with the button. Exit the menus again with the button.
The remaining time is shown in the bottom left of the display, with minutes running backwards.
15. Alarms
This radio has 2 individually adjustable alarm times. Press the button on the remote control and select "Alarm 1" or "Alarm 2" to make the settings.
Alternatively, you can also call up the alarm clock from the main menu. In addition, a setting on the radio is possible using the button and the knob. In standby mode, the saved alarm clocks of the button can be activated and deactivated. The following options are available for programming the alarm clock:
15.1 Activated:
Select here on which days the alarm should be activated. The following selection is available: Off/Daily/Once/Weekend/Week day
Select "Off" to deactivate an activated alarm clock.
15.2 Time:
Set the hours first with the or buttons and then the minutes after pressing the .
15.3 Mode:
Here you set the audio source with which you want to wake up. The following selection is available: Buzzer / Internet radio / DAB / FM / CD /USB
15.4 Preset:
The station with which to wake up is specified here. The station last listened to or the stations saved in the favourites are available here. Does not apply to buzzer, CD or USB mode.
15.5 Volume:
Set the desired alarm volume here.
15.6 Save:
Once you have made all the settings, please press the button to save the settings.
An activated alarm clock is shown with an alarm symbol and the number of the active alarm clock at the bottom left of the display. In standby mode you can also see the set alarm time.
15.7 Switching off the alarm clock after waking up
To switch off the alarm clock until the next alarm cycle, please press the button on the device or on the remote control "Alarm off" appears briefly on the display. If you only want to interrupt the alarm function for a few minutes (snooze), you can use any other button. The alarm delay is set by pressing the button in steps 5, 10, 15 and 30 minutes and can also be extended again and again. After a short time, the radio automatically switches back to "Standby" and the time remaining until waking up again is displayed next to the flashing alarm symbol.
Note: The saved wake-up times are retained in the event of a power failure.
16. System settings
In the system settings you can change the settings of the radio and call up important information about the radio.
16.1 Equalizer
With the equalizer you can adjust the sound of the radio to your liking. You can choose from preconfigured settings or create your own profile. Please proceed as follows:
Press the
, button and select "System Settings" and then "Equalizer". You can select a sound profile with the or buttons and then confirm with . The following profiles are available:
Powerful / Clear / Bright / Warm / Balanced
16.2 Network settings
16.2.1 Network wizard
The network assistant helps to connect the radio to the Internet. To call it up, please proceed as follows:
Select the "Network" in the "System Settings" menu and then confirm "Network Wizard". The radio now starts a search for available WLAN connections and then lists them. The various networks can be selected using the or buttons and the knob. At the end of the list there is the option to select "[Rescan]" or "[Manual config]".
16.2.2 Wireless network connection (WLAN)
Depending on the network, you have several options to choose from to connect to the network. Networks that support a WPS connection (Wi-Fi Protected Setup) are identified in the list by the preceding designation "[WPS ...]". Other connections are open networks or connections that are protected by the PSK method = pre-shared key (previously agreed key).
Note: An active network connection is indicated by a white symbol at the bottom right of the display. If no connection is active, this symbol is crossed out in red.
16.2.3 WPS / PSK / Open connection
A WPS connection enables the radio to be connected to your network in a simple yet protected manner. There are two options available. Establishing the connection through PBC = Push-Button-Configuration (configuration at the push of a button) or by the PIN procedure, in which the web interface of your router prompts you to enter a randomly generated sequence of numbers.
16.2.4 Setup using PBC
Select the desired network "[WPS ...]". Then select the "Press button" option with "WPS menu" and confirm. Now press the WPS button on your router or access point (AP). Please refer to the operating instructions of your router or AP for the exact procedure. .Alternatively, the process can also be started in the "Internet Settings" menu under "PBC WLAN Structure". Follow the instructions on the display.
16.2.5 Setup using a PIN
Select the desired network "[WPS ...]". Then use the "WPS menu" to select and confirm the "PIN" option. The radio now generates an 8-digit code, which you should confirm with the button and then enter the number via the user interface of the router or AP. Please refer to the Router or AP manual for more information.
16.2.6 Skip WPS/Setup using PSK (pre-shared key)
Select "Skip WPS" to establish the connection using the network key. In the case of networks without WPS support, you can go directly to the input mask. Now enter the key and confirm it with the "OK" button. If the entry is correct, the radio connects to your network and establishes an Internet connection.
16.2.7 Open connection
We recommend that you do not connect to an open network. If the network you have selected is not encrypted, you can confirm this with the button. Then the internet connection is established.
16.2.8 Manual network connection setup
If DHCP is active, please proceed as follows:
Please select the menus "Network" -> "Manual settings" -> "Wireless" -> "DHCP active". Then enter the full SSID (network name) and confirm it with the "OK" button. Now choose the appropriate encryption method.
Please refer to the configuration of the router or AP. Depending on the method selected, the network key is now entered and confirmed with the "OK" button.
16.2.9 If DHCP is inactive, please proceed as follows:
Please select the menus "Network" -> "Manual settings" -> "Wireless" -> "DHCP inactive". Now enter the information for "IP address", "Subnet mask", "Gateway address", "Primary DNS" and "Secondary DNS". The values can be set using the or on the remote control or the knob. Use the , or to select the individual number. Then proceed as described under "DHCP active".
16.3 View settings
In this menu you will find all settings of the network profile currently in use. To do this, select the "View settings" menu in the "Network" menu. The values can be displayed using the or on the remote control or the knob.
16.4 NetRemote PIN setup
In this menu you can set a 4-digit PIN that will be requested when the UNDOK App is set up for the first time (see Chapter 24). The default is "1234". The PIN should be changed immediately.
16.5 Network profile
Here you can see the list of network profiles saved on the radio. If you have created several profiles, choose the one closest to the corresponding router or AP.
You can delete network profiles that are no longer required by pressing the or button on the remote control or the knob to select the profile to be deleted and confirm with the button. The active network profile is marked with "*".
Note: The active network profile cannot be deleted.
16.6 Clear network settings
In this menu you can delete the network settings of the current profile. To do this, select the "YES" button and confirm your entry with the . Selecting the "NO" button cancels the process.
16.7 Keep network connection
This menu is used to set whether the WLAN connection to the network should be maintained in standby mode. This enables you to switch on the radio using the UNDOK App (see page 27). Power consumption in standby mode is slightly higher in networked mode. Select the "YES" or "NO" button for the setting and confirm the entry with the .
17. Time settings
Settings for time and date can be made in the "Time/Date" menu. The following options are available:
The time and date can be set here manually. The values can be changed using the or on the remote control or the knob. Use the , or button to select the individual blocks of numbers and to save the values.
Here you can specify the source from which the time and date should be updated. The following options are available:
Update from DAB: Time and date are updated via DAB.
Update from FM: The time and date are updated via FM.
Update from NET: The network updates the time and date.
No update: Time and date must be set manually.
The currently selected option is marked with "*".
In this menu you can specify whether the clock should be displayed in 12 or 24 hour format. Select with the or button, the confirmation is made with the button. The currently selected option is marked with "*".
18. Language
In the "Language" menu you can set the menu language of the radio. If you have started up the device with the setup wizard, the device language has already been set there. To select a language, please use the or buttons and confirm this by pressing the button. Alternatively, the selection can also be made with the knob.
The following languages are available:
Danish, German, English, Finnish, French, Italian, Dutch, Norwegian, Polish, Portuguese, Swedish, Spanish, Turkish
19. Factory reset
To reset the radio to the delivery state, please select "YES" in the menu "Factory reset".
Attention: All previous settings are deleted.
If you select "NO" the process is cancelled.
Note: Be sure to reset the radio to the factory settings before you pass it on (e.g. to sell, give away or dispose of).
20. Software update
In this menu you can check whether a software update is available for the radio.
If you select "Auto-check setting" the radio automatically checks the availability of new software updates on a regular basis.
Select the menu item "Check now" to search for a new version. If newer software is found, please select "YES" to install it or "NO" to cancel the update. If "YES" the radio restarts to carry out the process.
Then the software is downloaded and you are asked with "Proceed" whether the update should be carried out. Please choose "YES" if you consent or "NO" to cancel the update. The "Warning: do not remove power" and the software version to be installed flash alternatively. When the process is complete, "Update completed" appears on the display and you can confirm the process with the button.
You can check the version number of the installed software under the "System settings" menu under "Info".
Attention!
Make sure that there is a stable power supply before you start a software update.
An interruption during an update can cause irreparable damage to the radio!
21. Setup wizard
You can start the setup wizard again in the "Setup wizard" menu. To do this, proceed as described under "3.8 Starting the setup wizard".
22. Info
In this menu you will find the version number of the current firmware, among other things. Have this ready if you want to contact customer service.
23. Privacy policy
Please read the data protection regulations listed there or go to this website:
www.frontiersmart.com/privacy
24. Backlight
The display illumination can be programmed in 3 brightness levels. The following settings can be made in the "Backlight" menu:
"Timeout": Time until the display is set to the "Dim level" lighting level.
Choices: "On / 10 / 20 / 30 / 45 / 60 / 90 / 120 / 180 seconds"
"ON" means that the radio always remains in the brightness level of the "On setting".
"On level": Brightness of the display when the radio is switched on.
Choices: "High" / "Medium" / "Low"
"Dim level": Brightness adjustment for operation and standby.
Choices: "Medium" / "Low" / "Night" / "Off"
25. UNDOK - Control of the radio via App
The UNDOK application (App) developed by Frontier Silicon gives you full control of radios and speakers on your smartphone.
Regardless of whether you are setting up the device for the first time, configuring Equalizer or managing your favourite channels - UNDOK offers you all the features on your smartphone or tablet and offers you even more convenience. Download the UNDOK App from the Google Play Store or the Apple App Store.
Initial setup of the device with UNDOK
When switched on for the first time, or after the radio has been set to the factory settings, the radio is in SETUP mode and a so-called micro-access point (own WLAN network) is generated. This allows your smartphone or tablet to connect to the radio.
Set up with Android
Make sure the radio is in SETUP mode. Open the UNDOK-APP on your smartphone or tablet and select the menu item "Set up audio system".
Press "NEXT" and select the menu item "SELECT THE ACCESS POINT".
The WLAN menu of the terminal device opens up, select the "M-9000S" network there. After connecting, "Connected to M-9000S" appears in the App. Follow the further instructions of the App to set up the radio completely. Finally, the radio connects to the network and you can now operate the device with the UNDOK APP by pressing "Use my audio system".
Set up with iOS
Make sure the radio is in SETUP mode. Open the UNDOK APP on your iPhone or iPad, and select the menu item "Set up audio system".
Press "NEXT" and select the menu item "SELECT THE ACCESS POINT".
The WLAN menu of the terminal device opens up, select the "M-9000S" network there. After connecting, "Connected to M-9000S" appears in the App. Follow the further instructions of the App to set up the radio completely. Finally, the radio connects to the network and you can now operate the device with the UNDOK APP by pressing "Use my audio system".
26. Troubleshooting
Please check the following points in case of malfunctions:
No sound
→ Plug in the power adapter properly.
The system does not respond at the touch of a button
→ Unplug the AC adapter and reconnect it.
Problems with radio reception
→ Reorient the antenna.
A network connection cannot be established
→ Check the WLAN function, make sure the password is correct.
27. Maintenance and care
Cleaning the housing
Use a cloth lightly moistened with a mild detergent. Do not use detergents containing alcohol, ammonia or scouring agents.
Cautions on condensation
Condensation (dew) may form inside the unit if there is a significant difference between the temperature of the unit and the ambient temperature. If condensation occurs inside the unit, proper function is no longer guaranteed. In this case, you have to wait a few hours; After the moisture has dried, the device can be reused.
Special care should be taken in the following circumstances
When the unit is moved from one place to another at a much higher or lower temperature, or when the humidity at the installation site increases, etc.
Handling of CDs
Hold the CD so that you do not touch the signal surface. (The unprinted side is the playing side.)
Use only use CDs with disc marking. In some cases, CDs with this marking may not play back properly.
Worth knowing about USB devices
Notes on using a USB device
This device is capable of playing audio files stored on a flash memory or digital audio player if these devices have a USB port (these devices are referred to as USB Devices in this document).
The following restrictions apply to the usable USB Devices:
Usable USB Devices
• USB Devices that belong to the USB Mass Storage Class.
Even if you use a USB device that meets the above specifications, audio files may not play back properly depending on the type or condition of the USB device.
28. Disposal
Disposal of used electrical and electronic equipment and batteries.
The crossed-out wheeled bin symbol on the product or its packaging indicates that this product must not be treated as normal household waste, but must be returned to a collection point for the recycling of electrical and electronic equipment and batteries. By helping to properly dispose of this product, you are protecting the environment and the health of your fellow human beings. Improper or incorrect disposal endangers the environment and health. For more information about the recycling of this product, please contact your local authority or your municipal waste disposal service.
Attention: The "Pb" sign under the battery symbol indicates that this battery contains lead.
The end user is responsible for deleting data on the old device using the menu item "Factory setting" before disposal (see Chapter 18).
The Bluetooth ^® word mark and logos are registered trademarks of Bluetooth SIG Inc. and any use of such marks by JVCKENWOOD Corporation takes place under license. Other trademarks and trade names are those of their respective owners.
Technical Specifications M-9000S
Power supply AC voltage 100 - 240 V. AC input frequency 50/60 Hz Power consumption 40 Watts Power consumption in standby mode 0.8 Watts Power consumption in networked standby 0.8 Watts Tuner FM/DAB + DAB tuning range BAND III 174.928 MHz – 239.200 MHz FM tuning range 87.50 MHz – 108.00 MHz CD mode Signal-to-noise ratio (A filter) ≥ 65 dB Dynamic Range ≥ 60 dB Network connection (WLAN) Supported networks WIFI IEEE 802.11a/b/g/n Supported frequency ranges WiFi: 2.412 - 2.472 GHz, 5.18 - 5.32 GHz, 5.50 - 5.70GHz, 5.745 - 5.825GHz Maximum radio-frequency power WIFI 2.4 G: 13.6 dBm / WIFI 5G: 13.6 dBmWIFI 5.8G: 13.6 dBm Supported encryption WEP, WPA, WPA2 (PSK), WPS Supported streaming formats MP3, AAC / AAC + (up to 48 kHz, 16 bit) USB devices Playable files: MP3Compatible with USB1.1 full-speed, FAT16, FAT32 Max. 500 mA, Bit rates: 32 kBit/s to 320 kBit/s BLUETOOTH BLUETOOTH version V4.2 Power class Class 1 Maximum radio-frequency power 4.3 dBm Reach About 10 meters (may vary depending on the environment) Frequency range 2.402 GHz – 2.480 GHz BLUETOOTH profile A2DP (Advanced Audio Distribution Profile, AVRCP (Audio/Video Remote Control Profile) Line-In 3.5 mm jack socket Amplifier part Output power 2 x 50 watts / 6 ohms Frequency range 60 Hz - 20 kHz Dimensions and weight Main unit (W x H x D) 260 x 115 x 260 mm / 2.0 kg Speaker (W x H x D) 173 x 263 x 240 mm / 2.4 kg per piece. Temperature range 0°C to 35°C
Technical modifications reserved
30. Guarantee
Dear Customer,
We would like to thank you for purchasing this Kenwood product. If this product is found to be defective in material or workmanship under normal operating conditions, in accordance with the provisions of the following warranty, we will rectify these faults free of charge or replace the device.
Please retain this warranty card in a safe place.
Kenwood grants a two year warranty for this device from the date of purchase according to the invoice or purchase receipt from the Kenwood dealer.
This warranty covers defects in materials or workmanship. We reserve the right to replace the product if economical repair is no longer possible. Costs for packaging and installation and risks associated with the actual repair are not included in the warranty coverage and will be invoiced.
Conditions
A. In addition to presentation of this warranty card, the following information is required to assert a claim:
(a) Your name with complete address
Kenwood reserves to right to deny warranty coverage if the above-mentioned information is missing or if changes have been made to the product after its initial purchase.
B. At the time of delivery of this product to the retailer, this product complied with all standards and safety regulations which apply in the country of destination. Modifications required to operate this device in countries outside the country of destination do not fall under the above-mentioned warranty provisions. Furthermore, we do not accept liability for work connected with this or for damage to the product which arise due to such work.
If the product is used in a country for which it is not designed and produced, then warranty work will only be carried out if the cost for converting the device to nationally valid standards and safety regulations is carried by the user.
Furthermore, if the product differs from the products distributed by the official importer and if replacement parts are not available for repairing this device, the user must carry the costs for the transport of the device to and from the land of purchase.
The same applies if no warranty coverage can be offered in the country under consideration because of other, justifiable reasons.
C. Exceptions from warranty coverage are:
(a) Changes to the product as well as normal service and adjustment work, including the regular checks mentioned in the operating manual.
This warranty can be invoked by anyone who has legally purchased the product.
In accordance with the above warranty provisions, the product will be either repaired or replaced free of charge. This right in now way restricts the user's other rights within the framework of the applicable legal regulations.
Repair or replacement do not effect any extension on the warranty period.
Any further claims shall be excluded, in particular any claims for order cancellation, price reduction or for compensation for any damage.
JVCKENWOOD U.K. Limited
First Floor, Gleneagles, the Belfry, Colonial Way, Watford, Hertfordshire WD24 4WH
Email : Enquiries@uk.jvckenwood.com www.kenwood-electronics.co.uk
KENWOOD
KENWOOD
Système Micro Hifi Smart
M-9000S
NOTICE D'EMPLOI
JVCKENWOOD Corporation
Sommaire
Sommaire Page
Avant la mise sous tension 3
Mise en service 6
Éléments et fonctions 7
Menu principal 10
Radio Internet 11
Podcasts 12
Spotify 14
Lecteur de CD 15
Lecteur USB 16
Radio DAB+ 17
Radio FM 18
Audio Bluetooth 19
Ports analogiques 20
Minuterie de veille (Sleeptimer) 20
Réveil 20
Paramètres système 22
Réglage de l'heure 24
Langue 25
Paramétrages d'usine 25
Mises à jour du logiciel 25
Assistant de configuration 26
Informations 26
Politique de confidentialité 26
Éclairage 26
Appli UNDOK 27
Élimination des défaillances 28
Maintenance et entretien 28
Mise au rebut 29
Caractéristiques techniques 30
Remarque concernant la garantie 31
En raison de la plage de 5 GHz du module WiFi intégré, l'utilisation est limitée à l'intérieur des bâtiments dans les pays suivants :
AT BE BG CZ DK EE FR DE IS IE IT EL ES CY LVU LT LU H U MT NL NO PL PT RO SL SK TR FI SE CH UK HR
AT=Autriche, BE=Belgique, BG=Bulgarie, CZ=Tchéquie, DK=Danemark, EE=Estonie, FR=France, DE=Allemagne, IS=Islande, IE=Irlande, IT=Italie, EL=Grèce, ES=Espagne, CY=Chypres, LV=Lettonie, LT=Lituanie, LU=Luxembourg, HU=Hongrie, MT=Malte, NL=Pays-Bas, NO=Norvège, PL=Pologne, PT=Portugal, RO=Roumanie, SL=Slovénie, SK=Slovaquie, TR=Turquie, FI=Finlande, SE=Suède, CH=Suisse, UK=Royaume-Uni, HR=Croatie
1. Avant la mise sous tension
CONSIGNES DE SÉCURITÉ IMPORTANTES
Attention : Lisez attentivement cette page afin d'assurer l'utilisation sûre de l'appareil !
Lire attentivement ces consignes !
- Respectez toutes les consignes de sécurité et d'action lorsque vous mettez ce produit en service.
Conserver soigneusement ces consignes !
- Conservez les consignes de sécurité et d'action afin de pouvoir vous y reporter ultérieurement.
Respecter toutes les mises en garde !
- Respectez scrupuleusement toutes les mises en garde figurant sur le produit et dans la notice d'emploi.
1.1 Nettoyer uniquement avec un chiffon sec !
- Débranchez la fiche d'alimentation de cet appareil de la prise secteur avant de le nettoyer. N'utilisez jamais de détergents liquides ou en aérosol. Utilisez uniquement un chiffon légèrement humide pour nettoyer l'appareil.
1.2 Accessoires
- Utilisez uniquement les accessoires indiqués par le fabricant.
1.3 N'utilisez pas cet appareil à proximité de l'eau
– L'appareil ne doit jamais être exposé à des gouttes ou projections d'eau – par exemple à proximité d'une baignoire, d'un lavabo, d'un évier, d'une machine à laver, dans un sous-sol humide ou à proximité d'une piscine, etc. Ne posez jamais des récipients contenant de l'eau sur l'appareil, par exemple un vase avec des fleurs.
1.4 Ventilation
- Les fentes et orifices du boîtier servent à la ventilation de l'appareil, afin d'assurer le bon fonctionnement de l'appareil et le protéger contre toute surchauffe qui pourrait occasionner une auto-ignition. N'obturez pas les orifices de ventilation. Installez l'appareil conformément aux consignes du fabricant. N'obturez pas les orifices de ventilation en posant l'appareil sur un lit, un canapé, un tapis ou un autre support mou similaire. En absence d'une ventilation suffisante, l'appareil ne doit pas être encastré dans une bibliothèque ou un placard.
1.5 Alimentation électrique
- Cet appareil ne doit être branché qu'à la tension d'alimentation indiquée appareil. Si vous avez des doutes sur le type d'alimentation électrique de votre logement, veuillez vous adresser à votre reven- deur spécialisé ou à votre fournisseur d'énergie local.
1.6 Câble d'alimentation
– Veillez à ce que personne ne puisse trébucher sur le câble d'alimentation. Veillez également à ce que le câble d'alimentation ne puisse pas être écrasé à proximité immédiate d'une prise secteur, y compris les prises à rallonge. Le câble d'alimentation ne doit pas non plus être écrasé à la sortie de l'appareil. La fiche secteur étant utilisée pour une déconnexion complète du réseau, elle doit être laissée sur le câble d'alimentation et rester accessible à tout moment.
1.7 Orages
- Débranchez l'appareil du secteur en cas d'orage ou s'il n'est pas utilisé pendant une durée prolongée.
1.8 Surcharge
– N'exposez jamais les prises secteur, rallonges ou multiprises à une surcharge, puisque cela génère un risque d'incendie ou d'électrisation.
1.9 Pénétration de corps étrangers et de liquides
- Veillez à ce qu'aucun corps étranger ou liquide ne puisse pénétrer dans l'appareil par les orifices de ventilation. Cela pourrait conduire à un contact avec des éléments sous haute tension ou un court-circuit, qui peuvent occasionner un incendie ou une électrisation. Ne déversez jamais un liquide quelconque sur l'appareil.
1.10 Maintenance
- Ne tentez jamais d'effectuer vous-même la maintenance de cet appareil, car l'ouverture ou le retrait de caches peuvent donner accès à des éléments sous tension. Tout contact avec ces éléments génère des risques. Confiez les opérations de maintenance aux collaborateurs compétents d'un service clients.
1.11 Détériorations qui requièrent une réparation
- Ne faites effectuer les opérations de maintenance et de réparation que par un service clients qualifié.
La maintenance/réparation est nécessaire lorsque l'appareil a été endommagé (par ex. le câble d'alimentation ou la fiche), qu'un liquide a pénétré dans l'appareil, que des objets ont pénétré dans l'appareil, que l'appareil a été exposé à la pluie ou l'humidité, lorsqu'il ne fonctionne plus correctement ou est tombé.
1.12 Pièces détachées
- En cas de mise en place de pièces détachées, assurez-vous que le technicien du service clients utilise des pièces détachées prescrites par le fabricant ou présentant les mêmes caractéristiques que les pièces d'origine. Les pièces détachées non homologuées peuvent occasionner des incendies, électrisations ou autres accidents.
1.13 Contrôle de sécurité
- Après la réalisation d'opérations de maintenance ou de réparation, priez le technicien du service clients d'effectuer un contrôle de sécurité afin de s'assurer du parfait état de fonctionnement de l'appareil.
1.14 Chaleur
– N'installez pas l'appareil à proximité de surfaces chaudes telles que par exemple des radiateurs, radiateurs soufflants, poêles ou autres appareils pouvant dégager de la chaleur (y compris les amplificateurs). Ne posez jamais des objets avec des flammes nues tels que des bougies ou des lanternes sur ou à proximité de l'appareil. Les piles installées ne doivent pas être exposés à une chaleur élevée occasionnée par ex. par la lumière directe du soleil, le feu, etc.
1.15 Batteries
– Lorsque la radio n'est pas utilisée pendant un mois ou plus, vous devez retirer les piles du compartiment à piles de la télécommande afin d'éviter qu'elles ne fuient. Mettez immédiatement au rebut les piles qui fuient, en respectant l'ensemble des dispositions légales applicables. Les piles qui fuient peuvent occasionner des blessures et endommager l'appareil. Ne mélangez jamais des piles de différents types ou des piles usagées avec des piles neuves.
Afin de minimiser le risque d'une électrisation, d'un incendie, etc.,
- vous ne devez pas retirer de vis, de caches ou d'éléments du boîtier.
- le bouton Marche/Arrêt ne coupe jamais entièrement l'alimentation électrique, quelle que soit sa position.
Pour isoler entièrement l'appareil du secteur, vous devez débrancher la fiche d'alimentation de la prise secteur.
1.16 Risques liés à un volume sonore élevé
- Pour éviter les éventuels dommages auditifs, nous vous recommandons de ne pas trop prolonger l'écoute à un volume sonore élevé.
1.17 Connexion réseau
Veuillez vous assurer que la fonction de pare-feu de votre point d'accès au réseau (routeur) est activée. Reportez-vous à cet effet à la notice d'emploi de votre routeur.
Si vous ne souhaitez pas installer de connexion réseau, il convient de ne pas installer l'assistant de configuration (voir 3.8).
1.18 Télécommande
Si vous exposez le capteur de la télécommande à la lumière directe du soleil ou à la lumière de tubes fluorescents à haute fréquence, des dysfonctionnements sont possibles. Dans de tels cas, le système doit être installé à un autre endroit pour éviter de tels dysfonctionnements.
Les piles fournies sont destinées au contrôle fonctionnel et peuvent présenter une durée de vie limitée. Lorsque la portée de la télécommande diminue, il convient de remplacer les piles usagées par piles neuves.
Prudence!
Risque d'explosion en cas de remplacement de la pile par une pile d'un type inadapté ;
de températures élevées ou faibles auxquelles une pile peut être exposée pendant l'utilisation, le stockage ou le transport ;
d'une pression atmosphérique faible à grande altitude ;
du remplacement de la pile par un type inadapté, qui peut shunter une sécurité (par ex. certains types de piles au lithium) ;
la mise au feu ou dans un four chaud d'une pile, ou l'écrasement ou le sectionnement mécanique d'une pile ;
de l'exposition prolongée d'une pile à un environnement à températures très élevées, qui peuvent conduire à l'explosion ou à la fuite de liquides ou gaz inflammables ;
de l'exposition prolongée d'une pile à une pression atmosphérique très faible, qui peut conduire à l'explosion ou à la fuite de liquides ou gaz inflammables.
1.19 Fonction d'économie d'énergie automatique
Le modèle est équipé d'une fonction d'économie d'énergie automatique. Elle commute l'appareil en mode veille après 15 minutes lorsque le volume sonore la lecture est très faible ou que la radio est réglée sur le mode silencieux. Ce réglage ne peut pas être modifié.
IMPORTANT POUR LES PRODUITS LASER
PRODUIT LASER DE LA CLASSE 1
PRUDENCE: Ne pas ouvrir le boîtier. L'appareil ne contient pas d'éléments dont la maintenance peut être effectuée par l'utilisateur. Faites effectuer la maintenance uniquement par des techniciens qualifiés.
Par la présente, la société JVCKENWOOD Corporation déclare que le type de dispositif radio M-9000S satisfait aux exigences de la directive 2014/53/UE. Le texte complet de la déclaration de conformité UE est disponible via l'adresse Internet suivante : http://www.kenwood.com/cs/eudoc/
Fabricant : JVCKENWOOD Corporation
3-12. Moriyacho, Kanagawa-ku, Yokohama-shi, Kanagawa 221-0022, JAPAN
Responsible (UE) : JVCKENWOOD EUROPE B.V.
Amsterdamseweg 37, 1422 AC UITHOORN, THE NETHERLANDS
2. Mise en service
2.1 Déballage
Déballez avec précaution l'appareil en veillant à ce que tous les accessoires soient présents.
• Télécommande infrarouge
2.2 Branchement
- Ouvrez le compartiment à piles de la télécommande et insérez les piles en veillant à leur polarité. La polarité requise (+/-) est indiquée dans le compartiment à piles.
Branchez les baffes gauche et droite au connecteur (Speaker Out) au dos de l'appareil. Appuyez à cet effet sur les bornes à ressort et insérez les extrémités libres des câbles dans les orifices prévus à cet effet. Veillez à relier le conducteur noir à la borne à ressort noire. L'autre conducteur est branché à la borne rouge.
text_image
Câble de baffle
R L
Noir/Gris
Noir
- Branchez la fiche d'alimentation directement à une prise secteur à courant alternatif. Comme la fiche d'alimentation est utilisée pour isoler entièrement l'appareil du réseau électrique, la prise doit être constamment accessible.
2.3 Branchement de l'antenne DAB+ / FM
Branchez l'antenne filaire au connecteur [FM ANTENNA 75Ω].
Cherchez l'endroit qui vous offrira la meilleure réception.
Fixez l'antenne.
L'antenne fournie est une antenne filaire simple. Pour assurer une réception stable, nous recommandons l'installation d'une antenne extérieure (disponible dans le commerce).
Pour brancher l'antenne extérieure, commencez par débrancher l'antenne intérieure.
Nous ne sommes pas en mesure de garantir la bonne réception des stations radio depuis le réseau câblé.
2.4 Connexion réseau
Afin de pouvoir recevoir les stations radio Internet, la radio doit être intégrée à un réseau. À cet effet, le routeur doit être activé et la connexion Internet établie. Assurez-vous que la connexion WiFi du routeur est activée. Reportez-vous à cet effet aussi à la notice d'emploi du routeur.
3. Éléments et fonctions
text_image
MODE MENU ALARM SHUFFLE/ REPEAT
EQ VOL+
OK (SCAN)
1 2 3
ABC DEF
4 5 6
GHI JKL MNO
7 8 9
PQRS TUV WXYZ
PROG 0 INFO
FAV INTRO
KENWOOD
text_image
Veille marche/arrêt, réveil arrêt
Ouverture/fermeture du tiroir de lecteur CD (« Eject »)
MODE Ouvrir/fermer la sélection de mode
MENU Ouvrir/fermer le menu
ALARM Réglage du réveil
SHUFFLE / Musique : lecture aléatoire/répétée
REPEAT
►►► Démarrer/interrompre la lecture
►►► | / ►► Chang. titre / rech. titre / rech. station radio FM suivant
►◄◄ / ◀◄ Chang. titre / rech. titre / rech. station radio FM précédent
■Couplage Bluetooth, pause lecture
►►► Vers le haut ; FM : Réglage de la fréquence
►► Vers le bas ; FM : Réglage de la fréquence
►► Gauche, précédent, emplacement mémoire précédent
►► Droite, suivant, emplacement mémoire suivant
OK Confirmer l'entrée ; FM : recherche de stations ;
(SCAN) Image radio, diapositives en mode plein écran
EQ Sélection du préréglage d'égalisateur
►► Mode silencieux, annuler le mode silencieux
Volume - / Volume +
(0-9) Saisie chiffres d'emplacem. mémoire, et des n°s de t
PROGRAMMATION titres, attr. un emplacement mémoire
INFORMATION affichage à l'écran ; pendant la lecture
INTRO 10 secondes d'intro par titre
3. Éléments et fonctions, suite
1 - Volume
text_image
Face avant
①
②
③
SELECT
④
⑤
Bluetooth
1 - Veille
Vue d'en haut
flowchart
graph TD
    A["+"] --> B["1"]
    C["="] --> D["2"]
    E["..."] --> F["3"]
    G["="] --> H["4"]
    I["•"] --> J["5"]
    K["..."] --> L["6"]
    M["..."] --> N["7"]
    O["★"] --> P["8"]
    Q["±"] --> R["9"]
1 - Connecteur de baffle
Face arrière
text_image
①
②
③
U760
PR 1000000
CVR 10
SPRARE OUT-850
KENWOOD
CO-MOBO SYSTEM
AC 100 (CVR 1000000)
Power transmission power
USB 10.0 (A) = 320Hz
S/N: L
CAV/ULB
CAV/ULB
CAV/ULB
CAV/ULB
CAV/ULB
CAV/ULB
CAV/ULB
CAV/ULB
CAV/ULB
CAV/ULB
CAV/ULB
CAV/ULB
CAV/ULB
CAV/ULB
CAV/ULB
CAV/ULB
CAV/ULB
CAV 1000000
SAV/ULB
SAV/ULB
SAV/ULB
SAV/ULB
SAV/ULB
SAV/ULB
SAV/ULB
SAV/ULB
SAV/ULB
SAV/ULB
SAV/ULB
SAV/ULB
SAV/ULB
SAV/ULB
SAV/ULB
SAV/ULB
SAV/ULB
SAV 1000000
SAV/ULB
SAV/ULB
SAV/ULB
SAV/ULB
SAV/ULB
SAV/ULB
SAV/ULB
SAV/ULB
SAV/ULB
SAV/ULB
SAV/ULB
SAV/ULB
SAV/ULB
SAV/ULB
SAV/ULB
3.1 Activer / désactiver (mode veille)
Appuyez sur la touche (Veille) de la télécommande ou de l'appareil pour allumer la radio. Appuyez une nouvelle fois sur cette touche pour commuter l'appareil en mode veille. Pour éteindre l'appareil entièrement, débranchez-le de l'alimentation électrique.
L'actionnement des touches de la télécommande vous permet de vous déplacer dans les menus. L'actionnement de la touche confirme la sélection. Ces processus de réglage peuvent être réalisées aussi sur l'appareil à l'aide du bouton de réglage (Navigation). Tournez le bouton de réglage pour vous déplacer dans les menus et confirmez les options de menu en appuyant sur le bouton de réglage.
3.3 Saisie de mots de passe, textes de recherche, etc.
Sélectionnez à l'aide des touches les caractères numériques et/ou alphabétiques correspondants, puis confirmez votre choix respectif en appuyant sur . Pour corriger une saisie erronée, placez le curseur sur le champ et confirmez par la touche de la télécommande. Vous supprimez ainsi la dernière saisie. Utilisez le champ « ANNULE » pour annuler entièrement la saisie. Lorsque vous avez terminé votre sélection, placez le curseur sur le champ « OK » et confirmez votre choix en appuyant sur la touche .
3.4 Réglage du volume et mode « Silencieux »
Vous pouvez régler le volume en appuyant sur les touches et de la télécommande ou en tournant le bouton de réglage de l'appareil. Appuyez sur la touche (Silencieux) pour commuter la radio en mode silencieux. Au prochain actionnement de la touche, le volume précédent est rétabli.
L'actionnement répété de la touche permet d'afficher des informations complémentaires, en fonction de la source et de la station :
Description
Nom de la station, du programme actuel, contenus, thèmes, etc.
Genre
Le style de programme (genre) de la station s'affiche.
Niveau de signal et erreurs de signal
Dans les modes « Radio FM » et « Radio numérique DAB+ », des informations sur la puissance de réception, le mode stéréo, le signal RDS (FM uniquement) et l'emplacement mémoire affecté s'affichent en bas à droite de l'écran. En absence de l'affichage correspondant, l'information n'est pas disponible.
3.6 Assistant de configuration
Lors du premier démarrage, l'assistant de configuration (« Setup Wizard ») est démarré automatiquement.
L'assistant de configuration est exécuté en anglais.
Vous pouvez fermer l'assistant et l'ouvrir ultérieurement en français.
Lors de la première mise en service, toutes les langues de menus disponibles s'affichent. Sélectionnez à l'aide des touches la langue souhaitée, puis confirmez par .
3.8 Démarrage de l'assistant de configuration
Pour faciliter la première mise en service (réglage de la date et de l'heure, configuration de la connexion Internet, etc.) et la rendre plus rapide, nous vous recommandons d'exécuter l'assistant de configuration. À cet effet, sélectionnez « OUI ». Si vous préférez ne pas exécuter l'assistant de configuration, sélectionnez « NON ».
Tous les réglages réalisés avec l'assistant de configuration peuvent être effectués aussi individuellement dans les paramètres système. En outre, l'assistant de configuration peut être exécuté une nouvelle fois à tout moment. Sélectionnez ensuite « OUI » ou « NON » pour exécuter ou non l'assistant de configuration lors du prochain démarrage de la radio. Ensuite, le menu principal s'affiche.
- Date/heure
Format 12/24
• MAJ automatique (date et heure)
Mise à jour DAB ou FM (recommandé)
Lors de la mise à jour automatique via le réseau radio FM/DAB/DAB+, la date et l'heure sont fournies par les sociétés de radiodiffusion. Dans le cas d'une synchronisation avec ces sources, l'heure est réglée correctement même après une panne de secteur. Cela permet notamment de conserver les horaires de réveil.
- MAJ via réseau
Lors de la sélection de cette option, la date et l'heure sont réglées automatiquement via la connexion Internet. De plus, le fuseau horaire et les heures d'été/hiver peuvent être adaptées.
- Pas de MAJ
La date et l'heure doivent être réglées manuellement.
- Gardez réseau connecté
La configuration réseau est décrite en détail dans le chapitre « Paramètres système ».
Le menu principal comprend les différentes sources audio et les possibilités de réglage :
Radio Internet
Podcasts
Spotify
USB
Bluetooth
Entrée Aux (Line-In)
Mode sommeil
Alarmes
Configuration
Lorsque vous avez sélectionné source audio, appuyez sur la touche
de la télécommande ou de l'appareil, puis sélectionnez l'option « Menu principal ».
5. Radio Internet
La radio Internet permet de bénéficier d'un choix énorme d'offres les plus diverses provenant du monde entier. Vous pouvez choisir les stations de différentes manières. Sélectionnez à cet effet la source « Radio Internet » dans le menu principal.
5.1 Recherche de stations
La radio offre plusieurs moyens pour rechercher les stations souhaitées.
Déplacez-vous dans les options de menu et options. Lorsque vous avez trouvé la station souhaitée, confirmez ce choix en appuyant sur la touche . Pour interrompre la lecture de la radio Internet, il suffit d'appuyer sur la touche (Lecture/Pause) de la télécommande. Un nouvel actionnement de la touche recharge la station.
5.1.1 Recherche par pays et régions
Appuyez sur la touche
pour ouvrir la « Liste des stations » afin de rechercher des stations provenant de continents, pays et régions spécifiques. Confirmez la sélection.
Sélectionnez le menu « Lieu » pour choisir un pays ou une région.
5.1.2 Recherche par genres
Procédez comme suit pour rechercher des stations par genres de musique ou thèmes :
Appuyez sur la touche
pour ouvrir la « Liste des stations ». Après la confirmation de votre choix, ouvrez le menu « Découvrir ». Après la confirmation, vous pouvez également filtrer les réponses par origine ou langue des stations.
5.1.3 Recherche par nom
Si vous connaissez le nom de la station souhaitée, vous pouvez le rechercher de manière ciblée :
Appuyez sur la touche
pour ouvrir la « Liste des stations ». Après la confirmation de votre choix, ouvrez le menu « Recherche ». Saisissez dans le masque de saisie l'intégralité ou une partie du nom de la station, puis appuyez sur le champ « OK » pour lancer la recherche. L'appareil affiche la liste de toutes les stations dont le nom contient le texte recherché.
5.1.4 Stations populaires
Procédez comme suit pour afficher une sélection des stations les plus prisées :
Appuyez sur la touche
pour ouvrir la « Liste des stations ». Après la confirmation de la sélection, ouvrez le menu « Populaire » et sélectionnez la station souhaitée.
5.1.5 Stations locales
Procédez comme suit pour rechercher de manière ciblée les stations du pays dans lequel la radio est utilisée actuellement :
Appuyez sur la touche
pour ouvrir la « Liste des stations ». Après confirmation de la sélection, ouvrez le menu avec le nom du pays du lieu d'utilisation actuel (par ex. « France »).
Au sein de ce filtre local, vous pouvez effectuer une recherche supplémentaire par genres ou par stations locales ou prisées.
5.2 Favoris (emplacements mémoire)
Vous disposez de 40 emplacements mémoire pour mémoriser vos stations préférées (favoris). Vous pouvez enregistrer dans vos favoris des stations provenant des sources « Radio Internet » et « Podcasts ». Pour afficher les stations mémorisées depuis l'appareil principal, appuyez sur la touche <*> et sélectionnez l'emplacement mémoire souhaité en tournant le régulateur . Pour charger la station, appuyez sur .
5.2.1 Mémorisation de stations avec la télécommande :
Les emplacements mémoire 1 à 10 peuvent être affectés à l'aide des touches numériques de la télécommande. Sélectionnez à cet effet la station souhaitée et appuyez sur l'une des touches numériques de la télécommande jusqu'à ce que l'écran affiche « Mémorisé ». Les emplacements mémoire sont alors accessibles par un actionnement bref des touches de la télécommande.
5.2.2 Enregistrement de stations sur les emplacements mémoire 11 à 40 :
Sélectionnez la station souhaitée et appuyez de manière prolongée sur la touche (Favoris) de la télécommande. Sélectionnez à présent un emplacement mémoire dans la liste des mémoires de stations et confirmez votre choix à l'aide de la touche (Sélection) de la radio. L'écran affiche « Mémorisé ». Vous pouvez ouvrir facilement la liste des stations en appuyant brièvement sur la touche <*> de la radio ou de la télécommande (PROG touche). Utilisez les touches ou le bouton de réglage pour sélectionner une station, puis appuyez sur pour confirmer.
Remarque : Les emplacements mémoire ne peuvent pas être supprimés, mais ils peuvent être écrasés par d'autres stations.
6. Podcasts
Les Podcasts sont des contributions affichables au sujet de certains thèmes, par ex. des émissions d'information, des infos, etc. Comme dans le cas de la radio Infernet, les Podcasts peuvent être filtrés ou recherchés dans l'ensemble de la base de données. Sélectionnez à cet effet la source « Podcasts » dans le menu principal.
6.1 Recherche de Podcasts
La radio offre plusieurs moyens pour rechercher des Podcasts. Déplacez-vous dans les options de menu et options. Lorsque vous avez trouvé le Podcast souhaité, confirmez ce choix en appuyant sur la touche . Pour interrompre ou poursuivre la lecture du Podcast, il suffit d'appuyer sur la touche
(Lecture/Pause) de la télécommande. Tant que vous maintenez les touches appuyées, vous pouvez faire défiler les Podcasts à une vitesse croissante (max. 32 fois) vers l'avant ou l'arrière. Un actionnement bref de la touche vous ramène au début du Podcast.
6.1.1 Recherche par pays et régions
Appuyez sur la touche
pour ouvrir la « Podcast list » afin de rechercher des Podcasts provenant de continents, pays et régions spécifiques. Confirmez la sélection.
Sélectionnez le menu « Lieu » pour choisir un pays ou une région.
6.1.2 Recherche par genres
Procédez comme suit pour rechercher des Podcasts par contenus ou thèmes :
Appuyez sur la touche
pour ouvrir la « Podcast list ». Après la confirmation de votre choix, ouvrez le menu « Découvrir ». Après la confirmation, vous pouvez également filtrer les réponses par origine ou langue des Podcasts.
6.1.3 Recherche par nom
Si vous connaissez le nom du Podcast souhaité, vous pouvez le rechercher de manière ciblée :
Appuyez sur la touche
pour ouvrir la « Podcast list ». Après la confirmation de votre choix, ouvrez le menu « Recherche ». Saisissez dans le masque de saisie l'intégralité ou une partie du nom du Podcast, puis appuyez sur le champ « OK » pour lancer la recherche. L'appareil affiche la liste de toutes les Podcast dont le nom contient le texte recherché.
6.1.4 Podcasts populaires
Procédez comme suit pour rechercher de manière ciblée les Podcasts du pays dans lequel la radio est utilisée actuellement :
Appuyez sur la touche
pour ouvrir la « Podcast list ». Après confirmation de la sélection, ouvrez le menu avec le nom du pays du lieu d'utilisation actuel (par ex. « France »). Au sein de ce filtre local, vous pouvez effectuer une recherche supplémentaire par genres ou par Podcasts locaux ou prisés.
6.2 Favoris (emplacements mémoire)
Vous disposez de 40 emplacements mémoire pour mémoriser vos Podcasts préférés (favoris). Vous pouvez enregistrer dans vos favoris des stations provenant des sources « Radio Internet » et « Podcasts ». Pour afficher les Podcasts mémorisés depuis l'appareil principal, appuyez sur la touche <*> et sélectionnez l'emplacement mémoire souhaité en tournant le régulateur . Pour charger le Podcast, appuyez sur .
6.2.1 Mémorisation de Podcasts avec la télécommande :
Les emplacements mémoire 1 à 10 peuvent être affectés à l'aide des touches numériques de la télécommande. Sélectionnez à cet effet le Podcast souhaité et appuyez sur l'une des touches numériques de la télécommande jusqu'à ce que l'écran affiche « Mémorisé ». Les emplacements mémoire sont alors accessibles par un actionnement bref des touches de la télécommande.
6.2.2 Enregistrement de Podcasts sur les emplacements mémoire 11 à 40 :
Sélectionnez la Podcast souhaitée et appuyez de manière prolongée sur la touche (Favoris) de la télécommande. Sélectionnez à présent un emplacement mémoire dans la liste des mémoires de stations et confirmez votre choix à l'aide de la touche (Sélection) de la radio. L'écran affiche « Mémorisé ». Vous pouvez accéder facilement aux emplacements mémoire en appuyant brièvement sur la touche <*> de la radio ou de la télécommande. Utilisez les touches ou le bouton de réglage pour sélectionner une Podcasts, puis appuyez sur pour confirmer.
Remarque : Les emplacements mémoire ne peuvent pas être supprimés, mais ils peuvent être écrasés par d'autres Podcasts.
7. Spotify
Utilisez votre téléphone, votre tablette ou votre ordinateur comme une télécommande pour contrôler Spotify. Accédez à spotify.com/connect pour en savoir plus. Le logiciel Spotify fait l'objet de licences de tiers disponibles à l'adresse suivante : www.spotify.com/connect/third-party-licenses
Installez l'appli Spotify sur votre appareil Android/iOS. Vous pouvez la télécharger depuis Play Store ou Apple App Store. Après l'installation, démarrez l'appli et connectez-vous ou enregistrez-vous avec vos données d'accès. La radio et l'appareil Android/iOS avec l'appli Spotify doivent se trouver sur le même réseau.
7.1 Utilisation
Dans le menu principal, sélectionnez la source « Spotify » et lancez la lecture Spotify sur votre smartphone comme d'habitude. En bas de l'écran du téléphone, le logo Spotify Connect et l'indication « Appareils disponibles » s'affichent. Appuyez sur « Appareils disponibles » pour afficher la liste des appareils disponibles sur le réseau. Sélectionnez ensuite « M-9000S ». La lecture s'effectue alors depuis la radio. Le succès de la connexion est indiquée par le texte vert. Après le succès de la première connexion, vous pouvez aussi connecter le smartphone à la radio en procédant comme suit : Dans le menu principal, sélectionnez la source « Spotify » et appuyez sur . L'écran affiche à présent « Appuyer sur lecture... ». La connexion est établie en appuyant sur la touche (Lecture/Pause) de la télécommande. La lecture de la liste de titres actuelle débute. La télécommande permet aussi de commuter entre les titres de la liste actuelle.
7.2 Favoris (emplacements mémoire)
Vous disposez de 10 emplacements mémoire (favoris) pour mémoriser des listes de titres.
7.2.1 Mémorisation de listes de titres avec la télécommande :
Les emplacements mémoire 1 à 10 peuvent être affectés à l'aide des touches numériques de la télécommande. Sélectionnez à cet effet la liste de titres souhaitée et appuyez sur l'une des touches numériques de la télécommande jusqu'à ce que l'écran affiche « Mémorisé ». Les emplacements mémoire sont alors accessibles par un actionnement bref des touches de la télécommande. Vous pouvez aussi mémoriser des titres individuels qui ne figurent pas dans les listes de titres.
Remarque : Les emplacements mémoire ne peuvent pas être supprimés, mais ils peuvent être écrasés
par d'autres listes de titres/titres.
8. Lecteur de CD
Cette source permet la lecture de CD audio et de CD MP3. Sélectionnez à cet effet la source « CD » dans le menu principal. Ouvrez le compartiment CD en appuyant sur la touche de l'appareil principal ou de la télécommande. Insérez le CD et fermez le compartiment en appuyant sur . La lecture débute automatiquement par le premier titre du CD. En appuyant sur la touche de la télécommande, vous pouvez écouter brièvement les débuts des titres du CD. Un nouvel actionnement de la touche interrompt cette fonction.
Pour les CD audio, les informations concernant le nombre de titres et la durée de lecture totale s'affichent comme suit :
TXX XX:XX
Le premier bloc de chiffres correspond alors au nombre de titres et le second à la durée de lecture totale du CD.
8.1 Lecture de fichiers MP3
Sélectionnez le répertoire ou le titre souhaité dans le menu. Lancez la lecture du titre à l'aide de la touche . Les touches vous permettent de vous déplacer dans les arborescences de répertoires. La touche (Lecture/Pause) permet d'interrompre ou de poursuivre la lecture. Tant que vous maintenez la touche appuyée, vous pouvez faire défiler les titres à une vitesse croissante (max. 32 fois) vers l'avant ou l'arrière. L'actionnement bref de la touche vous ramène au début du titre ou au titre précédent.
Pour les CD contenant des MP3, le nombre de répertoires et fichiers disponibles s'affiche comme suit :
FXX TXXX
Le chiffre après le « F » correspond au nombre de répertoires, et le second bloc de chiffres au nombre total « T »de fichiers.
8.2 Lecture aléatoire et en boucle
Procédez comme suit pour obtenir une lecture aléatoire d'un CD ou des fichiers MP3 d'un répertoire, ou une lecture en boucle des fichiers :
Appuyez sur la touche
et sélectionnez l'option « Repeat » et/ou « Shuffle » (Aléatoire). La touche active ou désactive respectivement les fonctions. Alternativement, vous pouvez aussi utiliser la touche (Aléatoire/En boucle) de la télécommande à cet effet.
Les fonctions sont activées comme suit par l'actionnement répété de la touche :
Appuyer 1 x : Répéter le titre / Appuyer 2 x : Dossier de répétition (MP3 seulement)
Appuyer 3 x : Répétez tout / Appuyer 4 x : Aléatoire / Appuyer 5 x : Off
9. Lecteur USB
Cette source vous permet de lire des fichiers MP3 (16 bit/48 kHz) depuis une clé USB. Sélectionnez à cet effet la source « USB » dans le menu principal.
9.1 Lecture de fichiers MP3
Sélectionnez le répertoire ou le titre souhaité dans le menu. Lancez la lecture du titre à l'aide de la touche . Les touches vous permettent de vous déplacer dans les arborescences de répertoires. La touche (Lecture/Pause) permet d'interrompre ou de poursuivre la lecture. Tant que vous maintenez la touche appuyée, vous pouvez faire défiler les titres à une vitesse croissante (max. 32 fois) vers l'avant ou l'arrière. L'actionnement bref de la touche vous ramène au début du titre ou au titre précédent.
9.2 Lecture aléatoire et en boucle
Procédez comme suit pour obtenir une lecture aléatoire des fichiers MP3 d'un répertoire, ou une lecture en boucle :
Appuyez sur la touche
et sélectionnez l'option « Repeat » et/ou « Shuffle » (Aléatoire). La touche active ou désactive respectivement les fonctions. Alternativement, vous pouvez aussi utiliser la touche (Aléatoire/En boucle) de la télécommande à cet effet. Les fonctions sont activées comme suit par l'actionnement répété de la touche :
Appuyer 1 x : Répéter le titre / Appuyer 2 x : Dossier de répétition
Appuyer 3 x : Répétez tout / Appuyer 4 x : Aléatoire / Appuyer 5 x : Offs
10. Radio DAB+
Pour activer la réception radio numérique DAB+, commutez dans le menu principal la source sur « Radio DAB ». Lors de la première commutation, l'appareil lance une recherche de stations automatique. L'écran affiche « Recherche », ainsi que le nombre de stations déjà trouvées et une barre d'avancement. Certaines stations proposent des informations complémentaires sous forme de diapositives.
Afin de les afficher en plein écran sur l'écran de la radio, appuyez sur la touche de la télécommande ou de la radio. Un nouvel actionnement de la touche ramène l'écran à l'affichage précédent.
10.1 Recherche de stations
Vous pouvez lancer une recherche de stations automatique pour trouver les stations disponibles à la réception. Appuyez à cet effet sur la touche
pour ouvrir le menu, puis sélectionnez l'option « Recherche complète ». L'écran affiche « Recherche », ainsi que le nombre de stations déjà trouvées et une barre d'avancement. Les stations sont alors mémorisées par ordre alphabétique.
Les stations trouvées lors d'une recherche automatique précédente, mais non disponibles actuellement, s'affichent dans la liste des stations avec un « ? » précédant le nom de la station.
10.2 Réglage manuel
Vous pouvez aussi régler manuellement des ensembles. Appuyez à cet effet sur la touche
pour ouvrir le menu, puis sélectionnez l'option « Réglage manuel ». Sélectionnez ensuite le canal souhaité et confirmez par . Les informations au sujet de l'ensemble et de la puissance du signal s'affichent alors. Un nouvel actionnement de la touche mémorise les stations correspondantes dans la liste.
10.3 Liste des stations
Appuyez sur la touche
et confirmez l'option « Liste des stations » par . Utilisez les touches ou le bouton de réglage pour sélectionner une station, puis appuyez sur pour confirmer. L'appareil lance automatiquement la lecture.
Remarque : La qualité de réception de la station dépend de facteurs tels que le temps, le lieu d'installation et de l'orientation de l'antenne. Si la réception d'une station de la liste de stations devait ne pas être possible, vous pouvez modifier l'orientation de l'antenne ou déplacer la radio. Les stations supprimées peuvent être effacées de la liste des stations.
10.4 Supprimer les stations dont la réception n'est pas ou plus possible
Les stations dont la réception n'est plus possible peuvent être supprimées de la liste. Appuyez à cet effet sur la touche
, puis sélectionnez l'option « Élagage invalides ». Sous « Suppression stations invalides. OK ? », sélectionnez « OUI » pour supprimer ces stations. Sélectionnez « NON » pour revenir au menu sans supprimer les stations.
10.5 Favoris (emplacements mémoire)
Vous disposez de 20 emplacements mémoire pour mémoriser des stations DAB+ (favoris). Pour afficher les stations mémorisées depuis l'appareil principal, appuyez sur la touche <^*> et sélectionnez l'emplacement mémoire souhaité en appuyant sur .
10.5.1 Mémorisation de stations DAB+ avec la télécommande :
Les emplacements mémoire 1 à 10 peuvent être affectés à l'aide des touches numériques de la télécommande. Sélectionnez à cet effet la station souhaitée et appuyez sur l'une des touches numériques de la télécommande jusqu'à ce que l'écran affiche « Mémorisé ». Les emplacements mémoire sont alors accessibles par un actionnement bref des touches de la télécommande.
10.5.2 Enregistrement de stations DAB+ sur les emplacements mémoire 11 à 20 :
Sélectionnez la station souhaitée et appuyez de manière prolongée sur la touche de la télécommande. Sélectionnez à présent un emplacement mémoire dans la liste des mémoires de stations et confirmez votre choix à l'aide de la touche (Sélection) de la radio. L'écran affiche « Mémorisé ». Vous pouvez accéder facilement aux emplacements mémoire en appuyant brièvement sur la touche de la télécommande. Utilisez les touches ou le bouton de réglage pour sélectionner une station, puis appuyez sur pour confirmer.
Remarque : Les emplacements mémoire ne peuvent pas être supprimés, mais ils peuvent être écrasés par d'autres stations.
10.6 DRC (Dynamic Range Control)
Certaines stations DAB+ sont compatibles avec la fonction DRC, qui réduit les pics de volume. Les réglages suivants sont possibles :
DRC haut :
Compression élevée des volumes différents. La dynamique est fortement réduite.
DRC bas :
Compression faible, sans grande réduction de la dynamique.
DRC désactivée :
Aucune compression.
Procéder comme suit pour effectuer les réglages :
Appuyez sur la touche
et sélectionnez l'option « DRC ». Le menu suivant permet de modifier les réglages de la DRC. Le réglage actuel est indiqué par un astérisque (« * »).
10.7 Ordre d'affichage des stations
Par défaut, la radio affiche les stations apr ordre alphabétique. Toutefois, vous pouvez aussi trier les stations par ensembles.
Procéder comme suit pour effectuer les réglages :
Appuyez sur la touche
et sélectionnez l'option « Ordre des stations ». Le menu suivant permet de modifier les réglages. Le réglage actuel est indiqué par un astérisque (« * »). Le réglage actuel est indiqué par un astérisque (« * »).
11. Radio FM
Sélectionnez dans le menu principal l'option « Radio FM » pour commuter en réception FM.
11.1 Recherche de stations
Vous pouvez effectuer une recherche automatique des stations FM. Pour lancer la recherche automatique, appuyez sur la touche de la télécommande ou de la radio. La recherche automatique est interrompue à la prochaine station détectée et la radio passe en diffusion.
11.2 Réglages de recherche de stations
Cette fonction permet de définir si seules les stations avec un signal puissant sont prises en compte.
Appuyez à cet effet sur la touche
, puis sélectionnez l'option « Réglages de recherche ».
Dans le menu « Rech. stations FM » suivant, vous pouvez répondre à la question « Stations au signal puissant seulement ? » par « OUI » ou par « NON ». Le réglage actuel est indiqué par un astérisque (« * »).
11.3 Paramètres audio
Pour les stations à réception faible, le passage en réception mono permet éventuellement d'obtenir une légère amélioration de la qualité. Appuyez à cet effet sur la touche
, puis sélectionnez l'option « Réglages audio ». Dans le menu « Réception FM faible » suivant, vous pouvez répondre à la question « Activer lecture des stations mono uniquement ? » par « OUI » ou par « NON ».
Le réglage actuel est indiqué par un astérisque (« * »).
11.4 Favoris (emplacements mémoire)
Vous disposez de 20 emplacements mémoire pour mémoriser des stations FM (favoris). Pour afficher les stations mémorisées depuis l'appareil principal, appuyez sur la touche <> et sélectionnez l'emplacement mémoire souhaité en appuyant sur .
11.4.1 Mémorisation de stations FM avec la télécommande :
Les emplacements mémoire 1 à 10 peuvent être affectés à l'aide des touches numériques de la télécommande. Sélectionnez à cet effet la station souhaitée et appuyez sur l'une des touches numériques de la télécommande jusqu'à ce que l'écran affiche « Mémorisé ». Les emplacements mémoire sont alors accessibles par un actionnement bref des touches de la télécommande.
11.4.2 Enregistrement de stations FM sur les emplacements mémoire 11 à 20 :
Sélectionnez la station souhaitée et appuyez de manière prolongée sur la touche de la télécommande. Sélectionnez à présent un emplacement mémoire dans la liste des mémoires de stations et confirmez votre choix à l'aide de la touche (Sélection) de la radio. L'écran affiche « Mémorisé ». Vous pouvez accéder facilement aux emplacements mémoire en appuyant brièvement sur la touche de la télécommande. Utilisez les touches ou le bouton de réglage pour sélectionner une station, , puis appuyez sur pour confirmer.
Remarque : Les emplacements mémoire ne peuvent pas être supprimés, mais ils peuvent être écrasés par d'autres stations.
12. Audio Bluetooth
La fonction BLUETOOTH permet la transmission sans fil des fichiers de musique (Streaming audio) à la radio. Des smartphones, tablettes ou appareils similaires peuvent être appariés à la radio. Sélectionnez à cet effet la source « Bluetooth » dans le menu principal.
12.1 Premier appariage (Pairing) d'appareils BLUETOOTH
Assurez-vous que le terminal à apparier est allumé et que sa fonction Bluetooth est bien activée.
Sélectionnez la source « Bluetooth » dans le menu principal. L'écran affiche « Bluetooth à découvrir ». Ouvrez alors les réglages Bluetooth du terminal à apparier et lancez la recherche d'appareils Bluetooth disponible sur ce terminal. Sélectionnez l'option « M-9000S » et lancez le processus d'appariage. Lorsque l'appariage s'est terminé avec succès, l'écran affiche « Connecté ». Vous pouvez à présent gérer la diffusion de musique via le terminal. Utilisez à cet effet l'appli de musique de votre choix.
La commande de base des fonctions Lecture/Pause et Sauts de titre Avant/Arrière est possible à l'aide des touches correspondantes de la télécommande.
Remarque : Certains terminaux requièrent un code PIN pour l'appariage. Saisissez alors les chiffres « 0000 ».
12.2 Connexion automatique après l'appariage
Lorsque la source « Bluetooth » est désélectionnée ou que la radio est éteinte, la connexion Bluetooth est interrompue. Lorsque la radio est rallumée ou que la source « Audio Bluetooth » est
resélectionnée, la connexion est établie automatiquement.
Remarque : Si la connexion automatique devait ne pas être possible, procédez comme suit :
Appuyez sur la touche
, puis sélectionnez l'option « Voir les détails ». Ouvrez ensuite la « Liste d'appareils jumelés » pour sélectionner et connecter le terminal souhaité. L'actionnement de la touche établit la connexion et l'écran affiche brièvement le message « Connecté ».
12.3 Appariage d'un nouveau terminal
Pour apparier un nouveau terminal à la radio, appuyez sur la touche
et sélectionnez l'option « Configurer Bluetooth ». La connexion actuelle est interrompue.
Procédez ensuite comme lors du premier appariage d'un terminal. Ce terminal est alors enregistré également dans la liste des appareils appariés et peut être sélectionné à l'aide du menu correspondant (voir ci-dessus). Un maximum de 8 appareils peuvent être enregistrées.
12.4 Interruption de la connexion Bluetooth
Si vous souhaitez interrompre la connexion avec un appareil apparié, il vous suffit d'appuyer pendant 2 secondes sur la touche (Appariage Bluetooth) de la télécommande. La redio commute alors en mode d'appariage.
13. Ports analogiques
13.1 Line-In
Pour la lecture de musique, vous pouvez brancher des appareils externes tels que des lecteurs MP3, lecteurs DVD ou consoles de jeu au port Line-In. Sélectionnez à cet effet la source « AUX-IN » dans le menu principal.
14. Minuterie de veille
Cette fonction vous permet de commuter automatiquement la radio en mode veille après un laps de temps défini. Vous pouvez choisir entre 15, 30, 45 ou 60 minutes. L'option « Mode sommeil » efface le laps de temps réglé précédemment. Après avoir sélectionné la source audio, appuyez sur la touche
et sélectionnez « Menu principal ». Déplacez-vous ensuite dans le menu à l'aide des touches ou et sélectionnez l'option « Mode sommeil ». Sélectionnez le laps de temps souhaité à l'aide des touches ou dans le menu « Régler mode sommeil » et confirmez par la touche . Quittez ensuite les menus à l'aide de la touche .
Le temps restant s'affiche en bas à gauche de l'écran avec un compte à rebours en minutes.
15. Réveil
Cette radio permet de régler 2 horaires de réveil distincts. Appuyez sur la touche (Réveil) de la télécommande et sélectionnez l'option « Alarme 1 » ou « Alarme 2 » pour procéder aux réglages. Alternativement, vous pouvez aussi ouvrir la fonction de réveil depuis le menu principal. De plus, le
réglage est possible directement sur la radio à l'aide de la touche (Réveil) et du bouton de réglage (Naviguer). En mode veille, les horaires de réveil mémorisés peuvent être activée et désactivée à l'aide de la touche (Réveil). Les options suivantes sont disponibles pour la programmation du réveil :
15.1 Activer :
Sélectionnez ici les jours d'activation du réveil. Les options suivantes sont disponibles au choix :
Arrêt / Quotidienne / Une fois / Week-end / Jours de semaine
Sélectionnez l'option « Arrêt » pour désactiver un réveil actif.
15.2 Heure :
À l'aide des touches ou , réglez d'abord les heures, puis, après avoir actionné la touche , les minutes.
15.3 Mode :
réglez ici la source audio pour la fonction de réveil. Les options suivantes sont disponibles au choix :
Alarme / Radio Internet / DAB / FM / CD / USB
15.4 Présélection :
définissez ici la station pour la fonction de réveil. Vous disposez ici de la dernière station diffusée ou des stations mémorisées dans les favoris. Cela ne s'applique pas au mode de alarme, CD et USB.
15.5 Volume :
Réglez ici le volume souhaité pour le réveil.
15.6 Enregistrer :
Lorsque vous avez procédé à tous les réglages, appuyez sur la touche pour mémoriser les réglages.
Un réveil activé est indiqué par le symbole de réveil et le numéro du réveil activé affichés en bas à gauche de l'écran. En mode veille, l'heure réglée pour le réveil s'affiche également.
15.7 Désactivation du réveil après le réveil
Pour désactiver le réveil jusqu'au cycle de réveil suivant, appuyez sur la touche (Veille) de l'appareil ou de la télécommande. Le message « Arrêt réveil » s'affiche brièvement à l'écran. Si vous souhaitez interrompre la fonction de réveil pour quelques minutes uniquement (Snooze), vous pouvez appuyer sur une touche quelconque. La fonction Snooze est réglée à l'aide de la touche par incréments de 5, 10, 15 et 30 minutes et peut être prolongée à volonté. Après un bref délai, la radio recommute en mode « Veille » et le temps restant jusqu'au prochain réveil s'affiche à côté du symbole de réveil clignotant.
Remarque : En cas de panne de secteur, les horaires de réveil mémorisés sont conservés.
16. Paramètres système
Dans les paramètres système, vous pouvez modifier les réglages de la radio et consulter d'importantes informations au sujet de la radio.
16.1 Égaliseur
L'égaliseur vous permet d'adapter le son de votre radio à vos préférences. Vous pouvez sélectionner l'un des réglages préconfigurés ou créer votre propre profil. À cet effet, procédez comme suit :
Appuyez sur la touche
et sélectionnez l'option « Paramètres système », puis « Égaliseur ». Les touches ou vous permettent de sélectionner un profil de timbre avant de le confirmer par . Les profils suivants sont disponibles :
Powerful / Clear / Bright / Warm / Balanced
16.2 Paramètres Internet
16.2.1 Assistant de réseau
L'assistant de réseau vous aide à connecter la radio à Internet. Pour l'ouvrir, procédez comme suit : Sélectionnez dans le menu « Configuration » l'option « Réseau », puis confirmez par « Assistant réseau ». La radio lance alors une recherche automatique pour détecter les connexions Wifi disponibles et les affiche ensuite dans une liste. Les touches ou et le bouton de réglage (Naviguer) permettent de choisir parmi les différents réseaux. À la fin de liste figurent les options « [Nlle recherche] » ou « [Config manuelle] ».
16.2.2 Connexion réseau sans fil (Wifi)
En fonction du réseau, vous disposez de plusieurs options pour établir la connexion avec le réseau. Les réseau compatibles avec une connexion WPS (Wi-Fi Protected Setup) sont identifiés dans la liste par la mention « [WPS ...] » qui les précède. Les autres connexions sont des réseaux ouverts ou protégés par le procédé PSK (Pre-Shared Key), c'est-à-dire par un code partagé en amont.
Remarque : Un symbole blanc en bas à droite de l'écran indique qu'une connexion réseau est active. En absence de connexion active, ce symbole est barré par un trait rouge.
16.2.3 Connexion WPS / PSK / ouverte
Une connexion WPS offre une connexion aisée, mais néanmoins sûre de la radio à votre réseau. Deux possibilités sont disponibles. La configuration de la connexion par PBC (Push-Button- Configuration – configuration par actionnement d'un bouton) ou au moyen du procédé PIN pour lequel l'interface utilisateur de votre routeur vous demande de saisir une série de chiffres générés de manière aléatoire.
16.2.4 Configuration par PBC
Sélectionnez le réseau « [WPS...] » souhaité. Sélectionnez ensuite à l'aide du « Menu WPS » l'option
« Touche d'installation », puis confirmez. Appuyez ensuite sur la touche WPS de votre routeur ou point d'accès (Access Point – AP). Le mode opératoire précis est décrit dans la notice d'emploi de votre routeur ou AP. Alternativement, vous pouvez aussi lancer le processus dans le menu « Re-seau » sous « Réglage PBC Wlan ». Suivez alors les instructions affichées à l'écran.
16.2.5 Configuration par PIN
Sélectionnez le réseau « [WPS...] » souhaité. Sélectionnez ensuite à l'aide du « Menu WPS » l'option « Code PIN », puis confirmez. La radio génère un code à 8 chiffres que vous confirmer au moyen de la touche . Saisissez ensuite ce code sur l'interface utilisateur du routeur ou de l'AP. De plus amples informations à ce sujet figurent dans la notice d'emploi du routeur de ou de l'AP.
16.2.6 Ignorer WPS / Configuration par PSK (Pre-Shared Key – Code partagé en amont)
Sélectionnez « Sauter le WPS », pour établir la connexion au réseau au moyen d'un code réseau. Dans le cas d'un réseau non compatible WPS, vous accédez directement au masque de saisie. Saisissez alors le code et confirmez-le en appuyant sur le bouton « OK ». Si la saisie est correcte, la radio se connecte à votre réseau et établit la connexion Internet.
16.2.7 Connexion ouverte
Nous vous recommandons de ne pas établir de connexion avec un réseau ouvert. Si le réseau que vous avez choisi n'est pas crypté, vous pouvez le confirmer à l'aide de la touche . Ensuite, la connexion Internet est établie.
16.2.8 Configuration manuelle de la connexion réseau
Lorsque DHCP est actif, procédez comme suit :
Sélectionnez les menus « Réseau » -> « Config manuelle » -> « Sans fil » -> « DHCP activé ». Saisissez ensuite le SSID (nom de réseau) complet et confirmez-le en appuyant sur le bouton « OK ». Sélectionnez ensuite la méthode de cryptage correspondante.
Vous la trouverez dans la configuration du routeur ou de l'AP. En fonction de la méthode choisie, vous devais saisir le code réseau et le confirmer à l'aide du bouton « OK ».
16.2.9 Lorsque DHCP est n'est pas actif, procédez comme suit :
Sélectionnez les menus « Réseau » -> « Config manuelle » -> « Sans fil » -> « DHCP désactivé ». Saisissez à présent les informations nécessaires pour « Adresse IP », « Masque de sous-réseau », « Adresse passerelle », « DNS primaire » et « DNS secondaire ». Les touches ou de la télécommande ou le bouton de réglage (Naviguer) permettent de régler ces valeurs. Les touches , ou vous permettent de sélectionner les différents pavés numériques pour les réglages. Poursuivez ensuite comme décrit sous « DHCP activé ».
16.3 Afficher les paramètres réseau
Ce menu contient tous les paramètres du profil réseau utilisé actuellement. Dans le menu « Paramètres réseau », sélectionnez le menu « Voir configurations ». Les touches ou de la télécommande ou le bouton de réglage (Naviguer) permettent d'afficher ces valeurs.
16.4 Configuration du PIN NetRemote
Ce menu permet de régler un PIN à 4 chiffres qui sera demandé lors de la première installation de l'appli UNDOK (voir le chapitre 24). Le code préréglé est « 1234 ». Modifiez le code PIN immédia-tement.
16.5 Profil de réseau
Ici s'affiche la liste des profils de réseau mémorisés dans la radio. Si vous avez créé plusieurs profils, sélectionnez celui avec la distance la plus courte par rapport au routeur ou à l'AP correspondant. Vous pouvez supprimer les profils de réseau dont vous n'avez plus besoin en sélectionnant le profil à supprimer à l'aide des touches ou de la télécommande ou du bonton de réglage (Naviguer) avant de confirmer par . Le profil de réseau actif est identifié par un astérisque (« * »).
Remarque : Le profil de réseau actif ne peut pas être supprimé.
16.6 Effacer les paramètres réseau?
Ce menu permet de supprimer les paramètres réseau du profil actuel. Sélectionnez à cet effet le bouton « OUI » et confirmez votre saisie à l'aide de la touche . L'actionnement du bouton « NON » annule le processus.
16.7 Gardez réseau connecté
Ce menu permet de définir si la connexion Wifi au réseau doit être maintenue en mode veille. Vous pouvez alors allumer la radio à l'aide de l'appli UNDOK (voir page 27). La consommation électrique en mode veille est légèrement plus élevée en mode réseau. Pour le réglage, appuyez sur le bouton « OUI » ou « NON », puis confirmez votre saisie à l'aide de la touche .
17. Réglage de l'heure
Le menu « Date/heure » vous permettent de définir les paramètres pour la date et l'heure. Vous disposez des options suivantes à cet effet :
Cette option sert à régler manuellement la date et l'heure. Les touches ou de la télécommande ou le bouton de réglage (Naviguer) permettent de modifier ces valeurs. Les touches , oder servent à sélectionner les différents pavés numériques et à enregistrer les valeurs.
Ici, vous pouvez définir à partir de quelle source la date et l'heure seront actualisées. Les options suivantes sont disponibles :
MAJ via DAB : La date et l'heure sont actualisées via DAB.
MAJ via FM : La date et l'heure sont actualisées via FM.
MAJ via réseau : La date et l'heure sont actualisées via le réseau.
Pas de MAJ : La date et l'heure doivent être réglées manuellement.
L'option sélectionnée actuellement est identifiée par un astérisque (« * »).
Ce menu permet de définir si l'heure est affichée au format 12 heures ou 24 heures. Effectuez votre choix à l'aide des touches ou , puis confirmez par . L'option sélectionnée actuellement est identifiée par un astérisque (« * »).
18. Langue
Le menu « Langue » permet de définir la langue des menus de la radio. Si vous avez mis en service l'appareil avec l'assistant de configuration, vous avez déjà réglé la langue d'affichage de l'appareil. Pour sélectionner une langue, utilisez les touches ou , puis confirmez par la touche . Alternativement, vous pouvez aussi procéder à ce choix au moyen du bouton de réglage (Naviguer).
Les langues suivantes sont disponibles :
allemand, anglais, danois, espagnol, finlandais, français, italien, néerlandais, norvégien, polonais, portugais, suédois, turc.
19. Paramétrage d'usine
Pour rétablir la configuration d'origine de la radio, il suffit de sélectionner « OUI » dans le menu « Réglages d'origine ». Attention : Tous les paramétrages effectués jusqu'à cet instant sont effacés.
L'actionnement du bouton « NON » annule le processus.
Remarque : Avant de céder la radio (par ex. dans le cadre d'une vente, d'un don ou de sa mise au rebut), rétablissez systématiquement son paramétrage d'usine.
20. MAJ Logiciel
Ce menu vous permet de vérifier si une mise à jour logicielle est disponible pour la radio.
Si vous sélectionnez « MAJ automatique », la radio vérifie régulièrement si de nouvelles mises à jour du logiciel sont disponibles.
Sélectionnez l'option de menu « Vérifier maintenant » pour rechercher les nouvelles versions éventuelles. Si une nouvelle version est détectée, sélectionnez « OUI » pour l'installer ou « NON » pour annuler la mise à jour. Si vous optez pour « OUI », la radio redémarre pour exécuter ce processus. Ensuite, le logiciel est téléchargé et l'appareil vous demande par « Poursuivre ? » s'il doit installer la mise à jour. Sélectionnez « YES » (Oui) pour poursuivre ou « NO » (Non) pour interrompre la mise à jour. Le message „Warning: do not remove power" (Avertissement : ne pas couper l'alimentation électrique) et la version logicielle à installer clignotent en alternance. Lorsque le processus est terminé,
« Upgrade completed » (Mise à jour terminée » s'affiche à l'écran et vous pouvez confirmer le processus au moyen de la touche .
Vous pouvez consulter le numéro de version du logiciel installé dans le menu « Configuration », option « Informations ».
Attention!
Veillez à assurer une alimentation électrique stable avant de lancer une mise à jour du logiciel.
Toute interruption pendant une mise à jour peut occasionner des dommages irréparables !
21. Assistant de configuration
Vous pouvez redémarrer l'assistant de configuration depuis le menu « Assistant réglages ». Procédez à cet effet comme indiqué au point « 3.8 Démarrage de l'assistant de configuration ».
Ce menu contient notamment le numéro de version du progiciel actuel. Préparez ce numéro lorsque vous souhaitez vous adresser au service clients.
23. Politique de confidentialité
Veuillez lire les dispositions de protection des données qui y sont présentées ou ouvrir la page Internet suivante :
www.frontiersmart.com/privacy
24. Éclairage
L'éclairage de l'afficheur peut être ajusté selon 3 niveaux de luminosité. Les fonctions suivantes peuvent être réglées dans le menu « Rétroéclairage » :
« Temps mort » : Durée jusqu'à ce que l'afficheur soit réglé au niveau d'éclairage défini dans l'option « Niveau d'intensité ».
Options disponibles : « On / 10 / 20 / 30 / 45 / 60 / 90 / 120 / 180 secondes »
« On » signifie que la radio présente toujours le niveau de luminosité « Au niveau ».
« Au niveau » : La luminosité de l'afficheur lorsque la radio est mise en marche.
Options disponibles : « Haut » / « Moyenne » / « Bas »
« Niveau d'intensité » : Réglage de la luminosité pour le fonctionnement et le mode Veille.
Options disponibles : « Moyenne » / « Bas » / « La Nuit » / « Off »
25. UNDOK – Commande de la radio par l'appli
L'application (appli) UNDOK développée par Frontier Silicon vous permet de commander vos radios et haut-parleurs intégralement depuis votre smartphone.
Que ce soit pour la première mise en service de l'appareil, la configuration de compresseurs ou la gestion de vos stations préférées – UNDOK vous permet d'accéder à toutes les fonctions depuis votre smartphone ou votre tablette et vous offre ainsi encore plus de confort. Téléchargez l'appli UNDOK depuis Google Play Store ou Apple App Store.
Première mise en service de l'appareil avec UNDOK
Lors de la première mise en service ou lorsque la radio a été réinitialisée aux paramètres d'usine, la radio est en mode SETUP (Configuration) et un « Micro Access Point » (Micro point d'accès, un réseau Wifi spécifique) est généré. Ainsi, votre smartphone ou tablette peut se connecter à la radio.
Paramétrage avec Android
Assurez-vous que la radio est en mode SETUP (Configuration). Ouvrez l'APPLI UNDOK sur votre smartphone ou tablette, puis sélectionnez l'option de menu « Configuration système audio ».
Appuyez sur « SUIVANT » et sélectionnez l'option de menu « CHOISIR LE POINT D'ACCÈS ».
Le menu Wifi du terminal s'affiche et vous pouvez y sélectionner le réseau « M-9000S ». Après la connexion, le message « Connecté à M-9000S » s'affiche dans l'appli. Suivez les instructions de l'appli jusqu'à avoir entièrement configuré la radio. Pour terminer, la radio se connecte au réseau et vous pouvez commander dorénavant l'appareil à l'aide de l'APPLI UNDOK en appuyant sur le bouton « Utiliser mon système audio ».
Configuration avec iOS
Assurez-vous que la radio est en mode SETUP (Configuration). Ouvrez l'APPLI UNDOK sur votre iPhone ou iPad, puis sélectionnez l'option de menu « Configuration système audio ».
Appuyez sur « SUIVANT » et sélectionnez l'option de menu « CHOISIR LE POINT D'ACCÈS ». Le menu Wifi du terminal s'affiche et vous pouvez y sélectionner le réseau « M-9000S ». Après la connexion, le message « Connecté à M-9000S » s'affiche dans l'appli. Suivez les instructions de l'appli jusqu'à avoir entièrement configuré la radio. Pour terminer, la radio se connecte au réseau et vous pouvez commander dorénavant l'appareil à l'aide de l'APPLI UNDOK en appuyant sur le bouton « Utiliser mon système audio ».
26. Élimination des défaillances
En cas de dysfonctionnements, veuillez vérifier les points suivants :
Absence de son
→ Branchez correctement le bloc d'alimentation à fiches.
Le système ne réagit pas à l'actionnement des touches
→ Débranchez le bloc d'alimentation à fiche et rebranchez-le.
Problèmes lors de la réception radio
→ Réorientez l'antenne.
Aucune connexion réseau ne peut être établie.
→ Contrôler la fonction Wifi et assurez-vous d'avoir saisi le bon mot de passe.
27. Maintenance et entretien
Nettoyage du boîtier
Utilisez un chiffon légèrement humecté avec un détergent doux. N'utilisez pas de détergents contenant de l'alcool, de l'ammoniac ou d'abrasifs.
La condensation (rosée) peut se former à l'intérieur de l'appareil si la différence entre la température de l'appareil et la température ambiante est trop importante. Si la condensation se forme à l'intérieur de l'appareil, elle peut nuire à son bon fonctionnement. Dans ce cas, il convient d'attendre quelques heures. Une fois l'humidité disparue, l'appareil peut de nouveau être utilisé.
Des précautions particulières sont à prendre dans les cas suivants :
Si l'appareil est déplacé d'un endroit à un autre dont la température est considérablement plus élevée ou basse, si l'humidité ambiante augmente sur le lieu d'installation de l'appareil, etc.
Manipulation des CD
Tenez le CD de sorte à ne pas toucher la surface numérique. (Le côté non imprimé du CD correspond au côté de lecture.)
Utilisez exclusivement des CD avec le DISC marquage. Un CD sans ce marquage ne pourra éventuellement pas être lu correctement.
Remarques concernant l'utilisation d'un appareil USB
Cet appareil est en mesure de lire les fichiers audio enregistrés sur une mémoire Flash ou un lecteur audio numérique, dès lors que ces appareils disposent d'un port USB (dans le présent document, ces appareils sont désignés par « Appareils USB »).
Les restrictions suivantes s'appliquent concernant les appareils USB utilisables :
Appareils USB utilisables
Appareils USB appartenant à la classe des mémoires masse USB.
Appareils USB, dont le courant absorbé maximal est de 500 mA.
Appareils USB, de la classe des mémoires de masse USB : des appareils USB que le PC détecte comme mémoire externe, sans qu'un pilote spécial ou un logiciel d'application spécial ne soit nécessaire.
Veuillez vous adresser à votre revendeur, si vous n'êtes pas certain que votre appareil USB correspond aux spécifications de la classe des mémoires de masse USB.
L'utilisation d'un appareil USB qui n'est pas supporté peut conduite à une lecture ou un affichage erronés du fichier audio.
Même si vous utilisez un appareil USB qui correspond aux spécifications figurant ci-dessus, les fichiers audio peuvent ne pas être lus correctement en fonction du type ou de l'état de l'appareil USB.
28. Mise au rebut
Mise au rebut d'appareils électriques et électroniques usagés et de piles
Le symbole (poubelle barrée) sur le produit ou son emballage indique que ce produit ne doit pas être jeté aux ordures ménagères, mais doit être remis à un point de collecte pour le recyclage d'appareils électriques et électroniques et de piles. Par votre contribution à l'élimination correcte de ce produit, vous protégez l'environnement et la santé de vos concitoyens. Une mise au rebut non conforme ou erronée occasionne des risques pour l'environnement et la santé. Vous pouvez obtenir des informations plus détaillées au sujet du recyclage de ce produit auprès de votre commune ou des entreprises de traitement de déchets communaux. Attention : Le sigle « Pb » sous le symbole des piles indique que ces piles contiennent du plomb.
L'utilisateur final est seul responsable de la suppression des données avant la mise au rebut de l'appareil usagé. Les fonctions nécessaires figurent dans l'option de menu « Paramétrage d'usine » (voir le chapitre 19).
La marque et les logos Bluetooth® sont des marques déposées de la société Bluetooth SIG Inc. Toute utilisation de ces marques par la société JVCKENWOOD Corporation. Fait l'objet d'une licence. Les autres marques et appellations commerciales appartiennent à leurs propriétaires respectifs.
Caractéristiques techniques – M-9000S
Alimentation électrique Tension alternative 100 - 240 V Fréquence de courant alternatif d'entrée 50/60 Hz Consommation d'électricité 40 Watt Consommation d'électricité en mode de veille 0,8 Watt Consommation d'électricité en mode de veille réseau 0,8 Watt Antenne UKW/DAB+ Gamme d'accord DAB BANDE III 174,928 MHz – 239,200 MHz Gamme d'accord FM 87,50 MHz – 108,00 MHz Mode CD Distance de bruit de signal (filtre A) ≥ 65 dB Étendue dynamique ≥ 60 dB Connexion réseau (Wifi) Réseau compatibles WIFI IEEE 802.11a/b/g/n Plages de fréquences compatibles WiFi : 2.412 - 2.472 GHz, 5.18 - 5.32 GHz, 5.50 - 5.70GHz, 5.745 – 5.825GHz Puissance émettrice maximale WIFI 2.4 G : 13,6 dBm / WIFI 5G : 13,6 dBmWIFI 5.8G : 13,6 dBm Cryptages compatibles WEP, WPA, WPA2 (PSK), WPS Formats de Streaming compatibles MP3, AAC/AAC+ (jusqu'à 48 kHz, 16 bits) Appareils USB Fichiers exécutables : MP3 Compatible avec USB1.1 Full-speed, FAT16, FAT32 Max. 500 mA, vitesses de transmission : 32 kbit/s à 320 kbit/s BLUETOOTH Version BLUETOOTH V4.2 Classe de performances Classe 1 Puissance émettrice maximale 4,3 dBm Portée Env. 10 m (peut varier en fonction de l'environnement) Plage de fréquences 2,402 GHz – 2,480 GHz Profil BLUETOOTH A2DP (Advanced Audio Distribution Profile, AVRCP (Audio/Video Remote Control Profile) Line-In Douille de jack 3,5 mm Amplificateur Puissance de sortie 2 x 50 Watt / 6 Ohm Plage de fréquences 60 Hz - 20 kHz Dimensions et poids Module principal (l x h x p) 260 x 115 x 260 mm / 2,0 kg Baffles (l x h x p) 173 x 263 x 240 mm / 2,4 kg chaque unité Plage de température 0°C à 35°C
Sous réserve de modifications techniques
30. Garantie
Cher Utilisateur de Produits Kenwood,
Nous vous remercions d'avoir choisi ce produit Kenwood („le Produit“). Si celui-ci, dans de conditions d'utilisation normales, devait s'avérer défectueux, il serait réparé ou remplacé gratuitement, conformément aux conditions de la présente Carte de Garantie.
Conservez précieusement cette Carte de Garantie car elle vous sera indispensable pour toute réclamation.
Le Produit est garanti pour une durée de deux ans à compter de la date de première acquisition auprès d'un détaillant de produits Kenwood. La Garantie couvre tant les pièces de rechange que la main d'oeuvre et la réparation sera effectuée gratuitement. Nous nous réservons le droit de remplacer le Produit si sa réparation ne s'avère pas possible. Les frais d'emballage, d'installation ainsi que tous autres frais ou risques indirectement liés à la réparation ne sont pas couverts par la garantie et seront à la charge de l'utilisateur.
Conditions
A. Toutes réclamation formulée en vertu de la Garantie doit être accompagnée de la présente Carte de Garantie et des informations et documents suivants:
(a) Votre identité et adresse complète.
Si ces informations ne peuvent être fournies ou si le Produit a été modifié ou altéré de quelque manière que ce soit depuis la date d'aquisition, Kenwood se réserve le droit de refuser de réparer le Produit aux conditions de la présente Garantie.
B. Le Produit a été construit de manière à se conformer aux normes et exigences de sécurité nationales et locales applicables dans le pays de première mise sur le marché en Europe par le farbicant. Les modifications nécessaires à l'utilisation du Produit à un endroit autre ne sont pas couvertes par la présente Garantie et la responsabilité de Kenwood ne pourra être engagée pour toute prestation effectuée à cette fin ou tout dommage causé au Produit et résultant de telles prestations. Si le Produit est utilisé dans un pays Européen dans lequel il est soumis à des normes et exigences différentes de celles en vigueur dans le pays Européen de première mise sur la marché par le fabriquant, toute prestation en exécution de la présente Garantie sera soumise à la condition que l'utilisateur du Produit prenne à sa charge les frais d'adaption du Produit aux normes et exigences applicables. En outre, si le Produit est d'un type différent des produits mis sur le marché par l'importateur officiel du pays dans lequel le Produit est présenté pour réparation au titre de la garantie, et que les pièces de rechange appropriées ne sont pas disponibles dans ce pays, ou que la réparation de garantie n'est pas possibledans de pays pour toute autre raison légitime, les frais relatifs autransport aller retour du Produit pour réparation dans le pays de première acquisition seront à la charge de l'utilisateur.
C. La présente Garantie ne couvre pas:
(a) Les altérations du Produit, les adaptations et entretiens normaux, y compris les contrôles périodiques tels que mentionnés dans la Manuel joint au Produit;
(b) Le dommage causé au Produit résultant de réparations inappropriées ou inadéquates effectuées par toute personne n'étant pas habilitée par Kenwood à exécuter des réparations de garantie pour le compte de cette dernière;
(c) Le dommage causé au Produit résultant d'une négligance, d'un accident, de modifications, d'une installation ou d'un emballage défectu eux, d'une utilisation incorrecte ou de l'utilisation de pièces de rechange inappropriées;
(d) Le dommage causé au Produit dû au feu, l'immersion dans l'eau, la foudre, un tremblement de terre, une ventilation in adéquate, un cas de force majeure, une utilisation, pourquoi cause que ce soit, avec une tension électrique d'alimentation incorrecte ou toute autre cause hors du contrôle de Kenwood;
(e) Les hauts-parleurs endommagés suite à leur utilisation à une puissance supérieure à celle indiquée, et le dommage causé aux disques, ban des cassettes audio, cassettes vidéo, compact disc, ou tout autre bien qui n'est pas le Produit entant que tel, et ce quelle qu'en soit la cause;
(f) Les biens consommables ou les pièces d'usure devant être remplacées en raison de leur utilisation normale, et notamment les éléments de gramophone remplaçables, les aiguilles phono, les courroies, les têtes de lecture et d'enregistrement, et les tubes finaux;
(g) Le Produit dont le numéro de série a été partiellement ou intégralement retiré, modifié ou effacé.
La présente Garantie est constituée en faveur de toute personne ayant acquise le Produit de manière légale.
Le Produit sera remplacé ou réparé gratuitement aux conditions exposées ci-dessus. Si l'utilisateur est un non-professionnel ou un consommateur, il bénéficiera en tout état de cause de la garantie légale en cas de défauts ou de vices cachés du Produit.
Adresse:
JVCKENWOOD EUROPE B.V. Succursale France
7 Allee des Barbanniers,
92632 Gennevilliers CEDEX
Tel. 09-69-390-811 www.kenwood-electronics.fr
KENWOOD
KENWOOD
Sistema Micro HiFi Smart
M-9000S
ISTRUZIONI PER L'USO
JVCKENWOOD Corporation
Indice
Contenuto
Pagina
Prima di attivare la tensione di alimentazione 3
Messa in servizio 6
Componenti e funzioni 7
Menu principale 10
Radio Internet 11
Podcast 12
Spotify 14
Lettore CD 15
Lettore USB 16
Radio digitale DAB+ 16
Radio FM 18
Audio Bluetooth 19
Collegamenti analogici 20
Sleep (pisolino) 20
Sveglia 20
Impostazioni di sistema 21
Impostazioni ora 24
Lingua 25
Impostazioni di fabbrica 25
Aggiornamento software 25
Installazione guidata 26
Informazioni 26
Informativa sulla privacy 26
Illuminazione 26
App UNDOK 27
Risoluzione dei problemi 28
Cura e manutenzione 28
Smaltimento 29
Dati tecnici 30
Indicazioni di garanzia 31
A causa della gamma di frequenza di 5 GHz del modulo WLAN integrato, l'uso è consentito solo all'interno degli edifici nei seguenti paesi.
AT BE BG CZ DK EE FR DE IS IE IT EL ES CY LVU LT LU H U MT NL NO PL PT RO SL SK TR FI SE CH UK HR
AT=Austria, BE=Belgio, BG=Bulgaria, CZ=Repubblica Ceca, DK=Danimarca, EE=Estonia, FR=Francia, DE=Germania, IS=Islanda, IE=Irlanda, IT=Italia, EL=Grecia, ES=Spagna, CY=Cipro, LV=Lettonia, LT=Lituania, LU=Lussemburgo, HU=Ungheria, MT=Malta, NL=Olanda, NO=Norvegia, PL=Polonia, PT=Portogallo, RO=Romania, SL=Slovenia, SK=Slovacchia, TR=Turchia, FI=Finlandia, SE=Svezia, CH=Svizzera, UK=Regno Unito, HR=Croazia
1. Prima di attivare la tensione di alimentazione
IMPORTANTI ISTRUZIONI DI SICUREZZA
Attenzione: Leggere attentamente questa pagina per garantire un funzionamento sicuro dell'unità.
Leggere attentamente queste istruzioni!
- Seguire tutte le istruzioni di sicurezza e d'uso durante l'utilizzo di questo prodotto.
Conservare le note in un luogo sicuro!
- Conservare le istruzioni di sicurezza e d'uso per future consultazioni.
Osservare tutte le indicazioni di avvertenza!
- Seguire scrupolosamente tutte le avvertenze riportate sul prodotto e nelle istruzioni per l'uso.
1.1 Pulire solo con un panno asciutto!
- Prima di pulire il prodotto, scollegare l'alimentatore di rete dalla presa a muro. Non utilizzare mai detergenti liquidi o spray di pulizia. Per la pulizia utilizzare solo un panno umido.
1.2 Accessori
- Utilizzare solo gli accessori specificati dal produttore.
1.3 Non usare questo prodotto vicino all'acqua.
- Non esporre mai l'apparecchio a gocce o spruzzi d'acqua - ad esempio in prossimità di una vasca da bagno, lavabo, lavandino, lavello, lavatrice, cantina umida, piscina, ecc. Non collocare mai sopra l'apparecchio contenitori pieni di liquidi, come vasi.
1.4 Ventilazione
– Le fessure e le aperture all'interno dell'involucro sono previste per la ventilazione dell'apparecchio per garantire un funzionamento affidabile dell'apparecchio, per proteggerlo dal surriscaldamento e dall'eventuale autoaccensione. Non bloccare le aperture di ventilazione. Installare l'apparecchio secondo le istruzioni del produttore. Non bloccare mai le aperture di ventilazione collocando l'apparecchio su un letto, un divano, una moquette o una superficie morbida simile. Questa unità non deve essere installata in una libreria o in un armadio a meno che non vi sia un'adeguata ventilazione.
1.5 Alimentazione della tensione
- Questo apparecchio può essere collegato esclusivamente alla tensione di rete indicata sull'apparecchio stesso. Se non siete sicuri del tipo di alimentazione elettrica della vostra casa, contattate il vostro rivenditore o l'azienda elettrica locale.
1.6 Cavo di rete
– Assicurarsi che non sia possibile inciampare sul cavo di rete e che esso non sia scollegato nelle immediate vicinanze di una presa, comprese le uscite aggiuntive. Inoltre, non schiacciare il cavo di alimentazione quando esce dall'unità.
Poiché la spina di rete viene utilizzata per la completa disconnessione dalla rete, deve essere lasciata sul cavo di rete e rimanere sempre accessibile.
1.7 Intemperie
- Scollegare l'apparecchio dalla rete elettrica durante i temporali e quando non verrà utilizzato per un lungo periodo di tempo.
1.8 Sovraccarico
– Non sovraccaricare mai le prese di alimentazione, le prolunghe o le prese multiple, in quanto sussiste il rischio di incendio o scossa elettrica.
1.9 Penetrazione di materiale estraneo e liquido
– Non permettere che materiali estranei o liquidi entrino nell'apparecchio attraverso le aperture in dotazione, poiché ciò potrebbe causare il contatto diretto dell'apparecchio con elementi soggetti a tensioni eccessive, provocare cortocircuiti, incendi o scosse elettriche. Non versare mai liquidi di alcun tipo su questo apparecchio.
1.10 Manutenzione
- Non tentare mai di riparare l'apparecchio da soli, poiché le aperture o la rimozione delle coperture possono esporre parti sotto tensione che potrebbero essere pericolose al contatto. Per tutti gli interventi di manutenzione rivolgersi a personale qualificato.
1.11 Danni che richiedono una riparazione
- I lavori di manutenzione e riparazione devono essere eseguiti esclusivamente da un centro di assistenza clienti qualificato.
L'assistenza è necessaria quando l'apparecchio è stato danneggiato (ad esempio, cavo di alimentazione o la espina), è stato versato del liquido, sono caduti oggetti all'interno dell'apparecchio, oppure l'apparecchio è stato esposto a pioggia o umidità, non funziona normalmente o è caduto.
1.12 Ricambi
- Se sono necessarie parti di ricambio, assicurarsi che il tecnico dell'assistenza utilizzi parti di ricambio prescritte dal costruttore o aventi le stesse caratteristiche delle parti originali. Ricambi non autorizzati possono causare incendi, scosse elettriche o altri incidenti.
1.13 Controllo di sicurezza
– Al termine dei lavori di manutenzione o riparazione di questo apparecchio, chiedere al tecnico dell'assistenza di eseguire un controllo di sicurezza per determinare se l'apparecchio è in perfette condizioni di funzionamento.
1.14 Calore
- Non installare l'unità in prossimità di superfici calde come radiatori, termoventilatori, stufe o altre apparecchiature (compresi gli amplificatori) che potrebbero surriscaldarsi. Non collocare mai oggetti con fiamme libere, come candele o lanterne, sopra o vicino al prodotto. Non esporre le batterie installate a calore eccessivo, come luce solare diretta, fuoco o simili.
1.15 Batterie
- Se non si utilizza la radio per un mese o più, rimuovere le batterie dall'apposito vano del telecomando per evitare perdite. Smaltire immediatamente le batterie che presentano perdite e rispettare tutte le disposizioni di legge pertinenti. La perdita delle batterie può causare lesioni e danneggiare il dispositivo. Non combinare mai batterie di tipo diverso o batterie vecchie e nuove.
Per ridurre al minimo il rischio di scosse elettriche, incendi, ecc
- Non rimuovere viti, coperture o parti dell'alloggiamento.
- Il pulsante di accensione non scollega completamente l'alimentazione in nessuna posizione.
Per scollegare completamente il dispositivo dall'alimentazione, scollegare l'alimentatore dalla presa.
1.16 Rischi associati a volumi elevati
- Per evitare possibili danni all'udito, non ascoltare ad alto volume per lunghi periodi di tempo.
1.17 Connessione di rete
- Assicuratevi che la funzione firewall sia attivata nel vostro punto di accesso alla rete (router). Si prega di consultare le istruzioni per l'uso del router.
- Se non volete impostare una connessione di rete, eseguite l'installazione guidata (vedi 3.8)
1.18 Telecomando
- Se si espone il sensore del telecomando alla luce solare diretta o alla luce di tubi fluorescenti ad alta frequenza, possono verificarsi dei malfunzionamenti. In questi casi collocare il sistema in un altro posto per evitare tali malfunzionamenti.
- La batteria fornita in dotazione è pensata per un test funzionale e può avere una durata limitata. Quando il raggio d'azione del telecomando diminuisce, sostituire la batteria vecchia con una nuova.
Prudenza!
Pericolo di esplosione se la batteria viene sostituita con una di tipo non corretto;
Alte o basse temperature estreme alle quali una batteria può essere esposta durante l'uso, lo stoccaggio o il trasporto;
Bassa pressione dell'aria ad alte quote;
Sostituzione di una batteria con una batteria di tipo errato che può bypassare un fusibile (ad esempio, alcuni tipi di batterie al litio);
Lo smaltimento di una batteria nel fuoco o in una stufa calda, o lo schiacciamento meccanico o il taglio di una batteria;
Lasciare una batteria in un ambiente con temperature estremamente elevate che possono provocare un'esplosione o la fuoriuscita di liquidi o gas infiammabili;
Una batteria esposta ad una pressione dell'aria estremamente bassa, che può causare un'esplosione o la fuoriuscita di liquidi o gas infiammabili.
1.19 Funzione automatica di risparmio energetico
Il modello è dotata di una funzione automatica di risparmio energetico. Questo commuta l'apparecchio in modalità standby entro 15 minuti se la radio è in riproduzione a volume molto basso o se la radio è silenziata. Questa impostazione non può essere modificata.
IMPORTANTE PER PRODOTTI LASER
PRODOTTO LASER DI CLASSE 1
PRUDENZA: Non aprire l'alloggiamento. L'apparecchio non contiene pezzi che possono essere sottoposti a manutenzione da parte dell'utente; fare eseguire le operazioni di manutenzione esclusivamente a personale specializzato qualificato.
JVCKENWOOD Corporation dichiara che l'apparecchiatura radio tipo M-9000S è conforme alla Direttiva 2014/53/UE. Il testo integrale della dichiarazione di conformità UE è disponibile al seguente indirizzo Internet: http://www.kenwood.com/cs/eudoc/
Produttore:
JVCKENWOOD Corporation
3-12. Moriyacho, Kanagawa-ku, Yokohama-shi, Kanagawa 221-0022, GIAPPONE
Rappresentante autorizzato (UE):
JVCKENWOOD EUROPE B.V.
Amsterdamseweg 37, 1422 AC UITHOORN, THE NETHERLANDS
2. Messa in servizio
2.1 Sconfezionamento
Sconfezionare delicatamente il dispositivo e assicurarsi che tutti gli accessori siano presenti.
• Telecomando a infrarossi
2.2 Collegamento
- Aprire il vano batterie del telecomando e inserire le batterie con la polarità corretta. La polarità specificata (+/-) è indicata nel vano batterie.
Collegare gli altoparlanti sulla presa e destra e a sinistra (all'uscita altoparlante) sul retro dell'unità. A tale scopo, premere le clip a molla e inserire le estremità dei cavi sfusi nelle aperture previste. Collegare il filo nero con il morsetto a molla nero. L'altro filo è collegato al terminale rosso nello stesso modo.
text_image
Cavo per altopar
R L
Nero/ grigio
Nero
- Collegare saldamente la spina di alimentazione a una presa di corrente. Poiché la spina di rete serve per scollegarsi completamente dalla rete, la presa deve rimanere sempre accessibile.
2.3 Attacco antenna mobile DAB+ / UKW
Collegare l'antenna mobile alla presa [ANTENNA FM 75Ω].
Trovare il luogo dove si ottiene la migliore ricezione.
Fissare l'antenna.
L'antenna fornita con il sistema è una semplice antenna mobile. Per una ricezione stabile del segnale, si raccomanda l'uso di un'antenna esterna (disponibile in commercio).
Per collegare un'antenna esterna, prima scollegare l'antenna interna.
La ricezione delle stazioni radio dalla rete via cavo non può essere garantita.
2.4 Connessione di rete
Per poter ricevere la radio via Internet, la radio deve essere integrata in una rete. Il router deve essere acceso e disporre di una connessione Internet. Verificare che sia attivata la connessione Wi-Fi del router. Si prega di consultare anche le struzioni per l'uso del router.
3. Componenti e funzioni
text_image
MODE MENU ALARM SHUFFLE/ REPEAT
EQ VOL
OK (SCAN)
1 2 3
ABC DEF
4 5 6
GHI JKL MNO
7 8 9
PQRS TUV WXYZ
PROG 0 INFO
FAV INTRO
KENWOOD
text_image
Standby On/Off, Sveglia Off
Vassoio CD aperto/chiuso (Eject)
MODE Aprire/chiudere selezione modalità
MENU Aprire/chiudere il menu
ALARM Impostazione sveglia
SHUFFLE / REPEAT Musica: Selezione casuale/ripetuta
▶ Avvia riproduzione, pausa
▶ Abrano/ricerca brano/ricerca stazione FM in avanti
▶ Abrano/ricerca brano/ricerca stazione FM indietro
Accoppiamento Bluetooth, riproduzione in pausa
▶ Alta; UKW: Impostare frequenza
▶ Bassa; UKW: Impostare frequenza
▶ Sinistra; brano preceden., memoria preimpostata indiet.
▶ Destra; brano successiva, memoria preimpostata avanti
OK Confermare immissione; UKW Avviare ricerca;
(SCAN) Immagine radio, presentazione a schermo intero
EQ Selezionare la preimpostazione dell'equalizzatore
▶ Silenziatore; disattivare silenziatore
Volume più / meno
(0-9) Ingresso numerico memoria preimpos., ingresso num. titolo
PROGRAMMazione dei titoli, preset preimpostati
INFORMATIENUTRUMMAZIONE Informazioni sullo schermo; durante la riproduzione 10 secondi di intro per traccia
3. Componenti e funzioni Continuazione
1 - Volume
text_image
Lato anteriore
①
②
③
SELECT
④
⑤
Bluetooth SSB
1 - Standby
Pianta
flowchart
graph TD
    A["+"] --> B["2"]
    B --> C["3"]
    C --> D["4"]
    D --> E["5"]
    E --> F["6"]
    F --> G["7"]
    G --> H["8"]
    H --> I["9"]
    style A fill:#fff,stroke:#000
    style I fill:#fff,stroke:#000
1 - Attacco Altoparlante
Lato posteriore
text_image
1
2
3
UTS2
Power transformer
COS. NO.
SPRAME OUT-002
KENWOOD
CO-MICRO SYSTEM
AC 75% (400kW) 600000
Power transmission valve
USB 857.5V (5000A)
S/N: L_
CLASS 1
Laser Project
CAUTION
DC/DC ELECTRIC SWITCH
REDAVATION
RS 45W-5000Hz
RS 150MHz
3.1 Accensione / Spegnimento (Standby)
Premere il tasto sul telecomando p sul dispositivo per accendere la radio. Premere nuovamente il tasto per mettere il dispositivo in modalità standby. Per spegnerlo completamente, scollegarlo dall'alimentazione elettrica.
È possibile navigare fra i menu premendo i pulsanti sul telecomando. Premendo il tasto la selezione è confermata. Queste operazioni possono essere eseguite anche sullo strumento, con il regolatore . Ruotando il regolatore si naviga attraverso i menu; premendo il regolatore si conferma una voce di menu.
3.3 Inserimento di password, testi di ricerca, ecc.
Selezionare con i pulsanti per selezionare singolarmente i numeri e/o le lettere corrispondenti e confermare la rispettiva selezione premendo . Per correggere un inserimento errato, si prega di andare al campo e confermare con il tasto sul telecomando. Questo cancella l'ultima voce. Utilizzare il campo "ANNULLA." per annullare completamente l'immissione. Se la selezione è completa, navigare nel campo "OK" e confermare la selezione premendo il tasto .
3.4 Regolare il volume e "Mute"
Premendo i tasti e controllo sull'unitr, č possibile regolare il volume sul telecomando, o ruotando il sul dispositivo. Una pressione del tasto silenzierà la radio. Premendo nuovamente il tasto si ripristina il volume originale.
Premendo ripetutamente il tasto possono essere visualizzate informazioni aggiuntive, a seconda della sorgente e della stazione:
Descrizione
Nome del canale, del programma corrente, dei contenuti, degli argomenti, ecc.
Genere
Viene visualizzato lo stile del programma (genere) del canale.
Livello del segnale ed errore del segnale
Bit Rate
Nelle modalità operative "Radio FM" e "Radio digitale DAB+", le informazioni sull'intensità di ricezione, la modalità stereo, il segnale RDS (solo FM) e la posizione della memoria preimpostata sono disponibili sul bordo inferiore destro del display. Se manca il display corrispondente, l'informazione non è disponibile.
3.6 Installazione guidata
Al primo avvio la procedura guidata verrà avviata automaticamente (Setup Wizard).
La procedura guidata di configurazione viene eseguita in inglese.
Si può saltare la procedura guidata e richiamarla più tardi in tedesco.
Tutte le lingue disponibili per il menu vengono elencate per la prima volta durante la messa in funzione.
Con i tasti si può selezionare la lingua desiderata e confermare con .
3.8 Avvio della procedura guidata di configurazione
Per una semplice e rapida messa in funzione iniziale (impostazione dell'ora e della data, impostazione della connessione Internet, ecc.) vi raccomandiamo di eseguire l'assistente di configurazione. Si prega di selezionare "Sì". Se si desidera saltare l'assistente di configurazione, selezionare "NO".
Tutte le impostazioni effettuate con l'aiuto dell'assistente di configurazione possono essere modificate anche in un secondo momento individualmente tramite le impostazioni di sistema. In alternativa, la procedura guidata di configurazione può essere eseguita di nuovo in qualsiasi momento. Quindi selezionare "Sì" o "NO" per eseguire l'assistente di configurazione automaticamente al successivo avvio o meno della radio. Dopodiché ci si troverà nel menu principale.
- Data/ora
Formato 12/24
- Aggiornamento automatico (ora e data)
Aggiornamento da DAB o FM (consigliato)
In caso di aggiornamento automatico tramite la rete radio FM/DAB/DAB+, l'ora e la data sono fornite dalle stazioni. Se tarato attraverso queste sorgenti, il tempo sarà impostato correttamente anche dopo un'interruzione di corrente. Ciò significa che è possibile mantenere anche gli orari di allarme impostati.
- Aggiornamento da NET
Selezionando questa opzione, l'ora e la data vengono impostate automaticamente tramite la connessione Internet. Inoltre, è possibile regolare il fuso orario e l'ora solare / legale.
- Nessun aggiornamento
L'ora e la data devono essere impostate manualmente.
- Mantenere la connessione di rete
Nel capitolo "Impostazioni di sistema" la configurazione della rete viene spiegata in modo più dettagliato.
Il menu principale contiene le varie sorgenti audio e le opzioni di impostazione:
Radio Internet
Podcast
Spotify
USB
Bluetooth
Ingresse Line-In
Spegnimento
Sveglie
Config. di sistema
Premere per una sorgente audio selezionata, premere il tasto
sul telecomando o sull'unità e selezionare "Menu principale".
5. Radio Internet
La radio via Internet offre una vasta scelta di stazioni diverse in tutto il mondo. È possibile selezionare le stazioni in molti modi. Per farlo, si prega di selezionare la sorgente "Radio Internet" dal menu principale.
5.1 Ricerca canali
La radio offre varie opzioni per la ricerca delle stazioni desiderate.
Navigare all'interno delle voci di menu e delle opzioni. Una volta trovata la stazione desiderata, confermare la selezione premendo . La riproduzione radio via internet può essere fermata premendo il tasto sul telecomando. Premendo nuovamente il pulsante si ricaricherà il trasmettitore.
5.1.1 Ricerca per paese e regione
Per cercare le stazioni da specifici continenti, paesi e regioni, premere il tasto
per richiamare l'“Lista stazioni”. Confermare la selezione.
Selezionare il menu "Posizione" per selezionare un paese o una regione.
5.1.2 Ricerca per genere
Per cercare stazioni con musica o temi specifici, eseguire la procedura seguente:
Premere il pulsante
per richiamare l' "Lista stazioni". Dopo aver confermato la selezione, passare al menu "Scoprire". Dopo la conferma, è possibile effettuare un'ulteriore restrizione in base all'origine o alla lingua della stazione.
5.1.3 Ricerca per nome
Se si conosce il nome della stazione desiderata, è possibile cercarlo in modo specifico:
Premere il pulsante
per richiamare l' "Lista stazioni". Dopo aver confermato la selezione, passare al menu "Ricerca". Inserire tutto o parte del nome della stazione nella maschera di immissione e selezionare il campo "OK" per iniziare la ricerca. Riceverete un elenco di tutte le stazioni i cui nomi contengono il testo ricercato.
5.1.4 stazioni più ricercati
Di seguito è riportata una selezione delle stazioni più ricercate:
Premere il pulsante
per richiamare l' "Lista stazioni". Dopo aver confermato la selezione, passare al menu "Popolare" e selezionare la stazione desiderata.
5.1.5 Stazioni locali
Per cercare specificamente le stazioni del paese in cui si trova attualmente la radio, procedere come segue: Premere il pulsante
, per richiamare l'“Lista stazioni”. Dopo aver confermato la selezione, passare al menu con il nome del paese della località attuale (ad es "Italia").
All'interno di questa restrizione locale è possibile anche cercare generi, stazioni locali o famose.
5.2 Preferiti (spazi di memoria)
Sono disponibili 40 posizioni di memoria (Preferiti) per memorizzare le vostre stazioni preferite. Potete occupare queste posizioni Preferite a vostro piacimento con le stazioni "Radio Internet" e "Podcast". Per richiamare le stazioni memorizzate sull'unità principale, premere il tasto <*> e selezionare la posizione di memoria desiderata girando il regolatore . Per caricare il trasmettitore, premere .
5.2.1 Memorizzare le stazioni con il telecomando:
Le posizioni di memoria da 1 a 10 possono essere assegnate tramite i tasti numerici del telecomando. Selezionare la stazione desiderata e premere un tasto numerico sul telecomando fino a quando "Pre-selez. memor." appare sul display. Le posizioni di memoria possono ora essere richiamate premendo brevemente un tasto del telecomando.
5.2.2 Memorizzazione delle stazioni sulle posizioni di selezione diretta 11-40:
Selezionare la stazione desiderata e tenere premuto il tasto sul telecomando. Ora selezionare una posizione di memoria dall'elenco delle memorie delle stazioni e confermate la selezione con il tasto sulla radio. Sul display appare "Preselez. memor.". È possibile accedere comodamente all'elenco delle stazioni premendo brevemente il tasto <*> sulla radio o sul telecomando (PROG tasto). Utilizzare i tasti o per selezionare una stazione e premere per la conferma.
Avvertenza: Le posizioni di memoria non possono essere cancellate, possono essere sovrascritte solo con altre stazioni.
6. Podcast
I podcast sono contributi recuperabili su vari argomenti, ad esempio trasmissioni di informazioni, notizie e molto altro ancora. Come per la radio via Internet, è possibile filtrare i podcast o cercare un podcast nell'intera banca dati. Per farlo, si prega di selezionare la sorgente "Podcasts" dal menu principale.
6.1 Ricerca di podcast
La radio offre diversi modi per cercare i podcast. Navigare all'interno delle voci di menu e nelle opzioni. Una volta trovato il Podcast desiderato, confermare la selezione premendo . La riproduzione del Podcasts può essere fermata premendo il tasto sul telecomando. Premendo in modo permanente i tasti è possibile avanzare o retrocedere all'interno del podcast a velocità crescente (max. 32 x). Una breve pressione del tasto su fa passare all'inizio del podcast.
6.1.1 Ricerca per paese e regione
Per cercare le stazioni da specifici continenti, paesi e regioni, premere il tasto
per richiamare l'"Podcast list". Confermare la selezione.
Selezionare il menu "Posizione" per selezionare un paese o una regione.
6.1.2 Ricerca per genere
Per cercare Podcast con musica o temi specifici, eseguire la procedura seguente:
Premere il pulsante
per richiamare l'"Podcast list". Dopo aver confermato la selezione, passare al menu "Scopri". Dopo la conferma, è possibile effettuare un'ulteriore restrizione in base all'origine o alla lingua del Podcast.
6.1.3 Ricerca per nome
Se si conosce il nome del Podcasts desiderato, è possibile cercarlo in modo specifico:
Premere il pulsante
per richiamare l'"Podcast list". Dopo aver confermato la selezione, passare al menu "Ricerca". Inserire tutto o parte del nome del Podcast nella maschera di immissione e selezionare il campo "OK" per iniziare la ricerca. Riceverete un elenco di tutti i Podcast o episodi i cui nomi contengono il testo ricercato.
6.1.4 Podcast popolari
Per cercare specificamente i Podcast del paese in cui si trova attualmente la radio, procedere come segue:
Premere il pulsante
per richiamare l'"Podcast list". Dopo aver confermato la selezione, passare al menu con il nome del paese della località attuale (ad es "Italia"). All'interno di questa restrizione locale è possibile anche cercare generi, Podcast locali o famosi.
6.2 Preferiti (spazi di memoria)
Sono disponibili 40 posizioni di memoria (Preferiti) per memorizzare i vostri Podcast preferiti.
Potete occupare queste posizioni Preferite a vostro piacimento con le stazioni "Radio Internet" e "Podcast". Per richiamare i Podcast memorizzate sull'unità principale, premere il tasto <*> e selezionare la posizione di memoria desiderata girando il regolatore . Per caricare il Podcast, premere .
6.2.1 Memorizzare i podcast con il telecomando:
Le posizioni di memoria da 1 a 10 possono essere assegnate tramite i tasti numerici del telecomando. Selezionare il Podcast desiderato e premere un tasto numerico sul telecomando fino a quando "Pre-selez. memor." appare sul display. Le posizioni di memoria possono ora essere richiamate premendo brevemente un tasto del telecomando.
6.2.2 Memorizzazione dei Podcast sui posizioni di selezione diretta 11-40:
Selezionare il Podcast desiderata e tenere premuto il tasto sul telecomando. Ora selezionare una posizione di memoria dall'elenco delle memorie delle stazioni e confermate la selezione con il tasto sulla radio. Sul display appare "Preselez. memor.". Potete accedere comodamente alle postazioni di memoria in modo comodo col tasto <*> alla radio o sul telecomando.
Utilizzare i tasti o per selezionare un podcast e premere per la conferma.
Avvertenza: Le posizioni di memoria non possono essere cancellate, possono essere sovrascritte solo con altri podcast.
7. Spotify
Usa il tuo cellulare, tablet o computer come telecomando remoto per Spotify. Vai su spotify.com/connect per scoprire come. Il software Spotify è soggetto a licenze di terzi, accessibili al seguente indirizzo: www.spotify.com/connect/third-party-licenses
Installare l'applicazione Spotify sul dispositivo Android/iOS. Potete scaricarli dal Play Store o dall'Apple App Store. Dopo l'installazione, avviare l'app ed effettuare il login con i dati di accesso o il registro. La radio e il dispositivo Android/iOS con l'applicazione Spotify devono essere sulla stessa rete.
7.1 Utilizzo
Selezionare nel menu principale la fonte "Spotify" e iniziare al riproduzione su Spotify sul telefono come al solito. Nella parte inferiore dello schermo del telefono viene visualizzato il logo Spotfiy Connect e "Dispositivi disponibili". Premere il tasto "Dispositivi disponibili" per visualizzare un elenco di dispositivi disponibili in rete. Ora seleziona "M-9000S" e la riproduzione avviene via radio. Un collegamento riuscito è indicato da una scritta verde. Dopo una prima connessione iniziale riuscita, è possibile collegare lo smartphone alla radio anche come segue: Selezionare la sorgente nel menu principale "Spotify" e premere . Il display mostra ora "Premere Play...". Premendo il tasto sul telecomando, si stabilisce il collegamento e si avvia la riproduzione della playlist corrente. Potete anche usare il telecomando per saltare tra i titoli della lista corrente.
7.2 Preferiti (spazi di memoria)
Sono disponibili 10 posizioni di memoria (Preferiti) per memorizzare le vostre playlist preferite.
7.2.1 Memorizzare le playlist con il telecomando:
Le posizioni di memoria da 1 a 10 possono essere assegnate tramite i tasti numerici del telecomando. Selezionare la playlist desiderata e premere un tasto numerico sul telecomando fino a quando "Pre-selez. memor." appare sul display. Le posizioni di memoria possono ora essere richiamate premendo brevemente un tasto del telecomando. È possibile salvare anche singoli titoli che non sono disponibili nelle playlist.
Avvertenza: Le posizioni di memoria non possono essere cancellate, possono essere sovrascritte solo con altre playlist / titoli.
8. Lettore CD
Puoi usare questa sorgente per riprodurre CD audio e CD MP3. Per farlo, si prega di selezionare la sorgente "CD" dal menu principale. Aprire il vano CD premendo il pulsante sull'unità principale o sul Telecomando. Inserire il CD e chiudere il vassoio premendo . La riproduzione inizia automaticamente col primo titolo del CD memorizzato. Premendo il tasto PULSANTE sul telecomando, è possibile riprodurre brevemente i titoli del CD. Premendo di nuovo il pulsante si termina questa funzione.
Per i CD audio l'inform. sui numero di brani e alla durata totale del brano, viene visualizzata come segue:
TXX XX:XX
In questo caso il primo gruppo di numeri indica il numero dei brani e il secondo il tempo di riproduzione totale del CD.
8.1 Riproduzione di file MP3
Selezionare la cartella o il brano desiderato dal menu, la riproduzione musicale viene avviata con il tasto . È possibile utilizzare i tasti per navigare fra le strutture delle cartelle. Col tasto si mette in pausa e riprende la riproduzione. Premendo in modo permanente i tasti è possibile avanzare o retrocedere all'interno del titolo a velocità crescente (max. 32 x). Con una breve pressione del tasto si va all'inizio del titolo o al titolo precedente.
Per CD contenenti file audio (ad es. MP3), il numero delle cartelle e dei file presenti viene visualizzatonel modo seguente:
FXX TXXX
In questo caso la cifra dopo la lettera "F" indica il numero delle cartelle mentre il secondo gruppo di numeri indica la quantità totale di file "T".
8.2 Riproduzione casuale e ripetizione
Per riprodurre i titoli di un CD o file MP3 in una cartella in ordine casuale, o per ripetere la riproduzione dei file, seguire la procedura seguente:
Premere il tasto
e selezionare "Ripetere" e/o "Shuffle". Col tasto le funzioni vengono rispettivamente attivate o disattivate. In alternativa, è possibile utilizzare anche il sul telecomando.
Premendo ripetutamente, le funzioni vengono attivate come segue:
Premere 1 x: Ripetere il titolo / premere 2 volte: Ripetizione della cartella (solo MP3)
Premere 3 volte: Ripetere tutto / Premere 4 volte: Shuffle / Premere 5 volte: Off
9. Lettore USB
Con questa sorgente è possibile riprodurre file MP3 (16Bit/48kHz) da una chiavetta USB. Per farlo, si prega di selezionare la sorgente "USB" dal menu principale.
9.1 Riproduzione di file MP3
Selezionare la cartella o il brano desiderato dal menu, la riproduzione musicale viene avviata con il tasto . È possibile utilizzare i tasti per navigare fra le strutture delle cartelle. Col tasto si mette in pausa e riprende la riproduzione. Premendo in modo permanente i tasti è possibile avanzare o retrocedere all'interno del titolo a velocità crescente (max. 32 x). Con una breve pressione del tasto si va all'inizio del titolo o al titolo precedente.
9.2 Riproduzione casuale e ripetizione
Per riprodurre i file MP3 in una cartella in ordine casuale, o per ripetere la riproduzione dei file, seguire la procedura seguente:
Premere il tasto
e selezionare "Ripetere" e/o "Shuffle". Col tasto le funzioni vengono rispettivamente attivate o disattivate. In alternativa, è possibile utilizzare anche il sul telecomando. Premendo ripetutamente, le funzioni vengono attivate come segue:
Premere 1 x: Ripetere il titolo / premere 2 volte: Ripetizione della cartella (solo MP3)
Premere 3 volte: Ripetere tutto / Premere 4 volte: Shuffle / Premere 5 volte: Off
10. Radio digitale DAB+
Per ricevere la radio digitale DAB+, passare nel menu principale alla sorgente "Radio DAB". Alla prima commutazione viene avviata una ricerca automatica delle stazioni. Il display mostra "Ricerca...", il numero di stazioni trovate finora e una barra di avanzamento corrispondente. Alcune stazioni offrono informazioni aggiuntive come una cosiddetta presentazione.
Per visualizzarli in formato grande sul display della radio, premere il tasto sul telecomando o sulla radio. Premendo di nuovo il tasto, il display torna ad essere visualizzato.
10.1 Scansione stazioni
Per cercare le stazioni ricevibili, è possibile avviare una scansione automatica. Per fare questo, richiamare il menu con il tasto
per aprire il menu e selezionare "Ricerca Complet.".". Il display mostra "Ricerca..." il numero di stazioni trovate finora e una barra di avanzamento corrispondente. Dopodiché le stazioni vengono memorizzate in ordine alfabetico.
I canali che sono stati trovati durante una precedente ricerca ma che attualmente non sono ricevibili vengono visualizzati nella lista dei canali con un "?" davanti al nome della stazione.
10.2 Impostare manualmente
È anche possibile impostare manualmente le stazioni. Per fare questo, richiamare il menu con il tasto
per aprire il menu e selezionare "Sinton. Manuale". Selezionare quindi il canale desiderato e confermare con . Ora vengono visualizzate le informazioni sulla stazione e sulla potenza del segnale. Premendo nuovamente il tasto si salvano le stazioni corrispondenti nella lista.
10.3 Elenco dei canali
Premere il pulsante
e confermare "Lista stazioni" con . Utilizzare i tasti o per selezionare una stazione e premere per la conferma. L'unità avvia automaticamente la riproduzione.
Avvertenza: La qualità di ricezione di una stazione dipende da fattori quali il tempo, la posizione e dalla ricezione dell'antenna. Se una stazione dell'elenco delle stazioni non può essere ricevuta, cambiare l'orientamento dell'antenna o la posizione della radio. Le stazioni che non possono più essere ricevute possono essere rimosse dall'elenco delle stazioni.
10.4 Cancellare le stazioni che non sono (più) ricevibili
Le stazioni che non possono più essere ricevute possono essere cancellate dalla lista. Per fare questo, premere il tasto
e scegliere "Rimoz. non valida". Selezionare "Tute le staz. non valide saranno elim. Continuare?" "Sì", e queste stazioni vengono eliminate. Selezionare "NO" vi riporta al menu senza cancellare i canali.
10.5 Preferiti (spazi di memoria)
Sono disponibili 20 posizioni di memoria (Preferiti) per memorizzare le vostre stazioni DAB+. Per richiamare le stazioni memorizzate sull'unità principale, premere il tasto <*> e selezionare la posizione di memoria desiderata e premere .
10.5.1 Memorizzare le stazioni DAB+ con il telecomando:
Le posizioni di memoria da 1 a 10 possono essere assegnate tramite i tasti numerici del telecomando. Selezionare la stazione desiderata e premere un tasto numerico sul telecomando fino a quando "Pre-selez. memor." appare sul display. Le posizioni di memoria possono ora essere richiamate premendo brevemente un tasto del telecomando.
10.5.2 Memorizzazione delle stazioni DAB+ sulle posizioni di selezione diretta 11-20:
Selezionare la stazione desiderata e tenere premuto il tasto sul telecomando. Ora selezionare una posizione di memoria dall'elenco delle memorie delle stazioni e confermate la selezione con il tasto sulla radio. Sul display appare "Preselez. memor.". Potete accedere comodamente alle postazioni di memoria in modo comodo col tasto sul telecomando. Utilizzare i tasti o per selezionare una stazione e premere per la conferma.
Avvertenza: Le posizioni di memoria non possono essere cancellate, possono essere sovrascritte solo con altre stazioni.
10.6 DRC (Dynamic Range Control)
Alcune stazioni DAB+ supportano la DRC, che riduce la differenza tra suoni forti e leggeri. Sono possibili le seguenti impostazioni:
DRC alto:
Forte compressione dei diversi livelli di volume. La dinamica è notevolmente ridotta.
DRC basso:
Bassa compressione, senza grande riduzione della dinamica
DRC disattivato:
Non c'è compressione
Per effettuare le impostazioni bisogna procedere nel modo seguente:
Premere il pulsante
e selezionare "DRC". Nel seguente menu è possibile modificare le impostazioni per DRC. L'impostazione attuale è indicata da "*".
10.7 Sequenza stazioni
Per impostazione predefinita, la radio ordina le stazioni in ordine alfabetico. Le stazioni possono anche essere ordinate per gruppi.
Per effettuare le impostazioni bisogna procedere nel modo seguente:
Premere il pulsante
e selezionare "Ordine stazioni". Nel seguente menu è possibile modificare le impostazioni. L'impostazione attuale è indicata da "*".
11. Radio FM
Nel menu principale, selezionare "RADIO FM" per passare alla ricezione FM.
11.1 Scansione stazioni
È possibile cercare automaticamente le stazioni UKW. Per avviare la ricerca automatica delle stazioni, premere il tasto sul telecomando o sulla radio. La ricerca si ferma alla stazione successiva trovata e poi inizia la riproduzione.
11.2 Impostazioni di ricerca
Con questa funzione è possibile stabilire se vengono presi in considerazione solo trasmettitori con un forte segnale di ricezione. Per fare questo, premere il tasto
e scegliere "Impostaz. di ricerca". Nel seguente menu "Scan stazioni FM" ora potete rispondere alla domanda "Solo staz.
buona ric." con "Sì" oppure "NO". L'impostazione attuale è indicata da "*".
11.3 Impostazioni audio
Per le stazioni con ricezione debole, un leggero miglioramento della qualità può essere ottenuto passando alla ricezione mono. Per fare questo, premere il tasto
e scegliere "Impostaz. audio". Nel seguente menu "Segnale FM debole" ora potete rispondere alla domanda "Solo mono" con "Sì" oppure "NO". L'impostazione attuale è indicata da "*".
11.4 Preferiti (spazi di memoria)
Sono disponibili 20 posizioni di memoria (Preferiti) per memorizzare le vostre stazioni UKW preferite. Per richiamare le stazioni memorizzate sull'unità principale, premere il tasto <*> e selezionare la posizione di memoria desiderata e premere .
11.4.1 Memorizzare le stazioni UKW+ con il telecomando:
Le posizioni di memoria da 1 a 10 possono essere assegnate tramite i tasti numerici del telecomando. Selezionare la stazione desiderata e premere un tasto numerico sul telecomando fino a quando "Pre-selez. memor." appare sul display. Le posizioni di memoria possono ora essere richiamate premendo brevemente un tasto del telecomando.
11.4.2 Memorizzazione delle stazioni UKW+ sulle posizioni di memoria 11-20:
Selezionare la stazione desiderata e tenere premuto il tasto sul telecomando. Ora selezionare una posizione di memoria dall'elenco delle memorie delle stazioni e confermate la selezione con il tasto sulla radio. Sul display appare "Preselez. memor.". Potete accedere comodamente alle postazioni di memoria in modo comodo col tasto sul telecomando. Utilizzare i tasti o per selezionare una stazione e premere per la conferma.
Avvertenza: Le posizioni di memoria non possono essere cancellate, possono essere sovrascritte solo con altre stazioni.
12. Audio Bluetooth
La funzione BLUETOOTH permette la trasmissione senza fili di file musicali (streaming audio) alla radio. Smartphone, tablet o dispositivi simili possono essere accoppiati. Per farlo, si prega di selezionare la sorgente "Bluetooth Audio" dal menu principale.
12.1 Accoppiamento di dispositivi Bluetooth per la prima volta (Pairing)
Assicurarsi che il dispositivo sia acceso e che il Bluetooth sia attivato. Per farlo, si prega di selezionare la sorgente "Bluetooth Audio" dal menu principale. Il display mostra "Rilevabile via Bluetooth". A questo punto aprire le impostazioni Bluetooth sul dispositivo da accoppiare e avviare la ricerca dei dispositivi Bluetooth disponibili. Selezionare "M-9000S" e iniziare il processo di accoppiamento. Dopo il successo dell'accoppiamento, il display mostra "Collegato". Ora la riproduzione della musica può essere controllata tramite il dispositivo terminale. Utilizzate l'applicazione musicale di vostra scelta. Il funzionamento di base di play/pausa e salto di traccia in avanti/indietro è possibile utilizzando i tasti corrispondenti sul telecomando.
Avvertenza: Alcuni terminali richied. un codice PIN durante l'accoppiamento, quindi immettere "0000".
12.2 Collegamento automatico dopo l'accoppiamento
Se è spenta la fonte "Audio Bluetooth" oppure la radio, la connessione Bluetooth è scollegata. Quando la radio viene riaccesa o la sorgente "Audio Bluetooth" viene ripristinata, viene stabilito un collegamento automatico.
Avvertenza: Se non fosse possibile un collegamento autom., vi preghiamo di procedere come segue: Per fare ciò, premere il tasto
e scegliere "Vedi dettagli". Poi aprire il "Elenco dei dispositivi accoppiati" per selezionare e accoppiare il dispositivo terminale desiderato. Premendo il tasto il collegamento è stabilito e appare brevemente "Collegato" nel display.
12.3 Accoppiamento di un ulteriore dispositivo terminale
Per accoppiare un altro terminale con la radio, premere il tasto
e scegliere "Configura Bluetooth". In questo modo si scollega il collegamento di corrente.
Procedere ora come per il primo accoppiamento di un dispositivo terminale. Successivamente, questo apparecchio terminale viene memorizzato anche nell'elenco degli apparecchi accoppiati e può essere selezionato tramite il relativo menu (vedi sopra). È possibile memorizzare un massimo di 8 dispositivi.
12.4 Interruzione della connessione Bluetooth
Se si desidera interrompere il collegamento ad un dispositivo accoppiato, premere il tasto sul telecomando. La radio torna quindi in modalità di accoppiamento.
13. Collegamenti analogici
13.1 Line-In
Per riprodurre musica, è possibile collegare alla porta Line-In dispositivi esterni come lettori MP3, lettori DVD o console di gioco. Per farlo, si prega di selezionare la sorgente "AUX-IN" dal menu principale.
14. Spegnimento (Snooze)
Questa funzione consente di commutare automaticamente la radio in modalità standby dopo un periodo di tempo prestabilito. Potete scegliere tra 15, 30, 45 o 60 minuti; "Spegnimento" cancella il periodo di tempo precedentemente impostato. Per fare questo, premere il pulsante con la sorgente audio selezionata
e selezionare "Menu principale". Poi usare i tasti oppure navigare nel menu e selezionare "Spegnimento". Con i tasti oppure nel menu "Tempo di sleep" per selezionare il periodo di tempo desiderato e premere il tasto per confermare. Col tasto lasciare di nuovo i menu.
Il tempo rimanente viene visualizzato sul display in basso a sinistra, con i minuti che vanno all'indietro.
15. Sveglie
Questa radio ha 2 tempi di allarme regolabili individualmente. Premere il tasto sul telecomando e selezionare "Sveglia 1" oppure "Sveglia 2" per effettuare le impostazioni.
In alternativa, è possibile richiamare la sveglia anche dal menu principale. Inoltre, un'impostazione sulla radio può essere cambiata con il tasto e il regolatore . In modalità standby, le sveglie memorizzate possono essere resettate premendo il tasto e possono essere attivate e disattivate. Per la programmazione della sveglia sono disponibili le seguenti opzioni:
15.1 Abilita:
Selezionare qui i giorni in cui la sveglia deve essere attivata. È disponibile la seguente selezione: Off / Ogni giorno / Una volta / fine settimana / Giornie della sett.
Selezionare "Off" per disattivare una sveglia attivata.
15.2 Ora:
Utilizzare i tasti oppure per impostare prima le ore e dopo aver premuto il pulsante bisogna impostare i minuti della sveglia.
15.3 Modalità:
Qui si imposta la sorgente audio con la quale ci si vuole svegliare. È disponibile la seguente selezione:
Tone / Radio Internet / DAB / FM / CD / USB
15.4 Preimpostazione:
Qui si definisce la stazione con la quale ci si vuole svegliare. L'ultima stazione ascoltata o le stazioni salvate nei Preferiti sono disponibili qui. Non si applica alla modalità Tone, CD o USB.
15.5 Volume:
Impostare il volume desiderato per la sveglia.
15.6 Salvare:
Dopo aver effettuato tutte le impostazioni, premere il tasto per salvare le impostazioni.
Un allarme attivato è indicato da un'icona di allarme e dal numero della sveglia nell'angolo in basso a sinistra del display. In modalità standby, viene visualizzata anche l'ora della sveglia impostata.
15.7 Spegnimento della sveglia dopo il risveglio
Per spegnere la sveglia fino al prossimo ciclo di sveglia, premere il tasto sull'apparecchio o sul telecomando, il display mostra brevemente "Allarme off". Se si desidera interrompere la funzione di allarme solo per alcuni minuti (snooze), è possibile utilizzare qualsiasi altro tasto. Il ritardo di allarme viene impostato premendo il pulsante a passi di 5, 10, 15 e 30 minuti e può anche essere prolungato più volte. Dopo un breve periodo di tempo, la radio torna automaticamente a "Standby" e il tempo rimanente fino al prossimo risveglio viene visualizzato accanto al simbolo della sveglia che lampeggia.
Avvertenza: In caso di mancanza di corrente, i tempi della sveglia memorizzati vengono mantenuti.
16. Impostazioni di sistema
In impostazioni di sistema è possibile modificare le impostazioni della radio e accedere a informazioni importanti sulla radio.
16.1 Equalizzatore
Con l'equalizzatore è possibile regolare il suono della radio a proprio piacimento. È possibile scegliere tra impostazioni preconfigurate o creare un proprio profilo. Procedere nel modo seguente:
Premere il tasto
e selezionare "Config. di sistema" e/o "Equalizzatore". Con i tasti oppure è possibile selezionare un profilo audio e poi premere per confermare. Sono a disposizione ie seguenti profili:
Potente / Chiaro / Luminoso / Caldo / Bilanciato
16.2 Impostazioni Internet
16.2.1 Assistente di rete
L'assistente di rete vi aiuta a collegare la vostra radio a Internet. Per richiamarlo, si prega di procedere come segue:
Selezionare nel menu "Config. di sistema le "Rete" e confermare in seguito "Assistenterete". La radio avvia ora una ricerca delle connessioni WLAN disponibili e le elenca nella lista delle connessioni. Con i tasti oppure e col regolatore è possibile selezionare le diverse reti. Alla fine della lista selezionare l'opzione "[Cercare ancora]" oppure "[Config. manuale]".
16.2.2 Connessione di rete senza fili (WLAN)
A seconda della rete, avete diverse opzioni tra cui scegliere per la connessione alla rete. Le reti che supportano una connessione Wi-Fi Protected Setup (WPS) sono identificate nell'elenco con il prefisso ["WPS..."]. Altre connessioni sono reti aperte o connessioni che sono protette dalla procedura PSK = Pre-Shared Key (chiave pre-condivisa).
Avvertenza: Una connessione di rete attiva è indicata da un simbolo bianco nell'angolo in basso a destra del display. Se non è attivo nessun collegamento, questo simbolo è barrato in rosso.
16.2.3 WPS- / PSK- / Connessione aperta
Una connessione WPS consente di collegare la radio alla rete in modo semplice ma sicuro. Sono disponibili due opzioni. Impostazione del collegamento attraverso PBC = Push-Button-Configurazione (configurazione premendo un pulsante) o con la procedura PIN, in cui l'interfaccia web del vostro router vi chiede di inserire una sequenza di numeri generata in modo casuale.
16.2.4 Impostazione tramite PBC
Selezionare la rete desiderata ["WPS..."]. In seguito col "Menu WPS selezionare l'opzione "Premere il tasto" e confermare. Ora premete il tasto WPS sul vostro router o punto di accesso (AP). Per la procedura esatta, consultare il manuale d'uso del router o dell'AP. In alternativa, il processo può essere avviato anche nel menu "Impostazioni Internet all'indirizzo "Impostazione PBC Wlan". Seguire le istruzioni sul display.
16.2.5 Impostazione tramite PIN
Selezionare la rete desiderata ["WPS..."]. In seguito col "Menu WPS selezionare l'opzione "PIN" e confermare. La radio genererà ora un codice a 8 cifre, che dovrete inserire premendo il tasto e poi inserire il numero tramite il router o l'interfaccia utente AP. Per ulteriori informazioni, consultare il manuale del Router o dell'AP.
16.2.6 Salta WPS / Impostazione tramite PSK (tasto di pre-condivisione)
Selezionare "Salta WPS" per stabilire la connessione utilizzando i codici di rete. Per le reti senza supporto WPS, si può andare direttamente alla maschera di immissione. Ora inserite il codice e confermate con il tasto Pulsante "OK. Se la voce è corretta, la radio si collega alla vostra rete e stabilisce una connessione a Internet.
16.2.7 Connessione aperta
Si consiglia di non collegarsi ad una rete aperta. Se la rete selezionata non è criptata, potete confermarlo col tasto . Successivamente viene stabilita la connessione a Internet.
16.2.8 Impostazione manuale della connessione di rete
Con DHCP attivo, si prega di procedere come segue:
Si prega di selezionare i menu "Impostazioni di rete" -> "Impostazioni manuali" -> "Wireless" -> "DHCP attivo". Quindi inserire l'SSID completo (nome della rete) e confermarlo sul modulo "OK". Ora selezionare il metodo di crittografia appropriato.
Questo si trova nella configurazione del router o dell'AP. A seconda del metodo selezionato, il codice di rete viene ora immessa e visualizzata sul display e confermata con "OK".
16.2.9 Con DHCP inattivo, si prega di procedere come segue:
Selezionare i menu "Impostazioni Internet" -> "Impostaz. manuali" -> "Senza cavo" -> "DHCP inattivo". Ora inserire le informazioni su "Indirizzo IP", "Subnet Mask", "Ind. Gateway", "DNS primario e "DNA secondario". Con i tasti oppure sul telecomando e col regolatore è possibile visualizzare i valori. Con i tasti , oppure è possibile selezionare i singoli blocchi di numeri da impostare. Procedere quindi come descritto al punto "DHCP attivo".
16.3 Visualizzare le impostazioni di rete
In questo menu si trovano tutte le impostazioni del profilo di rete attualmente utilizzato. Per fare questo, selezionare nel menu "Impostazioni di rete" il menu "Vedere impostaz.". Con i tasti oppure sul telecomando e col regolatore è possibile visualizzare i valori.
16.4 Impostazione del PIN NetRemote
In questo menu è possibile impostare un PIN di 4 cifre che viene richiesto la prima volta che viene impostata l'app UNDOK (vedi capitolo 24). L'impostazione predefinita è "1234". Il PIN dovrebbe essere cambiato immediatamente.
16.5 Profilo di rete
Qui potete vedere l'elenco dei profili di rete memorizzati nella radio. Se avete creato più profili, selezionate quello con la distanza più breve dal router o dall'AP corrispondente.
È possibile cancellare i profili di rete che non sono più necessari premendo il tasto oppure sul telecomando, o il regolatore per selezionare il profilo da cancellare e confermare con . Il profilo di rete attivo è contrassegnato con "*".
Avvertenza: Non è possibile cancellare il profilo di rete.
16.6 Cancellare le impostazioni di rete
In questo menu è possibile cancellare le impostazioni di rete del profilo corrente. Per fare questo, selezionare il tasto "Sì" e confermare l'iscrizione con . Selezionando il pulsante "NO" il processo viene interrotto.
16.7 Tenere rete connessa
Questo menu serve a stabilire se la connessione WLAN alla rete debba essere mantenuta in standby. In questo modo è possibile accendere la radio con l'applicazione UNDOK (vedi pagina 27). Il consumo di energia in modalità standby è leggermente superiore nella modalità in rete. Selezionare per l'impostazione il pulsante "SI" o "NO" e confermare l'immissione. con il tasto .
17. Impostazioni ora
Nel menu "Ora/Data" è possibile effettuare le impostazioni per l'ora e la data. Sono a disposizione i seguenti profili:
Qui è possibile impostare manualmente l'ora e la data. Con i tasti oppure sul telecomando e col regolatore è possibile cambiare i valori. Con i tasti oppure vengono selezionati i singoli blocchi di numeri e vengono salvati anche i valori.
Qui è possibile specificare da quale fonte l'ora e la data devono essere aggiornate. Si possono scegliere i seguenti moduli:
Aggiorn. da DAB: Ora e data sono aggiornate tramite DAB.
Aggiorn. da FM: Ora e data sono aggiornate tramite UKW.
Aggiorn. da Rete: Ora e data sono aggiornate dalla rete.
Nessun aggiorn.: Ora e la data devono essere impostate manualmente.
L'opzione attualmente selezionata è contrassegnata con "*" marcato.
In questo menu è possibile determinare se l'orologio viene visualizzato in formato 12 o 24 ore.
Selezionare con i tasti oppure ; la conferma viene fatta col tasto .
L'opzione attualmente selezionata è contrassegnata con "*" marcato.
18. Lingua
Nel menu "Lingua" è possibile impostare la lingua del menu della radio. Se si imposta il dispositivo con il Procedura guidata di configurazione la lingua del dispositivo è già stata impostata lì. Per selezionare una lingua utilizzare i tasti oppure e confermare premendo il tasto . In alternativa, questa selezione possono essere eseguita anche con il regolatore .
Si possono scegliere le seguenti lingue:
danese, finlandese, francese, inglese, italiano, norvegese, olandese, polacco, portoghese, spagnolo, svedese, turco, tedesco
19. Impostazioni di fabbrica
Per resettare la radio alle impostazioni di fabbrica, selezionare "Sì" sul menu "Ripristino valori di default". Attenzione: Tutte le impostazioni effettuate in precedenza vengono cancellate.
Selezionando "NO" il processo viene interrotto.
Avvertenza: In ogni caso, resettate la radio alle impostazioni di fabbrica prima di consegnarla (ad esempio, venderla o regalarla).
20. Aggiornamento software
In questo menu è possibile verificare se è disponibile un aggiornamento software per la radio.
Se si seleziona "Aggiorn. autom." la radio controllerà automaticamente e regolarmente la presenza di nuovi aggiornamenti software.
Selezionare la voce di menu "Verifica ora" per cercare una nuova versione. Se si trova un software più recente, selezionare "Sì" per installarli, oppure "NO" per annullare l'aggiornamento. Con "Sì" riavvia la radio per eseguire l'operazione.
Poi il software viene scaricato e vi verrà richiesto di "Procedere", ossia se l'aggiornamento deve essere effettuato. Si prega di selezionare "Sì" per concedere oppure "NO" per annullare l'aggiornamento.
Lampeggiante alternativamente "Attenzione: non rimuovere l'alimentazione" e la versione del software da installare. Quando il processo è completo apparirà "Aggiornamento completato nel display e si può confermare il processo premendo .
Il numero di versione del software installato si trova nella cartella "Config. di sistema" sotto il punto "Informazioni.".
Attenzione!
Assicurarsi che sia disponibile un'alimentazione stabile prima di avviare un aggiornamento del software. Un'interruzione durante un aggiornamento può causare danni irreparabili alla radio!
21. Installazione guidata
Nel menu "Installaz. guidata" è possibile avviare nuovamente l'assistente di configurazione. Procedere come descritto al punto "3.8 Avvio della procedura guidata di configurazione".
In questo menu troverete tra l'altro il numero di versione del firmware attuale. Tenerlo pronto nel caso in cui sia necessario contattare il servizio clienti.
Si prega di leggere l'informativa sulla privacy qui elencata o di visitare questo sito web: www.frontiersmart.com/privacy
24. Illuminazione
L'illuminazione del display può essere programmata in 3 livelli di luminosità. Nel menu è possibile effettuare le seguenti impostazioni di "Controluce":
"Timeout": Tempo fino a quando il display è impostato sul livello di illuminazione nella schermata "Livello di Dim" è regolamentato.
Possibilità di scelta: "On / 10 / 20 / 30 / 45 / 60 / 90 / 120 / 180 secondi"
"On" significa che la radio è sempre nel livello di luminosità del parametro "A livello".
"A livello": Luminosità del display quando la radio è accesa.
Possibilità di scelta: "Alto" / "Medio" / "Basso"
"Livello di Dim": Impostazione della luminosità per il funzionamento e stand-by.
Possibilità di scelta: "Medio" / "Basso" / "Notte" / "Off"
25. UNDOK – Controllo della radio tramite app
L'applicazione UNDOK (app) sviluppata da Frontier Silicon porta il pieno controllo di radio e altoparlanti sul vostro smartphone.
Non importa se state configurando il dispositivo per la prima volta, configurando gli equalizzatori o gestendo i vostri canali preferiti - UNDOK vi offre tutte le funzionalità del vostro smartphone o tablet e vi offre quindi ancora più comfort. Scarica l'applicazione UNDOK dal Google Play Store o dall'Apple App Store
Configurazione iniziale dell'apparecchio con UNDOK
Quando la radio viene accesa per la prima volta, o dopo che la radio è stata impostata sulle impostazioni di fabbrica, la radio è in modalità SETUP e viene creato un cosiddetto micro access point (rete WLAN propria). Questo permette al vostro smartphone o tablet di connettersi alla radio.
Impostazione con Android
Assicurarsi che la radio sia in modalità SETUP. Aprire l'applicazione UNDOK sul vostro smartphone o tablet e selezionare la voce di menu "Impostare il sistema audio".
Premere "AVANTI" e selezionare la voce di menu "SELEZIONARE PUNTO DI ACCESSO".
Si apre il menu WLAN dell'apparecchio terminale, selezionare la rete "M-9000S". Dopo il collegamento, il display mostra "Collegato a M-9000S" nell'app. Seguire le istruzioni dell'applicazione per completare la configurazione della radio. Infine, la radio si collega alla rete e si può iniziare l'ascolto premendo "Usa il mio sistema audio" ora azionare l'apparecchio con l'UNDOK-APP.
Impostazione con iOS
Assicurarsi che la radio sia in modalità SETUP. Aprire l'applicazione UNDOK sul vostro iPhone o iPad e selezionare la voce di menu "Impostare il sistema audio".
Premere "AVANTI" e selezionare la voce di menu "SELEZIONARE PUNTO DI ACCESSO".
Si apre il menu WLAN dell'apparecchio terminale, selezionare la rete "M-9000S". Dopo il collegamento, il display mostra "Collegato a M-9000S" nell'app. Seguire le istruzioni dell'applicazione per completare la configurazione della radio. Infine, la radio si collega alla rete e si può iniziare l'ascolto premendo "Usa il mio sistema audio" ora azionare l'apparecchio con l'UNDOK-APP.
26. Risoluzione dei problemi
In caso di malfunzionamenti, verificare i seguenti punti:
Nessun suono
→ Inserire correttamente l'alimentatore di rete.
Il sistema non risponde alla pressione di un tasto
→ Scollegare e ricollegare l'alimentatore di rete.
Problemi di ricezione radio
→ Riorientare l'antenna.
Non è possibile stabilire una connessione di rete
→ Controllare la funzione WLAN, assicurarsi che la password sia corretta.
27. Cura e manutenzione
Pulizia dell'alloggiamento:
Utilizzare un panno leggermente inumidito con un detergente delicato. Non utilizzare detergenti contenenti alcool, ammoniaca o abrasivi.
La condensa (rugiada) può formarsi all'interno dell'apparecchiatura se vi è una differenza significativa tra la temperatura dell'apparecchiatura e la temperatura ambiente. Se all'interno dell'unità si forma della condensa, non è possibile garantire il corretto funzionamento. In questo caso, l'unità deve essere sottoposta a manutenzione per alcune ore; dopo che l'umidità si sia asciugata, l'unità può essere riutilizzata.
Particolare attenzione deve essere prestata nelle seguenti circostanze
Se l'apparecchiatura viene spostata da un luogo ad un altro dove la temperatura è significativamente più alta o più bassa, o se l'umidità nel luogo in cui l'apparecchiatura è installata aumenta, ecc.
Come maneggiare i CD
Tenere il CD in modo da non toccare la superficiedel segnale. (Il lato non stampato è il lato di riproduzione.)
Utilizzare esclusivamente CD con la marcatura disc. Un CD privo di questa marcatura potrebbe fra l'altro non essere riprodotto correttamente.
Indicazioni per l'utilizzo di un dispositivo USB
Questo apparecchio è in grado di riprodurre file audio salvati su una memoria flash o su un audio player digitale, se questi dispositivi dispongono di una porta USB (Nel presente documento questi apparecchi vengono definiti dispositivi USB).
Per quanto concerne i dispositivi USB utilizzabili valgono le seguenti limitazioni:
Dispositivi USB utilizzabili
Dispositivi USB appartenenti alla classe dei dispositivi di memoria di massa USB.
I dispositivi USB il cui assorbimento massimo di corrente non supera i 500 mA.
Classe dei dispositivi di memoria di massa USB: Dispositivi USB che il PC riconosce come memorie esterne, senza che siano necessari un driver o un software di utilizzo speciali.
Consultare il proprio rivenditore se non si è sicuri se il proprio dispositivo USB è conforme alle specifiche per la classe dei dispositivi di memoria di massa USB.
L'utilizzo di un dispositivo USB non supportato può determinare una riproduzione o una visualizzazione errate dei fileaudio.
Anche quando si utilizza un dispositivo USB conforme alle specifiche summenzionate, è possibile che i file audio, in base al tipo o allo stato del dispositivo USB, non vengano riprodotti correttamente.
28. Smaltimento
Smaltimento delle apparecchiature elettriche ed elettroniche e delle batterie usate.
Il simbolo (cestino barrato) sul prodotto o sulla sua confezione indica che questo prodotto non deve essere trattato come un normale rifiuto domestico, ma deve essere riconsegnato ad un punto di raccolta per il riciclaggio di apparecchiature elettriche, elettroniche e batterie. Contribuendo al corretto smaltimento di questo prodotto, si protegge l'ambiente e la salute degli altri esseri umani. Uno smaltimento improprio o non corretto mette in pericolo l'ambiente e la salute. Per ulteriori informazioni sul riciclaggio di questo prodotto, contattare l'autorità locale o l'azienda comunale di gestione dei rifiuti.
Attenzione: Il segno "Pb" sotto il simbolo della batteria indica che questa batteria contiene piombo.
L'utente finale stesso è responsabile della cancellazione dei dati sul vecchio apparecchio tramite la voce di menu "Impostazione di fabbrica" prima dello smaltimento (vedi capitolo 18).
Il marchio denominativo e i loghi Bluetooth® sono marchi registrati di Bluetooth SIG Inc. e qualsiasi uso di questi marchi da parte di JVCKENWOOD Corporation è concesso in licenza. Gli altri marchi e nomi commerciali sono quelli dei rispettivi proprietari.
Dati tecnici M-9000S
Tensione di ingresso Tensione alternata 100 – 240 V Frequenza di ingresso CA 50/60 Hz Potenza assorbita 40 Watt Consumo di energia in modalità standby 0,8 Watt Consumo energetico in modalità standby in rete 0,8 Watt Antenna UKW/DAB+ Intervallo di sintonizzazione DAB BAND III 174,928 MHz – 239,200 MHz Gamma di sintonia UKW 87,50 MHz – 108,00 MHz Funzionamento con CD Distanza segnale/rumore (filtro A) ≥ 65 dB Intervallo dinamico ≥ 60 dB Connessione di rete (WLAN) Reti supportate WIFI IEEE 802.11a/b/g/n Gamme di frequenza supportate WiFi : 2.412 - 2.472 GHz, 5.18 - 5.32 GHz, 5.50 - 5.70GHz, 5.745 – 5.825GHz Massima potenza di trasmissione WIFI 2.4 G: 13,6 dBm / WIFI 5G: 13,6 dBmWIFI 5.8G: 13,6 dBm Crittografia supportata WEP, WPA, WPA2 (PSK), WPS Formati di streaming supportati MP3, AAC/AAC+ (fino a 48 kHz, 16 bit) Dispositivi USB File riproducibili: MP3 Compatible con USB1.1 Full-Speed, FAT16, FAT32Max. 500 mA, bit rate: da 32 kBit/s a 320 kBit/s BLUETOOTH Versione BLUETOOTH V4.2 Classe di prestazione Classe 1 Massima potenza di trasmissione 4,3 dBm Autonomia Circa 10 metri (può variare a seconda dell'ambiente) Intervallo di frequenza 2,402 GHz – 2,480 GHz Profili BLUETOOTH A2DP (Profilo di distribuzione audio avanzata, AVRCP (Profilo telecomando audio/video)) Line-In Presa jack da 3,5 mm Amplificatore Potenza in uscita 2 x 50 Watt / 6 Ohm Intervallo di frequenza 60 Hz - 20 kHz Pesi e misure Unità principale (L x A x P) 260 x 115 x 260 mm / 2,0 kg Altoparlante (L x A x P) 173 x 263 x 240 mm / 2,4 kg per pezzo Intervallo di temperatura 0°C / 35°C
Con riserva di modifiche tecniche
30. Garanzia
All'utilizzatore di prodotti Kenwood:
La ringraziamo di aver scelto questo prodotto Kenwood (il „Prodotto“). Se, in normali condizioni di funzionamento, esso risultasse difettoso, verrà riparato o sostiuto gratuitamente, secondo i termini della presente Cartolina di Garanzia.
La preghiamo di conservare questa Cartolina di Garanzia, dato che le verrà richiesta in caso di reclamo.
Il Prodotto è garantito per due anni dalla data di acquisto presso qualsiasi venditore CEE di prodotti Kenwood. La garanzia copresia i materiali che la mano d'opera e la reparazione verrà eseguita gratuitamente. Kenwood si riserva il diritto di sostituire il Prodotto
con uno identico o, nell'ipotesi questo non fosse più prodotto, con uno di identiche caratteristiche qualora, a suo insindacabile giudizio, il costo della riparazione fosse molto elevato. Kenwood null'altro garantisce, in particolare non sono inclusi nella garanzia i costi relativi all'imballo ed alla disinstallazione/installazione del prodotto. I costi di trasporto saranno a carico del cliente.
Condizioni
A. Durante il periodo della garanzia qualsiasi reclamo deve essere accompagnato dalla Cartolina di Garanzia ed inoltre da:
(a) Il suo nome, cognome ed indirizzo.
Qualora non sia possibile fornire queste informazioni, o se il Prodotto è stato modificato o alterato in qualsiasi modo dopo l'acquisto, Kenwood Corporation si riserva il diritto di rifiutare la riparazione del Prodotto secondo i termini di questa Garanzia.
B. Il Prodotto è stato realizzato in modo da dossistare tutti gli standard nazionali o locali ed i requisti di sicurezza vigenti nella nazione dove è venduto. Eventuali modifiche necessarie per l'utilizzo in altri paesi non sono coperte da questa Garanzia.
Se il Prodotto, venduto in Italia, viene utilizzato in una nazione europea, dove esso è soggetto a standard e requisti diversi da quelli ivi vigenti, qualsiasi servizio reso in garanzia, potrà avvenire a condizione che l'utilizzatore si accolli il costo di adattare il prodotto agli standard ed ai requisti vigenti. Ugualmente per prodotti acquistati in altri paesi CEE ove vigono standard e requisiti diversi da quelli italiani, il servizio di garanzia sarà reso in Italia a condizione che l'utilizzatore si accolli il costo di adattare il prodotto agli standard ed ai requisiti ivi vigenti. Inoltre, qualora il Prodotto sia di tipo diverso da quelli commercializzati dall'importatore ufficiale della nazione dove viene portato per la riparazione in garanzia, ed in quella nazione non siano disponibili i pezzi
di
ricambio appropriati o non possano essere resi, per altro valido motivo, servizi in garanzia, allora il costo relativo alle spedizione del Prodotto da riparare alla nazione dove è stato acquistato, e ritorno, verrà sostentuto dall'utilizzatore.
C. Questa Garanzia non copre:
(a) alterazioni del Prodotto e le normali operazioni di manutenzione e taratura, compresi i controlli periodici menzionati nel Manuale fornito con il Prodotto;
Questa Garanzia è a disposizione di chiunque sia entrato legalmente in possesso del Prodotto.
Fatto salvo quanto citato al punto (C), il Prodotto verrà riparato o sostituito gratuitamente; quanto sopra non interferisce e non influisce in alcun modo sui diritti dell'utilizzatore del Prodotto a norma delle vigenti disposizioni di legge.
Indirizzo:
JVCKENWOOD ITALIA S.p.A.
Via G. Sirtori 7/9, 20129 Milano
Tel. +39(02)204821
www.kenwood.it info@it.jvckenwood.com
KENWOOD
KENWOOD
Smart Micro HiFi Systeem
M-9000S
GEBRUIKSAANWIJZING
JVCKENWOOD Corporation
Inhoudsopgave
Inhoud
Pagina
Vóór het inschakelen van de spanningsvoorziening 3
Ingebruikname 6
Componenten en functies 7
Hoofdmenu 10
Internetradio 11
Podcasts 12
Spotify 14
CD-speler 15
USB-speler 16
Digitale radio DAB+ 16
FM-radio 18
Bluetooth audio 19
Analoge aansluitingen 20
Sluimertijd 20
Alarm 20
Systeeminstellingen 21
Tijdsinstellingen 24
Taal 25
Fabrieksinstellingen 25
Software-update 25
Installatiewizard 26
Informatie 26
Privacybeleid 26
Achtergrondverlichting 26
UNDOK-app 27
Oplossing van storingen 28
Onderhoud en zorg 28
Afvalverwerwijdering 29
Technische gegevens 30
Opmerking over de garantie 31
Omwille van het 5 GHz-frequentiebereik van de ingebouwde WLAN-module is het gebruik in volgende landen alleen binnen gebouwen toelaatbaar.
AT BE BG CZ DK EE FR DE IS IE IT EL ES CY LVU LT LU H U MT NL NO PL PT RO SL SK TR FI SE CH UK HR
AT=Oostenrijk, BE=België, BG=Bulgarije, CZ=Tsjechië, DK=Denemarken, EE=Estland, FR=Frankrijk, DE=Duitsland, IS=IJsland, IE=Ierland, IT=Italië, EL=Griekenland, ES=Spanje, CY=Cyprus, LV=Letland, LT=Litouwen, LU=Luxemburg, HU=Hongarije, MT=Malta, NL=Nederland, NO=Noorwegen, PL=Polen, PT=Portugal, RO=Roemenië, SL=Slovenië, SK=Slowakije, TR=Turkije, FI=Finland, SE=Zweden, CH=Zwitserland, UK=Verenigd Koninkrijk, HR=Kroatië
1. Vóór het inschakelen van de spanningsvoorziening
BELANGRIJKE VEILIGHEIDSINSTRUCTIES
Let op: Lees deze pagina aandachtig door om de veilige werking van het apparaat te garanderen.
Opmerkingen aandachtig lezen!
- Geef gevolg aan alle veiligheids- en bedieningsinstructies wanneer u dit product in gebruik neemt.
Instructies zorgvuldig bewaren!
- U dient de veiligheids- en bedieningsinstructies te bewaren om ze later te kunnen raadplegen.
Alle waarschuwingsinstructies in acht nemen!
- U dient aan alle aan het product aangegeven en in de gebruiksaanwijzing vermelde waarschuwingen strikt gevolg te geven.
1.1 Alleen met een droge doek reinigen!
- Trek de netstekker van dit apparaat uit de wandcontactdoos voordat u dit product reinigt.
Gebruik nooit vloeibare reinigingsmiddelen of reinigingssprays. Gebruik voor de reiniging alleen een bevochtigde doek.
1.2 Accessoires
- Gebruik alleen de door de fabrikant aangegeven accessoires.
1.3 Gebruik dit apparaat niet in de nabijheid van water
- Het apparaat mag nooit aan waterdruppels of - spatten blootgesteld worden - zoals bijvoorbeeld in de nabijheid van een badkuip, een wastafel, een aanrecht in de keuken, een wasmachine, in een vochtige kelderruimte of in de nabijheid van een zwembad, enz. Zet nooit met vloeistoffen gevulde houders, zoals bv. bloemenvazen, op het apparaat.
1.4 Ventilatie
- Sleuven en openingen in de behuizing dienen voor de verluchting van het apparaat, om de betrouwbare werking van het apparaat veilig te stellen en om het apparaat tegen oververhitting en een mogelijke zelfontbranding te beschermen. Blokkeer de ventilatieopeningen niet. Installeer het apparaat in overeenstemming met de door de fabrikant verstrekte gegevens. Blokkeer nooit de ventilatieopeningen doordat u het apparaat op een bed, bank, tapijt of een al even zachte onderlaag zet. Dit apparaat mag niet in een boekenrek of inbouwkast ingebouwd worden wanneer er niet voor voldoende ventilatie gezorgd is.
1.5 Spanningsvoorziening
- Apparaat mag alleen aangesloten worden op de netspanning die aan het apparaat aangegeven is. Als u niet zeker bent van het type van de spanningsvoorziening in uw woning, richt u zich tot uw dealer of tot het lokale energiebedrijf.
1.6 Netsnoer
– Zorg ervoor dat men niet over het netsnoer kan struikelen en dat het netsnoer in de onmiddellijke nabijheid van een contactdoos, waaronder ook bijkomende contactdozen, niet afgekneld wordt. Ook aan de uitlaat van het apparaat mag het netsnoer in geen geval geplet worden. Omdat de netstekker wordt gebruikt om de stekker volledig van het net los te koppelen, moet deze aan het netsnoer blijven zitten en te allen tijde bereikbaar blijven.
1.7 Onweer
- Het apparaat van het stroomnet verbreken bij onweer en wanneer het langere tijd niet gebruikt wordt.
1.8 Overbelasting
- Overbelast nooit wandcontactdozen, verlengsnoeren of meervoudige contactdozen, omdat anders het gevaar voor brand of elektrische schokken bestaat.
1.9 Binnendringen van vreemd materiaal en vloeistof
- Let erop dat er nooit vreemd materiaal of vloeistof door ventilatieopeningen dit apparaat binnendringt, omdat het anders tot contact met onder hoe spanning staande componenten dan wel tot een kortsluiting met de daaruit voortvloeiende brand of elektrische schok kan komen. Mors nooit vloeistoffen van eender welke aard op dit apparaat.
1.10 Onderhoud
- Tracht nooit zelf, het onderhoud van dit apparaat uit te voeren, omdat door de openingen of door het verwijderen van afdekkingen onder spanning staande onderdelen vrij gelegd kunnen worden. De aanraking van deze onderdelen kan immers gevaren met zich meebrengen. Laat alle onderhoudswerkzaamheden over aan gekwalificeerd klantenservicepersoneel.
1.11 Beschadigingen die een reparatie vereisen
- Onderhouds- en reparatiewerkzaamheden alleen door een gekwalificeerde klantenservice laten uitvoeren.
Een onderhoudsbeurt/reparatie is noodzakelijk als het apparaat (bv. netsnoer of de stekker) beschadigd werd, als er vloeistof in het apparaat gelopen is, wanneer er voorwerpen het apparaat binnengedrongen zijn, als het apparaat aan regen of vochtigheid blootgesteld was, als het niet meer perfect functioneert of neergevallen is.
1.12 Wisselstukken
- Wanneer er wisselstukken benodigd worden, overtuigt u er zich van dat de klantenservicetechnicus wisselstukken gebruikt die door de fabrikant voorgeschreven zijn of die dezelfde eigenschappen als de originele onderdelen hebben. Niet-toelaatbare wisselstukken kunnen tot brand, elektrische schokken of andere ongevallen leiden.
1.13 Veiligheidscontrole
- Verzoek de klantenservicetechnicus na de beëindiging van onderhouds- of reparatiewerkzaamheden aan dit apparaat om de uitvoering van een veiligheidscontrole om vast te stellen, of het apparaat zich in een perfecte operationele toestand bevindt.
1.14 Warmte
- Installeer het apparaat niet in de nabijheid van hete oppervlakken zoals bv. radiatoren, straalkachels, ovens of andere apparaten (versterkers inbegrepen) die heet kunnen worden. Stel nooit objecten met open vlammen, zoals kaarsen of lantaarns, op of in de buurt van het apparaat op. De ged'nstalleerde batterijen mogen niet aan felle hitte, zoals direct zonlicht, vuur of dergelijke, blootgesteld worden.
1.15 Batterijen
- Als u de radio één maand of langer niet gebruikt, verwijdert u de batterijen uit het batterijvak van de afstandsbediening om te verhinderen dat de batterijen uitlopen. Voer uitlopende batterijen onmiddellijk vakkundig en met inachtneming van alle relevante wettelijke voorschriften af. Uitlopende batterijen kunnen letsels veroorzaken en het apparaat beschadigen. Combineer nooit batterijen van een verschillend type of oude met nieuwe batterijen.
Om het risico op een elektrische schok, brand etc. tot een minimum te herleiden
Verwijdert u geen schroeven, afdekkingen of onderdelen van de behuizing.
De inschakelknop verbreekt de stroomtoevoer in geen enkele stand volkomen.
Gelieve de netstekker uit de wandcontactdoos te trekken om het apparaat compleet van de stroom te verbreken.
1.16 Risico's in combinatie met hoge volumes
- Om mogelijke gehoorschade te voorkomen, luistert u niet gedurende langere perioden met een hoog volume.
1.17 Netwerkverbinding
- Gelieve u er zich van te vergewissen dat bij uw netwerktoegangspunt (router) de Firewall-functie geactiveerd is. Raadpleeg in dit verband de gebruiksaanwijzing van uw router.
-G elieve, indien u geen netwerkverbinding tot stand wenst te brengen, de instellingsassistent (zie 3.8) niet uit te voeren.
1.18 Afstandsbediening
- Als u de afstandsbedieningssensor aan direct zonlicht of aan het licht van fluorescentielampen blootstelt, kan het tot functiestoringen komen. In dergelijke gevallen dient u het systeem op een andere plaatste installeren om dergelijke functiestoringen te vermijden.
- De bijgeleverde batterij is berekend op een functionele controle en kan een beperkte levensduur hebben. Als het bereik van de afstandsbediening afneemt, vervangt u de oude batterijen door nieuwe.
Opgepast!
Explosiegevaar als de batterij door een verkeerd type vervangen wordt;
Hoge of lage extreme temperaturen, waaraan een batterij tijdens het gebruik, de opslag of het transport blootgesteld kan zijn;
Lage luchtdruk op grote hoogte;
De vervanging van een batterij door een verkeerd type dat een beveiliging kan omzeilen (bv. bij een aantal lithiumbatterijtypes);
Het weggooien van een batterij in vuur of in een hete oven of het mechanisch kneuzen of snijden van een batterij;
Het achterlaten van een batterij in een omgeving met extreem hoge temperaturen die tot een explosie of tot het vrijkomen van brandbare vloeistoffen of gassen kan leiden;
Een batterij die blootgesteld is aan een extreem lage luchtdruk die tot een explosie of tot het vrijkomen van brandbare vloeistoffen kan leiden.
1.19 Automatische energiebesparingsfunctie
Het model is met een automatische energiesbesparingsfunctie uitgerust. Deze schakelt het apparaat binnen 15 minuten in de modus "Stand-by" wanneer de weergave met een zeer gering volume plaatsvindt resp. wanneer de radio stil afgestemd is. Deze instelling kan niet gewijzigd worden.
BELANGRIJK VOOR LASERPRODUCTEN
LASERPRODUCT VAN DE KLASSE 1
OPGEPAST: De behuizing niet openen. Het apparaat bevat geen onderdelen die door de gebruiker onderhouden kunnen worden; onderhoudsbeurten alleen door gekwalificeerd vakpersoneel laten uitvoeren.
Hiermee verklaart de JVCKENWOOD Corporation dat de radio-installatie van het type M-9000S aan de richtlijn 2014/53/EU voldoet. De volledige tekst van de EU-conformiteitsverklaring is op volgende website beschikbaar: http://www.kenwood.com/cs/eudoc/
Fabrikant:
JVCKENWOOD Corporation
3-12. Moriyacho, Kanagawa-ku, Yokohama-shi, Kanagawa 221-0022, JAPAN
Gemachtigde (EU): JVCKENWOOD EUROPE B.V.
Amsterdamseweg 37, 1422 AC UITHOORN, THE NETHERLANDS
2. Ingebruikname
2.1 Uitpakken
Pak het apparaat voorzichtig uit en let erop dat alle accessoires aanwezig zijn:
• Infrarood-afstandsbediening
2.2 Aansluiten
- Open het batterijvak van de afstandsbediening en breng de batterijen met de juiste polariteit aan. De vooropgestelde polariteit (+/-) is in het batterijvak aangegeven.
Verbind de linke en rechtse luidspreker met de aansluiting (Speaker Out) aan de achterzijde van het apparaat. Druk daarvoor op de veerbeugels en steek de losse uiteinden van het snoer in de daarvoor bestemde openingen. Daarbij de zwarte leidingdraden met de zwarte veerklem verbinden. De andere leidingdraad wordt analoog daarmee met de rode klem.
text_image
Luidsprekerkabe
R L
Zwart/Grijs
Zwart
- Sluit de netstekker vast aan op een wisselstroomcontactdoos. Omdat de netstekker voor het compleet verbreken van het stroomnet gebruikt wordt, moet de contactdoos voortdurend toegankelijk blijven.
2.3 DAB+ / FM antenneaansluiting
Sluit de werpantenne op het contactvoetje [FM ANTENNA 75Ω] aan.
Zoek de plaats, waar de beste ontvangst bereikt wordt.
Zet de antenne vast.
Bij de met het systeem geleverde antenne gaat het om een gewone werpantenne. Voor een stabiele signaalontvangst wordt het gebruik van een (in de handel verkrijgbare) buitenantenne aanbevolen.
Trek voor de aansluiting van een buitenantenne in eerste instantie de kamerantenne af.
De ontvangst van radiozenders uit het kabelnetwerk ka niet gegarandeerd worden.
2.4 Netwerkverbinding
Om Internetradio te kunnen ontvangen, moet de radio in een netwerk ged'integreerd worden. De router moet daarvoor ingeschakeld zijn en er moet een internetverbinding bestaan. Vergewis u daarbij van dat de WLAN-verbinding van de router geactiveerd is. Raadpleeg in dit verband ook de gebruiksaanwijzing van de router.
3. Componenten en functies
text_image
MODE MENU ALARM SHUFFLE
BEET PAIR
EQ VOL
OK
(SCAN)
1 2 3
ABC DEF
4 5 6
GHI JKL MNO
7 8 9
PQRS TUVWXYZ
PROG 0 INFO
FAV INTRO
KENWOOD
text_image
Stand-by Aan/Uit, wekker uit
CD-lade openen/sluiten (Eject)
MODE Modusselectie openen/Sluiten
MENU Menu openen/Sluiten
ALARM Wekker instellen
SHUFFLE / REPEAT Muziek: Willekeurige -/Herh.
►►► Weergave starten, pauzeren
►►►►►►►►►►►►►►►►►►►►►►►►►►►►►►►►►►►►►►►►►►►►►►►►►►►►►►►►►►►►►►►►►►►►►►►►►►►►►►►►►►►►►►►►►►►►►►►►►►►►◄►►►►►►►►►►►►►►►►►►►►►►►►►►►►►►►►►►►►►►►►►►►►►►►►►►►►►►►►►►►►►►►►►►►►►►►►►►►►►►►►►►►►►►►►►►►►►►►►►►► ► heavier
●▼▼▼▼▼▼▼▼▼▼▼▼▼▼▼▼▼▼▼▼▼▼▼▼▼▼▼▼▼▼▼▼▼▼▼▼▼▼▼▼▼▼▼▼▼▼▼▼▼▼▼▼▼▼▼▼▼▼▼▼▼▼▼▼▼▼▼▼▼▼▼▼▼▼▼▼▼▼▼▼▼▼▼▼▼▼▼▼▼▼▼▼▼▼▼▼▼▼▼▼▲ Omhoog; FM: Frequentie instelle
●▼▼▼▼▼▼▼▼▼▼▼▼▼▼▼▼▼▼▼▼▼▼▼▼▼▼▼▼▼▼▼▼▼▼▼▼▼▼▼▼▼▼▼▼▼▼▼▼▼▼▼▼▼▼▼▼▼▼▼▼▲ Omlaag; FM: Frequentie insteller
●◄◄◄◄◄◄◄◄◄◄◄◄◄◄◄◄◄◄◄◄◄◄◄◄◄◄◄◄◄◄◄◄◄◄◄◄◄◄◄◄◄◄◄◄◄◄◄◄◄◄◄◄◄◄◄◄◄◄◄◄◄◄◄◄◄◄◄◄◄◄◄◄◄◄◄◄◄◄◄◄◄◄◄◄◄◄◄◄◄◄◄◄◄◄◄◄◄◄◄◄ ► Rechts; volgende stap, voorinstel
OK (SCAN) Invoer bevest.; FM: Automat
Radiobeeld, diashow in de m
EQ Equalizer-voorinstelling kiezen
⊗ Stille afstemming, stille afst
○Stiller / Luider
(○)●●●●●●●●●●●●●●●●●●●●●●●●●●●●●●●●●●●●●●●●●●●●●●●●●●●●●●●●●●●●●●●●●●●●●●●●●●●●●●●●●●●●●●●●●●●●●●●●●●●● ●
PROG PAVELPROGRAMMERING, voorinstelgeher
INFO INTRSCHAKELING beeldscherminformat
10 seconden intro per track
3. Componenten en functies vervolg
1 - Volume
text_image
Voorzijde
①
②
③
SELECT
④
⑤
Bluetooth
1 - Stand-by
Bovenaanzicht
flowchart
graph TD
    A["+"] --> B["2"]
    B --> C["3"]
    C --> D["4"]
    D --> E["5"]
    E --> F["6"]
    F --> G["7"]
    G --> H["8"]
    H --> I["9"]
1 - Luidsprekeraansluiting
Achterzijde
text_image
①
②
③
U760
PR 1000000
CVR 10
SPRARE OUT-850
KENWOOD
CO-MOBO SYSTEM
AC 100 (CVR 1000000)
Power transmission power
USB 10.0 (A) = 320Hz
S/N: L
CAV/ULB
CAV/ULB
CAV/ULB
CAV/ULB
CAV/ULB
CAV/ULB
CAV/ULB
CAV/ULB
CAV/ULB
CAV/ULB
CAV/ULB
CAV/ULB
CAV/ULB
CAV/ULB
CAV/ULB
CAV/ULB
CAV/ULB
CAV 240V-NEIDER
BE 240V-NEIDER
3.1 In- / Uitschakelen (stand-by)
Drukop de toets op de afstandsbediening of aan het apparaat om de radio in te schakelen. Druk opnieuw op de toets om het apparaat in de stand-by modus te zetten. Om het apparaat volledig uit te schakelen, verbreekt u het van de stroomvoorziening.
Door het indrukken van de toetsen op de afstandsbediening kunt u in de menu's navigeren. Door het indrukken van de toets bevestigd de selectie. Deze bedieningsstappen kunnen ook aan het apparaat, met de regelaar , uitgevoerd worden. Door de regelaar te draaien, navigeert u door de menu's, de bevestiging van een menupunt volgt door te drukken op de regelaar.
3.3 Invoer van wachtwoorden, zoekteksten etc.
Selecteer met de betreffende cijfers en/of letters individueel en bevestig de gegeven selectie door het indrukken van . Gelieve, om een foutieve invoer te corrigeren, naar het veld te gaan en met toets op de afstandsbediening te bevestigen. Daardoor wordt de laatste invoer gewist. Gebruik het veld „ANNULE“ om de invoer compleet voortijdig te beëindigen. Is uw selectie volledig, gelieve dan te navigeren naar het veld „OK“ en de selectie te bevestigen door het indrukken van de toets .
3.4 Volume aanpassen en „Mute“
Dooor het indrukken van de toetsen en op de afstandsbediening of door het draaien van de regelaar aan het apparaat kunt u het volume aanpassen. Door het indrukken van de toets wordt de radio stil afgestemd. Door nogmaals de toets in te drukken, wordt het oorspronkelijke volume hersteld.
Door het herhaaldelijk indrukken van de toets kan er, afhankelijk van bron en zender, bijkomende informatie weergegeven worden:
Beschrijving
Naam van de zender, van het actuele programma, inhoud, thema's etc..
Genre
De programmastijl (genre) van de zender wordt aangegeven.
Kanaalinformatie
Huidige datum en actueel tijdstip
In de modi „FM-radio“ en „Digitale radio DAB+“ staat er aan de rechtse displayrand onderaan informatie over ontvangststerkte, stereomodus, RDS-signaal (alleen FM) en voorinstelgeheugenplaats ter beschikking. Ontbreekt de betreffende indicatie, dan staat de informatie niet ter beschikking.
3.6 Instellingsassistent
Bij de eerste start wordt automatisch de instellingsassistent (set-up wizard) gestart.
De instellingsassistent wordt in het Egels uitgevoerd.
U kunt de assistent overslaan en later in het Duits opnieuw oproepen.
Bij de eerste ingebruikname worden alle beschikbare menutalen opgesomd. Met de toetsen de gewenste taal selecteren en met bevestigen.
3.8 Start van de instellingsassistent
Voor een eenvoudige en snelle eerste ingebruikname (instelling van tijd en datum, instelling van de internetverbinding etc.) adviseren wij u de uitvoering van de instellingsassistent. Gelieve daarvoor „JA“ te selecteren. Wenst u de instellingsassistent over te slaan, dan kiest u „NEE“.
Alle instellingen die met behulp van de instellingsassistent plaatsvinden, kunnen later ook individueel via de systeeminstellingen doorgevoerd worden. Alternatief kan de instellingsassistent te allen tijde opnieuw uitgevoerd worden. Kies vervolgens „JA“ of „NEE“ om de instellingsassistent automatisch bij de volgende start van de radio al dan niet uit te voeren. Daarna bevindt u zich in het hoofdmenu.
- Datum/Tijd
12/24-uur formaat
• Automatische update (tijd & datum)
Update van DAB of FM (aanbevolen)
Bij de automatische update via het radionetwerk FM/DAB/DAB+ worden tijdstip en datum door de omroepen beschikbaar gesteld. Bij een afstelling via deze bronnen wordt zelfs na een stroomstoring het tijdstip correct ingesteld. Zodoende kunnen ook ingestelde wektijden aangehouden worden.
- Update van Netwerk
Bij selectie van deze optie worden tijdstip en datum automatisch via de internetverbinding ingesteld. Aanvullend kunnen de tijdzone en zomer-/wintertijd aangepast worden.
- Geen update
Tijdstip en datum moeten handmatig ingesteld worden.
- Verbonden blijven met netwerk
In het hoofddstuk „Systeeminstellingen“ wordt er gedetailleerder op de netwerkconfiguratie ingegaan.
Het hoofdmenu omvat de verschillende audiobonnen en instelmogelijkheden:
Internetradio
Podcasts
Spotify
USB
Bluetooth
Extra Ingang (Line-In)
Sluimertijd
Alarmer
Systeeminstellingen
Druk bij geselecteerde audiobron op de toets
op de afstandsbediening of aan het apparaat en selecteer „Hoofdmenu”.
5. Internetradio
De internetradio biedt een zeer ruime waaier aan de meest uiteenlopende aanbiedingen in de hele wereld. Daarbij kunt u de stations op veelvuldige wijze selecteren. Gelieve daarvoor in het hoofdmenu de bron „Internetradio“ te selecteren.
5.1 Zoeken van zenders
De radio biedt verschillende mogelijkheden om naar gewenste zenders te zoeken.
Navigeer binnen de menupunten en opties. Hebt u de gewenste zender gevonden, dan bevestigt u de selectie met de toets . De weergave van internetradio kan door het indrukken van de toets op de afstandsbediening gestopt worden. Door de toets nogmaals in te drukken, wordt de zender opnieuw geladen.
5.1.1 Zoeken naar landen en regio's
Om zenders uit bepaalde continenten, landen en regio's te zoeken, drukt u op de toets
om de „Zenderlijst“ op te roepen. Bevestig de selectie.
Kies het menu „Locatie“ om een land of een regio te selecteren.
5.1.2 Zoeken naar genres
Om zenders met bepaalde muziekstromingen of thema's te zoeken, gaat u als volgt te werk: Druk op de toets
, om de „Zenderlijst“ op te roepen. Na bevestiging van de selectie navigeert u naar het menu „Ontdekken“. Na de bevestiging kunt u een bijkomende beperking volgens oorsprong of taal van de zenders doorvoeren.
5.1.3 Zoeken naar namen
Als u de naam van de gewenste zender kent, kunt u doelgericht naar deze zender zoeken:
Druk op de toets
, om de „Zenderlijst“ op te roepen. Na bevestiging van de selectie navigeert u naar het menu „Zoeken“. Voer in het invoermasker de volledige zendernaam of een gedeelte van de zendernaam in en kies het veld „OK“ om het zoeken te starten. U krijgt een opsomming van alle zenders, wier namen de gezochte tekst omvatten.
5.1.4 Populaire zenders
Een greep uit de populairste zenders krijgt u als volgt:
Druk op de toets
, om de „Zenderlijst“ op te roepen. Na bevestiging van de selectie navigeert u naar het menu „Populair“ en kiest u de gewenste zender.
5.1.5 Lokale zenders
Gelieve, om doelgericht naar zenders uit het land van de actuele locatie van de radio te zoeken, als volgt te werk:
Druk op de toets
, om de „Zenderlijst“ op te roepen. Na bevestiging van de selectie navigeert u naar het menu met de landnaam van de actuele locatie (bv. „Nederland“).
Binnen deze lokale beperking kunt u aanvullend naar genres, lokale of populaire zenders zoeken.
5.2 Favorieten (geheugenplaatsen)
Om uw favoriete zenders op te slaan, staan er 40 geheugenplaatsen (favorieten) ter beschikking.
Deze kunt u willekeurig met zenders uit de bronnen „Internetradio“ en „Podcasts“ bezetten.
Gelieve, om opgeslagen zenders aan het hoofdapparaat op te roepen, de toets <> in te drukken en de gewenste geheugenplaats te selecteren door te draaien aan de regelaar . Om de zender te laden, drukt u op .
5.2.1 Opslaan van zenders met de afstandsbediening:
De geheugenplaatsen 1 –10 kunnen door middel van de cijfertoetsen op de afstandsbediening bezet worden. Selecteer daarvoor de gewenste zender en druk op een cijfertoets op de afstandsbediening totdat „Voorkeuze opgeslagen“ op het display verschijnt. De geheugenplaatsen kunnen nu opgeroepen worden door via de afstandsbediening even op de toets te drukken.
5.2.2 Opslaan van zenders op de geheugenplaatsen 11 - 40:
Selecteer het gewenste station en houd de knop op de afstandsbediening ingedrukt. Kies nu een geheugenlocatie uit de lijst met zendergeheugens en bevestig uw keuze met de -knop op de radio. Op het display verschijnt „Voorkeuze opgeslagen“. De zenderlijst kut u comfortabel oproepen door de toets <*> op de radio of op de afstandsbediening te drukken (PROG knop). Gebruik de toetsen of de -knop om een station te selecteren en druk op om te bevestigen.
Opmerking: De geheugenplaatsen kunnen niet gewist worden, er kan alleen met andere zenders over geschreven worden.
6. Podcasts
Podcasts zijn oproepbare inzendingen over verschillende onderwerpen, bv. informatieve uitzendingen, nieuws en veel meer. Net als bij internetradio is er de mogelijkheid om podcasts te filteren of in de hele databank naar een podcast te zoeken. Gelieve in het hoofdmenu de bron „Podcasts“ te selecteren.
6.1 Zoeken van podcasts
De radio biedt verschillende mogelijkheden om naar podcasts te zoeken. Navigeer binnen de menupunten en opties. Hebt u de gewenste podcast gevonden, dan bevestigt u de selectie met de toets . De weergave van podcasts kan door het indrukken van de toets op de afstandsbediening gepauzeerd en weer gestart worden. Door het permanent indrukken van de toetsen kan er binnen de podcast met toenemende snelheid (max. een 32-voud) vooruit en achteruit gespoeld worden. Door even te drukken op de toets
wordt er naar het begin van de podcast gesprongen.
6.1.1 Zoeken naar landen en regio's
Om podcasts uit bepaalde continenten, landen en regio's te zoeken, drukt u op de toets
om de „Podcast-lijst“ op te roepen. Bevestig de selectie.
Kies het menu „Locatie“ om een land of een regio te selecteren.
6.1.2 Zoeken naar genres
Om podcasts met een bepaalde inhoud of met bepaalde onderwerpen te zoeken, gaat u als volgt te werk:
Druk op de toets
om de „Podcast-lijst“ op te roepen. Na bevestiging van de selectie navigeert u naar het menu „Ontdekken“. Na de bevestiging kunt u een bijkomende beperking volgens oorsprong of taal van de podcast doorvoeren.
6.1.3 Zoeken naar namen
Als u de naam van de gewenste podcast kent, kunt u doelgericht naar deze podcast zoeken:
Druk op de toets
om de „Podcast-lijst“ op te roepen. Na bevestiging van de selectie navigeert u naar het menu „Zoeken“. Voer in het invoermasker de volledige naam van de podcast of een gedeelte van de naam van de podcast in en kies het veld „OK“ om het zoeken te starten. U krijgt een opsomming van alle podcasts of episoden, wier namen de gezochte tekst omvatten.
6.1.4 Populaire podcasts
Gelieve, om doelgericht naar populaire podcasts uit het land van de actuele locatie van de radio te zoeken, als volgt te werk:
Druk op de toets
om de „Podcast-lijst“ op te roepen. Na bevestiging van de selectie navigeert u naar het menu met de landnaam van de actuele locatie (bv. „Nederland“). Binnen deze lokale beperking kunt u aanvullend naar genres, lokale of populaire podcasts zoeken.
6.2 Favorieten (geheugenplaatsen)
Om podcasts op te slaan, staan er 40 geheugenplaatsen (favorieten) ter beschikking. Deze favorieten kunt u willekeurig met zenders uit de bronnen „Internetradio“ en „Podcasts“ bezetten. Gelieve, om Voorkeuze opgeslagen podcasts aan het hoofdapparaat op te roepen, de toets <*> in te drukken en de gewenste geheugenplaats te selecteren door te draaien aan de regelaar . Om de podcast te laden, drukt u op .
6.2.1 Opslaan van podcasts met de afstandsbediening:
De geheugenplaatsen 1 –10 kunnen door middel van de cijfertoetsen op de afstandsbediening bezet worden. Selecteer daarvoor de gewenste podcast en druk op een cijfertoets op de afstandsbediening totdat „Voorkeuze opgeslagen“ op het display verschijnt. De geheugenplaatsen kunnen nu opge-roepen worden door via de afstandsbediening even op de toets te drukken.
6.2.2 Opslaan van podcasts op de geheugenplaatsen 11 - 40:
Selecteer de gewenste podcast en houd de toets op de afstandsbediening ingedrukt. Selecteer nu uit de lijst met de zendergeheugens een geheugenplaats en bevestig de selectie met de toets
aan de radio. Op het display verschijnt „Voorkeuze opgeslagen“. De geheugenplaatsen kunt u comfortabel oproepen door de toets <*> aan de radio of op de afstandsbediening even in te drukken. Gebruik de toetsen of de regelaar om een podcast te selecteren en druk op om te bevestigen.
Opmerking: De geheugenplaatsen kunnen niet gewist, maar alleen met andere podcasts overschreven worden.
7. Spotify
Gebruik je telefoon, tablet of computer als een afstandsbediening voor Spotify. Ga naar spotify.com/connect om te leren hoe je dat doet. De Spotify-software is onderworpen aan voor derden geldende licenties die op het volgende adres opgeroepen kunnen worden:
www.spotify.com/connect/third-party-licenses
Installeer de Spotify-app op uw Android-/iOS-apparaat. Deze kunt u in de Play Store of uit de Apple App Store downloaden. Na de installatie start u de app en logt u met uw toegangsgegevens aan resp. registreert u zich. De radio en het Android-/ iOS-apparaat met de Spotify-app moeten zich in hetzelfde netwerk bevinden.
7.1 Gebruik
Gelieve in het hoofdmenu de bron „Spotify“ te selecteren en zoals gewoonlijk de weergave van Spotify op uw smartphone te starten. Aan de onderste rand van het beeldscherm van de telefoon worden het Spotfiy Connect-logo en „Beschikbare apparaten“ aangegeven. Druk op „Beschikbare apparaten“ om een lijst met de in het netwerk beschikbare apparaten weer te geven. Selecteer nu „M-9000S“ en de weergave vindt plaats via de radio. Een succesvolle verbinding wordt door groene letters aangegeven. Na een succesvolle eerste verbinding kunt u de smartphone ook als volgt met de radio verbinden: Kies in het hoofdmenu de bron „Spotify“ en druk op . Op het display verschijnt nu „Press Play ...“. Door het indrukken van de toets op de afstandsbediening wordt de verbinding tot stand gebracht en de weergave van de actuele playlist gestart. Via de afstandsbediening kan er ook tussen de titels van de actuele lijst gesprongen worden.
7.2 Favorieten (geheugenplaatsen)
Om playlists op te slaan, staan er 10 geheugenplaatsen (favorieten) ter beschikking.
7.2.1 Opslaan van playlists met de afstandsbediening:
De geheugenplaatsen 1 –10 kunnen door middel van de cijfertoetsen op de afstandsbediening bezet worden. Selecteer daarvoor de gewenste playlist en druk op een cijfertoets op de afstandsbediening totdat „Voorkeuze opgeslagen” op het display verschijnt. De geheugenplaatsen kunnen nu opgeroepen worden door via de afstandsbediening even op de toets te drukken. Er kunnen ook individuele titels die niet in playlists beschikbaar zijn, opgeslagen worden.
Opmerking: De geheugenplaatsen kunnen niet gewist, maar er kan alleen met andere playlists/titels over geschreven worden.
8. CD-speler
Via deze bron kunt u audio-CD's en MP3-CD's afspelen. Gelieve daarvoor in het hoofdmenu de bron „CD“ te selecteren. Open het CD-vak door de toets aan het hoofdapparaat of op de afstandsbediening in te drukken. Leg de CD in en sluit het vak door te drukken op . De weergave begint automatisch met de eerste titel van de CD. Door de toets op de afstandsbediening in te drukken, kunt u de titels van de CD even laten afspelen. Door nog een andere toets in te drukken, wordt deze functie beëindigd.
Bij audio-CD's wordt de informatie over het aantal titels en totale speelduur als volgt aangegeven:
TXX XX:XX
Daarbij staat het eerste cijferblok voor het aantal titels en het tweede voor de totale speelduur van de CD.
8.1 Afspelen van MP3-bestanden
Selecteer de gewenste map of titel uit het menu, de muziekweergave wordt met de toets gestart. Via de toetsen kunt u in de mapstructuren navigeren. Met de toets wordt de weergave gepauzeerd en voortgezet. Door het permanent indrukken van de toetsen kan er binnen de titel met toenemende snelheid (max. een 32-voud) vooruit en achteruit gespoeld worden. Door even te drukken op geraakt men tot het begin van de titel of tot de vorige titel.
Bij CD's die MP3-bestanden bevatten, wordt het aantal beschikbare mappen en bestanden als volgt aangegeven:
FXX TXXX
Daarbij staat het cijfer achter „F“ voor het aantal mappen en het tweede cijferblok voor het totaalaantal „T“ bestanden.
8.2 Willekeurige weergave en herhaling
Gelieve, om titels van een CD of MP3-bestanden in een map in toevallige volgorden weer te geven of om de weergave van de bestanden te herhalen, als volgt te werk te gaan:
Druk op de toets
en selecteer „Herhalen“ en/of „Shuffle“. Met de toets worden de functies telkens in- of uitgeschakeld. Alternatief kunt u ook de toets op de afstandsbediening daarvoor gebruiken.
Door het herhaaldelijk indrukken, worden de functies als volgt geactiveerd:
1 x indrukken: Herhaling titel / 2 x indrukken: Herhaling map (alleen MP3)
3 x indrukken: Herhaling Alles / 4 x indrukken: Shuffle / 5 x indrukken: Uit
9. USB-speler
Via deze bron kunt u MP3-bestanden (16Bit/48kHz) van een USB-stick afspelen. Selecteer daarvoor in het hoofdmenu de bron „USB“.
9.1 Afspelen van MP3-bestanden
Selecteer de gewenste map of titel uit het menu, de muziekweergave wordt met de toets gestart. Via de toetsen kunt u in de mapstructuren navigeren. Met de toets wordt de weergave gepauzeerd en voortgezet. Door het permanent indrukken van de toetsen kan er binnen de titel met toenemende snelheid (max. een 32-voud) vooruit en achteruit gespoeld worden. Door even te drukken op geraakt men tot het begin van de titel of tot de vorige titel.
9.2 Willekeurige weergave en herhaling
Gelieve, om MP3-bestanden in een map in willekeurige reeksen weer te geven of om de weergave van de bestanden te herhalen, als volgt te werk te gaan:
Druk op de toets
en selecteer „Herhalen“ en/of „Shuffle“. Met de toets worden de functies telkens in- of uitgeschakeld. Alternatief kunt u ook de toets op de afstandsbediening daarvoor gebruiken. Door het herhaaldelijk indrukken, worden de functies als volgt geactiveerd:
1 x indrukken: Herhaling titel / 2 x indrukken: Herhaling map
3 x indrukken: Herhaling Alles / 4 x indrukken: Shuffle / 5 x indrukken: Uit
10. Digitale radio DAB+
Gelieve, om de digitale radio DAB+ te ontvangen, in het hoofdmenu over te schakelen naar de bron „DAB radio“. Bij de eerste omschakeling wordt er een automatische afstemming van de zenders gestart. Op het display verschijnt „Volledige scan“, het aantal tot nu toe gevonden zenders en een overeenkomstige voortgangsbalk. Een aantal zenders biedt bijkomende informatie als zogenaamde Slideshow aan.
Om dit in groot formaat op het radiodisplay weer te geven, drukt u op de op de afstandsbediening of aan de radio. Door de toets opnieuw in te drukken, schakelt het display weer terug.
10.1 Afstemming van de zenders
Om naar ontvangbare zenders te zoeken, kunt u een automatische afstemming van de zenders starten. Roep daarvoor met de toets
het menu op en kies „Volledige scan“. Op het display verschijnt „Volledige scan“, het aantal tot nu toe gevonden zenders en een overeenkomstige voortgangsbalk. Daarna zijn de zenders in alfabetische volgorde opgeslagen.
Zenders die bij een vorige afstemming van de zenders gevonden worden, maar op het gegeven mo-
ment niet te ontvangen zijn, worden in de zenderlijst met een „?” vóór de zendernaam aangegeven.
10.2 Handmatig instellen
U kunt ensembles ook handmatig instellen. Roep daarvoor met de toets
het menu op en selecteer „Handmatig afstemmen“. Daarna het gewenste kanaal selecteren en met bevestigen. Nu wordt er informatie over het ensemble en wordt de signaalsterkte aangegeven. Door nogmaals te drukken op de toets worden de betreffende zenders in de lijst opgeslagen.
10.3 Zenderlijst
Druk op de toets
en bevestig „Zenderlijst“ met . Gebruik de toetsen of de regelaar voor de selectie van een zender en druk op om te bevestigen. Het apparaat begint automatisch met de weergave.
Opmerking: De ontvangstkwaliteit van een zender is afhankelijk van factoren zoals weer, opstellingsplaats en antenne-oriëntering. Indien een zender uit de zenderlijst niet ontvangbaar is, wijzigt u de oriëntatie van de antenne of de plaats van opstelling van de radio. Niet meer ontvangbare zenders kunnen uit de zenderlijst verwijderd worden.
10.4 Niet (meer) ontvangbare zenders wissen
Zenders die niet meer ontvangen kunnen worden, kunnen uit de lijst gewist worden. Druk daarvoor op de toets
en selecteer „Verwijderen niet mogelijk“. Selecteer bij „U verwijdert alle ongeldige zenders, doorgaan?“ „JA“ en deze zenders worden gewist. Door het selecteren van „NEE“ wordt u weer naar het menu geleid, zonder de zenders te wissen.
10.5 Favorieten (geheugenplaatsen)
Om DAB+ zenders op te slaan, staan er 20 geheugenplaatsen (favorieten) ter beschikking. Gelieve, om opgeslagen zenders aan het hoofdapparaat op te roepen, de toets <> in te drukken en de gewenste geheugenplaats te selecteren door in te drukken.
10.5.1 Opslaan van DAB+ zenders met de afstandsbediening:
De geheugenplaatsen 1 –10 kunnen door middel van de cijfertoetsen op de afstandsbediening bezet worden. Selecteer daarvoor de gewenste zender en druk op een cijfertoets op de afstandsbediening totdat „Voorkeuze opgeslagen“ op het display verschijnt. De geheugenplaatsen kunnen nu opgeroepen worden door via de afstandsbediening even op de toets te drukken.
10.5.2 Opslaan van DAB+ zenders op de geheugenplaatsen 11 - 20:
Selecteer e gewenste zender en houd de toets op de afstandsbediening ingedrukt. Selecteer nu uit de lijst met de zendergeheugens een geheugenplaats en bevestig de selectie met de toets aan de radio. Op het display verschijnt „Voorkeuze opgeslagen“. De geheugenplaatsen kunt u comfortabel oproepen door de toets op de afstandsbediening even in te drukken. Gebruik de toetsen of de regelaar voor de selectie van een zender en druk op om te bevestigen.
Opmerking: De geheugenplaatsen kunnen niet gewist worden, er kan alleen met andere zenders
over geschreven worden.
10.6 DRC (Dynamic Range Control)
Sommige DAB+ zenders ondersteunen DRC dat het verschil tussen luide en stille klanken vermindert.
Volgende instellingen zijn mogelijk:
DRC hoog:
Sterke compressie van de verschillende volumes. De dynamiek wordt in ruime mate verminderd.
DRC laag:
Lage compressie, zonder aanzienlijke vermindering van de dynamiek.
DRC uit:
Er volgt geen compressie.
Om de instellingen door te voeren, gaat u als volgt te werk:
Druk op de toets
en selecteer „DRC“. In het volgende menu kunnen de instellingen voor
DRC gewijzigd worden. De actuele instelling wordt door „*“ aangegeven.
10.7 Zendervolgorde
Standaard sorteert de radio de zenders in alfabetische volgorde. De zenders kunnen echter op ensembles gesorteerd worden.
Om de instellingen door te voeren, gaat u als volgt te werk:
Druk op de toets
en selecteer „Zendervolgorde“. In het volgende menu kunnen de instellingen gewijzigd worden. De actuele instelling wordt door „*“ aangegeven. De actuele instelling wordt door „*“ aangegeven.
11. FM-radio
Selecteer in het hoofdmenu „FM RADIO“ om naar FM-ontvangst om te schakelen.
11.1 Afstemming van de zenders
U kunt automatisch naar FM-zenders laten zoeken. Gelieve, om de automatische afstemming van zenders te starten, de toets op de afstandsbediening of aan de radio n te drukken. De zoekfunctie stopt bij de volgende gevonden zender en de radio begint met het afspelen.
11.2 Instellingen automatische afstemming
Met deze functie kunt u vastleggen, of er alleen zenders met een sterk ontvangstsignaal in aanmerking genomen worden. Druk daarvoor op de toets
en selecteer „Scaninstelling“. In het hiernavolgende menu „Scan FM-stations“ kunt u nu de vraag „Alleen sterke zenders?“ met „JA“ of „NEE“ beantwoorden. De actuele instelling wordt door „*“ aangegeven.
11.3 Audio-instellingen
Bij zenders met zwakke ontvangst kan door omschakeling naar mono-ontvangst een lichte kwaliteitsverbetering gerealiseerd worden. Druk daarvoor op de toets
en selecteer „Audio-instelling“. In het hiernavolgende menu „FM-ontvangst zwak“ kunt u nu de vraag „Mono
luisteren?" met „JA" of „NEE" beantwoorden. De actuele instelling wordt door „*“ aangegeven.
11.4 Favorieten (geheugenplaatsen)
Om FM-zenders op te slaan, staan er 20 geheugenplaatsen (favorieten) ter beschikking. Gelieve, om opgeslagen zenders aan het hoofdapparaat op te roepen, de toets <> in te drukken en de gewenste geheugenplaats te selecteren door in te drukken.
11.4.1 Opslaan van FM-zenders met de afstandsbediening:
De geheugenplaatsen 1 –10 kunnen door middel van de cijfertoetsen op de afstandsbediening bezet worden. Selecteer daarvoor de gewenste zender en druk op een cijfertoets op de afstandsbediening totdat „Voorkeuze opgeslagen“ op het display verschijnt. De geheugenplaatsen kunnen nu opgeroepen worden door via de afstandsbediening even op de toets te drukken.
11.4.2 Opslaan van FM-zenders op de geheugenplaatsen 11 - 20:
Selecteer e gewenste zender en houd de toets op de afstandsbediening ingedrukt. Selecteer nu uit de lijst met de zendergeheugens een geheugenplaats en bevestig de selectie met de toets aan de radio. Op het display verschijnt „Voorkeuze opgeslagen“. De geheugenplaatsen kunt u comfortabel oproepen door de toets op de afstandsbediening even in te drukken. Gebruik de toetsen of de regelaar voor de selectie van een zender, en druk op om te bevestigen.
Opmerking: De geheugenplaatsen kunnen niet gewist worden, er kan alleen met andere zenders over geschreven worden.
12. Bluetooth audio
De BLUETOOTH-functie laat de draadloze overdracht van muziekbestanden (Audio Streaming) aan de radio toe. Er kunnen smartphones, tablets of gelijkaardige apparaten gekoppeld worden. Selecteer daarvoor in het hoofdmenu de bron „Bluetooth“.
12.1 Eerste koppeling van Bluetooth-apparaten (Pairing)
Vergewis u ervan dat het te koppelen eindapparaat ingeschakeld en Bluetooth geactiveerd is.
Selecteer in het hoofdmenu de bron „Bluetooth“. Op het display verschijnt „Bluetooth vindbaar“.
Open nu de Bluetooth-instellingen op het te koppelen eindapparaat en start daar het zoeken naar beschikbare Bluetooth-apparaten. Selecteer „M-9000S“ en start het koppelingsproces. Nadat het Pairing voltooid werd, verschijnt op het display „Verbonden“. Nu kan de muziekweergave via het eindapparaat gestuurd worden. Gebruik daarvoor een muziek-app naar keuze.
De basisbediening van weergave/pauze en titelsprong is via de betreffende toetsen op de afstandsbediening mogelijk.
Opmerking: Sommige eindapparaten vereisen bij de koppeling een PIN-code, voer dan „0000“ in.
12.2 Automatische verbinding na reeds plaatsgevonden koppeling
Als van de bron „Bluetooth“ omgeschakeld of de radio uitgeschakeld wordt, wordt de Bluetooth-verbinding verbroken. Wordt de radio weer ingeschakeld of wordt er terug naar de bron „Bluetooth“ omgeschakeld, dan wordt er een automatische verbinding tot stand gebracht.
Opmerking: Gelieve, indien een automatische verbinding niet mogelijk is, als volgt te werk te gaan: Druk op de toets
en selecteer „Bekijk Details“. Vervolgens opent de „Gekoppelde Apparatenlijst“ om het gewenste apparaat te selecteren en te koppelen. Door het indrukken van de toets te drukken en „Verbonden“ verschijnt kort in het display.
12.3 Nog een ander eindapparaat koppelen
Gelieve, om nog een ander eindapparaat met de radio te koppelen, te drukken op de toets
en „Bluetooth instellen“ te selecteren. Daardoor wordt de actuele verbinding verbroken.
Ga nu zoals bij de eerste koppeling van een eindapparaat te werk. Daarna is ook dit eindapparaat in de lijst met de gekoppelde apparaten opgeslagen en kan het via het betreffende menu (zie hierboven) geselecteerd worden. Er kunnen maximaal 8 apparaten opgeslagen worden.
12.4 Onderbreken van de Bluetooth-verbinding
Wenst u de verbinding met een gekoppeld apparaat te onderbreken, gelieve dan 2 seconden lang te drukken op de toets op de afstandsbediening. De radio schakelt dan weer om naar de koppelingsmodus.
13. Analoge aansluitingen
13.1 Line-In
Voor de weergave van muziek kunnen er op de Line-In aansluiting externe apparaten, zoals bv. MP3-Player, DVD-Player of spelconsoles aangesloten worden. Gelieve daarvoor in het hoofdmenu de bron „Line-IN“ te selecteren.
14. Sluimertijd
Met deze functie kunt u de radio na een bepaalde tijd automatisch in de stand-bymodus schakelen. U kunt daarbij tussen 15, 30, 45 of 60 minuten kiezen, „Sluimer uit“ wist de vooraf ingestelde tijds. Druk daarvoor bij een gekozen audiobron op de toets
en kies „Hoofdmenu“. Vervolgens met de toets of <OMLAAG in het menu navigeren en „Sluimer“ selecteren. Door middel van de toets of in het menu „Sluimertijd instellen“ de gewenste tijdspanne selecteren en met de toets bevestigen. Met de toets de menu's weer verlaten.
De overblijvende resterende tijd wordt op het display links onderaan, met achterwaarts lopende minuten, aangegeven.
15. Alarmer
Deze radio beschikt over 2 individueel instelbare wektijden. Druk op de toets op de afstandsbediening en kies „Alarm 1“ of „Alarm 2“ om de instellingen door te voeren.
Alternatief kunt u de wekker ook via het hoofdmenu oproepen. Aanvullend is een instelling aan de radio met de toets en de regelaar mogelijk. In de stand-by modus kunnen de opgeslagen wekkers van de toets geactiveerd en gedeactiveerd worden. Voor de programmering van de wekker staan volgende opties ter beschikking:
15.1 Geactiveerd:
Selecteer hier, op welke dagen de wekker geactiveerd dient te worden. Ter beschikking staat volgende keuze: Uit / Dagelijks / Een keer / Weekends / Doordeweekse dagen Kies „Uit“ om een geactiveerde wekker te deactiveren.
15.2 Tijd:
Stel met de toets of eerst de uren en na het indrukken van de toets dan de minuten van de wektijd in.
15.3 Modus:
Hier stelt u de audiobron in, waarmee er gewekt dient te worden. Ter beschikking staat volgende keuze: Zoemer / Internetradio / DAB / FM /CD / USB
15.4 Programma:
Hier wordt de zender vastgelegd, waarmee er gewekt dient te worden. Ter beschikking staan hier de voor het laatst beluisterde zender of de in de favorieten opgeslagen stations. Geldt niet voor de modus Zoemer, CD en USB.
15.5 Volume:
Stel hier het gewenste wekvolume in.
15.6 Opslaan:
Hebt u alle instellingen doorgevoerd, gelieve dan de toets in te drukken om de instellingen op te slaan.
Een geactiveerde wekker wordt met een wekkersymbool en met het nummer van de actieve wekker links onderaan op het display weergegeven. In de standby-modus kunt u ook de ingestelde wektijd zien.
15.7 Uitschakelen van de wekker na het wekken
Gelieve, om de wekker tot de volgende wekcyclus uit te schakelen, de toets aan het apparaat of op de afstandsbediening in te drukken, op het display verschijnt even „Alarm uit“. Wenst u de wekfunctie slechts enkele minuten lang te onderbreken (Snooze), dan kunt u elke andere toets gebruiken. De wekvertraging wordt door het indrukken van de toets in de stappen 5, 10, 15 en 30 minuten ingesteld en kan ook altijd weer verlengd worden. De radio schakelt na korte tijd automatisch weer om naar „Stand-by“ en de resterende tijd, totdat er opnieuw gewekt wordt, wordt naast het knipperende wekkersymbool aangegeven.
Opmerking: Bij een stroomstoring blijven de opgeslagen wektijden behouden.
16. Systeeminstellingen
In de systeeminstellingen kunt u de instellingen van de radio wijzigen en belangrijke informatie over de radio oproepen.
16.1 Equalizer
Met de equalizer kunt u de klank van de radio naar wens aan. U kunt kiezen uit voorgeconfigureerde instellingen of u kunt uw eigen profiel aanmaken. Gelieve daarvoor als volgt te werk te gaan:
Druk op de toets
, en selecteer eerst „Systeeminstellingen“ en daarna „Equalizer“. Met de toets of kunt u een klankprofiel selecteren en daarna met bevestigen. Volgende profielen staan ter beschikking:
Krachtig / Duidelijk / Helder / Warm / Balanced
16.2 Internetinstellingen
16.2.1 Netwerkassistent
De netwerkassistent helpt bij de verbinding van de radio met het internet. Gelieve, om deze op te roepen, als volgt te werk te gaan:
Selecteer in het menu „Systeeminstellingen“ de „Netwerk“ en bevestig daarna
„Netwerkwizard“. De radio gaat nu van start met een afstemming van de zenders volgens beschikbare WLAN-verbindingen en somt deze vervolgens op. Met de toets of en met de regelaar kunnen de verschillende netwerken geselecteerd worden.
Op het einde van de lijst bestaat de mogelijkheid om „[Opnieuw scannen]" of „[Handmatige configuratie.]" te selecteren.
16.2.2 Draadloze netwerkverbinding (WLAN)
Afhankelijk van het netwerk staan er verschillende opties ter beschikking om de verbinding met het netwerk tot stand te brengen. Netwerken die een WPS-verbinding (Wi-Fi Protected Setup) ondersteunen, worden in de lijst door de voorop gestelde benaming „[WPS...]“ aangegeven. Bij andere verbindingen gaat het om open netwerken of om verbindingen die door het PSK-proces = Pre-Shared-Key (vooraf overeengekomen sleutel) beschermd zijn.
Opmerking: Een actieve netwerkverbinding wordt door een wit symbool onderaan rechts op het display aangegeven. Is er geen verbinding actief, dan is dit symbool rood doorgestreept.
16.2.3 WPS- / PSK- / Open verbinding
Een WPS-verbinding maakt een eenvoudige en toch beschermde verbinding van de radio met uw neetwerk mogelijk. Daarbij staan er twee mogelijkheden ter beschikking. De totstandkoming van de verbinding door PBC = Push-Button-Configuration (configuratie door het indrukken van een knop) of door het PIN-proces, waarbij u door het webinterface van uw router verzocht wordt, een toevallig gegenereerde cijferreeks in te voeren.
16.2.4 Totstandkoming door middel van PBC
Selecteer het gewenste netwerk „[WPS...]“. Vervolgens met „WPS-menu“ de optie „Druk op de knop" selecteren en bevestigen. Druk nu op de WPS-toets aan uw router of Access-Point (AP). Voor de precieze werkwijze verwijzen wij naar de gebruiksaanwijzing van uw router of AP. Alternatief kan het proces ook in het menu „Internetinstellingen“ onder „PBC WLAN opbouw“ gestart worden. Volg daarbij de aanwijzingen op het display.
16.2.5 Totstandkoming door PIN
Selecteer het gewenste netwerk „[WPS...]“. Vervolgens met „WPS-menu“ de optie „PIN“ selecteren en bevestigen. De radio genereert nu een uit 8 cijfers bestaande code die u met de toets dient te bevestigen; bovendien moet u het cijfer vervolgens via de gebruikersinterface van de router of van het AP invoeren. Voor bijkomende informatie daarover verwijzen wij naar het handboek van router of AP.
16.2.6 WPS overslaan / totstandkoming door middel van PSK (Pre-Shared-Key)
Kies „WPS overslaan“ om de verbinding door een netwerksleutel tot stand te brengen. Bij netwerken zonder WPS-ondersteuning geraakt u direct in het invoermasker. Voer nu de sleutel in en bevestig deze met de knop „OK“. Is de invoer correct, dan wordt de radio met uw netwerk verbonden en wordt er een internetverbinding tot stand gebracht.
16.2.7 Open verbinding
Wij adviseren u, geen verbinding met een open netwerk tot stand te brengen. Indien het door u gekozen netwerk niet versleuteld is, kunt u dit met de toets bevestigen. Daarna wordt de internetverbinding tot stand gebracht.
16.2.8 Handmatige totstandkoming van de netwerkverbinding
Gelieve bij een actief DHCP als volgt te werk te gaan:
Gelieve de menu's „Internetinstellingen“ -> „Handmatige instellingen“ -> „Draadloos“ -> „DHCP inschakelen“ te selecteren. Voer vervolgens de volledige SSID (netwerknaam) in en bevestig deze op de knop „OK“. Kies nu de passende versleutelingsmethode.
Gelieve deze uit de configuratie van de router of van het AP af te leiden. Afhankelijk van de gekozen methode wordt nu de netwerksleutel ingevoerd en op de knop „OK“ bevestigd.
16.2.9 Gelieve bij een inactief DHCP als volgt te werk te gaan:
Gelieve de menu's „Internetinstellingen“ -> „Handmatige instellingen“ -> „Draadloos“ -> „DHCP uitschakelen“ te selecteren. Voer nu de informatie over „IP-adres“, „Subnetmasker“, „Gateway-adres“, „Primaire DNS“ en „Secundaire DNS“ in. Met de toets of op de afstandsbediening of aan de regelaar kunnen de waarden ingesteld worden. Met de toets , of kunt u de individuele cijferblokken voor de instelling selecteren. Vervolgens gaat u verder te werk zoals onder „DHCP actief“ beschreven.
16.3 Netwerkinstellingen weergeven
In dit menu vindt u alle instellingen van het op het gegeven moment gebruikte netwerkprofiel. Selecteer daarvoor in het menu „Netwerk“ het menu „Bekijk Instellingen“. Met de toets of op de afstandsbediening of met de regelaar kunnen de waarden aangegeven worden.
16.4 NetRemote PIN-set-up
In dit menu kunt u een uit 4 cijfers bestaande PIN instellen die bij de eerste instelling van de UNDOK-app (zie hoofdstuk 24) opgevraagd wordt. Vooraf ingesteld is hier „1234“. De PIN dient onmiddellijk gewijzigd te worden..
16.5 Netwerkprofiel
Hier ziet u de lijst met de in de radio opgeslagen netwerkprofielen. Indien u meerdere profielen aangemaakt hebt, kiest u het profiel met de kortste afstand tot de/het betreffende router of AP. U kunt niet meer benodigde netwerkprofielen wissen doordat u met de toets of op de afstandsbediening of met de regelaar het te wissen profiel selecteert en met de toets bevestigt. Het actieve netwerkprofiel wordt met „*“ aangegeven.
Opmerking: Het actieve netwerkprofiel kan niet gewist worden.
16.6 Wis netwerkinstellingen
In dit menu kunt u de netwerkinstellingen van het actuele profiel wissen. Selecteer daarvoor de knop „JA“ en bevestig de invoer met de toets . Door het kiezen van de knop „NEE“ wordt het proces voortijdig beeindigd.
16.7 Handhaven netwerkverbinding
In dit menu wordt ingesteld, of de WLAN-verbinding met het netwerk in de stand-by modus gehandhaafd dient te worden. Daardoor kunt u de radio via de UNDOK-app (zie pagina 27) inschakelen. Het stroomverbruik in de stand-by modus is in de gekoppelde modus lichtjes hoger. Selecteer voor de instelling van de knop „JA“ of „NEE“ en bevestig de invoer met de toets .
17. Tijdsinstellingen
In het menu „Tijd / Datum“ kunnen er instellingen voor tijd en datum doorgevoerd worden. Daarbij staan volgende opties ter beschikking:
Hier kunnen tijd en datum handmatig ingesteld worden. Met de toets of op de afstandsbediening of de -controller. Met de toets , of worden de individuele cijferblokken geselecteerd en de waarden ook opgeslagen.
Hier kunt u vastleggen, uit welke bron tijdstip en datum een update dienen te ondergaan. Volgende opties staan ter beschikking:
Update van DAB: Tijd en datum worden via DAB geupdated.
Update van FM: Tijd en datum worden via FM geupdated.
Update van Netwerk: Tijd en datum worden door het netwerk geupdated.
Geen update: Tijd en datum moeten handmatig ingesteld worden.
De op het gegeven moment geselecteerde optie is met „*“ aangegeven.
In dit menu kunt u vastleggen, of de weergave van de klok in het 12- of 24-uur formaat dient te gebeuren. Selecteren met de toets of , de bevestiging vindt plaats met de toets . De op het gegeven moment geselecteerde optie is met „*“ aangegeven.
18. Taal
In het menu „Taal“ kunt u de menutaal van de radio vastleggen. Indien u het apparaat met de Instellingsassistent in gebruik genomen hebt, werd daarin reeds de taal van het apparaat ingesteld. Gelieve, om een taal te selecteren, de toets of te selecteren en deze te bevestigen door het indrukken van de toets . Alternatief kan de selectie ook met de regelaar uitgevoerd worden.
Volgende talen staan ter beschikking:
Deens, Duits, Engels, Fins, Frans, Italiaans, Nederlands, Noors, Pools, Portugees, Zweeds, Spaans, Turks
19. Fabrieksinstelling
Gelieve, om de radio terug in de toestand bij levering te brengen, „JA“ in het menu „Fabrieksinstellingen“ te kiezen. Let op: Alle voordien doorgevoerde instellingen worden gewist.
Bij de selectie van „NEE“ wordt het proces voortijdig beëindigd.
Opmerking: Breng de radio in ieder geval terug in de toestand bij levering, voordat u hem doorgeeft (bv. als u hem verkoopt, cadeau doet of weggooit).
20. Software-update
In dit menu kunt u nakijken, of er voor de radio een software-update ter beschikking staat. Wanneer u „Auto Update“ selecteert, controleert de radio automatisch regelmatig de beschikbaarheid van nieuwe software-updates.
Kies het menupunt „Nu controleren“ om naar een nieuwe versie te zoeken. Wordt er een nieuwere software gevonden, gelieve dan „JA“ te selecteren om deze te installeren of „NEE“ om de update voortijdig te beëindigen. Bij „JA“ start de radio opnieuw om het proces uit te voeren.
Daarna wordt de software gedownload en u wordt dan met „Proceed“ gevraagd, of de update uitgevoerd dient te worden. Gelieve „YES“ bij toestemming of „NO“ te kiezen om de update voortijdig te beëindigen. Beurtelings knippert „Waarschuwing: do not remove power“ en de te installeren softwareversie. Is het proces voltooid, dan staat „Update completed“ op het display en kunt u het proces met de toets bevestigen.
Het versienummer van de ged'installeerde software kunt u in het menu „Systeeminstellingen“ onder het punt „Info“ opvragen.
Let op!
Let erop dat er een stabiele stroomvoorziening is voordat u een software-update start.
Een onderbreking tijdens een update kan onherstelbare schade aan de radio veroorzaken!
21. Installatiewizard
In het menu „Installatiewizard“ kunt u de instellingsassistent opnieuw starten. Ga daarvoor te werk zoals onder het punt „3.8 Start van de instellingsassistent“ beschreven.
In dit menu vindt u onder andere het versienummer van de actuele firmware. Houd deze ter beschikking indien u met de klantenservice contact wenst op te nemen.
23. Privacybeleid
Gelieve de daar vermelde gegevensbeschermingsbepalingen te lezen of deze website op te roepen: www.frontiersmart.com/privacy
24. Achtergrondverlichting
De displayverlichting kan in 3 helderheidstrappen geprogrammeerd worden. Volgende instellingen kunnen in het menu „Achtergrondverlichting“ doorgevoerd worden:
„Time-Out“: Tijd, tot wanneer het display tot op de verlichtingstrap in de „Dim-instelling“ geregeld wordt.
Keuzemogelijkheden: „Aan / 10 / 20 / 30 / 45 / 60 / 90 / 120 / 180 seconden“
„Aan“ betekent dat de radio altijd in de helderheidstrap van de „Op niveau“ blijft.
„Op niveau“: Helderheid van het display wanneer de radio ingeschakeld wordt.
Keuzemogelijkheden: „Hoog“ / „Medium“ / „Laag“
„Dim Niveau“: Helderheidsinstelling voor werking en stand-by.
Keuzemogelijkheden: „Medium“ / „Laag“ / „Nacht“ / “Uit“
25. UNDOK – besturing van de radio via app
De door Frontier Silicon ontwikkelde UNDOK-applicatie (app) zorgt ervoor dat de volledige controle van radio's en luidsprekers op uw smartphone krijgt.
Bij de eerste instelling van het apparaat, bij de configuraties van Equalizer of bij het beheer van uw favoriete zenders – het maakt niet uit: UNDOK biedt u alle features op de smartphone of het tablet en biedt u daardoor nog meer comfort. Download de UNDOK-app in de Google Play Store of in de Apple App Store.
Eerste instelling van het apparaat met UNDOK
Wanneer er voor het eerst ingeschakeld wordt of nadat de radio op fabrieksinstellingen gezet werd, staat de radio in de SETUP-modus en wordt er een zogenaamd Micro-Access-Point (van een eigen WLAN-net) geproduceerd. Daardoor kan uw smartphone of tablet met de radio verbonden worden.
Instellen met Android
Vergewis u ervan dat de radio zich in de SETUP-modus bevindt. Open de UNDOK-APP op uw smartphone of tablet en kies daar het menupunt „Audiosysteem instellen“.
Druk op „VERDER“ en selecteer het menupunt „KIES HET TOEGANGSPUNT“.
Het WLAN-menu van het eindapparaat gaat open, selecteer daar het netwerk „M-9000S“. Na de verbinding staat „Verbonden met M-9000S“ in de app. Volg de verdere aanwijzingen van de app voor een complete instelling van de radio. Tot slot wordt de radio met het netwerk verbonden en kunt u door het indrukken van „Mijn audiosysteem gebruiken“ het apparaat nu met de UNDOK-APP bedienen.
Instellen met iOS
Vergewis u ervan dat de radio zich in de SETUP-modus bevindt. Open de UNDOK-APP op uw iPhone of iPad en kies daar het menupunt „Audiosysteem instellen“.
Druk op „VERDER“ en selecteer het menupunt „KIES HET TOEGANGSPUNT“.
Het WLAN-menu van het eindapparaat gaat open, selecteer daar het netwerk „M-9000S“. Na de verbinding staat „Verbonden met M-9000S“ in de app. Volg de verdere aanwijzingen van de app voor een complete instelling van de radio. Tot slot wordt de radio met het netwerk verbonden en kunt u door het indrukken van „Mijn audiosysteem gebruiken“ het apparaat nu met de UNDOK-APP bedienen.
26. Oplossing van storingen
Gelieve bij functiestoringen de volgende punten te controleren:
Geen klank
→ Steek de stekkernetvoeding naar behoren in.
Het systeem reageert niet op het indrukken van een toets
→ Trek de stekkernetvoeding af en sluit deze weer aan.
Problemen bij de radio-ontvangst
→ Positioneer de antenne opnieuw.
Er kan geen netwerkverbinding tot stand gebracht worden
→ Controleer de WLAN-functie, vergewis u ervan dat het wachtwoord correct is.
27. Onderhoud en zorg
Reinigen van de behuizing
Gebruik een met een mild reinigingsmiddel lichtjes bevochtigde doek. Gebruik geen reinigingsmiddelen die alcohol, ammoniak of schuurmiddel bevatten.
Waarschuwingsinstructies betreffende de vorming van condensatie
Condensatie (dauw) kan binnenin het apparaat tot ontwikkeling komen als er tussen de temperatuur van het apparaat en de omgevingstemperatuur een wezenlijk verschil bestaat. Indien er zich binnenin het apparaat consensatie voordoet, is een perfecte werking niet meer gegarandeerd. In dit geval moet er enkele uren lang gewacht worden; nadat de vochtigheid gedroogd is, kan het apparaat weer gebruikt worden
In volgende omstandigheden moet men uiterst voorzichtig te werk gaan
Wanneer het apparaat verplaatst wordt van de ene naar de andere plaats, waar er een beduidend hogere of lagere temperatuur heerst, of wanneer de luchtvochtigheid op de plaats van opstelling van het apparaat toeneemt, enz.
Hantering van CD's
Houd de CD zodanig vast, dat u het signaaloppervlak niet aanraakt. (De onbedrukte zijde is de afspeelzijde.)
Gebruik uitsluitend CD's met de disc marking. Een CD zonder deze marking kan soms niet naar behoren weergegeven worden.
Wetenswaardigheden over USB-apparaten
Aanwijzingen voor het gebruik van een USB-apparaat
Dit apparaat is in staat om op een flashgeheugen of op een digitale Audio-Player opgeslagen audiobestanden weer te geven als deze apparaten over een USB-poort beschikken (in dit document worden deze apparaten als USB-apparaten bestempeld).
Met betrekking tot de bruikbare USB-apparaten gelden volgende beperkingen:
Bruikbare USB-apparaten
USB-apparaten die tot de USB-massageheugenklasse behoren.
USB-apparaten, wier maximale stroomopname hoogstens 500 mA bedraagt.
USB-massageheugenklasse: USB-apparaten die de PC als extern geheugen detecteert zonder dat er speciale driver of zonder dat er speciale toepassingssoftware noodzakelijk zou zijn.
Gelieve uw dealer te raadplegen als u er niet zeker van bent, of uw USB-apparaat met de specificaties voor de USB-massageheugenklasse overeenstemt.
Het gebruik van een USB-apparaat dat niet ondersteund wordt, kan tot een verkeerde weergave of indicatie van het audio-bestand leiden.
Zelfs als u een USB-apparaat gebruikt dat aan de hoger vermelde specificaties voldoet, kunnen audiobestanden, afhankelijk van type of toestand van het USB-apparaat soms niet perfect weergegeven worden.
28. Afvalverwerwijdering
Afvoer van gebruikte elektrische en elektronische apparaten en batterijen.
Het symbool (doorgestreepte vuilnisbak) op het product of op de verpakking daarvan wijst erop dat dit product niet als normaal huishoudelijk afval behandeld mag worden, maar op een recyclingpunt voor de recycling van elektrische en elektronische apparaten en batterijen afgegeven moet worden Door uw bijdrage aan een correcte afvoer van dit product beschermt u het milieu en de gezondheid van uw medemens. Een onvakkundige of verkeerde afvoer brengt milieu en gezondheid in gevaar. Bijkomende informatie over de recycling van dit product krijgt u van uw gemeente of van de gemeentelijke afvalverwerkende bedrijven. Let op: Het teken „Pb“ onder het symbool voor batterijen geeft aan dat deze batterij lood bevat.
De eindgebruiker is er zelf verantwoordelijk voor, gegevens op het oude apparaat via het menupunt „Fabrieksinstelling“ te wissen voordat het weggegooid wordt (zie hoofdstuk 18).
Het Bluetooth ^® woordmerk en logo's zijn geregistreerde merken van Bluetooth SIG Inc. en elk gebruik van deze merken door de firma JVCKENWOOD Corporation Vindt plaats onder licentie. Andere merken en handelsnamen zijn die van hun betreffende houders.
Technische gegevens M-9000S
Spanningsvoorziening Wisselspanning 100 – 240 V Ingangswisselstroomfrequentie 50/60 Hz Elektriciteitsverbruik 40 watt Elektriciteitsverbruik in stand-by 0,8 watt Elektriciteitsverbruik in netwerkgebonden stand-by 0,8 watt Tuner UKW/DAB+ DAB-afstembereik BAND III 174,928 MHz – 239,200 MHz FM-afstembereik 87,50 MHz – 108,00 MHz CD-modus Signaal-ruisverhouding (A-filter) ≥ 65 dB Dynamiekomvang ≥ 60 dB Netwerkverbinding (WLAN) Ondersteunde netwerken WIFI IEEE 802.11a/b/g/n Ondersteunde frequentiegebieden WiFi : 2.412 - 2.472 GHz, 5.18 - 5.32 GHz, 5.50 - 5.70GHz, 5.745 – 5.825GHz Maximaal zendvermogen WIFI 2.4 G: 13,6 dBm / WIFI 5G: 13,6 dBmWIFI 5.8G: 13,6 dBm Ondersteunde versleutelingen WEP, WPA, WPA2 (PSK), WPS Ondersteunde streamingformaten MP3, AAC/AAC+ (maximaal 48 kHz, 16 bit) USB-apparaten Afspeelbare bestanden: MP3Compatibel met USB1.1 Full-Speed, FAT16, FAT32Max. 500 mA, Bitsnelheden: 32 kBit/s tot 320 kBit/s BLUETOOTH BLUETOOTH versie V4.2 Vermogensklasse Klasse 1 Maximaal zendvermogen 4,3 dBm Reikwijdte ca. 10 meter (kan afhankelijk van omgeving afwijken) Frequentiegebied 2,402 GHz – 2,480 GHz BLUETOOTH profiel A2DP (Advanced Audio Distribution Profile, AVRCP (Audio/Video Remote Control Profile) Line-In 3,5 mm stekkerbus Versterkergedeelte Uitgangsvermogen 2 x 50 Watt / 6 Ohm Frequentiegebied 60 Hz - 20 kHz Afmetingen en gewichten Hoofdeenheid (B x H x D) 260 x 115 x 260 mm / 2,0 kg Luidsprekers (B x H x D) 173 x 263 x 240 mm / 2,4 kg per st.. Temperatuurbereik 0°C tot 35°C
30. Garantie
Beste klant,
Wij willen u danken voor de aanschaf van dit KENWOOD-product. Als dit product defecten vertoont in materiaal of vakmanschap onder normale omstandigheden, zullen wij in overeenstemming met de bepalingen van de volgende garantie, deze defecten gratis herstellen of het apparaat vervangen.
Bewaar deze garantiekaart op een veilige plaats.
Kenwood geeft een garantie van twee jaar op dit apparaat vanaf de datum van aankoop volgens de factuur of aankoopbon van de Kenwood-dealer.
Deze garantie dekt gebreken in materiaal of vakmanschap. Wij behouden ons het recht voor het product te vervangen als economisch herstel niet langer mogelijk is. Kosten voor verpakking en installatie en risico's verbonden aan de feitelijke reparatie zijn niet inbegrepen in de garantiebepalingen en zullen worden gefactureerd.
Voorwaarden
A. Naast de overhandiging van deze garantiekaart zijn de volgende gegevens noodzakelijk om een claim in te dienen:
(a) Uw naam met volledig adres
Kenwood behoudt zich het recht voor de garantiedekking te weigeren als de bovengenoemde informatie ontbreekt of als er wijzigingen zijn aangebracht aan het product na de oorspronkelijke aankoop.
B. Op het moment van levering van dit product aan de winkel voldeed dit product aan alle normen en veiligheidsvoorschriften die van toepassing zijn in het land van bestemming. Aanpassingen vereist voor bediening van dit apparaat in landen buiten het land van bestemming vallen niet onder de bovengenoemde garantiebepalingen. Bovendien accepteren wij geen aansprakelijkheid voor werkzaamheden met of voor schade aan het product die ontstaat als gevolg van dergelijke werkzaamheden.
Als het product wordt gebruikt in een land waarvoor het niet is ontworpen en geproduceerd, dan worden garantiewerkzaamheden alleen uitgevoerd als de kosten voor het omzetten van het apparaat naar de nationaal geldende normen en veiligheidsvoorschriften door de gebruiker worden gedragen.
Bovendien als het product van verschilt van de producten die worden geleverd door de officiële importeur en als er geen vervangende onderdelen beschikbaar zijn voor het repareren van dit apparaat, moet de gebruiker de kosten voor het transport van het apparaat naar en van het land van aankoop dragen.
Hetzelfde geldt als er geen garantiedekking kan worden aangeboden in het land in kwestie als gevolg van andere, gerechtvaardigde redenen.
C. Uitzonderingen op garantiedekking:
(a) Wijzigingen in het product, alsmede de normale onderhouds- en aanpassingswerkzaamheden, met inbegrip van de regelmatige controles vermeld in de gebruiksaanwijzing.
Deze garantie kan worden aangeroepen door iedereen die het product legaal heeft gekocht.
Overeenkomstig de bovengenoemde garantiebepalingen zal het product worden gerepareerd of kosteloos vervangen. Dit recht beperkt geenszins de andere rechten die de gebruiker heeft in het kader van de toepasselijke wettelijke bepalingen.
Reparatie of vervanging heeft geen invloed op eventuele verlenging van de garantieperiode.
Verdere vorderingen worden uitgesloten, met name vorderingen voor orderannulering, prijsvermindering of voor vergoeding van schade.
Contactadres:
JVCKENWOOD Europe B.V.
Amsterdamseweg 37, 1422AC - Uithoorn
Tel. 0297-519 900, www.kenwood.nl
KENWOOD