
SLM190 - Accessoire voor projector Chief - Gratis gebruiksaanwijzing en handleiding
Vind de handleiding van het apparaat gratis SLM190 Chief in PDF-formaat.


| Producttype | Projectorbeugel |
| Model | SLM190 |
| Merk | Chief |
| Categorie | Accessoire voor projector |
| Draagvermogen | Maximaal 45 kg |
| VESA compatibiliteit | Tot 600x400 mm |
| Materiaal | Staal met poedercoating |
| Kleur | Zwart |
| Verstelbaarheid | Kantelen, draaien, nivelleren |
| Kantelhoek | +15° / -15° |
| Draaibereik | 360° |
| Nivellering | ±5° |
| Afmetingen (BxHxD) | 380 x 280 x 110 mm |
| Gewicht | 3,5 kg |
| Montage | Aan plafond of muur |
| Inclusief bevestigingsmateriaal | Ja |
| Garantie | 5 jaar |
| Onderhoud | Afnemen met droge doek |
| Veiligheid | Voldoet aan UL 2442 |
Veelgestelde vragen - SLM190 Chief
Gebruikersvragen over SLM190 Chief
0 vraag over dit apparaat. Beantwoord die u kent of stel uw eigen vraag.
Stel een nieuwe vraag over dit apparaat
Download de handleiding voor uw Accessoire voor projector in PDF-formaat gratis! Vind uw handleiding SLM190 - Chief en neem uw elektronisch apparaat weer in handen. Op deze pagina staan alle documenten die nodig zijn voor het gebruik van uw apparaat. SLM190 van het merk Chief.
GEBRUIKSAANWIJZING SLM190 Chief
INSTALLATION INSTRUCTIONS
SSB-190, SSM-190, SLB-190 and SLM-190 Interface Brackets
SSB-190, SSM-190, SLB-190 and SLM-190 Interface Brackets are designed for use with Chief® Series Projector Mounts. See the specific installation instructions provided with the mount for additional installation information.
Unpack carton and verify kit contents. If any listed parts are missing, immediately contact a Chief Customer Service representative.

WARNING: IMPROPER INSTALLATION CAN LEAD TO EQUIPMENT FALLING CAUSING SERIOUS PERSONAL INJURY AND DAMAGE TO EQUIPMENT! DO NOT substitute hardware. Use only hardware supplied by manufacturer!
(1) Interface Bracket (1) Screw, Button Head Cap, 1/4-20 x 5/8"
(4) 10-24 Thumb Nuts ** (2) Washer, Flat, 1/4"
(1) All-Points Security Kit (1) Spacer, Nylon, .320 x 1/2" x 1/4"
(4) Pad, Felt

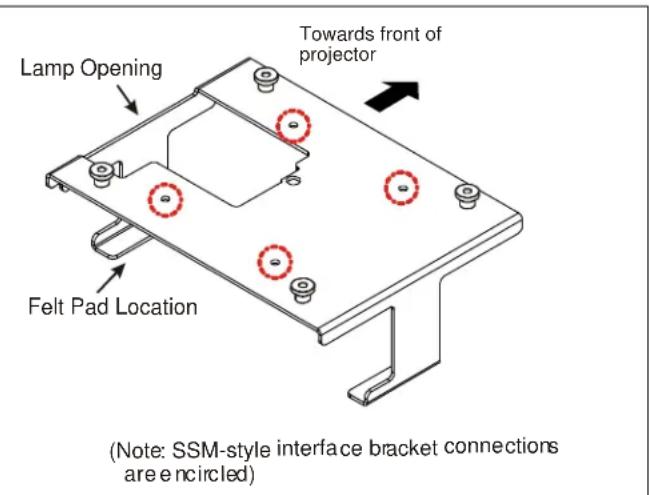
**Only used when installing SLB/SSB interface brackets.
NOTE: Specific to SSB-style and SSM-style interface bracket installation, all appropriate screws come pre-installed as reflected in the encircled locations above. DO NOT attempt to substitute and USE ONLY this pre-installed hardware for SSB-style and SSM-style interface bracket installation.
Installation Instructions

WARNING: OVER TIGHTENING OF SCREWS CAN DAMAGE PARTS AND CAN LEAD TO SERIOUS PERSONAL INJURY AND DAMAGE TO EQUIPMENT! DO NOT over tighten screws when installing interface brackets.
NOTE: Step 1 is only required when installing an SLB/SSB interface bracket. If an SLM/SSM bracket is being installed, proceed to step 2.
- Screw thumb screws onto 10-24 x 5/8" Phillips pan head screws. DO NOT fully tighten thumb screws at this time.
- Turn projector upside down on a flat surface.
- Place the optional felt pads on the mount surface (as seen above) to protect projector paint.
- Slide the front of the projector through the rear or the mount forward and align the 1/4" mounting hole in the projector with the 1/4" mounting hole in the mount.
- Place the 1/4" nylon spacer on the lamp door of the projector and slide it in between the projector and the 1/4" mounting hole in the mount.
- Using the 1/4" - 20 x 5/8" long button head screw and 1/4" flat washer, place screw and washer through the bracket hole and nylon spacer, and secure all using 5/32" hex key. Tighten all fasteners at this time, securing the bracket to the projector.
NOTE: Security screws can be substituted when mounting interface bracket to projector by using the parts and installation instructions in the All-Points Security Kit.
Chief® is a registered trademark of Milestone AV Technologies. All rights reserved.

Milestone AV Technologies, and its affiliated corporations and subsidiaries (collectively, "Milestone"), intend to make this manual accurate and complete. However, Milestone makes no claim that the information contained herein covers all details, conditions or variations, nor does it provide for every possible contingency in connection with the installation or use of this product. The information contained in this document is subject to change without notice or obligation of any kind. Milestone makes no representation of warranty, expressed or implied, regarding the information contained herein. Milestone assumes no responsibility for accuracy, completeness or sufficiency of the information contained in this document.

CHIEF®
Our Mounts. Your Vision.
Chief Manufacturing, a products division of Milestone AV Technologies
8401 Eagle Creek Parkway, Savage, MN 55378
• P: 800.582.6480 / 952.894.6280 • F:877.894.6918 / 952.894.6918
8802-000259 Rev01
©2009 Milestone AV Technologies,
a Duchossois Group Company
05/09


Merk : Chief
Model : SLM190
Categorie : Accessoire voor projector