GIEI824470 - Šildymas GRUNDIG - Nemokama naudojimo instrukcija
Raskite įrenginio instrukciją nemokamai GIEI824470 GRUNDIG PDF formatu.

Naudotojų klausimai apie GIEI824470 GRUNDIG
0 klausimas apie šį prietaisą. Atsakykite į tas, kurias žinote, arba užduokite savo.
Užduokite naują klausimą apie šį prietaisą
Atsisiųskite instrukciją savo Šildymas PDF formatu nemokamai! Raskite savo instrukciją GIEI824470 - GRUNDIG ir vėl perimkite savo elektroninį įrenginį. Šiame puslapyje skelbiami visi dokumentai, reikalingi jūsų įrenginio naudojimui. GIEI824470 prekės ženklo GRUNDIG.
NAUDOJIMO INSTRUKCIJA GIEI824470 GRUNDIG
BUILT-IN HOB
USER MANUAL
GIEI 824470 X
natural_image
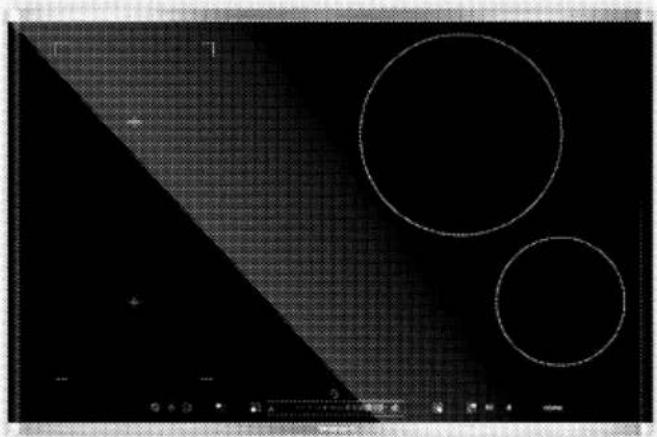
Abstract black-and-white geometric pattern with two large white circles and a diagonal dark rectangle (no text or symbols)Please read this user manual first!
Dear Customer,
Thank you for purchasing this Grundig product. We hope that you get the best results from your product which has been manufactured with high quality and state-of-the-art technology.
Therefore, please read this entire user manual and all other accompanying documents carefully before using the product and keep it as a reference for future use. If you handover the product to someone else, give the user manual as well. Follow all warnings and information in the user manual.
Remember that this user manual is also applicable for several other models. Differences between models will be identified in the manual.
Please visit the "Support" section on the Grundig website at www.grundig.co.uk to register your 5 year warranty.
Grundig Helpline
0845 603 1234
0345 603 1234
Explanation of symbols
Throughout this user manual the following symbols are used:

Important information or useful hints about usage.

Warning of hazardous situations with regard to life and property.

Warning of electric shock.
Warning of risk of fire.
Warning of hot surfaces.
CE
TABLE OF CONTENTS
1 Important instructions and warnings for safety and environment 4
General safety 4
Electrical safety....4
Product safety 5
Intended use 6
Safety for children 7
Disposing of the old product 7
Package information 7
2 General information 8
Overview 8
Technical specifications 8
3 Installation 9
Before installation....9
Installation and connection 10
Future Transportation 12
4 Preparation 13
Tips for saving energy....13
Initial use 13
First cleaning of the appliance....13
Initial heating 13
5 How to use the hob 14
General information about cooking ..... 14
Using the hobs....16
Control panel....17
6 Maintenance and care 26
General information....26
Cleaning the hob 26
7 Troubleshooting 27
8 Guarantee 28
9 Service 29
1 Important instructions and warnings for safety and environment
This section contains safety instructions that will help protect from risk of personal injury or property damage. Failure to follow these instructions shall void any warranty.
General safety
This appliance can be used by children aged from 8 years and above and persons with reduced physical, sensory or mental capabilities or lack of experience and knowledge if they have been given supervision or instruction concerning use of the appliance in a safe way and understand the hazards involved.
Children shall not play with the appliance. Cleaning and user maintenance shall not be made by children without supervision.
■ Installation and repair procedures must always be performed by Authorized Service Agents. The manufacturer shall not be held responsible for damages arising from procedures carried out by unauthorized
persons which may also void the warranty. Before installation, read the instructions carefully.
- Do not operate the product if it is defective or has any visible damage.
- Ensure that the product function knobs are switched off after every use.
Electrical safety
If the product has a failure, it should not be operated unless it is repaired by an Authorized Service Agent. There is the risk of electric shock!
Only connect the product to a grounded outlet/line with the voltage and protection as specified in the "Technical specifications". Have the grounding installation made by a qualified electrician while using the product with or without a transformer. Our company shall not be liable for any problems arising due to the product not being earthed in accordance with the local regulations.
■ Never wash the product by spreading or pouring water
onto it! There is the risk of electric shock!
- The product must be disconnected during installation, maintenance, cleaning and repairing procedures.
If the power connection cable for the product is damaged, it must be replaced by the manufacturer, its service agent or similarly qualified persons in order to avoid a hazard.
The appliance must be installed so that it can be completely disconnected from the mains supply. The separation must be provided by a switch built into the fixed electrical installation, according to construction regulations.
- Any work on electrical equipment and systems should only be carried out by authorized and qualified persons.
In case of any damage, switch off the product and disconnect it from the mains. To do this, turn off the fuse at home.
■ Make sure that fuse rating is compatible with the product.
Product safety
The appliance and its accessible parts become hot during use. Care should be taken to avoid touching heating elements. Children less than 8 years of age shall be kept away unless continuously supervised.
- Never use the product when your judgment or coordination is impaired by the use of alcohol and/or drugs.
- Be careful when using alcoholic drinks in your dishes. Alcohol evaporates at high temperatures and may cause fire since it can ignite when it comes into contact with hot surfaces.
- Do not place any flammable materials close to the product as the sides may become hot during use.
- Keep all ventilation slots clear of obstructions.
- Do not use steam cleaners to clean the appliance as this may cause an electric shock.
■ Unattended cooking on a hob with fat or oil can be dangerous and may result in fire. NEVER try to extinguish a fire with water, but switch off
the appliance and then cover flame e.g. with a lid or a fire blanket.
■ Danger of fire: Do not store items on the cooking surfaces.
If the surface is cracked, switch off the appliance to avoid the possibility of electric shock.
■ After use, switch off the hob element by its control and do not rely on the pan detector.
■ Metallic objects such as knives, forks, spoons and lids should not be placed on the hob surface since they can get hot.
■ The appliance is not intended to be operated by means of an external timer or separate remote-control system.
- Vapour pressure that build up due to the moisture on the hob surface or at the bottom of the pot can cause the pot to move. Therefore, make sure that the oven surface and bottom of the pots are always dry.
Hotplates are equipped with "Induction" technology. Your induction hob that provides both time and money savings must be used with pots suitable for induction cooking; otherwise hotplates will not operate. See.General
information about cooking, page 14, selecting the pots.
As induction hobs create a magnetic field, they may cause harmful impacts for people who use devices such as insulin pump or pacemaker.
- Use only hob guards designed by the manufacturer of the cooking appliance or indicated by the manufacturer of the appliance in the instructions for use as suitable or hob guards incorporated in the appliance. The use of inappropriate guards can cause accidents.
Prevention against possible fire risk!
- Ensure all electrical connections are secure and tight to prevent risk of arcing.
* Do not use damaged cables or extension cables.
■ Ensure liquid or moisture is not accessible to the electrical connection point.
Intended use
This product is designed for domestic use. Commercial use will void the guarantee.
This appliance is for cooking purposes only. It must not be
used for other purposes, for example room heating.
- The manufacturer shall not be liable for any damage caused by improper use or handling errors.
Safety for children
■ Accessible parts may become hot during use. Young children should be kept away.
The packaging materials will be dangerous for children. Keep the packaging materials away from children. Please dispose of all parts of the packaging according to environmental standards.
■ Electrical products are dangerous to children. Keep children away from the product when it is operating and do not allow them to play with the product.
- Do not place any items above the appliance that children may reach for.
Disposing of the old product Compliance with the WEEE Directive and Disposing of the Waste Product:

This product complies with EU WEEE Directive (2012/19/EU). This product bears a classification symbol for waste electrical and electronic equipment (WEEE). This product has been manufactured with high quality parts and materials which can be reused and are suitable for recycling. Do not dispose of the waste product with normal domestic and other wastes at the end of its service life. Take it to the collection center for the recycling of electrical and electronic equipment. Please consult your local authorities to learn about these collection centers.
Compliance with RoHS Directive:
The product you have purchased complies with EU RoHS Directive (2011/65/EU). It does not contain harmful and prohibited materials specified in the Directive.
Package information
Packaging materials of the product are manufactured from recyclable materials in accordance with our National Environment Regulations. Do not dispose of the packaging materials together with the domestic or other wastes. Take them to the packaging material collection points designated by the local authorities.
2 General information
Overview

text_image
1 2 4 3 2 51 induction cooking plate
2 Assembly clamp
3 Vitroceramic surface
4 Base cover
5 Induction cooking plate
Technical specifications
| Voltage / frequency | 1N ~ 220.240 V/ 2N ~ 380.415 V ~ 50 Hz |
| Total power consumption | max. 7200 W |
| Fuse | min. 32 A/16 A x 2 |
| Cable type / section | H05RR-F 5 x 1.5 mm2 or equivalent |
| Cable length | max. 2 m |
| External dimensions (height / width / depth) | 55 mm/770 mm/510 mm |
| Installation dimensions (width / depth) | 750 mm/490 mm |
| Burners | |
| Rear left | Induction cooking plate |
| Dimension | 180 mm |
| Power | 1800/2500 W |
| Front left | Induction cooking plate |
| Dimension | 180 mm |
| Power | 1800/2500 W |
| Front right | Induction cooking plate |
| Dimension | 145mm |
| Power | 1400/1800 W |
| Rear right | Induction cooking plate |
| Dimension | 240 mm |
| Power | 2200/3200 W |

Technical specifications may be changed without prior notice to improve the quality of the product.

Figures in this manual are schematic and may not exactly match your product.

Values stated on the product labels or in the documentation accompanying it are obtained in laboratory conditions in accordance with relevant standards. Depending on operational and environmental conditions of the product, these values may vary.
3 Installation
Product must be installed by a qualified person in accordance with the regulations in force. The manufacturer shall not be held responsible for damages arising from procedures carried out by unauthorized persons which may also void the warranty.
 | Preparation of location and electrical installation for the product is under installer's responsibility. |
 | DANGER:The product must be installed in accordance with all local electrical regulations. |
 | DANGER:Prior to installation, visually check if the product has any defects on it. If so, do not have it installed.Damaged products cause risks for your safety. |
text_image
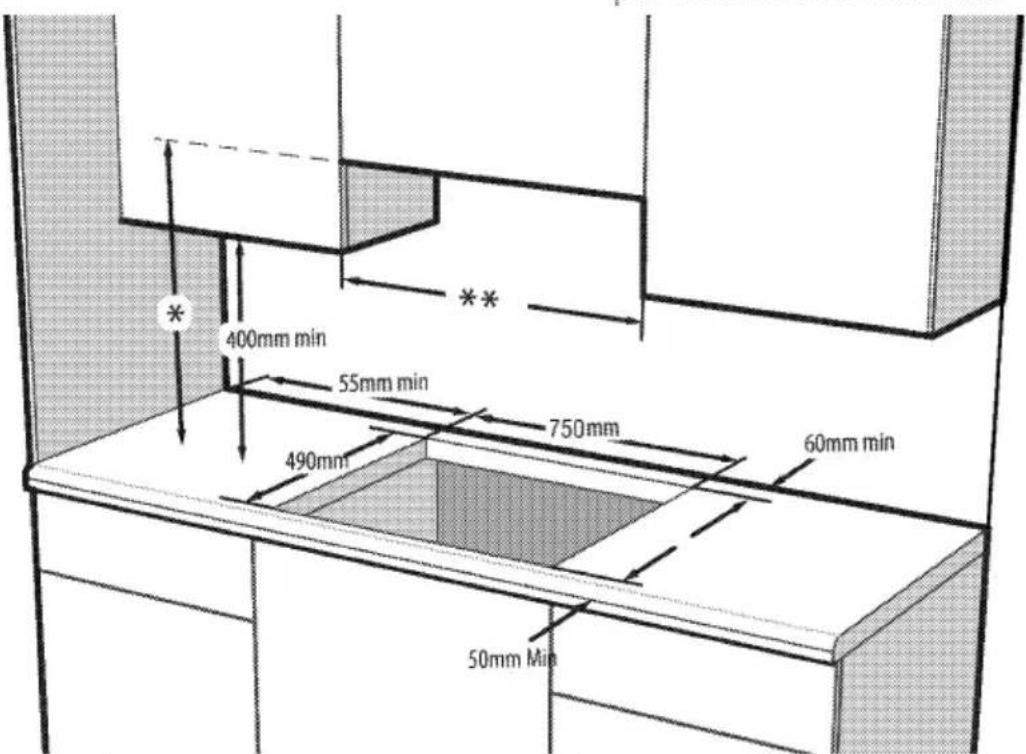
400mm min 55mm min 750mm 60mm min 490mm 50mm Min* Minimum height to extractor as recommend in extractor instruction manual
Before installation
The hob is designed for installation into commercially available work tops. A safety distance must be left between the appliance and the kitchen walls and furniture. See figure (values in mm).
It can also be used in a free standing position. Allow a minimum distance of 650 mm above the hob surface.
(*) If a cooker hood is to be installed above the cooker, refer to cooker hood manufacturer' instructions regarding installation height (min 650 mm)
* Remove packaging materials and transport locks.
* Surfaces, synthetic laminates and adhesives used must be heat resistant (100 °C minimum).
The worktop must be aligned and fixed horizontally.
- Cut aperture for the hob in worktop as per installation dimensions.
Minimum distance between cabinetry must be equal to width of hob
Installation and connection
* Product can only be installed and connected in accordance with the statutory installation rules.
Do not install the hob on places with sharp edges or corners. There is the risk of breaking for glass ceramic surface!
Electrical connection
Connect the product to a grounded outlet/line protected by a fuse of suitable capacity as stated in the "Technical specifications" table. Have the grounding installation made by a qualified electrician while using the product with or without a transformer. Our company shall not be liable for any damages that will arise due to using the product without a grounding installation in accordance with the local regulations.
DANGER:
The product must be connected to the mains supply only by an authorised and qualified person. The product's warranty period starts only after correct installation. Manufacturer shall not be held responsible for damages arising from procedures carried out by unauthorised persons.

DANGER:
The power cable must not be clamped, bent or trapped or come into contact with hot parts of the product. A damaged power cable must be replaced by a qualified electrician. Otherwise, there is risk of electric shock short circuit or fire!
■ Connection must comply with national regulations.
The mains supply data must correspond to the data specified on the type label of the product. Type label is at the rear housing of the product.
* Power cable of your product must comply with the values in "Technical specifications" table.

DANGER:
Before starting any work on the electrical installation, disconnect the product from the mains supply. There is the risk of electric shock!
Connecting the power cable
- This product must only be connected by a qualified electrician such as a technician from the local electricity company or NICEIC registered contractor to a suitable double-pole control unit with a minimum contact clearance of 3 mm in all poles. This control unit must be installed accordance with the IEE regulation. Failure to obey this instruction may cause operational problems and invalidate the product warranty.
Additional protection by a residual current circuit breaker is recommended.
If a cable is supplied with the product:

text_image
L1 L2 N2N AC 380-415 V

natural_image
Diagram of a three-pin electrical connector with labeled pins L and N (no text or symbols beyond labels)1N AC 220-240 V
- For single-phase connection, connect the wires as identified below:
Brown/Black cable = L (Phase)
* Blue/Grey cable = N (Neutral)
Green/yellow cable = (E) ≡ (Ground)
- For double-phase connection, connect the wires as identified below:
* Brown cable = L1 (Phase 1)
- Black cable = L2 (Phase 2)
* Blue/Grey cable = N (Neutral)
* Green/yellow cable = (E) 1= (Ground)
» or
- Black cable = L1 (Phase 1)
* Grey cable = L2 (Phase 2)
Blue/Brown cable = N (Neutral)
* Green/yellow cable = (E) 1= (Ground)
Installing the product
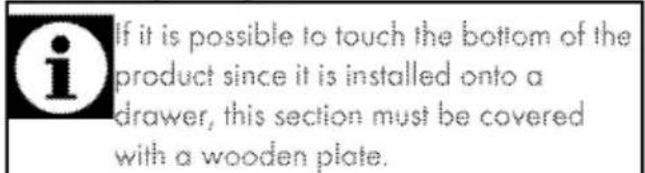
text_image
If it is possible to touch the bottom of the product since it is installed onto a drawer, this section must be covered with a wooden plate.
natural_image
Pure mechanical diagram showing a beam supported by two vertical supports with a central load and dimension label '1' (no text or symbols beyond basic geometry)1 min. 55 mm

text_image
When installing the hob onto a cabinet, a shelf must be installed in order to separate the cabinet from the hob as illustrated in the above figure. This is not required when installing onto a built-in oven.If the oven is below:

text_image
20 mm 7 mm min.min.
It is required to leave a ventilation opening of minimum 180 cm ^2 at the rear section of the furniture as illustrated in the following figure.

text_image
Technical diagram showing a cross-sectional view with labeled components and directional arrows, likely illustrating a mechanical or structural assembly.* min. 55 mm
If the board is below:
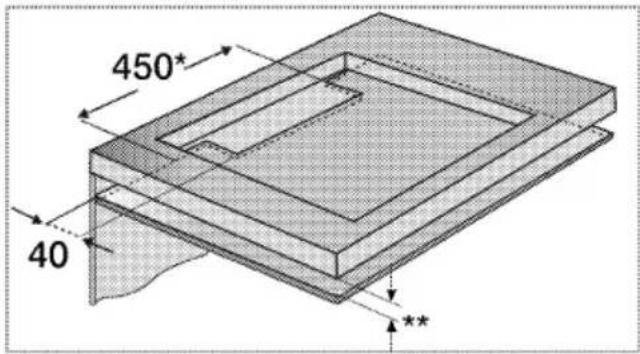
text_image
450* 40 *** min. ** min. 55 mm
During installation of your induction hob, place the product parallel to the installation surface. Also, apply sealing gasket to the parts of the hob contacting the counter as described below in order to prevent any liquid from penetrating between the product and the counter.
- Prepare the surface of the counter as shown in the figure.
- Apply the sealing gasket provided with the product to the edges of the hob's lower housing that contact with the counter as illustrated in figure.

natural_image
Two-panel image showing a person interacting with a laptop and a device panel (no visible text or symbols)-
Center the product in the counter.
-
Using the installation clamps secure the hob by fitting through the holes on the lower casing.
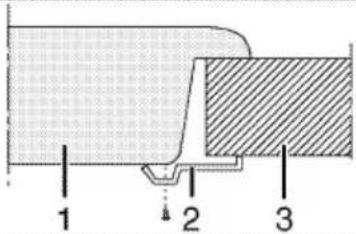
text_image
1 2 31 Hob
2 Installation clamp
3 Counter
» Rear view (connection holes)
natural_image
Top-down view of a grid-patterned surface with scattered white symbols and directional arrows, no readable text or labels.
Making connections to different holes is not a good practice in terms of safety since it can damage the gas and electrical system.
Final check
- Connect the power cable and switch on the product's fuse.
- Check the functions.
Future Transportation
- Keep the product's original carton and transport the product in it. Follow the instructions on the carton. If you do not have the original carton, pack the product in bubble wrap or thick cardboard and tape it securely.

Check the general appearance of your product for any damages that might have occurred during transportation.
4 Preparation
Tips for saving energy
The following information will help you to use your appliance in an ecological way, and to save energy:
* Defrost frozen dishes before cooking them.
* Use pots/pans with cover for cooking. If there is no cover, energy consumption may increase 4 times.
* Select the cooking zone which is suitable for the bottom size of the pot to be used. Always select the correct pot size for your dishes. Larger pots require more energy.
* Use flat bottom pots when cooking with electric hobs.
* Pots with thick bottom will provide a better heat conduction. You can obtain energy savings up to 1/3.
- Vessels and pots must be compatible with the cooking zones. Bottom of the vessels or pots must not be smaller than the hotplate.
* Keep the cooking zones and bottom of the pots clean. Dirt will decrease the
heat conduction between the cooking zone and bottom of the pot.
Initial use
First cleaning of the appliance

The surface might get damaged by some detergents or cleaning materials. Do not use aggressive detergents, cleaning powders/creams or any sharp objects during cleaning. Do not use harsh abrasive cleaners or sharp metal scrapers to clean the oven door glass since they can scratch the surface, which may result in shattering of the glass.
- Remove all packaging materials.
- Wipe the surfaces of the appliance with a damp cloth or sponge and dry with a cloth.
Initial heating

Smoke and smell may emit for a couple of hours during the initial operation. This is quite normal. Ensure that the room is well ventilated to remove the smoke and smell. Avoid directly inhaling the smoke and the smell that emits.
5 How to use the hob
General information about cooking

Never fill the pan with oil more than one third of it. Do not leave the hob unattended when heating oil. Overheated oils bring risk of fire.
Never attempt to extinguish a possible fire with water!
When oil catches fire, cover it with a fire blanket or damp cloth. Turn off the hob if it is safe to do so and call the fire department.
Before frying foods, always dry them well and gently place into the hot oil. Ensure complete thawing of frozen foods before frying.
* Do not cover the vessel you use when heating oil.
- Place the pans and saucepans in a manner so that their handles are not over the hob to prevent heating of the handles. Do not place unbalanced and easily tilting vessels on the hob.
Do not place empty vessels and saucepans on cooking zones that are switched on. They might get damaged.
- Operating a cooking zone without a vessel or saucepan on it will cause damage to the product. Turn off the cooking zones after the cooking is complete.
As the surface of the product can be hot, do not put plastic and aluminum vessels on it.
* Clean any melted such materials on the surface immediately.
* Such vessels should not be used to keep foods either.
- Use flat bottomed saucepans or vessels only.
- Put appropriate amount of food in saucepans and pans. Thus, you will not have to make any unnecessary cleaning
by preventing the dishes from overflowing.
* Do not put covers of saucepans or pans on cooking zones.
- Place the saucepans in a manner so that they are centered on the cooking zone. When you want to move the saucepan onto another cooking zone, lift and place it onto the cooking zone you want instead of sliding it.
Saucepan selection
* Glass ceramic surface is heatproof and is not affected by big temperature differences.
Do not use the glass ceramic surface as a place of storage or as a cutting board.
* Use only the saucepans and pans with machined bottoms. Sharp edges create scratches on the surface.

natural_image
Simple line drawing of a fire with smoke rising above a structure and crossed out by a black X (no text or symbols)Spills may damage the glass ceramic surface and cause fire.
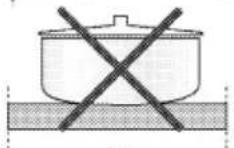
Do not use vessels with concave or convex bottoms.

Use only the saucepans and pans with flat bottoms. They ensure easier heat transfer.
For induction hobs, use only vessels suitable for induction cooking.
Saucepan test
Use following methods to test whether your saucepan is compatible with the induction hob or not.
- Your saucepan is compatible if its bottom holds a magnet.
- Your saucepan is compatible if "L" symbol does not flash when you place your saucepan on a cooking zone.
Only ferromagnetic pans can be used for induction cooking
Ferromagnetic materials include:
- Enameled steel
Cast iron - Stainless steel designed for induction cooking
Non-ferromagnetic materials include:
These types of pans will not work with induction cooking.
Stainless steel
Glass
Ceramic
* Copper or aluminum pans
| Some saucepans have a smaller ferromagnetic area than the real diameter of the saucepans. Only this area will be heated up by the induction zone, therefore the cooking performance may be reduced. These pan types cannot be detected by bigger induction zones. The diameter of pan's ferromagnetic area should match the size of the cooking zone. If the pan is not detected by the cooking zone, try it on the next smaller cooking zone. |
| Some vessels have a base which includes non-ferromagnetic materials such as aluminum. These types of vessels cannot be detected by the induction zone. |
You can use steel, teflon or aluminium saucepans with special magnetic bottom that contains labels or warnings indicating that the saucepan is compatible with induction cooking. Glass and ceramic vessels, pots and the stainless steel vessels with non-magnetic aluminium bottom should not be used.
Saucepan recognition-focusing system
In induction cooking, only the area covered by the vessel on the relevant cooking zone is energised. The vessel's bottom is recognised by the system and only this area is heated automatically. Cooking stops if the cooking vessel is lifted from the cooking zone during cooking. Selected cooking zone and "L" symbol flashes alternately.
Safe use
Do not select high heating levels when you will use a non-sticking (teflon) saucepan with no oil or with very little oil.
Do not put metal items such as forks, knives or saucepan covers onto your hob since they can get heated.
Never use aluminium foil for cooking. Never place food items wrapped with aluminium foil onto the cooking zone.
text_image
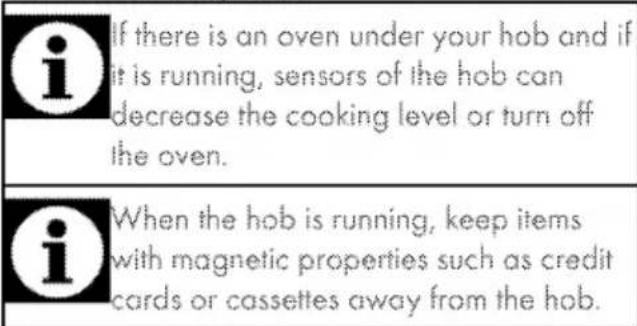
If there is an oven under your hob and if it is running, sensors of the hob can decrease the cooking level or turn off the oven. When the hob is running, keep items with magnetic properties such as credit cards or cassettes away from the hob.Selecting cooking zone suitable to the vessel
| Large cooking zone | Normal cooking zone | Small cooking zone |
| Large cooking zoneChoose the correct pan size for the surface cooking area. The diameter of the pan's base should correspond to the size of the surface cooking area.Distributes the power ideally.Provides perfect heat distribution. Used to cook dishes such as large crepes or large fishes rare or very rare. | Normal cooking zoneChoose the correct pan size for the surface cooking area. The diameter of the pan's base should correspond to the size of the surface cooking area.Distributes the power ideally.Provides perfect heat distribution. Used for all kinds of cookings. | Small cooking zoneChoose the correct pan size for the surface cooking area. The diameter of the pan's base should correspond to the size of the surface cooking area.Used for slow cookings (sauces, creams)Used to prepare small portions or portions based on number of persons. |
Using pots on the wide surface cooking zone
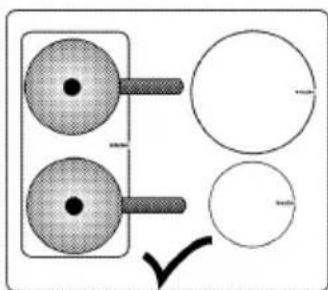
text_image
Diagram showing two circular objects with labeled dimensions and a checkmark indicating selection or measurement.You can use the wide surface cooking zone in two halves separately as rear left and front left cooking zones.

natural_image
Simple diagram showing a grid-patterned rectangle and two circles with a checkmark, no text or symbols present.You can use the wide surface cooking zone for large pots.

text_image
Diagram showing a circular object with plus signs and a cross symbol, alongside three smaller circles labeled '100m' and '50m'.Your pot must cover both centers of the wide surface cooking zone. Do not use the cooking zone in other ways.
Using the hobs
DANGER:
Do not allow any object to drop on the hob. Even small objects such as a saltshaker may damage the hob.
Do not use cracked hobs. Water may leak through these cracks and cause short circuit.
In case of any kind of damage on the surface (eg., visible cracks), switch off the product immediately to minimize the risk of electric shock.
Control panel

text_image
88 ① 8 9 9 ECOSpecifications

Adjustment area (for temperature level and timer setting)
| Light indicating that the relevant key is functioning | |
| I | On / Off key |
| II | Keylock key |
| L | Timer Activation / Deactivation key |
| ### | Quick Heating key / Booster key |
| ] ### | Keep Warm key |
| III | Stop key |
| ECO | Economy mode key |
| [○] | Wide Surface Cooking Zone |
| [○] | Selection key |
| ○○ | Front Left Cooking Zone Selection key |
| ●○ | |
| ●○ | Rear Left Cooking Zone Selection key |
| ○○ | |
| ○● | Rear Right Cooking ZoneSelection key |
| ○○ | |
| ○○ | |
| ○○ | Front Right Cooking ZoneSelection key |
| ○● |

Graphics and figures are for informational purposes only. Actual displays and functions may vary according to the model of your hob.
Cooking zone display

flowchart
graph TD
    A["1"] --> B["2"]
    B --> C["3"]
    C --> D["4"]
    D --> E["5"]
    E --> F["6"]
1 Temperature Indicator (temperature setting 0 ... 9)
2 Cooking zone light
3 Cooking Zone Selection key
4 Keep Warm Function symbol (*)
5 Timer symbol
6 Multi-segmented Cooking Zone symbol (*)
* Varies according to the model.

This device is controlled with a touch control panel. Each operation you make on your touch control panel will be confirmed by an audible signal.

Always keep the control panel clean and dry. Having damp and soiled surface may cause problems with the functions.
Turning on the hob
- Touch "①" key on the control panel. Light of the "①" key turns on. The hob is ready for use.

If no operation is performed within 20 seconds, the hob will automatically return to Standby mode.

When any key ("@" key) is pressed for a long time, the product automatically turns off for safety reasons.
Turning off the hob
- Touch "①" key on the control panel. The hob will turn off and return to Standby mode.

"H" or "h" symbols that appear on the cooking zone display after the hob is turned off indicates that the cooking zone is still hot. Do not touch cooking zones.
Residual heat indicator
"H" symbol that appears on the cooking zone display indicates that the hob is still hot and may be used to keep a small amount of food warm. This symbol will soon turn to "h" symbol meaning less hot.

When power is cut off, residual heat indicator will not light up and does not warn the user against hot cooking zones.
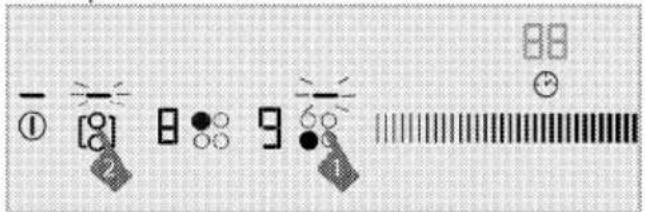
Turning on the cooking zones

text_image
Diagram showing three labeled icons (①, ②, ③) with arrows and symbols, likely representing a camera or navigation system.- Touch "①" key to turn on the hob.
- Touch the selection key of the cooking zone you want to turn on.
"0" appears on the cooking zone display and the light of the relevant cooking zone illuminates.

If no operation is performed within 20 seconds, the hob will automatically return to Standby mode.
Setting the temperature level
By touching the adjustment area or by sliding your finger across the area, adjust the temperature level between "0" and "9".
Each temperature setting has 2 temperature levels and these are denoted by a “.” after the numeric number.
e.g.: "0" "1" "1." "2" "2." etc.
Turning off the cooking zones:
A cooking zone can be turned off in 3 different ways:
- By dropping the temperature level to "0"
* You can turn the cooking zone off by dropping the temperature level to "0".
- By using the turning off function the timer option for the desired cooking zone
* When the time is over, the timer will turn off the cooking zone assigned to it. "0" or "00" will appear on all displays. The "☐" symbol on the hob display will disappear.
* When the time is over, an audible alarm will sound. Touch any key on the control panel to silence the audible alarm.
- By touching the relevant cooking zone symbol for 3 seconds.
* Touch the symbol of the cooking zone that you want to turn off for about 3 seconds.
Turning on the wide surface cooking zone
-
Touch "①" key to turn on the hob.
-
Touch Wide Surface Cooking Zone Selection key
» 0 appears on the left rear cooking zone display and the light of the wide surface cooking zone flashes.

text_image
Diagram showing three labeled icons (①, ②, ③) with corresponding symbols and arrows, likely representing UI control or status indicators.- By touching the adjustment area or by sliding your finger across the area, adjust the temperature level between 0 and 9.
» Cooking zone starts to run. If another cooking zone is selected or no operation is performed for 10 seconds, the light of the wide surface cooking zone illuminates continuously.
Turning on the wide surface cooking zone while one or both of the left cooking zones are running
While one or both of the left cooking zones are running, you can combine both cooking zones by activating the wide surface cooking zone. Thus, you can utilize a wider cooking zone just with the same values.
text_image
① 8 8 9 88 ② 8 8 8 8-
Select one of the left cooking zones while one or both of the left cooking zones are running.
-
Touch Wide Surface Cooking Zone Selection key
» Temperature value of the previously selected cooking zone appears on the left rear cooking zone display and the light of the wide surface cooking zone flashes. » Combined cooking zones continue operating with the temperature and the timer (if available) value of the left cooking zone you have selected. Value of the left cooking zone which was not selected before combining the cooking zones is canceled.
text_image
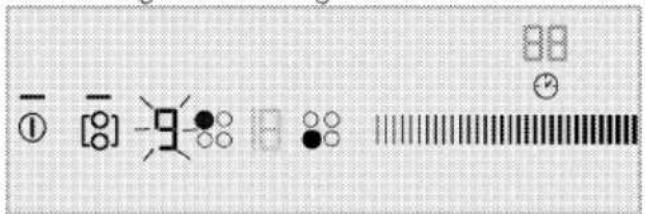
① [8] -9 16 88
text_image
If you touch any of the left cooking zone selection keys while the wide surface cooking zone is active, cooking zones are separated and turned off.» To change the temperature value at a later stage, touch the wide surface cooking zone selection key and activate the cooking zone. Adjust the desired temperature value in the adjustment area.
Turning off the wide surface cooking zone
Wide surface cooking zone can be turned off in 4 different ways:
- By dropping the temperature level to "0"
You can turn the wide surface cooking zone off by dropping the temperature level to "0".
- By using the turn-off with the timer option for the wide surface cooking zone
When the time is over, the timer will turn off the wide surface cooking zone. 0 will appear on the left cooking zone display and 00 will appear on the timer display. The "☐" symbol on the rear left cooking zone display will disappear.
- By touching the symbol of any of the left cooking zones
If you touch the symbol of any of the left cooking zones while the wide surface cooking zone is active, cooking zones are separated and turned off.
- By touching the wide surface cooking zone symbol for 3 seconds.
If you touch the wide surface cooking zone symbol for 3 seconds, the cooking zone is turned off
High Power (Booster) Function
For rapid heating, you can use booster function. However, this function is not recommended for cooking a long time. Booster function may not be available in all cooking zones.
Selecting Booster directly:
- Touch "①" key to turn on the hob.
- Select the desired cooking zone by touching the Cooking Zone Selection keys.
- Touch the "☐" key.
Selected cooking zone will operate at the maximum power and 3 lights will flash on the
cooking zone display respectively. When booster time ends, cooking zone turns off.
Selecting Booster when cooking zone is active:
- Touch "R" after cooking zone has operated at least 20 seconds on a certain level.

Cooking zone should complete operating for at least 20 seconds on the selected level.
- Selected cooking zone will operate at the maximum power and 3 lights will flash on the cooking zone display respectively. Once the Booster period is over, the cooking zone switches to the set temperature level and only the selected temperature value is displayed.
Turning off Booster function prematurely:
Touch "☐" to turn off booster any time you want.
Quick heating
Qucik heating is a function which facilitates cooking. It can be used for rapid heating for short time period. All cooking zones are equipped with Quick heating function. This function can be operated by setting temperature level beforehand.

Quick heating function can be set within 20 seconds after cooking zone is switched on and temperature level is adjusted.
Selecting Quick heating function:

text_image
Diagram illustrating a device or sensor setup with labeled components and directional arrows, including symbols like 'f', '1', '2', '3', and a plus sign.- Touch "①" key to turn on the hob.
- Select the desired cooking zone by touching the Cooking Zone Selection keys.
-
Adjust the desired temperature level by touching the adjustment area or by sliding your finger across the area.
-
Touch the "☐" key.
The cooking zone you have selected will operate at high power for a certain period of time (see following table). 3 lights and the set temperature value will appear on the cooking zone display respectively.
5. Once the Quick heating period is over, the cooking zone switches to the set temperature level and only the selected temperature value is displayed.
Table: Quick Heating Operation Times
| Temperature level | Operation time limit - second |
| 0 | 0 |
| 1 | 10 |
| 1. | 10 |
| 2 | 20 |
| 2. | 30 |
| 3 | 40 |
| 3. | 47 |
| 4 | 56 |
| 4. | 65 |
| 5 | 75 |
| 5. | 85 |
| 6 | 85 |
| 6. | 25 |
| 7 | 25 |
| 7. | 35 |
| 8 | 35 |
| 8. | 45 |
| 9 | 45 |
| 9. | 10 |
| Boost | Boost |
Turning off Quick heating function:
Touch "☐" key to turn off the Quick heating function whenever you want.
Cleaning lock
The cleaning lock prevents operation of all keys on the control panel for 20 seconds to allow the user to make a short cleaning while the hob is in use.
Activating the cleaning lock

text_image
Digital display interface with icons for timer, lock, battery, and timer control- When the hob is in On mode, press and hold "☐" key until a single signal sound is heard.
Cleaning lock light will illuminate and the clock display of the hob will start to count down from 20. None of the keys on the control panel will be functional throughout this period except "①" key.
Deactivating the cleaning lock
You do not have to press any key to deactivate the cleaning lock. The hob will give an audio signal after 20 seconds, keylock light will turn off and the cleaning lock is automatically deactivated.
Child Lock
When the hob is in Standby mode, you can protect the hob with child lock to prevent children from turning on the cooking zones. Child Lock can be activated or deactivated in Standby mode only.
Activating the Child Lock
- When the hob is in Standby model, press and hold "☐" key until two signal sounds are heard.
The Child Lock will be activated and the light of the "☐" key will turn off.

If any key is pressed when the Child Lock is active, the light of the "☐" key flashes.
Deactivating the Child Lock
- When the Child Lock is activated, press and hold "☐" key until a single signal sound is heard.
» Child Lock will be deactivated and the light of the "☐" key will turn off.
Keylock
You can activate the keylock to avoid changing the functions by mistake when the hob is operating.
Activating the keylock
- Touch and hold the "①" key for a long time to lock the control panel.
Only one signal sound will be heard first. In this case, your hob is switched to Cleaning Lock. Then, keep on touching without lifting your finger until you hear two successive signal sounds.
The light of the "☐" key will flash and all cooking zones will be locked.

You can activate the keylock in operation mode only. When keylock is activated, only the "①" key will be functional. When you touch any other key, the light of the "②" key will flash to indicate that the keylock is active. If you turn the hob off when the keys are locked, the keylock must be deactivated to turn the hob on again.
Deactivating the keylock
- Keep "0" key pressed for 2 seconds. The operation is confirmed with an audible signal. The light of the "0" key turns off and the control panel is unlocked.
Timer function

The timer can only be set between 0-99 minutes.
When the timer is set you will not need to continually monitor the pans on the hob.
Cooking zone will be turned off automatically at the end of the time you have selected.
Activating the timer
-
Touch "①" key to turn on the hob.
-
Select the desired cooking zone by touching the Cooking Zone Selection keys.
-
Adjust the desired temperature level by touching the adjustment area or by sliding your finger across the area.
- Touch "L" key to activate the timer.
"00" appears on the timer display and "J" symbol starts flashing on the cooking zone display.
- Adjust the desired time period by either sliding your finger or touching and holding your finger in the minus (-) area to decrease, or plus(+) area to increase.

text_image
-88 + 100% - 10000000000000000000000000000000000000000000000000000000000000000000Please note the adjustment cannot be made with one sliding action, the sliding action must be done continuously in the minus (-) or plus (+) area.
After flashing for a certain period of time, the "☐" symbol lights up permanently. Lighting up of "☐" symbol continuously indicates that the function is activated.
| i | The timer can only be set for the cooking zones already in use. |
| i | Repeat the above procedures for the other cooking zones for which you wish to set the timer. |
| i | Timer cannot be adjusted unless the cooking zone and the temperature value for the cooking zone are selected. |
| i | When the timer is activated, only the set time for the selected cooking zone will appear on the timer display. |
Deactivating the timer
Once the set time is over, the hob will automatically turn off and give an audible warning.
Press any key to silence the audio warning.
Turning off the timers earlier
If you turn off the timer earlier, the hob will carry on operating at the set temperature until it is turned off.
You can turn the timer off in two different ways:
1-Turning off the timer by dropping its value down to "00":
- Select the cooking zone you want to turn off.
- Touch "☐" key to select the timer of the relevant cooking zone.
- Decrease the value until "00" appears on the timer display by touching the adjustment area or by sliding your finger across the area.
"💡" symbol flashes on the cooking zone display for a certain time period and then it turns off permanently and the timer is canceled.
2-Turning off the timer by pressing timer key for 3 seconds:
- Select the cooking zone you want to turn off.
- Touch "①" key to select the timer of the relevant cooking zone.
- Touch "①" key for about 3 seconds.
"☐" symbol flashes on the cooking zone display for a certain time period and then it turns off permanently and the timer is canceled.
Keep warm function (if any)
You can use this function to keep your meal warm after the cooking process is completed. The keep warm function may be used in two different ways: with and without setting the timer.
Activating the keep warm function without setting the timer
-
Select the cooking zone that has been set to a certain temperature and you want to use for keeping warm.
-
Touch "###" key to activate the keep warm function for the relevant cooking zone.

The cooking zone will go on operating at low temperature. "U" and "U" symbols appear on the cooking zone display.
Activating the keep warm function by setting the timer

text_image
Camera control panel interface showing light path, aperture, and screen settings with numbered labels-
Select the desired cooking zone for which the temperature and timer has been set, and you are planning to run the keep warm function.
-
Touch "###" key to activate the keep warm function for the relevant cooking zone.
"١٠٣٣" symbol appears on the cooking zone display.
The cooking zone will keep on operating at the set temperature throughout the set time period. When the time is over, it switches to keep warm function and starts operating at low temperature. "u" symbol appears on the cooking zone display.
Turning off the keep warm function
- If the timer is activated, select the cooking zone for which the keep warm function is activated.
Touch ""###" key to turn off the keep warm function.
The cooking zone will continue operating with the previous time and temperature setting.
- If the timer is deactivated, select the cooking zone for which the keep warm function is activated. Set the desired temperature by touching the adjustment area or by sliding your finger across it in order to deactivate the keep warm function.
The cooking zone will go on operating at the new temperature you have set.

You can cancel the keep warm function by touching the "①" key and turning off the hob entirely.
Stop function
Using this function, you may stop all functions operating on the hob (except timer) for a certain period of time.

If the timer is set for any cooking zone, timer will continue operating during stoppage.

text_image
BB ① ② ③ ④ ⑤ ⑥ ⑦ ⑧ ⑨ ECO Ⅲ 1- Touch the "||" key when your hob is operating.
All active cooking zones will stop.
- Touch "II" key again to restart all stopped cooking zones with previous settings.
Eco mode
You can switch all cooking zones to lower level by using this function.

Economy mode can only be activated for active cooking zones.
- Touch the "ECO" key when cooking zone is operating.
» Active cooking zone switches to economy mode and its level drops by half.
Using induction cooking zones safely and efficiently
Operating principles: Induction hob heats directly the cooking vessel as a feature of its operating principles. Therefore, it has various advantages when compared to other hob types. It operates more efficiently and the hob surface does not heat up.
Induction hob is equipped with superior safety systems that will provide you maximum usage safety.

Your hob can be equipped with induction cooking zones with a diameter of 145, 180, 210 and 280 mm depending on the model. With induction feature, each cooking zone detects the diameter of each vessel placed on them. Energy builds up only where the vessel contacts with the cooking zone and thus, minimum energy consumption is achieved.
Operation time constraints
The hob control is equipped with an operation time limit. When one or more cooking zones are left on, the cooking zone will automatically be deactivated after a certain period of time (see Table-1). If there is a timer assigned to the cooking zone, the timer display will also turn off later.
Operation time limit depends on the selected temperature level. Maximum operation time is applied at this temperature level.
The cooking zone may be restarted by the user after it is turned off automatically as described above.
Table-1: Operation time constraints
| Temperature level | Operation time limit - second |
| 0 | 0 |
| 1 | 6 |
| 1. | 6 |
| 2 | 5 |
| 2. | 5 |
| 3 | 4 |
| 3. | 4 |
| 4 | 3 |
| 4. | 3 |
| 5 | 2,5 |
| 5. | 2,5 |
| 6 | 2 |
| 6. | 2 |
| 7 | 1,5 |
| 7. | 1,5 |
| 8 | 1 |
| 8. | 1 |
| 9 | 0,5 |
| 9. | 0,5 |
| High Power(Booster) Function | 10 minutes |
Overheating protection
Your hob is equipped with some sensors ensuring protection against overheating. Following may be observed in case of overheating:
* Active cooking zone may be turned off.
* Selected level may drop. However, this condition cannot be seen on the indicator.
Overflow safety system
Your hob is equipped with overflow safety system. If there is any overflow that spills onto the control panel, system will cut the power connection immediately and turn off your hob. "E" warning appears on display during this period.
Precise power setting
Induction hob reacts the commands immediately as a feature of its operating principles. It changes the power settings very fast. Thus, you can prevent a meal (water, milk) from overflowing even if it was just about to overflow.
Operating noisy
Some noises may arise from the induction hob. These sounds are normal and a part of induction cooking.
* Noise becomes prominent in high temperature levels.
* Alloy of the saucepan can cause noise.
* In low levels, a regular on/off sound can be heard because of the operating principles.
* Noise can be heard if an empty saucepan is heated. When you put water or meal in it, this sound will clear away.
The noise of the fan that cools electric system can be heard.
Error codes / warning messages and error sources
Table-2:
| Cause of error | Indicator | Display |
| Two or more keys are pressed or overflow spills onto the keys. | "E" symbol flashes | Cooking zone display |
| Hob overheated | "H" symbol flashes | Cooking zone display |
| No proper vessel on the zone. | "□" symbol lights up | Cooking zone display |
| Touch control hardware error. | "Fx**" symbol lights up | Timer display |
| Induction hardware error. | "Ex***" symbol lights up | Cooking zone display |
| Touch-key sensitivity error | "F2" symbol lights up | Timer display |
| Communication error in touch control. | "F3" symbol lights up | Timer display |
| Induction hardware error. | "Ex***" symbol flashes | Cooking zone display |
| x**: "1,2..9" | ||

For further information about error messages that may appear on the touch control panel, see Table-2. If "Fx" and "Ex" messages display constantly, call Authorized Service Agent.

If the surface of the touch control panel is exposed to intense vapor, entire control system may become deactivated and give "E" error signal. Signal sounds are heard.

Keep the surface of the touch control panel clean. Erroneous operation may be observed.
6 Maintenance and care
General information
Service life of the product will extend and the possibility of problems will decrease if the product is cleaned at regular intervals.

DANGER:
Disconnect the product from mains supply before starting maintenance and cleaning works. There is the risk of electric shock!

DANGER:
Allow the product to cool down before you clean it. Hot surfaces may cause burns!
- Clean the product thoroughly after each use. In this way it will be possible to remove cooking residues more easily, thus avoiding these from burning the next time the appliance is used.
* No special cleaning agents are required for cleaning the product. Use warm water with washing liquid, a soft cloth or sponge to clean the product and wipe it with a dry cloth.
* Always ensure any excess liquid is thoroughly wiped off after cleaning and any spillage is immediately wiped dry.
Do not use cleaning agents that contain acid or chloride to clean the stainless or inox surfaces. Use a soft cloth with a liquid detergent (not abrasive) to wipe those parts clean, paying attention to sweep in one direction.

The surface might get damaged by some detergents or cleaning materials. Do not use aggressive detergents, cleaning powders/creams or any sharp objects during cleaning. Do not use harsh abrasive cleaners or sharp metal scrapers to clean the oven door glass since they can scratch the surface, which may result in shattering of the glass.

Do not use steam cleaners to clean the appliance as this may cause an electric shock.
Cleaning the hob
Glass ceramic surfaces
Wipe the glass ceramic surface using a piece of cloth dampened with cold water in a manner as not to leave any cleaning agent on it. Dry with a soft and dry cloth. Residues may cause damage on the glass ceramic surface when using the hob for the next time. Dried residues on the glass ceramic surface should under no circumstances be scraped with hook blades, steel wool or similar tools. Remove calcium stains (yellow stains) by a small amount of lime remover such as vinegar or lemon juice. You can also use suitable commercially available products. If the surface is heavily soiled, apply the cleaning agent on a sponge and wait until it is absorbed well. Then, clean the surface of the hob with a damp cloth.

Sugar-based foods such as thick cream and syrup must be cleaned promptly without waiting the surface to cool down. Otherwise, glass ceramic surface may be damaged permanently.
Slight color fading may occur on coatings or other surfaces in time. This will not affect operation of the product.
Color fading and stains on the glass ceramic surface is a normal condition, and not a defect.
7 Troubleshooting
Water drops occur during cooking.
The vapour that arises during cooking can condense and form water droplets when it hits cold surfaces of the product. >>> This is not a fault.
Product emits metal noises while heating and cooling.
* When the metal parts are heated, they may expand and cause noise. >>> This is not a fault.
Product does not operate.
* The mains fuse is defective or has tripped. >>> Check fuses in the fuse box. If necessary, replace or reset them.
* Product is not plugged into the (grounded) socket. >>> Check the plug connection.
* If the display does not light up when you switch the hob on again. >>> Disconnect the appliance at the circuit breaker. Wait 20 seconds and then reconnect it.
* Overheat protection is active. >>> Allow your hob to cool down.
* The cooking pot is not suitable. >>> Check your pot.
“L” symbol appears on the cooking zone display.
* You have not placed the pot on the active cooking zone. >>> Check if there is a pot on the cooking zone.
* Your pot is not compatible with induction cooking. >>> Check if your cooking pot is compatible with induction hob.
The cooking pot is not centered properly or the bottom surface of the pot is not wide enough for the cooking zone. >>> Choose a pot wide enough and center the pot on the cooking zone properly.
* Cooking pot or cooking zone is overheated. >>> Allow them to cool down.
Selected cooking zone suddenly turns off during operation.
* Cooking time for the selected cooking zone may be over. >>> You may set a new cooking time or finish cooking.
* Overheat protection is active. >>> Allow your hob to cool down.
* An object may be covering the touch control panel. >>> Remove the object on the panel.
The pot does not get warm even if the cooking zone is on.
- Your pot is not compatible with induction cooking. >>> Check if your cooking pot is compatible with induction hob.
The cooking pot is not centered properly or the bottom surface of the pot is not wide enough for the cooking zone. >>> Choose a pot wide enough and center the pot on the cooking zone properly.
Cooling fan continues operating although the hob is turned off.
This is not a fault. Cooling fan will continue operating until the electronics in the hob cools down to a suitable temperature.

Consult the Authorised Service Agent or technician with licence or the dealer where you have purchased the product if you can not remedy the trouble although you have implemented the instructions in this section. Never attempt to repair a defective product yourself.
Guarantee for Refrigeration, Cooking Appliances, Washing Machines & Dishwashers
Your new Grundig product is guaranteed against the cost of breakdown repairs for 5 years from the date of the original purchase.
"Please visit the "support" section on the Grundig website at www.grundig.co.uk to register your 5 year warranty."
What is covered?
* Repairs necessary as a result of faulty materials, defective components or manufacturing defect.
The cost of functional replacement parts, but excluding consumable items.
The labour costs of a Grundig approved repairer to carry out the repair.
What is not covered?
■ Transit, delivery or accidental damage or misuse and abuse.
* Cabinet or appearance parts, including knobs, flaps, handles or container lids.
* Accessories or consumable items including but not limited to, ice trays, scrapers, cutlery baskets, filters and light bulbs.
- Repairs required as a result of unauthorised repair or inexpert installation that fails to meet the requirements contained in the user instruction book.
* Repairs to products used on commercial or non-residential household premises.
Loss of frozen food in freezers or fridge/freezers.(Food loss insurance is often included within your household contents insurance policy, or may be available separately from your retailer.)
Important notes
* Your Grundig product is designed and built for domestic household use only.
The guarantee will be void if the product is installed or used in commercial or non-residential domestic household premises.
The product must be correctly installed, located and operated in accordance with the instructions contained in the User Instructions Booklet provided.
* Professional installation by a qualified Electrical Domestic Appliance Installer is recommended for all Washing Machines, Dishwashers and Electric Cookers
Gas Cookers must only be installed by a Gas Safe (or BORD GAIS) registered Gas Installer.
The guarantee is given only within the boundaries of the United Kingdom and the Republic of Ireland.
The guarantee is applicable only to new products and is not transferable if the product is resold.
Grundig disclaims any liability for incidental or consequential damages.
The guarantee does not in anyway diminish your statutory or legal rights.
Should you experience any difficulty in obtaining service please contact the Grundig Customer Helpline.
Tel: 0845 603 1234
0345 603 1234
e-mail:service@Grundig.co.uk
Please keep your purchase receipt or other proof of purchase in a safe place; you will need to have it should the product require attention under guarantee.
You should also complete the details below; it will help us assist you when requesting service. (The model number is printed on the Instruction Booklet and the serial number is printed on the Rating Label affixed to the appliance)
Model No:
Serial No:
Retailer:
Date of purchase:
For service under guarantee simply telephone the appropriate number below UK Mainland & Northern Ireland
0845 603 1234
0345 603 1234
Republic of Ireland
All Refrigeration, All Cookers
Washing Machines and Dishwashers
01 862 3411
Before requesting service please check the trouble-shooting guide in the Operating Instructions as a charge may be levied where no fault is found even though your product may still be under guarantee. Service once the manufacturers guarantee has expired.
If you have purchased an extended guarantee please refer to the instructions contained within the extended guarantee agreement document. Otherwise please call the appropriate number above where service can be obtained at a charge.
Grundig, 1 Greenhill Crescent, Watford Herts WD18 8QU
FOR A GOOD REASON
GRÜNDIG