
PDK-50HW2A - 電子機器用ホルダー PIONEER - 無料のユーザーマニュアル
デバイスのマニュアルを無料で見つける PDK-50HW2A PIONEER PDF形式.

| 製品タイプ | 電子機器用サポート |
| ブランド | PIONEER |
| モデル | PDK-50HW2A |
| 互換性 | 最大50インチの画面とデバイス |
| 寸法 (幅 x 奥行 x 高さ) | 660 x 200 x 400 mm |
| 重量 | 3.5 kg |
| 素材 | 処理鋼材とABSプラスチック |
| 色 | ブラック |
| 最大耐荷重 | 15 kg |
| 傾斜角度 | -5°~+15° |
| 回転 | 360° |
| 主な機能 | 調節可能な壁掛けマウント、ケーブル管理機能内蔵 |
| 取付規格 | VESA 200x200 および 400x400 |
| パッケージ内容 | マウント、取付キット、取扱説明書 |
| 保証 | 2年間 |
| お手入れと清掃 | 柔らかい乾いた布で拭いてください |
| 安全 | 最大荷重を超えないでください、頑丈な壁に固定してください |
| 一般情報 | 屋内使用向け、動作温度:-10°C~40°C |
よくある質問 - PDK-50HW2A PIONEER
ユーザーの質問 PDK-50HW2A PIONEER
0 質問 この機器について。知っているものに答えるか、ご自身の質問をしてください。
この機器について新しい質問をする
デバイスの取扱説明書をダウンロード 電子機器用ホルダー 無料でPDF形式で!マニュアルを見つける PDK-50HW2A - PIONEER 電子デバイスをもとに戻しましょう。このページにはデバイスの使用に必要なすべての書類が掲載されています。 PDK-50HW2A ブランド PIONEER.
使用説明書 PDK-50HW2A PIONEER
てのたは八才二製品を買い求いんだきまてまにとにあがうさいま。
它的取据説明書をよく請みに係、正し安全に使いんださ。特に「安全上のご注意」は必す請みんださ。
なお、「取挃説明書」は「保証書」と一緒に必す保管てくだせ。
取拔上の注意
本製品はラスマデイス克莱イPDP-503CMX専用です。PDP-502CB、PDP-502MXには取り付けいたします。
TPLASMADEISPREIの操作·取扱いに開理由は、TPLASMADEISPREIの取扱説明書をご覈(<ださ)。
販売店樣
它的取拔説明書は据え付け終了後客樣に必すお渡し、取扎挃の方法の説明を行てくさい。
它的装置は、情報処理装置等電波障害自主規制協議会(VCCI)の基準に基つくケラスB情報技術裝置です。它的装置は、家庭環境で使用するとを目的とていま�が、它的装置がラジ才やテレリフン受信機に近接て使用いたします。、受信障害を引き起こさ它がたま�。
取拔説明書に徃て正い取扱をて下さ。
目次
特長 2
安全上の注意 3
付属品の確認 5
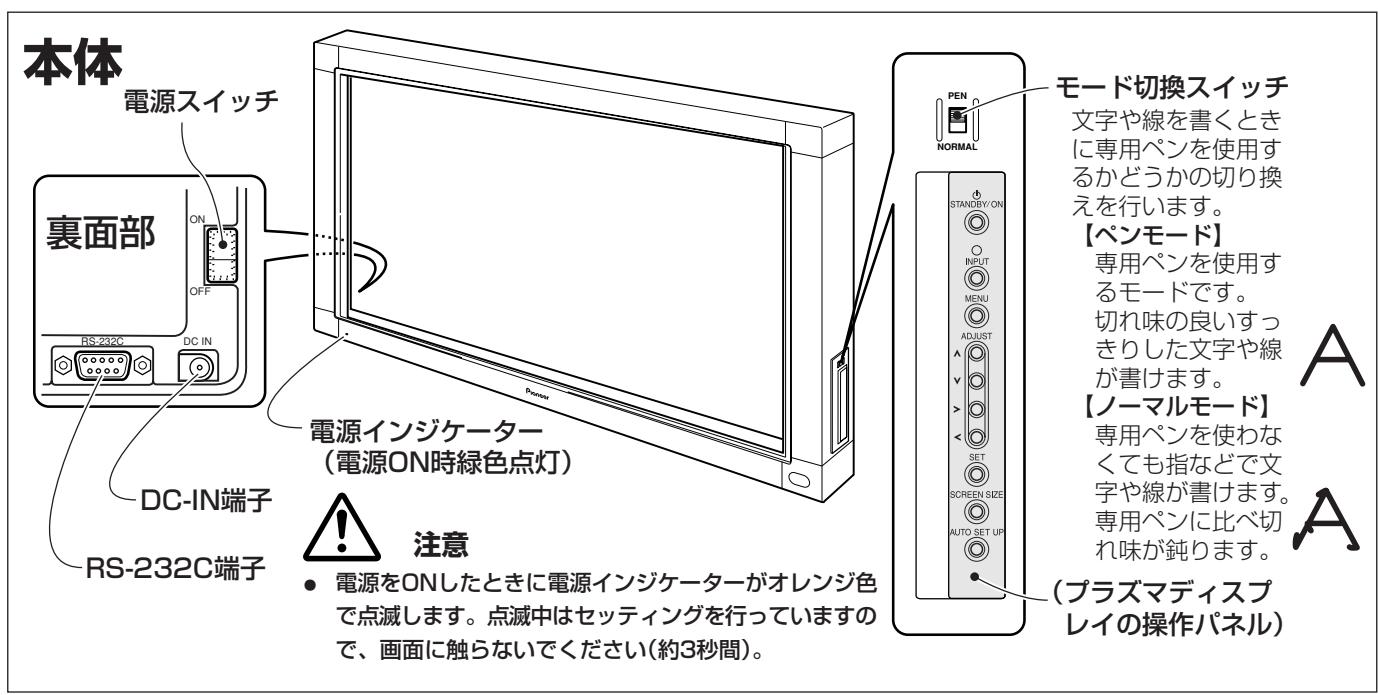
各部の名称 6
本体 6
6
電池の入い方 6
7
設置 7
本機の取り付款 7
7
接续 8
手入 11
保证和艾夫一沙巴
仕 横 12
特長
專用バンを使てTPLASマデイスPLEY上ごのバUNコN操作が可能です。
た、指哪及も簡卍入力操作がてきま�。
□ 画質劣化のない赤外線スロー方式を採用いたします。
□ 高速スロー方式を採用し、XGA相当の高分解能とハレスボンスを実現いたします。
安全に正しおお使いんだくたに
图記号にて
ご取説明書およ製品ご表示は、製品を安全に正しく保使いたけ、あた他的人々ご危害や財産ごの損害を未然に防止するたに、いろりな円記号を使用ていま�。その記号と意味は次のうになていま�。
内容をはく理解てから本文を請みくさい。

ご表示を無視て、誤った取扱すると、人が死亡たは重傷を負う可能性が想定いたします内容を表語言。

ご表示無視て、誤了取扱をすると、人が傷害を負可能性が想定たる内容おは物の損害のみの発生が想定たる内容を表ていま。
円記号の意味

記号は注意(警告を含む)しおけりばなか内容です。

記号は、やてはいりない(禁止)内容です。

記号は、必す行てんだは(強制)内容です。円の中に具体的指示内容(左円の场合は電源シャガをCONSENTか枠け)が描れいたします。
警告
異常時の处置
万一煙が出來、変なにお願いや音をする,Noの異常状態のまま使用すると、火災・感電の原因くださいます。
必す電源TPLGをCONSENTか枠て
<ださい>。煙が出なくなるのを確認て、販売店に修理をこ依賴<ださい>。客様による修治理は危険ですかから絶対におやねください。
万一內部に水や異物等が入った場合は、電源TPLGをCONSENTに拔て、販売店に連絡くださいます。そのまえ使用すると火災・感電の原因为之称す。
操作ができない各種故障状態で使用くださいますようお願いいたします。火災・感電の原因为ります。電源TPLADをCONSENTにから拔いたします、修理を販売店にご依賴くださいます。

PLAGU

PLAGU

PLAGU
設置
振動の多い所や、くつた的台や傾た所なを避け安定た場所に置てくだて。落た、倒た、たてはけが的原因くださいます。必す軀倒防止の備をてくだて。
電源コトの上に重いモをのせた、コトが本機の下敷きにらないようにてくだせ。コトの上を敷物なて覆うごにり、そのに気付かす、重いモをのせてまう它にたが線上。重いモのをのせた和一は、火災·感電の原因为。

注意

禁止
警告
設置
「德拉夫德斯克莱の背面の通気孔からの放熱を妨avenportはけだて。本機は壁に背面を密着さての使用は可能ですか、通常は壁から10cm以上離て設置てけだて。

禁止
本機の背面を壁に密着さて使用する場合は、使用環境条件等に制限がわる可能性のはんだご必紹販売店に相談くさ。
た。
本機の背面を壁に密着さて使用くださ、その他特殊な設置(壁埋む)、上向を設置、たて置を設置等)をす用场合には、同樣に販売店にご相談くだせ。
使用环境
本機の内部に水が入った、濡らさないようご注意くだて。屋外や風呂場等诸多、水場は使用くださいますかんだい。火災・感電の原因,Thら。

禁止
表示た電源電圧(交流100bolト)以外の電圧使用てはくさ。火災・感電の原因くださいます。

100V以外禁止
本機を使用くださいますようお願いいたします。船舶哪家直流(DC)電源には接続しぃいてんだい。火災の原因为之称す。

禁止
使用方法
本機の上に花ひん、コット、化粧品、菓品や水たの入った容器たは小さな金属物を置かないてだい。此ばりた、中に入った場合、火災・感電の原因と冊ま�。

禁止
本機の通気孔哪家、內部に金屬類や燃えやすい。そのと異物を差し入んだり、落と入んだりしおてくださ。火災・感電の原因くださいます。特に予子樣のる環境下載はご注意くださ。

禁止
電源コードを傷,Thoke、加工しは、無理に曲けた、ねじてリ、ひばんだり、加熱しぃるいくだせ。コトが破損し火災・感電の原因为標ま。コトが痛んだら(芯線の露出、断線等行业)、販売店に交換をご依賴くさ。

禁止
雷鳴出的使用中止、電源和接續載在的下一類には触いはんだ。感電的原因とります。

接触禁止
電源TPLGの刃おはり矢の付近にほこや金属物が付着てい的场合は、電源TPLGを拔てから乾た布で取り除てくだせ。そのまま使用すると火災・電の原因くださいます。

乙除去
乾電池は充電しおてくだせ。電池の破裂、液もれによ、火災・けがの原因为之称ま。

禁止
注意
設置
放熱を良くするたて他の機器・壁等から間隔をとてください(10cm以上)。た、次のうな使の方をしぃいかくさい。フラマデイスTPLイの通気孔を併さと内部に熱が己モり、火災の原因之称的ごさはらみ。
·押入るな、風通の悪い狹いとさろに押し込む。
- じゆうたんやふたんの上に置く。
- バーツルクロスなかをかける。
·横倒にする。
·逆さ末にす。
·壁に密着する、水平にる等の特殊な使用をする场合は、必紈販売店にご相談くだてい。
電源TPLG拔く時は、電源一トを引張らないてくさ。一トが傷て火災·感電の原因なる它がた態ま。必説TPLGを持て拔いてくさ。

禁止
本機の上にモを置,Noいくだて。バラスが崩て倒た、落下てはの原因とる它にた態は。

禁止
電源コトを熱器具に近付けないてんださ。コトの被ひくが溶けて、火災·感電の原因くださる它のはんだよはり標。

禁止
屋外その移動時、雨なかにより本機に水滴が付着しぃうはてんださ。水滴が付着た場合はよく乾燥さてからご使用んださ。水滴が付着たまま使用すると、火災・感電の原因くださいます。

禁止
本機調理台及加湿器、工アコンの吹き出ロのそば各種高温、多湿にる場所あたは油煙、およほこりの多い場所には置かないては。火災·感電的原因及びごさは。

禁止
移動させる场合は電源スイドを切り、必す電源テガをコンSENTか拔き、外部のコト、軀倒防止具を外た。と確認てください。コト類を外さに移動するとコトが傷つき、火災·感電の原因なる它がたはみ。

PLAGU
設置
怒を閉む切った自動車の中や、直射日光が当た場所、エアコン・ヒーダーの吹き出現にと、異常に温度が高くる場所に放置いたしますかはんだ。熱による変形や、本機内部の部品に悪影響を与え、火災の原因)+(2)
本機は、性能を維持するたのアス端子付けは3芯電源コドを使用いたします。必す3芯CONsetトから電源を取り、確實に接地て使用くださいます。
設置の際、本機を梱包から取り出、一時のに寝かせておく場合、以下の点に此配慮くださ。
·置場所は、水平な安定た注意場所请点击。た、本に傷かがたい樣、異物には十分注意てくさ。
·本機の画面側を下にて寝か場合、荷重をかたるような置き方は、決てしおいにください。
本機を直射日光が当之場所に長期間置,Noはくだ。光学特性が変化し、変色た、その原因,Thら。

禁止

注意

注意
長時間使用不完的時は、リモド場合、荷重を上しおてはい。電池を取出ておはいては。電池から液がもて火災やけが、あらは周圍を污す原因くださるとがようお願いいたします。
注意
電池
指定以外の電池は使用くださいます。

禁止

注意
電池をpan内にせつる場合、フス(+)とマイナス(一)の極性表示に注意し、表示通に入てくさい。間違え和電池の破裂、液もれにや、火災やけが、あらはは周図を污す原因くださるごにたか%=。

禁止
長時間使用不完的時候は、リモローか電池を取り出ておいてくだせ。電池から液がもに火災やけが、あたはは周田を污す原因くださるこにたたは。
もし液がたかた場合は、電池ケスにしだ的液をよくひきとてから新い電池を入てくさ。も万一、た液が身体にしだ的時は、水でく洗い流てくさ。
使用環境
周圍温度は0~40℃の範圍内で此使用くださいます。

注意
本機を冷え切った状態のまえ室内に持ち込んだり、急に室温を上ばたります及、動作部に露が生じ(結露)、本機の性能を十分に発揮くださいますなるばかて,No、故障の原因とる这句话は很有。

注意
它的方式场合はよく乾燥するま�放置か、徐々に室温を上てから使用くださいます。
長期間使用にailable時は、安全のた必要電源テ格をCONSENTから拔いくださ。

FlaG拔
使用方法
電源TPLGはCONSETに根元まて確実に差し迵てくさ。差し迵が不完全ですと発熱たはほこが付着て火災の原因为な它があま。も、電源TPLGの双重を上ごはみ。

確実に差す
電源PLAは、根元ま間差と。達てもゆるみがるルトには接統しおてくさい。発熱て火災の原因なをにが線上。販店店や電気工事店にルトの交換を依賴てくさい。

禁止
保守·点棱
例えは、1年に一度くらは内部の掃除を販売店,Noにご相談かい、内部にほこがたまてまま、長間間掃除をしおい和火災や故障の原因,Thるにごは。

注意
特に湿気の多なる梅雨期の前に行うと効果的です。NSE扫除費用にては販売店またはアフターサイド連絡先哪にご相談くださ。
你手入の際は安全のたてに電源テ�をトか拔て行てくさ。その際、液体ケーナーやスリ一式ケーナー一直接本機に吹きかけないでくさ。内部に入、火災·感電的原因とたるごがたは。

PLA 1
�的通气孔は、1カ月に1回を目安に掃除機がモロリを吸い取てくstadt(そのとを掃除機は「弱」に設定てくstadt)。

注意
た、通気孔の手入手は必す本機の主電源を切り、電源TPLGをCONSETトから拔いて行てくさ。
木円をたてたま使用すると内部の温度が上昇し、故障や火災の原因くださいます。
確認が成長了一日にチエック(√)てくだせ。
| □ バン ×1 | □ ACアダpler×1 |
| □ 单4形ルカリ乾電池(LR03) ×2 | □ 電源コービx1 |
| □ 替元芯 ×2 | □ ム现代农业の米町県 |
| □ RS-232Cケーツル(9ピング、スリレト、3m) ×1 | □ 取吸説明書 ×1 □ ダ现代农业の米町県 □ 保証書 ×1 |
| □ 6角穴付bolト ×2 | |
| □ バン置き ×1 |
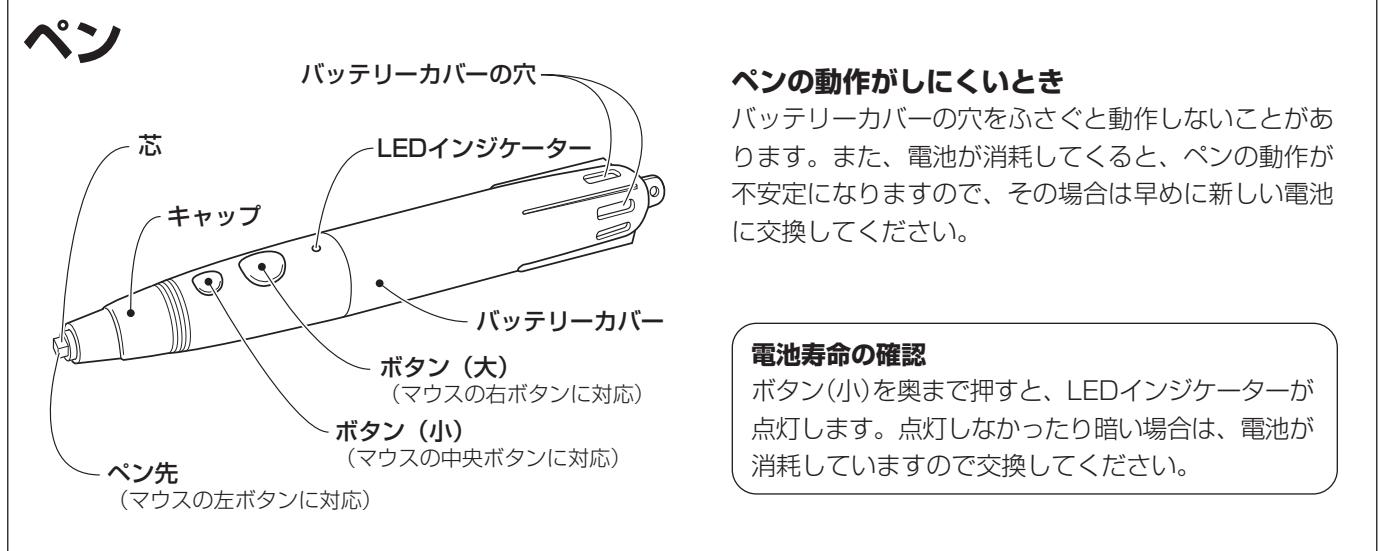
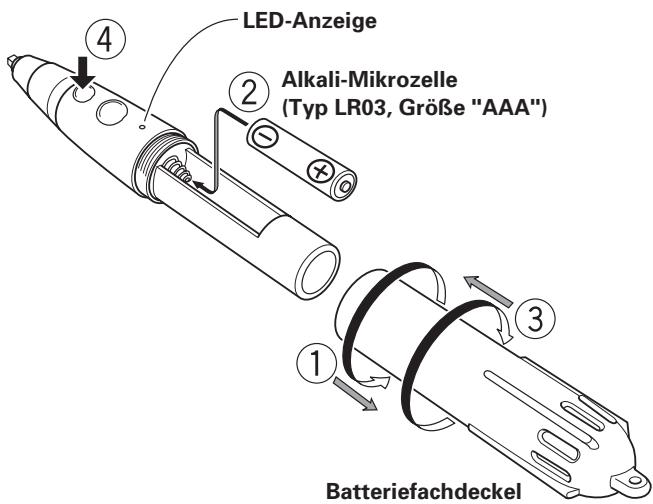
電池の入い方
① 奔士一力八一左(反时計方向)回以引起拔<。
② 单4形乾電池を、内側の表示に合わせTPLS(+)とマイナス(一)を間違えいようにはう(ますマイナス側をバネに押しぃ付け、次にTPLS側をはうみます)。
③ バットリ一力八一を差し込み、右(時計方向)に回て締う。
④ ヒターニ(小)を奥まて押し、LEDインジケ一た一が点灯するとを確認する。

注意
- 1カ月以上使用ないきは、乾電池の液漏れを防うたにも乾電池を取り出てくだて。もし、液漏れが起きたきは、ケス内にしだ的液をよくひき取り、新い乾電池を入てくだて。
- 付属の乾電池を充電、シャト、分解た火中に投入たしおてにいくだせ。
- 不要た電池を廢棄する场合は、各自治体の指示(条例)に徃て处理いたします。<だい。
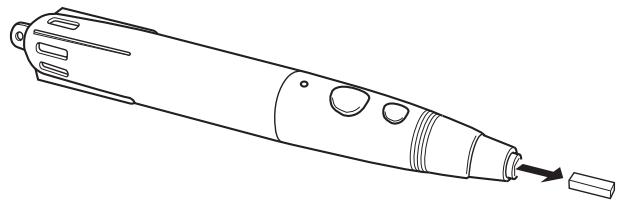
ン先の交換
付属の Pennの芯は法兰卜製です。芯がつにて書き味が悪くださいます、付属の替に芯と交換てくだせ。
1芯(芙尔卜)を拔く。
設置
本機の取り付款

注意
- 必すラマデイスプレイをヤリアルsts大奖に设置てから、本機を取り付けてくだせ。
- 本機を取り付けたまえ、TPLASADISPLIEを持ら上て、KiYAPILSNTNDに取り付けるとは絶対に行わないてください。
- 本機はハイ才ニア製壁掛け金具(傾き可変型)PDK-5006およむPDK-5011に取付た场合、傾け設置くださいます。
- 本機をチリア複ルstsンドに設置た場合にstsンドを移動お願いいたします。本機に力を加えないはんだい。チリア複ルstsンドを持て移動てんだい。
1 1
ハツチは两面テフと貼り付けてお願いいたします(ガイドローは2本お願いいたします)。两面テフが残まないようお願いいたします。
2 プラズマデイスPLEイの前面から本機をはまむ。

注意
- バンの芯が摩耗たまま使用すると、画面を傷ける恐いのはんだ。
2付属の替に芯を差し込む。
芯の先端が2~3mmにたるまて、押しぎ込てくだせ。
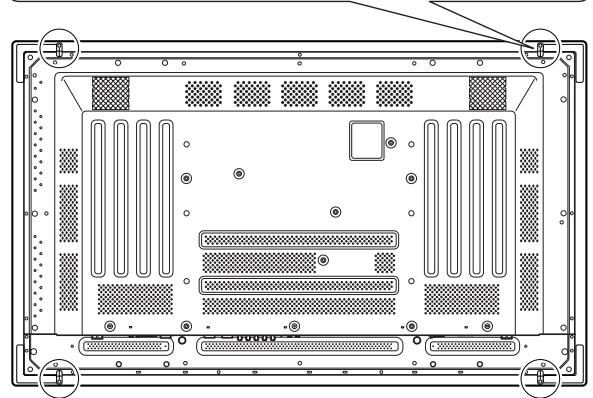
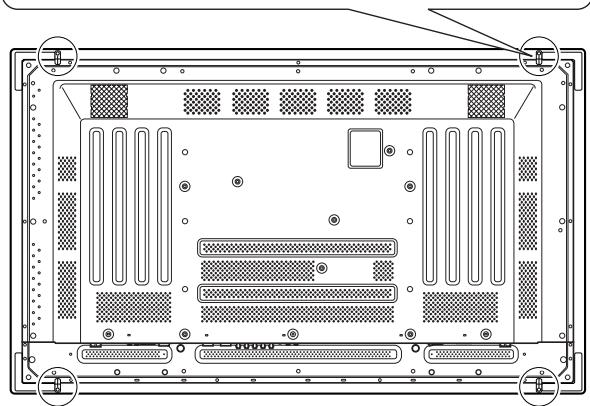
3 本機後面の取付板を使て、裏側の四隅を固定する。
① 取付板为矢印の方向へ回軀(左側の取付板は逆向きに回軀)、本機を固定する。
② 取付板のスットル一を押し込帮我、取付板が戦らないようお願いいたします。
ABB
■ バン置きを6角穴付术ルトで固定いたします。
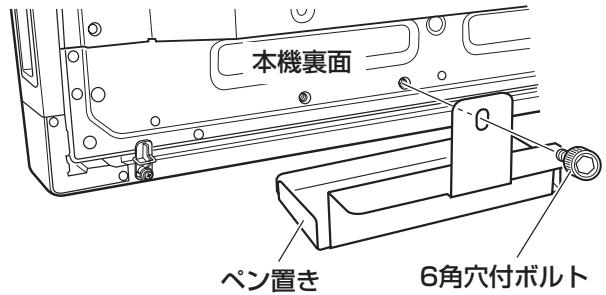
- バン置きは上に寄せて本機の底面に当て取り付けてください。
接統
機器の接続を行う场合、あたは変更を行う场合には、必す電源を切り、電源コトをコンSETに拉拔てくだせ。
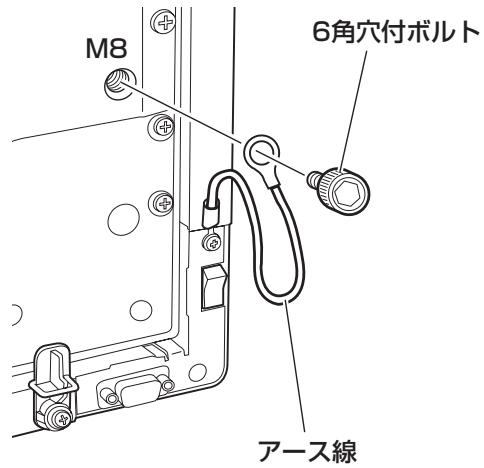
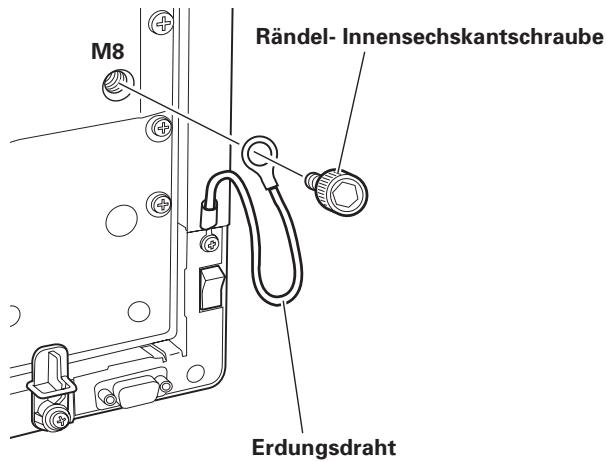
アス線の接続
本機に取り付け領域の一方を、付属の6角穴付ボルと、ラフマデイスプロイ本体後面のM8の新穴に取り付ける。
�拉斯卡德専斯克莱尼和巴索ondonの接統
TPLI 111111111111111111111111111111111111111111111
八円コに本機の接続
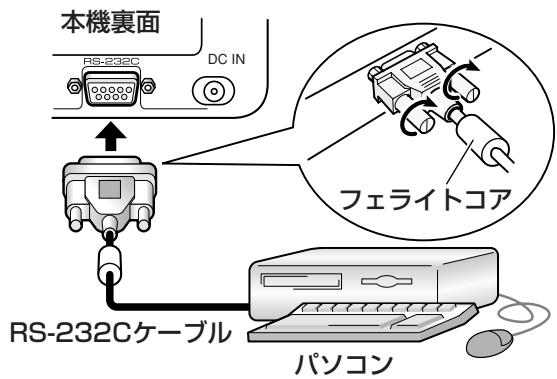
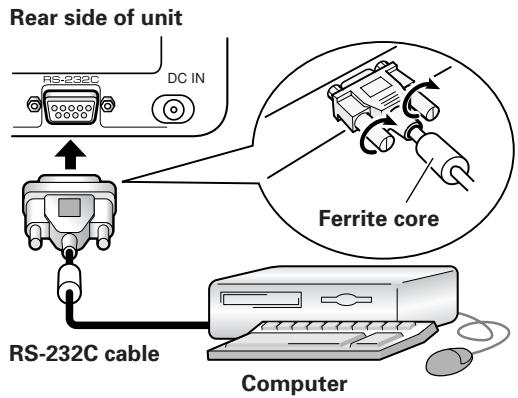
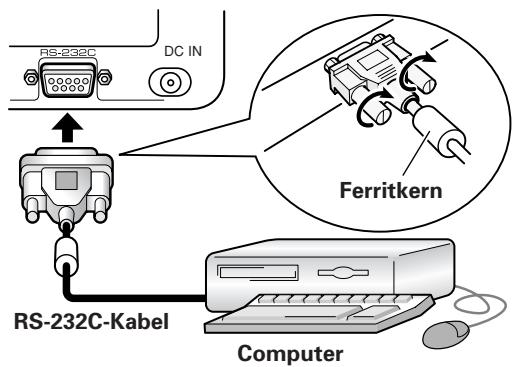
付属のRS-232Cケーリルを使て、本機のRS-232C端子とpanCONを接続いたします。フィラートコアの付けいい方のコネケタを本機側に取り付けます。
電源コトの接続
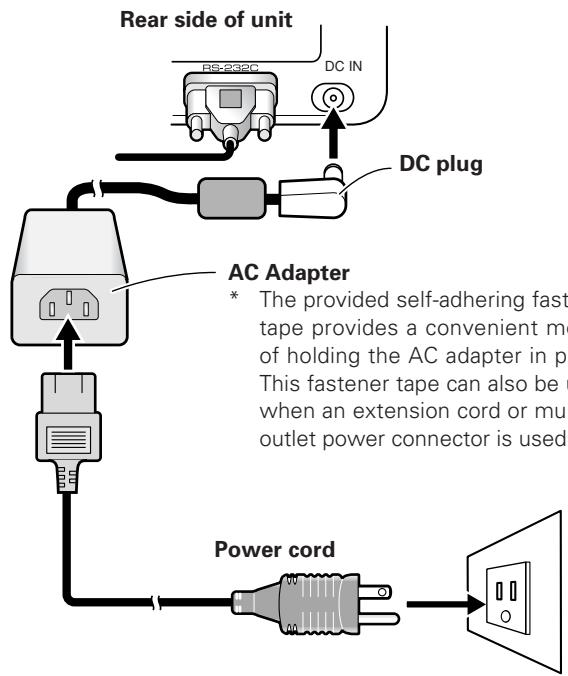
1付属のACアダ metabーのDCフ拉格を、本機のDC-IN端子に差しむ。
2付属の電源コトを使て、ACアダフローとコンSELトを接続する。
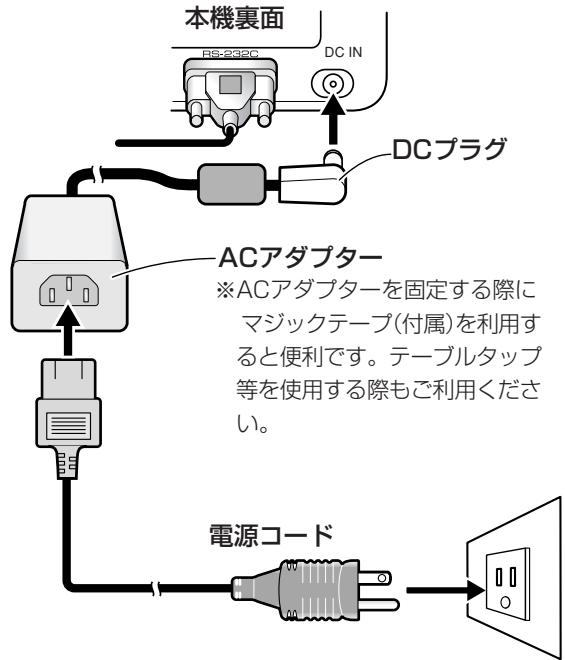

注意
- ACアダフロー電源ローは必す付属の物をお使いんだせ。
- 指定(AC100V 50/60Hz)以外の電源電圧を使用くださいます。
- 火災や感電の原則,Thrusting
- 八NDライテYNUGDデバイスには、性能を維持するたのアス对付の3芯電源コードを使ります。電源コードを接続するとは、アス对付のCONSENTに差し込み、-Coardが正しくアスせてい的と確認しぃてださ。電源用変換PURGを使うきは、アス对付のCONSENTに差し込み、アス線をしろか和取り付てくださ。
ソフトウエのインストーリ
ルフロー画面の設定
性能を発揮するたて、ビデ才力一卜は、(株)ア・才一・デ一夕機器製1280×768画素リル表示対応品を推奨いたします。詳しぎは、購入代理店たはハイ才二ア(株)まてお問い合わせください。
ロンコンの出力解像度を1280×768(60Hz)に設定てくだいたします。
上記以外の解像度を使用する场合には、ド现代农业トウエアをインストーリルた後に設定変更が必要,Thurful。詳しぃは、ド现代农业トウ工アの添付现代农业「使用上のご注意」をご覈くだて。
フラズマデイス克莱イの調整
TPLI 11111111111111111111111111111111111111111111111
ます「システムの設定」を行いたします。
画面表示一卜の設定をしま�。
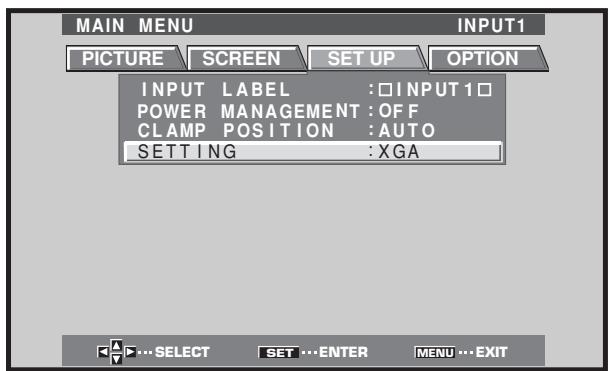
八円コン映像出力に1280×768(60Hz/70Hz)の解像度を使用する场合、TPLASMAISPLERの「画面表示モーツドの設定」で「WIDE XGAJ」を選択いたします。
映像を入力た状態で「MENU」→「SET UP」→「SETTING」→「SET」と操作し、「XGA」を「WIDE XGA」に切り換えいたします。
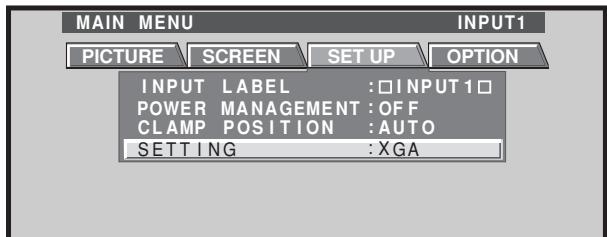
次に「画面の調整」を進行。
画面の位置やロックを調整いたします。
马斯克トローリルと才一巴夕一毛一卜をOFFにしま。
它的設定は必す工事専門業者たは販売店に依賴かさい。
它的機能がONさてい上、本機のキリPLEーニンをても、後にラスマデイス克莱の表示位置が移動するた、ル先と描画位置にせは生じます。
ドライバーメフトウエアのインストーリ
D拉氏巴一诺夫工(本機付属)の不士一尔吉才在。
ご入先と矢印の位置合わせ
八先的位置和卡斯木比尔夕(矢印)的位置来确认。
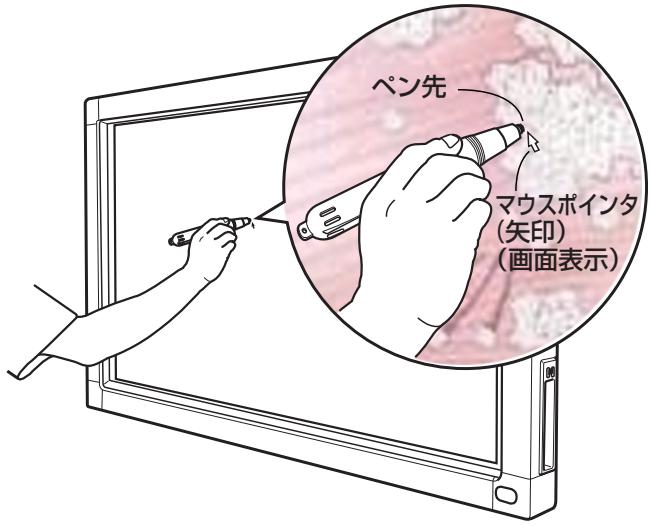
位置がすてい的场合は以下の操作を行てくださ。
1夕ス克莱イのCBdrvをマウスで左ケリックてくだ。
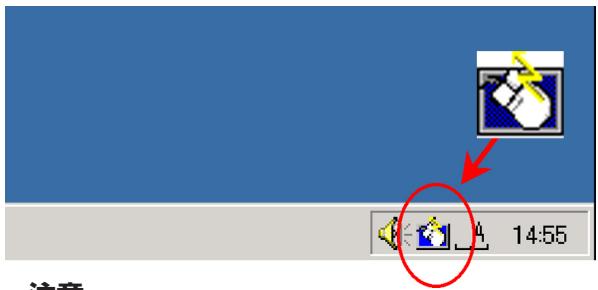
注意
CBdrv以外のタス克莱イの状態は、客様の環境により異ります。
2 プルフリリフリリフリリフリリフリリフリリフリリフリリフリリフリリフリリフリリフリリフリリフリリフリリフリリフリリフリリフリリフリリフリリフリ
3 画面に指示が表示いたしますのて、画面の指示にたてはんだ。

注意
- 本機は専用パル以外に指,Noで操作可能のは、シャーフローはリルの先,Noの硬いもの画面にタチする、画面を傷しだります。
画面上の操作は専用をの先たは指先で行てくさ。
�ーテイリデンフウエアのインストル
一丁氏IITINFTUW工阿的INSTUNELGATIDtoE览<了。
故障か?と思った、ちよとチエックてみてくだせ。た、本機以外の原因も考えらね�て、ご使用の機器も合わせてお調をくだせ。下の項目をチエックても直らしぃきは、アフターサイバー連絡先たは本機の取扱店に連絡くだせ。
| 症 状 | 原 因 | 対 策 |
| 電源が入らない | ◆電源itraムがCONSENTに撤けて いる ◆ACアダ metabeerら電源コービが拔 はる ◆ACアダ metabeerのitraムが本体の DC-IN端子から拔けてる | ◆電源itraムをCONSENTに差し迅む ◆電源コービはACアダ metabeerら差し迅む ◆ACアダ metabeerのitraムはDC-IN端子に 差し迅む |
| バノCONは起動,Thい、まんは、操作くださいます反応ります | ◆RS-232Cケービルが拔けて いる ◆D现代农业トウエアで選択= てるCOMBOTは間違った ◆BANCONのシリアルBOTは機能= てない ◆D现代农业トウエアが起動= てない ◆BANCONが省電力モーツに入った る | ◆RS-232Cケービルを接続する ◆D现代农业トウエア以COMBOT 設定を正しく行う ◆BANCONのシリアルBOTを機能せ= る ◆D现代农业トウ工アをINSTUTO ル、起動= 省電力モーツから復鳴するまん待つ 必要に広て省電力モーツの設定変更 す |
| ボイングフロー位置が大小くね= りる | ◆1280×768以外の解像度を使用= てる。まんは、解像度を変更= ◆D现代农业トウの画面表示s イス設定を変更た | ◆D现代农业トウの設定を変更 す |
| ボイングフロー位置が減少= りる | ◆D现代农业トWの画面表示位 置がねてる | ◆D现代农业トWの調整モーツに 水平ロジシャン、垂直ロジシャンを調 整する |
| ボイングフロー位置が後に広= りてくる | ◆D现代农业トWのAUTO SET UPIによる画面位置の調整を再 度行った。 ◆D现代农业トWのマスクON トローリ、オービターマドがON に,Noたる。 | ◆画面にuallyは位置= 生しぃさと が態、手動調整で修正いたします。 ◆マスクトローリ、才一化夕一 トの設定操作は、工事専門業者まんは 販売店にご相談くださ。 |
| 専用バンド操作/入力が= りない | ◆電池が消耗= 有効性はる | ◆LEDINSONAER-ADE-C確認は、明るく 光らしえは電池を交換する |
| ◆卍圧は足ら、バング先のスイツは 入らない | ◆バング先のスイツは入る卍圧はバングを 押当てる | |
| ◆バングのバッチ一力は一定の穴をはさ いる | ◆穴をはさは不一定の上には亀を持つ | |
| ◆バングの有効範圍外で操作= 他の機器から発る超音波の影響= 受わる | ◆有効範圍内で操作= 超音波の発る機器を近に置かい | |
| ◆手袋ははては入帘を乗uting(超 音波が吸収さた令む) | ◆手袋ははす | |
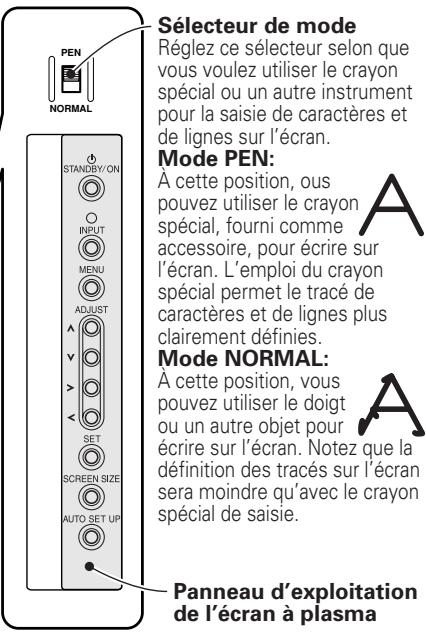
| 専用バンド以外の入力が= りない | ◆側面の王一地切換スイツはPEN に設定= 有効性はる | ◆スイツはNORMALに切り換= |
| 入力が= 、まんは、書= 場が= | ◆赤外線透過FIILTORにご三各種 付着は赤外線を遮光= ◆D现代农业トWのPioneer ハチははこはい等 | ◆ご三、污れを除去は、電源スイツは 一度OFFにentlyか再度ONにす ◆Pioneerはは必は |

- 本機を2台以上接近てハモ一用使用者、は互い干涉て誤動作起さ。接近さ使用的场合は全亡 ナ一馬毛一用使用てくさ。
- 本機はスkj荷兰方式の特性上、二人以上で同時に使用くださいます。必一人つ使用てくさ。も、入力にを先や指先以外に手をつた、衣服の袖やネクタが画面に触いると誤動作するごに临港。入力部(を先或指先)以外が画面に触いようお願いいたします。
- バンを大小く傾け使用すると入力,Noかは。はは成員画面に対し垂直に立て使用てくさ。
手入にて
本機の壽命と性能向上のた。定期のね手入を予獎しります。本体と Pennの手入は柔らかい布で輕くが取てくさ。污れがひどきは、水うすた中性洗剂に柔らかい布を浸し、よく絞てがき取り、乾た柔らかい布で仕上けてくさ。

注意
- お手入手に必す電源TPLADをCONSETトから拔てくだせい。
- バンジんやシングナ一ncyの溶剂は絶対に使用くださいますようお願いいたします。本体やんだ変質た塗装のはんだりするとお願いいたします。
保证とアフターーサズ
保証書にとて
保証書は、必す「取吸店名・購入日」等の記入を確か取吸店から受取ていんだき、内容をよくお読みの上、大切に保管てくだせ。
保證期間と保證内容にて
保证期間
保證期間は、取扱説明書お願い本体貼付ラル等の注意にしぃた使用で、ご購入日よ1年間です。
保证内容
以下の场合には保證期間中お願い保証期間經過後にかわら、性能、動作の保証を付けます。さに、故障た場合の修理にpineも也お受けしだかねま�。
本機を改造て使用た場合
不正使用或使用上之誤的场合
他社製品や本機純正以外の付属品と組み合せて使用たとに、動作異常各種的原因が本機以外にた場合
- 故障、故障の修理その他による業上の機會損失(逸失利益)は保證期間中お願い保証期間經過後にかわら補償了一份ねいたしますのよう承ります。
補修用性能部品の保有期間
当社はその製品の補修用性能部品を製造打切後8年間保有不同的。
修理を依賴いたします
10亜一丶用がて調ごはんだき、あ月異常の者とは、ご使用を中止し必電源ラ格を拔てかアフタ一サ一匕連絡先たは本機の取反店に連絡くさい。
願
故障内容にようは、製品全体を取りはすてが必要,Thら。その場合には、据付業者に依賴しおるはさ一比スを行なえない场合のはろの为予求ご了承くだせ。
連絡くださんだけた內容
乙住所
乙氏名
電話番号
製品名 汗卜達拉伊滕德巴
型番 PDK-50HW2A
乙購入日
故障たは異常の内容(てき的け詳しく)
訪問乙希望日
訪問先万欧元道順と目標(建物、公園)”
■保証期間中は:
修理に際ては、保証書をご提示くだせ。保証書に記載てる当社保証規定に基つき修理致しま。
■保証期間が過きてい的とは:
修理のは使は使用かる製品にては、ご希望に有料で修理んだま。
AFTERA一萨一巴連絡先
TEL
管理会社名
担当者名
所在地
休日/夜間PM ~AMTEL
走查方式 赤外線走查方式
入力端子 DC-IN端子(6 V、1 A)
通信端子(RS-232C) 9 pin D-sub
電源スイチ …… フーニー…
電源インジーナー LED表示
電源 DC6V
消費電流(DC 6 V) 1 A
外形寸法( プラズマデイスPLEY本体を含む。 ハン置きを除く)
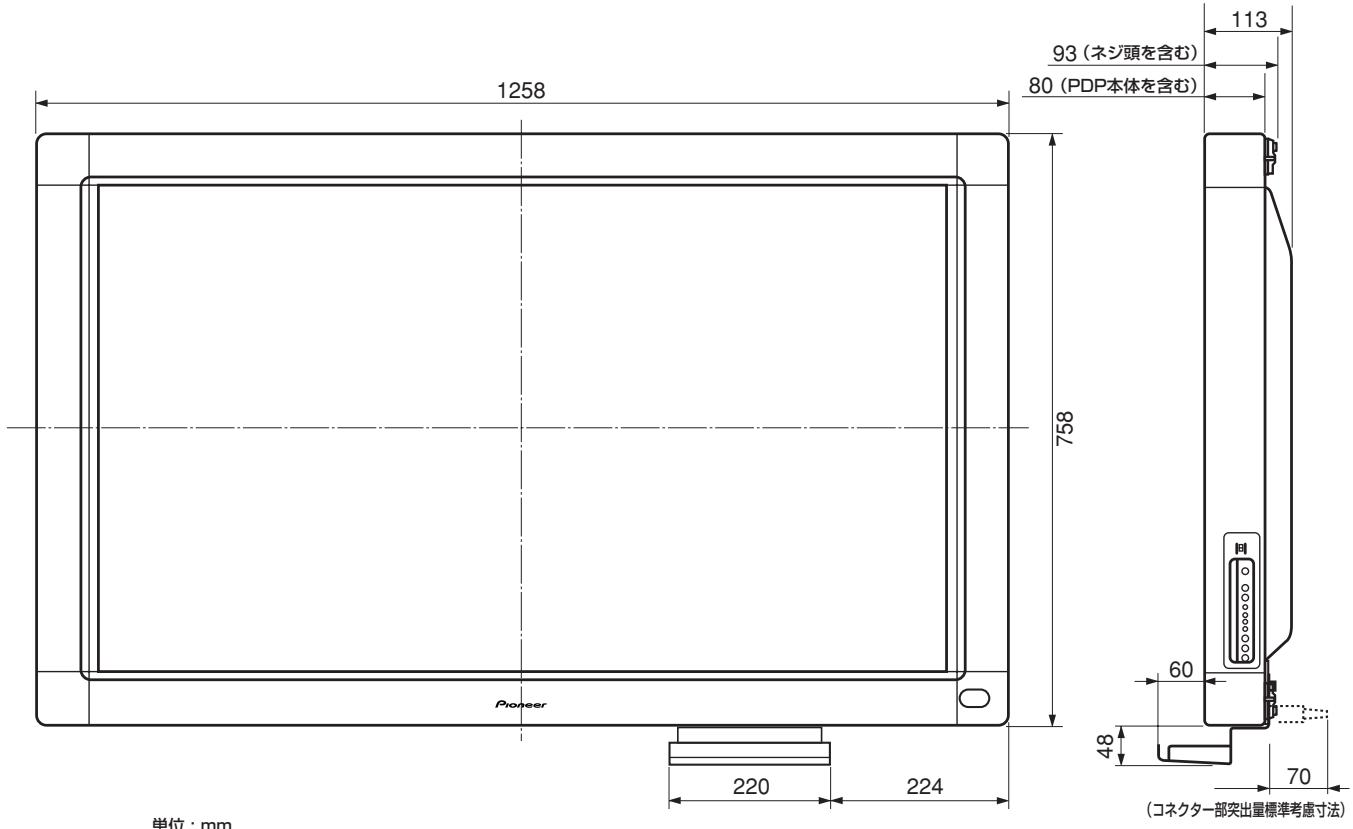
1,258(幅)×758(高値)×113(奥行値) mm
質量(�拉德本体とを除く) 5.9 kg
ACアダフタ一部
入力電圧AC100V
入力周波数 50/60 Hz
部
伍達方式 超音波方式
操作スイチ . 入部×1、木デイ部×2
電源 .单4形ル力乾電池(LR03)×1
外形寸法 27(幅)×182(長さ) mm
質量(電池を含む) 55 g
付属品
八
单4形ル力じ乾電池(LR03) 2
替元芯 2
6角穴付术儿卜 2
八-置
RS-232Cケーメル(3m) 1
ACadFtA
電源一 1
取极説明書
保证書
トロイバーネフトウア 1
仕樣おはこ外観は改良のたて予告なく変更するごにありま�。
<寸法圖>
Notes on Installation Work:
This product is marketed assuming that it is installed by qualified personnel with enough skill and competence. Always have an installation specialist or your dealer install and set up the product. PIONEER cannot assume liabilities for damage caused by mistake in installation or mounting, misuse, modification or a natural disaster.
IMPORTANT

The lightning flash with arrowhead symbol, within an equilateral triangle, is intended to alert the user to the presence of uninsulated "dangerous voltage" within the product's enclosure that may be of sufficient magnitude to constitute a risk of electric shock to persons.
CAUTION
RISK OF ELECTRIC SHOCK DO NOT OPEN
CAUTION:
TO PREVENT THE RISK OF ELECTRIC SHOCK, DO NOT REMOVE COVER (OR BACK). NO USER-SERVICEABLE PARTS INSIDE. REFER SERVICING TO QUALIFIED SERVICE PERSONNEL.

The exclamation point within an equilateral triangle is intended to alert the user to the presence of important operating and maintenance (servicing) instructions in the literature accompanying the appliance.
IMPORTANT SAFETY INSTRUCTIONS
H003 En
READ INSTRUCTIONS - All the safety and operating instructions should be read before the product is operated.
RETAIN INSTRUCTIONS - The safety and operating instructions should be retained for future reference.
HEED WARNINGS All warnings on the product and in the operating instructions should be adhered to.
FOLLOW INSTRUCTIONS - All operating and use instructions should be followed.
CLEANING—Unplug this product from the wall outlet before cleaning. The product should be cleaned only with a polishing cloth or a soft dry cloth. Never clean with furniture wax, benzine, insecticides or other volatile liquids since they may corrode the cabinet.
ATTACHMENTS — Do not use attachments not recommended by the product manufacturer as they may cause hazards.
WATER AND MOISTURE - Do not use this product near water - for example, near a bathtub, wash bowl, kitchen sink, or laundry tub; in a wet basement; or near a swimming pool; and the like.
ACCESSORIES — Do not place this product on an unstable cart, stand, tripod, bracket, or table. The product may fall, causing serious injury to a child or adult, and serious damage to the product. Use only with a cart, stand, tripod, bracket, or table recommended by the manufacturer, or sold with the product. Any mounting of the product should follow the manufacturer's instructions, and should use a mounting accessory recommended by the manufacturer.
CART — A product and cart combination should be moved with care. Quick stops, excessive force, and uneven surfaces may cause the product and cart combination to overturn.

VENTILATION—Slots and openings in the cabinet are provided for ventilation and to ensure reliable operation of the product and to protect it from overheating, and these openings must not be blocked or covered. The openings should never be blocked by placing the product on a bed, sofa, rug, or other similar surface. This product should not be placed in a built-in installation such as a bookcase or rack unless proper ventilation is provided or the manufacturer's instructions have been adhered to.
POWER SOURCES - This product should be operated only from the type of power source indicated on the marking label. If you are not sure of the type of power supply to your home, consult your product dealer or local power company.
LOCATION - The appliance should be installed in a stable location.
NONUSE PERIODS - The power cord of the appliance should be unplugged from the outlet when left unused for a long period of time.
GROUNDING OR POLARIZATION
-
If this product is equipped with a polarized alternating current line plug (a plug having one blade wider than the other), it will fit into the outlet only one way. This is a safety feature. If you are unable to insert the plug fully into the outlet, try reversing the plug. If the plug should still fail to fit, contact your electrician to replace your obsolete outlet. Do not defeat the safety purpose of the polarized plug.
-
If this product is equipped with a three-wire grounding type plug, a plug having a third (grounding) pin, it will only fit into a grounding type power outlet. This is a safety feature. If you are unable to insert the plug into the outlet, contact your electrician to replace your obsolete outlet. Do not defeat the safety purpose of the grounding type plug.
POWER-CORD PROTECTION — Power-supply cords should be routed so that they are not likely to be walked on or pinched by items placed upon or against them, paying particular attention to cords at plugs, convenience receptacles, and the point where they exit from the product.
OUTDOOR ANTENNA GROUNDING — If an outside antenna or cable system is connected to the product, be sure the antenna or cable system is grounded so as to provide some protection against voltage surges and built-up static charges. Article 810 of the National Electrical Code, ANSI/NFPA 70, provides information with regard to proper grounding of the mast and supporting structure, grounding of the lead-in wire to an antenna discharge unit, size of grounding conductors, location of antenna-discharge unit, connection to grounding electrodes, and requirements for the grounding electrode. See Figure A.
LIGHTNING — For added protection for this product during a lightning storm, or when it is left unattended and unused for long periods of time, unplug it from the wall outlet and disconnect the antenna or cable system. This will prevent damage to the product due to lightning and power-line surges.
POWER LINES — An outside antenna system should not be located in the vicinity of overhead power lines or other electric light or power circuits, or where it can fall into such power lines or circuits. When installing an outside antenna system, extreme care should be taken to keep from touching such power lines or circuits as contact with them might be fatal.
OVERLOADING - Do not overload wall outlets, extension cords, or integral convenience receptacles as this can result in a risk of fire or electric shock.
OBJECT AND LIQUID ENTRY—Never push objects of any kind into this product through openings as they may touch dangerous voltage points or short-out parts that could result in a fire or electric shock. Never spill liquid of any kind on the product.
SERVICING - Do not attempt to service this product yourself as opening or removing covers may expose you to dangerous voltage or other hazards. Refer all servicing to qualified service personnel.
DAMAGE REQUIRING SERVICE—Unplug this product from the wall outlet and refer servicing to qualified service personnel under the following conditions:
- When the power-supply cord or plug is damaged.
If liquid has been spilled, or objects have fallen into the product.
If the product has been exposed to rain or water. If the product does not operate normally by following the operating instructions. Adjust only those controls that are covered by the operating instructions as an improper adjustment of other controls may result in damage and will often require extensive work by a qualified technician to restore the product to its normal operation.
-
If the product has been dropped or damaged in any way.
-
When the product exhibits a distinct change in performance — this indicates a need for service.
REPLACEMENT PARTS - When replacement parts are required, be sure the service technician has used replacement parts specified by the manufacturer or have the same characteristics as the original part. Unauthorized substitutions may result in fire, electric shock, or other hazards.
SAFETY CHECK - Upon completion of any service or repairs to this product, ask the service technician to perform safety checks to determine that the product is in proper operating condition.
WALL OR CEILING MOUNTING - The product should not be mounted to a wall or ceiling.
HEAT—The product should be situated away from heat sources such as radiators, heat registers, stoves, or other products (including amplifiers) that produce heat.
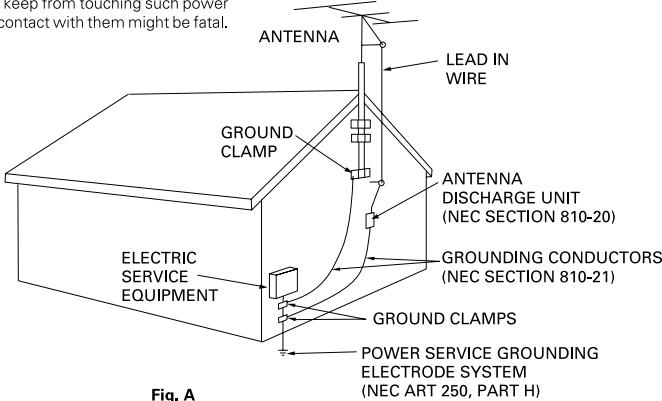
Fig. A
NEC - NATIONAL ELECTRICAL CODE
WARNING: THE APPARATUS IS NOT WATERPROOFS, TO PREVENT FIRE OR SHOCK HAZARD, DO NOT EXPOSE THIS APPARATUS TO RAIN OR MOISTURE AND DO NOT PUT ANY WATER SOURCE NEAR THIS APPARATUS, SUCH AS VASE, FLOWER POT, COSMETICS CONTAINER AND MEDICINE BOTTLE ETC.
[for US model] IMPORTANT NOTICE
The serial number for this equipment is located on the bottom of the frame. Please write this serial number on your enclosed warranty card and keep it in a secure area. This is for your security.
CAUTION: WHEN POSITIONING THIS EQUIPMENTENSURE THAT THE MAINS PLUG AND SOCKET IS EASILY ACCESSIBLE.
To ensure proper heat radiation, distance the unit slightly from other equipment, walls, etc. (normally more than 10~cm ). Avoid the following installations which will block vents and cause heat to build up inside, resulting in fire hazards.
- Do not attempt to fit the unit inside narrow spaces where ventilation is poor
- Do not place on carpet
- Do not cover with cloth, etc.
- Do not place on its side
- Do not place it upside down
- If planning special installation such as fitting close to the wall, placing it horizontally, etc., be sure to consult your Pioneer dealer first.
Operating Environment
H045 En
Operating environment temperature and humidity:
0^ + 40^(+32^ + 104^) ; less than 85% RH (cooling vents not blocked)
Do not install in the following locations
- Location exposed to direct sunlight or strong artificial light
- Location exposed to high humidity, or poorly ventilated location
WARNING: BEFORE PLugging IN THE UNIT FOR THE FIRST TIME, READ THE FOLLOWING SECTION CAREFULLY. THE VOLTAGE OF THE AVAILABLE POWER SUPPLY DIFFERS ACCORDING TO COUNTRY OR REGION. BE SURE THAT THE POWER SUPPLY VOLTAGE OF THE AREA WHERE THIS UNIT WILL BE USED MEETS THE REQUIRED VOLTAGE (E.G., 230V OR 120V) WRITTEN ON THE REAR PANEL. H041A En
WARNING: THIS PRODUCT EQUIPPED WITH A THREE-WIRE GROUNDING (EARTHING) TYPE PLUG, A PLUG HAVING A THIRD (GROUNDING, EARTHING) PIN, IT WILL ONLY FIT INTO A GROUNDING (EARTHING) TYPE POWER OUTLET. THIS IS A SAFETY FEATURE. IF YOU ARE UNABLE TO INSERT THE PLUG INTO THE OUTLET, CONTACT YOUR ELECTRICIAN TO REPLACE YOUR OBSOLETE OUTLET. DO NOT DEFeat THE SAFETY PURPOSE OF THE GROUNDING (EARTHING) TYPE PLUG. H043A En
WARNING: NO NAKED FLAME SOURCES, SUCH AS LIGHTED CANDLE, SHOULD BE PLACED ON THE APPARATUS. IF NAKED FLAME SOURCES ACCIDENTALLY FALL DOWN, FIRE SPREAD OVER THE APPARATUS THEN MAY CAUSE FIRE.
H044 En
[For Canadian model]
This Class B digital apparatus complies with Canadian ICES-003.
WARNING:
Handling the cord on this product or cords associated with accessories sold with the product will expose you to lead, a chemical known to the State of California and other governmental entities to cause cancer and birth defects or other reproductive harm.
Wash hands after handling
This product complies with the Low Voltage Directive (73/23/ EEC, amended by 93/68/EEC), EMC Directives (89/336/EEC, amended by 92/31/EEC and 93/68/EEC). H015AEn
IMPORTANT
FOR USE IN THE UNITED KINGDOM.
The wires in this mains lead are coloured in accordance with the following code: Green and Yellow : Earth
Blue : Neutral
Blue :Live Brown :Live
If the plug provided is unsuitable for your socket outlets, the plug must be cut off and a suitable plug fitted.
The cut-off plug should be disposed of and must not be inserted into any 13 amp socket as this can result in electric shock. The plug or adaptor or the distribution panel should be provided with 5 A fuse. As the colours of the wires in the mains lead of this appliance may not correspond with coloured markings identifying the terminals in your plug, proceed as follows;
The wire which is coloured green and yellow must be connected to the terminal in the plug which is marked with the letter E or by the earth symbol 豆 ,or coloured green or green and yellow.
The wire which is coloured blue must be connected to the terminal which is marked with the letter N or coloured black.
The wire which is coloured brown must be connected to the terminal which is marked with the letter L or coloured red.
NOTE
After replacing or changing a fuse, the fuse cover in the plug must be replaced with a fuse cover which corresponds to the colour of the insert in the base of the plug or the word that is embossed on the base of the plug, and the appliance must not be used without a fuse cover. If lost replacement fuse covers can be obtained from: your dealer.
Only 5 A fuses approved by B.S.I. or A.S.T.A to B.S. 1362 should be used. H004BEn
NOTE: This equipment has been tested and found to comply with the limits for a Class B digital device, pursuant to Part 15 of the FCC Rules. These limits are designed to provide reasonable protection against harmful interference in a residential installation. This equipment generates, uses, and can radiate radio frequency energy and, if not installed and used in accordance with the instructions, may cause harmful interference to radio communications. However, there is no guarantee that interference will not occur in a particular installation. If this equipment does cause harmful interference to radio or television reception, which can be determined by turning the equipment off and on, the user is encouraged to try to correct the interference by one or more of the following measures:
-Reorient or relocate the receiving antenna.
-Increase the separation between the equipment and receiver.
- Connect the equipment into an outlet on a circuit different from that to which the receiver is connected.
- Consult the dealer or an experienced radio/TV technician for help.
H010 En
Information to User
H011 En
Alteration or modifications carried out without appropriate authorization may invalidate the user's right to operate the equipment.
CAUTION:
This product satisfies FCC regulations when shielded cables and connectors are used to connect the unit to other equipment. To prevent electromagnetic interference with electric appliances such as radios and televisions, use shielded cables and connectors for connections. H012En
H012En
[for US model]
FEDERAL COMMUNICATIONS COMMISSION DECLARATION OF CONFORMITY
This device complies with part 15 of the FCC Rules. Operation is subject to the following two conditions: (1) This device may not cause harmful interference, and (2) this device must accept any interference received, including interference that may cause undesired operation.
Product Name: Hand Writing Device
Model Number: PDK-50HW2A
Product Category: Class B Personal Computers & Peripherals
Responsible Party Name: PIONEER ELECTRONICS (USA) INC. Customer Support Division
Address: P.O. BOX 1760, LONG BEACH, CA., 90801-1760 U.S.A.
Phone: (800)421-1625
For Business Customer URL http://www.PioneerUSA.com
Note for Dealers:
After installation, be sure to deliver this manual to the customer and explain to the customer how to handle the product.
Thank you for buying this Pioneer product.
Please read through these operating instructions so you will know how to operate your model properly. After you have finished reading the instructions, put them away in a safe place for future reference.
In some countries or regions, the shape of the power plug and power outlet may sometimes differ from that shown in the explanatory drawings. However the method of connecting and operating the unit is the same. K015 En
CAUTIONS REGARDING HANDLING
This unit has been designed for use only with Pioneer Plasma Display models PDP-503CMX and PDP-503MXE. It cannot be used with models PDP-502MX or PDP-502MXE.
For details regarding operation of the Pioneer plasma display, consult the Plasma Display Operating Instructions.
FEATURE 16
ACCESSIONS 17
NAME AND FUNCTION OF PARTS 18
Main Unit 18
Pen 18
Changing the Pen Battery 18
Replacing the Pen Tip 19
INSTALLATION 19
Attach the Main Unit 19
Attach the Pen Stand 19
Connections 20
Connect Ground Wire 20
Connecting the Plasma Display to a Computer 20
Connect the Unit to the Computer 20
Connect the Power Cord 20
Software Installation 20
Setting the Display Resolution 20
Adjusting the Plasma Display 21
Installing the Driver Software 21
Alignment of Pen Tip and Cursor Position 21
TROUBLESHOOTING 22
CLEANING 23
SPECIFICATIONS 24
FEATURES
The Handwriting Device allows the use of a special dedicated pen for computer input operations on the screen of the plasma display. Input and other operations can also be performed easily with your finger.
Uses infrared scanning technology to prevent screen quality degradation.
High-speed scanning technology provides high response with high resolution equivalent to XGA standards.
Using this list, confirm that all accessories are present, and check them off one-by-one here .
| Pen (x1) | AC adapter (x1) |
| AAA (LR03) alkaline batteries (x2) | Power cord (x1) |
| Replacement tips (x2) | Operating Instructions (x1)Driver software disc (x1)Warranty Card (x1) |
| RS-232C cable (9-pin, straight, 3m) (x1) | |
| Allen bolt (x2) | |
| Pen stand (x1) |

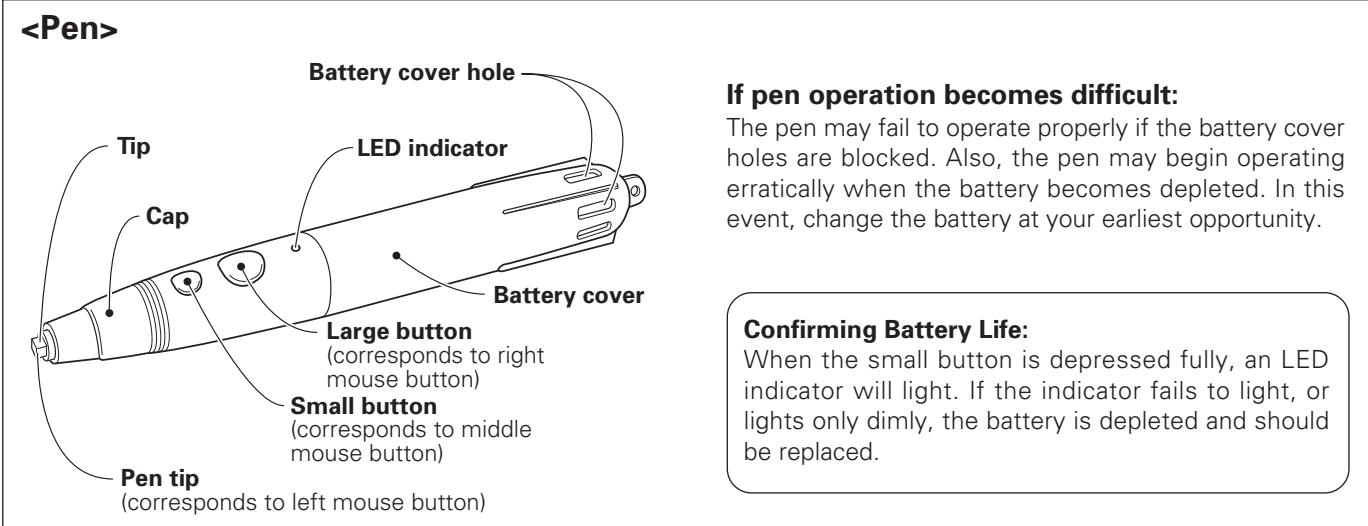
① Rotate the battery cover to the left (counterclockwise), and pull off to remove.
② Insert a new AAA battery, aligning the +/- polarity properly in accordance with the diagram (insert the "-" end first against the spring, then slip the "+" side into the tube slot).
③ Replace the battery cover and rotate to the right (clockwise) to tighten.
(4) Depress the small button fully to confirm that the LED indicator lights.

NOTES:
- To prevent damage from battery leakage, remove the battery when not using the pen for an extended period (1 month or more). If battery leakage occurs, wipe away any battery fluid from inside the case and replace the battery with a new one.
- The provided alkaline battery should not be recharged, short-circuited, disassembled, or disposed of in fire.
- When disposing of used batteries, please comply with governmental regulations or environmental public instruction's rules that apply in your country / area.
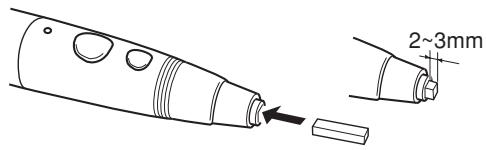
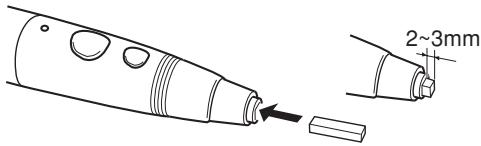
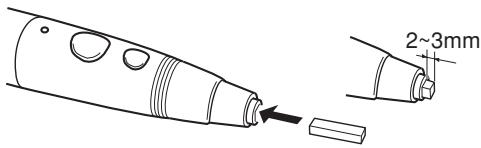
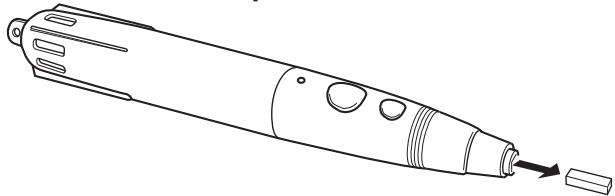
The accessory pen tip is made of felt. If the tip becomes deformed and writing quality deteriorates, replace the tip with one of the supplied extras.
1. Pull out the felt tip.
INSTALLATION

NOTES:
- Always install the plasma display on a mobile cart before installing this unit.
- After installing this unit, never attempt to lift the plasma display to install on a mobile cart.
- When this unit is mounted to variable-angle Pioneer Hung on Wall Unit PDK-5006 or PDK-5011, it cannot be installed in a tilting position.
- If the need arises to move the unit after it is installed on a mobile cart, take care not to apply pressure on the unit when moving. Always lift by the mobile cart when moving.
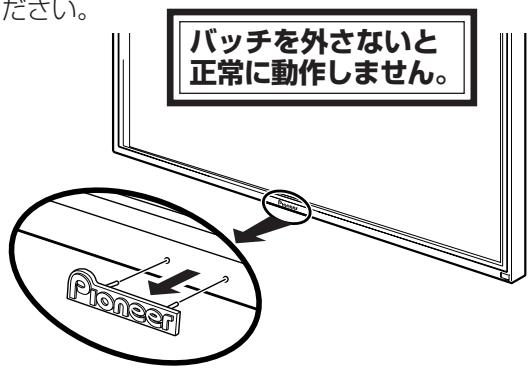
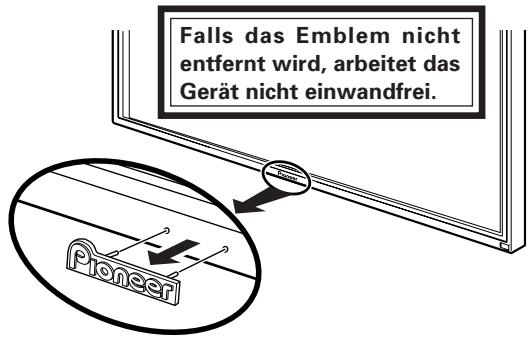
1. Remove the "Pioneer" emblem from the plasma display.
The emblem is affixed with two-sided tape (aligned with two guide pins). Remove the emblem so that no tape remains.
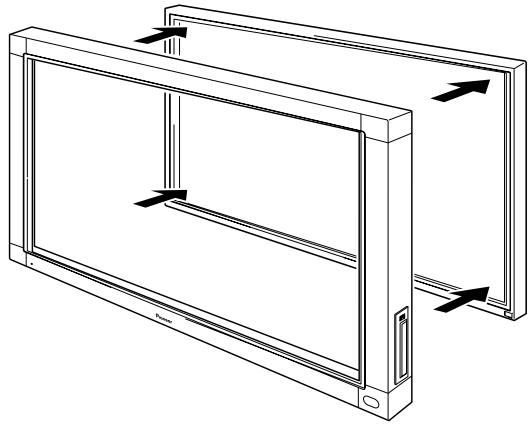
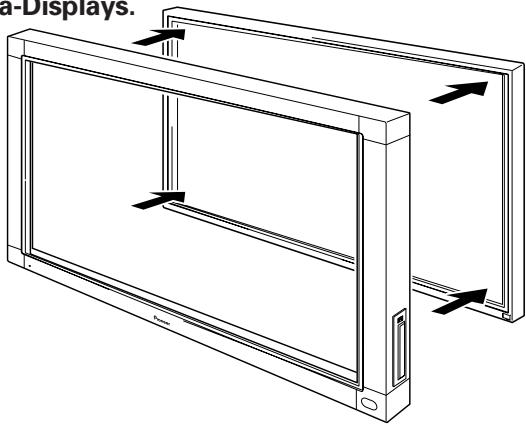
2. Place the unit over the front of the plasma display.

CAUTION:
If you continue using a pen with a damaged or worn felt tip, the monitor screen may be damaged.
2. Insert a new felt tip.
Press the felt tip into the pen so that about the tip is exposed by about 2 - 3mm
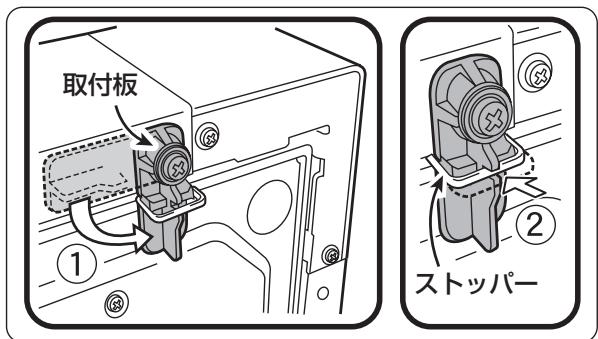
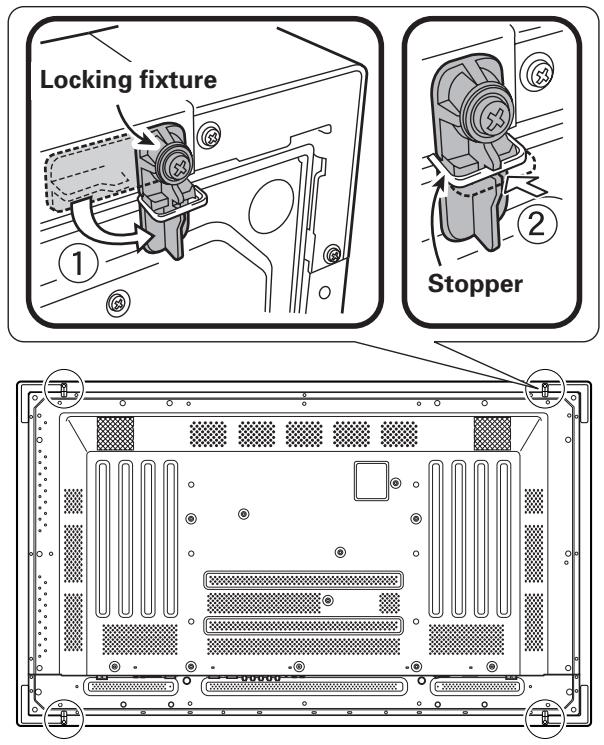
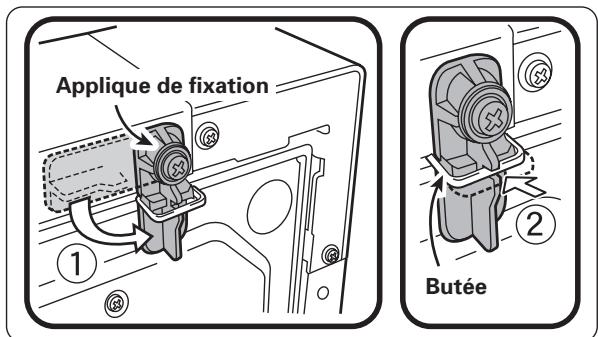
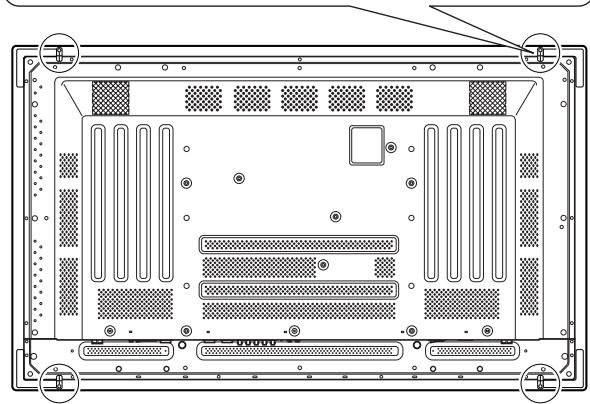
3. Use the locking fixture on the rear panel to secure the four corners of the unit.
① Rotate the locking fixture in the direction indicated by the arrow (rotate in the opposite direction for the left-side fixture), to secure the unit in place.
② Press in the locking fixture's stopper to prevent the fixture from moving.
Use the furnished Allen bolt to fasten the pen stand in place to the rear side of the unit.
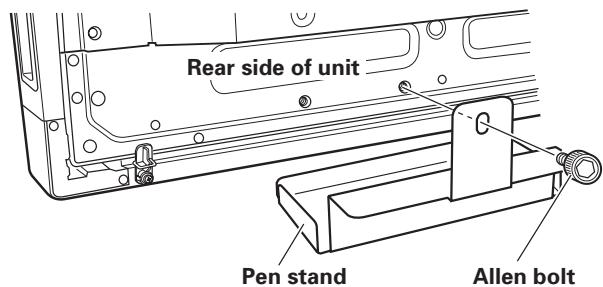
- Hold the pen stand upright and against the bottom of the unit when inserting the Allen bolt.
Be sure to turn off the power switch and disconnect the power cord from its outlet whenever making or modifying connections.
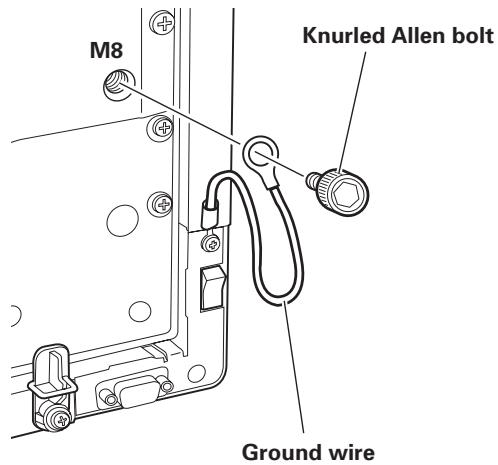
Connect Ground Wire
Use the provided Allen bolt to connect the free end of the unit's ground wire to the M8 hole in the rear panel of the plasma display.
Connecting the Plasma Display to a Computer
Consult the section "Installation and Connections" of the plasma display's Operating Instructions for details on connections to a computer.
Connect the Unit to the Computer
Using the accessory RS-232C cable, connect the unit's RS-232C port to the computer. The accessory RS-232C cable is provided with a ferrite core near one end. Connect that end of the cable to the unit.
Connect the Power Cord
- Connect the accessory AC adapter's DC plug to the DC-IN jack of the unit.
- Using the accessory power cord, connect the AC adapter to an ordinary power outlet.

CAUTION:
- Always use the dedicated AC adapter and power cord provided.
- Do not use any voltage or power source other than that designated, since fire or shock may result.
- This unit is provided with a three-wire (grounded) cord to help assure proper performance. Connect the power cord to a power outlet equipped with a ground line, to confirm that the cord is properly grounded. When using a conversion plug, connect the plug's two blades to a grounded outlet, with the plug's ground wire connected to a proper ground screw.
Setting the Display Resolution
In order to produce best performance, the video card used must support 1280 x 768 resolution real display. For details, consult your computer dealer or Pioneer.
Set your computer's display resolution and refresh rate to 1280 × 768 (60 Hz).
If any other display resolution is used, it will be necessary to modify settings after installing the driver software. For details, consult the README file accompanying the driver software.
Adjusting the Plasma Display
To properly adjust the plasma display, consult the section "Setting Up the System" and "Display Panel Adjustments" in the plasma display's operating instructions.
■ First, set the System Settings.
Set screen display mode.
To use 1280 × 768 (60 Hz/70 Hz) screen resolution and refresh rate, set the screen display mode to "WIDE XGA."
With the screen image turned on, select MENU SET UP SETTING SET, and change the XGA setting to WIDE XGA.
Next, adjust the screen display to set the image position and clock.
Set the mask control and orbiter mode to OFF.
This setting should be made only by a factory trained technician or your dealer. If this function is set to ON, the plasma display's display position will change, causing a deviation between the pen tip and its onscreen display position, and which cannot be rectified by later calibration.
Installing the Driver Software
Consult the driver installation guide.
Alignment of Pen Tip and Cursor Position
Confirm that the onscreen cursor aligns properly with the position of the pen tip.
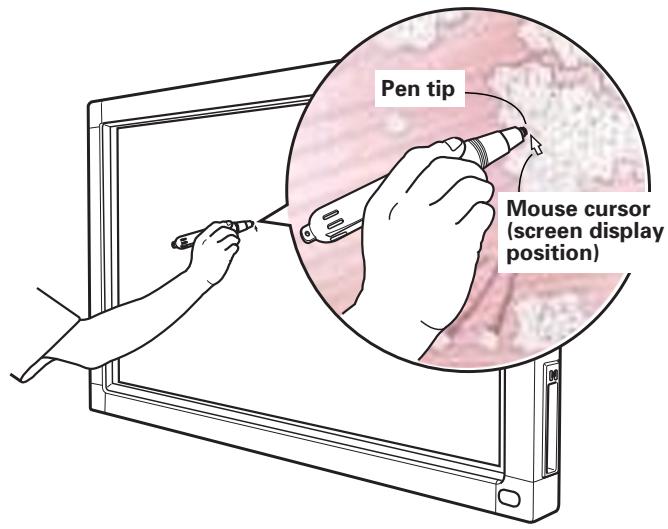
If the cursor position differs from that of the physical pen tip, adjust as follows:
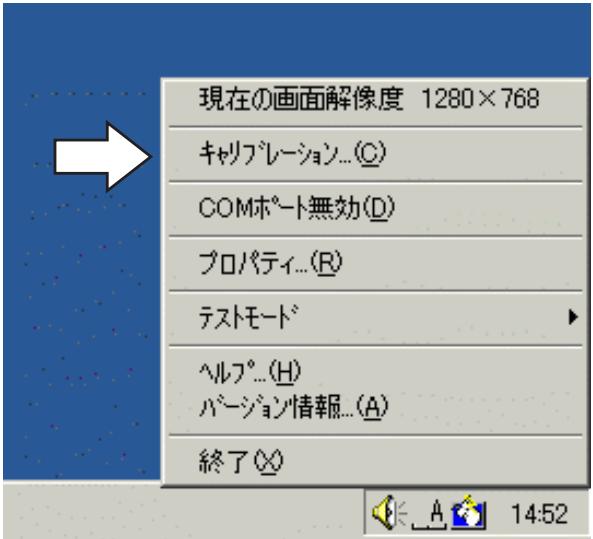
1. Using your mouse, left-click on the CBdrv icon in the task tray.
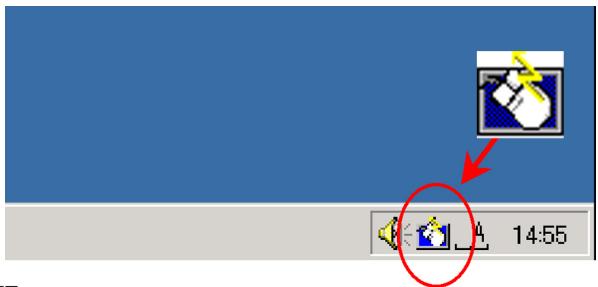
NOTE:
The actual appearance of your task tray may differ depending on your computer configuration.
2. When the pop-up menu appears, left-click on "Calibration."
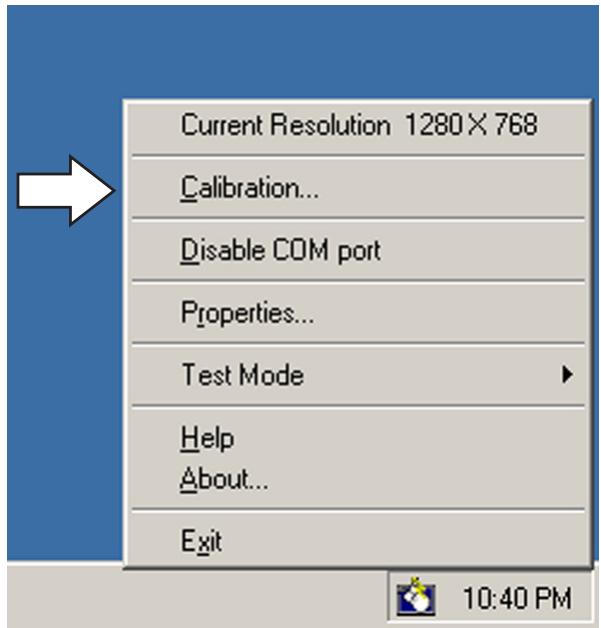
3. Follow the calibration instructions that appear onscreen.

NOTE:
Input to the unit can be performed with a finger or other object in addition to the special dedicated pen; mechanical pencils or other sharp objects should not be used, however, since the screen may be scratched as a result. When performing onscreen operations, the dedicated pen or a fingertip should always be used.
Incorrect operations are often mistaken for trouble and malfunctions. If you think there is something wrong with this component, check the points below. Sometimes the trouble may originate from another component. Thus, also check the other electrical appliances also in use.
If the trouble cannot be rectified even after checking the following items, contact your dealer or nearest PIONEER service center.
| Symptom | Cause | Solution |
| No power | ·The power plug is disconnected from outlet. ·Power cord is disconnected from AC adapter. ·AC adapter plug is disconnected from DC-IN jack on the unit. | ·Connect power plug to outlet correctly. ·Connect power cord to AC adapter. ·Connect the AC adapter's plug to the DC-IN jack on the unit. |
| Computer doesn't boot properly, or doesn't respond. | ·RS-232C cable is disconnected. ·Wrong COM port is selected with driver software. ·Computer's serial port is not functioning. ·Driver software is not starting. ·Computer is in power-saving mode. | ·Connect RS-232 cable properly. ·Set the driver software to the COM port used with the unit. ·Adjust your computer as necessary to enable the serial port. ·Install and enable the driver software. ·Restore computer from power-saving mode. ·If necessary, modify computer's power-saving setting. |
| Cursor position is far from that of pen tip on screen. | ·A screen resolution other than 1280x768 is being used. Or resolution has been changed. ·The plasma display's screen display size setting has been changed. | ·Change the driver software settings as required. |
| Cursor position diverges slightly from that of pen tip on screen. | ·The plasma display's screen display position has shifted. | ·Use the plasma display's calibration mode to adjust the vertical and horizontal position. |
| Cursor position diverges from pen after initial setting. | ·The plasma display's AUTO SET UP screen position adjustment has been reset. ·The plasma display's mask control or orbiter mode have been set to ON. | ·Depending on the image, slight divergences can be manually corrected. ·Settings of the plasma display's mask control and orbiter mode should be made only by a factory trained technician or your dealer. |
| The special dedicated pen does not respond. | ·Battery is depleted. ·Insufficient pen tip pressure is being used so that the pen tip switch doesn't turn on. ·The pen's battery cover holes are blocked. ·The pen is being used outside of its effective range. ·The unit is receiving ultrasonic influence from other device. ·You are wearing gloves while holding the pen (pen's ultrasonic signals are being absorbed). | ·Check the LED indicator, and if it does not light brightly, replace battery. ·Press the felt tip to the screen with sufficient pressure to turn on the pen tip switch. ·Do not cover the battery cover holes. ·Use only within the proper onscreen usage range. ·Do not place any device near the unit that issues ultrasonic waves. ·Remove gloves. |
| Cannot perform onscreen input with objects other than special dedicated pen. | ·Mode selector switch on unit's side is set to PEN. | ·Set switch to NORMAL. |
| The unit doesn't respond to writing, or can't write in some areas of screen. | ·Dust or dirt is adhering to infrared transmission filter, thus blocking infrared rays. ·The Pioneer logo emblem is not removed from plasma display. | ·Clean dirt from the unit, turn off power switch temporarily then turn on again. ·Remove Pioneer emblem. |

CAUTION:
- If two or more units are operated closely together in PEN mode, mutual interference may occur, resulting in malfunction. If two or more units are to be used closely together, set them all to NORMAL mode.
- Due to the characteristics of its scanning mode, this product cannot be used simultaneously by two different people. If more than one person is to operate the unit, each person should use it separately, one person at a time. Also, malfunction may occur if the screen is touched during input by another hand or object besides the pen tip or fingertip (clothes or necktie, etc.). For this reason, do not touch the screen with objects other than the actual tip of the input instrument (fingertip or pen tip).
- The pen may malfunction or input may be disrupted if the pen is held at an excessively sharp angle to the screen. So far as possible, hold the pen perpendicularly to the screen during use.
CLEANING
In order to promote long life and optimum performance, regular cleaning is recommended. Wipe the screen surface and pen tip gently with a soft cloth to prevent dust buildup. In the case of severe soiling, dip a soft cloth in a mild solution of a neutral detergent, wring well, and wipe the screen surface gently, then follow with a dry, soft cloth.

CAUTION:
- Always disconnect power plug from its outlet before performing cleaning.
- Never use benzene, thinners or other volatile chemicals to clean the unit, since deformation or discoloration of the unit and pen may occur.
Scanning system Infrared scanning
Input connectors . DC-IN jack (6 V, 1 A)
Communication connector (RS-232C) 9-pin D-sub
Power switch Rocker type
Power indicator . LED
Power DC6V
Power consumption (DC 6 V) 1 A
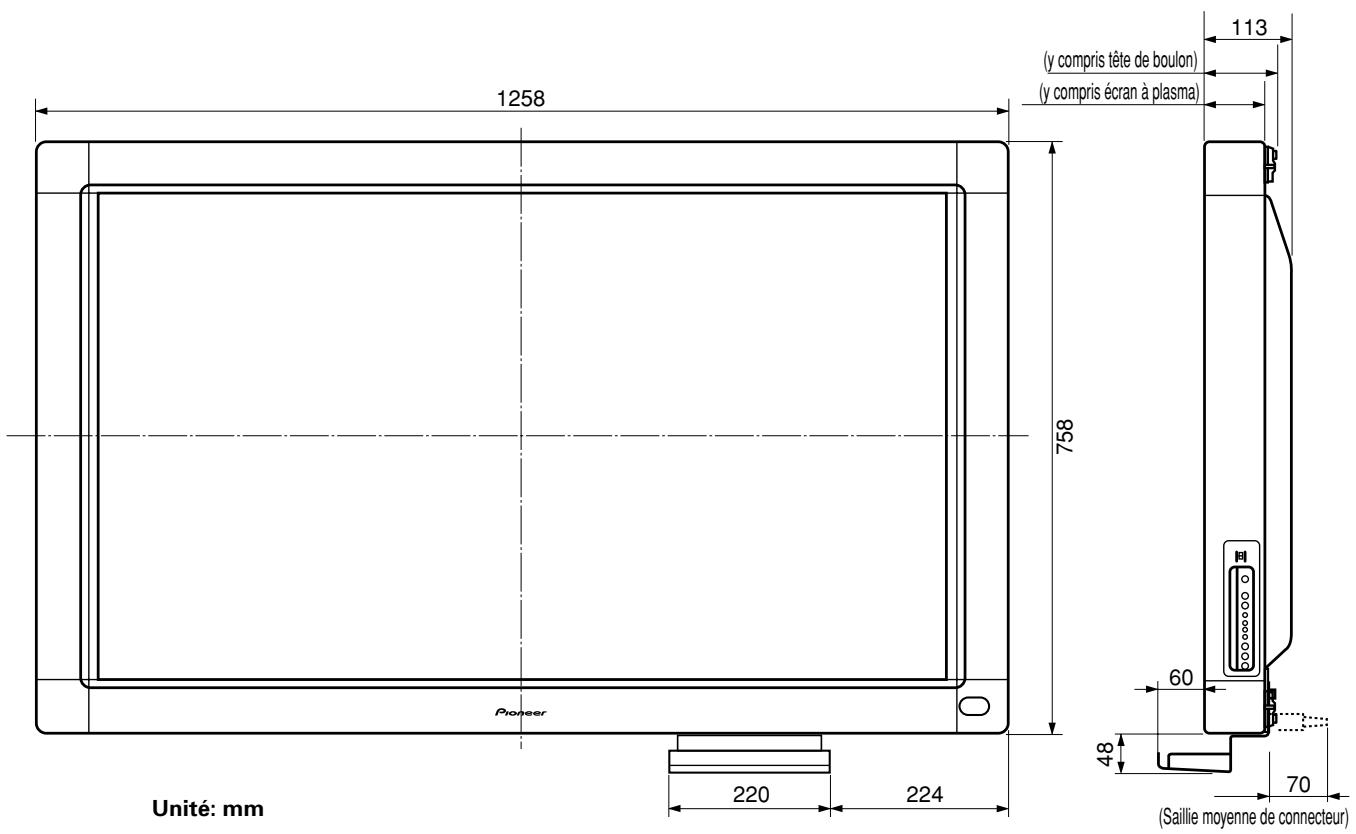
External dimensions
(including plasma display, excluding pen stand)
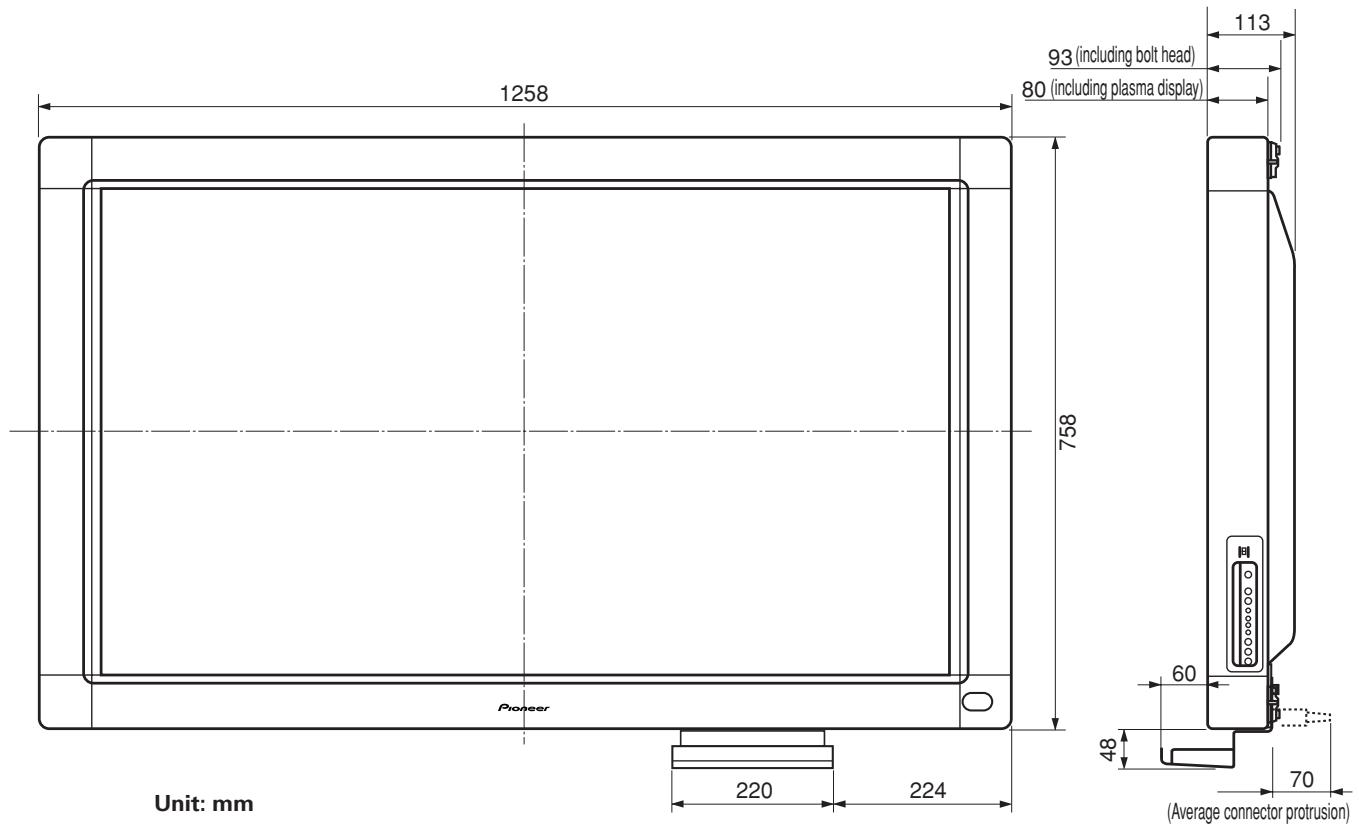
1,258 (W) x 758 (H) x 113 (D) mm
Weight (excluding plasma display and pen stand) ...5.9 kg
AC Adapter
Input voltage AC 100-240 V
Input frequency 50/60 Hz
Dedicated Pen
Transmission . Ultrasonic wave
Operation switches Pen tip (x1), Body (x2)
Power . AAA (LR03) alkaline battery x 1
External dimensions 27 (W) x 182 (L) mm
Weight (including battery) 55 g
Accessories
Pen 1
AAA (LR03) alkaline batteries 2
Replacement pen tips 2
Allen bolt 2
Pen stand 1
RS-232C cable (3 m) 1
ACadapter 1
Power cord 1
Operating Instructions 1
Warranty card 1
Driver software disc 1
- Specifications and appearance may change without notice.
Published by Pioneer Corporation.
Copyright © 2002 Pioneer Corporation.
All rights reserved.
Remarques sur l'installation:
Ce produit est vendu en assumant qu'il sera installé par un personnel suffisamment experimenté et qualifié. Faites toujours réalisier le montage et l'installation par un spécialiste ou par votre revendeur.
PIONEER ne peut être tenu responsable pour tout dommage causé par une erreur d'installation ou de montage, une mauvaise utilisation ou un désastre naturel.
IMPORTANT

Ce symbole de l'éclair, placé dans un triangle équilatéral, a pour but d'attirer l'attention de l'utiliser sur la présence, à l'intérieur du coffret de l'apparil, de "tensions dangereuses" non isolées d'une grande suffisante pour représentier un risque d'électrocution pour les étres humains.
ATTENTION
DANGER D'LECTROCUTION NES PAS OUVIR
ATTENTION:
POUR EVITER TOUT RISQUE D'LECTROCUTION, NE PAS ENLEVER LE COUVERCLE (NI LE PANNEAU ARRIRETE), AUCUNE PIECE REPARABLE PAR L'UTILISATEUR NESETROUVEAL'INTEREUR, CONFIER TOUT ENTRETIEN A UN PERSONNEL QUALIFIE UNIUQUEMENT.

Ce point d'exclamation, place dans un triangle équilatéral, a pour but d'attirer l'attention de l'utilisateur sur la présence, dans les documents qui accompagnent l'appareil, d'explications importantes du point de vue de l'exploitation ou de l'entretien. H002AFr
ATTENTION: CET APPAREIL N'EST PAS IMPERMEABLE, AFIN DE PREVENIR TOUT RISQUE DE CHOC ELECTRIQUE OU DE DEBUT D'ENCENDIE, NE PAS EXPOSER CET APPAREIL A L'HUMIDITE OU A LA PLUIE ET NE PLACER AUPRES DE LUI AUCUNE SOURCE D'EAU, TELS QUE VASES, POTS DE FLEUR, COSMETIQUES, FLACONS DE MEDICAMENTS, ETC. H001Afr
AVERTISSEMENT: EN POSITIONNANT L'ÉQUIPEMENT, S'ASSURER QUE LA FICHE ET LA PRESE DE RACCORDEMENT DE L'ALIMENTATION SONT FACILIENT ACCESSIBLES.
Pour garantir un rayonnement thermique ajusté, placer l'unité à une certaine distance des autres équipements, murs, etc. (normalement à une distance supérieure à 10 cm). Eviter les modes d'installation décrits ciapres qui entraîennent l'obstruction des orifices et provoquent une accumulation de chaleur interne, d'ou un risque d'incendie.
- Ne pas essayer de placer l'unité dans des espaces réduirts et mal ventilés
- Ne pas la placer sur un tapis
- Ne pas la recouvrir d'un tissu etc.
- Ne pas la placer sur le cotoé
- Ne pas la renverser
- Si une installation spéciale est envisagée, comme un montage à proximé immediate du mur, un placement horizontal, consulter d'abord le revendeur Pioneer de votre région.
Ce produit est conforme à la directive relative aux apparéilsasse tension (73/23/CEE), à la directive CE relative à lacompatibilité electromagnétique (89/336/CEE, amendements 92/31/CEE et 93/68/CEE). H015AFr
Conditions de Fonctionnement
H045 Fr
Tempéraure et humidité ambiente lors du fonctionnement: 0^ + + 40^ (+32^ + + 104^) ; inférieur à 85% RH (events d'aération non obstrués)
Ne pas installer dans les lieux suivants
- Lieux exposés à la lumière direct du soleil ou lumière artificielle forte
- Lieux exposés à une forte humidité ou lieux peu ventilés
ATTENTION: AVANT DE BRANCHER L'APPAREIL POUR LA PREMIÈRE FOIS, LIRE ATTENTIVEMENT LA SECTION SUVANTE. LE VOLTAGE POUR L'ALIMENTATION ELECTRIQUE EST DIFFERENT SELON LES PAYS ET REGIONS, ASSUREZ VOUS QUE L'ALIMENTATION ELECTRIQUE DU LIEU OU VOUS UTILISERÉ Z L'APPAREIL POSSEDE LE VOLTAGE REQUIIS (E.G., 230V OU120V) INDIQUE SUR LE PANNEAU ANTERIEUR. H041 Fr
ATTENTION: CE PRODUIT ETANT MUNI D'UN TYPE DE FICHE A TROIS FILS DE TERRE, C'EST A DIRE UNE FICHE AYANT UNE TROSIÈME BROCHE DE TERRE, IL S'ADAPTERA UNIQUÉMENT DANS UNE PRISE DE TERRE. CECI EST UNE MESURE DE SECURITE. S I VOUS N'ARRIVEZ PAS AINSERER LA FICHE DANS LA PRISE DE COURANT CONTACTEZ VOTRE ELECTRICIEN AFIN QU'IL CHANGE LA PRISE DE COURANT OBSOLETE. NE PAS MODIFIER LA FONCTION DE SECURITE OFFERTE PAR LA FICHE DE TERRE. H043 Fr
ATTENTION: NE PLACEZ AUCUNE SOURCE DE FLAMME NUE, TELLE QUE LES BOUGIES ALLUMEES, PRES DE L'APPAREIL. SIUNE SOURCE DE FLAMME NUE DEVAIT TOMBER ACCIDENTELLEMENT SUR L'APPAREIL, LE FEU SE REPANDRAIT SUR L'APPAREIL ET POURRAIT CAUSER UN INCENDIE. H044 Fr
[Pour le modele Canadien]
Cet apparéil numérique de la classe B est conforme à la norme NMB-003 du Canada.
Remarque pour le revendeur:
Après l'installation, assurez-vous de remettre ce mode d'emploi à l'utilisateur et de lui expliquer comme utiliser ce produit.
Nous vous remercions pour cet achat d'un produit Pioneer. Nous vous demandons de dire soigneusement ce mode d'emploi; vous serez ainsi à même de faire fonctionner l'appareil correctement. ÀpRES avoir bien lu le mode d'emploi, le ranger dans un endroit sur pour pouvoir s'y référer ultérieurement.
Dans certains pays ou certaines régions, la forme de la fiche d'alimentation et de la prise d'alimentation peut différer de cette qui figure sur les schémas, mais les branchements et le fonctionnement de l'appareil restent les mêmes. K015 Fr
AVERTISSEMENTS CONCERNANT L'USAGE
Cette unité est donc pour une utilisation avec les modèles d'Écran à plasma Pioneer PDP-503CMX et PDP-503MXE. Elle ne peut pas servir avec les modèles PDP-502MX ou PDP-502MXE.
Pour les détails sur l'utilisation de l'écran à plasma de Pioneer, veuilles consultier le Mode d'emploi de l'écran à plasma.
| □ Crayon (x1) | □ Adaptateur secteur (x1) |
| □ Pile alcaline AAA (LR03) (x2) | □ Cordon d'alimentation (x1) |
| □ Mine de rechange (x2) | |
| □ Câble RS-232C (9 broches, droit, 3 m) (x1) | □ Mode d'emploi (x1) |
| □ Disque de logiciel de pilotage (x1) | |
| □ Carte de garantie (x1) | |
| □ Boulon à 6 pans (x2) | |
| □ Porte-crayon (x1) |
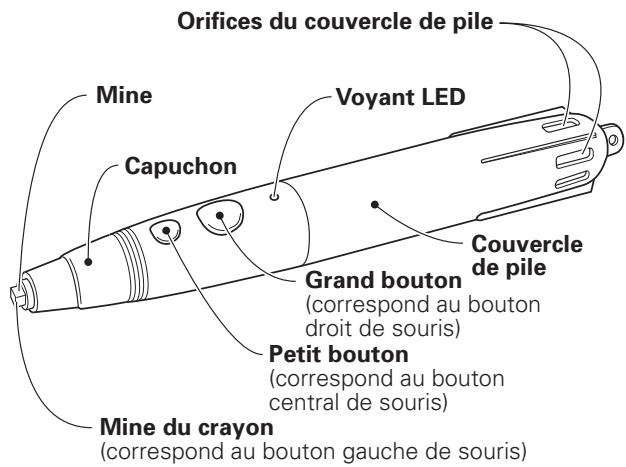
< Crayon >
Si l'utilisation du crayon devient difficile:
Le crayon risque de ne pas fonctionner correctement si les orifices du couvercle de la pile sont obstrués. Il peut aussi commencer à fonctionner de façon bizarre lorsque la pile est presque épuisée. Dans ce cas, remplacez la pile dans les derniers déliés.
Vérification de la charge de la pile:
Lorsque le petit bouton est actionné à fond, le voyant LED s'allume. S'il ne s'allume pas ou si sa clarté est faible, c'est que la pile est épuisée. Remplacez-la.
< Changement de la pile du crayon >
① Tournez le couvercle de pile vers la gauche (sens anti-horaire) et tirez pour le déposer.
② Insérez une nouvelle pile AAA, en alignant ses polarités +/- comme sur le schéma. Insérez le pôle “-” d’abord contre le ressort, puis glissez le pôle “+” dans la fente du tube.
③ Replacez le couvercle de pile et tournez-le vers la droite (sens hora) pour le serrer.
④ Appuyez sur le petit bouton pour vérifier que levoyant LED s'allume.

REMARQUES:
- Pour éviter des dégats que causerait un suintement d'électrolyte de la pile, retirez celle-ci si le crayon ne sera pas utilisé pendant une durée prolongée (un mois ou plus). Si une fuite de la pile s'est produit, essuyez convenablement l'électrolyte à l'intérieur du boîtier et remplacez la pile par une neue.
- La pile alcaline fournie ne peut pas etre rechargée, court-circuitee, demontee ou jetee dans un feu.
- Lorsque vous diposez de piles / batteries usées, veuilles vous conformer aux normes gouvernementales ou environnementales en vigueur dans votre pays ou région.

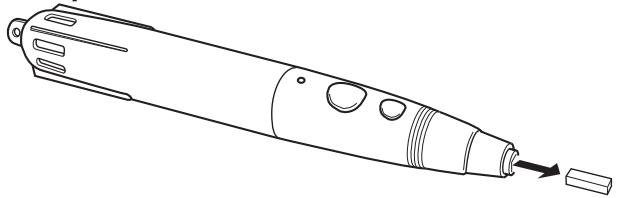
La mine du crayon fourni comme accessoire est fabriquée en feetre. Si le bout se déforme ou si la qualité de l'écriture diminue, remplacez la mine par une, fournies comme accessoires.
1. Extrayez la mine en feuitre.
INSTALLATION

REMARQUES:
- Installez toujours l'écran à plasma sur un support mobile avant de placer cette unité.
- Àprous avoir installé cette unité, n'essayez jamais de lever l'écran à plasma pour le placer sur le support mobile.
- Lorsque cette unité est montée sur l'Écran Mural à angle variable PDK-5006 ou PDK-5011 de Pioneer, elle ne peut pas être installée en position inclinée.
- S'il est nécessaire de déplacer l'unité après l'avoir installée sur le support mobile, voirlez à ne pas presser sur l'unité pendant le déplacement. Soulevez-la toujours par le support mobile pour la déplacer.
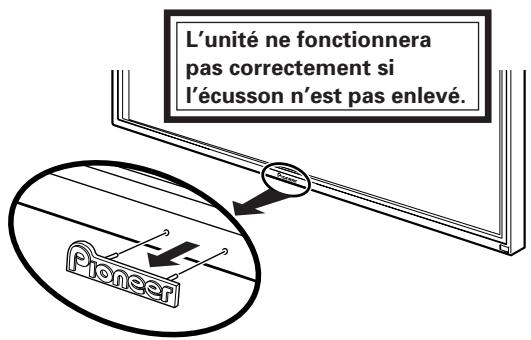
1. Retirez l'écussion "Pioneer" de l'écran à plasma.
L'écussion est fixé par une bande biface (alignée avec deux goujons de guidage). Déposez l'écussion sans laisser de trace de la bande.
2. Placez l'unité sur l'avant de I'écran à plasma.


ATTENTION:
Vous risque d'abimer l'écran si vous continuez d'utiliser une mine de crayon usée ou endommagée.
2. Insérez une nouvelle mine.
Poussez la mine de feucre dans l'orifice de sorte qu'elle ne dépasse que de 2 à 3 mm environ.
3. Utilisez l'applique de fixation sur la face arrrière pour immobiliser les quatrecoins de l'appareil.
① Tournez l'applique de fixation dans le sens indiqué par la flèche (tournez dans le sens opposé pour l'applique du côté gauche) pour immobiliser l'unité.
② Enforcez la butée de l'applique de fixation pour empêcher tout mouvement de l'applique.
■ Servez-vous du boulon à 6 pans fourni pour fixer le porte-crayon sur la face arrière de l'unité.
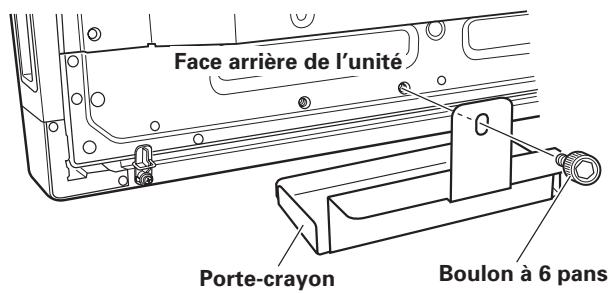
- Tenez le porte-crayon d'équerre et contre le fond de l'unité lorsque vous insérez le boulon.
Veillez à couper l'alimentation et à débrancher le cordon d'alimentation au niveau de la prise secteur chaque fois que vous effectuez ou modifiez les branchements.
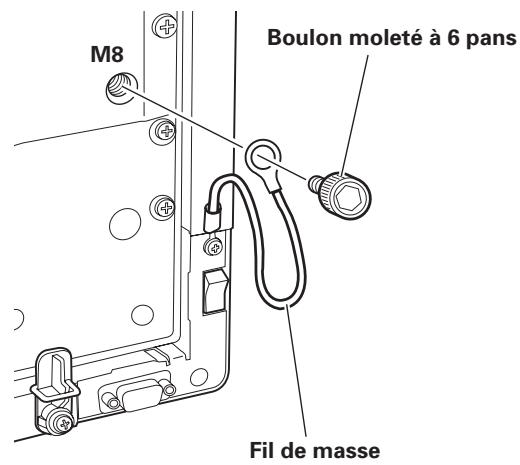
Branchement du fil de masse
Utilisez le boulon à 6 pans fourni pour raccorder le bout libre du fil de masse de l'appareil sur l'orifice M8 sur la face arrrière de l'écran à plasma.
Branchement de l'écran à plasma à un ordinateur
Reportez-vous au chapitre "Installation et branchements" du Mode d'emploi de l'écran à plasma pour des détails sur le raccordement à un ordinateur.
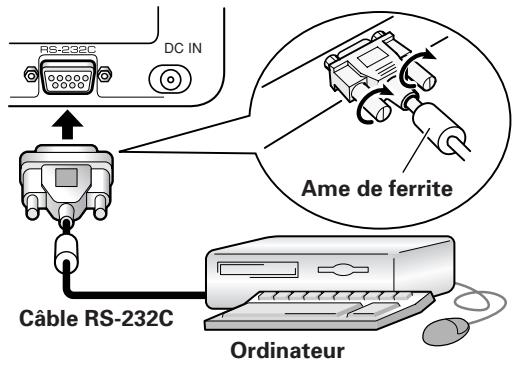
Branchement de l'unité sur un ordinateur
Au moyen du cable RS-232C fourni comme accessoire, raccordez le port RS-232C de l'unité à l'ordinateur. Le cable RS-232C fourni comme accessoire est muni d'une âme en ferrite à une de ses extrémités. Branchez cette extrémité sur l'unité.
Face arrêté de l'unité
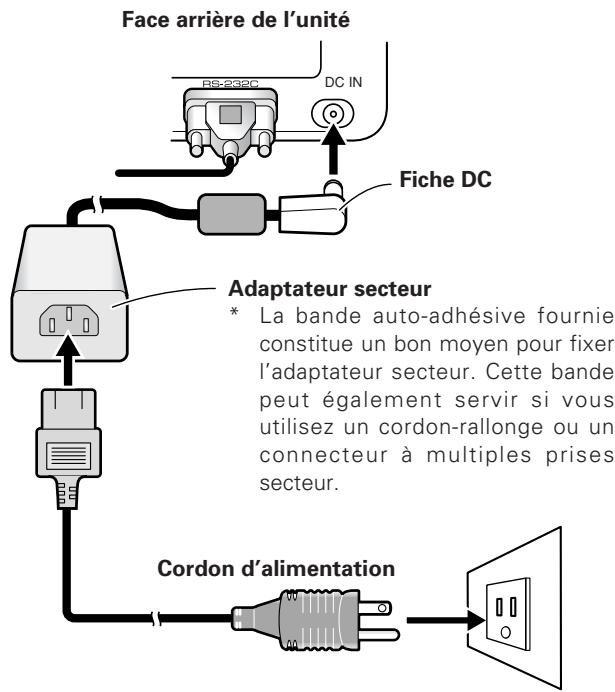
Branchement du cordon d'alimentation
- Branchez la fiche DC de l'adaptateur secteur sur la prise DC-IN de l'unité.
- Au moyen du cordon d'alimentation fourni, raccordez l'adaptateur secteur à une prise secteur ordinaire.

ATTENTION:
- Utilisez uniquement l'adaptateur secteur spécial et le cordon d'alimentation fourni.
- Sous peine de provoquer un incendie ou une décharge électrique, n'utilise pas de tension ou de sources de courant, autres que celles qui sont spécifiées.
- Cette unité s'accompagne d'un cordon à trois fils (terre) pour garantir la sécurité de son fonctionnement. Branchez le cordon d'alimentation dans une prise secteur à fil de terre, de sorte qu'il soit correctement mis à la masse. Si vous utilisez une fiche de conversion, branchez les deux lames de la fiche sur une prise, mise à la terre, et reliiez le fil de terre de la fiche sur une vie de terre appropriée.
Réglage de la résolution d'affichage
Pour obtenir d'excellents résultats, la carte videoutilisée doit supporter un écran à résolution de 1280× 768 Pour plus de détails, consultez Pioneer ou le concessionnaire de votre ordinateur.
- Réglez la résolution d'affichage et le taux de rafraîchissement de votre ordinateur sur 1280 × 768 (60 Hz). Si vous utilisez une autre résolution d'affichage, il sera nécessaire de modifier les réglages après avoir installé le logiciel pilote de péripérisque. Pour des détails, consultez le ficher README (Lisez-moi) qui accompagne le logiciel de pilotage.
Ajustement de l'écran à plasma
Pour ajuster correctement l'écran à plasma, consultez les chapitres "Configuration du Systeme" et "Ajustements du panneau d'affichage" dans le mode d'emploi de l'écran à plasma.
■ Effectuez d'abord les réglages du système.
Réglez le mode d'affichage sur écran.
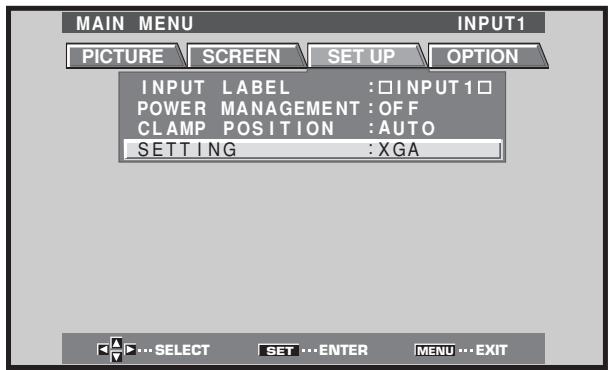
Pour utiliser la résolution d'écran et le taux de rafraîchissement de 1280 x 768 (50 Hz/70 Hz), réglez le mode d'affichage sur écran à "WIDE XGA",
L'écran étant sous tension, Sélectionnez MENU SET UP SETTING SET et changez le réglage XGA en WIDE XGA.
Ajustez ensuite l'affichage sur écran pour ajuster la position de l'image et l'horloge.
Réglez le contrôle de masque et le mode orbiteur sur OFF.
Ce réglage doit être effectué uniquement par un technicien spécialément formé ou votre concessionnaire. Si cette fonction est mise en service (ON), la position d'affichage sur l'écran à plasma changera, entraînant un décalage entre la mine du crayon et sa position d'affichage sur l'écran. Ce décalage ne pourrait pas être corrigé par une calibration ultérieure.
Installation du calcul de pilotage
Consultez le guide d'installation du logiciel pilote.
Alignement de la mine du crayon et de la position du curseur
Vérifiez que le curseur sur l'écran correspond exactement à la position de la mine du crayon.
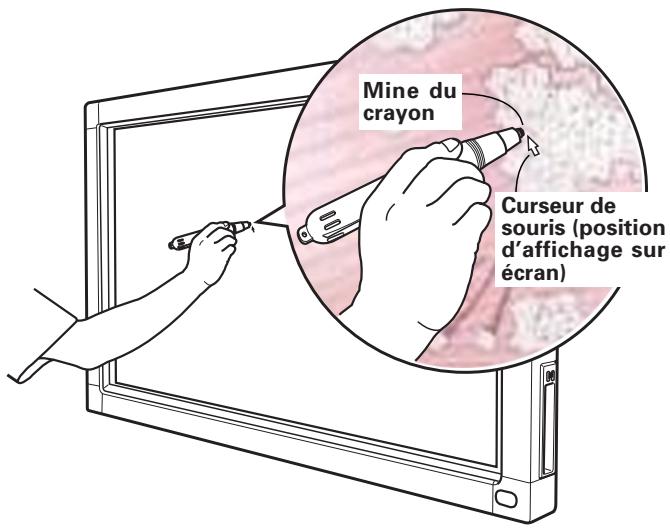
Si la position du curseur diffère de celle de la mine réelle du crayon, ajustez en procédant comme suit:
1. En vous servant de la souris, cliquez du bouton gauche sur l'icone CBdrv dans le tiroir Tâches.

REMARQUE:
L'aspect réel de votre tiroir Tâches peut être différent selon la configuration de votre ordinateur.
2. Lorsque le menu déroulant apparait, cliquez du bouton gauche sur "Calibration".
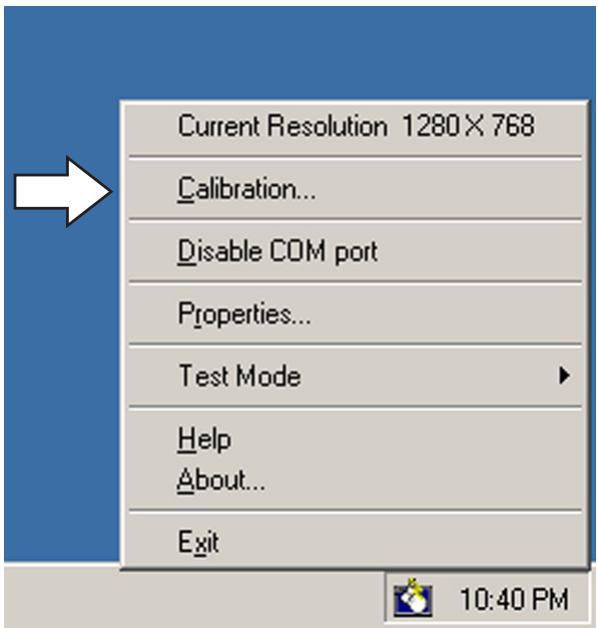
3. Suívez les instructions de calibrage, apparaisant sur l'écran.

REMARQUE:
Outre le crayon spécialément concu, le doigt ou un autre object peut être utilisé pour la saisie sur le Dispositif d'écriture manuscrite. Toutefois, n'utilise pas de stylet métallique ou un object pointu car l'écran pourrait en être griffé. Utilisez uniquement le crayon spécial ou le bout du doigt pour effectuer des opérations sur l'écran.
De fausses manipulations sont souvent prises pour des pannes et des dysfonctionnements. Si vous croyez que ce composant a un problème, vérifie les points du tableau suivant. Parfois le problème est ailleurs, dans un autre composant. Vérifiez donc les autres apparèils utilisés avec celui-ci.
Si le problème persiste, même après vérification des points enumerés ci-dessous, contactez votre revendeur ou votre centre de service après-venture PIONEER le plus proche.
| Symptôme | Cause | Correction |
| Pas d'alimentation | • La fiche du cordon d'alimentation est débranchée de la prise. • Le cordon d'alimentation est débranché au niveau de l'adaptateur secteur. • La fiche de l'adaptateur secteur est débranchée de la prise DC-IN sur l'unité. | • Branchez correctement la fiche du cordon sur la prise secteur. • Branchez le cordon d'alimentation sur l'adaptateur secteur. • Branchez la fiche de l'adapter secteur sur la prise DC-IN de l'unité. |
| L'ordinateur ne s'amorce pas ou ne répond pas. | • Le cable RS-232C est débranché. • Le port COM erroné est sélectionné par le logiciel de pilotation. • Le port série de l'ordinateur ne fonctionne pas. • Le logiciel de pilotation ne démarre pas. • L'ordinateur est en mode Économie. | • Branchez correctement le cable RS-232C. • Réglez le logiciel de pilotation au port COM, utilisé avec l'unité. • Ajustez votre ordinateur selon les besoins pour valider le port série. • Installé et validez le logiciel de pilotation. • Annulez le mode Économie de l'ordinateur. • Au besoin, modifiez le réglage Économie de l'ordinateur. |
| La position du curseur est très éloignée de cette de la mine du crayon sur l'écran. | • Une résolution d'écran autre que 1280 x 768 est utilisée. Ou bien la résolution a été modifiée. • Le réglage de la taille d'affichage sur l'écran à plasma a été modifié. | • Changez les réglages du logiciel de pilotation selon les besoins. |
| La position du curseur diverge légèrement de cette de la minute du crayon sur l'écran. | • La position d'affichage sur l'écran à plasma s'est décalée. | • Utilisez le mode de calibrage de l'écran à plasma pour ajuster les positions horizontal et verticale. |
| La position du curseur est différente de cette du crayon après le réglage initial. | • Le réglage de position d'affichage AUTO SET UP (configuration automatique) de l'écran à plasma a été réinitialisée. • Le contrôle de masque ou le mode orbite de l'écran à plasma a été réglé sur ON (marche). | • Selon l'image, une légère divergence peut être corrigée manuelle. • Les réglages du contrôle de masque et du mode orbite de l'écran à plasma doivent être effectuels uniquement par un technicien spécifique formé ou votre concessionnaire. |
| Le crayon spécial ne fonctionne pas. | • La pile est déchargée. • Une pression suffisante n'est pas appliquée à la mine du crayon; de ce fait, le contacteur du crayon n'agit pas. • Les orifices du couvercle de la pile sont obstrués. • Le crayon est utilisé en dehors de sa portée effective. • L'unité subit l'influence ultrasonique d'un autre appeareil. • Vous portez des gants en tenant le crayon (les signaux ultrasons du crayon sont absorbés). | • Vérifiez le voyant LED et s'il n'est pas brillant, remplacez la pile. • Appuyez suffisamment fort sur la mine du crayon pour allumer son contacteur. • Ne recouvrez pas les orifices du couvercle de la pile. • Utilisez le crayon dans les limites de son utilisation sur l'écran. • Ne place pas de dispositifs près de l'unité qui émet des ultrasons. • Enlevez vos gants. |
| La saisie sur écran n'est pas possible avec des objets autres que le crayon spécial. | • Sur le côté de l'unité, le selectiveur de mode est régèle sur PEN. | • Déplacez le selectiveur sur NORMAL. |
| L'unité ne répond pas à l'écriture, ou impossible d'écrire sur certaines zones de l'écran. | • De la poussière ou des saletés adhérent au filtre de transmission infrarouge, bloquant les rayons infrarouges. • L'écusson du logo Pioneer n'est pas retire de l'écran à plasma. | • Enlevez les saletés sur l'unité, coupez temporairement l'interruption d'alimentation, puis remettez l'unité sous tension. • Retirez l'écusson Pioneer. |

ATTENTION:
- Si plusieurs unités sont utilisées l'une première de l'autre en mode PEN, des interférences réciropques peuvent se produit et entraîner une défaillance. Pour utiliser plusieurs unités à proximé l'une de l'autre, réglez-les toutes en mode NORMAL.
- Du fait des caractéristiques de son mode de balayage, cette unité ne peut pas être utilisée simultanément par deux personnes. Si plusieurs personnes doivent utiliser l'unité, chacune doit le faire séparément. De plus, une défaillance risque de se produit si l'écran est touché pendant la saisie par une autre main ou un object, autre que la mine du crayon ou le bout d'un doigt (vêtements, cravate, etc.) C'est pourquoit ne touchez pas l'écran avec autre chose que le bout de l'instrument de saisie (doigt ou mine du crayon spécial).
- Il se peut que le crayon ne fonctionne pas correctement ou que la saisie soit perturbée si le crayon est tenu à un angle très aigu par rapport à l'écran. Autant que possible, tenez le crayon à la perpendicularité de l'écran lorsque vous y écrivez.
NETTOYAGE
Pour prolonger la durée de vie de l'écran et en obtenir des performances optimales, un nettoyage régulier est conseillé. Frottez liéaclement la surface de I'écran et la mine du crayon spécial avec un linge doux pour éviter une accumulation de poussières. En cas d'encrasement important, trempez un linge doux dans une solution diluée de détergent neutre, essorez-le bien et frottez liéaclement la surface de I'écran, puis essuyez-la avec un linge doux et sec.

ATTENTION:
- Débranchetz plusieurs la fiche du cordon d'alimentation de la prise secteur avant d'effectuer un nettoyage.
- N'utilise pas de benzine, diluant ou autre produit chimique volatile pour nettoyer l'unité parce que ces produits pouraient déformer ou décolorer l'unité et le crayon spécial.
Système de balayage . Par rayons infrarouges
Connecteurs d'entrée . Prise DC-IN (6 V, 1 A)
Connecteur de communication (RS-232C) D-sub à 9 broches
Interrupteur d'alimentation .... Type a bascule
Voyant d'alimentation Diode LED
Alimentation Courant continu 6 V
Consummation (CC 6 V) 1 A
Dimensions hors-tout
(écran à plasma compris, porte-crayon exclus) 1.258 x 758 x 113 mm (l/h/p)
Poids (écran à plasma et porte-crayon exclus) 5,9 kg
Adaptateur secteur
Tension d'entrée Secteur 100-240 V
Fréquence d'entrée 50/60 Hz
Crayon spécial
Transmission . Par ondes ultrasonores
Contacteurs de fonctionnement
Mine du crayon (x1), Corps (x2)
Alimentation . Pile alkaline AAA (LR03) x1
Dimensions hors-tout... 27 x 182 mm (diametre x longueur)
Poids (pile comprise) 55g
Accessoires
Crayon 1
Pile alkaline AAA (LR03) 2
Mines de crayons de rechange 2
Boulon à 6 pans 2
Porte-crayon 1
Cable RS-232C (3 m) 1
Adaptateur secteur 1
Cordon d'alimentation 1
Mode d'emploi 1
Carte de garantie 1
Disque de logiciel de pilotage 1
- Spécifications sous réserve de modifications sans avis préalable.
Publication de Pioneer Corporation.
© 2002 Pioneer Corporation.
Tous droits de reproduction et de traduction réservés.
Hinweis zur Installation:
Dieses Produkt ist für die Installation durch einen Fachmann bestimmt. Der Käfer muss theses Produkt entweder von einem qualizierten Techniker oder vom Fachhändler installieren und einrichten halten. PIONEER übernimmt keinerlei Haftung für Schäden, die auf unsachgemäß Installation oder Befestigung, zweckent fremdeten Gebrauch, Nachgestaltung oder Naturkatastrophen zusammen hält.
WICTIG

Das Blitzsymbol in einem Dreiaceckweist den Nutzer darauf auf hin, dass eine Berufngesfahrt mit nicht isolierten Teilen im Geräteinneren, die einegefährliche Spannung führen, besteht. Die Spannung kann so hoch sein,dassie die Gefahr eines elektrischen Schlags bei Personen birtg.
CAUTION
RISK OF ELECTRIC SHOCK DO NOT OPEN
ACHTUNG:
UM SICH NICT DER GEFAHR EINES ELEKTRISCHEN SCHLAGS, AUSZUSETZEN, DURFEN SIE NICT DEN DECKEL (ODER DIE RUCKSEITE) ENTFERNEN. IM GERAEINNEREN BEFINDEN SICH KEINE VOM NUTZER REPARIERBARE TEILE. UBERLASSEN SIE REPARATUREN DEM QUALIFIZIERENT KUNDENDIENTNIST.

Ein Ausrufungszeichen in einem Dreieck weist den Nutzer auf wichtige Bedienungs- und Wartungsanweisungeninn den Dokumenten hin, die dem Gerat beiliegen.
H002AGE
WARNING: DIESES GERÄT IST NICT WASSERUNDURCHLÄSSIG. UM EINEN BRAND ODER STROMSCHLAG ZUVERMEIDEN, DIESES GERÄT NICT REGEN ODER FEUCHTIGKEIT AUSSETZEN UND KEINEN BEHÄLTER MIT WASSER, WIE VASEN, BLUMENTÖPFE, KOSMETIKBEHÄLTER UND MEDIZINFLASCHEN, IN DER NAHE DIESES GERÄTS STEllen. H001Age
VORSICHT: Bei der Aufstellung theses Geräts ist darauf zu achten, dass Netzsteckdose und Netzstecker leicht zugänglich sind.
Um eine ausreichende Belüfung zu gewährleisten, sollte das Gerät in einem Mindestabstand von 10 cm von anderen Geräten, Wänden usw. aufgestellt werden. Vermeiden Sie die nachstehenden Installationsarten, die die Ventilationsschlitze blockieren können. Dadurch konnte im Inneren des Gerätes ein Wärmeastau entstehen, der wiederum einen Brandausbruch verursachen kann.
- Stellen Sie das Gerät nicht in engen Räumen mit unzureichender Belüftung auf.
- Stellen Sie das Gerät nicht auf Teppich bzw. Teppichboden auf.
- Decken Sie das Gerät nicht mit Decken o.ä.ab.
- Legen Sie das Gerät nicht auf die Seite
- Stellen Sie das Gerät nicht auf den Kopf.
- Wenn Sie eine spezielle Installation beabsichtigen, z.B. unmittelbar an einer Wand, in horizontaler Position usw., halten Sie sich vorher von ihrem Pioneer-Fachhändler beraten.
Betriebsbedingungen
H045 Ge
Betriebstemperatur und -feuchtigkeit:
0 °C - +40 °C (+32 °F - +104 °F); weniger als 85 % rel. Luftfeuchtigkeit (Luftungsöffnungen nicht blockiert) Nicht an folgenden Orten aufstellen:
- Orte, die direktem Sonnenlicht oder starkem künstlichen Licht ausgesetzt sind
- Orte mit hoher Luftfeuchtigkeit oder schlechter Belüfung
WARNING: BEVOR SIE DAS GERÄT ZUM ERSTEN MAL ANSCHLIESSEN, LESEN SIE DEN FOLGENDEN ABSCHNITT. DIE NETZSPANNUNG IST JE NACH LAND BZW. REGION UNTERSCHIEDLICH. Achten SIE DARAUF, DASS DIE NETZSPANNUNG IN DEM GEBIET, IN DEM DAS GERÄT VERWENDET WIRD, MIT DER ERFORDERLICHEN SPANNUNG, DIE AUF DER RÜCKSEITE ANGEGEBEN IST (BEISPIELSWEISE 230 V ODER 120 V), ÜBEREINSTIMMT. H041 Ge
WARNING: DIESES GERÄTIST MITE EINEM DREIADRIGEN STECKER (MIT ERDUNGSLIETER) AUSGESTATTET. DIESER STECKER HAT EINEN DRITTEN STIFT (ERDUNGSSTIFT) UND PASSTAUSSICHERHEITSGRündEN NUR IN NETZSTECKDOSEN MIT ERDUNG. FALLS ES NICT MÖGLICH IST, DEN NETZSTECKER IN DIE STECKDOSE ZU STECKEN, WENDEN SIE SICH AN EINEN ELEKTRIKER, DAMIT ER DIE VERALTETE STECKDOSE AUSTAUSCHT. SETZEN SIESICH NICT ÜBER DIE SICHERHEITSFUNTION DES STECKERS MIT ERDUNG HINweg.
H043 Ge
WARNING: AUF DAS GERÄT DÜRFEN KEINE LICH/ WärMEQUellen MIT OFFENER FLAMME, WIE EINE BRENNENDE KERZE, GESTELLTWERDEN. WENNE EINE SOLCHE LICH/WärMEQUELVERSEHENTLICH UMFÄLLT, KANN AUS DEM SICH ÜBER DAS GERÄT AUSBREITENDEN FEUER EIN BRAND ENTSTEHEN. H044 Ge
Dieses Produkt entspricht den Niederspannungsrichtlinien (73/23/EEC, geändert durch 93/68/EEC), den EMV-Richtlinien (89/336/EEC, geändert durch 92/31/EEC und 93/68/EEC). H015AGe
Remarque pour le revendeur:
Après l'installation, assurez-vous de remettre ce mode d'emploi à l'utilisateur et de lui expliquer comme utiliser ce produit.
Wir danken Ihnen für den Kauf dieseres Pioneer-Produkts
Lesen Sie sichitte diese Bedienungsanleitung durch. Dann wissen Sie, wie Sie Ihr Gerät richtig bedieren. Bewahren Sie sie an einem sicheren Platz auf, um auch zukünftig nachschlagen zu konnen.
In manchen Ländern oder Verkaufsgebieten weichen die Ausführungen von Netzstecker oder Netzsteckdose u.U. von den in den Abbildungen gezeugten ab; die Anschluß- und Bedienungsverfahren des Gerätes sind jedoch gleich.
K015 Ge
AUFSTELLUNG UND REINIGUNG
Dieses Gerät ist ausschließlich auf die Verwendung mit einem Pioneer Plasma-Display des Modells PDP-503CMX oder PDP-503MXE ausgelegt. Es kann nicht mit den Modellen PDP-502MX und PDP-502MXE verwendet werden.
Einzelheiten zur Bedienung des Pioneer Plasma-Displays.
finden Sie in dessen Bedienungsanleitung.
MERKMALE 36
MITGELIEFERTES ZUBEHÖR 37
BEZEICHNUNGEN UND FUNKTIONEN DER TEILE 38
Hauptgerät 38
Griffel 38
Ausweiseln der Griffelbatterie 38
Auswechseln der Griffelspitze 39
INSTALLATION 39
Befestigen des Hauptgerätes 39
Befestigen der Griffelablage 39
Anschlisse 40
Anschlieben des Erdungsdrahtes 40
Anschlieben des Plasma-Displays an einen Computer 40
Anschlieben des Gerätes an den Computer 40
Anschlieben des Netzkabels 40
Software-Installation 40
Einstellen der Bildschirm-Auflösung 40
Einstellen des Plasma-Displays 41
Installieren der Treiber-Software 41
Ausrichtung von Griffelspitze und Cursor-Position 41
STÖRUNGSBESEITIGUNG 42
REINIGUNG 43
TECHNISCHE DATEN 44
MERKMALE
Das Beschriftsgerät erhögt den Gebrauch eines Spezialgriffels für Computer-Eingabeoperationen auf dem Bildschirm des Plasma-Displays. Eingaben und andere Operationen können bequem mit der Fingerspitze vorgenommen werden.
Der Einsatz von Infrarot-Abtasttechnologie verhindert eine Beeinträchtigung der Bildschirmqualität.
Dank Hochgeschwindigkeits-Abtasttechnologie ist ein rasches, prazises Ansprechen mit einer hohen Auflosung in XGA-Norm gewährleistet.
Bitte vergewissern Sie sich anhand der nachstehenden Checkliste, dass das mitgelieferte Zubehör vollständig vorhanden ist, indem Sie die entsprechenden Kästchen abhaken ✓
| □ Griffel (1 Stck.) | □ Netzadapter (1 Stck.) |
| □ Alkali-Mikrozellen (Typ LR03, Höhe "AAA") (2 Stck.) | □ Netzkabel (1 Stck.) |
| □ Ersatzspitzen (2 Stck.) | □ Bedienungsanleitung (1 Stck.) |
| □ RS-232C-Kabel (9-polig, gerade, 3 m Höhe) (1 Stck.) | □ Treiber-Software-Disc (1 Stck.) |
| □ Innensechskantschraube (2 Stck.) | □ Garantieschein (1 Stck.) |
| □ Griffelablage (1 Stck.) |
RS-232C-Anschluss

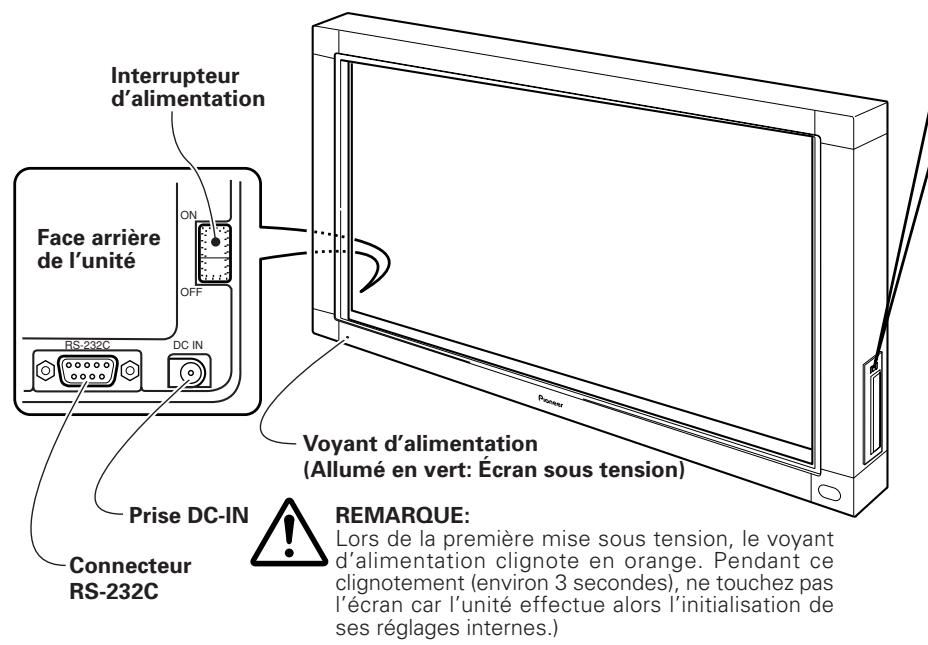
HINWEIS:
Nach dem erstmaligen Einsatzen des Netzschalters blinkt die Betriebsanzeige orangefarben; während diese Anzeige blinkt (ca. 3 Sekunden lang), darf der Bildschirm nicht berührt werden, da das Gerat während dieser Zeitdauer seine internen Einstellungen initialisiert.
Betriebsarten-Wahlschalter
Bringen Sie den Betriebsarten-Schalter in die gewünschte Stellung, je nachdem, ob der Spezialgriffel oder ein anderes Gerat zur Eingabe von Zeichen und Linien auf dem Bildschirm verwendet werden soll.
PEN-Modus:
In this Modus kann der Spezialgriffel im Lieferumfang zum Beschriften des Bildschirms verwendet werden. Der Gebrauch des Spezialgriffels ermöglicht es,KHR abgegrenzte Zeichen und Linien zu zeichnen.
NORMAL-Modus:
In thisem Modus konnen Sie mit der Fingerspitze oder einem anderen Gegenstand auf dem Bildschirm schreiben. Im Vergleich zum Gebrauch des Spezial-Eingabgrefels zum Zeichern wird in thisem Modus jedoch eine geringere Bildschirmaulösung erzielt.
Bedienfeld des Plasma-Displays

Bei einer Funktionstörung des Griffels:
Falls die Batteriefachdeckel-Öffnungen blockiert sind, arbeitet der Griffel u.U. nicht einwandfrei. Bei abnehmender Batteriespannung treten ebenfalls Störungen in der Arbeitsweise des Griffels auf. In einem solchen Fall sollte die Batterie möglichst bald ausgewechselt werden.
Überprüfen der Batterie-Restspannung:
Wenn Sie den kleinen Knopf vollständig eindrücken, leuchtet die LED-Anzeige auf. Falls sie nicht oder nur schwach aufleuchtet, ist die Batterie erschöpft und muss ausgewechselt werden.
< Auswechseln der Griffelbatterie >
① Drehen Sie den Batteriefachdeckel nach links (entgegen den Uhrzeigersinn) undziehen Sieihn ab.
② Legen Sie eine frische Mikrozelle gemäß den Polaritätsmarkierungen (+/−) des Diagramms in das Batteriefach ein (schieben Sie zunachst das Ende mit dem Minuspol "-" gegen die Feder und drücken Sie dann das Ende mit dem Pluspol "+" in das Batteriefach ein).
③ Bringen Sie den Batteriefachdeckel wieder an und drehen Sie hijn nach rechts (im Uhrzeigersinn), um hijn festzuziehen.
④ Drücken Sie den kleinen Knopf vollständig ein und vergewissemern Sie sich, dass die LED-Anzeige aufleuchtet.

HINWEISE:
- Um eine Beschädigung durch Auslaufen von Batterieelektrolyt zu vermeiden, sollte die Batterie aus dem Batteriefach entfernt werden, wenn der Griffel langere Zeit über (einen Monat oder länger) nicht benutzt wird. Falls Elektrolyt ausgelaufen ist, reinigen Sie das Innere des Batteriefachs gründlich mit einem Lappen, bevor Sie eine neue Batterie einlagen.
Die mitgelieferte Alkalibatteriearfndichtaufgeladen, kurzgeschlossen,zerlegtoderin ein Feuer geworfen werden. - Zur Entsorgung von verbrauchten Batterien beachten Sieitte die gesetzlichen Vorschriften bzw. Umweltschutzbestimmungen Ihres Landes.
Die mitgelieferte Griffelspitze besteht aus Filzt. Falls sich die Spitze nach längerem Gebrauch verformt hat und die Schreibqualität dadurch beeinträchtigt wird, wechseln Sie die Spitze gegen eine der Ersatzspitzen im Lieferumfang aus.
1. Ziehen Sie die Filzspitze vom Griffel ab.
INSTALLATION

HINWEISE:
- Achten Sie unbedingt daraufuf, das Plasma-Display auf dem mobilen Ständer aufzustellen, bevor Sie diesen Gerät installmenten.
- Nach der Installation theses Gerätes darauf auf keinen Fall versucht werden, das Plasma-Display auf dem mobilen Ständer aufzustellen.
- Wenn these Gerät an der winkelverstellbaren Pioneer-Wandbefestigungseinheit PDK-5006 oder PDK-5011 befestigt worden ist, kann es nicht in einer geneigten Position installiert werden.
- Falls das Gerät nach Aufstellung auf dem mobilen Ständer an einen anderen Ort gebracht werden muss, ist darauf darauf zu achten, dass während des Transports kein Druck auf das Gerät ausgeübt wird. Bei einem Transport muss stets der mobile Ständer gehoben werden, nicht das Gerät selbst.
1. Entfernen Sie das "Pioneer"-Emblem vom Plasma-Display.
Das Emblem ist mit beidseitig haftendem Klebeband befestigt (auf die zwei Führungsstifte ausgerichtet). Entfernen Sie das Emblem so, dass kein Klebeband zurückbleibt.
2. Platzieren Sie das Gerät über der Vorderseite des Plasma-Displays.

VORSICHT:
Bei fortgesettem Gebrauch des Griffels mit einer beschädigten oder abgenutzten Spitze kann die Oberfläche des Bildschirms beschädigt werden.
2. Setzen Sie eine neue Filzspitze in den Griffel ein.
Schieben Sie die Filzspitze soweit in den Griffel ein, bis die Spitze um ca. 2-3 mm Herausragt.

3. Verwenden Sie die Halterungen an der Rückseite, um die vier Ecken in Arbeitsstellung zu sichern.
① Drehen Sie die Halterung in Pfeilrichtung (linke Halterung: in der dem Pfeil entgegengesetzten Richtung), um das Gerät zu sichern.
② Drücken Sie den Anschlag der Halterung hinein, um die Halterung zu arretieren.

■ Verwenden Sie die mitgelieferte Innensechskantschraube, um die Griffelablage an der Rückseite des Gerätes in Arbeitsstellung zu befestigen.
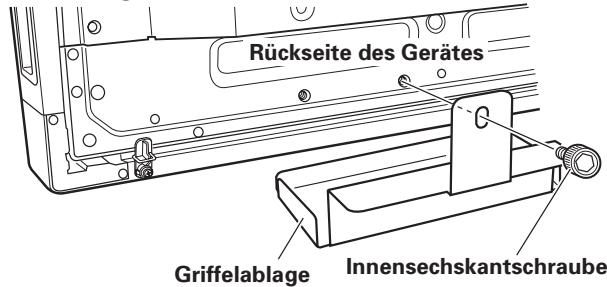
- Halten Sie die Griffelablage beim Einsetzen der Innensechskantschraube mit der in der Abbildung gezeugten Ausrichtung gegen die Unterkante des Gerätes.
Achten Sie unbedingt daraufuf, den Netzschalter auszuschalten und das Netzkabel von der Netzsteckdose zu trennen, bevor irgendwelche An Schlusse hergestellt oder geändert werden.
Anschließlich des Erdungsdrahtes
Verwenden Sie die Innensechskantschraube im Lieferumfang, um das frei Ende des Erdungsdrahtes des Gerätes an die M8-Bohrung in der Rückseite des Plasma-Displays anzuschreiben.
Anschließlich des Plasma-Displays an einen Computer
Einzelheiten zum Anschlieben des Plasma-Displays an einen Computer finden Sie im Abschnitt "Installation und Anschlüsse" in der Bedienungsanleitung des Plasma-Displays.
Anschlieben des Gerätes an den Computer
Verbinden Sie den RS-232C-Anschluss des Gerätes über das RS-232C-Kabel im Lieferumfang mit dem entsprechenden Anschluss am Computer. Das mitgelieferte RS-232C-Kabel ist mit einem Ferritkern ausgestattet, der kurz vor einem Ende des Kabels befestigt ist. Schließen Sie theses Ende des Kabels an das Gerät an.
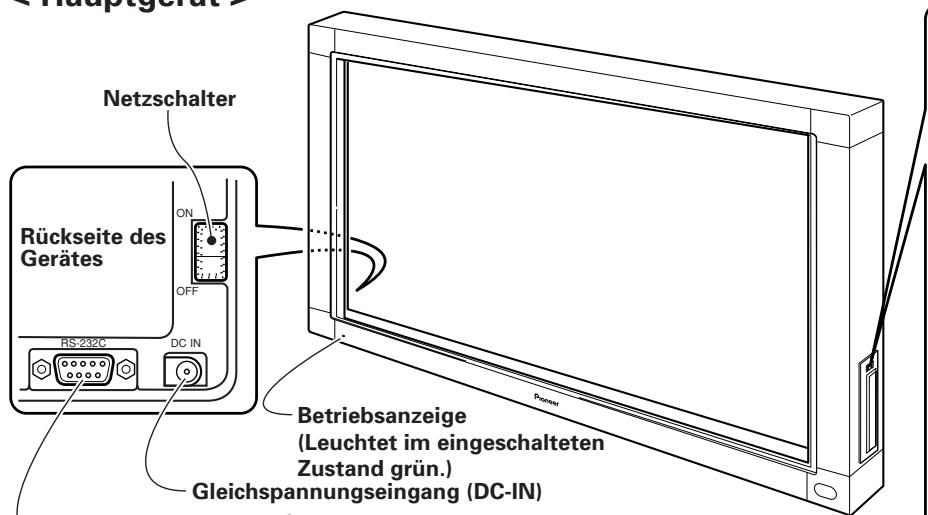
Rückseite des Gerätes
Anschließen des Netzkabels
- Schließen Sie den Gleichspannungsstecker des Netzadapters im Lieferumfang an die Buchse DC-IN des Gerätes an.
- Verbinden Sie den Netzadapter über das Netzkabel im Lieferumfang mit einer Netzsteckdose.
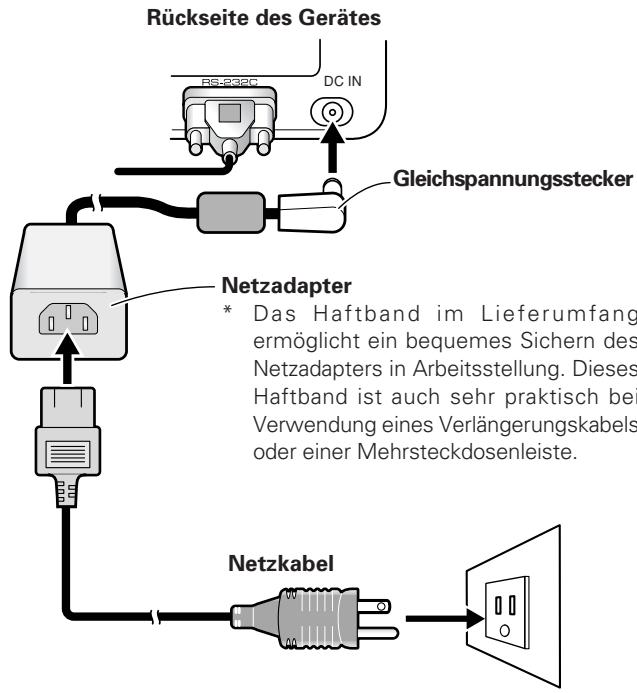

VORSICHT:
- Verwenden Sie ausschließlich den Spezial-Netzadapter und das Netzkabel im Lieferumfang.
- Verwenden Sie keine andere als die angegebene Spannung oder Stromquelle, da anderenfalls die Gefahr von Brand und elektrischem Schlag besteht.
- Dieses Gerät ist mit einem (geerdeten) Dreileiter-Netzkabel ausgestattet, um eine einwandfrei Leistung zu gewährleisten. Schließen Sie das Netzkabel ausschließlich an eine vorschrifsmäßig geerdete Netzsteckdose an, um sicherzustellen, dass das Kabel einwandfrei geerdet ist. Bei Gebrauch eines Wandlersteckers sind die beiden Steckerpole an eine geerdete Netzsteckdose anzuschreiben und der Erdungsdraht des Netzsteckers mit einer vorschrifsmäßigen Erdungsschraube zu verbinden.
Einstellen der Bildschirm-Auflösung
Um die optimale Leistung erzielen zu konnen, muss die jeweils verwendete Grafikkarte eine Echtzeit-Auflösung von 1280 × 768 Bildpunkten unterstützen. Einzelheiten hierzu erfahren Sie von Ihrem Computer-Fachhändler oder vom Pioneer-Kundendienst.
- Stellen Sie die Display-Auflösung Ihres Computers auf 1280 x 768 und die Auffrischrate auf 60 Hz ein. Bei Verwendung einer anderen Auflösung müssen die Einstellungen nach Installation der Treiber-Software geändert werden. Einzelheiten hierzu finden Sie in der Daten "README" im Lieferumfang der Treiber-Software.
Einstellen des Plasma-Displays
Detaillierte Informationen zur Einstellung des Plasma-Displays finden Sie in den Abschnitten "System-Setup" und "Bildschirm-Einstellungen" in der Bedienungsanleitung des Plasma-Displays.
- Nehmen Sie zuerst die Systemeinstellungen vor. - Stellen Sie den Anzeigemodus ein.
Wahlen Sie den Anzeigemodus "WIDE XGA", um eine Bildschirm-Auflösung von 1280 × 768 und eine Auffrischrate von 60Hz / 70Hz zu verwenden.
Bei eingeschalteter Bildschirmanzeige wahren Sie nacheinander MENU SET UP SETTING SET aus, und ändern Sie dann die Einstellung von "XGA" auf "WIDE XGA".
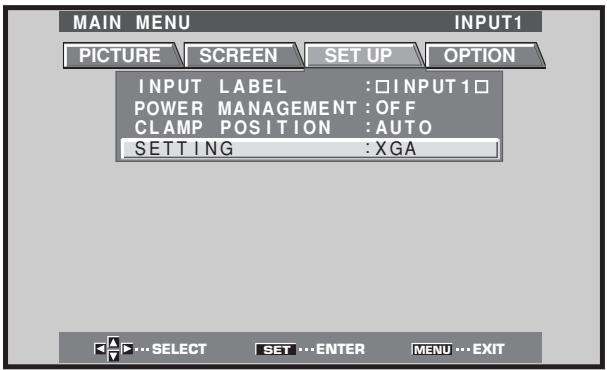
■ Als nachstes justieren Sie die Bildschirmanzeige zur Einstellung von Bildposition und Taktgeber.
■ Stellen Sie die Maskensteuerung und den Orbiter-Modus auf "OFF" ein.
These Einstellung darf nur von einem Kundendienst-Techniker oder Fachhändler ausgeführrt werden. Bei Einstellung dieser Funktion auf "ON"ändert sich die Anzeigeposition des Plasma-Displays, so dass eine Abweichung zwischen der Griffelspitze und der entsprechenden Position auf dem Bildschirm auftritt, die später nicht mehr behoben werden kann.
Installieren der Treiber-Software
Bitte schlagen Sie hierzu im Leitfaden für Treiber-Installation nach.
Ausrichtung von Griffelspitze und Cursor-Position
Vergewissern Sie sich, dass der auf dem Bildschirm erscheinende Cursor korrekt auf die Position der Griffelspitze ausgerichtet ist.
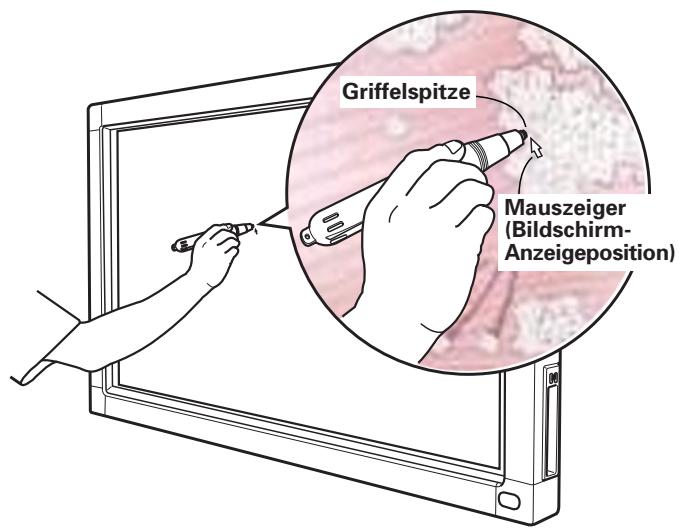
Falls die Cursor-Position von der physischen Position der Griffelspitze abweicht, führen Sie folgende Justierung aus:
1. Klichen Sie mit der linken Maustaste auf das Symbol "CBdrv" in der Taskleiste.

HINWEIS:
Das tatsächliche Erscheinungsbild der Taskleiste richtig sich nach der jeweiligen Konfiguration Ihres Computers.
2. Wenn das Kontextmenu erscheint, klichen Sie mit der linken Maustaste auf "Calibration."
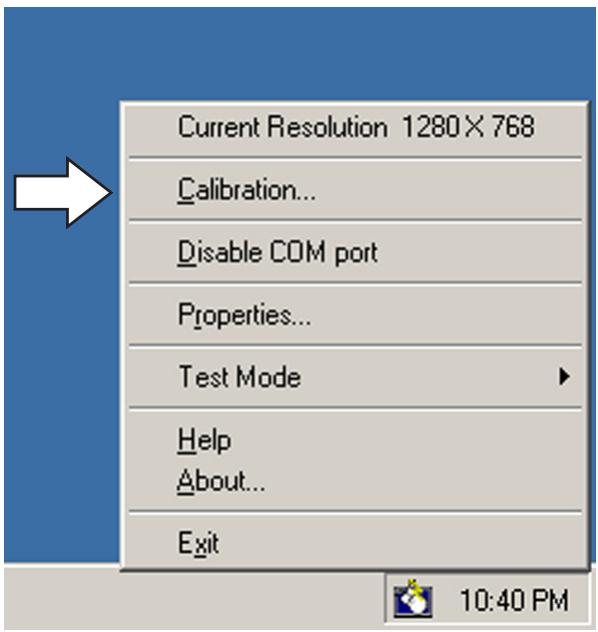
3. Folgen Sie den Anweisungen zur Kalibrierung, die auf dem Bildschirm erschieren.

HINWEIS:
Eingaben an das Beschriftsgerät können nicht nur unter Verwendung des Spezialgriffels, sondern auch mit einer Fingerspitze oder einem anderen Gegenstand vorgenommen werden; verwenden Sie jedoch keine Drehbleistiffe oder andere Gegenstände mit scharfer Spitze, da dies Kratzer auf dem Bildschirm verursichen kann. Für Eingabeoperationen auf dem Bildschirm soll stets der Spezialgriffel oder eine Fingerspitze verwendet werden.
Eine falsche Bedienung führt früig zu Problemen und Fehlfunktionen. Wenn Sie annehmen, daß das Mischpult nicht richtig Funktioniert, prüfen Sie die folgenden Punkte. Das Problem kann auch bei einem anderen Gerät liegen. Prüfen Sie dazu auch die benutzten anderen Geräte.
Wenn das Problem auch nach Prüfung der folgenden Punkte nicht behoben werden kann, wenden Sie sich an ihren Handler oder den nachstgelegen den PIONEER-Kundendienst.
| Störung | Ursache | Abhilfemaßnahme |
| Keine Stromzufahr | • Der Stecker des Netzkabels ist nicht an eine Netzestackdose angeschlossen. • Das Netzkabel ist nicht an den Netzadapter angeschlossen. • Der Stecker des Netzadapters ist nicht an die Buchse DC-IN des Gerätes angeschlossen. | • Schließen Sie den Netzstecker korrekt an eine Netzestackdose an. • Schließen Sie das Netzkabel an den Netzadapter an. • Schließen Sie den Stecker des Netzadapters an die Buchse DC-IN am Gerät an. |
| Der Computer führt keinen Systemstart aus, oder spricht nicht auf Befehle an. | • Das RS-232C-Kabel ist nicht angeschlossen. • In der Treiber-Software wurde ein falscher COM-Anschluss ausgewähl. • Die serielle Schnittstelle des Computers funktioniert nicht. • Die Treiber-Software startet nicht. • Der Computer befindet sich im Energiespar-Modus. | • Schließen Sie das RS-232-Kabel korrekt an. • Stellen Sie die Treiber-Software auf den COM-Anschluss ein, der für das Gerät verwendet werden soll. • Stellen Sie den Computer so ein, dass die serielle Schnittstelle freigegeben ist. • Installieren Sie die Treiber-Software und geben Sie sie frei. • Heben Sie den Energiesparzustand des Computers auf. • Ändern Sie ggf. die Energiespar-Einstellung Ihrches Computers. |
| Ein großer Abstand liegt zwischen der Cursor-Position und der Position der Griffelspitze auf dem Bildschirm. | • Eine andere Bildschirm-Auflösung als 1280x768 wird verwendet, oder die Auflösung wurde geändert. • Die Einstellung des Anzeugeformats der Plasma-Displays wurde geändert. | • Ändern Sie die Einstellungen der Treiber-Software nach Erfordernis. |
| Die Cursor-Position weicht geringfügig von der Position der Griffelspitze auf dem Bildschirm ab. | • Die Anzeigeposition des Plasma-Displays hat sich verschoben. | • Verwenden Sie den Kalibrierungs-Modus des Plasma-Displays, um die vertikale und horizontale Anzeigeposition zu justieren. |
| Nach der ursprünglichen Einstellung weicht die Cursor-Position von der Position der Griffelspitze auf dem Bildschirm ab. | • Die Einstellung der AUTO SET UP-Funktion des Plasma-Displays ist rückgestellt worden. • Die Maskensteuerung oder der Orbiter-Modus des Plasma-Displays sind auf "ON" eingestellt. | • Je nach Bild konnen keine Abweichungen manuell korrigiert werden. • Die Einstellungen von Maskensteuerung und Orbiter-Modus des Plasma-Displays dürfen nur von einem Kundendienst-Techniker oder Fachhändler vorgenommen werden. |
| Der Spezialgriffel spricht nicht an. | • Die Batterie ist erschöft. • Der Griffelspitzenshalter wird nicht eingeschalten, da kein ausreichender Druck auf die Griffelspitze ausgeübt wird. • Die Öffnungen im Batteriefachdeckel sind blockiert. • Der Griffel wird außerhalb seines effektiven Bereichs verwendet. • Dieses Gerät fängt Ultraschall-Einstreuungen von einem anderen Gerät auf. • Beim Gebrauch des Griffels wurden Handschuhengeitragen (die Ultraschallsignale des Griffels werden von den Handschufen absorbiert). | • Überprüfen Sie die LED-Anzeige und wechseln Sie die Batterie aus, falls die Anzeige nicht hell leuchtet. • Drücken Sie die Griffelspitze ausreichend stark gegen den Bildschirm, um den Griffelspitzenhalter einschalten. • Vermeiden Sie eine Blockierung der Batteriefachdeckel-Öffnungen. • Verwenden Sie den Griffel stets innerhalb des effektiven Bildschirmbereichs. • Bringen Sie kein Ultraschallwellen erzeugendes Gerät in die Höhe these Geräts. • Nehmen Sie die Handschuhe ab. |
| Eingabeoperationen mit anderen Gegenständen als dem Griffel können nicht ausgeführten werden. | • Der Betriebsarten-Wahlschalter an der Seite des Gerätes befindet sich in der Stellung "PEN". | • Bringen Sie den Schalter in die Stellung "NORMAL". |
| Das Geräte spricht nicht auf Beschchriftsvorgänge an, oder nur innerhalb bestimmter Bereiche. | • Staub oder Schmutz haftet am Infrarot-Übertragungsfilter an, wodurch die Infrarotstrahlen blockiert werden. • Das Emblem mit dem Pioneer-Schrifzug wurde nicht vom Plasma-Display halten. | • Reinigen Sie das Geräte, schalten Sie den Netzschalteromal aus und dann wieder ein. • Entfernen Sie das Pioneer-Emblem. |

VORSICHT:
- Wenn zwei oder mehr Geräte in unmittelbarer Höhe voneinander im PEN-Modus betätigten werden, kann eine gegenseitige Beeinträchtigung auftreten, die eine Funktionstörung verursacht. Achten Sie dazu stets darauf, zwei oder mehr Geräte, die dicht aneinander betriebenen werden sollen, auf den NORMAL-Modus einzustellen.
- Aufgrund von Eigenschaften seines Abtastmodus kann these Gerät nicht gleichzeitig von zwei verschiedenen Personen benutzt werden. Wenn mehrere Personen das Gerät bedieren soll, muss dies so erfolgen, dass nur jeweils eine einzige Person Eingabevorgänge ausfuhrt. Außen dem kann eine Funktionstörung auftreten, wenn der Bildschirm während eines Eingabevorgangs von einer anderen Hand oder einem anderen Gegenstand als der Griffelspitze oder eine Fingerspitze berührt wird, z.B. durch Kleidungsstücke, Krawatten usw. Achten Sie dazu sorgfältig daraufuf, den Bildschirm nicht mit anderen Gegenständen als der Spitze des jeweiligen Eingabeinstruments (Fingerspitze oder Griffelspitze) zu berühren.
- Wird der Griffel in einem zu spitzen Winkel gegen den Bildschirm gehalten, kann eine Funktionstörung auftreten, oder die Eingabe wird unterbrochen. Halten Sie den Griffel beim Gebrauch möglichst im rechten Winkel gegen den Bildschirm.
REINIGUNG
Eine regelmäßige Reinigung des Gerätesträgt dazu bei, die Lebensdauer zu verlangern und stets die optimale Leistung zu erzielen. Reiben Sie die Oberfläche des Bildschirms und die Griffelspitze sich mit einem weichen Tuch ab, um Staubansammlungen zu verhindern. Bei hartnackiger Verschmutzung tauchen Sie ein weiches Tuch in eine neutrale Reinigungsmittel-Lösung, wringen Sie das Tuch gründlich aus und wischen Sie die Oberfläche des Bildschirms sicht damit ab. Reiben Sie anschließend mit einem trockenen Tuch nach.

VORSICHT:
- Ziehen Sie unbedingt den Netzstecker aus der Netzsteckdose, bevor Sie mit der Reinigung des Gerätes beginnen.
- Verwenden Sie auf keinen Fall Benzol, Farbverdūnner oder andere leichtflüchtige Chemikalien zur Reinigung des Gerätes, da derartige Substanzen eine Verformung oder Verfährung des Gerätes und des Griffels verursachen können.
Abtastsystem Infrarot-Abstatement
Eingangsbuchse
Gleichspannungseingang DC-IN (6 V, 1 A)
DU-Anschluss (RS-232C) 9-polige D-sub-Buchse
Netzschalterausführung Kippschalter
Betriebsanzeige LED
Betriebsspannung 6 V Gleichspannung
Leistungsaufnahme (6 V Gleichspannung) 1 A
Außenabmessungen (einschließlich Plasma-Display, ausschließlich Griffelablage)
1.258 (B) x 758 (H) x 113 (T) mm
Masse (ausschließlich Plasma-Display und Griffelablage).
5,9 kg
Netzadapter
Eingangsspannung .... 100 V bis 240 V Wechselspannung
Eingangsfrequency 50/60 Hz
Spezialgriffel
Übertragungsverfahren Ultraschallwellen
Betriebsschalter. Griffelspitze (1 Stck.), Gehäuse (2 Stck.)
Spannungsversorgung
...... Eine Alkali-Mikrozelle (Typ LR03, Großße "AAA")
Außenabmessungen 27 (B) x 182 (L) mm
Masse (einschließlich Batterie) 55 g
Mitgeliefertes Zubehor
Griffel 1 Stck.
Alkali-Mikrozellen (Typ LR03, Groß "AAA") 2 Stck.
Ersatz-Griffelspitzen 2 Stck.
Innensechskantschraube 2 Stck.
Griffelablage 1 Stck.
RS-232C-Kabel (Lange 3 m) 1 Stck.
Netzadapter 1 Stck.
Netzkabel 1 Stck.
Bedienungsanleitung 1 Stck.
Garantiekarte 1 Stok.
Treiber-Software-Disc 1 Stck.
- Änderungen der technischen Daten und äußerten Aufmachung bleiben jederzeit vorbehalten.
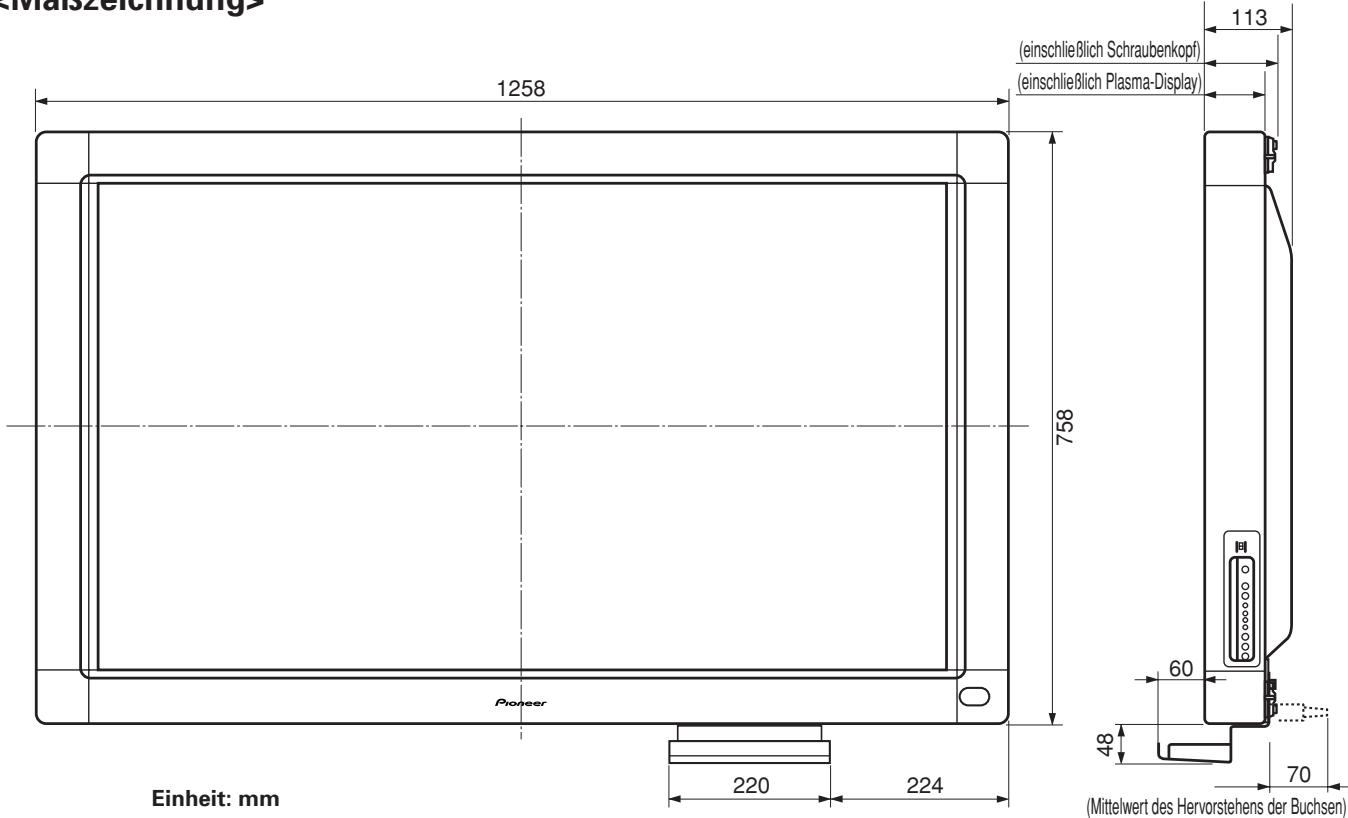
Publication de Pioneer Corporation.
© 2002 Pioneer Corporation
Tous droits de reproduction et de traduction réservés.
ご取极説明書は再生紙を使用ていま�。
© 2002 次才二株式会社 禁無斷軸載
Published by Pioneer Corporation.
Copyright © 2002 Pioneer Corporation.
All rights reserved.
八才二株式会社
153-8654 東京都目黑区目黑1丁目4番1号
PIONEER CORPORATION
4-1, Meguro 1-Chome, Meguro-ku, Tokyo 153-8654, Japan
PIONEER ELECTRONICS (USA) INC. P.O. BOX 1540, Long Beach, California 90801-1540, U.S.A. TEL: 1-310-952-2111
PIONEER ELECTRONICS OF CANADA INC. 300 Allstate Parkway, Markham, Ontario L3R OP2, Canada TEL: 1-905-479-4411
PIONEER EUROPE NV MULTIMEDIA DIVISION Pioneer House Hollybush Hill, Stoke Poges, Slough SL2 4QP, U.K., TEL: 44-1753-789-789
PIONEER ELECTRONICS AUSTRALIA PTY.LTD. 178-184 Boundary Road, Braeside, Victoria 3195, Australia, TEL: 61-39-586-6300
PIONEER ELECTRONICS ASIACENTRE PTE. LTD. 253 Alexandra Road #04-01, Singapore 159936, TEL: 65-6472-1111
PIONEER ELECTRONICS (CHINA) LTD.
Suite 901-906, 9th Floor, World Commerce Centre, Harbour City 11 Canton Road, Tsim Sha Tsui, Kowloon, Hong Kong, TEL: 852-2848-6488
PIONEER GULF FZE Lob 11-017, Jebel Ail Free Zone, P.O. BOX 61226, Jebel Ali, Dubai, United Arab Emirates, TEL: 971-4-815756
PIONEER HIGH FIDELITY TAIWAN CO., LTD. 13FL., No.44 Chung Shan North Road, Section 2 Taipei, Taiwan, TEL: 886-2-2521-3588
- 取拔上の注意
- 販売店樣
- 目次
- 特長 2
- 安全上の注意 3
- 付属品の確認 5
- 各部の名称 6
- 設置 7
- 特長
- 安全に正しおお使いんだくたに
- 图記号にて
- 円記号の意味
- 警告
- 異常時の处置
- 設置
- 使用环境
- 使用方法
- 注意
- 電池
- 使用環境
- 保守·点棱
- 電池の入い方
- ン先の交換
- 本機の取り付款
- ABB
- 接統
- アス線の接続
- �拉斯卡德専斯克莱尼和巴索ondonの接統
- 八円コに本機の接続
- 電源コトの接続
- ソフトウエのインストーリ
- ルフロー画面の設定
- フラズマデイス克莱イの調整
- ドライバーメフトウエアのインストーリ
- ご入先と矢印の位置合わせ
- �ーテイリデンフウエアのインストル
- 手入にて
- 保证とアフターーサズ
- 保証書にとて
- 保證期間と保證内容にて
- 保证期間
- 保证内容
- 補修用性能部品の保有期間
- 修理を依賴いたします
- 願
- 連絡くださんだけた內容
- ■保証期間中は:
- ■保証期間が過きてい的とは:
- ACアダフタ一部
- 部
- 付属品
- Notes on Installation Work:
- IMPORTANT
- CAUTION
- RISK OF ELECTRIC SHOCK DO NOT OPEN
- IMPORTANT SAFETY INSTRUCTIONS
- GROUNDING OR POLARIZATION
- [for US model] IMPORTANT NOTICE
- CAUTION: WHEN POSITIONING THIS EQUIPMENTENSURE THAT THE MAINS PLUG AND SOCKET IS EASILY ACCESSIBLE.
- Operating Environment
- [For Canadian model]
- WARNING:
- FOR USE IN THE UNITED KINGDOM.
- NOTE
- Information to User
- CAUTION:
- [for US model]
- FEDERAL COMMUNICATIONS COMMISSION DECLARATION OF CONFORMITY
- Note for Dealers:
- CAUTIONS REGARDING HANDLING
- FEATURES
- NOTES:
- Pull out the felt tip.
- INSTALLATION
- Remove the "Pioneer" emblem from the plasma display.
- Place the unit over the front of the plasma display.
- Insert a new felt tip.
- Use the locking fixture on the rear panel to secure the four corners of the unit.
- Use the furnished Allen bolt to fasten the pen stand in place to the rear side of the unit.
- Connect Ground Wire
- Connecting the Plasma Display to a Computer
- Connect the Unit to the Computer
- Connect the Power Cord
- Setting the Display Resolution
- Adjusting the Plasma Display
- ■ First, set the System Settings.
- Set screen display mode.
- Installing the Driver Software
- Alignment of Pen Tip and Cursor Position
- Using your mouse, left-click on the CBdrv icon in the task tray.
- NOTE:
- When the pop-up menu appears, left-click on "Calibration."
- Follow the calibration instructions that appear onscreen.
- CLEANING
- AC Adapter
- Dedicated Pen
- Accessories
- Remarques sur l'installation:
- ATTENTION
- ATTENTION:
- AVERTISSEMENT: EN POSITIONNANT L'ÉQUIPEMENT, S'ASSURER QUE LA FICHE ET LA PRESE DE RACCORDEMENT DE L'ALIMENTATION SONT FACILIENT ACCESSIBLES.
- Conditions de Fonctionnement
- [Pour le modele Canadien]
- Remarque pour le revendeur:
- AVERTISSEMENTS CONCERNANT L'USAGE
- CHARACTERISTIQUES
- Si l'utilisation du crayon devient difficile:
- Vérification de la charge de la pile:
- < Changement de la pile du crayon >
- REMARQUES:
- Extrayez la mine en feuitre.
- Retirez l'écussion "Pioneer" de l'écran à plasma.
- Placez l'unité sur l'avant de I'écran à plasma.
- Insérez une nouvelle mine.
- Utilisez l'applique de fixation sur la face arrrière pour immobiliser les quatrecoins de l'appareil.
- Branchement du fil de masse
- Branchement de l'écran à plasma à un ordinateur
- Branchement de l'unité sur un ordinateur
- Branchement du cordon d'alimentation
- Réglage de la résolution d'affichage
- Ajustement de l'écran à plasma
- ■ Effectuez d'abord les réglages du système.
- Réglez le mode d'affichage sur écran.
- Installation du calcul de pilotage
- Alignement de la mine du crayon et de la position du curseur
- En vous servant de la souris, cliquez du bouton gauche sur l'icone CBdrv dans le tiroir Tâches.
- REMARQUE:
- Lorsque le menu déroulant apparait, cliquez du bouton gauche sur "Calibration".
- Suívez les instructions de calibrage, apparaisant sur l'écran.
- NETTOYAGE
- Adaptateur secteur
- Crayon spécial
- Accessoires
- Hinweis zur Installation:
- WICTIG
- ACHTUNG:
- Betriebsbedingungen
- AUFSTELLUNG UND REINIGUNG
- MERKMALE
- HINWEIS:
- Betriebsarten-Wahlschalter
- PEN-Modus:
- NORMAL-Modus:
- Bei einer Funktionstörung des Griffels:
- Überprüfen der Batterie-Restspannung:
- < Auswechseln der Griffelbatterie >
- HINWEISE:
- Ziehen Sie die Filzspitze vom Griffel ab.
- Entfernen Sie das "Pioneer"-Emblem vom Plasma-Display.
- Platzieren Sie das Gerät über der Vorderseite des Plasma-Displays.
- VORSICHT:
- Setzen Sie eine neue Filzspitze in den Griffel ein.
- Verwenden Sie die Halterungen an der Rückseite, um die vier Ecken in Arbeitsstellung zu sichern.
- ■ Verwenden Sie die mitgelieferte Innensechskantschraube, um die Griffelablage an der Rückseite des Gerätes in Arbeitsstellung zu befestigen.
- Anschließlich des Erdungsdrahtes
- Anschließlich des Plasma-Displays an einen Computer
- Anschlieben des Gerätes an den Computer
- Anschließen des Netzkabels
- Einstellen der Bildschirm-Auflösung
- Einstellen des Plasma-Displays
- - Nehmen Sie zuerst die Systemeinstellungen vor. - Stellen Sie den Anzeigemodus ein.
- Installieren der Treiber-Software
- Ausrichtung von Griffelspitze und Cursor-Position
- Klichen Sie mit der linken Maustaste auf das Symbol "CBdrv" in der Taskleiste.
- Wenn das Kontextmenu erscheint, klichen Sie mit der linken Maustaste auf "Calibration."
- Folgen Sie den Anweisungen zur Kalibrierung, die auf dem Bildschirm erschieren.
- REINIGUNG
- Netzadapter
- Spezialgriffel
- Mitgeliefertes Zubehor
- 八才二株式会社
- PIONEER CORPORATION
- PIONEER ELECTRONICS (CHINA) LTD.
ブランド : PIONEER
モデル : PDK-50HW2A
カテゴリ : 電子機器用ホルダー