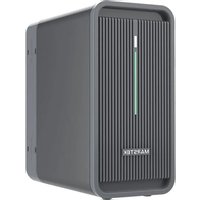
B2500 - Batteria Marstek - Manuale utente e istruzioni gratuiti
Trova gratuitamente il manuale del dispositivo B2500 Marstek in formato PDF.


Domande degli utenti su B2500 Marstek
0 domanda su questo apparecchio. Rispondi a quelle che conosci o fai la tua.
Fai una nuova domanda su questo apparecchio
Scarica le istruzioni per il tuo Batteria in formato PDF gratuitamente! Trova il tuo manuale B2500 - Marstek e riprendi in mano il tuo dispositivo elettronico. In questa pagina sono pubblicati tutti i documenti necessari per l'utilizzo del tuo dispositivo. B2500 del marchio Marstek.
MANUALE UTENTE B2500 Marstek
MARSTEK
MICRO ESS B2500
Instruction Manual
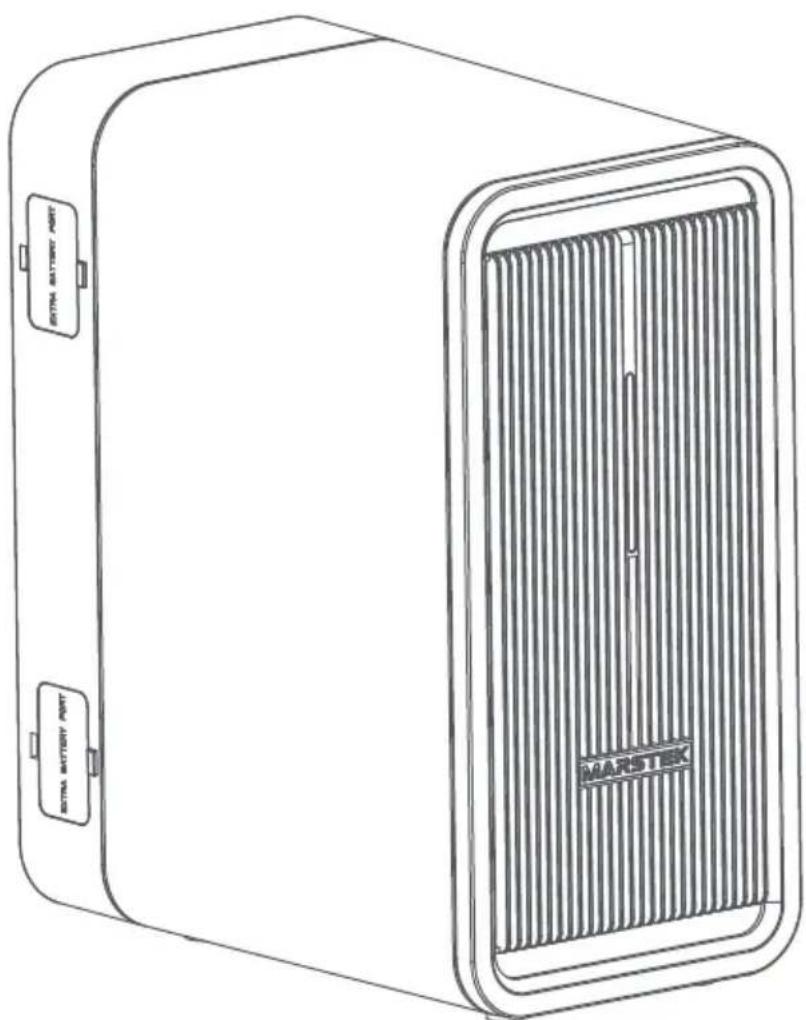
text_image
MARISTIK POTR MATTERY PORT POTR MATTERY PORTCONTENTS
EN
Specifications 1
Operating Temperature range 1
Product description 2
Use Instructions 3
Packing list 4
APP Instructions 5
Frequently Questions & Answers 8
Warranty and Contact Information 8
Chemical Composition of Toxic and Harmful Substances 8
Important safety information 9
Specifications
 Capacity Battery CellWeight Capacity Battery CellWeight |  |  |  |  |  |
| Dimension Certificate | Waterproof | ||||
| 2240Wh(50000mAh/44.8V) | LiFePO4Battery 18.7±0.5 kg296*175*350r |   RoHS RoHS | |||
  PV Input PV PV Input PV |   Output Output |  Extra battery portInput Extra battery portInput |  Extra battery portOutput Extra battery portOutput |  Extra battery portCapacity Extra battery portCapacity |
| 12V-59V --- 8.47A*2500W*2 Max. | 42V-50.4V --- 9.25A*2400W*2 Max. | 44.8V-51.1V--- 22A 42V-51.1V | 23A 6720Wh |
 Cycle times Protect system Cycle times Protect system |  Storage Temperature Storage Temperature |  Operation Temperature Operation Temperature |  Charging Temperature Charging Temperature |  |
| 6000times (25°C) | -10 - 55°C -10 - 50°C 0 - 50°C | Overcharge protection, Over-discharge protection, Overcurrent protection, Over temperature protection, Short circuit protection, Overvoltage protection. |
Operating Temperature range
Low temperature may affect the battery capacity of the product, The product can be charged in a temperature range of 0^ C-50°C. Charge the product when the temperature is below 0^ C, We recommend placing the product in an insulated cooler or other temperature conditions. The product can be used in the temperature range of -10^ C-50°C. In order to extend the service life of the battery, it is recommended to use this product in the environment of 20^ C to 30^ C.
Product description
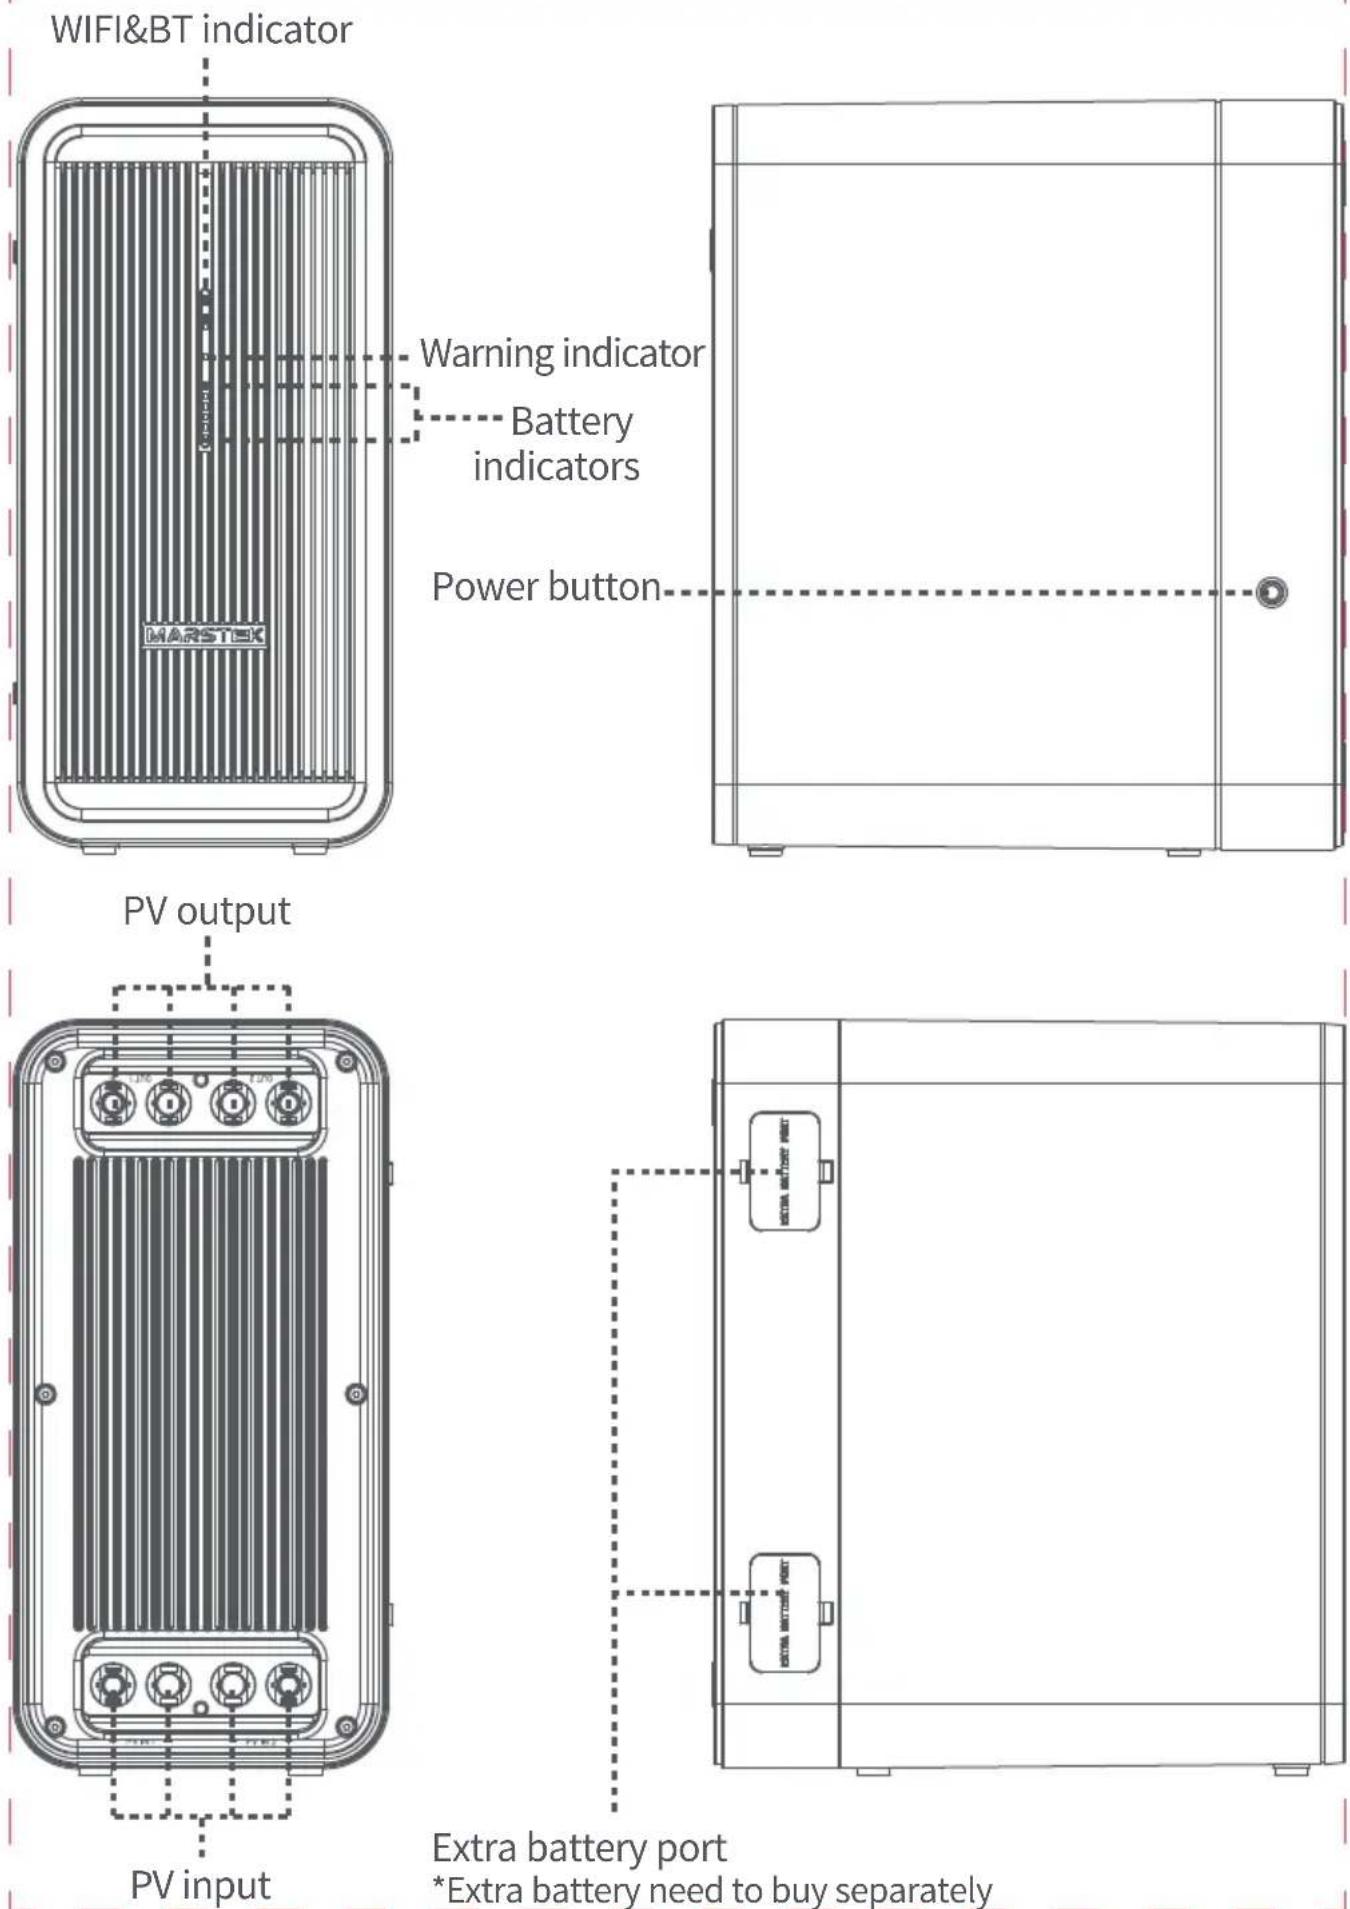
EN
Use Instructions
How to use it:
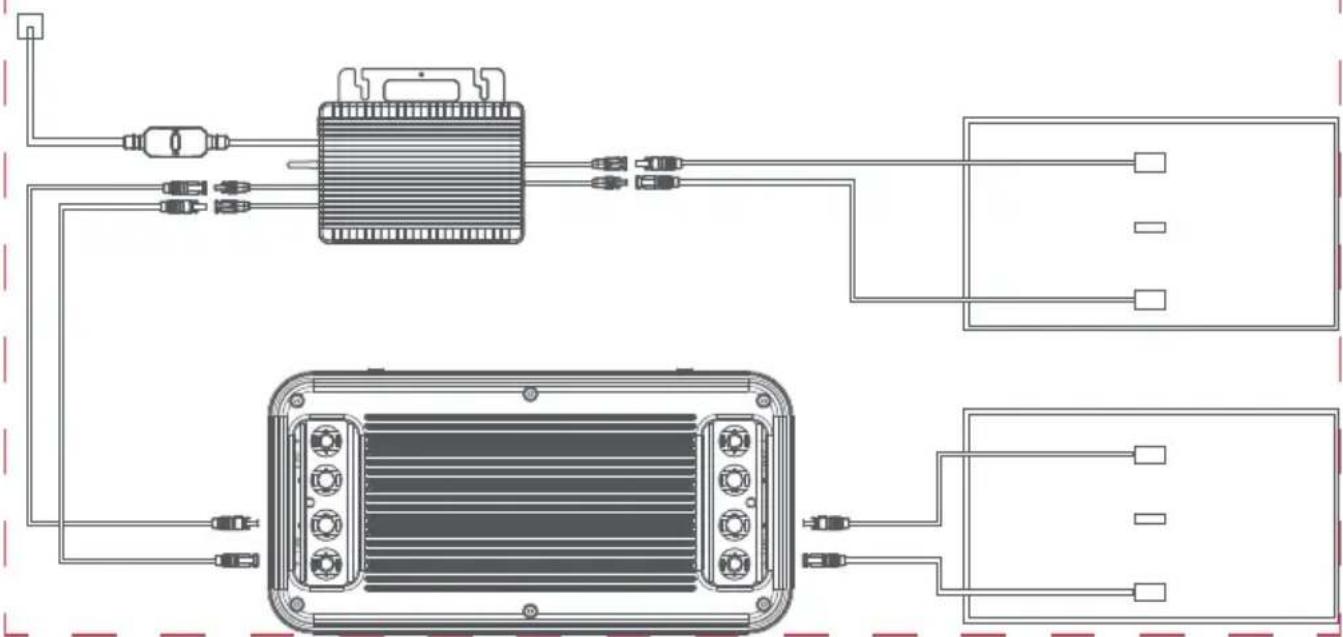
- Connect the solar panel to B2500 PV IN;
- Connect the micro inverter MC4 input to B2500 MC4 OUT;
3.Long press the B2500 switch button until the power display state light up; - If not in use, you can Long press 10S the switch button to turn off the B2500.
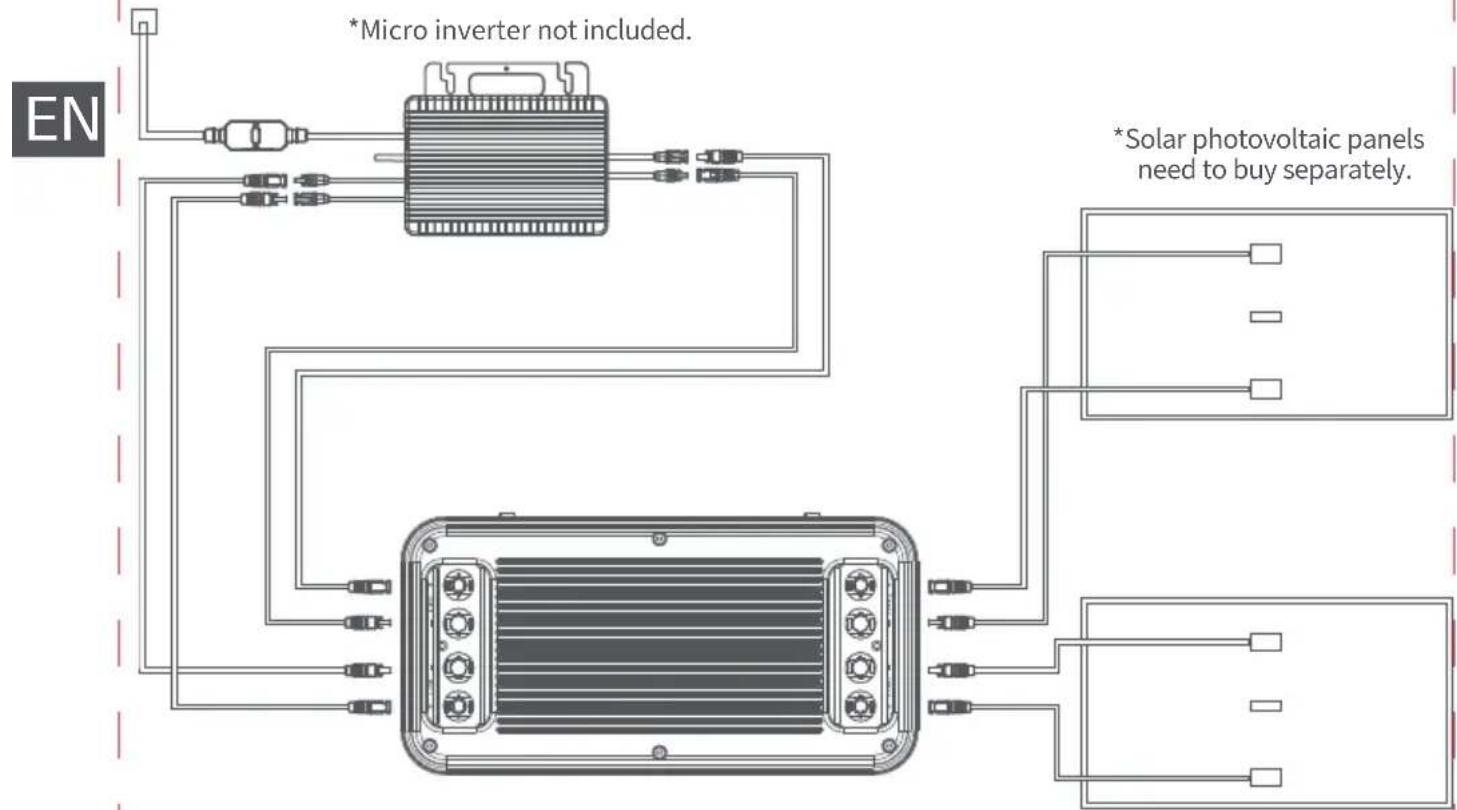
flowchart
graph TD
    A["EN"] --> B["Micro inverter not included."]
    B --> C["Solar photovoltaic panels need to buy separately."]
    C --> D["Output 1"]
    C --> E["Output 2"]
    C --> F["Output 3"]
    C --> G["Output 4"]
    C --> H["Output 5"]
    C --> I["Output 6"]
    style A fill:#f9f,stroke:#333
    style B fill:#ccf,stroke:#333
    style C fill:#cfc,stroke:#333
    style D fill:#fcc,stroke:#333
    style E fill:#fcc,stroke:#333
    style F fill:#fcc,stroke:#333
    style G fill:#fcc,stroke:#333
    style H fill:#fcc,stroke:#333
    style I fill:#fcc,stroke:#333
If you find that the micro inverter is not functioning properly after the connection described above, please connect as follows: Connect one of the micro inverter to the Output1 of the product, and the other micro inverter should either be disconnected or connected to the solar energy.
natural_image
Pure electrical circuit lines without any symbols*This issue arises from the fact that some of the micro inverters available on the market have a common internal reference point. When both micro inverters are connected to a battery bank simultaneously, the micro inverter will function abnormally.
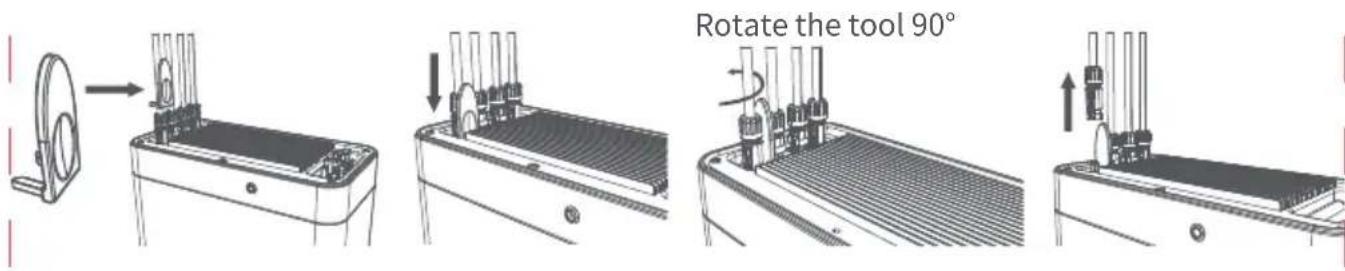
Cable removal:
text_image
Rotate the tool 90°
Important Tips:
- Before connecting cables, ensure that the micro inverter, solar panels, and the home grid are disconnected, and product is turned off.
- Before setting the output to micro inverter please confirm the rated power of your micro inverter, the output to micro inverter should not be greater than the rated power of your micro inverter.
• The product should be protected from direct sunlight to prevent rapid temperature increase. - Please check the accessories before installation, some accessories need to be purchased separately.
• After the installation, please first download the App to check electricity produced. - For long-term storage, charge and discharge product once every 3 months (discharge product to 20% , then recharge it to 80% ).
Packing list
natural_image
Line drawing of a rectangular electronic device with a central panel and side connectors (no text or symbols)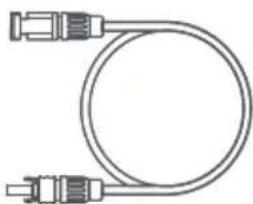
natural_image
Pure electrical circuit lines without any symbols
text_image
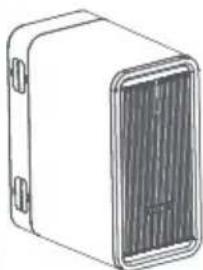
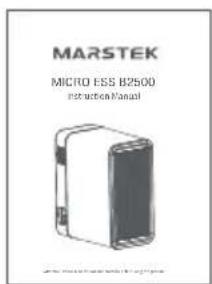
MARSTEK MICRO ESS B2500 instruction ManualB2500*1 MC4 Extension Cable *4
Tools*1
User Manual
APP Instructions
MARSTEK APP can connect all your devices via Bluetooth or wi-fi to track your energy use and production in real time, dynamically display the status data of the device in real time, and control the energy of the device in its own hands.
This software could be operated on mobile phones with Android 6.0 and IOS12.0 or above.
Software installed
Scan the QR code and install the opened app on your smartphone.
EN
text_image
QR code image containing a central logo, likely linking to a digital resource or website.Login
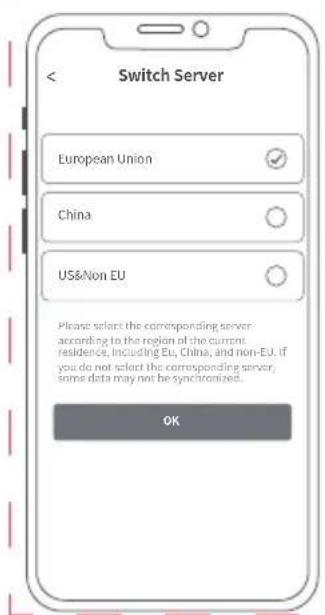
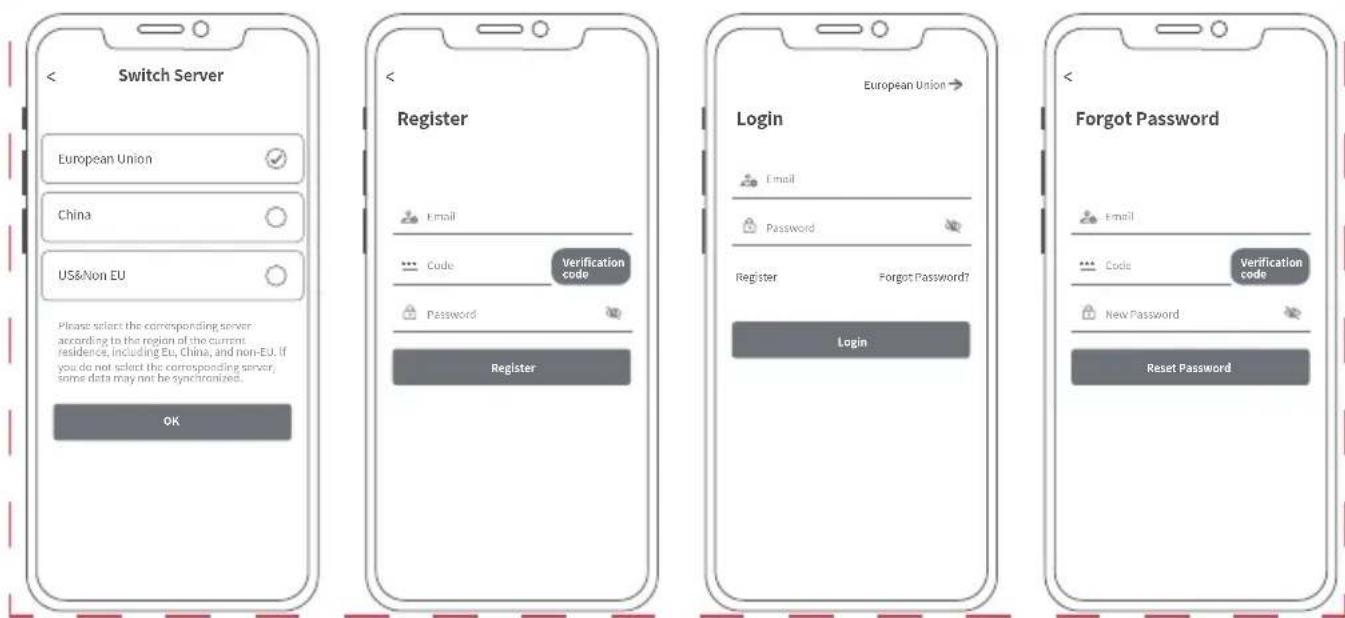
. After installation, users can click the desktop icon to enter the login interface, you will enter the server switching interface when you open it at the first time.
Select Register Account, Enter your e-mail address.A confirmation code will be sent to the email address previously provided for verification.Confirm your email in the app with the code you have just received and set a password.
Log in with your e-mail address and the password you have chosen.
If you have forgotten your password, select "Forgot Password?" and reset it.
. In the login interface click on the upper right corner -> enter the server selection interface, according to different regions to choose. If you select the wrong server, the app cannot retrieve device history data.
text_image
Switch Server European Union China US&Non EU Please select the corresponding server according to the region of the current residence, including Eu, China, and non-EU. if you do not select the corresponding server, some data may not be synchronized. OK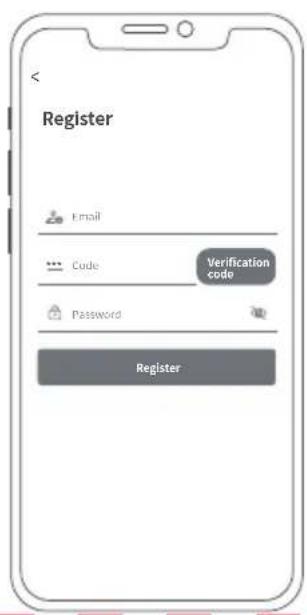
text_image
Register Email Code Verification code Password Register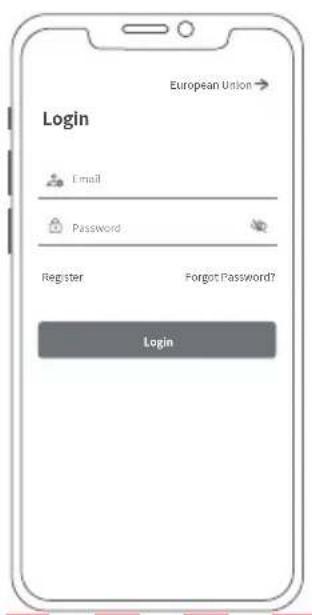
text_image
European Union Login Email Password Register Forgot Password? Login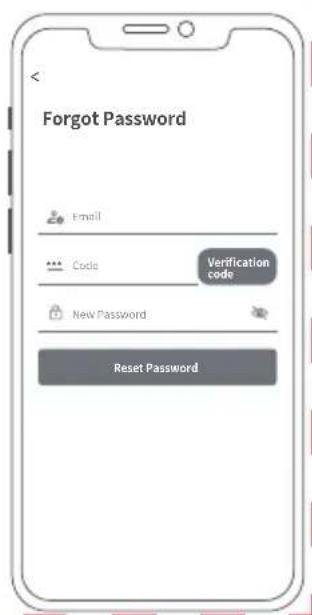
text_image
Forgot Password Email Code Verification code New Password Reset PasswordAdding devices
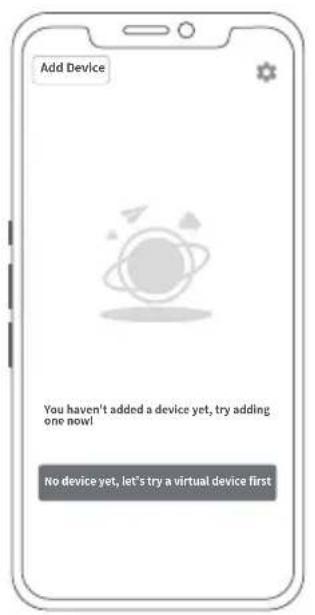
. After successful login, select "Add Device" in the upper left corner to add a device.
. Scan the QR code (QR code only for M5000) on your device to add the device, or open Bluetooth® on your smartphone and location sharing on the phone and select the device to add it directly.
Once the device has been successfully added, the name of your power station is displayed on the start page.
. Clicking on different devices in the device management page will switch the connection to different devices, left swipe on IOS system triggers modifying and deleting devices, long press on the device list on Android system triggers modifying and deleting devices.
text_image
Add Device You haven't added a device yet, try adding one now! No device yet, let's try a virtual device first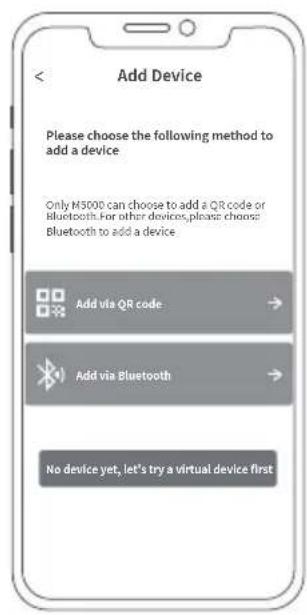
text_image
Add Device Please choose the following method to add a device Only H5000 can choose to add a QR code or Bluetooth. For other devices, please choose Bluetooth to add a device Add via QR code Add via Bluetooth No device yet, let's try a virtual device first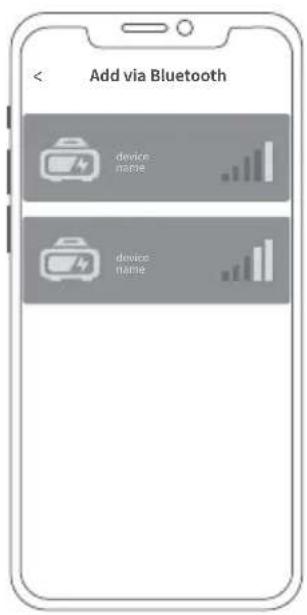
text_image
Add via Bluetooth device name device name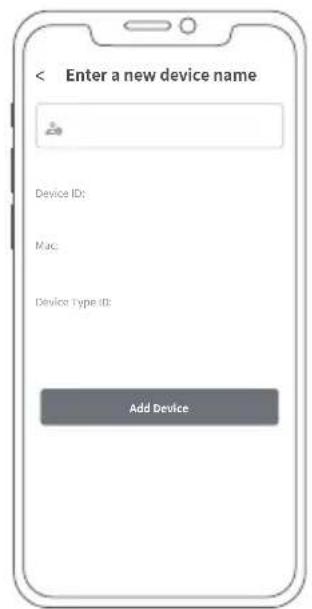
text_image
< Enter a new device name Device ID: Mac: Device Type ID: Add Device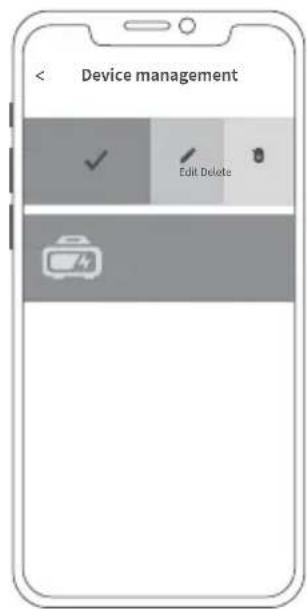
text_image
< Device management Edit DeleteEquipment home page
Real-time display the solar charging status, discharge and other status.
. Charging settings: 1. PV1 and PV2 charging the battery for fully charged, then discharged.
- PV1 and PV2 transmitting to Micro inverter.
Discharge settings: set the output mode of the product, (1) You can select the time period of each line and power output of the product through the APP. (2) You can turn on the smart power control mode, in which the product will automatically collect the household electricity, and control the product output of the household electricity needs, thereby saving electricity.
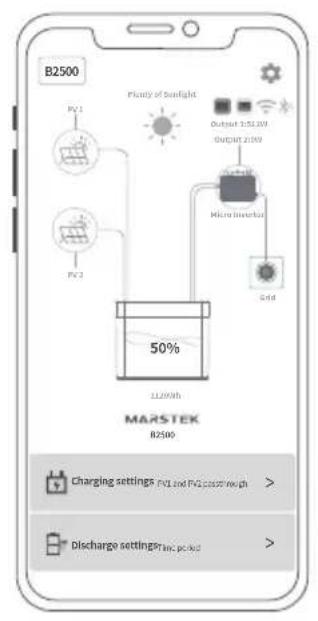
text_image
B2500 Plasty of sunlight PG1 PG2 Outset 3.5LW OUTset 2.5LW High efficiency Grid 50% LL200Wh MARSTEK B2500 Charging settings PG1 and PG2 output/avg chg > Discharge setting/avg poked >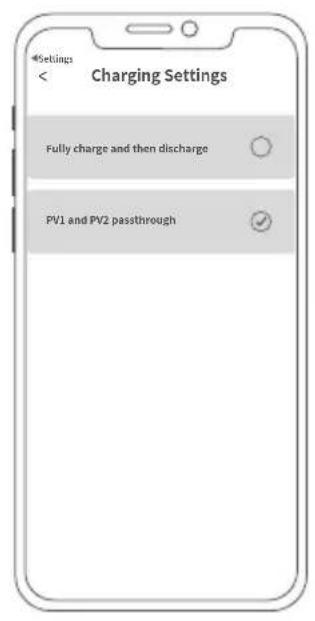
text_image
Charging Settings Fully charge and then discharge PV1 and PV2 passthrough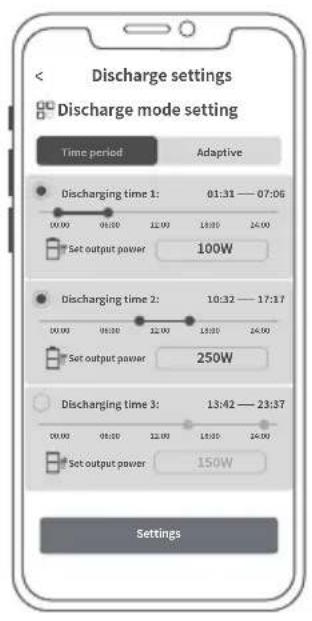
text_image
Discharge settings Discharge mode setting Time period Adaptive Discharging time 1: 01:31 — 07:06 10.00 01.00 12.00 13.00 24.00 Set output power 100W Discharging time 2: 10:32 — 17:17 10.00 01.00 12.00 13.00 24.00 Set output power 250W Discharging time 3: 13:42 — 23:37 10.00 01.00 12.00 13.00 24.00 Set output power 150W SettingsApp settings
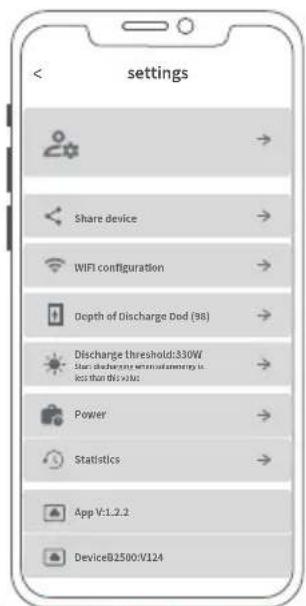
Select the settings wheel at the top right to change settings or get information:
. Account Management.
. Share Equipment.
. WiFi network.
. Deep discharge setting.
. Discharge start threshold setting.
. Power.
. Statistics.
. App and device information.
text_image
settings Share device WIFI configuration Depth of Discharge Dod (98) Discharge threshold:330W Share discharge threshold is less than this value Power Statistics App V:1.2.2 DeviceB2500/V124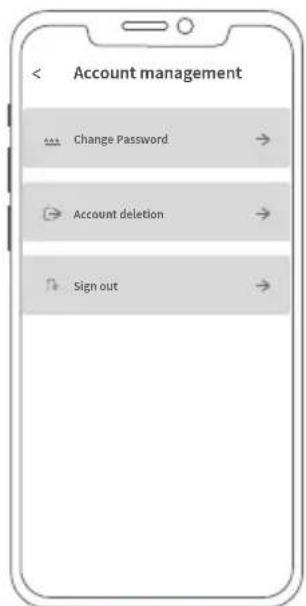
text_image
< Account management Change Password Account deletion Sign out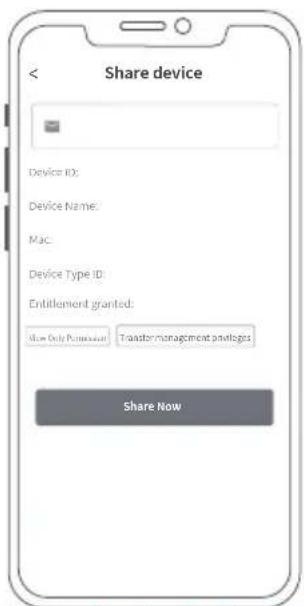
text_image
Share device Device ID: Device Name: Mac: Device Type ID: Entitlement granted: Show Only Permission Transfer management privileges Share Now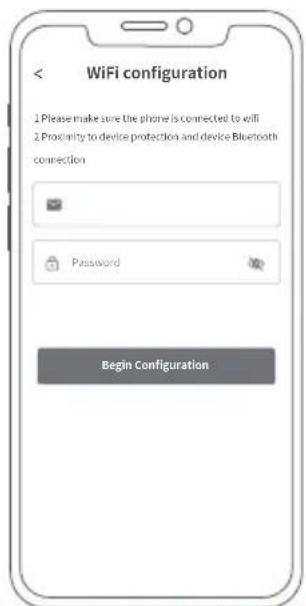
text_image
WiFi configuration 1 Please make sure the phone is connected to wifi 2 Proximity to device protection and device Bluetooth connection Password Begin ConfigurationFrequently Questions & Answers
O:What is the battery type?
LiFePO4 Battery.
O: Can the product be taken on the aircraft?
No, according to the airline transportation standards, 100Wh capacity of lithium battery can not board the aircraft.
O: Can be charged with solar panels from a different brand?
Yes. Please use solar panels that meet the following specifications for charging. Voltage range: 12-59VDC, Rated output power (discharging): 800W max. (Choose our solar photovoltaic products, just insert the DC port, you can easily charge the product with solar energy. This product uses MPPT (Maximum Power Tracking) technology, which can compare the output voltage point of the solar panel with the battery voltage of the product in real time, so as to find the maximum power output point that the solar panel can provide and charge the battery of the machine to obtain the best charging efficiency. * Actual performance is related to weather)
Q: How can I prolong the lifespan or better maintain my product that is mounted on the floor? If your balcony is often flooded, we recommend raising your product. This will prevent malfunctions due to prolonged soaking.
Warranty and Contact Information
Under normal use of the product, it will not affect the result of defective workmanship and materials used in the product: This warranty period describes the complete and exclusive warranty obligations of the product, and we will not assign or authorize anyone to be responsible for any other products.
warranty period
Product warranty period of 3 years. In all cases, the warranty period starts from the date of purchase by the consumer. In order to ensure the start date of the warranty period, the consumer needs to provide proof of purchase or other reasonable supporting documents.
The following conditions are not covered by the warranty
- The appearance of the product is damaged after use.
- Unauthorized disassembly and maintenance of non-professionals.
- Performance problems caused by human factors.
- Damage caused by natural disasters, lightning Strikes, accidents and other irresistible factors.
How to get warranty service
You can contact our customer service through our official website or e-commerce platform. Thank you for your cooperation!
Chemical Composition of Toxic and Harmful Substances
| Part Name | Toxic and harmful substances or chemical elements | |||||
| Pb | Hg | Cd | Cr(VI) | PBB | PBDE | |
| Product shell | 0 | 0 | 0 | 0 | 0 | 0 |
| Circuit module | X | 0 | 0 | 0 | 0 | 0 |
| button | 0 | 0 | 0 | 0 | 0 | 0 |
| Small hardware | 0 | 0 | 0 | 0 | 0 | 0 |
| Charging Cable | 0 | 0 | 0 | 0 | 0 | 0 |
| Battery | 0 | 0 | 0 | 0 | 0 | 0 |
O: The content of hazardous substances in homogeneous materials all components are limit requirement specified in GB-T 26572.
X: The content of hazardous substance in at least one of the average materials of the part exceeds the limit requirement of GB-T 26572, and there is no mature alternative in the industry at present, which meets the environmental protection requirements of the EU RoHS directive.
This information for reference purposes only and does not represent a binding agreement. Product (Color, Size, OSD, etc.) in kind prevail
Important safety information
Warnings!
Please notice the following safety precautions carefully. If physical injury, loss of data, or damage is caused by failure to follow instructions, the warranty does not apply.
• To reduce the risk of injury, close supervision is necessary when the product is used near children.
- Do not put fingers or hands into the product.
- Use of an attachment not recommended or sold by the product manufacturer may result in a risk of fire, electric shock, or injury to persons.
• To reduce risk of damage to the electric plug and cord, pull the plug rather than the cord when disconnecting the product.
- Do not use the product in excess of its output rating. Overload outputs above the rating may result in a risk of fire or injury to persons.
- Do not use the product or attachment that is damaged or modified. Damaged or modified batteries may exhibit unpredictable behavior resulting in fire, explosion, or risk of injury.
• Do not operate the product with a damaged cord or plug, or a damaged output cable.
- Do not disassemble the product. Take it to a qualified service person when service or repair is required. Incorrect reassembly may result in a risk of fire or electric shock.
- Do not expose the product to fire or high temperatures. Exposure to fire or temperatures above 130^ may cause an explosion.
• To reduce the risk of electric shock, unplug the power pack from the outlet before attempting any instructed servicing.
- Have servicing performed by a qualified repair person using only identical replacement parts. This will ensure that the safety of the product is maintained.
- When charging a device, the product may feel warm. This is a normal operating condition and should not be a cause for concern.
- When charging the internal battery, work in a well-ventilated area and do not restrict ventilation in any way.
- Do not clean the product with harmful chemicals or detergents.
- Misuse, dropping, or excessive force may cause product damage.
- When disposing of secondary cells or batteries, keep cells or batteries of different electrochemical systems separate from each other.
- Do not use or store this product in direct sunlight for a long period, such as in a car, cargo bed, or any other place where it will be exposed to high temperatures. Doing so may cause the product to malfunction, deteriorate, or generate heat.
- Servicing of batteries should be performed or supervised by personnel knowledgeable about batteries and the required precautions.
- Do not use this product near strong static electricity or strong magnetic fields.
- Do not expose this product to flammable, explosive gas, or smoke.
- Do not stand on the product.
- Do not immerse the product in water. If the product accidentally falls into water, place it in a safe, open place and keep it away from fire until it is completely dry.
- Please deal with the scraps according to the regulations. For more details, please follow the local laws and regulations on battery recycling and disposal.
MARSTEK
MICRO ESS B2500
Bedienungsanleitung
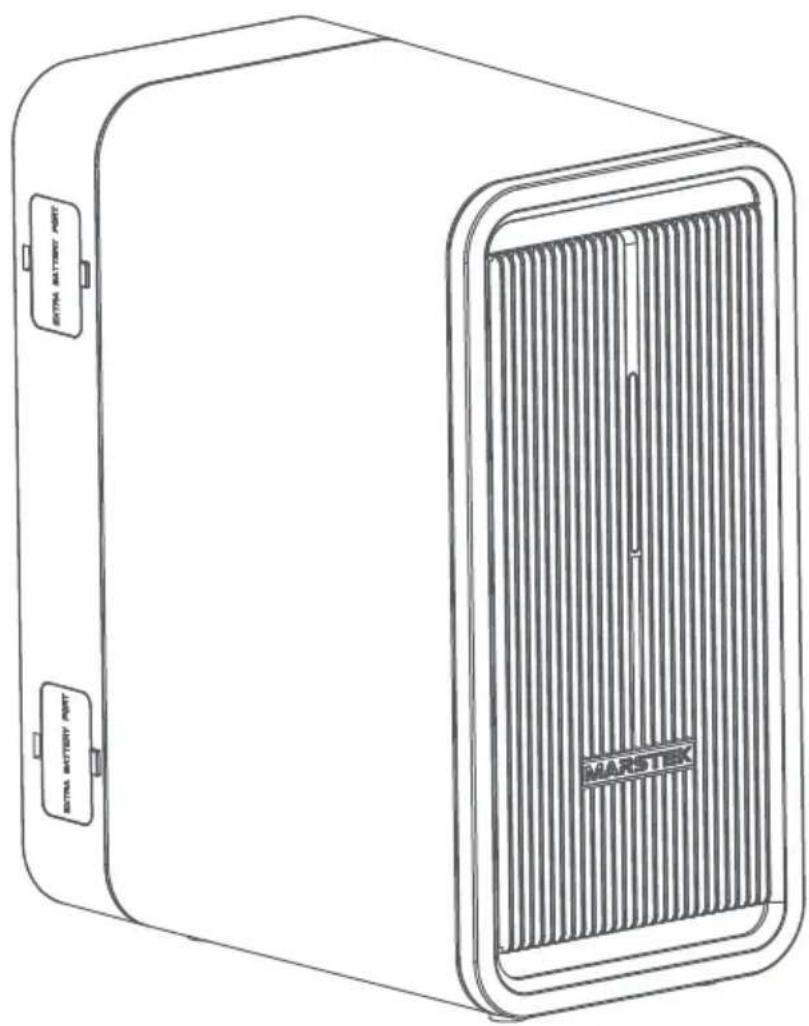
text_image
MARSTIK ENTAL BATTERY PORT ENTAL BATTERY PORTINHALTSVERZEICHNIS
DE
Technische Daten 1
Betriebstemperaturbereich 1
Produktbeschreibung 2
Gebrauchsanweisung 3
Lieferumfang 4
APP-Anweisungen 5
Häufig gestellte Fragen 8
Garantie und Kontaktdaten 8
Chemische Zusammensetzung von giftigen und schädlichen Stoffen 9
Wichtige Sicherheitshinweise 9
Technische Daten
| | | | | |
| Kapazität AkkutypGewicht Abmessungen Zertifizierung | Wasserfest | ||||
| 2240 Wh(50000 mAh/44,8 V) | LiFePO418,7±0,5 kg 2965175 x 350 |  ml... ml...  RoHS RoHS | |||
  PV-Eingang PV-Ausgang PV-Eingang PV-Ausgang |  | Zusatz AkkusEingang |  Zusatz AkkusAusgang Zusatz AkkusAusgang | Erweiterbar aufKapazität |
| 12V-59V --- 8,47Ax2max. 500Wx2 | 42V-50,4V --- 9,25Ax2max. 400Wx2 | 44,8V-51,1V --- 22A | 42V-51,1V --- 23A | 6720Wh |
 |  | [SGTW] | [SGXC] |  |
| Zyklus anzahl Schageztemperatur Entladetemperatur Ladetemperatur | ||||
| 6000 (25 °C) -10 bis +55 °C -10 bis +50 °C 0 bis +50 °C | Überladung, Tiefentladung, Überstrom, Überhitzung, Kurzschluss, Überspannung. | |||
Betriebstemperaturbereich
Niedrige Umgebungstemperaturen können die Akkukapazität des Produkts beeinträchtigen. Das Produkt ist für einen Ladetemperaturbereich von 0 °C bis +50 °C konzipiert. Möchten Sie das Produkt bei Temperaturen unter 0 °C aufladen, empfehlen wir, das Produkt in einer isolierten Kühlbox oder unter anderen Temperaturbedingen unterzubringen. Das Produkt ist so konzipiert, dass es bei einer Umgebungstemperatur zwischen -10 °C und +50 °C verwendet werden kann. Um die Lebensdauer des Akkus zu verlängern, ist es wird empfohlen, dieses Produkt in einer Umgebung von 20°C bis 30°C zu betreiben.
DE
Produktbeschreibung
LED-Statusanzeige für WIFI&BT
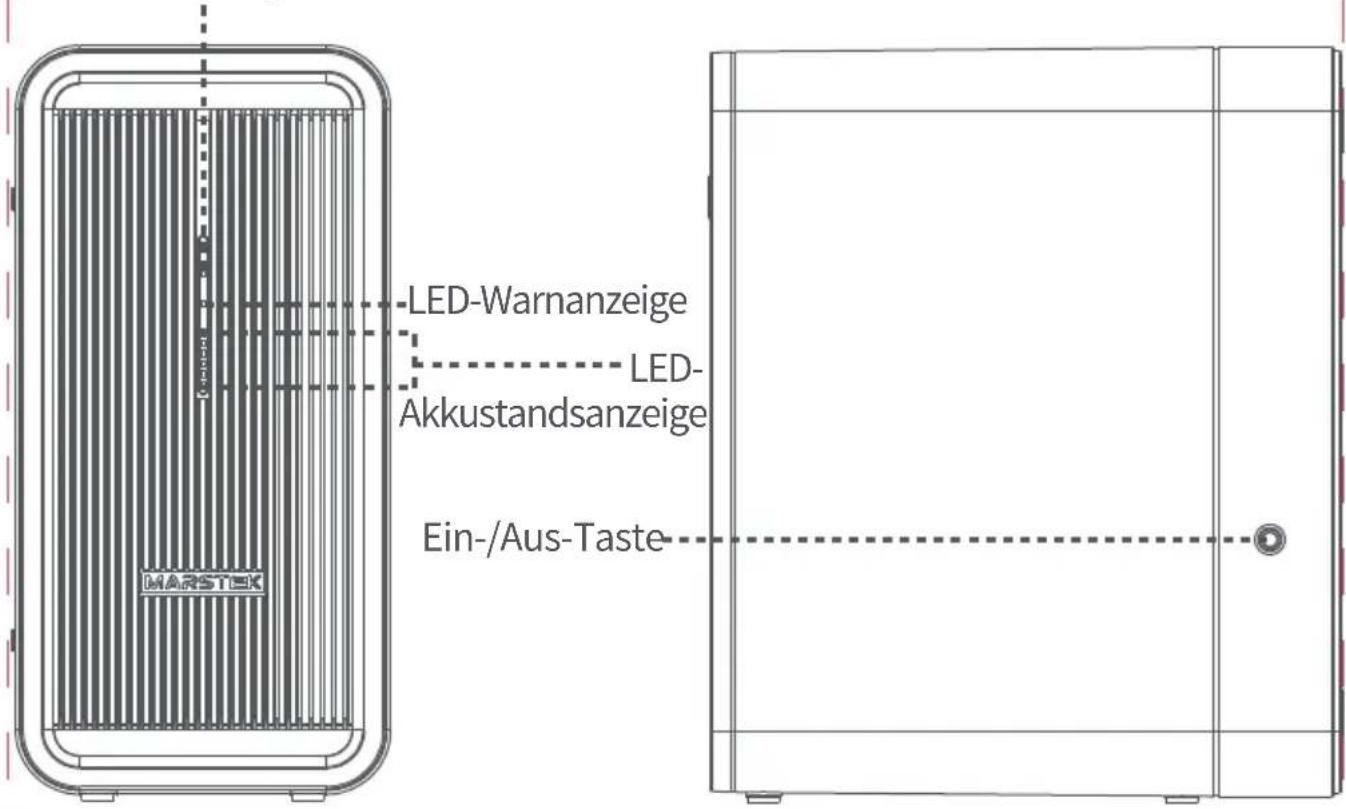
text_image
LED-Warnanzeige LED- Akkustandsanzeige Ein-/Aus-Taste MARSTEKPV-Ausgang
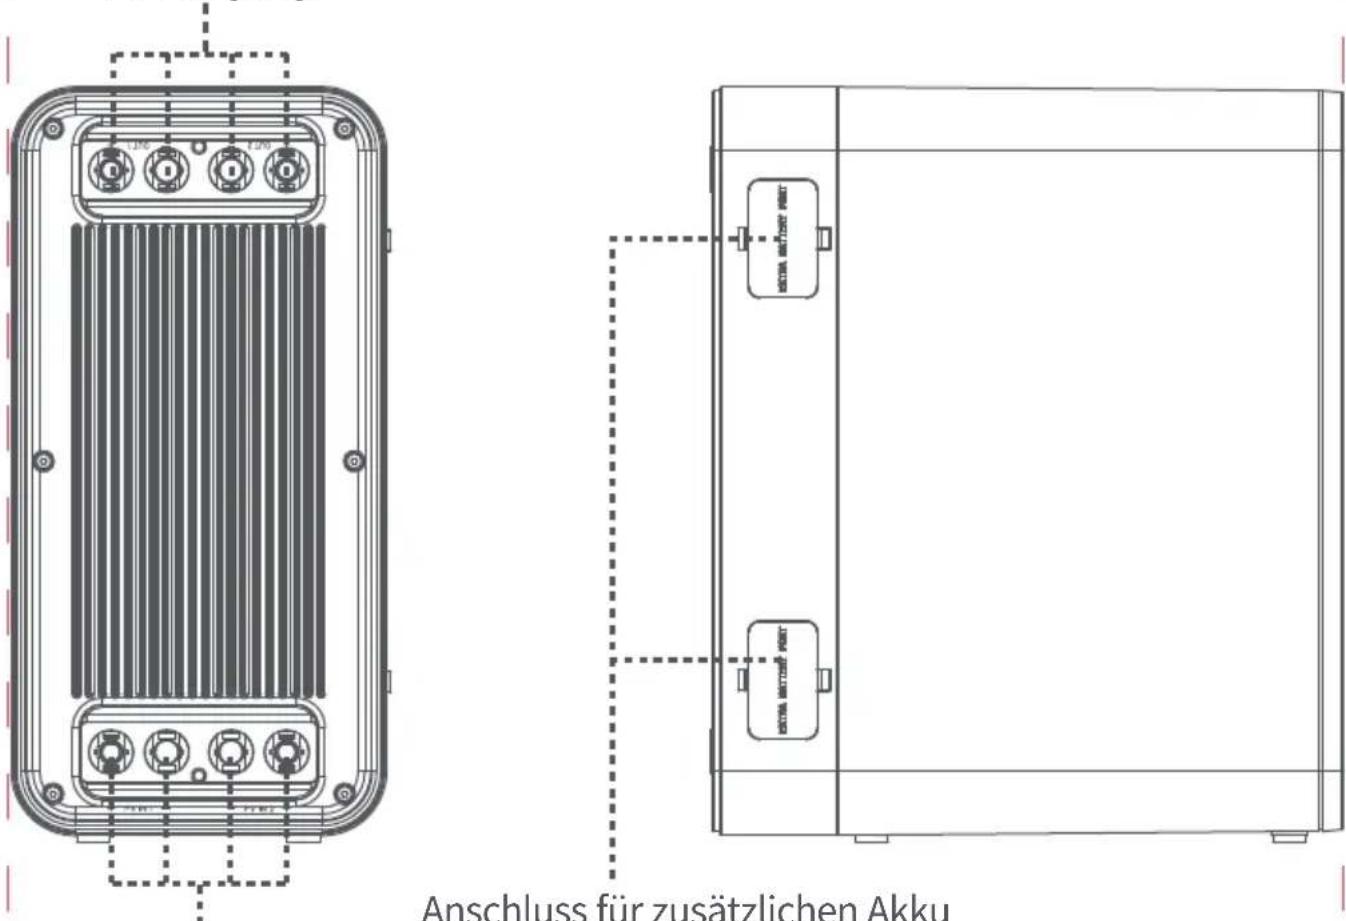
text_image
Anschluss für zusätzlichen AkkuAnschluss für zusätzlichen Akku
* Zusätzliche Akkus sind nicht im Lieferumfang enthalten.
Gebrauchsanweisung
How to use it:
- Schließen Sie das Solarmodul an einen der PV-Eingänge des B2500 an.
- Schließen Sie ein Ende des Kabels an den MC4-Eingang des Mikro-Wechselrichters und das andere Ende an den MC4-Ausgang des B2500 an.
- Halten Sie die Ein-/Aus-Taste des B2500 gedrückt, bis die LED-Betriebsanzeige zu leuchten beginnt.
- Wenn Sie die B2500 nicht benutzen, können Sie sie durch 10s Drücken des Ausschaltknopfes ausschalten.
*Mikro-Wechselrichter sind nicht im Lieferumfang enthalten.
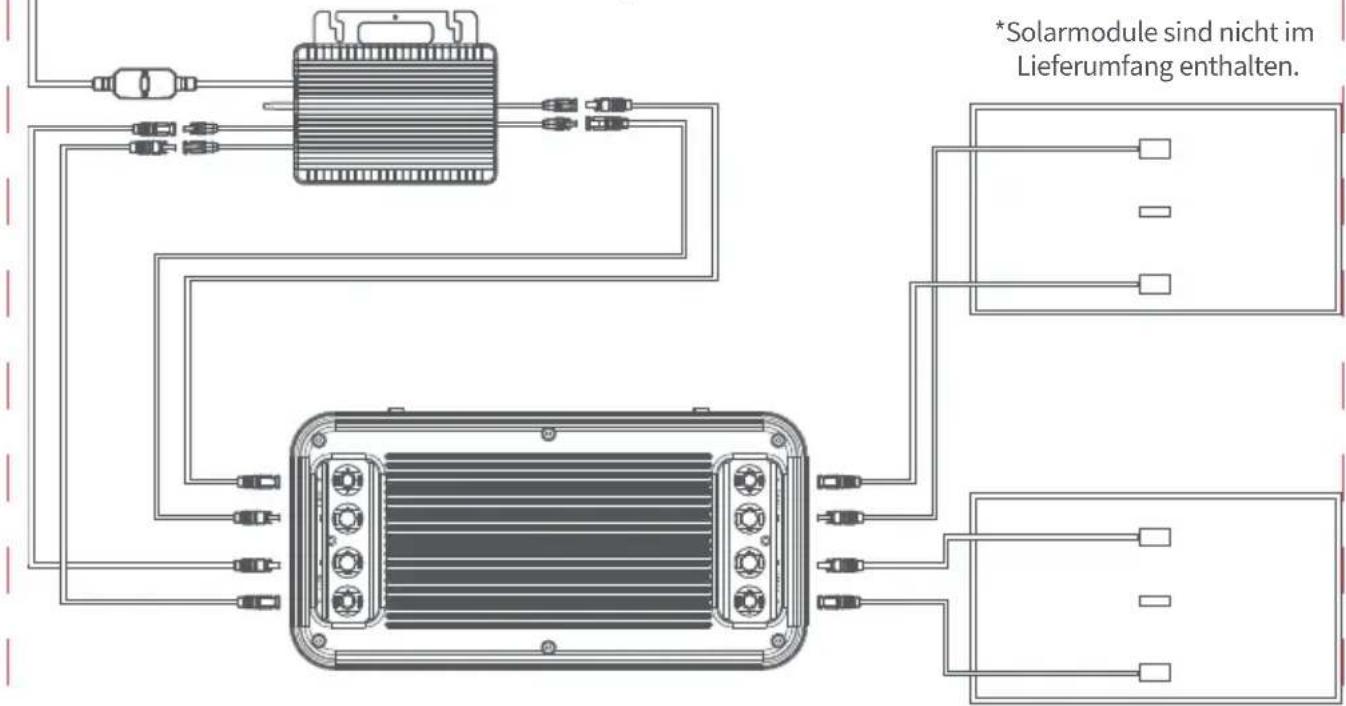
text_image
*Solarmodule sind nicht im Lieferumfang enthalten.*Solarmodule sind nicht im Lieferumfang enthalten.
DE
Haben Sie die Mikro-Wechselrichter gemäß der oben aufgeführten Schritte angeschlossen und stellen fest, dass diese nicht ordnungsgemäß funktionieren, gehen Sie bitte wie folgt vor: Schließen Sie einen der Mikro-Wechselrichter an den Ausgang 1 des Produkts an und nehmen Sie den anderen Mikro-Wechselrichter entweder außer Betrieb oder schließen Sie ihn direkt an ein Solarmodul an.
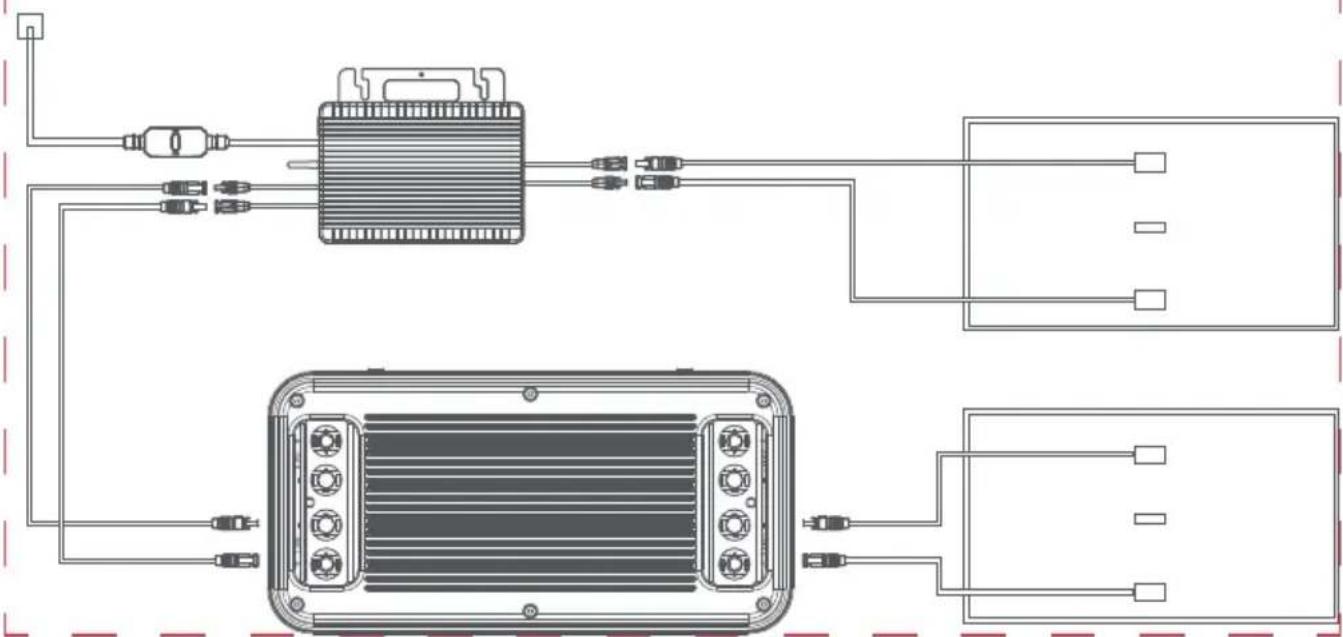
natural_image
Pure electrical circuit lines without any symbols*Dieser Betriebsstörung kann der Umstand zugrunde liegen, dass sich im Inneren einiger der auf dem Markt erhältlichen Mikro-Wechselrichter ein Schutzleiter befindet. Sind die beiden Mikro-Wechselrichter-Kanäle gleichzeitig an ein Akkupack angeschlossen, funktioniert der Mikrowechselrichter nicht ordnungsgemäß.
Entfernen des Kabels:

text_image
Werkzeug um 90° drehenDE
Wichtige Hinweise:
- Vergewissern Sie sich vor dem Anschließen der Kabel, dass der Mikro-Wechselrichter, die Solarmodule und das Versorgungsnetz nicht miteinander verbunden sind und das Produkt ausgeschaltet ist.
- Stellen Sie vor dem Einstellen der Leistung Ihres Mikro-Wechselrichters sicher, dass die an den Mikro-Wechselrichter ausgegebene Leistung dessen Nennleistung nicht überschreitet.
- Sorgen Sie dafür, dass das Produkt keiner direkten Sonneneinstrahlung ausgesetzt ist, um einem schnellen Temperaturanstieg entgegenzuwirken.
- Überprüfen Sie vor der Montage den Zustand und das Vorhandensein sämtlicher Zubehörteile. Beachten Sie, dass einige der erforderlichen Zubehörteile nicht im Lieferumfang enthalten sind.
- Laden Sie sich nach Abschluss der Montagearbeiten zunächst einmal die App herunter, um die erzeugte Strommenge zu überprüfen.
- Denken Sie bei längerem Nichtgebrauch daran, das Produkt einmal alle drei Monate zu entladen und wieder aufzuladen (Produkt auf 20 % entladen und dann wieder auf 80 % aufladen).
Lieferumfang
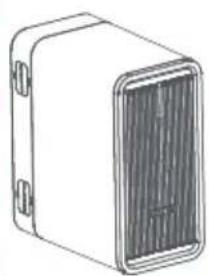
natural_image
Illustration of a rectangular electronic device with a central panel and mounting holes (no text or symbols)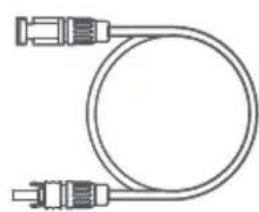
natural_image
Pure diagram of a U-shaped cable with two connectors (no text or symbols)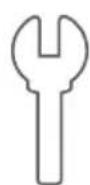
text_image
MARSTEK MICRO ESS B2500 instruction ManualB2500 x 1 MC4-Verlängerungskabel x 4
Werkzeug x 1
Bedienungsanleitung
APP-Anweisungen
Mit der MARSTEK-App haben Sie die Möglichkeit, über Bluetooth oder WLAN alle Ihre Geräte zu koppeln, um Ihren Energieverbrauch und Ihre Produktion in Echtzeit zu erfassen, Statusinformationen der Geräte in Echtzeit dynamisch anzuzeigen und sowohl die eingespeisten als auch die ausgegebenen Strommengen der Geräte zu überwachen.
Diese Software ist mit den Betriebssystemen Android 6.0 (oder aktueller) und IOS12.0 (oder aktueller) kompatibel.
Herunterladen und Installieren der App
- Scannen Sie den QR-Code, um die App herunterzuladen und auf Ihrem Smartphone zu installieren.
text_image
QR code image containing a central logo, likely linking to a digital resource or website.DE
Anmelden/Erstellen eines Benutzerkontos
- Tippen Sie nach dem erfolgreichen Abschuss des Installationsvorgangs auf die App, wird Ihnen zunächst einmal die Ansicht für das Wechseln des Servers und dann die Ansicht für die Anmeldung angezeigt.
- Tippen Sie auf die Schaltfläche „Benutzerkonto erstellen“ und geben Sie Ihre E-Mail-Adresse an. Daraufhin wird Ihnen zum Zwecke der Überprüfung der von Ihnen angegebenen E-Mail-Adresse ein Bestätigungscode zugesendet. Geben Sie nach Erhalt der entsprechenden Aufforderung den Code in der App ein, um Ihre E-Mail-Adresse zu bestätigen, und legen Sie ein Passwort fest.
- Melden Sie sich anschließend mit Ihrer E-Mail-Adresse und dem von Ihnen festgelegten Passwort an.
- Sollten Sie Ihr Passwort einmal vergessen, tippen Sie auf „Passwort vergessen?“ und setzen Sie es zurück.
- Tippen Sie nun in der Ansicht für die Anmeldung auf die obere rechte Ecke, um zur Ansicht für die Auswahl des Servers bzw. Ihrer Region zu gelangen. Beachten Sie, dass die App keine Verlaufsdaten zu Geräten abrufen kann, wenn Sie einen falschen Server auswählen.
text_image
Hinzufügen von Geräten
- Haben Sie sich erfolgreich angemeldet, tippen Sie in der oberen linken Ecke auf die Schaltfläche „Gerät hinzufügen“, um ein Gerät hinzuzufügen. - Scannen Sie dann den QR-Code (QR-Code nur für M5000) auf Ihrem Gerät, um das Gerät hinzuzufügen. Alternativ können Sie auch die Bluetooth®-Funktion und die Standortermittlung Ihres Smartphones aktivieren, das Gerät auswählen und es direkt hinzufügen. - Wurde ein Gerät erfolgreich hinzugefügt, wird Ihnen dessen Name (z. B. der Name Ihres Akkus) in der Startansicht angezeigt. - Sie können nun zwischen den Ansichten der Geräte umschalten, indem Sie die Ansicht für die Geräteverwaltung aufrufen und auf das gewünschte Gerät tippen. Möchten Sie Geräte bearbeiten oder löschen, streichen Sie mit Ihrem Finger nach links (iOS) bzw. tippen Sie auf die Geräteliste und lassen Sie Ihren Finger darauf ruhen (Android).  text_image
< Enter a new device name Device ID: Mac: Device Type ID: Add Devicetext_image
< Device management Edit DeleteHauptansicht des Geräts
• In dieser Ansicht werden Ihnen der Status des PV-Ladevorgangs, der Status des Entladevorgangs und weitere Informationen angezeigt. - Optionen für den Ladevorgang: 1. Der Akku wird über die PV-Eingänge 1 und 2 vollständig aufgeladen und entlädt sich anschließend. 2. Der Akku wird über die PV-Eingang 1 und 2 an den Mikro-Wechselrichter weiter. • Optionen für Entladung: Einstellung des Ausgabemodus des Produkts (1) Sie können die Ausgangsleistung und den Zeitraum, in dem der gespeicherte Strom ausgegeben werden soll, für beide Ausgänge des Produkts individuell über die App festlegen. (2) Sie können den Modus zur intelligenten Leistungsregelung aktivieren, wodurch das Produkt automatisch den Strombedarf Ihres Haushalts ermittelt und die auszugebende Leistung daran anpasst, um Strom zu sparen. text_image
B2500 PV 1 PV 2 Plenty of Sunlight Output: 3.0L100 Output: 2.0W Home Inverter Grid 50% 11.24% MARSTEK B2300 Charging settings: PV1 and PV2 power/megals > discharge settings/box periods >text_image
#Settings Charging Settings Fully charge and then discharge PV1 and PV2 passthroughtext_image
Discharge settings Discharge mode setting Time period Adaptive Discharging time 1: 01:51—07:06 00:00 90:00 12:00 13:00 24:00 Set output power 100W Discharging time 2: 10:32—17:17 00:00 00:00 12:00 13:00 24:00 Set output power 250W Discharging time 3: 13:42—23:37 00:00 90:00 12:00 13:00 24:00 Set output power 150W SettingsApp-Einstellungen
Tippen Sie oben rechts auf das Zahnrad-Symbol, um Änderungen an den nachstehend aufgeführten Einstellungen vorzunehmen oder Informationen zur App und zum Gerät aufzurufen: • Verwaltung des Benutzerkontos. • Grenzwert für Beginn des Entladevorgangs. • Informationen zur App und zum Gerät. - Geräte teilen. • WLAN. • Tiefentladung. - Strom • Statistik text_image
settings Share device IWI configuration Depth of Discharge Dod (98) Discharge threshold:330W Star discharging when manufacturing is less than 0.5 x 100 Power Statistics App V:1.2.2 DeviceB2500/V124text_image
< Account management Change Password Account deletion Sign outtext_image
Share device Device ID: Device Name: Mac: Device Type ID: Entitlement granted: Use Only Permission Transfer management privileges Share Nowtext_image
WiFi configuration 1 Please make sure the phone is connected to wifi 2 Proximity to device protection and device Bluetooth connection Password Begin ConfigurationHäufig gestellte Fragen
F: Welcher Akkutyp ist in dem Produkt verbaut? In dem Produkt ist ein LiFePO4-Akku verbaut. F: Ist es erlaubt, das Produkt auf einem Flug mitzuführen? Nein. Gemäß den Transportvorschriften der Fluggesellschaften dürfen Lithium-Akkus mit einer Kapazität von 100 Wh nicht an Bord eines Flugzeugs mitgeführt werden. F: Ist es möglich, das Produkt mit Solarmodulen anderer Hersteller aufzuladen? Ja. Verwenden Sie zum Laden des Akkus jedoch ausschließlich Solarmodule, die den nachstehend aufgeführten Spezifikationen entsprechen. Spannungsbereich: 12 – 59 V/DC, Nennausgangsleistung (Entladevorgang): max. 800 W (Entscheiden Sie sich für eines unserer Photovoltaik-Produkte, können Sie dieses problemlos an den DC-Eingangsanschluss anschließen, um das Produkt mit Sonnenenergie aufzuladen. Dieses Produkt verwendet die MPPT-Technologie (Maximum Power Point Tracking), die den Punkt bezüglich der Ausgangsspannung des Solarmoduls mit der Akkuspannung des Produkts in Echtzeit vergleicht, um den Punkt bezüglich der maximalen Ausgangsleistung zu ermitteln, den das Solarmodul liefern kann, und den Akku des Produkts mit der optimalen Ladeeffizienz zu laden. \*Die tatsächliche Leistung ist stets von den Witterungsbedingungen abhängig.) F: Gibt es im Hinblick auf die Pflege des Produkts Möglichkeiten, mit denen sich dessen Lebensdauer im Falle der Montage auf dem Boden verlängern lässt? Sollte Ihr Balkon häufig überschwemmt werden, empfehlen wir Ihnen, das Produkt an bzw. auf einer erhöhten Stelle zu montieren. Betriebsstörungen durch zu langes Eintauchen in Wasser lassen sich so vermeiden.Garantie und Kontaktdaten
Wird das Produkt ordnungsgemäß verwendet, lassen sich etwaige Betriebsstörungen oder Defekte entweder auf Fehler während des Fertigungsprozesses oder auf mangelhafte Werkstoffe zurückführen. Diese Garantie beschreibt die vollständigen und ausschließlichen Garantieverpflichtungen für das Produkt. Weder von uns beauftragte noch von uns ermächtigte Personen übernehmen die Verantwortung für etwaige Probleme mit anderen Produkten.Garantiezeitraum
Die Produktgarantie gilt für einen Zeitraum von einem (3) Jahr. Der Beginn des Garantiezeitraums ist in jedem Fall das Datum, an dem die Kundin/der Kunde das Produkt erwirbt. Um den Beginn des Garantiezeitraums überprüfen zu können, müssen Kunden bei Inanspruchnahme einer Garantieleistung stets den Kaufnachweis oder andere geeignete Belege vorlegen. Unter den folgenden Umständen ist eine Inanspruchnahme der Garantieleistungen ausgeschlossen: 1. Veränderung des Erscheinungsbilds des Produkts nach dem Gebrauch. 2. Unzulässige Demontage und Wartung des Produkts durch Personen ohne entsprechende Fachkenntnisse. 3. Leistungseinbußen, die sich auf eine unsachgemäße Verwendung durch die Kundin/den Kunden zurückführen lassen. 4. Schäden, die durch Naturkatastrophen, Blitzschlag, Unfälle und andere nicht vermeidbare Faktoren verursacht werden. Inanspruchnahme von Garantieleistungen Möchten Sie Garantieleistungen in Anspruch nehmen, können Sie sich entweder über unsere offizielle Website oder unsere E-Commerce-Plattform an unseren Kundendienst wenden. Wir danken Ihnen für Ihre Zusammenarbeit!Chemische Zusammensetzung von giftigen und schädlichen Stoffen
| Bezeichnung der Komponente | Giftige und schädliche Stoffe oder chemische Elemente | |||||
| Pb | Hg | Cd | Cr(VI) | PBB | PBDE | |
| Gehäuse | 0 | 0 | 0 | 0 | 0 | 0 |
| Schaltkreis | X | 0 | 0 | 0 | 0 | 0 |
| Taste | 0 | 0 | 0 | 0 | 0 | 0 |
| Kleinteile | 0 | 0 | 0 | 0 | 0 | 0 |
| Ladekabel | 0 | 0 | 0 | 0 | 0 | 0 |
| Akku | 0 | 0 | 0 | 0 | 0 | 0 |
Wichtige Sicherheitshinweise
Warnungen!
Lesen Sie sich die folgenden Sicherheitshinweise sorgfältig durch. Verletzungen, Datenverluste oder Sachschäden, die sich aus der Nichtbeachtung dieser Hinweise ergeben, sind nicht durch die Garantie abgedeckt. \- Verwenden Sie dieses Produkt in der Nähe von Kindern, müssen Sie eine ständige Beaufsichtigung sicherstellen, um die Gefahr von Verletzungen zu verringern. • Führen Sie Ihre Finger und Hände nicht in das Innere des Produkts. \- Verwenden Sie keine Zubehörteile, die nicht vom Hersteller des Produkts empfohlen oder vertrieben werden. Die Nichtbeachtung dieses Hinweises kann die Entstehung eines Brandes, einen elektrischen Schlag oder Verletzungen nach sich ziehen. \- Trennen Sie den Netzstecker des Produkts unter keinen Umständen durch Ziehen am Kabel von der Steckdose, um die Gefahr einer Beschädigung des Steckers und des Kabels zu verringern. \- Überschreiten Sie nicht die für dieses Produkt angegebene Nennleistung. Überlastungen bzw. Ausgangsleistungen, die die Grenzwerte überschreiten, können die Entstehung eines Brandes und Verletzungen nach sich ziehen. \- Sollten Sie Beschädigungen an dem Produkt oder an einem der Zubehörteile feststellen, sehen Sie von der weiteren Verwendung unbedingt ab. Akkus, die Beschädigungen aufweisen oder an denen Änderungen vorgenommen wurden, verursachen unter Umständen unerwartete Betriebsstörungen, die wiederum die Entstehung eines Brandes, eine Explosion oder Verletzungen nach sich ziehen können. \- Sollten das Netzkabel oder der Netzstecker Beschädigungen aufweisen, sehen Sie von der weiteren Verwendung des Produkts unbedingt ab. \- Zerlegen Sie das Produkt unter keinen Umständen in seine einzelnen Komponenten. Bringen Sie es im Falle erforderlicher Wartungs- oder Reparaturarbeiten zu einer qualifizierten Fachkraft für Elektrotechnik. Das unsachgemäße Zusammenbauen des Produkts kann die Entstehung eines Brandes und/oder einen elektrischen Schlag nach sich ziehen. \- Setzen Sie das Produkt keinen offenen Flammen oder hohen Temperaturen aus. Offene Flammen oder Temperaturen von mehr als 130 °C können eine Explosion verursachen. \- Trennen Sie vor der Durchführung etwaiger Wartungsarbeiten stets den Netzstecker von der Steckdose, um die Gefahr eines elektrischen Schlags zu verringern.  - Lassen Sie Reparaturen an Ihrem Produkt nur von einem entsprechend qualifizierten Reparaturdienst, der ausschließlich identische Ersatzteile verwendet, vornehmen. Nur so lässt sich die Beibehaltung der Betriebssicherheit des Produkts gewährleisten. - Das Produkt wird während des Ladevorgangs möglicherweise warm. Dies ist während des Betriebs ganz normal und mitnichten ein Grund zur Sorge. - Halten Sie sich während des Ladevorgangs des internen Akkus in einer gut belüfteten Umgebung auf und sorgen Sie dafür, dass die Belüftung in keiner Weise eingeschränkt ist bzw. wird. - Reinigen Sie das Produkt unter keinen Umständen mit aggressiven bzw. scheuernden Chemikalien oder Reinigungsmitteln. - Eine unsachgemäße Verwendung, das Fallenlassen oder eine übermäßige Gewaltanwendung können irreparable Schäden am Produkt nach sich ziehen. - Achten Sie bei der Entsorgung von Akkumulatoren und Batterien darauf, jene unterschiedlicher elektrochemischer Systeme stets getrennt voneinander aufzubewahren. - Sorgen Sie dafür, dass das Produkt weder während des Betriebs noch bei Nichtgebrauch oder Lagerung über einen längeren Zeitraum direkter Sonneneinstrahlung (z. B. in einem Auto, auf einer Ladefläche oder an einem anderen Ort, an dem hohe Temperaturen herrschen) ausgesetzt ist. Die Nichtbeachtung dieses Hinweises kann Betriebsstörungen, Beschädigungen oder eine Überhitzung des Produkts nach sich ziehen. - Lassen Sie Wartungsarbeiten an Akkus nur von entsprechend ausgebildetem Fachpersonal mit Kenntnissen bezüglich der einzuhaltenden Sicherheitsvorkehrungen vornehmen. - Nehmen Sie dieses Produkt nicht in der Nähe von starken elektrostatischen oder magnetischen Feldern in Betrieb. - Setzen Sie dieses Produkt weder brennbaren oder explosiven Gasen noch Rauch aus. - Stellen Sie sich nicht auf das Produkt. • Tauchen Sie das Produkt nicht in Wasser oder andere Flüssigkeiten. Sollte Ihnen das Produkt versehentlich ins Wasser fallen, bringen Sie es an einen sicheren, offenen Ort und warten Sie, bis es vollständig getrocknet ist. Greifen Sie unter keinen Umständen auf eine offene Flamme zurück, um den Trocknungsprozess zu beschleunigen. - Bitte entsorgen sie den müll ordnungsgemäß. Für weitere informationen lesen sie die örtlichen gesetze und sonstigen vorschriften für die entsorgung Von batterie.MARSTEK
MICRO ESS B2500
Manuale di istruzioni
text_image
MARSTIK ENTR. BATTERY PORT ENTR. BATTERY PORTINDICE
Specifiche 1
Intervallo temperatura di esercizio 1IT
Descrizione del prodotto 2 Istruzioni per l'uso 3 Contenuto della confezione 4 Istruzioni sull' app 5 Domane e risposte frequenti 8 Garanzia e informazioni di contatto 8 Composizione chimica di sostanze tossiche e nocive 8 Informazioni importanti sulla sicurezza 9| Specifiche | |||||
 Capacità Cella batteriaPeso Capacità Cella batteriaPeso |  | [3D70]Dimensioni Certificazione |  | [DSD3]impermeabile |  |
| 2240Wh(50000mAh/44.8V) | Batteria LiFePO418.7±0.5 MgSO96*175*350 | [THBA]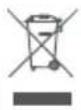 RoHS RoHS | |||
  Ingresso fotovoltaico Ingresso fotovoltaico |   Uscita fotovoltaica Uscita fotovoltaica |  Ingresso Porta aggiuntiva per batteria Ingresso Porta aggiuntiva per batteria |  Uscita Porta aggiuntiva per batteria Uscita Porta aggiuntiva per batteria |  Capacità Porta aggiuntiva per batteria Capacità Porta aggiuntiva per batteria |
| 12V-59V --- 8.47A*2500W*2 Max. | 42V-50.4V --- 9.25A*2400W*2 Max. | 44.8V-51.1V--- 22A 42V-51.1V | 23A 6720Wh |
| [6044]Cicli di lavoro Sistemi di protezione di stoccaggio |  Temperatura di protezione di esercizio Temperatura di protezione di esercizio |  Temperatura di esercizio Temperatura di esercizio |  Temperatura di carica Temperatura di carica | [2633] |
| 6000 volte (25 °C) | da -10 a 55 °C da | -10 a 50 °C da 0 a 50 °C | Protezione da sovraccarico, protezione da sovrascarica, protezione da sovracorrente, protezione da sovratemperatura, protezione da cortocircuito, protezione da sovratensione. |
Intervallo temperatura di esercizio
Le basse temperature possono compromettere la capacità della batteria del prodotto, che può essere caricato a una temperatura compresa tra 0 e 50 °C. Caricare il prodotto quando la temperatura è inferiore a 0 °C. We consiglia di posizionare il prodotto in un frigorifero isolato o in altre condizioni di temperatura. Il prodotto è in grado di caricare i dispositivi in un intervallo di temperatura compreso tra -10 e 50 °C. Per prolungare la durata della batteria, esso si consiglia di utilizzare questo prodotto in un ambiente con temperatura compresa tra 20 °C e 30 °C. ITDescrizione del prodotto
Indicatore WIFI&BT text_image
MARSTEK Indicatore di avviso Indicatori batteria Pulsante di alimentazionetext_image
Porta aggiuntiva per batteriaIstruzioni per l'uso
Come utilizzare il prodotto:
1. Collegare il pannello solare all' ingresso fotovoltaico del B2500; 2. Collegare l'ingresso MC4 del micro inverter all'uscita MC4 del B2500; 3. Tenere premuto a lungo il pulsante di alimentazione del B2500 fino a quando non si accende il display; 4. Se non è in uso, premere il pulsante di alimentazione per 10 secondi spegnere il B2500. \* Il micro inverter non è incluso. text_image
*1 pannelli fotovoltaici devono essere acquistati separatamente.natural_image
Pure electrical circuit lines without any symbolstext_image
Ruotare lo strumento di 90°Suggerimenti importanti:
- Prima di collegare i cavi, assicurarsi che il micro inverter, i pannelli solari e la rete domestica siano scollegati e che il prodotto sia spento. - Prima di impostare l'uscita al micro inverter, verificare la potenza nominale dello stesso; l'uscita al micro inverter non deve essere superiore alla potenza nominale del micro inverter stesso. - Il prodotto deve essere protetto dalla luce solare diretta per evitare un rapido aumento della temperatura. - Controllare gli accessori prima dell' installazione, alcuni di essi devono essere acquistati separatamente. - Una volta completata l' installazione, scaricare per prima cosa l'app per controllare l' energia elettrica prodotta. - Per la conservazione a lungo termine, caricare e scaricare il prodotto una volta ogni 3 mesi (scaricare il prodotto al 20%, quindi ricaricarlo all'80%).Contenuto della confezione
natural_image
Simple line drawing of a rectangular electronic device with a central screen (no text or symbols)natural_image
Pure diagram of a U-shaped cable with two connectors (no text or symbols)text_image
MARSTEK MICRO ESS B2500 instruction ManualIstruzioni sull' app
L'app MARSTEK è in grado di connettersi a tutti i dispositivi tramite Bluetooth o Wi-Fi per monitorare l'utilizzo e la produzione di energia in tempo reale, visualizzare in modo dinamico i dati di stato del dispositivo in tempo reale e controllare l'energia del dispositivo in modo autonomo. Questo software può essere utilizzato su telefoni cellulari con sistema operativo Android 6.0 e IOS12.0 o versioni successive.Installazione del software
\- Eseguire la scansione del codice QR e installare l' app in questione sul proprio smartphone. text_image
QR code with a central logo, likely linking to a digital resource or website.Accesso
- Dopo l'installazione, gli utenti possono fare clic sull'icona del desktop per accedere all'interfaccia di accesso; alla prima apertura si accede all'interfaccia di selezione del server. - Selezionare Registra account, inserire il proprio indirizzo e-mail. Un codice di conferma verrà inviato all'indirizzo e-mail fornito in precedenza per la verifica. Confermare l' e-mail nell'app con il codice appena ricevuto e impostare una password. - Accedere con il proprio indirizzo e-mail e la password scelta. - Nel caso in cui ci si dimentichi della password, selezionare "Password dimenticata?" e reimpostarla. - Nell' interfaccia di accesso, fare clic sull' angolo superiore destro -> accedere all' interfaccia di selezione del server in base alle varie aree geografiche tra cui scegliere. In caso di selezione del server errato, l' app non è in grado di recuperare dati sulla cronologia del dispositivo. text_image
< Switch Server European Union ✓ China ○ US&Non EU ○ Please select the corresponding server according to the region of the current residence, including EU, China, and non-EU. If you do not select the corresponding server, some data may not be synchronized. OKtext_image
Register Email Code Verification code Password Registertext_image
European Union Login Email Password Register Forgot Password? Logintext_image
Forgot Password Email Code Verification code New Password Reset PasswordAggiunta di dispositivi
- Una volta effettuato l'accesso, selezionare "Aggiungi dispositivo" nell' angolo superiore sinistro per aggiungere un dispositivo. - Eseguire la scansione del codice QR (codice QR solo per M5000) sul proprio dispositivo per aggiungerlo, oppure attivare Bluetooth® sul proprio smartphone e la condivisione della posizione, dopodiché selezionare il dispositivo per aggiungerlo direttamente. - Una volta aggiunto correttamente il dispositivo, il nome della propria power station verrà visualizza-to nella pagina iniziale. - Facendo clic su diversi dispositivi nella pagina di gestione dei dispositivi, la connessione a quest'ultimi avviene scorrendo il dito verso sinistra sul sistema IOS, mentre con una pressione prolungata sull'elenco dei dispositivi sul sistema Android è possibile modificarli ed eliminarli. text_image
Add Device You haven't added a device yet, try adding one now! No device yet, let's try a virtual device firsttext_image
Add Device Please choose the following method to add a device Only MS000 can choose to add a QR code or Bluetooth. For other devices, please choose: Bluetooth to add a device Add via QR code Add via Bluetooth No device yet, let's try a virtual device firsttext_image
Add via Bluetooth device name device nametext_image
< Enter a new device name Device ID: Mac: Device Type ID: Add Devicetext_image
Device management Edit DeletePagina iniziale dell' apparecchio
\- Visualizzazione in tempo reale dello stato di carica solare, di scarica e di altri stati. - Impostazioni di carica: 1. Ricarica della batteria tramite il pannello fotovoltaico 1 e il pannello fotovoltaico 2 per una carica completa, dopodiché avviene la scarica. 2. PV1 e PV2 trasmettono al micro inverter. \- Impostazioni di scarico: imposta la modalità di uscita del prodotto, (1) È possibile selezionare il periodo di tempo di ciascuna linea e la potenza in uscita del prodotto tramite l'APP. (2) L'utente ha la possibilità di attivare la modalità di controllo intelligente dell'energia, in base alla quale il prodotto raccoglie automaticamente i dati relativi al consumo di energia elettrica dell'abitazi one e controlla l'uscita del prodotto in base al fabbisogno di energia elettrica dell'abitazione, consentendo così di risparmiare energia elettrica. text_image
B2500 PV1 PV2 PV3 Plenty of Sunlight Output 125kW OUTPUT 210W Micro Inverter Grid 50% 11.20Wh MARSTEK B2500 Charging settings FVT and PV2 power/math Discharge setting Print.pooledtext_image
*Settings Charging Settings Fully charge and then discharge PV1 and PV2 passthroughtext_image
Discharge settings Discharge mode setting Time period Adaptive Discharging time 1: 01:31 — 07:06 10:00 06:00 12:00 18:00 24:00 Set output power 100W Discharging time 2: 10:32 — 17:17 10:00 06:00 12:00 18:00 24:00 Set output power 250W Discharging time 3: 13:42 — 23:37 10:00 06:00 12:00 18:00 24:00 Set output power 150W SettingsImpostazioni dell' app
Utilizzare la rotellina delle impostazioni in alto a destra per modificare le impostazioni o ottenere informazioni: - Impostazione di scarica profonda. - Impostazione della soglia di inizio della scarica. - Informazioni sull' app e il dispositivo. • Condivisione dell' apparecchio. • Gestione account. - Rete Wi-Fi. • Energia. • Statistiche. text_image
settings Share device WIFI configuration Depth of Discharge Dod (98) Discharge threshold:130W Start discharges when manufacturing is less than the 25x200 Power Statistics App V:1.2.2 DeviceB2500:V124text_image
< Account management Change Password Account deletion Sign outtext_image
< Share device Device ID: Device Name: Mac: Device Type ID: Entitlement granted: Move Only Permission Transfer management privileges Share Nowtext_image
WiFi configuration 1 Please make sure the phone is connected to wifi 2 Proximity to device protection and device Bluetooth connection Password Begin ConfigurationDomane e risposte frequenti
D: Qual è il tipo di batteria? Batteria LiFePO4. D: Il prodotto può essere portato a bordo di un aereo? No, secondo gli standard di trasporto delle compagnie aeree, le batterie al litio con capacità pari a 100 Wh non possono essere imbarcate. D: Per la ricarica è possibile utilizzare pannelli solari di altri marchi? Sì. Per la ricarica utilizzare pannelli solari che soddisfano le seguenti specifiche. Intervallo di tensione: 12-59 V CC, potenza di uscita nominale (scarica): 800 W max. (scegliendo i nostri prodotti solari fotovoltaici, è sufficiente utilizzare la porta CC per caricare facilmente il prodotto tramite l'energia solare. Questo prodotto utilizza la tecnologia MPPT (Maximum Power Tracking), in grado di confrontare in tempo reale il punto di tensione di uscita del pannello solare con la tensione della batteria del prodotto, in modo da individuare il punto di massima potenza in uscita che il pannello solare è in grado di fornire per caricare la batteria dell'apparecchio e ottenere la migliore efficienza di carica. \* Le prestazioni effettive solo legate alle condizioni atmosferiche) D: Come posso prolungare la vita utile o mantenere meglio il mio prodotto montato a terra? Se il proprio balcone si bagna spesso, si consiglia di mettere il prodotto in una posizione rialzata. In questo modo si evitano malfunzionamenti dovuti a un'esposizione eccessiva a condizioni di bagnato.Garanzia e informazioni di contatto
In condizioni di normale utilizzo del prodotto, lo stesso risulta privo di eventuali difetti di lavorazione e dei materiali utilizzati nel prodotto: questo periodo di garanzia descrive gli obblighi di garanzia completi ed esclusivi del prodotto, inoltre non viene assegnata o autorizzata alcuna responsabilità per altri prodotti. Periodo di garanzia La garanzia del prodotto è valida 3 anni. In ogni caso, il periodo di garanzia decorre dalla data di acquisto da parte del consumatore. Al fine di garantire la data di inizio del periodo di garanzia, il consumatore deve fornire la prova di acquisto o altri documenti di supporto appropriati. I seguenti casi non sono coperti dalla garanzia: 1. Il prodotto presenta segni di danni dopo l'uso. 2. Smontaggio non autorizzato e manutenzione non eseguita da parte di tecnici qualificati. 3. Problemi di prestazioni dovuti a errori umani. 4. Danni causati da calamità naturali, fulmini, incidenti e altri fattori imprevedibili. Come usufruire del servizio di garanzia È possibile contattare il nostro servizio clienti attraverso il nostro sito web o la nostra piattaforma di e-commerce. Grazie per la collaborazione!Composizione chimica di sostanze tossiche e nocive
| Nome parte | Sostanze o elementi chimici tossici e nocivi | |||||
| Pb | Hg | Cd | Cr(VI) | PBB | PBDE | |
| Involucro del prodotto | 0 | 0 | 0 | 0 | 0 | 0 |
| Modulo del circuito | X | 0 | 0 | 0 | 0 | 0 |
| Pulsante | 0 | 0 | 0 | 0 | 0 | 0 |
| Hardware di piccole dimensioni | 0 | 0 | 0 | 0 | 0 | 0 |
| Cavo di ricarica | 0 | 0 | 0 | 0 | 0 | 0 |
| Batteria | 0 | 0 | 0 | 0 | 0 | 0 |
Informazioni importanti sulla sicurezza
Avvertenze!
Osservare attentamente le seguenti misure di sicurezza. In caso di lesioni fisiche, perdita di dati o danni causati dalla mancata osservanza delle istruzioni, la garanzia non è applicabile. \- Per ridurre il rischio di lesioni, occorre una stretta sorveglianza quando il prodotto viene utilizzato in prossimità di bambini. \- Evitare di inserire mani o dita nel prodotto. • L'utilizzo di accessori non raccomandati o venduti dal produttore del prodotto può comportare il rischio di incendi, scosse elettriche o lesioni alle persone. \- Per ridurre il rischio di danni alla spina e al cavo elettrico, tirare la spina anziché il cavo per scollegare il prodotto. \- Non utilizzare il prodotto superando la potenza di uscita nominale. Un sovraccarico superiore al valore nominale può comportare il rischio di incendio o di lesioni alle persone. \- Non utilizzare il prodotto o gli accessori danneggiati o modificati. Le batterie danneggiate o modificate possono produrre effetti imprevedibili con conseguente incendio, esplosione o rischio di lesioni. • Non utilizzare il prodotto con un cavo o una spina danneggiati o con un cavo di uscita danneggiato. \- Non smontare il prodotto. Per la manutenzione o la riparazione, rivolgersi a un tecnico qualificato. Il rimontaggio errato può comportare il rischio di incendi o scosse elettriche. \- Non esporre il prodotto a fiamme o temperature elevate. L' esposizione a fiamme o temperature superiori ai 130 °C possono provocare un incendio. \- Per ridurre il rischio di scosse elettriche, scollegare l'alimentatore dalla presa di corrente prima di leseguire qualunque intervento di manutenzione. \- Far eseguire gli interventi di manutenzione da un tecnico qualificato, utilizzando esclusivamente parti di ricambio identiche. In questo modo si garantisce la sicurezza del prodotto. \- Durante la ricarica di un dispositivo, il prodotto può risultare caldo al fatto. Si tratta di una condizione di funzionamento normale e non deve essere motivo di preoccupazione. \- Quando si carica la batteria interna, operare in un'area ben ventilata e non limitare in alcun modo la ventilazione. \- Non pulire il prodotto con prodotti chimici o detergenti nocivi. • L'uso improprio, la caduta o la forza eccessiva possono danneggiare il prodotto. \- Per lo smaltimento di celle o batterie secondarie, tenere separate le celle o le batterie di sistemi elettrochimici diversi. \- Evitare di utilizzare o conservare il prodotto esponendolo alla luce diretta del sole per periodi di tempo prolungati, ad esempio in auto, in un pianale di carico o in qualsiasi altro luogo in cui possa essere esposto a temperature elevate. In caso contrario, il prodotto potrebbe non funzionare correttamente, deteriorarsi o generare calore. \- La manutenzione delle batterie deve essere eseguita o supervisionata da personale esperto di batterie e con le precauzioni necessarie. • Non utilizzare il prodotto in prossimità di forti scariche elettrostatiche o forti campi magnetici. \- Non esporre il prodotto a gas infiammabili, esplosivi o al fumo. • Non salire sul prodotto. \- Non immergere il prodotto in acqua. In caso di caduta accidentale del prodotto in acqua, riporlo in un luogo sicuro e aperto e tenerlo lontano da fonti di calore fino a quando non sarà completamente asciutto. \- trattare gli scarti secondo le norme. Per ulteriori dettagli, seguire le leggi e i regolamenti locali sul riciclaggio e lo smaltimento delle pile. RoHS     MARSTEK
MICRO ESS B2500
Manual de instrucciones
text_image
MARSTIK MARSTIK MATTERY PORT MATTERY PORT MATTERY PORTCONTENIDOS
Especificaciones 1
Intervalo de temperatura de funcionamiento 1 Descripción del producto 2 Instrucciones de uso 3 Lista de empaque 4 Instrucciones de la aplicación 5 Preguntas de frecuentes y respuestas 8 Garantía e Información de contacto 8 Composición química de sustancias tóxica y peligrosas 8 Información de seguridad importante 9  Especificaciones Capacidad Capacidad |  Peso Dimen Peso Dimen |  nssiones Certificado nssiones Certificado | [7000]Celdas dela batería | [K3Y2]Impermeables |  |
| 2240Wh(50000mAh/44,8V) | Batería de LiFePO4 | 18,7±0,5Rg296 x 175x :  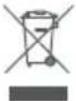 RoHS RoHS |
 | |  Entrada fotovoltaica Entrada fotovoltaica |  | |  Salida fotovoltaica Salida fotovoltaica |  Entrada Puerto para batería adicional Entrada Puerto para batería adicional |  Salida Puerto para batería adicional Salida Puerto para batería adicional |  Capacidad Puerto para batería adicional Capacidad Puerto para batería adicional |
| 12V-59V--- 8,47A x 2500W x 2 máx. | 42V-50,4V--- 9,25A x 2400W x 2 máx. | 44,8V-51,1V--- 22A 42V-51,1V | 23A 6720Wh |
 Ciclos de carga/descarga Ciclos de carga/descarga |  Temperatura de almacenamiento Temperatura de almacenamiento | [Y452]Temperatura de funcionamiento | [TSC6]Temperatura de carga |  Sistema de protección Sistema de protección |
| 6000 veces (25 °C) | -10 a 55 °C -10 a | 50 °C 0 a 50 °C | Protección contra sobrecarga, protección contra sobredescarga, protección contra sobrecorriente, protección contra sobretemperatura, protección contra cortocircuito, protección contra sobretensión. |
Intervalo de temperatura de funcionamiento
Las bajas temperaturas pueden afectar a la capacidad de la batería del producto. El producto puede cargarse a temperaturas comprendidas entre 0 y 50 °C. Si tiene que cargar el producto cuando la temperatura es inferior a 0 °C. Recomendamos colocar el producto en una nevera aislada u otras condiciones de temperatura. El producto se puede utilizar en un rango de temperatura de -10 °C a 50 °C. Para prolongar la vida útil de la batería, es Se recomienda utilizar este producto en un ambiente de 20 °C a 30 °C.Descripción del producto
Indicador de WIFI&BT text_image
Indicador de advertencia Indicadores de batería MARSTEKnatural_image
Line drawing of a rectangular cabinet or enclosure with a dashed line indicating a vertical alignment (no text or symbols)natural_image
Technical line drawing of a rectangular electronic device with heat sinks and ports (no text or symbols)text_image
ECTRA BUTTONS POST ECTRA BUTTONS POSTInstrucciones de uso
Cómo usar el sistema:
1. Conecte el panel solar a la entrada fotovoltaica del B2500; 2. Conecte la entrada del microinversor MC4 a la salida MC4 del B2500; 3. Pulsación larga en el botón interruptor del B2500 hasta que se ilumine la pantalla; 4. Cuando no lo use, pulse 10S el botón interruptor para apagar el B2500.  text_image
* El microinversor no viene incluido. *Los paneles fotovoltaicos solares se compran por separado.natural_image
Pure electrical circuit lines without any symbolsExtracción del cable:
text_image
Gire la herramienta 90°Consejos importantes:
- Antes de conectar los cables, asegúrese de que el microinversor, los paneles solares y la red eléctrica doméstica están desconectados, y que el producto está apagado. - Antes de ajustar la salida al microinversor, confirme la potencia nominal de su microinversor. La potencia de salida al microinversor no debe ser superior a la potencia nominal de su microinversor. - El producto debería estar protegido de la luz directa del sol para evitar un aumento rápido de temperatura. - Compruebe los accesorios antes de la instalación. Algunos accesorios hay que comprarlos por separado. - Después de la instalación, lo primero es descargar la aplicación para comprobar la electricidad producida. - Si se va a almacenar por un largo periodo de tiempo, cargue y descargue el producto una vez cada 3 meses (descargue el producto al 20 % y, a continuación, cárguelo al 80 %).Lista de empaque
natural_image
Line drawing of a rectangular electronic device with a central panel and side connectors (no text or symbols)natural_image
Pure electrical circuit lines without any symbolstext_image
MARSTEK MICRO ESS B2500 instruction ManualInstrucciones de la aplicación
La aplicación MARSTEK puede conectar todos sus dispositivos mediante Bluetooth o wifi para llevar un control del uso y producción de energía en tiempo real, mostrando dinámicamente los datos de estado del dispositivo en tiempo real, y tener el centro de la energía del dispositivo en sus propias manos. Este software se puede utilizar en teléfonos móviles con Android 6.0 y IOS12.0 o superior.Software instalado
\- Escanee el código QR e instale la aplicación abierta en su smartphone. text_image
QR code with a central logo, likely linking to a digital resource or website.Inicio de sesión
- Tras la instalación, los usuarios pueden hacer clic sobre el icono del escritorio para entrar en la interfaz de inicio de sesión, entrará en la interfaz de conmutación del servidor cuando la abra por primera vez. - Seleccione «Registrar una cuenta» e introduzca su dirección de correo electrónico. Recibirá un código de confirmación en la dirección de correo electrónico que haya proporcionado, para la verificación. Confirme su correo electrónico en la aplicación con el código recibido, y establezca una contraseña. - Inicie sesión con su dirección de correo electrónico y la contraseña que acaba de elegir. - Si olvida la contraseña elegida, seleccione "¿Olvidó la contraseña?" y restablézcala. - En la interfaz de inicio de sesión, haga clic en la esquina superior derecha -> entre en la interfaz de selección de servidor, de acuerdo con las diferentes regiones para elegir. Si seleccione un servidor incorrecto, la aplicación no podrá recuperar los datos históricos del dispositivo. text_image
Añadir dispositivos
- Después de iniciar sesión correctamente, seleccione "Añadir dispositivo" en la esquina superior izquierda para añadir uno. - Escanee el código QR (código QR sólo para M5000) en su dispositivo para añadir el dispositivo. También puede abrir el Bluetooth® en su teléfono móvil, seleccionar el dispositivo y añadirlo directamente. - Una vez que el dispositivo se ha añadido correctamente, el nombre de su estación eléctrica aparecerá en la página de inicio. - Haciendo clic en los diferentes dispositivos en la página de gestión de dispositivos, se cambiará la conexión a los distintos dispositivos. Con un sistema iOS, deslice el dedo hacia la izquierda en el sistema para activar la modificación y eliminación de dispositivos. En un sistema Android, mantenga pulsado sobre la lista de dispositivos en el sistema Android para activar la modificación y eliminación de dispositivos. text_image
Add Device You haven't added a device yet, try adding one now! No device yet, let's try a virtual device firsttext_image
Add Device Please choose the following method to add a device Only M5000 can choose to add a QR code or Bluetooth. For other devices, please choose Bluetooth to add a device Add via QR code Add via Bluetooth No device yet, let's try a virtual device firsttext_image
< Add via Bluetooth device name device nametext_image
< Enter a new device name Device ID: Mac: Device Type ID: Add Devicetext_image
< Device management ✓ Edit DeletePágina de inicio del equipo
- Visualización en tiempo real del estado de carga solar, de la descarga y de otros estados. - Ajustes de carga: 1. Los paneles fotovoltaicos (PV1 y PV2) cargan la batería hasta que esté completa mente cargada, luego se descarga. 2. PV1 y PV2 transmitiendo al microinversor. \- Ajustes de descarga: establece el modo de salida de energía del producto (1) Puede seleccionar el período de tiempo de cada línea y la potencia de salida del producto a través de la APLICACIÓN. (2) Puede activar el modo de control inteligente de potencia, donde el que el producto recogerá automáticamente la electricidad del hogar y controlará la salida de energía del producto de las necesidades eléctricas del hogar, ahorrando electricidad. text_image
Smartphone screen interface showing MARSTEK device with charging and discharge settings, including PV1, PV2, and output ports.text_image
#Settings Charging Settings Fully charge and then discharge PV1 and PV2 passthroughtext_image
Discharge settings Discharge mode setting Time period Adaptive Discharging time 1: 01:31 — 07:06 00:00 00:00 12:00 18:00 24:00 Set output power 100W Discharging time 2: 10:32 — 17:17 00:00 00:00 12:00 18:00 24:00 Set output power 250W Discharging time 3: 13:42 — 23:37 00:00 00:00 12:00 18:00 24:00 Set output power 150W SettingsAjustes de la aplicación
Seleccione la rueda de ajustes en la esquina superior derecha para cambiar los ajustes o para obtener información: • Ajuste de descarga profunda. • Ajuste del umbral de inicio de descarga. - Información de la aplicación y del dispositivo. • Gestionar la cuenta. - Compartir equipo. • Red wifi. - Fuerza. - Estadísticas. text_image
settings Share device WIFI configuration Depth of Discharge Dod (98) Discharge threshold:330W Sun: discharging when manufacturing is less than this value Power Statistics App V:1.2.2 DeviceB2500:V124text_image
< Account management Change Password Account deletion Sign outtext_image
Share device Device ID: Device Name: Mac: Device Type ID: Entitlement granted: Move Only Permission Transfer management privileges Share Nowtext_image
< WiFi configuration 1 Please make sure the phone is connected to wifi 2 Proximity to device protection and device Bluetooth connection Password Begin ConfigurationPreguntas de frecuentes y respuestas
P: ¿Qué tipo de batería es? Batería LiFePO4. P: ¿Puede llevarse el producto en un avión? No, de acuerdo con las normas de transporte en aerolíneas, una batería de litio de 100 Wh de capacidad no puede embarcar en un avión. P: ¿Puede cargarse con paneles solares de una marca diferente? Sí. Para la carga, utilice paneles solares que cumplan las especificaciones siguientes. Rango de tensión: 12 - 59 VCC, Potencia nominal de salida (descarga): 800 W máx. (Si elige uno de nuestros productos fotovoltaicos, solo tiene que conectar el puerto CC para cargar facilmente el producto con energía solar. Este producto utiliza la tecnología MPPT (Rastreo de potencia máxima), que puede comparar el punto de tensión de salida del panel solar con la tensión de la batería del producto en tiempo real, con el fin de encontrar el punto de salida de potencia máxima que el panel solar puede proporcionar y cargar la batería de la máquina para obtener la mejor eficiencia de carga. \* El rendimiento real dependerá del tiempo atmosférico) P: ¿Cómo puedo prolongar la vida útil de mi producto o mejorar el mantenimiento cuando está montado sobre el suelo? Si su balcón se llena de agua a menudo, es recomendable elevar el producto. De este modo se evitarán fallos de funcionamiento debidos a un remojo prolongado.Garantía e Información de contacto
Utilizando el producto en situaciones normales, no afectará el resultado de mano de obra y materiales defectuosos utilizados en el producto: Este periodo de garantía describe las obligaciones de garantía completas y exclusivas del producto, y no designaremos ni autorizaremos a nadie a responsabilizarse de ningún otro producto. Periodo de garantía Periodo de garantía del producto de 3 años. En todos los casos, el periodo de garantía comienza a partir de la fecha de compra por parte del consumidor. Para garantizar la fecha de inicio del periodo de garantía, el consumidor tiene que proporcionar la prueba de compra u otro justificante razonable. La garantía no cubre las siguientes condiciones. 1. La apariencia del producto presenta daños tras el uso. 2. Desmontaje y mantenimiento no autorizado por personas no profesionales. 3. Problemas de funcionamiento causados por factores humanos. 4. Daños causados por desastres naturales, impactos de rayos, accidentes u otros factores de fuerza mayor. Cómo obtener el servicio de garantía Puede ponerse en contacto con nuestro servicio de atención al cliente usando nuestro sitio web oficial o nuestra plataforma de comercio electrónico. ¡Gracias por su cooperación!Composición química de sustancias tóxica y peligrosas
| Nombre de la pieza | Sustancias toxicas o peligrosas, o elementos químicos | |||||
| Pb | Hg | Cd | Cr(VI) | PBB | PBDE | |
| Carcasa | 0 | 0 | 0 | 0 | 0 | 0 |
| Módulo de circuitos | X | 0 | 0 | 0 | 0 | 0 |
| Botón | 0 | 0 | 0 | 0 | 0 | 0 |
| Piezas pequeñas | 0 | 0 | 0 | 0 | 0 | 0 |
| Cable de carga | 0 | 0 | 0 | 0 | 0 | 0 |
| Batería | 0 | 0 | 0 | 0 | 0 | 0 |
Información de seguridad importante
¡Advertencias!
Observe atentamente las siguientes precauciones de seguridad. Si se producen lesiones personales, pérdida de datos o daños materiales por no seguir las instrucciones, la garantía no será de aplicación. \- Para reducir el riesgo de lesiones, será necesaria una estrecha supervisión cuando se use el producto cerca de niños. \- No meta los dedos ni las manos dentro del producto. \- El uso de accesorios no recomendados o no vendidos por el fabricante del producto puede resultar en un riesgo de incendio, descarga eléctrica o lesiones personales. \- Para reducir el riesgo de averiar el enchufe y el cable de alimentación, cuando desconecte el cable del producto, tire del cable agarrando por el enchufe, no tire agarrando por el cable. \- No use el producto por encima del su salida nominal. Sobrecargar las salidas por encima de su valor nominal puede resultar en un riesgo de incendio o lesiones personales. \- No use el producto ni accesorios si presentan daños o han sido modificados. Las baterías dañadas o modificadas puede tener comportamientos impredecibles con resultado de incendio, explosión o riesgo de lesiones. \- No utilice el producto con el cable o el enchufe de alimentación dañados, ni con el cable de salida de energía dañado. \- No desmonte el producto. Si necesita mantenimiento o reparación, llévelo a un técnico cualificado. Un montaje incorrecto puede provocar riesgo de incendio o descarga eléctrica. \- No exponga el producto al fuego ni a temperaturas altas. La exposición al fuego o a temperaturas superiores a 130 °C puede causar una explosión. \- Para reducir el riesgo de descarga eléctrica, desenchufe la batería de la toma de corriente antes de realizar cualquier mantenimiento programado. \- Los mantenimientos los debe realizar un técnico cualificado utilizando repuestos idénticos a los originales. Esto garantizará la seguridad del producto mantenido. \- Cuando se carga un dispositivo, el producto puede calentarse. Esto es una condición de funcionamiento normal y no debería ser motivo de preocupación. \- Cuando cargue la batería interna, hágalo en una zona con buena ventilación y no restrinja dicha ventilación de ningún modo. \- No limpie el producto usando productos químicos o detergentes perjudiciales. \- El uso indebido, la caída o ejercer fuerza excesiva sobre el producto puede causar daños en el mismo. \- Cuando se deshaga de baterías o celdas secundarias, manténgalas separadas si corresponden a diferentes sistemas electromecánicos. \- No utilice ni guarde este producto donde quede expuesto a los rayos directos del sol, como dentro de un vehículo, en una caja de carga o en cualquier otro lugar donde vaya a estar expuesto a altas temperaturas. Si hace esto podría causar fallos de funcionamiento y deterioro del producto, o generar excesivo calor. \- El mantenimiento de las baterías lo debería realizar o supervisar personal cualificado, con conocimiento sobre baterías y de las precauciones necesarias. \- No utilice este producto cerca de campos con fuerte electricidad estática o campos magnéticos intensos. \- No exponga este producto a gas inflamable o explosivo, ni al humo. \- No se ponga de pie sobre el producto. \- No sumerja el producto en agua. Si el producto cae accidentalmente en el agua, colóquelo en un lugar abierto y seguro, y aléjelo del fuego hasta que esté completamente seco. • por favor, tratar los desechos de acuerdo con las normas. Para obtener más información, siga las leyes y reglamentos locales sobre reciclaje y eliminación de baterías. RoHS     MARSTEK
MICRO ESS B2500
Manuel d' utilisation
text_image
MARTIK MARTIK BATTERY PORT MARTIK BATTERY PORTTABLE DES MATIÈRES
Spécifications 1
Plage de température de fonctionnement 1 Détails du produit 2 Utilisation 3 Contenu de l'emballage 4FR
Instructions relatives à l' application 5 Questions fréquentes et réponses 8 Garantie et informations de contact 8 Composition chimique des substances toxiques et nocives 8 Consignes de sécurité importantes 9| Spécifications | |||||
 Capacité BatteriePoids Dimensions Capacité BatteriePoids Dimensions |  |  |  |  Étanches Étanches |  Certificats Certificats |
| 2240 Wh(50 000 mAh/44,8 V) | Batterie LiFePO418,7±0,5 kg6296 x 175 x 3. |  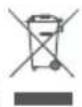 RoHS RoHS | |||
  Entrée PV Sortie PV Entrée PV Sortie PV |   |  Entrée pour un port de batterie supplémentaire Entrée pour un port de batterie supplémentaire |  Sortie pour un port de batterie supplémentaire Sortie pour un port de batterie supplémentaire |  Capacité des ports de batterie supplémentaires Capacité des ports de batterie supplémentaires |
| 12V-59V---8,47A x 22 x 500 W max. | 42V-50,4V---9,25A x 22 x 400 W max. | 44,8V-51,1V---22A | 42V-51,1V---23A | 6720Wh |
 Nombre de cycles Nombre de cycles | [SAWX]Température de stockage | [COAT]Température de fonctionnement |  Température de charge Température de charge |  Système de protection Système de protection |
| 6000 fois (25 °C) | -10 à 55 °C -10 à | 50 °C 0 à 50 °C | Protection contre la surcharge, protection contre la surdécharge, protection contre la surintensité, protection contre la surchauffe, protection contre les courts-circuits, protection contre la surtension. |
Plage de température de fonctionnement
Une température basse peut affecter la capacité de la batterie de l' appareil. L' appareil peut être rechargé à une température comprise entre 0 °C et 50 °C. Chargez l' appareil lorsque la température est inférieure à 0 °C, nous Nous recommandons de placer le produit dans une glacière isolée ou dans d'autres conditions de température. Le produit peut être utilisé dans la plage de température de -10 °C à 50 °C. Afin de prolonger la durée de vie de la batterie, il Il est recommandé d'utiliser ce produit dans un environnement de 20 °C à 30 °C.Détails du produit
Utilisation
Come utilizzare il prodotto:
1. Connectez le panneau solaire à l' entrée PV du B2500 ; 2. Connectez l' entrée MC4 du micro-onduleur à la sortie MC4 du B2500 ; 3. Appuyez longuement sur le bouton de commutation du B2500 jusqu'à ce que l'état de l'affichage s'allume; 4. Si vous n'utilisez pas le B2500, vous pouvez l'éteindre en appuyant 10 s sur le bouton d'arrêt. \* Micro-onduleur non inclus. text_image
*Les panneaux solaires photovoltaïques doivent être achetés séparément.natural_image
Pure electrical circuit lines without any symbolsRetrait du câble:
text_image
Tournez l' outil de 90°Conseils importants:
- Avant de connecter les câbles, assurez-vous que le micro-onduleur, les panneaux solaires et le réseau domestique sont déconnectés et que l' appareil est éteint. - Avant de régler la sortie sur le micro-onduleur, veuillez confirmer la puissance nominale de votre micro-onduleur. La sortie sur le micro-onduleur ne doit pas être supérieure à la puissance nominale de votre micro-onduleur. • L' appareil doit être protégé de la lumière directe du soleil pour éviter une augmentation rapide de la température. - Veuillez vérifier les accessoires avant l'installation, certains accessoires doivent être achetés séparément. - Après l'installation, veuillez d'abord télécharger l'application pour vérifier l'électricité produite. - Pour un stockage à long terme, chargez et déchargez l' appareil une fois tous les 3 mois (déchargez l' appareil à 20 %, puis rechargez-le à 80 %).FR
Contenu de l'emballage
natural_image
Line drawing of a rectangular electronic device with a central panel and side connectors (no text or symbols)natural_image
Pure diagram of a U-shaped cable with two connectors (no text or symbols)text_image
MARSTEK MICRO ESS B2500 instruction ManualInstructions relatives à l' application
MARSTEK APP peut connecter tous vos appareils via Bluetooth ou Wi-Fi pour suivre votre consommation et votre production d' énergie en temps réel, afficher dynamiquement les données d' état de l' appareil en temps réel et contrôler l' énergie de l' appareil dans ses propres mains. Ce logiciel peut être utilisé sur des téléphones portables équipés d' Android 6.0 et d' iOS 12.0 ou versions supérieures.Logiciel installé
\- Scannez le code QR et installez l' application sur votre smartphone. text_image
QR code with a central logo, likely linking to a digital resource or website.Connexion
- Après l'installation, les utilisateurs peuvent cliquer sur l'icône du bureau pour entrer dans l'interface de connexion. Vous entrerez dans l'interface de commutation de serveur lorsque vous l'ouvrirez pour la première fois. - Sélectionnez Enregistrer un compte et saisissez votre adresse e-mail. Un code de confirmation sera envoyé à l' adresse e-mail précédemment fournie pour vérification. Confirmez votre e-mail dans l' application avec le code que vous venez de recevoir et définissez un mot de passe. - Connectez-vous avec votre adresse e-mail et le mot de passe que vous avez choisi. - Si vous avez oublié votre mot de passe, sélectionnez « Mot de passe oublié ? » et réinitialisez-le. - Dans l' interface de connexion, cliquez sur le coin supérieur droit et entrez dans l' interface de sélection du serveur, selon les différentes régions à choisir. Si vous sélectionnez le mauvais serveur, l' application ne peut pas récupérer les données de l' historique de l' appareil. text_image
Switch Server European Union China US&Non EU Please select the corresponding server according to the region of the current residence, including EU, China, and non-EU. If you do not select the corresponding server, some data may not be synchronized. OKtext_image
Register Email Code Verification code Password Registertext_image
European Union Login Email Password Register Forgot Password? Logintext_image
Forgot Password Email Code Verification code New Password Reset PasswordAjout des appareils
- Une fois la connexion réussie, sélectionnez « Ajouter un appareil » dans le coin supérieur gauche pour ajouter un appareil. - Scannez le code QR (code QR uniquement pour le M5000) sur votre appareil pour ajouter l' appareil, ou activez le Bluetooth® et le partage de localisation sur votre smartphone et sélectionnez l' appareil pour l' ajouter directement. - Une fois que l'appareil a été ajouté avec succès, le nom de votre centrale s'affiche sur la page d'accueil. - Un clic sur différents appareils dans la page de gestion des appareils permet de passer d'un appareil à l'autre. Un glissement vers la gauche sur le système iOS déclenche la modification et la suppression d'appareils. Un appui long sur la liste des appareils sur le système Android déclenche la modification et la suppression d'appareils. text_image
Add Device You haven't added a device yet, try adding one now! No device yet, let's try a virtual device firsttext_image
Add Device Please choose the following method to add a device Only M500 can choose to add a QR code or Bluetooth. For other devices, please choose Bluetooth to add a device Add via QR code Add via Bluetooth No device yet, let's try a virtual device firsttext_image
Add via Bluetooth device name device nametext_image
< Enter a new device name Device ID: Mac: Device Type ID: Add Devicetext_image
Device management Edit DeletePage d' accueil de l' équipement
- Affichage en temps réel de l' état de charge solaire, de la décharge et d' autres états. - Paramètres de charge : 1. PV1 et PV2 chargent la batterie jusqu'à ce qu'elle soit complètement chargée, puis déchargée. 2. PV1 et PV2 transmettant au micro-onduleur. \- Paramètres de décharge : définir le mode de sortie de l' appareil, (1) Vous pouvez sélectionner la période de temps de chaque ligne et la puissance de sortie du produit via l'application. (2) Vous pouvez activer le mode de contrôle intelligent de l'énergie, dans lequel l'appareil collectera automatiquement l'électricité du ménage et contrôlera la puissance de sortie de l'appareil en fonction des besoins en électricité du ménage, économisant ainsi de l'électricité. text_image
B2500 PV.1 PV.3 Plofty of Sunlight Output: LULW Output: 200V High Inverter SND 50% 1L20kWh MARSTEK B2500 Charging settings (PV and PV power/meg) Discharge settings (interprent)text_image
#Settings Charging Settings Fully charge and then discharge PV1 and PV2 passthroughtext_image
Discharge settings Discharge mode setting Time period Adaptive Discharging time 1: 01:31—07:06 10:00 9:00 12:00 15:00 24:00 Set output power 100W Discharging time 2: 10:32—17:17 10:00 9:00 12:00 15:00 24:00 Set output power 250W Discharging time 3: 13:42—23:37 10:00 9:00 12:00 15:00 24:00 Set output power 150W SettingsParamètres de l' application
Sélectionnez la molette de réglage en haut à droite pour modifier les réglages ou obtenir des informations : • Paramètres de décharge profonde. • Réglage du seuil de démarrage de la décharge. • Informations sur l' application et l' appareil. • Gestion du compte. • Partager l' équipement. • Réseau Wi-Fi. - Pouvoir. • Statistiques. text_image
settings Share device WIFI configuration Depth of Discharge Dod (98) Discharge threshold:330W Sure discharges when maintaining is less than this value Power Statistics App V:1.2.2 DeviceB2500\V124text_image
< Account management Change Password Account deletion Sign outtext_image
Share device Device ID: Device Name: Mac: Device Type ID: Entitlement granted: Now Only Permission Transfer management privileges Share Nowtext_image
WiFi configuration 1 Please make sure the phone is connected to wifi 2 Proximity to device protection and device Bluetooth connection Password Begin ConfigurationQuestions fréquentes et réponses
Q : Quel est le type de batterie ? Batterie LiFePO4. Q : L' appareil peut-il être emporté dans l' avion ? Non, selon les normes de transport des compagnies aériennes, les batteries au lithium d'une capacité de 100 Wh ne peuvent pas être embarquées dans l'avion. Q : Est-il possible de recharger l' appareil avec des panneaux solaires d'une marque différente ? Oui. Veuillez utiliser des panneaux solaires qui répondent aux spécifications suivantes pour la charge. Plage de tension : 12 à 59 V CC, puissance de sortie nominale (décharge) : 800 W max. (Choisissez nos appareils solaires photovoltaïques, il suffit d' insérer le port CC pour recharger facilement l' appareil à l' aide de l' énergie solaire. Cet appareil utilise la technologie MPPT (dispositif de poursuite du point de puissance maximale), qui peut comparer le point de tension de sortie du panneau solaire avec la tension de la batterie de l' appareil en temps réel, afin de trouver le point de sortie de puissance maximale que le panneau solaire peut fournir et de charger la batterie de l' appareil pour obtenir la meilleure efficacité de charge. \* Les performances réelles sont liées aux conditions météorologiques) Q : Comment puis-je prolonger la durée de vie ou mieux entretenir mon appareil monté sur le sol ? Si votre balcon est souvent inondé, nous vous recommandons de surélever votre appareil. Vous éviterez ainsi les dysfonctionnements dus à une immersion prolongée.Garantie et informations de contact
Dans le cadre d'une utilisation normale de l'appareil, il n'affectera pas le résultat d'un défaut de fabrication et des matériaux utilisés dans l'appareil : Cette période de garantie décrit les obligations de garantie complètes et exclusives de l'appareil, et nous n'assignerons ni n'autoriserons personne à être responsable d'autres appareils. Période de garantie La période de garantie de l' appareil est de 3 ans. Dans tous les cas, la période de garantie commence à la date d' achat par le consommateur. Afin de s' assurer de la date de début de la période de garantie, le consommateur doit fournir une preuve d' achat ou d' autres documents justificatifs raisonnables. Les conditions suivantes ne sont pas couvertes par la garantie 1. La dégradation de l' aspect de l' appareil après son utilisation. 2. Le démontage et l' entretien non autorisés par des personnes non qualifiées. 3. Les problèmes de performance causés par des facteurs humains. 4. Les dommages causés par des catastrophes naturelles, la foudre, des accidents et d'autres facteurs irrésistibles. Modalités d' obtention du service de garantie Vous pouvez contacter notre service clientèle via notre site Web officiel ou notre plateforme deComposition chimique des substances toxiques et nocives
| Nom de pièce | Substances toxiques et nocives ou éléments chimiques | |||||
| Pb | Hg | Cd | Cr(VI) | PBB | PBDE | |
| Coque de l’ appareil | O | O | O | O | O | O |
| Module de circuit | X | O | O | O | O | O |
| bouton | O | O | O | O | O | O |
| Petit matériel | O | O | O | O | O | O |
| Câble de charge | O | O | O | O | O | O |
| Batterie | O | O | O | O | O | O |