SR20M7079WD - Aspirapolvere SAMSUNG - Manuale utente e istruzioni gratuiti
Trova gratuitamente il manuale del dispositivo SR20M7079WD SAMSUNG in formato PDF.

Domande degli utenti su SR20M7079WD SAMSUNG
0 domanda su questo apparecchio. Rispondi a quelle che conosci o fai la tua.
Fai una nuova domanda su questo apparecchio
Scarica le istruzioni per il tuo Aspirapolvere in formato PDF gratuitamente! Trova il tuo manuale SR20M7079WD - SAMSUNG e riprendi in mano il tuo dispositivo elettronico. In questa pagina sono pubblicati tutti i documenti necessari per l'utilizzo del tuo dispositivo. SR20M7079WD del marchio SAMSUNG.
MANUALE UTENTE SR20M7079WD SAMSUNG
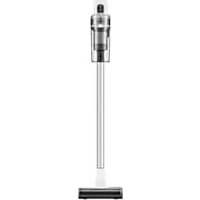
POWERbot
User manual
SR1*M70****, SR2*M70**** Series
- Before operating this unit, please read the instructions carefully.
- For indoor use only.

natural_image
Black-and-white photo of a modern lounge chair with leather backrest and metallic armrest, featuring a pair of headphones placed on the backrest (no text or symbols visible)SAMSUNG
Contents
03 Safety information
08 Installation
Accessories / Installation note
10 Charging
Automatic charging / Recharging / Low battery (Lo)
12 Using POWERbot
Turning the power on/off / Selecting cleaning modes / Using special cleaning functions
15 Installing the Virtual guard
Part name of the Virtual guard / Inserting batteries
17 Using the remote controller
20 Name of each part
Top / Bottom / Display panel
22 Setting time/schedule
Setting the time / Setting the schedule
25 Cleaning and maintaining
Cleaning the dustbin / Cleaning the sensors and the camera / Cleaning the brush and Auto shutter tool / Cleaning the Driving wheel
27 SmartThings App
31 Notes and cautions
Charging / Using / Cleaning and maintenance / About the battery / About the IrDA sensor
33 Information codes
35 Troubleshooting
39 Warnings about battery
40 Open Source Announcement
41 Specifications
Safety information
SAFETY INFORMATION

- Before operating the appliance, please read this manual thoroughly and retain it for your reference.

- Because these following operating instructions cover various models, the characteristics of your vacuum cleaner may differ slightly from those described in this manual.
CAUTION/WARNING SYMBOLS USED
W | Indicates that a danger of death or serious injury exists. |
 | Indicates that a risk of personal injury or material damage exists. |
OTHER SYMBOLS USED
| NOTE | Indicates that the following text contains additional important information. |
- For information on Samsung's environmental commitments and product specific regulatory obligations e.g. REACH visit: samsung.com/uk/aboutsamsung/samsungelectronics/corporate citizenship/data_corner.htm
Safety information
IMPORTANT SAFETY INSTRUCTIONS
When using an electrical appliance, basic precautions should be observed, including the following:
READ ALL INSTRUCTIONS BEFORE USING YOUR POWERbot.
Unplug from outlet when not in use and before conducting maintenance.
WARNING: to reduce the risk of fire, electric shock, or injury:
GENERAL
- Use only as described in this manual.
- Do not operate POWERbot or the battery charger / docking station if it has been damaged in any way.
- If the vacuum cleaner is not working as it should, has been dropped, damaged, left outdoors, or dropped in water, return it to a customer care center.
- Do not handle the battery charger / docking station or POWERbot with wet hands.
- Use only on dry, indoor surfaces.
- This appliance can be used by children aged from 8 years and above and persons with reduced physical, sensory or mental capabilities or lack of experience and knowledge if they have been given supervision or instruction concerning use of the appliance in a safe way and understand the hazards involved. Children shall not play with the appliance. Cleaning and user maintenance shall not be made by children without supervision.
- If the supply cord is damaged, it must be replaced by the manufacturer or its service agent or a similarly qualified person in order to avoid a hazard.
Battery charger / Docking station
- Do not modify the polarized plug to fit a non-polarized outlet or extension cord.
- Do not use outdoors or on wet surfaces.
- Unplug the battery charger / docking station from the outlet when not in use and before servicing.
- Use only the battery charger / docking station supplied by the manufacturer to recharge.
- Do not use with a damaged cord or plug or a loose power outlet.
-
Do not pull or carry by the cord, use the cord as a handle, close the door on the cord, or pull the cord around sharp edges or corners. Keep the cord away from heated surfaces.
-
Do not use extension cords or outlets with inadequate current carrying capacity.
- Do not unplug by pulling on the cord. To unplug, grasp the plug, not the cord.
- Do not mutilate or incinerate batteries as they will explode at high temperatures.
- Do not attempt to open the battery charger / docking station. Repairs should only be carried out by a qualified customer care center.
- Do not expose the battery charger / docking station to high temperatures or allow moisture or humidity of any kind to come into contact with the battery charger / docking station.
- Do not charge the non-rechargeable batteries with charger.
POWERbot
- Do not pick up hard or sharp objects such as glass, nails, screws, coins, and etc.
- Do not use without a filter in place. When servicing the unit, never put fingers or other objects into the fan chamber in case the unit accidentally turns on.
- Do not put any objects into openings. Do not use with any openings blocked; keep openings free of dust, lint, hair, and anything that may reduce air flow.
- Do not pick up toxic materials (chlorine bleach, ammonia, drain cleaner, etc.).
- Do not pick up anything that is burning or smoke, such as cigarettes, matches, or hot ashes.
- Do not use to pick up flammable or combustible liquids such as gasoline, non-use on areas where they may be present.
- Locations with candles or desk lamps on the floor.
- Locations with unattended fires (fire or embers).
- Locations with distilled alcohol, thinner, ashtravs with burning cigarettes, etc.
- Do not use POWERbot in an enclosed space filled with vapours given off by oil based paint, paint thinner, moth proofing substances, flammable dust, or other explosive or toxic vapours.
- Leaks from battery cells can occur under extreme usage or temperature conditions. If the liquid gets on skin, wash quickly with water. If the liquid gets into the eyes, flush them immediately with clean water for a minimum of 10 minutes. Seek medical attention.
Safety information

WARNING
Power related
▶ Please prevent any risk of electric shock or fire.
- Do not damage the power cord.
- Do not pull the power cord too hard or touch the power plug with wet hands.
- Do not use a power source other than 100-240 V\~ and also do not use a multi outlet to supply power to number of devices at the same time. (Do not leave the cord carelessly on the floor.)
- Do not use a damaged power plug, power cord or loose power outlet.
▶ Clean dust or any foreign matters on the pin and contact part of the power plug.
- There is a risk of electric shock or malfunction.
▶ Do not spill any liquids on the docking station.
- There is a risk of fire or electric shock.
▶ Do not use the docking station for anything other than its intended purpose.
- There is a risk of fire or severe damage to the docking station.
▶ Always keep the cliff sensor clean for your safety.

WARNING
In use
▶ If any abnormal sounds, smells or smoke come from POWERbot, immediately shut off the emergency switch at the bottom of POWERbot and contact a service center.

WARNING
Before use
▶ Do not use POWERbot near a heater or combustible materials.
- Do not use POWERbot near fire or flame such as a movable heater, a candlelight, a desk lamp, a fireplace etc. or in a place where combustible materials such as gasoline, alcohol, thinner etc. exist.
- Make sure there are no dangerous objects around the POWERbot's cleaning area to prevent collision and unplug any electric heaters or fans.
The POWERbot is intended for household use therefore do not use it in an attic, basement, storage, industrial building, out of indoor space, places with moisture (such as bathroom, laundry), on the table or shelves.
- The POWERbot can be damaged or malfunction.
▶ Be sure POWERbot does not pass through or touch any kind of liquids.
- The POWERbot can be severely damaged and it may contaminate other areas if the wheels pass through liquid.

WARNING
Cleaning and maintenance
- When power cord is damaged, contact a service center to get it replaced by a certified repairman.
- There is a risk of fire or electric shock.
▶ Please check with a Samsung Electronics service center when exchanging batteries.
- Using batteries from other products can cause malfunction.

CAUTION
Before use
▶ Insert the dustbin before using POWERbot.
▶ Be careful with the followings for proper automatic recharging.
- Always turn on the power of the docking station.
- Install the docking station where POWERbot can easily find.
- Do not leave any object in front of the docking station.
▶ When installing the docking station, do not leave the cord carelessly on the floor since POWERbot may get tangled by it.
▶ Do not use POWERbot on black colored floors.
- The POWERbot may not be able to operate normally.
▶ Do not place any objects within 0.5 m to both sides and 1 m to the front of the docking station.
- Make sure the docking station's charging contact is not damaged or have any foreign matters on it.
▶ Do not install the docking station in an area with a dark floor.
- If the floor around the docking station is dark, recharging is hindered.
▶ Move any obstacles that may disturb POWERbot's movement (such as children's indoor swing or slides) before cleaning.
▶ Do not use the POWERbot in a place which is narrower than the turning radius (0.5 m or less) of the POWERbot.
▶ If a brush or brush cover is not assembled correctly, scratches may occur on the floor, or product malfunction may occur.
▶ Before operating the POWERbot, remove the objects which could break such as a frame, mirror, and porcelain items so that the POWERbot works without interruption.

CAUTION In use
▶ Using POWERbot on thick carpet may damage both POWERbot and the carpet.
- The POWERbot cannot pass over carpet that is thicker than 1 cm.
▶ Do not use POWERbot on tables or other high surfaces.
- There is a risk of damage if it falls.
▶ The POWERbot may bump into chair, desk legs therefore move them away for faster and efficient cleaning.
▶ When POWERbot is operating, do not lift it up or carry it to another area.
▶ Do not hold by driving wheels of POWERbot when carrying it to another area.
▶ Do not put any objects on top of POWERbot and camera since it may cause malfunction.
▶ Remove any large papers or plastic bags immediately when using POWERbot since they may block the intake.
▶ Do not aim the red pointer directly at people or animals.
▶ Do not lie down around the POWERBOT that is running.
- Your hair may be caught in the brush, resulting in physical injury.

CAUTION
Cleaning and maintenance
▶ Prevent any damage to POWERbot by complying with the following
- Do not clean POWERbot by spraying water directly onto it or use benzene, thinner, acetone or alcohol to clean it.
▶ Do not disassemble or repair POWERbot. This should only be done by a certified repairman.
▶ Always keep the obstacle sensor, cliff sensor and camera clean.
- If foreign matter accumulates, sensors may malfunction.
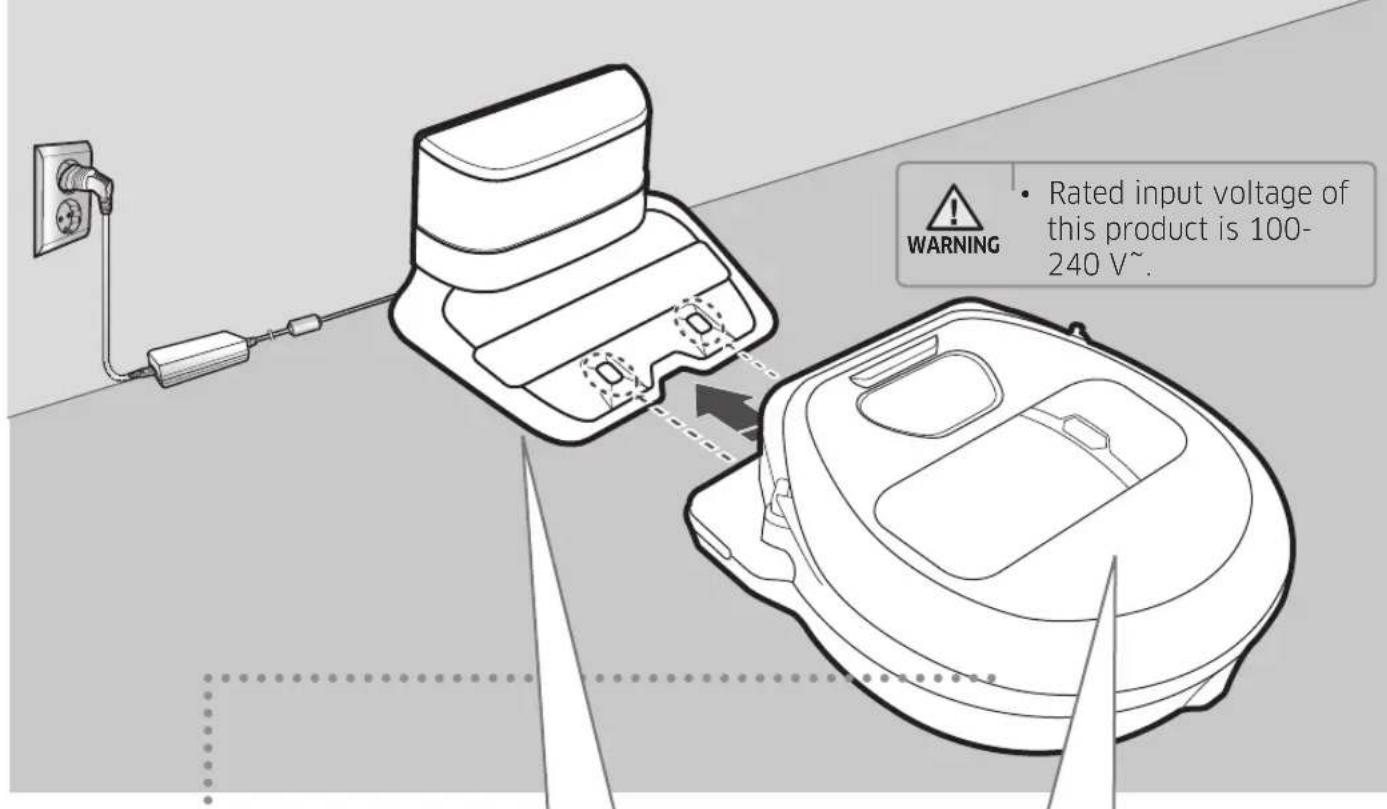
Installation
The docking station must be plugged in and turned on at all times.
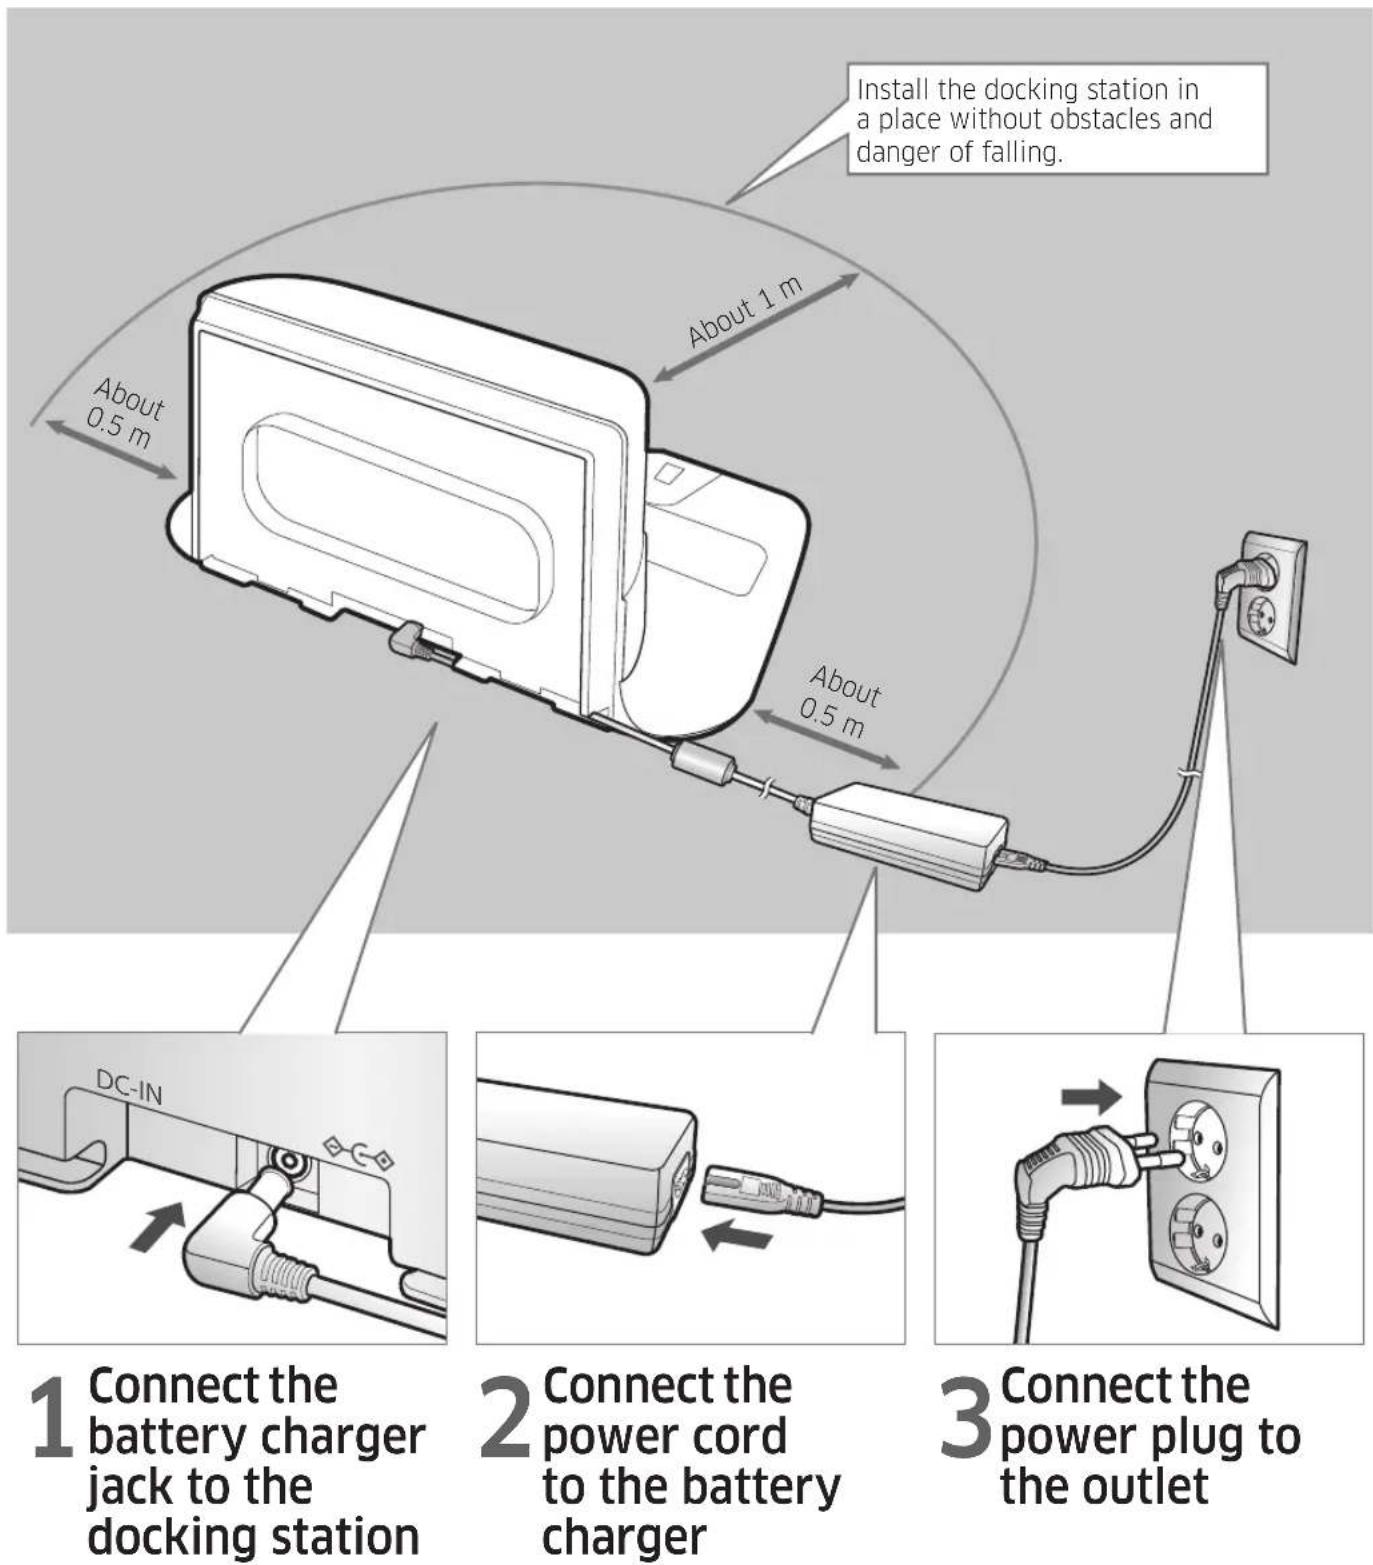
When using the battery charger, the side with the sticker attached must face down.
Accessories
 Remote controller (Optional) Remote controller (Optional) | 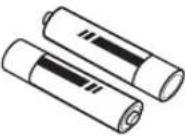 Batteries (AAA type) (Optional) Batteries (AAA type) (Optional) |  User manual Spare filter (Optional) User manual Spare filter (Optional) | 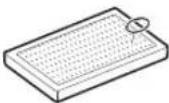 |
 Docking station Power cord Battery charger Virtual guard (Optional) Docking station Power cord Battery charger Virtual guard (Optional) | 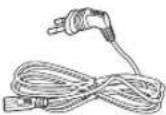 | 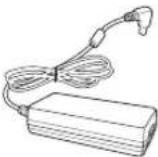 | 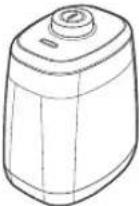 |
* Accessories may differ depending on the models.
* Battery Spec
SR1*M70**** series : Lithium-ion, 21.6V, 1800mAh, 6cell
SR2*M70**** series : Lithium-ion, 21.6V, 3600mAh, 12cell
Installation note

Note
▶ Install the docking station in a place where the floor and wall are level.
▶ It is best to install the docking station along the grain of wooden floors.
▶ If the emergency switch is off, the POWERbot will not charge even if it is docked on the docking station.
▶ Always turn on the power of the docking station.
- If power is not supplied to the docking station, the POWERbot cannot find it and cannot automatically recharge.
- If the POWERbot is left detached from the docking station, the battery will drain naturally.
▶ If the POWERbot is in sleep mode, power will not come on even if the emergency switch is turned off and then on. Press and hold the [Start/Stop] button on the POWERbot to turn the sleep mode off.
Charging
After completely charging the POWERbot for the first time (after purchase), it can be used for 60 min. in Nomal (mode. (Refer to the page 41 for the charging time.)
Smart Charging
If POWERbot runs out of charge in Auto clean mode, it will automatically return to the docking station to be charged and will recommence the cleaning to complete the cleaning area after two-third of battery charging is done. (Max. 2 times).
text_image
WARNING • Rated input voltage of this product is 100- 240 V~.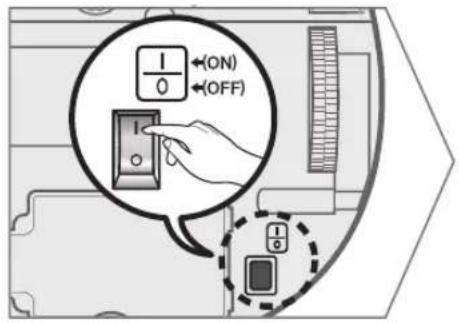
text_image
1/0 ←(ON) ←(OFF)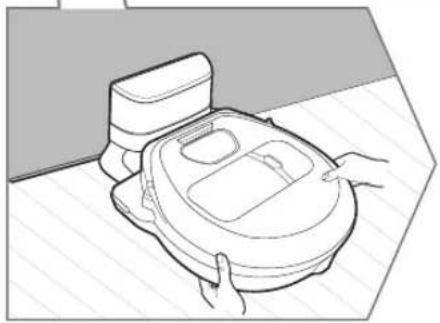
natural_image
Line drawing of a robotic vacuum cleaner with hands operating it (no text or symbols)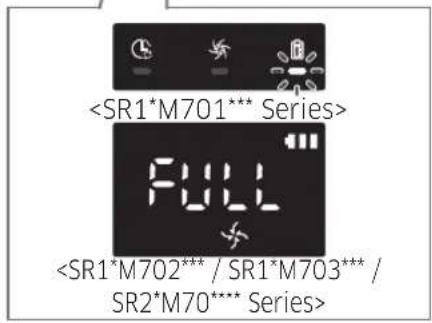
text_image
1 Turn on the emergency switch on the bottom
You must turn on the emergency switch to turn on the POWERbot.
Press and release the button.
2 Manually charge the POWERbot by placing it on the docking station
Make sure the charging pins on the POWERbot and the docking station are aligned.
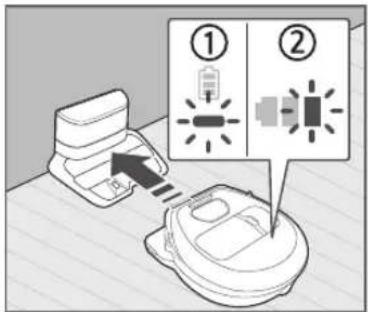
3 Check the charging status
For SR1*M701*** Series, The battery indicator blinks at 1 sec. intervals during charging and the indicator will remain in ON status when fully charged. For SR1*M702*** / SR1*M703*** / SR2*M70**** Series, "B will turn on according to charging progress and "FULL" will turn on when charging is complete.

natural_image
Abstract geometric shape with a diagonal line dividing it into two triangular sections (no text or symbols)Automatic charging
text_image
Diagram showing two labeled components with arrows indicating movement, likely illustrating a process or assembly.1. SR1\*M701\*\*\* Series
If the battery indicator blinks at 0.4 sec. intervals, the POWERbot will automatically return to the docking station to be charged.
2. SR1\*M70\*\*\*\* / SR2\*M70\*\*\*\* Series
When the battery indicator blinks during cleaning, the POWERbot will return to the docking station to charge itself automatically.
Recharging
natural_image
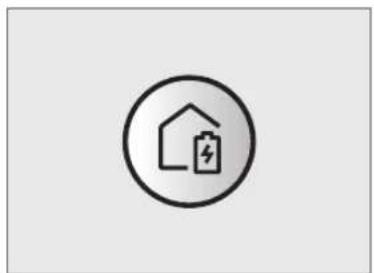
Simple line icon of a house with a battery inside, no text or symbols presentYou can command the POWERbot to recharge at the docking station while it is in cleaning.
Low battery (Lo)
natural_image
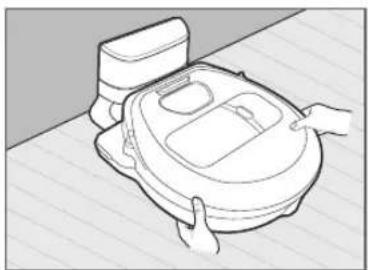
Line drawing of a hand holding a circular object on a tiled floor (no text or symbols)Manually charge the POWERbot by placing it on the docking station.
Steps to take if recharging not occurring:
Check the installation status of the docking station when:
▶ the docking station is located in a place where the POWERbot cannot easily access it.
▶ the distance between the docking station and POWERbot is over 5 m.
- It may take a long time for POWERbot to return to the docking station for recharging
Manually charge the POWERbot when:
▶the docking station is located in a corner
▶the battery is fully exhausted
▶ the POWERbot is immobilized by an obstacle (furniture etc.)
▶ the POWERbot can't climb a threshold near the docking station (The maximum height of a threshold the POWERbot can climb is about 1.5 cm.)
▶when the battery indicator blinks and "Lo" is displayed
▶when the battery indicator blinks (Applicable to SR1*M701*** Series)
▶when the POWERbot is set to the Spot clean or Manual clean mode
Using POWERbot
You must turn on the emergency switch on the bottom of the unit before using POWERbot.
Turning the power on/off
Press the Ⓑ button for more than 3 seconds

- When POWERbot is not used for 30 min.; SR1*M70**U* / SR2*M70**U* series: Turns to energy-saving mode. SR1*M70**W* / SR2*M70**W* series: Automatically returns to the docking station to be charged.
Starting Auto clean mode
Press and release this button. The POWERbot moves and automatically cleans the set areas only once.

* Stop cleaning: Press and release the button
Using Spot clean mode
The POWERbot cleans a localized area intensely.

Recharging
You can command POWERbot to recharge at the docking station automatically while it is cleaning by pressing this button.
Selecting cleaning modes
| Cleaning mode How to select | Displayed icon | ||
| SR1*M702***SR1*M703***SR2*M70**** | SR1*M701*** | ||
| Auto clean |  |  |  |
| Spot clean |  |  |  |
| Repeat clean | *Press the [A,B type], [C,D type (Report) the remote controller first and then press the [Start/Stop ▶]. |  | - |
| Manual clean | *Manual clean mode can be selected by the direction control buttons of the remote controller. |  | - |
* If POWERbot fails to return to the docking station, it will turn to energy-saving mode and display panel will be turned off.
* To exit the energy-saving mode, press the [Start/Stop] or [Power ⏻ button of main body or remote controller.
* If cleaning in Auto clean mode is completed within 15 minutes, POWERbot cleans 1 more time.
natural_image
Abstract geometric pattern with horizontal lines and a small icon (no text or symbols)Using POWERbot
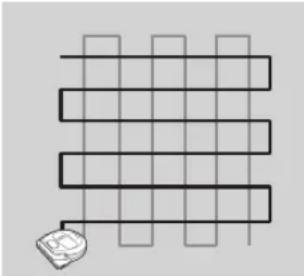
Cleaning method for each modes
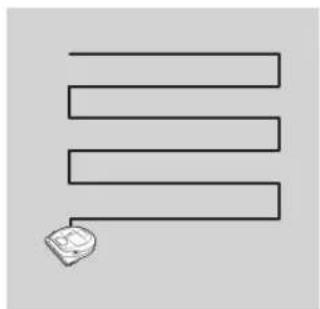
natural_image
Simple line drawing of three parallel horizontal bars with a small icon at the bottom (no text or symbols)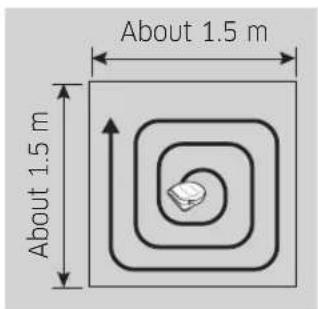
text_image
About 1.5 m About 1.5 m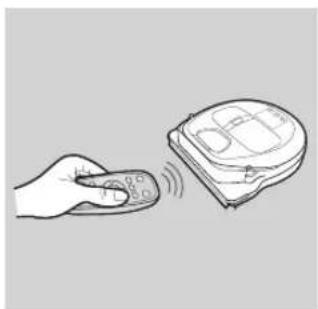
natural_image
Illustration of a hand holding a remote control with a device emitting sound waves (no text or symbols)
natural_image
Abstract geometric pattern with intersecting lines and a small 3D cube at the bottom (no text or symbols)Auto clean
Automatically cleans the set areas only once. * SR1*M701*** series : Cleans repeatedly until the battery is depleted.
Spot clean
Cleans a localized area intensely. It can be used to clean bread or cookie crumbs.
Manual clean
You can move POWERbot with the remote controller to clean the desired spot. * This function is not applicable to SR1*M701*** series.
Repeat clean
Cleans repeatedly until the battery is depleted. * This function is not applicable to SR1*M701*** series.

Note
▶ If Auto clean or Repeat clean is commenced, POWERbot cleans the area near the docking station first.
Using special cleaning functions
| Cleaning function | Operation | Displayed icon | |
| SR1*M702***SR1*M703***SR2*M70**** | SR1*M701*** | ||
| Intelligent power control | * When the POWERbot detects a carpet in normal mode, it will automatically operate with stronger suction power. | 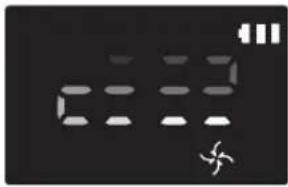 |  |
| Edge Clean Master | * When the POWERbot detects an edge or corner in Auto clean or Spot clean, the auto shutter tool operates and approaches the edge or corner section to clean.►Straight edge (One time cleaning►Corner (Two times cleaning) | 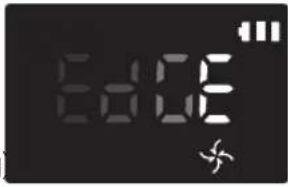 | 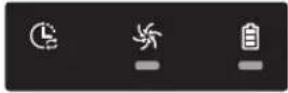 |
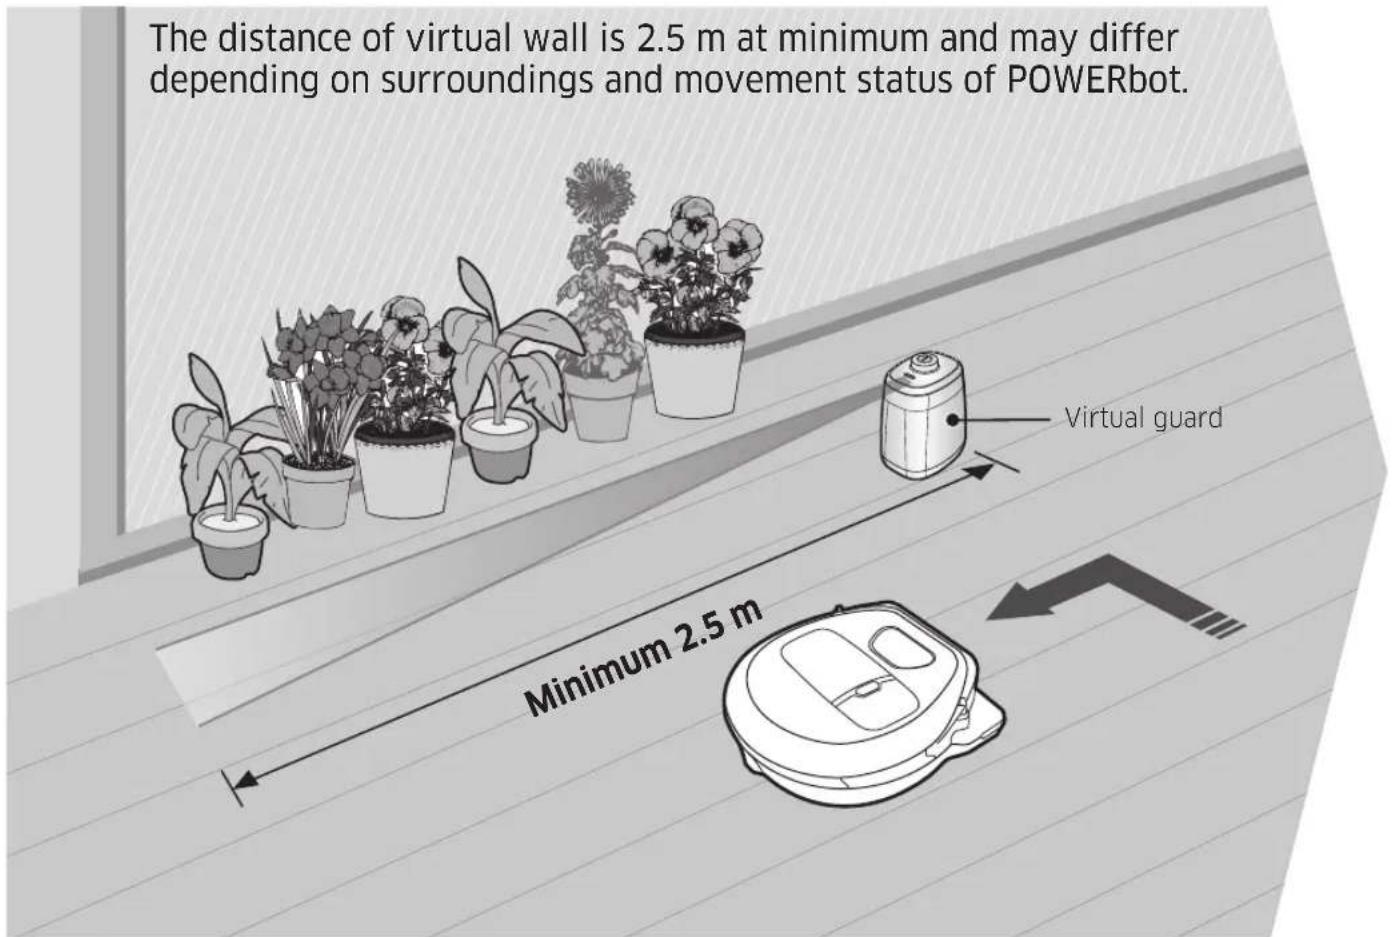
Installing the Virtual guard
Infrared ray from the Virtual guard will restrict POWERbot from approaching certain area.
* (Included with SR2*M707*** series only. For SR2*M704*** / SR2*M705*** / SR2*M706*** series, additional purchase is required.)
text_image
The distance of virtual wall is 2.5 m at minimum and may differ depending on surroundings and movement status of POWERbot. Virtual guard Minimum 2.5 m1 Press the Power button to turn it on
Power lamp (Red) will blink.
natural_image
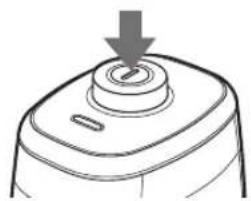
Line drawing of a mechanical component with a downward arrow indicating force or direction (no text or symbols)2 Install the Virtual guard where you want to restrict POWERbot's entrance
Make sure that distance sensor is facing at the desired direction you want to create a invisible barrier (which will restrict POWERbot's approach).
Installing the Virtual guard
Part name of the Virtual guard
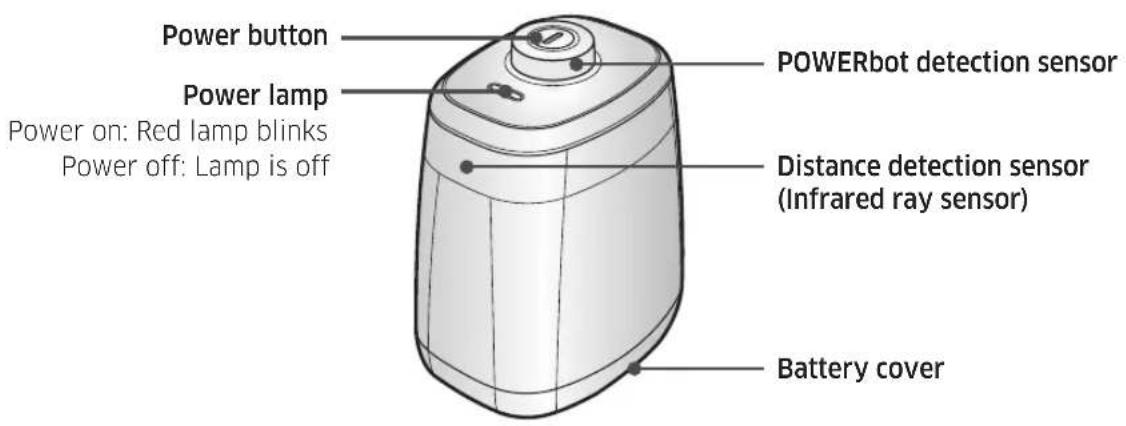
text_image
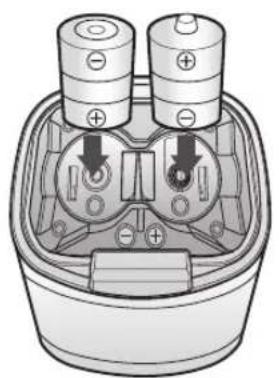
Power button Power lamp Power on: Red lamp blinks Power off: Lamp is off POWERbot detection sensor Distance detection sensor (Infrared ray sensor) Battery coverInserting batteries
Batteries for Virtual guard must be purchased separately.

natural_image
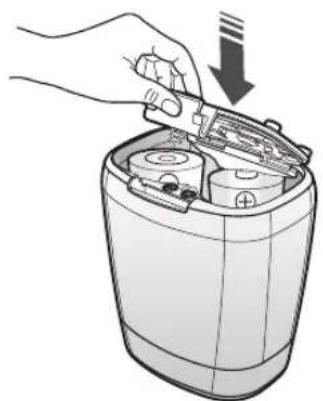
Illustration of a hand using a tool to clean or restore a cylindrical container (no text or symbols visible)1 Open the battery cover of the Virtual guard by pressing the locking tab and lift it up.
natural_image
Diagram of a battery pack with two batteries and internal components, showing no text or symbols2 Insert the alkaline batteries (D type) as shown in the illustration (check the +, - polarity).
natural_image
Illustration of a hand inserting a battery into a cylindrical device (no text or symbols)3 Insert the tip of the cover into the slot and push the other end to close the battery cover.
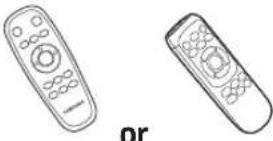
Using the remote controller
[A Type] [B Type]

text_image
1 3 1, 2 5 Spot Repeat Sound 4 2 Schedule Clock Schedule Cancel(1sec) SAMSUNG Refer to page 22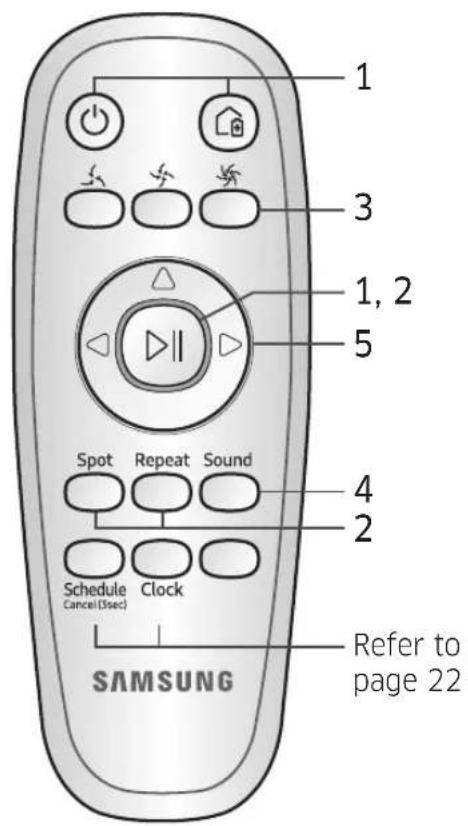
text_image
1 3 1, 2 5 Spot Repeat Sound 4 2 Schedule Clock Cancel (Sec) SAMSUNG Refer to page 22[C Type] [D Type]

text_image
1 3 1, 2 5 Point Cleaning 6 2 4 4 Spot Repeat Sound Schedule Clock Remote Cancel(3sec) Refer to page 23 SAMSUNG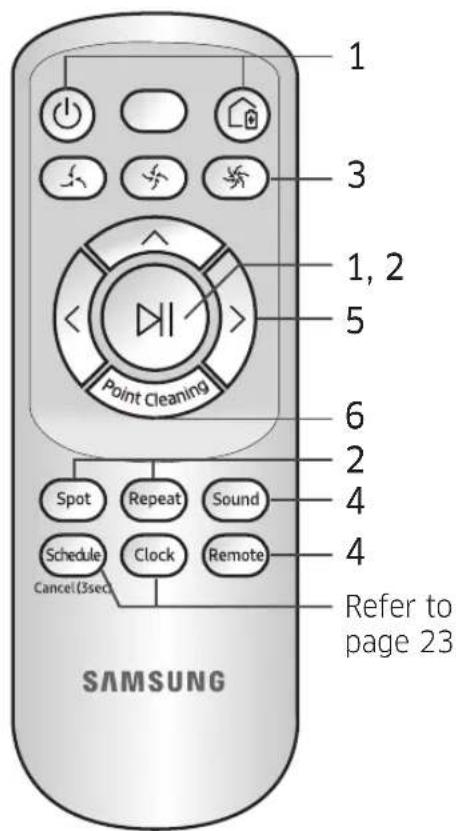
text_image
1 3 1, 2 5 Point Cleaning 6 2 4 4 Spot Repeat Sound Schedule Clock Remote Cancel(3sec) Refer to page 23 SAMSUNGUsing the remote controller
□ [A Type] / □ [B Type] / [C Type] / [D Type]
1 Power / Recharging / Start/Stop
| Power |  |  |  |  | Turn POWERbot's power on/off |
| Recharging |  |  |  |  | Select to recharge POWERbot at the docking station automatically |
| Start/Stop |  |  |  |  | Select to start or stop cleaning process |
2 Cleaning modes
| Auto clean | [HDBW] |  |  |  | Select to clean all set areas only once and then automatically return to the docking station. |
| Spot clean |  |  |  |  | Select to clean a localized area intensely |
| Repeat clean |  |  |  |  | Select to clean repeatedly until the battery becomes very low with indicator blinking |
3 Suction power
| Turbo mode |  |  |  |  | Select to clean with the strongest suction power |
| Normal mode |  |  |  |  | Select to clean with moderate suction power |
| Quiet mode |  |  |  |  | Select to clean with lower operation noise |
4 Additional function
| Sound |  |  |  |  | Each time you press this button, Sound Effects → Mute is selected in this sequence |
| Remote control |  |  |  |  | Select to turn Wi-Fi function on or off |
*The previously selected setting will not change even if the emergency switch is turned off and then on.
5 Manual clean mode & Direction control
| Move forward |  |  |  |  | Select to move forward |
| Turn left |  |  |  |  | Select to turn left |
| Turn right |  |  |  |  | Select to turn right |
* Moving backward is not available.
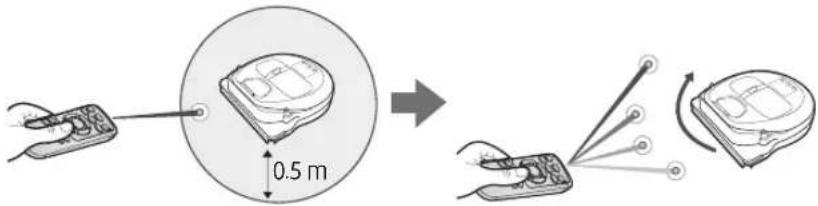
6 Point cleaning
Available only with C, D type remote controllers.
You can use the remote controller to point and clean the desired spot while the POWERbot is in cleaning process.
Point the red light on the floor within 0.5 m around POWERbot's location.
Press and hold the Point cleaning button to move the red light to the desired spot. The POWERbot will follow the light while cleaning.
text_image
0.5 mOperating distance of the remote controller
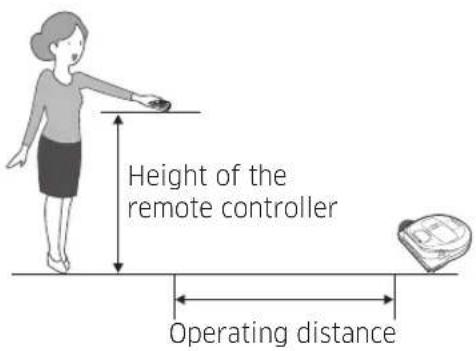
text_image
Height of the remote controller Operating distance| Height of the remote controller | 0.5 m 1 m | 1.5 m | |
| Operating distance | About 1.5 m | About 2 m | About 3 m |
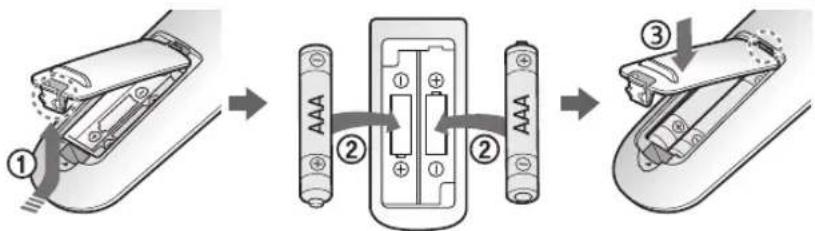
Inserting batteries
Open the battery cover by lifting it up while pressing the locking tab and insert the batteries as shown in the illustration. Then, close the cover until it clicks into place.
text_image
Diagram illustrating the step-by-step assembly of a battery pack with labeled components and mechanisms.Name of each part
text_image
6 5 3 7 8 2 1 4 2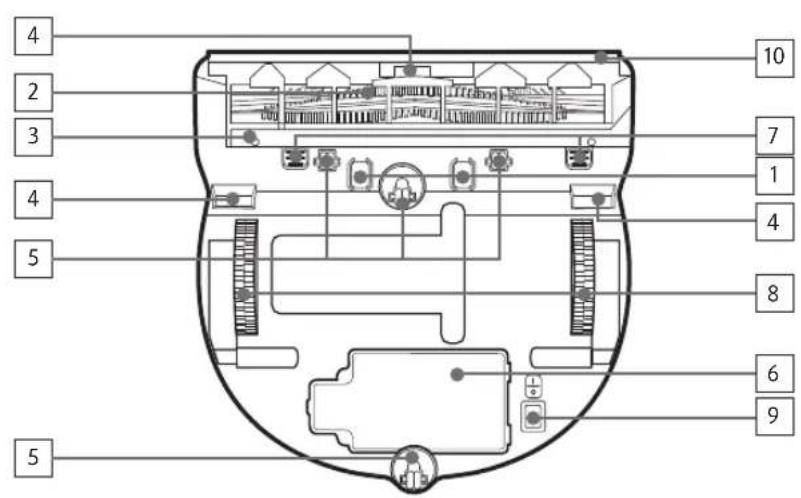
text_image
4 2 3 4 5 5 10 7 1 4 8 6 9
text_image
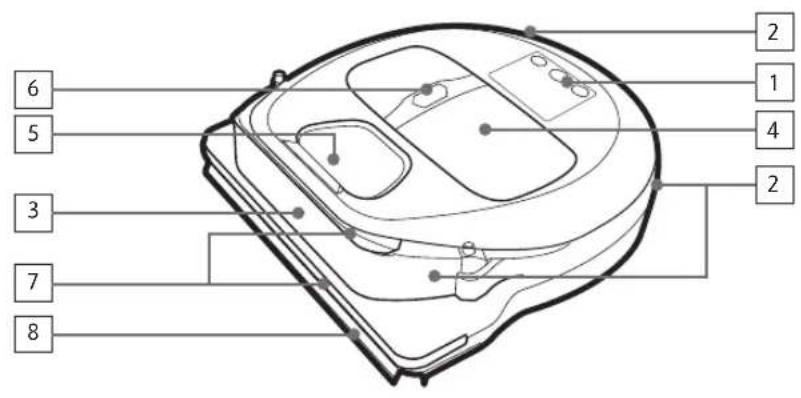
1 2 3 4 5 6 (3sec) (3sec)Top
- Display panel
- Remote control signal receiver
- Obstacle sensor
- Dustbin
- Camera
- Dustbin button
- Bumper sensor
- Auto shutter tool
Bottom
- Charge pins
- Brush
- Brush cover
- Cliff sensor
- Roller
- Battery cover
- Brush cover button
- Driving wheel
- Emergency switch
- Auto shutter tool
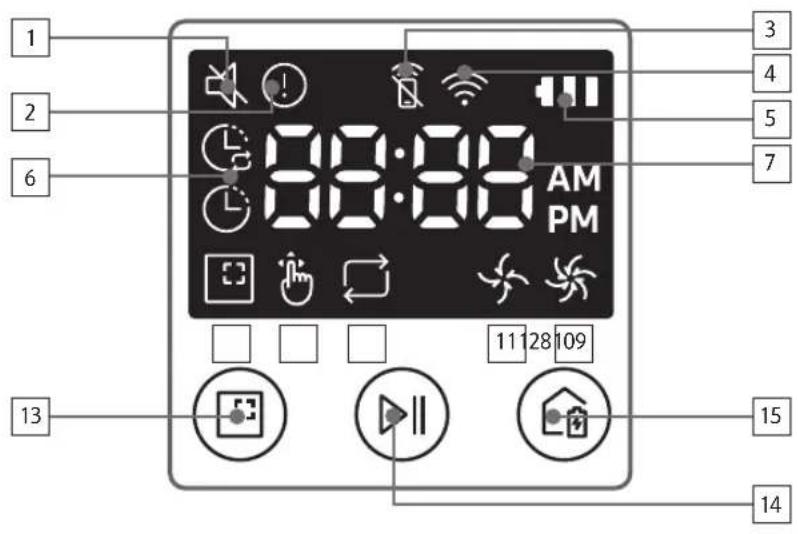
Display panel
- Daily schedule
- Normal/Turbo mode
- Battery indicator
- Spot cleaning button, daily schedule(3sec)
- Start/Stop button, Turbo mode(3sec)
- Recharging button
text_image
1 2 6 13 3 4 5 7 8:00:00 AM PM 11 28 109 15 14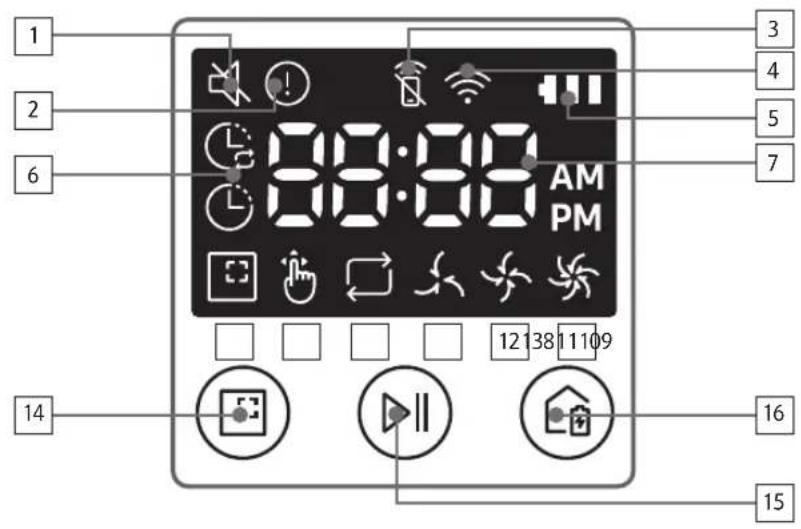
text_image
1 2 6 14 3 4 5 7 8:00:00 AM PM 12 38 11 109 16 15
series>
1. Mute
2. Information Indicator
3. \*Remote control Off/On indicator
4. \*Wi-Fi
5. Battery indicator
6. One-time/Daily schedule
7. Number display
8. Spot clean mode
9. Manual clean mode
10. Repeat clean mode
11. Normal mode
12. Turbo mode
13. Spot cleaning button
14. Start/Stop button
15. Recharging button
1. Mute
2. Information Indicator
3. \*Remote control Off/On indicator
4. \*Wi-Fi
5. Battery indicator
6. One-time/Daily schedule
7. Number display
8. Spot clean mode
9. Manual clean mode
10. Repeat clean mode
11. Quiet mode
12. Normal mode
13. Turbo mode
14. Spot cleaning button
15. Start/Stop button
16. Recharging button
\* SR1\*M70\*\*W\* / SR2\*M70\*\*W\*: Wi-Fi supported model
Setting time/schedule
[A Type, B Type] Only Auto clean mode can be scheduled.
Setting the time
You must set the current time before using the One-time/daily schedule.

flowchart
graph LR
    A["Start setting"] --> B["Clock"]
    B --> C["Select "Hour" Select "Minute""]
    C --> D["Select "AM/PM" Setting complete"]
    D --> E["Skip to previous, next setting"]
Setting the schedule
Setting/cancelling the schedule can only be done while POWERbot is docked on the docking station.

flowchart
graph LR
    A["Start setting Select "One-time" or "Daily" schedule"] --> B["Select "Hour""]
    B --> C["Select "Minute" Select "AM/PM" Setting"]
    C --> D["Skip to previous, next setting"]
Cancelling during setup

▶Setting will be canceled automatically when there's no input for 7 seconds.
Cancelling One-time/Daily schedule
When both One-time/Daily schedule is set  Schedule
 or
or  Schedule
 or
or  Cancel (3sec)
Press for 3 sec. Select the schedule Cancel complete When either one ofOne-time or Dailyschedule is set ScheduleCancel (3sec)Press for 3 sec.
[C Type, D Type] Only Auto clean mode can be scheduled.
Setting the time
You must set the current time before using the One-time/daily schedule.

flowchart
graph LR
    A["Clock"] --> B["Start setting Select "Hour" Select "Minute""]
    B --> C["Select "AM/PM"Setting complete"]
    C --> D["Skip to previous, next setting"]
Setting the schedule
Setting/cancelling the schedule can only be done while POWERbot is docked on the docking station.

flowchart
graph LR
    A["Start setting Select "One-time" or "Daily" schedule"] --> B["Select "Hour""]
    B --> C["Select "Minute" Select "AM/PM" Setting"]
    C --> D["End"]
    E["Schedule Cancel (3sec)"] --> A
    F["Button"] --> C

Skip to previous, next setting
Cancelling during setup

▶Setting will be canceled automatically when there's no input for 7 seconds.
Cancelling One-time/Daily schedule
When both One-time/ Daily schedule is set  [xWYD]
  OR
OR  →
→ 
 Press for 3 sec. Select the schedule Cancel complete
When either one of One-time or Daily schedule is set ScheduleCancel (3sec)Press for 3 sec.
Setting time/schedule
[SR1\*M701\*\*\* series] For the models which do not include a remote controller, schedule setting is available as below.
Setting the schedule
Setting/cancelling the schedule can only be done while POWERbot is docked on the docking station.

Press for 3 sec.


When the schedule LED is turned on, Daily schedule is set.
\*The time you press the button will be set as a schedule. Cleaning will be automatically done everyday according to the schedule time.
Cancelling daily schedule
When a daily schedule is set  Press for 3 sec.
Cleaning and maintaining

You must turn off the emergency switch before cleaning POWERbot.
Cleaning the dustbin

text_image
①
②
PUSH
1 Press the button to remove the dustbin

text_image
Diagram showing two labeled parts of a mechanical device with directional arrows indicating movement or assembly.
2 Remove the dustbin cover

natural_image
Illustration of hands pouring liquid into a trash bin with a spray can (no text or symbols)
3 Remove dust in the
dustbin and cyclone
unit

text_image
Illustration showing two open containers with labeled parts and a sun icon, illustrating a process for cleaning or storage.
4 Detach the cyclone unit from the dustbin cover, and then wash the dustbin and the filter

text_image
Diagram illustrating three steps of installing a device into a device, with numbered instructions and visual icons.
5 Reassemble the dustbin

text_image
'Click'
6 Reinsert the dustbin into the main body until it clicks
Cleaning the sensors and the camera
Lightly wipe with soft cloth. Do not use water or cleaning solutions.

text_image
Camera
Front sensor window
Cliff sensors
Rear sensor window
Cleaning and maintaining
Cleaning the brush and Auto shutter tool
Brush design may differ depending on the model. Do not clean the brush with water.

text_image
Diagram showing a device with labeled parts and a magnified view of the component, likely illustrating a mechanical or electronic assembly.
1 Remove the brush cover

natural_image
Illustration of a hand holding a tool over a device component, with an arrow indicating motion (no text or symbols present)
2 Remove the brush

natural_image
Illustration of a welding torch and tool interacting with a textured material (no text or symbols)
3 Clean the brush

text_image
Diagram showing three-step steps of a tool application: opening, cutting, and holding a pen.
4 Clean the auto shutter tool

text_image
Diagram showing hands holding a device with a numbered step labeled '1' pointing to the component area.
5 Reassemble the brush

text_image
Diagram showing a hand holding a device with labeled parts and directional arrows indicating process steps

text_image
Diagram illustrating car gear shift and disassembly process with labeled arrows and a magnified inset showing tool insertion.
6 Reassemble the brush cover

text_image
Diagram showing hands operating a device with labeled components and a magnified view of a component with a downward arrow.
Cleaning the Driving wheel

natural_image
Illustration of hands holding a device with internal components (no text or symbols visible)
1 Put a soft cloth on the floor and place POWERbot upside-down on the cloth.


natural_image
Hand using a tool to lift a tire on a road surface (no text or symbols visible)
2 Use a blunt rod or tweezers to remove foreign matter.
SmartThings App
The SmartThings App is only compatible with models that have a Wi-Fi function.
Setting up the wireless router
▶ Please refer to the user manual of your wireless router if you have access problems.
Samsung POWERbot supports only Wi-Fi 2.4 Ghz.
Samsung POWERbot supports IEEE 802.11b/g/n and Soft-AP.
- IEEE 802.11n is recommended.
▶ Samsung POWERbot supports only DHCP (Dynamic Host Configuration Protocol). Please make sure that the DHCP server option is activated on your wireless router.
▶ POWERbot supports the WEP-OPEN, WPA-PSK/TKIP, and WPA2-PSK/AES for the authentication and encryption protocols.
\- WPA2-PSK/AES is recommended.
\- Confirm that your router has a unique SSID and password.
▶ The quality of your wireless network connection may be influenced by the surrounding wireless environment.
▶ If your Internet service provider has permanently registered the MAC address (a unique identification number) of your PC or modem, your POWERbot may not be able to connect to the Internet. Ask your Internet service provider about the procedure to connect an apparatus other than a PC to the Internet.
▶ If your internet service provider requires your ID or password to connect to the internet, your POWERbot may not be able to connect. If this is the case, you must enter your ID or password when connecting to the Internet.
▶ The POWERbot may not be able to connect to the Internet because of firewall issues. Contact your Internet service provider to resolve these issues.
▶ Some wireless routers may transmit an abnormal Domain Name Server (DNS) address even if the Internet is not connected. If this occurs, contact the manufacturer of your wireless router and your Internet service provider.
▶ If you still cannot connect to the Internet even after trying the procedure provided by your Internet service provider, please contact an authorized Samsung service center.
▶ If your router is not a Wi-Fi certified product, The POWERbot may not be able to connect to the Internet.
SmartThings App
Downloading the SmartThings App
▶ Download and install the SmartThings app from the markets (Google Play Store, Apple App Store, or Samsung Galaxy Apps). To find the app, use the keyword "SmartThings".

Note
SmartThings is incompatible with tablets and some mobile devices.
\- Android 6.0 or later (at least 2GB of RAM) is recommended.
▶ iPad and some mobile devices may not be supported.
\- iOS 10.0 or later / iPhone 6 or later is supported.
- Visit Play Store or App Store to see if your mobile device is compatible with SmartThings.
▶ The supported features are subject to change without any prior notice.
Setting up a Samsung account
▶ You must sign in to a Samsung account before using the SmartThings app.
▶ To set up a Samsung account, you can follow the directions provided by the SmartThings app.
▶ Or, if you have a Samsung smartphone, you can add your Samsung account in the setting app of your smartphone. Then, it will automatically sign in to your Samsung account.
Adding a device to the SmartThings APP
1. Connect your smartphone to your wireless router.
- If the smartphone is not connected, turn on the Wi-Fi in the Settings App and select a wireless router you want to connect to.
- Disable the "Mobile data" use option of a smartphone to use Wi-Fi only and connect a device.
2. Launch the SmartThings app on your smartphone.
3. If a pop-up saying that a new device has been found appears, tap ADD NOW.
\- If the pop-up doesn't appear, tap the + button and select the device which you want to connect from the list of AVAILABLE DEVICES.
\- If your device doesn't appear in the list, add the device manually by selecting the device type and selecting the specific device model.
4. [Android] The connection to your device will be progressed automatically.
\- [iOS] Open the setting app, and select [robot vacuum] Samsung in the Wi-Fi list.
5. Provide the authentication when you are directed to do so.
6. [Android] The connection to your wireless router will be progressed automatically.
\- [iOS] Open the setting app, and select the wireless router in the Wi-Fi list.
7. The remaining setup will be automatically done. Then, a new Device Card will be added.

Note
▶ If you cannot complete the product registration, please take the following steps.
- Try the registration procedure again as you have directed by the pop-up messages.
- Confirm that the UPnP option of your wireless router is active, and then try the registration procedure again.
- Confirm that your wireless router is operating in wireless mode, and then try the registration procedure again.
- If you have two or more POWERbots, turn off the other POWERbots, and then try to register your POWERbot again.
- If there is any other wireless router that has the same SSID as your wireless router, the registration might be failed.
▶ Remote control and Wi-Fi indicator
On Remote control is blocked. (The remote controller can still be allowed.) 
Off Remote control is allowed. On The POWERbot is connected to the wireless router. Off The POWERbot is trying to connect the wireless router.
- When the remote control is blocked, you cannot control the POWERbot on your smartphone.
▶ The POWERbot and your smartphone are not connected to the same wireless router, a response delay may occur depending on your network environment.
SmartThings App
Software Update
- When the POWERbot is charging on the docking station, the POWERbot connects to the server and then checks if a software is available. If a new software is found, POWERbot will automatically download and update it.
If "UP" is displayed on the display panel while the POWERbot is charging, it means that an update is in progress. Please wait for completing the update before using the POWERbot.
Using the SmartThings APP
\- When you tap the device card on the SmartThings app, the plug-in for your device will be launched.

text_image
ROBOT #2
OFFICE
HELP ⑪
①
②
AUTO
SPOT ④
Fully charged ⑤
Battery ⑥
Suction power Normal ⑦
Repeat ⑧
Schedule ⑨
History ⑩
1. Power (on / off)
2. Directional controls with Manual clean mode (Forward, Left turn, Right turn)
3. Auto clean mode (start /stop)
4. Spot clean mode
5. Current status
6. Battery status
7. Suction power
8. Repeat option (on / off)
9. Schedule (Once / Daily)
- The current time of the device will be synchronized when entering the schedule setting.
- A scheduled cleaning will only be started when the device is charging on the docking station.
10. Cleaning history
11. Settings > Voice Guide
Notes and cautions
Charging

Note
▶ If the battery overheats during charging, it may take longer to charge.
▶ When automatic charging is not working, do the following:
- Turn the emergency switch (on the bottom of POWERbot) off and on again.
- Unplug the docking station's power plug and then plug it back on.
- Unplug the docking station, and then check whether there is any foreign matter on the charge pins and clean POWERbot and the charge pins of the docking station with a dry cloth or rag.
- Check for any obstacles such as reflective objects, chairs, etc. near the docking station.
▶ If POWERbot is left detached from the docking station, the battery will drain naturally.
\- Try to keep POWERbot being charged on the docking station. (However, turn off the emergency switch and leave the docking station unplugged when planning to leave the house for long periods of time by going on a business trip or vacation, etc.)
Using

Note
▶ The POWERbot may get caught on thresholds, etc. during cleaning.
- To restart operation, shut off the emergency switch, move the POWERbot to an area where it can move easily, and then turn on the power again.
▶ The POWERbot cannot completely clean areas it cannot enter, such as corners, between the wall and sofa, etc.
- Please use another cleaning tool to clean them regularly.
▶ The POWERbot cannot vacuum clumps of dirt, so some may remain on the floor after cleaning.
- Please use another cleaning tool to clean them regularly.
▶ If POWERbot is turned off, you cannot turn it on by pressing the Power button on the remote controller. Press and hold the [Start/Stop] button on POWERbot.
▶ You cannot select and have the POWERbot execute Spot clean mode while it is charging.
▶ If you press Manual clean / Point cleaning button while charging, the POWERbot will be detached from the docking station and then turn into the standby mode.
Cleaning and maintenance

Note
▶ If you washed the dustbin and filter with water
- Dustbin: Completely wipe out the water.
- Filter: Completely dry it in the shade before using.
- When cleaning the auto shutter tool, do not pull the auto shutter tool out too hard.

Caution
▶ Watch your fingers when attaching or detaching the filter, since they may get stuck in the dustbin's intake.
▶ To avoid blockages by foreign matter, do not let the POWERbot vacuum up toothpicks, cotton swabs etc.
▶ If it is difficult to remove foreign matter from the brush, contact an authorized Samsung service center.
Notes and cautions
▶ Since the brush removes dirt from the floor during cleaning, foreign matter such as thread, long hair, etc. may get caught in it. For the best cleaning results, check and clean it regularly.
▶ If a brush or brush cover is not assembled correctly after the maintenance work, scratches may occur on the floor, or product malfunction may occur. Therefore, assemble them correctly by checking the maintenance method.
About the battery

Note
▶ Purchase batteries at authorized Samsung centers and check for the symbol (SAMSUNG) stuck on the battery and the model name before purchasing.
This battery is exclusively for the Samsung Electronics POWERbot. Do not use it for any other product.
▶ Do not disassemble or modify the battery.
▶ Do not throw the battery out in fire or heat it.
▶ Do not connect any metallic object to the charging contacts (+, -).
▶ Store the battery indoors (at 0 °C\~40 °C).
▶ If the battery malfunctions, do not disassemble it yourself. Contact your nearest Samsung service center.
- Battery charging time and usage time may decrease the more the battery is used. If the battery’s lifespan has been exceeded and it no longer docking stations properly, have it replaced at a Samsung service center.
▶ The battery warranty period is 6 months from the date of purchase.
About the IrDA sensor

Caution
▶ Infrared signal transmission may not be smooth in locations exposed to halogen lamps or in outdoor locations.
▶ The POWERbot uses 3 types of infrared devices. Each of the devices has a different priority level. A device may not work if it's signal is superseded by a device with a higher priority.
\- Infrared signal Priority: Remote control > Docking station
▶ Different infrared signals may interfere with one another and cause the devices to malfunction if they are used together in a small space or in close proximity.
▶ If more than one POWERbot is used simultaneously, they may malfunction due to interference between infrared signals.
Information codes
1 The three indicators below blink and an information codes alarm sounds.
2 Turn off the emergency switch and check the below instructions and take appropriate action
3 Information code will disappear when you turn on the emergency switch
Information codes animation

flowchart
graph LR
    A["Sensor Input"] --> B["Sensor Output"]
    B --> C["Information Code"]
    C --> D["Data Output"]
    D --> E["Feedback Loop"]
Information codes Checklist


The POWERbot is caught, stuck or trapped while moving around.
▶Turn off the emergency switch and move the POWERbot to another area.
Foreign matter caught in the brush.
▶Turn off the emergency switch and remove the foreign matter from the brush.
Foreign matter caught in the left Driving wheel.
▶Turn off the emergency switch and remove the foreign matter from the Driving wheel.
Foreign matter caught in the right Driving wheel.
▶Turn off the emergency switch and remove the foreign matter from the Driving wheel.
Bumper sensor needs to be checked.
▶Turn off the emergency switch and turn it back on.
▶When information code does not disappear, check if there's any small foreign matter between the bumper and the main body. If there is, pull the bumper slightly and remove the foreign matter.
Foreign matter accumulated on the obstacle sensor.
▶ Turn off the emergency switch and clean the front and rear sensor with a soft cloth.
Foreign matter accumulated on the cliff sensor.
▶Turn off the emergency switch and clean the cliff sensor with a soft cloth.
Main PCB needs to be checked.
▶Turn off and restart the product. If the same problem occurs repeatedly, a service check is required.
Information codes
1 The information code below is shown with an error alarm.
2 Turn off the emergency switch and check the below instructions and take appropriate action
3 Information code will disappear when you turn on the emergency switch
Information codes Checklist

The POWERbot is caught, stuck or trapped while moving around.►Turn off the emergency switch and move the POWERbot to another area. 
Foreign matter caught in the brush.►Turn off the emergency switch and remove the foreign matter from the brush. 
Foreign matter caught in the left Driving wheel.►Turn off the emergency switch and remove the foreign matter from the Driving wheel. 
Foreign matter caught in the right Driving wheel.►Turn off the emergency switch and remove the foreign matter from the Driving wheel. 
Bumper sensor needs to be checked.►Turn off the emergency switch and turn it back on.►When information code does not disappear, check if there's any small foreign matter between the bumper and the main body. If there is, pull the bumper slightly and remove the foreign matter. 
Foreign matter accumulated on the obstacle sensor.►Turn off the emergency switch and clean the front and rear sensor with a soft cloth. 
Foreign matter accumulated on the cliff sensor.►Turn off the emergency switch and clean the cliff sensor with a soft cloth. 
Main PCB needs to be checked.►Turn off and restart the product. If the same problem occurs repeatedly, a service check is required.
Troubleshooting
Symptom Checklist The POWERbot is not working at all. ▶Check if the emergency switch is on.▶Check if all the icons are displayed on the display panel.▶Check if the POWERbot's battery is depleted.- When "Lo" is displayed, place the POWERbot on the docking station to charge it.- When the battery indicator blinks, manually place the POWERbot on the docking station to charge. (Only SR1*M701*** series)▶Replace the batteries (AAA type) if the remote controller is not working. The POWERbot has stopped during cleaning. ▶When "Lo" is displayed on the display panel, place the POWERbot on the docking station to charge it.▶When the battery indicator blinks, manually place the POWERbot on the docking station to charge. (Only SR1*M701*** series)▶When POWERbot is immobilized by an obstacle such as a cord, threshold etc, pick it up and move it away from the obstacle.- If any fabric or string is caught in a drive wheel, turn off the emergency switch and remove the fabric or string before using it again. Suction power is weak. ▶When there's too much dust in the dustbin, suction power may get weakened. Turn off the emergency switch and empty the dustbin.▶If the intake (on bottom of POWERbot) is blocked by foreign matter, turn off the emergency switch and remove foreign matter from the intake.▶When noise suddenly increase, turn off the emergency switch and empty the dustbin. The POWERbot cannot find the docking station. ▶Check if there's a power failure or whether the power plug is unplugged.▶Remove any obstacles around the docking station that may prevent POWERbot from returning to the docking station.▶When there's foreign matter on the charge pins, charging can be affected. Clean the foreign matter off the pins. The POWERbot suddenly cleans diagonally. ▶Check if the docking station is installed along the grain of wooden floors or tiles.▶The POWERbot may clean in a diagonal direction if it is moving to another area using the shortest route. It may also move at a diagonal if it made contact with an obstacles at that angle, if it was charged at the docking station at an angle, or if the grain of the wooden/tile floor skewed is in that direction. Point cleaning is not working. ▶If you point the red light directly at POWERbot, it may not move desired direction.- Point the red light on the floor within 0.5 m of POWERbot.* Do not use point cleaning in direct sunlight, under bright light, or on dark floors.
Troubleshooting
Symptom Checklist I have installed the SmartThings app, but the POWERbot fails to be connected. ►You can use the product after connecting the wireless router and the POWERbot through Easy-Setup according to the procedure. I fail to log into the Samsung account. ►Check your ID and password on the screen of the Samsung account. There appears a message saying there is a failure during Easy-Setup. ►You may have failed temporarily due to the distance from the wireless router or other obstacles. Please try again after a while. The products do not work even though the smartphone is normally connected to the POWERbot. ►Turn off the SmartThings app and then run it again, or disconnect the smartphone from the wireless router and then connect it again. Or turn off the power supply of the POWERbot, turn it on, wait for a minute or longer, and then run the SmartThings app again. The functions of the SmartThings App do not work. ►Check if the remote control blocking function of the POWERbot is set. (When the remote control is locked, the Wi-Fi indicator is turned off.) The SmartThings Robot Vacuum App fails to get started. ►Check if the POWERbot is connected to the wireless router. POWERbot is not connected to Wi-Fi. ►Check the setting status of the wireless router. Intelligent power control function works on a normal floor. ►Check whether the floor is not even and then the POWERbot works with its body a bit lifted up.►Check whether there are any foreign matters on the cliff sensor which is at the bottom of the POWERbot.►Check whether the floor color is dark. Intelligent power control function does not work. ►When the POWERbot cleans a carpet with short fibre and bright color, it may recognize the carpet as a floor and then the Intelligent power control function may not work. Edge clean master function does not work. ►When POWERbot cannot recognize the wall, the Edge clean master may not work.- When an obstacle made of reflective material is in front of the wall- When the wall itself is made of reflective material- When the wall is a dark color Edge clean master function works though there is no wall or corner. ►Check whether small obstacles are arranged in a narrow space.►When the POWERbot recognizes the front obstacle as a wall, Edge clean master function may work. The Edge clean master function works though the POWERbot has not approached a wall or corner. ►When the degree of the angle of a corner which the POWERbot detects is large, the Edge clean master function may work without approaching the wall or corner.
\* Hereby, Samsung Electronics, declares that the radio equipment type appliance is in compliance with Directive 2014/53/EU. The full text of the EU declaration of conformity is available at the following internet address: The official Declaration of conformity may be found at http://www.samsung.com, go to Support > Search Product Support and enter the model name.
Symptom Checklist SmartThings App cannot be installed. ►SmartThings App operates on Android OS 6.0 or later, iOS 10 or later.►The supporting OS version for SmartThings App may change later.►For rooted smart devices, standard installation and use will not be guaranteed. A message of product registration failure appears. ►Try the product registration procedure again by referring to the pop-up messages.►Please refer to the "Setting up the wireless router" in the user manual.►Please refer to the steps for completing the product registration in the user manual section "Adding a device to the SmartThings APP".►When the product registration fails repeatedly, reset the POWERbot and Smartphone, run the SmartThings App again and try the product registration.►The same Samsung account should be used for the login of App and product registration.►All users should use the Samsung account issued by the same country. During product registration, recharging button is pressed and held as instructed but the next step does not appear. ►Press the recharging button until you hear it beep.►If the next step does not appear within several seconds, press the recharging button one more time. During product registration, the wireless router I want to connect cannot be searched. ►Cancel the product registration, run the SmartThings App again, and try the product registration again. During product registration, the AP password 1111122222 is not input correctly. ►Press and hold the "[robot vacuum] Samsung" on the network list and delete the network to initialize the password. During product registration, the password of the connecting wireless router is not input correctly. ►Cancel the product registration, run the SmartThings App again, and try the product registration again.►Press and hold the wireless router you want to connect on the network list, and delete the network to initialize the password. A connection cut between the SmartThings App and the POWERbot occurs though the product registration is completed. ►Refresh the screen and wait.►Run the SmartThings App again.►Check whether there is an internet connection problem. Especially, a firewall may interrupt standard operation.
Troubleshooting
Symptom Checklist A connection cut between the SmartThings App and the POWERbot suddenly occurs during normal operation of the app. ►If the POWERbot is distant from a wireless router, connection cut may occur.►Reset the POWERbot and the smartphone, and check the connection again.►If the connection cut occurs repeatedly, try the product registration again.►When the SSID/password of a wireless router is changed, try the product registration again. Controlling with SmartThings App does not work since the remote control function is disabled. ►Remote control function is disabled status. Make the remote control function enabled status with a remote controller.
Warnings about battery

You must not remove (or attempt to remove) the battery incorporated in this product on your own. To replace the battery, you must contact your service provider or an independent qualified professional. These instructions have been prepared for the exclusive use of your service provider or independent qualified professional.
FOR YOUR OWN SAFETY, DO NOT ATTEMPT TO REMOVE THE BATTERY ON YOUR OWN OR DISPOSE OF IT IN FIRE. DO NOT DISASSEMBLE, CRUSH OR PUNCTURE THE BATTERY.
How to remove the battery
Remove POWERbot from the charger / docking station for disassembling. You must turn off POWERbot for safety before disassembling.

natural_image
Hand using a screwdriver to apply a component on a mechanical part (no text or symbols visible)
1 Lay down and invert POWERbot and then remove 2 screws.

natural_image
Line drawing of a hand inserting a small object into a device panel (no text or symbols)
2 Remove the dustbin cover.

text_image
Diagram showing a device with labeled parts and an inset view of a hand interacting with a component, likely illustrating a mechanical or electrical setup.
3 Remove the battery from the slot and disconnect the connector.

Correct disposal of batteries in this product
(Applicable in countries with separate battery return systems.)
The marking on the battery, manual or packaging indicates that the battery in this product should not be disposed of with other household waste. Where marked, the chemical symbols Hg, Cd or Pb indicate that the battery contains mercury, cadmium or lead above the reference levels in EC Directive 2006/66.
The battery incorporated in this product is not user replaceable. For information on its replacement, please contact your service provider. Do not attempt to remove the battery or dispose it in a fire. Do not disassemble, crush, or puncture the battery. If you intend to discard the product, the waste collection site will take the appropriate measures for the recycling and treatment of the product, including the battery
Open Source Announcement
The software included in this product contains open source software. You may obtain the complete corresponding source code for a period of three years after the last shipment of this product by sending an email to mailto:oss.request@samsung.com.
It is also possible to obtain the complete corresponding source code in a physical medium such as a CD-ROM; a minimal charge will be required.
The following URL http://opensource.samsung.com/opensource/VR7000\_A20\_TZ/seq/0 leads to the download page of the source code made available and open source license information as related to this product. This offer is valid to anyone in receipt of this information.

text_image
QR code image containing encoded data, no visible human-readable text
Specifications
Classification Item Detail information SR1*M701*** SR1*M702***SR1*M703*** Mechanical specifications (POWERbot) Size (D x H x L) 340 mm x 97 mm x 348 mm Weight 4 kg Sensor Ceiling shape recognition (Visionary mapping plus TM) Button type of POWERbot Touch type Power specifications Power voltage 100-240 V~, 50 Hz/60 Hz Power consumption 80 W Battery specifications 21.6 V/ 38.8 Wh Cleaning Charging type Automatic charging/Manual charging Cleaning mode Auto, Spot, Daily schedule Auto, Spot, Repeat, Manual, One-time schedule, Daily schedule Charging time Approximately 240 minutes Cleaning time (On the basis of hard floor) Turbo mode Approximately 30 minutes Normal mode Approximately 60 minutes Wi-Fi Frequency range 2412 - 2472 MHz Transmitter power(Max) 20 dBm
Classification Item Detail information Mechanical specifications (POWERbot) Size (D x H x L) 340 mm x 97 mm x 348 mm Weight 4.3 kg Sensor Ceiling shape recognition (Visionary mapping plus TM) Button type of POWERbot Touch type Power specifications Power voltage 100-240 V~, 50 Hz/60 Hz Power consumption 130 W Battery specifications 21.6 V/ 77.8 Wh Cleaning Charging type Automatic charging/Manual charging Cleaning mode Auto, Spot, Repeat, Manual, One-time schedule, Daily schedule Charging time Approximately 160 minutes Cleaning time (On the basis of hard floor) Turbo mode Approximately 30 minutes Normal mode Approximately 60 minutes Quiet mode Approximately 90 minutes Wi-Fi Frequency range 2412 - 2472 MHz Transmitter power(Max) 20 dBm
\* For product improvement purposes, design and specifications of the product are subject to change without prior notice.
\* Charging and cleaning times may differ according to conditions of use.
If you have any questions or comments relating to Samsung products, please contact the SAMSUNG customer care center.
Country Customer Care Center Web Site SWITZERLAND 0800 726 78 64 (0800-SAMSUNG) www.samsung.com/ch/support (German)www.samsung.com/ch_fr/support (French) AUSTRIA 080 0 72 67 864 (0800-SAMSUNG) www.samsung.com/at/support
POWERbot
Benutzerhandbuch
Serien SR1\*M70\*\*\*\*, SR2\*M70\*\*\*\*
- Lesen Sie die Anweisungen sorgfältig durch, ehe Sie das Gerät in Betrieb nehmen.
- Nur zum Einsatz in geschlossenen Räumen geeignet.

natural_image
Black-and-white photo of a modern lounge chair with leather backrest and metallic armrest, featuring a pair of headphones placed on the backrest (no text or symbols visible)
SAMSUNG
Inhalt
03 Sicherheitsinformationen
08 Installation
Zubehör / Aufstellhinweise
10 Laden
Automatisches Laden / Laden / Niedrige Akkuladung („Lo“)
12 Verwenden des POWERbot
Ein-/Ausschalten / Auswählen des Reinigungsmodus / Verwenden der Spezialsaugfunktionen
15 Aufstellen des Virtual Guard
Übersicht über den Virtual Guard / Einlegen der Batterien
17 Verwenden der Fernbedienung
20 Bezeichnungen der Teile
Oberseite / Unterseite / Display
22 Uhrzeiteinstellung/Programmierung
Einstellen der Uhrzeit / Einstellen eines Programms
25 Reinigung und Pflege
Reinigen des Staubbehälters / Reinigen der Sensoren und der Kamera / Reinigen der Burste und des Auto-Shutters / Reinigen des Antriebsrads
27 SmartThings-App
31 Hinweise und Vorsichtsmaßnahmen
Laden / Betrieb / Reinigung und Pflege /
Informationen zum Akku / Infos zum IrDA-Sensor
33 Informationscodes
35 Fehlerbehebung
39 Warnhinweise zum Akku
Entfernen des Akkus
40 Informationen über Open-Source-Software
41 Technische Daten
Sicherheitsinformationen
SICHERHEITSINFORMATIONEN

\- Lesen Sie vor der Verwendung des Geräts das Benutzerhandbuch sorgfältig durch, und bewahren Sie sie zum späteren Nachschlagen auf.

\- Da die folgenden Hinweise zum Betrieb für verschiedene Modelle gelten, können die Eigenschaften Ihres Geräts leicht von den in dieser Bedienungsanleitung beschriebenen Merkmalen abweichen.
SYMBOLE DER GEFAHREN-/WARNHINWEISE
WARNUNG Dieses Symbol weist darauf hin, dass Lebensgefahr oder das Risiko ernsthafter Verletzungen besteht. VORSICHT Dieses Symbol weist darauf hin, dass die Gefahr von Personen- oder Sachschäden besteht.
WEITERE VERWENDETE SYMBOLE
HINWEIS Dieses Symbol weist darauf hin, dass der folgende Text wichtige Zusatzinformationen enthält.
\- Weitere Informationen zu den Umweltverpflichtungen von Samsung und zu produktspezifischen gesetzlichen Pflichten (z. B. REACH) finden Sie unter: samsung.com/uk/aboutsamsung/samsungelectronics/corporatecitizenship/data\_corner.htm
Sicherheitsinformationen
WICHTIGE SICHERHEITSHINWEISE
Beim Umgang mit Elektrogeräten sind einige grundlegende Vorsichtsmaßnahmen wie u. a. die folgenden zu beachten:
LESEN SIE VOR DER VERWENDUNG IHRES POWERbot SÄMTLICHE ANWEISUNGEN GRÜNDLICH DURCH.
Ziehen Sie den Stecker aus der Dose, wenn Sie das Gerät nicht verwenden und ehe Sie Wartungsarbeiten durchführen.
WARNUNG: So verringern Sie die Gefahr von Verletzungen, Stromschlägen oder Bränden:
ALLGEMEIN
- Verwenden Sie das Gerät nur wie in diesem Handbuch beschrieben.
- Verwenden Sie weder den POWERbot noch die Lade-/Dockingstation, wenn sie beschädigt sind.
- Wenn das Gerät nicht ordnungsgemäß arbeitet, heruntergefallen, beschädigt oder ins Wasser gefallen ist oder im Freien vergessen wurde, schicken Sie es an das nächstgelegene Kundendienstzentrum.
- Berühren Sie die Lade-/Dockingstation und den POWERbot nicht mit nassen Händen.
- Verwenden Sie ihn nur für trockene Flächen in geschlossenen Räumen.
- Dieses Gerät darf von Kindern ab 8 Jahren und Personen mit verminderten körperlichen, sensorischen oder geistigen Fähigkeiten oder einem Mangel an Erfahrung und Wissen nur bedient werden, wenn sie unter Aufsicht stehen oder eine Unterweisung zum sicheren Umgang mit dem Gerät erhalten haben und die damit verbundenen Gefahren verstehen. Kinder dürfen nicht mit dem Gerät spielen. Kinder dürfen bei Reinigung und Wartung nur dann helfen, wenn sie dabei beaufsichtigt werden.
Lade-/Dockingstation
- Modifizieren Sie den gepolten Stecker nicht, um ihn an eine ungepolte Steckdose oder ein ungepoltes Verlängerungskabel anschließen zu können.
- Verwenden Sie das Gerät nicht im Freien oder auf nassen Flächen.
- Ziehen Sie den Stecker der Lade-/Dockingstation aus der Dose, wenn Sie das Gerät nicht verwenden und ehe Sie Wartungsarbeiten durchführen.
- Verwenden Sie nur die vom Hersteller mitgelieferte Lade-/Dockingstation.
- Verwenden Sie niemals beschädigte oder lose Netzkabel, Netzstecker oder Steckdosen.
- Ziehen und tragen Sie das Gerät nicht am Kabel, und verwenden Sie das Kabel nicht als Tragegriff. Ziehen Sie das Kabel auch nicht um scharfe Kanten oder Ecken herum. Halten Sie das Kabel entfernt von beheizten Oberflächen.
- Verwenden Sie keine Verlängerungskabel oder Steckdosen mit unzureichender Leistung.
- Ziehen Sie nicht am Netzkabel, wenn Sie den Stecker aus der Dose ziehen. Ziehen Sie den Stecker stets am Stecker selbst und nicht am Kabel heraus.
- Beschädigen und verbrennen Sie die Batterien nicht, da sie bei hohen Temperaturen explodieren.
- Versuchen Sie keinesfalls, die Lade-/Dockingstation zu öffnen. Reparaturen dürfen nur von einem qualifizierten Kundendienstzentrum durchgeführt werden.
- Setzen Sie die Lade-/Dockingstation keinen hohen Temperaturen aus, und lassen Sie weder Feuchtigkeit noch Nässe in irgendeiner Form in Kontakt mit der Lade-/Dockingstation kommen.
POWERbot
- Saugen Sie keine harten oder scharfen Gegenstände wie Glas, Nägel, Schrauben, Münzen usw. auf.
- Verwenden Sie das Gerät niemals ohne Filter. Führen Sie bei der Wartung und Pflege des Geräts niemals Ihre Finger oder andere Gegenstände in die Lüfterkammer ein, da sich das Gerät möglicherweise ungewollt einschalten könnte.
- Stecken Sie keine Objekte in die Öffnungen des Geräts. Verwenden Sie das Gerät nicht mit versperrten Öffnungen. Halten Sie Öffnungen frei von Staub, Fusseln, Haaren und anderen Stoffen, die die Luftströmung behindern könnten.
- Saugen Sie keine toxischen Stoffe (Chlorbleiche, Ammoniak, Abflussreiniger usw.) auf.
- Saugen Sie nichts auf, was brennt oder Rauch erzeugt (z. B. Zigaretten, Streichhölzer oder heiße Asche).
- Verwenden Sie das Gerät nicht, um leicht entzündliche oder brennbare Flüssigkeiten wie Benzin aufzusaugen und setzen Sie es nicht an Stellen ein, wo solche Stoffe vorhanden sein könnten.
- Räume mit Kerzen oder Schreibtischlampen auf dem Boden.
- Räume mit unbeaufsichtigtem Feuer (Feuer oder Glut).
- Räume, in denen sich Benzin, Alkohol, Verdünner, Aschenbecher mit brennenden Zigaretten usw. befinden.
- Verwenden Sie den POWERbot nicht in geschlossenen Räumen, wenn die Luft darin Dämpfe von lösungsmittelhaltigen Farben, Lackverdünnern, Mottenschutzmitteln, brennbaren Stäuben oder andere explosive bzw. toxische Dämpfe enthält.
- Die Akkus können bei extremen Einsatz- oder Temperaturbedingungen auslaufen. Wenn diese Flüssigkeit auf die Haut gelangt, waschen Sie sie schnell mit Wasser ab. Wenn die Flüssigkeit in die Augen gelangt, spülen Sie sie sofort und mindestens 10 Minuten lang mit sauberem Wasser aus. Suchen Sie medizinische Hilfe auf.
Sicherheitsinformationen

WARNUNG
Hinweise zur Stromversorgung
▶ Beugen Sie der Gefahr eines Stromschlags oder Brands vor.
- Beschädigen Sie nicht das Netzkabel.
- Ziehen Sie niemals am Kabel, um den Netzstecker aus der Steckdose zu ziehen, und berühren Sie den Netzstecker nicht mit nassen Händen.
- Schließen Sie das Gerät ausschließlich an eine eigens dafür bestimmte Steckdose mit 100 - 240 VAC und niemals an eine Steckerleiste an, die für weitere Geräte verwendet wird. (Lassen Sie das Kabel nicht ungeschützt auf dem Boden herumliegen.)
- Verwenden Sie keine beschädigten oder losen Netzstecker, Netzkabel und Steckdosen.
▶ Entfernen Sie Staub und sonstige Fremdpartikel vom Ladestift und den Kontakten des Netzsteckers.
\- Andernfalls besteht die Gefahr eines Stromschlags oder einer Fehlfunktion.

WARNUNG Vor der Verwendung
▶ Verwenden Sie POWERbot nicht in der Nähe von Heizgeräten oder brennbaren Materialien.
- Verwenden Sie POWERbot nicht in der Nähe von Zündquellen und offenen Flammen (z. B. tragbare Heizkörper, Kerzen, Schreibtischlampen, Kamine usw.) oder an Stellen, an denen brennbare Materialien wie Benzin, Alkohol, Verdünner usw. vorhanden sind.
Um Kollisionen zu vermeiden, stellen Sie bitte sicher, dass sich im Reinigungsbereich des POWERbot keine gefährlichen Gegenstände befinden, und trennen Sie elektrische Heizgeräte und Ventilatoren vom Netz.
Der POWERbot ist für den Gebrauch im Haushalt bestimmt. Verwenden Sie ihn deshalb nicht zur Reinigung von Kellern, Dachböden, Lagerräumen, industriell genutzten Gebäuden, Flächen im Außenbereich oder in feuchten Umgebungen (z. B. Badezimmer, Waschküche), auf Tischen oder Regalen.
- Andernfalls könnten Schäden oder Fehlfunktion am POWERbot die Folge sein.
▶ Stellen Sie sicher, dass der POWERbot nicht durch Flüssigkeiten jeglicher Art fährt oder in sonstiger Weise mit ihnen in Kontakt kommt.
- Der POWERbot kann schwer beschädigt werden und andere Flächen verschmutzen, wenn die Räder durch Flüssigkeiten fahren.
▶ Schütten Sie keine Flüssigkeiten auf die Dockingstation.
- Es besteht die Gefahr von Stromschlägen oder Bränden.
▶ Verwenden Sie die Dockingstation ausschließlich zum dafür vorgesehenen Zweck.
- Andernfalls besteht die Gefahr von Bränden oder schweren Schäden an der Dockingstation.
▶ Halten Sie den Höhensensor zu Ihrer eigenen Sicherheit stets sauber.

WARNUNG Im Betrieb
▶ Wenn der POWERbot ungewöhnliche Geräusche, Gerüche oder Rauch entwickelt, schalten Sie den POWERbot unverzüglich mit dem Notschalter an der Geräteunterseite aus und wenden Sie sich an ein Kundendienstzentrum.

WARNUNG Reinigung und Pflege
Wenden Sie sich bei einem beschädigten Netzkabel an ein Kundendienstzentrum, um es von einer qualifizierten Fachkraft austauschen zu lassen.
- Es besteht die Gefahr von Stromschlägen oder Bränden.
Wenden Sie sich für einen Austausch der Akkus an ein Kundendienstzentrum von Samsung Electronics.
- Die Verwendung von Akkus aus anderen Geräten kann zu Fehlfunktionen führen.

VORSICHT Vor der Verwendung
▶ Setzen Sie vor Verwendung des POWERbot den Staubbehälter ein.
▶ Beachten Sie für eine ordnungsgemäße Durchführung des automatischen Ladevorgangs die folgenden Hinweise.
- Die Dockingstation muss stets eingeschaltet sein.
- Stellen Sie die Dockingstation an einer Stelle auf, die vom POWERbot leicht gefunden und angesteuert werden kann.
- Beseitigen Sie alle Hindernisse vor der Dockingstation.
▶ Achten Sie beim Aufstellen der Dockingstation darauf, dass das Kabel nicht ungeschützt auf dem Boden herumliegt, da sich der POWERbot darin verfangen könnte.
▶ Verwenden Sie den POWERbot nicht auf schwarzen Böden.
\- In diesem Fall funktioniert der POWERbot möglicherweise nicht ordnungsgemäß.
▶ Entfernen Sie in einem Bereich von 0,5 m zu beiden Seiten bzw. von 1 m vor der Dockingstation alle Gegenstände.
▶ Stellen Sie sicher, dass die Ladestifte der Dockingstation nicht beschädigt sind oder sich Fremdstoffe darauf befinden.
▶ Stellen Sie die Dockingstation nicht auf einem dunklen Untergrund auf.
\- Ein zu dunkler Untergrund um die Dockingstation erschwert möglicherweise den Ladevorgang des POWERbot.
▶ Entfernen Sie vor der Verwendung alle Gegenstände, die die Bewegung des POWERbot behindern könnten (wie z. B. Kinder-Schaukeln oder -Rutschen für den Innenbereich).
▶ Verwenden Sie den POWERbot nicht in Bereichen, die schmaler sind als der Wenderadius des POWERbot (0,5 m oder schmaler) sind.
▶ Wenn eine Bürste oder eine Bürstenabdeckung nicht ordnungsgemäß montiert ist, kann es zu Kratzern auf dem Boden oder zu einer Produktstörung kommen.
▶ Ehe Sie den POWERbot einschalten, beseitigen Sie Objekte wie Rahmen, Spiegel und Porzellangegenstände, die zerbrechen könnten, damit der POWERbot ohne Unterbrechung arbeiten kann.

VORSICHT
Im Betrieb
▶ Verwenden Sie den POWERbot nicht auf dicken Teppichböden, da andernfalls Schäden sowohl am POWERbot als auch am Teppich die Folge sein können.
\- Der POWERbot ist nicht für die Reinigung von Teppichen mit einer Dicke von mehr als 1 cm geeignet.
▶ Verwenden Sie den POWERbot nicht auf Tischen oder an anderen erhöhten Stellen.
\- Er könnte beschädigt werden, wenn er herunterfällt.
▶ Der POWERbot könnte beim Reinigen gegen Stuhl- und Tischbeine fahren. Räumen Sie Stühle und Tische deshalb für eine schnelle und wirksame Reinigung stets beiseite.
▶ Heben Sie den laufenden POWERbot nicht an und tragen Sie ihn nicht in einen anderen Raum.
▶ Fassen Sie den POWERbot beim Transportieren nicht an den Antriebsrädern.
▶ Stellen oder legen Sie keine Gegenstände auf den POWERbot oder die Kamera, da andernfalls Fehlfunktionen die Folge sein können.
▶ Entfernen Sie bei Verwendung des POWERbot stets evtl. herumliegende Papier- oder Kunststofftüten, da diese den Lufteinlass des Geräts blockieren könnten.
\- Richten Sie den roten Pointer niemals direkt auf Personen oder Tiere.
▶ Legen Sie sich nicht auf den Boden, während der POWERbot in Betrieb ist.
\- Ihre Haare könnten sich in der Bürste verfangen, was zu Verletzungen führen könnte.

VORSICHT
Reinigung und Pflege
▶ Befolgen Sie die folgenden Hinweise, um Schäden am POWERbot zu vermeiden.
\- Sprühen Sie zum Reinigen kein Wasser direkt auf den POWERbot. Verwenden Sie niemals Waschbenzin, Verdünner oder Alkohol, um das Gerät zu reinigen.
▶ Demontieren und reparieren Sie den POWERbot nicht selbst. Diese Arbeiten dürfen nur von einer qualifizierten Fachkraft durchgeführt werden.
▶ Halten Sie den Hindernissensor, den Höhensensor und die Kamera stets sauber.
\- Wenn sich Fremdstoffe auf den Sensoren ansammeln, funktionieren sie möglicherweise nicht mehr ordnungsgemäß.
Installation
Die Dockingstation muss stets an die Steckdose angeschlossen und eingeschaltet sein.

text_image
Stellen Sie die Dockingstation an einem Ort ohne Hindernisse und Absturzgefahr auf.
Ca. 1 m
Ca. 0,5 m
Ca. 0,5 m
DC-IN
1 Verbinden Sie den Stecker des Netzteils mit der Dockingstation
2 Verbinden Sie das Netzkabel mit der Ladestation.
Verwenden Sie das Netzteil stets so, dass der Aufkleber nach unten weist.
3 Verbinden Sie den Netzstecker mit der Steckdose.
Zubehör
oder
Fernbedienung (optional erhältlich)
Batterien (Typ AAA) (optional erhältlich)
Benutzerhandbuch Ersatzfilter
(optional erhältlich)
Dockingstation Netzkabel Akkuladegerät Virtual Guard
(optional erhältlich)
\* Die Saugaufsätze können sich je nach Modell unterscheiden.
\* Batterie-Spezifikationen
Serie SR1\*M70\*\*\*\* : Lithium-Ionen-Akku 21,6 V, 1800 mAh, 6 Zellen
Serie SR2\*M70\*\*\*\* : Lithium-Ionen-Akku 21,6 V, 3600 mAh, 12 Zellen
Hinweis
▶ Stellen Sie die Dockingstation in einem Raum mit ebenem Untergrund und geraden Wänden auf.
▶ Stellen Sie die Dockingstation bei Holzfußböden am besten in Richtung der Maserung des Holzes auf.
▶ Wenn sich der Notschalter in der Aus-Position befindet, wird der POWERbot auch dann nicht geladen, wenn er an die Dockingstation angedockt ist.
▶ Die Dockingstation muss stets eingeschaltet sein.
- Wenn die Dockingstation nicht eingeschaltet oder die Stromversorgung unterbrochen ist, kann der POWERbot die Dockingstation nicht ansteuern und wird nicht automatisch geladen.
- Der Akku entlädt sich langsam von selbst, sobald der POWERbot von der Dockingstation getrennt wird.
▶ Wenn sich der POWERbot im Energiesparmodus befindet, wird er nicht wieder aktiviert, selbst wenn er mit dem Notschalter aus- und dann wieder eingeschaltet wird. Halten Sie die Taste [Start/Stop] am POWERbot gedrückt, um den Energiesparmodus zu deaktivieren.
Laden
Wenn Sie den POWERbot zum ersten Mal (nach dem Kauf) vollständig aufgeladen haben, kann er 60 min lang im Modus Normal (Verwendet werden. (Benötigte Ladezeit: siehe S. 41.)
Intelligentes Laden
Wenn der POWERbot im Modus „Automatische Reinigung“ beinahe entladen ist, kehrt er zum Aufladen automatisch zur Dockingstation zurück und nimmt die Reinigung der begonnenen Fläche wieder auf, sobald der Akku wieder zu zwei Dritteln geladen ist. (Höchstens zweimal).

text_image
WARNING
• Die Nennspannung dieses
Geräts beträgt 100-
240 V~.

text_image
1/0 ←(ON)
←(OFF)
1/0
1/5

natural_image
Line drawing of a toilet with hands holding the lid (no text or symbols)

text_image
1 Stellen Sie den Notschalter an der Geräteunterseite auf die Ein-Position.
Sie müssen den Notschalter auf die Ein-Position stellen, um den POWERbot einschalten zu können.
Drücken Sie die Taste und lassen Sie sie wieder los.
2 Laden Sie den POWERbot manuell, indem Sie ihn in die Dockingstation stellen.
Stellen Sie sicher, dass die Ladestifte von POWERbot und Dockingstation zueinander ausgerichtet sind.
3 Überprüfen Sie den Ladestatus.
Bei den Serien SR1\*M701\*\*\* blinkt die Akkuanzeige während des Ladens in Intervallen von 1 Sekunde. Wenn der Akku vollständig geladen ist, verbleibt die Anzeige im Status EIN. Bei den Serien SR1\*M702\*\*\* / SR1\*M703\*\*\* / SR2\*M70\*\*\*\* wird je nach dem Fortschritt des Ladevorgangs „“ angezeigt. Wenn der Ladevorgang abgeschlossen ist, wird „VOLL“ angezeigt.

natural_image
Abstract geometric shape with a diagonal line crossing through it, no text or symbols present
Automatisches Laden

text_image
Diagram showing two labeled components (① and ②) with arrows pointing to a device, likely illustrating a process or assembly.
1. Serie SR1\*M701\*\*\*
Wenn die Akkuanzeige in Intervallen von 0,4 Sekunden blinkt, kehrt der POWERbot automatisch zur Dockingstation zurück, um geladen zu werden.
2. Serien SR1\*M70\*\*\*\* / SR2\*M70\*\*\*\* Series
Wenn die Akkuanzeige beim Reinigen blinkt, kehrt der POWERbot zur Dockingstation zurück, um sich automatisch aufzuladen.
Laden

natural_image
Simple line icon of a house with a battery inside, no text or symbols present
Sie können den POWERbot so einstellen, dass er beim Saugen automatisch die Dockingstation anfährt.
Niedrige Akkuladung („Lo“)

natural_image
Line drawing of a hand holding a small appliance on a tiled floor (no text or symbols)
Sie können den POWERbot manuell laden, indem Sie ihn auf die Dockingstation stellen.
Wenn der Ladevorgang nicht ordnungsgemäß durchgeführt wird:
Überprüfen Sie die Aufstellung der Dockingstation und kontrollieren Sie, ob:
▶ die Dockingstation an einer Stelle aufgestellt wurde, die der POWERbot nicht leicht anfahren kann.
▶ die Entfernung zwischen Dockingstation und POWERbot mehr als 5 m beträgt.
\- Es kann länger dauern, bis der POWERbot den Rückweg zur Dockingstation findet, um die Batterien aufzuladen.
Laden Sie den POWERbot manuell, wenn:
▶ sich die Dockingstation in einer Ecke befindet.
▶ der Akku vollkommen entladen ist
▶ der POWERbot von einem Hindernis (Möbelstück o. ä.) blockiert wird.
▶ sich vor der Dockingstation eine Schwelle befindet, die der POWERbot nicht überwinden kann. (Der POWERbot kann maximal Schwellen mit einer Höhe von ca. 1,5 cm überwinden.)
▶ die Akkuanzeige blinkt und im Display die Meldung „Lo“ angezeigt wird.
▶ die Akkuanzeige blinkt (Gilt für Serie SR1\*M701\*\*\* )
▶ der POWERbot auf „Punktsaugen“ oder „Handsaugen“ eingestellt ist.
Verwenden des POWERbot
Sie müssen den Notschalter auf die Ein-Position stellen, ehe Sie den POWERbot verwenden.
Ein-/Ausschalten
Halten Sie die Taste länger als 3 Sekunden lang gedrückt.

\- Wenn der POWERbot 30 min lang nicht verwendet wird, geschieht Folgendes: Serien SR1\*M70\*\*U\* / SR2\*M70\*\*U\*: Er wechselt in den Energiesparmodus. Serien SR1\*M70\*\*W\* / SR2\*M70\*\*W\*: Er kehrt automatisch zur Dockingstation zurück, um geladen zu werden.
Automatikbetrieb
Drücken Sie diese Taste. Der POWERbot fährt die eingestellten Bereiche nur einmal zur Reinigung ab.

\* Saugvorgang anhalten: Drücken Sie die Taste
Punktsaugen
Der POWERbot führt eine intensive Reinigung einer abgegrenzten Fläche durch.

Laden
Durch Drücken dieser Taste können Sie den POWERbot so einstellen, dass er während des Reinigungsvorgangs automatisch die Dockingstation ansteuert.

Auswählen des Reinigungsmodus
Reinigungsmodus So wählen Sie ihn aus Angezeigtes Symbol SR1*M702***SR1*M703***SR2*M70**** SR1*M701*** Automatische Reinigung Punktsaugen 
Wiederholte Reinigung * Drücken Sie auf der Fernbedienungzunächst [A,B type 1, [C,D type 2 und anschließend [Start/Stop 3] 
- Handsaugen * Der Modus für Handsaugen kann mit Hilfe der Richtungstasten auf der Fernbedienung ausgewählt werden. 
-
\* Wenn der POWERbot nicht zur Dockingstation zurückgelangt, wechselt er in den Energiesparmodus, und das Display wird deaktiviert.
\* Wenn Sie den Energiesparmodus beenden möchten, drücken Sie die Taste [Start/Stop] bzw. [Ein/Aus I am Gehäuse oder auf der Fernbedienung.
\* Wenn im Modus „Automatische Reinigung“ der Reinigungsvorgang innerhalb von 15 min abgeschlossen ist, wiederholt der POWERbot diesen noch einmal.

natural_image
Grid pattern with horizontal lines and a small 3D icon at the bottom-left corner (no text or symbols)
Verwenden des POWERbot
Saugbewegungen in den einzelnen Modi

natural_image
Simple line drawing of three parallel horizontal bars with a small icon at the bottom (no text or symbols)
Automatische Reinigung
Eingestellte Bereiche werden nur einmal gereinigt.
\* Serie SR1\*M701\*\*\*; Reinigt solange, bis der Akku leer ist.

text_image
Ca. 1,5 m
Ca. 1,5 m
Punktsaugen
Reinigt eine abgegrenzte Fläche intensiv. Dieser Modus kann verwendet werden, um z. B. Brot- oder Kekskrümel aufzusaugen.

natural_image
Line drawing of a hand holding a remote control with a device on top (no text or symbols)
Handsaugen
Sie können den POWERbot mit der Fernbedienung zu einem bestimmten Bereich fahren, damit dieser gereinigt wird.
\* Diese Funktion steht bei der Serie SR1\*M701\*\*\* nicht zur Verfügung.

natural_image
Abstract geometric pattern with intersecting lines and a small 3D cube at the bottom (no text or symbols)
Wiederholte Reinigung
Reinigt solange, bis der Akku leer ist.
\* Diese Funktion steht bei der Serie SR1\*M701\*\*\*
nicht zur Verfügung.

Hinweis
▶ Wenn die Automatische Reinigung oder die Wiederholte Reinigung gestartet wird, reinigt der POWERbot zunächst den Bereich in der Nähe der Dockingstation.
Verwenden der Spezialsaugfunktionen
Saugfunktion Betrieb Angezeigtes Symbol SR1*M702***SR1*M703***SR2*M70**** SR1*M701*** Intelligente Leistungssteuerung * Wenn der POWERbot im Normalen Modus einen Teppich erkennt, erhöht er automatisch die Saugleistung. 
Masterfunktion „Kantensaugen“ * Wenn der POWERbot im Modus „Automatische Reinigung“ oder „Punktsaugen“ eine Kante oder Ecke erkennt, wird der Auto-Shutter aktiviert und das Gerät nähert sich zum Reinigen dem Kanten- oder Eckbereich.► Gerade Kante (Einmalige Reinigung)► Ecke (Zweifache Reinigung) 
Aufstellen des Virtual Guard
Der Virtual Guard verhindert mit Hilfe von Infrarotstrahlen, dass der POWERbot bestimmte Flächen abfährt.
\* (Nur bei Serie SR2\*M707\*\*\* im Lieferumfang enthalten) Für die Serien SR2\*M704\*\*\* / SR2\*M705\*\*\* / SR2\*M706\*\*\* muss er hinzugekauft werden.)

text_image
Die Länge der vom Virtual Guard erzeugten virtuellen Wand beträgt mindestens 2,5 m. Die tatsächliche Länge ist abhängig von den Umgebungsbedingungen und der Bewegung des POWERbot.
Virtual Guard
Mindestens 2,5 m
1 Drücken Sie die Taste „Ein/Aus“, um das Gerät einzuschalten.
Die Netzanzeige blinkt rot.

natural_image
Simple line drawing of a mechanical component with a downward arrow indicating force or direction (no text or symbols)
2 Stellen Sie den Virtual Guard an einer Stelle auf, die der POWERbot nicht passieren soll.
Stellen Sie sicher, dass der Entfernungssensor in die Richtung zeigt, in der Sie die unsichtbare Barriere errichten wollen (diese Linie kann der POWERbot nicht passieren).
Aufstellen des Virtual Guard
Übersicht über den Virtual Guard

text_image
Ein/Aus-Schalter
Netzlampe
Einschalten: Lampe blinkt rot
Ausschalten: Lampe erlischt
Abstandserkennungssensor des POWERbot
Entfernungssensor (Infrarotsensor)
Akkuabdeckung
Einlegen der Batterien
Batterien für den Virtual Guard müssen separat erworben werden.

natural_image
Illustration of a hand using a tool to adjust or install a cylindrical container with an arrow indicating motion (no text or symbols present)
1 Ziehen Sie die Abdeckung des Akkufachs zum Öffnen bei gedrückter Verriegelung nach oben.

natural_image
Diagram of a battery pack with two batteries and internal components, showing no text or symbols
2 Setzen Sie wie in der Abbildung gezeigt Alkaline-Batterien vom Typ D ein, und achten Sie dabei auf die richtige Polung (+,-).

natural_image
Illustration of a hand inserting a battery into a cylindrical device (no text or symbols)
3 Schieben Sie die Lasche der Abdeckung in die dafür vorgesehene Öffnung, und drücken Sie das andere Ende nach unten, um die Akkufachabdeckung zu schließen.
Verwenden der Fernbedienung
(Modell A) (Modell B)

text_image
1
3
1, 2
5
Spot Repeat Sound
4
2
Schedule Clock
Schedule Cancel(Dec)
Siehe Seite
22
SAMSUNG

text_image
1
3
1, 2
5
Spot Repeat Sound
4
2
Schedule Clock
Schedule Cancel (Dsec)
SAMSUNG
Siehe Seite
22
[Typ C] [Typ D]

text_image
1
3
1, 2
5
Point Cleaning
6
2
4
4
Spot
Repeat
Sound
Schedule
Clock
Remote
Cancel(3sec)
Siehe Seite
23
SAMSUNG

text_image
1
3
1, 2
5
Point Cleaning
6
2
4
4
SAMSUNG
Spot
Repeat
Sound
Schedule
Clock
Remote
Cancel(3sec)
Siehe Seite
23
Verwenden der Fernbedienung
☐ [Typ A] / ☐ [Typ B] / [Typ C] / [Typ D]
1 Ein/Aus / Laden / Start/Stop
Ein/Aus 


Hiermit schalten Sie den POWERbot ein/aus. Laden 


Hiermit kehrt der POWERbot automatisch zum Laden an die Dockingstation zurück. Start/Stop 


Hiermit starten bzw. beenden Sie den Saugvorgang.
2 Reinigungsmodi
Automatische Reinigung 


Hiermit werden alle eingestellten Bereiche nur einmal gereinigt, bevor das Gerät zur Dockingstation zurückkehrt. Punktsaugen 


Hiermit wird ein abgegrenzter Bereich intensiv gereinigt. Wiederholte Reinigung 


Hiermit wird die Reinigung so lange wiederholt, bis der Akku fast entladen ist und die Anzeige blinkt.
3 Saugleistung
Turbomodus 


Hiermit wird der Reinigungsvorgang mit maximaler Saugleistung durchgeführt. Normaler Modus 


Hiermit wird der Reinigungsvorgang mit moderater Saugleistung durchgeführt. Flüsterbetrieb 


Hiermit wird der Reinigungsvorgang mit einem besonders geringeren Geräuschpegel durchgeführt.
4 Zusatzfunktionen
Ton 


Mit dieser Taste können Sie die Soundeffekte des Geräts aktivieren oder deaktivieren (Soundeffekte → Stumm). Fernsteuerung 


Hiermit schalten Sie die Wi-Fi-Funktion ein oder aus
\* Die zuvor ausgewählte Einstellung wird auch dann nicht geändert, wenn der Notschalter in die Aus- und dann wieder in die Ein-Position geschoben wird.
5 Modus „Handsaugen“ und Richtungssteuerung
Geradeaus fahren 

Hiermit fährt das Gerät geradeaus Links abbiegen [Z0H2] [ZC04] 
Hiermit biegt das Gerät nach links ab Rechts abbiegen [08K4] 
Hiermit biegt das Gerät nach rechts ab
\* Eine Funktion zum Rückwärtsfahren gibt es nicht.
6 Lichtgeführtes Saugen
Nur bei Fernbedienungen der Typen C und D verfügbar.
Während der POWERbot arbeitet, können Sie mit der Fernbedienung auf eine Stelle zeigen, die er anfahren und reinigen soll.
Zeigen Sie mit dem roten Licht in einem Bereich von 0,5 m um den POWERbot auf den Boden.
Halten Sie die Taste „Lichtgeführtes Saugen“ gedrückt, und bewegen Sie das rote Licht an die gewünschte Stelle. Der POWERbot folgt beim Reinigen dem Licht.

text_image
0.5 m
Bedienungsabstand der Fernbedienung

text_image
Höhe der
Fernbedienung
Bedienungsabstand
Höhe der Fernbedienung 0,5 m 1 m 1,5 m Bedienungsabstand ca. 1,5 m ca. 2 m ca. 3 m
Einlegen der Batterien
Zum Öffnen ziehen Sie die Abdeckung des Akkufachs bei gedrückter Verriegelung nach oben. Legen Sie dann die Akkus ein (siehe Abbildung). Schließen Sie dann die Abdeckung, bis sie hörbar einrastet.

text_image
Diagram illustrating the step-by-step assembly of a battery pack with labeled components and mechanisms.
Bezeichnungen der Teile

text_image
6
5
3
7
8
2
1
4
2

text_image
4
2
3
4
5
10
7
1
4
8
6
9
5

text_image
1
2
3
4
5
6
(3sec)
(3sec)
Oberseite
1. Display
2. Signalempfänger für die Fernbedienung
3. Hindernissensor
4. Staubbehälter
5. Kamera
6. Taste für den Staubbehälter
7. Stoßstangensensor
8. Auto-Shutter
Unterseite
1. Ladestifte
2. Bürste
3. Bürstenabdeckung
4. Höhensensor
5. Rolle
6. Akkuabdeckung
7. Taste für die Bürstenabdeckung
8. Antriebsrad
9. Notschalter
10. Auto-Shutter
Display
1. Tagesprogramm
2. Normaler Modus/Turbomodus
3. Akkuanzeige
4. Taste „Punktsaugen“, Tagesprogramm (3 s)
5. Taste „Start/Stop“, Turbomodus (3 s)
6. Taste „Laden“

text_image
1
2
6
13
00:00 AM
PM
11 28 109
3
4
5
7
15
14

text_image
1
2
6
14
3
4
5
7
12 38 11 109
15
16
1. Stumm
2. Informationsanzeige
3. \*Ein/Aus-Anzeige der Fernsteuerung
4. \*Wi-Fi
5. Akkuanzeige
6. Einmal-/Tagesprogramm
7. Ziffernanzeige
8. Punktsaugen
9. Handsaugen
10. Modus „Wiederholte Reinigung“
11. Normaler Modus
12. Turbomodus
13. Taste „Punktsaugen“
14. Taste „Start/Stop“
15. Taste „Laden“
1. Stumm
2. Informationsanzeige
3. \*Ein/Aus-Anzeige der Fernsteuerung
4. \*Wi-Fi
5. Akkuanzeige
6. Einmal-/Tagesprogramm
7. Ziffernanzeige
8. Punktsaugen
9. Handsaugen
10. Modus „Wiederholte Reinigung“
11. Flüsterbetrieb
12. Normaler Modus
13. Turbomodus
14. Taste „Punktsaugen“
15. Taste „Start/Stop“
16. Taste „Laden“
\* SR1\*M70\*\*W\* / SR2\*M70\*\*W\*: Wi-Fi-unterstütztes Modell
Uhrzeiteinstellung/Programmierung
[Typ A, Typ B] Nur Modus „Automatische Reinigung“ kann programmiert werden.
Einstellen der Uhrzeit
Sie müssen die aktuelle Uhrzeit einstellen, ehe Sie das Einmal-/Tagesprogramm verwenden können.

flowchart
graph LR
    A["Start-Einstellung Stellen Sie die Stunde ein"] --> B["Stellen Sie die Minuten ein"]
    B --> C["Wählen Sie zwischen „AM“ und „PM“Einstellung beender"]
    C --> D["Wechseln Sie zur vorherigen/nachsten Einstellung."]
Einstellen eines Programms
Sie können das Programm nur einstellen/abbrechen, solange der POWERbot an der Dockingstation angedockt ist.

flowchart
graph LR
    A["Start-Einstellung"] --> B["Wählen Sie „Einmalprogramm“ oder „Tagesprogramm“"]
    B --> C["Stellen Sie die Stunde ein"]
    C --> D["Einstellung beenden"]
    D --> E["Wählen Sie zwischen „AM“ und „PM“"]
    E --> F["Stellen Sie die Minuten ein"]
    F --> G["Wechseln Sie zur vorherigen/nächsten Einstellung."]
Abbrechen des Einstellvorgangs
▶ Die Einstellungen werden automatisch abgebrochen, wenn 7 Sekunden lang keine Eingabe vorgenommen wird.
Abbrechen eines Einmal-/Tagesprogramms
Wenn sowohl ein Einmal- als auch ein Tagesprogramm eingestellt ist  ScheduleCancel (3sec)3 Sekunden lang drücken
→  oder
oder  ScheduleCancel (3sec)Wählen Sie das Programm Abbrechvorgang beendet
→  oder
oder  ScheduleCancel (3sec)
Wenn entweder ein Einmal- oder ein Tagesprogramm eingestellt ist ScheduleCancel (3sec)3 Sekunden lang drücken
[Typ C, Typ D] Nur Modus „Automatische Reinigung“ kann programmiert werden.
Einstellen der Uhrzeit
Sie müssen die aktuelle Uhrzeit einstellen, ehe Sie das Einmal-/Tagesprogramm verwenden können.

flowchart
graph LR
    A["Start-Einstellung Stellen Sie die Stunde ein"] --> B["Stellen Sie die Minuten ein"]
    B --> C["Wählen Sie zwischen „AM“ und „PM“Einstellung beender"]
    C --> D["Wechseln Sie zur vorherigen/nachsten Einstellung."]
Einstellen eines Programms
Sie können das Programm nur einstellen/abbrechen, solange der POWERbot an der Dockingstation angedockt ist.

flowchart
graph LR
    A["Schedule\nCancel (3sec)\nStart-Einstellung"] --> B["Wählen Sie\n„Einmalprogramm“ oder\n„Tagesprogramm“"]
    B --> C["Stellen Sie die\nStunde ein"]
    C --> D["Stellen Sie die\nMinuten ein\nWechseln Sie zur vorherigen/nächsten Einstellung."]
    D --> E["Einstellung beenden"]
    E --> F["Wählen Sie zwischen „AM“\nund „PM“"]
    F --> G["Stellen Sie zwischen „AM“\nund „PM“"]
    G --> H["Stellen Sie zwischen „AM“\nund „PM“"]
    H --> I["Stellen Sie zwischen „AM“\nund „PM“"]
Abbrechen des Einstellvorgangs
▶ Die Einstellungen werden automatisch abgebrochen, wenn 7 Sekunden lang keine Eingabe vorgenommen wird.
Abbrechen eines Einmal-/Tagesprogramms
Wenn sowohl ein Einmal- als auch ein Tagesprogramm eingestellt ist  3 Sekunden lang drücken
 oder
oder 
→ 

Wählen Sie das Programm Abbrechvorgang beendet Wenn entweder ein Einmal- oder ein Tagesprogramm eingestellt ist ScheduleCancel (3sec)3 Sekunden lang drücken
Uhrzeiteinstellung/Programmierung
[Serien SR1\*M701\*\*\*] Modelle, die nicht mit einer Fernbedienung ausgestattet sind, können wie unten angegeben programmiert werden.
Einstellen eines Programms
Sie können das Programm nur einstellen/abbrechen, solange der POWERbot an der Dockingstation angedockt ist.

3 Sekunden lang drücken


Wenn die LED-Anzeige für das
Programm leuchtet, ist das
Tagesprogramm eingestellt.
\* Die Zeit, die Sie per Knopfdruck eingeben, wird als Programm eingestellt. Die Reinigung wird jeden Tag automatisch entsprechend der programmierten Zeit ausgeführt.
Tagesprogramm verwerfen
Wenn ein Tagesprogramm eingestellt ist  3 Sekunden lang drücken
Reinigung und Pflege
Sie müssen den Notschalter auf die Aus-Position stellen, ehe Sie den POWERbot reinigen.
Reinigen des Staubbehälters

text_image
①
②
PUSH
1 Drücken Sie die Taste, um den Staubbehälter herauszunehmen

text_image
Diagram showing two labeled parts of a mechanical device with directional arrows indicating movement or force.
2 Nehmen Sie den Deckel des Staubbehälters ab.

natural_image
Illustration of hands pouring granular material into a trash bin (no text or symbols)
3 Entfernen Sie den Staub aus dem Staubbehälter und dem Zyklonfilter.

text_image
Illustration showing two open containers with labeled steps and a sunlit sink, illustrating a process for cleaning or cooling.
4 Trennen Sie den Zyklonfilter vom Deckel des Staubbehälters, und waschen Sie dann den Staubbehälter sowie den Filter aus.

text_image
Diagram illustrating three steps of installing a device into a box, with numbered instructions and visual icons.
5 Setzen Sie den Staubbehälter wieder zusammen.

text_image
"Klick"
6 Schieben Sie den Staubbehälter wieder in das Gehäuse des Geräts, sodass er hörbar einrastet.
Reinigen der Sensoren und der Kamera
Leicht mit einem weichen Tuch abwischen. Kein Wasser oder Reinigungsmittel verwenden.

text_image
Kamera
Fenster des vorderen Sensors
Höhensensoren
Fenster des hinteren Sensors
Reinigung und Pflege
Reinigen der Bürste und des Auto-Shutters
Das Aussehen der Bürste kann sich je nach Modell unterscheiden. Reinigen Sie die Bürste nicht mit Wasser.

text_image
Diagram showing a device with labeled parts and a circular annotation indicating a step 1 pointing to a component.
1 Entfernen Sie die Bürstenabdeckung

natural_image
Illustration of a hand holding a tool inside a device casing, with an arrow indicating direction (no text or symbols present)
2 Entfernen Sie die Bürste.

natural_image
Illustration of a welding torch tool interacting with a welded joint (no text or symbols present)
3 Reinigen Sie die Bürste.

text_image
Diagram showing three-step steps of a tool application: cutting, holding a pen, and writing on paper.
4 Reinigen Sie den Auto-shutter

text_image
Diagram showing hands holding a pen with a numbered label (1) pointing to the pen tip, likely illustrating a mechanical or electrical component.
5 Setzen Sie die Bürste wieder ein.

text_image
Diagram showing a hand holding a device with labeled parts and directional arrows indicating process steps

text_image
Diagram illustrating car gear shift and disassembly steps with labeled arrows and a magnified detail view
6 Setzen Sie die Bürstenabdeckung wieder ein.

text_image
Diagram showing hands operating a device with labeled components and a magnified view of a component with a downward arrow.
Reinigen des Antriebsrads

natural_image
Illustration of hands holding a device casing with internal components (no text or symbols visible)
1 Legen Sie ein weiches Tuch auf den Boden, und legen Sie den POWERbot mit der Unterseite nach oben darauf.


natural_image
Hand using a tool to lift a tire on a surface (no text or symbols visible)
2 Verwenden Sie einen stumpfen Stab oder eine Pinzette, um etwaige Fremdkörper zu entfernen.
SmartThings-App
Die SmartThings-App ist nur mit Modellen kompatibel, die über eine Wi-Fi-Funktion verfügen.
Einrichten des Drahtlosrouters
▶ Bei Zugangsproblemen schlagen Sie bitte im Benutzerhandbuch des jeweiligen Drahtlosrouters nach.
▶ Der Samsung POWERbot unterstützt ausschließlich das Wi-Fi-Frequenzband mit 2,4 Ghz.
Samsung POWERbot unterstützt IEEE 802.11b/g/n und Soft-AP.
\- IEEE 802.11n wird empfohlen.
Samsung POWERbot unterstützt ausschließlich DHCP (Dynamic Host Configuration Protocol). Bitte stellen Sie sicher, dass die Option „DHCP Server“ auf Ihrem Drahtlosrouter aktiviert ist.
▶ POWERbot unterstützt als Authentifizierungs- und Verschlüsselungsprotokolle WEP-OPEN, WPA-PSK/TKIP und WPA2-PSK/AES.
- Wir empfehlen die Verwendung von WPA2-PSK/AES.
- Vergewissern Sie sich, dass Ihr Router über eine eindeutige SSID und ein Passwort verfügt.
▶ Die Qualität Ihres Drahtlosnetzwerks kann durch die Drahtlosumgebung beeinflusst werden.
▶ Wenn die MAC-Adresse (eine eindeutige Identifikationsnummer) Ihres PCs oder Modems von Ihrem Internetdienstanbieter permanent registriert wird, kann der POWERbot möglicherweise keine Verbindung zum Internet herstellen. Fragen Sie Ihren Internetdienstanbieter nach der richtigen Vorgehensweise, um andere Geräte als einen Computer mit dem Internet zu verbinden.
▶ Wenn Ihr Internetdienstanbieter für die Verbindung mit dem Internet eine ID und ein Kennwort benötigt, können Sie den POWERbot möglicherweise nicht mit dem Internet verbinden. In diesem Fall müssen Sie die ID und das Kennwort für die Verbindung zum Internet eingeben.
Möglicherweise können Sie den POWERbot auch wegen Problemen mit einer Firewall nicht mit dem Internet verbinden. Bitten Sie Ihren Internetdienstanbieter, Ihnen bei der Lösung des Problems behilflich zu sein.
▶ Einige Drahtlosrouter übertragen möglicherweise auch dann eine ungewöhnliche Adresse des Domain Name Servers (DNS), wenn keine Verbindung zum Internet besteht. Wenden Sie sich in diesem Fall an den Hersteller Ihres Drahtlosrouters oder an Ihren Internetdienstanbieter.
▶ Wenn Sie auch dann keine Verbindung zum Internet herstellen können, nachdem Sie die vom Internetdienstanbieter vorgeschlagenen Schritte durchgeführt haben, wenden Sie sich bitte an ein Kundendienstzentrum von Samsung.
▶ Wenn Ihr Router kein Wi-Fi-zertifiziertes Produkt ist, kann der POWERbot möglicherweise keine Verbindung zum Internet herstellen.
SmartThings-App
Herunterladen der SmartThings-App
\- Sie können die SmartThings-App von einer der üblichen Websites für Apps (Google Play Store, Apple App Store oder Samsung Galaxy Apps) herunterladen und installieren. Suchen Sie mit Hilfe des Schlagworts „SmartThings“ nach der App.

Hinweis
▶ SmartThings ist mit Tablets und bestimmten Mobilgeräten nicht kompatibel.
- Android 6.0 oder höher (mindestens 2 GB RAM) wird empfohlen.
▶ iPads und bestimmte andere Mobilgeräte werden möglicherweise nicht unterstützt.
- iOS 10.0 oder höher / iPhone 6 oder besser werden unterstützt.
▶ Besuchen Sie den Play Store oder den App Store, um zu sehen, ob Ihr Mobilgerät mit SmartThings kompatibel ist.
▶ Die unterstützten Funktionen können sich ohne vorherige Ankündigung ändern.
Einrichten eines Samsung-Kontos
▶ Sie müssen sich bei einem Samsung-Konto anmelden, ehe Sie die SmartThings-App verwenden.
Um ein Samsung-Konto einzurichten, befolgen Sie bitte die Anweisungen in der SmartThings-App.
▶ Wenn Sie über ein Samsung-Smartphone verfügen, können Sie ein Samsung-Konto alternativ auch über die Einstellungen Ihres Smartphones hinzufügen. Dann meldet es sich automatisch bei Ihrem Samsung-Konto an.
Hinzufügen eines Geräts zur SmartThings-App
1. Verbinden Sie Ihr Smartphone mit Ihrem Drahtlosrouter.
- Wenn das Smartphone nicht verbunden ist, aktivieren Sie in den Einstellungen das WLAN und wählen Sie einen WLAN-Router aus, mit dem Sie eine Verbindung herstellen möchten.
- Deaktivieren Sie die Option „Mobile Daten“ des Smartphones, um nur WLAN zu verwenden und ein Gerät zu verbinden.
2. Starten Sie die SmartThings-App auf Ihrem Smartphone.
3. Wenn ein Popup mit der Nachricht eingeblendet wird, dass ein neues Gerät gefunden wurde, tippen Sie auf ADD NOW.
- Wird kein Popup angezeigt, tippen Sie auf die Taste „+“ und wählen Sie aus der Liste AVAILABLE DEVICES das Gerät aus, mit dem Sie sich verbinden möchten.
- Wenn Ihr Gerät nicht in der Liste der verfügbaren Geräte aufgeführt wird, fügen Sie das Gerät manuell hinzu. Wählen Sie dazu zunächst den Gerätetyp und anschließend das genaue Modell des Geräts aus.
4. [Android] Die Verbindung mit Ihrem Gerät wird automatisch aufgebaut.
\- [IOS] Öffnen Sie die Einstellungen und wählen Sie in der Wi-Fi-Liste [robot vacuum] Samsung.
5. Geben Sie auf Aufforderung die Authentifizierung ein.
6. [Android] Die Verbindung mit Ihrem Drahtlosrouter wird automatisch aufgebaut.
\- [IOS] Öffnen Sie die Einstellungen und wählen Sie in der Wi-Fi-Liste den Drahtlosrouter aus.
7. Das Setup wird dann automatisch zu Ende geführt. Anschließend wird eine neue Device Card hinzugefügt.

Hinweis
▶ Gehen Sie folgendermaßen vor, wenn Sie die Produktregistrierung nicht abschließen können.
- Wiederholen Sie die Registrierung entsprechend den Anweisungen in den Popups.
- Stellen Sie sicher, dass die UPnP-Option des Drahtlosrouters aktiviert ist, und wiederholen Sie das Registrierungsverfahren.
- Vergewissern Sie sich, dass Ihr Drahtlosrouter im Drahtlosmodus arbeitet und wiederholen Sie danach die Registrierung.
- Wenn Sie zwei oder mehr POWERbots besitzen, schalten Sie zuerst alle anderen POWERbots aus und versuchen Sie dann erneut, Ihren POWERbot zu registrieren.
- Die Registrierung kann fehlschlagen, wenn es einen anderen Drahtlosrouter mit der gleichen SSID wie Ihr Drahtlosrouter gibt.
▶ Fernsteuerung und Wi-Fi-Anzeige
Ein Die Fernsteuerung ist gesperrt. (Die Fernbedienung kann noch einsatzbereit sein.) 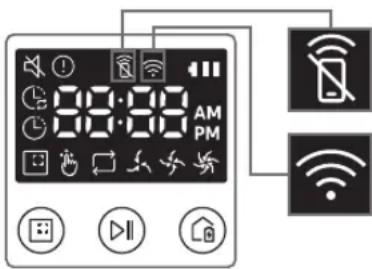
Aus Die Fernsteuerung ist einsatzbereit. Ein Der POWERbot ist mit dem Drahtlosrouter verbunden. Aus Der POWERbot versucht, eine Verbindung zum Drahtlosrouter herzustellen.
▶ Wenn die Fernsteuerung gesperrt ist, können Sie den POWERbot nicht mit Ihrem Smartphone steuern.
▶ Wenn der POWERbot und Ihr Smartphone nicht mit dem gleichen Drahtlosrouter verbunden sind, kann es je nach Netzwerkumgebung zu Reaktionsverzögerungen kommen.
SmartThings-App
Software-Aktualisierung
▶ Wenn POWERbot sich in der Dockingstation befindet und geladen wird, stellt er automatisch eine Verbindung zum Server her und überprüft, ob eine Software verfügbar ist. Wenn eine neue Software gefunden wird, lädt der POWERbot sie automatisch herunter und wird aktualisiert.
▶ Während eines Ladevorgangs bedeutet die Meldung „UP“ im Display, dass gerade ein Update für die Software des POWERbot installiert wird. Warten Sie, bis das Update abgeschlossen ist, ehe Sie den POWERbot wieder verwenden.
Verwenden der SmartThings-App
▶ Wenn Sie auf die Gerätekarte in der SmartThings-App tippen, wird das Plugin für Ihr Gerät gestartet.

text_image
ROBOT #2
OFFICE
HELP ⑪
①
②
AUTO
SPOT ④
Fully charged ⑤
Battery ⑥
Suction power
Normal ⑦
Repeat ⑧
Schedule ⑨
History ⑩
1. Ein/Aus
2. Richtungssteuerung beim manuellen Saugen (Vorwärts, Linkslauf, Rechtslauf)
3. Aktivieren/Deaktivieren der automatischen Reinigung
4. Punktsaugen
5. Aktueller Gerätestatus
6. Batteriestatus
7. Saugleistung
8. Wiederholte Reinigung ein/aus
9. Programm (einmal/täglich)
- Die aktuelle Uhrzeit des Geräts wird bei Eingabe der Programmeinstellung synchronisiert.
- Die Saugprogramme werden nur dann gestartet, wenn das Gerät in der Dockingstation geladen wird.
10. Reinigungsverlaufs
11. Einstellungen > Sprachführung
Hinweise und Vorsichtsmaßnahmen
Laden

Hinweis
▶ Wenn der Akku während des Ladevorgangs überhitzt, dauert das Laden möglicherweise länger.
▶ Wenn das automatische Laden nicht funktioniert, gehen Sie wie folgt vor:
- Schalten Sie den Notschalter (auf der Unterseite des POWERbot) aus und wieder ein.
- Ziehen Sie den Netzstecker der Dockingstation aus der Steckdose und schließen Sie ihn dann wieder an.
- Ziehen Sie den Netzstecker der Dockingstation aus der Steckdose und prüfen Sie, ob Fremdstoffe an den Ladestiften anhaften. Reinigen Sie den POWERbot und die Ladestifte der Dockingstation mit einem trockenen Tuch oder Lappen.
- Kontrollieren Sie die nähere Umgebung der Dockingstation auf Hindernisse (z. B. reflektierende Objekte, Stühle usw.).
▶ Der Akku entlädt sich langsam von selbst, sobald der POWERbot von der Dockingstation getrennt wird.
\- Entfernen Sie den POWERbot möglichst nicht von der Dockingstation, während er geladen wird. (Stellen Sie jedoch den Notschalter auf die Aus-Position und trennen Sie die Dockingstation vom Stromnetz, wenn Sie vorhaben, das Haus für längere Zeit zu verlassen, weil Sie beispielsweise auf eine Geschäftsreise oder in Urlaub gehen.)
Betrieb

Hinweis
▶ Der POWERbot kann beim Reinigen an Schwellen usw. stecken bleiben.
- Um den Betrieb wieder aufzunehmen, stellen Sie den Notschalter auf die Aus-Position, bringen Sie den POWERbot in einen Bereich, wo er sich leicht bewegen kann, und schalten Sie ihn dann wieder ein.
▶ Der POWERbot kann Stellen, die für ihn unerreichbar sind (z. B. Ecken oder den Raum zwischen Wand und Sofa usw.), nicht reinigen.
- Verwenden Sie ein anderes Reinigungsgerät, um diese Stellen regelmäßig zu reinigen.
▶ Der POWERbot kann keine Schmutzklumpen vom Boden aufsaugen, so dass sich auch nach der Reinigung noch Reste davon auf dem Boden befinden können.
- Verwenden Sie ein anderes Reinigungsgerät, um diese Stellen regelmäßig zu reinigen.
▶ Wenn der POWERbot ausgeschaltet ist, kann er mit der Ein-/Aus-Taste der Fernbedienung nicht eingeschaltet werden. Halten Sie die Taste [Start/Stop] des POWERbot gedrückt.
▶ Sie können den Modus „Punktsaugen“ weder einstellen noch ausführen, solange der POWERbot geladen wird.
- Wenn Sie während des Ladevorgangs die Taste „Handsaugen / Lichtgeführtes Saugen“ drücken, verlässt der POWERbot die Dockingstation und wechselt in den Standby-Modus.
Reinigung und Pflege

Hinweis
▶ Nach dem Reinigen von Staubbehälter und Filter mit Wasser
- Staubbehälter: Wischen Sie das Wasser vollständig aus dem Behälter.
- Filter: Lassen Sie ihn vor der Verwendung gründlich an einer schattigen Stelle trocknen.
▶ Ziehen Sie den Auto-Shutter nicht mit zu viel Kraft heraus, wenn Sie ihn reinigen möchten.

Vorsicht
▶ Achten Sie beim Einsetzen und Entnehmen des Filters auf Ihre Finger, da sie im Einlass des Staubbehälters stecken bleiben können.
Hinweise und Vorsichtsmaßnahmen
- Um Verstopfungen durch Fremdstoffe zu vermeiden, achten Sie darauf, dass der POWERbot keine Zahnstocher, Wattestäbchen usw. aufsaugt.
Wenden Sie sich an ein autorisiertes Samsung-Kundendienstzentrum, wenn Sie Probleme haben, Fremdstoffe aus der Bürste zu entfernen.
▶ Da die Bürste beim Reinigen Schmutz vom Boden entfernt, können sich darin Fremdstoffe wie Fäden, lange Haare usw. verfangen. Reinigen Sie sie für beste Saugergebnisse regelmäßig.
- Wenn eine Bürste oder eine Bürstenabdeckung nach den Pflegearbeiten nicht ordnungsgemäß montiert ist, kann es zu Kratzern auf dem Boden oder zu einer Produktstörung kommen. Setzen Sie sie deshalb richtig zusammen. Beziehen Sie sich dabei auf die jeweilige Wartungsmethode.
Informationen zum Akku

Hinweis
▶ Erwerben Sie Akkus nur in zugelassenen Samsung-Kundendienstzentren und kontrollieren Sie vor dem Kauf, ob das Symbol (SAMSUNG) kku aufgeklebt und im Modellnamen enthalten ist.
▶ Dieser Akku ist ausschließlich für den Samsung Electronics POWERbot bestimmt. Verwenden Sie sie nicht für andere Produkte.
▶ Sie dürfen den Akku keinesfalls zerlegen oder in sonstiger Weise modifizieren.
▶ Werfen Sie den Akku nicht ins Feuer, und erhitzen Sie ihn nicht.
▶ Verbinden Sie die Ladekontakte (+, -) mit keinerlei metallischen Objekten.
▶ Bewahren Sie den Akku ausschließlich in Innenräumen (bei 0 °C bis 40 °C) auf.
- Wenn der Akku nicht ordnungsgemäß zu funktionieren scheint, versuchen Sie niemals, ihn eigenständig zu zerlegen. Wenden Sie sich an das nächstgelegene Samsung-Kundendienstzentrum.
▶ Die Ladezeit und die Betriebszeit des Akkus können sich im Laufe der Nutzung verschlechtern. Wenn die Nutzungsdauer des Akkus überschritten ist, lassen Sie ihn im Samsung-Kundendienstzentrum ersetzen.
▶ Die Garantiezeit für den Akku beträgt 6 Monate ab dem Kaufdatum.
Infos zum IrDA-Sensor

Vorsicht
▶ Die Übertragung der Infrarotsignale erfolgt möglicherweise im Freien oder an solchen Stellen nicht störungsfrei, wo Halogenlampen eingesetzt werden.
▶ Der POWERbot verwendet 3 Arten von Infrarot-Geräten. Jedes der Geräte besitzt eine andere Priorität. Möglicherweise funktioniert eines der Geräte nicht, wenn sein Signal durch ein Gerät mit höherer Priorität überlagert wird.
\- Priorität der Infrarotsignale: Fernsteuerung > Dockingstation
▶ Verschiedene Infrarotsignale können einander stören und zu Fehlfunktionen der Geräte führen, wenn sie zusammen in einem kleinen Raum oder in geringem Abstand verwendet werden.
- Wenn Sie mehrere POWERbots gleichzeitig verwenden, kann es aufgrund von Interferenzen der Infrarotsignale zu Störungen kommen.
Informationscodes
1 Die drei unten angegebenen Anzeigen blinken bei gleichzeitigem Fehleralarm.
2 Stellen Sie den Notschalter auf die Aus-Position, kontrollieren Sie die folgenden Punkte und ergreifen Sie dann entsprechende Gegenmaßnahmen.
3 Der Informationscode wird gelöscht, wenn Sie den Notschalter wieder in die Ein-Position stellen.
Animation für Informationscodes

flowchart
graph LR
    A["Input Image"] --> B["Input Image"]
    B --> C["Information Code"]
    C --> D["Output Image"]
    D --> E["Output Image"]
Informationscodes Checkliste 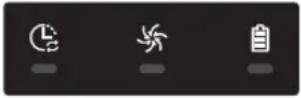
Der POWERbot hat sich beim Fahren verfangen, verklemmt oder hängt fest.► Schieben Sie den Notschalter in die Aus-Position und tragen Sie den POWERbot in einen anderen Bereich. 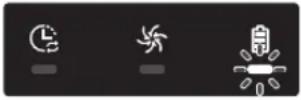
Fremdkörper in der Bürste.► Stellen Sie den Notschalter auf die Aus-Position, und entfernen Sie die Fremdstoffe von der Bürste. 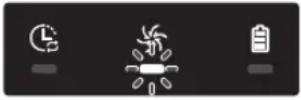
Fremdkörper im linken Antriebsrad.► Stellen Sie den Notschalter auf die Aus-Position, und entfernen Sie die Fremdkörper vom Antriebsrad. 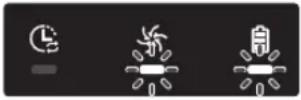
Fremdkörper im rechten Antriebsrad.► Stellen Sie den Notschalter auf die Aus-Position, und entfernen Sie die Fremdkörper vom Antriebsrad. 
Der Stoßstangensensor muss überprüft werden.► Schalten Sie den Notschalter aus und wieder ein.► Wenn der Informationscode nicht erlischt, überprüfen Sie den Raum zwischen Stoßstange und Saugschlitten auf kleine Fremdkörper. Wenn sich Fremdkörper angesammelt haben, ziehen Sie die Stoßstange leicht nach vorne und entfernen Sie die Fremdkörper. 
Fremdkörper auf dem Hindernissensor angesammelt.► Stellen Sie den Notschalter auf die Aus-Position, und reinigen Sie den vorderen und hinteren Sensor mit einem weichen Tuch. 
Fremdkörper auf dem Höhensensor angesammelt.► Stellen Sie den Notschalter auf die Aus-Position, und reinigen Sie den Höhensensor mit einem weichen Tuch. 
Die Hauptplatine muss überprüft werden.► Ausschalten und Neustarten des Gerätes. Wenn das gleiche Problem wiederholt auftritt, ist eine Serviceprüfung erforderlich.
Informationscodes
1 Der unten angegebene Informationscode wird zusammen mit einem Fehleralarm angezeigt.
2 Stellen Sie den Notschalter auf die Aus-Position, kontrollieren Sie die folgenden Punkte und ergreifen Sie dann entsprechende Gegenmaßnahmen.
3 Der Informationscode wird gelöscht, wenn Sie den Notschalter wieder in die Ein-Position stellen.
Informationscodes Checkliste

Der POWERbot hat sich beim Fahren verfangen, verklemmt oder hängt fest.► Schieben Sie den Notschalter in die Aus-Position und tragen Sie den POWERbot in einen anderen Bereich. 
Fremdkörper in der Bürste.► Stellen Sie den Notschalter auf die Aus-Position, und entfernen Sie die Fremdstoffe von der Bürste. 
Fremdkörper im linken Antriebsrad.► Stellen Sie den Notschalter auf die Aus-Position, und entfernen Sie die Fremdkörper vom Antriebsrad. 
Fremdkörper im rechten Antriebsrad.► Stellen Sie den Notschalter auf die Aus-Position, und entfernen Sie die Fremdkörper vom Antriebsrad. 
Der Stoßstangensensor muss überprüft werden.► Schalten Sie den Notschalter aus und wieder ein.► Wenn der Informationscode nicht erlischt, überprüfen Sie den Raum zwischen Stoßstange und Saugschlitten auf kleine Fremdkörper. Wenn sich Fremdkörper angesammelt haben, ziehen Sie die Stoßstange leicht nach vorne und entfernen Sie die Fremdkörper. 
Fremdkörper auf dem Hindernissensor angesammelt.► Stellen Sie den Notschalter auf die Aus-Position, und reinigen Sie den vorderen und hinteren Sensor mit einem weichen Tuch. 
Fremdkörper auf dem Höhensensor angesammelt.► Stellen Sie den Notschalter auf die Aus-Position, und reinigen Sie den Höhensensor mit einem weichen Tuch. 
Die Hauptplatine muss überprüft werden.► Ausschalten und Neustarten des Gerätes. Wenn das gleiche Problem wiederholt auftritt, ist eine Serviceprüfung erforderlich.
Fehlerbehebung
Symptom Checkliste Der POWERbot funktioniert überhaupt nicht. ► Kontrollieren Sie, ob der Notschalter in der Ein-Position steht.► Überprüfen Sie, ob im Display alle Symbole angezeigt werden.► Überprüfen Sie, ob der Akku des POWERbot leer ist.- Wenn „Lo“ angezeigt wird, setzen Sie den POWERbot auf die Dockingstation, damit die Batterie aufgeladen wird.- Wenn die Akkuanzeige blinkt, setzen Sie den POWERbot zum Aufladen per Hand auf die Dockingstation. (Nur Serie SR1*M701***)► Ersetzen Sie die Batterien (Typ AAA), wenn die Fernbedienung nicht funktioniert. Der POWERbot hält beim Reinigen an. ► Wenn im Display „Lo“ angezeigt wird, setzen Sie den POWERbot auf die Dockingstation, damit der Akku aufgeladen wird.► Wenn die Akkuanzeige blinkt, setzen Sie den POWERbot zum Aufladen per Hand auf die Dockingstation. (Nur Serie SR1*M701***)► Wenn der POWERbot durch Hindernisse wie Kabel, Schwellen usw. blockiert wird, heben sie ihn an und bewegen Sie ihn vom Hindernis fort.- Wenn sich Stoffe oder Schnüre einem der Antriebsräder verfangen, stellen Sie den Notschalter auf die Aus-Position, und entfernen Sie die Stoffe oder Schnüre, ehe Sie das Gerät wieder verwenden. Schwache Saugleistung. ► Wenn sich zu viel Staub im Staubbehälter befindet, verringert sich möglicherweise die Saugleistung. Stellen Sie den Notschalter auf die Aus-Position, und leeren Sie den Staubbehälter.► Wenn die Ansaugöffnung (auf der Unterseite des POWERbot) durch Fremdkörper verstopft ist, stellen Sie den Notschalter auf die Aus-Position und entfernen Sie die Fremdkörper aus dem Einlass.► Wenn das Geräusch plötzlich zunimmt, stellen Sie den Notschalter auf die Aus-Position und leeren Sie den Staubbehälter. Der POWERbot kann die Dockingstation nicht finden. ► Prüfen Sie, ob ein Stromausfall vorliegt und ob das Netzkabel angeschlossen ist.► Entfernen Sie eventuelle Hindernisse in der Nähe der Dockingstation, durch die die Rückfahrt des POWERbot zur Dockingstation gestört werden kann.► Wenn sich Fremdstoffe auf den Ladestiften befinden, kann der Ladevorgag gestört werden. Befreien Sie die Ladestifte von den Fremdstoffen. Der POWERbot fährt beim Reinigen plötzlich diagonal. ► Überprüfen Sie, ob die Dockingstation entlang der Maserung von Holzböden oder Fliesen aufgestellt ist.► Der POWERbot fährt beim Reinigen möglicherweise diagonal, weil er den kürzesten Weg zu einem anderen Bereich nimmt. Weitere mögliche Gründe für eine diagonale Bewegung sind der Kontakt mit Hindernissen, das Laden an einer schräg aufgestellten Dockingstation oder eine diagonal zur Dockingstation verlaufende Maserung des Holz-/Fliesenbodens. Lichtgeführtes Saugen funktioniert nicht. ► Wenn Sie das rote Licht direkt auf den POWERbot richten, kann es passieren, dass er sich nicht in die gewünschte Richtung bewegt.- Zeigen Sie mit dem roten Licht in einem Bereich von 0,5 m um den POWERbot auf den Boden.* Nutzen Sie die Funktion „Punktsaugen“ nicht in direktem Sonnenlicht, bei hellem Licht oder auf dunklen Böden.
Fehlerbehebung
Symptom Checkliste Ich habe die SmartThings-App installiert, es wird jedoch keine Verbindung zum POWERbot hergestellt. ► Sie können das Gerät erst nutzen, nachdem Sie den POWERbot mit Hilfe des Easy-Setup-Verfahrens mit dem Drahtlosrouter verbunden haben. Ich kann mich nicht bei meinem Samsung-Konto anmelden. ► Überprüfen Sie im Bildschirm für das Samsung-Konto Ihre Angaben zu ID und Kennwort. Das Easy-Setup-Verfahren kann nicht durchgeführt werden, und es erscheint eine entsprechende Meldung. ► Dieses Problem ist möglicherweise nur vorübergehend und auf etwaige Hindernisse oder eine zu große Entfernung zum Drahtlosrouter zurückzuführen. Bitten versuchen Sie es nach einiger Zeit erneut. Die Geräte funktionieren nicht, obwohl das Smartphone ordnungsgemäß mit dem POWERbot verbunden ist. ► Schließen Sie die SmartThings-App und starten Sie sie dann neu, oder trennen Sie die Verbindung zwischen Smartphone und Drahtlosrouter und verbinden Sie die Geräte anschließend erneut. Alternativ können Sie den POWERbot aus- und dann wieder einschalten und mindestens eine Minute warten, bevor Sie die SmartThings-App erneut ausführen. Die Funktionen der SmartThings-App werden nicht ordnungsgemäß ausgeführt. ► Überprüfen Sie, ob die Sperre der Fernsteuerung am POWERbot aktiviert ist. (Bei gesperrter Fernsteuerung leuchtet die Wi-Fi-Anzeige nicht.) Die SmartThings Robot Vacuum-App wird nicht gestartet. ► Überprüfen Sie, ob der POWERbot mit dem Drahtlosrouter verbunden ist. Es besteht keine Wi-Fi-Verbindung zum POWERbot. ► Überprüfen Sie die Einstellungen des Drahtlosrouters. Die Funktion „Intelligente Leistungssteuerung“ ist auf einem normalen Fußboden aktiv. ► Überprüfen Sie, ob der Boden uneben ist und ob der POWERbot funktioniert, wenn Sie ihn ein wenig am Gehäuse anheben.► Überprüfen Sie, ob sich auf dem Höhensensor an der Unterseite des POWERbot Fremdstoffe befinden.► Überprüfen Sie, ob die Farbe des Fußbodens zu dunkel ist. Die Funktion „Intelligente Leistungssteuerung“ ist nicht aktiv. ► Wenn der POWERbot zum Reinigen eines Teppichs mit kurzen Fasern und heller Farbe verwendet wird, erkennt er unter Umständen den Teppich als unbedeckten Fußboden. In diesem Fall wird die Funktion „Intelligente Leistungssteuerung“ möglicherweise nicht aktiviert. Die Masterfunktion „Kantensaugen“ ist gestört. ► Wenn der POWERbot die Wand nicht erkennen kann, kann die Masterfunktion möglicherweise nicht verwendet werden.- Wenn sich ein Hindernis aus reflektierendem Material vor der Wand befindet.- Wenn die Wand selbst aus reflektierendem Material besteht.- Wenn die Wand von dunkler Farbe ist. Die Masterfunktion „Kantensaugen“ ist aktiv, obwohl keine Wand oder Ecke in der Nähe ist. ► Überprüfen Sie, ob kleine Hindernisse auf engem Raum angeordnet sind.► Wenn der POWERbot das vorderste Hindernis als Wand erkennt, kann hierdurch die Masterfunktion „Kantensaugen“ aktiviert worden sein. Die Masterfunktion „Kantensaugen“ ist aktiv, obwohl der POWERbot sich nicht auf eine Wand oder Ecke zu bewegt hat. ► Wenn der Winkel von Ecken, die der POWERbot erkennt, groß ist, kann es zur Aktivierung der Masterfunktion „Kantensaugen“ kommen, auch ohne dass sich das Gerät einer Wand oder Ecke nähert.
\* Samsung Electronics erklärt hiermit, dass diese Vorrichtung vom Gerätetyp Funkgerät der Richtlinie 2014/53/EU entspricht. Der gesamte Text der EU-Konformitätserklärung ist unter der folgenden Internetadresse verfügbar: Die offizielle Konformitätserklärung ist unter http://www.samsung.com zu finden. Gehen Sie zu Support > Produktsupport durchsuchen und geben Sie den Modellnamen ein.
Symptom Checkliste SmartThings-App kann nicht installiert werden. ► SmartThings-App arbeitet unter Android ab Version 6.0 und iOS ab Version 10.► Die unterstützten OS-Versionen für die SmartThings-App können sich später ändern.► Für generische Smart-Geräte werden standardmäßige Installation und Nutzung nicht garantiert. Es wird eine Meldung zum Produktregistrierungsfehler angezeigt. ► Wiederholen Sie die Produktregistrierung und beachten Sie dabei die Popup-Meldungen.► Schlagen Sie in der Bedienungsanleitung unter „Einrichten des WLAN-Routers“ nach.► Führen Sie die Arbeitsschritte zum Ausfüllen der Produktregistrierung aus dem Abschnitt „Hinzufügen eines Geräts zur SmartThings-APP“ des Benutzerhandbuchs durch.► Wenn die Produktregistrierung wiederholt fehlschlägt, setzen Sie den POWERbot und das Smartphone zurück, starten Sie die SmartThings-App erneut und wiederholen Sie die Produktregistrierung noch einmal.► Verwenden Sie für die Anmeldung der App und zur Produktregistrierung das gleiche Samsung-Konto.► Alle Benutzer müssen das von demselben Land ausgestellte Samsung-Konto verwenden. Während der Produktregistrierung wird die Ladetaste gedrückt und wie angewiesen gehalten, aber der nächste Schritt wird nicht ausgelöst. ► Drücken Sie die Ladetaste solange, bis Sie einen Signalton hören.► Wenn der nächste Schritt nicht innerhalb von einigen Sekunden ausgelöst wird, drücken Sie die Ladetaste noch einmal. Bei der Produktregistrierung kann der gesuchte Drahtlos-Router nicht gefunden werden. ► Beenden Sie die Produktregistrierung, führen Sie die SmartThings-App erneut aus und wiederholen Sie die Produktregistrierung noch einmal. Bei der Produktregistrierung wird das Kennwort 1111122222 des Zugangspunkts nicht richtig eingegeben. ► Halten Sie in der Netzwerkliste den Eintrag „[robot vacuum] Samsung“ gedrückt und löschen Sie das Netzwerk, um das Kennwort zu initialisieren. Bei der Produktregistrierung wird das Kennwort des angeschlossenen Darhtlos-Routers nicht richtig eingegeben. ► Beenden Sie die Produktregistrierung, führen Sie die SmartThings-App erneut aus und wiederholen Sie die Produktregistrierung noch einmal.► Halten Sie in der Netzwerkliste den Drahtlosrouter gedrückt und löschen Sie das Netzwerk, um das Kennwort zu initialisieren. Die Verbindung zwischen der SmartThings-App und dem POWERbot wird unterbrochen, obwohl die Produktregistrierung abgeschlossen wird. ► Aktualisieren Sie den Bildschirm und warten Sie ab.► Starten Sie die SmartThings-App erneut.► Prüfen Sie, ob ein Problem mit der Internetverbindung vorliegt. Insbesondere kann eine Firewall dafür sorgen, dass der Vorgang nicht wie erwartet abläuft.
Fehlerbehebung
Symptom Checkliste Die Verbindung zwischen der SmartThings-App und dem POWERbot wird plötzlich bei normalem Betrieb der App unterbrochen. ▸ Die Verbindung kann unterbrochen werden, wenn sich der POWERbot in größerer Entfernung vom Drahtlos-Router befindet.▸ Setzen Sie den POWERbot und das Smartphone zurück und überprüfen Sie die Verbindung erneut.▸ Wiederholen Sie die Produktregistrierung, wenn es wiederholt zum Verbindungsausfall kommt.▸ Wiederholen Sie die Produktregistrierung, wenn die SSID/das Kennwort eines Wireless Routers geändert wird. Die Steuerung mit der SmartThings-App funktioniert nicht, da die Fernsteuerungsfunktion deaktiviert ist. ▸ Die Fernsteuerungsfunktion ist deaktiviert. Aktivieren Sie die Fernsteuerung mit einer Fernbedienung.
Warnhinweise zum Akku

Sie dürfen den in dieses Produkt eingebaute Akku keinesfalls selbst entfernen oder einen entsprechenden Versuch unternehmen. Wenden Sie sich für einen Austausch des Akkus unbedingt an Ihren Dienstleister oder eine unabhängige qualifizierte Fachkraft. Diese Anweisungen sind ausschließlich für den Gebrauch durch Ihren Dienstleister oder eine unabhängige qualifizierte Fachkraft bestimmt.
VERSUCHEN SIE ZU IHRER EIGENEN SICHERHEIT NICHT, DEN AKKU SELBST ZU ENTFERNEN, UND ENTSORGEN SIE SIE KEINEFALLS IM FEUER. SIE DÜRFEN DEN AKKU KEINESFALLS ZERLEGEN ODER IN SONSTIGER WEISE MANIPULIEREN ODER BESCHÄDIGEN.
Entfernen des Akkus
Nehmen Sie den POWERbot für den Austausch von der Dockingstation.
Schalten Sie den POWERbot aus Sicherheitsgründen zunächst aus, bevor Sie Arbeiten daran vornehmen.

natural_image
Line drawing of a hand using a screwdriver to apply a component on a mechanical part (no text or symbols)
1 Legen Sie den POWERbot mit der Unterseite nach oben auf den Boden und entfernen Sie die beiden Schrauben.

natural_image
Line drawing of a hand inserting a component into a device casing (no text or symbols)
2 Nehmen Sie den Deckel des Staubbehälters ab.

text_image
Diagram showing a device with labeled parts and a magnified view of the component being inserted into a car interior.
3 Entfernen Sie den Akku aus dem Akkufach, und trennen Sie das Kabel.

Korrekte Entsorgung der in diesem Gerät eingebauten Batterie
(Gilt für Länder mit separaten Altbatterie-Rücknahmesystemen.)
Die Kennzeichnung auf dem Akku, dem Handbuch oder der Verpackung gibt an, dass der in diesem Gerät eingebaute Akku nicht zusammen mit dem normalen Haushaltsmüll entsorgt werden darf. Sofern vermerkt, geben die chemischen Symbole Hg, Cd oder Pb an, dass der Akku Quecksilber, Kadmium oder Blei in einer Konzentration enthält, die über den nach EG-Verordnung 2006/66 zulässigen Grenzwerten liegt.
Der in diesem Gerät eingebaute Akku darf nicht vom Benutzer ausgetauscht werden. Informationen zum Austausch erhalten Sie bei Ihrem Dienstleister. Versuchen Sie keinesfalls, den Akku selbst zu entfernen, und entsorgen Sie sie nicht im Feuer. Sie dürfen den Akku keinesfalls zerlegen oder in sonstiger Weise manipulieren oder beschädigen. Entsorgen Sie das Gerät nach Ablauf seiner Lebensdauer bei einer Abfallsammelstelle in Ihrer Nähe, damit dort geeignete Maßnahmen für die weitere Behandlung und Wiederverwertung des Produkts, einschließlich des Akkus, ergriffen werden können.
Informationen über Open-Source-Software
Die in diesem Produkt verwendete Software enthält Open-Source-Code. Sie können den entsprechenden Quellcode für einen Zeitraum von drei Jahren nach der letzten Auslieferung dieses Produkts vollständig erhalten, wenn Sie eine E-Mail senden an mailto:oss.request@samsung.com.
Es ist auch möglich, den entsprechenden Quellcode vollständig auf einem Medium wie einer CD-ROM zu erhalten. Hierfür wird eine minimale Gebühr erhoben.
Die URL http://opensource.samsung.com/opensource/VR7000\_A20\_TZ/seq/0 führt zur Downloadseite des zur Verfügung gestellten Quellcodes. Dort werden auch die entsprechenden Informationen zur Open-Source-Lizenz für dieses Produkt bereitgestellt. Dieses Angebot gilt für jeden, der diese Informationen erhält.

text_image
QR code image containing encoded data, no visible human-readable text
Technische Daten
Klassifikation Kategorie Detailinformationen SR1*M701*** SR1*M702*** / SR1*M703*** Mechanische Daten (POWERbot) Größe (T x H x L) 340 mm x 97 mm x 348 mm Gewicht 4 kg Sensor Deckenformerkennung (Visionary Mapping PlusTM) Tastentyp des POWERbot Berührung Stromversorgung Netzspannung 100-240 V~, 50/60 Hz Leistungsaufnahme 80 W Akku 21,6 V/ 38,8 Wh Reinigung Ladetyp Automatisch / Manuell Reinigungsmodus Automatische Reinigung, Punktsaugen, Tagesprogramm Automatische Reinigung, Punktsaugen, Wiederholte Reinigung, Handsaugen, Einmalprogramm, Tagesprogramm Ladezeit Etwa 240 Minuten Saugdauer (auf hartem Untergrund) Turbomodus Etwa 30 Minuten Normaler Modus Etwa 60 Minuten Wi-Fi Frequenzbereich 2412 - 2472 MHz Senderleistung (Max) 20 dBm
Klassifikation Kategorie Detailinformationen Mechanische Daten (POWERbot) Größe (T x H x L) 340 mm x 97 mm x 348 mm Gewicht 4,3 kg Sensor Deckenformerkennung (Visionary Mapping PlusTM) Tastentyp des POWERbot Berührung Stromversorgung Netzspannung 100-240 V~, 50/60 Hz Leistungsaufnahme 130 W Akku 21,6 V/ 77,8 Wh Reinigung Ladetyp Automatisch / Manuell Reinigungsmodus Automatische Reinigung, Punktsaugen, Wiederholte Reinigung, Handsaugen, Einmalprogramm, Tagesprogramm Ladezeit Etwa 160 Minuten Saugdauer (auf hartem Untergrund) Turbomodus Etwa 30 Minuten Normaler Modus Etwa 60 Minuten Flüsterbetrieb Etwa 90 Minuten Wi-Fi Frequenzbereich 2412 - 2472 MHz Senderleistung (Max) 20 dBm
\* Zur Produktverbesserung sind unangekündigte Änderungen von Konstruktion und technischen Daten vorbehalten.
\* Die Ladezeit und die Saugdauer können sich je nach Einsatzbedingungen unterscheiden.
SAMSUNG
POWERbot
Manuel d'utilisation
Série SR1\*M70\*\*\*\*, SR2\*M70\*\*\*\*
- Avant d'utiliser cet appareil, veuillez lire attentivement les instructions.
• Utilisation en intérieur uniquement.

natural_image
Black-and-white photo of a modern lounge chair with leather backrest and metallic armrest, featuring a pair of headphones placed on the backrest (no text or symbols visible)
SAMSUNG
Sommaire
03 Consignes de sécurité
08 Installation
Accessoires / Remarque pour l'installation
10 Mise en charge
Charge automatique / Recharge / Batterie faible (Lo)
12 Utilisation du POWERbot
Mise sous/hors tension / Sélection des modes de nettoyage / Utilisation des fonctions spéciales de nettoyage
15 Installation du dispositif de protection virtuelle
Nomenclature des composants du dispositif de protection virtuelle / Insertion des piles
17 Utilisation de la télécommande
20 Nom de chaque pièce
Partie supérieure / Partie inférieure / Écran
22 Réglage de l'heure/du programme
Réglage de l'heure / Réglage du programme
25 Nettoyage et entretien
Nettoyage du réservoir de poussière / Nettoyage des capteurs et de la caméra / Nettoyage de la brosse et du volet obturateur automatique / Nettoyage de la roue d'entrainement
27 Application SmartThings
31 Remarques et mises en garde
Mise en charge / Utilisation / Nettoyage et entretien / À propos de la batterie / À propos du capteur infrarouge
33 Codes d'information
35 Dépannage
39 Avertissements concernant la batterie
Comment retirer la batterie
40 Annonce de logiciel open source
41 Caractéristiques techniques
Consignes de sécurité
CONSIGNES DE SÉCURITÉ

\- Avant d'utiliser cet appareil, veuillez lire attentivement ce manuel et le conserver pour toute référence ultérieure.

\- Les instructions d'utilisation suivantes concernent plusieurs modèles ; il est donc possible que les caractéristiques de votre aspirateur soient légèrement différentes de celles spécifiées dans ce manuel.
SYMBOLES ATTENTION/AVERTISSEMENT UTILISÉS
!AVERTISSEMENT Indique un danger de mort ou de blessure grave. !ATTENTION Indique un risque de blessure ou de dégât matériel.
AUTRES SYMBOLES UTILISÉS
REMARQUE Indique que le texte associé contient des informations importantes supplémentaires.
\- Pour plus d'informations sur les engagements de Samsung en matière d'environnement et les obligations légales spécifiques à l'appareil (par ex. REACH), consultez le site Web : samsung.com/uk/aboutsamsung/samsungelectronics/corporatecitizenship/data\_corner.htm
Consignes de sécurité
CONSIGNES IMPORTANTES DE SÉCURITÉ
Lors de l'utilisation d'un appareil électrique, des précautions de base doivent être prises, notamment :
LISEZ TOUTES LES INSTRUCTIONS AVANT D'UTILISER VOTRE POWERbot.
Débranchez l'appareil de la prise lorsqu'il n'est pas utilisé ou avant toute opération d'entretien.
AVERTISSEMENT : pour limiter tout risque d'incendie, d'électrocution ou de blessures :
GÉNÉRALITÉS
- Utilisez cet appareil uniquement tel qu'indiqué dans le présent guide.
- Ne faites pas fonctionner le POWERbot ou le chargeur de batterie / la base si celui-ci ou celle-ci est endommagé(e) de quelque manière que ce soit.
- Si l'aspirateur fonctionne anormalement, a reçu un choc, a été endommagé, laissé à l'extérieur ou plongé dans l'eau, retournez-le au centre d'assistance clientèle.
- Ne manipulez pas le chargeur de batterie / la base ou le POWERbot si vous avez les mains mouillées.
- Utilisez-le uniquement à l'intérieur et sur des surfaces sèches.
- Cet appareil n'est pas destiné à être utilisé par des enfants de moins de 8 ans ou des personnes ayant des capacités physiques, sensorielles ou mentales réduites, ou un manque d'expérience et de connaissances, à moins qu'elles soient surveillées ou qu'elles aient reçu les instructions nécessaires concernant l'utilisation sécurisée de cet appareil et qu'elles comprennent les dangers impliqués. Les enfants ne doivent pas jouer avec l'appareil. Le nettoyage et l'entretien de l'appareil ne doivent pas être effectués par des enfants sans surveillance.
Chargeur de batterie / Base
- N'utilisez pas la prise polarisée avec une prise murale ou une rallonge non-polarisée.
- N'utilisez pas l'appareil à l'extérieur ni sur des surfaces mouillées.
- Débranchez le chargeur de batterie / la base de la prise lorsqu'il / elle n'est pas utilisé(e) ou avant toute opération d'entretien.
- Utilisez uniquement le chargeur de batterie / la base fourni(e) par le fabricant pour recharger l'appareil.
- N'utilisez pas de cordon ou de prise endommagé(e) ni de prise murale mal fixée.
- Ne tirez pas sur le cordon ; ne soulevez pas l'appareil par le cordon ; n'utilisez pas le cordon comme poignée ; ne fermez pas la porte sur le cordon ; ne tirez pas le cordon sur des rebords ou des angles coupants. Maintenez le cordon éloigné des surfaces chauffées.
\- N'utilisez pas de rallonges ni de prises murales ayant une intensité maximale admissible inadéquate.
\- Ne débranchez pas l'appareil en tirant sur le cordon. Pour débrancher, tenez la prise et non le cordon.
\- Ne détériorez pas les batteries et ne les faites pas brûler car elles risquent d'exploser à des températures élevées.
\- N'essayez pas d'ouvrir le chargeur de batterie / la base. Les réparations doivent être effectuées uniquement par un technicien qualifié du centre d'assistance clientèle.
\- N'exposez jamais le chargeur de batterie / la base à des températures élevées et évitez tout contact avec l'humidité.
POWERbot
\- N'aspirez jamais d'objets pointus ou tranchants tels que des morceaux de verres, des clous, des vis, des pièces de monnaie, etc.
\- N'utilisez pas l'appareil sans filtre. Pour les opérations de maintenance, n'insérez jamais vos doigts ou des objets dans le compartiment du ventilateur au cas où l'appareil se remettrait accidentellement en marche.
\- N'insérez aucun objet dans les ouvertures. N'utilisez pas l'appareil si l'une des ouvertures est obstruée ; nettoyez régulièrement les ouvertures pour éliminer toute trace de poussière, peluches, cheveux, ou toute autre chose risquant d'empêcher le passage de l'air.
• N'aspirez jamais de matière toxique (iavel, ammoniague, produit de débouchage, etc.)
\- N'aspirez jamais d'objets en train de brûler ou de fumer, tels que des cigarettes, des allumettes ou des cendres chaudes.
\- N'aspirez jamais de liquides inflammables ou combustibles tels que de l'essence et n'utilisez jamais l'appareil si de tels liquides risquent d'être présents.
\- Les lieux avec des bougies ou lampes de bureau posées sur le sol.
\- Les lieux où des feux sont laissés sans surveillance (feu ou braises).
\- Les lieux avec présence d'alcool distillé, de diluant, de cendriers avec cigarettes allumées, etc.
\- N'utilisez pas le POWERbot dans un espace clos rempli de vapeurs de peinture à l'huile, de diluant, de substances antimites, de poussières inflammables et autres vapeurs explosives ou toxiques.
\- Des fuites de batterie peuvent se produire suite à un usage intensif ou à des températures extrêmes. En cas de contact du liquide avec la peau, rincez abondamment à l'eau. En cas de contact du liquide avec les yeux, rincez immédiatement à l'eau claire pendant 10 minutes minimum. Consultez un médecin rapidement.
Consignes de sécurité

AVERTISSEMENT
À propos de l'alimentation
▶ Veillez à éviter tout risque d'électrocution ou d'incendie.
\- N'endommagez pas le cordon d'alimentation.
\- Ne tirez pas trop fort sur le cordon d'alimentation et ne touchez jamais la fiche d'alimentation avec les mains mouillées.
\- Veillez à utiliser uniquement une source d'alimentation de 100 à 240 V \~ et n'utilisez jamais de multiprise pour alimenter plusieurs appareils en même temps. (Ne laissez pas le cordon traîner sur le sol.)
\- N'utilisez pas de cordon ou de fiche d'alimentation endommagé(e) ou de prise électrique mal fixée.
▶ Retirez toute poussière ou corps étranger présent sur la broche ou sur la pièce de contact de la fiche d'alimentation.
\- Risque de choc électrique ou de dysfonctionnement.

AVERTISSEMENT
Avant l'utilisation
▶ N'utilisez pas le POWERbot à proximité d'un radiateur ou de substances inflammables.
\- N'utilisez pas le POWERbot près du feu ou d'une flamme, notamment un radiateur mobile, une bougie, une lampe de bureau, une cheminée, etc. ou dans un endroit contenant des substances inflammables comme de l'essence, de l'alcool, du diluant, etc.
▶ Vérifiez l'absence d'objets dangereux autour de la zone de nettoyage du POWERbot afin d'éviter toute collision. Débranchez également tout ventilateur ou radiateur électrique.
▶ Le POWERbot est destiné à une utilisation domestique. Par conséquent, veillez à ne pas l'utiliser dans un grenier, un sous-sol, un garde-meuble, un bâtiment industriel, en extérieur, dans des endroits humides (salle de bain, buanderie), sur une table ou des étagères.
\- Cela risque d'endommager le POWERbot ou d'entraîner un dysfonctionnement.
▶ Assurez-vous que le POWERbot ne traverse ou n'entre en contact avec aucun type de substance liquide.
\- Cela risque de gravement endommager le POWERbot et de contaminer d'autres zones si les roues touchent le liquide.
▶ Ne renversez aucune substance liquide sur la base.
\- Risque d'incendie ou d'électrocution.
▶ N'utilisez pas la base à d'autres fins que celles prévues pour cet appareil.
\- Risque d'incendie ou d'endommagement grave de la base.
Pour votre sécurité, veillez à ce que le capteur d'escarpement soit toujours propre.

AVERTISSEMENT
Pendant l'utilisation
▶ Si le POWERbot produit des sons et des odeurs étranges ou de la fumée, appuyez immédiatement sur le bouton d'arrêt d'urgence en dessous du POWERbot, puis prenez contact avec un centre de service.

AVERTISSEMENT
Nettoyage et entretien
▶ Si le cordon d'alimentation est endommagé, contactez un centre de service afin de le faire remplacer par un réparateur certifié.
\- Risque d'incendie ou d'électrocution.
▶ Veuillez vous adresser à un centre de service Samsung Electronics pour le remplacement des piles.
\- L'utilisation de piles provenant d'autres produits peut entraîner un dysfonctionnement.

ATTENTION
Avant l'utilisation
\- Insérez le réservoir de poussière avant d'utiliser le POWERbot.
Pour que la recharge automatique fonctionne, assurez-vous que les conditions suivantes soient remplies.
- Mettez toujours la base sous tension.
- Installez la base à un endroit facile à trouver pour le POWERbot.
- Ne laissez aucun objet devant la base.
▶ Lors de l'installation de la base, ne laissez pas traîner le cordon au sol. Les roues du POWERbot pourraient s'y emmêler.
▶ N'utilisez pas le POWERbot sur des sols de couleur noire.
\- Le POWERbot risquerait de ne pas fonctionner correctement.
▶ Ne placez aucun objet à moins de 0,5 m de chaque côté de la base et à moins de 1 m à l'avant.
▶ Assurez-vous que le contact de charge de la base n'est pas endommagé ou contaminé par des corps étrangers.
▶ N'installez pas la base dans une pièce dont le sol est sombre.
\- Si le sol autour de la base est sombre, la recharge est altérée.
- Avant le nettoyage, déplacez tout obstacle pouvant empêcher le déplacement du POWERbot (balançoire ou toboggan d'intérieur pour enfants, par exemple).
▶ N'utilisez pas le POWERbot dans un endroit plus étroit que son rayon de virage (0,5 m ou moins).
▶ Si une brosse ou un cache de brosse est mal réinstallé(e), vous risquez de rayer le sol ou d'entraîner un dysfonctionnement de l'appareil.
- Avant de mettre le POWERbot en marche, retirez les objets qui pourraient se casser (cadre, miroir, objets en porcelaine), afin que le POWERbot puisse fonctionner sans interruption.

ATTENTION Pendant l'utilisation
▶ Utiliser le POWERbot sur une moquette épaisse peut endommager à la fois le POWERbot et la moquette.
- Le POWERbot ne peut pas monter sur une moquette de plus de 1 cm d'épaisseur.
▶ N'utilisez pas le POWERbot sur des tables ou d'autres surfaces en hauteur.
- Risque d'endommagement en cas de chute.
▶ Le POWERbot peut heurter des pieds de chaises ou de bureau ; par conséquent, pensez à les relever pour garantir un nettoyage plus rapide et efficace.
▶ Lorsque le POWERbot est en marche, ne le levez pas et ne le portez pas vers une autre pièce.
Lorsque vous déplacez le POWERbot dans une autre pièce, ne le saisissez pas par ses roues d'entraînement.
▶ Ne placez aucun objet sur le POWERbot et sur la caméra car cela pourrait entraîner un dysfonctionnement.
- Ramassez immédiatement les feuilles de papier et sacs en plastique lorsque vous utilisez le POWERbot. Cela pourrait boucher l'aspiration.
▶ Ne visez pas directement des personnes ou animaux avec le pointeur rouge.
▶ Ne vous allongez pas autour du POWERbot lorsqu'il est en marche.
\- Vos cheveux pourraient se coincer dans la brosse et vous pourriez vous blesser.

ATTENTION
Nettoyage et entretien
▶ Veillez à respecter les consignes suivantes afin d'éviter tout endommagement du POWERbot
- Ne vaporisez jamais d'eau directement sur le POWERbot pour le nettoyer. De même, ne le nettoyez jamais avec du benzène, du diluant, de l'acétone ou de l'alcool.
▶ Ne démontez ou ne réparez pas le POWERbot. Cette tâche doit être effectuée uniquement par un réparateur certifié.
▶ Assurez-vous que le capteur d'obstacles, le capteur d'escarpement et la caméra sont toujours propres.
- Si des corps étrangers s'accumulent dessus, les capteurs peuvent connaître des dysfonctionnements.
Installation
La base doit toujours être branchée et allumée.

text_image
Installez la base dans une zone dégagée et sans risque de chute.
Environ 1 m
Environ 0.5 m
Environ 0.5 m
DC-IN
1 Raccordez le connecteur femelle du chargeur de batterie à la base
2 Raccordez le cordon d'alimentation au chargeur de batterie
Lorsque vous utilisez le chargeur de batterie, le côté comportant l'autocollant doit être face au sol.
3 Raccordez la fiche d'alimentation à la prise électrique.
Accessoires
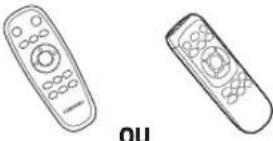 Télécommande(en option)
 Piles (type AAA)(en option)
 Manuel d'utilisation Filtre de rechange(en option)
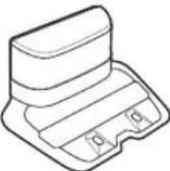 Base Cordon d'alimentation Chargeur de batterie Dispositif de protection
 virtuelle (en option)
\* Les accessoires peuvent varier en fonction des modèles.
\* Caractér. de la batterie
Serie SR1\*M70\*\*\*\* : Lithium-ion 21,6 V , 1 800 mAh, 6 éléments
Serie SR2\*M70\*\*\*\* : Lithium-ion 21,6 V , 3 600 mAh, 12 éléments
Remarque pour l'installation

Remarque
\- Installez la base dans un endroit où le sol et le mur sont à niveau.
Il vaut mieux installer la base dans le sens des lames du parquet.
▶ Si le bouton d'arrêt d'urgence est désactivé, le POWERbot ne se mettra pas en charge même s'il a rejoint la base.
▶ Mettez toujours la base sous tension.
- Si la base n'est pas sous tension, le POWERbot ne peut pas la trouver et il ne peut donc pas se recharger automatiquement.
- Si vous laissez le POWERbot séparé de la base, les piles se déchargent naturellement.
▶ Si le POWERbot est en mode veille, il ne s'allumera pas même si le bouton d'arrêt d'urgence est désactivé, puis réactivé. Maintenez le bouton [Départ/Arrêt] sur le POWERbot enfoncé pour désactiver le mode veille.
Mise en charge
Une fois la première mise en charge complète du POWERbot terminée (après l'achat), l'appareil peut être utilisé pendant 60 minutes en mode Normal ( ). (Consultez la page 41 pour la durée de mise en charge.)
Mise en charge intelligente
Si le POWERbot se décharge totalement en mode Nettoyage automatique, il reviendra automatiquement à la base pour se recharger et reprendra le nettoyage de la zone à nettoyer une fois que les deux tiers de la batterie seront complètement chargés. (À 2 reprises au maximum).

text_image
AVERTISSEMENT
• Tension nominale d'entrée de l'appareil : 100 à 240 V ~.

text_image
(ON)
(OFF)

natural_image
Line drawing of a robotic vacuum cleaner with hands adjusting the component (no text or symbols)

text_image
1 Activez le bouton d'arrêt d'urgence en-dessous.
Vous devez activer le bouton d'arrêt d'urgence pour allumer le POWERbot.
Appuyez puis relâchez le bouton 📋.
2 Mettez le POWERbot en charge manuellement en le plaçant sur la base.
Vérifiez que les broches de chargement du POWERbot et celles de la base sont alignées.
3 Vérifiez l'état de la charge.
Pour la série SR1\*M701\*\*\*,
le voyant de la batterie clignote toutes
les secondes au cours de la charge et
reste fixe lorsque la charge est terminée.
Pour les séries SR1\*M702\*\*\* /
SR1\*M703\*\*\* / SR2\*M70\*\*\*\*,
« »s allumera selon l'avancée de
la mise en charge et « FULL » apparaîtra
lorsque la mise en charge sera complète.

natural_image
Abstract geometric shape with a diagonal line dividing it into two triangular sections (no text or symbols)
Charge automatique

text_image
Diagram showing two labeled components (① and ②) with arrows pointing to a device, likely illustrating a process or assembly.
1. Série SR1\*M701\*\*\*
Si le voyant de la batterie clignote à des intervalles de 0,4 secondes, le POWERbot reviendra automatiquement à la base pour se charger.
2. Séries SR1\*M70\*\*\*\* / SR2\*M70\*\*\*\*
Lorsque le voyant de la batterie se met à clignoter en cours de nettoyage, le POWERbot retourne sur sa base pour se charger automatiquement.
Recharge

natural_image
Simple line icon of a house with a battery inside, no text or symbols present
Vous pouvez ordonner au POWERbot d'aller se recharger sur la base pendant le nettoyage.
Batterie faible (Lo)

natural_image
Line drawing of a robotic vacuum cleaner with hands adjusting the casing (no text or symbols)
Mettez le POWERbot en charge manuellement en le plaçant sur la base.
Étapes à suivre si la recharge n'a pas lieu :
Vérifiez l'état d'installation de la base lorsque :
▶ la base est située à un endroit difficile d'accès pour le POWERbot ;
▶ la distance entre la base et le POWERbot est supérieure à 5 m.
- Il faudra certainement plus de temps au POWERbot pour revenir à la base et se recharger.
Mettez le POWERbot en charge manuellement lorsque :
r▶ la base se situe dans un coin ;
▶ la batterie est entièrement déchargée ;
▶ le POWERbot est immobilisé à cause d'un obstacle (meuble, etc.) ;
▶ le POWERbot ne parvient pas à franchir un seuil à proximité de la base (la hauteur maximale de seuil que le POWERbot peut franchir est d'environ 1,5 cm) ;
▶ le voyant de la batterie clignote et que le message « Lo » s'affiche ;
▶ le voyant de la batterie clignote (applicable à la série SR1\*M701\*\*\*)
▶ le POWERbot est en mode Nettoyage localisé ou Nettoyage manuel.
Utilisation du POWERbot
Vous devez activer le bouton d'arrêt d'urgence sur le dessous de l'appareil avant d'utiliser le POWERbot.
Mise sous/hors tension
Appuyez sur le bouton pendant plus de 3 secondes.

\- Lorsque le POWERbot n'est pas utilisé pendant 30 minutes,
Séries SR1\*M70\*\*U\* / SR2\*M70\*\*U\*: passe en mode économie d'énergie.
Séries SR1\*M70\*\*W\* / SR2\*M70\*\*W\*: revient automatiquement à la base pour se charger.

natural_image
Line drawing of a computer monitor with control buttons and scroll wheel (no text or symbols)
Démarrage du mode Nettoyage automatique
Appuyez puis relâchez ce bouton. Le POWERbot se déplace et nettoie automatiquement et une seule les zones réglées.

\* Arrêt du nettoyage : Appuyez puis relâchez le bouton
Utilisation du mode Nettoyage localisé
Le POWERbot permet d'effectuer le nettoyage intensif d'une zone spécifique

Recharge
Vous pouvez ordonner au POWERbot d'aller se recharger automatiquement sur la base pendant le processus de nettoyage, en appuyant sur ce bouton.

Sélection des modes de nettoyage
Mode de nettoyage Sélection Icône affichée SR1*M702***SR1*M703***SR2*M70**** SR1*M701*** Nettoyage automatique 
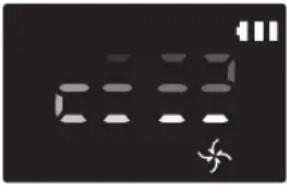

Nettoyage localisé 
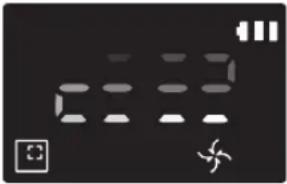

Nettoyage répété * Appuyez d'abord sur [type A, B], [type C, D Repeat] de la télécommande puis appuyez sur [Départ/Arrêt ▷II]. 
- Nettoyage manuel * Le mode de nettoyage manuel peut être sélectionné à l'aide des boutons directionnels de la télécommande. 
-
\* Si le POWERbot ne parvient pas à revenir à la base, il passera en mode économie d'énergie et l'écran s'éteindra.
\* Pour quitter le mode économie d'énergie, appuyez sur le bouton [Départ/Arrêt ▶II] ou [Marche/Arrêt Iou corps principal de la télécommande.
\* Si le nettoyage en mode Nettoyage automatique est terminé en 15 minutes, le POWERbot effectuera un autre nettoyage.

natural_image
Abstract grid pattern with horizontal lines and a small icon at the bottom-left corner (no text or symbols)
Utilisation du POWERbot
Méthode de nettoyage pour chaque mode

natural_image
Simple line drawing of three parallel horizontal bars with a small 3D icon at the bottom (no text or symbols)

text_image
Environ 1,5 m
Environ 1,5 m

natural_image
Line drawing of a hand holding a remote control with a device on top (no text or symbols)

natural_image
Abstract geometric pattern with intersecting lines and a small icon (no text or symbols)
Nettoyage automatique
Nettoie automatiquement et une seule fois les zones réglées.
\* Série SR1\*M701\*\*\* : Le nettoyage se poursuit à plusieurs reprises jusqu'à ce que la batterie soit épuisée.
Nettoyage localisé
Effectue le nettoyage intensif d'une zone spécifique. Il peut être utilisé pour aspirer des miettes de pain ou de biscuits.
Nettoyage manuel
Vous pouvez déplacer le POWERbot à l'aide de la télécommande pour nettoyer la zone souhaitée.
\* Cette fonction n'est pas applicable à la série SR1\*M701\*\*\*.
Nettoyage répété
Le nettoyage se poursuit à plusieurs reprises jusqu'à ce que la batterie soit épuisée.
\* Cette fonction n'est pas applicable à la série SR1\*M701\*\*\*.

Remarque
▶ Si le Nettoyage automatique ou le Nettoyage répété est lancé, le POWERbot nettoie d'abord la zone autour de la base.
Utilisation des fonctions spéciales de nettoyage
Fonction de nettoyage Fonctionnement Icône affichée SR1*M702***SR1*M703***SR2*M70**** SR1*M701*** Contrôle intelligent de la puissance * Lorsque le POWERbot détecte un tapis en mode normal, il fonctionnera automatiquement avec une puissance d'aspiration plus élevée. 
Brosse de nettoyage des angles * Lorsque POWERbot détecte un bord ou un angle en mode Nettoyage automatique ou Nettoyage localisé, le volet obturateur automatique s'active et s'approche du bord ou de l'angle à nettoyer.► Bord plat (un nettoyage)► Coin (deux nettoyages) 
Installation du dispositif de protection virtuelle
Le rayon infrarouge émis par le dispositif de protection virtuelle empêchera le POWERbot de s'approcher d'une certaine zone.
\* (Fourni pour la série SR2\*M707\*\*\* uniquement. Pour les séries SR2\*M704\*\*\* / SR2\*M705\*\*\* / SR2\*M706\*\*\*, achat nécessaire.)

text_image
La longueur du mur virtuel est d'au moins 2,5 m et peut varier en fonction de l'environnement et de l'état de déplacement du POWERbot.
Au moins 2,5 m
Dispositif de protection virtuelle
1 Appuyez sur le bouton Marche/Arrêt pour l'allumer.
Le voyant rouge Marche/Arrêt clignote.

natural_image
Simple line drawing of a mechanical component with a downward arrow indicating force or direction (no text or symbols)
2 Installez le dispositif de protection virtuelle là où vous souhaitez interdire l'accès au POWERbot.
Assurez-vous que le capteur de distance soit dirigé dans la direction dans laquelle vous souhaitez créer une barrière invisible (ce qui limitera l'approche du POWERbot).
Installation du dispositif de protection virtuelle
Nomenclature des composants du dispositif de protection virtuelle

text_image
Bouton Marche/Arrêt
Témoin d'alimentation
Mise sous tension : le voyant rouge clignote.
Mise hors tension : le voyant est éteint.
Capteur de détection POWERbot
Capteur de détection de distance (capteur à rayon infrarouge)
Cache des piles
Insertion des piles
Les piles du dispositif de protection virtuelle doivent être achetées séparément.

natural_image
Illustration of a hand using a tool to clean or adjust a cylindrical container with an arrow indicating the process (no text or symbols present)
1 Ouvrez le cache des piles du dispositif de protection virtuelle en appuyant sur la languette de verrouillage, puis en la soulevant.

natural_image
Diagram of a battery pack with two batteries and internal components (no text or symbols)
2 Insérez les piles alcalines (type D) comme indiqué sur l'illustration (vérifiez la polarité +/-).

natural_image
Illustration of a hand using a tool to adjust or install a battery into a cylindrical container (no text or symbols visible)
3 Insérez l'extrémité du cache dans la fente et poussez l'autre extrémité pour le refermer.
Utilisation de la télécommande
[Type A] [Type B]

text_image
1
3
1, 2
5
Spot Repeat Sound
4
2
Schedule Clock
Schedule Cancel(1sec)
SAMSUNG
Reportez-vous à la page 22

text_image
1
3
1, 2
5
Spot Repeat Sound
4
2
Schedule Clock
Schedule Cancel (3sec)
SAMSUNG
Reportez-vous à la page 22
[Type C] [Type D]

text_image
1
3
1, 2
5
Point Cleaning
6
2
4
4
Spot
Repeat
Sound
Schedule
Clock
Remote
Cancel(3sec)
Reportez-vous à la page 23
SAMSUNG

text_image
1
3
1, 2
5
Point Cleaning
6
2
4
4
Spot
Repeat
Sound
Schedule
Clock
Remote
Cancel(3sec)
Reportez-vous à la page 23
SAMSUNG
Utilisation de la télécommande
☐ [Type A] / ☐ [Type B] / [Type C] / [Type D]
1 Mise sous/hors tension, Recharge et Départ/Arrêt
Mise sous/hors tension 


Permet de mettre le POWERbot sous/hors tension Recharge 


Permet de demander au POWERbot de se recharger automatiquement sur la base Départ/Arrêt 


Permet de démarrer ou d'arrêter le processus de nettoyage
2 Modes de nettoyage
Nettoyage automatique 


Permet à l'appareil de nettoyer toutes les zones réglées une seule fois et de revenir automatiquement à la base. Nettoyage localisé 


Permet d'effectuer le nettoyage intensif d'une zone spécifique Nettoyage répété 


Permet de poursuivre le nettoyage jusqu'à ce que la batterie devienne très faible et que le voyant clignote
3 Puissance d'aspiration
Mode Turbo 


Permet d'aspirer à la puissance maximale. Mode Normal 


Permet d'aspirer à une puissance moyenne. Mode Silencieux 


Permet d'effectuer le nettoyage en silence
4 Fonction supplémentaire
Signal sonore 


À chaque fois que vous appuyez sur ce bouton, Effets sonores → Sourdine est sélectionné dans cet ordre. Commande à distance 


Permet d'activer ou de désactiver la fonction Wi-Fi.
\* Le réglage précédent sera conservé, même si le bouton d'arrêt d'urgence est désactivé, puis réactivité.
5 Mode de nettoyage manuel et contrôle de la direction
Aller tout droit 


Permet un déplacement vers l'avant Tourner à gauche 

Permet de tourner à gauche Tourner à droite Permet de tourner à droite
\* La marche arrière n'est pas disponible.
6 Nettoyage localisé
Disponible uniquement avec les télécommandes de type C et D.
Vous pouvez utiliser la télécommande pour pointer et nettoyer la zone souhaitée, pendant que le POWERbot est en cours de nettoyage.
Pointez la lumière rouge vers le sol, dans un rayon de 0,5 m autour du POWERbot.
Maintenez appuyé le bouton de nettoyage localisé pour déplacer la lumière rouge vers la zone souhaitée. Le POWERbot se déplacera et nettoiera en suivant la lumière.

text_image
Diagram illustrating a mobile phone operation with magnified view and directional arrows indicating light path changes.
Portée de la télécommande

text_image
Hauteur de la
télécommande
Portée
Hauteur de la télécommande 0,5 m 1 m 1,5 m Portée Environ 1,5 m Environ 2 m Environ 3 m
Insertion des piles
Ouvrez le cache de l'emplacement des piles en le soulevant et en appuyant sur la languette de verrouillage, puis insérez les piles comme indiqué sur l'illustration. Ensuite, refermez le cache jusqu'à entendre un « clic ».

text_image
Diagram illustrating the step-by-step assembly of a battery pack with labeled components and mechanisms.
Nom de chaque pièce

text_image
6
5
3
7
8
2
1
4
2

text_image
4
2
3
4
5
10
7
1
4
8
6
9
5

text_image
1
2
3
4
5
6
(3sec)
(3sec)
Partie supérieure
1. Écran
2. Récepteur des signaux de la télécommande
3. Capteur d'obstacles
4. Réservoir de poussière
5. Caméra
6. Bouton du réservoir de poussière
7. Capteur antichoc
8. Volet obturateur automatique
Partie inférieure
1. Broches de chargement
2. Brosse
3. Cache de la brosse
4. Capteur d'escarpement
5. Roulette
6. Cache de la batterie
7. Bouton du cache de la brosse
8. Roue d'entraînement
9. Bouton d'arrêt d'urgence
10. Volet obturateur automatique
Écran
1. Programme Quotidien
2. Mode Normal/Turbo
3. Voyant de la batterie
4. Bouton de nettoyage localisé, programme quotidien (3 s)
5. Bouton Départ/Arrêt, Mode Turbo (3 s)
6. Bouton de recharge

text_image
1
2
6
13
3
4
5
7
8:00:00 AM
PM
11 28 109
15
14

text_image
1
2
6
14
3
4
5
7
12 38 11 109
15
16
1. Sourdine
2. Voyant d'information
3. \*Voyant d'activation/désactivation de la fonction Commande à distance
4. \*Wi-Fi
5. Voyant de batterie
6. Programme Quotidien/Pour une seule fois
7. Affichage numérique
8. Mode Nettoyage localisé
9. Mode Nettoyage manuel
10. Mode Nettoyage répété
11. Mode Normal
12. Mode Turbo
13. Bouton de nettoyage localisé
14. Bouton Départ/Arrêt
15. Bouton de recharge
1. Sourdine
2. Voyant d'information
3. \*Voyant d'activation/désactivation de la fonction Commande à distance
4. \*Wi-Fi
5. Voyant de batterie
6. Programme Quotidien/Pour une seule fois
7. Affichage numérique
8. Mode Nettoyage localisé
9. Mode Nettoyage manuel
10. Mode Nettoyage répété
11. Mode Silencieux
12. Mode Normal
13. Mode Turbo
14. Bouton de nettoyage localisé
15. Bouton Départ/Arrêt
16. Bouton de recharge
\* SR1\*M70\*\*W\* / SR2\*M70\*\*W\*: Wi-Fi pris en charge
Réglage de l'heure/du programme
[Type A, Type B] Seul le mode Nettoyage automatique peut être programmé.
Réglage de l'heure
Vous devez régler l'heure actuelle avant d'utiliser le programme Quotidien/Pour une seule fois.

flowchart
graph LR
    A["Clock"] --> B["Sélectionnez « Heure »"]
    B --> C["Sélectionnez « Minute »"]
    C --> D["Sélectionnez « Matin/Après-midi »Réglage terminé"]
    D --> E["Aller au prochain/précédent réglage"]
Réglage du programme
Le réglage/l'annulation du programme ne peut être effectué(e) que lorsque le POWERbot est sur la base.

flowchart
graph LR
    A["Schedule Cancel (3sec)"] --> B["Commencer le réglage"]
    B --> C["Sélectionner le programme « Pour une seule fois » ou « Quotidien »"]
    C --> D["Sélectionnez « Heure »"]
    D --> E["Réglage terminé"]
    E --> F["Sélectionnez « Matin/ Après-midi »"]
    F --> G["Sélectionnez « Minute »"]
    G --> H["Aller au prochain/précédent réglage"]
Annulation au moment du réglage

▶ Si vous ne saisissez rien pendant 7 secondes, le réglage est automatiquement annulé.
Annulation du programme Pour une seule fois/Quotidien
Lorsque les programmesPour une seule fois/Quotidien sont tous les deux réglés  ScheduleCancel (3sec)
 OU
OU  ScheduleCancel (3sec)
 OU
OU  ScheduleCancel (3sec)Appuyez pendant 3 s. Sélectionnez le programme Annulation effectuée
Lorsque soit le programmePour une seule fois, soit leprogramme Quotidien est réglé ScheduleCancel (3sec)Appuyez pendant 3 s.
[Type C, Type D] Seul le mode Nettoyage automatique peut être programmé.
Réglage de l'heure
Vous devez régler l'heure actuelle avant d'utiliser le programme Quotidien/Pour une seule fois.

flowchart
graph LR
    A["Clock"] --> B["Sélectionnez « Heure »"]
    B --> C["Sélectionnez « Minute »"]
    C --> D["Sélectionnez « Matin/Après-midi »Réglage terminé\nAller au prochain/précédent réglage"]
    D --> E["End"]
Réglage du programme
Le réglage/l'annulation du programme ne peut être effectué(e) que lorsque le POWERbot est sur la base.

flowchart
graph LR
    A["Schedule"] --> B["Cancel (3sec)"]
    B --> C["Commencer le réglage"]
    C --> D["Sélectionner le programme « Pour une seule fois » ou « Quotidien »"]
    D --> E["Sélectionnez « Heure »"]
    E --> F["Réglage terminé"]
    F --> G["Sélectionnez « Matin/ Après-midi »"]
    G --> H["Sélectionnez « Minute »"]
    H --> I["Aller au prochain/précédent réglage"]
Annulation au moment du réglage

▶ Si vous ne saisissez rien pendant 7 secondes, le réglage est automatiquement annulé.
Annulation du programme Pour une seule fois/Quotidien
Lorsque les programmesPour une seule fois/Quotidien sont tous les deux réglés  [c7Yt]
  OU
OU  Cancel (3sec) →
  [Schedule Cancel (3sec)] Appuyez pendant 3 s. Sélectionnez le programme Annulation effectuée
Lorsque soit le programmePour une seule fois, soit le programme Quotidien est réglé  Appuyez pendant 3 s.
Réglage de l'heure/du programme
[Série SR1\*M701\*\*\*] Pour les modèles sans télécommande, le réglage du programme est disponible comme suit.
Réglage du programme
Le réglage/l'annulation du programme ne peut être effectué(e) que lorsque le POWERbot est sur la base.

Appuyez pendant 3 s.


Lorsque la DEL du programme est allumée, le programme Quotidien est réglé.
\* La durée pendant laquelle vous appuyez sur le bouton sera réglée comme programme. Le nettoyage se lancera automatiquement tous les jours en fonction de l'heure du programme.
Annulation du programme quotidien
Lorsqu'un programme quotidien est réglé  Appuyez pendant 3 s.
Nettoyage et entretien
Vous devez désactiver le bouton d'arrêt d'urgence avant de nettoyer le POWERbot.
Nettoyage du réservoir de poussière

text_image
①
②
PUSH
1 Appuyez sur le bouton pour retirer le réservoir de poussière

text_image
Diagram showing two labeled parts of a mechanical device with directional arrows indicating movement or assembly.
2 Retirez le cache du réservoir de poussière.

natural_image
Illustration of hands pouring liquid into a trash bin with a spray can (no text or symbols)
3 Videz le réservoir de poussière et l'unité cyclone.

text_image
Illustration showing two steps to open a laptop and then to use a sunlit sink, with water tap and mug icons present.
4 Retirez l'unité cyclone du cache du réservoir de poussière, puis lavez le réservoir de poussière et le filtre.

text_image
Diagram illustrating three steps of installing a device into a laptop, with numbered instructions and visual icons.
5 Réassemblez le réservoir de poussière.

text_image
« Clic »
6 Remettez le réservoir de poussière en place sur le robot. Vous devez entendre un « clic ».
Nettoyage des capteurs et de la caméra
Essuyez doucement avec un chiffon doux. N'utilisez pas d'eau ou de solutions de nettoyage.

text_image
Caméra
Fenêtre des capteurs avant
Capteurs d'escarpement
Fenêtre du capteur arrière
Nettoyage et entretien
Nettoyage de la brosse et du volet obturateur automatique
La conception de la brosse peut varier en fonction des modèles. Ne nettoyez pas la brosse avec de l'eau.

text_image
Diagram showing a device with labeled parts and a magnified view of the component being turned into a grid.
1 Retirez le cache de la brosse

natural_image
Illustration of a hand holding a tool over a device component, with an arrow indicating upward motion (no text or symbols present)
2 Retirez la brosse

natural_image
Illustration of a welding torch and tool interacting with a welded joint (no text or symbols)
3 Nettoyez la brosse

text_image
Diagram showing three-step steps of a tool application: writing, holding a pen, and cutting a paper with a pencil.
4 Nettoyez le volet obturateur automatique

text_image
Diagram showing hands holding a pen with a numbered label '1' pointing to the pen tip, likely illustrating a procedure or step in a technical or mechanical context.
5 Réassemblez la brosse

text_image
Diagram showing a hand holding a device with labeled parts and directional arrows indicating process steps

text_image
Diagram illustrating car safety instructions with hand gesture, cross symbol, and numbered instructions
6 Réassemblez le cache de la brosse

text_image
Diagram showing hands operating a device with a labeled component and internal components, likely illustrating a process or setup.
Nettoyage de la roue d'entraînement

natural_image
Illustration of hands holding a device casing with internal components (no text or symbols visible)
1 Étalez un chiffon doux sur le sol et retournez le POWERbot dessus.


natural_image
Hand using a tool to lift a tire on a road surface (no text or symbols visible)
2 Retirez les corps étrangers à l'aide d'une petite tige émoussée ou de pincettes.
Application SmartThings
L'application SmartThings n'est compatible qu'avec les modèles qui disposent d'une fonction Wi-Fi.
Paramétrage du routeur sans fil
▶ Veuillez vous reporter au manuel d'utilisation de votre routeur sans fil si vous rencontrez des problèmes d'accès.
▶ L'aspirateur POWERbot de Samsung prend uniquement en charge une connexion Wi-Fi de 2,4 GHz.
▶ L'aspirateur POWERbot de Samsung prend en charge les protocoles IEEE 802.11b/g/n et Soft-AP.
- Le protocole IEEE 802.11n est recommandé.
L'aspirateur POWERbot de Samsung prend uniquement en charge le protocole DHCP (Dynamic Host Configuration Protocol). Veuillez vous assurer que l'option de serveur DHCP est activée sur votre routeur sans fil.
▶ Le POWERbot prend en charge WEP-OPEN, WPA-PSK/TKIP et WPA2-PSK/AES pour les protocoles d'authentication et de codage.
- Le protocole WPA2-PSK/AES est recommandé.
- Vérifiez que votre routeur dispose d'un identifiant SSID et d'un mot de passe uniques.
▶ La qualité de la connexion de votre réseau sans fil peut être influencée par l'environnement sans fil existant.
Une fois que votre fournisseur d'accès Internet (FAI) a enregistré définitivement l'adresse MAC (numéro d'identification unique) de votre ordinateur ou modem, il se peut que votre POWERbot ne parvienne pas à se connecter à Internet. Demandez à votre FAI de vous communiquer la procédure à suivre pour connecter un appareil autre qu'un ordinateur à Internet.
▶ Si le FAI vous demande votre identifiant ou mot de passe pour établir la connexion à Interner, il se peut que votre POWERbot ne puisse pas se connecter à Internet. Si tel est le cas, vous devez saisir votre identifiant ou mot de passe lors de l'établissement de la connexion à Internet.
▶ Le POWERbot peut ne pas parvenir à se connecter à Internet à cause de problèmes de pare-feu. Prenez contact avec votre FAI pour résoudre ces problèmes.
▶ Certains routeurs sans fil peuvent transmettre une adresse DNS (serveur de noms de domaine) non valide, même si aucune connexion à Internet n'est établie. Si tel est le cas, prenez contact avec le fabricant de votre routeur sans fil ainsi qu'avec votre FAI.
▶ Si vous ne parvenez toujours pas à vous connecter à Internet, même après avoir suivi la procédure indiquée par votre FAI, veuillez prendre contact avec un centre de dépannage Samsung agréé.
▶ Si votre routeur n'est pas un produit certifié Wi-Fi, il se peut que le POWERbot ne parvienne pas à se connecter à Internet.
Application SmartThings
Téléchargement de l'application SmartThings
▶ Téléchargez et installez l'application SmartThings sur les marchés d'applications (Google Play Store, Apple App Store ou Samsung Galaxy Apps). Pour trouver l'application, recherchez le mot-clé « SmartThings ».

Remarque
▶ SmartThings n'est pas compatible avec les tablettes et certains appareils mobiles.
\- Le système d'exploitation Android 6.0 ou version ultérieure (au moins 2 Go de RAM) est recommandé.
Les iPad et certains appareils mobiles peuvent ne pas être pris en charge.
\- Le système d'exploitation iOS 10.0 ou une version ultérieure / l'iPhone 6 ou une version ultérieure est pris en charge.
▶ Rendez-vous sur Play Store ou App Store pour voir si votre appareil mobile est compatible avec SmartThings.
Les fonctions prises en charge sont soumises à modification sans préavis.
Création d'un compte Samsung
\- Vous devez créer un compte Samsung pour pouvoir utiliser l'application SmartThings.
Pour créer un compte Samsung, vous pouvez suivre les instructions fournies par l'application SmartThings.
▶ Sinon, si vous avez un smartphone Samsung, vous pouvez ajouter votre compte Samsung dans l'application des réglages de votre smartphone. Vous serez ainsi automatiquement connecté à votre compte Samsung.
Ajout d'un appareil sur l'application SmartThings
1. Connectez votre smartphone à votre routeur sans fil.
\- Si le smartphone n'est pas connecté, activez le Wi-Fi sur l'appli Settings App et sélectionnez un routeur sans fil sur lequel le connecter.
\- Désactivez l'option "Données mobiles" d'un smartphone pour utiliser le Wi-Fi uniquement et connectez un périphérique.
2. Lancez l'application SmartThings sur votre smartphone.
3. Si une fenêtre contextuelle s'affiche indiquant qu'un nouvel appareil a été détecté, appuyez sur ADD NOW.
\- Si la fenêtre contextuelle n'apparaît pas, appuyez sur le bouton + et sélectionnez l'appareil que vous souhaitez connecter dans la liste AVAILABLE DEVICES.
\- Si votre appareil n'apparaît pas dans la liste, ajoutez-le manuellement en sélectionnant le type d'appareil et le modèle spécifique d'appareil.
4. [Android] La connexion à votre appareil sera établie automatiquement.
\- [iOS] Ouvrez l'application des réglages et sélectionnez [robot vacuum] Samsung dans la liste des connexions Wi-Fi disponibles.
5. Authentifiez-vous lorsque vous êtes invité(e) à le faire.
6. [Android] La connexion à votre routeur sans fil sera établie automatiquement.
\- [iOS] Ouvrez l'application des réglages et sélectionnez le routeur sans fil dans la liste des connexions Wi-Fi disponibles.
7. Les opérations restantes de configuration seront automatiquement effectuées. Ensuite, une nouvelle Device Card sera ajoutée.

Remarque
▶ Si vous ne parvenez pas à enregistrer l'appareil, veuillez suivre les étapes ci-dessous.
\- Essayez d'appliquer une nouvelle fois la procédure d'enregistrement selon les instructions fournies dans les messages contextuels.
\- Vérifiez que l'option UPnP de votre routeur sans fil est activée, puis réessayez d'appliquer la procédure d'enregistrement.
\- Vérifiez que le mode sans fil de votre routeur sans fil est bien activé, puis réessayez d'appliquer la procédure d'enregistrement.
\- Si vous avez deux aspirateurs POWERbot ou plus, éteignez les autres aspirateurs POWERbot, puis réessayez d'enregistrer votre POWERbot.
\- Si tout autre routeur sans fil possède le même identifiant SSID que votre routeur sans fil, il se peut que l'enregistrement échoue.
▶ Voyant de la fonction Commande à distance et de connexion Wi-Fi
Activée La fonction Commande à distance est bloquée.(L'utilisation de la télécommande peut quand même être autorisée.) 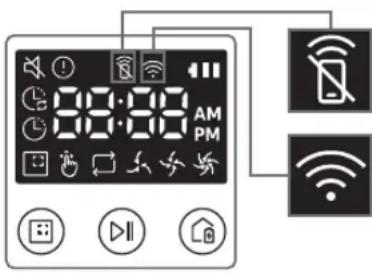
Désactivée La fonction Commande à distance est autorisée. Activée Le POWERbot est connecté au routeur sans fil. Désactivée Le POWERbot tente de se connecter au routeur sans fil.
Application SmartThings
Lorsque la fonction Commande à distance est bloquée, vous ne pouvez pas commander le POWERbot depuis votre smartphone.
▶ Le POWERbot et votre smartphone ne sont pas connectés au même routeur sans fil ; un délai de réponse peut être constaté selon votre environnement réseau.
Mise à jour du logiciel
Lorsque le POWERbot est en charge sur la base, le POWERbot se connecte au serveur puis vérifie si un logiciel est disponible. Si un nouveau logiciel est trouvé, le POWERbot le télécharge et le met à jour automatiquement.
▶ Si le message « UP » s'affiche sur l'écran alors que le POWERbot est en charge, cela signifie qu'une mise à jour est en cours. Veuillez attendre que la mise à jour soit terminée avant d'utiliser le POWERbot.
Utilisation de l'application SmartThings
▶ Lorsque vous appuyez sur la carte de l'appareil dans l'application SmartThings, le plug-in (module d'extension) pour votre appareil sera lancé.

text_image
ROBOT #2
OFFICE
HELP ⑪
①
②
RECHARGING
AUTO
SPOT ④
Fully charged ⑤
Battery ⑥
Suction power
Normal ⑦
Repeat ⑧
Schedule ⑨
History ⑩
1. Mise sous / hors tension
2. Commandes de direction avec le mode de nettoyage manuel (avancer, tourner à gauche, tourner à droite)
3. Mode de nettoyage automatique (activation / désactivation)
4. Mode Nettoyage localisé
5. État actuel
6. État de la batterie
7. Puissance d'aspiration
8. Option de répétition (activation / désactivation)
9. Programme (Une seule fois / Quotidien)
- L'heure actuelle affichée sur l'appareil sera synchronisée lorsque vous saisirez le réglage du programme.
- Un cycle de nettoyage programmé ne commencera que lorsque l'appareil sera en charge sur la base.
10. Historique de nettoyage
11. Réglages > Guide vocal
Remarques et mises en garde
Mise en charge

Remarque
En cas de surchauffe de la batterie pendant la charge, l'opération peut prendre plus de temps que prévu.
▶ Si la charge automatique ne fonctionne pas, effectuez les opérations suivantes :
- Désactivez le bouton d'arrêt d'urgence (endessous du POWERbot) puis réactivez-le.
- Débranchez puis rebranchez la fiche d'alimentation de la base.
- Débranchez la base, puis vérifiez l'absence de corps étrangers sur les broches de chargement et nettoyez le POWERbot et les broches de chargement de la base à l'aide d'un chiffon sec.
- Vérifiez l'absence d'obstacles à proximité de la base (objets réfléchissants, chaises, etc.).
▶ Si vous laissez le POWERbot séparé de la base, la batterie se décharge naturellement.
\- Essayez de maintenir le POWERbot en charge sur la base. (Toutefois, désactivez le bouton d'arrêt d'urgence et laissez la base débranchée lorsque vous prévoyez de vous absenter de la maison pendant une période prolongée dans le cadre d'un voyage d'affaires ou de vos vacances, etc.)
Utilisation

Remarque
▶ Le POWERbot peut rester bloqué sur des seuils, entre autres, pendant le nettoyage.
- Pour reprendre le fonctionnement, désactivez le bouton d'arrêt d'urgence, placez le POWERbot dans un endroit dégagé et rallumez-le.
▶ Le POWERbot n'est pas conçu pour nettoyer parfaitement les zones auxquelles il ne peut pas accéder (angles, espace entre les meubles et le mur, etc.).
- Veuillez utiliser un autre outil de nettoyage pour aspirer ces zones.
▶ Le POWERbot n'est pas conçu pour aspirer les peluches de poussière ; il est donc possible que certaines restent sur le sol après le nettoyage.
- Veuillez utiliser un autre outil de nettoyage pour aspirer ces zones.
▶ Si le POWERbot est éteint, vous ne pouvez pas l'allumer en appuyant sur le bouton Marche/Arrêt de la télécommande. Maintenez enfoncé le bouton [Départ/Arrêt] sur le POWERbot.
- Vous ne pouvez pas sélectionner et ordonner au POWERbot d'exécuter le mode Nettoyage localisé lorsqu'il est en charge.
▶ Si vous appuyez sur le bouton de nettoyage manuel/localisé pendant la charge, le POWERbot quittera la base et passera en mode veille.
Nettoyage et entretien

Remarque
▶ Lorsque vous lavez le réservoir de poussière et le filtre à l'eau claire
- Réservoir de poussière : essuyez-le minutieusement avant de le remettre en place.
- Filtre : faites-le sécher complètement à l'ombre avant de le réutiliser.
▶ Lorsque vous nettoyez le volet obturateur automatique, retirez-le en le tirant délicatement.

Attention
▶ Veillez à ne pas vous coincer les doigts dans l'entrée du réservoir de poussière lorsque vous démontez ou remontez le filtre.
▶ Ne laissez pas d'objets risquant d'obstruer l'entrée du POWERbot sur le sol (ex. : cure-dents, cotons-tiges, etc.).
▶ Si vous ne parvenez pas à retirer un corps étranger de la brosse, prenez contact avec un centre de service Samsung agréé.
Remarques et mises en garde
▶ La brosse étant chargée de nettoyer le sol, des fils ou encore des cheveux risquent de rester coincés dedans. Pour des résultats de nettoyage optimaux, vérifiez-le et nettoyez-le régulièrement.
▶ Si une brosse ou un cache de brosse est mal réinstallé(e) après une opération de maintenance, vous risquez de rayer le sol ou d'entraîner un dysfonctionnement de l'appareil. Par conséquent, assemblez-les correctement en vérifiant la procédure de maintenance.
À propos de la batterie

Remarque
- Achetez des batteries dans les centres Samsung agréés et vérifiez la présence du symbole (SAMSUMG)es batteries, ainsi que le nom de modèle, avant d'acheter.
- Cette batterie est destinée exclusivement au POWERbot Samsung Electronics. Ne l'utilisez pas avec tout autre appareil.
▶ Ne démontez pas et ne modifiez pas la batterie.
▶ Ne jetez pas la batterie au feu et ne la faites pas chauffer.
▶ N'appliquez pas d'objet métallique sur les bornes de charge (+, -).
▶ Rangez la batterie en intérieur (entre 0 et 40 °C).
▶ En cas de dysfonctionnement de la batterie, ne la démontez pas vous-même. Prenez contact avec votre centre de service Samsung le plus proche.
- Les temps de charge et d'utilisation de la batterie diminuent au fur et à mesure. Si la durée de vie de la batterie est dépassée et qu'elle ne charge plus correctement la base, faites-la remplacer auprès d'un centre de service Samsung.
▶ La période de garantie de la batterie est de 6 mois à compter de la date d'achat.
À propos du capteur infrarouge

Attention
▶ La transmission du signal infrarouge peut ne pas être régulière dans les lieux comportant des lampes halogènes ou en extérieur.
▶ Le POWERbot utilise 3 types de dispositifs infrarouge. Chacun des dispositifs possède un niveau de priorité différent. Un dispositif peut ne pas fonctionner si son signal est remplacé par un dispositif ayant une priorité supérieure.
\- Priorité des signaux infrarouge : Commande à distance > Base
Les différents signaux infrarouges émis par les appareils peuvent interférer les uns avec les autres et provoquer des dysfonctionnements si les appareils concernés se situent dans une pièce exiguë ou sont proches les uns des autres.
▶ Si plusieurs aspirateurs POWERbot sont utilisés simultanément, ils risquent de mal fonctionner en raison d'interférences entre les signaux infrarouges.
Codes d'information
1 Les trois voyants ci-dessous clignotent et une alarme de codes d'information retentit.
2 Désactivez le bouton d'arrêt d'urgence, effectuez les contrôles indiqués ci-dessous et prenez les mesures appropriées.
3 Le code d'information disparaît lorsque vous activez le bouton d'arrêt d'urgence.
Animation des codes d'information

flowchart
graph LR
    A["Sensor Input"] --> B["Code Output"]
    B --> C["Code 1"]
    B --> D["Code 2"]
    B --> E["Code 3"]
    B --> F["Code 4"]
    C --> G["Output"]
    D --> G
    E --> G
    F --> G
Codes d'information Liste de vérification
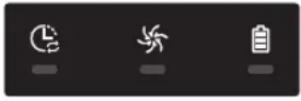
Le POWERbot s'est coincé, bloqué ou piégé pendant son déplacement.►Désactivez le bouton d'arrêt d'urgence et déplacez le POWERbot dans une autre zone. 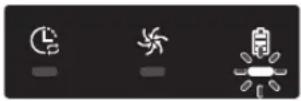
Corps étrangers coincés dans la brosse.►Désactivez le bouton d'arrêt d'urgence et retirez les corps étrangers de la brosse. 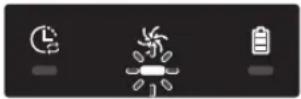
Corps étrangers coincés dans la roue d'entraînement gauche.►Désactivez le bouton d'arrêt d'urgence et retirez les corps étrangers de la roue d'entraînement. 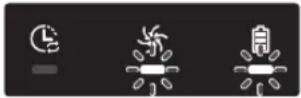
Corps étrangers dans la roue d'entraînement droite►Désactivez le bouton d'arrêt d'urgence et retirez les corps étrangers de la roue d'entraînement. 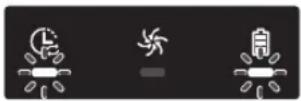
Contrôle du capteur antichoc►Désactivez, puis réactivez le bouton d'arrêt d'urgence.►Si le code d'information ne disparaît pas, vérifiez l'absence de corps étrangers entre le pare-chocs et le corps de l'appareil. Le cas échéant, tirez doucement sur le pare-chocs et retirez les particules étrangères. 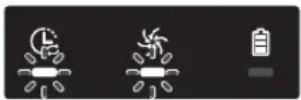
Accumulation de corps étrangers sur le capteur d'obstacles.►Désactivez le bouton d'arrêt d'urgence et nettoyez les capteurs avant et arrière à l'aide d'un chiffon doux. 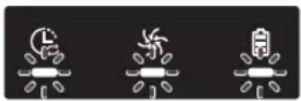
Accumulation de corps étrangers sur le capteur d'escarpement►Désactivez le bouton d'arrêt d'urgence et nettoyez le capteur d'escarpement à l'aide d'un chiffon doux. 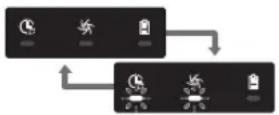
La carte de circuit imprimé principale doit être contrôlée.►Éteignez l'appareil et redémarrez-le. Si le même problème continue de survenir, un contrôle d'entretien est requis.
Codes d'information
1 Le code d'information ci-dessous s'affiche avec une alarme d'erreur.
2 Désactivez le bouton d'arrêt d'urgence, effectuez les contrôles indiqués ci-dessous et prenez les mesures appropriées.
3 Le code d'information disparaît lorsque vous activez le bouton d'arrêt d'urgence.
Codes d'information Liste de vérification 
Le POWERbot s'est coincé, bloqué ou piégé pendant son déplacement.► Désactivez le bouton d'arrêt d'urgence et déplacez le POWERbot dans une autre zone. 
Corps étrangers coincés dans la brosse.► Désactivez le bouton d'arrêt d'urgence et retirez les corps étrangers de la brosse. 
Corps étrangers coincés dans la roue d'entraînement gauche.► Désactivez le bouton d'arrêt d'urgence et retirez les corps étrangers de la roue d'entraînement. 
Corps étrangers dans la roue d'entraînement droite► Désactivez le bouton d'arrêt d'urgence et retirez les corps étrangers de la roue d'entraînement. 
Contrôle du capteur antichoc► Désactivez, puis réactivez le bouton d'arrêt d'urgence.► Si le code d'information ne disparaît pas, vérifiez l'absence de corps étrangers entre le pare-chocs et le corps de l'appareil. Le cas échéant, tirez doucement sur le pare-chocs et retirez les particules étrangères. 
Accumulation de corps étrangers sur le capteur d'obstacles.► Désactivez le bouton d'arrêt d'urgence et nettoyez les capteurs avant et arrière à l'aide d'un chiffon doux. 
Accumulation de corps étrangers sur le capteur d'escarpement► Désactivez le bouton d'arrêt d'urgence et nettoyez le capteur d'escarpement à l'aide d'un chiffon doux. 
La carte de circuit imprimé principale doit être contrôlée.► Éteignez l'appareil et redémarrez-le. Si le même problème continue de survenir, un contrôle d'entretien est requis.
Dépannage
Symptôme Liste de vérification Le POWERbot ne fonctionne pas du tout. ▸ Vérifiez que le bouton d'arrêt d'urgence est activé.▸ Vérifiez que toutes les icônes sont affichées à l'écran.▸ Vérifiez que la batterie du POWERbot est chargée.- Si le message « Lo » s'affiche, placez le POWERbot sur sa base pour le mettre en charge.- Lorsque le voyant de la batterie clignote, placez manuellement le POWERbot sur la base pour le charger. (Série SR1*M701*** uniquement)▸ Remplacez les piles (type AAA) si la télécommande ne fonctionne pas. Le POWERbot s'est arrêté pendant le nettoyage. ▸ Si le message « Lo » s'affiche sur l'écran, placez le POWERbot sur sa base pour le mettre en charge.▸ Lorsque le voyant de la batterie clignote, placez manuellement le POWERbot sur la base pour le charger. (Série SR1*M701*** uniquement)▸ Si le POWERbot est immobilisé par un obstacle (ex. : cordon électrique, seuil, etc.), prenez-le et dégagez-le de l'obstacle.- Si des corps étrangers (morceaux de tissu, fils) restent bloqués dans une roue d'entraînement, désactivez le bouton d'arrêt d'urgence et retirez-les avant réutilisation. La puissance d'aspiration est faible ▸ Un réservoir trop plein peut faire baisser la puissance d'aspiration de l'appareil. Désactivez le bouton d'arrêt d'urgence et videz le réservoir▸ Si l'entrée située (en-dessous du POWERbot) est obstruée par des corps étrangers, désactivez le bouton d'arrêt d'urgence et retirez-les.▸ Si l'appareil devient soudainement plus bruyant, désactivez le bouton d'arrêt d'urgence et videz le réservoir. Le POWERbot ne parvient pas à trouver la base. ▸ Il peut s'agir d'une panne de courant ou la fiche d'alimentation est peut-être débranchée.▸ Retirez tout obstacle se trouvant autour de la base et pouvant empêcher le POWERbot de revenir à la base.▸ La mise en charge peut être affectée par la présence de corps étrangers sur les broches de chargement. Retirez les corps étrangers présents sur les broches. Le POWERbot effectue soudainement le nettoyage en diagonale. ▸ Vérifiez que la base est bien installée dans le sens du revêtement de sol (lames de parquet ou carrelage).▸ Le POWERbot peut nettoyer en diagonale s'il se dirige vers une autre zone en suivant le parcours le plus court. Il peut également se déplacer en diagonale s'il est entré en contact avec un obstacle suivant cet angle, s'il a été mis en charge sur la base suivant cet angle ou si le revêtement du sol (lames de parquet ou carrelage) est dans ce sens. Le nettoyage localisé ne fonctionne pas ▸ Si vous pointez la lumière rouge directement sur le POWERbot, il se peut qu'il n'aille pas dans la direction souhaitée.- Pointez la lumière rouge vers le sol à une distance de 0,5 m du POWERbot.※ N'utilisez pas le mode de nettoyage localisé si la zone est ensoleillée, très claire, ou sur des sols sombres.
Dépannage
Symptôme Liste de vérification J'ai installé l'application SmartThings, mais le POWERbot ne parvient pas à se connecter. ► Vous pouvez utiliser l'appareil après avoir connecté le routeur sans fil et le POWERbot via une Configuration facile, en suivant la procédure indiquée. Je ne parviens pas à me connecter au compte Samsung. ► Vérifiez votre identifiant et votre mot de passe sur l'écran du compte Samsung. Un message apparaît alors indiquant qu'une erreur est survenue pendant la Configuration facile. ► Il est possible que vous n'y parveniez pas temporairement en raison de la distance par rapport au routeur sans fil ou à cause d'autres obstacles. Veuillez réessayer plus tard. Les appareils ne fonctionnent pas même lorsque le smartphone est connecté normalement au POWERbot. ► Fermez l'application SmartThings et lancez-la à nouveau, ou déconnectez le smartphone du routeur sans fil, puis reconnectez-le. Sinon, coupez l'alimentation du POWERbot, remettez-le sous tension, patientez au moins une minute, puis relancez l'application SmartThings. Les fonctions de l'application SmartThings ne fonctionnent pas. ► Vérifiez si la fonction de blocage de la fonction Commande à distance du POWERbot est activée. (Lorsque la fonction Commande à distance est bloquée, le voyant de connexion Wi-Fi est éteint.) L'application SmartThings Robot Vacuum ne parvient pas à s'ouvrir. ► Vérifiez si le POWERbot est connecté au routeur sans fil. Le POWERbot n'est pas connecté au réseau Wi-Fi. ► Vérifiez l'état de réglage du routeur sans fil. La fonction Contrôle intelligent de la puissance fonctionne sur les sols normaux. ► Vérifiez que le sol est bien à niveau et que le POWERbot fonctionne et que son corps est légèrement levé.► Vérifiez la présence éventuelle de corps étrangers sur le capteur d'escarpement situé sous le POWERbot.► Vérifiez si la couleur du sol est sombre. La fonction Contrôle intelligent de la puissance ne fonctionne pas. ► Lorsque le POWERbot nettoie un tapis de couleur vive et à poils courts, il peut reconnaître le tapis comme un sol et la fonction Contrôle intelligent de la puissance peut ne pas fonctionner. La fonction Brosse de nettoyage des angles ne fonctionne pas. ► Lorsque le POWERbot ne parvient pas à reconnaître le mur, la fonction Brosse de nettoyage des angles peut ne pas fonctionner.- Lorsqu'un obstacle réfléchissant fait face au mur- Lorsque le mur est lui-même réfléchissant- Lorsque le mur est de couleur foncée La fonction Brosse de nettoyage des angles s'active en l'absence de murs ou de coins. ► Vérifiez la présence éventuelle de petits obstacles disposés sur une zone étroite.► Lorsque le POWERbot reconnaît l'obstacle lui faisant face comme un mur, la fonction Brosse de nettoyage des angles peut s'activer. La fonction Brosse de nettoyage des angles s'active alors que le POWERbot ne rencontre aucun mur ou coin. ► Lorsque le degré de l'angle du coin détecté par le POWERbot est grand, la fonction Brosse de nettoyage des angles peut s'activer sans rencontrer aucun mur ou coin.
\* Par la présente, Samsung Electronics déclare que cet appareil de type équipement radio est en conformité avec la Directive 2014/53/UE. Le texte intégral de la déclaration de conformité de l'UE est disponible à l'adresse Internet suivante : La Déclaration officielle de conformité se trouve sur http://www.samsung.com, rendez-vous sur la page d'assistance > Rechercher dans l'Assistance et saisissez un nom de modèle.
Symptôme Liste de vérification L'application SmartThings ne peut pas être installée. ► L'application SmartThings fonctionne sur le système d'exploitation Android 6.0 ou une version supérieure et sur iOS 10 ou une version supérieure.► Il se peut que la version du système d'exploitation prenant en charge l'application SmartThings change ultérieurement.► Pour les appareils intelligents connectés par routeur, nous ne pouvons pas garantir une installation et une utilisation normales. Un message d'échec de l'enregistrement de l'appareil s'affiche. ► Réessayez la procédure d'enregistrement de l'appareil en vous reportant aux messages qui s'affichent.► Veuillez vous reporter à la section « Paramétrage du routeur sans fil » du guide d'utilisation.► Veuillez vous reporter aux étapes pour procéder à l'enregistrement de l'appareil dans la section du guide d'utilisation intitulée « Ajout d'un appareil sur l'application SmartThings ».► Lorsque l'enregistrement de l'appareil échoue à plusieurs reprises, réinitialisez le POWERbot et votre smartphone, lancez à nouveau l'application SmartThings, puis essayez de procéder à l'enregistrement de l'appareil.► Vous devez utiliser le même compte Samsung pour la connexion à l'application et pour l'enregistrement de l'appareil.► Tous les utilisateurs doivent utiliser le compte Samsung émis par le même pays. Pendant l'enregistrement de l'appareil, le bouton de recharge est actionné et maintenu enfoncé selon les instructions, mais l'étape suivante n'apparaît pas. ► Appuyez sur le bouton de recharge jusqu'à ce que vous entendiez un « bip ».► Si l'étape suivante n'apparaît pas sous quelques secondes, appuyez sur le bouton de recharge une fois de plus. Pendant l'enregistrement de l'appareil, le routeur sans fil que je souhaite connecter n'est pas trouvé lors de la recherche. ► Annulez l'enregistrement de l'appareil, lancez à nouveau l'application SmartThings et réessayez de procéder à l'enregistrement de l'appareil. Pendant l'enregistrement de l'appareil, le mot de passe du point d'accès 1111122222 n'est pas saisi correctement. ► Maintenez le doigt appuyé sur « [robot vacuum] Samsung » dans la liste des réseaux et supprimez le réseau pour initialiser le mot de passe. Pendant l'enregistrement de l'appareil, le mot de passe du routeur sans fil en cours de connexion n'est pas saisi correctement. ► Annulez l'enregistrement de l'appareil, lancez à nouveau l'application SmartThings et réessayez de procéder à l'enregistrement de l'appareil.► Maintenez le doigt appuyé sur le nom du routeur sans fil que vous souhaitez connecter dans la liste des réseaux et supprimez le réseau pour initialiser le mot de passe. Une coupure de connexion entre l'application SmartThings et le POWERbot survient mais l'enregistrement de l'appareil est bien terminé. ► Actualisez l'écran et attendez.► Lancez à nouveau l'application SmartThings.► Vérifier s'il y a un problème de connexion à Internet. En particulier, un pare-feu peut interrompre le fonctionnement normal.
Dépannage
Symptôme Liste de vérification Une coupure de connexion entre l'application SmartThings et le POWERbot survient soudainement pendant le fonctionnement normal de l'application. ► Si le POWERbot est distant d'un routeur sans fil, une coupure de la connexion peut survenir.► Réinitialisez le POWERbot et le smartphone, puis vérifiez à nouveau la connexion.► Si la coupure de connexion survient à plusieurs reprises, essayez d'enregistrer à nouveau l'appareil.► Lorsque l'identifiant SSID / le mot de passe d'un routeur sans fil a été modifié, essayez d'enregistrer à nouveau l'appareil. Le contrôle via l'application SmartThings ne fonctionne pas car la fonction Commande à distance est désactivée. ► La fonction Commande à distance est au statut désactivé. Placez la fonction Commande à distance au statut activé à l'aide d'une télécommande.
Avertissements concernant la batterie

Ne retirez pas (ou n'essayez pas de retirer) la batterie incorporée dans cet appareil par vous-même. Pour remplacer la batterie, vous devez prendre contact avec votre fournisseur de services ou un professionnel qualifié indépendant. Ces instructions ont été préparées pour une utilisation exclusive par votre fournisseur de services ou par un professionnel qualifié indépendant.
POUR VOTRE PROPRE SÉCURITÉ, N'ESSAYEZ PAS DE RETIRER LA BATTERIE PAR VOUS-MÊME ET NE LA METTEZ PAS AU FEU. NE DÉMONTEZ PAS, N'ÉCRASEZ PAS ET NE PERCEZ PAS LA BATTERIE.
Comment retirer la batterie
Retirez le POWERbot du chargeur / de la base pour le démonter.
Pour des raisons de sécurité, vous devez éteindre le POWERbot avant de le démonter.

natural_image
Hand using a screwdriver to apply a component on a mechanical part (no text or symbols visible)
1 Allongez et retournez le POWERbot puis retirez 2 vis.

natural_image
Line drawing of a hand inserting a small object into a device panel (no text or symbols)
2 Retirez le cache du réservoir de poussière.

text_image
Diagram showing a device with labeled parts and an inset view of a hand interacting with a component, likely illustrating a mechanical or electrical setup.
3 Retirez la batterie de son logement puis débranchez le connecteur.

Les bons gestes de mise au rebut des batteries de cet appareil
(Applicable aux pays disposant de systèmes de collecte de batteries séparés.)
Ce symbole sur la batterie, son manuel ou son emballage indique que la batterie de cet appareil ne doit pas être jetée avec les autres déchets ménagers. Si les symboles chimiques Hg, Cd ou Pb sont inscrits sur la batterie, cela indique que la batterie contient des teneurs en mercure, en cadmium ou en plomb supérieures aux niveaux de référence de la directive CE 2006/66.
La batterie incorporée dans cet appareil ne doit pas être remplacée par l'utilisateur. Pour plus d'informations sur son remplacement, veuillez prendre contact avec votre fournisseur de services. N'essayez pas de retirer la batterie et ne la jetez pas au feu. Ne démontez pas, n'écrasez pas et ne percez pas la batterie. Si vous prévoyez de jeter l'appareil, le site de collecte des déchets prendra les mesures appropriées pour le recyclage et le traitement de votre appareil, y compris la batterie.
Annonce de logiciel open source
Le logiciel inclus dans cet appareil contient un logiciel libre. Vous pouvez obtenir le code source correspondant pendant une période de trois ans après la sortie de la dernière version de ce produit en adressant un email à l'adresse suivante : mailto:oss.request@samsung.com.
Il est également possible d'obtenir le code source complet correspondant sur un support physique tel qu'un CD-ROM ; un coût minimal sera requis.
L'URL suivante http://opensource.samsung.com/opensource/VR7000\_A20\_TZ/seq/0 renvoie à la page de téléchargement du code source mis à votre disposition, ainsi qu'aux informations concernant la licence de logiciel open source relative à cet appareil. Cette offre est valable pour quiconque ayant reçu cette information.

text_image
QR code image containing encoded data, no visible human-readable text
Caractéristiques techniques
Classification Élement Informations détaillées SR1*M701*** SR1 *M702*** / SR1*M703*** Caractéristiques mécaniques (POWERbot) Dimensions (P x H x L) 340 mm x 97 mm x 348 mm Poids 4 kg Capteur Système de reconnaissance du plafond (Visionary mapping plus TM) Type de boutons du POWERbot Tactile Caractéristiques d'alimentation Tension 100 à 240 V~, 50 Hz/60 Hz Consommation électrique 80 W Caractéristiques de la batterie 21,6 V / 38,8 WH Nettoyage Type de charge Charge automatique/manuelle Mode de nettoyage Programme Automatique, Localisé, Quotidien Automatique, Localisé, Intensif, Manuel, programme Pour une seule fois, programme Quotidien Temps de charge Environ 240 minutes Temps de nettoyage (sur sol dur) Mode Turbo Environ 30 minutes Mode Normal Environ 60 minutes Wi-Fi Plage de fréquences De 2 412 à 2 472 MHz Puissance de l'émetteur (maximum) 20 dBm
Classification Élément Informations détaillées Caractéristiques mécaniques (POWERbot) Dimensions (P x H x L) 340 mm mm x 97 mm x 348 mm Poids 4,3 kg Capteur Système de reconnaissance du plafond (Visionary mapping plus TM) Type de boutons du POWERbot Tactile Caractéristiques d'alimentation Tension 100 à 240 V~ 50 Hz/60 Hz Consommation électrique 130 W Caractéristiques de la batterie 21,6 V / 77,8 WH Nettoyage Type de charge Charge automatique/manuelle Mode de nettoyage Automatique, Localisé, Intensif, Manuel, programme Pour une seule fois, programme Quotidien Temps de charge Environ 160 minutes Temps de nettoyage (sur sol dur) Mode Turbo Environ 30 minutes Mode Normal Environ 60 minutes Mode Silencieux Environ 90 minutes Wi-Fi Plage de fréquences De 2 412 à 2 472 MHz Puissance de l'émetteur (maximum) 20 dBm
\* La conception et les caractéristiques techniques de l'appareil sont susceptibles d'être modifiées sans préavis à des fins d'amélioration de l'appareil.
\* Les temps de charge et de nettoyage peuvent varier en fonction des conditions d'utilisation.
SAMSUNG
POWERbot
Manuale dell'utente
SR1\*M70\*\*\*\*, SR2\*M70\*\*\*\* Series
- Prima di utilizzare questo prodotto, leggere attentamente le istruzioni.
- Solo per uso in interno.

natural_image
Black-and-white photo of a modern lounge chair with leather backrest and metallic armrest, featuring a pair of headphones placed on the backrest (no text or symbols visible)
SAMSUNG
Sommario
03 Informazioni di sicurezza
08 Installazione
Accessori / Note per l'installazione
10 Ricarica
Ricarica automatica / Ricarica / Batterie scariche (Lo)
12 Uso di POWERbot
Accensione e spegnimento / Selezione della
modalita di pulizia / Uso delle funzioni di
pulizia speciali
15 Installazione della Virtual guard
Nomenclatura delle parti della Virtual guard / Inserimento delle batterie
17 Uso del telecomando
20 Nomenclatura delle parti
Alto / Fondo / Display
22 Impostazione dell'orario / della programmazione
Impostazione dell'orario / Impostazione della programmazione
25 Pulizia e manutenzione
Pulizia del contenitore di raccolta polvere / Pulizia dei sensori e della telecamera / Pulizia della spazzola e della bocchetta automatica / Pulizia della ruota di guida
27 App SmartThings
31 Note e precauzioni
Ricarica / Uso / Pulizia e manutenzione / Informazioni sulla batteria / Informazioni sul sensore IrDA
33 Codici informativi
35 Risoluzione dei problemi
39 Avvertenze sulla batteria
40 Dichiarazione Open Source
41 Specifiche
Informazioni di sicurezza
INFORMAZIONI DI SICUREZZA

\- Prima di utilizzare il prodotto, leggere attentamente questo manuale e conservarlo per future consultazioni.

\- Dal momento che queste istruzioni coprono diversi modelli di prodotto, le caratteristiche dell'aspirapolvere acquistato potrebbero differire leggermente da quanto descritto in questo manuale.
SIMBOLI DI ATTENZIONE/AVVERTENZA UTILIZZATI
 AVVERTENZA
Indica il possibile rischio di lesioni gravi perfino mortali. [YS2T]ATTENZIONE Indica il rischio di lesioni personali o danni materiali.
ALTRI SIMBOLI UTILIZZATI
NOTA Indica che il testo che segue contiene informazioni importanti.
\- Per ulteriori informazioni sull'impegno ambientale di Samsung e sugli obblighi normativi specifici dei singoli prodotti es. REACH visitare la pagina: samsung.com/uk/aboutsamsung/samsungelectronics/corporatecitizenship/data\_corner.html
Informazioni di sicurezza
ISTRUZIONI DI SICUREZZA IMPORTANTI
Durante l'uso di apparecchiature elettriche, è necessario seguire alcune precauzioni di base, tra le quali:
LEGGERE TUTTE LE ISTRUZIONI PRIMA DELL'USO DI POWERbot.
Scollegare il prodotto dalla presa di corrente in caso di inutilizzo o prima di effettuare la manutenzione.
AVVERTENZA: per ridurre il rischio di incendio, scariche elettriche o lesioni:
GENERALE
- Usare il prodotto solo secondo quanto descritto in questo manuale.
• Non utilizzare POWERbot o il caricabatterie / docking station se presentano danni.
- In caso di malfunzionamento, caduta, danni, permanenza all'esterno o immersione in acqua del robot aspirapolvere o del caricabatterie, rivolgersi a un Centro di assistenza autorizzato.
- Non toccare POWERbot o il caricabatterie / docking station con le mani bagnate.
- Usare il prodotto solo su superfici asciutte e in interno.
- Questo apparecchio può essere utilizzato da bambini di età superiore agli 8 anni e da persone con ridotte capacità fisiche, sensoriali o mentali o senza esperienza o conoscenza del prodotto solo sotto la supervisione di una persona responsabile o nel caso in cui abbiano ricevuto informazioni specifiche sull'uso sicuro dell'apparecchio e ne abbiano compreso i rischi ad esso associati. Non consentire ai bambini di giocare con l'apparecchio. La pulizia e la manutenzione dell'apparecchio non può essere eseguita da minori senza la diretta supervisione di un adulto.
Caricabatterie / Docking station
- Non modificare la spina polarizzata per adattarla a una presa non polarizzata o a un cavo di prolunga.
- Non utilizzare in esterno o su superfici bagnate.
- Scollegare il caricabatterie / docking station dalla presa elettrica in caso di inutilizzo e prima di effettuare la manutenzione.
- Usare solo il caricabatterie / docking station forniti in dotazione dal costruttore.
- Non usare un cavo o una spina di alimentazione danneggiati o una presa allentata.
- Non trasportare il prodotto tirandolo per il cavo, non utilizzare il cavo come una maniglia, non incastrare il cavo chiudendo una porta, non far passare il cavo intorno a bordi o angoli taglienti. Tenere il cavo lontano da superfici bollenti.
- Non utilizzare prolunghe o prese con una capacità di corrente inadeguata al carico.
- Non scollegare la spina di alimentazione tirandola per il cavo. Per scollegare il prodotto, afferrare la spina, non il cavo.
- Non aprire o bruciare le batterie poiché potrebbero esplodere ad elevate temperature.
- Non tentare di aprire il caricabatterie / docking station. Le riparazioni devono essere eseguite esclusivamente da un centro assistenza clienti qualificato.
- Non esporre caricabatterie / docking station a temperature elevate, umidità o vapore di alcun genere.
POWERbot
- Non aspirare oggetti rigidi, appuntiti o taglienti come vetro, chiodi, viti, monete o simili.
- Non utilizzare senza filtro. Durante la manutenzione dell'unità, non inserire dita o altri oggetti nel comparto della ventola per evitare lesioni in caso di attivazione accidentale del prodotto.
- Non inserire oggetti estranei nelle aperture di ventilazione. Non utilizzare se le aperture sono ostruite; mantenerle libere da polvere, residui, capelli o qualunque oggetto possa ridurre il flusso dell'aria.
• Non aspirare sostanze tossiche (candeggina, ammoniaca, disgorgante idraulico).
- Non aspirare oggetti ardenti o che producono fumo, quali sigarette, fiammiferi o braci.
- Non utilizzare per aspirare liquidi infiammabili o combustibili quali benzina, né usare in luoghi dove tali sostanze potrebbero essere presenti.
- Non usare in luoghi in cui siano presenti candele o lampade da tavolo appoggiate al pavimento.
• Non usare in luoghi in cui siano presenti fiamme libere (camini o stufe).
- Non usare in luoghi in cui siano presenti alcool distillato, diluenti, portacenere con sigarette accese, ecc.
- Non usare POWERbot in spazi ristretti in cui siano presenti vapori rilasciati da vernici a base d'olio, diluenti, antitarme, polveri infiammabili o altri vapori esplosivi o tossici.
- In caso di uso intensivo o temperature estreme, dalle batterie può fuoriuscire liquido. Se il liquido fuoriuscito entra a contatto con la pelle, lavare immediatamente con acqua. Se il liquido fuoriuscito entra a contatto con gli occhi, lavare immediatamente con acqua corrente per almeno 10 minuti. Consultare un medico.
Informazioni di sicurezza

AVVERTENZA
Tensione nominale
- Evitare qualsiasi rischio di incendio o scariche elettriche.
- Non danneggiare il cavo di alimentazione.
- Non estrarre il cavo di alimentazione con forza eccessiva e non toccare la spina con le mani bagnate.
- Utilizzare solo una fonte di alimentazione da 100-240 V\~ e non utilizzare una presa multipla che alimenti più dispositivi contemporaneamente. (non lasciare il cavo di alimentazione appoggiato a terra).
- Non usare un cavo o una spina di alimentazione danneggiati o una presa allentata.
- Rimuovere polvere e sostanze estranee dai poli e dai contatti della spina elettrica.
- Rischio di scarica elettrica o malfunzionamento.

AVVERTENZA
Prima dell'uso
▶ Non usare POWERbot vicino a fonti di calore o materiali infiammabili.
- Non usare POWERbot vicino a fonti di calore o fiamme libere come una stufetta, una candela, una lampada da tavolo, un camino ecc. o in luoghi in cui sono presenti materiali infiammabili come benzina, alcol, diluenti ecc.
Accertarsi dell'assenza di oggetti pericolosi intorno all'area di pulizia di POWERbot così da prevenire collisioni e scollegare eventuali stufette o ventilatori.
▶ POWERbot è inteso per un uso domestico, pertanto se ne sconsiglia l'uso in attici o seminterrati, in magazzini, edifici industriali, all'esterno, su tavoli o scaffali o in luoghi caratterizzati da umidità come lavanderie e bagni.
- In caso contrario POWERbot potrebbe subire danni o funzionare in modo anomalo.
▶ POWERbot non deve attraversare pozze di liquido o entrare a contatto con liquidi.
- Se le ruote attraversano un liquido, POWERbot potrebbe riportare gravi danni e contaminare altre aree lungo il suo passaggio.
▶ Non versare liquidi sul caricabatterie.
- Pericolo di scariche elettriche o incendi.
▶ Non usare il caricabatterie per scopi diversi da quelli per i quali è stata progettato.
- Il caricabatterie potrebbe subire gravi danni o potrebbe insorgere un rischio di incendio.
▶ Per la propria sicurezza, mantenere sempre il sensore di dislivello pulito.

AVVERTENZA
Utilizzo
Se si avvertono odori o rumori insoliti o si nota del fumo fuoriuscire da POWERbot, spegnere immediatamente l'apparecchio agendo sull'interruttore di emergenza posto sul fondo di POWERbot e contattare un Centro di assistenza autorizzato.

AVVERTENZA
Pulizia e manutenzione
Se il cavo di alimentazione è danneggiato, contattare un Centro di assistenza autorizzato per richiederne la sostituzione da parte di un tecnico certificato.
- Pericolo di scariche elettriche o incendi.
▶ Per sostituire le batterie, rivolgersi ad un Centro di assistenza autorizzato Samsung Electronic.
- L'uso di batterie di altri prodotti può provocare malfunzionamenti.

ATTENZIONE
Prima dell'uso
- Prima di avviare POWERbot inserire il contenitore di raccolta polvere.
- Prestare attenzione alle seguenti condizioni per effettuare una ricarica corretta delle batterie.
- Accendere sempre la docking station.
- Installare la docking station in un luogo facilmente individuabile da POWERbot.
- Non lasciare oggetti davanti alla docking station.
Durante l'installazione della docking station, non lasciare cavi sul pavimento che potrebbero bloccare i movimenti di POWERbot.
▶ Non usare POWERbot su pavimenti scuri.
- POWERbot potrebbe non essere in grado di funzionare regolarmente.
▶ Non posizionare oggetti a meno di 0,5 m sui lati e 1 m sulla parte anteriore della docking station.
Accertarsi che i contatti della docking station non siano danneggiati o coperti da sostanze estranee.
▶ Non installare la docking station su un pavimento nero o scuro.
- Se il pavimento intorno alla docking station è scuro, il robot potrebbe non riuscire a raggiungere la base per effettuare la ricarica.
- Prima di avviare la pulizia, rimuovere qualsiasi oggetto possa ostacolare il movimento di POWERbot (ad esempio i giochi per bambini).
▶ Non utilizzare POWERbot in luoghi vicini troppo angusti per il raggio di curvatura di POWERbot (0,5 m o meno).
Se una spazzola o il coperchio di una spazzola non è montato correttamente, si potrebbe graffiare il pavimento o il prodotto potrebbe non funzionare regolarmente.
- Prima di azionare il POWERbot, rimuovere gli oggetti che potrebbero rompersi quali cornici, specchi e oggetti in porcellana in modo che POWERbot sia libero di muoversi senza fermarsi.

ATTENZIONE
Utilizzo
▶ L'uso di POWERbot su un tappeto spesso potrebbe danneggiare sia POWERbot sia il tappeto.
- POWERbot non è in grado di passare su tappeti spessi oltre 1 cm.
▶ Non usare POWERbot su tavoli o superfici sopraelevate.
- Il robot potrebbe cadere e subire danni.
▶ POWERbot potrebbe urtare sedie e gambe di tavoli, pertanto si consiglia di spostarli prima di azionare il robot al fine di consentire una pulizia rapida ed efficiente.
Durante il funzionamento di POWERbot, non sollevarlo da terra o spostarlo in un'altra zona della casa.
▶ Quando si trasporta POWERbot, non afferrarlo dalle ruote di guida.
▶ Non posizionare oggetti sopra POWERbot e sulla telecamera poiché potrebbero funzionare in modo scorretto.
Rimuovere eventuali sacchetti di carta o plastica di grandi dimensioni prima di usare POWERbot poiché potrebbero bloccarne l'aspirazione.
▶ Non indirizzare direttamente il puntatore rosso verso persone o animali.
▶ Non sdraiarsi a terra intorno a POWERBOT mentre è in funzione.
\- I capelli potrebbero rimanere intrappolati nella spazzola principale causando lesioni.

ATTENZIONE
Pulizia e manutenzione
Attenersi alle seguenti indicazioni per evitare danni a POWERbot.
- Non pulire POWERbot spruzzandovi sopra acqua o usando benzina, diluenti, acetone o alcool.
▶ Non disassemblare o riparare autonomamente POWERbot. Tale operazione deve essere effettuata da un tecnico qualificato.
- Mantenere sempre puliti il sensore degli ostacoli, il sensore di dislivello e la lente della telecamera.
- In caso si accumuli dello sporco, i sensori potrebbero non funzionare correttamente.
Installazione
La docking station deve essere sempre accesa e collegata alla presa elettrica.

Quando si usa il
caricabatterie, il lato con
l'adesivo deve essere rivolto
verso il basso.
Accessori
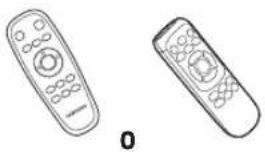 Telecomando (Opzionale)
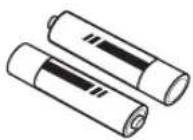 Batterie (Tipo AAA)(Opzionale)
 Manuale dell'utente Filtro di ricambio(Opzionale)
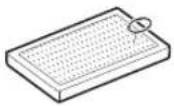
 Docking station Cavo
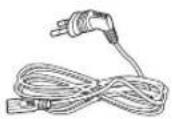 di alimentazione Caricabatterie Virtual guard (Opzionale)
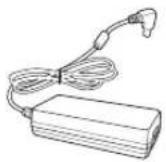
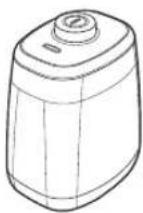
\* Gli accessori in dotazione al prodotto possono variare in base al modello acquistato.
\* Specifiche delle batterie
SR1\*M70\*\*\*\* series : Ioni di Litio 21.6 V , 1800 mAh, 6 celle
SR2\*M70\*\*\*\* series : Ioni di Litio 21.6 V , 3600 mAh, 12 celle
Note per l'installazione

Nota
- Installare la docking station in un luogo che presenti pavimento e pareti a livello.
▶ E' meglio installare la docking station lungo la scanalatura dei pavimenti in legno.
Se l'interruttore di emergenza è spento, POWERbot non effettuerà la ricarica anche se collegato alla docking station.
▶ Accendere sempre la docking station.
- Se la docking station non è alimentata, POWERbot non sarà in grado di effettuare la ricarica automatica.
- Se POWERbot viene lasciato scollegato dalla docking station, la batteria si scaricherà nel tempo.
Se il robot aspirapolvere è in modalità risparmio energetico, l'alimentazione non si attiverà nemmeno spegnendo e riaccendendo l'interruttore di emergenza. Tenere premuto il tasto [Start/Stop] sul POWERbot per disattivare la modalità di risparmio energetico.
Ricarica
Una volta completata la prima ricarica (dopo l'acquisto) POWERbot può essere utilizzato per 60 min. in modalità Normale (ledere a pagina 41 per i tempi di ricarica).
Ricarica Smart
Se la carica di POWERbot si esaurisce in modalità di pulizia Auto, esso ritornerà automaticamente alla docking station e riprenderà la pulizia dell'area una volta che la carica delle batterie abbia raggiunto i due terzi della capacità massima. (max 2 volte).

text_image
AVVERTENZA
• La tensione nominale
di ingresso di questo
prodotto è 100-240 V~.

text_image
1/0 ←(ON)
←(OFF)
1/0
1/5

natural_image
Line drawing of a toilet with hands holding the lid (no text or symbols)

text_image
1 Attivare l'interruttore di emergenza posto sul fondo
E' necessario attivare l'interruttore di emergenza per accendere POWERbot.
Premere e rilasciare il tasto

2 Effettuare la ricarica manuale di POWERbot posizionandolo nella docking station.
Verificare l'allineamento dei contatti di ricarica su POWERbot e sulla docking station.
ITALIANO-10
3 Controllare lo stato della carica.
Per SR1\*M701\*\*\* Series, durante la ricarica la spia di ricarica lampeggia ad intervalli di 1 sec. e la spia rimane accesa al termine della ricarica.
Per SR1\*M702\*\*\* / SR1\*M703\*\*\* / SR2\*M70\*\*\*\* Series.
" si accenderà in base
all'andamento della ricarica mentre si
accenderà "FULL" al termine della ricarica.

natural_image
Abstract geometric shape with a diagonal line dividing it into two triangular sections (no text or symbols)
Ricarica automatica

text_image
Diagram showing a device with two labeled icons (① and ②) pointing to a device component, likely illustrating a process or installation.
1. SR1\*M701\*\*\* Series
Se la spia di carica della batteria lampeggia ad intervalli di 0,4 sec., POWERbot tornerà automaticamente alla docking station per effettuare la ricarica.
2. SR1\*M70\*\*\*\* / SR2\*M70\*\*\*\* Series
Quando la spia della batteria lampeggia durante la pulizia, POWERbot ritorna alla base di ricarica per eseguire automaticamente la ricarica delle batterie.
Ricarica

natural_image
Simple line icon of a house with a battery inside, no text or symbols present
E' possibile indicare all'aspirapolvere POWERbot di recarsi alla docking station durante il processo di pulizia.
Batterie scariche (Lo)

natural_image
Line drawing of a hand holding a circular object on a tiled floor (no text or symbols)
Effettuare la ricarica manuale di POWERbot posizionandolo nella docking station.
Azioni da intraprendere se la ricarica non viene eseguita:
Verificare l'installazione della docking station quando:
▶ la docking station è situata in una posizione non facilmente accessibile da POWERbot.
▶ la distanza tra la docking station e POWERbot è superiore a 5 m.
\- POWERbot potrebbe impiegare molto tempo per raggiungere la docking station
Caricare manualmente POWERbot quando:
la docking station è posizionata in un angolo
la batteria è completamente scarica
POWERbot è bloccato da un ostacolo (mobile, ecc.)
▶ POWERbot non può scavalcare una soglia vicina alla docking station (l'altezza massima della soglia che POWERbot è in grado di scavalcare è di 1,5 cm).
\- quando la spia di carica della batteria lampeggia e sul display appare "Lo"
▶ quando la spia di carica della batteria lampeggia (applicabile a SR1\*M701\*\*\* Series)
▶ POWERbot è impostato in modalità di pulizia Spot o Manual
Uso di POWERbot
È necessario attivare l'interruttore di emergenza posto sul fondo prima di usare POWERbot.
Accensione e spegnimento
Premere il tasto per più di 3 secondi

\- Quando POWERbot non viene utilizzato per 30 min.;
SR1\*M70\*\*U\* / SR2\*M70\*\*U\* Series: Attiva la modalità di risparmio energetico.
SR1\*M70\*\*W\* / SR2\*M70\*\*W\* Series: Torna automaticamente alla docking station per effettuare la ricarica.

text_image
Diagram showing a device with labeled buttons and a digital display, likely illustrating a control or navigation system.
Avviamento della modalità di pulizia Auto
Premere e rilasciare questo tasto. POWERbot si sposta ed inizia a pulire automaticamente una volta le aree impostate.

\* Interruzione della pulizia: Premere e rilasciare il tasto
Uso della modalità modalità pulizia Spot
POWERbot effettua una pulizia accurata di una specifica zona.

Ricarica
Premendo questo tasto è possibile impostare POWERbot perché esegua automaticamente la procedura di ricarica alla base durante la pulizia.

Selezione della modalità di pulizia
Modalità di pulizia Come selezionarla Icona visualizzata SR1*M702***SR1*M703***SR2*M70**** SR1*M701*** Pulizia Auto Pulizia Spot Pulizia Repeat *Premere [A,B], [C,DRepeat] sul telecomando quindi premere [Avvia/Stop ▶]. 
- Pulizia Manual *La modalità di pulizia Manual può essere impostata mediante i tasti di controllo direzionale del telecomando. 
-
\* Se POWERbot non riesce a tornare alla docking station, attiverà la modalità di risparmio energetico ed il pannello verrà disattivato.
\* Per uscire dalla modalità di risparmio energetico, premere il tasto [Avvia/Stop ▶] o [Accensione ▶sul corpo del telecomando.
\* Se la pulizia Auto viene terminata entro 15 minuti, POWERbot effettuerà una seconda pulizia.

natural_image
Abstract geometric pattern with nested horizontal lines and a small circular icon at the bottom (no text or symbols)
Uso di POWERbot
Metodi di pulizia per ogni modalità

natural_image
Simple line drawing of three parallel horizontal bars with a small icon at the bottom (no text or symbols)

text_image
Circa 1,5 m
Circa 1,5 m

natural_image
Line drawing of a hand holding a remote control with a device on top (no text or symbols)

natural_image
Abstract geometric pattern with nested squares and a small 3D cube at the bottom (no text or symbols)
Pulizia Auto
Effettua una pulizia delle aree impostate.
\* SR1\*M701\*\*\* Series : Effettua una pulizia continua fino all'esaurimento della batteria.
Pulizia Spot
Effettua la pulizia
accurata di un'area
specifica. Questa modalità
può essere utilizzata per
pulire briciole di pane o
dolci.
Pulizia Manual
Per pulire un'area
specifica è possibile
spostare POWERbot
mediante il telecomando.
\* Questa funzione non è disponibile nella serie SR1\*M701\*\*\*.
Pulizia Repeat
Effettua una pulizia continua fino all'esaurimento della batteria.
\* Questa funzione non è disponibile nella serie SR1\*M701\*\*\*.

Nota
Se viene attivata la funzione Auto e Repeat, POWERbot esegue per primo la pulizia dell'area vicino alla docking station.
Uso delle funzioni di pulizia speciali
Funzione di pulizia Funzionamento Icona visualizzata SR1*M702***SR1*M703***SR2*M70**** SR1*M701*** Controllo potenza intelligente ※ Quando POWERbot rileva un tappeto in modalità Normale, attiverà automaticamente una maggiore potenza di aspirazione. Edge Clean Master ※ Quando POWERbot rileva un bordo o un angolo in modalità pulizia Auto o Spot, si attiva la bocchetta automatica e POWERbot approccia la parte del bordo o dell'angolo da pulire.► Bordo dritto (pulizia Una volta)► Angolo (pulizia Due volte) 
Installazione della Virtual guard
I raggi infrarossi emessi dalla Virtual guard impediscono a POWERbot di accedere ad alcune zone.
\* (in dotazione con SR2\*solo M707\*\*\* Series) Per SR2\*M704\*\*\* / SR2\*M705\*\*\* / SR2\*M706\*\*\* Series, necessario ulteriore acquisto).

text_image
La distanza della barriera virtuale è di minimo 2,5 m e può differire in base allo spazio circostante e ai movimenti di POWERbot.
Virtual guard
Minimo 2,5 m
1 Premere il tasto di accensione per accendere il robot
La spia di alimentazione (rossa) lampeggia.

natural_image
Simple line drawing of a mechanical component with a downward arrow indicating force or direction (no text or symbols)
2 Installare la Virtual guard dove si desidera limitare l'accesso di POWERbot
Verificare che il sensore di distanza sia rivolto nella direzione nella quale si desidera creare la barriera invisibile (che limiterà l'accesso di POWERbot).
Installazione della Virtual guard
Nomenclatura delle parti della Virtual guard

text_image
Tasto Accensione
Spia di alimentazione
Accensione: la spia rossa lampeggia
Spegnimento: Luce spenta
Sensore rilevamento POWERbot
Sensore di rilevamento della distanza (sensore a infrarossi)
Coperchio batterie
Inserimento delle batterie
Le batterie della Virtual guard devono essere acquistate a parte.

natural_image
Illustration of a hand using a tool to clean or adjust a cylindrical container with an arrow indicating the process (no text or symbols present)
1 Aprire il coperchio della batteria della Virtual guard premendo la linguetta di blocco, quindi sollevarlo.

natural_image
Diagram of a battery pack with two batteries and internal components (no text or symbols)
2 Inserire le batterie alcaline (tipo D) come mostrato nell'immagine (controllare la polarità +, -).

natural_image
Illustration of a hand using a tool to clean or install electronic components inside a battery casing (no text or symbols visible)
3 Inserire un'estremità del coperchio nell'alloggiamento e premere l'altra estremità per chiudere il vano batterie.
Uso del telecomando
[Tipo A] [Tipo B]

text_image
1
3
1, 2 1, 2
5
Spot Repeat Sound
4
2
Schedule Clock
Schedule Cancel(0sec)
SAMSUNG
Vedere pagina 22

text_image
1
3
5
Spot Repeat Sound
4
2
Schedule Clock
Schedule Cancel(1sec)
SAMSUNG
Vedere pagina 22
[Tipo C] [Tipo D]

text_image
1
3
1, 2
5
Point Cleaning
6
2
4
4
Spot
Repeat
Sound
Schedule
Clock
Remote
Cancel(3sec)
SAMSUNG
Vedere
pagina 23

text_image
1
3
1, 2
5
Point Cleaning
6
2
4
4
Spot
Repeat
Sound
Schedule
Clock
Remote
Cancel(3sec)
SAMSUNG
Vedere
pagina 23
Uso del telecomando
☐ [Tipo A] / ☐ [Tipo B] / [Tipo C] / [Tipo D]
1 Accensione / Ricarica / Avvio/Stop
Accensione 


Per accendere/spegnere POWERbot Ricarica 

-HT8D] 
Selezionare per effettuare la ricarica automatica di POWERbot presso la docking station Avvio/Stop 


Selezionare per avviare o terminare il processo di pulizia
2 Modalità di pulizia
Pulizia Auto 


Selezionare per effettuare la pulizia di tutte le aree una sola volta per poi tornare alla docking station. Pulizia Spot 


Selezionare per effettuare la pulizia intensa di una specifica zona Pulizia Repeat 


Selezionare per effettuare la pulizia ripetuta fino allo scarico della batteria ad indicatore lampeggiante
3 Potenza di aspirazione
Modalità Turbo 


Selezionare per effettuare la pulizia con la massima potenza di aspirazione Modalità Normal 


Selezionare per effettuare la pulizia con una potenza di aspirazione media Modalità Quiet 


Selezionare per eseguire la pulizia con un livello di rumore inferiore (silenzioso)
4 Funzioni aggiuntive
Sound 


A ogni pressione di questo tasto si seleziona in sequenza Effetti audio → Muto. Comando a distanza 


Selezionare per attivare e disattivare la funzione Wi-Fi
\* L'impostazione precedentemente effettuata non varierà anche spegnendo e riaccendendo l'interruttore di emergenza.
5 Modalità pulizia Manual e controllo direzione
Avanti 
Selezionare per procedere in avanti Sinistra [02W7] [TAZW] 
Selezionare per girare a sinistra Destra 


Selezionare per girare a destra
\* Il movimento in retro non è disponibile
6 Pulizia di uno specifico punto
Disponibile solo con telecomandi di tipo C e D.
È possibile usare il telecomando per indicare di pulire un punto specifico mentre POWERbot è in fase di pulizia.
Puntare la luce rossa sul pavimento a una distanza di 0,5 m da POWERbot.
Tenere premuto il pulsante Point cleaning per spostare il raggio rosso sul punto desiderato. POWERbot seguirà la luce durante i suoi spostamenti per eseguire la pulizia dell'ambiente.

text_image
0.5 m
Distanza operativa del telecomando

text_image
Altezza del
telecomando
Distanza operativa
Altezza del telecomando 0,5 m 1 m 1,5 m Distanza operativa Circa 1,5 m Circa 2 m Circa 3 m
Inserimento delle batterie
Aprire il vano batterie premendo la linguetta di blocco e sollevando il coperchio, quindi inserire le batterie come mostrato in figura. Riposizionare il coperchio e premere fino allo scatto in posizione.

text_image
Diagram illustrating the step-by-step installation of a battery pack with AAA batteries, showing internal components and final assembly.
Nomenclatura delle parti

text_image
6
5
3
7
8
2
1
4
2

text_image
4
2
3
4
5
10
7
1
4
8
6
9
5

text_image
1
2
3
4
5
6
(3sec)
(3sec)
Alto
1. Display
2. Ricevitore segnali telecomando
3. Sensore ostacoli
4. Serbatoio di raccolta polvere
5. Fotocamera
6. Tasto serbatoio di raccolta polvere
7. Sensore paracolpi
8. Bocchetta automatica
Fondo
1. Contatti di ricarica
2. Spazzola
3. Coperchio spazzola
4. Sensore di dislivello
5. Rullo
6. Coperchio batterie
7. Tasto coperchio spazzola
8. Ruote di guida
9. Interruttore di emergenza
10. Bocchetta automatica
Display
1. Programmazione giornaliera
2. Modalità Normal/Turbo
3. Spia batteria
4. Tasto pulizia Spot, programmazione giornaliera (3 sec)
5. Tasto Avvio/Stop button, Modalità Turbo (3 sec)
6. Tasto Ricarica

text_image
1
2
6
13
3
4
5
7
8:00:00 AM
PM
11 28 109
15
14

text_image
1
2
6
14
3
4
5
7
8:00:00 AM
PM
12 38 11 109
16
15
Series>
1. Muto
2. Indicatore informazioni
3. \*Off/On spia Comando a distanza
4. \*Wi-Fi
5. Spia batteria
6. Programmazione Una volta/Giornaliero
7. Display numerico
8. Modalità pulizia Spot
9. Modalità pulizia Manual
10. Modalità pulizia Repeat
11. Modalità Normal
12. Modalità Turbo
13. Tasto pulizia Spot
14. Tasto Avvio/Stop
15. Tasto Ricarica
1. Muto
2. Indicatore informazioni
3. \*Off/On spia Comando a distanza
4. \*Wi-Fi
5. Spia batteria
6. Programmazione Una volta/Giornaliero
7. Display numerico
8. Modalità pulizia Spot
9. Modalità pulizia Manual
10. Modalità pulizia Repeat
11. Modalità Quiet
12. Modalità Normal
13. Modalità Turbo
14. Tasto pulizia Spot
15. Tasto Avvio/Stop
16. Tasto Ricarica
Impostazione dell'orario / della programmazione
[Tipo A, Tipo B] È possibile programmare solo la modalità di pulizia Auto.
Impostazione dell'orario
Prima di utilizzare la programmazione Una volta/Giornaliero è necessario impostare l'orario corrente.

flowchart
graph LR
    A["Clock"] --> B["Selezionare "Ora" Selezionare "Minuto""]
    B --> C["Selezionare "AM/PM" Impostazione completata"]
    C --> D["Passare alla precedente, successiva impostazione"]
    style A fill:#fff,stroke:#000
    style B fill:#fff,stroke:#000
    style C fill:#fff,stroke:#000
    style D fill:#fff,stroke:#000
Impostazione della programmazione
L'impostazione/annullamento della programmazione può essere effettuata solo quando POWERbot è fermo nella docking station.

flowchart
graph LR
    A["Schedule Cancel (3sec)"] --> B["Selezionare la programmazione "Una volta" o "Giornaliero""]
    B --> C["Selezionare "Ora""]
    C --> D["Selezionare "AM/PM" Impostazione"]
    D --> E["Selezionare "Minuto" Passare alla precedente, successiva impostazione"]
    F["completata"] --> G["Selezionare "Am/PM" Impostazione"]
    G --> H["Selezionare "Ora""]
    H --> I["Selezionare "Minuto""]
    I --> J["Selezionare "Ora""]
    J --> K["Selezionare "Am/PM" Impostazione"]
    K --> L["Selezionare "Ora""]
    L --> M["Selezionare "Minuto""]
    M --> N["Selezionare "Ora""]
    N --> O["Selezionare "Ora""]
    O --> P["Selezionare "Ora""]
    P --> Q["Selezionare "Ora""]
    Q --> R["Selezionare "Ora""]
    R --> S["Selezionare "Ora""]
    S --> T["Selezionare "Ora""]
    T --> U["Selezionare "Ora""]
    U --> V["Selezionare "Ora""]
    V --> W["Selezionare "Ora""]
    W --> X["Selezionare "Ora""]
    X --> Y["Selezionare "Ora""]
    Y --> Z["Selezionare "Ora""]
    Z --> AA["Selezionare "Ora""]
    AA --> AB["Selezionare "Ora""]
    AB --> AC["Selezionare "Ora""]
    AC --> AD["Selezionare "Ora""]
    AD --> AE["Selezionare "Ora""]
    AE --> AF["Selezionare "Ora""]
    AF --> AG["Selezionare "Ora""]
    AG --> AH["Selezionare "Ora""]
    AH --> AI["Selezionare "Ora""]
    AI --> AJ["Selezionare "Ora""]
    AJ --> AK["Selezionare "Ora""]
    AK --> AL["Selezionare "Ora""]
    AL --> AM["Selezionare "Ora""]
    AM --> AN["Selezionare "Ora""]
    AN --> AO["Selezionare "Ora""]
    AO --> AP["Selezionare "Ora""]
    AP --> AQ["Selezionare "Ora""]
    AQ --> AR["Selezionare "Ora""]
    AR --> AS["Selezionare "Ora""]
    AS --> AT["Selezionare "Ora""]
    AT --> AU["Selezionare "Ora""]
    AU --> AV["Selezionare "Ora""]
    AV --> AW["Selezionare "Ora""]
    AW --> AX["Selezionare "Ora""]
    AX --> AY["Selezionare "Ora""]
Annullamento durante l'impostazione
L'impostazione viene annullata automaticamente in mancanza di una azione entro 7 secondi.
Annullamento programmazione Una volta/Giornaliero
Quando sono impostate entrambe le programmazioni Una volta/Giornaliero  Premere per 3 secondi.
→ 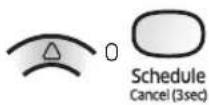 Selezionare la programmazione desiderata
→ 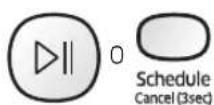 Annullamento completato
Quando è impostata una delle programmazioni Una volta o Giornaliero Schedule Cancel (3sec)Premere per 3 secondi.
[Tipo C, Tipo D] È possibile programmare solo la modalità di pulizia Auto.
Impostazione dell'orario
Prima di utilizzare la programmazione Una volta/Giornaliero è necessario impostare l'orario corrente.

flowchart
graph LR
    A["Clock"] --> B["Selezionare "Ora" Selezionare "Minuto""]
    B --> C["Selezionare "AM/PM" Impostazione completata"]
    C --> D["Passare alla precedente, successiva impostazione"]
    style A fill:#f9f,stroke:#333
    style B fill:#ccf,stroke:#333
    style C fill:#cfc,stroke:#333
    style D fill:#fcc,stroke:#333
Impostazione della programmazione
L'impostazione/annullamento della programmazione può essere effettuata solo quando POWERbot è fermo nella docking station.

flowchart
graph LR
    A["Schedule Cancel (3sec)"] --> B["Impostazione di Avvio"]
    B --> C["Selezionare la programmazione "Una volta" o "Giornaliero""]
    C --> D["Selezionare "Ora""]
    D --> E["Selezionare "Am/PM" Impostazione"]
    E --> F["Selezionare "Minuto""]
    F --> G["Passare alla precedente, successiva impostazione"]
    H["completata"] --> I["Selezionare "AM/PM" Impostazione"]
    I --> J["Selezionare "Ora""]
    J --> K["Selezionare "Minuto""]
Annullamento durante l'impostazione
L'impostazione viene annullata automaticamente in mancanza di una azione entro 7 secondi.
Annullamento programmazione Una volta/Giornaliero
Quando sono impostate entrambe le programmazioni Una volta/Giornaliero  Cancel (3sec)Premere per 3 secondi.
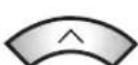
 Cancel (3sec)
→ [7SA3]  Cancel (3sec)
Quando è impostata una delle programmazioni Una volta o Giornaliero  Premere per 3 secondi.
Impostazione dell'orario / della programmazione
[SR1\*M701\*\*\* Series] Per le modalità che non prevedono un telecomando, è disponibile la programmazione sotto.
Impostazione della programmazione
L'impostazione/annullamento della programmazione può essere effettuata solo quando POWERbot è fermo nella docking station.

Premere per 3 secondi.


Quando il LED della programmazione è acceso ciò indica che è stata impostata una programmazione Giornaliero.
\* Verrà inserita la programmazione corrispondente all'orario in cui si preme il tasto. La pulizia verrà automaticamente eseguita in base all'orario programmato.
Annullamento programmazione Giornaliero
Quando è stata impostata la programmazione Giornaliero

Premere per 3 secondi.
Pulizia e manutenzione
E' necessario disattivare l'interruttore di emergenza prima di eseguire la pulizia di POWERbot.
Pulizia del contenitore di raccolta polvere

text_image
①
②
PUSH
1 Premere il tasto per rimuovere il contenitore di raccolta della polvere

text_image
Technical diagram showing mechanical assembly with numbered components and directional arrows indicating motion or force
2 Rimuovere il coperchio del contenitore di raccolta polvere

natural_image
Illustration of hands pouring liquid into a trash bin (no text or symbols)
3 Rimuovere la polvere dal contenitore di raccolta e dal ciclone

text_image
Illustration showing two steps to open a toilet with water, followed by a diagram of a sink, tap, and coffee cup with sun symbol.
4 Scollegare il ciclone dal coperchio del contenitore di raccolta e lavare contenitore e filtro

text_image
Diagram illustrating three steps of installing a device into a box, with numbered instructions and visual icons.
5 Rimontare il contenitore di raccolta polvere

text_image
"Clic"
6 Reinserire il contenitore di raccolta polvere nel corpo del robot fino ad avvertire uno scatto
Pulizia dei sensori e della telecamera
Pulire delicatamente con un panno morbido. Non utilizzare prodotti abrasivi o pagliette saponate.

text_image
pagllette saponate:
Fotocamera
Finestra del
sensore anteriore

text_image
Sensori di
dislivello

text_image
Finestra del
sensore posteriore
Pulizia e manutenzione
Pulizia della spazzola e della bocchetta automatica
La forma della spazzola può variare in base al modello acquistato. Non pulire la spazzola con acqua.

text_image
Diagram showing a device with labeled parts and a magnified view of the component, likely illustrating a device's internal structure or status.
1 Rimuovere il coperchio della spazzola principale

natural_image
Illustration of a hand holding a tool over a device component, with an upward arrow indicating motion (no text or symbols present)
2 Rimuovere la spazzola principale

natural_image
Illustration of a welding torch tool interacting with a clamped tool (no text or symbols present)
3 Pulire la spazzola principale

text_image
Diagram showing three-step steps of a tool application: cutting, holding a pen, and writing on paper.
4 Pulizia della bocchetta automatica

text_image
Diagram showing hands holding a pen with a numbered label pointing to a section, likely illustrating a procedure or step in a technical or mechanical context.
5 Rimontare la spazzola principale

text_image
Diagram showing a hand holding a device with labeled parts and an inset close-up of the device's internal structure.

text_image
Diagram illustrating car safety instructions with labeled symbols and arrows indicating correct and incorrect actions
6 Rimontare il coperchio della spazzola principale

text_image
Diagram showing hands operating a device with a labeled component and directional arrows indicating operation
Pulizia della ruota di guida

natural_image
Illustration of hands holding a device casing with internal components (no text or symbols visible)
1 Appoggiare un panno morbido sul pavimento e posizionare POWERbot su di esso capovolto.


natural_image
Hand using a tool to lift a tire on a road surface (no text or symbols visible)
2 Usare delle forbici o una bacchetta non appuntiti per rimuovere eventuali materiali estranei.
App SmartThings
La app SmartThings è disponibile solo nei modelli dotati di una funzione Wi-Fi.
Impostazione del router wireless
In caso di problemi di accesso del router wireless vedere il relativo manuale dell'utente.
Samsung POWERbot supporta solo la banda Wi-Fi 2,4 Ghz.
Samsung POWERbot supporta IEEE 802.11b/g/n and Soft-AP.
- Si consiglia l'adozione dello standard IEEE 802.11n.
Samsung POWERbot supporta solo il protocollo DHCP (Dynamic Host Configuration Protocol). Assicurarsi che l'opzione DHCP server sul proprio router wireless sia attivata.
▶ POWERbot supporta i protocolli WEP-OPEN, WPA-PSK/TKIP e WPA2-PSK/AES quali protocolli di autenticazione e crittografia.
\- Si consiglia l'uso del protocollo WPA2-PSK/AES.
\- Accertarsi che il router sia dotato di una SSID e di una password univoci.
▶ La qualità della connessione del network wireless può essere influenzata dalle condizioni ambientali circostanti.
Qualora il vostro Internet service provider registri permanentemente l'indirizzo MAC (un numero di identificazione unico) del vostro PC o modem, il vostro POWERbot potrebbe non riuscire a connettersi ad Internet. Richiedete al vostro Internet service provider la procedura necessaria per connettere un apparato diverso dal PC ad Internet.
Qualora il vostro Internet service provider richieda il vostro ID o la password per la connessione Internet, il vostro POWERbot potrebbe non essere in grado di connettersi ad internet. In questo caso, digitare il proprio ID o la password durante la connessione ad internet.
▶ POWERbot potrebbe non essere in grado di connettersi ad Internet per varie problematiche relative al firewall. Chiedete al vostro Internet service provider le soluzioni a tale problema.
- Alcuni router wireless possono veicolare un indirizzo di Domain Name Server (DNS) anomalo anche in assenza di connessione Internet. In questo caso, rivolgetevi al produttore del vostro router wireless ed al vostro Internet service provider.
Se, anche dopo aver provato la procedura suggerita dal proprio Internet service provider non si riesce connettersi ad Internet, rivolgersi ad un Centro di assistenza autorizzato Samsung.
- Qualore il router non sia un prodotto certificato Wi-Fi, POWERbot potrebbe non essere in grado di connettersi a Internet.
App SmartThings
Download della app SmartThings
▶ Eseguire il download ed installare la app SmartThings dai vari market (Google Play Store, Apple App Store, o Samsung Galaxy Apps). Per trovare la app da scaricare usare la parola chiave "SmartThings."

Nota
▶ SmartThings non è compatibile con tablet ed alcuni dispositivi mobile.
\- È consigliato disporre di Android 6.0 o successivo (almeno 2GB di RAM).
▶ iPad ed alcuni dispositivi mobile possono non essere supportati.
\- iOS 10.0 o successivo / iPhone 6 o successivi sono supportati.
\- Visitare il Play Store o App Store per capire se il proprio dispositivo mobile è compatibile con SmartThings.
▶ Le funzioni supportate sono soggette a modifiche senza alcun preavviso.
Impostazione di un account Samsung
▶ Per usare la app SmartThings è necessario disporre di un account Samsung.
▶ Per impostare un account Samsung, seguire le indicazioni fornite dalla app SmartThings.
In alternativa, se si dispone di uno smartphone Samsung, aggiungere l'account Samsung nella app di impostazione del proprio smartphone. In seguito lo smartphone effettuerà l'accesso automatico all'account Samsung.
Aggiungere un dispositivo alla app SmartThings
1. Connettere il proprio smartphone al router wireless.
\- Se lo smartphone non è collegato, attivare il Wi-Fi in Impostazioni e selezionare il router wireless al quale si desidera collegarsi.
\- Disabilitare l'opzione "Dati mobili" dello smartphone per usare solo il Wi-Fi e connettere un dispositivo.
2. Avviare la app SmartThings sul proprio smartphone.
3. In caso di comparsa di una finestra indicante l'individuazione di un nuovo dispositivo, premere ADD NOW.
\- Qualora la finestra non venga visualizzata, premere il tasto + e selezionare il dispositivo da aggiungere nell'elenco AVAILABLE DEVICES.
\- Se il dispositivo non compare nell'elenco, aggiungerlo manualmente selezionandone il tipo e lo specifico modello.
4. [Android] La connessione al dispositivo viene effettuata automaticamente.
\- [iOS] Accedere alla app delle impostazioni e selezionare [robot vacuum] Samsung nell'elenco dei Wi-Fi disponibili.
5. A richiesta fornire le credenziali di autenticazione.
6. [Android] La connessione al router wireless viene effettuata automaticamente.
\- [iOS] Accedere alla app delle impostazioni e selezionare il router wireless presente nell'elenco dei Wi-Fi disponibili.
7. Le rimanenti operazioni di impostazione vengono effettuate automaticamente. Verrà quindi aggiunta una nuova Device Card.

Nota
\- Qualora non sia possibile completare la registrazione del prodotto, intraprendere le seguenti azioni.
\- Provare nuovamente la procedura di registrazione così come indicato dai messaggi visualizzati.
\- Controllare se l'opzione UPnP del router wireless è disponibile e riprovare la procedura di registrazione.
\- Confermare che il router wireless sia operativo in modalità wireless, quindi riprovare nuovamente la procedura di registrazione.
\- In presenza di due o più POWERbot, spegnere gli altri POWERbot e riprovare nuovamente la registrazione del POWERbot.
\- Qualora nelle vicinanze vi sia un altro router con lo stesso SSID del proprio router wireless, la registrazione non potrà essere completata.
▶ Spia Wi-Fi e Comando a distanza
On Comando a distanza è inibito. (è ancora possibile usare il telecomando). 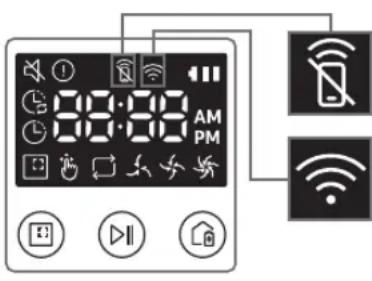
Off Comando a distanza è abilitata. On POWERbot è connesso al router wireless. Off POWERbot sta tentando di connettersi al router wireless.
App SmartThings
- Quando la funzione comando a distanza è inibita, non è possibile controllare il POWERbot dal proprio smartphone.
Se POWERbot e lo smartphone non sono connessi allo stesso router wireless, può verificarsi un ritardo di risposta in base alle condizioni dell'ambiente di rete.
Aggiornamento Software
- Quando POWERbot è in carica nella docking station, POWERbot si collega al server e verifica la presenza di aggiornamenti software. Se viene trovato un aggiornamento del software, POWERbot effettuerà automaticamente il download e lo aggiornerà.
Se sul display viene visualizzato "UP" mentre POWERbot è in ricarica, ciò indicherà che l'aggiornamento è in corso. Attendere il completamento dell'aggiornamento prima di usare POWERbot.
Uso della app SmartThings
▶ Selezionando la scheda del dispositivo nella app SmartThings, verrà avviato il plug-in del proprio dispositivo.

text_image
ROBOT #2
OFFICE
HELP ⑪
①
②
RECHARGING
AUTO
SPOT ④
Fully charged ⑤
Battery ⑥
Suction power
Normal ⑦
Repeat ⑧
Schedule ⑨
History ⑩
1. Accensione/spegnimento
2. Tasti direzionali in modalità Pulizia Manuale (avanti, sinistra, destra)
3. Attivazione/disattivazione modalità pulizia Auto
4. Modalità pulizia Spot
5. Indicatore stato corrente
6. Indicatore carica della batteria
7. Potenza di aspirazione
8. Opzione Ripetizione (on / off)
9. Programma (Una volta / Giornaliero)
- L'orario del dispositivo verrà sincronizzato durante l'attivazione dell'impostazione della programmazione.
- Una pulizia programmata viene eseguita solo quando il dispositivo è inserito nella docking station.
10. Cronologia della pulizia
11. Impostazioni > Guida vocale
Note e precauzioni
Ricarica

Nota
Se la batteria si surriscalda durante la ricarica, il tempo di carica potrebbe essere più lungo.
Se la ricarica automatica non funziona, controllare le seguenti condizioni:
- Attivare e riattivare l'interruttore di emergenza (posto sul fondo di POWERbot).
- Scollegare e ricollegare la spina di alimentazione della docking station.
- Scollegare la base di ricarica, quindi con un panno asciutto o uno straccio, verificare che non vi siano sostanze estranee sui contatti di carica di POWERbot e della docking station.
- Controllare che non vi siano ostacoli od oggetti riflettenti, sedie ecc. vicino alla docking station.
Se POWERbot viene lasciato scollegato dalla docking station, la batteria si scaricherà nel tempo.
\- Fare in modo che POWERbot sia sempre caricato dalla docking station. (tuttavia spegnere il dispositivo e lasciare la docking station scollegata durante una prolungata assenza da casa).
Uso

Nota
▶ POWERbot potrebbe restare bloccato in una soglia o altrove durante la pulizia.
\- Per riavviare il funzionamento, disattivare l'interruttore di emergenza, spostare POWERbot in una zona dove sia in grado di muoversi facilmente quindi riattivare l'interruttore.
▶ POWERbot non è in grado di pulire completamente le aree nelle quale non riesce ad accedere, ad esempio angoli, spazio tra muro e divano, ecc.
\- Per questo, utilizzare un diverso strumento di pulizia.
▶ POWERbot non è in grado di aspirare grossi agglomerati di sporcizia, pertanto alcuni residui possono restare sul pavimento al termine della pulizia.
- Per questo, utilizzare un diverso strumento di pulizia.
Se POWERbot viene spento, non è possibile riaccenderlo mediante il tasto Power del telecomando. Tenere premuto il tasto [Avvio/Stop] su POWERbot.
▶ Non è possibile selezionare ed impostare POWERbot in modo che esegua una pulizia Spot durante la fase di ricarica.
▶ Premendo il tasto pulizia Manual / Point cleaning durante la fase di ricarica POWERbot si scollegherà dalla docking station entrando in modalità standby.
Pulizia e manutenzione

Nota
▶ Dopo aver lavato il contenitore di raccolta della polvere ed il filtro con acqua
- Contenitore di raccolta polvere: Asciugare completamente l'acqua residua.
- Filtro: Lasciare asciugare completamente all'ombra prima dell'uso.
▶ Nel pulire la bocchetta automatica, non estrarla con eccessiva forza.

Attenzione
- Prestare attenzione alle dita nello smontare/rimontare il filtro poiché è facile che rimangano intrappolate nell'ingresso del contenitore di raccolta.
▶ Al fine di evitare ostruzioni a causa di corpi estranei, non permettere a POWERbot di aspirare stuzzicadenti, cotton fioc o simili.
Note e precauzioni
Qualora sia difficile rimuovere gli oggetti estranei dalla spazzola principale, rivolgersi ad un Centro di assistenza autorizzato Samsung.
▶ Poiché la spazzola principale rimuove lo sporco dal pavimento durante la pulizia, è possibile che capelli lunghi o altri materiali possano restarvi impigliati. Per ottenere risultati di pulizia ottimali, controllarla e pulirla regolarmente.
Se una spazzola o il coperchio di una spazzola non è montato correttamente una volta eseguita la manutenzione, si potrebbe graffiare il pavimento o il prodotto potrebbe non funzionare regolarmente. Pertanto, montarli correttamente seguendo le procedure di manutenzione previste.
Informazioni sulla batteria

Nota
- Acquistare le batterie presso di Centri di assistenza autorizzata Samsung e verificare la presenza del simbolo (\$AMSUNG applicato alla batteria ed il nome del modello perima di completare l'acquisto.
▶ Questa batteria è indicata eclusivamente per un POWERbot Samsung Electronics. Non utilizzarla per altri prodotti.
▶ Non disassemblare o modificare la batteria.
▶ Non gettare la batteria nel fuoco o riscaldarla.
▶ Non posizionare alcun oggetto metallico sui contatti di carica (+, -).
▶ Tenere il prodotto all'interno (0 °C\~40 °C).
In caso di malfunzionamento della batterie, non tentare di disassemblarle autonomamente. Rivolgersi ad un Centro di assistenza autorizzato Samsung.
- Il tempo di ricarica della batteria e il tempo di utilizzo possono diminuire con l'uso della batteria. Se la batteria è esausta e il robot non si inserisce più correttamente nella docking station, richiederne la sostituzione presso un Centro di assistenza autorizzato Samsung.
- Il periodo di garanzia della batteria è di 6 mesi dalla data di acquisto.
Informazioni sul sensore IrDA

Attenzione
▶ La trasmissione a infrarossi potrebbe essere irregolare nei luoghi esposti a luce alogena o in spazi aperti.
▶ POWERbot utilizza 3 tipi di dispositivi ad infrarossi. Ogni dispositivo ha un diverso livello di priorità. Un dispositivo potrebbe non funzionare correttamente se il suo segnale è disturbato da un dispositivo con priorità maggiore.
\- Priorità dei segnali a infrarossi: Comando a distanza > Docking station
▶ Diversi segnali a infrarossi possono interferire l'uno con l'altro e provocare malfunzionamenti ai dispositivi se usati insieme in uno spazio ristretto o a breve distanza.
Se si utilizzano più dispositivi POWERbot contemporaneamente, il loro funzionamento potrebbe risultare irregolare a causa delle interferenze dei segnali a infrarossi.
Codici informativi
1 Le tre spie sotto lampeggiano e vengono emessi allarmi acustici di codici informativi.
2 Disattivare l'interruttore di emergenza e controllare le istruzioni sottostanti adottando l'azione opportuna
3 Il codice informativo scompare attivando l'interruttore di emergenza
Animazione dei Codici informativi

flowchart
graph LR
    A["Raw Data"] --> B["Data Collection"]
    B --> C["Codici Informativi"]
    C --> D["Output"]
Codici informativi Checklist
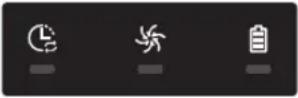
POWERbot è rimasto impigliato, ostacolato o bloccato lungo il suo percorso di pulizia.►Disattivare l'interruttore di emergenza e spostare POWERbot in un'altra zona. 
Corpo estraneo impigliato nella spazzola principale.►Disattivare l'interruttore di emergenza e rimuovere gli oggetti estranei dalla spazzola di pulizia. 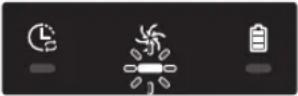
Corpo estraneo impigliato nella ruota di guida sinistra.►Disattivare l'interruttore di emergenza e rimuovere il corpo estraneo dalla ruota di guida. 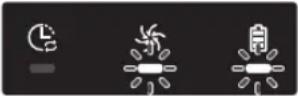
Corpo estraneo impigliato nella ruota di guida destra.►Disattivare l'interruttore di emergenza e rimuovere il corpo estraneo dalla ruota di guida. 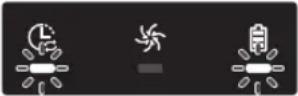
Controllare il sensore paracolpi.►Disattivare l'interruttore di emergenza e riattivarlo.►Se il codice di errore visualizzato non scompare, verificare l'eventuale presenza di un corpo estraneo tra il paracolpi e l'apparecchio. Nel caso vi sia un corpo estraneo, estrarre delicatamente il paracolpi e rimuoverlo. 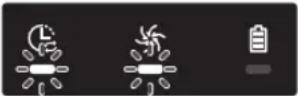
Sul sensore ostacoli si è accumulato dello sporco.►Disattivare l'interruttore di emergenza e pulire i sensori anteriore e posteriore con un panno morbido. 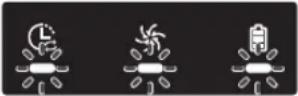
Sul sensore di dislivello si è accumulato dello sporco.►Disattivare l'interruttore di emergenza e pulire il sensore di dislivello con un panno morbido. 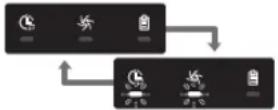
Controllare la scheda madre.►Spegnere e riavviare l'apparecchio. In caso il problema persista, contattare un Centro di assistenza autorizzato.
Codici informativi
1 Viene visualizzato il codice informativo sotto insieme ad un allarme di errore.
2 Disattivare l'interruttore di emergenza e controllare le istruzioni sottostanti adottando l'azione opportuna
3 Il codice informativo scompare attivando l'interruttore di emergenza
Codici informativi Checklist 
POWERbot è rimasto impigliato, ostacolato o bloccato lungo il suo percorso di pulizia.► Disattivare l'interruttore di emergenza e spostare POWERbot in un'altra zona. 
Corpo estraneo impigliato nella spazzola principale.► Disattivare l'interruttore di emergenza e rimuovere gli oggetti estranei dalla spazzola di pulizia. 
Corpo estraneo impigliato nella ruota di guida sinistra.► Disattivare l'interruttore di emergenza e rimuovere il corpo estraneo dalla ruota di guida. 
Corpo estraneo impigliato nella ruota di guida destra.► Disattivare l'interruttore di emergenza e rimuovere il corpo estraneo dalla ruota di guida. 
Controllare il sensore paracolpi.► Disattivare l'interruttore di emergenza e riattivarlo.► Se il codice di errore visualizzato non scompare, verificare l'eventuale presenza di un corpo estraneo tra il paracolpi e l'apparecchio. Nel caso vi sia un corpo estraneo, estrarre delicatamente il paracolpi e rimuoverlo. 
Sul sensore ostacoli si è accumulato dello sporco.► Disattivare l'interruttore di emergenza e pulire i sensori anteriore e posteriore con un panno morbido. 
Sul sensore di dislivello si è accumulato dello sporco.► Disattivare l'interruttore di emergenza e pulire il sensore di dislivello con un panno morbido. 
Controllare la scheda madre.► Spegnere e riavviare l'apparecchio. In caso il problema persista, contattare un Centro di assistenza autorizzato.
Risoluzione dei problemi
Sintomo Checklist POWERbot non funziona. ▸ Controllare l'attivazione dell'interruttore di emergenza.▸ Controllare che tutte le icone siano visualizzate sul display.▸ Verificare che la batteria di POWERbot non sia scarica.- Se sul display viene visualizzato "Lo", posizionare POWERbot nella docking station per ricaricare la batteria.- Quando la spia di carica della batteria lampeggia, posizionare manualmente POWERbot nella docking station per ricaricarlo. (Solo SR1*M701*** Series)▸ Se il telecomando non funziona, sostituire le batterie (tipo AAA). POWERbot si arresta durante il ciclo di pulizia. ▸ Se sul display viene visualizzato "Lo", posizionare POWERbot nella docking station per ricaricare la batteria.▸ Quando la spia di carica della batteria lampeggia, posizionare manualmente POWERbot nella docking station per ricaricarlo. (Solo SR1*M701*** Series)▸ Se POWERbot rimane bloccato in ostacoli quali cavi, soglie o altro, sollevarlo per liberarne il movimento.- Se nella ruota di guida rimangono impigliati tessuti o lacci, spegnere il dispositivo e rimuovere eventuali occlusioni prima di utilizzare nuovamente l'apparecchio. La potenza di aspirazione è bassa. ▸ Quando il contenitore di raccolta polvere è troppo pieno, la potenza di aspirazione può risultare inferiore. Disattivare l'interruttore di emergenza e vuotare il contenitore di raccolta polvere.▸ Se l'aspirazione (situata sul fondo di POWERbot) viene ostruita da corpi estranei, disattivare l'interruttore di emergenza e rimuoverli.▸ Se la rumorosità aumenta improvvisamente, disattivare l'interruttore di emergenza e vuotare il contenitore di raccolta polvere. POWERbot non riesce a individuare la base di ricarica. ▸ Controllare se si è verificato un blackout o se il cavo di alimentazione è stato scollegato.▸ Rimuovere eventuali ostacoli intorno alla docking station che possano ostacolare l'accesso di POWERbot.▸ In caso di presenza di corpi estranei sui contatti di ricarica, la ricarica ne sarà influenzata. Rimuovere eventuali corpi estranei dai contatti di ricarica. POWERbot pulisce improvvisamente in diagonale. ▸ Verificare se la docking station sia installata lungo le venature di un parquet o di piastrelle.▸ POWERbot può iniziare a pulire in diagonale qualora si rechi in un'altra zona di pulizia seguendo il percorso più corto. Può anche iniziare a pulire in diagonale qualora urti contro ostacoli con quell'angolazione, se ha avuto accesso alla docking station con quella angolazione, o se la trama del pavimento in legno o ceramica segue quella angolazione. La pulizia di un singolo punto non viene eseguita. ▸ Puntando la luce rossa direttamente verso POWERbot, questo potrebbe non spostarsi nella direzione desiderata.- Puntare la luce rossa sul pavimento a una distanza di 0,5 m da POWERbot.※ Non utilizzare il puntatore in piena luce del sole, sotto una luce intensa o su pavimenti scuri.
Risoluzione dei problemi
Sintomo Checklist Ho installato la app SmartThings, ma POWERbot non riesce a connettersi. ▶ Una volta effettuata la connessione del router wireless e del POWERbot mediante un Easy-Setup è possibile usare il prodotto. Non riesco ad accedere al mio account Samsung. ▶ Controllare la proprio ID e la propria password sullo schermo nella schermata dell'account Samsung. Viene visualizzato un messaggio che indica un malfunzionamento durante l'impostazione Easy-Setup. ▶ Il mancato funzionamento temporaneo potrebbe essere dovuto alla eccessiva distanza dal router wireless o ad altri ostacoli. Attendere qualche minuto e riprovare. I prodotti non funzionano nonostante lo smart phone sia regolarmente connesso al POWERbot. ▶ Chiudere la app SmartThings ed eseguirla nuovamente, oppure sconnettere lo smartphone dal router wireless e ricollegarlo. Spegnere l'alimentatore del POWERbot, quindi riaccenderlo, attendere per un minuto o più, quindi eseguire nuovamente la app SmartThings. Le funzioni della app SmartThings non hanno effetto. ▶ Controllare se è stata impostata sul telecomando la funzione di blocco del comando a distanza di POWERbot. (quando la funzione comando a distanza è bloccata la spia Wi-è spenta). La app SmartThings Robot vacuum app non viene eseguita. ▶ Verificare che POWERbot sia connesso al router wireless. POWERbot non è connesso al Wi-Fi. ▶ Verificare lo stato di impostazione del router wireless. La funzione Controllo potenza intelligente funziona solamente su un pavimento normale. ▶ Verificare se il pavimento è livellato in quanto POWERbot non funziona se il corpo non è sollevato leggermente dalla superficie di appoggio.▶ Verificare l'eventuale presenza di corpi estranei sul sensore di dislivello situato sul fondo di POWERbot.▶ Verificare se il pavimento è di colore scuro. La funzione Controllo potenza intelligente non funziona. ▶ Quando POWERbot pulisce un tappeto a pelo raso e colori sgargianti, potrebbe confonderlo con un pavimento rendendo quindi inaccessibile la funzione Controllo potenza intelligente. La funzione Edge clean master non funziona. ▶ Quando POWERbot non riesce a riconoscere una parete, la funzione Edge clean master potrebbe non funzionare.- Quando un ostacolo composto da materiale riflettente è posizionato di fronte alla parete- Quando la parete stessa è composta da materiale riflettente- Quando la parete è di colore scuro La funzione Edge clean funziona anche in assenza di pareti o angoli. ▶ Verificare se vi sono oggetti piccoli posizionati in luoghi molto angusti.▶ Quando POWERbot riconosce l'ostacolo davanti a sé come una parete, la funzione Edge clean funziona correttamente. La funzione Edge clean funziona anche se POWERbot non ha raggiunto una parete o un angolo. ▶ Quando POWERbot rileva un grande angolo, la funzione Edge clean funziona anche senza raggiungere la parete o l'angolo.
\* Samsung Electronics dichiara che l'apparecchiatura radio aderisce alla direttiva 2014/53/EU. Il testo integrale della dichiarazione di conformità EU è disponibile al seguente indirizzo: La dichiarazione ufficiale di conformità è disponibile su http://www.samsung.com, selezionare supporto> Cerca Supporto Prodotto e inserire il nome del modello.
Sintomo Checklist La app SmartThings non può essere installata. ► La app SmartThings è eseguibile su Android OS 6.0 o successivi, iOS 10 o successivi.► La versione operativa di supporto della app SmartThings potrà variare in seguito.► Per i dispositivi smart instradati, l'installazione standard e l'uso non è garantito. Viene visualizzato un messaggio relativo alla mancata registrazione del prodotto. ► Riprovare la procedura di registrazione del prodotto seguendo le indicazioni riportate nei messaggio visualizzati.► Vedere "Impostazione del router wireless" nel Manuale dell'utente.► Seguire le fasi per il completamento della registrazione del prodotto nella sezione del manuale dell'utente "Aggiungere un dispositivo alla app SmartThings"► Qualora la registrazione del prodotto non venga completata più volte, reimpostare il POWERbot e lo Smartphone, eseguire nuovamente la app SmartThings e riprovare la registrazione del prodotto.► Per l'accesso alla App e la registrazione del prodotto è necessario usare lo stesso account Samsung.► Tutti gli utenti devono usare l'account Samsung creato nello stesso paese. Durante la registrazione del prodotto, il tasto di ricarica viene tenuto premuto come indicato ma non viene visualizzato il passaggio successivo. ► Premere il tasto di ricarica fino ad avvertire un segnale acustico.► Se il passaggio successivo non compare entro pochi secondi, premere il tasto di ricarica un'altra volta. Durante la registrazione del prodotto, non si riesce ad individuare il router wireless al quale collegarsi. ► Annullare la procedura di registrazione del prodotto, eseguire nuovamente la app SmartThings e riprovare la procedura di registrazione del prodotto. Durante la registrazione del prodotto, la password 1111122222 dell'AP non viene inserita correttamente. ► Tenere premuto "[robot vacuum] Samsung" nell'elenco dei dispositivi in rete ed eliminare la rete per inizializzare la password. Durante la registrazione del prodotto, la password del router wireless in connessione non viene inserita correttamente. ► Annullare la procedura di registrazione del prodotto, eseguire nuovamente la app SmartThings e riprovare la procedura di registrazione del prodotto.► Tenere premuto il router wireless al quale si desidera collegarsi nell'elenco dei dispositivi in rete ed eliminare la rete per inizializzare la password. Viene quindi creato un collegamento tra la app SmartThings ed il POWERbot mediante la registrazione del prodotto. ► Aggiornare lo schermo ed attendere.► Eseguire nuovamente la app SmartThings.► Verificare che non vi siano problemi di connessione alla rete Internet. In particolare, un firewall potrebbe interferire con il funzionamento regolare.
Risoluzione dei problemi
Sintomo Checklist Durante il normale funzionamento della app viene quindi creato un collegamento tra la app SmartThings ed il POWERbot. ► Se il POWERbot è distante dal router wireless, possono verificarsi problemi di connessione.► Reimpostare il POWERbot e lo smartphone, e verificare nuovamente la connessione.► Se i problemi di irregolarità di connessione persistono, effettuare nuovamente la registrazione del prodotto.► Se la SSID/password del router wireless viene modificata, è necessario effettuare nuovamente la registrazione del prodotto. Il controllo mediante la app SmartThings non è attivo in quanto la funzione di controllo remoto è disabilitata. ► La funzione di controllo remoto è disabilitata. Verificare che la funzione di controllo remoto sia abilitata mediante un telecomando.
Avvertenze sulla batteria

Non rimuovere o tentare di rimuovere autonomamente la batteria inserita all'interno del prodotto. Per sostituire la batteria, contattare un tecnico qualificato o il Centro di assistenza autorizzato.
Queste istruzioni sono state preparate ad uso esclusivo del tecnico o del centro assistenza.
PER LA PROPRIA SICUREZZA, NON TENTARE DI RIMUOVERE LA BATTERIA AUTONOMAMENTE NÉ SMALTIRLA NEL FUOCO. NON DISASSEMBLARE, ROMPERE O FORARE LA BATTERIA.
Come estrarre la batteria
Per smontare POWERbot, estrarlo dal caricatore / docking station. Per ragioni di sicurezza, spegnere POWERbot prima di disassemblarlo.

natural_image
Hand using a pipette to apply material to a component on a device (no text or symbols visible)
1 Appoggiare POWERbot capovolto e rimuovere le 2 viti.

natural_image
Line drawing of a hand inserting a component into a device casing (no text or symbols)
2 Rimuovere il coperchio del contenitore di raccolta polvere.

text_image
Diagram showing a device with labeled parts and an inset view of a hand interacting with a component, likely illustrating a mechanical or electrical assembly.
3 Rimuovere la batteria dall'alloggiamento e scollegare il connettore.

Corretto smaltimento delle batterie di questo prodotto
(applicabile nei paesi dotati di sistemi di raccolta e restituzione delle batterie).
L'etichetta presente sulla batteria, sul manuale o sull'imballaggio indica che la batteria di questo prodotto non deve essere smaltita insieme ai rifiuti domestici. Laddove apposti, i simboli chimici Hg, Cd o Pb indicano che nella batteria vi è un contenuto di mercurio, cadmio o piombo superiore rispetto ai livelli di riferimento indicati nella Direttiva CE 2006/66.
La batteria incorporata nel prodotto non è sostituibile dall'utente. Per informazioni sulla sostituzione, rivolgersi ad un Centro di assistenza autorizzato. Non tentare di rimuovere la batteria né di smaltirla nel fuoco. Non disassemblare, rompere o forare la batteria. Per smaltire il prodotto recarsi presso un centro di raccolta rifiuti dove verranno seguite le corrette procedure di riciclo e trattamento del prodotto, compresa la batteria.
Dichiarazione Open Source
Il software incluso in questo prodotto contiene codice open source. E' possibile ottenere il codice sorgente corrispondente completo per un periodo di tre anni dall'ultima spedizione di questo prodotto inviando una email a mailto:oss.request@samsung.com.
È inoltre possibile ottenere il codice sorgente corrispondente completo su un supporto fisico come un CD-ROM; in tal caso verrà addebitato un importo minimo.
Il seguente URL http://opensource.samsung.com/opensource/VR7000\_A20\_TZ/seq/0 porta alla pagina di download del codice sorgente reso disponibile e alle informazioni di licenza open source relative al prodotto. Questa offerta è valida per chiunque riceva questa informazione.

text_image
QR code image containing encoded data, no visible human-readable text
Specifiche
Classificazione Articolo Informazioni dettagliate SR1*M701*** SR1*M702***SR1*M703*** Specifiche meccaniche (POWERbot) Dimensioni (P x A x L) 340 mm x 97 mm x 348 mm Peso 4 kg Sensore Riconoscimento della forma del soffitto (Visionary mapping plus TM) Tipo di tasti di POWERbot Tipo touch Specifiche di alimentazione Tensione di corrente 100-240 V~, 50 Hz/60 Hz Consumo elettrico 80 W Specifiche delle batterie 21,6 V/ 38,8 Wh Pulizia Tipo di ricarica Ricarica automatica/Ricarica manuale Modalità di pulizia Auto, Spot, Giornaliero Auto, Spot, Repeat, Manual, Una volta, Giornaliero Tempo di ricarica Circa 240 minuti Durata pulizia(calcolata sulla base di pavimenti con superfici lisce) Modalità Turbo Circa 30 minuti Modalità Normal Circa 60 minuti Wi-Fi Gamma frequenze 2412 - 2472 MHz Potenza di trasmissione (Max) 20 dBm
Classificazione Articolo Informazioni dettagliate Specifiche meccaniche (POWERbot) Dimensioni (P x A x L) 340 mm x 97 mm x 348 mm Peso 4,3 kg Sensore Riconoscimento della forma del soffitto (Visionary mapping plus TM) Tipo di tasti di POWERbot Tipo touch Specifiche di alimentazione Tensione di corrente 100-240 V~, 50 Hz/60 Hz Consumo elettrico 130 W Specifiche delle batterie 21,6 V/ 77,8 Wh Pulizia Tipo di ricarica Ricarica automatica/Ricarica manuale Modalità di pulizia Auto, Spot, Repeat, Manual, Una volta, Giornaliero Tempo di ricarica Circa 160 minuti Durata pulizia(calcolata sulla base di pavimenti con superfici lisce) Modalità Turbo Circa 30 minuti Modalità Normal Circa 60 minuti Modalità Quiet Circa 90 minuti Wi-Fi Gamma frequenze 2412 - 2472 MHz Potenza di trasmissione (Max) 20 dBm
\* Ai fini di migliorare il prodotto, la forma e le specifiche del prodotto sono soggette a modifiche senza alcun preavviso.
\* I tempi di ricarica e di pulizia possono differire in base alle condizioni d'uso.
series>
1. Mute 2. Information Indicator 3. \*Remote control Off/On indicator 4. \*Wi-Fi 5. Battery indicator 6. One-time/Daily schedule 7. Number display 8. Spot clean mode 9. Manual clean mode 10. Repeat clean mode 11. Normal mode 12. Turbo mode 13. Spot cleaning button 14. Start/Stop button 15. Recharging buttonSetting time/schedule
[A Type, B Type] Only Auto clean mode can be scheduled.Setting the time
You must set the current time before using the One-time/daily schedule. flowchart
graph LR
A["Start setting"] --> B["Clock"]
B --> C["Select "Hour" Select "Minute""]
C --> D["Select "AM/PM" Setting complete"]
D --> E["Skip to previous, next setting"]
Setting the schedule
Setting/cancelling the schedule can only be done while POWERbot is docked on the docking station. flowchart
graph LR
A["Start setting Select "One-time" or "Daily" schedule"] --> B["Select "Hour""]
B --> C["Select "Minute" Select "AM/PM" Setting"]
C --> D["Skip to previous, next setting"]
Cancelling during setup
 ▶Setting will be canceled automatically when there's no input for 7 seconds.Cancelling One-time/Daily schedule
| When both One-time/Daily schedule is set | Schedule or Schedule or Cancel (3sec) | |||||
| Press for 3 sec. Select the schedule Cancel complete | ||||||
| When either one ofOne-time or Dailyschedule is set | ScheduleCancel (3sec)Press for 3 sec. | |||||
Setting the time
You must set the current time before using the One-time/daily schedule. flowchart
graph LR
A["Clock"] --> B["Start setting Select "Hour" Select "Minute""]
B --> C["Select "AM/PM"Setting complete"]
C --> D["Skip to previous, next setting"]
Setting the schedule
Setting/cancelling the schedule can only be done while POWERbot is docked on the docking station. flowchart
graph LR
A["Start setting Select "One-time" or "Daily" schedule"] --> B["Select "Hour""]
B --> C["Select "Minute" Select "AM/PM" Setting"]
C --> D["End"]
E["Schedule Cancel (3sec)"] --> A
F["Button"] --> C
Cancelling during setup
 ▶Setting will be canceled automatically when there's no input for 7 seconds.Cancelling One-time/Daily schedule
| When both One-time/ Daily schedule is set | [xWYD] OR → Press for 3 sec. Select the schedule Cancel complete |
| When either one of One-time or Daily schedule is set | ScheduleCancel (3sec)Press for 3 sec. |
Setting time/schedule
[SR1\*M701\*\*\* series] For the models which do not include a remote controller, schedule setting is available as below.Setting the schedule
Setting/cancelling the schedule can only be done while POWERbot is docked on the docking station.  Press for 3 sec.   When the schedule LED is turned on, Daily schedule is set. \*The time you press the button will be set as a schedule. Cleaning will be automatically done everyday according to the schedule time.Cancelling daily schedule
| When a daily schedule is set | Press for 3 sec. |
Cleaning and maintaining
 You must turn off the emergency switch before cleaning POWERbot.Cleaning the dustbin
text_image
① ② PUSHtext_image
Diagram showing two labeled parts of a mechanical device with directional arrows indicating movement or assembly.natural_image
Illustration of hands pouring liquid into a trash bin with a spray can (no text or symbols)text_image
Illustration showing two open containers with labeled parts and a sun icon, illustrating a process for cleaning or storage.text_image
Diagram illustrating three steps of installing a device into a device, with numbered instructions and visual icons.text_image
'Click'Cleaning the sensors and the camera
Lightly wipe with soft cloth. Do not use water or cleaning solutions. text_image
Camera Front sensor window Cliff sensors Rear sensor windowCleaning and maintaining
Cleaning the brush and Auto shutter tool
Brush design may differ depending on the model. Do not clean the brush with water. text_image
Diagram showing a device with labeled parts and a magnified view of the component, likely illustrating a mechanical or electronic assembly.natural_image
Illustration of a hand holding a tool over a device component, with an arrow indicating motion (no text or symbols present)natural_image
Illustration of a welding torch and tool interacting with a textured material (no text or symbols)text_image
Diagram showing three-step steps of a tool application: opening, cutting, and holding a pen.text_image
Diagram showing hands holding a device with a numbered step labeled '1' pointing to the component area.text_image
Diagram showing a hand holding a device with labeled parts and directional arrows indicating process stepstext_image
Diagram illustrating car gear shift and disassembly process with labeled arrows and a magnified inset showing tool insertion.text_image
Diagram showing hands operating a device with labeled components and a magnified view of a component with a downward arrow.Cleaning the Driving wheel
natural_image
Illustration of hands holding a device with internal components (no text or symbols visible)natural_image
Hand using a tool to lift a tire on a road surface (no text or symbols visible)SmartThings App
The SmartThings App is only compatible with models that have a Wi-Fi function.Setting up the wireless router
▶ Please refer to the user manual of your wireless router if you have access problems. Samsung POWERbot supports only Wi-Fi 2.4 Ghz. Samsung POWERbot supports IEEE 802.11b/g/n and Soft-AP. - IEEE 802.11n is recommended. ▶ Samsung POWERbot supports only DHCP (Dynamic Host Configuration Protocol). Please make sure that the DHCP server option is activated on your wireless router. ▶ POWERbot supports the WEP-OPEN, WPA-PSK/TKIP, and WPA2-PSK/AES for the authentication and encryption protocols. \- WPA2-PSK/AES is recommended. \- Confirm that your router has a unique SSID and password. ▶ The quality of your wireless network connection may be influenced by the surrounding wireless environment. ▶ If your Internet service provider has permanently registered the MAC address (a unique identification number) of your PC or modem, your POWERbot may not be able to connect to the Internet. Ask your Internet service provider about the procedure to connect an apparatus other than a PC to the Internet. ▶ If your internet service provider requires your ID or password to connect to the internet, your POWERbot may not be able to connect. If this is the case, you must enter your ID or password when connecting to the Internet. ▶ The POWERbot may not be able to connect to the Internet because of firewall issues. Contact your Internet service provider to resolve these issues. ▶ Some wireless routers may transmit an abnormal Domain Name Server (DNS) address even if the Internet is not connected. If this occurs, contact the manufacturer of your wireless router and your Internet service provider. ▶ If you still cannot connect to the Internet even after trying the procedure provided by your Internet service provider, please contact an authorized Samsung service center. ▶ If your router is not a Wi-Fi certified product, The POWERbot may not be able to connect to the Internet.SmartThings App
Downloading the SmartThings App
▶ Download and install the SmartThings app from the markets (Google Play Store, Apple App Store, or Samsung Galaxy Apps). To find the app, use the keyword "SmartThings". Note
SmartThings is incompatible with tablets and some mobile devices. \- Android 6.0 or later (at least 2GB of RAM) is recommended. ▶ iPad and some mobile devices may not be supported. \- iOS 10.0 or later / iPhone 6 or later is supported. - Visit Play Store or App Store to see if your mobile device is compatible with SmartThings. ▶ The supported features are subject to change without any prior notice.Setting up a Samsung account
▶ You must sign in to a Samsung account before using the SmartThings app. ▶ To set up a Samsung account, you can follow the directions provided by the SmartThings app. ▶ Or, if you have a Samsung smartphone, you can add your Samsung account in the setting app of your smartphone. Then, it will automatically sign in to your Samsung account.Adding a device to the SmartThings APP
1. Connect your smartphone to your wireless router. - If the smartphone is not connected, turn on the Wi-Fi in the Settings App and select a wireless router you want to connect to. - Disable the "Mobile data" use option of a smartphone to use Wi-Fi only and connect a device. 2. Launch the SmartThings app on your smartphone. 3. If a pop-up saying that a new device has been found appears, tap ADD NOW. \- If the pop-up doesn't appear, tap the + button and select the device which you want to connect from the list of AVAILABLE DEVICES. \- If your device doesn't appear in the list, add the device manually by selecting the device type and selecting the specific device model. 4. [Android] The connection to your device will be progressed automatically. \- [iOS] Open the setting app, and select [robot vacuum] Samsung in the Wi-Fi list. 5. Provide the authentication when you are directed to do so. 6. [Android] The connection to your wireless router will be progressed automatically. \- [iOS] Open the setting app, and select the wireless router in the Wi-Fi list. 7. The remaining setup will be automatically done. Then, a new Device Card will be added. Note
▶ If you cannot complete the product registration, please take the following steps. - Try the registration procedure again as you have directed by the pop-up messages. - Confirm that the UPnP option of your wireless router is active, and then try the registration procedure again. - Confirm that your wireless router is operating in wireless mode, and then try the registration procedure again. - If you have two or more POWERbots, turn off the other POWERbots, and then try to register your POWERbot again. - If there is any other wireless router that has the same SSID as your wireless router, the registration might be failed. ▶ Remote control and Wi-Fi indicator| On | Remote control is blocked. (The remote controller can still be allowed.) | | |
| Off | Remote control is allowed. | ||
| On | The POWERbot is connected to the wireless router. | ||
| Off | The POWERbot is trying to connect the wireless router. |
SmartThings App
Software Update
- When the POWERbot is charging on the docking station, the POWERbot connects to the server and then checks if a software is available. If a new software is found, POWERbot will automatically download and update it. If "UP" is displayed on the display panel while the POWERbot is charging, it means that an update is in progress. Please wait for completing the update before using the POWERbot.Using the SmartThings APP
\- When you tap the device card on the SmartThings app, the plug-in for your device will be launched. text_image
ROBOT #2 OFFICE HELP ⑪ ① ② AUTO SPOT ④ Fully charged ⑤ Battery ⑥ Suction power Normal ⑦ Repeat ⑧ Schedule ⑨ History ⑩Notes and cautions
Charging
Note
▶ If the battery overheats during charging, it may take longer to charge. ▶ When automatic charging is not working, do the following: - Turn the emergency switch (on the bottom of POWERbot) off and on again. - Unplug the docking station's power plug and then plug it back on. - Unplug the docking station, and then check whether there is any foreign matter on the charge pins and clean POWERbot and the charge pins of the docking station with a dry cloth or rag. - Check for any obstacles such as reflective objects, chairs, etc. near the docking station. ▶ If POWERbot is left detached from the docking station, the battery will drain naturally. \- Try to keep POWERbot being charged on the docking station. (However, turn off the emergency switch and leave the docking station unplugged when planning to leave the house for long periods of time by going on a business trip or vacation, etc.)Using
Note
▶ The POWERbot may get caught on thresholds, etc. during cleaning. - To restart operation, shut off the emergency switch, move the POWERbot to an area where it can move easily, and then turn on the power again. ▶ The POWERbot cannot completely clean areas it cannot enter, such as corners, between the wall and sofa, etc. - Please use another cleaning tool to clean them regularly. ▶ The POWERbot cannot vacuum clumps of dirt, so some may remain on the floor after cleaning. - Please use another cleaning tool to clean them regularly. ▶ If POWERbot is turned off, you cannot turn it on by pressing the Power button on the remote controller. Press and hold the [Start/Stop] button on POWERbot. ▶ You cannot select and have the POWERbot execute Spot clean mode while it is charging. ▶ If you press Manual clean / Point cleaning button while charging, the POWERbot will be detached from the docking station and then turn into the standby mode.Cleaning and maintenance
Note
▶ If you washed the dustbin and filter with water - Dustbin: Completely wipe out the water. - Filter: Completely dry it in the shade before using. - When cleaning the auto shutter tool, do not pull the auto shutter tool out too hard. Caution
▶ Watch your fingers when attaching or detaching the filter, since they may get stuck in the dustbin's intake. ▶ To avoid blockages by foreign matter, do not let the POWERbot vacuum up toothpicks, cotton swabs etc. ▶ If it is difficult to remove foreign matter from the brush, contact an authorized Samsung service center.Notes and cautions
▶ Since the brush removes dirt from the floor during cleaning, foreign matter such as thread, long hair, etc. may get caught in it. For the best cleaning results, check and clean it regularly. ▶ If a brush or brush cover is not assembled correctly after the maintenance work, scratches may occur on the floor, or product malfunction may occur. Therefore, assemble them correctly by checking the maintenance method.About the battery
Note
▶ Purchase batteries at authorized Samsung centers and check for the symbol (SAMSUNG) stuck on the battery and the model name before purchasing. This battery is exclusively for the Samsung Electronics POWERbot. Do not use it for any other product. ▶ Do not disassemble or modify the battery. ▶ Do not throw the battery out in fire or heat it. ▶ Do not connect any metallic object to the charging contacts (+, -). ▶ Store the battery indoors (at 0 °C\~40 °C). ▶ If the battery malfunctions, do not disassemble it yourself. Contact your nearest Samsung service center. - Battery charging time and usage time may decrease the more the battery is used. If the battery’s lifespan has been exceeded and it no longer docking stations properly, have it replaced at a Samsung service center. ▶ The battery warranty period is 6 months from the date of purchase.About the IrDA sensor
Caution
▶ Infrared signal transmission may not be smooth in locations exposed to halogen lamps or in outdoor locations. ▶ The POWERbot uses 3 types of infrared devices. Each of the devices has a different priority level. A device may not work if it's signal is superseded by a device with a higher priority. \- Infrared signal Priority: Remote control > Docking station ▶ Different infrared signals may interfere with one another and cause the devices to malfunction if they are used together in a small space or in close proximity. ▶ If more than one POWERbot is used simultaneously, they may malfunction due to interference between infrared signals.Information codes
flowchart
graph LR
A["Sensor Input"] --> B["Sensor Output"]
B --> C["Information Code"]
C --> D["Data Output"]
D --> E["Feedback Loop"]
Information codes
| The POWERbot is caught, stuck or trapped while moving around.►Turn off the emergency switch and move the POWERbot to another area. |
| Foreign matter caught in the brush.►Turn off the emergency switch and remove the foreign matter from the brush. |
| Foreign matter caught in the left Driving wheel.►Turn off the emergency switch and remove the foreign matter from the Driving wheel. |
| Foreign matter caught in the right Driving wheel.►Turn off the emergency switch and remove the foreign matter from the Driving wheel. |
| Bumper sensor needs to be checked.►Turn off the emergency switch and turn it back on.►When information code does not disappear, check if there's any small foreign matter between the bumper and the main body. If there is, pull the bumper slightly and remove the foreign matter. |
| Foreign matter accumulated on the obstacle sensor.►Turn off the emergency switch and clean the front and rear sensor with a soft cloth. |
| Foreign matter accumulated on the cliff sensor.►Turn off the emergency switch and clean the cliff sensor with a soft cloth. |
| Main PCB needs to be checked.►Turn off and restart the product. If the same problem occurs repeatedly, a service check is required. |
Troubleshooting
| Symptom Checklist | |
| The POWERbot is not working at all. | ▶Check if the emergency switch is on.▶Check if all the icons are displayed on the display panel.▶Check if the POWERbot's battery is depleted.- When "Lo" is displayed, place the POWERbot on the docking station to charge it.- When the battery indicator blinks, manually place the POWERbot on the docking station to charge. (Only SR1*M701*** series)▶Replace the batteries (AAA type) if the remote controller is not working. |
| The POWERbot has stopped during cleaning. | ▶When "Lo" is displayed on the display panel, place the POWERbot on the docking station to charge it.▶When the battery indicator blinks, manually place the POWERbot on the docking station to charge. (Only SR1*M701*** series)▶When POWERbot is immobilized by an obstacle such as a cord, threshold etc, pick it up and move it away from the obstacle.- If any fabric or string is caught in a drive wheel, turn off the emergency switch and remove the fabric or string before using it again. |
| Suction power is weak. | ▶When there's too much dust in the dustbin, suction power may get weakened. Turn off the emergency switch and empty the dustbin.▶If the intake (on bottom of POWERbot) is blocked by foreign matter, turn off the emergency switch and remove foreign matter from the intake.▶When noise suddenly increase, turn off the emergency switch and empty the dustbin. |
| The POWERbot cannot find the docking station. | ▶Check if there's a power failure or whether the power plug is unplugged.▶Remove any obstacles around the docking station that may prevent POWERbot from returning to the docking station.▶When there's foreign matter on the charge pins, charging can be affected. Clean the foreign matter off the pins. |
| The POWERbot suddenly cleans diagonally. | ▶Check if the docking station is installed along the grain of wooden floors or tiles.▶The POWERbot may clean in a diagonal direction if it is moving to another area using the shortest route. It may also move at a diagonal if it made contact with an obstacles at that angle, if it was charged at the docking station at an angle, or if the grain of the wooden/tile floor skewed is in that direction. |
| Point cleaning is not working. | ▶If you point the red light directly at POWERbot, it may not move desired direction.- Point the red light on the floor within 0.5 m of POWERbot.* Do not use point cleaning in direct sunlight, under bright light, or on dark floors. |
Troubleshooting
| Symptom Checklist | |
| I have installed the SmartThings app, but the POWERbot fails to be connected. | ►You can use the product after connecting the wireless router and the POWERbot through Easy-Setup according to the procedure. |
| I fail to log into the Samsung account. | ►Check your ID and password on the screen of the Samsung account. |
| There appears a message saying there is a failure during Easy-Setup. | ►You may have failed temporarily due to the distance from the wireless router or other obstacles. Please try again after a while. |
| The products do not work even though the smartphone is normally connected to the POWERbot. | ►Turn off the SmartThings app and then run it again, or disconnect the smartphone from the wireless router and then connect it again. Or turn off the power supply of the POWERbot, turn it on, wait for a minute or longer, and then run the SmartThings app again. |
| The functions of the SmartThings App do not work. | ►Check if the remote control blocking function of the POWERbot is set. (When the remote control is locked, the Wi-Fi indicator is turned off.) |
| The SmartThings Robot Vacuum App fails to get started. | ►Check if the POWERbot is connected to the wireless router. |
| POWERbot is not connected to Wi-Fi. | ►Check the setting status of the wireless router. |
| Intelligent power control function works on a normal floor. | ►Check whether the floor is not even and then the POWERbot works with its body a bit lifted up.►Check whether there are any foreign matters on the cliff sensor which is at the bottom of the POWERbot.►Check whether the floor color is dark. |
| Intelligent power control function does not work. | ►When the POWERbot cleans a carpet with short fibre and bright color, it may recognize the carpet as a floor and then the Intelligent power control function may not work. |
| Edge clean master function does not work. | ►When POWERbot cannot recognize the wall, the Edge clean master may not work.- When an obstacle made of reflective material is in front of the wall- When the wall itself is made of reflective material- When the wall is a dark color |
| Edge clean master function works though there is no wall or corner. | ►Check whether small obstacles are arranged in a narrow space.►When the POWERbot recognizes the front obstacle as a wall, Edge clean master function may work. |
| The Edge clean master function works though the POWERbot has not approached a wall or corner. | ►When the degree of the angle of a corner which the POWERbot detects is large, the Edge clean master function may work without approaching the wall or corner. |
| Symptom Checklist | |
| SmartThings App cannot be installed. | ►SmartThings App operates on Android OS 6.0 or later, iOS 10 or later.►The supporting OS version for SmartThings App may change later.►For rooted smart devices, standard installation and use will not be guaranteed. |
| A message of product registration failure appears. | ►Try the product registration procedure again by referring to the pop-up messages.►Please refer to the "Setting up the wireless router" in the user manual.►Please refer to the steps for completing the product registration in the user manual section "Adding a device to the SmartThings APP".►When the product registration fails repeatedly, reset the POWERbot and Smartphone, run the SmartThings App again and try the product registration.►The same Samsung account should be used for the login of App and product registration.►All users should use the Samsung account issued by the same country. |
| During product registration, recharging button is pressed and held as instructed but the next step does not appear. | ►Press the recharging button until you hear it beep.►If the next step does not appear within several seconds, press the recharging button one more time. |
| During product registration, the wireless router I want to connect cannot be searched. | ►Cancel the product registration, run the SmartThings App again, and try the product registration again. |
| During product registration, the AP password 1111122222 is not input correctly. | ►Press and hold the "[robot vacuum] Samsung" on the network list and delete the network to initialize the password. |
| During product registration, the password of the connecting wireless router is not input correctly. | ►Cancel the product registration, run the SmartThings App again, and try the product registration again.►Press and hold the wireless router you want to connect on the network list, and delete the network to initialize the password. |
| A connection cut between the SmartThings App and the POWERbot occurs though the product registration is completed. | ►Refresh the screen and wait.►Run the SmartThings App again.►Check whether there is an internet connection problem. Especially, a firewall may interrupt standard operation. |
Troubleshooting
| Symptom Checklist | |
| A connection cut between the SmartThings App and the POWERbot suddenly occurs during normal operation of the app. | ►If the POWERbot is distant from a wireless router, connection cut may occur.►Reset the POWERbot and the smartphone, and check the connection again.►If the connection cut occurs repeatedly, try the product registration again.►When the SSID/password of a wireless router is changed, try the product registration again. |
| Controlling with SmartThings App does not work since the remote control function is disabled. | ►Remote control function is disabled status. Make the remote control function enabled status with a remote controller. |
Warnings about battery
 You must not remove (or attempt to remove) the battery incorporated in this product on your own. To replace the battery, you must contact your service provider or an independent qualified professional. These instructions have been prepared for the exclusive use of your service provider or independent qualified professional. FOR YOUR OWN SAFETY, DO NOT ATTEMPT TO REMOVE THE BATTERY ON YOUR OWN OR DISPOSE OF IT IN FIRE. DO NOT DISASSEMBLE, CRUSH OR PUNCTURE THE BATTERY.How to remove the battery
Remove POWERbot from the charger / docking station for disassembling. You must turn off POWERbot for safety before disassembling. natural_image
Hand using a screwdriver to apply a component on a mechanical part (no text or symbols visible)natural_image
Line drawing of a hand inserting a small object into a device panel (no text or symbols)text_image
Diagram showing a device with labeled parts and an inset view of a hand interacting with a component, likely illustrating a mechanical or electrical setup.Correct disposal of batteries in this product
(Applicable in countries with separate battery return systems.)
The marking on the battery, manual or packaging indicates that the battery in this product should not be disposed of with other household waste. Where marked, the chemical symbols Hg, Cd or Pb indicate that the battery contains mercury, cadmium or lead above the reference levels in EC Directive 2006/66. The battery incorporated in this product is not user replaceable. For information on its replacement, please contact your service provider. Do not attempt to remove the battery or dispose it in a fire. Do not disassemble, crush, or puncture the battery. If you intend to discard the product, the waste collection site will take the appropriate measures for the recycling and treatment of the product, including the batteryOpen Source Announcement
The software included in this product contains open source software. You may obtain the complete corresponding source code for a period of three years after the last shipment of this product by sending an email to mailto:oss.request@samsung.com. It is also possible to obtain the complete corresponding source code in a physical medium such as a CD-ROM; a minimal charge will be required. The following URL http://opensource.samsung.com/opensource/VR7000\_A20\_TZ/seq/0 leads to the download page of the source code made available and open source license information as related to this product. This offer is valid to anyone in receipt of this information. text_image
QR code image containing encoded data, no visible human-readable textSpecifications
| Classification Item | Detail information | |||
| SR1*M701*** | SR1*M702***SR1*M703*** | |||
| Mechanical specifications (POWERbot) | Size (D x H x L) 340 mm x 97 mm x 348 mm | |||
| Weight 4 kg | ||||
| Sensor | Ceiling shape recognition (Visionary mapping plus TM) | |||
| Button type of POWERbot Touch type | ||||
| Power specifications | Power voltage 100-240 V~, 50 Hz/60 Hz | |||
| Power consumption 80 W | ||||
| Battery specifications 21.6 V/ 38.8 Wh | ||||
| Cleaning | Charging type Automatic charging/Manual charging | |||
| Cleaning mode | Auto, Spot, Daily schedule | Auto, Spot, Repeat, Manual, One-time schedule, Daily schedule | ||
| Charging time Approximately 240 minutes | ||||
| Cleaning time (On the basis of hard floor) | Turbo mode Approximately 30 minutes | |||
| Normal mode Approximately 60 minutes | ||||
| Wi-Fi | Frequency range 2412 - 2472 MHz | |||
| Transmitter power(Max) 20 dBm | ||||
| Classification Item Detail information | |||
| Mechanical specifications (POWERbot) | Size (D x H x L) 340 mm x 97 mm x 348 mm | ||
| Weight | 4.3 kg | ||
| Sensor | Ceiling shape recognition (Visionary mapping plus TM) | ||
| Button type of POWERbot Touch type | |||
| Power specifications | Power voltage 100-240 V~, 50 Hz/60 Hz | ||
| Power consumption | 130 W | ||
| Battery specifications 21.6 V/ 77.8 Wh | |||
| Cleaning | Charging type Automatic charging/Manual charging | ||
| Cleaning mode | Auto, Spot, Repeat, Manual, One-time schedule, Daily schedule | ||
| Charging time Approximately 160 minutes | |||
| Cleaning time (On the basis of hard floor) | Turbo mode Approximately 30 minutes | ||
| Normal mode Approximately 60 minutes | |||
| Quiet mode Approximately 90 minutes | |||
| Wi-Fi | Frequency range 2412 - 2472 MHz | ||
| Transmitter power(Max) 20 dBm | |||
| Country Customer Care Center Web Site | ||
| SWITZERLAND | 0800 726 78 64 (0800-SAMSUNG) | www.samsung.com/ch/support (German)www.samsung.com/ch_fr/support (French) |
| AUSTRIA 080 | 0 72 67 864 (0800-SAMSUNG) www.samsung.com/at/support | |
POWERbot
Benutzerhandbuch
Serien SR1\*M70\*\*\*\*, SR2\*M70\*\*\*\* - Lesen Sie die Anweisungen sorgfältig durch, ehe Sie das Gerät in Betrieb nehmen. - Nur zum Einsatz in geschlossenen Räumen geeignet. natural_image
Black-and-white photo of a modern lounge chair with leather backrest and metallic armrest, featuring a pair of headphones placed on the backrest (no text or symbols visible)Inhalt
03 Sicherheitsinformationen 08 Installation Zubehör / Aufstellhinweise 10 Laden Automatisches Laden / Laden / Niedrige Akkuladung („Lo“) 12 Verwenden des POWERbot Ein-/Ausschalten / Auswählen des Reinigungsmodus / Verwenden der Spezialsaugfunktionen 15 Aufstellen des Virtual Guard Übersicht über den Virtual Guard / Einlegen der Batterien 17 Verwenden der Fernbedienung 20 Bezeichnungen der Teile Oberseite / Unterseite / Display 22 Uhrzeiteinstellung/Programmierung Einstellen der Uhrzeit / Einstellen eines Programms 25 Reinigung und Pflege Reinigen des Staubbehälters / Reinigen der Sensoren und der Kamera / Reinigen der Burste und des Auto-Shutters / Reinigen des Antriebsrads 27 SmartThings-App 31 Hinweise und Vorsichtsmaßnahmen Laden / Betrieb / Reinigung und Pflege / Informationen zum Akku / Infos zum IrDA-Sensor 33 Informationscodes 35 Fehlerbehebung 39 Warnhinweise zum Akku Entfernen des Akkus 40 Informationen über Open-Source-Software 41 Technische DatenSicherheitsinformationen
SICHERHEITSINFORMATIONEN
 \- Lesen Sie vor der Verwendung des Geräts das Benutzerhandbuch sorgfältig durch, und bewahren Sie sie zum späteren Nachschlagen auf.  \- Da die folgenden Hinweise zum Betrieb für verschiedene Modelle gelten, können die Eigenschaften Ihres Geräts leicht von den in dieser Bedienungsanleitung beschriebenen Merkmalen abweichen. SYMBOLE DER GEFAHREN-/WARNHINWEISE| WARNUNG | Dieses Symbol weist darauf hin, dass Lebensgefahr oder das Risiko ernsthafter Verletzungen besteht. |
| VORSICHT | Dieses Symbol weist darauf hin, dass die Gefahr von Personen- oder Sachschäden besteht. |
| HINWEIS | Dieses Symbol weist darauf hin, dass der folgende Text wichtige Zusatzinformationen enthält. |
Sicherheitsinformationen
WICHTIGE SICHERHEITSHINWEISE
Beim Umgang mit Elektrogeräten sind einige grundlegende Vorsichtsmaßnahmen wie u. a. die folgenden zu beachten:LESEN SIE VOR DER VERWENDUNG IHRES POWERbot SÄMTLICHE ANWEISUNGEN GRÜNDLICH DURCH.
Ziehen Sie den Stecker aus der Dose, wenn Sie das Gerät nicht verwenden und ehe Sie Wartungsarbeiten durchführen. WARNUNG: So verringern Sie die Gefahr von Verletzungen, Stromschlägen oder Bränden:ALLGEMEIN
- Verwenden Sie das Gerät nur wie in diesem Handbuch beschrieben. - Verwenden Sie weder den POWERbot noch die Lade-/Dockingstation, wenn sie beschädigt sind. - Wenn das Gerät nicht ordnungsgemäß arbeitet, heruntergefallen, beschädigt oder ins Wasser gefallen ist oder im Freien vergessen wurde, schicken Sie es an das nächstgelegene Kundendienstzentrum. - Berühren Sie die Lade-/Dockingstation und den POWERbot nicht mit nassen Händen. - Verwenden Sie ihn nur für trockene Flächen in geschlossenen Räumen. - Dieses Gerät darf von Kindern ab 8 Jahren und Personen mit verminderten körperlichen, sensorischen oder geistigen Fähigkeiten oder einem Mangel an Erfahrung und Wissen nur bedient werden, wenn sie unter Aufsicht stehen oder eine Unterweisung zum sicheren Umgang mit dem Gerät erhalten haben und die damit verbundenen Gefahren verstehen. Kinder dürfen nicht mit dem Gerät spielen. Kinder dürfen bei Reinigung und Wartung nur dann helfen, wenn sie dabei beaufsichtigt werden.Lade-/Dockingstation
- Modifizieren Sie den gepolten Stecker nicht, um ihn an eine ungepolte Steckdose oder ein ungepoltes Verlängerungskabel anschließen zu können. - Verwenden Sie das Gerät nicht im Freien oder auf nassen Flächen. - Ziehen Sie den Stecker der Lade-/Dockingstation aus der Dose, wenn Sie das Gerät nicht verwenden und ehe Sie Wartungsarbeiten durchführen. - Verwenden Sie nur die vom Hersteller mitgelieferte Lade-/Dockingstation. - Verwenden Sie niemals beschädigte oder lose Netzkabel, Netzstecker oder Steckdosen. - Ziehen und tragen Sie das Gerät nicht am Kabel, und verwenden Sie das Kabel nicht als Tragegriff. Ziehen Sie das Kabel auch nicht um scharfe Kanten oder Ecken herum. Halten Sie das Kabel entfernt von beheizten Oberflächen. - Verwenden Sie keine Verlängerungskabel oder Steckdosen mit unzureichender Leistung. - Ziehen Sie nicht am Netzkabel, wenn Sie den Stecker aus der Dose ziehen. Ziehen Sie den Stecker stets am Stecker selbst und nicht am Kabel heraus. - Beschädigen und verbrennen Sie die Batterien nicht, da sie bei hohen Temperaturen explodieren. - Versuchen Sie keinesfalls, die Lade-/Dockingstation zu öffnen. Reparaturen dürfen nur von einem qualifizierten Kundendienstzentrum durchgeführt werden. - Setzen Sie die Lade-/Dockingstation keinen hohen Temperaturen aus, und lassen Sie weder Feuchtigkeit noch Nässe in irgendeiner Form in Kontakt mit der Lade-/Dockingstation kommen.POWERbot
- Saugen Sie keine harten oder scharfen Gegenstände wie Glas, Nägel, Schrauben, Münzen usw. auf. - Verwenden Sie das Gerät niemals ohne Filter. Führen Sie bei der Wartung und Pflege des Geräts niemals Ihre Finger oder andere Gegenstände in die Lüfterkammer ein, da sich das Gerät möglicherweise ungewollt einschalten könnte. - Stecken Sie keine Objekte in die Öffnungen des Geräts. Verwenden Sie das Gerät nicht mit versperrten Öffnungen. Halten Sie Öffnungen frei von Staub, Fusseln, Haaren und anderen Stoffen, die die Luftströmung behindern könnten. - Saugen Sie keine toxischen Stoffe (Chlorbleiche, Ammoniak, Abflussreiniger usw.) auf. - Saugen Sie nichts auf, was brennt oder Rauch erzeugt (z. B. Zigaretten, Streichhölzer oder heiße Asche). - Verwenden Sie das Gerät nicht, um leicht entzündliche oder brennbare Flüssigkeiten wie Benzin aufzusaugen und setzen Sie es nicht an Stellen ein, wo solche Stoffe vorhanden sein könnten. - Räume mit Kerzen oder Schreibtischlampen auf dem Boden. - Räume mit unbeaufsichtigtem Feuer (Feuer oder Glut). - Räume, in denen sich Benzin, Alkohol, Verdünner, Aschenbecher mit brennenden Zigaretten usw. befinden. - Verwenden Sie den POWERbot nicht in geschlossenen Räumen, wenn die Luft darin Dämpfe von lösungsmittelhaltigen Farben, Lackverdünnern, Mottenschutzmitteln, brennbaren Stäuben oder andere explosive bzw. toxische Dämpfe enthält. - Die Akkus können bei extremen Einsatz- oder Temperaturbedingungen auslaufen. Wenn diese Flüssigkeit auf die Haut gelangt, waschen Sie sie schnell mit Wasser ab. Wenn die Flüssigkeit in die Augen gelangt, spülen Sie sie sofort und mindestens 10 Minuten lang mit sauberem Wasser aus. Suchen Sie medizinische Hilfe auf.Sicherheitsinformationen
WARNUNG
Hinweise zur Stromversorgung
▶ Beugen Sie der Gefahr eines Stromschlags oder Brands vor. - Beschädigen Sie nicht das Netzkabel. - Ziehen Sie niemals am Kabel, um den Netzstecker aus der Steckdose zu ziehen, und berühren Sie den Netzstecker nicht mit nassen Händen. - Schließen Sie das Gerät ausschließlich an eine eigens dafür bestimmte Steckdose mit 100 - 240 VAC und niemals an eine Steckerleiste an, die für weitere Geräte verwendet wird. (Lassen Sie das Kabel nicht ungeschützt auf dem Boden herumliegen.) - Verwenden Sie keine beschädigten oder losen Netzstecker, Netzkabel und Steckdosen. ▶ Entfernen Sie Staub und sonstige Fremdpartikel vom Ladestift und den Kontakten des Netzsteckers. \- Andernfalls besteht die Gefahr eines Stromschlags oder einer Fehlfunktion. WARNUNG Vor der Verwendung
▶ Verwenden Sie POWERbot nicht in der Nähe von Heizgeräten oder brennbaren Materialien. - Verwenden Sie POWERbot nicht in der Nähe von Zündquellen und offenen Flammen (z. B. tragbare Heizkörper, Kerzen, Schreibtischlampen, Kamine usw.) oder an Stellen, an denen brennbare Materialien wie Benzin, Alkohol, Verdünner usw. vorhanden sind. Um Kollisionen zu vermeiden, stellen Sie bitte sicher, dass sich im Reinigungsbereich des POWERbot keine gefährlichen Gegenstände befinden, und trennen Sie elektrische Heizgeräte und Ventilatoren vom Netz. Der POWERbot ist für den Gebrauch im Haushalt bestimmt. Verwenden Sie ihn deshalb nicht zur Reinigung von Kellern, Dachböden, Lagerräumen, industriell genutzten Gebäuden, Flächen im Außenbereich oder in feuchten Umgebungen (z. B. Badezimmer, Waschküche), auf Tischen oder Regalen. - Andernfalls könnten Schäden oder Fehlfunktion am POWERbot die Folge sein. ▶ Stellen Sie sicher, dass der POWERbot nicht durch Flüssigkeiten jeglicher Art fährt oder in sonstiger Weise mit ihnen in Kontakt kommt. - Der POWERbot kann schwer beschädigt werden und andere Flächen verschmutzen, wenn die Räder durch Flüssigkeiten fahren. ▶ Schütten Sie keine Flüssigkeiten auf die Dockingstation. - Es besteht die Gefahr von Stromschlägen oder Bränden. ▶ Verwenden Sie die Dockingstation ausschließlich zum dafür vorgesehenen Zweck. - Andernfalls besteht die Gefahr von Bränden oder schweren Schäden an der Dockingstation. ▶ Halten Sie den Höhensensor zu Ihrer eigenen Sicherheit stets sauber. WARNUNG Im Betrieb
▶ Wenn der POWERbot ungewöhnliche Geräusche, Gerüche oder Rauch entwickelt, schalten Sie den POWERbot unverzüglich mit dem Notschalter an der Geräteunterseite aus und wenden Sie sich an ein Kundendienstzentrum. WARNUNG Reinigung und Pflege
Wenden Sie sich bei einem beschädigten Netzkabel an ein Kundendienstzentrum, um es von einer qualifizierten Fachkraft austauschen zu lassen. - Es besteht die Gefahr von Stromschlägen oder Bränden. Wenden Sie sich für einen Austausch der Akkus an ein Kundendienstzentrum von Samsung Electronics. - Die Verwendung von Akkus aus anderen Geräten kann zu Fehlfunktionen führen. VORSICHT Vor der Verwendung
▶ Setzen Sie vor Verwendung des POWERbot den Staubbehälter ein. ▶ Beachten Sie für eine ordnungsgemäße Durchführung des automatischen Ladevorgangs die folgenden Hinweise. - Die Dockingstation muss stets eingeschaltet sein. - Stellen Sie die Dockingstation an einer Stelle auf, die vom POWERbot leicht gefunden und angesteuert werden kann. - Beseitigen Sie alle Hindernisse vor der Dockingstation. ▶ Achten Sie beim Aufstellen der Dockingstation darauf, dass das Kabel nicht ungeschützt auf dem Boden herumliegt, da sich der POWERbot darin verfangen könnte. ▶ Verwenden Sie den POWERbot nicht auf schwarzen Böden. \- In diesem Fall funktioniert der POWERbot möglicherweise nicht ordnungsgemäß. ▶ Entfernen Sie in einem Bereich von 0,5 m zu beiden Seiten bzw. von 1 m vor der Dockingstation alle Gegenstände. ▶ Stellen Sie sicher, dass die Ladestifte der Dockingstation nicht beschädigt sind oder sich Fremdstoffe darauf befinden. ▶ Stellen Sie die Dockingstation nicht auf einem dunklen Untergrund auf. \- Ein zu dunkler Untergrund um die Dockingstation erschwert möglicherweise den Ladevorgang des POWERbot. ▶ Entfernen Sie vor der Verwendung alle Gegenstände, die die Bewegung des POWERbot behindern könnten (wie z. B. Kinder-Schaukeln oder -Rutschen für den Innenbereich). ▶ Verwenden Sie den POWERbot nicht in Bereichen, die schmaler sind als der Wenderadius des POWERbot (0,5 m oder schmaler) sind. ▶ Wenn eine Bürste oder eine Bürstenabdeckung nicht ordnungsgemäß montiert ist, kann es zu Kratzern auf dem Boden oder zu einer Produktstörung kommen. ▶ Ehe Sie den POWERbot einschalten, beseitigen Sie Objekte wie Rahmen, Spiegel und Porzellangegenstände, die zerbrechen könnten, damit der POWERbot ohne Unterbrechung arbeiten kann. VORSICHT
Im Betrieb
▶ Verwenden Sie den POWERbot nicht auf dicken Teppichböden, da andernfalls Schäden sowohl am POWERbot als auch am Teppich die Folge sein können. \- Der POWERbot ist nicht für die Reinigung von Teppichen mit einer Dicke von mehr als 1 cm geeignet. ▶ Verwenden Sie den POWERbot nicht auf Tischen oder an anderen erhöhten Stellen. \- Er könnte beschädigt werden, wenn er herunterfällt. ▶ Der POWERbot könnte beim Reinigen gegen Stuhl- und Tischbeine fahren. Räumen Sie Stühle und Tische deshalb für eine schnelle und wirksame Reinigung stets beiseite. ▶ Heben Sie den laufenden POWERbot nicht an und tragen Sie ihn nicht in einen anderen Raum. ▶ Fassen Sie den POWERbot beim Transportieren nicht an den Antriebsrädern. ▶ Stellen oder legen Sie keine Gegenstände auf den POWERbot oder die Kamera, da andernfalls Fehlfunktionen die Folge sein können. ▶ Entfernen Sie bei Verwendung des POWERbot stets evtl. herumliegende Papier- oder Kunststofftüten, da diese den Lufteinlass des Geräts blockieren könnten. \- Richten Sie den roten Pointer niemals direkt auf Personen oder Tiere. ▶ Legen Sie sich nicht auf den Boden, während der POWERbot in Betrieb ist. \- Ihre Haare könnten sich in der Bürste verfangen, was zu Verletzungen führen könnte. VORSICHT
Reinigung und Pflege
▶ Befolgen Sie die folgenden Hinweise, um Schäden am POWERbot zu vermeiden. \- Sprühen Sie zum Reinigen kein Wasser direkt auf den POWERbot. Verwenden Sie niemals Waschbenzin, Verdünner oder Alkohol, um das Gerät zu reinigen. ▶ Demontieren und reparieren Sie den POWERbot nicht selbst. Diese Arbeiten dürfen nur von einer qualifizierten Fachkraft durchgeführt werden. ▶ Halten Sie den Hindernissensor, den Höhensensor und die Kamera stets sauber. \- Wenn sich Fremdstoffe auf den Sensoren ansammeln, funktionieren sie möglicherweise nicht mehr ordnungsgemäß.Installation
Die Dockingstation muss stets an die Steckdose angeschlossen und eingeschaltet sein. text_image
Stellen Sie die Dockingstation an einem Ort ohne Hindernisse und Absturzgefahr auf. Ca. 1 m Ca. 0,5 m Ca. 0,5 m DC-INZubehör
oder
Fernbedienung (optional erhältlich) Batterien (Typ AAA) (optional erhältlich) Benutzerhandbuch Ersatzfilter (optional erhältlich)Dockingstation Netzkabel Akkuladegerät Virtual Guard
(optional erhältlich) \* Die Saugaufsätze können sich je nach Modell unterscheiden. \* Batterie-Spezifikationen Serie SR1\*M70\*\*\*\* : Lithium-Ionen-Akku 21,6 V, 1800 mAh, 6 Zellen Serie SR2\*M70\*\*\*\* : Lithium-Ionen-Akku 21,6 V, 3600 mAh, 12 ZellenHinweis
▶ Stellen Sie die Dockingstation in einem Raum mit ebenem Untergrund und geraden Wänden auf. ▶ Stellen Sie die Dockingstation bei Holzfußböden am besten in Richtung der Maserung des Holzes auf. ▶ Wenn sich der Notschalter in der Aus-Position befindet, wird der POWERbot auch dann nicht geladen, wenn er an die Dockingstation angedockt ist. ▶ Die Dockingstation muss stets eingeschaltet sein. - Wenn die Dockingstation nicht eingeschaltet oder die Stromversorgung unterbrochen ist, kann der POWERbot die Dockingstation nicht ansteuern und wird nicht automatisch geladen. - Der Akku entlädt sich langsam von selbst, sobald der POWERbot von der Dockingstation getrennt wird. ▶ Wenn sich der POWERbot im Energiesparmodus befindet, wird er nicht wieder aktiviert, selbst wenn er mit dem Notschalter aus- und dann wieder eingeschaltet wird. Halten Sie die Taste [Start/Stop] am POWERbot gedrückt, um den Energiesparmodus zu deaktivieren.Laden
Wenn Sie den POWERbot zum ersten Mal (nach dem Kauf) vollständig aufgeladen haben, kann er 60 min lang im Modus Normal (Verwendet werden. (Benötigte Ladezeit: siehe S. 41.)Intelligentes Laden
Wenn der POWERbot im Modus „Automatische Reinigung“ beinahe entladen ist, kehrt er zum Aufladen automatisch zur Dockingstation zurück und nimmt die Reinigung der begonnenen Fläche wieder auf, sobald der Akku wieder zu zwei Dritteln geladen ist. (Höchstens zweimal). text_image
WARNING • Die Nennspannung dieses Geräts beträgt 100- 240 V~.text_image
1/0 ←(ON) ←(OFF) 1/0 1/5natural_image
Line drawing of a toilet with hands holding the lid (no text or symbols)text_image
1 Stellen Sie den Notschalter an der Geräteunterseite auf die Ein-Position.
Sie müssen den Notschalter auf die Ein-Position stellen, um den POWERbot einschalten zu können. Drücken Sie die Taste und lassen Sie sie wieder los.2 Laden Sie den POWERbot manuell, indem Sie ihn in die Dockingstation stellen.
Stellen Sie sicher, dass die Ladestifte von POWERbot und Dockingstation zueinander ausgerichtet sind.3 Überprüfen Sie den Ladestatus.
Bei den Serien SR1\*M701\*\*\* blinkt die Akkuanzeige während des Ladens in Intervallen von 1 Sekunde. Wenn der Akku vollständig geladen ist, verbleibt die Anzeige im Status EIN. Bei den Serien SR1\*M702\*\*\* / SR1\*M703\*\*\* / SR2\*M70\*\*\*\* wird je nach dem Fortschritt des Ladevorgangs „“ angezeigt. Wenn der Ladevorgang abgeschlossen ist, wird „VOLL“ angezeigt. natural_image
Abstract geometric shape with a diagonal line crossing through it, no text or symbols presentAutomatisches Laden
text_image
Diagram showing two labeled components (① and ②) with arrows pointing to a device, likely illustrating a process or assembly.1. Serie SR1\*M701\*\*\*
Wenn die Akkuanzeige in Intervallen von 0,4 Sekunden blinkt, kehrt der POWERbot automatisch zur Dockingstation zurück, um geladen zu werden.2. Serien SR1\*M70\*\*\*\* / SR2\*M70\*\*\*\* Series
Wenn die Akkuanzeige beim Reinigen blinkt, kehrt der POWERbot zur Dockingstation zurück, um sich automatisch aufzuladen.Laden
natural_image
Simple line icon of a house with a battery inside, no text or symbols presentNiedrige Akkuladung („Lo“)
natural_image
Line drawing of a hand holding a small appliance on a tiled floor (no text or symbols)Wenn der Ladevorgang nicht ordnungsgemäß durchgeführt wird:
Überprüfen Sie die Aufstellung der Dockingstation und kontrollieren Sie, ob:
▶ die Dockingstation an einer Stelle aufgestellt wurde, die der POWERbot nicht leicht anfahren kann. ▶ die Entfernung zwischen Dockingstation und POWERbot mehr als 5 m beträgt. \- Es kann länger dauern, bis der POWERbot den Rückweg zur Dockingstation findet, um die Batterien aufzuladen.Laden Sie den POWERbot manuell, wenn:
▶ sich die Dockingstation in einer Ecke befindet. ▶ der Akku vollkommen entladen ist ▶ der POWERbot von einem Hindernis (Möbelstück o. ä.) blockiert wird. ▶ sich vor der Dockingstation eine Schwelle befindet, die der POWERbot nicht überwinden kann. (Der POWERbot kann maximal Schwellen mit einer Höhe von ca. 1,5 cm überwinden.) ▶ die Akkuanzeige blinkt und im Display die Meldung „Lo“ angezeigt wird. ▶ die Akkuanzeige blinkt (Gilt für Serie SR1\*M701\*\*\* ) ▶ der POWERbot auf „Punktsaugen“ oder „Handsaugen“ eingestellt ist.Verwenden des POWERbot
Sie müssen den Notschalter auf die Ein-Position stellen, ehe Sie den POWERbot verwenden.Ein-/Ausschalten
Halten Sie die Taste länger als 3 Sekunden lang gedrückt.  \- Wenn der POWERbot 30 min lang nicht verwendet wird, geschieht Folgendes: Serien SR1\*M70\*\*U\* / SR2\*M70\*\*U\*: Er wechselt in den Energiesparmodus. Serien SR1\*M70\*\*W\* / SR2\*M70\*\*W\*: Er kehrt automatisch zur Dockingstation zurück, um geladen zu werden.Automatikbetrieb
Drücken Sie diese Taste. Der POWERbot fährt die eingestellten Bereiche nur einmal zur Reinigung ab.  \* Saugvorgang anhalten: Drücken Sie die TastePunktsaugen
Der POWERbot führt eine intensive Reinigung einer abgegrenzten Fläche durch. Laden
Durch Drücken dieser Taste können Sie den POWERbot so einstellen, dass er während des Reinigungsvorgangs automatisch die Dockingstation ansteuert.  Auswählen des Reinigungsmodus| Reinigungsmodus So wählen Sie ihn aus | Angezeigtes Symbol | ||
| SR1*M702***SR1*M703***SR2*M70**** | SR1*M701*** | ||
| Automatische Reinigung | | | |
| Punktsaugen | | | |
| Wiederholte Reinigung | * Drücken Sie auf der Fernbedienungzunächst [A,B type 1, [C,D type 2 und anschließend [Start/Stop 3] | | - |
| Handsaugen | * Der Modus für Handsaugen kann mit Hilfe der Richtungstasten auf der Fernbedienung ausgewählt werden. | | - |
natural_image
Grid pattern with horizontal lines and a small 3D icon at the bottom-left corner (no text or symbols)Verwenden des POWERbot
Saugbewegungen in den einzelnen Modi natural_image
Simple line drawing of three parallel horizontal bars with a small icon at the bottom (no text or symbols)Automatische Reinigung
Eingestellte Bereiche werden nur einmal gereinigt. \* Serie SR1\*M701\*\*\*; Reinigt solange, bis der Akku leer ist. text_image
Ca. 1,5 m Ca. 1,5 mPunktsaugen
Reinigt eine abgegrenzte Fläche intensiv. Dieser Modus kann verwendet werden, um z. B. Brot- oder Kekskrümel aufzusaugen. natural_image
Line drawing of a hand holding a remote control with a device on top (no text or symbols)Handsaugen
Sie können den POWERbot mit der Fernbedienung zu einem bestimmten Bereich fahren, damit dieser gereinigt wird. \* Diese Funktion steht bei der Serie SR1\*M701\*\*\* nicht zur Verfügung. natural_image
Abstract geometric pattern with intersecting lines and a small 3D cube at the bottom (no text or symbols)Wiederholte Reinigung
Reinigt solange, bis der Akku leer ist. \* Diese Funktion steht bei der Serie SR1\*M701\*\*\* nicht zur Verfügung. Hinweis
▶ Wenn die Automatische Reinigung oder die Wiederholte Reinigung gestartet wird, reinigt der POWERbot zunächst den Bereich in der Nähe der Dockingstation. Verwenden der Spezialsaugfunktionen| Saugfunktion Betrieb | Angezeigtes Symbol | ||
| SR1*M702***SR1*M703***SR2*M70**** | SR1*M701*** | ||
| Intelligente Leistungssteuerung | * Wenn der POWERbot im Normalen Modus einen Teppich erkennt, erhöht er automatisch die Saugleistung. | | |
| Masterfunktion „Kantensaugen“ | * Wenn der POWERbot im Modus „Automatische Reinigung“ oder „Punktsaugen“ eine Kante oder Ecke erkennt, wird der Auto-Shutter aktiviert und das Gerät nähert sich zum Reinigen dem Kanten- oder Eckbereich.► Gerade Kante (Einmalige Reinigung)► Ecke (Zweifache Reinigung) | | |
Aufstellen des Virtual Guard
Der Virtual Guard verhindert mit Hilfe von Infrarotstrahlen, dass der POWERbot bestimmte Flächen abfährt. \* (Nur bei Serie SR2\*M707\*\*\* im Lieferumfang enthalten) Für die Serien SR2\*M704\*\*\* / SR2\*M705\*\*\* / SR2\*M706\*\*\* muss er hinzugekauft werden.) text_image
Die Länge der vom Virtual Guard erzeugten virtuellen Wand beträgt mindestens 2,5 m. Die tatsächliche Länge ist abhängig von den Umgebungsbedingungen und der Bewegung des POWERbot. Virtual Guard Mindestens 2,5 mnatural_image
Simple line drawing of a mechanical component with a downward arrow indicating force or direction (no text or symbols)Aufstellen des Virtual Guard
Übersicht über den Virtual Guard
text_image
Ein/Aus-Schalter Netzlampe Einschalten: Lampe blinkt rot Ausschalten: Lampe erlischt Abstandserkennungssensor des POWERbot Entfernungssensor (Infrarotsensor) AkkuabdeckungEinlegen der Batterien
Batterien für den Virtual Guard müssen separat erworben werden. natural_image
Illustration of a hand using a tool to adjust or install a cylindrical container with an arrow indicating motion (no text or symbols present)natural_image
Diagram of a battery pack with two batteries and internal components, showing no text or symbolsnatural_image
Illustration of a hand inserting a battery into a cylindrical device (no text or symbols)Verwenden der Fernbedienung
(Modell A) (Modell B) text_image
1 3 1, 2 5 Spot Repeat Sound 4 2 Schedule Clock Schedule Cancel(Dec) Siehe Seite 22 SAMSUNGtext_image
1 3 1, 2 5 Spot Repeat Sound 4 2 Schedule Clock Schedule Cancel (Dsec) SAMSUNG Siehe Seite 22text_image
1 3 1, 2 5 Point Cleaning 6 2 4 4 Spot Repeat Sound Schedule Clock Remote Cancel(3sec) Siehe Seite 23 SAMSUNGtext_image
1 3 1, 2 5 Point Cleaning 6 2 4 4 SAMSUNG Spot Repeat Sound Schedule Clock Remote Cancel(3sec) Siehe Seite 23Verwenden der Fernbedienung
☐ [Typ A] / ☐ [Typ B] / [Typ C] / [Typ D] 1 Ein/Aus / Laden / Start/Stop| Ein/Aus | | | | | Hiermit schalten Sie den POWERbot ein/aus. |
| Laden | | | | | Hiermit kehrt der POWERbot automatisch zum Laden an die Dockingstation zurück. |
| Start/Stop | | | | | Hiermit starten bzw. beenden Sie den Saugvorgang. |
| Automatische Reinigung | | | | | Hiermit werden alle eingestellten Bereiche nur einmal gereinigt, bevor das Gerät zur Dockingstation zurückkehrt. |
| Punktsaugen | | | | | Hiermit wird ein abgegrenzter Bereich intensiv gereinigt. |
| Wiederholte Reinigung | | | | | Hiermit wird die Reinigung so lange wiederholt, bis der Akku fast entladen ist und die Anzeige blinkt. |
| Turbomodus | | | | | Hiermit wird der Reinigungsvorgang mit maximaler Saugleistung durchgeführt. |
| Normaler Modus | | | | | Hiermit wird der Reinigungsvorgang mit moderater Saugleistung durchgeführt. |
| Flüsterbetrieb | | | | | Hiermit wird der Reinigungsvorgang mit einem besonders geringeren Geräuschpegel durchgeführt. |
| Ton | | | | | Mit dieser Taste können Sie die Soundeffekte des Geräts aktivieren oder deaktivieren (Soundeffekte → Stumm). |
| Fernsteuerung | | | | | Hiermit schalten Sie die Wi-Fi-Funktion ein oder aus |
5 Modus „Handsaugen“ und Richtungssteuerung
| Geradeaus fahren | | | | | Hiermit fährt das Gerät geradeaus |
| Links abbiegen | [Z0H2] | [ZC04] | | | Hiermit biegt das Gerät nach links ab |
| Rechts abbiegen | [08K4] | | | | Hiermit biegt das Gerät nach rechts ab |
6 Lichtgeführtes Saugen
Nur bei Fernbedienungen der Typen C und D verfügbar. Während der POWERbot arbeitet, können Sie mit der Fernbedienung auf eine Stelle zeigen, die er anfahren und reinigen soll. Zeigen Sie mit dem roten Licht in einem Bereich von 0,5 m um den POWERbot auf den Boden. Halten Sie die Taste „Lichtgeführtes Saugen“ gedrückt, und bewegen Sie das rote Licht an die gewünschte Stelle. Der POWERbot folgt beim Reinigen dem Licht. text_image
0.5 mtext_image
Höhe der Fernbedienung Bedienungsabstand| Höhe der Fernbedienung | 0,5 m 1 m | 1,5 m | |
| Bedienungsabstand | ca. 1,5 m ca. 2 m ca. 3 m | ||
Einlegen der Batterien
Zum Öffnen ziehen Sie die Abdeckung des Akkufachs bei gedrückter Verriegelung nach oben. Legen Sie dann die Akkus ein (siehe Abbildung). Schließen Sie dann die Abdeckung, bis sie hörbar einrastet. text_image
Diagram illustrating the step-by-step assembly of a battery pack with labeled components and mechanisms.Bezeichnungen der Teile
text_image
6 5 3 7 8 2 1 4 2text_image
4 2 3 4 5 10 7 1 4 8 6 9 5text_image
1 2 3 4 5 6 (3sec) (3sec)Oberseite
1. Display 2. Signalempfänger für die Fernbedienung 3. Hindernissensor 4. Staubbehälter 5. Kamera 6. Taste für den Staubbehälter 7. Stoßstangensensor 8. Auto-ShutterUnterseite
1. Ladestifte 2. Bürste 3. Bürstenabdeckung 4. Höhensensor 5. Rolle 6. Akkuabdeckung 7. Taste für die Bürstenabdeckung 8. Antriebsrad 9. Notschalter 10. Auto-ShutterDisplay
text_image
1 2 6 13 00:00 AM PM 11 28 109 3 4 5 7 15 14text_image
1 2 6 14 3 4 5 7 12 38 11 109 15 16Uhrzeiteinstellung/Programmierung
[Typ A, Typ B] Nur Modus „Automatische Reinigung“ kann programmiert werden.Einstellen der Uhrzeit
Sie müssen die aktuelle Uhrzeit einstellen, ehe Sie das Einmal-/Tagesprogramm verwenden können. flowchart
graph LR
A["Start-Einstellung Stellen Sie die Stunde ein"] --> B["Stellen Sie die Minuten ein"]
B --> C["Wählen Sie zwischen „AM“ und „PM“Einstellung beender"]
C --> D["Wechseln Sie zur vorherigen/nachsten Einstellung."]
Einstellen eines Programms
Sie können das Programm nur einstellen/abbrechen, solange der POWERbot an der Dockingstation angedockt ist. flowchart
graph LR
A["Start-Einstellung"] --> B["Wählen Sie „Einmalprogramm“ oder „Tagesprogramm“"]
B --> C["Stellen Sie die Stunde ein"]
C --> D["Einstellung beenden"]
D --> E["Wählen Sie zwischen „AM“ und „PM“"]
E --> F["Stellen Sie die Minuten ein"]
F --> G["Wechseln Sie zur vorherigen/nächsten Einstellung."]
Abbrechen des Einstellvorgangs
▶ Die Einstellungen werden automatisch abgebrochen, wenn 7 Sekunden lang keine Eingabe vorgenommen wird.Abbrechen eines Einmal-/Tagesprogramms
| Wenn sowohl ein Einmal- als auch ein Tagesprogramm eingestellt ist | ScheduleCancel (3sec)3 Sekunden lang drücken | → | oder ScheduleCancel (3sec)Wählen Sie das Programm Abbrechvorgang beendet | → | oder ScheduleCancel (3sec) |
| Wenn entweder ein Einmal- oder ein Tagesprogramm eingestellt ist | ScheduleCancel (3sec)3 Sekunden lang drücken | ||||
Einstellen der Uhrzeit
Sie müssen die aktuelle Uhrzeit einstellen, ehe Sie das Einmal-/Tagesprogramm verwenden können. flowchart
graph LR
A["Start-Einstellung Stellen Sie die Stunde ein"] --> B["Stellen Sie die Minuten ein"]
B --> C["Wählen Sie zwischen „AM“ und „PM“Einstellung beender"]
C --> D["Wechseln Sie zur vorherigen/nachsten Einstellung."]
Einstellen eines Programms
Sie können das Programm nur einstellen/abbrechen, solange der POWERbot an der Dockingstation angedockt ist. flowchart
graph LR
A["Schedule\nCancel (3sec)\nStart-Einstellung"] --> B["Wählen Sie\n„Einmalprogramm“ oder\n„Tagesprogramm“"]
B --> C["Stellen Sie die\nStunde ein"]
C --> D["Stellen Sie die\nMinuten ein\nWechseln Sie zur vorherigen/nächsten Einstellung."]
D --> E["Einstellung beenden"]
E --> F["Wählen Sie zwischen „AM“\nund „PM“"]
F --> G["Stellen Sie zwischen „AM“\nund „PM“"]
G --> H["Stellen Sie zwischen „AM“\nund „PM“"]
H --> I["Stellen Sie zwischen „AM“\nund „PM“"]
Abbrechen des Einstellvorgangs
▶ Die Einstellungen werden automatisch abgebrochen, wenn 7 Sekunden lang keine Eingabe vorgenommen wird. Abbrechen eines Einmal-/Tagesprogramms| Wenn sowohl ein Einmal- als auch ein Tagesprogramm eingestellt ist | 3 Sekunden lang drücken | | oder | → | | |
| Wählen Sie das Programm Abbrechvorgang beendet | ||||||
| Wenn entweder ein Einmal- oder ein Tagesprogramm eingestellt ist | ScheduleCancel (3sec)3 Sekunden lang drücken | |||||
Uhrzeiteinstellung/Programmierung
[Serien SR1\*M701\*\*\*] Modelle, die nicht mit einer Fernbedienung ausgestattet sind, können wie unten angegeben programmiert werden.Einstellen eines Programms
Sie können das Programm nur einstellen/abbrechen, solange der POWERbot an der Dockingstation angedockt ist.  3 Sekunden lang drücken   Wenn die LED-Anzeige für das Programm leuchtet, ist das Tagesprogramm eingestellt. \* Die Zeit, die Sie per Knopfdruck eingeben, wird als Programm eingestellt. Die Reinigung wird jeden Tag automatisch entsprechend der programmierten Zeit ausgeführt.Tagesprogramm verwerfen
| Wenn ein Tagesprogramm eingestellt ist | 3 Sekunden lang drücken |
Reinigung und Pflege
Sie müssen den Notschalter auf die Aus-Position stellen, ehe Sie den POWERbot reinigen.Reinigen des Staubbehälters
text_image
① ② PUSHtext_image
Diagram showing two labeled parts of a mechanical device with directional arrows indicating movement or force.natural_image
Illustration of hands pouring granular material into a trash bin (no text or symbols)text_image
Illustration showing two open containers with labeled steps and a sunlit sink, illustrating a process for cleaning or cooling.text_image
Diagram illustrating three steps of installing a device into a box, with numbered instructions and visual icons.text_image
"Klick"Reinigen der Sensoren und der Kamera
Leicht mit einem weichen Tuch abwischen. Kein Wasser oder Reinigungsmittel verwenden. text_image
Kamera Fenster des vorderen Sensors Höhensensoren Fenster des hinteren SensorsReinigung und Pflege
Reinigen der Bürste und des Auto-Shutters
Das Aussehen der Bürste kann sich je nach Modell unterscheiden. Reinigen Sie die Bürste nicht mit Wasser. text_image
Diagram showing a device with labeled parts and a circular annotation indicating a step 1 pointing to a component.natural_image
Illustration of a hand holding a tool inside a device casing, with an arrow indicating direction (no text or symbols present)natural_image
Illustration of a welding torch tool interacting with a welded joint (no text or symbols present)text_image
Diagram showing three-step steps of a tool application: cutting, holding a pen, and writing on paper.text_image
Diagram showing hands holding a pen with a numbered label (1) pointing to the pen tip, likely illustrating a mechanical or electrical component.text_image
Diagram showing a hand holding a device with labeled parts and directional arrows indicating process stepstext_image
Diagram illustrating car gear shift and disassembly steps with labeled arrows and a magnified detail viewtext_image
Diagram showing hands operating a device with labeled components and a magnified view of a component with a downward arrow.Reinigen des Antriebsrads
natural_image
Illustration of hands holding a device casing with internal components (no text or symbols visible)natural_image
Hand using a tool to lift a tire on a surface (no text or symbols visible)SmartThings-App
Die SmartThings-App ist nur mit Modellen kompatibel, die über eine Wi-Fi-Funktion verfügen.Einrichten des Drahtlosrouters
▶ Bei Zugangsproblemen schlagen Sie bitte im Benutzerhandbuch des jeweiligen Drahtlosrouters nach. ▶ Der Samsung POWERbot unterstützt ausschließlich das Wi-Fi-Frequenzband mit 2,4 Ghz. Samsung POWERbot unterstützt IEEE 802.11b/g/n und Soft-AP. \- IEEE 802.11n wird empfohlen. Samsung POWERbot unterstützt ausschließlich DHCP (Dynamic Host Configuration Protocol). Bitte stellen Sie sicher, dass die Option „DHCP Server“ auf Ihrem Drahtlosrouter aktiviert ist. ▶ POWERbot unterstützt als Authentifizierungs- und Verschlüsselungsprotokolle WEP-OPEN, WPA-PSK/TKIP und WPA2-PSK/AES. - Wir empfehlen die Verwendung von WPA2-PSK/AES. - Vergewissern Sie sich, dass Ihr Router über eine eindeutige SSID und ein Passwort verfügt. ▶ Die Qualität Ihres Drahtlosnetzwerks kann durch die Drahtlosumgebung beeinflusst werden. ▶ Wenn die MAC-Adresse (eine eindeutige Identifikationsnummer) Ihres PCs oder Modems von Ihrem Internetdienstanbieter permanent registriert wird, kann der POWERbot möglicherweise keine Verbindung zum Internet herstellen. Fragen Sie Ihren Internetdienstanbieter nach der richtigen Vorgehensweise, um andere Geräte als einen Computer mit dem Internet zu verbinden. ▶ Wenn Ihr Internetdienstanbieter für die Verbindung mit dem Internet eine ID und ein Kennwort benötigt, können Sie den POWERbot möglicherweise nicht mit dem Internet verbinden. In diesem Fall müssen Sie die ID und das Kennwort für die Verbindung zum Internet eingeben. Möglicherweise können Sie den POWERbot auch wegen Problemen mit einer Firewall nicht mit dem Internet verbinden. Bitten Sie Ihren Internetdienstanbieter, Ihnen bei der Lösung des Problems behilflich zu sein. ▶ Einige Drahtlosrouter übertragen möglicherweise auch dann eine ungewöhnliche Adresse des Domain Name Servers (DNS), wenn keine Verbindung zum Internet besteht. Wenden Sie sich in diesem Fall an den Hersteller Ihres Drahtlosrouters oder an Ihren Internetdienstanbieter. ▶ Wenn Sie auch dann keine Verbindung zum Internet herstellen können, nachdem Sie die vom Internetdienstanbieter vorgeschlagenen Schritte durchgeführt haben, wenden Sie sich bitte an ein Kundendienstzentrum von Samsung. ▶ Wenn Ihr Router kein Wi-Fi-zertifiziertes Produkt ist, kann der POWERbot möglicherweise keine Verbindung zum Internet herstellen.SmartThings-App
Herunterladen der SmartThings-App
\- Sie können die SmartThings-App von einer der üblichen Websites für Apps (Google Play Store, Apple App Store oder Samsung Galaxy Apps) herunterladen und installieren. Suchen Sie mit Hilfe des Schlagworts „SmartThings“ nach der App. Hinweis
▶ SmartThings ist mit Tablets und bestimmten Mobilgeräten nicht kompatibel. - Android 6.0 oder höher (mindestens 2 GB RAM) wird empfohlen. ▶ iPads und bestimmte andere Mobilgeräte werden möglicherweise nicht unterstützt. - iOS 10.0 oder höher / iPhone 6 oder besser werden unterstützt. ▶ Besuchen Sie den Play Store oder den App Store, um zu sehen, ob Ihr Mobilgerät mit SmartThings kompatibel ist. ▶ Die unterstützten Funktionen können sich ohne vorherige Ankündigung ändern.Einrichten eines Samsung-Kontos
▶ Sie müssen sich bei einem Samsung-Konto anmelden, ehe Sie die SmartThings-App verwenden. Um ein Samsung-Konto einzurichten, befolgen Sie bitte die Anweisungen in der SmartThings-App. ▶ Wenn Sie über ein Samsung-Smartphone verfügen, können Sie ein Samsung-Konto alternativ auch über die Einstellungen Ihres Smartphones hinzufügen. Dann meldet es sich automatisch bei Ihrem Samsung-Konto an.Hinzufügen eines Geräts zur SmartThings-App
1. Verbinden Sie Ihr Smartphone mit Ihrem Drahtlosrouter. - Wenn das Smartphone nicht verbunden ist, aktivieren Sie in den Einstellungen das WLAN und wählen Sie einen WLAN-Router aus, mit dem Sie eine Verbindung herstellen möchten. - Deaktivieren Sie die Option „Mobile Daten“ des Smartphones, um nur WLAN zu verwenden und ein Gerät zu verbinden. 2. Starten Sie die SmartThings-App auf Ihrem Smartphone. 3. Wenn ein Popup mit der Nachricht eingeblendet wird, dass ein neues Gerät gefunden wurde, tippen Sie auf ADD NOW. - Wird kein Popup angezeigt, tippen Sie auf die Taste „+“ und wählen Sie aus der Liste AVAILABLE DEVICES das Gerät aus, mit dem Sie sich verbinden möchten. - Wenn Ihr Gerät nicht in der Liste der verfügbaren Geräte aufgeführt wird, fügen Sie das Gerät manuell hinzu. Wählen Sie dazu zunächst den Gerätetyp und anschließend das genaue Modell des Geräts aus. 4. [Android] Die Verbindung mit Ihrem Gerät wird automatisch aufgebaut. \- [IOS] Öffnen Sie die Einstellungen und wählen Sie in der Wi-Fi-Liste [robot vacuum] Samsung. 5. Geben Sie auf Aufforderung die Authentifizierung ein. 6. [Android] Die Verbindung mit Ihrem Drahtlosrouter wird automatisch aufgebaut. \- [IOS] Öffnen Sie die Einstellungen und wählen Sie in der Wi-Fi-Liste den Drahtlosrouter aus. 7. Das Setup wird dann automatisch zu Ende geführt. Anschließend wird eine neue Device Card hinzugefügt. Hinweis
▶ Gehen Sie folgendermaßen vor, wenn Sie die Produktregistrierung nicht abschließen können. - Wiederholen Sie die Registrierung entsprechend den Anweisungen in den Popups. - Stellen Sie sicher, dass die UPnP-Option des Drahtlosrouters aktiviert ist, und wiederholen Sie das Registrierungsverfahren. - Vergewissern Sie sich, dass Ihr Drahtlosrouter im Drahtlosmodus arbeitet und wiederholen Sie danach die Registrierung. - Wenn Sie zwei oder mehr POWERbots besitzen, schalten Sie zuerst alle anderen POWERbots aus und versuchen Sie dann erneut, Ihren POWERbot zu registrieren. - Die Registrierung kann fehlschlagen, wenn es einen anderen Drahtlosrouter mit der gleichen SSID wie Ihr Drahtlosrouter gibt. ▶ Fernsteuerung und Wi-Fi-Anzeige| Ein | Die Fernsteuerung ist gesperrt. (Die Fernbedienung kann noch einsatzbereit sein.) | | |
| Aus | Die Fernsteuerung ist einsatzbereit. | ||
| Ein | Der POWERbot ist mit dem Drahtlosrouter verbunden. | ||
| Aus | Der POWERbot versucht, eine Verbindung zum Drahtlosrouter herzustellen. |
SmartThings-App
Software-Aktualisierung
▶ Wenn POWERbot sich in der Dockingstation befindet und geladen wird, stellt er automatisch eine Verbindung zum Server her und überprüft, ob eine Software verfügbar ist. Wenn eine neue Software gefunden wird, lädt der POWERbot sie automatisch herunter und wird aktualisiert. ▶ Während eines Ladevorgangs bedeutet die Meldung „UP“ im Display, dass gerade ein Update für die Software des POWERbot installiert wird. Warten Sie, bis das Update abgeschlossen ist, ehe Sie den POWERbot wieder verwenden.Verwenden der SmartThings-App
▶ Wenn Sie auf die Gerätekarte in der SmartThings-App tippen, wird das Plugin für Ihr Gerät gestartet. text_image
ROBOT #2 OFFICE HELP ⑪ ① ② AUTO SPOT ④ Fully charged ⑤ Battery ⑥ Suction power Normal ⑦ Repeat ⑧ Schedule ⑨ History ⑩Hinweise und Vorsichtsmaßnahmen
Laden
Hinweis
▶ Wenn der Akku während des Ladevorgangs überhitzt, dauert das Laden möglicherweise länger. ▶ Wenn das automatische Laden nicht funktioniert, gehen Sie wie folgt vor: - Schalten Sie den Notschalter (auf der Unterseite des POWERbot) aus und wieder ein. - Ziehen Sie den Netzstecker der Dockingstation aus der Steckdose und schließen Sie ihn dann wieder an. - Ziehen Sie den Netzstecker der Dockingstation aus der Steckdose und prüfen Sie, ob Fremdstoffe an den Ladestiften anhaften. Reinigen Sie den POWERbot und die Ladestifte der Dockingstation mit einem trockenen Tuch oder Lappen. - Kontrollieren Sie die nähere Umgebung der Dockingstation auf Hindernisse (z. B. reflektierende Objekte, Stühle usw.). ▶ Der Akku entlädt sich langsam von selbst, sobald der POWERbot von der Dockingstation getrennt wird. \- Entfernen Sie den POWERbot möglichst nicht von der Dockingstation, während er geladen wird. (Stellen Sie jedoch den Notschalter auf die Aus-Position und trennen Sie die Dockingstation vom Stromnetz, wenn Sie vorhaben, das Haus für längere Zeit zu verlassen, weil Sie beispielsweise auf eine Geschäftsreise oder in Urlaub gehen.)Betrieb
Hinweis
▶ Der POWERbot kann beim Reinigen an Schwellen usw. stecken bleiben. - Um den Betrieb wieder aufzunehmen, stellen Sie den Notschalter auf die Aus-Position, bringen Sie den POWERbot in einen Bereich, wo er sich leicht bewegen kann, und schalten Sie ihn dann wieder ein. ▶ Der POWERbot kann Stellen, die für ihn unerreichbar sind (z. B. Ecken oder den Raum zwischen Wand und Sofa usw.), nicht reinigen. - Verwenden Sie ein anderes Reinigungsgerät, um diese Stellen regelmäßig zu reinigen. ▶ Der POWERbot kann keine Schmutzklumpen vom Boden aufsaugen, so dass sich auch nach der Reinigung noch Reste davon auf dem Boden befinden können. - Verwenden Sie ein anderes Reinigungsgerät, um diese Stellen regelmäßig zu reinigen. ▶ Wenn der POWERbot ausgeschaltet ist, kann er mit der Ein-/Aus-Taste der Fernbedienung nicht eingeschaltet werden. Halten Sie die Taste [Start/Stop] des POWERbot gedrückt. ▶ Sie können den Modus „Punktsaugen“ weder einstellen noch ausführen, solange der POWERbot geladen wird. - Wenn Sie während des Ladevorgangs die Taste „Handsaugen / Lichtgeführtes Saugen“ drücken, verlässt der POWERbot die Dockingstation und wechselt in den Standby-Modus.Reinigung und Pflege
Hinweis
▶ Nach dem Reinigen von Staubbehälter und Filter mit Wasser - Staubbehälter: Wischen Sie das Wasser vollständig aus dem Behälter. - Filter: Lassen Sie ihn vor der Verwendung gründlich an einer schattigen Stelle trocknen. ▶ Ziehen Sie den Auto-Shutter nicht mit zu viel Kraft heraus, wenn Sie ihn reinigen möchten. Vorsicht
▶ Achten Sie beim Einsetzen und Entnehmen des Filters auf Ihre Finger, da sie im Einlass des Staubbehälters stecken bleiben können.Hinweise und Vorsichtsmaßnahmen
- Um Verstopfungen durch Fremdstoffe zu vermeiden, achten Sie darauf, dass der POWERbot keine Zahnstocher, Wattestäbchen usw. aufsaugt. Wenden Sie sich an ein autorisiertes Samsung-Kundendienstzentrum, wenn Sie Probleme haben, Fremdstoffe aus der Bürste zu entfernen. ▶ Da die Bürste beim Reinigen Schmutz vom Boden entfernt, können sich darin Fremdstoffe wie Fäden, lange Haare usw. verfangen. Reinigen Sie sie für beste Saugergebnisse regelmäßig. - Wenn eine Bürste oder eine Bürstenabdeckung nach den Pflegearbeiten nicht ordnungsgemäß montiert ist, kann es zu Kratzern auf dem Boden oder zu einer Produktstörung kommen. Setzen Sie sie deshalb richtig zusammen. Beziehen Sie sich dabei auf die jeweilige Wartungsmethode.Informationen zum Akku
Hinweis
▶ Erwerben Sie Akkus nur in zugelassenen Samsung-Kundendienstzentren und kontrollieren Sie vor dem Kauf, ob das Symbol (SAMSUNG) kku aufgeklebt und im Modellnamen enthalten ist. ▶ Dieser Akku ist ausschließlich für den Samsung Electronics POWERbot bestimmt. Verwenden Sie sie nicht für andere Produkte. ▶ Sie dürfen den Akku keinesfalls zerlegen oder in sonstiger Weise modifizieren. ▶ Werfen Sie den Akku nicht ins Feuer, und erhitzen Sie ihn nicht. ▶ Verbinden Sie die Ladekontakte (+, -) mit keinerlei metallischen Objekten. ▶ Bewahren Sie den Akku ausschließlich in Innenräumen (bei 0 °C bis 40 °C) auf. - Wenn der Akku nicht ordnungsgemäß zu funktionieren scheint, versuchen Sie niemals, ihn eigenständig zu zerlegen. Wenden Sie sich an das nächstgelegene Samsung-Kundendienstzentrum. ▶ Die Ladezeit und die Betriebszeit des Akkus können sich im Laufe der Nutzung verschlechtern. Wenn die Nutzungsdauer des Akkus überschritten ist, lassen Sie ihn im Samsung-Kundendienstzentrum ersetzen. ▶ Die Garantiezeit für den Akku beträgt 6 Monate ab dem Kaufdatum.Infos zum IrDA-Sensor
Vorsicht
▶ Die Übertragung der Infrarotsignale erfolgt möglicherweise im Freien oder an solchen Stellen nicht störungsfrei, wo Halogenlampen eingesetzt werden. ▶ Der POWERbot verwendet 3 Arten von Infrarot-Geräten. Jedes der Geräte besitzt eine andere Priorität. Möglicherweise funktioniert eines der Geräte nicht, wenn sein Signal durch ein Gerät mit höherer Priorität überlagert wird. \- Priorität der Infrarotsignale: Fernsteuerung > Dockingstation ▶ Verschiedene Infrarotsignale können einander stören und zu Fehlfunktionen der Geräte führen, wenn sie zusammen in einem kleinen Raum oder in geringem Abstand verwendet werden. - Wenn Sie mehrere POWERbots gleichzeitig verwenden, kann es aufgrund von Interferenzen der Infrarotsignale zu Störungen kommen.Informationscodes
flowchart
graph LR
A["Input Image"] --> B["Input Image"]
B --> C["Information Code"]
C --> D["Output Image"]
D --> E["Output Image"]
| Informationscodes | Checkliste |
| Der POWERbot hat sich beim Fahren verfangen, verklemmt oder hängt fest.► Schieben Sie den Notschalter in die Aus-Position und tragen Sie den POWERbot in einen anderen Bereich. |
| Fremdkörper in der Bürste.► Stellen Sie den Notschalter auf die Aus-Position, und entfernen Sie die Fremdstoffe von der Bürste. |
| Fremdkörper im linken Antriebsrad.► Stellen Sie den Notschalter auf die Aus-Position, und entfernen Sie die Fremdkörper vom Antriebsrad. |
| Fremdkörper im rechten Antriebsrad.► Stellen Sie den Notschalter auf die Aus-Position, und entfernen Sie die Fremdkörper vom Antriebsrad. |
| Der Stoßstangensensor muss überprüft werden.► Schalten Sie den Notschalter aus und wieder ein.► Wenn der Informationscode nicht erlischt, überprüfen Sie den Raum zwischen Stoßstange und Saugschlitten auf kleine Fremdkörper. Wenn sich Fremdkörper angesammelt haben, ziehen Sie die Stoßstange leicht nach vorne und entfernen Sie die Fremdkörper. |
| Fremdkörper auf dem Hindernissensor angesammelt.► Stellen Sie den Notschalter auf die Aus-Position, und reinigen Sie den vorderen und hinteren Sensor mit einem weichen Tuch. |
| Fremdkörper auf dem Höhensensor angesammelt.► Stellen Sie den Notschalter auf die Aus-Position, und reinigen Sie den Höhensensor mit einem weichen Tuch. |
| Die Hauptplatine muss überprüft werden.► Ausschalten und Neustarten des Gerätes. Wenn das gleiche Problem wiederholt auftritt, ist eine Serviceprüfung erforderlich. |
Informationscodes
| Der POWERbot hat sich beim Fahren verfangen, verklemmt oder hängt fest.► Schieben Sie den Notschalter in die Aus-Position und tragen Sie den POWERbot in einen anderen Bereich. |
| Fremdkörper in der Bürste.► Stellen Sie den Notschalter auf die Aus-Position, und entfernen Sie die Fremdstoffe von der Bürste. |
| Fremdkörper im linken Antriebsrad.► Stellen Sie den Notschalter auf die Aus-Position, und entfernen Sie die Fremdkörper vom Antriebsrad. |
| Fremdkörper im rechten Antriebsrad.► Stellen Sie den Notschalter auf die Aus-Position, und entfernen Sie die Fremdkörper vom Antriebsrad. |
| Der Stoßstangensensor muss überprüft werden.► Schalten Sie den Notschalter aus und wieder ein.► Wenn der Informationscode nicht erlischt, überprüfen Sie den Raum zwischen Stoßstange und Saugschlitten auf kleine Fremdkörper. Wenn sich Fremdkörper angesammelt haben, ziehen Sie die Stoßstange leicht nach vorne und entfernen Sie die Fremdkörper. |
| Fremdkörper auf dem Hindernissensor angesammelt.► Stellen Sie den Notschalter auf die Aus-Position, und reinigen Sie den vorderen und hinteren Sensor mit einem weichen Tuch. |
| Fremdkörper auf dem Höhensensor angesammelt.► Stellen Sie den Notschalter auf die Aus-Position, und reinigen Sie den Höhensensor mit einem weichen Tuch. |
| Die Hauptplatine muss überprüft werden.► Ausschalten und Neustarten des Gerätes. Wenn das gleiche Problem wiederholt auftritt, ist eine Serviceprüfung erforderlich. |
Fehlerbehebung
| Symptom Checkliste | |
| Der POWERbot funktioniert überhaupt nicht. | ► Kontrollieren Sie, ob der Notschalter in der Ein-Position steht.► Überprüfen Sie, ob im Display alle Symbole angezeigt werden.► Überprüfen Sie, ob der Akku des POWERbot leer ist.- Wenn „Lo“ angezeigt wird, setzen Sie den POWERbot auf die Dockingstation, damit die Batterie aufgeladen wird.- Wenn die Akkuanzeige blinkt, setzen Sie den POWERbot zum Aufladen per Hand auf die Dockingstation. (Nur Serie SR1*M701***)► Ersetzen Sie die Batterien (Typ AAA), wenn die Fernbedienung nicht funktioniert. |
| Der POWERbot hält beim Reinigen an. | ► Wenn im Display „Lo“ angezeigt wird, setzen Sie den POWERbot auf die Dockingstation, damit der Akku aufgeladen wird.► Wenn die Akkuanzeige blinkt, setzen Sie den POWERbot zum Aufladen per Hand auf die Dockingstation. (Nur Serie SR1*M701***)► Wenn der POWERbot durch Hindernisse wie Kabel, Schwellen usw. blockiert wird, heben sie ihn an und bewegen Sie ihn vom Hindernis fort.- Wenn sich Stoffe oder Schnüre einem der Antriebsräder verfangen, stellen Sie den Notschalter auf die Aus-Position, und entfernen Sie die Stoffe oder Schnüre, ehe Sie das Gerät wieder verwenden. |
| Schwache Saugleistung. | ► Wenn sich zu viel Staub im Staubbehälter befindet, verringert sich möglicherweise die Saugleistung. Stellen Sie den Notschalter auf die Aus-Position, und leeren Sie den Staubbehälter.► Wenn die Ansaugöffnung (auf der Unterseite des POWERbot) durch Fremdkörper verstopft ist, stellen Sie den Notschalter auf die Aus-Position und entfernen Sie die Fremdkörper aus dem Einlass.► Wenn das Geräusch plötzlich zunimmt, stellen Sie den Notschalter auf die Aus-Position und leeren Sie den Staubbehälter. |
| Der POWERbot kann die Dockingstation nicht finden. | ► Prüfen Sie, ob ein Stromausfall vorliegt und ob das Netzkabel angeschlossen ist.► Entfernen Sie eventuelle Hindernisse in der Nähe der Dockingstation, durch die die Rückfahrt des POWERbot zur Dockingstation gestört werden kann.► Wenn sich Fremdstoffe auf den Ladestiften befinden, kann der Ladevorgag gestört werden. Befreien Sie die Ladestifte von den Fremdstoffen. |
| Der POWERbot fährt beim Reinigen plötzlich diagonal. | ► Überprüfen Sie, ob die Dockingstation entlang der Maserung von Holzböden oder Fliesen aufgestellt ist.► Der POWERbot fährt beim Reinigen möglicherweise diagonal, weil er den kürzesten Weg zu einem anderen Bereich nimmt. Weitere mögliche Gründe für eine diagonale Bewegung sind der Kontakt mit Hindernissen, das Laden an einer schräg aufgestellten Dockingstation oder eine diagonal zur Dockingstation verlaufende Maserung des Holz-/Fliesenbodens. |
| Lichtgeführtes Saugen funktioniert nicht. | ► Wenn Sie das rote Licht direkt auf den POWERbot richten, kann es passieren, dass er sich nicht in die gewünschte Richtung bewegt.- Zeigen Sie mit dem roten Licht in einem Bereich von 0,5 m um den POWERbot auf den Boden.* Nutzen Sie die Funktion „Punktsaugen“ nicht in direktem Sonnenlicht, bei hellem Licht oder auf dunklen Böden. |
Fehlerbehebung
| Symptom Checkliste | |
| Ich habe die SmartThings-App installiert, es wird jedoch keine Verbindung zum POWERbot hergestellt. | ► Sie können das Gerät erst nutzen, nachdem Sie den POWERbot mit Hilfe des Easy-Setup-Verfahrens mit dem Drahtlosrouter verbunden haben. |
| Ich kann mich nicht bei meinem Samsung-Konto anmelden. | ► Überprüfen Sie im Bildschirm für das Samsung-Konto Ihre Angaben zu ID und Kennwort. |
| Das Easy-Setup-Verfahren kann nicht durchgeführt werden, und es erscheint eine entsprechende Meldung. | ► Dieses Problem ist möglicherweise nur vorübergehend und auf etwaige Hindernisse oder eine zu große Entfernung zum Drahtlosrouter zurückzuführen. Bitten versuchen Sie es nach einiger Zeit erneut. |
| Die Geräte funktionieren nicht, obwohl das Smartphone ordnungsgemäß mit dem POWERbot verbunden ist. | ► Schließen Sie die SmartThings-App und starten Sie sie dann neu, oder trennen Sie die Verbindung zwischen Smartphone und Drahtlosrouter und verbinden Sie die Geräte anschließend erneut. Alternativ können Sie den POWERbot aus- und dann wieder einschalten und mindestens eine Minute warten, bevor Sie die SmartThings-App erneut ausführen. |
| Die Funktionen der SmartThings-App werden nicht ordnungsgemäß ausgeführt. | ► Überprüfen Sie, ob die Sperre der Fernsteuerung am POWERbot aktiviert ist. (Bei gesperrter Fernsteuerung leuchtet die Wi-Fi-Anzeige nicht.) |
| Die SmartThings Robot Vacuum-App wird nicht gestartet. | ► Überprüfen Sie, ob der POWERbot mit dem Drahtlosrouter verbunden ist. |
| Es besteht keine Wi-Fi-Verbindung zum POWERbot. | ► Überprüfen Sie die Einstellungen des Drahtlosrouters. |
| Die Funktion „Intelligente Leistungssteuerung“ ist auf einem normalen Fußboden aktiv. | ► Überprüfen Sie, ob der Boden uneben ist und ob der POWERbot funktioniert, wenn Sie ihn ein wenig am Gehäuse anheben.► Überprüfen Sie, ob sich auf dem Höhensensor an der Unterseite des POWERbot Fremdstoffe befinden.► Überprüfen Sie, ob die Farbe des Fußbodens zu dunkel ist. |
| Die Funktion „Intelligente Leistungssteuerung“ ist nicht aktiv. | ► Wenn der POWERbot zum Reinigen eines Teppichs mit kurzen Fasern und heller Farbe verwendet wird, erkennt er unter Umständen den Teppich als unbedeckten Fußboden. In diesem Fall wird die Funktion „Intelligente Leistungssteuerung“ möglicherweise nicht aktiviert. |
| Die Masterfunktion „Kantensaugen“ ist gestört. | ► Wenn der POWERbot die Wand nicht erkennen kann, kann die Masterfunktion möglicherweise nicht verwendet werden.- Wenn sich ein Hindernis aus reflektierendem Material vor der Wand befindet.- Wenn die Wand selbst aus reflektierendem Material besteht.- Wenn die Wand von dunkler Farbe ist. |
| Die Masterfunktion „Kantensaugen“ ist aktiv, obwohl keine Wand oder Ecke in der Nähe ist. | ► Überprüfen Sie, ob kleine Hindernisse auf engem Raum angeordnet sind.► Wenn der POWERbot das vorderste Hindernis als Wand erkennt, kann hierdurch die Masterfunktion „Kantensaugen“ aktiviert worden sein. |
| Die Masterfunktion „Kantensaugen“ ist aktiv, obwohl der POWERbot sich nicht auf eine Wand oder Ecke zu bewegt hat. | ► Wenn der Winkel von Ecken, die der POWERbot erkennt, groß ist, kann es zur Aktivierung der Masterfunktion „Kantensaugen“ kommen, auch ohne dass sich das Gerät einer Wand oder Ecke nähert. |
| Symptom Checkliste | |
| SmartThings-App kann nicht installiert werden. | ► SmartThings-App arbeitet unter Android ab Version 6.0 und iOS ab Version 10.► Die unterstützten OS-Versionen für die SmartThings-App können sich später ändern.► Für generische Smart-Geräte werden standardmäßige Installation und Nutzung nicht garantiert. |
| Es wird eine Meldung zum Produktregistrierungsfehler angezeigt. | ► Wiederholen Sie die Produktregistrierung und beachten Sie dabei die Popup-Meldungen.► Schlagen Sie in der Bedienungsanleitung unter „Einrichten des WLAN-Routers“ nach.► Führen Sie die Arbeitsschritte zum Ausfüllen der Produktregistrierung aus dem Abschnitt „Hinzufügen eines Geräts zur SmartThings-APP“ des Benutzerhandbuchs durch.► Wenn die Produktregistrierung wiederholt fehlschlägt, setzen Sie den POWERbot und das Smartphone zurück, starten Sie die SmartThings-App erneut und wiederholen Sie die Produktregistrierung noch einmal.► Verwenden Sie für die Anmeldung der App und zur Produktregistrierung das gleiche Samsung-Konto.► Alle Benutzer müssen das von demselben Land ausgestellte Samsung-Konto verwenden. |
| Während der Produktregistrierung wird die Ladetaste gedrückt und wie angewiesen gehalten, aber der nächste Schritt wird nicht ausgelöst. | ► Drücken Sie die Ladetaste solange, bis Sie einen Signalton hören.► Wenn der nächste Schritt nicht innerhalb von einigen Sekunden ausgelöst wird, drücken Sie die Ladetaste noch einmal. |
| Bei der Produktregistrierung kann der gesuchte Drahtlos-Router nicht gefunden werden. | ► Beenden Sie die Produktregistrierung, führen Sie die SmartThings-App erneut aus und wiederholen Sie die Produktregistrierung noch einmal. |
| Bei der Produktregistrierung wird das Kennwort 1111122222 des Zugangspunkts nicht richtig eingegeben. | ► Halten Sie in der Netzwerkliste den Eintrag „[robot vacuum] Samsung“ gedrückt und löschen Sie das Netzwerk, um das Kennwort zu initialisieren. |
| Bei der Produktregistrierung wird das Kennwort des angeschlossenen Darhtlos-Routers nicht richtig eingegeben. | ► Beenden Sie die Produktregistrierung, führen Sie die SmartThings-App erneut aus und wiederholen Sie die Produktregistrierung noch einmal.► Halten Sie in der Netzwerkliste den Drahtlosrouter gedrückt und löschen Sie das Netzwerk, um das Kennwort zu initialisieren. |
| Die Verbindung zwischen der SmartThings-App und dem POWERbot wird unterbrochen, obwohl die Produktregistrierung abgeschlossen wird. | ► Aktualisieren Sie den Bildschirm und warten Sie ab.► Starten Sie die SmartThings-App erneut.► Prüfen Sie, ob ein Problem mit der Internetverbindung vorliegt. Insbesondere kann eine Firewall dafür sorgen, dass der Vorgang nicht wie erwartet abläuft. |
Fehlerbehebung
| Symptom Checkliste | |
| Die Verbindung zwischen der SmartThings-App und dem POWERbot wird plötzlich bei normalem Betrieb der App unterbrochen. | ▸ Die Verbindung kann unterbrochen werden, wenn sich der POWERbot in größerer Entfernung vom Drahtlos-Router befindet.▸ Setzen Sie den POWERbot und das Smartphone zurück und überprüfen Sie die Verbindung erneut.▸ Wiederholen Sie die Produktregistrierung, wenn es wiederholt zum Verbindungsausfall kommt.▸ Wiederholen Sie die Produktregistrierung, wenn die SSID/das Kennwort eines Wireless Routers geändert wird. |
| Die Steuerung mit der SmartThings-App funktioniert nicht, da die Fernsteuerungsfunktion deaktiviert ist. | ▸ Die Fernsteuerungsfunktion ist deaktiviert. Aktivieren Sie die Fernsteuerung mit einer Fernbedienung. |
Warnhinweise zum Akku
 Sie dürfen den in dieses Produkt eingebaute Akku keinesfalls selbst entfernen oder einen entsprechenden Versuch unternehmen. Wenden Sie sich für einen Austausch des Akkus unbedingt an Ihren Dienstleister oder eine unabhängige qualifizierte Fachkraft. Diese Anweisungen sind ausschließlich für den Gebrauch durch Ihren Dienstleister oder eine unabhängige qualifizierte Fachkraft bestimmt. VERSUCHEN SIE ZU IHRER EIGENEN SICHERHEIT NICHT, DEN AKKU SELBST ZU ENTFERNEN, UND ENTSORGEN SIE SIE KEINEFALLS IM FEUER. SIE DÜRFEN DEN AKKU KEINESFALLS ZERLEGEN ODER IN SONSTIGER WEISE MANIPULIEREN ODER BESCHÄDIGEN.Entfernen des Akkus
Nehmen Sie den POWERbot für den Austausch von der Dockingstation. Schalten Sie den POWERbot aus Sicherheitsgründen zunächst aus, bevor Sie Arbeiten daran vornehmen. natural_image
Line drawing of a hand using a screwdriver to apply a component on a mechanical part (no text or symbols)natural_image
Line drawing of a hand inserting a component into a device casing (no text or symbols)text_image
Diagram showing a device with labeled parts and a magnified view of the component being inserted into a car interior.Korrekte Entsorgung der in diesem Gerät eingebauten Batterie
(Gilt für Länder mit separaten Altbatterie-Rücknahmesystemen.) Die Kennzeichnung auf dem Akku, dem Handbuch oder der Verpackung gibt an, dass der in diesem Gerät eingebaute Akku nicht zusammen mit dem normalen Haushaltsmüll entsorgt werden darf. Sofern vermerkt, geben die chemischen Symbole Hg, Cd oder Pb an, dass der Akku Quecksilber, Kadmium oder Blei in einer Konzentration enthält, die über den nach EG-Verordnung 2006/66 zulässigen Grenzwerten liegt. Der in diesem Gerät eingebaute Akku darf nicht vom Benutzer ausgetauscht werden. Informationen zum Austausch erhalten Sie bei Ihrem Dienstleister. Versuchen Sie keinesfalls, den Akku selbst zu entfernen, und entsorgen Sie sie nicht im Feuer. Sie dürfen den Akku keinesfalls zerlegen oder in sonstiger Weise manipulieren oder beschädigen. Entsorgen Sie das Gerät nach Ablauf seiner Lebensdauer bei einer Abfallsammelstelle in Ihrer Nähe, damit dort geeignete Maßnahmen für die weitere Behandlung und Wiederverwertung des Produkts, einschließlich des Akkus, ergriffen werden können.Informationen über Open-Source-Software
Die in diesem Produkt verwendete Software enthält Open-Source-Code. Sie können den entsprechenden Quellcode für einen Zeitraum von drei Jahren nach der letzten Auslieferung dieses Produkts vollständig erhalten, wenn Sie eine E-Mail senden an mailto:oss.request@samsung.com. Es ist auch möglich, den entsprechenden Quellcode vollständig auf einem Medium wie einer CD-ROM zu erhalten. Hierfür wird eine minimale Gebühr erhoben. Die URL http://opensource.samsung.com/opensource/VR7000\_A20\_TZ/seq/0 führt zur Downloadseite des zur Verfügung gestellten Quellcodes. Dort werden auch die entsprechenden Informationen zur Open-Source-Lizenz für dieses Produkt bereitgestellt. Dieses Angebot gilt für jeden, der diese Informationen erhält. text_image
QR code image containing encoded data, no visible human-readable textTechnische Daten
| Klassifikation Kategorie | Detailinformationen | |||
| SR1*M701*** SR1*M702*** / SR1*M703*** | ||||
| Mechanische Daten (POWERbot) | Größe (T x H x L) 340 mm x 97 mm x 348 mm | |||
| Gewicht 4 kg | ||||
| Sensor Deckenformerkennung (Visionary Mapping PlusTM) | ||||
| Tastentyp des POWERbot Berührung | ||||
| Stromversorgung | Netzspannung 100-240 V~, 50/60 Hz | |||
| Leistungsaufnahme 80 W | ||||
| Akku 21,6 V/ 38,8 Wh | ||||
| Reinigung | Ladetyp Automatisch / Manuell | |||
| Reinigungsmodus | Automatische Reinigung, Punktsaugen, Tagesprogramm | Automatische Reinigung, Punktsaugen, Wiederholte Reinigung, Handsaugen, Einmalprogramm, Tagesprogramm | ||
| Ladezeit Etwa 240 Minuten | ||||
| Saugdauer (auf hartem Untergrund) | Turbomodus Etwa 30 Minuten | |||
| Normaler Modus Etwa 60 Minuten | ||||
| Wi-Fi | Frequenzbereich 2412 - 2472 MHz | |||
| Senderleistung (Max) | 20 dBm | |||
| Klassifikation Kategorie | Detailinformationen | ||
| Mechanische Daten (POWERbot) | Größe (T x H x L) 340 mm x 97 mm x 348 mm | ||
| Gewicht | 4,3 kg | ||
| Sensor Deckenformerkennung (Visionary Mapping PlusTM) | |||
| Tastentyp des POWERbot Berührung | |||
| Stromversorgung | Netzspannung 100-240 V~, 50/60 Hz | ||
| Leistungsaufnahme | 130 W | ||
| Akku 21,6 V/ 77,8 Wh | |||
| Reinigung | Ladetyp Automatisch / Manuell | ||
| Reinigungsmodus | Automatische Reinigung, Punktsaugen, Wiederholte Reinigung, Handsaugen, Einmalprogramm, Tagesprogramm | ||
| Ladezeit Etwa 160 Minuten | |||
| Saugdauer (auf hartem Untergrund) | Turbomodus Etwa 30 Minuten | ||
| Normaler Modus Etwa 60 Minuten | |||
| Flüsterbetrieb | Etwa 90 Minuten | ||
| Wi-Fi | Frequenzbereich 2412 - 2472 MHz | ||
| Senderleistung (Max) | 20 dBm | ||
POWERbot
Manuel d'utilisation
Série SR1\*M70\*\*\*\*, SR2\*M70\*\*\*\* - Avant d'utiliser cet appareil, veuillez lire attentivement les instructions. • Utilisation en intérieur uniquement. natural_image
Black-and-white photo of a modern lounge chair with leather backrest and metallic armrest, featuring a pair of headphones placed on the backrest (no text or symbols visible)Sommaire
03 Consignes de sécurité 08 Installation Accessoires / Remarque pour l'installation 10 Mise en charge Charge automatique / Recharge / Batterie faible (Lo) 12 Utilisation du POWERbot Mise sous/hors tension / Sélection des modes de nettoyage / Utilisation des fonctions spéciales de nettoyage 15 Installation du dispositif de protection virtuelle Nomenclature des composants du dispositif de protection virtuelle / Insertion des piles 17 Utilisation de la télécommande 20 Nom de chaque pièce Partie supérieure / Partie inférieure / Écran 22 Réglage de l'heure/du programme Réglage de l'heure / Réglage du programme 25 Nettoyage et entretien Nettoyage du réservoir de poussière / Nettoyage des capteurs et de la caméra / Nettoyage de la brosse et du volet obturateur automatique / Nettoyage de la roue d'entrainement 27 Application SmartThings 31 Remarques et mises en garde Mise en charge / Utilisation / Nettoyage et entretien / À propos de la batterie / À propos du capteur infrarouge 33 Codes d'information 35 Dépannage 39 Avertissements concernant la batterie Comment retirer la batterie 40 Annonce de logiciel open source 41 Caractéristiques techniquesConsignes de sécurité
CONSIGNES DE SÉCURITÉ
 \- Avant d'utiliser cet appareil, veuillez lire attentivement ce manuel et le conserver pour toute référence ultérieure.  \- Les instructions d'utilisation suivantes concernent plusieurs modèles ; il est donc possible que les caractéristiques de votre aspirateur soient légèrement différentes de celles spécifiées dans ce manuel. SYMBOLES ATTENTION/AVERTISSEMENT UTILISÉS| !AVERTISSEMENT | Indique un danger de mort ou de blessure grave. |
| !ATTENTION | Indique un risque de blessure ou de dégât matériel. |
| REMARQUE | Indique que le texte associé contient des informations importantes supplémentaires. |
Consignes de sécurité
CONSIGNES IMPORTANTES DE SÉCURITÉ
Lors de l'utilisation d'un appareil électrique, des précautions de base doivent être prises, notamment :LISEZ TOUTES LES INSTRUCTIONS AVANT D'UTILISER VOTRE POWERbot.
Débranchez l'appareil de la prise lorsqu'il n'est pas utilisé ou avant toute opération d'entretien.AVERTISSEMENT : pour limiter tout risque d'incendie, d'électrocution ou de blessures :
GÉNÉRALITÉS
- Utilisez cet appareil uniquement tel qu'indiqué dans le présent guide. - Ne faites pas fonctionner le POWERbot ou le chargeur de batterie / la base si celui-ci ou celle-ci est endommagé(e) de quelque manière que ce soit. - Si l'aspirateur fonctionne anormalement, a reçu un choc, a été endommagé, laissé à l'extérieur ou plongé dans l'eau, retournez-le au centre d'assistance clientèle. - Ne manipulez pas le chargeur de batterie / la base ou le POWERbot si vous avez les mains mouillées. - Utilisez-le uniquement à l'intérieur et sur des surfaces sèches. - Cet appareil n'est pas destiné à être utilisé par des enfants de moins de 8 ans ou des personnes ayant des capacités physiques, sensorielles ou mentales réduites, ou un manque d'expérience et de connaissances, à moins qu'elles soient surveillées ou qu'elles aient reçu les instructions nécessaires concernant l'utilisation sécurisée de cet appareil et qu'elles comprennent les dangers impliqués. Les enfants ne doivent pas jouer avec l'appareil. Le nettoyage et l'entretien de l'appareil ne doivent pas être effectués par des enfants sans surveillance.Chargeur de batterie / Base
- N'utilisez pas la prise polarisée avec une prise murale ou une rallonge non-polarisée. - N'utilisez pas l'appareil à l'extérieur ni sur des surfaces mouillées. - Débranchez le chargeur de batterie / la base de la prise lorsqu'il / elle n'est pas utilisé(e) ou avant toute opération d'entretien. - Utilisez uniquement le chargeur de batterie / la base fourni(e) par le fabricant pour recharger l'appareil. - N'utilisez pas de cordon ou de prise endommagé(e) ni de prise murale mal fixée. - Ne tirez pas sur le cordon ; ne soulevez pas l'appareil par le cordon ; n'utilisez pas le cordon comme poignée ; ne fermez pas la porte sur le cordon ; ne tirez pas le cordon sur des rebords ou des angles coupants. Maintenez le cordon éloigné des surfaces chauffées. \- N'utilisez pas de rallonges ni de prises murales ayant une intensité maximale admissible inadéquate. \- Ne débranchez pas l'appareil en tirant sur le cordon. Pour débrancher, tenez la prise et non le cordon. \- Ne détériorez pas les batteries et ne les faites pas brûler car elles risquent d'exploser à des températures élevées. \- N'essayez pas d'ouvrir le chargeur de batterie / la base. Les réparations doivent être effectuées uniquement par un technicien qualifié du centre d'assistance clientèle. \- N'exposez jamais le chargeur de batterie / la base à des températures élevées et évitez tout contact avec l'humidité.POWERbot
\- N'aspirez jamais d'objets pointus ou tranchants tels que des morceaux de verres, des clous, des vis, des pièces de monnaie, etc. \- N'utilisez pas l'appareil sans filtre. Pour les opérations de maintenance, n'insérez jamais vos doigts ou des objets dans le compartiment du ventilateur au cas où l'appareil se remettrait accidentellement en marche. \- N'insérez aucun objet dans les ouvertures. N'utilisez pas l'appareil si l'une des ouvertures est obstruée ; nettoyez régulièrement les ouvertures pour éliminer toute trace de poussière, peluches, cheveux, ou toute autre chose risquant d'empêcher le passage de l'air. • N'aspirez jamais de matière toxique (iavel, ammoniague, produit de débouchage, etc.) \- N'aspirez jamais d'objets en train de brûler ou de fumer, tels que des cigarettes, des allumettes ou des cendres chaudes. \- N'aspirez jamais de liquides inflammables ou combustibles tels que de l'essence et n'utilisez jamais l'appareil si de tels liquides risquent d'être présents. \- Les lieux avec des bougies ou lampes de bureau posées sur le sol. \- Les lieux où des feux sont laissés sans surveillance (feu ou braises). \- Les lieux avec présence d'alcool distillé, de diluant, de cendriers avec cigarettes allumées, etc. \- N'utilisez pas le POWERbot dans un espace clos rempli de vapeurs de peinture à l'huile, de diluant, de substances antimites, de poussières inflammables et autres vapeurs explosives ou toxiques. \- Des fuites de batterie peuvent se produire suite à un usage intensif ou à des températures extrêmes. En cas de contact du liquide avec la peau, rincez abondamment à l'eau. En cas de contact du liquide avec les yeux, rincez immédiatement à l'eau claire pendant 10 minutes minimum. Consultez un médecin rapidement.Consignes de sécurité
AVERTISSEMENT
À propos de l'alimentation
▶ Veillez à éviter tout risque d'électrocution ou d'incendie. \- N'endommagez pas le cordon d'alimentation. \- Ne tirez pas trop fort sur le cordon d'alimentation et ne touchez jamais la fiche d'alimentation avec les mains mouillées. \- Veillez à utiliser uniquement une source d'alimentation de 100 à 240 V \~ et n'utilisez jamais de multiprise pour alimenter plusieurs appareils en même temps. (Ne laissez pas le cordon traîner sur le sol.) \- N'utilisez pas de cordon ou de fiche d'alimentation endommagé(e) ou de prise électrique mal fixée. ▶ Retirez toute poussière ou corps étranger présent sur la broche ou sur la pièce de contact de la fiche d'alimentation. \- Risque de choc électrique ou de dysfonctionnement. AVERTISSEMENT
Avant l'utilisation
▶ N'utilisez pas le POWERbot à proximité d'un radiateur ou de substances inflammables. \- N'utilisez pas le POWERbot près du feu ou d'une flamme, notamment un radiateur mobile, une bougie, une lampe de bureau, une cheminée, etc. ou dans un endroit contenant des substances inflammables comme de l'essence, de l'alcool, du diluant, etc. ▶ Vérifiez l'absence d'objets dangereux autour de la zone de nettoyage du POWERbot afin d'éviter toute collision. Débranchez également tout ventilateur ou radiateur électrique. ▶ Le POWERbot est destiné à une utilisation domestique. Par conséquent, veillez à ne pas l'utiliser dans un grenier, un sous-sol, un garde-meuble, un bâtiment industriel, en extérieur, dans des endroits humides (salle de bain, buanderie), sur une table ou des étagères. \- Cela risque d'endommager le POWERbot ou d'entraîner un dysfonctionnement. ▶ Assurez-vous que le POWERbot ne traverse ou n'entre en contact avec aucun type de substance liquide. \- Cela risque de gravement endommager le POWERbot et de contaminer d'autres zones si les roues touchent le liquide. ▶ Ne renversez aucune substance liquide sur la base. \- Risque d'incendie ou d'électrocution. ▶ N'utilisez pas la base à d'autres fins que celles prévues pour cet appareil. \- Risque d'incendie ou d'endommagement grave de la base. Pour votre sécurité, veillez à ce que le capteur d'escarpement soit toujours propre. AVERTISSEMENT
Pendant l'utilisation
▶ Si le POWERbot produit des sons et des odeurs étranges ou de la fumée, appuyez immédiatement sur le bouton d'arrêt d'urgence en dessous du POWERbot, puis prenez contact avec un centre de service. AVERTISSEMENT
Nettoyage et entretien
▶ Si le cordon d'alimentation est endommagé, contactez un centre de service afin de le faire remplacer par un réparateur certifié. \- Risque d'incendie ou d'électrocution. ▶ Veuillez vous adresser à un centre de service Samsung Electronics pour le remplacement des piles. \- L'utilisation de piles provenant d'autres produits peut entraîner un dysfonctionnement. ATTENTION
Avant l'utilisation
\- Insérez le réservoir de poussière avant d'utiliser le POWERbot. Pour que la recharge automatique fonctionne, assurez-vous que les conditions suivantes soient remplies. - Mettez toujours la base sous tension. - Installez la base à un endroit facile à trouver pour le POWERbot. - Ne laissez aucun objet devant la base. ▶ Lors de l'installation de la base, ne laissez pas traîner le cordon au sol. Les roues du POWERbot pourraient s'y emmêler. ▶ N'utilisez pas le POWERbot sur des sols de couleur noire. \- Le POWERbot risquerait de ne pas fonctionner correctement. ▶ Ne placez aucun objet à moins de 0,5 m de chaque côté de la base et à moins de 1 m à l'avant. ▶ Assurez-vous que le contact de charge de la base n'est pas endommagé ou contaminé par des corps étrangers. ▶ N'installez pas la base dans une pièce dont le sol est sombre. \- Si le sol autour de la base est sombre, la recharge est altérée. - Avant le nettoyage, déplacez tout obstacle pouvant empêcher le déplacement du POWERbot (balançoire ou toboggan d'intérieur pour enfants, par exemple). ▶ N'utilisez pas le POWERbot dans un endroit plus étroit que son rayon de virage (0,5 m ou moins). ▶ Si une brosse ou un cache de brosse est mal réinstallé(e), vous risquez de rayer le sol ou d'entraîner un dysfonctionnement de l'appareil. - Avant de mettre le POWERbot en marche, retirez les objets qui pourraient se casser (cadre, miroir, objets en porcelaine), afin que le POWERbot puisse fonctionner sans interruption. ATTENTION Pendant l'utilisation
▶ Utiliser le POWERbot sur une moquette épaisse peut endommager à la fois le POWERbot et la moquette. - Le POWERbot ne peut pas monter sur une moquette de plus de 1 cm d'épaisseur. ▶ N'utilisez pas le POWERbot sur des tables ou d'autres surfaces en hauteur. - Risque d'endommagement en cas de chute. ▶ Le POWERbot peut heurter des pieds de chaises ou de bureau ; par conséquent, pensez à les relever pour garantir un nettoyage plus rapide et efficace. ▶ Lorsque le POWERbot est en marche, ne le levez pas et ne le portez pas vers une autre pièce. Lorsque vous déplacez le POWERbot dans une autre pièce, ne le saisissez pas par ses roues d'entraînement. ▶ Ne placez aucun objet sur le POWERbot et sur la caméra car cela pourrait entraîner un dysfonctionnement. - Ramassez immédiatement les feuilles de papier et sacs en plastique lorsque vous utilisez le POWERbot. Cela pourrait boucher l'aspiration. ▶ Ne visez pas directement des personnes ou animaux avec le pointeur rouge. ▶ Ne vous allongez pas autour du POWERbot lorsqu'il est en marche. \- Vos cheveux pourraient se coincer dans la brosse et vous pourriez vous blesser. ATTENTION
Nettoyage et entretien
▶ Veillez à respecter les consignes suivantes afin d'éviter tout endommagement du POWERbot - Ne vaporisez jamais d'eau directement sur le POWERbot pour le nettoyer. De même, ne le nettoyez jamais avec du benzène, du diluant, de l'acétone ou de l'alcool. ▶ Ne démontez ou ne réparez pas le POWERbot. Cette tâche doit être effectuée uniquement par un réparateur certifié. ▶ Assurez-vous que le capteur d'obstacles, le capteur d'escarpement et la caméra sont toujours propres. - Si des corps étrangers s'accumulent dessus, les capteurs peuvent connaître des dysfonctionnements.Installation
La base doit toujours être branchée et allumée. text_image
Installez la base dans une zone dégagée et sans risque de chute. Environ 1 m Environ 0.5 m Environ 0.5 m DC-IN| Télécommande(en option) | Piles (type AAA)(en option) | Manuel d'utilisation Filtre de rechange(en option) | |
| Base Cordon d'alimentation Chargeur de batterie Dispositif de protection | virtuelle (en option) | ||
Remarque pour l'installation
Remarque
\- Installez la base dans un endroit où le sol et le mur sont à niveau. Il vaut mieux installer la base dans le sens des lames du parquet. ▶ Si le bouton d'arrêt d'urgence est désactivé, le POWERbot ne se mettra pas en charge même s'il a rejoint la base. ▶ Mettez toujours la base sous tension. - Si la base n'est pas sous tension, le POWERbot ne peut pas la trouver et il ne peut donc pas se recharger automatiquement. - Si vous laissez le POWERbot séparé de la base, les piles se déchargent naturellement. ▶ Si le POWERbot est en mode veille, il ne s'allumera pas même si le bouton d'arrêt d'urgence est désactivé, puis réactivé. Maintenez le bouton [Départ/Arrêt] sur le POWERbot enfoncé pour désactiver le mode veille.Mise en charge
Une fois la première mise en charge complète du POWERbot terminée (après l'achat), l'appareil peut être utilisé pendant 60 minutes en mode Normal ( ). (Consultez la page 41 pour la durée de mise en charge.)Mise en charge intelligente
Si le POWERbot se décharge totalement en mode Nettoyage automatique, il reviendra automatiquement à la base pour se recharger et reprendra le nettoyage de la zone à nettoyer une fois que les deux tiers de la batterie seront complètement chargés. (À 2 reprises au maximum). text_image
AVERTISSEMENT • Tension nominale d'entrée de l'appareil : 100 à 240 V ~.text_image
(ON) (OFF)natural_image
Line drawing of a robotic vacuum cleaner with hands adjusting the component (no text or symbols)text_image
1 Activez le bouton d'arrêt d'urgence en-dessous.
Vous devez activer le bouton d'arrêt d'urgence pour allumer le POWERbot. Appuyez puis relâchez le bouton 📋.2 Mettez le POWERbot en charge manuellement en le plaçant sur la base.
Vérifiez que les broches de chargement du POWERbot et celles de la base sont alignées.3 Vérifiez l'état de la charge.
Pour la série SR1\*M701\*\*\*, le voyant de la batterie clignote toutes les secondes au cours de la charge et reste fixe lorsque la charge est terminée. Pour les séries SR1\*M702\*\*\* / SR1\*M703\*\*\* / SR2\*M70\*\*\*\*, « »s allumera selon l'avancée de la mise en charge et « FULL » apparaîtra lorsque la mise en charge sera complète. natural_image
Abstract geometric shape with a diagonal line dividing it into two triangular sections (no text or symbols)Charge automatique
text_image
Diagram showing two labeled components (① and ②) with arrows pointing to a device, likely illustrating a process or assembly.1. Série SR1\*M701\*\*\*
Si le voyant de la batterie clignote à des intervalles de 0,4 secondes, le POWERbot reviendra automatiquement à la base pour se charger.2. Séries SR1\*M70\*\*\*\* / SR2\*M70\*\*\*\*
Lorsque le voyant de la batterie se met à clignoter en cours de nettoyage, le POWERbot retourne sur sa base pour se charger automatiquement.Recharge
natural_image
Simple line icon of a house with a battery inside, no text or symbols presentBatterie faible (Lo)
natural_image
Line drawing of a robotic vacuum cleaner with hands adjusting the casing (no text or symbols)Étapes à suivre si la recharge n'a pas lieu :
Vérifiez l'état d'installation de la base lorsque :
▶ la base est située à un endroit difficile d'accès pour le POWERbot ; ▶ la distance entre la base et le POWERbot est supérieure à 5 m. - Il faudra certainement plus de temps au POWERbot pour revenir à la base et se recharger.Mettez le POWERbot en charge manuellement lorsque :
r▶ la base se situe dans un coin ; ▶ la batterie est entièrement déchargée ; ▶ le POWERbot est immobilisé à cause d'un obstacle (meuble, etc.) ; ▶ le POWERbot ne parvient pas à franchir un seuil à proximité de la base (la hauteur maximale de seuil que le POWERbot peut franchir est d'environ 1,5 cm) ; ▶ le voyant de la batterie clignote et que le message « Lo » s'affiche ; ▶ le voyant de la batterie clignote (applicable à la série SR1\*M701\*\*\*) ▶ le POWERbot est en mode Nettoyage localisé ou Nettoyage manuel.Utilisation du POWERbot
Vous devez activer le bouton d'arrêt d'urgence sur le dessous de l'appareil avant d'utiliser le POWERbot.Mise sous/hors tension
Appuyez sur le bouton pendant plus de 3 secondes.  \- Lorsque le POWERbot n'est pas utilisé pendant 30 minutes, Séries SR1\*M70\*\*U\* / SR2\*M70\*\*U\*: passe en mode économie d'énergie. Séries SR1\*M70\*\*W\* / SR2\*M70\*\*W\*: revient automatiquement à la base pour se charger. natural_image
Line drawing of a computer monitor with control buttons and scroll wheel (no text or symbols)Démarrage du mode Nettoyage automatique
Appuyez puis relâchez ce bouton. Le POWERbot se déplace et nettoie automatiquement et une seule les zones réglées.  \* Arrêt du nettoyage : Appuyez puis relâchez le boutonUtilisation du mode Nettoyage localisé
Le POWERbot permet d'effectuer le nettoyage intensif d'une zone spécifique Recharge
Vous pouvez ordonner au POWERbot d'aller se recharger automatiquement sur la base pendant le processus de nettoyage, en appuyant sur ce bouton.  Sélection des modes de nettoyage| Mode de nettoyage | Sélection | Icône affichée | |
| SR1*M702***SR1*M703***SR2*M70**** | SR1*M701*** | ||
| Nettoyage automatique | | | |
| Nettoyage localisé | | | |
| Nettoyage répété | * Appuyez d'abord sur [type A, B], [type C, D Repeat] de la télécommande puis appuyez sur [Départ/Arrêt ▷II]. | | - |
| Nettoyage manuel | * Le mode de nettoyage manuel peut être sélectionné à l'aide des boutons directionnels de la télécommande. | | - |
natural_image
Abstract grid pattern with horizontal lines and a small icon at the bottom-left corner (no text or symbols)Utilisation du POWERbot
Méthode de nettoyage pour chaque mode natural_image
Simple line drawing of three parallel horizontal bars with a small 3D icon at the bottom (no text or symbols)text_image
Environ 1,5 m Environ 1,5 mnatural_image
Line drawing of a hand holding a remote control with a device on top (no text or symbols)natural_image
Abstract geometric pattern with intersecting lines and a small icon (no text or symbols)Nettoyage automatique
Nettoie automatiquement et une seule fois les zones réglées. \* Série SR1\*M701\*\*\* : Le nettoyage se poursuit à plusieurs reprises jusqu'à ce que la batterie soit épuisée.Nettoyage localisé
Effectue le nettoyage intensif d'une zone spécifique. Il peut être utilisé pour aspirer des miettes de pain ou de biscuits.Nettoyage manuel
Vous pouvez déplacer le POWERbot à l'aide de la télécommande pour nettoyer la zone souhaitée. \* Cette fonction n'est pas applicable à la série SR1\*M701\*\*\*.Nettoyage répété
Le nettoyage se poursuit à plusieurs reprises jusqu'à ce que la batterie soit épuisée. \* Cette fonction n'est pas applicable à la série SR1\*M701\*\*\*. Remarque
▶ Si le Nettoyage automatique ou le Nettoyage répété est lancé, le POWERbot nettoie d'abord la zone autour de la base. Utilisation des fonctions spéciales de nettoyage| Fonction de nettoyage | Fonctionnement | Icône affichée | |
| SR1*M702***SR1*M703***SR2*M70**** | SR1*M701*** | ||
| Contrôle intelligent de la puissance | * Lorsque le POWERbot détecte un tapis en mode normal, il fonctionnera automatiquement avec une puissance d'aspiration plus élevée. | | |
| Brosse de nettoyage des angles | * Lorsque POWERbot détecte un bord ou un angle en mode Nettoyage automatique ou Nettoyage localisé, le volet obturateur automatique s'active et s'approche du bord ou de l'angle à nettoyer.► Bord plat (un nettoyage)► Coin (deux nettoyages) | | |
Installation du dispositif de protection virtuelle
Le rayon infrarouge émis par le dispositif de protection virtuelle empêchera le POWERbot de s'approcher d'une certaine zone. \* (Fourni pour la série SR2\*M707\*\*\* uniquement. Pour les séries SR2\*M704\*\*\* / SR2\*M705\*\*\* / SR2\*M706\*\*\*, achat nécessaire.) text_image
La longueur du mur virtuel est d'au moins 2,5 m et peut varier en fonction de l'environnement et de l'état de déplacement du POWERbot. Au moins 2,5 m Dispositif de protection virtuelle1 Appuyez sur le bouton Marche/Arrêt pour l'allumer.
Le voyant rouge Marche/Arrêt clignote. natural_image
Simple line drawing of a mechanical component with a downward arrow indicating force or direction (no text or symbols)2 Installez le dispositif de protection virtuelle là où vous souhaitez interdire l'accès au POWERbot.
Assurez-vous que le capteur de distance soit dirigé dans la direction dans laquelle vous souhaitez créer une barrière invisible (ce qui limitera l'approche du POWERbot).Installation du dispositif de protection virtuelle
Nomenclature des composants du dispositif de protection virtuelle text_image
Bouton Marche/Arrêt Témoin d'alimentation Mise sous tension : le voyant rouge clignote. Mise hors tension : le voyant est éteint. Capteur de détection POWERbot Capteur de détection de distance (capteur à rayon infrarouge) Cache des pilesInsertion des piles
Les piles du dispositif de protection virtuelle doivent être achetées séparément. natural_image
Illustration of a hand using a tool to clean or adjust a cylindrical container with an arrow indicating the process (no text or symbols present)natural_image
Diagram of a battery pack with two batteries and internal components (no text or symbols)natural_image
Illustration of a hand using a tool to adjust or install a battery into a cylindrical container (no text or symbols visible)Utilisation de la télécommande
[Type A] [Type B] text_image
1 3 1, 2 5 Spot Repeat Sound 4 2 Schedule Clock Schedule Cancel(1sec) SAMSUNG Reportez-vous à la page 22text_image
1 3 1, 2 5 Spot Repeat Sound 4 2 Schedule Clock Schedule Cancel (3sec) SAMSUNG Reportez-vous à la page 22text_image
1 3 1, 2 5 Point Cleaning 6 2 4 4 Spot Repeat Sound Schedule Clock Remote Cancel(3sec) Reportez-vous à la page 23 SAMSUNGtext_image
1 3 1, 2 5 Point Cleaning 6 2 4 4 Spot Repeat Sound Schedule Clock Remote Cancel(3sec) Reportez-vous à la page 23 SAMSUNGUtilisation de la télécommande
☐ [Type A] / ☐ [Type B] / [Type C] / [Type D] 1 Mise sous/hors tension, Recharge et Départ/Arrêt| Mise sous/hors tension | | | | | Permet de mettre le POWERbot sous/hors tension |
| Recharge | | | | | Permet de demander au POWERbot de se recharger automatiquement sur la base |
| Départ/Arrêt | | | | | Permet de démarrer ou d'arrêter le processus de nettoyage |
| Nettoyage automatique | | | | | Permet à l'appareil de nettoyer toutes les zones réglées une seule fois et de revenir automatiquement à la base. |
| Nettoyage localisé | | | | | Permet d'effectuer le nettoyage intensif d'une zone spécifique |
| Nettoyage répété | | | | | Permet de poursuivre le nettoyage jusqu'à ce que la batterie devienne très faible et que le voyant clignote |
| Mode Turbo | | | | | Permet d'aspirer à la puissance maximale. |
| Mode Normal | | | | | Permet d'aspirer à une puissance moyenne. |
| Mode Silencieux | | | | | Permet d'effectuer le nettoyage en silence |
| Signal sonore | | | | | À chaque fois que vous appuyez sur ce bouton, Effets sonores → Sourdine est sélectionné dans cet ordre. |
| Commande à distance | | | | | Permet d'activer ou de désactiver la fonction Wi-Fi. |
5 Mode de nettoyage manuel et contrôle de la direction
| Aller tout droit | | | | | Permet un déplacement vers l'avant |
| Tourner à gauche | | | | | Permet de tourner à gauche |
| Tourner à droite | Permet de tourner à droite |
6 Nettoyage localisé
Disponible uniquement avec les télécommandes de type C et D. Vous pouvez utiliser la télécommande pour pointer et nettoyer la zone souhaitée, pendant que le POWERbot est en cours de nettoyage. Pointez la lumière rouge vers le sol, dans un rayon de 0,5 m autour du POWERbot. Maintenez appuyé le bouton de nettoyage localisé pour déplacer la lumière rouge vers la zone souhaitée. Le POWERbot se déplacera et nettoiera en suivant la lumière. text_image
Diagram illustrating a mobile phone operation with magnified view and directional arrows indicating light path changes.text_image
Hauteur de la télécommande Portée| Hauteur de la télécommande | 0,5 m 1 m | 1,5 m | |
| Portée Environ | 1,5 m Environ | 2 m Environ | 3 m |
Insertion des piles
Ouvrez le cache de l'emplacement des piles en le soulevant et en appuyant sur la languette de verrouillage, puis insérez les piles comme indiqué sur l'illustration. Ensuite, refermez le cache jusqu'à entendre un « clic ». text_image
Diagram illustrating the step-by-step assembly of a battery pack with labeled components and mechanisms.Nom de chaque pièce
text_image
6 5 3 7 8 2 1 4 2text_image
4 2 3 4 5 10 7 1 4 8 6 9 5text_image
1 2 3 4 5 6 (3sec) (3sec)Partie supérieure
1. Écran 2. Récepteur des signaux de la télécommande 3. Capteur d'obstacles 4. Réservoir de poussière 5. Caméra 6. Bouton du réservoir de poussière 7. Capteur antichoc 8. Volet obturateur automatiquePartie inférieure
1. Broches de chargement 2. Brosse 3. Cache de la brosse 4. Capteur d'escarpement 5. Roulette 6. Cache de la batterie 7. Bouton du cache de la brosse 8. Roue d'entraînement 9. Bouton d'arrêt d'urgence 10. Volet obturateur automatiqueÉcran
text_image
1 2 6 13 3 4 5 7 8:00:00 AM PM 11 28 109 15 14text_image
1 2 6 14 3 4 5 7 12 38 11 109 15 16Réglage de l'heure/du programme
[Type A, Type B] Seul le mode Nettoyage automatique peut être programmé.Réglage de l'heure
Vous devez régler l'heure actuelle avant d'utiliser le programme Quotidien/Pour une seule fois. flowchart
graph LR
A["Clock"] --> B["Sélectionnez « Heure »"]
B --> C["Sélectionnez « Minute »"]
C --> D["Sélectionnez « Matin/Après-midi »Réglage terminé"]
D --> E["Aller au prochain/précédent réglage"]
Réglage du programme
Le réglage/l'annulation du programme ne peut être effectué(e) que lorsque le POWERbot est sur la base. flowchart
graph LR
A["Schedule Cancel (3sec)"] --> B["Commencer le réglage"]
B --> C["Sélectionner le programme « Pour une seule fois » ou « Quotidien »"]
C --> D["Sélectionnez « Heure »"]
D --> E["Réglage terminé"]
E --> F["Sélectionnez « Matin/ Après-midi »"]
F --> G["Sélectionnez « Minute »"]
G --> H["Aller au prochain/précédent réglage"]
Annulation au moment du réglage
 ▶ Si vous ne saisissez rien pendant 7 secondes, le réglage est automatiquement annulé.Annulation du programme Pour une seule fois/Quotidien
| Lorsque les programmesPour une seule fois/Quotidien sont tous les deux réglés | ScheduleCancel (3sec)OU ScheduleCancel (3sec)OU ScheduleCancel (3sec)Appuyez pendant 3 s. Sélectionnez le programme Annulation effectuée | |||||
| Lorsque soit le programmePour une seule fois, soit leprogramme Quotidien est réglé | ScheduleCancel (3sec)Appuyez pendant 3 s. | |||||
Réglage de l'heure
Vous devez régler l'heure actuelle avant d'utiliser le programme Quotidien/Pour une seule fois. flowchart
graph LR
A["Clock"] --> B["Sélectionnez « Heure »"]
B --> C["Sélectionnez « Minute »"]
C --> D["Sélectionnez « Matin/Après-midi »Réglage terminé\nAller au prochain/précédent réglage"]
D --> E["End"]
Réglage du programme
Le réglage/l'annulation du programme ne peut être effectué(e) que lorsque le POWERbot est sur la base. flowchart
graph LR
A["Schedule"] --> B["Cancel (3sec)"]
B --> C["Commencer le réglage"]
C --> D["Sélectionner le programme « Pour une seule fois » ou « Quotidien »"]
D --> E["Sélectionnez « Heure »"]
E --> F["Réglage terminé"]
F --> G["Sélectionnez « Matin/ Après-midi »"]
G --> H["Sélectionnez « Minute »"]
H --> I["Aller au prochain/précédent réglage"]
Annulation au moment du réglage
 ▶ Si vous ne saisissez rien pendant 7 secondes, le réglage est automatiquement annulé.Annulation du programme Pour une seule fois/Quotidien
| Lorsque les programmesPour une seule fois/Quotidien sont tous les deux réglés | [c7Yt] OU Cancel (3sec) → [Schedule Cancel (3sec)] Appuyez pendant 3 s. Sélectionnez le programme Annulation effectuée |
| Lorsque soit le programmePour une seule fois, soit le programme Quotidien est réglé | Appuyez pendant 3 s. |
Réglage de l'heure/du programme
[Série SR1\*M701\*\*\*] Pour les modèles sans télécommande, le réglage du programme est disponible comme suit.Réglage du programme
Le réglage/l'annulation du programme ne peut être effectué(e) que lorsque le POWERbot est sur la base.  Appuyez pendant 3 s.   Lorsque la DEL du programme est allumée, le programme Quotidien est réglé. \* La durée pendant laquelle vous appuyez sur le bouton sera réglée comme programme. Le nettoyage se lancera automatiquement tous les jours en fonction de l'heure du programme.Annulation du programme quotidien
| Lorsqu'un programme quotidien est réglé | Appuyez pendant 3 s. |
Nettoyage et entretien
Vous devez désactiver le bouton d'arrêt d'urgence avant de nettoyer le POWERbot.Nettoyage du réservoir de poussière
text_image
① ② PUSHtext_image
Diagram showing two labeled parts of a mechanical device with directional arrows indicating movement or assembly.natural_image
Illustration of hands pouring liquid into a trash bin with a spray can (no text or symbols)text_image
Illustration showing two steps to open a laptop and then to use a sunlit sink, with water tap and mug icons present.text_image
Diagram illustrating three steps of installing a device into a laptop, with numbered instructions and visual icons.text_image
« Clic »Nettoyage des capteurs et de la caméra
Essuyez doucement avec un chiffon doux. N'utilisez pas d'eau ou de solutions de nettoyage. text_image
Caméra Fenêtre des capteurs avant Capteurs d'escarpement Fenêtre du capteur arrièreNettoyage et entretien
Nettoyage de la brosse et du volet obturateur automatique
La conception de la brosse peut varier en fonction des modèles. Ne nettoyez pas la brosse avec de l'eau. text_image
Diagram showing a device with labeled parts and a magnified view of the component being turned into a grid.natural_image
Illustration of a hand holding a tool over a device component, with an arrow indicating upward motion (no text or symbols present)natural_image
Illustration of a welding torch and tool interacting with a welded joint (no text or symbols)text_image
Diagram showing three-step steps of a tool application: writing, holding a pen, and cutting a paper with a pencil.text_image
Diagram showing hands holding a pen with a numbered label '1' pointing to the pen tip, likely illustrating a procedure or step in a technical or mechanical context.text_image
Diagram showing a hand holding a device with labeled parts and directional arrows indicating process stepstext_image
Diagram illustrating car safety instructions with hand gesture, cross symbol, and numbered instructionstext_image
Diagram showing hands operating a device with a labeled component and internal components, likely illustrating a process or setup.Nettoyage de la roue d'entraînement
natural_image
Illustration of hands holding a device casing with internal components (no text or symbols visible)natural_image
Hand using a tool to lift a tire on a road surface (no text or symbols visible)Application SmartThings
L'application SmartThings n'est compatible qu'avec les modèles qui disposent d'une fonction Wi-Fi.Paramétrage du routeur sans fil
▶ Veuillez vous reporter au manuel d'utilisation de votre routeur sans fil si vous rencontrez des problèmes d'accès. ▶ L'aspirateur POWERbot de Samsung prend uniquement en charge une connexion Wi-Fi de 2,4 GHz. ▶ L'aspirateur POWERbot de Samsung prend en charge les protocoles IEEE 802.11b/g/n et Soft-AP. - Le protocole IEEE 802.11n est recommandé. L'aspirateur POWERbot de Samsung prend uniquement en charge le protocole DHCP (Dynamic Host Configuration Protocol). Veuillez vous assurer que l'option de serveur DHCP est activée sur votre routeur sans fil. ▶ Le POWERbot prend en charge WEP-OPEN, WPA-PSK/TKIP et WPA2-PSK/AES pour les protocoles d'authentication et de codage. - Le protocole WPA2-PSK/AES est recommandé. - Vérifiez que votre routeur dispose d'un identifiant SSID et d'un mot de passe uniques. ▶ La qualité de la connexion de votre réseau sans fil peut être influencée par l'environnement sans fil existant. Une fois que votre fournisseur d'accès Internet (FAI) a enregistré définitivement l'adresse MAC (numéro d'identification unique) de votre ordinateur ou modem, il se peut que votre POWERbot ne parvienne pas à se connecter à Internet. Demandez à votre FAI de vous communiquer la procédure à suivre pour connecter un appareil autre qu'un ordinateur à Internet. ▶ Si le FAI vous demande votre identifiant ou mot de passe pour établir la connexion à Interner, il se peut que votre POWERbot ne puisse pas se connecter à Internet. Si tel est le cas, vous devez saisir votre identifiant ou mot de passe lors de l'établissement de la connexion à Internet. ▶ Le POWERbot peut ne pas parvenir à se connecter à Internet à cause de problèmes de pare-feu. Prenez contact avec votre FAI pour résoudre ces problèmes. ▶ Certains routeurs sans fil peuvent transmettre une adresse DNS (serveur de noms de domaine) non valide, même si aucune connexion à Internet n'est établie. Si tel est le cas, prenez contact avec le fabricant de votre routeur sans fil ainsi qu'avec votre FAI. ▶ Si vous ne parvenez toujours pas à vous connecter à Internet, même après avoir suivi la procédure indiquée par votre FAI, veuillez prendre contact avec un centre de dépannage Samsung agréé. ▶ Si votre routeur n'est pas un produit certifié Wi-Fi, il se peut que le POWERbot ne parvienne pas à se connecter à Internet.Application SmartThings
Téléchargement de l'application SmartThings
▶ Téléchargez et installez l'application SmartThings sur les marchés d'applications (Google Play Store, Apple App Store ou Samsung Galaxy Apps). Pour trouver l'application, recherchez le mot-clé « SmartThings ». Remarque
▶ SmartThings n'est pas compatible avec les tablettes et certains appareils mobiles. \- Le système d'exploitation Android 6.0 ou version ultérieure (au moins 2 Go de RAM) est recommandé. Les iPad et certains appareils mobiles peuvent ne pas être pris en charge. \- Le système d'exploitation iOS 10.0 ou une version ultérieure / l'iPhone 6 ou une version ultérieure est pris en charge. ▶ Rendez-vous sur Play Store ou App Store pour voir si votre appareil mobile est compatible avec SmartThings. Les fonctions prises en charge sont soumises à modification sans préavis.Création d'un compte Samsung
\- Vous devez créer un compte Samsung pour pouvoir utiliser l'application SmartThings. Pour créer un compte Samsung, vous pouvez suivre les instructions fournies par l'application SmartThings. ▶ Sinon, si vous avez un smartphone Samsung, vous pouvez ajouter votre compte Samsung dans l'application des réglages de votre smartphone. Vous serez ainsi automatiquement connecté à votre compte Samsung.Ajout d'un appareil sur l'application SmartThings
1. Connectez votre smartphone à votre routeur sans fil. \- Si le smartphone n'est pas connecté, activez le Wi-Fi sur l'appli Settings App et sélectionnez un routeur sans fil sur lequel le connecter. \- Désactivez l'option "Données mobiles" d'un smartphone pour utiliser le Wi-Fi uniquement et connectez un périphérique. 2. Lancez l'application SmartThings sur votre smartphone. 3. Si une fenêtre contextuelle s'affiche indiquant qu'un nouvel appareil a été détecté, appuyez sur ADD NOW. \- Si la fenêtre contextuelle n'apparaît pas, appuyez sur le bouton + et sélectionnez l'appareil que vous souhaitez connecter dans la liste AVAILABLE DEVICES. \- Si votre appareil n'apparaît pas dans la liste, ajoutez-le manuellement en sélectionnant le type d'appareil et le modèle spécifique d'appareil. 4. [Android] La connexion à votre appareil sera établie automatiquement. \- [iOS] Ouvrez l'application des réglages et sélectionnez [robot vacuum] Samsung dans la liste des connexions Wi-Fi disponibles. 5. Authentifiez-vous lorsque vous êtes invité(e) à le faire. 6. [Android] La connexion à votre routeur sans fil sera établie automatiquement. \- [iOS] Ouvrez l'application des réglages et sélectionnez le routeur sans fil dans la liste des connexions Wi-Fi disponibles. 7. Les opérations restantes de configuration seront automatiquement effectuées. Ensuite, une nouvelle Device Card sera ajoutée. Remarque
▶ Si vous ne parvenez pas à enregistrer l'appareil, veuillez suivre les étapes ci-dessous. \- Essayez d'appliquer une nouvelle fois la procédure d'enregistrement selon les instructions fournies dans les messages contextuels. \- Vérifiez que l'option UPnP de votre routeur sans fil est activée, puis réessayez d'appliquer la procédure d'enregistrement. \- Vérifiez que le mode sans fil de votre routeur sans fil est bien activé, puis réessayez d'appliquer la procédure d'enregistrement. \- Si vous avez deux aspirateurs POWERbot ou plus, éteignez les autres aspirateurs POWERbot, puis réessayez d'enregistrer votre POWERbot. \- Si tout autre routeur sans fil possède le même identifiant SSID que votre routeur sans fil, il se peut que l'enregistrement échoue. ▶ Voyant de la fonction Commande à distance et de connexion Wi-Fi| Activée | La fonction Commande à distance est bloquée.(L'utilisation de la télécommande peut quand même être autorisée.) | | |
| Désactivée | La fonction Commande à distance est autorisée. | ||
| Activée Le POWERbot est connecté au routeur sans fil. | |||
| Désactivée | Le POWERbot tente de se connecter au routeur sans fil. |
Application SmartThings
Lorsque la fonction Commande à distance est bloquée, vous ne pouvez pas commander le POWERbot depuis votre smartphone. ▶ Le POWERbot et votre smartphone ne sont pas connectés au même routeur sans fil ; un délai de réponse peut être constaté selon votre environnement réseau.Mise à jour du logiciel
Lorsque le POWERbot est en charge sur la base, le POWERbot se connecte au serveur puis vérifie si un logiciel est disponible. Si un nouveau logiciel est trouvé, le POWERbot le télécharge et le met à jour automatiquement. ▶ Si le message « UP » s'affiche sur l'écran alors que le POWERbot est en charge, cela signifie qu'une mise à jour est en cours. Veuillez attendre que la mise à jour soit terminée avant d'utiliser le POWERbot.Utilisation de l'application SmartThings
▶ Lorsque vous appuyez sur la carte de l'appareil dans l'application SmartThings, le plug-in (module d'extension) pour votre appareil sera lancé. text_image
ROBOT #2 OFFICE HELP ⑪ ① ② RECHARGING AUTO SPOT ④ Fully charged ⑤ Battery ⑥ Suction power Normal ⑦ Repeat ⑧ Schedule ⑨ History ⑩Remarques et mises en garde
Mise en charge
Remarque
En cas de surchauffe de la batterie pendant la charge, l'opération peut prendre plus de temps que prévu. ▶ Si la charge automatique ne fonctionne pas, effectuez les opérations suivantes : - Désactivez le bouton d'arrêt d'urgence (endessous du POWERbot) puis réactivez-le. - Débranchez puis rebranchez la fiche d'alimentation de la base. - Débranchez la base, puis vérifiez l'absence de corps étrangers sur les broches de chargement et nettoyez le POWERbot et les broches de chargement de la base à l'aide d'un chiffon sec. - Vérifiez l'absence d'obstacles à proximité de la base (objets réfléchissants, chaises, etc.). ▶ Si vous laissez le POWERbot séparé de la base, la batterie se décharge naturellement. \- Essayez de maintenir le POWERbot en charge sur la base. (Toutefois, désactivez le bouton d'arrêt d'urgence et laissez la base débranchée lorsque vous prévoyez de vous absenter de la maison pendant une période prolongée dans le cadre d'un voyage d'affaires ou de vos vacances, etc.)Utilisation
Remarque
▶ Le POWERbot peut rester bloqué sur des seuils, entre autres, pendant le nettoyage. - Pour reprendre le fonctionnement, désactivez le bouton d'arrêt d'urgence, placez le POWERbot dans un endroit dégagé et rallumez-le. ▶ Le POWERbot n'est pas conçu pour nettoyer parfaitement les zones auxquelles il ne peut pas accéder (angles, espace entre les meubles et le mur, etc.). - Veuillez utiliser un autre outil de nettoyage pour aspirer ces zones. ▶ Le POWERbot n'est pas conçu pour aspirer les peluches de poussière ; il est donc possible que certaines restent sur le sol après le nettoyage. - Veuillez utiliser un autre outil de nettoyage pour aspirer ces zones. ▶ Si le POWERbot est éteint, vous ne pouvez pas l'allumer en appuyant sur le bouton Marche/Arrêt de la télécommande. Maintenez enfoncé le bouton [Départ/Arrêt] sur le POWERbot. - Vous ne pouvez pas sélectionner et ordonner au POWERbot d'exécuter le mode Nettoyage localisé lorsqu'il est en charge. ▶ Si vous appuyez sur le bouton de nettoyage manuel/localisé pendant la charge, le POWERbot quittera la base et passera en mode veille.Nettoyage et entretien
Remarque
▶ Lorsque vous lavez le réservoir de poussière et le filtre à l'eau claire - Réservoir de poussière : essuyez-le minutieusement avant de le remettre en place. - Filtre : faites-le sécher complètement à l'ombre avant de le réutiliser. ▶ Lorsque vous nettoyez le volet obturateur automatique, retirez-le en le tirant délicatement. Attention
▶ Veillez à ne pas vous coincer les doigts dans l'entrée du réservoir de poussière lorsque vous démontez ou remontez le filtre. ▶ Ne laissez pas d'objets risquant d'obstruer l'entrée du POWERbot sur le sol (ex. : cure-dents, cotons-tiges, etc.). ▶ Si vous ne parvenez pas à retirer un corps étranger de la brosse, prenez contact avec un centre de service Samsung agréé.Remarques et mises en garde
▶ La brosse étant chargée de nettoyer le sol, des fils ou encore des cheveux risquent de rester coincés dedans. Pour des résultats de nettoyage optimaux, vérifiez-le et nettoyez-le régulièrement. ▶ Si une brosse ou un cache de brosse est mal réinstallé(e) après une opération de maintenance, vous risquez de rayer le sol ou d'entraîner un dysfonctionnement de l'appareil. Par conséquent, assemblez-les correctement en vérifiant la procédure de maintenance.À propos de la batterie
Remarque
- Achetez des batteries dans les centres Samsung agréés et vérifiez la présence du symbole (SAMSUMG)es batteries, ainsi que le nom de modèle, avant d'acheter. - Cette batterie est destinée exclusivement au POWERbot Samsung Electronics. Ne l'utilisez pas avec tout autre appareil. ▶ Ne démontez pas et ne modifiez pas la batterie. ▶ Ne jetez pas la batterie au feu et ne la faites pas chauffer. ▶ N'appliquez pas d'objet métallique sur les bornes de charge (+, -). ▶ Rangez la batterie en intérieur (entre 0 et 40 °C). ▶ En cas de dysfonctionnement de la batterie, ne la démontez pas vous-même. Prenez contact avec votre centre de service Samsung le plus proche. - Les temps de charge et d'utilisation de la batterie diminuent au fur et à mesure. Si la durée de vie de la batterie est dépassée et qu'elle ne charge plus correctement la base, faites-la remplacer auprès d'un centre de service Samsung. ▶ La période de garantie de la batterie est de 6 mois à compter de la date d'achat.À propos du capteur infrarouge
Attention
▶ La transmission du signal infrarouge peut ne pas être régulière dans les lieux comportant des lampes halogènes ou en extérieur. ▶ Le POWERbot utilise 3 types de dispositifs infrarouge. Chacun des dispositifs possède un niveau de priorité différent. Un dispositif peut ne pas fonctionner si son signal est remplacé par un dispositif ayant une priorité supérieure. \- Priorité des signaux infrarouge : Commande à distance > Base Les différents signaux infrarouges émis par les appareils peuvent interférer les uns avec les autres et provoquer des dysfonctionnements si les appareils concernés se situent dans une pièce exiguë ou sont proches les uns des autres. ▶ Si plusieurs aspirateurs POWERbot sont utilisés simultanément, ils risquent de mal fonctionner en raison d'interférences entre les signaux infrarouges.Codes d'information
flowchart
graph LR
A["Sensor Input"] --> B["Code Output"]
B --> C["Code 1"]
B --> D["Code 2"]
B --> E["Code 3"]
B --> F["Code 4"]
C --> G["Output"]
D --> G
E --> G
F --> G
| Le POWERbot s'est coincé, bloqué ou piégé pendant son déplacement.►Désactivez le bouton d'arrêt d'urgence et déplacez le POWERbot dans une autre zone. |
| Corps étrangers coincés dans la brosse.►Désactivez le bouton d'arrêt d'urgence et retirez les corps étrangers de la brosse. |
| Corps étrangers coincés dans la roue d'entraînement gauche.►Désactivez le bouton d'arrêt d'urgence et retirez les corps étrangers de la roue d'entraînement. |
| Corps étrangers dans la roue d'entraînement droite►Désactivez le bouton d'arrêt d'urgence et retirez les corps étrangers de la roue d'entraînement. |
| Contrôle du capteur antichoc►Désactivez, puis réactivez le bouton d'arrêt d'urgence.►Si le code d'information ne disparaît pas, vérifiez l'absence de corps étrangers entre le pare-chocs et le corps de l'appareil. Le cas échéant, tirez doucement sur le pare-chocs et retirez les particules étrangères. |
| Accumulation de corps étrangers sur le capteur d'obstacles.►Désactivez le bouton d'arrêt d'urgence et nettoyez les capteurs avant et arrière à l'aide d'un chiffon doux. |
| Accumulation de corps étrangers sur le capteur d'escarpement►Désactivez le bouton d'arrêt d'urgence et nettoyez le capteur d'escarpement à l'aide d'un chiffon doux. |
| La carte de circuit imprimé principale doit être contrôlée.►Éteignez l'appareil et redémarrez-le. Si le même problème continue de survenir, un contrôle d'entretien est requis. |
Codes d'information
| Codes d'information Liste de vérification | |
| Le POWERbot s'est coincé, bloqué ou piégé pendant son déplacement.► Désactivez le bouton d'arrêt d'urgence et déplacez le POWERbot dans une autre zone. |
| Corps étrangers coincés dans la brosse.► Désactivez le bouton d'arrêt d'urgence et retirez les corps étrangers de la brosse. |
| Corps étrangers coincés dans la roue d'entraînement gauche.► Désactivez le bouton d'arrêt d'urgence et retirez les corps étrangers de la roue d'entraînement. |
| Corps étrangers dans la roue d'entraînement droite► Désactivez le bouton d'arrêt d'urgence et retirez les corps étrangers de la roue d'entraînement. |
| Contrôle du capteur antichoc► Désactivez, puis réactivez le bouton d'arrêt d'urgence.► Si le code d'information ne disparaît pas, vérifiez l'absence de corps étrangers entre le pare-chocs et le corps de l'appareil. Le cas échéant, tirez doucement sur le pare-chocs et retirez les particules étrangères. |
| Accumulation de corps étrangers sur le capteur d'obstacles.► Désactivez le bouton d'arrêt d'urgence et nettoyez les capteurs avant et arrière à l'aide d'un chiffon doux. |
| Accumulation de corps étrangers sur le capteur d'escarpement► Désactivez le bouton d'arrêt d'urgence et nettoyez le capteur d'escarpement à l'aide d'un chiffon doux. |
| La carte de circuit imprimé principale doit être contrôlée.► Éteignez l'appareil et redémarrez-le. Si le même problème continue de survenir, un contrôle d'entretien est requis. |
Dépannage
| Symptôme Liste de vérification | |
| Le POWERbot ne fonctionne pas du tout. | ▸ Vérifiez que le bouton d'arrêt d'urgence est activé.▸ Vérifiez que toutes les icônes sont affichées à l'écran.▸ Vérifiez que la batterie du POWERbot est chargée.- Si le message « Lo » s'affiche, placez le POWERbot sur sa base pour le mettre en charge.- Lorsque le voyant de la batterie clignote, placez manuellement le POWERbot sur la base pour le charger. (Série SR1*M701*** uniquement)▸ Remplacez les piles (type AAA) si la télécommande ne fonctionne pas. |
| Le POWERbot s'est arrêté pendant le nettoyage. | ▸ Si le message « Lo » s'affiche sur l'écran, placez le POWERbot sur sa base pour le mettre en charge.▸ Lorsque le voyant de la batterie clignote, placez manuellement le POWERbot sur la base pour le charger. (Série SR1*M701*** uniquement)▸ Si le POWERbot est immobilisé par un obstacle (ex. : cordon électrique, seuil, etc.), prenez-le et dégagez-le de l'obstacle.- Si des corps étrangers (morceaux de tissu, fils) restent bloqués dans une roue d'entraînement, désactivez le bouton d'arrêt d'urgence et retirez-les avant réutilisation. |
| La puissance d'aspiration est faible | ▸ Un réservoir trop plein peut faire baisser la puissance d'aspiration de l'appareil. Désactivez le bouton d'arrêt d'urgence et videz le réservoir▸ Si l'entrée située (en-dessous du POWERbot) est obstruée par des corps étrangers, désactivez le bouton d'arrêt d'urgence et retirez-les.▸ Si l'appareil devient soudainement plus bruyant, désactivez le bouton d'arrêt d'urgence et videz le réservoir. |
| Le POWERbot ne parvient pas à trouver la base. | ▸ Il peut s'agir d'une panne de courant ou la fiche d'alimentation est peut-être débranchée.▸ Retirez tout obstacle se trouvant autour de la base et pouvant empêcher le POWERbot de revenir à la base.▸ La mise en charge peut être affectée par la présence de corps étrangers sur les broches de chargement. Retirez les corps étrangers présents sur les broches. |
| Le POWERbot effectue soudainement le nettoyage en diagonale. | ▸ Vérifiez que la base est bien installée dans le sens du revêtement de sol (lames de parquet ou carrelage).▸ Le POWERbot peut nettoyer en diagonale s'il se dirige vers une autre zone en suivant le parcours le plus court. Il peut également se déplacer en diagonale s'il est entré en contact avec un obstacle suivant cet angle, s'il a été mis en charge sur la base suivant cet angle ou si le revêtement du sol (lames de parquet ou carrelage) est dans ce sens. |
| Le nettoyage localisé ne fonctionne pas | ▸ Si vous pointez la lumière rouge directement sur le POWERbot, il se peut qu'il n'aille pas dans la direction souhaitée.- Pointez la lumière rouge vers le sol à une distance de 0,5 m du POWERbot.※ N'utilisez pas le mode de nettoyage localisé si la zone est ensoleillée, très claire, ou sur des sols sombres. |
Dépannage
| Symptôme Liste de vérification | |
| J'ai installé l'application SmartThings, mais le POWERbot ne parvient pas à se connecter. | ► Vous pouvez utiliser l'appareil après avoir connecté le routeur sans fil et le POWERbot via une Configuration facile, en suivant la procédure indiquée. |
| Je ne parviens pas à me connecter au compte Samsung. | ► Vérifiez votre identifiant et votre mot de passe sur l'écran du compte Samsung. |
| Un message apparaît alors indiquant qu'une erreur est survenue pendant la Configuration facile. | ► Il est possible que vous n'y parveniez pas temporairement en raison de la distance par rapport au routeur sans fil ou à cause d'autres obstacles. Veuillez réessayer plus tard. |
| Les appareils ne fonctionnent pas même lorsque le smartphone est connecté normalement au POWERbot. | ► Fermez l'application SmartThings et lancez-la à nouveau, ou déconnectez le smartphone du routeur sans fil, puis reconnectez-le. Sinon, coupez l'alimentation du POWERbot, remettez-le sous tension, patientez au moins une minute, puis relancez l'application SmartThings. |
| Les fonctions de l'application SmartThings ne fonctionnent pas. | ► Vérifiez si la fonction de blocage de la fonction Commande à distance du POWERbot est activée. (Lorsque la fonction Commande à distance est bloquée, le voyant de connexion Wi-Fi est éteint.) |
| L'application SmartThings Robot Vacuum ne parvient pas à s'ouvrir. | ► Vérifiez si le POWERbot est connecté au routeur sans fil. |
| Le POWERbot n'est pas connecté au réseau Wi-Fi. | ► Vérifiez l'état de réglage du routeur sans fil. |
| La fonction Contrôle intelligent de la puissance fonctionne sur les sols normaux. | ► Vérifiez que le sol est bien à niveau et que le POWERbot fonctionne et que son corps est légèrement levé.► Vérifiez la présence éventuelle de corps étrangers sur le capteur d'escarpement situé sous le POWERbot.► Vérifiez si la couleur du sol est sombre. |
| La fonction Contrôle intelligent de la puissance ne fonctionne pas. | ► Lorsque le POWERbot nettoie un tapis de couleur vive et à poils courts, il peut reconnaître le tapis comme un sol et la fonction Contrôle intelligent de la puissance peut ne pas fonctionner. |
| La fonction Brosse de nettoyage des angles ne fonctionne pas. | ► Lorsque le POWERbot ne parvient pas à reconnaître le mur, la fonction Brosse de nettoyage des angles peut ne pas fonctionner.- Lorsqu'un obstacle réfléchissant fait face au mur- Lorsque le mur est lui-même réfléchissant- Lorsque le mur est de couleur foncée |
| La fonction Brosse de nettoyage des angles s'active en l'absence de murs ou de coins. | ► Vérifiez la présence éventuelle de petits obstacles disposés sur une zone étroite.► Lorsque le POWERbot reconnaît l'obstacle lui faisant face comme un mur, la fonction Brosse de nettoyage des angles peut s'activer. |
| La fonction Brosse de nettoyage des angles s'active alors que le POWERbot ne rencontre aucun mur ou coin. | ► Lorsque le degré de l'angle du coin détecté par le POWERbot est grand, la fonction Brosse de nettoyage des angles peut s'activer sans rencontrer aucun mur ou coin. |
| Symptôme Liste de vérification | |
| L'application SmartThings ne peut pas être installée. | ► L'application SmartThings fonctionne sur le système d'exploitation Android 6.0 ou une version supérieure et sur iOS 10 ou une version supérieure.► Il se peut que la version du système d'exploitation prenant en charge l'application SmartThings change ultérieurement.► Pour les appareils intelligents connectés par routeur, nous ne pouvons pas garantir une installation et une utilisation normales. |
| Un message d'échec de l'enregistrement de l'appareil s'affiche. | ► Réessayez la procédure d'enregistrement de l'appareil en vous reportant aux messages qui s'affichent.► Veuillez vous reporter à la section « Paramétrage du routeur sans fil » du guide d'utilisation.► Veuillez vous reporter aux étapes pour procéder à l'enregistrement de l'appareil dans la section du guide d'utilisation intitulée « Ajout d'un appareil sur l'application SmartThings ».► Lorsque l'enregistrement de l'appareil échoue à plusieurs reprises, réinitialisez le POWERbot et votre smartphone, lancez à nouveau l'application SmartThings, puis essayez de procéder à l'enregistrement de l'appareil.► Vous devez utiliser le même compte Samsung pour la connexion à l'application et pour l'enregistrement de l'appareil.► Tous les utilisateurs doivent utiliser le compte Samsung émis par le même pays. |
| Pendant l'enregistrement de l'appareil, le bouton de recharge est actionné et maintenu enfoncé selon les instructions, mais l'étape suivante n'apparaît pas. | ► Appuyez sur le bouton de recharge jusqu'à ce que vous entendiez un « bip ».► Si l'étape suivante n'apparaît pas sous quelques secondes, appuyez sur le bouton de recharge une fois de plus. |
| Pendant l'enregistrement de l'appareil, le routeur sans fil que je souhaite connecter n'est pas trouvé lors de la recherche. | ► Annulez l'enregistrement de l'appareil, lancez à nouveau l'application SmartThings et réessayez de procéder à l'enregistrement de l'appareil. |
| Pendant l'enregistrement de l'appareil, le mot de passe du point d'accès 1111122222 n'est pas saisi correctement. | ► Maintenez le doigt appuyé sur « [robot vacuum] Samsung » dans la liste des réseaux et supprimez le réseau pour initialiser le mot de passe. |
| Pendant l'enregistrement de l'appareil, le mot de passe du routeur sans fil en cours de connexion n'est pas saisi correctement. | ► Annulez l'enregistrement de l'appareil, lancez à nouveau l'application SmartThings et réessayez de procéder à l'enregistrement de l'appareil.► Maintenez le doigt appuyé sur le nom du routeur sans fil que vous souhaitez connecter dans la liste des réseaux et supprimez le réseau pour initialiser le mot de passe. |
| Une coupure de connexion entre l'application SmartThings et le POWERbot survient mais l'enregistrement de l'appareil est bien terminé. | ► Actualisez l'écran et attendez.► Lancez à nouveau l'application SmartThings.► Vérifier s'il y a un problème de connexion à Internet. En particulier, un pare-feu peut interrompre le fonctionnement normal. |
Dépannage
| Symptôme Liste de vérification | |
| Une coupure de connexion entre l'application SmartThings et le POWERbot survient soudainement pendant le fonctionnement normal de l'application. | ► Si le POWERbot est distant d'un routeur sans fil, une coupure de la connexion peut survenir.► Réinitialisez le POWERbot et le smartphone, puis vérifiez à nouveau la connexion.► Si la coupure de connexion survient à plusieurs reprises, essayez d'enregistrer à nouveau l'appareil.► Lorsque l'identifiant SSID / le mot de passe d'un routeur sans fil a été modifié, essayez d'enregistrer à nouveau l'appareil. |
| Le contrôle via l'application SmartThings ne fonctionne pas car la fonction Commande à distance est désactivée. | ► La fonction Commande à distance est au statut désactivé. Placez la fonction Commande à distance au statut activé à l'aide d'une télécommande. |
Avertissements concernant la batterie
 Ne retirez pas (ou n'essayez pas de retirer) la batterie incorporée dans cet appareil par vous-même. Pour remplacer la batterie, vous devez prendre contact avec votre fournisseur de services ou un professionnel qualifié indépendant. Ces instructions ont été préparées pour une utilisation exclusive par votre fournisseur de services ou par un professionnel qualifié indépendant. POUR VOTRE PROPRE SÉCURITÉ, N'ESSAYEZ PAS DE RETIRER LA BATTERIE PAR VOUS-MÊME ET NE LA METTEZ PAS AU FEU. NE DÉMONTEZ PAS, N'ÉCRASEZ PAS ET NE PERCEZ PAS LA BATTERIE.Comment retirer la batterie
Retirez le POWERbot du chargeur / de la base pour le démonter. Pour des raisons de sécurité, vous devez éteindre le POWERbot avant de le démonter. natural_image
Hand using a screwdriver to apply a component on a mechanical part (no text or symbols visible)natural_image
Line drawing of a hand inserting a small object into a device panel (no text or symbols)text_image
Diagram showing a device with labeled parts and an inset view of a hand interacting with a component, likely illustrating a mechanical or electrical setup.Les bons gestes de mise au rebut des batteries de cet appareil
(Applicable aux pays disposant de systèmes de collecte de batteries séparés.)
Ce symbole sur la batterie, son manuel ou son emballage indique que la batterie de cet appareil ne doit pas être jetée avec les autres déchets ménagers. Si les symboles chimiques Hg, Cd ou Pb sont inscrits sur la batterie, cela indique que la batterie contient des teneurs en mercure, en cadmium ou en plomb supérieures aux niveaux de référence de la directive CE 2006/66. La batterie incorporée dans cet appareil ne doit pas être remplacée par l'utilisateur. Pour plus d'informations sur son remplacement, veuillez prendre contact avec votre fournisseur de services. N'essayez pas de retirer la batterie et ne la jetez pas au feu. Ne démontez pas, n'écrasez pas et ne percez pas la batterie. Si vous prévoyez de jeter l'appareil, le site de collecte des déchets prendra les mesures appropriées pour le recyclage et le traitement de votre appareil, y compris la batterie.Annonce de logiciel open source
Le logiciel inclus dans cet appareil contient un logiciel libre. Vous pouvez obtenir le code source correspondant pendant une période de trois ans après la sortie de la dernière version de ce produit en adressant un email à l'adresse suivante : mailto:oss.request@samsung.com. Il est également possible d'obtenir le code source complet correspondant sur un support physique tel qu'un CD-ROM ; un coût minimal sera requis. L'URL suivante http://opensource.samsung.com/opensource/VR7000\_A20\_TZ/seq/0 renvoie à la page de téléchargement du code source mis à votre disposition, ainsi qu'aux informations concernant la licence de logiciel open source relative à cet appareil. Cette offre est valable pour quiconque ayant reçu cette information. text_image
QR code image containing encoded data, no visible human-readable textCaractéristiques techniques
| Classification Élement | Informations détaillées | |||
| SR1*M701*** SR1 | *M702*** / SR1*M703*** | |||
| Caractéristiques mécaniques (POWERbot) | Dimensions (P x H x L) 340 mm x 97 mm x 348 mm | |||
| Poids 4 kg | ||||
| Capteur | Système de reconnaissance du plafond (Visionary mapping plus TM) | |||
| Type de boutons du POWERbot Tactile | ||||
| Caractéristiques d'alimentation | Tension 100 à 240 V~, 50 Hz/60 Hz | |||
| Consommation électrique 80 W | ||||
| Caractéristiques de la batterie 21,6 V / 38,8 WH | ||||
| Nettoyage | Type de charge Charge automatique/manuelle | |||
| Mode de nettoyage | Programme Automatique, Localisé, Quotidien | Automatique, Localisé, Intensif, Manuel, programme Pour une seule fois, programme Quotidien | ||
| Temps de charge Environ 240 minutes | ||||
| Temps de nettoyage (sur sol dur) | Mode Turbo Environ 30 minutes | |||
| Mode Normal Environ 60 minutes | ||||
| Wi-Fi | Plage de fréquences De 2 412 à 2 472 MHz | |||
| Puissance de l'émetteur (maximum) | 20 dBm | |||
| Classification Élément Informations détaillées | |||
| Caractéristiques mécaniques (POWERbot) | Dimensions (P x H x L) 340 mm | mm x 97 mm x 348 mm | |
| Poids | 4,3 kg | ||
| Capteur | Système de reconnaissance du plafond (Visionary mapping plus TM) | ||
| Type de boutons du POWERbot Tactile | |||
| Caractéristiques d'alimentation | Tension 100 à 240 V~ | 50 Hz/60 Hz | |
| Consommation électrique | 130 W | ||
| Caractéristiques de la batterie 21,6 V / 77,8 WH | |||
| Nettoyage | Type de charge Charge automatique/manuelle | ||
| Mode de nettoyage | Automatique, Localisé, Intensif, Manuel, programme Pour une seule fois, programme Quotidien | ||
| Temps de charge Environ 160 minutes | |||
| Temps de nettoyage (sur sol dur) | Mode Turbo Environ 30 minutes | ||
| Mode Normal Environ 60 minutes | |||
| Mode Silencieux Environ 90 minutes | |||
| Wi-Fi | Plage de fréquences De 2 412 à 2 472 MHz | ||
| Puissance de l'émetteur (maximum) | 20 dBm | ||
POWERbot
Manuale dell'utente
SR1\*M70\*\*\*\*, SR2\*M70\*\*\*\* Series - Prima di utilizzare questo prodotto, leggere attentamente le istruzioni. - Solo per uso in interno. natural_image
Black-and-white photo of a modern lounge chair with leather backrest and metallic armrest, featuring a pair of headphones placed on the backrest (no text or symbols visible)Sommario
03 Informazioni di sicurezza 08 Installazione Accessori / Note per l'installazione 10 Ricarica Ricarica automatica / Ricarica / Batterie scariche (Lo) 12 Uso di POWERbot Accensione e spegnimento / Selezione della modalita di pulizia / Uso delle funzioni di pulizia speciali 15 Installazione della Virtual guard Nomenclatura delle parti della Virtual guard / Inserimento delle batterie 17 Uso del telecomando 20 Nomenclatura delle parti Alto / Fondo / Display 22 Impostazione dell'orario / della programmazione Impostazione dell'orario / Impostazione della programmazione 25 Pulizia e manutenzione Pulizia del contenitore di raccolta polvere / Pulizia dei sensori e della telecamera / Pulizia della spazzola e della bocchetta automatica / Pulizia della ruota di guida 27 App SmartThings 31 Note e precauzioni Ricarica / Uso / Pulizia e manutenzione / Informazioni sulla batteria / Informazioni sul sensore IrDA 33 Codici informativi 35 Risoluzione dei problemi 39 Avvertenze sulla batteria 40 Dichiarazione Open Source 41 SpecificheInformazioni di sicurezza
INFORMAZIONI DI SICUREZZA
 \- Prima di utilizzare il prodotto, leggere attentamente questo manuale e conservarlo per future consultazioni.  \- Dal momento che queste istruzioni coprono diversi modelli di prodotto, le caratteristiche dell'aspirapolvere acquistato potrebbero differire leggermente da quanto descritto in questo manuale. SIMBOLI DI ATTENZIONE/AVVERTENZA UTILIZZATI| AVVERTENZA | Indica il possibile rischio di lesioni gravi perfino mortali. |
| [YS2T]ATTENZIONE | Indica il rischio di lesioni personali o danni materiali. |
| NOTA | Indica che il testo che segue contiene informazioni importanti. |
Informazioni di sicurezza
ISTRUZIONI DI SICUREZZA IMPORTANTI Durante l'uso di apparecchiature elettriche, è necessario seguire alcune precauzioni di base, tra le quali:LEGGERE TUTTE LE ISTRUZIONI PRIMA DELL'USO DI POWERbot.
Scollegare il prodotto dalla presa di corrente in caso di inutilizzo o prima di effettuare la manutenzione. AVVERTENZA: per ridurre il rischio di incendio, scariche elettriche o lesioni:GENERALE
- Usare il prodotto solo secondo quanto descritto in questo manuale. • Non utilizzare POWERbot o il caricabatterie / docking station se presentano danni. - In caso di malfunzionamento, caduta, danni, permanenza all'esterno o immersione in acqua del robot aspirapolvere o del caricabatterie, rivolgersi a un Centro di assistenza autorizzato. - Non toccare POWERbot o il caricabatterie / docking station con le mani bagnate. - Usare il prodotto solo su superfici asciutte e in interno. - Questo apparecchio può essere utilizzato da bambini di età superiore agli 8 anni e da persone con ridotte capacità fisiche, sensoriali o mentali o senza esperienza o conoscenza del prodotto solo sotto la supervisione di una persona responsabile o nel caso in cui abbiano ricevuto informazioni specifiche sull'uso sicuro dell'apparecchio e ne abbiano compreso i rischi ad esso associati. Non consentire ai bambini di giocare con l'apparecchio. La pulizia e la manutenzione dell'apparecchio non può essere eseguita da minori senza la diretta supervisione di un adulto.Caricabatterie / Docking station
- Non modificare la spina polarizzata per adattarla a una presa non polarizzata o a un cavo di prolunga. - Non utilizzare in esterno o su superfici bagnate. - Scollegare il caricabatterie / docking station dalla presa elettrica in caso di inutilizzo e prima di effettuare la manutenzione. - Usare solo il caricabatterie / docking station forniti in dotazione dal costruttore. - Non usare un cavo o una spina di alimentazione danneggiati o una presa allentata. - Non trasportare il prodotto tirandolo per il cavo, non utilizzare il cavo come una maniglia, non incastrare il cavo chiudendo una porta, non far passare il cavo intorno a bordi o angoli taglienti. Tenere il cavo lontano da superfici bollenti. - Non utilizzare prolunghe o prese con una capacità di corrente inadeguata al carico. - Non scollegare la spina di alimentazione tirandola per il cavo. Per scollegare il prodotto, afferrare la spina, non il cavo. - Non aprire o bruciare le batterie poiché potrebbero esplodere ad elevate temperature. - Non tentare di aprire il caricabatterie / docking station. Le riparazioni devono essere eseguite esclusivamente da un centro assistenza clienti qualificato. - Non esporre caricabatterie / docking station a temperature elevate, umidità o vapore di alcun genere.POWERbot
- Non aspirare oggetti rigidi, appuntiti o taglienti come vetro, chiodi, viti, monete o simili. - Non utilizzare senza filtro. Durante la manutenzione dell'unità, non inserire dita o altri oggetti nel comparto della ventola per evitare lesioni in caso di attivazione accidentale del prodotto. - Non inserire oggetti estranei nelle aperture di ventilazione. Non utilizzare se le aperture sono ostruite; mantenerle libere da polvere, residui, capelli o qualunque oggetto possa ridurre il flusso dell'aria. • Non aspirare sostanze tossiche (candeggina, ammoniaca, disgorgante idraulico). - Non aspirare oggetti ardenti o che producono fumo, quali sigarette, fiammiferi o braci. - Non utilizzare per aspirare liquidi infiammabili o combustibili quali benzina, né usare in luoghi dove tali sostanze potrebbero essere presenti. - Non usare in luoghi in cui siano presenti candele o lampade da tavolo appoggiate al pavimento. • Non usare in luoghi in cui siano presenti fiamme libere (camini o stufe). - Non usare in luoghi in cui siano presenti alcool distillato, diluenti, portacenere con sigarette accese, ecc. - Non usare POWERbot in spazi ristretti in cui siano presenti vapori rilasciati da vernici a base d'olio, diluenti, antitarme, polveri infiammabili o altri vapori esplosivi o tossici. - In caso di uso intensivo o temperature estreme, dalle batterie può fuoriuscire liquido. Se il liquido fuoriuscito entra a contatto con la pelle, lavare immediatamente con acqua. Se il liquido fuoriuscito entra a contatto con gli occhi, lavare immediatamente con acqua corrente per almeno 10 minuti. Consultare un medico.Informazioni di sicurezza
AVVERTENZA
Tensione nominale
- Evitare qualsiasi rischio di incendio o scariche elettriche. - Non danneggiare il cavo di alimentazione. - Non estrarre il cavo di alimentazione con forza eccessiva e non toccare la spina con le mani bagnate. - Utilizzare solo una fonte di alimentazione da 100-240 V\~ e non utilizzare una presa multipla che alimenti più dispositivi contemporaneamente. (non lasciare il cavo di alimentazione appoggiato a terra). - Non usare un cavo o una spina di alimentazione danneggiati o una presa allentata. - Rimuovere polvere e sostanze estranee dai poli e dai contatti della spina elettrica. - Rischio di scarica elettrica o malfunzionamento. AVVERTENZA
Prima dell'uso
▶ Non usare POWERbot vicino a fonti di calore o materiali infiammabili. - Non usare POWERbot vicino a fonti di calore o fiamme libere come una stufetta, una candela, una lampada da tavolo, un camino ecc. o in luoghi in cui sono presenti materiali infiammabili come benzina, alcol, diluenti ecc. Accertarsi dell'assenza di oggetti pericolosi intorno all'area di pulizia di POWERbot così da prevenire collisioni e scollegare eventuali stufette o ventilatori. ▶ POWERbot è inteso per un uso domestico, pertanto se ne sconsiglia l'uso in attici o seminterrati, in magazzini, edifici industriali, all'esterno, su tavoli o scaffali o in luoghi caratterizzati da umidità come lavanderie e bagni. - In caso contrario POWERbot potrebbe subire danni o funzionare in modo anomalo. ▶ POWERbot non deve attraversare pozze di liquido o entrare a contatto con liquidi. - Se le ruote attraversano un liquido, POWERbot potrebbe riportare gravi danni e contaminare altre aree lungo il suo passaggio. ▶ Non versare liquidi sul caricabatterie. - Pericolo di scariche elettriche o incendi. ▶ Non usare il caricabatterie per scopi diversi da quelli per i quali è stata progettato. - Il caricabatterie potrebbe subire gravi danni o potrebbe insorgere un rischio di incendio. ▶ Per la propria sicurezza, mantenere sempre il sensore di dislivello pulito. AVVERTENZA
Utilizzo
Se si avvertono odori o rumori insoliti o si nota del fumo fuoriuscire da POWERbot, spegnere immediatamente l'apparecchio agendo sull'interruttore di emergenza posto sul fondo di POWERbot e contattare un Centro di assistenza autorizzato. AVVERTENZA
Pulizia e manutenzione
Se il cavo di alimentazione è danneggiato, contattare un Centro di assistenza autorizzato per richiederne la sostituzione da parte di un tecnico certificato. - Pericolo di scariche elettriche o incendi. ▶ Per sostituire le batterie, rivolgersi ad un Centro di assistenza autorizzato Samsung Electronic. - L'uso di batterie di altri prodotti può provocare malfunzionamenti. ATTENZIONE
Prima dell'uso
- Prima di avviare POWERbot inserire il contenitore di raccolta polvere. - Prestare attenzione alle seguenti condizioni per effettuare una ricarica corretta delle batterie. - Accendere sempre la docking station. - Installare la docking station in un luogo facilmente individuabile da POWERbot. - Non lasciare oggetti davanti alla docking station. Durante l'installazione della docking station, non lasciare cavi sul pavimento che potrebbero bloccare i movimenti di POWERbot. ▶ Non usare POWERbot su pavimenti scuri. - POWERbot potrebbe non essere in grado di funzionare regolarmente. ▶ Non posizionare oggetti a meno di 0,5 m sui lati e 1 m sulla parte anteriore della docking station. Accertarsi che i contatti della docking station non siano danneggiati o coperti da sostanze estranee. ▶ Non installare la docking station su un pavimento nero o scuro. - Se il pavimento intorno alla docking station è scuro, il robot potrebbe non riuscire a raggiungere la base per effettuare la ricarica. - Prima di avviare la pulizia, rimuovere qualsiasi oggetto possa ostacolare il movimento di POWERbot (ad esempio i giochi per bambini). ▶ Non utilizzare POWERbot in luoghi vicini troppo angusti per il raggio di curvatura di POWERbot (0,5 m o meno). Se una spazzola o il coperchio di una spazzola non è montato correttamente, si potrebbe graffiare il pavimento o il prodotto potrebbe non funzionare regolarmente. - Prima di azionare il POWERbot, rimuovere gli oggetti che potrebbero rompersi quali cornici, specchi e oggetti in porcellana in modo che POWERbot sia libero di muoversi senza fermarsi. ATTENZIONE
Utilizzo
▶ L'uso di POWERbot su un tappeto spesso potrebbe danneggiare sia POWERbot sia il tappeto. - POWERbot non è in grado di passare su tappeti spessi oltre 1 cm. ▶ Non usare POWERbot su tavoli o superfici sopraelevate. - Il robot potrebbe cadere e subire danni. ▶ POWERbot potrebbe urtare sedie e gambe di tavoli, pertanto si consiglia di spostarli prima di azionare il robot al fine di consentire una pulizia rapida ed efficiente. Durante il funzionamento di POWERbot, non sollevarlo da terra o spostarlo in un'altra zona della casa. ▶ Quando si trasporta POWERbot, non afferrarlo dalle ruote di guida. ▶ Non posizionare oggetti sopra POWERbot e sulla telecamera poiché potrebbero funzionare in modo scorretto. Rimuovere eventuali sacchetti di carta o plastica di grandi dimensioni prima di usare POWERbot poiché potrebbero bloccarne l'aspirazione. ▶ Non indirizzare direttamente il puntatore rosso verso persone o animali. ▶ Non sdraiarsi a terra intorno a POWERBOT mentre è in funzione. \- I capelli potrebbero rimanere intrappolati nella spazzola principale causando lesioni. ATTENZIONE
Pulizia e manutenzione
Attenersi alle seguenti indicazioni per evitare danni a POWERbot. - Non pulire POWERbot spruzzandovi sopra acqua o usando benzina, diluenti, acetone o alcool. ▶ Non disassemblare o riparare autonomamente POWERbot. Tale operazione deve essere effettuata da un tecnico qualificato. - Mantenere sempre puliti il sensore degli ostacoli, il sensore di dislivello e la lente della telecamera. - In caso si accumuli dello sporco, i sensori potrebbero non funzionare correttamente.Installazione
La docking station deve essere sempre accesa e collegata alla presa elettrica.  Quando si usa il caricabatterie, il lato con l'adesivo deve essere rivolto verso il basso. Accessori| Telecomando (Opzionale) | Batterie (Tipo AAA)(Opzionale) | Manuale dell'utente Filtro di ricambio(Opzionale) | |
| Docking station Cavo | di alimentazione Caricabatterie Virtual guard (Opzionale) | | |
Note per l'installazione
Nota
- Installare la docking station in un luogo che presenti pavimento e pareti a livello. ▶ E' meglio installare la docking station lungo la scanalatura dei pavimenti in legno. Se l'interruttore di emergenza è spento, POWERbot non effettuerà la ricarica anche se collegato alla docking station. ▶ Accendere sempre la docking station. - Se la docking station non è alimentata, POWERbot non sarà in grado di effettuare la ricarica automatica. - Se POWERbot viene lasciato scollegato dalla docking station, la batteria si scaricherà nel tempo. Se il robot aspirapolvere è in modalità risparmio energetico, l'alimentazione non si attiverà nemmeno spegnendo e riaccendendo l'interruttore di emergenza. Tenere premuto il tasto [Start/Stop] sul POWERbot per disattivare la modalità di risparmio energetico.Ricarica
Una volta completata la prima ricarica (dopo l'acquisto) POWERbot può essere utilizzato per 60 min. in modalità Normale (ledere a pagina 41 per i tempi di ricarica).Ricarica Smart
Se la carica di POWERbot si esaurisce in modalità di pulizia Auto, esso ritornerà automaticamente alla docking station e riprenderà la pulizia dell'area una volta che la carica delle batterie abbia raggiunto i due terzi della capacità massima. (max 2 volte). text_image
AVVERTENZA • La tensione nominale di ingresso di questo prodotto è 100-240 V~.text_image
1/0 ←(ON) ←(OFF) 1/0 1/5natural_image
Line drawing of a toilet with hands holding the lid (no text or symbols)text_image
1 Attivare l'interruttore di emergenza posto sul fondo
E' necessario attivare l'interruttore di emergenza per accendere POWERbot. Premere e rilasciare il tasto 2 Effettuare la ricarica manuale di POWERbot posizionandolo nella docking station.
Verificare l'allineamento dei contatti di ricarica su POWERbot e sulla docking station. ITALIANO-103 Controllare lo stato della carica.
Per SR1\*M701\*\*\* Series, durante la ricarica la spia di ricarica lampeggia ad intervalli di 1 sec. e la spia rimane accesa al termine della ricarica. Per SR1\*M702\*\*\* / SR1\*M703\*\*\* / SR2\*M70\*\*\*\* Series. " si accenderà in base all'andamento della ricarica mentre si accenderà "FULL" al termine della ricarica. natural_image
Abstract geometric shape with a diagonal line dividing it into two triangular sections (no text or symbols)Ricarica automatica
text_image
Diagram showing a device with two labeled icons (① and ②) pointing to a device component, likely illustrating a process or installation.1. SR1\*M701\*\*\* Series
Se la spia di carica della batteria lampeggia ad intervalli di 0,4 sec., POWERbot tornerà automaticamente alla docking station per effettuare la ricarica.2. SR1\*M70\*\*\*\* / SR2\*M70\*\*\*\* Series
Quando la spia della batteria lampeggia durante la pulizia, POWERbot ritorna alla base di ricarica per eseguire automaticamente la ricarica delle batterie.Ricarica
natural_image
Simple line icon of a house with a battery inside, no text or symbols presentBatterie scariche (Lo)
natural_image
Line drawing of a hand holding a circular object on a tiled floor (no text or symbols)Azioni da intraprendere se la ricarica non viene eseguita:
Verificare l'installazione della docking station quando:
▶ la docking station è situata in una posizione non facilmente accessibile da POWERbot. ▶ la distanza tra la docking station e POWERbot è superiore a 5 m. \- POWERbot potrebbe impiegare molto tempo per raggiungere la docking stationCaricare manualmente POWERbot quando:
la docking station è posizionata in un angolo la batteria è completamente scarica POWERbot è bloccato da un ostacolo (mobile, ecc.) ▶ POWERbot non può scavalcare una soglia vicina alla docking station (l'altezza massima della soglia che POWERbot è in grado di scavalcare è di 1,5 cm). \- quando la spia di carica della batteria lampeggia e sul display appare "Lo" ▶ quando la spia di carica della batteria lampeggia (applicabile a SR1\*M701\*\*\* Series) ▶ POWERbot è impostato in modalità di pulizia Spot o ManualUso di POWERbot
È necessario attivare l'interruttore di emergenza posto sul fondo prima di usare POWERbot.Accensione e spegnimento
Premere il tasto per più di 3 secondi  \- Quando POWERbot non viene utilizzato per 30 min.; SR1\*M70\*\*U\* / SR2\*M70\*\*U\* Series: Attiva la modalità di risparmio energetico. SR1\*M70\*\*W\* / SR2\*M70\*\*W\* Series: Torna automaticamente alla docking station per effettuare la ricarica. text_image
Diagram showing a device with labeled buttons and a digital display, likely illustrating a control or navigation system.Avviamento della modalità di pulizia Auto
Premere e rilasciare questo tasto. POWERbot si sposta ed inizia a pulire automaticamente una volta le aree impostate.  \* Interruzione della pulizia: Premere e rilasciare il tastoUso della modalità modalità pulizia Spot
POWERbot effettua una pulizia accurata di una specifica zona. Ricarica
Premendo questo tasto è possibile impostare POWERbot perché esegua automaticamente la procedura di ricarica alla base durante la pulizia.  Selezione della modalità di pulizia| Modalità di pulizia | Come selezionarla | Icona visualizzata | |
| SR1*M702***SR1*M703***SR2*M70**** | SR1*M701*** | ||
| Pulizia Auto | | | |
| Pulizia Spot | | | |
| Pulizia Repeat | *Premere [A,B], [C,DRepeat] sul telecomando quindi premere [Avvia/Stop ▶]. | | - |
| Pulizia Manual | *La modalità di pulizia Manual può essere impostata mediante i tasti di controllo direzionale del telecomando. | | - |
natural_image
Abstract geometric pattern with nested horizontal lines and a small circular icon at the bottom (no text or symbols)Uso di POWERbot
Metodi di pulizia per ogni modalità natural_image
Simple line drawing of three parallel horizontal bars with a small icon at the bottom (no text or symbols)text_image
Circa 1,5 m Circa 1,5 mnatural_image
Line drawing of a hand holding a remote control with a device on top (no text or symbols)natural_image
Abstract geometric pattern with nested squares and a small 3D cube at the bottom (no text or symbols)Pulizia Auto
Effettua una pulizia delle aree impostate. \* SR1\*M701\*\*\* Series : Effettua una pulizia continua fino all'esaurimento della batteria.Pulizia Spot
Effettua la pulizia accurata di un'area specifica. Questa modalità può essere utilizzata per pulire briciole di pane o dolci.Pulizia Manual
Per pulire un'area specifica è possibile spostare POWERbot mediante il telecomando. \* Questa funzione non è disponibile nella serie SR1\*M701\*\*\*.Pulizia Repeat
Effettua una pulizia continua fino all'esaurimento della batteria. \* Questa funzione non è disponibile nella serie SR1\*M701\*\*\*. Nota
Se viene attivata la funzione Auto e Repeat, POWERbot esegue per primo la pulizia dell'area vicino alla docking station. Uso delle funzioni di pulizia speciali| Funzione di pulizia | Funzionamento | Icona visualizzata | |
| SR1*M702***SR1*M703***SR2*M70**** | SR1*M701*** | ||
| Controllo potenza intelligente | ※ Quando POWERbot rileva un tappeto in modalità Normale, attiverà automaticamente una maggiore potenza di aspirazione. | | |
| Edge Clean Master | ※ Quando POWERbot rileva un bordo o un angolo in modalità pulizia Auto o Spot, si attiva la bocchetta automatica e POWERbot approccia la parte del bordo o dell'angolo da pulire.► Bordo dritto (pulizia Una volta)► Angolo (pulizia Due volte) | | |
Installazione della Virtual guard
I raggi infrarossi emessi dalla Virtual guard impediscono a POWERbot di accedere ad alcune zone. \* (in dotazione con SR2\*solo M707\*\*\* Series) Per SR2\*M704\*\*\* / SR2\*M705\*\*\* / SR2\*M706\*\*\* Series, necessario ulteriore acquisto). text_image
La distanza della barriera virtuale è di minimo 2,5 m e può differire in base allo spazio circostante e ai movimenti di POWERbot. Virtual guard Minimo 2,5 m1 Premere il tasto di accensione per accendere il robot
La spia di alimentazione (rossa) lampeggia. natural_image
Simple line drawing of a mechanical component with a downward arrow indicating force or direction (no text or symbols)2 Installare la Virtual guard dove si desidera limitare l'accesso di POWERbot
Verificare che il sensore di distanza sia rivolto nella direzione nella quale si desidera creare la barriera invisibile (che limiterà l'accesso di POWERbot).Installazione della Virtual guard
Nomenclatura delle parti della Virtual guard
text_image
Tasto Accensione Spia di alimentazione Accensione: la spia rossa lampeggia Spegnimento: Luce spenta Sensore rilevamento POWERbot Sensore di rilevamento della distanza (sensore a infrarossi) Coperchio batterieInserimento delle batterie
Le batterie della Virtual guard devono essere acquistate a parte. natural_image
Illustration of a hand using a tool to clean or adjust a cylindrical container with an arrow indicating the process (no text or symbols present)natural_image
Diagram of a battery pack with two batteries and internal components (no text or symbols)natural_image
Illustration of a hand using a tool to clean or install electronic components inside a battery casing (no text or symbols visible)Uso del telecomando
[Tipo A] [Tipo B] text_image
1 3 1, 2 1, 2 5 Spot Repeat Sound 4 2 Schedule Clock Schedule Cancel(0sec) SAMSUNG Vedere pagina 22text_image
1 3 5 Spot Repeat Sound 4 2 Schedule Clock Schedule Cancel(1sec) SAMSUNG Vedere pagina 22text_image
1 3 1, 2 5 Point Cleaning 6 2 4 4 Spot Repeat Sound Schedule Clock Remote Cancel(3sec) SAMSUNG Vedere pagina 23text_image
1 3 1, 2 5 Point Cleaning 6 2 4 4 Spot Repeat Sound Schedule Clock Remote Cancel(3sec) SAMSUNG Vedere pagina 23Uso del telecomando
☐ [Tipo A] / ☐ [Tipo B] / [Tipo C] / [Tipo D] 1 Accensione / Ricarica / Avvio/Stop| Accensione | | | | | Per accendere/spegnere POWERbot |
| Ricarica | | | -HT8D] | | Selezionare per effettuare la ricarica automatica di POWERbot presso la docking station |
| Avvio/Stop | | | | | Selezionare per avviare o terminare il processo di pulizia |
| Pulizia Auto | | | | | Selezionare per effettuare la pulizia di tutte le aree una sola volta per poi tornare alla docking station. |
| Pulizia Spot | | | | | Selezionare per effettuare la pulizia intensa di una specifica zona |
| Pulizia Repeat | | | | | Selezionare per effettuare la pulizia ripetuta fino allo scarico della batteria ad indicatore lampeggiante |
| Modalità Turbo | | | | | Selezionare per effettuare la pulizia con la massima potenza di aspirazione |
| Modalità Normal | | | | | Selezionare per effettuare la pulizia con una potenza di aspirazione media |
| Modalità Quiet | | | | | Selezionare per eseguire la pulizia con un livello di rumore inferiore (silenzioso) |
| Sound | | | | | A ogni pressione di questo tasto si seleziona in sequenza Effetti audio → Muto. |
| Comando a distanza | | | | | Selezionare per attivare e disattivare la funzione Wi-Fi |
5 Modalità pulizia Manual e controllo direzione
| Avanti | | | | | Selezionare per procedere in avanti |
| Sinistra | [02W7] | [TAZW] | | | Selezionare per girare a sinistra |
| Destra | | | | | Selezionare per girare a destra |
6 Pulizia di uno specifico punto
Disponibile solo con telecomandi di tipo C e D. È possibile usare il telecomando per indicare di pulire un punto specifico mentre POWERbot è in fase di pulizia. Puntare la luce rossa sul pavimento a una distanza di 0,5 m da POWERbot. Tenere premuto il pulsante Point cleaning per spostare il raggio rosso sul punto desiderato. POWERbot seguirà la luce durante i suoi spostamenti per eseguire la pulizia dell'ambiente. text_image
0.5 mtext_image
Altezza del telecomando Distanza operativa| Altezza del telecomando | 0,5 m 1 m | 1,5 m | |
| Distanza operativa | Circa 1,5 m Circa 2 m Circa 3 m | ||
Inserimento delle batterie
Aprire il vano batterie premendo la linguetta di blocco e sollevando il coperchio, quindi inserire le batterie come mostrato in figura. Riposizionare il coperchio e premere fino allo scatto in posizione. text_image
Diagram illustrating the step-by-step installation of a battery pack with AAA batteries, showing internal components and final assembly.Nomenclatura delle parti
text_image
6 5 3 7 8 2 1 4 2text_image
4 2 3 4 5 10 7 1 4 8 6 9 5text_image
1 2 3 4 5 6 (3sec) (3sec)Alto
1. Display 2. Ricevitore segnali telecomando 3. Sensore ostacoli 4. Serbatoio di raccolta polvere 5. Fotocamera 6. Tasto serbatoio di raccolta polvere 7. Sensore paracolpi 8. Bocchetta automaticaFondo
1. Contatti di ricarica 2. Spazzola 3. Coperchio spazzola 4. Sensore di dislivello 5. Rullo 6. Coperchio batterie 7. Tasto coperchio spazzola 8. Ruote di guida 9. Interruttore di emergenza 10. Bocchetta automaticaDisplay
text_image
1 2 6 13 3 4 5 7 8:00:00 AM PM 11 28 109 15 14text_image
1 2 6 14 3 4 5 7 8:00:00 AM PM 12 38 11 109 16 15
Series>
1. Muto
2. Indicatore informazioni
3. \*Off/On spia Comando a distanza
4. \*Wi-Fi
5. Spia batteria
6. Programmazione Una volta/Giornaliero
7. Display numerico
8. Modalità pulizia Spot
9. Modalità pulizia Manual
10. Modalità pulizia Repeat
11. Modalità Normal
12. Modalità Turbo
13. Tasto pulizia Spot
14. Tasto Avvio/Stop
15. Tasto Ricarica
1. Muto
2. Indicatore informazioni
3. \*Off/On spia Comando a distanza
4. \*Wi-Fi
5. Spia batteria
6. Programmazione Una volta/Giornaliero
7. Display numerico
8. Modalità pulizia Spot
9. Modalità pulizia Manual
10. Modalità pulizia Repeat
11. Modalità Quiet
12. Modalità Normal
13. Modalità Turbo
14. Tasto pulizia Spot
15. Tasto Avvio/Stop
16. Tasto Ricarica
Impostazione dell'orario / della programmazione
[Tipo A, Tipo B] È possibile programmare solo la modalità di pulizia Auto.
Impostazione dell'orario
Prima di utilizzare la programmazione Una volta/Giornaliero è necessario impostare l'orario corrente.

flowchart
graph LR
A["Clock"] --> B["Selezionare "Ora" Selezionare "Minuto""]
B --> C["Selezionare "AM/PM" Impostazione completata"]
C --> D["Passare alla precedente, successiva impostazione"]
style A fill:#fff,stroke:#000
style B fill:#fff,stroke:#000
style C fill:#fff,stroke:#000
style D fill:#fff,stroke:#000
Impostazione della programmazione
L'impostazione/annullamento della programmazione può essere effettuata solo quando POWERbot è fermo nella docking station.

flowchart
graph LR
A["Schedule Cancel (3sec)"] --> B["Selezionare la programmazione "Una volta" o "Giornaliero""]
B --> C["Selezionare "Ora""]
C --> D["Selezionare "AM/PM" Impostazione"]
D --> E["Selezionare "Minuto" Passare alla precedente, successiva impostazione"]
F["completata"] --> G["Selezionare "Am/PM" Impostazione"]
G --> H["Selezionare "Ora""]
H --> I["Selezionare "Minuto""]
I --> J["Selezionare "Ora""]
J --> K["Selezionare "Am/PM" Impostazione"]
K --> L["Selezionare "Ora""]
L --> M["Selezionare "Minuto""]
M --> N["Selezionare "Ora""]
N --> O["Selezionare "Ora""]
O --> P["Selezionare "Ora""]
P --> Q["Selezionare "Ora""]
Q --> R["Selezionare "Ora""]
R --> S["Selezionare "Ora""]
S --> T["Selezionare "Ora""]
T --> U["Selezionare "Ora""]
U --> V["Selezionare "Ora""]
V --> W["Selezionare "Ora""]
W --> X["Selezionare "Ora""]
X --> Y["Selezionare "Ora""]
Y --> Z["Selezionare "Ora""]
Z --> AA["Selezionare "Ora""]
AA --> AB["Selezionare "Ora""]
AB --> AC["Selezionare "Ora""]
AC --> AD["Selezionare "Ora""]
AD --> AE["Selezionare "Ora""]
AE --> AF["Selezionare "Ora""]
AF --> AG["Selezionare "Ora""]
AG --> AH["Selezionare "Ora""]
AH --> AI["Selezionare "Ora""]
AI --> AJ["Selezionare "Ora""]
AJ --> AK["Selezionare "Ora""]
AK --> AL["Selezionare "Ora""]
AL --> AM["Selezionare "Ora""]
AM --> AN["Selezionare "Ora""]
AN --> AO["Selezionare "Ora""]
AO --> AP["Selezionare "Ora""]
AP --> AQ["Selezionare "Ora""]
AQ --> AR["Selezionare "Ora""]
AR --> AS["Selezionare "Ora""]
AS --> AT["Selezionare "Ora""]
AT --> AU["Selezionare "Ora""]
AU --> AV["Selezionare "Ora""]
AV --> AW["Selezionare "Ora""]
AW --> AX["Selezionare "Ora""]
AX --> AY["Selezionare "Ora""]
Annullamento durante l'impostazione
L'impostazione viene annullata automaticamente in mancanza di una azione entro 7 secondi.
Annullamento programmazione Una volta/Giornaliero
Quando sono impostate entrambe le programmazioni Una volta/Giornaliero Premere per 3 secondi. → Selezionare la programmazione desiderata → Annullamento completato Quando è impostata una delle programmazioni Una volta o Giornaliero Schedule Cancel (3sec)Premere per 3 secondi.
[Tipo C, Tipo D] È possibile programmare solo la modalità di pulizia Auto.
Impostazione dell'orario
Prima di utilizzare la programmazione Una volta/Giornaliero è necessario impostare l'orario corrente.

flowchart
graph LR
A["Clock"] --> B["Selezionare "Ora" Selezionare "Minuto""]
B --> C["Selezionare "AM/PM" Impostazione completata"]
C --> D["Passare alla precedente, successiva impostazione"]
style A fill:#f9f,stroke:#333
style B fill:#ccf,stroke:#333
style C fill:#cfc,stroke:#333
style D fill:#fcc,stroke:#333
Impostazione della programmazione
L'impostazione/annullamento della programmazione può essere effettuata solo quando POWERbot è fermo nella docking station.

flowchart
graph LR
A["Schedule Cancel (3sec)"] --> B["Impostazione di Avvio"]
B --> C["Selezionare la programmazione "Una volta" o "Giornaliero""]
C --> D["Selezionare "Ora""]
D --> E["Selezionare "Am/PM" Impostazione"]
E --> F["Selezionare "Minuto""]
F --> G["Passare alla precedente, successiva impostazione"]
H["completata"] --> I["Selezionare "AM/PM" Impostazione"]
I --> J["Selezionare "Ora""]
J --> K["Selezionare "Minuto""]
Annullamento durante l'impostazione
L'impostazione viene annullata automaticamente in mancanza di una azione entro 7 secondi.
Annullamento programmazione Una volta/Giornaliero
Quando sono impostate entrambe le programmazioni Una volta/Giornaliero Cancel (3sec)Premere per 3 secondi. Cancel (3sec) → [7SA3] Cancel (3sec) Quando è impostata una delle programmazioni Una volta o Giornaliero Premere per 3 secondi.
Impostazione dell'orario / della programmazione
[SR1\*M701\*\*\* Series] Per le modalità che non prevedono un telecomando, è disponibile la programmazione sotto.
Impostazione della programmazione
L'impostazione/annullamento della programmazione può essere effettuata solo quando POWERbot è fermo nella docking station.

Premere per 3 secondi.


Quando il LED della programmazione è acceso ciò indica che è stata impostata una programmazione Giornaliero.
\* Verrà inserita la programmazione corrispondente all'orario in cui si preme il tasto. La pulizia verrà automaticamente eseguita in base all'orario programmato.
Annullamento programmazione Giornaliero
Quando è stata impostata la programmazione Giornaliero

Premere per 3 secondi.
Pulizia e manutenzione
E' necessario disattivare l'interruttore di emergenza prima di eseguire la pulizia di POWERbot.
Pulizia del contenitore di raccolta polvere

text_image
①
②
PUSH
1 Premere il tasto per rimuovere il contenitore di raccolta della polvere

text_image
Technical diagram showing mechanical assembly with numbered components and directional arrows indicating motion or force
2 Rimuovere il coperchio del contenitore di raccolta polvere

natural_image
Illustration of hands pouring liquid into a trash bin (no text or symbols)
3 Rimuovere la polvere dal contenitore di raccolta e dal ciclone

text_image
Illustration showing two steps to open a toilet with water, followed by a diagram of a sink, tap, and coffee cup with sun symbol.
4 Scollegare il ciclone dal coperchio del contenitore di raccolta e lavare contenitore e filtro

text_image
Diagram illustrating three steps of installing a device into a box, with numbered instructions and visual icons.
5 Rimontare il contenitore di raccolta polvere

text_image
"Clic"
6 Reinserire il contenitore di raccolta polvere nel corpo del robot fino ad avvertire uno scatto
Pulizia dei sensori e della telecamera
Pulire delicatamente con un panno morbido. Non utilizzare prodotti abrasivi o pagliette saponate.

text_image
pagllette saponate:
Fotocamera
Finestra del
sensore anteriore

text_image
Sensori di
dislivello

text_image
Finestra del
sensore posteriore
Pulizia e manutenzione
Pulizia della spazzola e della bocchetta automatica
La forma della spazzola può variare in base al modello acquistato. Non pulire la spazzola con acqua.

text_image
Diagram showing a device with labeled parts and a magnified view of the component, likely illustrating a device's internal structure or status.
1 Rimuovere il coperchio della spazzola principale

natural_image
Illustration of a hand holding a tool over a device component, with an upward arrow indicating motion (no text or symbols present)
2 Rimuovere la spazzola principale

natural_image
Illustration of a welding torch tool interacting with a clamped tool (no text or symbols present)
3 Pulire la spazzola principale

text_image
Diagram showing three-step steps of a tool application: cutting, holding a pen, and writing on paper.
4 Pulizia della bocchetta automatica

text_image
Diagram showing hands holding a pen with a numbered label pointing to a section, likely illustrating a procedure or step in a technical or mechanical context.
5 Rimontare la spazzola principale

text_image
Diagram showing a hand holding a device with labeled parts and an inset close-up of the device's internal structure.

text_image
Diagram illustrating car safety instructions with labeled symbols and arrows indicating correct and incorrect actions
6 Rimontare il coperchio della spazzola principale

text_image
Diagram showing hands operating a device with a labeled component and directional arrows indicating operation
Pulizia della ruota di guida

natural_image
Illustration of hands holding a device casing with internal components (no text or symbols visible)
1 Appoggiare un panno morbido sul pavimento e posizionare POWERbot su di esso capovolto.


natural_image
Hand using a tool to lift a tire on a road surface (no text or symbols visible)
2 Usare delle forbici o una bacchetta non appuntiti per rimuovere eventuali materiali estranei.
App SmartThings
La app SmartThings è disponibile solo nei modelli dotati di una funzione Wi-Fi.
Impostazione del router wireless
In caso di problemi di accesso del router wireless vedere il relativo manuale dell'utente.
Samsung POWERbot supporta solo la banda Wi-Fi 2,4 Ghz.
Samsung POWERbot supporta IEEE 802.11b/g/n and Soft-AP.
- Si consiglia l'adozione dello standard IEEE 802.11n.
Samsung POWERbot supporta solo il protocollo DHCP (Dynamic Host Configuration Protocol). Assicurarsi che l'opzione DHCP server sul proprio router wireless sia attivata.
▶ POWERbot supporta i protocolli WEP-OPEN, WPA-PSK/TKIP e WPA2-PSK/AES quali protocolli di autenticazione e crittografia.
\- Si consiglia l'uso del protocollo WPA2-PSK/AES.
\- Accertarsi che il router sia dotato di una SSID e di una password univoci.
▶ La qualità della connessione del network wireless può essere influenzata dalle condizioni ambientali circostanti.
Qualora il vostro Internet service provider registri permanentemente l'indirizzo MAC (un numero di identificazione unico) del vostro PC o modem, il vostro POWERbot potrebbe non riuscire a connettersi ad Internet. Richiedete al vostro Internet service provider la procedura necessaria per connettere un apparato diverso dal PC ad Internet.
Qualora il vostro Internet service provider richieda il vostro ID o la password per la connessione Internet, il vostro POWERbot potrebbe non essere in grado di connettersi ad internet. In questo caso, digitare il proprio ID o la password durante la connessione ad internet.
▶ POWERbot potrebbe non essere in grado di connettersi ad Internet per varie problematiche relative al firewall. Chiedete al vostro Internet service provider le soluzioni a tale problema.
- Alcuni router wireless possono veicolare un indirizzo di Domain Name Server (DNS) anomalo anche in assenza di connessione Internet. In questo caso, rivolgetevi al produttore del vostro router wireless ed al vostro Internet service provider.
Se, anche dopo aver provato la procedura suggerita dal proprio Internet service provider non si riesce connettersi ad Internet, rivolgersi ad un Centro di assistenza autorizzato Samsung.
- Qualore il router non sia un prodotto certificato Wi-Fi, POWERbot potrebbe non essere in grado di connettersi a Internet.
App SmartThings
Download della app SmartThings
▶ Eseguire il download ed installare la app SmartThings dai vari market (Google Play Store, Apple App Store, o Samsung Galaxy Apps). Per trovare la app da scaricare usare la parola chiave "SmartThings."

Nota
▶ SmartThings non è compatibile con tablet ed alcuni dispositivi mobile.
\- È consigliato disporre di Android 6.0 o successivo (almeno 2GB di RAM).
▶ iPad ed alcuni dispositivi mobile possono non essere supportati.
\- iOS 10.0 o successivo / iPhone 6 o successivi sono supportati.
\- Visitare il Play Store o App Store per capire se il proprio dispositivo mobile è compatibile con SmartThings.
▶ Le funzioni supportate sono soggette a modifiche senza alcun preavviso.
Impostazione di un account Samsung
▶ Per usare la app SmartThings è necessario disporre di un account Samsung.
▶ Per impostare un account Samsung, seguire le indicazioni fornite dalla app SmartThings.
In alternativa, se si dispone di uno smartphone Samsung, aggiungere l'account Samsung nella app di impostazione del proprio smartphone. In seguito lo smartphone effettuerà l'accesso automatico all'account Samsung.
Aggiungere un dispositivo alla app SmartThings
1. Connettere il proprio smartphone al router wireless.
\- Se lo smartphone non è collegato, attivare il Wi-Fi in Impostazioni e selezionare il router wireless al quale si desidera collegarsi.
\- Disabilitare l'opzione "Dati mobili" dello smartphone per usare solo il Wi-Fi e connettere un dispositivo.
2. Avviare la app SmartThings sul proprio smartphone.
3. In caso di comparsa di una finestra indicante l'individuazione di un nuovo dispositivo, premere ADD NOW.
\- Qualora la finestra non venga visualizzata, premere il tasto + e selezionare il dispositivo da aggiungere nell'elenco AVAILABLE DEVICES.
\- Se il dispositivo non compare nell'elenco, aggiungerlo manualmente selezionandone il tipo e lo specifico modello.
4. [Android] La connessione al dispositivo viene effettuata automaticamente.
\- [iOS] Accedere alla app delle impostazioni e selezionare [robot vacuum] Samsung nell'elenco dei Wi-Fi disponibili.
5. A richiesta fornire le credenziali di autenticazione.
6. [Android] La connessione al router wireless viene effettuata automaticamente.
\- [iOS] Accedere alla app delle impostazioni e selezionare il router wireless presente nell'elenco dei Wi-Fi disponibili.
7. Le rimanenti operazioni di impostazione vengono effettuate automaticamente. Verrà quindi aggiunta una nuova Device Card.

Nota
\- Qualora non sia possibile completare la registrazione del prodotto, intraprendere le seguenti azioni.
\- Provare nuovamente la procedura di registrazione così come indicato dai messaggi visualizzati.
\- Controllare se l'opzione UPnP del router wireless è disponibile e riprovare la procedura di registrazione.
\- Confermare che il router wireless sia operativo in modalità wireless, quindi riprovare nuovamente la procedura di registrazione.
\- In presenza di due o più POWERbot, spegnere gli altri POWERbot e riprovare nuovamente la registrazione del POWERbot.
\- Qualora nelle vicinanze vi sia un altro router con lo stesso SSID del proprio router wireless, la registrazione non potrà essere completata.
▶ Spia Wi-Fi e Comando a distanza
On Comando a distanza è inibito. (è ancora possibile usare il telecomando). Off Comando a distanza è abilitata. On POWERbot è connesso al router wireless. Off POWERbot sta tentando di connettersi al router wireless.
App SmartThings
- Quando la funzione comando a distanza è inibita, non è possibile controllare il POWERbot dal proprio smartphone.
Se POWERbot e lo smartphone non sono connessi allo stesso router wireless, può verificarsi un ritardo di risposta in base alle condizioni dell'ambiente di rete.
Aggiornamento Software
- Quando POWERbot è in carica nella docking station, POWERbot si collega al server e verifica la presenza di aggiornamenti software. Se viene trovato un aggiornamento del software, POWERbot effettuerà automaticamente il download e lo aggiornerà.
Se sul display viene visualizzato "UP" mentre POWERbot è in ricarica, ciò indicherà che l'aggiornamento è in corso. Attendere il completamento dell'aggiornamento prima di usare POWERbot.
Uso della app SmartThings
▶ Selezionando la scheda del dispositivo nella app SmartThings, verrà avviato il plug-in del proprio dispositivo.

text_image
ROBOT #2
OFFICE
HELP ⑪
①
②
RECHARGING
AUTO
SPOT ④
Fully charged ⑤
Battery ⑥
Suction power
Normal ⑦
Repeat ⑧
Schedule ⑨
History ⑩
1. Accensione/spegnimento
2. Tasti direzionali in modalità Pulizia Manuale (avanti, sinistra, destra)
3. Attivazione/disattivazione modalità pulizia Auto
4. Modalità pulizia Spot
5. Indicatore stato corrente
6. Indicatore carica della batteria
7. Potenza di aspirazione
8. Opzione Ripetizione (on / off)
9. Programma (Una volta / Giornaliero)
- L'orario del dispositivo verrà sincronizzato durante l'attivazione dell'impostazione della programmazione.
- Una pulizia programmata viene eseguita solo quando il dispositivo è inserito nella docking station.
10. Cronologia della pulizia
11. Impostazioni > Guida vocale
Note e precauzioni
Ricarica

Nota
Se la batteria si surriscalda durante la ricarica, il tempo di carica potrebbe essere più lungo.
Se la ricarica automatica non funziona, controllare le seguenti condizioni:
- Attivare e riattivare l'interruttore di emergenza (posto sul fondo di POWERbot).
- Scollegare e ricollegare la spina di alimentazione della docking station.
- Scollegare la base di ricarica, quindi con un panno asciutto o uno straccio, verificare che non vi siano sostanze estranee sui contatti di carica di POWERbot e della docking station.
- Controllare che non vi siano ostacoli od oggetti riflettenti, sedie ecc. vicino alla docking station.
Se POWERbot viene lasciato scollegato dalla docking station, la batteria si scaricherà nel tempo.
\- Fare in modo che POWERbot sia sempre caricato dalla docking station. (tuttavia spegnere il dispositivo e lasciare la docking station scollegata durante una prolungata assenza da casa).
Uso

Nota
▶ POWERbot potrebbe restare bloccato in una soglia o altrove durante la pulizia.
\- Per riavviare il funzionamento, disattivare l'interruttore di emergenza, spostare POWERbot in una zona dove sia in grado di muoversi facilmente quindi riattivare l'interruttore.
▶ POWERbot non è in grado di pulire completamente le aree nelle quale non riesce ad accedere, ad esempio angoli, spazio tra muro e divano, ecc.
\- Per questo, utilizzare un diverso strumento di pulizia.
▶ POWERbot non è in grado di aspirare grossi agglomerati di sporcizia, pertanto alcuni residui possono restare sul pavimento al termine della pulizia.
- Per questo, utilizzare un diverso strumento di pulizia.
Se POWERbot viene spento, non è possibile riaccenderlo mediante il tasto Power del telecomando. Tenere premuto il tasto [Avvio/Stop] su POWERbot.
▶ Non è possibile selezionare ed impostare POWERbot in modo che esegua una pulizia Spot durante la fase di ricarica.
▶ Premendo il tasto pulizia Manual / Point cleaning durante la fase di ricarica POWERbot si scollegherà dalla docking station entrando in modalità standby.
Pulizia e manutenzione

Nota
▶ Dopo aver lavato il contenitore di raccolta della polvere ed il filtro con acqua
- Contenitore di raccolta polvere: Asciugare completamente l'acqua residua.
- Filtro: Lasciare asciugare completamente all'ombra prima dell'uso.
▶ Nel pulire la bocchetta automatica, non estrarla con eccessiva forza.

Attenzione
- Prestare attenzione alle dita nello smontare/rimontare il filtro poiché è facile che rimangano intrappolate nell'ingresso del contenitore di raccolta.
▶ Al fine di evitare ostruzioni a causa di corpi estranei, non permettere a POWERbot di aspirare stuzzicadenti, cotton fioc o simili.
Note e precauzioni
Qualora sia difficile rimuovere gli oggetti estranei dalla spazzola principale, rivolgersi ad un Centro di assistenza autorizzato Samsung.
▶ Poiché la spazzola principale rimuove lo sporco dal pavimento durante la pulizia, è possibile che capelli lunghi o altri materiali possano restarvi impigliati. Per ottenere risultati di pulizia ottimali, controllarla e pulirla regolarmente.
Se una spazzola o il coperchio di una spazzola non è montato correttamente una volta eseguita la manutenzione, si potrebbe graffiare il pavimento o il prodotto potrebbe non funzionare regolarmente. Pertanto, montarli correttamente seguendo le procedure di manutenzione previste.
Informazioni sulla batteria

Nota
- Acquistare le batterie presso di Centri di assistenza autorizzata Samsung e verificare la presenza del simbolo (\$AMSUNG applicato alla batteria ed il nome del modello perima di completare l'acquisto.
▶ Questa batteria è indicata eclusivamente per un POWERbot Samsung Electronics. Non utilizzarla per altri prodotti.
▶ Non disassemblare o modificare la batteria.
▶ Non gettare la batteria nel fuoco o riscaldarla.
▶ Non posizionare alcun oggetto metallico sui contatti di carica (+, -).
▶ Tenere il prodotto all'interno (0 °C\~40 °C).
In caso di malfunzionamento della batterie, non tentare di disassemblarle autonomamente. Rivolgersi ad un Centro di assistenza autorizzato Samsung.
- Il tempo di ricarica della batteria e il tempo di utilizzo possono diminuire con l'uso della batteria. Se la batteria è esausta e il robot non si inserisce più correttamente nella docking station, richiederne la sostituzione presso un Centro di assistenza autorizzato Samsung.
- Il periodo di garanzia della batteria è di 6 mesi dalla data di acquisto.
Informazioni sul sensore IrDA

Attenzione
▶ La trasmissione a infrarossi potrebbe essere irregolare nei luoghi esposti a luce alogena o in spazi aperti.
▶ POWERbot utilizza 3 tipi di dispositivi ad infrarossi. Ogni dispositivo ha un diverso livello di priorità. Un dispositivo potrebbe non funzionare correttamente se il suo segnale è disturbato da un dispositivo con priorità maggiore.
\- Priorità dei segnali a infrarossi: Comando a distanza > Docking station
▶ Diversi segnali a infrarossi possono interferire l'uno con l'altro e provocare malfunzionamenti ai dispositivi se usati insieme in uno spazio ristretto o a breve distanza.
Se si utilizzano più dispositivi POWERbot contemporaneamente, il loro funzionamento potrebbe risultare irregolare a causa delle interferenze dei segnali a infrarossi.
Codici informativi
1 Le tre spie sotto lampeggiano e vengono emessi allarmi acustici di codici informativi.
2 Disattivare l'interruttore di emergenza e controllare le istruzioni sottostanti adottando l'azione opportuna
3 Il codice informativo scompare attivando l'interruttore di emergenza
Animazione dei Codici informativi

flowchart
graph LR
A["Raw Data"] --> B["Data Collection"]
B --> C["Codici Informativi"]
C --> D["Output"]
Codici informativi Checklist
POWERbot è rimasto impigliato, ostacolato o bloccato lungo il suo percorso di pulizia.►Disattivare l'interruttore di emergenza e spostare POWERbot in un'altra zona. Corpo estraneo impigliato nella spazzola principale.►Disattivare l'interruttore di emergenza e rimuovere gli oggetti estranei dalla spazzola di pulizia. Corpo estraneo impigliato nella ruota di guida sinistra.►Disattivare l'interruttore di emergenza e rimuovere il corpo estraneo dalla ruota di guida. Corpo estraneo impigliato nella ruota di guida destra.►Disattivare l'interruttore di emergenza e rimuovere il corpo estraneo dalla ruota di guida. Controllare il sensore paracolpi.►Disattivare l'interruttore di emergenza e riattivarlo.►Se il codice di errore visualizzato non scompare, verificare l'eventuale presenza di un corpo estraneo tra il paracolpi e l'apparecchio. Nel caso vi sia un corpo estraneo, estrarre delicatamente il paracolpi e rimuoverlo. Sul sensore ostacoli si è accumulato dello sporco.►Disattivare l'interruttore di emergenza e pulire i sensori anteriore e posteriore con un panno morbido. Sul sensore di dislivello si è accumulato dello sporco.►Disattivare l'interruttore di emergenza e pulire il sensore di dislivello con un panno morbido. Controllare la scheda madre.►Spegnere e riavviare l'apparecchio. In caso il problema persista, contattare un Centro di assistenza autorizzato.
Codici informativi
1 Viene visualizzato il codice informativo sotto insieme ad un allarme di errore.
2 Disattivare l'interruttore di emergenza e controllare le istruzioni sottostanti adottando l'azione opportuna
3 Il codice informativo scompare attivando l'interruttore di emergenza
Codici informativi Checklist POWERbot è rimasto impigliato, ostacolato o bloccato lungo il suo percorso di pulizia.► Disattivare l'interruttore di emergenza e spostare POWERbot in un'altra zona. Corpo estraneo impigliato nella spazzola principale.► Disattivare l'interruttore di emergenza e rimuovere gli oggetti estranei dalla spazzola di pulizia. Corpo estraneo impigliato nella ruota di guida sinistra.► Disattivare l'interruttore di emergenza e rimuovere il corpo estraneo dalla ruota di guida. Corpo estraneo impigliato nella ruota di guida destra.► Disattivare l'interruttore di emergenza e rimuovere il corpo estraneo dalla ruota di guida. Controllare il sensore paracolpi.► Disattivare l'interruttore di emergenza e riattivarlo.► Se il codice di errore visualizzato non scompare, verificare l'eventuale presenza di un corpo estraneo tra il paracolpi e l'apparecchio. Nel caso vi sia un corpo estraneo, estrarre delicatamente il paracolpi e rimuoverlo. Sul sensore ostacoli si è accumulato dello sporco.► Disattivare l'interruttore di emergenza e pulire i sensori anteriore e posteriore con un panno morbido. Sul sensore di dislivello si è accumulato dello sporco.► Disattivare l'interruttore di emergenza e pulire il sensore di dislivello con un panno morbido. Controllare la scheda madre.► Spegnere e riavviare l'apparecchio. In caso il problema persista, contattare un Centro di assistenza autorizzato.
Risoluzione dei problemi
Sintomo Checklist POWERbot non funziona. ▸ Controllare l'attivazione dell'interruttore di emergenza.▸ Controllare che tutte le icone siano visualizzate sul display.▸ Verificare che la batteria di POWERbot non sia scarica.- Se sul display viene visualizzato "Lo", posizionare POWERbot nella docking station per ricaricare la batteria.- Quando la spia di carica della batteria lampeggia, posizionare manualmente POWERbot nella docking station per ricaricarlo. (Solo SR1*M701*** Series)▸ Se il telecomando non funziona, sostituire le batterie (tipo AAA). POWERbot si arresta durante il ciclo di pulizia. ▸ Se sul display viene visualizzato "Lo", posizionare POWERbot nella docking station per ricaricare la batteria.▸ Quando la spia di carica della batteria lampeggia, posizionare manualmente POWERbot nella docking station per ricaricarlo. (Solo SR1*M701*** Series)▸ Se POWERbot rimane bloccato in ostacoli quali cavi, soglie o altro, sollevarlo per liberarne il movimento.- Se nella ruota di guida rimangono impigliati tessuti o lacci, spegnere il dispositivo e rimuovere eventuali occlusioni prima di utilizzare nuovamente l'apparecchio. La potenza di aspirazione è bassa. ▸ Quando il contenitore di raccolta polvere è troppo pieno, la potenza di aspirazione può risultare inferiore. Disattivare l'interruttore di emergenza e vuotare il contenitore di raccolta polvere.▸ Se l'aspirazione (situata sul fondo di POWERbot) viene ostruita da corpi estranei, disattivare l'interruttore di emergenza e rimuoverli.▸ Se la rumorosità aumenta improvvisamente, disattivare l'interruttore di emergenza e vuotare il contenitore di raccolta polvere. POWERbot non riesce a individuare la base di ricarica. ▸ Controllare se si è verificato un blackout o se il cavo di alimentazione è stato scollegato.▸ Rimuovere eventuali ostacoli intorno alla docking station che possano ostacolare l'accesso di POWERbot.▸ In caso di presenza di corpi estranei sui contatti di ricarica, la ricarica ne sarà influenzata. Rimuovere eventuali corpi estranei dai contatti di ricarica. POWERbot pulisce improvvisamente in diagonale. ▸ Verificare se la docking station sia installata lungo le venature di un parquet o di piastrelle.▸ POWERbot può iniziare a pulire in diagonale qualora si rechi in un'altra zona di pulizia seguendo il percorso più corto. Può anche iniziare a pulire in diagonale qualora urti contro ostacoli con quell'angolazione, se ha avuto accesso alla docking station con quella angolazione, o se la trama del pavimento in legno o ceramica segue quella angolazione. La pulizia di un singolo punto non viene eseguita. ▸ Puntando la luce rossa direttamente verso POWERbot, questo potrebbe non spostarsi nella direzione desiderata.- Puntare la luce rossa sul pavimento a una distanza di 0,5 m da POWERbot.※ Non utilizzare il puntatore in piena luce del sole, sotto una luce intensa o su pavimenti scuri.
Risoluzione dei problemi
Sintomo Checklist Ho installato la app SmartThings, ma POWERbot non riesce a connettersi. ▶ Una volta effettuata la connessione del router wireless e del POWERbot mediante un Easy-Setup è possibile usare il prodotto. Non riesco ad accedere al mio account Samsung. ▶ Controllare la proprio ID e la propria password sullo schermo nella schermata dell'account Samsung. Viene visualizzato un messaggio che indica un malfunzionamento durante l'impostazione Easy-Setup. ▶ Il mancato funzionamento temporaneo potrebbe essere dovuto alla eccessiva distanza dal router wireless o ad altri ostacoli. Attendere qualche minuto e riprovare. I prodotti non funzionano nonostante lo smart phone sia regolarmente connesso al POWERbot. ▶ Chiudere la app SmartThings ed eseguirla nuovamente, oppure sconnettere lo smartphone dal router wireless e ricollegarlo. Spegnere l'alimentatore del POWERbot, quindi riaccenderlo, attendere per un minuto o più, quindi eseguire nuovamente la app SmartThings. Le funzioni della app SmartThings non hanno effetto. ▶ Controllare se è stata impostata sul telecomando la funzione di blocco del comando a distanza di POWERbot. (quando la funzione comando a distanza è bloccata la spia Wi-è spenta). La app SmartThings Robot vacuum app non viene eseguita. ▶ Verificare che POWERbot sia connesso al router wireless. POWERbot non è connesso al Wi-Fi. ▶ Verificare lo stato di impostazione del router wireless. La funzione Controllo potenza intelligente funziona solamente su un pavimento normale. ▶ Verificare se il pavimento è livellato in quanto POWERbot non funziona se il corpo non è sollevato leggermente dalla superficie di appoggio.▶ Verificare l'eventuale presenza di corpi estranei sul sensore di dislivello situato sul fondo di POWERbot.▶ Verificare se il pavimento è di colore scuro. La funzione Controllo potenza intelligente non funziona. ▶ Quando POWERbot pulisce un tappeto a pelo raso e colori sgargianti, potrebbe confonderlo con un pavimento rendendo quindi inaccessibile la funzione Controllo potenza intelligente. La funzione Edge clean master non funziona. ▶ Quando POWERbot non riesce a riconoscere una parete, la funzione Edge clean master potrebbe non funzionare.- Quando un ostacolo composto da materiale riflettente è posizionato di fronte alla parete- Quando la parete stessa è composta da materiale riflettente- Quando la parete è di colore scuro La funzione Edge clean funziona anche in assenza di pareti o angoli. ▶ Verificare se vi sono oggetti piccoli posizionati in luoghi molto angusti.▶ Quando POWERbot riconosce l'ostacolo davanti a sé come una parete, la funzione Edge clean funziona correttamente. La funzione Edge clean funziona anche se POWERbot non ha raggiunto una parete o un angolo. ▶ Quando POWERbot rileva un grande angolo, la funzione Edge clean funziona anche senza raggiungere la parete o l'angolo.
\* Samsung Electronics dichiara che l'apparecchiatura radio aderisce alla direttiva 2014/53/EU. Il testo integrale della dichiarazione di conformità EU è disponibile al seguente indirizzo: La dichiarazione ufficiale di conformità è disponibile su http://www.samsung.com, selezionare supporto> Cerca Supporto Prodotto e inserire il nome del modello.
Sintomo Checklist La app SmartThings non può essere installata. ► La app SmartThings è eseguibile su Android OS 6.0 o successivi, iOS 10 o successivi.► La versione operativa di supporto della app SmartThings potrà variare in seguito.► Per i dispositivi smart instradati, l'installazione standard e l'uso non è garantito. Viene visualizzato un messaggio relativo alla mancata registrazione del prodotto. ► Riprovare la procedura di registrazione del prodotto seguendo le indicazioni riportate nei messaggio visualizzati.► Vedere "Impostazione del router wireless" nel Manuale dell'utente.► Seguire le fasi per il completamento della registrazione del prodotto nella sezione del manuale dell'utente "Aggiungere un dispositivo alla app SmartThings"► Qualora la registrazione del prodotto non venga completata più volte, reimpostare il POWERbot e lo Smartphone, eseguire nuovamente la app SmartThings e riprovare la registrazione del prodotto.► Per l'accesso alla App e la registrazione del prodotto è necessario usare lo stesso account Samsung.► Tutti gli utenti devono usare l'account Samsung creato nello stesso paese. Durante la registrazione del prodotto, il tasto di ricarica viene tenuto premuto come indicato ma non viene visualizzato il passaggio successivo. ► Premere il tasto di ricarica fino ad avvertire un segnale acustico.► Se il passaggio successivo non compare entro pochi secondi, premere il tasto di ricarica un'altra volta. Durante la registrazione del prodotto, non si riesce ad individuare il router wireless al quale collegarsi. ► Annullare la procedura di registrazione del prodotto, eseguire nuovamente la app SmartThings e riprovare la procedura di registrazione del prodotto. Durante la registrazione del prodotto, la password 1111122222 dell'AP non viene inserita correttamente. ► Tenere premuto "[robot vacuum] Samsung" nell'elenco dei dispositivi in rete ed eliminare la rete per inizializzare la password. Durante la registrazione del prodotto, la password del router wireless in connessione non viene inserita correttamente. ► Annullare la procedura di registrazione del prodotto, eseguire nuovamente la app SmartThings e riprovare la procedura di registrazione del prodotto.► Tenere premuto il router wireless al quale si desidera collegarsi nell'elenco dei dispositivi in rete ed eliminare la rete per inizializzare la password. Viene quindi creato un collegamento tra la app SmartThings ed il POWERbot mediante la registrazione del prodotto. ► Aggiornare lo schermo ed attendere.► Eseguire nuovamente la app SmartThings.► Verificare che non vi siano problemi di connessione alla rete Internet. In particolare, un firewall potrebbe interferire con il funzionamento regolare.
Risoluzione dei problemi
Sintomo Checklist Durante il normale funzionamento della app viene quindi creato un collegamento tra la app SmartThings ed il POWERbot. ► Se il POWERbot è distante dal router wireless, possono verificarsi problemi di connessione.► Reimpostare il POWERbot e lo smartphone, e verificare nuovamente la connessione.► Se i problemi di irregolarità di connessione persistono, effettuare nuovamente la registrazione del prodotto.► Se la SSID/password del router wireless viene modificata, è necessario effettuare nuovamente la registrazione del prodotto. Il controllo mediante la app SmartThings non è attivo in quanto la funzione di controllo remoto è disabilitata. ► La funzione di controllo remoto è disabilitata. Verificare che la funzione di controllo remoto sia abilitata mediante un telecomando.
Avvertenze sulla batteria

Non rimuovere o tentare di rimuovere autonomamente la batteria inserita all'interno del prodotto. Per sostituire la batteria, contattare un tecnico qualificato o il Centro di assistenza autorizzato.
Queste istruzioni sono state preparate ad uso esclusivo del tecnico o del centro assistenza.
PER LA PROPRIA SICUREZZA, NON TENTARE DI RIMUOVERE LA BATTERIA AUTONOMAMENTE NÉ SMALTIRLA NEL FUOCO. NON DISASSEMBLARE, ROMPERE O FORARE LA BATTERIA.
Come estrarre la batteria
Per smontare POWERbot, estrarlo dal caricatore / docking station. Per ragioni di sicurezza, spegnere POWERbot prima di disassemblarlo.

natural_image
Hand using a pipette to apply material to a component on a device (no text or symbols visible)
1 Appoggiare POWERbot capovolto e rimuovere le 2 viti.

natural_image
Line drawing of a hand inserting a component into a device casing (no text or symbols)
2 Rimuovere il coperchio del contenitore di raccolta polvere.

text_image
Diagram showing a device with labeled parts and an inset view of a hand interacting with a component, likely illustrating a mechanical or electrical assembly.
3 Rimuovere la batteria dall'alloggiamento e scollegare il connettore.

Corretto smaltimento delle batterie di questo prodotto
(applicabile nei paesi dotati di sistemi di raccolta e restituzione delle batterie).
L'etichetta presente sulla batteria, sul manuale o sull'imballaggio indica che la batteria di questo prodotto non deve essere smaltita insieme ai rifiuti domestici. Laddove apposti, i simboli chimici Hg, Cd o Pb indicano che nella batteria vi è un contenuto di mercurio, cadmio o piombo superiore rispetto ai livelli di riferimento indicati nella Direttiva CE 2006/66.
La batteria incorporata nel prodotto non è sostituibile dall'utente. Per informazioni sulla sostituzione, rivolgersi ad un Centro di assistenza autorizzato. Non tentare di rimuovere la batteria né di smaltirla nel fuoco. Non disassemblare, rompere o forare la batteria. Per smaltire il prodotto recarsi presso un centro di raccolta rifiuti dove verranno seguite le corrette procedure di riciclo e trattamento del prodotto, compresa la batteria.
Dichiarazione Open Source
Il software incluso in questo prodotto contiene codice open source. E' possibile ottenere il codice sorgente corrispondente completo per un periodo di tre anni dall'ultima spedizione di questo prodotto inviando una email a mailto:oss.request@samsung.com.
È inoltre possibile ottenere il codice sorgente corrispondente completo su un supporto fisico come un CD-ROM; in tal caso verrà addebitato un importo minimo.
Il seguente URL http://opensource.samsung.com/opensource/VR7000\_A20\_TZ/seq/0 porta alla pagina di download del codice sorgente reso disponibile e alle informazioni di licenza open source relative al prodotto. Questa offerta è valida per chiunque riceva questa informazione.

text_image
QR code image containing encoded data, no visible human-readable text
Specifiche
Classificazione Articolo Informazioni dettagliate SR1*M701*** SR1*M702***SR1*M703*** Specifiche meccaniche (POWERbot) Dimensioni (P x A x L) 340 mm x 97 mm x 348 mm Peso 4 kg Sensore Riconoscimento della forma del soffitto (Visionary mapping plus TM) Tipo di tasti di POWERbot Tipo touch Specifiche di alimentazione Tensione di corrente 100-240 V~, 50 Hz/60 Hz Consumo elettrico 80 W Specifiche delle batterie 21,6 V/ 38,8 Wh Pulizia Tipo di ricarica Ricarica automatica/Ricarica manuale Modalità di pulizia Auto, Spot, Giornaliero Auto, Spot, Repeat, Manual, Una volta, Giornaliero Tempo di ricarica Circa 240 minuti Durata pulizia(calcolata sulla base di pavimenti con superfici lisce) Modalità Turbo Circa 30 minuti Modalità Normal Circa 60 minuti Wi-Fi Gamma frequenze 2412 - 2472 MHz Potenza di trasmissione (Max) 20 dBm
Classificazione Articolo Informazioni dettagliate Specifiche meccaniche (POWERbot) Dimensioni (P x A x L) 340 mm x 97 mm x 348 mm Peso 4,3 kg Sensore Riconoscimento della forma del soffitto (Visionary mapping plus TM) Tipo di tasti di POWERbot Tipo touch Specifiche di alimentazione Tensione di corrente 100-240 V~, 50 Hz/60 Hz Consumo elettrico 130 W Specifiche delle batterie 21,6 V/ 77,8 Wh Pulizia Tipo di ricarica Ricarica automatica/Ricarica manuale Modalità di pulizia Auto, Spot, Repeat, Manual, Una volta, Giornaliero Tempo di ricarica Circa 160 minuti Durata pulizia(calcolata sulla base di pavimenti con superfici lisce) Modalità Turbo Circa 30 minuti Modalità Normal Circa 60 minuti Modalità Quiet Circa 90 minuti Wi-Fi Gamma frequenze 2412 - 2472 MHz Potenza di trasmissione (Max) 20 dBm
\* Ai fini di migliorare il prodotto, la forma e le specifiche del prodotto sono soggette a modifiche senza alcun preavviso.
\* I tempi di ricarica e di pulizia possono differire in base alle condizioni d'uso.
Series>
1. Muto 2. Indicatore informazioni 3. \*Off/On spia Comando a distanza 4. \*Wi-Fi 5. Spia batteria 6. Programmazione Una volta/Giornaliero 7. Display numerico 8. Modalità pulizia Spot 9. Modalità pulizia Manual 10. Modalità pulizia Repeat 11. Modalità Normal 12. Modalità Turbo 13. Tasto pulizia Spot 14. Tasto Avvio/Stop 15. Tasto RicaricaImpostazione dell'orario / della programmazione
[Tipo A, Tipo B] È possibile programmare solo la modalità di pulizia Auto.Impostazione dell'orario
Prima di utilizzare la programmazione Una volta/Giornaliero è necessario impostare l'orario corrente. flowchart
graph LR
A["Clock"] --> B["Selezionare "Ora" Selezionare "Minuto""]
B --> C["Selezionare "AM/PM" Impostazione completata"]
C --> D["Passare alla precedente, successiva impostazione"]
style A fill:#fff,stroke:#000
style B fill:#fff,stroke:#000
style C fill:#fff,stroke:#000
style D fill:#fff,stroke:#000
Impostazione della programmazione
L'impostazione/annullamento della programmazione può essere effettuata solo quando POWERbot è fermo nella docking station. flowchart
graph LR
A["Schedule Cancel (3sec)"] --> B["Selezionare la programmazione "Una volta" o "Giornaliero""]
B --> C["Selezionare "Ora""]
C --> D["Selezionare "AM/PM" Impostazione"]
D --> E["Selezionare "Minuto" Passare alla precedente, successiva impostazione"]
F["completata"] --> G["Selezionare "Am/PM" Impostazione"]
G --> H["Selezionare "Ora""]
H --> I["Selezionare "Minuto""]
I --> J["Selezionare "Ora""]
J --> K["Selezionare "Am/PM" Impostazione"]
K --> L["Selezionare "Ora""]
L --> M["Selezionare "Minuto""]
M --> N["Selezionare "Ora""]
N --> O["Selezionare "Ora""]
O --> P["Selezionare "Ora""]
P --> Q["Selezionare "Ora""]
Q --> R["Selezionare "Ora""]
R --> S["Selezionare "Ora""]
S --> T["Selezionare "Ora""]
T --> U["Selezionare "Ora""]
U --> V["Selezionare "Ora""]
V --> W["Selezionare "Ora""]
W --> X["Selezionare "Ora""]
X --> Y["Selezionare "Ora""]
Y --> Z["Selezionare "Ora""]
Z --> AA["Selezionare "Ora""]
AA --> AB["Selezionare "Ora""]
AB --> AC["Selezionare "Ora""]
AC --> AD["Selezionare "Ora""]
AD --> AE["Selezionare "Ora""]
AE --> AF["Selezionare "Ora""]
AF --> AG["Selezionare "Ora""]
AG --> AH["Selezionare "Ora""]
AH --> AI["Selezionare "Ora""]
AI --> AJ["Selezionare "Ora""]
AJ --> AK["Selezionare "Ora""]
AK --> AL["Selezionare "Ora""]
AL --> AM["Selezionare "Ora""]
AM --> AN["Selezionare "Ora""]
AN --> AO["Selezionare "Ora""]
AO --> AP["Selezionare "Ora""]
AP --> AQ["Selezionare "Ora""]
AQ --> AR["Selezionare "Ora""]
AR --> AS["Selezionare "Ora""]
AS --> AT["Selezionare "Ora""]
AT --> AU["Selezionare "Ora""]
AU --> AV["Selezionare "Ora""]
AV --> AW["Selezionare "Ora""]
AW --> AX["Selezionare "Ora""]
AX --> AY["Selezionare "Ora""]
Annullamento durante l'impostazione
L'impostazione viene annullata automaticamente in mancanza di una azione entro 7 secondi. Annullamento programmazione Una volta/Giornaliero| Quando sono impostate entrambe le programmazioni Una volta/Giornaliero | Premere per 3 secondi. | → | Selezionare la programmazione desiderata | → | Annullamento completato |
| Quando è impostata una delle programmazioni Una volta o Giornaliero | Schedule Cancel (3sec)Premere per 3 secondi. | ||||
Impostazione dell'orario
Prima di utilizzare la programmazione Una volta/Giornaliero è necessario impostare l'orario corrente. flowchart
graph LR
A["Clock"] --> B["Selezionare "Ora" Selezionare "Minuto""]
B --> C["Selezionare "AM/PM" Impostazione completata"]
C --> D["Passare alla precedente, successiva impostazione"]
style A fill:#f9f,stroke:#333
style B fill:#ccf,stroke:#333
style C fill:#cfc,stroke:#333
style D fill:#fcc,stroke:#333
Impostazione della programmazione
L'impostazione/annullamento della programmazione può essere effettuata solo quando POWERbot è fermo nella docking station. flowchart
graph LR
A["Schedule Cancel (3sec)"] --> B["Impostazione di Avvio"]
B --> C["Selezionare la programmazione "Una volta" o "Giornaliero""]
C --> D["Selezionare "Ora""]
D --> E["Selezionare "Am/PM" Impostazione"]
E --> F["Selezionare "Minuto""]
F --> G["Passare alla precedente, successiva impostazione"]
H["completata"] --> I["Selezionare "AM/PM" Impostazione"]
I --> J["Selezionare "Ora""]
J --> K["Selezionare "Minuto""]
Annullamento durante l'impostazione
L'impostazione viene annullata automaticamente in mancanza di una azione entro 7 secondi. Annullamento programmazione Una volta/Giornaliero| Quando sono impostate entrambe le programmazioni Una volta/Giornaliero | Cancel (3sec)Premere per 3 secondi. | | | Cancel (3sec) | → | [7SA3] | Cancel (3sec) |
| Quando è impostata una delle programmazioni Una volta o Giornaliero | Premere per 3 secondi. | ||||||
Impostazione dell'orario / della programmazione
[SR1\*M701\*\*\* Series] Per le modalità che non prevedono un telecomando, è disponibile la programmazione sotto.Impostazione della programmazione
L'impostazione/annullamento della programmazione può essere effettuata solo quando POWERbot è fermo nella docking station.  Premere per 3 secondi.   Quando il LED della programmazione è acceso ciò indica che è stata impostata una programmazione Giornaliero. \* Verrà inserita la programmazione corrispondente all'orario in cui si preme il tasto. La pulizia verrà automaticamente eseguita in base all'orario programmato.Annullamento programmazione Giornaliero
Quando è stata impostata la programmazione Giornaliero  Premere per 3 secondi.Pulizia e manutenzione
E' necessario disattivare l'interruttore di emergenza prima di eseguire la pulizia di POWERbot.Pulizia del contenitore di raccolta polvere
text_image
① ② PUSHtext_image
Technical diagram showing mechanical assembly with numbered components and directional arrows indicating motion or forcenatural_image
Illustration of hands pouring liquid into a trash bin (no text or symbols)text_image
Illustration showing two steps to open a toilet with water, followed by a diagram of a sink, tap, and coffee cup with sun symbol.text_image
Diagram illustrating three steps of installing a device into a box, with numbered instructions and visual icons.text_image
"Clic"Pulizia dei sensori e della telecamera
Pulire delicatamente con un panno morbido. Non utilizzare prodotti abrasivi o pagliette saponate. text_image
pagllette saponate: Fotocamera Finestra del sensore anterioretext_image
Sensori di dislivellotext_image
Finestra del sensore posteriorePulizia e manutenzione
Pulizia della spazzola e della bocchetta automatica
La forma della spazzola può variare in base al modello acquistato. Non pulire la spazzola con acqua. text_image
Diagram showing a device with labeled parts and a magnified view of the component, likely illustrating a device's internal structure or status.natural_image
Illustration of a hand holding a tool over a device component, with an upward arrow indicating motion (no text or symbols present)natural_image
Illustration of a welding torch tool interacting with a clamped tool (no text or symbols present)text_image
Diagram showing three-step steps of a tool application: cutting, holding a pen, and writing on paper.text_image
Diagram showing hands holding a pen with a numbered label pointing to a section, likely illustrating a procedure or step in a technical or mechanical context.text_image
Diagram showing a hand holding a device with labeled parts and an inset close-up of the device's internal structure.text_image
Diagram illustrating car safety instructions with labeled symbols and arrows indicating correct and incorrect actionstext_image
Diagram showing hands operating a device with a labeled component and directional arrows indicating operationPulizia della ruota di guida
natural_image
Illustration of hands holding a device casing with internal components (no text or symbols visible)natural_image
Hand using a tool to lift a tire on a road surface (no text or symbols visible)App SmartThings
La app SmartThings è disponibile solo nei modelli dotati di una funzione Wi-Fi.Impostazione del router wireless
In caso di problemi di accesso del router wireless vedere il relativo manuale dell'utente. Samsung POWERbot supporta solo la banda Wi-Fi 2,4 Ghz. Samsung POWERbot supporta IEEE 802.11b/g/n and Soft-AP. - Si consiglia l'adozione dello standard IEEE 802.11n. Samsung POWERbot supporta solo il protocollo DHCP (Dynamic Host Configuration Protocol). Assicurarsi che l'opzione DHCP server sul proprio router wireless sia attivata. ▶ POWERbot supporta i protocolli WEP-OPEN, WPA-PSK/TKIP e WPA2-PSK/AES quali protocolli di autenticazione e crittografia. \- Si consiglia l'uso del protocollo WPA2-PSK/AES. \- Accertarsi che il router sia dotato di una SSID e di una password univoci. ▶ La qualità della connessione del network wireless può essere influenzata dalle condizioni ambientali circostanti. Qualora il vostro Internet service provider registri permanentemente l'indirizzo MAC (un numero di identificazione unico) del vostro PC o modem, il vostro POWERbot potrebbe non riuscire a connettersi ad Internet. Richiedete al vostro Internet service provider la procedura necessaria per connettere un apparato diverso dal PC ad Internet. Qualora il vostro Internet service provider richieda il vostro ID o la password per la connessione Internet, il vostro POWERbot potrebbe non essere in grado di connettersi ad internet. In questo caso, digitare il proprio ID o la password durante la connessione ad internet. ▶ POWERbot potrebbe non essere in grado di connettersi ad Internet per varie problematiche relative al firewall. Chiedete al vostro Internet service provider le soluzioni a tale problema. - Alcuni router wireless possono veicolare un indirizzo di Domain Name Server (DNS) anomalo anche in assenza di connessione Internet. In questo caso, rivolgetevi al produttore del vostro router wireless ed al vostro Internet service provider. Se, anche dopo aver provato la procedura suggerita dal proprio Internet service provider non si riesce connettersi ad Internet, rivolgersi ad un Centro di assistenza autorizzato Samsung. - Qualore il router non sia un prodotto certificato Wi-Fi, POWERbot potrebbe non essere in grado di connettersi a Internet.App SmartThings
Download della app SmartThings
▶ Eseguire il download ed installare la app SmartThings dai vari market (Google Play Store, Apple App Store, o Samsung Galaxy Apps). Per trovare la app da scaricare usare la parola chiave "SmartThings." Nota
▶ SmartThings non è compatibile con tablet ed alcuni dispositivi mobile. \- È consigliato disporre di Android 6.0 o successivo (almeno 2GB di RAM). ▶ iPad ed alcuni dispositivi mobile possono non essere supportati. \- iOS 10.0 o successivo / iPhone 6 o successivi sono supportati. \- Visitare il Play Store o App Store per capire se il proprio dispositivo mobile è compatibile con SmartThings. ▶ Le funzioni supportate sono soggette a modifiche senza alcun preavviso.Impostazione di un account Samsung
▶ Per usare la app SmartThings è necessario disporre di un account Samsung. ▶ Per impostare un account Samsung, seguire le indicazioni fornite dalla app SmartThings. In alternativa, se si dispone di uno smartphone Samsung, aggiungere l'account Samsung nella app di impostazione del proprio smartphone. In seguito lo smartphone effettuerà l'accesso automatico all'account Samsung.Aggiungere un dispositivo alla app SmartThings
1. Connettere il proprio smartphone al router wireless. \- Se lo smartphone non è collegato, attivare il Wi-Fi in Impostazioni e selezionare il router wireless al quale si desidera collegarsi. \- Disabilitare l'opzione "Dati mobili" dello smartphone per usare solo il Wi-Fi e connettere un dispositivo. 2. Avviare la app SmartThings sul proprio smartphone. 3. In caso di comparsa di una finestra indicante l'individuazione di un nuovo dispositivo, premere ADD NOW. \- Qualora la finestra non venga visualizzata, premere il tasto + e selezionare il dispositivo da aggiungere nell'elenco AVAILABLE DEVICES. \- Se il dispositivo non compare nell'elenco, aggiungerlo manualmente selezionandone il tipo e lo specifico modello. 4. [Android] La connessione al dispositivo viene effettuata automaticamente. \- [iOS] Accedere alla app delle impostazioni e selezionare [robot vacuum] Samsung nell'elenco dei Wi-Fi disponibili. 5. A richiesta fornire le credenziali di autenticazione. 6. [Android] La connessione al router wireless viene effettuata automaticamente. \- [iOS] Accedere alla app delle impostazioni e selezionare il router wireless presente nell'elenco dei Wi-Fi disponibili. 7. Le rimanenti operazioni di impostazione vengono effettuate automaticamente. Verrà quindi aggiunta una nuova Device Card. Nota
\- Qualora non sia possibile completare la registrazione del prodotto, intraprendere le seguenti azioni. \- Provare nuovamente la procedura di registrazione così come indicato dai messaggi visualizzati. \- Controllare se l'opzione UPnP del router wireless è disponibile e riprovare la procedura di registrazione. \- Confermare che il router wireless sia operativo in modalità wireless, quindi riprovare nuovamente la procedura di registrazione. \- In presenza di due o più POWERbot, spegnere gli altri POWERbot e riprovare nuovamente la registrazione del POWERbot. \- Qualora nelle vicinanze vi sia un altro router con lo stesso SSID del proprio router wireless, la registrazione non potrà essere completata. ▶ Spia Wi-Fi e Comando a distanza| On | Comando a distanza è inibito. (è ancora possibile usare il telecomando). | | |
| Off | Comando a distanza è abilitata. | ||
| On | POWERbot è connesso al router wireless. | ||
| Off | POWERbot sta tentando di connettersi al router wireless. |
App SmartThings
- Quando la funzione comando a distanza è inibita, non è possibile controllare il POWERbot dal proprio smartphone. Se POWERbot e lo smartphone non sono connessi allo stesso router wireless, può verificarsi un ritardo di risposta in base alle condizioni dell'ambiente di rete.Aggiornamento Software
- Quando POWERbot è in carica nella docking station, POWERbot si collega al server e verifica la presenza di aggiornamenti software. Se viene trovato un aggiornamento del software, POWERbot effettuerà automaticamente il download e lo aggiornerà. Se sul display viene visualizzato "UP" mentre POWERbot è in ricarica, ciò indicherà che l'aggiornamento è in corso. Attendere il completamento dell'aggiornamento prima di usare POWERbot.Uso della app SmartThings
▶ Selezionando la scheda del dispositivo nella app SmartThings, verrà avviato il plug-in del proprio dispositivo. text_image
ROBOT #2 OFFICE HELP ⑪ ① ② RECHARGING AUTO SPOT ④ Fully charged ⑤ Battery ⑥ Suction power Normal ⑦ Repeat ⑧ Schedule ⑨ History ⑩Note e precauzioni
Ricarica
Nota
Se la batteria si surriscalda durante la ricarica, il tempo di carica potrebbe essere più lungo. Se la ricarica automatica non funziona, controllare le seguenti condizioni: - Attivare e riattivare l'interruttore di emergenza (posto sul fondo di POWERbot). - Scollegare e ricollegare la spina di alimentazione della docking station. - Scollegare la base di ricarica, quindi con un panno asciutto o uno straccio, verificare che non vi siano sostanze estranee sui contatti di carica di POWERbot e della docking station. - Controllare che non vi siano ostacoli od oggetti riflettenti, sedie ecc. vicino alla docking station. Se POWERbot viene lasciato scollegato dalla docking station, la batteria si scaricherà nel tempo. \- Fare in modo che POWERbot sia sempre caricato dalla docking station. (tuttavia spegnere il dispositivo e lasciare la docking station scollegata durante una prolungata assenza da casa).Uso
Nota
▶ POWERbot potrebbe restare bloccato in una soglia o altrove durante la pulizia. \- Per riavviare il funzionamento, disattivare l'interruttore di emergenza, spostare POWERbot in una zona dove sia in grado di muoversi facilmente quindi riattivare l'interruttore. ▶ POWERbot non è in grado di pulire completamente le aree nelle quale non riesce ad accedere, ad esempio angoli, spazio tra muro e divano, ecc. \- Per questo, utilizzare un diverso strumento di pulizia. ▶ POWERbot non è in grado di aspirare grossi agglomerati di sporcizia, pertanto alcuni residui possono restare sul pavimento al termine della pulizia. - Per questo, utilizzare un diverso strumento di pulizia. Se POWERbot viene spento, non è possibile riaccenderlo mediante il tasto Power del telecomando. Tenere premuto il tasto [Avvio/Stop] su POWERbot. ▶ Non è possibile selezionare ed impostare POWERbot in modo che esegua una pulizia Spot durante la fase di ricarica. ▶ Premendo il tasto pulizia Manual / Point cleaning durante la fase di ricarica POWERbot si scollegherà dalla docking station entrando in modalità standby.Pulizia e manutenzione
Nota
▶ Dopo aver lavato il contenitore di raccolta della polvere ed il filtro con acqua - Contenitore di raccolta polvere: Asciugare completamente l'acqua residua. - Filtro: Lasciare asciugare completamente all'ombra prima dell'uso. ▶ Nel pulire la bocchetta automatica, non estrarla con eccessiva forza. Attenzione
- Prestare attenzione alle dita nello smontare/rimontare il filtro poiché è facile che rimangano intrappolate nell'ingresso del contenitore di raccolta. ▶ Al fine di evitare ostruzioni a causa di corpi estranei, non permettere a POWERbot di aspirare stuzzicadenti, cotton fioc o simili.Note e precauzioni
Qualora sia difficile rimuovere gli oggetti estranei dalla spazzola principale, rivolgersi ad un Centro di assistenza autorizzato Samsung. ▶ Poiché la spazzola principale rimuove lo sporco dal pavimento durante la pulizia, è possibile che capelli lunghi o altri materiali possano restarvi impigliati. Per ottenere risultati di pulizia ottimali, controllarla e pulirla regolarmente. Se una spazzola o il coperchio di una spazzola non è montato correttamente una volta eseguita la manutenzione, si potrebbe graffiare il pavimento o il prodotto potrebbe non funzionare regolarmente. Pertanto, montarli correttamente seguendo le procedure di manutenzione previste.Informazioni sulla batteria
Nota
- Acquistare le batterie presso di Centri di assistenza autorizzata Samsung e verificare la presenza del simbolo (\$AMSUNG applicato alla batteria ed il nome del modello perima di completare l'acquisto. ▶ Questa batteria è indicata eclusivamente per un POWERbot Samsung Electronics. Non utilizzarla per altri prodotti. ▶ Non disassemblare o modificare la batteria. ▶ Non gettare la batteria nel fuoco o riscaldarla. ▶ Non posizionare alcun oggetto metallico sui contatti di carica (+, -). ▶ Tenere il prodotto all'interno (0 °C\~40 °C). In caso di malfunzionamento della batterie, non tentare di disassemblarle autonomamente. Rivolgersi ad un Centro di assistenza autorizzato Samsung. - Il tempo di ricarica della batteria e il tempo di utilizzo possono diminuire con l'uso della batteria. Se la batteria è esausta e il robot non si inserisce più correttamente nella docking station, richiederne la sostituzione presso un Centro di assistenza autorizzato Samsung. - Il periodo di garanzia della batteria è di 6 mesi dalla data di acquisto.Informazioni sul sensore IrDA
Attenzione
▶ La trasmissione a infrarossi potrebbe essere irregolare nei luoghi esposti a luce alogena o in spazi aperti. ▶ POWERbot utilizza 3 tipi di dispositivi ad infrarossi. Ogni dispositivo ha un diverso livello di priorità. Un dispositivo potrebbe non funzionare correttamente se il suo segnale è disturbato da un dispositivo con priorità maggiore. \- Priorità dei segnali a infrarossi: Comando a distanza > Docking station ▶ Diversi segnali a infrarossi possono interferire l'uno con l'altro e provocare malfunzionamenti ai dispositivi se usati insieme in uno spazio ristretto o a breve distanza. Se si utilizzano più dispositivi POWERbot contemporaneamente, il loro funzionamento potrebbe risultare irregolare a causa delle interferenze dei segnali a infrarossi.Codici informativi
flowchart
graph LR
A["Raw Data"] --> B["Data Collection"]
B --> C["Codici Informativi"]
C --> D["Output"]
| POWERbot è rimasto impigliato, ostacolato o bloccato lungo il suo percorso di pulizia.►Disattivare l'interruttore di emergenza e spostare POWERbot in un'altra zona. |
| Corpo estraneo impigliato nella spazzola principale.►Disattivare l'interruttore di emergenza e rimuovere gli oggetti estranei dalla spazzola di pulizia. |
| Corpo estraneo impigliato nella ruota di guida sinistra.►Disattivare l'interruttore di emergenza e rimuovere il corpo estraneo dalla ruota di guida. |
| Corpo estraneo impigliato nella ruota di guida destra.►Disattivare l'interruttore di emergenza e rimuovere il corpo estraneo dalla ruota di guida. |
| Controllare il sensore paracolpi.►Disattivare l'interruttore di emergenza e riattivarlo.►Se il codice di errore visualizzato non scompare, verificare l'eventuale presenza di un corpo estraneo tra il paracolpi e l'apparecchio. Nel caso vi sia un corpo estraneo, estrarre delicatamente il paracolpi e rimuoverlo. |
| Sul sensore ostacoli si è accumulato dello sporco.►Disattivare l'interruttore di emergenza e pulire i sensori anteriore e posteriore con un panno morbido. |
| Sul sensore di dislivello si è accumulato dello sporco.►Disattivare l'interruttore di emergenza e pulire il sensore di dislivello con un panno morbido. |
| Controllare la scheda madre.►Spegnere e riavviare l'apparecchio. In caso il problema persista, contattare un Centro di assistenza autorizzato. |
Codici informativi
| Codici informativi Checklist | |
| POWERbot è rimasto impigliato, ostacolato o bloccato lungo il suo percorso di pulizia.► Disattivare l'interruttore di emergenza e spostare POWERbot in un'altra zona. |
| Corpo estraneo impigliato nella spazzola principale.► Disattivare l'interruttore di emergenza e rimuovere gli oggetti estranei dalla spazzola di pulizia. |
| Corpo estraneo impigliato nella ruota di guida sinistra.► Disattivare l'interruttore di emergenza e rimuovere il corpo estraneo dalla ruota di guida. |
| Corpo estraneo impigliato nella ruota di guida destra.► Disattivare l'interruttore di emergenza e rimuovere il corpo estraneo dalla ruota di guida. |
| Controllare il sensore paracolpi.► Disattivare l'interruttore di emergenza e riattivarlo.► Se il codice di errore visualizzato non scompare, verificare l'eventuale presenza di un corpo estraneo tra il paracolpi e l'apparecchio. Nel caso vi sia un corpo estraneo, estrarre delicatamente il paracolpi e rimuoverlo. |
| Sul sensore ostacoli si è accumulato dello sporco.► Disattivare l'interruttore di emergenza e pulire i sensori anteriore e posteriore con un panno morbido. |
| Sul sensore di dislivello si è accumulato dello sporco.► Disattivare l'interruttore di emergenza e pulire il sensore di dislivello con un panno morbido. |
| Controllare la scheda madre.► Spegnere e riavviare l'apparecchio. In caso il problema persista, contattare un Centro di assistenza autorizzato. |
Risoluzione dei problemi
| Sintomo Checklist | |
| POWERbot non funziona. | ▸ Controllare l'attivazione dell'interruttore di emergenza.▸ Controllare che tutte le icone siano visualizzate sul display.▸ Verificare che la batteria di POWERbot non sia scarica.- Se sul display viene visualizzato "Lo", posizionare POWERbot nella docking station per ricaricare la batteria.- Quando la spia di carica della batteria lampeggia, posizionare manualmente POWERbot nella docking station per ricaricarlo. (Solo SR1*M701*** Series)▸ Se il telecomando non funziona, sostituire le batterie (tipo AAA). |
| POWERbot si arresta durante il ciclo di pulizia. | ▸ Se sul display viene visualizzato "Lo", posizionare POWERbot nella docking station per ricaricare la batteria.▸ Quando la spia di carica della batteria lampeggia, posizionare manualmente POWERbot nella docking station per ricaricarlo. (Solo SR1*M701*** Series)▸ Se POWERbot rimane bloccato in ostacoli quali cavi, soglie o altro, sollevarlo per liberarne il movimento.- Se nella ruota di guida rimangono impigliati tessuti o lacci, spegnere il dispositivo e rimuovere eventuali occlusioni prima di utilizzare nuovamente l'apparecchio. |
| La potenza di aspirazione è bassa. | ▸ Quando il contenitore di raccolta polvere è troppo pieno, la potenza di aspirazione può risultare inferiore. Disattivare l'interruttore di emergenza e vuotare il contenitore di raccolta polvere.▸ Se l'aspirazione (situata sul fondo di POWERbot) viene ostruita da corpi estranei, disattivare l'interruttore di emergenza e rimuoverli.▸ Se la rumorosità aumenta improvvisamente, disattivare l'interruttore di emergenza e vuotare il contenitore di raccolta polvere. |
| POWERbot non riesce a individuare la base di ricarica. | ▸ Controllare se si è verificato un blackout o se il cavo di alimentazione è stato scollegato.▸ Rimuovere eventuali ostacoli intorno alla docking station che possano ostacolare l'accesso di POWERbot.▸ In caso di presenza di corpi estranei sui contatti di ricarica, la ricarica ne sarà influenzata. Rimuovere eventuali corpi estranei dai contatti di ricarica. |
| POWERbot pulisce improvvisamente in diagonale. | ▸ Verificare se la docking station sia installata lungo le venature di un parquet o di piastrelle.▸ POWERbot può iniziare a pulire in diagonale qualora si rechi in un'altra zona di pulizia seguendo il percorso più corto. Può anche iniziare a pulire in diagonale qualora urti contro ostacoli con quell'angolazione, se ha avuto accesso alla docking station con quella angolazione, o se la trama del pavimento in legno o ceramica segue quella angolazione. |
| La pulizia di un singolo punto non viene eseguita. | ▸ Puntando la luce rossa direttamente verso POWERbot, questo potrebbe non spostarsi nella direzione desiderata.- Puntare la luce rossa sul pavimento a una distanza di 0,5 m da POWERbot.※ Non utilizzare il puntatore in piena luce del sole, sotto una luce intensa o su pavimenti scuri. |
Risoluzione dei problemi
| Sintomo Checklist | |
| Ho installato la app SmartThings, ma POWERbot non riesce a connettersi. | ▶ Una volta effettuata la connessione del router wireless e del POWERbot mediante un Easy-Setup è possibile usare il prodotto. |
| Non riesco ad accedere al mio account Samsung. | ▶ Controllare la proprio ID e la propria password sullo schermo nella schermata dell'account Samsung. |
| Viene visualizzato un messaggio che indica un malfunzionamento durante l'impostazione Easy-Setup. | ▶ Il mancato funzionamento temporaneo potrebbe essere dovuto alla eccessiva distanza dal router wireless o ad altri ostacoli. Attendere qualche minuto e riprovare. |
| I prodotti non funzionano nonostante lo smart phone sia regolarmente connesso al POWERbot. | ▶ Chiudere la app SmartThings ed eseguirla nuovamente, oppure sconnettere lo smartphone dal router wireless e ricollegarlo. Spegnere l'alimentatore del POWERbot, quindi riaccenderlo, attendere per un minuto o più, quindi eseguire nuovamente la app SmartThings. |
| Le funzioni della app SmartThings non hanno effetto. | ▶ Controllare se è stata impostata sul telecomando la funzione di blocco del comando a distanza di POWERbot. (quando la funzione comando a distanza è bloccata la spia Wi-è spenta). |
| La app SmartThings Robot vacuum app non viene eseguita. | ▶ Verificare che POWERbot sia connesso al router wireless. |
| POWERbot non è connesso al Wi-Fi. | ▶ Verificare lo stato di impostazione del router wireless. |
| La funzione Controllo potenza intelligente funziona solamente su un pavimento normale. | ▶ Verificare se il pavimento è livellato in quanto POWERbot non funziona se il corpo non è sollevato leggermente dalla superficie di appoggio.▶ Verificare l'eventuale presenza di corpi estranei sul sensore di dislivello situato sul fondo di POWERbot.▶ Verificare se il pavimento è di colore scuro. |
| La funzione Controllo potenza intelligente non funziona. | ▶ Quando POWERbot pulisce un tappeto a pelo raso e colori sgargianti, potrebbe confonderlo con un pavimento rendendo quindi inaccessibile la funzione Controllo potenza intelligente. |
| La funzione Edge clean master non funziona. | ▶ Quando POWERbot non riesce a riconoscere una parete, la funzione Edge clean master potrebbe non funzionare.- Quando un ostacolo composto da materiale riflettente è posizionato di fronte alla parete- Quando la parete stessa è composta da materiale riflettente- Quando la parete è di colore scuro |
| La funzione Edge clean funziona anche in assenza di pareti o angoli. | ▶ Verificare se vi sono oggetti piccoli posizionati in luoghi molto angusti.▶ Quando POWERbot riconosce l'ostacolo davanti a sé come una parete, la funzione Edge clean funziona correttamente. |
| La funzione Edge clean funziona anche se POWERbot non ha raggiunto una parete o un angolo. | ▶ Quando POWERbot rileva un grande angolo, la funzione Edge clean funziona anche senza raggiungere la parete o l'angolo. |
| Sintomo Checklist | |
| La app SmartThings non può essere installata. | ► La app SmartThings è eseguibile su Android OS 6.0 o successivi, iOS 10 o successivi.► La versione operativa di supporto della app SmartThings potrà variare in seguito.► Per i dispositivi smart instradati, l'installazione standard e l'uso non è garantito. |
| Viene visualizzato un messaggio relativo alla mancata registrazione del prodotto. | ► Riprovare la procedura di registrazione del prodotto seguendo le indicazioni riportate nei messaggio visualizzati.► Vedere "Impostazione del router wireless" nel Manuale dell'utente.► Seguire le fasi per il completamento della registrazione del prodotto nella sezione del manuale dell'utente "Aggiungere un dispositivo alla app SmartThings"► Qualora la registrazione del prodotto non venga completata più volte, reimpostare il POWERbot e lo Smartphone, eseguire nuovamente la app SmartThings e riprovare la registrazione del prodotto.► Per l'accesso alla App e la registrazione del prodotto è necessario usare lo stesso account Samsung.► Tutti gli utenti devono usare l'account Samsung creato nello stesso paese. |
| Durante la registrazione del prodotto, il tasto di ricarica viene tenuto premuto come indicato ma non viene visualizzato il passaggio successivo. | ► Premere il tasto di ricarica fino ad avvertire un segnale acustico.► Se il passaggio successivo non compare entro pochi secondi, premere il tasto di ricarica un'altra volta. |
| Durante la registrazione del prodotto, non si riesce ad individuare il router wireless al quale collegarsi. | ► Annullare la procedura di registrazione del prodotto, eseguire nuovamente la app SmartThings e riprovare la procedura di registrazione del prodotto. |
| Durante la registrazione del prodotto, la password 1111122222 dell'AP non viene inserita correttamente. | ► Tenere premuto "[robot vacuum] Samsung" nell'elenco dei dispositivi in rete ed eliminare la rete per inizializzare la password. |
| Durante la registrazione del prodotto, la password del router wireless in connessione non viene inserita correttamente. | ► Annullare la procedura di registrazione del prodotto, eseguire nuovamente la app SmartThings e riprovare la procedura di registrazione del prodotto.► Tenere premuto il router wireless al quale si desidera collegarsi nell'elenco dei dispositivi in rete ed eliminare la rete per inizializzare la password. |
| Viene quindi creato un collegamento tra la app SmartThings ed il POWERbot mediante la registrazione del prodotto. | ► Aggiornare lo schermo ed attendere.► Eseguire nuovamente la app SmartThings.► Verificare che non vi siano problemi di connessione alla rete Internet. In particolare, un firewall potrebbe interferire con il funzionamento regolare. |
Risoluzione dei problemi
| Sintomo Checklist | |
| Durante il normale funzionamento della app viene quindi creato un collegamento tra la app SmartThings ed il POWERbot. | ► Se il POWERbot è distante dal router wireless, possono verificarsi problemi di connessione.► Reimpostare il POWERbot e lo smartphone, e verificare nuovamente la connessione.► Se i problemi di irregolarità di connessione persistono, effettuare nuovamente la registrazione del prodotto.► Se la SSID/password del router wireless viene modificata, è necessario effettuare nuovamente la registrazione del prodotto. |
| Il controllo mediante la app SmartThings non è attivo in quanto la funzione di controllo remoto è disabilitata. | ► La funzione di controllo remoto è disabilitata. Verificare che la funzione di controllo remoto sia abilitata mediante un telecomando. |
Avvertenze sulla batteria
 Non rimuovere o tentare di rimuovere autonomamente la batteria inserita all'interno del prodotto. Per sostituire la batteria, contattare un tecnico qualificato o il Centro di assistenza autorizzato. Queste istruzioni sono state preparate ad uso esclusivo del tecnico o del centro assistenza. PER LA PROPRIA SICUREZZA, NON TENTARE DI RIMUOVERE LA BATTERIA AUTONOMAMENTE NÉ SMALTIRLA NEL FUOCO. NON DISASSEMBLARE, ROMPERE O FORARE LA BATTERIA.Come estrarre la batteria
Per smontare POWERbot, estrarlo dal caricatore / docking station. Per ragioni di sicurezza, spegnere POWERbot prima di disassemblarlo. natural_image
Hand using a pipette to apply material to a component on a device (no text or symbols visible)natural_image
Line drawing of a hand inserting a component into a device casing (no text or symbols)text_image
Diagram showing a device with labeled parts and an inset view of a hand interacting with a component, likely illustrating a mechanical or electrical assembly.Corretto smaltimento delle batterie di questo prodotto
(applicabile nei paesi dotati di sistemi di raccolta e restituzione delle batterie).
L'etichetta presente sulla batteria, sul manuale o sull'imballaggio indica che la batteria di questo prodotto non deve essere smaltita insieme ai rifiuti domestici. Laddove apposti, i simboli chimici Hg, Cd o Pb indicano che nella batteria vi è un contenuto di mercurio, cadmio o piombo superiore rispetto ai livelli di riferimento indicati nella Direttiva CE 2006/66. La batteria incorporata nel prodotto non è sostituibile dall'utente. Per informazioni sulla sostituzione, rivolgersi ad un Centro di assistenza autorizzato. Non tentare di rimuovere la batteria né di smaltirla nel fuoco. Non disassemblare, rompere o forare la batteria. Per smaltire il prodotto recarsi presso un centro di raccolta rifiuti dove verranno seguite le corrette procedure di riciclo e trattamento del prodotto, compresa la batteria.Dichiarazione Open Source
Il software incluso in questo prodotto contiene codice open source. E' possibile ottenere il codice sorgente corrispondente completo per un periodo di tre anni dall'ultima spedizione di questo prodotto inviando una email a mailto:oss.request@samsung.com. È inoltre possibile ottenere il codice sorgente corrispondente completo su un supporto fisico come un CD-ROM; in tal caso verrà addebitato un importo minimo. Il seguente URL http://opensource.samsung.com/opensource/VR7000\_A20\_TZ/seq/0 porta alla pagina di download del codice sorgente reso disponibile e alle informazioni di licenza open source relative al prodotto. Questa offerta è valida per chiunque riceva questa informazione. text_image
QR code image containing encoded data, no visible human-readable textSpecifiche
| Classificazione Articolo | Informazioni dettagliate | |||
| SR1*M701*** | SR1*M702***SR1*M703*** | |||
| Specifiche meccaniche (POWERbot) | Dimensioni (P x A x L) 340 mm x 97 mm x 348 mm | |||
| Peso 4 kg | ||||
| Sensore | Riconoscimento della forma del soffitto (Visionary mapping plus TM) | |||
| Tipo di tasti di POWERbot Tipo touch | ||||
| Specifiche di alimentazione | Tensione di corrente 100-240 V~, 50 Hz/60 Hz | |||
| Consumo elettrico 80 W | ||||
| Specifiche delle batterie 21,6 V/ 38,8 Wh | ||||
| Pulizia | Tipo di ricarica Ricarica automatica/Ricarica manuale | |||
| Modalità di pulizia | Auto, Spot, Giornaliero | Auto, Spot, Repeat, Manual, Una volta, Giornaliero | ||
| Tempo di ricarica Circa 240 minuti | ||||
| Durata pulizia(calcolata sulla base di pavimenti con superfici lisce) | Modalità Turbo Circa 30 minuti | |||
| Modalità Normal Circa 60 minuti | ||||
| Wi-Fi | Gamma frequenze 2412 - 2472 MHz | |||
| Potenza di trasmissione (Max) 20 dBm | ||||
| Classificazione Articolo Informazioni dettagliate | |||
| Specifiche meccaniche (POWERbot) | Dimensioni (P x A x L) 340 mm | x 97 mm x 348 mm | |
| Peso | 4,3 kg | ||
| Sensore | Riconoscimento della forma del soffitto (Visionary mapping plus TM) | ||
| Tipo di tasti di POWERbot Tipo touch | |||
| Specifiche di alimentazione | Tensione di corrente 100-240 V~, 50 Hz/60 Hz | ||
| Consumo elettrico | 130 W | ||
| Specifiche delle batterie 21,6 V/ | 77,8 Wh | ||
| Pulizia | Tipo di ricarica Ricarica automatica/Ricarica manuale | ||
| Modalità di pulizia | Auto, Spot, Repeat, Manual, Una volta, Giornaliero | ||
| Tempo di ricarica Circa 160 minuti | |||
| Durata pulizia(calcolata sulla base di pavimenti con superfici lisce) | Modalità Turbo Circa 30 minuti | ||
| Modalità Normal Circa 60 minuti | |||
| Modalità Quiet | Circa 90 minuti | ||
| Wi-Fi | Gamma frequenze 2412 - 2472 MHz | ||
| Potenza di trasmissione (Max) 20 dBm | |||