Camedia C-2100 Ultra Zoom - Fényképezőgép OLYMPUS - Ingyenes használati útmutató
Találja meg az eszköz kézikönyvét ingyenesen Camedia C-2100 Ultra Zoom OLYMPUS PDF formátumban.

Felhasználói kérdések a következőről Camedia C-2100 Ultra Zoom OLYMPUS
0 kérdés erről a készülékről. Válaszolj azokra, amiket ismersz, vagy tedd fel a sajátod.
Tegyél fel egy új kérdést erről a készülékről
Töltse le az útmutatót a következőhöz Fényképezőgép PDF formátumban ingyenesen! Találja meg kézikönyvét Camedia C-2100 Ultra Zoom - OLYMPUS és vegye vissza elektronikus eszközét a kezébe. Ezen az oldalon közzé van téve az eszköze használatához szükséges összes dokumentum. Camedia C-2100 Ultra Zoom márka OLYMPUS.
HASZNÁLATI ÚTMUTATÓ Camedia C-2100 Ultra Zoom OLYMPUS
CAMEDIA
DIGITAL CAMERA
C-2100 Ultra Zoom
INSTRUCTIONS
natural_image
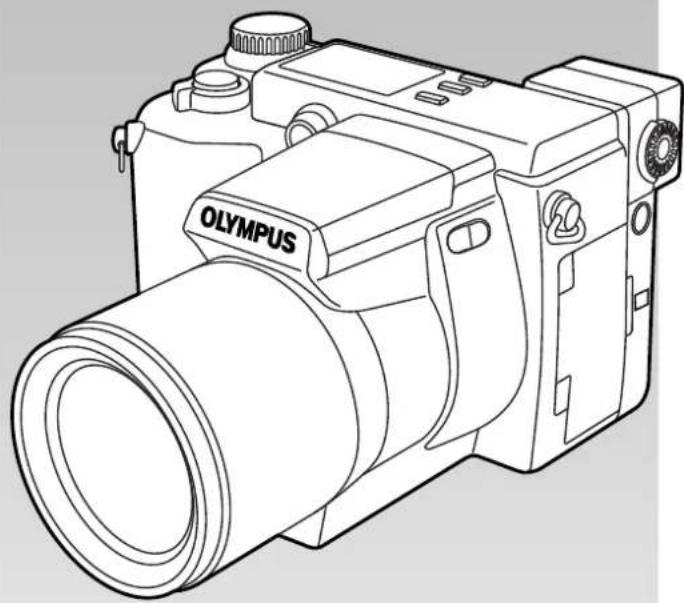
Line drawing of a Olympus DSLR camera with lens and control buttons (no text or symbols on body)OLYMPUS®
1 GETTING STARTED
2 BASIC FUNCTIONS
3 SHOOTING FOR SPECIAL SITUATIONS
4 USING YOUR CAMERA'S ADVANCED FUNCTIONS
5 ADVANCED RECORDING/
DISPLAY TECHNIQUES
6 PRINT SETTINGS
7 TRANSFERRING PICTURES TO A COMPUTER
8 MISCELLANEOUS
■Before using your camera, read this manual carefully to ensure correct use.
■We recommend that you take test shots to get accustomed to your camera before taking important photographs.
Thank you for purchasing an Olympus digital camera. Before you start to use your new camera, please read these instructions carefully to enjoy optimum performance and a longer service life. Keep this manual in a safe place for future reference.
Legal and other notices
- All contents of this publication are subject to change without notice.
- Although the contents of this publication have been carefully checked to avoid errors, some may still occur. If you have a question about any points, or find mistakes or omissions, please contact us.
- No part of this publication may be reproduced or reprinted except for personal use without prior written permission from Olympus.
- Olympus makes no representations or warranties regarding any damages, or benefit expected by using this unit lawfully, or any request from a third person, which are caused by the inappropriate use of this product.
- Olympus makes no representations or warranties regarding any damages or any benefit expected by using this unit lawfully which are caused by erasing picture data.
•Olympus reserves all rights to this manual.
Radio and Television Interference
Change or modifications not expressly approved by the manufacturer may void the user's authority to operate this equipment. This equipment has been tested and found to comply with the limits for a Class B digital device, pursuant to Part 15 of the FCC Rules. These limits are designed to provide reasonable protection against harmful interference in a residential installation. This equipment generates, uses, and can radiate radio frequency energy and, if not installed and used in accordance with the instructions, may cause harmful interference to radio communications.
However, there is no guarantee that interference will not occur in a particular installation. If this equipment does cause harmful interference to radio or television reception, which can be determined by turning the equipment off and on, the user is encouraged to try to correct the interference by one or more of the following measures:
- Adjust or relocate the receiving antenna.
- Increase the distance between the camera and receiver.
- Connect the equipment to an outlet on a circuit different from that to which the receiver is connected.
Only the RS-232C serial cable or USB cable should be used to connect the camera to a personal computer (PC).
Declaration of Conformity
Model Number: C-2100 Ultra Zoom
Trade Name: OLYMPUS
Responsible Party: Olympus America Inc.
Address: 2 Corporate Center Drive, Melville, New York 11747-3157 U.S.A.
Telephone Number: 631-844-5000
This device complies with Part 15 of the FCC rules. Operation is subject to the following two conditions:
(1) This device may not cause harmful interference, and
(2) This device must accept any interference received, including interference that may cause undesired operation.
This Class B digital apparatus meets all requirements of the Canadian Interference-Causing Equipment Regulations.
Trademarks
Windows® is a registered trademark of Microsoft Corporation.
Macintosh™ is a trademark of Apple Computer Inc.
All other brand names and product names are trademarks of their respective owners.
The standards for camera file systems referred to in this manual are the "Design Rule for Camera File System/DCF" standards stipulated by the Japan Electronics Industry Development Association (JEIDA).
Legal and other notices....2
Radio and television interference ....2
Trademarks ....3
Important safety instructions....11
Handling batteries 14
Handling the Camera 17
Camera care and storage 18
Selecting batteries for your camera 19
LCD display and backlight 20
Main features ......21
Package contents....23
Names of parts....25
Camera 25
Control panel indications 27
Viewfinder/Monitor indications
(Picture information) 28
1 GETTING STARTED 31
Attaching the strap....32
Loading the batteries ....33
Service life of NiMH battery 36
Using the AC power adapter (Optional) 37
Inserting and ejecting SmartMedia 39
Insert the SmartMedia card 40
Ejecting the SmartMedia card 41
Formatting new SmartMedia cards......42
Preparing the card for writing data -
Formatting 42
Setting the mode dial ....44
How to use the menu....45
Record mode menu list....48
Still picture record menu 48
MOVIE picture record menu 50
Display mode menu list....52
Display menu 52
Setting the date and time....54
How to use this instruction manual ....56
2 BASIC FUNCTIONS 57
Turn the power on....58
Confirming the displays 60
Checking the batteries 60
Checking the card 61
Checking the number of storable pictures left 62
Number of storable pictures left 63
Adjusting the diopter....64
How to use the viewfinder/monitor 📄 ......65
Holding the camera....66
Taking pictures....67
Proper shutter release 67
Taking a still picture 68
Recording movies 70
Zoom....71
Using the flash - Auto flash 72
Confirming recorded pictures - Quick view .....73
Displaying still pictures 73
Displaying movies 74
Displaying on TV....76
Erasing Images 77
Single frame erasure 77
All-frame erasure 78
Protection 79
Turning off the power 80
3 SHOOTING FOR SPECIAL SITUATIONS 81
Taking pictures under different conditions .....82
Taking portrait pictures 82
Taking pictures of moving subjects 82
Taking pictures focusing on both subject and
the background 83
Taking close-up pictures 83
Taking night scenes 84
Taking a picture of a moving object at night 85
Using the scene program (S-Prg) mode......86
Aperture priority mode 87
Shutter priority mode....88
Manual mode 89
Macro mode 90
4 USING YOUR CAMERA'S ADVANCED FUNCTIONS 91
Recording - range/focus 92
Subjects that are difficult to focus on 92
Focus lock 93
Setting the focus manually –
Manual focus MF 94
Focusing instantly - FULL TIME AF F-AF 95
Selecting the focus range - AF MODE 96
Compensating for image blur –
Stabilization system (97)
Using the 27X zoom - DIGITAL ZOOM 98
Recording - brightness/exposure .....99
Compensating for lighting conditions -
Exposure compensation 99
Selecting the area of the brightness for
metering - Metering mode ESP 100
Changing ISO ISO 101
Recording images sequentially with different
exposures – Auto bracket DRIVE BKT 102
Recording - color/image quality......104
Setting the record mode TIFF SHQ HQ SQ 104
Recording - using the flash....106
Flash mode 106
Red-eye reduction flash Ⓞ,
Fill-in flash (forced activation) ↓,
Off (flash override) 107
Correcting the amount of light produced by
the flash - Flash intensity control 109
Selecting the flash light emission timing
- Slow synchronization flash mode ↘ SLOW 110
Using an external flash 112
Taking pictures using both the main
flash and the FL-40 external flash 112
Taking pictures using the FL-40
external flash by itself 114
Taking pictures with commercially available
external flashes 115
Usable commercially available external
flashes 116
Recording - others 117
Taking pictures in sequence
- Sequential mode DRIVE 117
Sequential shooting/
AF sequential shooting ☐ AF☐ 118
Using the self-timer 119
Taking pictures using the remote control 120
Recording sound when taking a picture -
sound record 122
Display - checking recorded pictures ......124
Displaying a single image -
single image display 124
Displaying multiple pictures at one time -
index display 125
Close-up display 126
Slide-show 127
5 ADVANCED RECORDING/DISPLAY TECHNIQUES
129
Recording - brightness/exposure ....130
Locking the exposure \~ AE lock AEL 130
Metering the average brightness \~ Multi-Metering 132
Recording - color/image quality......134
Adjusting the color \~ White Balance 134
Recording - others 135
Taking panorama pictures \~ Function Card 135
Special Effects \~ Function Shooting 137
Display - checking pictures after shooting .....138
Rotating and checking vertically oriented pictures 138
Display - processing pictures......139
Add sound memo to still pictures 139
Processing movies \~ Function Display 140
Making an index 140
Movie editing 142
Function settings for easier camera operation - Mode setup....144
Mode setting menu table 144
How to use the mode setting menu screen 145
Resetting the camera's settings when turning it off - All reset....148
Resetting the camera's settings when turning it on - All reset - Custom 150
Still image sharpness \~ 📄 152
Setting picture size for TIFF recording \~ TIFF......153
Picture size and quality in SQ mode/ Setting the picture quality \~ SQ....154
Change the camera warning sound volume \~ ■) ...156
Setting the focus illumination \~ AF illuminator ....157
Displaying the image during recording \~ Rec view....158
Setting the times for power saving mode \~ Sleep ....159
Selecting the file numbering system \~ File name....160
About the file No. and folder No 160
The file No. and folder No. in each mode 160
Adjusting the brightness of the monitor \~ .....163
Selecting meters or feet as a measurement unit \~ m/ft....164
Setting the number of pictures to display in the index \~ ☐ 165
6 PRINT SETTINGS 167
About print settings....168
Printing all frames stored in a card \~ All-frame print reserve....170
Printing selected frames \~ Single-frame print reserve....172
Printing an enlarged part of a picture \~ Trimming print reserve......175
Resetting print reserve 178
7 TRANSFERRING PICTURES TO A COMPUTER 179
Methods of saving pictures on a computer .....180
Saving with the camera connected to a computer 180 Saving directly from a card 181
Connecting directly to a computer by cable .....182
Cable connection 182
Computer Operating environment 183
Connecting to your personal computer 185
Saving pictures using CAMEDIA Master 188
CAMEDIA Master features....190
Making dark images bright 190
Correcting blurry images 190
Composing images with templates 191
8 MISCELLANEOUS
193
Troubleshooting 194
Operating problems 194
Problems with images 198
User maintenance 201
After use 201
Cleaning the camera 201
Connectable devices \~ System chart .....202
Error codes....203
Optional items 205
Compatibility of the picture data 205
Specification 206
Index 209

CAUTION
RISK OF ELECTRIC SHOCK DO NOT OPEN

CAUTION: TO REDUCE THE RISK OF ELECTRICAL SHOCK, DO NOT REMOVE COVER (OR BACK). NO USER-SERVICEABLE PARTS INSIDE. REFER SERVICING TO QUALIFIED OLYMPUS SERVICE PERSONNEL.

A lightning flash with an arrowhead, enclosed in a triangle, alerts you to the presence of uninsulated voltage points inside the product which could cause a serious electrical shock.

An exclamation point enclosed in a triangle alerts you to important operating and maintenance instructions in the documentation provided with the product.
WARNING!
TO AVOID THE RISK OF FIRE OR ELECTRICAL SHOCK, NEVER EXPOSE THIS PRODUCT TO WATER OR OPERATE IN A HIGH HUMIDITY ENVIRONMENT.
Important safety instructions (cont.)
1 Read All Instructions — Before you use the product, read all operating instructions.
2 Save These Instructions — Save all safety and operating instructions for future reference.
3 Heed Warnings — Read carefully and follow all warning labels on the product and all warnings described in the instructions.
4 Follow Instructions — Follow all instructions provided with this product.
5 Cleaning — Always unplug this product from the wall outlet before cleaning. Use only a damp cloth for cleaning. Never use any type of liquid or aerosol cleaner, or any type of organic solvent to clean this product.
6 Attachments — For your safety, and to avoid damaging the product, use only accessories recommended by Olympus.
7 Water and Moisture — Never use this product around water (near a bathtub, kitchen sink, laundry tub, wet basement, or swimming pool).
8 Location — To avoid damage to the product and to avoid personal injury, never place this product on an unstable stand, tripod, bracket, table or cart. Mount only on a stable tripod, stand, or bracket. Follow the instructions which describe how to safely mount the product, and use only the mounting devices recommended by the manufacturer.
9 Power Sources — Connect this product only to the power source described on the product label. If you are not sure about the type of power supply in your home, consult your local power company. Refer to your operating instructions for information on using the product with batteries.
10 Grounding, Polarization — If this product can be used with an optional AC adapter, the adapter may be equipped with a polarized alternating current line plug, a plug with one blade wider than the other. This safety feature allows the plug to fit into the power outlet only one way. If you cannot insert the plug into the wall outlet, pull it out, reverse it, and then insert it again. If the plug still fails to fit, contact an electrician and have the receptacle replaced.
11 Protecting the Power Cord — The power supply cord should be routed so it will not be walked on. Never place a heavy object on the power cord and never wrap the power cord around the leg of a table or chair. Keep the areas around the power cord connection points, at the power outlet and at the product connection, free of all obstacles.
12 Lightning — If a lightning storm occurs while using the optional AC adapter, unplug the adapter power cord from the wall outlet immediately. To avoid damage from unexpected power surges, always unplug the AC adapter from the power outlet and disconnect it from the camera when the camera is not in use.
13 Overloading — Never overload wall outlets, extension cords, power strips, or other power connection points with too many plugs.
14 Foreign Objects, Spillage — To avoid personal injury from fire or electrical shock from contact with internal high voltage points, never insert a metal object into the product. Avoid using the product where there is a danger of spillage.
15 Servicing — Refer all servicing to qualified personnel. Attempting to remove the covers or disassemble the product, could expose you to dangerous high voltage points.
16 Damage Requiring Service — While using the optional AC adapter, if you notice any of the conditions described below, unplug the AC adapter from the wall outlet and refer servicing to qualified service personnel:
a) If liquid has been spilled, or any object has fallen into the product.
b) If the product has been exposed to water.
c) If the product does not operate normally while following operating instructions. Adjust only the controls described in the operating instructions as improper adjustment of other controls could damage the product, requiring extensive repair work by a qualified technician to restore the product to normal operation.
d) If the product has been dropped or damaged in any way.
e) If the product exhibits a distinct change in performance, this indicates a need for servicing.
17 Replacement Parts — When replacement parts are required, make sure that the service center uses only parts recommended by the manufacturer to ensure that the replacement parts have the same characteristics as the originals. Unauthorized substitution of parts could cause a fire, electrical shock, or create other hazards.
18 Safety Check — Upon completion of servicing or repairs, ask the service technician to perform safety checks to determine that the product is in good working condition.
19 Heat — Never use or store this product near a heat source such as a radiator, heat register, stove, or any type of equipment or appliance which generates heat, including stereo amplifiers.
WARNING!
- Keep batteries away from children.
- If a child swallows a battery, seek medical attention immediately.
- Dispose of lithium batteries promptly and safely in compliance with local laws regarding the disposal of such items.
- To avoid causing a fire or minor burns, always handle lithium batteries carefully.
- Never attempt to charge the lithium battery, disassemble it, heat it above 212^ (100°C) or incinerate it.
• To ensure good contact, wipe the battery with a clean, dry cloth before use. - To avoid short circuiting the +/- sides of the battery, never handle a lithium battery with a metal tool, tweezers, etc.

Danger: If the product is used without observing the information given under this symbol, serious injury or death may result.

Warning: If the product is used without observing the information given under this symbol, injury or death may result.

Caution: If the product is used without observing the information given under this symbol, minor personal injury, damage to the equipment, or the loss of valuable data may result.
Handling Batteries
Follow these important guidelines to prevent the batteries from leaking, overheating, burning, exploding, or causing electrical shock or burns.

DANGER
1 When using NiMH batteries, use only Olympus brand NiMH batteries and charger.
2 Never load batteries with their +/- terminals reversed. Never force batteries into the battery compartment.
3 To prevent causing battery leaks or damaging their terminals, carefully follow all instructions regarding the use of batteries. Never attempt to disassemble a battery or modify it in any way, with soldering, etc.
4 Take precautions when carrying or storing batteries to prevent them from coming into contact with any metal objects like jewelry, pins, fasteners, etc.
5 Never heat batteries or incinerate them.
6 Never attempt to connect a battery directly to a power outlet, or to a cigarette lighter in a vehicle.
7 If battery fluid gets into your eyes, flush your eyes immediately with clear, cold running water and seek medical attention immediately.

WARNING
1 Keep batteries dry at all times. Never allow them to come into contact with fresh water or salt water.
2 To prevent batteries from leaking, overheating, or causing a fire or explosion:
- Use only batteries recommended for use with this product.
- Never heat batteries, incinerate them, or attempt to disassemble them.
- Never mix batteries (old and new batteries, charged and uncharged batteries, batteries of different manufacture or capacity, etc.).
- Never attempt to charge alkaline or lithium batteries.
- Load batteries carefully as described in the operating instructions. Never reverse their polarity when loading.
- Do not use batteries if their body is not covered by the insulating sheet or if the sheet is torn as it may cause fluid leak, fire, or injury. Do not use these batteries even if they are sold in stores.
3 If NiMH batteries are not charged within the specified time, stop charging them and do not use them.
4 Before loading, always inspect batteries carefully for leaks, discoloration, warping, or any other abnormality.
5 Always store batteries out of the reach of small children. If a child accidentally swallows a battery, seek medical attention immediately.
6 If a battery leaks fluid onto your clothing or skin, remove the clothing and flush the affected area with clean, running cold water immediately. If the fluid burns your skin, seek medical attention immediately.
7 Never attempt to modify the battery compartment on the camera, never insert anything (other than the recommended battery) into the battery compartment.

CAUTION
1 Olympus NiMH batteries are intended for use only with Olympus digital cameras. Never use these batteries with any other device.
2 Never subject batteries to strong shocks or continuous vibration.
3 Never mix batteries (old and new batteries, charged and uncharged batteries, batteries of different manufacture or capacity, etc.).
4 Always charge sets of batteries (2 or 4) together.
5 Always charge NiMH batteries before using them for the first time, or if they have not been used for a long period.
6 While the camera is not in use, always remove the batteries to prevent accidental leakage which could damage the battery compartment.
7 If a battery leaks, becomes discolored or deformed, or in any other way becomes abnormal during operation, stop using the camera and consult your dealer or an authorized Olympus service center. Continued use may result in fire or electric shock.
8 Never store batteries where they will be exposed to direct sunlight, or subjected to high temperatures in a hot vehicle, near a heat source, etc.
9 Batteries may become hot during prolonged use. To avoid minor burns, never remove them immediately after using the camera.
Handling the Camera

WARNING
1 Use caution when taking flash pictures at close range. When you fire the flash, you must be at least 3 ft. away from the faces of your subjects, especially when taking pictures of infants and small children. Firing the flash too close to the subject's eyes could cause a momentary loss of vision.
2 To avoid damaging your eyes, never aim the camera directly into the sun, or any other extremely bright light source.
3 To avoid causing a fire or explosion, never use the camera near flammable or explosive gases.
4 Always use and store the camera out of the reach of young children and infants to prevent the following dangerous situations which could cause serious injury:
- Becoming entangled in the camera strap, causing strangulation.
• Accidentally swallowing a battery or small part. - Accidentally firing the flash into their own eyes or into the eyes of another child.
5 To avoid the hazards of fire or electrical shock, store the camera in a cool, dry location where it will not be subjected to high humidity or dust.
6 To avoid minor burns, never cover the flash with your hand when it is fired. Never touch the flash unit after continuous use. The flash unit becomes very hot during continuous operation.
7 If the camera is accidentally dropped in water, or if liquid is spilled into the camera, stop using the camera, allow the camera to dry, and then remove the batteries. Contact the nearest Olympus authorized service center.

CAUTION
1 During operation of the camera, if you notice any unusual odors, noise, or smoke around the camera, immediately switch the camera off, disconnect the optional AC adapter (if it is connected), and allow the camera to sit idle for a few minutes to allow it time to cool. Take the camera outdoors, away from flammable objects, and carefully remove the batteries to avoid burning your hands. Contact the nearest Olympus service center immediately.
2 Never attempt to disassemble the camera. The internal circuits contain high voltage points which could cause serious burns or electrical shock.
3 To avoid dangerous electrical shock, never hold or operate the camera with wet hands.
4 To avoid damaging the camera or causing a fire, never expose the camera to excessive heat.

CAUTION
Camera Care and Storage
- Never store or use the camera for long periods in locations subject to direct sunlight, high humidity, extreme variation in temperature, or strong shocks and constant vibration. Protect the camera at all times from dust and sand.
- Never store the camera near any type of appliance or equipment which generates high temperatures, low temperatures, high or low humidity, or a strong magnetic field. Never use the camera in a factory or laboratory where flammable gases are present.
- Never shake the camera or subject it to shock or strong vibration.
- To avoid damaging its precision lens, never leave the camera pointing directly into the sun.
- Before storing the camera for a long period, remove the batteries. Select a cool, dry location for storage to prevent condensation or mold from forming inside the camera. After storage, test the camera by pressing the shutter release button to make sure that it is operating normally.
- When the camera is mounted on a tripod, adjust the tripod head to re-position the camera; do not twist the camera.
- Never touch the flash after it has been fired. Avoid using the flash for extended periods. Allow it to cool occasionally between shots.
- To avoid injury from electrical shock, never attempt to disassemble or modify the camera in any way.

CAUTION
Selecting Batteries for Your Camera
- This camera can use four AA NiMH batteries, four AA Alkaline batteries, four AA lithium batteries, four AA NiCd batteries, or two CR-V3 lithium battery packs. Use of Olympus brand batteries is strongly recommended.
- Alkaline battery performance is limited, especially at low temperatures. Using NiMH batteries is recommended.
• AA manganese batteries cannot be used with this camera.
• Always follow the battery recommendations and loading instructions. Incorrectly loading the batteries could cause the batteries to leak or overheating.
- When using the camera on battery power at low temperatures, try to keep the camera and extra batteries as warm as possible. Batteries which run down at low temperatures may be restored after they are warmed at ambient temperature.
- Perspiration or oil from your hands on the battery contacts could prevent them from operating. Before loading batteries, wipe the terminals with a dry, clean cloth.
- Before going on a long trip, especially before traveling abroad, purchase an ample supply of extra batteries. The recommended batteries may be difficult to obtain while traveling.
• Always recharge NiMH or NiCd batteries with a charger recommended for use with these batteries
- Before using NiMH or NiCd batteries, always read the instructions provided with purchase of these batteries.
- To avoid personal injury or damage to the camera, always inspect batteries before loading. If you notice leaking, damage to the battery cover or insulation, discoloration, warping or any other abnormality do not use the batteries.
- Recommended temperature ranges for NiMH batteries:
Operation.... 32° \~ 104°F
Charge.... 32° \~ 104°F
Storage....-4° \~ 86°F
- Using, charging, or storing the batteries outside these ranges could shorten battery life or affect battery performance. Always unload the batteries from the camera before storing the camera and batteries for a long period.
Important safety instructions (cont.)
NOTES
LCD Display and Backlight
- Do not point the viewfinder towards strong light like the sun, as this may damage interior of the viewfinder.
- The backlight built into the monitor and control panel has a limited service life. When the monitor gets dark and jittery, consult your nearest Olympus dealer.
- In places subject to low temperatures, the backlight may take a long time to turn on or its color may change temporarily. When using the camera in extremely cold places, it is a good idea to occasionally place it in warm place. A backlight exhibiting poor performance due to low temperatures will recover in normal temperatures.
- Do not push the monitor forcibly; otherwise the image may become vague, resulting in a Display mode failure or damage to the monitor.
- When a subject is viewed diagonally in the camera, the edges may appear zigzagged on the monitor. This is not a malfunction; It will be less noticeable in Display mode.
- A strip of light may appear on the top/bottom of the monitor, but this is not a malfunction.
- The LCD display is made with high-precision technology. However, black spots or bright spots of light may appear constantly on the LCD display. Due to its characteristics or the angle at which you are viewing the monitor, the spot may not be uniform in color and brightness. This is not a malfunction.
■ 2,110,000-pixel CCD that delivers high picture quality.
■ 10X optical zoom lens with a stabilizer function plus 2.7X Digital Zoom to make possible photographs equivalent to 27X zoom. (P. 71/98)
■ Various exposure modes for advanced shooting. (P. 44)
■ Multi-metering which calculates the appropriate exposure based on brightness metering at multiple points. (P. 132)
Sequential shooting at high shutter speeds (max. 2 frames/second) in all modes except TIFF.*
■ Movie function that lets you record up to approx. 93 seconds in the SQ mode and approx. 23 seconds in the HQ mode when an 8MB card is used. (P. 63/70)
■ Electric viewfinder that enables information display in the Record mode. (P. 28/29)
■ Simultaneous recording of sound with movies, and sound recording with still pictures, either when they are shot or afterward.** (P. 122/139)
■ Wide-angle TFT LCD monitor.
■ Removable SmartMedia (SSFDC) memory card (with Panorama function). (P. 135)
■ A/V OUT jack provided for viewing pictures on a TV. (P. 76)
■ The optional FL-40 external flash can be used to take sophisticated flash photographs. (P. 112)
■ Support for lithium battery packs for longer battery life in addition to AA NiMH batteries.
* Recording mode: SQ NORMAL
**Sound cannot be played back by this camera. Connect it to a TV or personal computer for sound playback.
Camera

natural_image
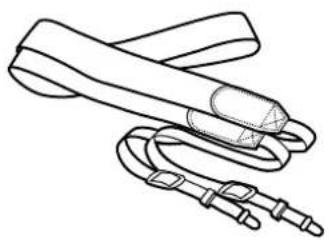
Line drawing of a Olympus DSLR camera with no visible text or symbols on the bodyStrap
natural_image
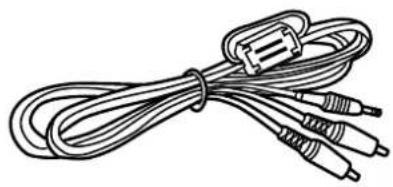
Line drawing of a medical or surgical device with coiled tubing and a central connector (no text or symbols)A/V cable
natural_image
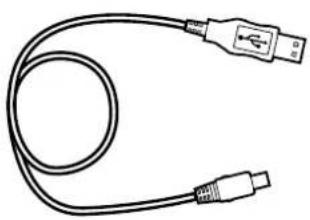
Coiled cable with three connectors and a connector clip (no text or symbols visible)USB cable
natural_image
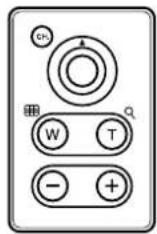
Line drawing of a USB cable with two connectors (no text or symbols)Remote control
Lens cap

Warranty card/Registration card

natural_image
Two overlapping rectangular shapes with a horizontal line inside, no text or symbols present.Instructions/Quick Start Guide

natural_image
Stack of three blank rectangular documents or folders, no text or symbols visibleRemote control instructions

Software CD's

natural_image
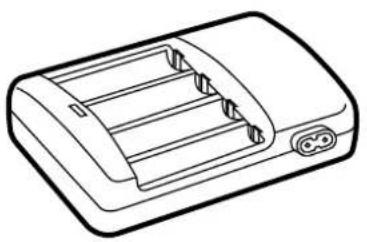
Simple diagram of two concentric circles with a central dot, no text or symbols present.Battery charger
natural_image
Line drawing of a battery pack with three compartments and a terminal outlet (no text or symbols)Instructions

text_image
Simple line drawing of a document with three horizontal lines, resembling a simplified text page or paper.AA NiMH batteries (4 pieces)

natural_image
Line drawing of three cylindrical batteries (no text or symbols)Power plug

natural_image
Line drawing of a U-shaped electrical plug with two terminal leads (no text or symbols)SmartMedia (SSFDC-8MB)
natural_image
Simple line drawing of a rectangular electronic device with a central screen and circular button (no text or symbols)Write-protect adhesive seals (4 pieces)

Static-free case

natural_image
Simple line drawing of a rectangular object with a curved indentation on top (no text or symbols)Instructions

natural_image
Simple line drawing of a document with three horizontal lines, no text or symbols present.Index labels (2 pieces)

text_image
SmartMedia SmartMedia OLYMPUS SmartMediaCamera
text_image
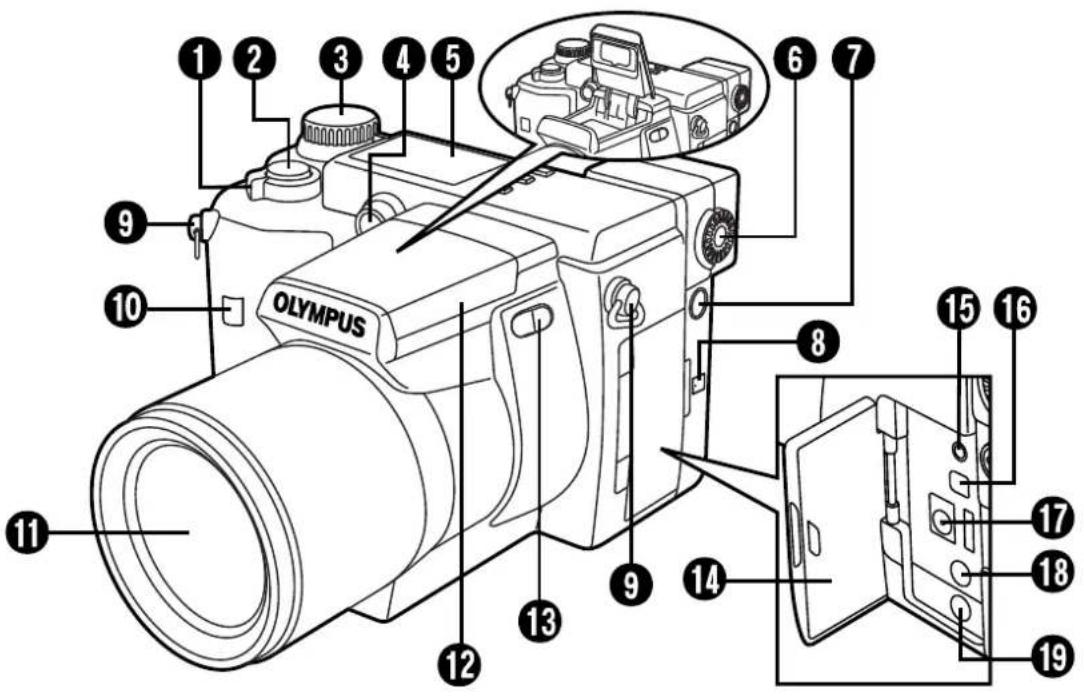
1 2 3 4 5 6 7 9 10 OLYMPUS 8 15 16 17 18 19 11 12 13 14 9① Zoom lever (T/W) (P. 71)/Index-display lever (T/W) (P. 125)
② Shutter button (P. 67)
③ Mode dial (P. 44)
4 Self-timer lamp/AF assist lamp (P. 68/119/121/157)
⑤ Control panel (P. 27)
⑥ Diopter adjustment dial (P. 64)
⑦ 5-pin external flash socket (P. 112)
8 Microphone (P. 123)
⑨ Strap eyelet (P. 32)
⑩ Remote control receiver (P. 121)
⑪ Lens
12 Flash (built-in) (P. 72/106–116)
13 Flash switch (P. 72/108/113)
14 Connector cover (P. 76/123/187)
15 Serial connector (RS-232C) (P. 182–187)
16 USB connector (P. 182–187)
⑰ DC-IN jack (P. 37)
18 External microphone jack (P. 123)
19 A/V OUT jack (P. 76)
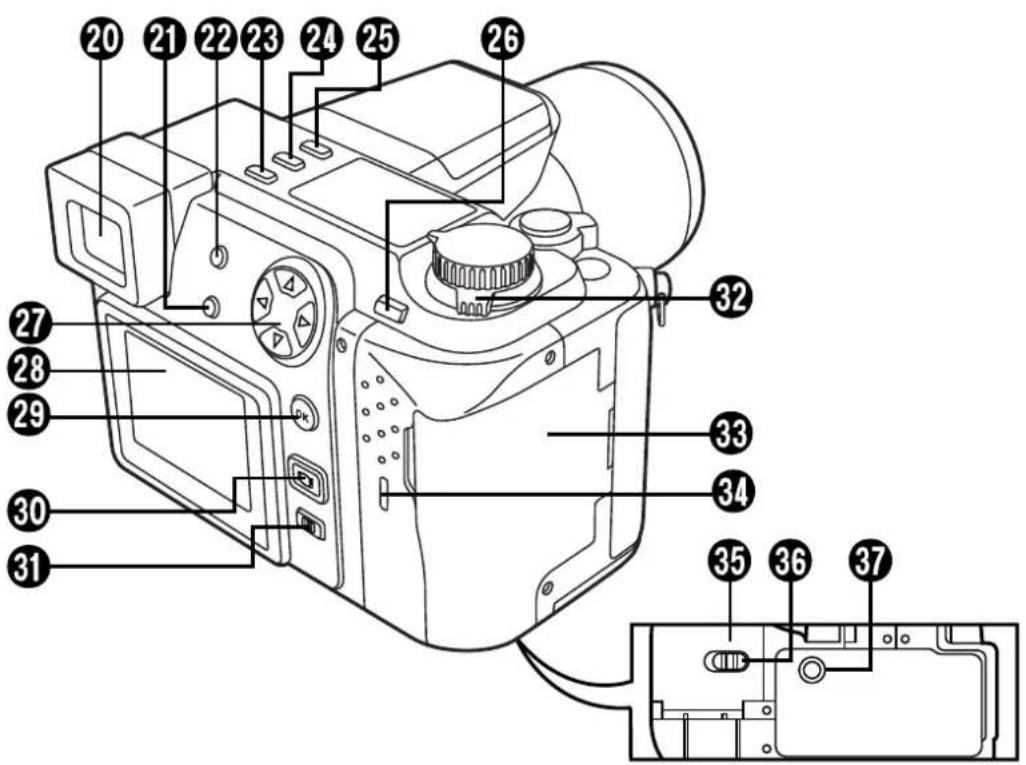
text_image
Labeled diagram of a digital camera with numbered parts for identification and assembly reference.20 Viewfinder (P. 28/29/65)
21 INFO button (P. 28)
22 Flash mode button (⚡) (P. 106/108)/Erase button (omin) (P. 77/78)
23 DRIVE button (P. 102/117/118/ 138)
- Returns vertically-oriented pictures rotated using the Macro button or Metering mode button to their original position during display mode.
24 Metering mode button ( [●] ) (P. 132/138)
- Rotates the vertically-oriented pictures 90° counterclockwise during display mode.
25 Macro button ( 🍴 ) (P. 90/138)
- Rotates the vertically-oriented pictures 90° clockwise during display mode.
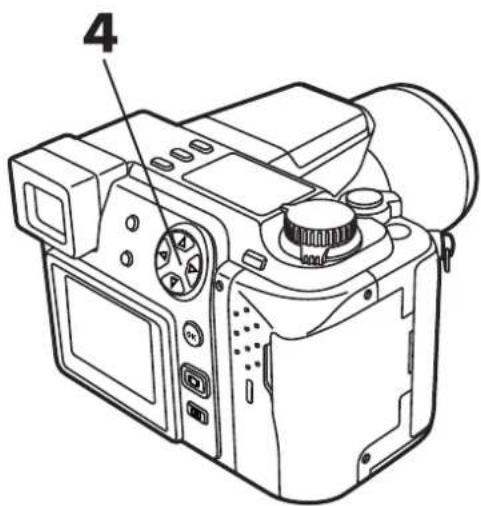
26 AE lock button (AEL)(P.130)/Multi-metering button (P.133)/Print button(☐)(P.168–178)
27 Arrow pad (P. 45–47)
28 Monitor (P. 28/29/65)
29 OK button (P. 47)/Manual focus button (MF) (P. 94)/Protect button (☐) (P. 79)
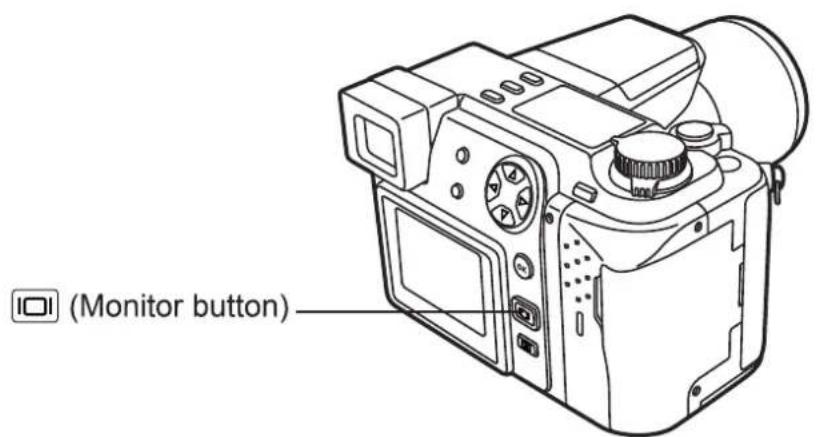
30 Monitor button (☐) (P. 65)
31 Menu button (☐) (P. 45)
32 Power switch (POWER OFF/ON/RESET) (P. 58)
33 Card cover (P. 40)
34 Card access lamp (P. 67)
35 Battery compartment cover (P. 33/34)
36 Battery compartment lock (P. 32/34)
37 Tripod socket (P. 112)
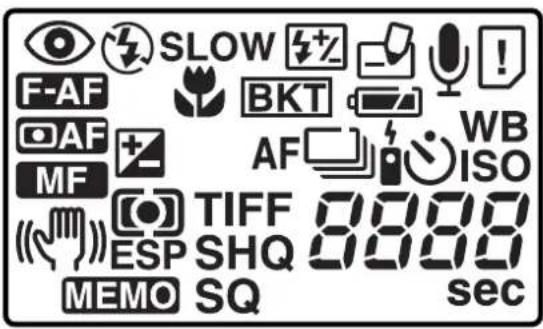
Control panel indications
text_image
SLOW BKT AF TIFF 8000 ESP SHQ 8000 MEMO SQ sec| Flash mode (P. 106) | AF | Sequential shooting(P. 118) | |
| SLOW | Slow shutter synchronization flash(P. 110) | Exposure compensation(P. 99) | |
| Flash intensity control(P. 109) | CAF | AF system (P. 96) | |
| MF | Manual focus (P. 94) | ||
| Card writing (P. 67) | Stabilization system(P. 97) | ||
| Sound record (P. 112) | |||
| Card error (P. 61/203) | ESP | Metering mode (P. 100) | |
| Battery check (P. 60) | MEMO | AE memory (P. 130) | |
| BKT | Auto bracket (P. 103) | TIFFSHQSQ | Record mode (P. 104) |
| Macro mode (P. 90) | |||
| F-AF | Full-time AF (P. 95) | 8888 | Number of storable still pictures (P. 63) |
| WB | White balance (P. 134) | sec | Seconds remaining in Movie mode (P. 63) |
| ISO | ISO (P. 101) | ||
| Self-timer/Remote control(P. 119/120) |
Viewfinder/Monitor indications (Picture information)
Press the Monitor button (☐) to select whether images appear on the Monitor or in the viewfinder. Press the INFO button to select how much information is displayed (P.26). The following 3 types of display are available.
Record mode
Only the AF target mark: Warnings (AF confirmation mark and battery check) appear when required. Settings that are changed are displayed for approx. 2 seconds.
Partial information: When using the camera, these indications are displayed for approx. 2 seconds.
Full information: These indications are displayed constantly in the Record mode.

natural_image
Illustration of a sitting dog with no text or symbols present
text_image
① ② ○ P F2.8 1/800 +2.0 ③ ④ ⑤ ⑥ ⑦ ⑧ [ ] ⑨ 17 10
text_image
P F2.8 1/800 +2.0 SLOW1 ISO100 SQ① Flash stand-by/Jitter warning/flash charge (P. 72/108)
② AF confirmation mark (P. 68)
③ Shooting mode (P. 44)
④ Battery check (displayed after the camera is turned on and when warnings appear) (P. 60)
⑤ Aperture value (P. 87/89)
⑥ Shutter speed (P. 88)
⑦ Exposure compensation/Exposure differential (P. 99)
8 AF target mark (P. 67/68)
9 Memory gauge (P. 69)
⑩ Number of storable pictures
11 Drive mode (P. 102/117–120)
⑫ Metering mode (P. 100)
13 Macro mode (P. 90)
14 White balance (P. 134)
⑮ ISO (P. 101)
16 Record mode (P. 104)
⑰ Flash mode (P. 106)
18 Slow shutter synchronization flash (not displayed when the flash is in the flash override mode) (P. 111)
19 Stabilization system (P. 97)
Display mode
No information: Only battery check and 📋 are displayed.
Partial information: These indications disappear after a certain amount of time has elapsed.
Full information: All indications are displayed all the time while in the Display mode.
Still picture
text_image
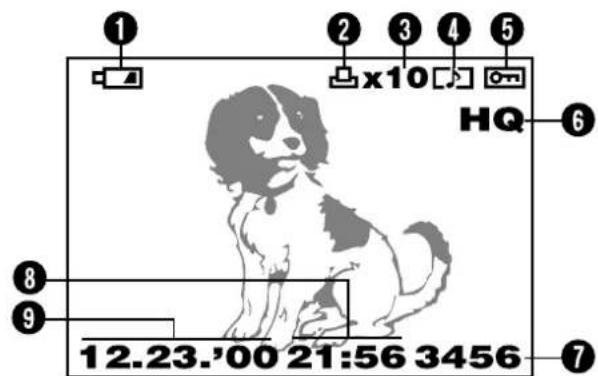
1 2 3 4 5 x10 HQ 6 8 9 12.23.'00 21:56 3456 7Partial information
Movie picture

text_image
① ⑩ ④ ⑤ HQ ⑥ 3456 ⑦Partial information

text_image
9 12 13 x10 HQ SIZE: 1600x1200 F2.8 1/800 +2.0 ISO400 12.23:00 21:56 FILE:123-3456Full information

text_image
HQ SIZE: 320x240 FILE: 123-3456Full information
① Battery check (P. 60)
② Print reserve (P. 169/170)
③ Number of prints (P. 173)
④ Sound record (P. 139)
⑤ Protect (P. 79)
6 Record mode
⑦ Frame number
8 Time
9 Date
10 Movie picture (P. 75)
Note:
⑪ Number of pixels
⑫ Aperture value
⑬ Shutter speed
14 Exposure compensation
15 White balance
16 ISO
17 File number (In the Movie picture display mode, the total recording time is displayed.)
The indications that appear on a movie picture that has been selected and displayed from the thumbnail display are different from those that appear when the movie picture is displayed using the Movie play function. (P. 75)

1
GETTING STARTED
This chapter outlines all of the things you need to do before you start using your camera such as loading batteries and inserting SmartMedia. It also explains how to use the Mode dial and the Menus.
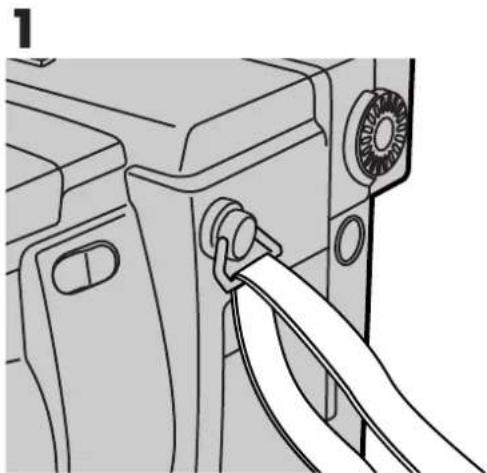
1 Thread the strap through the strap eyelet.
natural_image
Line drawing of a mechanical component with a cable inserted, showing no text or symbols2 Thread the strap through the stopper as the arrows in the illustration show, then pull on it to make sure it is securely fastened to the stopper.

text_image
2 StopperCamera strap eyelet
3 Attach the strap to the strap eyelet on the other side of camera, following steps 1 and 2 as explained above.
Note:
- Be careful with the strap when you carry the camera, as it can easily catch on stray objects, causing serious damage.
- Attach the strap correctly as shown so that the camera does not fall off. If the strap is attached incorrectly and the camera falls off, Olympus is not responsible for any damages.
This camera uses 4 AA NiMH batteries or 2 CR-V3 lithium battery packs, NiCd batteries, alkaline batteries or lithium batteries.
Important:
Do not peel the label on a CR-V3 lithium battery pack. If an insulating sheet covers the terminals, peel it off ONLY from the terminals.
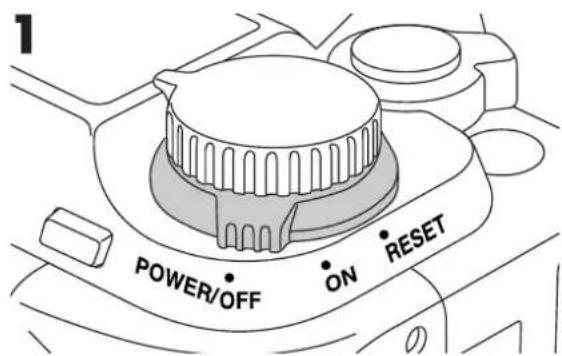
1 Make sure that the camera power switch is in the off position.
2 Slide the battery compartment lock on the battery compartment cover in the direction of ➤.
3 Slide the battery compartment cover in the direction of the arrow printed on it (the direction of the lens) with your fingertip.
- Attempting to slide the cover using a fingernail could result in injury.
4 Open the battery compartment cover.
text_image
POWER/OFF ON RESET
text_image
2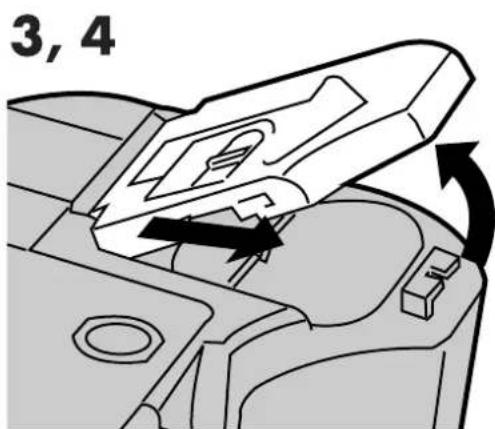
text_image
3, 45 Insert the batteries.
- When using AA batteries
Insert the batteries with their poles oriented in the direction shown in the illustration.
- When using lithium battery packs
Insert the batteries in the direction shown in the illustration. Do not insert them in any other direction.

natural_image
Technical diagram of a mechanical assembly with four circular components and mounting holes (no text or labels)When using AA batteries

text_image
Technical diagram showing mechanical assembly with labeled components and directional arrows indicating flow or movementWhen using lithium battery packs
6 Close the battery compartment cover, then press it down and slide it in the opposite direction of the arrow printed on it.
- When pressing the battery compartment cover shut, be sure to press the center of the cover, as it may be difficult to close properly by pressing the edge.
- Make sure the cover is completely closed.

natural_image
Mechanical component diagram showing a lever mechanism with arrows indicating motion (no text or symbols)
natural_image
Technical diagram of a mechanical component with internal components and directional arrow (no text or symbols)7 Slide the battery compartment lock on the battery compartment cover in the direction of ⊙.
Note:
- CR-V3 lithium battery packs cannot be charged.
- Alkaline batteries have a lot of variation in their performance and deteriorate particularly at low temperatures. It is recommended that lithium battery packs or NiMH batteries be used.
- Manganese batteries cannot be used. Please read the cautions concerning batteries. (See page 19.)
- If the terminals inside the battery compartment are dirty, it will noticeably shorten the life of the batteries. Do not touch the inside of the battery compartment.
- If the camera is left for 1 week with the batteries removed, all the internal settings will revert to the default settings.
Caution:
Do not use batteries whose bodies are not completely covered by an insulating sheet. If such batteries are used, they may cause leakage, excessive heat, or explosion. Some batteries are sold with a partial insulating sheet, or without any insulating sheet at all. Do not use these batteries under any circumstances.
- The following AA batteries cannot be used.


Batteries whose bodies are only partially covered, or not covered at all, by an insulating sheet.
Batteries whose — terminals are raised, but not covered by an insulating sheet.


Batteries whose — terminals are flat and not completely covered by an insulating sheet. (Such batteries cannot be used even if the — terminals are partially covered.)
Service life of NiMH battery
The table below shows the approximate number of photographs that can be taken and the display time available with the NiMH batteries. Note that the lives of battery packs may vary according to the type of battery, manufacture, camera shooting conditions, etc.
Service life of NiMH battery
| Shooting/Displaying | Condition | Battery life |
| Number of photos | 1 | Approx. 100 frames |
| Display time | 2 | Approx. 160 minutes |
* These figures are for reference only and are not guaranteed.
Shooting conditions
① • Repeat the same function in sequential 2fps shooting conditions for no more than 10 minutes than take a break
- Sequential 2fps shooting no more than 10 minutes then break
• Flash use no more than 50%
• One zoom adjustment on each shot
• Full-time AF turned off
- Digital Zoom off
- No displaying on or connecting to a PC
• Temperature 25°C
② Repeated sequential display in the slide show mode with periodic breaks
Note:
-
When connecting the camera to a PC, it is recommended that you use the optional AC adapter.
● Power is consumed continuously during the conditions below. This could reduce the number of pictures that can be taken. -
Repeated auto-focus by depressing the shutter button halfway.
• Repeated power zoom adjustments. - When the full-time AF mode is turned on.
- When the LCD monitor is in the display mode for an extended period of time.
- When communicating with a PC.
USING THE AC POWER ADAPTER (Optional)
An optional Olympus AC adapter allows you to power your digital camera from a common AC wall outlet.
Use an AC adapter designed for the area camera is used.
Consult your nearest Olympus dealer or Service center for details.
1 Make sure that the camera power switch is in the off position.
2 Plug the AC adapter into a power outlet.
3 Open the jack cover and plug the connection cord into the DC-In jack.
4 To disconnect, turn the camera switch off, and unplug the AC adapter first from the camera then from the outlet.
text_image
Technical diagram of a DSLR camera with labeled parts and directional arrow indicating movement or assembly.Open the jack cover as shown.
text_image
AC wall outlet 2 Power plug AC adapter DC-IN jack (Black) Connection cord plugNote:
- When in use for long periods, the AC adapter may get warm. This is normal.
⚠ Warning:
Incorrect use of the batteries may cause fire or electric shock.
- Be sure to use an Olympus AC adapter. Using a non-Olympus adapter could be hazardous and may damage the camera. Olympus is not responsible for any damage caused by the use of AC adapters not designed for this camera.
- Never plug or unplug the AC adapter if you have wet hands. When unplugging the adapter, hold the body of the unit, not the cord. Never pull, bend, twist or modify the cord.
- If you experience any of the following problems, contact your local dealer or the nearest authorized Olympus service center.
- If the AC adapter is hot, smells like smoke, or is emitting smoke.
- If there is any damage to the cord, or if there is a contact failure with the plug.
INSERTING AND EJECTING SmartMedia
What is SmartMedia?
SmartMedia is a recording medium for the Olympus CAMEDIA digital camera. Images recorded and stored on SmartMedia can easily be deleted, overwritten, and/or edited on a PC. This instruction manual uses the term "card" when referring to SmartMedia.
Compatible SmartMedia cards
● Provided 8 MB standard card (with the Panorama composite function).
- Optional Olympus 8 MB/ 16 MB/ 32 MB/ 64 MB cards
● Market-available 3V card 8 MB/16 MB/32 MB/64 MB

text_image
Diagram of a device with labeled parts, showing internal structure and numbered annotations① Contact area
The area where the card comes into contact with the camera
② Write-protect area
Attach the provided write-protect seal when you want to protect your data from accidental erasure or overwriting.
③ Index area
Use the provided index label to indicate the card's contents.
Note:
- Operating temperature: 0^ to 55^ ; Storing temperature: -20^ to 65^ ; Humidity: up to 95%
- Put the card into its anti-electrostatic case for storage or transportation.
- Do not bend, drop, or apply any physical shock to the card.
- Read the provided SmartMedia instruction manual carefully.
- Do not touch the contact area of the card.
- Do not use 5V cards. Use Olympus cards or other 3V (3.3V) cards.
- Non-Olympus 3V (3.3V) cards must be formatted by the camera (see p.42).
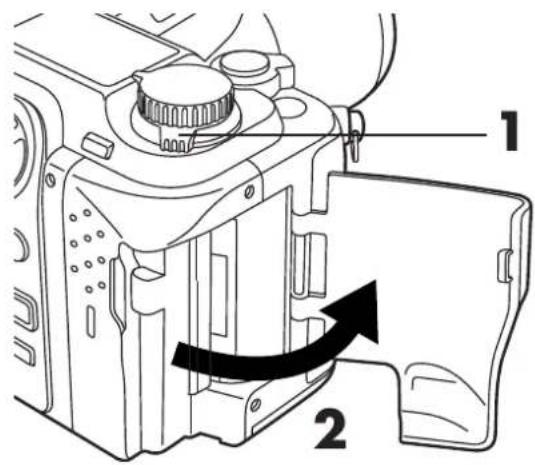
Insert the SmartMedia card
1 Make sure that the camera power switch is in the off position.
2 Open the Card cover.
3 Insert the SmartMedia card in the direction shown in the illustration.
- Note the orientation of the card. If it is inserted incorrectly, it may become jammed.
- When using a special function SmartMedia card (optional), insert it in the same way.
4 Close the cover tightly.

text_image
Technical diagram of a camera module with labeled parts and directional arrow indicating rotation or movement
natural_image
Diagram of a camera module with an air vent and directional arrow indicating motion (no text or symbols)Insert the card fully until you feel it lock into place.
Ejecting the SmartMedia card
1 Make sure that the camera power switch is in the off position.
2 Open the Card cover.
text_image
Technical diagram of a camera module with labeled parts and directional arrow indicating rotation or movement3 Push the card inward slightly.
- The card will pop out so that it can be withdrawn easily.
4 Pull out the card.

natural_image
Technical diagram of a mechanical assembly with a black arrow indicating a component, labeled '3' (no text or symbols beyond label)
natural_image
Technical line drawing of a mechanical component with no visible text or symbolsThe card is ejected
Note:
- NEVER open the Card cover, eject the card, remove the batteries, or disconnect the optional AC adapter while the camera is in use. Doing so could destroy all data on the card.
- Destroyed data cannot be restored.
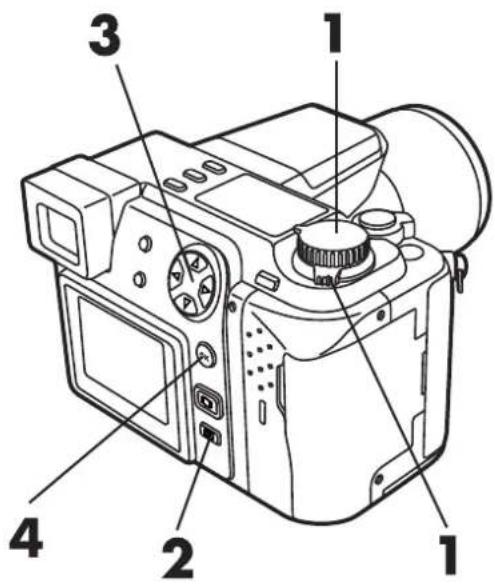
Preparing the card for writing data - Formatting
Formatting a card prepares it to accept data. Olympus Brand-formatted cards are highly recommended. When using non-Olympus cards or cards formatted by a PC, be sure to format them with the camera before use.
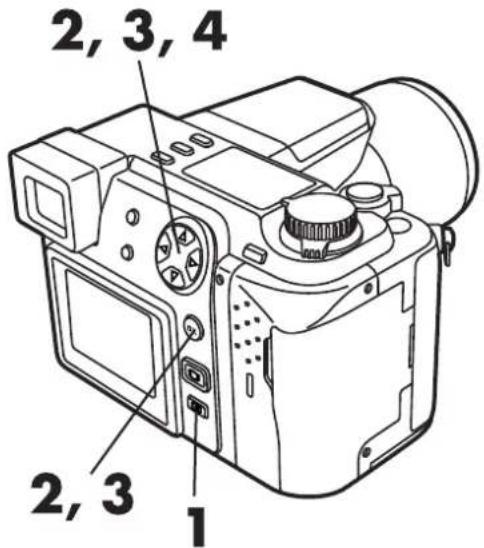
1 Turn the camera power on, and set the mode dial to the Record mode (P, A, S, M or S-Prg, ☐).
2 Press ☐ (Menu button).
- The menu is displayed on the viewfinder when the mode dial is set to the Record mode. The menu can be displayed on the monitor by pressing ☐ (Monitor button).
3 Press △ ▽ on the Arrow pad to select CARD SETUP, then press ▷.
- Selected item is displayed.
4 Press the OK button to select ↗.
● The confirmation screen will be displayed.
text_image
Diagram of a digital camera with numbered parts labeled 1, 2, 3, and 4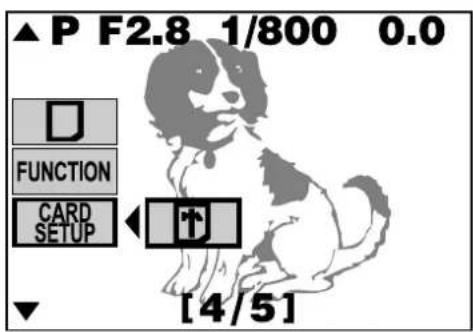
text_image
▲ P F2.8 1/800 0.0 FUNCTION CARD SETUP [4/5]Still picture on the display.
5 Press ◀ ▷ to select YES.
- If you want to cancel formatting, select NO.
6 Press the OK button to start the formatting process.
- Card formatting starts when the card-access lamp blinks.
- The menu disappears when formatting is complete.
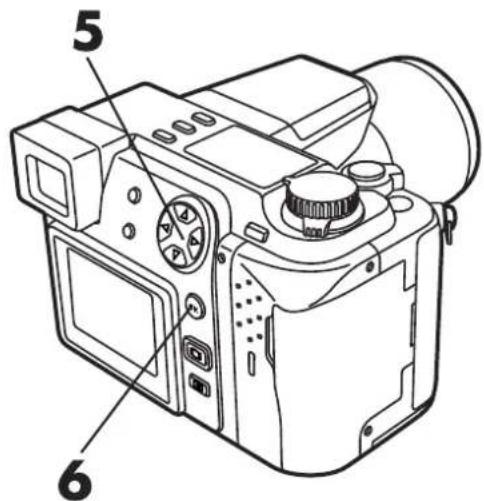
text_image
5 6
text_image
↑ YES NOConfirmation screen
Note:
- All existing data stored on the card will be erased when the card is formatted. Make sure that you save or transfer important data before formatting a used card.
- Recording time may be higher with non-Olympus cards, PC-formatted cards, and used cards. In such cases, re-formatting with the camera is recommended.
- Cards with a write-protect seal attached cannot be formatted.
You can change modes by turning the mode dial on the top righthand side of the camera.
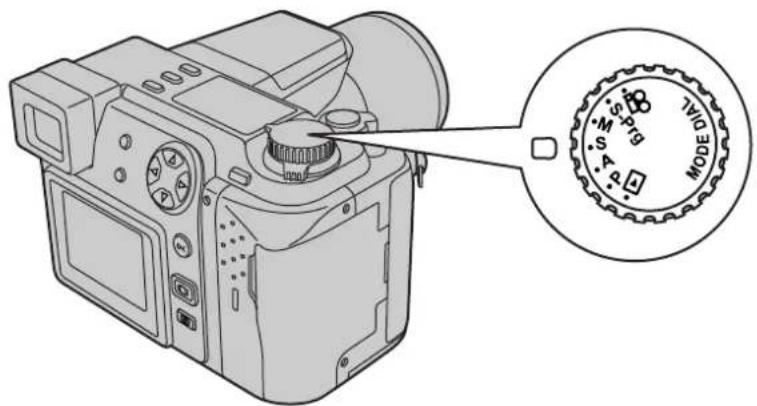
text_image
Diagram of a DSLR camera with an inset showing the dial labeled 'MODE' and its dial indicator.P (Program mode):
In program mode, you can take a properly exposed photograph by simply aiming the camera and pressing the shutter button. Aperture and shutter speed are set automatically by the camera.
A (Aperture priority mode):
Aperture can be set manually in the aperture priority mode. This is useful when you want to have more control over image exposure. Shutter speed is set automatically by the camera.
S (Shutter priority mode):
Shutter speed can be set manually in the shutter priority mode. Set it to a high speed for a still picture of a moving object. Set it to a low speed to show motion. Aperture is set automatically by the camera.
M (Manual mode):
You can set both aperture and shutter speed independently in the manual mode.
S-Prg (Scene program mode):
The camera will automatically optimize the combination of aperture and shutter speed according to the type of subject. You can select from Portrait, Sports, Landscape and Night Scene. Selections are displayed in the menu. Also read “SHOOTING FOR SPECIAL SITUATIONS” (P.81 - 86).

(Movie mode):
You can shoot motion pictures in the movie mode. Aperture and shutter speed are set automatically by the camera.

(Display mode):
Allows you to view a display of your photographs.
Most functions can be easily displayed and set with the menu on the Monitor. Adjustments to the mode dial will determine available menu selections. Modes not available on the menu can be set with the corresponding buttons on the camera.
Refer to the menu index (P.48 - 53) and select the function you need.
Functions that can be set by the mode dial are listed below.
Still picture record menu: P, A, S, M, S-Prg
Motion picture record menu: 📁
Still picture display menu: ▶
Motion picture display menu: ▶
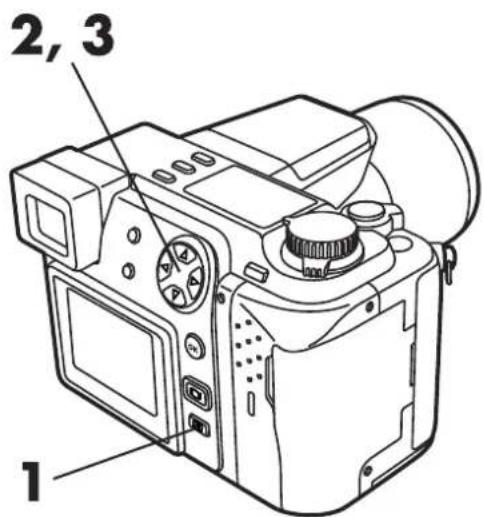
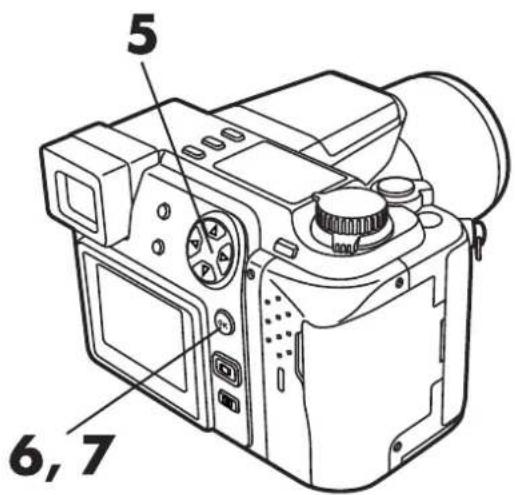
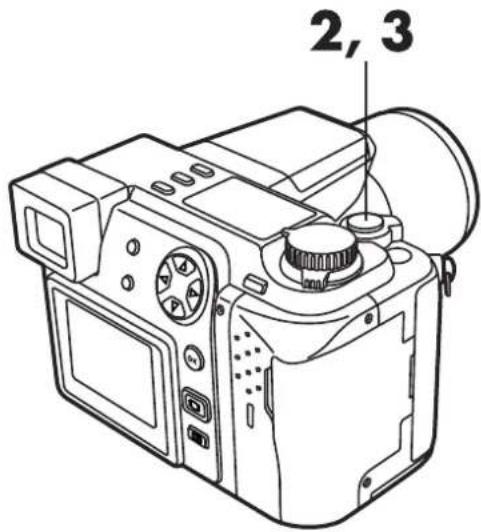
1 Press ☐ (Menu button).
- The menu is super-imposed over the image already displayed on the viewfinder or monitor.
2 Press △ ▽ on the Arrow pad to select the item you want to adjust.
- The green frame will move from item to item.
- Refer to P.144 to 147 when you select MODE SETUP.
3 Press ▷ to display further selections.
- The green frame will move to the right. Additional options for that item will be displayed.
text_image
2, 3 1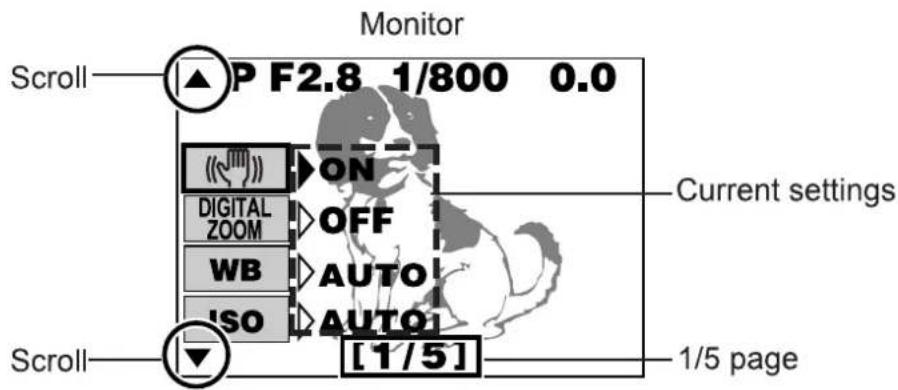
text_image
Monitor P F2.8 1/800 0.0 Scroll ON DIGITAL OFF ZOOM WB AUTO ISO AUTO [1/5] Current settings Scroll 1/5 page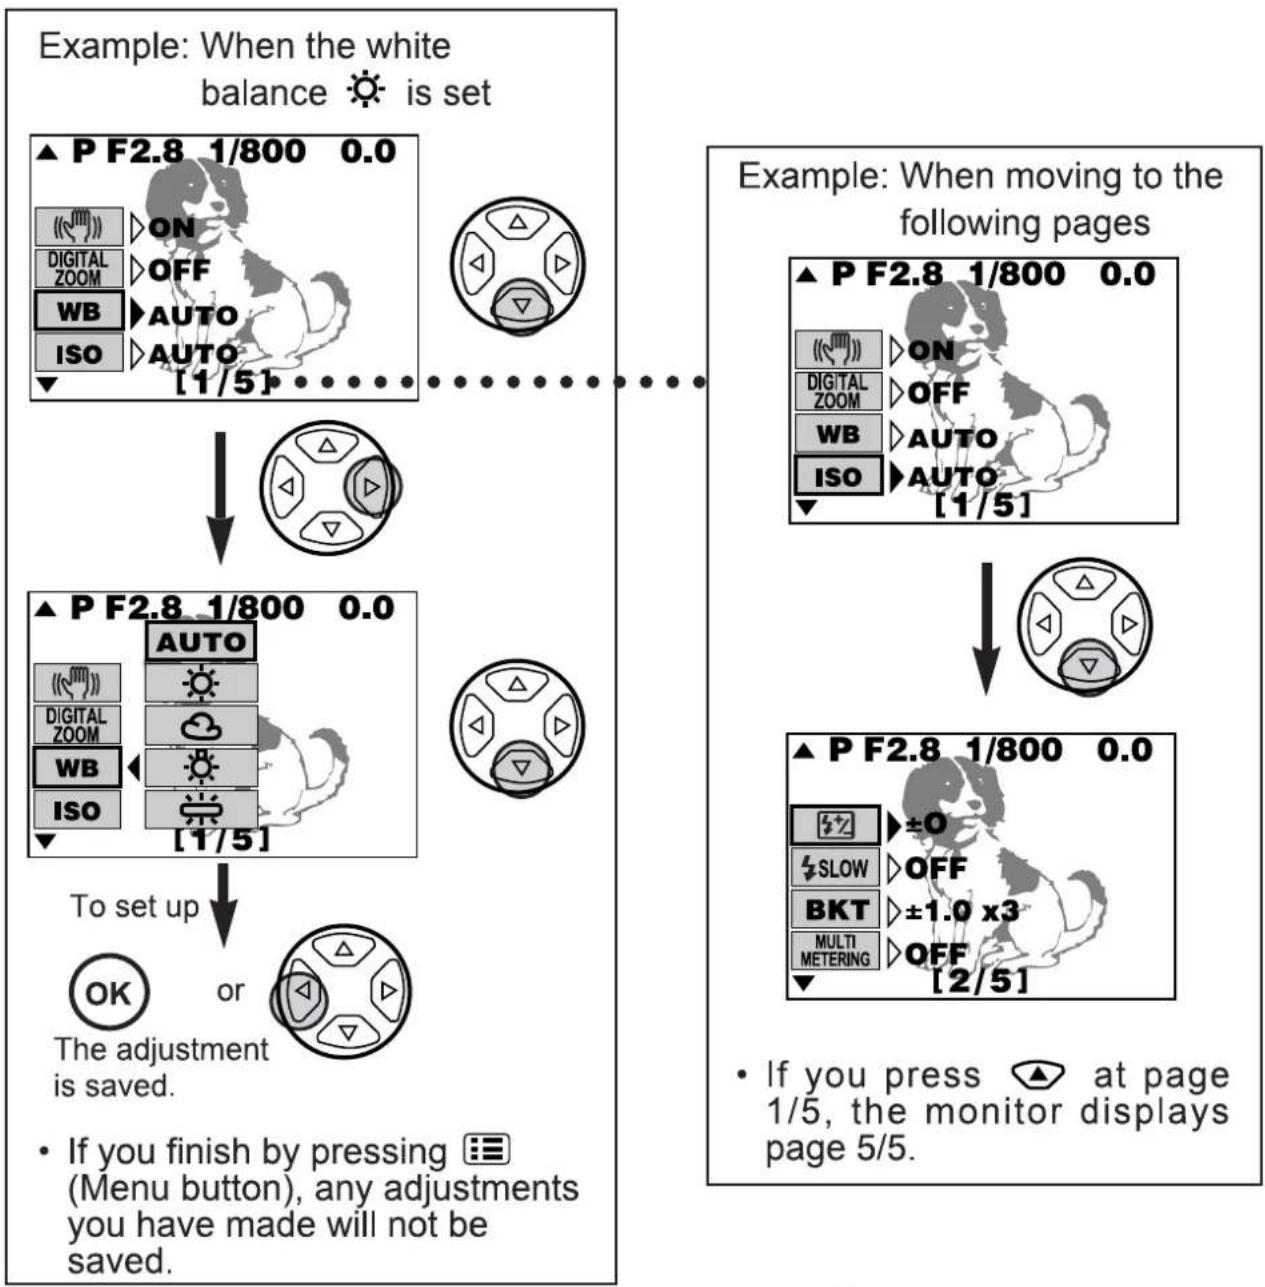
flowchart
graph TD
    A["Example: When the white balance is set"] --> B["▲ P F2.8 1/800 0.0"]
    B --> C["ON"]
    C --> D["DIGITAL ZOOM"]
    D --> E["OFF"]
    E --> F["WB"]
    F --> G["AUTO"]
    G --> H["ISO"]
    H --> I["AUTO [1/5"]]
    I --> J["↓"]
    J --> K["▲ P F2.8 1/800 0.0"]
    K --> L["AUTO"]
    L --> M["DIGITAL ZOOM"]
    M --> N["OFF"]
    N --> O["WB"]
    O --> P["AUTO"]
    P --> Q["ISO"]
    Q --> R["AUTO [1/5"]]
    R --> S["↓"]
    S --> T["▲ P F2.8 1/800 0.0"]
    T --> U["ON"]
    U --> V["DIGITAL ZOOM"]
    V --> W["OFF"]
    W --> X["WB"]
    X --> Y["AUTO"]
    Y --> Z["ISO"]
    Z --> AA["AUTO [1/5"]]
    AA --> AB["↓"]
    AB --> AC["▲ P F2.8 1/800 0.0"]
    AC --> AD["±O"]
    AD --> AE["SLOW"]
    AE --> AF["OFF"]
    AF --> AG["BKT"]
    AG --> AH["±1.0 x3"]
    AH --> AI["MULTI METERING"]
    AI --> AJ["OFF [2/5"]]
    AJ --> AK["• If you press at page 1/5, the monitor displays page 5/5."]
    K --> AL["To set up"]
    AL --> AM{OK or}
    AM -->|Yes| AN["The adjustment is saved."]
    AM -->|No| AO{If you finish by pressing (Menu button), any adjustments you have made will not be saved.}
4 Press △▽ to select the menu options.
- Selected items are displayed in green.
- To view additional menu options, go to step 5. If no additional selections are needed, go to step 6.
text_image
45 To select additional menu options Press ▷ to view additional menu options (for each selection), then press △▽ to select the desired option.
6 When finished, press the OK button or ◀.
- The green frame moves to the left and adjusted items are displayed on the right.
- When in the record mode (any mode except ▶) pictures can be taken.
7 Press the OK button.
● The setting will be saved and the normal display will be restored.
text_image
5 6,7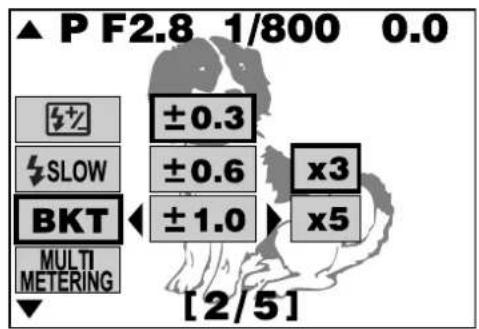
text_image
▲ P F2.8 1/800 0.0 ±0.3 ±0.6 x3 ±1.0 x5 BKT MULTI METERING [2/5]BKT setting
Note:
- When you want to go back to previous menu pages (or forward to the next pages)
→ When the green frame is at the bottom of the displayed menu options, press ▽ (or △). The display will go to the next page. When the monitor displays the last page, press ▽ to go back to the first page. You can move to the last page by pressing △ on the first page.
- When you want to cancel the menu
→ Press ☐ (Menu button). Adjustment settings are canceled and the normal display is restored.
- When the menu is not displayed in the display mode
→ The menu is not displayed when there is no data in the card.
- When you want to save an adjustment
→ Set "ALL RESET" — "OFF". The adjustment settings are then automatically saved when the camera is turned off (P.148).
- When the adjusted item does not function
→ The OK button was not pressed after the adjustment. Reset the adjustment, then press the OK button.
The following items can be adjusted. This can be done any time. Please refer to HOW TO USE THE MENU (P.45), and/or the pages for each function, in order to set the following items (P.48 – 53).
Still picture record menu

Displays by the Still picture record mode (P, A, S, M, S-Prg).
| Menu page | Display | Function | Initial setting |
| 1/5 |  | Activates the Stabilization system. (P.97) | ON |
| DIGITAL ZOOM | 2.7x digital zoom is available. (P.98) | OFF | |
| WB | Adjusts the white balance according to the light source. (P.134) | AUTO | |
| ISO | Adjusts the ISO sensitivity. (P.101) | AUTO | |
| 2/5 | [TTTS] | Controls the flash intensity. (P.109) | ±0 |
 | Allows you to take pictures of night scenes. (P.110) | OFF | |
BKT  | Sets the condition of auto bracket mode. (P.102) | ±1.0/x3 | |
MULTI  METERING METERING | Obtains the right exposure by metering multiple objects. (P.132) | OFF |
| Menu page | Display | Function | Initial setting | |
| 3/5 | AF MODE | OAF | Adjusts the focusing range when using autofocus. (P.96) | iESP |
| FULL-TIME AF | F-AF | The camera automatically focuses without pressing the shutter button halfway. (P.95) | OFF | |
| [SX40] | Able to record sound after taking pictures. (P.122) | OFF | ||
| 4/5 | [HDX0] |  | Card function for taking panorama picture images. (P.135) | [BC36] |
| FUNCTION | Allows you to use picture effects: monochrome, sepia, white, and black boards. (P.137) |  | ||
| CARD SETUP | Formats the card. (P.42) | - | ||
| 5/5 | MODE SETUP | Change the camera to your desired setting.→ Mode setting menu table (P. 144) | - | |
| S-Prg | Adjusts the S-Prg mode for each occasion. (P. 86) | [TDST] | ||
 | TIFF SHQ HQ SQ | Sets the record mode (TIFF/SHQ/HQ/SQ). (P.104) | HQ | |
MOVIE picture record menu

Options when the movie picture record mode 🔗 is activated.
| Menu page | Display | Function | Initial setting |
| 1/3 |  | Activates the Stabilization system. (P.97) | ON |
| DIGITAL ZOOM | 2.7x digital zoom is available. (P.98) | OFF | |
| WB | Adjusts the white balance according to the light source. (P.134) | AUTO | |
| ISO | Adjusts the ISO sensitivity. (P.101) | AUTO | |
| 2/3 | MULTI  METERING METERING | Obtains the appropriate exposure by metering multiple objects. (P.132) | OFF |
AF MODE  | Adjusts the focal point range with autofocus. (P.96) | iESP | |
FULL-TIME  AF AF | The camera will always focus automatically.There is no need to press the shutter button halfway. (P.95) | OFF | |
| [yHZS] | Allows sound record during movie recording. (P.122) | ON | |
| 3/3 | FUNCTION | Special effects are available: monochrome/sepia (P.137) | OFF |
| CARD SETUP | Formats the card. (P.42) | - | |
| MODE SETUP | Change the camera to your desired setting. → Mode setting menu table (P. 144) | - | |
| HQ SQ | Sets the record mode (HQ/SQ). (P.104) | HQ |
Display menu

Options available when a still picture is displayed.
| Menu page | Display | Function | Initial setting |
| 1/1 |  | Runs through all stored pictures automatically. (P.127) | - |
 | Dubs sound onto recorded pictures. (P.139) | - | |
| FUNCTION | Not available. | - | |
| CARD SETUP | Erases all frames (P. 78) and formats the card (P. 42). | - | |
| MODE SETUP | Change the camera to your desired setting. → Mode setting menu table (P. 144) | - |
Options available when a movie picture is displayed.
| Menu page | Display | Function | Initial setting |
| 1/1 | MOVIE PLAY | Plays back movie pictures. (P.74) | - |
| FUNCTION | Creating a movie index (P.140) and editing movies pictures. (P.142) | - | |
| CARD SETUP | Erases all frames (P. 78) and formats the card (P. 42). | - | |
| MODE SETUP | Change the camera to your desired setting. → Mode setting menu table (P. 144) | - |
You can adjust and include the date and time, and put them on recorded pictures.
1 Press ☐ (Menu button). (P.45)
- Menu will be displayed on the monitor.
- When no images are recorded on the card, menu options can be adjusted in all modes except display ▶.
2 Press △ ▽ on the Arrow pad to select MODE SETUP, then press ▷ to select SETUP. Finally, press the OK button.
- Mode setting screen will be displayed on the monitor.
3 Press △ ▽ to select Ⓑ, then press ▷. When SETUP appears on the monitor, press the OK button.
- Date/time setup screen will be displayed on the monitor.
4 Press △ ▽ to set the date format when ☑ is selected.
- You can choose any one of the following formats:
DMY (Day/Month/Year) MDY (Month/Day/Year) YMD (Year/Month/Day)
text_image
2, 3, 4 2, 3 1Still picture record menu

text_image
▲ A F2.8 1/800 0.0 MODE SETUP S-Prg [5/5]Mode setting screen

text_image
FILE NAME >RESET 12.23.00 12:34 m/ft >m [3/3]
text_image
FILE NAME SETUP m/ft [3/3]5 Press ▷ to move to the year (Y) setting.
6 Press △ ▽ to select the year. When the year is selected, press ▷ to set the month.
- Repeat the procedure until the date and time are completely set.
7 Press the OK button.
- For a more accurate setting, press the OK button when the clock hits 00 seconds. The clock will start when you press the OK button.
- Mode setting screen will appear here.
8 Press the OK button twice.
- Menu screen will disappear.
- The date/time setting wil remain until you reset it.

text_image
5, 6 7, 8Date and time screen

text_image
12 . 23 . '00 M — D — Y 21 : 56●The year 2000 is displayed as '00.
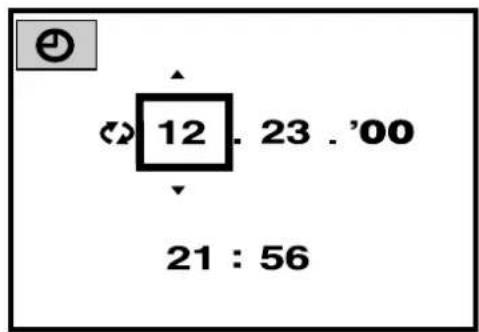
text_image
12 . 23 . '00 21 : 56Note:
- The date setting will be cancelled if the camera is left with no batteries for about one week (based on our testing). You will have to set the date again if this happens.
This manual uses various signs and symbols to indicate different types of information. Please read the following explanation carefully before operating your digital camera.
Before operation, switch the mode dial until the following signs appear. If the mode dial's setting signs are not displayed, you can use functions without setting the mode dial.
This indicates the button, control panel or viewfinder/monitor indications that correspond to the function you will use.

TAKING PHOTOGRAPHS AT CLOSE RANGE - MACRO MODE

You can get as close as 8" to your subject. An approx. 2.4" x 3" subject can be photographed almost fully within the frame.

1 Press ⚙ several times until ⚙ appears on the control panel.
- To cancel the Macro mode, press ⚙ several times until ⚙ disappears
2 Take a picture.

text_image
the frame. 1 2
text_image
Control panel Macro mode ESP HQ 10This number shows the order of operation.
2
BASIC FUNCTIONS
This chapter demonstrates how to use your camera's basic functions, such as taking pictures, displaying stored pictures, and erasing stored pictures. Please read this section carefully.
■Setting the power switch

text_image
OFF ON RESET POWER/OFF ON RESET: Power off
: Power on
: Move the switch to reset momentarily and then release, the power switch will automatically move back to ON. All settings except the mode setting menu (P. 144) will be reset to the factory-preset (initial settings).
- Hold the switch in reset position for over 3 seconds, and all settings, except for the date and time, will be reset to the initial settings.
1 Push the edge of the lens cap (as shown by the arrows in the illustration) to remove the lens cap.
2 Turn the mode dial to P.
3 Turn the power switch on.
● Battery check, as well as the number of pictures that can still be stored, will be displayed on the control panel. (P.60/63)
● The subject the camera is aimed at will be displayed on the Viewfinder.
- To take a picture while viewing the subject on Monitor, press ☐ (Monitor button). The subject will be displayed in the Monitor. (P.65)
4 Set the date and time when you first use the camera. (P.54)

text_image
2 1 OLYMPUS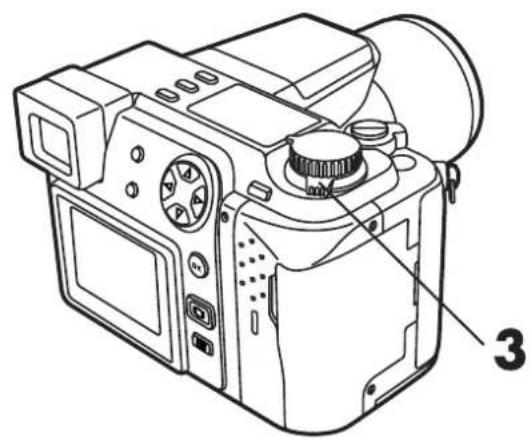
natural_image
Line drawing of a DSLR camera with labeled parts (no text or symbols beyond label)TAKING PICTURES WHILE USING THE MONITOR
Press ☐ (Moniter button). The same sign on the finder will be displayed on the monitor. The displayed subject will switch between the viewfinder and monitor each time you press this button.
text_image
(Monitor button)When the power is turned on in the Record mode (P, A, S, M, S-Prg, 📋), the icon appears in the viewfinder, and when the power is turned on in the Display mode (▶), it appears on the monitor. To switch between the monitor and viewfinder, press 📋 (Monitor button) after the power is turned on.
Note:
- NEVER open the card cover, eject the card, remove the batteries, or pull the plug when the card access lamp is blinking. Doing so could destroy stored pictures and prevent storage of pictures you have just taken.
- The camera will enter sleep mode if no operations are performed during a 1-minute period. The camera will activate again as soon as you touch any switch or button. You can adjust the sleep mode time.(P.159) Please turn the camera off when you are not planning to use it.
Checking the batteries
When the power is turned on, the remaining battery power will be displayed on the control panel. If it is low, please replace the batteries. If your batteries are either NiMH or NiCd, please charge them when their power is low.
Control panel
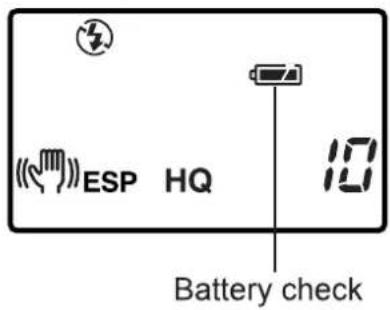
text_image
ESP HQ Battery check
lights and turns off automatically.
The batteries are OK. You are ready to take pictures.
blinks and other indicators on the control panel are displayed normally.
The battery power is low and the batteries should be replaced. You can shoot with the remaining power, but the batteries may die soon.
☑ blinks and then turns off after 12 seconds. Other indicators on the control also go out.
The batteries are dead and should be replaced immediately.
Note:
- The timing of each battery level indicator varies depending on the type of batteries used.
- When the camera is being operated on batteries that are running low, the camera may emit several short beeps and blink the number of storable pictures on the control panel after you take a shot or when you turn on the power. If this happens, the picture you have just taken will not turn out properly. Replace the batteries and take the picture again.
Checking the card
When the power is turned on, the camera checks the SmartMedia card.
Control panel Card error Card error | When there is no SmartMedia card in the camera: The card error indicator on the monitor blinks and NO CARD appears on the viewfinder.→Insert the SmartMedia card. |
Control panel | When there is a problem with the SmartMedia card: An error sign appears with the blinking card error indicator and CARD ERROR appears on the monitor.→Format the card or use a new card. |
Control panel  | When the card needs to be formatted: The card error indicator turns on in the monitor and the card format confirmation screen appears on the viewfinder.→Format the SmartMedia card (P.42).Select 📋 with the Arrow pad and press the OK button to enter the card format menu (P.42).When formatting is complete, the monitor will switch screens and display the subject that you are shooting. |
Checking the number of storable pictures left
When the power is turned on in the still picture mode, the number of storable pictures left will appear on the control panel. For movie pictures, the seconds remaining will appear.
- When the power is turned on with the mode dial at A, S, M, P, or S-Prg:
The number of storable pictures left will appear.

text_image
ESP HQ 10Number of storable pictures left
- When the power is turned on with the mode dial :
The seconds remaining will appear.
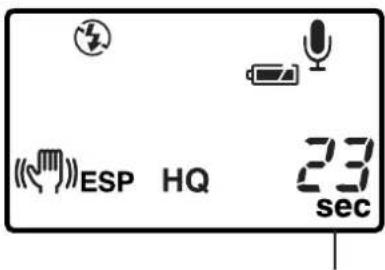
text_image
(ESP HQ 23 sec)Remaining time
- When there is no storable space left for pictures in the still picture record mode :
Beeps will emit when the card cannot store anymore pictures and the displays below will appear on the control panel and viewfinder. If this happens, replace the card with a new/storable card or erase unwanted images in the existing card to make space (P.77/78).
Control panel

natural_image
Simple line drawing of a rectangular frame with two vertical lines and a warning symbol (no text or labels)Viewfinder

text_image
CARD FULLNumber of storable pictures left
The number of storable pictures left and recording time remaining will vary depending on the selected recording mode or remaining card storage. Preset print or sound recording will also affect memory capacity.
Number of still pictures that can be taken
| Recording mode | Number of pixels | File | Memory capacity (Image only/Image with sound) | ||||||
| 2MB | 4MB | 8MB | 16MB | 32MB | 64MB | ||||
| TIFF* | 1600x1200 | TIFF | 0/- | 0/- | 1/- | 2/- | 5/- | 11/- | |
| 1280x960 | 0/- | 1/- | 2/- | 4/- | 8/- | 17/- | |||
| 1024x768 | 0/- | 1/- | 3/- | 6/- | 13/- | 27/- | |||
| 640x480 | 2/- | 4/- | 8/- | 17/- | 34/- | 68/- | |||
| SHQ | 1600x1200 | JPEG | 1/1 | 2/2 | 5/5 | 11/11 | 22/22 | 45/44 | |
| HQ | 1600x1200 | 4/3 | 8/7 | 16/15 | 31/30 | 64/60 | 128/120 | ||
| SQ | HIGH (quality) | 1280x960 | 2/2 | 4/4 | 8/8 | 17/16 | 34/33 | 69/67 | |
| NORMAL | 6/5 | 12/11 | 24/22 | 49/45 | 99/90 | 199/181 | |||
| HIGH (quality) | 1024x768 | 3/3 | 6/6 | 13/12 | 26/25 | 53/51 | 107/102 | ||
| NORMAL | 9/8 | 18/16 | 38/32 | 76/66 | 153/132 | 306/265 | |||
| HIGH (quality) | 640x480 | 8/7 | 16/14 | 32/29 | 66/58 | 132/117 | 265/234 | ||
| NORMAL | 21/15 | 40/30 | 82/61 | 165/123 | 331/248 | 664/498 | |||
* If the recording mode is set to TIFF, sound will not be recorded with a picture when the Mode dial is set to P or A/S/M, but it can be added later during playback. (p. 139)
The number of seconds that you can record movie pictures:
Longest continuous recording time per movie frame
| Recording mode | Number of pixels | Memory capacity | |||
| 2MB | 4MB | 8MB | 16MB OVER | ||
| HQ | 320x240 | 5/5 | 11/11 | 23/23 | 36/35 |
| SQ | 160x120 | 26/22 | 52/46 | 105/93 | 145/134 |
- Please refer to P.104 for the recording mode.
Note:
- Because the amount of data used varies depending on the subject, more/fewer pictures than the number shown may be photographed.
- The number of storable pictures may not be reduced every time a picture is taken, or increased when a picture is erased.
● Numerical values are approximate.
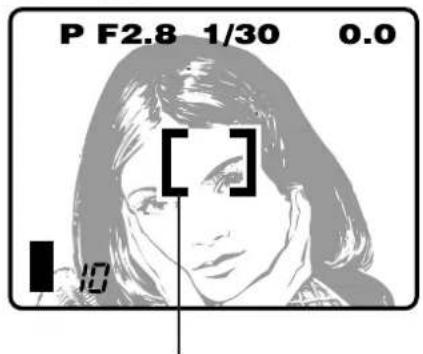
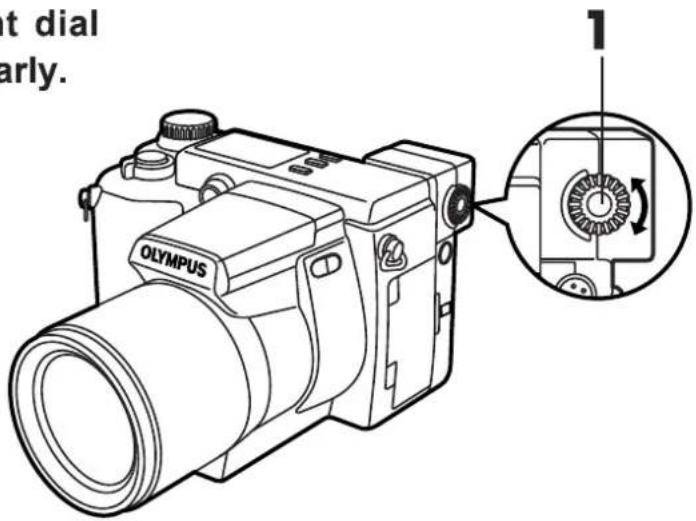
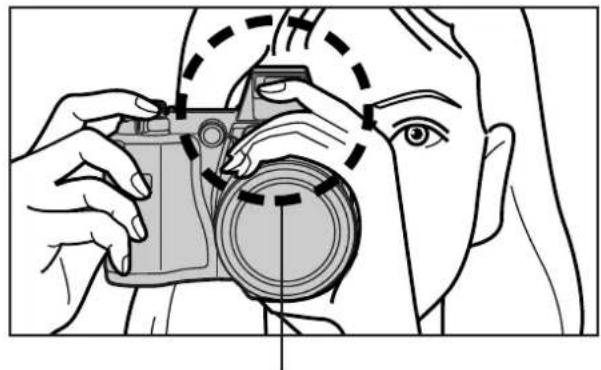
1 Turn the Diopter adjustment dial to see the AF target mark clearly.
Viewfinder
text_image
P F2.8 1/30 0.0 [ ] 10AF target mark
text_image
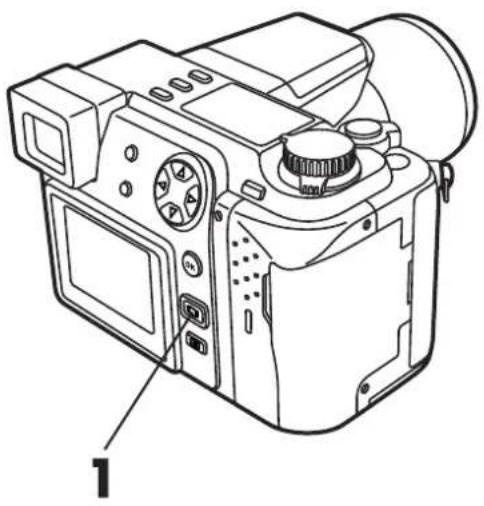
t dial early. 1 OLYMPUS1 Press ☐ to switch the display to the monitor.
The monitor is more useful than the viewfinder if you cannot hold the camera in a proper position.
natural_image
Line drawing of a DSLR camera with labeled parts (no text or symbols beyond label)If nothing appears on the viewfinder:
- Is the power on?
- Has the lens cap been removed?
- Is the camera in the sleep mode?
- Is the monitor turned on with the ▶ mode?
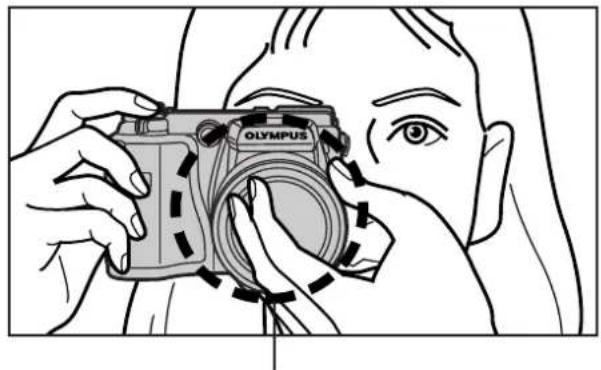
Hold the camera firmly with both hands while keeping your elbows at your sides to prevent the camera from moving.
Proper

natural_image
Line drawing of a person holding a Olympus digital camera (no text or symbols on the camera body)Proper
natural_image
Line drawing of a person adjusting a camera lens (no text or symbols present)Improper
natural_image
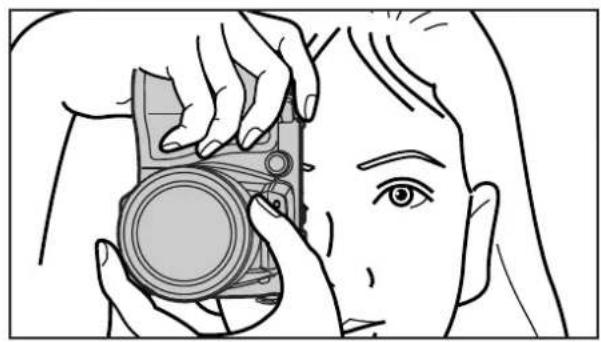
Line drawing of a person using a Olympus camera to examine the eye (no text or symbols present)Keep your fingers away from the lens.
natural_image
Line drawing of a person using a camera to adjust the lens (no text or symbols present)Keep your fingers away from the flash.
Note:
- Keep your finger and the strap away from the lens, flash, and AF assist lamp.
Proper shutter release
There are 2 steps when releasing the Shutter. Practice well before actually taking photos.
1 Press the shutter button halfway.
- The AF confirmation mark will light when the focus and exposure are locked. It will blink if the focus or exposure are not locked.
- To focus the camera when the subject of the picture is outside the AF target mark, use the focus lock. (P.93)
2 Press the shutter button fully to release the shutter and take a picture.
● The camera emits a beep when the shutter is released.
- The card access lamp blinks while the picture is being recorded.
- You can change the volume of the beep sound emitted when operating the camera or cancel the beep. → Changing the beep (P. 156)
★★When the AF confirmation mark blinks
Set the camera to the macro mode when photographing the subject closer than 23.6" (P.90).
Depending on the condition of the subject, the focus and exposure may be locked. (See SUBJECTS THAT ARE HARD TO FOCUS, P.92)
Press halfway

text_image
ifwayShutter button
Press fully

text_image
s fullyShutter button
AF confirmation mark

text_image
OP-F2.8 1/30 0.0 [ ]AF target mark
Note:
- Press the shutter button gently using the ball of your finger. If it is pressed hard, the camera may move and pictures may come out blurred.
Taking a still picture
1 Compose the picture by turning the camera towards the subject.
2 Press the shutter button halfway to lock the focus and exposure. Use the focus lock if the camera itself cannot focus on the subject (P.93).
● The AF confirmation mark will light up and the camera will beep once.
- The AF confirmation mark will blink if the focus and exposure are not locked. Please refer to SUBJECTS THAT ARE HARD TO FOCUS, P.92.
- If a subject is not well lit and is difficult to focus on, the AF assist lamp will light automatically. You can also turn off the AF assist lamp manually if desired. (P.157)
- To save you time, when the full-time AF is activated, pictures displayed on the monitor are always already in focus. (P.95)
text_image
2, 3AF confirmation mark

text_image
OP F2.8 1/30 0.0AF target mark
★★When the ↓ flash stand-by blinks
Slide the flash switch to set the flash. See USING THE FLASH (P.72).
3 Press the shutter button fully to take a picture.
● A beep means that the photograph was taken successfully.
● The lower image memory gauge will light up and the camera will begin storing the image onto the card.
- Soon after displaying the picture just taken, the viewfinder will again show the area it is being aimed at. See REC VIEW (P.158).
- Continuous shooting is available if the memory gauge shows there is space in the card.
- When more than two images are recorded, the center block will light up.
- When the buffer memory is full, the upper block will light up and no more pictures can be taken.
- When the aperture is set to F8, the fastest shutter speed possible is 1/1150 sec.

text_image
OP F2.8 1/30 0.0 [ ] Number of storable pictures Memory gauge
natural_image
Simple line drawing of a hand pressing a block with motion lines indicating sound or vibration (no text or symbols)★★If you take pictures continuously
The memory gauge will gradually increase as you take pictures. If the memory becomes full and the memory gauge lights up completely, you cannot take any more pictures.

Before shooting/No picture taken

One picture taken

More than one taken

No recordable space
Note:
- Recorded pictures will be saved regardless of whether the camera is turned off or the batteries are replaced.
- NEVER open the card cover, eject the card, remove the batteries, or pull the plug when the card access lamp is blinking. Doing so could destroy stored pictures and prevent storage of pictures you have just taken.
Recording movies
1 Set the mode dial to 📁.
2 Compose the picture by turning the camera towards the subject.
3 Press the shutter button halfway to lock the focus and exposure. Use the focus lock if the camera itself cannot focus the subject (P.93).
● The AF confirmation mark will light up and the camera will beep.
- The AF confirmation mark will blink if the focus and exposure are not locked. Please refer to SUBJECTS THAT ARE HARD TO FOCUS, P.92.
4 Press the shutter button fully. Recording will start. To stop recording, press the shutter button fully again.
- The ⚙ mark will light up in red while shooting movies.
- You cannot take movies if the entire image memory gauge is lit up.
● The seconds of recording time remaining in the memory will appear on the monitor. - When recording starts, correct focusing and exposure is maintained continuously.
5 The card access lamp will blink and the camera will begin storing images onto the card.
- You cannot take the next movie until the camera is finished storing the current one, even if the memory indicates that there is sufficient memory.
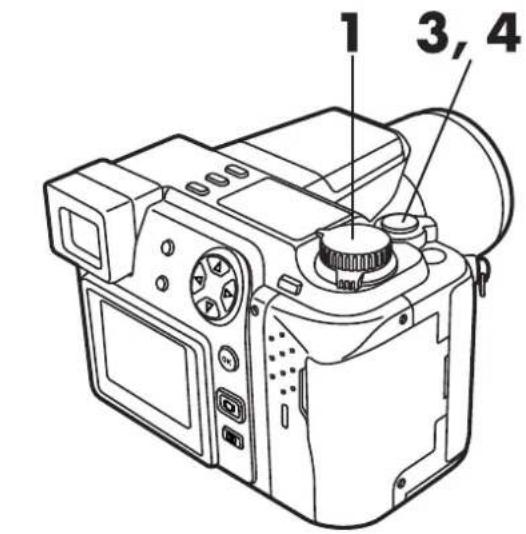
text_image
1 3, 4


text_image
F2.8 1/30 0.0 24" Seconds remainingMemory gauge
★★To record the next movie picture
Wait until the card access lamp goes off and writing of movie pictures into the card is finished.
You can select telephoto or wide-angle with the 10x zoom. When the digital zoom in the menu is turned on (P.98), 27x zoom is available with the 2.7x digital zoom.
When you take a picture from a distance (telephoto):
Press the zoom lever toward T to zoom in.
When you take a picture at close range (wide-angle):
Press the zoom lever toward W to zoom out.
■ The speed of the zoom-in/out can be adjusted by changing the angle of the zoom lever.
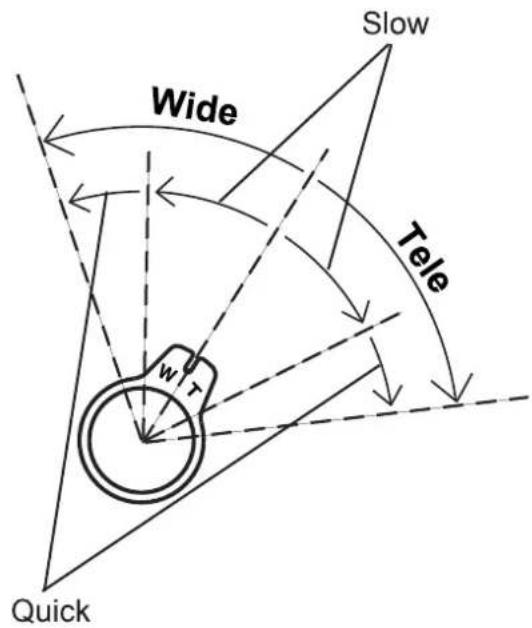
text_image
Slow Wide Tele w r Quick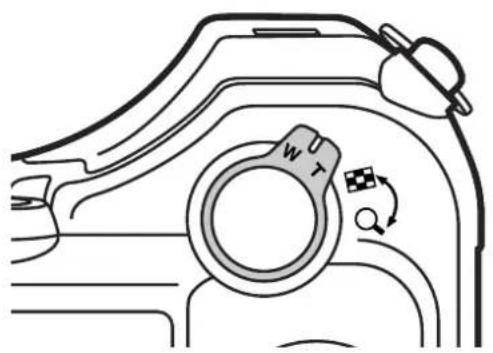
natural_image
Technical line drawing of a mechanical component with no visible text or symbols
text_image
P F2.8 1/1000 W W T P F2.8 1/1000 W W TNote:
- When recording movies while zooming, images may become jittery.
The flash will work automatically in low-light conditions. For other conditions, refer to P.107.
1 Slide the flash switch located under the flash (see the illustration) to raise the flash.
- Make sure that Ⓞ, ↓ and ⚫ do not appear on the control panel. If there is one or more of them, press the flash mode button to turn them off. See SELECT THE FLASH PATTERN on P.106
2 Press the shutter button halfway.
- When lights on the viewfinder, the flash is activated.
- The flash charges while ↓ is blinking. The shutter cannot be released at this time. Wait until ↓ turns off before taking pictures.
3 Press the shutter button fully.
- The flash will go off.
Flash working range:
Wide-angle: approx. 11-13/16" to 13 ft Telephoto: approx. 3.25 ft to 13 ft
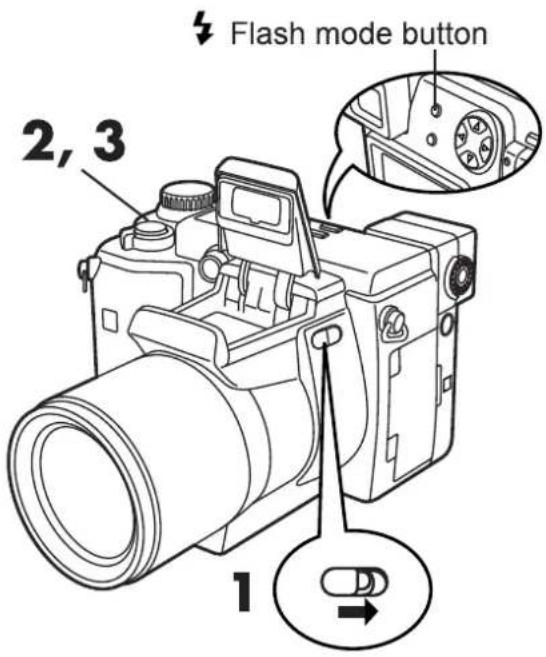
text_image
Flash mode button 2, 3 1Flash stand-by

text_image
AF confirmation mark P F2.8 1/30 0.0 [ ]Note:
- The flash will not go off in the following modes: Auto-bracket (P.102), White/Black Board (P.137), and Panorama (P.135).
- When using the flash in the macro mode, especially during wide-angle shooting, images may be unclear and the flash may not have the proper effect. Confirm the results by displaying images.
Displaying still pictures
You can quickly shift from the record mode to the display mode by pressing
☐. This allows you to check the movie you have just recorded.
1 Press ☐ twice quickly.
● The monitor will turn on and the last recorded picture will be displayed.
- Setting the Mode dial to ▶ will also display recorded pictures.
2 All stored pictures in the card can be displayed by pressing the Arrow pad.
▷ : Displays the next picture.
◀ : Displays the previous picture.
△ : Jumps to the picture 10 frames ahead.
▽: Jumps to the picture 10 frames behind.
3 Press the shutter button halfway to return to the record mode.
● The viewfinder will turn on and the subject will appear on it.

text_image
Technical diagram of a digital camera with numbered parts labeled 1, 2, and 3Displaying movies
1 Use the Quick view to display a recorded movie (P.73).
2 Select images with the 🔗 mark using the Arrow pad.
3 Press ☐ (Menu button).
● The menu screen will appear.
4 Select MOVIE PLAY, then press ▷ to select START.
- Press the menu button to cancel.

text_image
2, 4 3
text_image
MOVIE PLAY FUNCTION CARD SETUP MODE SETUP START [1/1]5 Press the OK button.
● The movie display will start after the card access lamp stops blinking.
When you want to pause...
Press the OK button while displaying images.
You can display frames with the Arrow pad when normal displaying is paused or stopped.
△ : Jumps to the beginning of the movie.
▽ : Displays the end of the movie.
▷: Every time the right arrow is pressed, the next frame will be displayed. A movie is displayed by holding down the right arrow continuously.
◀: Every time the left arrow is pressed, the previous frame will be displayed. A movie is displayed in reverse by holding down the left arrow continuously.
6 Press ☐ to leave the movie picture display mode.
- When selecting other frames, press 📄 again to turn the menu screen off, then press the Arrow pad to select the frames.
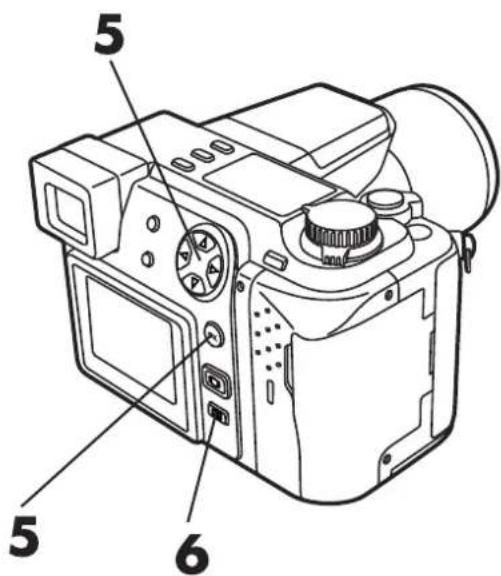
text_image
5 5 6
text_image
Date and time (Displays for approx. 4 sec.) 12.23.00 0"/15" Displaying time Total recording time★★If you want to return to the record mode immediately
Press the shutter button halfway. The viewfinder will appear with the subject displayed on it, even in the middle of displaying movies or when the menu screen is on.
Recorded images and sound can be displayed on TV with the AV cable.
[Connection]
* Make sure that the TV and camera power are off before connecting.
① Connect the AV cable to the camera's A/V OUT jack (black).
2 Connect the AV cable to the TV's video input (yellow) and audio input (white) connectors.
[After connection]
1 Turn on the camera and TV.
2 Set the mode dial to ▶.
3 Select the image to be displayed using the Arrow pad.
● The selected image will be displayed on the TV.
![OLYMPUS Camedia C-2100 Ultra Zoom - [After connection] - 1](/content/2026/05/1106613/images/a43044017df3302159a3f9a4322c16bf95bf935f1a61b998f51ed73115abd2d7.jpg)
text_image
AV cable Connect to the A/V OUT jack (black).Using a remote control
* When using the remote control, point it towards the remote-control sensor on the camera.
+/- button : Selects images.
W button : Turns on the index-display.
T button : Lets you do close-ups. In this mode, the magnified area can be moved to the left/right using the +/- button.

text_image
Remote control W button T button - button + buttonNote:
● The monitor turns off automatically when connected to a PC.
- The image may appear off-center on the TV screen. This is due to the TV's adjustment settings.
- Your TV may produce a black frame around the picture. This is normal.
- The optional AC adapter is recommended when using the camera with a TV.
Unwanted images can be erased using the same process for both still images and movies. Before erasing, make sure that the protection seal has been removed from the SmartMedia card and other image protection settings on the camera have been cancelled.
Be aware of the following!
- NEVER perform the following acts while erasing pictures. They may destroy data stored in the SmartMedia card.
- Open the card cover
- Eject the card
- Remove the batteries
- Pull the plug
Single frame erasure

1 Set the mode dial to ▶.
- The card access lamp will blink and a list of stored images will be read out. After that, the last recorded picture will be displayed.
2 Select the images you want to erase using the Arrow pad.
3 Press ⏻ (Erase button).
- A message asking you to confirm the erasure will appear.
4 Make sure that YES is selected, then press the OK button.
- The selected images will be erased.
To cancel:
Press ▷ on the Arrow pad to select NO, then press the OK button or ⏻ (Erase button).

text_image
Diagram of a digital camera with numbered parts labeled 1, 2, 3, and 4
text_image
SQ 倍 YES NO[倍]Confirmation screen
All-frame erasure

1 Set the mode dial to ▶.
- The card access lamp will blink and a list of stored images will be read out. After that, the last recorded picture will be displayed.
2 Press ☐ (Menu button).
- The menu screen will be displayed.
3 Select CARD SETUP, then 📋.
4 Press the OK button.
- A message asking you to confirm the erasure will appear.
To cancel:
Press ▷ on the Arrow pad to select NO, then press the OK button or ⏻ (Erase button).
5 Make sure that YES is selected and press the OK button.
- All of the images stored in the SmartMedia card will be erased.

text_image
2, 4 1 5, 6 3Still image erasure menu screen

text_image
FUNCTION CARD SETUP MODE SETUP [1/1]
text_image
YES NO[ ]Confirmation screen
You can prevent accidental erasure of pictures you want to keep.

1 Set the mode dial to ▶.
- The card access lamp will blink and a list of stored images will be read out. After that, the last recorded picture will be displayed.
2 Display the picture you want to protect. (DISPLAY AN IMAGE (P.124), CLOSE-UP DISPLAY (P.126), and INDEX-DISPLAY MODE (P.125).)
3 Press the OK button. The displayed picture will then be protected.
- will appear on the monitor.
To cancel protection:
Press the OK button a second time while the picture is displayed. ☐ will disappear and the protection will be cancelled.

text_image
Diagram of a digital camera with labeled parts including main body, lens, and control panel
natural_image
Black-and-white stylized portrait of a woman with hand near face, no visible text or symbolsNote:
- The protected picture will not be deleted with All-Frame erase, but will be deleted with Card format.
- Protection is not available when the write-protect adhesive seal is placed on the card.
- The setting will remain until it is readjusted.
When you are finished using the camera, turn the power off. Although the camera will automatically enter sleep mode if not used for an extended period of time, turning off the power is still highly recommended.
1 Turn the camera's power switch off.
- The power will now be off. If an image is being recorded on the card (the card access lamp will be blinking), the camera will turn off after recording is complete.
2 Put on the lens cap.
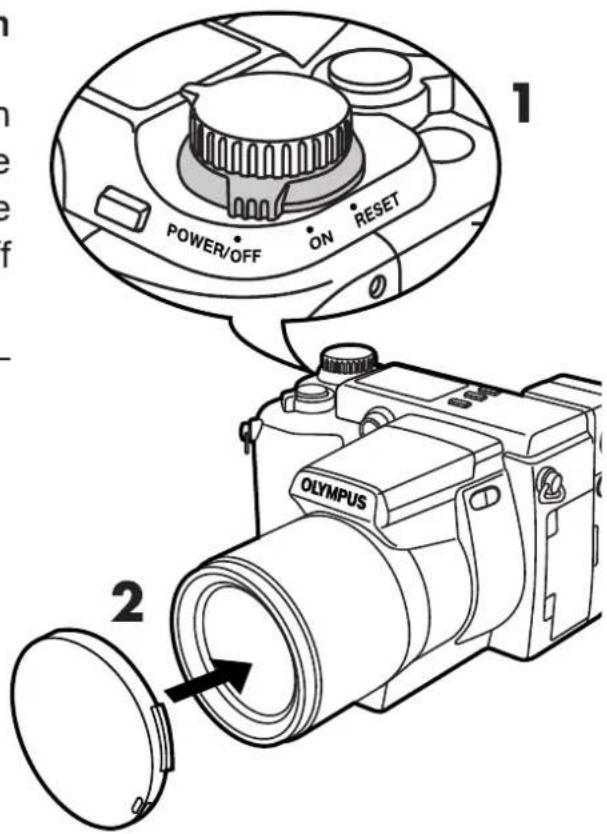
text_image
POWER/OFF ON RESET 1 2 OLYMPUS3
SHOOTING FOR SPECIAL SITUATIONS
This section explains how to use the camera's advanced features to achieve professional-looking results under a variety of conditions.
Taking portrait pictures


A portrait-style photograph features an in-focus subject against a blurred background. Your camera offers two different ways of achieving this effect.
■ With the mode dial set to "S-Prg", select "S-Prg"-“☐” in the Menu (P.86).
Focus on the subject. Exposure is adjusted automatically according to the conditions.
■ Set the mode dial to "A", then manually set the aperture to a lower value. (P. 87)
By decreasing the aperture value, you will force the camera to focus within a smaller range, producing a picture with a blurred background.

natural_image
Black-and-white stylized portrait of a woman with shoulder-length hair, no text or symbols visibleTaking pictures of moving subjects


If the subject of your photograph is moving quickly — such as athletes in a sports scene or fast-moving vehicles, you can adjust the shutter speed to capture the action without blurring or to heighten the sense of movement by blurring the action. To capture fast-moving action precisely without blurring, set the shutter speed to higher value. On the other hand, if you want your photograph to have a sense of motion, set the shutter speed to a lower value. This will blur the main subject, while the background remains clear.
Your camera offers two different ways of achieving these effects.
■ With the mode dial set to "S-Prg", select "S-Prg"-“” in the Menu (p.86).
Focus on the subject. Exposure is adjusted automatically according to the conditions.
■ Set the mode dial to "S", then select the shutter speed manually (p.88).
natural_image
Illustration of a soccer player kicking a ball on a grid mat (no text or symbols)Taking pictures focusing on both subject and the background


For example, if you want to take a picture with a beautiful background when you are on travel, you will want to have both your subject and the background in focus.
Your camera offers two different ways of achieving this effect.
■ With the mode dial set to "S-Prg", select "S-Prg"-“☐” in the Menu (p.86).
Focus on the subject. Exposure is adjusted automatically according to the conditions.
■ Set the mode dial to “A”, then set the aperture manually to a higher value. (p.87)
Increasing the value forces your camera to focus over a wider range to the forward/backward directions, resulting in a picture in which both the subject and the background are in focus.

natural_image
Illustration of two children standing in front of a house with trees (no text or symbols)Taking close-up pictures

When you want to take a picture from a very short range — for example, if your subject is insects or flowers — use the “💡” mode (p.90). This allows you to get as close as 4 inches in maximum to your subject (when the zoom lever is set to “W” to the maximum position).
Set the zoom lever to "W" to capture your object in even more detail.

natural_image
Black and white stylized floral illustration with no text or symbolsTaking night scenes


To capture a twilight scene or sunset naturally, you need to set your shutter speed to a lower value. If the Mode dial is set to "P", the lack of brightness will result in a dark picture with only the glow of the sunset or sparkle of the stars appearing.
We recommend that you experiment by taking several pictures to determine the optimum settings for natural-looking twilight shots.
Your camera offers two different ways of capturing twilight scenes.
■ With the mode dial set to "S-Prg", select "S-Prg"-“☐” in the Menu (p.86).
This mode uses the lower shutter speed compared to the normal mode. Exposure is adjusted automatically according to the conditions.
■ Set the mode dial to "M", then select both shutter speed and aperture manually (p.89).
Select the optimal aperture, shutter speed and focus range.

natural_image
Black background with scattered white circles of varying sizes (no text or symbols)
Note:
We recommend you to use a tripod for the optimum result for this effect which uses the lower shutter speed.

natural_image
Stylized black-and-white illustration of a city skyline with skyscrapers reflected in water, no text or symbols present.Taking a picture of a moving object at night ♦ SLOW
With the slow synchronization ( ♣ SLOW ) mode, you can achieve interesting effects when taking pictures of moving objects (such as cars ) at night. Depending on the type of effect, you want you can select from “ ♣ SLOW ”-“ ♣ SLOW 1” or “ ♣ SLOW 2” in the Menu (p.110).
- Select “↓SLOW 1” to capture the subject at the beginning of the shutter release. The streak made by the headlights of a moving car will come towards you.
- Select “⚡ SLOW 2” to capture the subject at the end of the shutter release. The streak made by the taillights of a moving car will recede.

natural_image
Line drawing of a car with a long nose cone on its side, no text or symbols present
natural_image
Line drawing of a car with motion lines indicating speed or speed (no text or symbols)
1 Press ☐ to display the Menu.
- You can display the menu regardless of the mode selected by the mode dial (P, A, S, M, S-Prg).
2 Press △ ▽ on the Arrow pad to select "S-Prg", then press ▷.
3 Select the desired S-Prg mode from “☐, ☐, ☐, ☐”, then press the OK button. (p.82-84)
4 Press the OK button again.
- The settings will be stored in memory, and the Menu will disappear.
5 Take a picture.
- When the aperture is set to F8, the fastest shutter speed possible is 1/1150 sec.
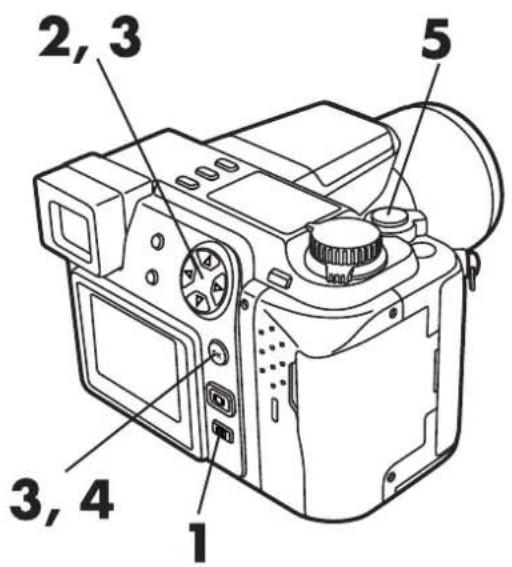
text_image
2, 3 5 3, 4 1
text_image
F2.8 1/800 0.0 MODE SETUP S-Prg [5/5]Note:
- You cannot set the aperture or shutter speed manually in S-Prg mode.
You can set the aperture manually in the Aperture priority mode. This is especially useful for taking portrait pictures with blurred backgrounds.

1 Set the Mode dial to "A".
- Aperture setting is displayed in green.
2 Select △ ▽ on the Arrow pad to select the aperture.
△ : Increases the value.
▽ : Decreases the value.
| Zoom position | Range of the value |
| Wide (W) | F2.8 – F8.0 |
| Tele (T) | F3.5 – F8.0 |
★★ When the aperture indication appears in red on the display
The aperture indication appears in red when the aperture setting is unsuitable for the conditions. “▼” appears beneath the aperture indication when the aperture is too small, and “▲” appears when the aperture is too large (see illustration on the right). Adjust the aperture to the optimum setting according to “▼/▲” on the display.
- When the aperture is set to F8, the fastest shutter speed possible is 1/1150 sec.

text_image
2 1 Aperture
text_image
Aperture A F2.8 1/800 0.0 [ ] 10Down exposure

text_image
A F8.0 1/800 0.0 [ ] 10Note:
- If you set the Mode dial to "A" when the ISO speed is set to AUTO, ISO speed is automatically set to 100.
- When the built-in flash is activated, you cannot set the shutter speed to 1/30 sec. or slower when the zoom lever is set to the maximum position of "W", and 1/200 sec. or slower when the zoom lever is set to the maximum position of "T".
- Unless OFF is selected in "ALL RESET", the setting will be canceled and reset to off when the power is turned off. (p.148)
You can set the shutter speed manually in the Shutter priority mode. Set the shutter to a fast speed to capture a moving object. Set it to a slow speed to express motion.

1 Set the Mode dial to "S".
- Shutter speed appears on the display.
2 Press △ ▽ on the Arrow pad to select the shutter speed.
△ : To increase shutter speed.
▽ : To lower shutter speed.
Shutter speed range*
1/2 to 1/800 (sec)

text_image
Technical diagram of a digital camera with labeled parts 1 and 2Shutter speed

text_image
S F2.8 1/800 0.0 [ ] 10★★When the shutter speed indication appears in red on the display
The shutter speed appears in red when the shutter speed is not suitable for the conditions. “▼” appears beneath the shutter speed indication when the shutter speed is too high, and “▲” appears when the shutter speed is too low. Adjust the shutter speed to the optimum setting according to “▼/▲” on the display.
Note:
- If you set the Mode dial to "A" when the ISO speed is set to AUTO, ISO speed is automatically set to 100.
- When the exposure setting is unsuitable, the aperture display will blink and “▲” (overexposure) or “▼” (underexposure) will appear on the display.
- Unless OFF is selected in "All Reset", the setting will be canceled and reset to off when the power is turned off. (p.148)
You can set the aperture and the shutter speed manually in the Manual mode. To check the exposure, refer to the exposure differential on the display.

1 Set the mode dial to "M".
● The aperture and the shutter speed appear on the display.
2 Press △ ▽ ▷ ◀ on the Arrow pad to select the aperture and the shutter speed.
◀ : Increases the aperture
▷ : Decreases the aperture
△ : Makes faster the shutter speed
▽: Makes slower the shutter speed
★★Aperture differential
- The difference (ranging from -3.0 to +3.0) between the exposure determined by the currently selected aperture and shutter speed compared to the exposure level considered optimal by the camera appears in the upper right-hand corner on the screen.
- When AEL is pressed, the aperture differential appears at the bottom of the screen indicated with the bar. Pressing the Shutter button halfway allows you to stop the indicator on the bar when the exposure differential is determined by the camera.
- When the exposure is set to less than -3.0 or more than +3, the aperture differential appears in red on the display.

text_image
Technical diagram of a digital camera with labeled parts 1 and 2Shutter speed
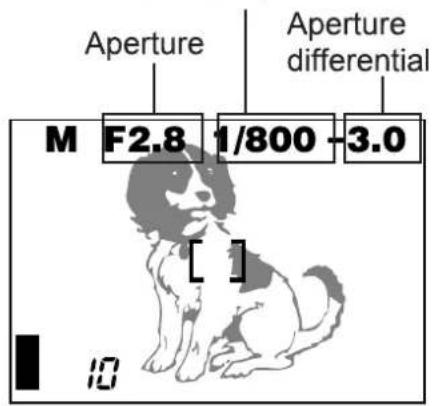
text_image
Aperture Aperture differential M F2.8 1/800 -3.0 [ ] 10M F2.8 1/800

natural_image
Illustration of a sitting dog with a black-and-white pattern and a bracket at the bottom (no text or symbols)When the bar is displayed
Note:
- If you set the Mode dial to "M" when the ISO speed is set to AUTO, ISO speed is set to 100 automatically.
- Unless OFF is selected in "All Reset", the setting will be canceled and reset to off when the power is turned off. (p.148)
Use the Macro mode to shoot subjects at close range. You can get as close as 4 inches to your subject (when the zoom lever is set to "W" to the maximum position), allowing you to fill the entire frame with your subject.

1 Press 📊 to display “💡” on the control panel.
- To cancel the Macro mode, press the Macro button repeatedly until the “💡” goes off on the control panel.
2 Take picture.
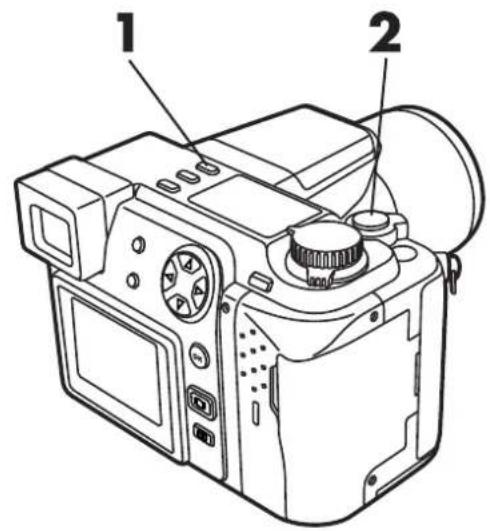
text_image
Technical diagram of a digital camera with labeled parts 1 and 2
text_image
Control panel Macro mode ESP HQ 10- Each time you press 📊, “ ” goes on and off.
| Mode/Control panel | Shooting range | ||
| WIDE (W) | TELE (T) | ||
 | acro (No indication) | 23.6" to ∞ | 6.5ft to ∞ |
| Macro ( [IMAGE] ) | 3.9" to 23.6" | 3.25ft to 6.5ft | |
Note:
- When you use the flash in the Macro mode, the flash may not have the proper effect. Confirm the result on the display.
- Unless OFF is selected in "All Reset", the setting will be canceled and reset to off when the power is turned off. (p.148)
4
USING YOUR CAMERA'S ADVANCED FUNCTIONS
In this section, you will find out how to take pictures using more advanced functions, such as manual focus, brightness adjustment, special effects, etc.
Subjects that are difficult to focus on
Under certain types of conditions auto focus may not work properly. If you run into problems, try the procedure below or switch to Manual focus (p.94).
Conditions ① to ③
Auto focus may not work properly. The AF confirmation mark may blink.
① Subjects with low contrast
Lock the focus on an object that is at the same distance from the camera as the subject, then aim at the subject to take the picture. (p. 93)

natural_image
Line drawing of a sports car (no text or symbols)② Subjects with no vertical lines
Lock the focus on the subject by holding the camera vertically, then change it to the horizontal position to take the picture. (p. 93)

natural_image
Simple line drawing of a window with horizontal slats and a vertical panel, next to a plant (no text or symbols)③ Subjects in excessively bright light
Lock the focus on an object that is at the same distance from the camera as the subject, then aim at the subject to take the picture. (p. 93)

natural_image
Line drawing of a car driving on a road with a fence in the background (no text or symbols)Conditions ④ and ⑤
Auto focus may not work properly even when the AF confirmation mark lights when you press the Shutter button down halfway.
④ Subjects at different distances
Lock the focus on an object that is at the same distance from the camera as the subject, then aim at the subject to take the picture. (p. 93)

text_image
Scanned text of contract clauses with vertical columns and handwritten annotations⑤ Fast-moving subjects
Lock the focus on an object that is at the same distance from the camera as the subject, then aim at the subject to take the picture. (p. 93)
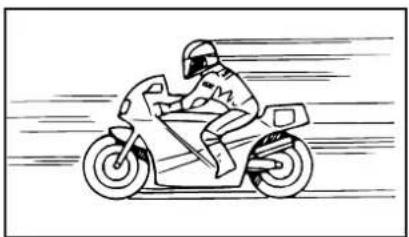
natural_image
Line drawing of a motorcyclist riding on a scooter with motion blur lines (no text or symbols)Focus lock
When your main subject is not within the AF target marks, follow the procedure below.
1 Position your subject within the AF target mark, and press the Shutter button halfway.
- The exposure is locked, and the AF confirmation mark lights.
When the AF confirmation mark blinks...
The focus or exposure is not locked. Position your subject again, and repeat step 1 until the AF confirmation mark lights.
2 Compose your shot again while keeping the Shutter button pressed down halfway.
3 Press the Shutter button all the way down to take the picture.

text_image
O P F2.8 1/800 0.0 [ ]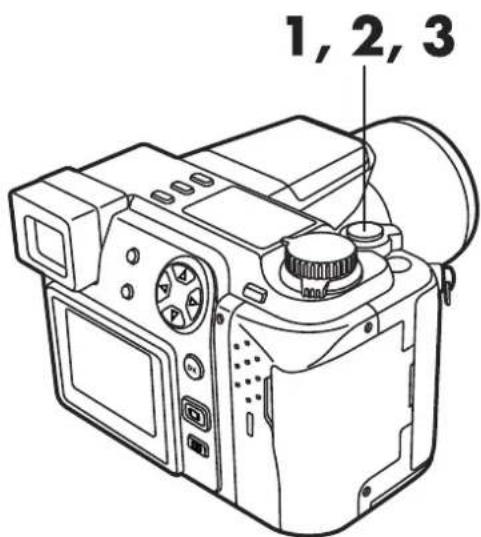
text_image
1, 2, 3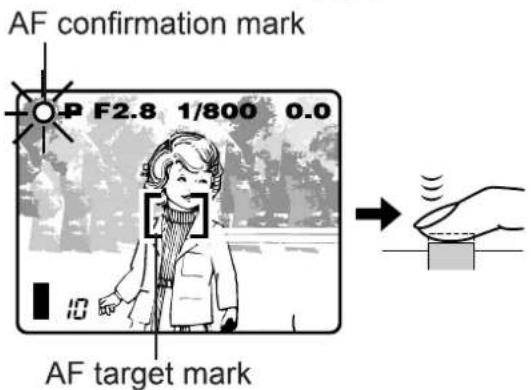
text_image
AF confirmation mark P F2.8 1/800 0.0 10 AF target mark
text_image
○ P F2.8 1/800 0.0 [ ] →Setting the focus manually — Manual focus
MF
Use this function to focus manually.

1 Press the OK button.
● The focus mode selection menu appears.
2 Press ▷ on the Arrow pad to select MF.
- MF and the distance indicator appear on the control panel.
3 Press △▽ to select the focal length.
● The display will be magnified to make focusing easier.
- When the distance indicator is moved to less than 3.25 ft, the display will switch to a shorter distance (3-15/16" to 3.25 ft).
4 Press the OK button.
● The setting is stored and MF appears in red.
- To cancel Manual focus, press the OK button to display MF, then press ◀ to select AF. Press the OK button.
★★Focusing is not possible at ∞ :
- Although MF is displayed and the distance indicator at the top of the bar, focusing may not be possible at . When this occurs, press to reset the display.
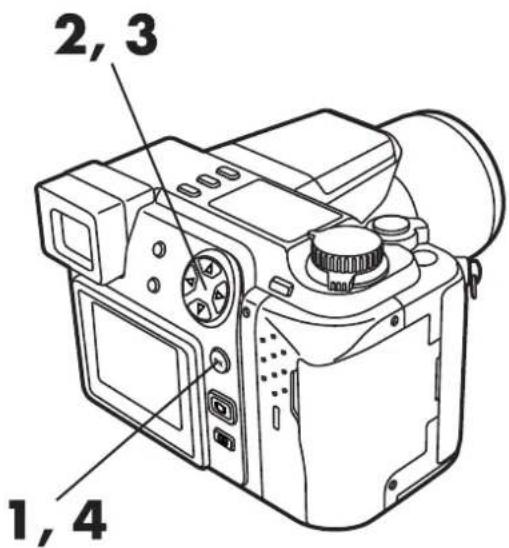
text_image
2, 3 1, 4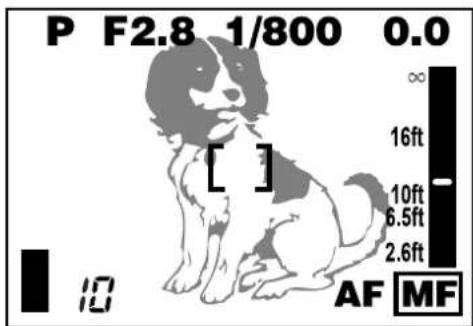
text_image
P F2.8 1/800 0.0 ∞ 16ft [ ] 10ft 6.5ft 2.6ft AF MF
text_image
Control panel MF ESP HQ 10Manual focus
Note:
- When using the flash, shoot within the flash working range.
- Unless OFF is selected in All Reset, the setting will be canceled when the power is turned off (p.148).
- The distances shown on the screen are for reference only.
- The picture may go out of focus when the Zoom lever is pressed in the Manual focus mode.
Focusing instantly — FULL TIME AF
F-AF
With FULL TIME AF, focusing time may be shorter. FULL TIME AF keeps the image on the LCD monitor/viewfinder in focus at all times. To select/cancel FULL TIME AF, set it to ON or OFF in the Menu.

1 Press
- Menu appears.
2 Press △▽ on the Arrow pad to select FULL-TIME AF, then press ▷.
3 Press △▽ to select ON, then press the OK button.
- Confirm your settings.
- If you want to take a picture now, you can do so.
4 Press the OK button.
- The settings are stored and the Menu disappears.
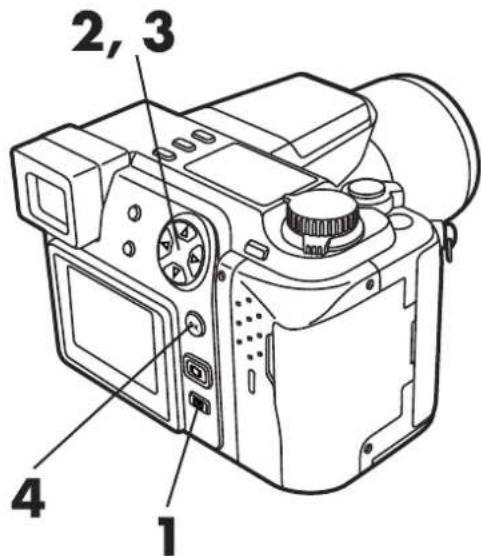
text_image
2, 3 4 1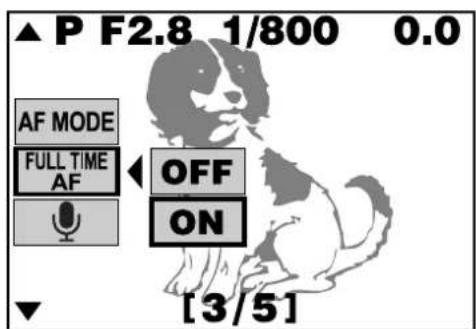
text_image
▲ P F2.8 1/800 0.0 AF MODE FULL TIME AF OFF ON [3/5]Menu (still picture recording mode)

text_image
Control panel Full-time AF—F-AF ESP HQ 10Note:
- Battery power consumption is higher when Full-time AF is on, so battery life will be shortened.
● The setting will not change until it is reset. - Unless OFF is selected in All Reset, the setting will be canceled when the power is turned off (p.148).
Selecting the focus range (AF MODE)

You can select the focus range of your subject.
iESP : Focus selection is based on the entire image on the screen (factory preset).
SPOT : Focus selection is based on the image within the AF target mark.

1 Press ☐ to display Menu.
2 Press △▽ on the Arrow pad to select AF MODE, then press ▷.
3 Press △▽ to select iESP or SPOT, then press the OK button.
- If you want to take a picture now, you can do so.
4 Press the OK button.
● The settings are stored and the Menu disappears.
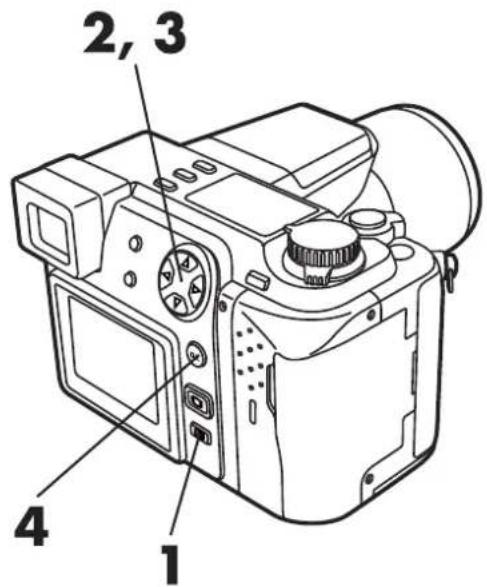
text_image
2, 3 4 1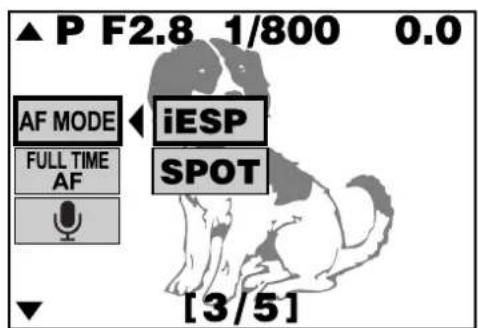
text_image
▲ P F2.8 1/800 0.0 AF MODE FULL TIME AF iESP SPOT [3/5]Menu (still picture recording mode)

text_image
Control panel OAF ESP HQ 10AF system
Compensating for image blur — Stabilization system (")
When you take pictures with at wide-angle or telephoto, camera shake is more likely to affect the picture, causing image blur. If this happens to you, you can compensate for camera shake with the camera shake prevention feature.
Under some conditions, («) may not work effectively.
- When the camera angle is changed very quickly
• Night-scene recording
• Overexposure - When the battery indicator is blinking

1 Press ☐ to display Menu.
2 Press △▽ on the Arrow pad to select ◇, then press ▷. When ◇ appears, press △▽ to select ON, then press the OK button.
- To go back to the normal screen, press the OK button again. The setting is stored.
3 Press the Shutter button halfway.
- It takes about for 1 sec. to stabilize the image after setting. Check the image on the screen.
4 Press the Shutter button all the way down.
- This mode does not work effectively if you press the Shutter button all the way down soon after pressing it halfway down.
- If the shutter speed is low (p.110), this mode does not function.
- Since the Stabilization system remains activated for approx. 2 sec. after a picture is taken, you do not have to wait until the image is stabilized during Sequential shooting.
★★This mode is not suitable in the following cases
- When using a tripod.
- When using a cinepanhead
- When using a conversion lens

text_image
2 3, 4 2 1
text_image
▲ P F2.8 1/800 0.0 OFF ON [1/5]Menu (still picture recording mode)
Control panel

text_image
ESP HQ 10Stabilization system
Using the 27X zoom — DIGITAL ZOOM
You can take a 2.7X zoom photograph with the maximum optical zoom. If you use a 10X optical zoom, you can take an 27X zoom photograph with DIGITAL ZOOM.

1 Press
- Menu appears.
2 Press △ ▽ on the Arrow pad to select DIGITAL ZOOM, then press ▷.
When DIGITAL ZOOM appears, press △▽ to select ON, then press the OK button.
3 Press the OK button again.
- To go back to the normal screen, press the OK button again. The setting is stored.
4 Press the zoom lever towards T to magnify the image.
● The zoom lever is displayed. The white area of the bar indicates optical zoom, and the red area indicates digital zoom.
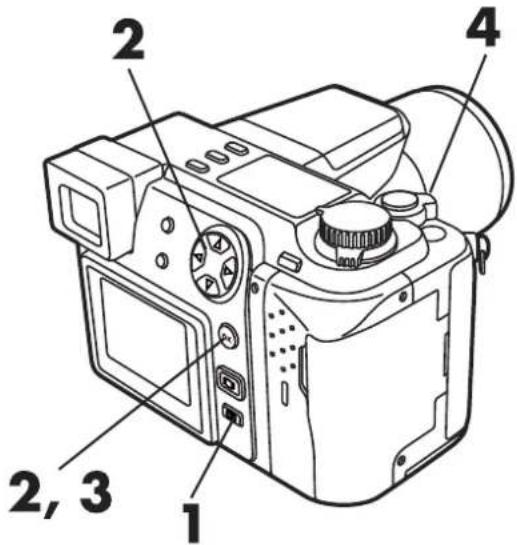
text_image
1 2, 3 2 4
text_image
▲ P F2.8 1/800 0.0 [<Menu (still picture recording mode)

text_image
P F2.8 1/800 0.0 T W [ ] 17Note:
- Unless OFF is selected in All Reset, the setting will be canceled when the power is turned off (p. 148).
- Images may be grainy in this mode.
Compensating for lighting conditions — Exposure compensation

You can adjust exposure manually by +/- 2 (in increments of approx. 1/3). If you want a white object to appear as white as possible, adjust + to increase the exposure. If you want a black object to appear as black as possible, adjust - to decrease the exposure.

1 Set the Mode dial to P, A, S, S-Prg or ☐.
- The exposure setting will be displayed.
2 Press ▷ on the Arrow pad for + adjustment and ◀ for - adjustment.
- When exposure is set to any value other than 0, ☑ is displayed on the control panel.

text_image
-2.0 ↓ Images become darker ±0 ↓ Images become lighter +2.0 ↓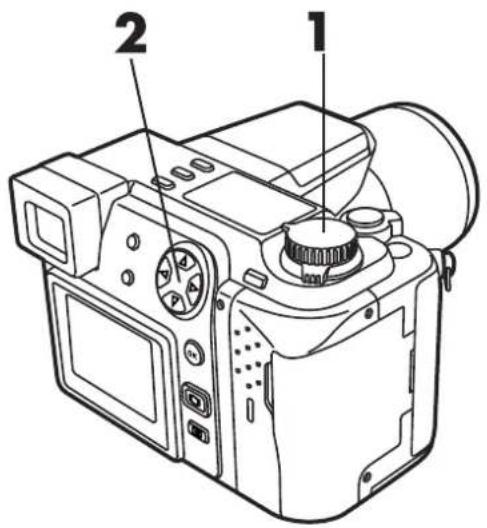
text_image
Technical diagram of a digital camera with labeled parts 1 and 2Exposure compensation

text_image
P F2.8 1/200 +2.0 [ ] 10Menu (still picture recording mode)
Note:
● Unless OFF is selected in All Reset, the setting will be canceled when the power is turned off (p. 148).
- If the subject is mostly dark, the exposure compensation does not function effectively. In such a case, display the recorded picture and check the brightness.
- You cannot correct the amount of light in this mode. To adjust brightness, refer to page 109.
Selecting the area of the brightness for metering — Metering mode ESP
You can select the area of the brightness for metering. When you know the area is properly exposed, press the 🔒 to choose the metering mode.
| Setting mode/Control panel display | Functions |
| Standard(digital ESP metering) | Meters the center of the subject and the area around the subject (digital ESP metering) |
| Center-weightedaveraging metering | Meters the center of the subject primarily. |
| Spot metering | Meters within the AF target mark primarily. Use this mode when backlight is making the subject darker. |

1 Press 📷 until Ⓐ (Spot metering) or ⚡ (Center-weighted averaging metering) mark is displayed on the control panel.
2 Take pictures.
Note:
- When MULTI METERING is set to ON, ESP is not available. Multi metering (P. 132)
- When the Mode dial is set to M, the metering mode can be switched. However, the exposure setting value is adjusted in the Manual mode (P. 89). The exposure value is displayed on the bar.
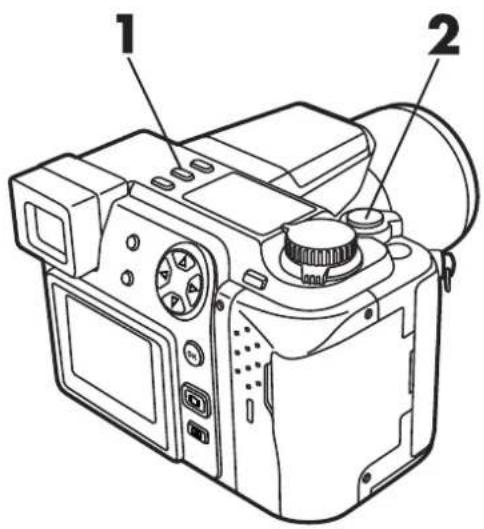
text_image
Technical diagram of a digital camera with labeled parts 1 and 2Control panel

text_image
HQ 10Metering mark
Changing the ISO
ISO
Increase the ISO when you want to take pictures in low-light situations with a fairly high shutter speed. You can select from AUTO, as well as 100, 200 and 400. When you set to AUTO, the sensitivity is automatically changed depending on the shooting conditions. The higher the ISO, the faster the shutter speed that can be used and the less light required.

1 Press
- Menu appears.
2 Press △▽ on the Arrow pad to select ISO, then press ▷.
3 Press △▽ to select the sensitivity, then press the OK button. You can select AUTO only when the Mode dial is set to P, S-Prg, 📋.
- To go back to the normal screen, press the OK button again. The setting is stored.
- ISO appears on the control panel when a setting other than AUTO is selected.
- ISO blinks on the control panel even when the ISO is automatically increased in the AUTO mode.
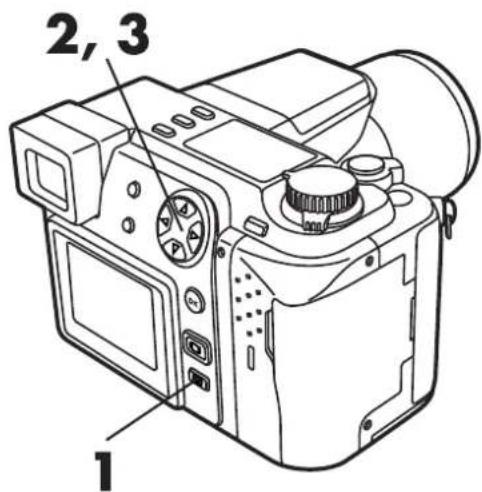
text_image
2, 3 1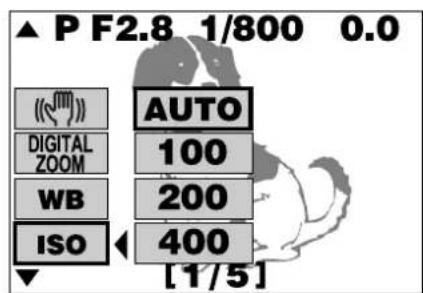
text_image
▲ P F2.8 1/800 0.0 AUTO DIGITAL ZOOM 100 WB 200 ISO 400 [1/5]Menu (still picture recording mode)
Control panel
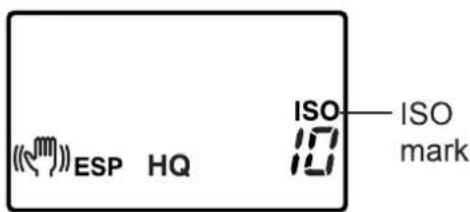
text_image
ESP HQ ISO 10 ISO markNote:
- The ISO scale is based on that used for conventional photographic film, but the figures are for reference only.
- When set to AUTO, sensitivity will be changed to 100 when the Mode dial is set to A/S/M.
- When AUTO is selected, the ISO is automatically increased in low-light situations when the flash is not used. This is to prevent blurring from camera shake.
● Pictures will appear grainy when the ISO is high. - Unless OFF is selected in All Reset, the setting will be canceled and reset to AUTO when the power is turned off (p. 148).
Recording images sequentially with different exposures — Auto bracket DRIVE
DRIVE BKT
Use this mode to record images with different exposures. Focus and white balance will be measured first and fixed during sequential shooting. You can select the number of pictures to take sequentially.

1 Set the record mode to any mode other than TIFF. If the record mode is set to TIFF, BKT is not available. (P. 104)
2 Press ☐ to display the Menu.
3 Press △▽ on the Arrow pad to select BKT, then press ▷.
4 Press △▽ to select the range, then press ▷.
5 Press △▽ to select the number of pictures, then press the OK button repeatedly until the Menu disappears.
Control panel
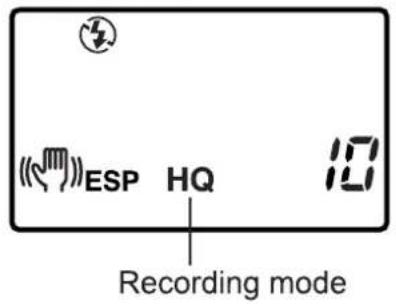
text_image
ESP HQ Recording mode
text_image
3, 4, 5 2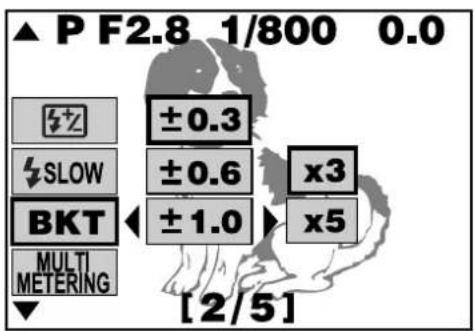
text_image
▲ P F2.8 1/800 0.0 ±0.3 ±0.6 x3 ±1.0 x5 MULTI METERING [2/5]
text_image
▲ P F2.8 1/800 0.0 ±0.3 ±0.6 x3 ±1.0 x5 MULTI METERING [2/5]
Press DRIVE until BKT disappears from the control panel.
7 Take a picture.
- When the Shutter button is released in the sequence mode, the camera stops taking pictures.

text_image
6 7Control panel

text_image
BKT ESP HQ 10Auto bracket
Note:
- If there is not enough room left in memory for the sequence mode with Bracketing, it will not be possible to take next picture.
- Unless OFF is selected in All Reset, the setting will be canceled when the power is turned off (p. 148).
Setting the record mode
TIFF SHQ HQ SQ
Select the desired record mode.
- With the mode dial set to P, A, S, M or S-Prg (for still pictures)
You can select from TIFF, SHQ, HQ and SQ. Image quality increases in the order of SQ HQ SHQ TIFF . TIFF is the highest quality image format. The higher the quality, the better the printed images will look. Pictures shot in the SHQ or TIFF mode take longer to record and play back than picture shot in SQ and HQ.
- With the mode dial set to 📋 (for motion picture recording)
You can select from HQ and SQ. The image quality increases in the order of SQ→HQ.

1 Press ☐ to display Menu.
2 Press △▽ on the Arrow pad to select ◀, then press ▷.
3 Press △▽ to select the image quality, then press the OK button.
- File size and compression rate values can be selected for TIFF and SQ. (P. 153-155)
- Pressing the OK button again stores the setting and restores the normal screen.
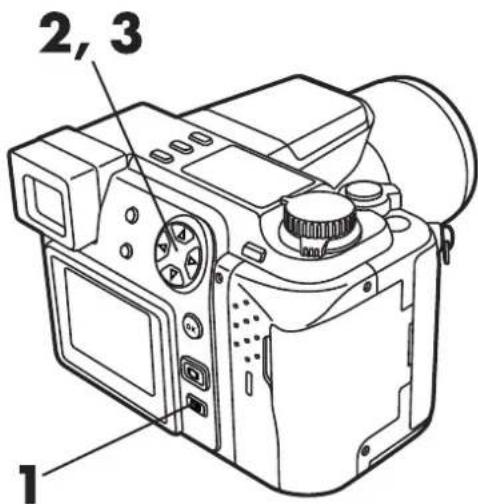
text_image
2, 3 1
text_image
▲ P F2.8 1/800 0.0 MODE SETUP S-Prg TIFF SHQ HQ SQ [5/5]Menu (still picture recording mode)
Control panel
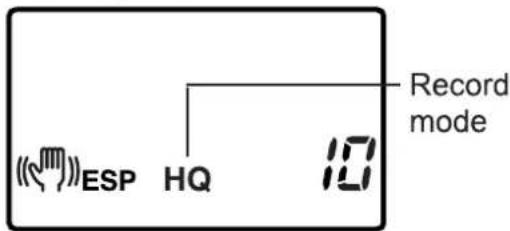
text_image
Record mode ESP HQ★★Default resolution and compression rate settings
Refer to the table below for image quality factory presets.
- For TIFF mode, you can select the resolution (p.153).
- For SQ mode, you can select the resolution and compression rate (p.154).
Still picture recording (Initial settings)
| Record mode | TIFF | SHQ | HQ | SQ[NORMAL] |
| Resolution | 1600 x 1200 pixels | 640 x 480 pixels | ||
| Compression | Uncompressed | Low-Compression JPEG | Standard JPEG | Standard JPEG |
Movie recording (Initial settings)
| Record mode | Resolution |
| HQ | 320 x 240 pixels (15 frames/sec.) |
| SQ | 160 x 120 pixels (15 frames/sec.) |
Note:
● The number of pictures that can be stored or the number of seconds of motion recording varies according to the recording mode. (P. 63)
● Unless OFF is selected in All Reset, the setting will be canceled when the power is turned off (p. 148).
Select a flash mode to match the lighting conditions and the effect you want to achieve. You can also correct the amount of light using the flash compensation mode (p.109). To use the external flash, refer to page 112.
Press ↘ (Flash mode button) to select a flash mode. Each time you press the button, the camera switches between the following flash modes. (P. 108)
Flash mode
| Flash mode/Control panel | Use |
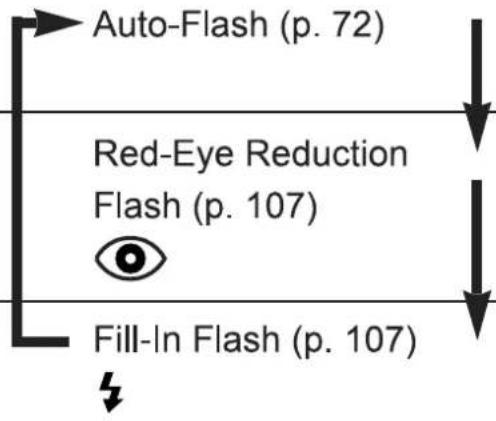 | Automatically fires in low-light and backlight conditions. |
| Significantly reduces the phenomenon of “red-eye” (subject’s eyes appearing red). | |
| Fires regardless of available light. |
FLASH OFF

- The ⑦ is displayed whenever the built-in flash is within the camera housing. You cannot select this mode if the built-in flash is extended.
-
In the following situation, the flash does not fire even when the flash is extended. 📋 appears on the control panel.
-
Bracketing BKT
– Picture effects (WHITE BOARD/BLACK BOARD) - Movie Recording
- Taking panorama pictures □
Flash working range:
Wide-angle : Approx. 11.8" to 13 ft
Telephoto : Approx. 3.25 ft to 11 ft
Control panel

text_image
ESP HQ 10RED-EYE REDUCTION FLASH

This mode significantly reduces the phenomenon of "red-eye" by emitting about 10 pre-flashes before firing the regular flash. This mode works the same way as the auto-flash except for the pre-flashes.

natural_image
Black-and-white illustration of a woman's face with closed eyes, showing a change from left to right (no text or symbols)Note:
- It takes about 1 sec. before the Shutter is released.
- Effectiveness may be limited if the subject is not looking directly at the preflashes, or if the shooting range is to far. Individual physical characteristics may also limit effectiveness.
- The mode is not available when the Mode dial is set to M and S-Prg-Sports.
Fill-in Flash (forced activation)

The flash fires regardless of available light. This mode is useful for eliminating shadows on the subject's face or for correcting the color shift produced by artificial lighting (especially fluorescent light).

natural_image
Two-panel black-and-white illustration showing a smiling woman with headphones, set against a rural background (no text or symbols)Note:
- It may not have the desired effect under excessively bright light.
OFF (flash override)
The flash does not fire even in low-light conditions. Use this mode in situations where flash photography is not desired or prohibited, or when you want to shoot a natural-looking twilight or night scene. To use this mode, push the flash back into the camera.

natural_image
Black-and-white illustration of a man in a tuxedo and woman in a suit, with other people seated in the background (no visible text or symbols)Note:
- Since a slow shutter speed is automatically selected in low-light situations when in the OFF mode, the use of a tripod is recommended to prevent blurred pictures caused by camera shake.

1 Slide the flash switch to the left to pop up the flash.
- The flash does not fire in the movie recording mode (☐).
2 Press ↗ until the desired flash mode appears on the control panel.
- Each time you press ↓, the flash mode will switch from AUTO-FLASH →RED-EYE REDUCTION FLASH (○)→FILL-IN FLASH (↓).
3 Press the Shutter button halfway down.
- When the flash mark (⚡) lights on the display, the flash is ready to fire.
- If the flash mark (⚡) is blinking, the flash is charging. In this case, release the Shutter button and wait until the flash mark lights steadily before taking the picture.
- Pay attention to the "Notes" for each mode (p.106/107).
4 Press the Shutter button all the way down.

text_image
3, 4 2 1Flash mark
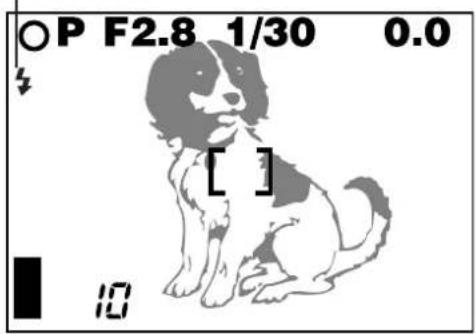
text_image
P F2.8 1/30 0.0 [ ] 10Control panel

text_image
ESP HQ 10Note:
● The flash does not function in the Bracketing (p.102), Picture Effects (WHITE BOARD/BLACK BOARD) (p.137) and Panorama modes(p.135).
- The flash may not give you the results you want in the Macro mode, especially with wide-angle shooting. Check your results on the Monitor. If a conversion lens is attached to the lens, it may reduce the output of the flash.
- Unless OFF is selected in All Reset, the setting will be canceled and reset to Auto-Flash when the power is turned off (p.148).
Correcting the amount of light produced by the flash — Flash intensity control
You can adjust the amount of light emitted by the flash to correspond with
your shooting requirements.

1 Press ☐ to display Menu.
2 Press △▽ on the Arrow pad to select ☐, then press ▷.
3 Press △▽ to increase/decrease the amount of light emitted.
● 5+ appears on the control panel.
- Use to increase/decrease the value.
△: The exposure is corrected by a +1/3 EV step with each press.
∇: The exposure is corrected by a -1/3 EV step with each press.
- Correction can be made within a range of ±2EV (ExposureValue).
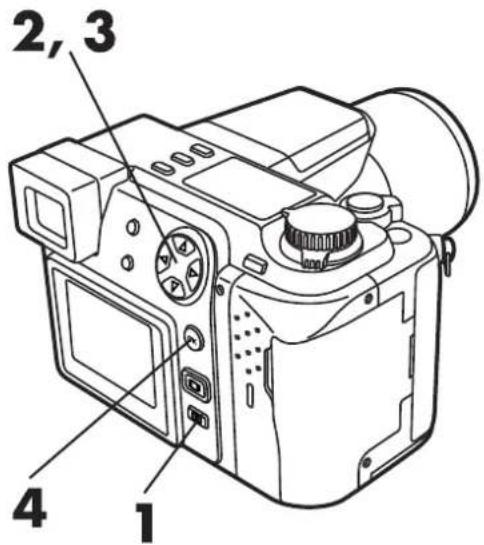
text_image
2, 3 4 1
text_image
▲ P F2.8 1/800 0.0 ±0 SLOW BKT MULTI METERING [2/5]4 Press the OK button.
● The setting is stored in memory and the Menu disappears.
Control panel
Flash intensity control
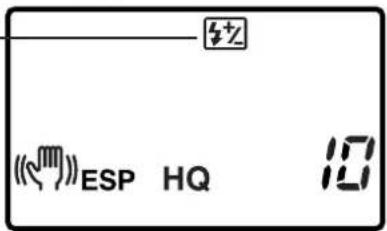
text_image
ESP HQ 10Note:
- If the FL-40 extension flash is set to TTL-AUTO and used simultaneously with the main flash, correction is made for the amount of light emitted by both flashes.
- If the FL-40 external flash is set to MANUAL and used simultaneously with the main flash, correction is made only for the amount of light emitted by the main flash only.
- The flash correction effect may not be sufficient if the shutter speed is too fast.
Selecting the flash light emission timing — Slow synchronization flash mode
SLOW
This mode allows you to synchronize the light emitted by the flash with a slow shutter speed. Setting the shutter speed to a lower value lets you capture a sharper image.
SLOW 1 : 1st-CURTAIN:
To capture the subject at the beginning of the shutter release. The streak made by the headlights of a moving car will come towards you.

natural_image
Line drawing of a car with motion lines indicating speed or speed (no text or symbols)SLOW 2 : 2nd-CURTAIN:
To capture the subject at the end of the shutter release. The streak made by the taillights of a moving car will recede.

natural_image
Line drawing of a car with motion lines indicating speed or motion (no text or symbols)
1 Press ☐ to display Menu.
- This mode does not function if the mode dial set to S-Prg, and 📄, 📇 or 🔒 is selected.
2 Press △▽ on the Arrow pad to select ↘SLOW, then press ▷.
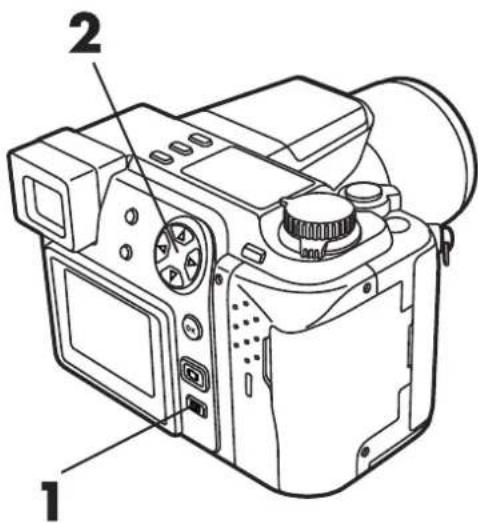
text_image
1 23 Press △▽ to select SLOW 1 or SLOW 2, then press the OK button.
- ↓ SLOW appears on the control panel.
- Press the OK button again to store the setting. The Menu disappears and the normal screen is restored.
4 Take a picture.
- When SLOW 2 is selected, the flash will fire a pre-flash before the regular flash.

text_image
Diagram of a digital camera with numbered parts labeled 3, 4, and 5 pointing to different components.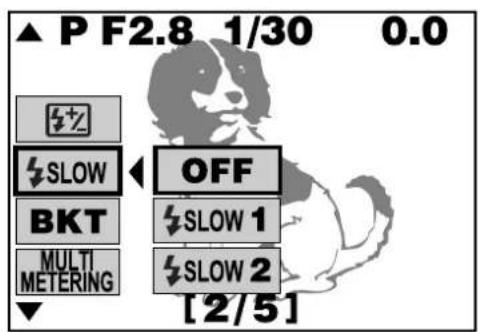
text_image
▲ P F2.8 1/30 0.0 OFF SLOW 1 BKT MULTI METERING [SLOW 2] [2/5]Control panel
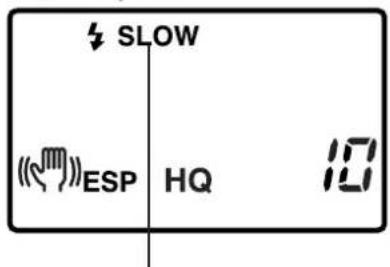
text_image
SLOW ESP HQ 10Slow shutter
synchronization flash mode
Note:
- It is impossible to select ↘ SLOW—OFF when the Mode dial is set to S or M. If the Mode dial is switched to S or M when ↘ SLOW—OFF has been selected, SLOW 1 will be set. You can then select from SLOW 1 or SLOW 2.
- Since a slow shutter speed is automatically selected in this mode, use the tripod to prevent blurred pictures caused by camera shake.
- This mode can be used with both the built-in flash and an external flash.
- Unless OFF is selected in All Reset, the setting will be canceled and reset to off when the power is turned off (p.148).
Using an external flash
The FL-40 external flash (optional) can be used when taking flash pictures, either by itself or together with the main flash. To connect the FL-40 to the camera, the exclusive FL-BK01 flash bracket (optional) and FL-CB01 bracket cable (optional) are required. Without these options, the FL-40 will not perform differently from non-Olympus external flashes.
■ Taking pictures using both the main flash and the FL-40 external flash
If the FL-40 is used, flash mode and exposure compensation will be detected automatically by the camera, allowing the main flash and external flash to function together.
Using the two flashes together allows for more sophisticated lighting, such as catch lighting.
1 Mount the FL-40 external flash on the flash bracket, then fasten it to the camera's tripod socket and connect the flash bracket and the camera's 5-pin external flash socket using the bracket cable.
- Please refer to each separate instruction manual for the external flash, flash bracket, and flash cable.
- The 5-pin external flash socket cover on the camera is threaded. Unscrew and remove it before connecting the bracket cable.

natural_image
Technical line drawing of a camera with an inset close-up showing internal components (no text or symbols)5-pin external flash socket
2 Set the Mode dial to P, A, S, M, or S-Prg.
3 Turn on the external flash.
- The mode for the external flash is TTL-AUTO.
4 Slide the flash switch on the camera to open the main flash.
5 Press ↗ (Flash mode button) to select the camera's flash mode.
● Auto-Flash (P.72), Red-Eye Reduction Flash (P.107), and Fill-in Flash (P.107) are available.
● A slow-shutter synchronization flash can also be set (P.110).
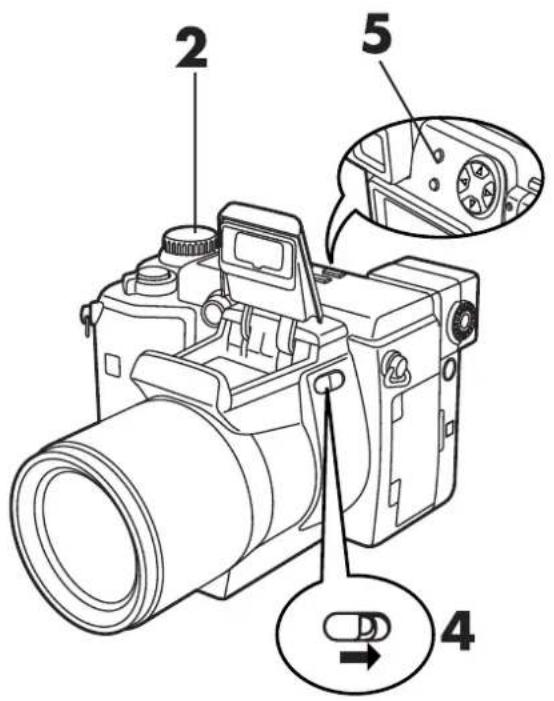
text_image
2 5 4■ Taking pictures using the FL-40 external flash by itself
See steps 1 and 2 in Taking pictures using both the main flash and the FL-40 external flash (P.112)
3 Make sure that the main flash is closed. If it opens at any time during shooting, close it.
4 Press ↘ (Flash mode button) to display the available modes on the control panel. Modes will be displayed in the following order: Auto-Flash (no display), Red-Eye Reduction Flash Ⓞ, Fill-in Flash ↘, FLASH OFF ⏻.
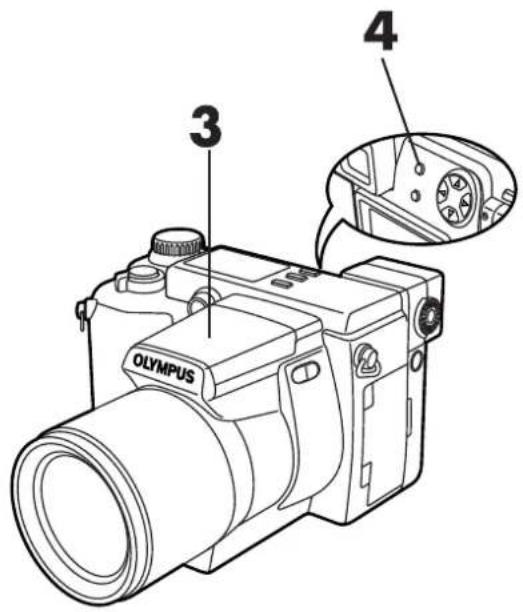
text_image
3 4 OLYMPUSNote:
When using both the FL-40 external flash and the main flash
- If close-up pictures are overexposed, try using the main flash by itself.
- When the main flash and the FL-40 are used together, the main flash is used as the compensating light source. This means that if the amount of light from the FL-40 is insufficient (beyond its working range), the resulting pictures may be underexposed.
When using the FL-40 external flash by itself
● The extension flash may occasionally misfire.
Taking pictures with commercially available external flashes
External flashes (commercially available) can also be used with the exclusive FL-BK01 (optional) and FL-CB01 bracket cable (optional). For details about how and when to use external flash, see "Usable commercially available external flashes". (P. 116)
1 Mount an external flash on the flash bracket, then fasten it to the camera's tripod socket and connect the flash bracket and the camera's 5-pin external flash socket using the bracket cable.
2 Set the Mode dial to M, then adjust the shutter speed and the aperture.
- Remember that a slow shutter speed can produce blurred images.
3 Turn on the external flash.
4 Set the flash mode on the external flash. Also set ISO and aperture on the external flash to match the camera's settings.
- See the user's manual for the external flash to select its modes.
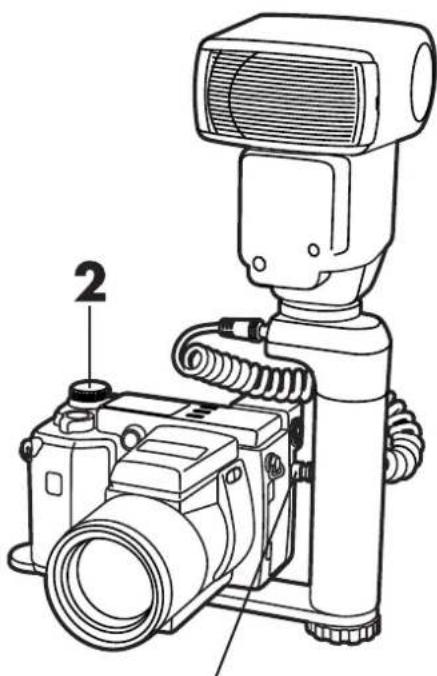
natural_image
Line drawing of a digital camera with attached lens and control unit (no text or symbols)5-pin external flash socket
Note:
- The camera's flash mode will have no effect on the external flash. The external flash will fire even when the camera's flash mode is set to OFF.
- Check the following before using a commercially available external flash:
- Some flashes available on the market operate with a high voltage synchro terminal. If one of these is used, it may not function normally. Contact the manufacturer of the flash you are using concerning the specifications of the flash's synchro terminal.
- Some flashes available on the market have the polarity of the synchro terminal reversed. In this case, even if the flash is connected, it will not fire. Contact the manufacturer of the flash for more information.
- Confirm in advance that the external flash you are using is synchronized with the camera.
- We highly recommend that an Olympus external flash be used with this camera.
■ Usable commercially available external flashes
When selecting an extension flash, use products which meet the following basic conditions.
(1) Exposures when using an extension flash require that adjustments be made on the extension flash unit.
If an extension flash is used in the Auto mode, match it with the F value and ISO sensitivity settings on the camera.
(2) Even if the auto F value and ISO sensitivity of the extension flash are set to the same conditions as those on the camera, depending on the photographic conditions, it is possible that the correct exposure may not be obtained anyway. In such a case, adjust the auto F value or ISO value on extension flash unit or calculate the distance in the manual mode and use it that way. However, generally, the auto F value and ISO value can only be adjusted 1 step and beyond that, exposure compensation cannot be made. (Exposure compensation in the camera is made invalid in extension flash photography.)
(3) Use a flash which is capable of covering an illumination angle for a 38 mm or larger lens when calculated for 35 mm film. However, in close-up photography with the lens on the wide setting, the bottom of the image may not expose correctly. The ideal is to have a wide angle adapter to fit on the flash and spread the illumination angle so it is wider.
(4) Use a flash unit with a flash time of 1/200 sec. or less when using the flash at full strength. For devices with a long flash time, such as a ring flash, a portion of the light emitted will not contribute to the exposure.
(5) If a flash unit or other accessory with additional communications functions other than the FL-40 is used, it may not only fail to function normally, but may also cause damage to the camera's circuitry. Do not use such a device.
Taking pictures in sequence — Sequential mode
DRIVE
Use this mode to take pictures in sequence. When the shutter release button is held down, the camera will take pictures in sequence. Picture-taking will stop when you release your finger from the button. A max. 2 frames/sec. is available in this mode. (in all record modes except TIFF) Press DRIVE to change the function of this mode. The sequential mode includes:
Single-picture Shooting (no display): Takes only one picture when you press the shutter button. (Initial setting)
Sequential Shooting (☐): Takes pictures in sequence. Focus, brightness (exposure), and white balance are locked at the first frame. Up to 5 frames can be taken in sequence at once. The approximate recording speed during Sequential mode and the number of still pictures that can be stored is shown below.
AF sequential Shooting (AF): Takes pictures in sequence. Focus, brightness (exposure), and white balance are metered and adjusted in each frame. The speed of picture-taking slows down. Up to 5 frames can be taken in sequence at once. The approximate recording speed during Sequential mode and the number of still pictures that can be stored is shown below.
Self-timer/remote-control (💡): Takes pictures with the self-timer/remote-control. See P.119 to 121 for further information.
Auto bracket (BKT): Takes pictures in sequence. The camera will adjust the brightness (exposure) in each frame. Focus and white balance are locked at the first frame. See P.102 for further information.
Recording speed during Sequential mode and number of still pictures that can be stored
| Record mode | Recording speed during Sequential mode | Number of storable still pictures |
| TIFF | Not available. | |
| SHQ | 1.5 frames/sec | approx. 5 |
| HQ | 1.8 frames/sec | approx. 16 |
| SQ (640 X 480) | 2 frames/sec | approx. 86 |
Note:
- When using the flash, the speed of sequential shooting slows down, to allow the flash to recharge.
Sequential shooting/AF sequential shooting


1 Set the record mode to any mode other than TIFF. If the record mode is set to TIFF, the Sequential mode is not available. (P. 104).
2 Make sure that the mode dial is switched to P, A, S, M or S-Prg.
3 Press DRIVE until (sequential mode) or AF (AF sequential mode) is displayed.
4 Press the shutter button to take pictures.
- If the battery power runs out during sequential shooting and the battery check mark blinks, shooting stops. Pictures already taken will be written to the card.
Control panel

text_image
(ESP HQ 10 Record mode
text_image
Diagram of a digital camera with numbered parts labeled 2, 3, and 4Control panel
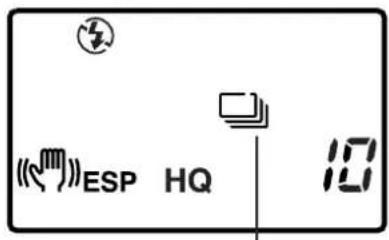
text_image
ESP HQ 10Sequential shooting mode
Note:
- Red-eye reduction mode Ⓞ cannot be set during the sequential mode.
- When using an external flash, set the speed fast enough to fire for each shot during sequential shooting.
- Since the slowest shutter speed in the sequence mode is set to 1/30 second to prevent blurring from camera movement, the resulting picture may be darker than expected.
- Unless OFF is selected in All Reset, settings will not be cancelled when the power is turned off. (P. 148)
Using the self-timer
Use a tripod to fix the camera securely.

1 Press DRIVE until 🎨 (self-timer/remote control) is displayed on the control panel.
2 Press the shutter button.
- The self-timer lamp on the front of the camera will light up for approx. 10 seconds. Then, the illuminator will blink for approx. 2 seconds and the shutter will be released.
- In the ⚙ mode, movie recording starts. To stop recording, wait until the camera stops recording (i.e. until maximum continuous recording time passes), or press the Shutter button.
To stop the self-timer:
Press DRIVE.

text_image
Technical diagram of a digital camera with labeled parts 1 and 2Control panel
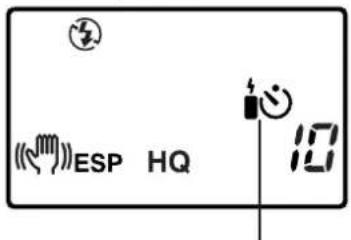
text_image
ESP HQ 10Self-timer/remote control

text_image
Self-timer lamp- The self-timer/remote control mode will be cancelled once self-timer shooting is complete.
Taking pictures using the remote control
You can shoot and display pictures using the remote control. (P. 76) Before use, attach the camera to a tripod securely.

1 Press DRIVE until 📋 (self-timer/remote control) appears.

natural_image
Line drawing of a DSLR camera with labeled component (no text or symbols beyond label)Control panel

text_image
ESP HQ Self-timer/Remote Control2 Compose the picture, aim the remote control at the remote control window on the camera, then press the shutter button on the remote control to take the picture.
● The self-timer lamp will blink.
3 When the mode dial is set to P, A, S, M, or S-Prg...
Press the shutter button on the remote control.
- The self-timer lamp will blink and the shutter will be released in approx. 3 seconds.
When the mode dial is set to 📋 (movie), press the shutter button on the remote control.
- The self-timer lamp will blink and the shutter will be released in approx. 2 seconds. Recording will then start. To stop recording, press the shutter button. The card will then begin storing the picture data taken so far.
★★When the remote control does not work
- If the self-timer lamp does not blink when the shutter button on the remote control is pressed, get closer to the camera and try it again.
- If the self-timer lamp does not blink, there may be frequency interference. Change the remote control's frequency according to its instruction manual.

text_image
15° 9.8ft 15° 9.8ft 16.4ft
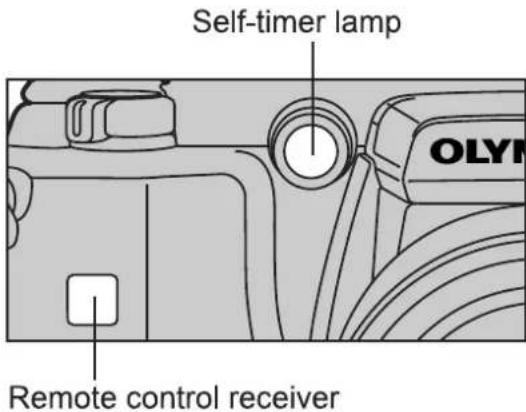
text_image
Self-timer lamp OLY Remote control receiverNote:
- Working distance may be reduced in brightly lit areas, such as direct sunlight.
- Do not expose the remote control window to bright light.
- The self-timer/remote control mode will not be cancelled when shooting is finished.
Recording Sound When Taking A Picture — Sound record

Select to take pictures with or without sound.
Still Picture Recording: 4-second sound recording is possible.
Movie Recording: Simultaneous sound recording is possible.
Set the sound record mode in the Still picture record mode or the ⚙️ mode independently.
Sound can be added to still pictures after they are taken. (P. 139)

When taking a still picture: Set the mode dial to P, A, S, M or S-Prg. When recording a movie: Set the mode dial to ☐ (movie).
2 Press .
● The menu screen will appear.
3 Press △ ▽ on the Arrow pad and select ⚙, then press ▷.
4 Press △▽ and select ON, then press the OK button.
● A recording mark will appear on the control panel.
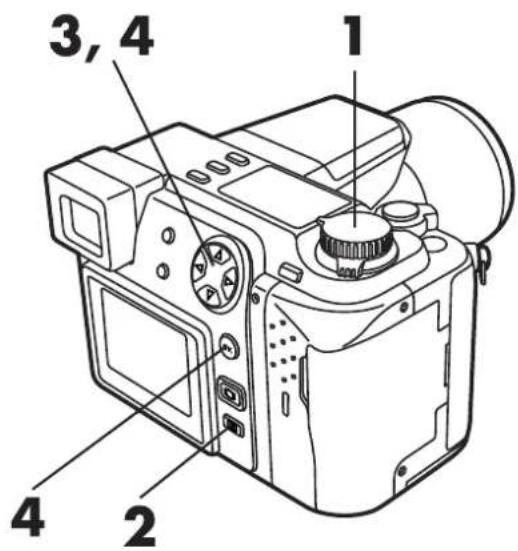
text_image
1 2 3, 4 4Still Picture Recording Menu
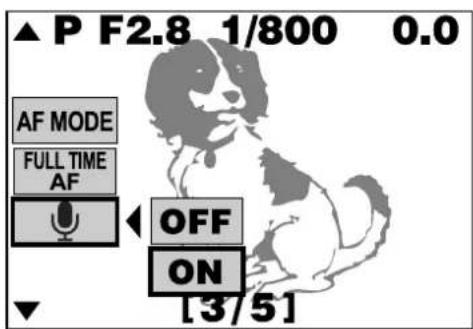
text_image
▲ P F2.8 1/800 0.0 AF MODE FULL TIME AF OFF ON [3/5]Control Panel

text_image
ESP HQSound record mark
5 Press the OK button, then take the picture.
- Settings will be stored and the menu screen will disappear.
- 0.5 seconds after the shutter is released, sound recording will start.
6 During recording, turn the camera microphone towards the subject.
● During recording, the recording mark on the control panel will blink and a bar showing that recording is proceeding will be displayed.
- When the camera is more than 1m from the subject, sound cannot be recorded clearly.
● During recording, it is not possible to take the next picture.
★★Recording a sound memo using an external microphone
Connect an external microphone to the camera's external microphone jack and turn the microphone towards the intended subject. The built-in microphone is disabled when an external microphone is used.
★★In the Display ▶ mode
Sound can be added to still pictures already taken. → P.139
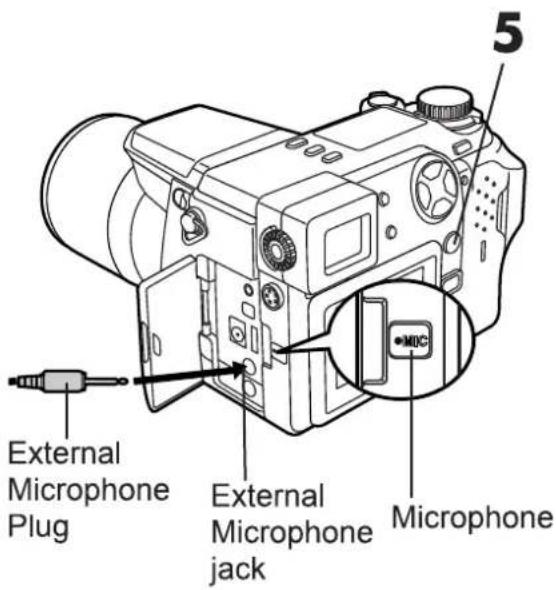
text_image
External Microphone Plug External Microphone jack Microphone 5
natural_image
Illustration of a sitting dog with a microphone and sound wave indicator (no text or symbols)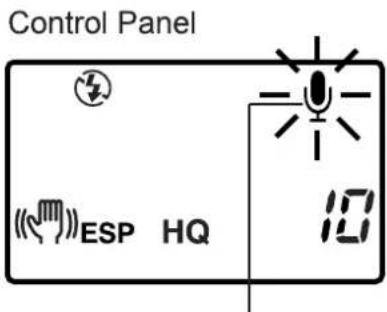
text_image
Control Panel ESP HQSound record mark
Note:
- This function is not available in TIFF. Sound can be added later to still pictures. (P.139)
- This function is not available when the drive mode is set to sequential shooting ☐ AF☐ or auto bracket BKT.
DISPLAY—Checking Recorded Pictures
Single-picture display or index display (showing multiple pictures at one time) are available. You can also magnify a single picture (close-up display) or display pictures like an automatic slide-show (automatic display).
Displaying a single image — Single Image Display

1 Set the mode dial to ▶.
● The card access lamp will blink and the last picture taken will appear on the Monitor.
- If you press 📄, you can switch the display in the viewfinder. (P.65)
- To select a picture for display, use the Arrow pad.
◀ : Go back to the previous picture
▷ : Go to the next picture.
△ : Go back 10 pictures.
▽ : Go ahead 10 pictures.
- To see information about a picture, such as set items, date, or file name, press the INFO button. (P.28)
● The functions accessed by turning the Mode dial in the Display mode are also available in Quick view. (P. 73) - You can rotate a vertically oriented picture. Rotating a vertically oriented picture (P. 138)
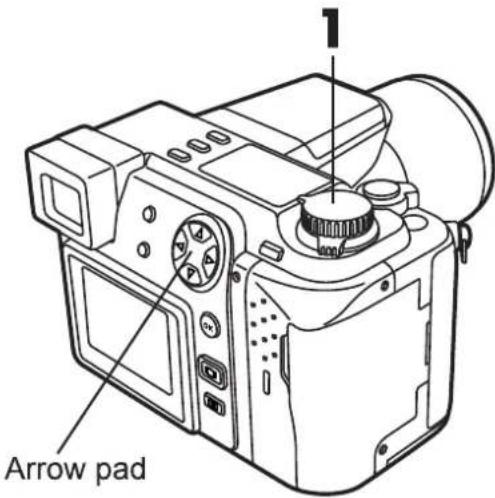
text_image
Arrow pad
text_image
Record Mode Protect Sound record Print reserve Battery check ×10 HQ 12.23.00 21:56 10 Date Time Frame numberSingle image Display
(when picture information is being displayed)
Note:
- Do not press the LCD monitor strongly with your finger or you may cause damage.
- To play sound, connect the camera to a TV.
Displaying Multiple Pictures At One Time — Index Display
If you turn the zoom lever to W, you can display multiple pictures at once (4, 9, or 16-grid). This is convenient for picking one picture in comparison to several others. To change the number of pictures displayed → CHANGE THE NUMBER OF PICTURES IN THE INDEX DISPLAY. (P.165)

1 Set the mode dial to ▶.
- The card access lamp will blink and the last picture taken will appear on the Monitor.
2 Turn the zoom lever to W.
● The pictures, including the one displayed in step 1, will appear after a few seconds.
3 Select the picture you want to see using the Arrow pad.
◀ : Move to the left.
▷ : Move to the right.
△: Go to the previous page, keeping the picture in the top left.
▽: Go to the next page, keeping the picture in the bottom right.

text_image
Diagram of a digital camera with labeled parts including main body, lens, and control knobs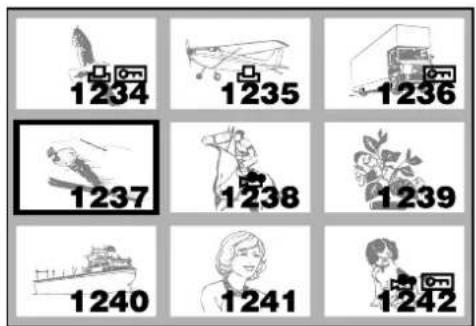
text_image
1234 1235 1236 1237 1238 1239 1240 1241 1242Index Display (9-division)
When choosing a picture in the index display to view separately...
Select the picture using the Arrow pad and turn the zoom lever to T.
DISPLAY—Checking Recorded Pictures (Cont.)
Close-up display
By moving the zoom lever to the T side, images can be enlarged 1.5x, 2x, 2.5x, or 3x.

1 Select the images you want to enlarge.
- Images with the 🔒 mark cannot be enlarged.
2 Press the zoom lever towards T.
- With each further press of the zoom lever, the picture will be enlarged 1.5x, 2x, 2.5x, or 3x.
- To return to 1x, press the zoom lever to W.

text_image
Technical diagram of a digital camera with labeled parts 1 and 2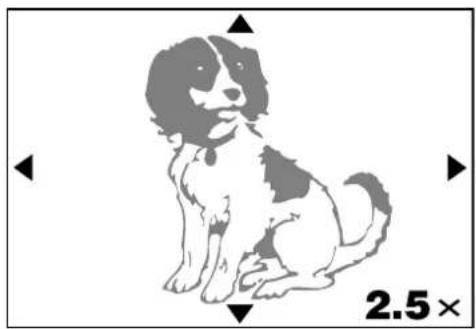
natural_image
Illustration of a sitting dog with black-and-white pattern, no text or symbols presentTo see a different area of the picture enlarged:
Press the Arrow pad ( ◀/ ▷/ △/ ▽ ) to slide the enlarged picture and view in the directions ◀/ ▶/ ▲/ ▼ on the screen.
To select another picture to enlarge:
Turn the zoom lever to W to return to 1x, then select the desired picture. (P.124/125)
Slide-show
This mode allows you to automatically run through multiple pictures stored on the card.

1 Press ☐.
- The menu screen will be displayed.
2 Press △▽ on the Arrow pad to select the slide-show mode, then press ▷ to select START.
3 Press the OK button.
● The slide-show will start.
- To cancel the slide-show, press the menu button.
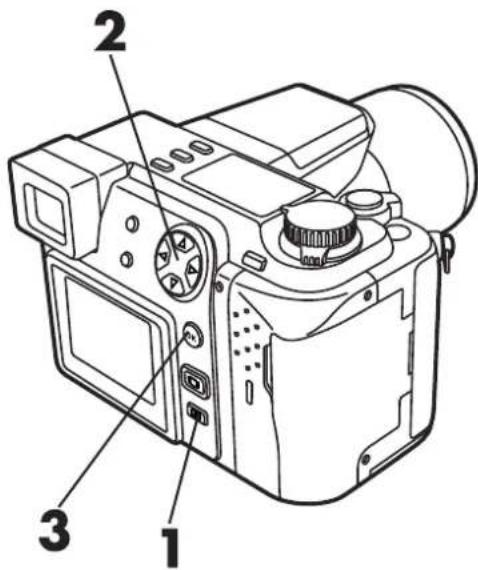
text_image
Technical diagram of a digital camera with numbered parts labeled 1, 2, and 3
text_image
PLAY [1/1]Note:
- Use the AC adapter to run the slide-show for long periods of time. If batteries are used, the power will turn off automatically in about 30 minutes.
- The slide-show will not stop until you cancel it.

5
ADVANCED RECORDING/DISPLAY TECHNIQUES
This chapter discusses various advanced recording/displaying techniques that give you greater creative flexibility. You can control various settings and functions as precisely as desired. Note that the items you can adjust in the Still Image Recording Display menu are different from the items you can adjust in the Movie Recording and Display Menus.
Locking the Exposure \~ AE Lock
AEL
By pressing the AEL button, you can lock the exposure at the setting you prefer. This is useful when you want to set an exposure that is different from what the camera would normally choose.

1 Set the Mode Dial to P, A, S, S-Prg or 📁.
- AE Lock is not available when it is set to M.
2 Compose your shot, then press the AEL button.
- AEL appears when the exposure is being recorded.
- When MULTI METERING is set to ON in the menu, the light meter is displayed on the Monitor. Set it to OFF to turn off the display. (P132)
To change the locked exposure...
Re-position the camera and press the AEL button again. Each time you press the AEL button, the exposure is reset to the current reading.
To cancel AE lock...
Press ▷ on the Arrow pad. The AEL display disappears.
To keep the memorized exposure after recording (AE Memory)...
Press ◀ on the Arrow pad, then MEMO appears.
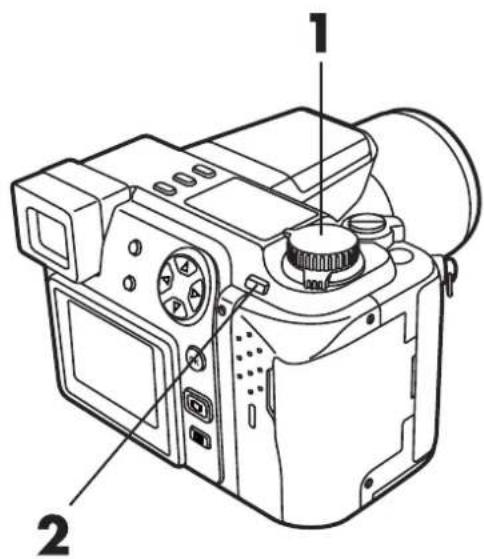
text_image
Technical diagram of a digital camera with labeled parts 1 and 2
text_image
P F2.8 1/800 0.0 AEL [ ]
text_image
P F2.8 1/800 0.0 MEMO [ ] 10AE being recorded
3 Position the AF target mark where you like to focus, then press the shutter button halfway down.
- AF confirmation mark lights.
4 Press the shutter button all the way down.
- After recording, the AE lock is released, and the AEL display disappears.
- When MEMO is displayed, the exposure remains memorized and is effective next time you take a picture.
■ AE lock is possible even after pressing the shutter button halfway down.
★★When the AE lock is canceled
The AE lock and AE Memory are canceled, when...
● The Mode Dial setting is changed.
● The power is turned off.
- Metering mode is changed with (Metering mode button).
- Drive mode is changed.
- Flash mode is changed.
- is pressed to display the Menu screen.
The AE Lock remains engaged even when the camera is set to sleep mode.
AF confirmation mark

text_image
OP F2.8 1/800 0.0 AEL [ ]
text_image
Diagram illustrating two-step mechanical or electrical process with downward arrows indicating motion or vibration, showing hand pressing on a block.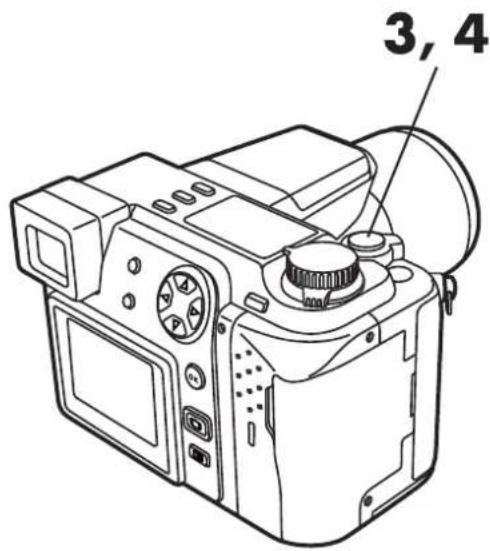
text_image
3, 4Note:
● The AE Lock is not available with the Menu screen displayed.
Metering the Average Brightness \~ Multi-Metering
Meters the brightness of the subject at up to 8 different points to set the correct exposure based on the average brightness.

1 Press (Metering mode button) and select (Center-weighted averaging metering) or (Spot Metering). (P.100)
2 Press ☐.
● The Menu screen appears.
3 Press △ ▽ on the Arrow pad, and select "MULTI METERING", then press ▷.
4 Press △ ▽ and select "ON", then press the OK button.
5 Press the OK button again.
- The setting is stored and the Menu screen disappears, then the normal screen comes back on.

text_image
1 2 3, 4 4, 5
text_image
▲ P F2.8 1/800 0.0 SLOW BKT OFF MULTI METERING ON [2/5]Still Picture Recording Menu
6 Aim the camera at the subject and press AEL (Multi-Metering button).
- At the bottom of the screen, a progress bar appears.
● Brightness readings are ignored after the 9th reading. - When you press AEL, all metered values are reset.
- When you press , the Multi-Metering average (up to that point) is memorized (AE Memory).

text_image
6 77 Take a picture.
eg. : When metering 2 points. (pressing AEL button twice)
The average values for the aperture and shutter speed as calculated by metering 2 points. These values are recalculated every time another metering point is added.
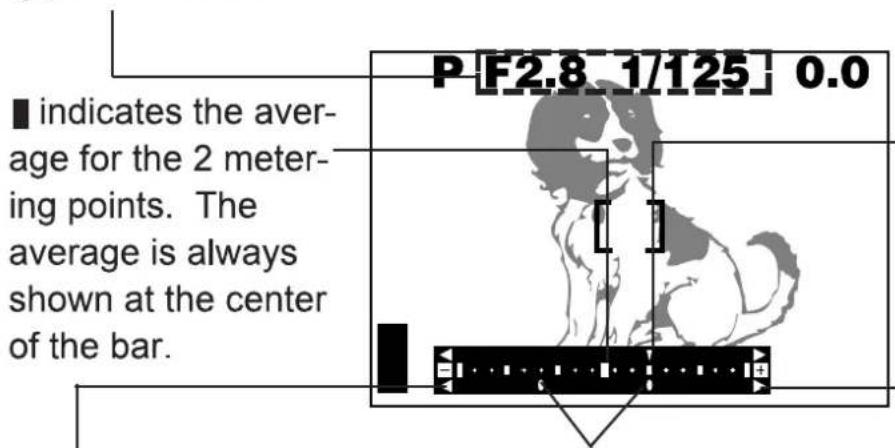
text_image
P [F2.8 1/125] 0.0 ■ indicates the average for the 2 metering points. The average is always shown at the center of the bar.The reading with the AEL button pressed.
◆ indicates the number of times you have pressed the button. ◆ indicates the difference between the metered and average readings.
▼ indicates how much the present exposure you are metering is different from the average exposure value. The present exposure can be fixed by pressing the shutter button halfway down. (The present exposure is not added to the average value unless you press the AEL button.)
When ♦ moves ±3 far from the center of the bar (the average reading), the red ◀ ▷ appears.
Adjusting the Color \~ White Balance
Color reproduction differs depending on the lighting conditions. You can adjust the white balance to match the lighting conditions and assure natural looking colors. Settings for tungsten and fluorescent lights are also available, allowing you to get better results indoors.

1 Press .
● The Menu screen appears.
2 Press △ ▽ on the Arrow pad and select "WB", then press ▷.
3 Press △ ▽ and select a setting item (see below), then press the OK button.
- Setting Items: AUTO,
(Daylight),
(Overcast),
( tungsten Light) or ( Fluorescent).
- If the OK button is pressed again, the setting is stored and the Menu screen disappears. The normal screen comes back on.
- When any setting except Auto is selected, "WB" appears in the control panel.
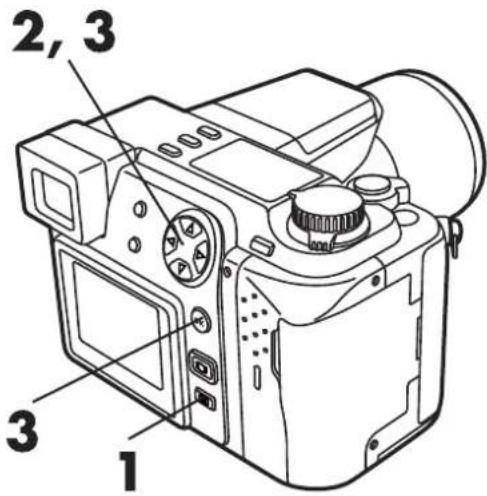
text_image
2, 3 3 1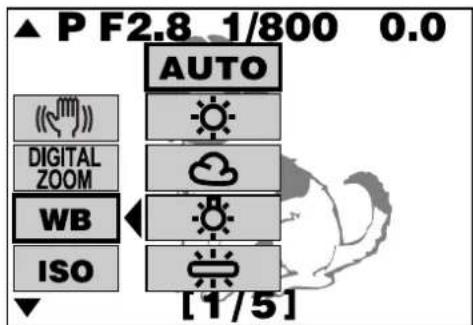
text_image
▲ P F2.8_1/800 0.0 AUTO DIGITAL ZOOM WB ISO [1/5]Still Picture Recording menu

text_image
ESP HQ WB 10Manual White Balance Mark
Note:
- Set to Auto for most shooting conditions.
● Under certain lighting conditions, Auto may not be suitable. - When ALL RESET is off (p.148), current settings are retained even when the power is turned off.
- Make sure you check the color with the image displayed.
Taking Panorama Pictures—Function Card
The Olympus SmartMedia card has a Panorama Mode that allows you to take extra-wide panoramic shots.
You can use CAMEDIA Master to connect several images end to end to create a single panorama picture.


1 Press ☐.
● The Menu screen appears.
2 Press △ ▽ on the Arrow pad and select "□".
3 Press ▷ and select "PLAY", then press the OK button.
4 Press the Arrow pad, and select the connecting direction (right, left, up and down).
● The direction in which the pictures will be connected is indicated.

text_image
1 2, 3, 4 3
text_image
▲ P F2.8 1/800 0.0 □ ◀ PLAY FUNCTION CARD SETUP [4/5]5 Compose your pictures so that the end of each picture is the beginning of the next picture.
- Focus, Exposure and White Balance will be fixed on the first shot. Do not take the first picture with the sun in the frame.
● After the first shot, do not switch to telephoto shooting as this will disable the picture connection function. - Up to 10 panorama pictures can be recorded.
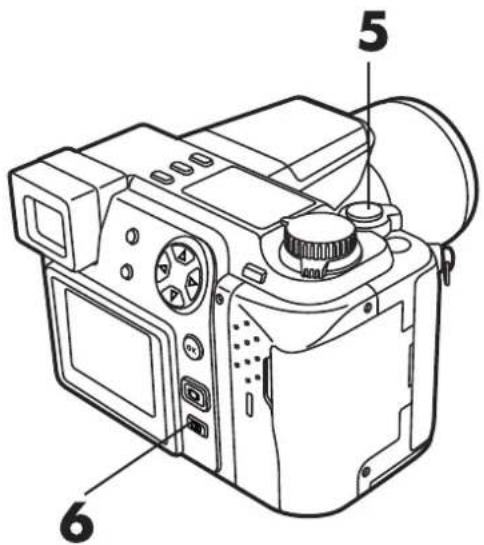
text_image
Technical diagram of a digital camera with numbered parts labeled 5 and 6
flowchart
graph LR
    A["Crop Field"] --> B["Outdoor Scene"]
    B --> C["Shutter Button"]
    C --> D["Outdoor Field"]
    D --> E["Shutter Button"]
Take pictures so that the end of each picture is the beginning of the next picture.
6 To exit panorama shooting, press ☐.
● The frame on the screen disappears and the normal screen is restored.
Note:
- Panorama Mode is available with standard cards only.
- You cannot assemble a panorama picture using only the camera. Use the CAMEDIA Master 2.0 to assemble a panorama picture.
- For best results, shoot panorama pictures in the SQ mode. If you use HQ/SHQ modes, your PC may run out of memory.
- Panorama pictures shot in TIFF (Non-Compression) mode are recorded in JPEG format.
- Even when it gets dark, the ↗ (Flash mark) does not appear when you press the shutter halfway down during panorama picture recording.
Special Effects \~ Function Shooting
"BLACK & WHITE" lets you shoot in black and white picture, while "SEPIA" adds a sepia (brownish tint) to your image. "WHITE BOARD" lets you take a picture and superimpose letters on a white board, while "BLACK BOARD" does the same with a black board. When the Mode dial is set to 📋, only "BLACK & WHITE" and "SEPIA" are available.

text_image
•P •A •S •M •S-Prg1 Press ☐.
● The Menu screen appears.
2 Press △ ▽ on the Arrow pad and select "FUNCTION", then press ▷.
3 Press △ ▽ and select an item (see above), then press the OK button.
- If the OK button is pressed again, the setting is stored and the Menu screen disappears. The normal screen comes back on.

text_image
1 2, 3 44 Take a picture.
Still Picture Recording Menu
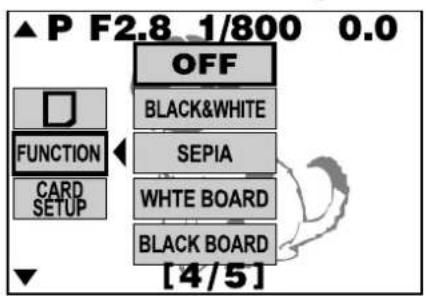
text_image
▲ P F2.8_1/800 0.0 OFF BLACK&WHITE FUNCTION SEPIA WHITE BOARD CARD SETUP BLACK BOARD [4/5]Movie Recording Menu
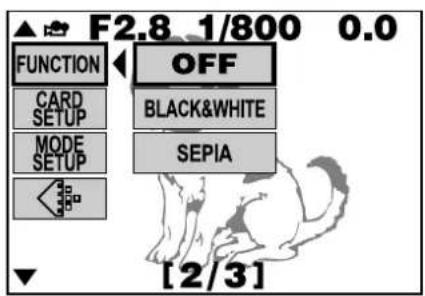
text_image
F2.8_1/800 0.0 FUNCTION OFF CARD SETUP BLACK&WHITE MODE SETUP SEPIA [2/3]Note:
- When "WHITE BOARD" or "BLACK BOARD" is selected, the flash mode is set to 📋 (flash override). (P. 107)
- Adjust the exposure if letters are not clearly recorded with "WHITE BOARD" or "BLACK BOARD" selected. (P. 99)
- When "ALL RESET" is off (p.148), current settings are retained even when the power is turned off.
- When the Mode dial is set to ☐, "WHITE BOARD" and "BLACK BOARD" are turned off.
- White balance cannot be used.
Rotating and Checking Vertically Oriented Pictures


When you take a shot with the camera held in the vertical position, the image will be oriented vertically, ie. longer vertically than horizontally. You can turn it horizontally, 90° clockwise or counter-clockwise.

1 Display a vertically oriented picture.
To turn it 90° clockwise...
Press 📊 (Macro button).
To turn it 90° counter-clockwise...
Press ☐ (Metering mode button).
To restore the original position...
Press DRIVE (Drive button).

text_image
2 2 2
text_image
SQ 12.23.00 21:56 10A vertically oriented picture

natural_image
Abstract grayscale illustration of a stylized animal or creature with no visible text or symbolsPressing 📋 (macro button) turns the picture 90* clockwise.

natural_image
Illustration of a sitting dog with a black-and-white body, no text or symbols presentPressing (metering button) turns the picture 90* counter-clockwise.
Note:
● The setting is retained in memory even with the power off.
- This function is not available during Print reserve operation. When you restore the normal display mode, this function is available again.
Add Sound Memo to Still Pictures
You can add sound to still pictures or change the audio that has already been recorded,
How to use an external microphone...
Sound can be recorded with an external microphone (optional). Use only microphones exclusively made for digital cameras.

1 Press :≡.
● The Menu screen appears.
2 Press △ ▽ on the Arrow pad and select ⚙, then press ▷.
3 Point the microphone in the direction of the sound you want to record.
- For clear sound, the microphone should be no further than 1m from the subject.
4 Press the OK button and start recording.
- Recording time is approx. 4 seconds.
- During recording, a progress bar appears.
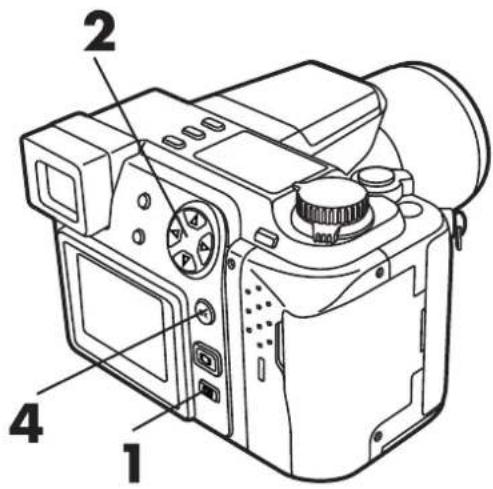
text_image
1 2 43

text_image
•MIC
text_image
START FUNCTION CARD SETUP MODE SETUP [1/1]
natural_image
Illustration of a sitting dog with a microphone and sound wave indicator (no text or symbols)Note:
● Sound recording is not possible with protected images.
● Sound recording is not possible on write-protected cards.
- Sound recording is not possible on a card with inadequate memory.
- When new sound is recorded, the previously recorded sound is erased.
Processing Movies \~ Function Display
Indexing or editing a movie.
■Making an index
To check a movie at a glance, you can make an index. You can also store the index on a SmartMedia card as still pictures. A movie index can have up to 9 pictures. Index pictures are not stored in the same mode as the one in which they were originally shot.
| Mode when shot | Mode when stored as the index |
| HQ | SQ (1024 x 768/High Quality) |
| SQ | SQ (640 x 480/High Quality) |

1 Press the Arrow pad and display a picture with 🔗 attached.
2 Press .
● The Menu screen appears.
3 Press △ ▽ and select "FUNCTION", then press ▷.
4 Press △ ▽ and select "MOVIE INDEX", then press the OK button.

text_image
1, 3, 4 4 2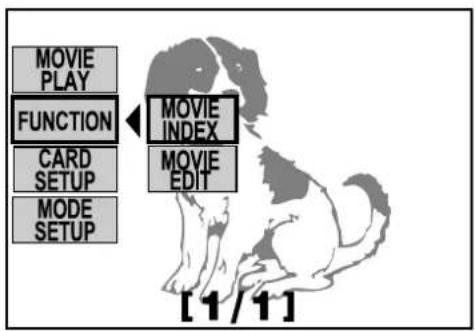
text_image
MOVIE PLAY FUNCTION CARD SETUP MODE SETUP MOVIE INDEX MOVIE EDIT [1/1]5 Press the Arrow pad and select the first index picture from the movie. Then press the OK button.
△ : Go to the first movie picture.
▽ : Go to the last movie picture.
▷ : Advance one frame at a time
◀ : Back one frame at a time
- When the last picture is selected, all other pictures will be automatically inserted.
● The total time and end time of the movie are displayed on the left. - When the first movie picture is fixed with the OK button pressed, the selection frame moves to the last image.
6 Press the Arrow pad (see Step 5 above) and select the last picture of the index from the movie. Refer to Step 5 for how to use the Arrow pad.
● The first picture is retained, while the rest of the pictures are automatically inserted.
- When you press the Menu button, you return to the first picture.
7 When the last picture is selected, press the OK button.
● The index pictures are stored on the card and the display disappears from the Menu screen.

text_image
5, 6 5, 7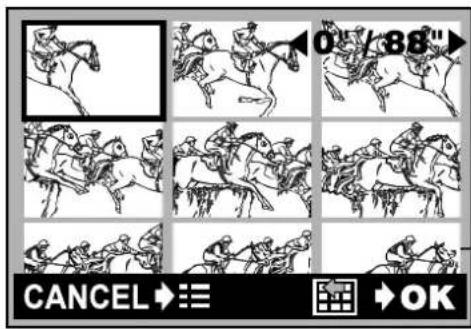
text_image
0"/88" CANCEL →≡ OKLast picture of the index

text_image
CANCEL →:≡ OK ←0" / 88"
natural_image
Simple horizontal bar with two white segments on a black background (no text or symbols)Note:
- Indexes cannot be created on the cards listed below.
- Protected cards
- Cards that warn you when the card has inadequate memory in the recording mode.
■ Movie Editing
You can select the scenes you want and record them together as a new movie.

1 Press the Arrow pad and display a picture with 🔗 attached.
2 Press ☐.
● The Menu screen appears.
3 Press △ ▽ and select "FUNCTION", then press ▷.
4 Press △ ▽ and select "MOVIE EDIT", then press the OK button.
5 Press the Arrow pad and select the first index picture from the movie. Then press the OK button.
△ : Go to the first movie picture.
▽ : Go to the last movie picture.
▷ : Advance one frame at a time
◀ : Back one frame at a time

text_image
1, 3, 4, 5 4, 5 2
text_image
MOVIE PLAY FUNCTION CARD SETUP MODE SETUP MOVIE INDEX MOVIE EDIT [1/1]6 Press the Arrow pad (See 5 above) and display the last picture. After confirming it, press the OK button.
7 Press ◀ ▷ and select "NEW" or "ERASE".
- "NEW" lets you save the edited pictures as a new picture with a different name.
- "ERASE" lets you save the edited pictures keeping the same name. The previous pictures are overwritten.
8 Press the OK button.
- The pictures are written to memory, and the display disappears from the Menu.

text_image
6, 7 6, 8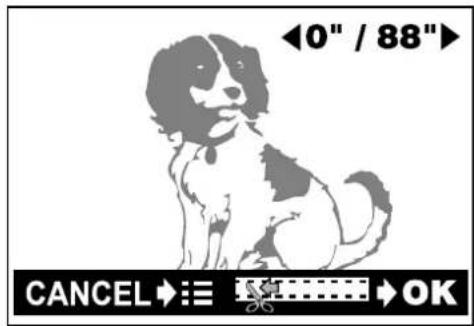
text_image
◄0" / 88◄ CANCEL →:≡ →OK
text_image
CANCEL ➔ ≡ → OK ◀0" / 88"Note:
- Indexes cannot be created on the cards listed below.
- Protected cards
- Cards that warn you when the card has inadequate memory in the recording mode.
- You cannot save pictures on a write-protected card.

text_image
NEW ERASEFunction Settings for Easier Camera Operation \~ MODE SETUP
To make camera operation easier, you can set your preferences for monitor brightness, focal length measurement units, the camera control sound, etc.
Mode Setting Menu
| Item | Description | Initial Setting |
| ALL RESET (P.148) | Returns all setting to default settings. | ON |
| (P.152) | Set the level of picture sharpness | NORMAL |
| TIFF *1, *2 (P.153) | Select image size in TIFF. | 1600 x 1200 |
| SQ *1, *2 (P.154) | Select image size and quality in SQ mode. | 640 x 480 (NORMAL) |
| (P.156) | Adjust the volume of the sound produced by each camera control. | HIGH |
| AF ILLUMINATOR*1 *2 (P.157) | Select AF assist lamp ON/OFF. | ON |
| REC VIEW *2 (P.158) | Select whether or not the recorded image is displayed. | OFF |
| SLEEP (P.159) | Set the duration of time after the last action before the camera goes to sleep. | 1 MIN |
| FILE NAME *2 (P.160) | Specify how to record file names on the card. | RESET |
| (P.163) | Adjust the brightness of the Monitor and viewfinder. | - - - - - - - - - - - - - - - - - - - - - - - - - - - - - - - - - - - - - - - - - - - - - - - - - - - - - - - - - - - - - - - - - - - - - - - - - - - - - - - - - - - - - - - - - - - - - - - - - - - - - |
| (P.54) | Date setting | - |
| m/ft *2 (p.164) | Set the focal length measurement units. | m |
| *3 (p.165) | Sets the number of picture displayed on the screen at one time. | 9 |
*1 During movie recording (with the Mode dial set to ☐), mode setting does not appear in the menu screen.
*2 When displaying (with the Mode dial set to ▶), mode setting does not appear in the menu screen.
*3 This menu is only available when displaying a picture.
Note:
- When resetting with the power switch, everything except date is set back to the initial setting (P. 58).
How to use the Mode Setting Menu Screen
1 Press ☐.
● The Menu screen appears.
2 Press △ ▽ on the Arrow pad and select "MODE SETUP", then press ▷ to select "SETUP".
3 Press the OK button.
● The Mode Setting screen appears.
4 Press △ ▽ and select the item you want to set, then press ▷. If the selected item has more than one setting available, go to step 5. When "SETUP" is displayed, go to step 6.
e.g.: Still Picture Recording Mode Setting Menu.
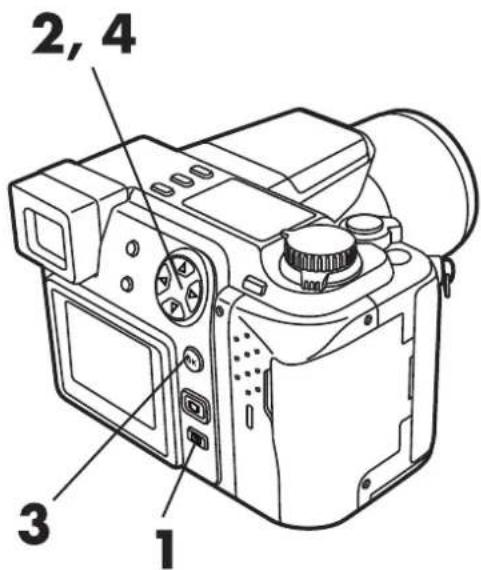
text_image
2, 4 3 1Still picture recording menu

text_image
▲ P F2.8 1/800 0.0 MODE SETUP S-Prg [5/5]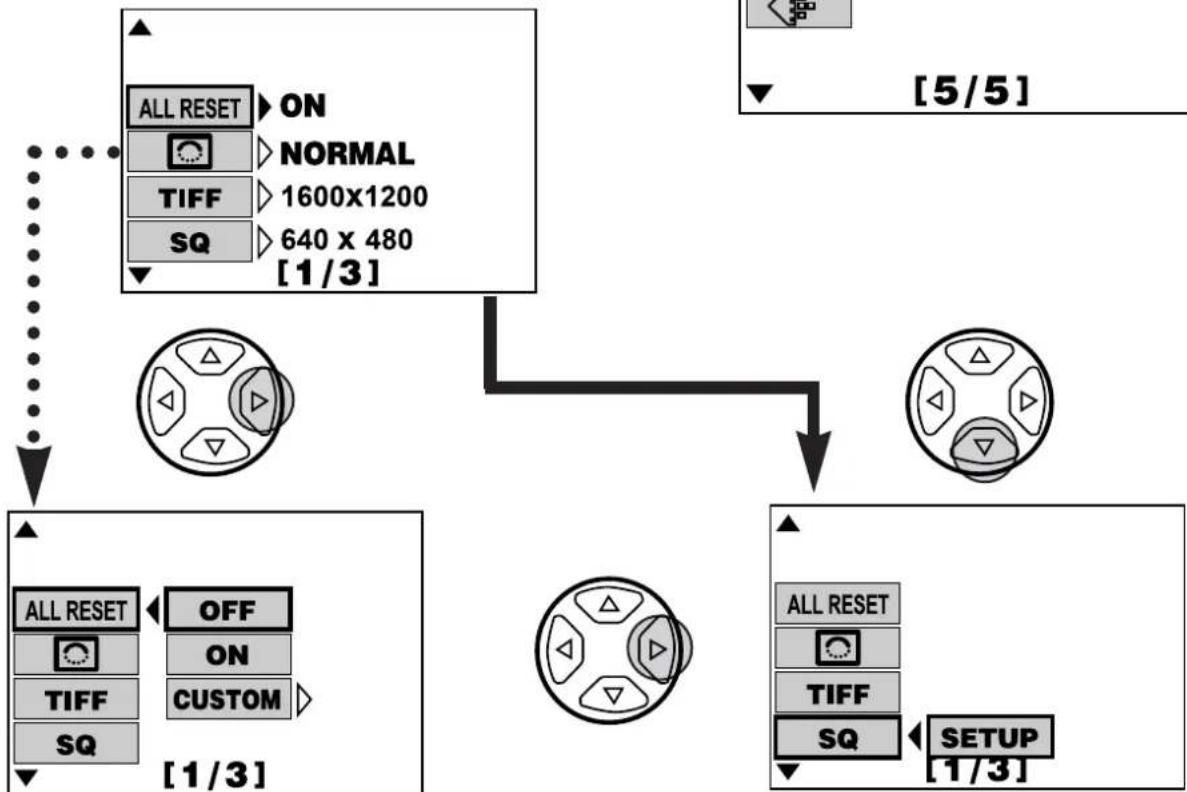
flowchart
graph TD
    A["ALL RESET ON"] --> B["TIFF 1600x1200"]
    A --> C["SQ 640 x 480"]
    B --> D["[1/3"]]
    C --> D
    E["ALL RESET OFF"] --> F["TIFF CUSTOM"]
    G["ALL RESET"] --> H["TIFF"]
    I["SETUP"] --> J["SQ"]
    K["[5/5"]] --> L["[1/3"]]
e.g.: Go to Step 5 when choosing the ALL RESET setting.
e.g.: Go to Step 6 when choosing the SQ setting.
5 When the selected item has more one setting available
Press △▽ to select the setting item, then press the OK button to set it. Go to step 7.
When "ALL RESET" — "CUSTOM" is selected.
① Press ▷. The Custom setting screen appears.
② Press △ ▽ and select the desired item and press ▷.
③ Press △ ▽ to select "RESET ON" or "RESET OFF" and then press the OK button. Continue doing this for all other desired items. Press the OK button again after all the items are set. Then, go to step 7.
Custom setting screen
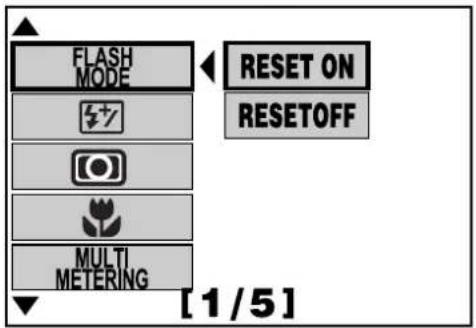
text_image
FLASH MODE RESET ON RESETOFF MULTI METERING [1/5]6 When "SETUP" is displayed.
① Press the OK button.
② Press △ ▽ and select the setting item.
③ When the selected setting has only one option
Press the OK button. The Mode setting screen comes back on.
When the selected setting has more than one option.
Press ▷ and press △ ▽ to select the setting option, then press the OK button. The Mode setting screen comes back on.
7 Press the OK button.
● The setting is stored and the Menu screen disappears. The normal screen is restored.
When the selected setting has only one option

text_image
TIFF 1600x1200 1280x 960 1024x 768 640 x 480When the selected setting has more than one option

text_image
SQ 1280x 960 1024x 768 640 x 480 HIGH NORMALNote:
- When storing the setting, make sure you press the OK button and return to the Mode Setting screen.
Resetting the Camera's Settings When Turning it off - ALL RESET
Before turning off the power, set "OFF" to save the current settings. This will allow you to use the current settings again when the power is turned back on.
1 Display the mode setting screen. → See "How to use the Mode Setting Menu Screen 1 \~ 3" (P.145).
2 Press △ ▽ on the Arrow pad to select "ALL RESET", then press ▷. Press △ ▽ to select the items you want to set. Press the OK button to set the selected items.
- CUSTOM : Please refer to P.150.
- ON: The initial default settings will be restored when the camera is turned back on after being turned off. (P.149)
OFF: Your current settings will be saved, even after the power is turned off.
3 Press the OK button repeatedly until the menu disappears.
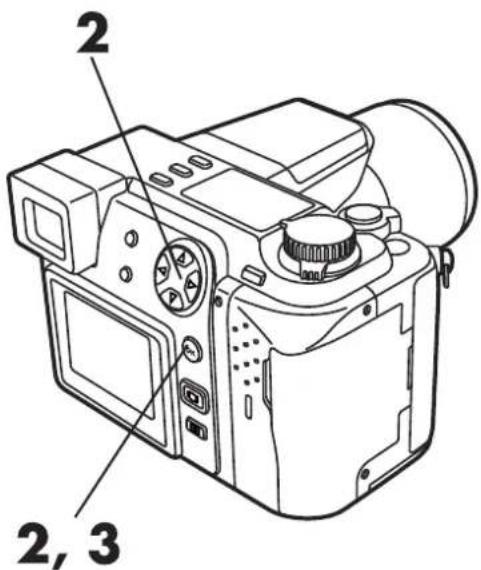
text_image
2 2, 3Still picture record mode setting menu

text_image
ALL RESET ON NORMAL TIFF 1600x1200 SQ 640 x 480 [1/3]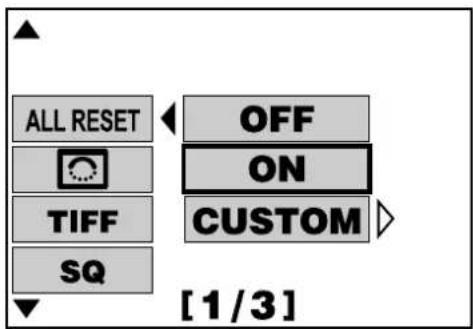
text_image
ALL RESET OFF ON TIFF CUSTOM SQ [1/3]Note:
● These settings remain in effect until they are changed.
When you select "ON", following items will be reset to their default settings when the camera is turned on again after the power is turned off.
| Setting | Initial setting |
| Flash (P.106) | Auto |
| Flash intensity control (P.109) | ±0 |
| Metering mode (P.100) | ESP |
| Macro mode (p.90) | Normal |
| Multi metering (p.132) | OFF |
| Drive (P.117) | Single-picture shooting |
| BKT (Auto bracket) setting (P.102) | ±1, 3 shots |
| Stabilization system (P.97) | ON |
| Zoom (P.71) | Wide |
| Digital Zoom (P.98) | OFF |
| Aperture setting (P.87) | F2.8 |
| Shutter speed setting (P.88) | 1/60 |
| Exposure compensation (P.99) | ±0 |
| White balance (P.134) | Auto |
| ISO sensitivity (P.101) | Auto |
| Slow shutter synchronization flash (P.110) | OFF |
| AF mode (P.96) | iESP |
| Full-time AF (P.95) | OFF |
| Focus mode (P.94) | AF |
| INFO (Image information display) (P.28) | ON (Only certain displays) |
| Function mode (P.137) | OFF |
| S-Prg mode (P.86) | Portrait |
| Still sound record mode (P.122) | OFF |
| Movie sound record mode (P.122) | ON |
| Still image quality mode (P.104) | HQ |
| Movie image quality mode (P.104) | HQ |
Resetting the Camera's Settings When Turning it on - ALL RESET - CUSTOM
Settings such as Zoom and Aperture can be preset so that they will be automatically ready when the power is turned on.
1 Display the mode setting screen. → See "How to use the Mode Setting Menu Screen 1 \~ 3" (P.145).
2 Press △ ▽ on the Arrow pad to select "ALL RESET", then press ▷. Press △ ▽ to select "CUS-TOM", then press ▷.
- Custom setting screen will be displayed.
3 Press △▽ to select items you want to set (see items that can be set by "CUSTOM", P.151), then press ▷.

text_image
2, 3Still picture record setting menu
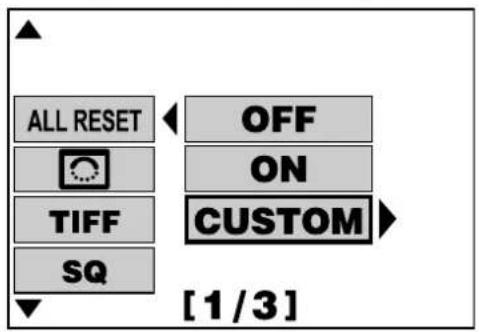
text_image
ALL RESET OFF ON TIFF CUSTOM SQ [1/3]Custom setting menu
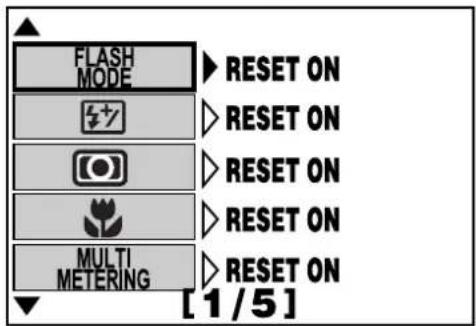
text_image
FLASH MODE ▶ RESET ON ▶ RESET ON ▶ RESET ON ▶ RESET ON ▶ RESET ON MULTI METERING ▶ RESET ON [1/5]4 Press △ ▽ to select "RESET ON" or "RESET OFF", then press the OK button.
- Repeat steps 2, 3, and 4 if there are other settings you want to change.
5 Press the OK button repeatedly until the menu disappears.
- The settings in "CUSTOM" will be saved even if you select settings other than "CUSTOM" in "ALL RESET".
Items that can be selected in "CUSTOM"
- Flash
●Flash intensity control - Metering mode
- Macro mode
- Multi metering
- Drive
●BKT setting
● Stabilization system - Zoom
- Digital zoom
- Aperture
- Shutter speed
●Exposure compensation - White balance
- ISO sensitivity
- Slow shutter synchronization flash
- AF mode
●Full-time AF - AF/MF
- INFO
- Function
● Still sound record mode
● Movie sound record mode
●S-Prg mode - Still image mode
- Movie image mode
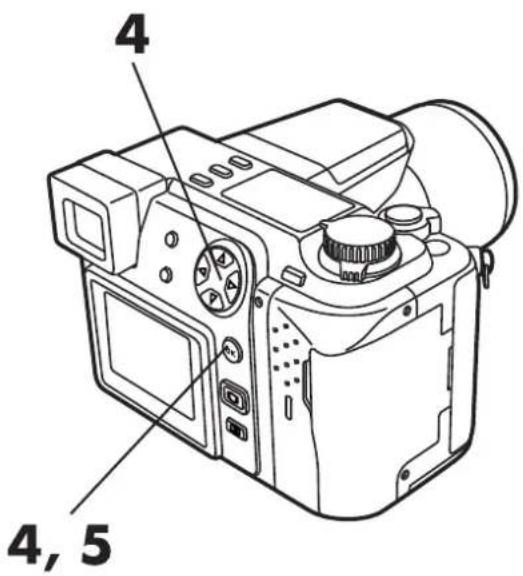
text_image
4 4, 5
text_image
FLASH MODE RESET ON RESETOFF MULTI METERING [1/5]★★When setting "RESET ON"
Restores the initial default settings as shown on the chart on p.149.
Note:
● These settings will remain in effect until they are changed.
Setting Image Sharpness \~
Selecting "NORMAL" will sharpen the outlines of images, making it ideal for printing. Selecting "SOFT" will make outlines softer. Selecting "HARD" will emphasize the outlines of images so that the images themselves will be clear and crisp. Adjust it to suit your needs.

1 Display the mode setting screen → See "How to use the Mode Setting Menu Screen 1 \~ 3" (P.145).
2 Press △ ▽ on the Arrow pad to select "☐", then press ▷. Press △ ▽ again to select the items (see below) you want to set. Then, press the OK button to set your selections. Items : HARD, SOFT, NORMAL.
3 Press the OK button repeatedly until the menu disappears.
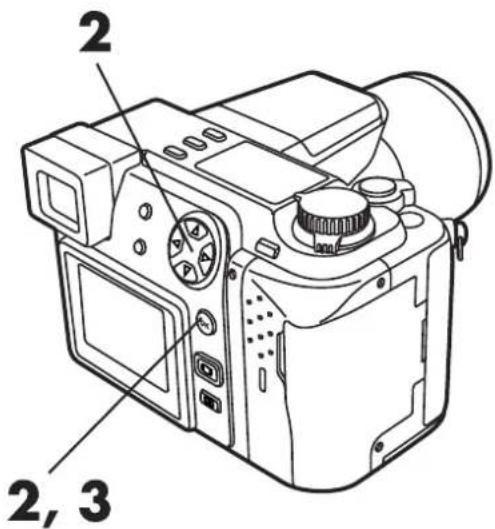
text_image
2 2, 3Still picture record setting mode

text_image
ALL RESET ▷ ON OFF ▷ NORMAL TIFF ▷ 1600x1200 SQ ▷ 640 x 480 [1/3]
text_image
ALL RESET TIFF SQ HARD NORMAL SOFT [1/3]Note:
● These settings will remain in effect until they are changed.
Setting Picture Size for TIFF Recording \~ TIFF
When setting a picture size for TIFF recording, we recommend that you select a large size if you plan to enlarge the picture for display or printing. The picture size you select is applied when shooting in TIFF. (P. 104)

1 Display the Mode setting screen. → See "How to use the Mode Setting Menu Screen 1 \~ 3" (P.145).
2 Press △▽ to select "TIFF", then press ▷. "SETUP" will be displayed. Press the OK button.
• The picture size setting screen appears.
3 Press △▽ and select your preferred picture size, then press the OK button.
- Select a picture size from 1600 x 1200, 1280 x 960, 1024 x 768 or 640 x 480.
4 Press the OK button and the mode setting screen disappears.
• The Menu screen appears.
5 Set the recording mode to "TIFF" on the Menu screen.
→ See "How to use the Mode Setting Menu Screen 2 \~ 3" (P.104).
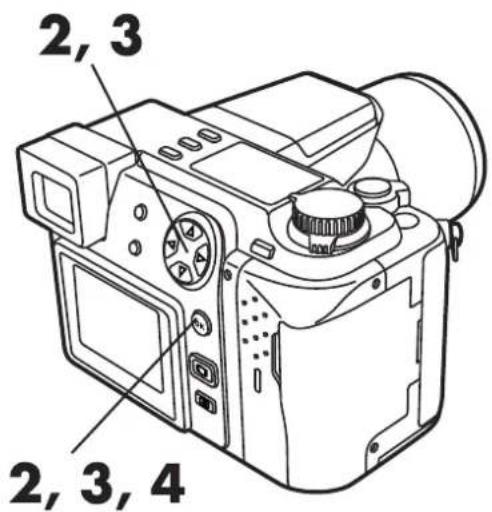
text_image
2, 3 2, 3, 4Still Picture Recording Menu
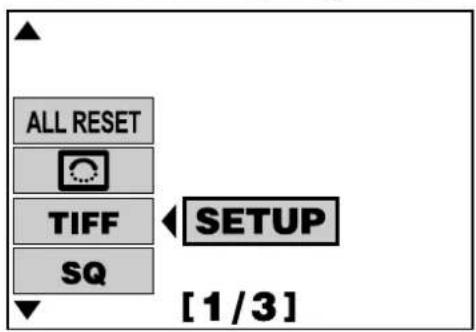
text_image
ALL RESET TIFF SQ SETUP [1/3]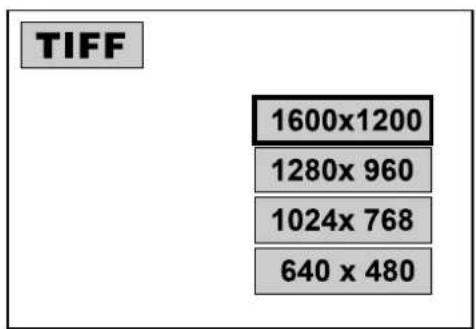
text_image
TIFF 1600x1200 1280x 960 1024x 768 640 x 480Note:
● The setting remains in effect until it is changed again.
- Note that the higher the quality of image, the longer it takes to record and display, and the fewer the number of images that can be taken.
Picture Size and Quality in SQ Mode/Setting the Picture Quality \~ SQ
You can set both picture quality and size in SQ mode. With "NORMAL", more pictures can be stored, while with "HIGH", noise generated in JPEG compression can be reduced.

1 Display the Mode setting screen. → See "How to use the Mode Setting Menu Screen 1 \~ 3" (P.145).
2 Press △▽ to select "SQ", then press ▷. "SETUP" will be displayed. Press the OK button.
- The picture size setting screen appears.
3 Press △▽ and select a picture size, then press ▷ to go to the SQ mode.
- See the table below for selectable picture sizes.
SQ Mode
| Picture Quality | Picture Size | File Format | |
| SQ | HIGH | 1280 x 960 | JPEG |
| NORMAL | |||
| HIGH | 1024 x 768 | ||
| NORMAL | |||
| HIGH | 640 x 480 | ||
| NORMAL | |||
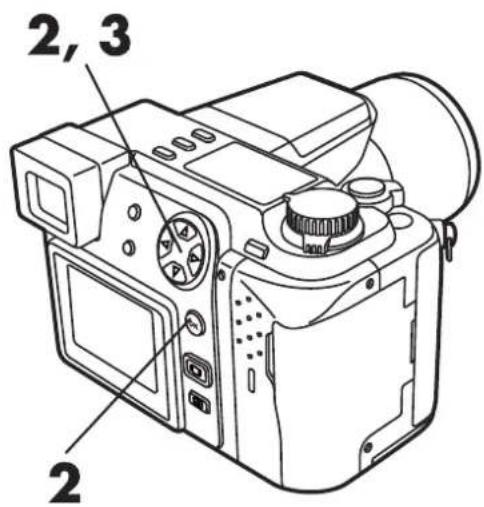
text_image
2, 3 2Still Picture Recording Menu

text_image
ALL RESET TIFF SQ ← SETUP [1/3]4 Press △▽ and select "HIGH" or "NORMAL", then press the OK button to confirm the setting.
5 Press the OK button and the mode setting screen disappears.
● The Menu screen appears.
6 Set the picture quality to "SQ" on the Menu screen.
→ See "How to use the Mode Setting Menu Screen 2 \~ 3" (P.104).
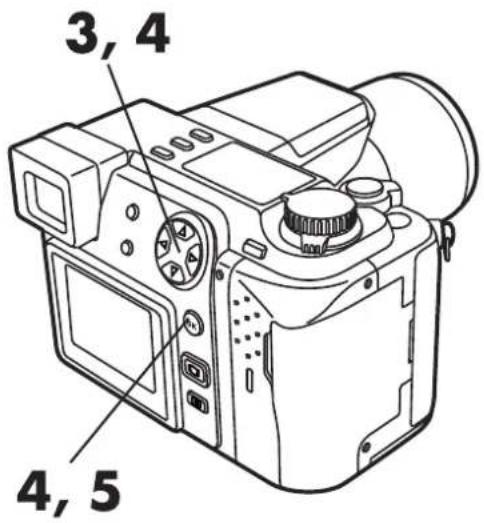
text_image
3, 4 4, 5
text_image
SQ 1280x 960 1024x 768 640 x 480 HIGH NORMAL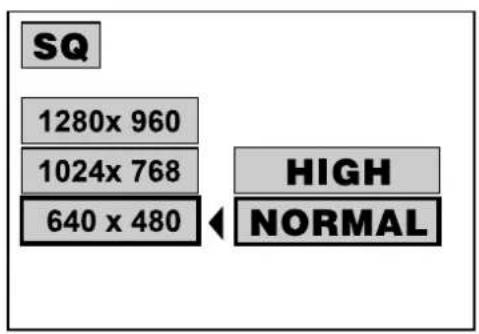
text_image
SQ 1280x 960 1024x 768 640 x 480 HIGH NORMALNote:
- The setting remains in effect until it is changed again.
- Note that the greater the number of pixels, the longer it takes to record and display, and the fewer the number of pictures that can be taken. (P.63)
Set the volume of the beep sound, or turn off the sound.
1 Display the mode setting screen. → See "How to use the Mode Setting Menu Screen 1 \~ 3" (P.145).
2 Press △▽ on the Arrow pad and select "■")", then press ▷.
3 Press △▽ and select an item you like to set. Press the OK button and confirm the setting.
Setting Items: OFF, LOW, HIGH
4 Press the OK button repeatedly until the menu disappears.

text_image
2, 3 3, 4Still Picture Recording Mode Setting Menu

text_image
■))▶ HIGH AF ILLUMNATOR ▷ ON REC VIEW ▷ OFF SLEEP ▷ 1MIN [2/3]
text_image
OFF AF ILLUMNATOR REC VIEW SLEEP LOW HIGH [2/3]Note:
● The setting remains in effect until it is changed again.
Setting the Focus Illumination \~ AF ILLUMINATOR
The AF assist lamp provides additional illumination when the subject is dark. It always operates by default, but you can disable it (OFF).

1 Display the mode setting screen. → See "How to use the Mode Setting Menu Screen 1 \~ 3" (P.145).
2 Press △ ▽ on the Arrow pad and select "AF ILLUMINATOR", then press ▷.
3 Press △ ▽ and select "ON" or "OFF", then press the OK button to confirm the setting.
4 Press the OK button repeatedly until the menu disappears.

text_image
AF assist lamp OLYMPUS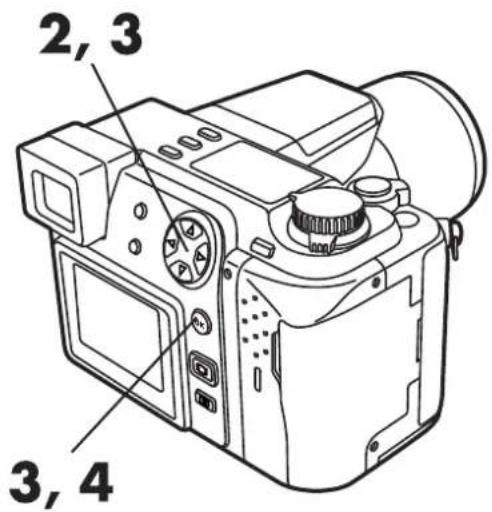
text_image
2, 3 3, 4Still Picture Recording Mode Setting Menu
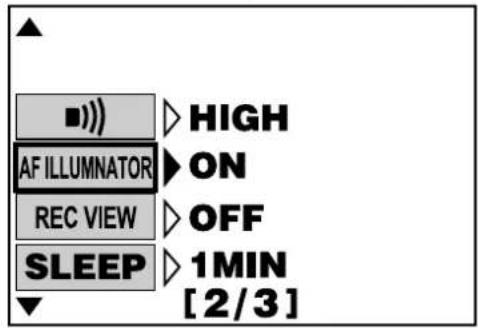
text_image
■)) ▷ HIGH AF ILLUMNATOR ▷ ON REC VIEW ▷ OFF SLEEP ▷ 1MIN [2/3]
text_image
OFF AF ILLUMNATOR REC VIEW SLEEP [2/3]Note:
- The setting remains in effect until it is changed again.
Selects whether or not the picture will be displayed on the monitor during recording.

1 Display the mode setting screen. → See "How to use the Mode Setting Menu Screen 1 \~ 3" (P.145).
2 Press △ ▽ on the Arrow pad and select "REC VIEW", then press ▷.
3 Press △▽ and select "ON" or "OFF", then press the OK button to confirm the setting.
● ON: Displays the image on the Monitor or Viewfinder while it is being recorded to help you check the recording process.
OFF: Displays the image that the camera is aimed at on the Monitor or Viewfinder. Images being recorded to the Card will not appear on the Monitor or Viewfinder during the recording process
4 Press the OK button repeatedly until the menu disappears.

text_image
2, 3 3, 4Still Picture Recording Mode Setting Menu
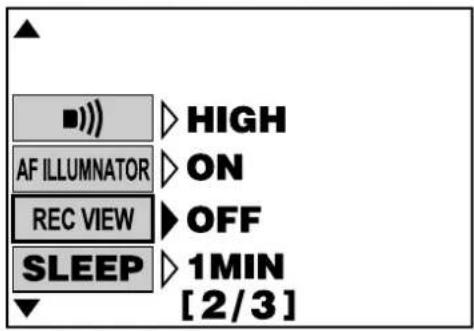
text_image
■))▷ HIGH AF ILLUMNATOR ▷ ON REC VIEW ▷ OFF SLEEP ▷ 1MIN [2/3]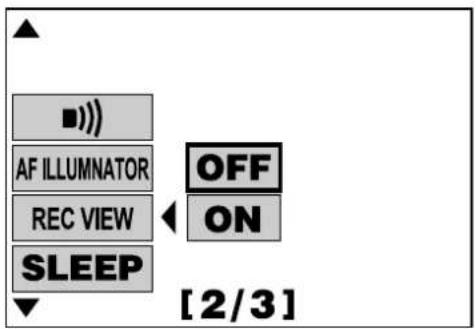
text_image
AF ILLUMNATOR REC VIEW SLEEP OFF ON [2/3]Setting the Times for Power Saving Mode \~ SLEEP
The camera will automatically switch to Power Saving Mode (SLEEP) if the time you set has passed with no operations. This function can be disabled (OFF).
Time settings can be selected for Record mode (P. A. S. M. S-Prg.) and Display mode (▶) separately.
1 Display the mode setting screen - See "How to use the Mode Setting Menu Screen 1\~3" (P.145).
2 Press △ ▽ to select "SLEEP", then press ▷.
3 Press △ ▽ to select a time setting (see below), then press the OK button to set your selection.
Time Settings: OFF. 30SEC. 1MIN.
2MIN. 5MIN.
4 Press the OK button repeatedly until the menu disappears.
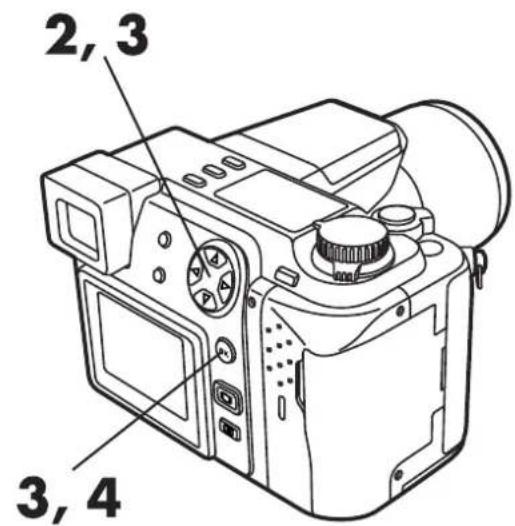
text_image
2, 3 3, 4Still picture recording mode setting menu

text_image
■)) ▷ HIGH AF ILLUMNATOR ▷ ON REC VIEW ▷ OFF SLEEP ▷ 1MIN [2/3]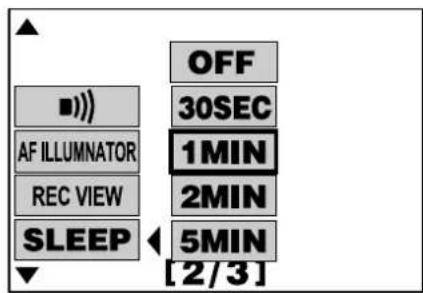
text_image
OFF 30SEC AF ILLUMNATOR 1MIN REC VIEW 2MIN SLEEP 5MIN [2/3]Note:
- Time settings cannot be set for Record mode and Display mode simultaneously. Set the time for each mode separately.
- Time settings remain in effect until you change them.
- "SLEEP" will not work when using an AC adapter,
- If a Slide-Show is displayed for more than 30 minutes, the camera will automatically go to sleep.
Selecting the File Numbering System \~ FILE NAME
You can select the file numbering system for images transferred to a personal computer. Files can be numbered from 0001 to 9999 and folders can be numbered from 100 to 999.
■ About the File No. and Folder No.
The file number and folder number used for each image are expressed as shown.

flowchart
graph TD
    A["\ D C I M \ * * * O L Y M P \ P m d d * * * *. j p g"] --> B["100~999"]
    A --> C["Month (1~C) 0001~9999"]
    A --> D["Day (01~31)"]
*Month: Jan. \~ Sep. = 1-9, Oct. = A, Nov. = B, Dec. = C
■ The File No. and Folder No. in Each Mode
- RESET
When RESET is selected, the file number and folder number will be reset every time a card is inserted in the camera.

flowchart
graph LR
    A["Folder No.102\nFile No.\n0005"] -->|Card change| B["Folder No.100\nFile No.\n0001"]
• AUTO
When AUTO is selected, the same folder number and a continuing number from the last file number of the last card will be used, so that the same file number will not be used for pictures taken together and saved in multiple cards.
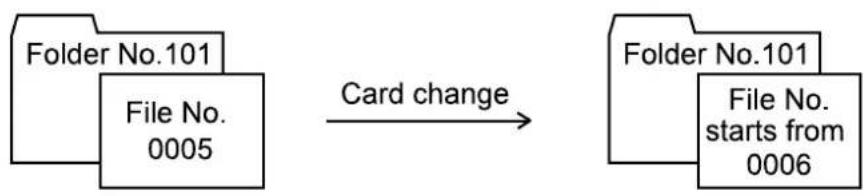
flowchart
graph LR
    A["Folder No.101\nFile No.\n0005"] -->|Card change| B["Folder No.101\nFile No.\nstarts from\n0006"]
When images are transferred to a computer...
- Even when pictures are stored in multiple cards, a different file number will be used for each. This will continue until 9999, when numbers will start over again at 0001.
- For convenience, the folder numbers remain the same when transferred to a computer.
\ DCIM \ *** OLYMP \ Pmdd **** .jpg Folder No.

1 Display the mode setting screen - See "How to use the Mode Setting Menu Screen 1\~3" (P.145)
2 Press △ ▽ on the Arrow pad to select "FILE NAME", then press ▷.
3 Press △ ▽ to select "AUTO" or "RESET", then press the OK button to confirm the setting.
4 Press the OK button repeatedly until the menu disappears.

text_image
2, 3 3, 4Still picture recording mode setting menu

text_image
FILE NAME RESET 12.23.00 12:34 m/ft [m [3/3]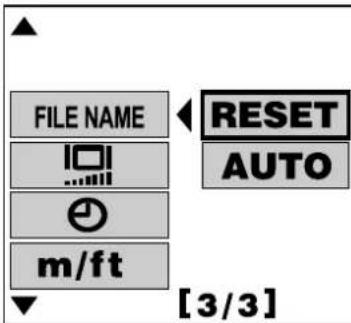
text_image
FILE NAME RESET AUTO m/ft [3/3]Note:
- When a card is used with a first file number larger than the last one in the previous card, file numbers will continue from the larger number.
- When the maximum file number (9999) of the maximum folder number (999) is reached, the number of storable pictures becomes 0, even if the card is not full yet. No more pictures can be taken.
- Settings will remain until you change them.
Adjusting the brightness of the Monitor and Viewfinder to your preferences. The brightness of each can be adjusted separately.
1 Press ☐ to display the Monitor or Viewfinder, depending on which one you want to adjust.
2 Display the mode setting screen - See "How to use the Mode Setting Menu Screen 1\~3" (P.145)
3 Press △ ▽ on the Arrow pad to select “☐”, then press ▷. “SETUP” will be displayed. Press the OK button.
● The brightness setting screen will appear.
4 To make the image brighter...
Press ▷ so that the cursor moves toward +.
To make the image darker...
Press ◀ so that the cursor moves toward –.
5 Press the OK button to confirm your settings.
6 Press the OK button repeatedly until the menu disappears.
3, 4
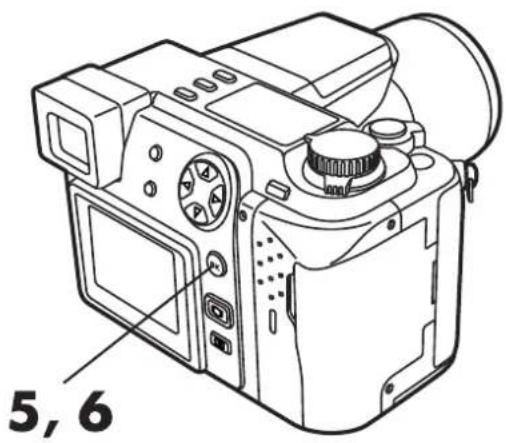
text_image
5, 6Still picture recording mode setting menu

text_image
FILE NAME SETUP m/ft [3/3]Brightness setting screen
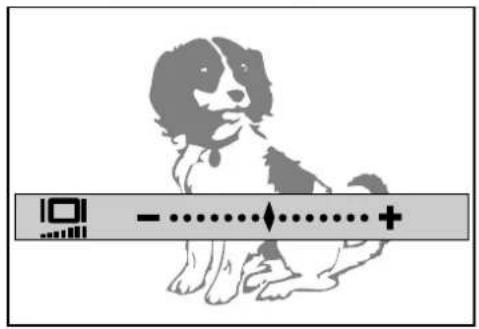
text_image
Illustration of a dog with a scale bar and a plus sign, likely indicating a measurement or score.Note:
- Settings will remain in effect until you change them.
Selecting Meters or Feet as a Measurement Unit \~ m/ft
In the Manual focus mode (P.94), you can select either meters or feet. (In the Macro mode, these are replaced by centimeters or inches respectively.)

1 Display the mode setting screen. → See "How to use the Mode Setting Menu Screen 1 \~ 3" (P.145).
2 Press △ ▽ on the Arrow pad and select "m/ft", then press ▷.
3 Press △ ▽ and select "m" or "ft", then press the OK button to confirm the setting.
4 Press the OK button repeatedly until the menu disappears.
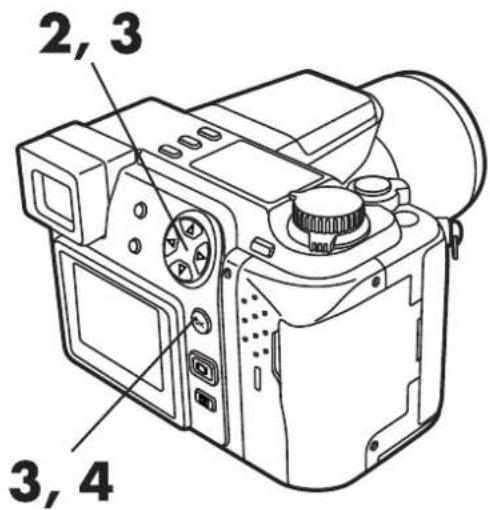
text_image
2, 3 3, 4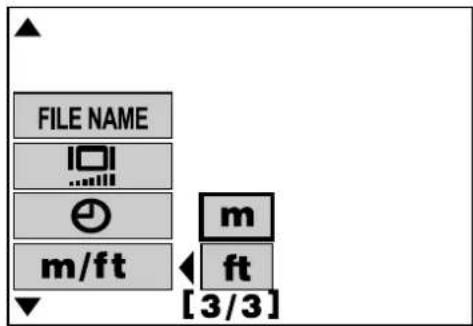
text_image
FILE NAME m/ft [3/3]Still Picture Recording Mode Setting Menu
Note:
- The setting remains in effect until it is changed again.
Setting the Number of Pictures to Display in the Index \~ ☐
When displaying pictures, you can increase the number of pictures displayed on the monitor by moving the zoom lever to W. 4-, 9-, or 16-image displays can be selected.

1 Display the mode setting screen.
→ See "How to use the Mode Setting Menu Screen 1 \~ 3" (P.145).
2 Press △ ▽ on the Arrow pad and select "☐", then press ▷.
3 Press △▽ and select "4", "9" or "16", then press the OK button to confirm the setting.
4 Press the OK button repeatedly until the menu disappears.
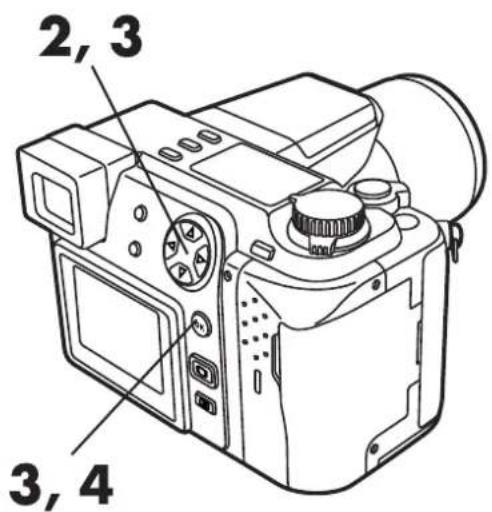
text_image
2, 3 3, 4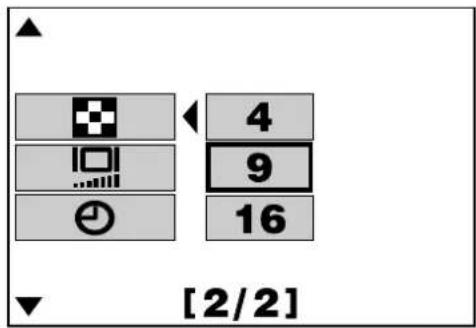
text_image
[2/2]Still Picture Recording Mode Setting Menu.
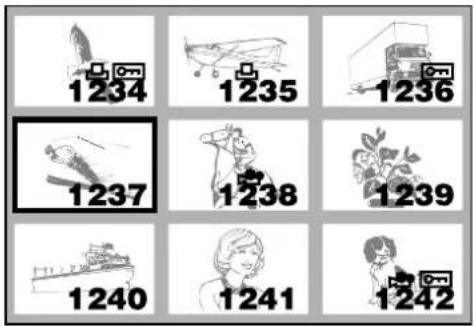
text_image
1234 1235 1236 1237 1238 1239 1240 1241 12429-divided index display
Note:
- If there is no data on the card, the Menu screen does not appear.
- The setting remains in effect until it is changed again.
6
PRINT SETTINGS
- Recorded images can be printed out with a printer.
- Selected images can be reserved in a SmartMedia card for printing on a printer or at a photo lab that supports the DPOF (Digital Print Order Format) system.
You can make prints of images stored in a SmartMedia, using one of the following methods:
Images in the SmartMedia can be selected for printing, as well as the number of copies for each and whether or not to print the date and time with them. This information is saved in the card (Print-reserve) for later printing from a printer or at a photo lab that supports DPOF.
If a SmartMedia with Print-reserve data recorded in it is inserted into an Olympus CAMEDIA P-400/P-330N printer, printing can be performed at the touch of a button. For more information, consult your printer's user manual.
Images can be transferred directly to a personal computer via USB or a PC connection kit, or by using an optional FlashPath, PC Card Adapter or USB SmartMedia Reader/Writer. Images can then be printed on a printer connected to the personal computer using a software application. For more information, consult the software's user manual.
About DPOF
DPOF (Digital Print Order Format) is a system that allows you to select images in a SmartMedia card to be printed as well as the number of copies to make of each. This information is stored in the card for use by printers or photo labs that support this system to make prints automatically.
Note:
- Images taken with this camera can also be printed using a printer or at a photo lab that supports the Design rule for Camera File system/DCF.
- DPOF reservations set by another device cannot be changed by this camera. Make changes using the original device.
- If a card contains DPOF reservations set by another device, entering reservations using this camera may overwrite the previous reservations.
- Even if an image appears with the message "PICTURE ERROR", print reserve may be performed on it. In such a case, the print reserve icon (☐) does not appear on the screen where an image is displayed for full view. Since ☐ appears on the screen where multiple images are displayed (index-display mode), it is possible to confirm the print reserve status.
- This camera cannot be directly connected to printers such as the Olympus P-300 digital printer.
- Not all functions may be available on all printers or at all photo labs.
Print reserve
This allows you to store the data needed to make prints of your photos on a printer or at a lab that supports this system.
All-frame print reserve allows you to store print data for all the pictures on the card, as well as allowing you to choose how may prints you want.
1 Set the Mode dial to ▶ to display a still picture.
- Print reserve cannot be performed for a picture displayed with 📄.
2 Press □.
● The Print reserve setting screen is displayed.
- If Print reserve data is already stored on the card, a screen will appear giving you the choice of resetting the data or keeping it. (P. 178)
● The buttons are disabled during close-up display. (P. 126)
3 Press △ ▽ on the Arrow pad to select [IMAGE], then press the OK button.
● The print number and date setting screen are displayed.
4 Press △▽ to select ☐×, then press ◀▷ to enter the number.
◀ : Decreases the number.
▷ : Increases the number.
- The number of prints can be set from 0 to 10.

text_image
1 2 3, 4 3
text_image
PRINT ORDER CALL CANCEL → SET → OK5 Press △ ▽ to select (∅), then press ◀ ▷ to select DATE or TIME.
6 Press the OK button.
- The Menu screen disappears and the picture reappears. The ☐ print reserve indicator and the number of prints are displayed.
★★If □ print reserve indicator is not displayed
Although you can use Print reserve with pictures protected with the Protect function, it cannot be used on pictures stored on a write-protected card.
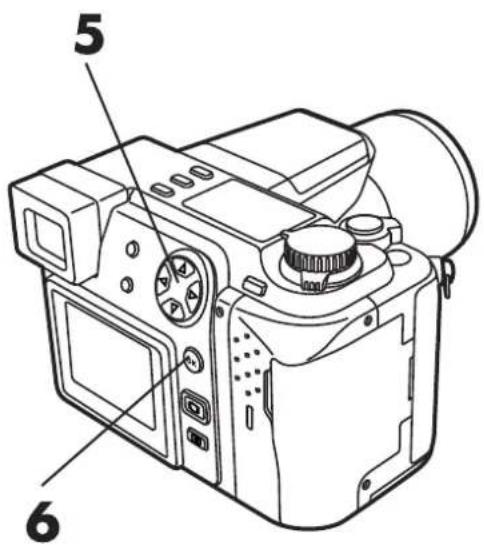
text_image
5 6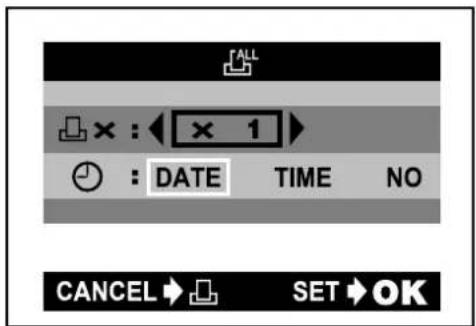
text_image
ALL × : × 1 : DATE TIME NO CANCEL SET OKNote:
● The setting will remain until it is readjusted.
- If you are printing using the P-330N, only the first 999 images can be printed.
- Print reserve may take considerable time in some cases.
Single-frame print reserve
This allows you to store print data for specified pictures.
1 Set the Mode dial to ▶ to display a still picture.
- Print reserve cannot be performed for a picture displayed with 🔊.
2 Press □.
● The Print reserve setting screen is displayed.
- If Print reserve data is already stored on the card, a screen will appear giving you the choice of resetting the data or keeping it. (P. 178)
3 Press △ ▽ on the Arrow pad to select ☐, then press the OK button.
- The print reserve selection screen is displayed.

text_image
Diagram of a digital camera with numbered parts labeled 1, 2, and 3
text_image
PRINT ORDER CALL SET OK4 Press the Arrow pad to select the picture you wish to print.
◀ : Displays the picture in the previous frame.
▷ : Displays the picture in the next frame.
△ : Displays the picture 10 frames back.
▽ : Displays the picture 10 frames forward.
- To display an index of pictures, press the Zoom lever to W.
◀ : Moves to the previous frame.
▷ : Moves to the next frame.
△ : Displays the previous page.
▽ : Displays the next page.
- The number of pictures shown in the Index-Display mode depends on the Index-Display mode setting (P. 165).
4-frame setting: 2 frames, 9-frame setting: 6 frames, 16-frame setting: 12 frames
- When the number of prints has already been set for the selected pictures, the previously set number is displayed.
- To set the Trimming print reserve, press the Zoom lever toward T (P. 175).
5 Press the OK button.
- The □ setting menu is displayed.
6 Press △▽ to select □x, then press ◀▷ to enter the number.
◀ : Decreases the number.
▷ : Increases the number.
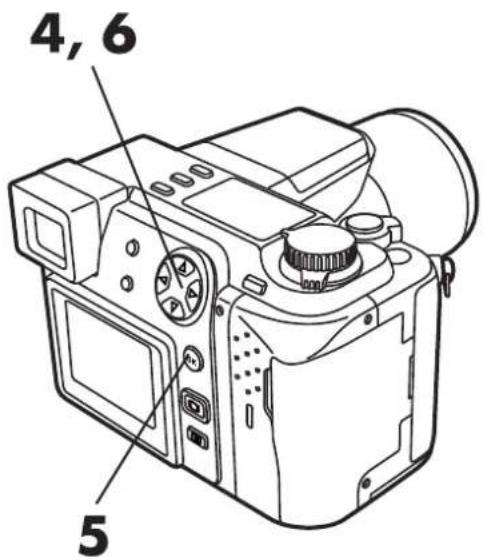
text_image
4, 6 5Print order setting screen
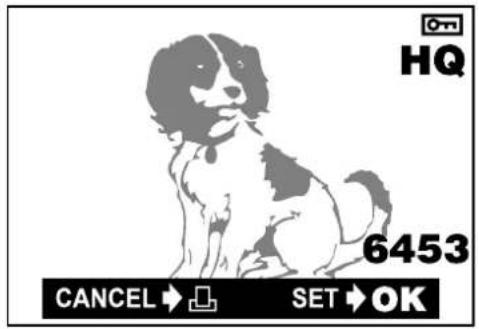
text_image
HQ 6453 CANCEL → SET → OK
text_image
1234 1235 1236 1237 1238 1239 CANCEL → SET → OK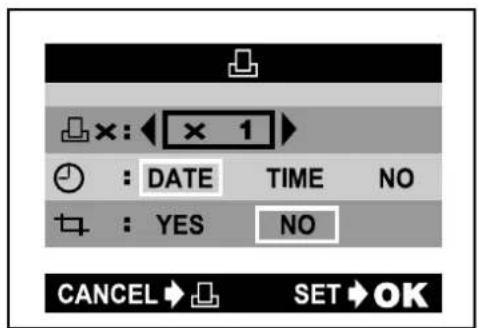
text_image
×: 1 : DATE TIME NO : YES NO CANCEL SET OK7 Press △ ▽ to select (∅), then press ◀ ▷ to select DATE or TIME.
- When Print reserve has been performed for a picture without date/time settings (P. 54), you cannot select DATE and TIME in this step.
8 Press △▽ to select (▽TRIMMING), then press ◀▷ to YES or NO.
- If trimming is not set, YES cannot be selected. Refer to "Trimming print reserve" for setting trimming (P. 175).
9 Press the OK button to complete the setting.
- The Menu screen disappears and the picture reappears. The ☐ print reserve indicator and the number of prints are displayed.
- To perform Print reserve for more pictures, repeat steps 4 through 9.
10 Press □.
- The screen exits the Print reserve mode and returns to the Display mode.
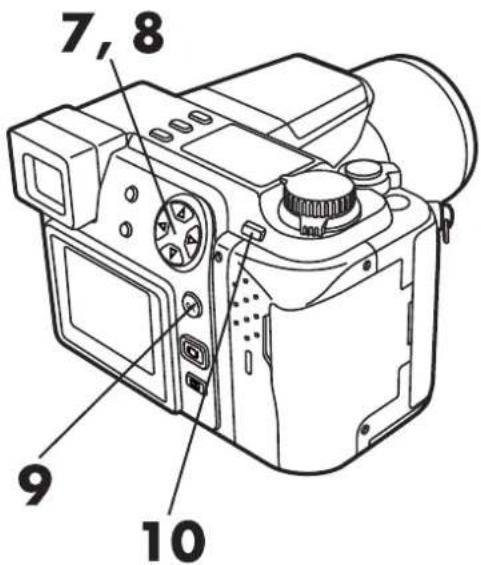
text_image
7, 8 9 10
text_image
×: 1 : DATE TIME NO : YES NO CANCEL SET OK
text_image
×: × 1 : DATE TIME NO : YES NO CANCEL → SET OKNote:
● The setting will remain until it is readjusted.
- If you are printing using the P-330N, only the first 999 images can be printed.
- Print reserve may take considerable time in some cases.
You can print an enlarged part of a recorded picture.
1 Perform steps 1 through 4 of "Printing selected frames\~Single-frame print reserve" (P. 172/173).
● The print reserve selection screen is displayed.
2 Press the Zoom lever toward T.
- The trimming mode screen is displayed and the selected cursor is displayed in green.
3 Press the Arrow pad or Zoom lever to move the cursor to set the top-left corner portion of the desired picture.
△ ▽ : Moves up/down.
◀ ▷ : Moves to the left/right.
Toward W: Moves to the top left corner.
Toward T : Moves to the bottom right corner.
4 When the position is set, press the OK button.

text_image
Diagram of a digital camera with numbered parts labeled 2, 3, and 4
text_image
HQ 6453 CANCEL → SET → OK
natural_image
Illustration of a sitting dog with a black-and-white patch, enclosed in a grid (no text or symbols)Trimming mode screen
5 Press the Arrow pad or Zoom lever to move the cursor to set the bottom right corner of the desired picture.
△ ▽ : Moves up/down.
◀ ▷ : Moves to the left/right.
Toward W: Moves to the top left corner.
Toward T : Moves to the bottom right corner.
- To change the already set position of the top left corner, press □.
6 When the position is set, press the OK button.
- The trimming size is set and displayed.
- To confirm the trimming size again, press the INFO button. The trimming size is displayed for approx. 1 second.

text_image
5 5 6
natural_image
Illustration of a sitting dog with a black-and-white body, enclosed in a grid (no text or symbols)
natural_image
Illustration of a sitting dog with a black-and-white patch, enclosed in a square frame (no text or symbols)Displayed for approx. 1 second.
7 Press the OK button.
- The Single-frame print reserve screen is displayed.
- Following the procedure of "Single-frame print reserve", set ☐ x (number of prints), ⏻ (DATE/TIME). ☐ (trimming) has already been set to YES. (P. 172–174)
8 When Print reserve is finished, press the OK button.
- The Print reserve is completed. The screen display returns to the one shown in step 1. To perform trimming print reserve for more pictures, select the desired pictures using the Arrow pad. Single-frame print reserve (P. 172)

text_image
7,8
text_image
CANCEL → SET → OKWhen setting is finished, the picture and frame are displayed for approx. 1 second, then the CANCEL/SET screen appears.
Note:
- The size of the printed image will vary depending on the print reserve settings. An image trimmed to a small size will have lower resolution.
- For best results with close-up prints, it is recommended to use the TIFF, SHQ or HQ mode.
- The vertical to horizontal ratio in the trimming screen can be changed using the Arrow pad, but if the zoom lever is used, the ratio is fixed at 4:3.
This resets all the print reserve settings for images saved in a card.
1 Set the Mode dial to ▶ and display a still picture.
2 Press □.
● The Print order setting screen is displayed.
- If there are no pictures on the card, this screen is not displayed.
3 Press ◀ ▷ to select RESET, then press the OK button.
- To keep the print order, select KEEP and press the OK button.
- To remove the selected image only, set the number of prints in Single-frame print reserve to 0.

text_image
Labeled diagram of a digital camera with numbered parts for identification
text_image
PRINT ORDER SETTING PRINT ORDERED RESET KEEP CANCEL SET OKNote:
- If RESET is selected, the print reserve will be canceled for all the images in the card.
7
TRANSFERRING
PICTURES TO A
COMPUTER
Your computer can save pictures stored on a card. Once the image data is in your computer, you can take advantage of various image processing capabilities and use your images in publications, web sites, multimedia, etc.
Saving with the camera connected to a computer (P. 182)
Images stored on the card can be saved directly via the camera's USB connector or computer connector. To do this, you will need the following:
- Required cables
For USB connection → USB cable
For serial connection → Serial cable
- OLYMPUS CAMEDIA Master 2.0 — required software to enable transfer to a personal computer
Important: OLYMPUS CAMEDIA Master 2.0 is required to process images shot with this camera.
Saving directly from a card
Card adapters enable you to save images on your personal computer without using any special software.
| Personal computer type | Required card adapter |
| Personal computer equipped with 3.5" floppy disk-drive | FlashPath floppy disk adapter (optional) |
| Personal computer equipped with a PC card slot (PCMCIA) or an external PC card reader/writer | PC card adapter (optional) |
| Personal computer equipped with an USB port | SmartMedia Reader/Writer (MAUSB-2) (optional) |
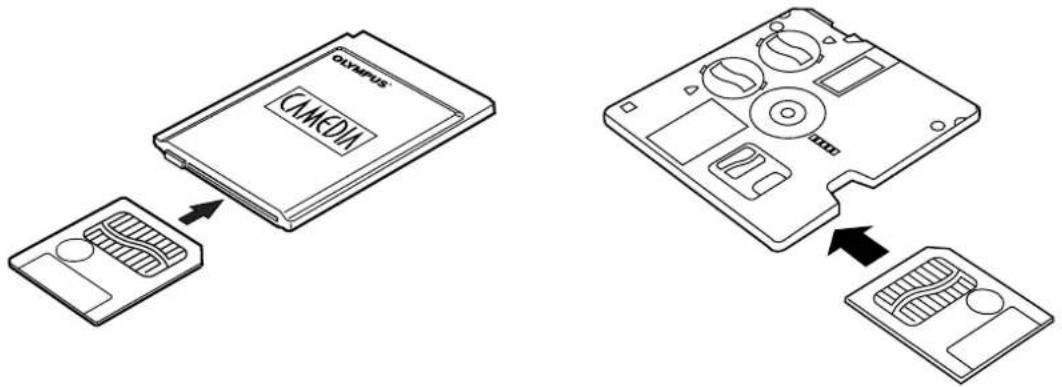
text_image
Olympus VMM VMM VMMImportant:
- Check for compatibility. The above devices may not function properly in some operating environments. Function may also be affected by the SmartMedia memory capacity.
- OLYMPUS CAMEDIA Master is not necessary to save pictures from a card. The pictures can processed as normal PC files, using any commercially available image processing application.
Note:
- Do not try to use a write-protected Smart Media on a computer as doing so will cause errors. Refer to the instructions of the adapter you are using for more details.
CONNECTING DIRECTLY TO A COMPUTER BY CABLE
This section explains how to use the camera's transfer function and how to save pictures on a personal computer using CAMEDIA Master.
First, make sure you have a suitable cable to connect the camera to your personal computer and that CAMEDIA Master is installed on your computer.
Cable connection
Connect the camera to a personal computer (IBM PC/AT compatible, Apple Macintosh).
This camera is equipped with 2 transfer connectors.
If your computer is equipped with a USB interface and is running either are Windows 98/98 Second Edition/2000 Professional or Macintosh OS, you can transfer picture data via a USB cable.
If your personal computer is not equipped with a USB interface or is running Windows 95/NT4.0 or Macintosh OS, you can transfer data via a serial cable.
To connect this camera directly to a personal computer, it must have either a serial port or USB port.
Note:
- It is not possible to transfer data to a personal computer via a cable unless you use CAMEDIA Master 2.0 to capture pictures. For more details on using a USB connector, read “Computer Operating Environment” (P. 183).
Computer Operating Environment
Check your personal computer's operating environment.
Personal computers used with this camera must conform to the following minimum standards.
- Windows
| CPU | : Pentium or later |
| OS | : Windows 98/98 Second Edition/2000 Professional (USB)Windows 95/98/98 Second Edition/2000 Professional/NT 4.0 SP3 or later |
| Available HD space | : 100MB or more |
| RAM | : 32MB or more (64MB or more recommended) |
| Connectors | : USB port (USB connection)RS-232C port (serial connection)D-SUB 9-pin connector (serial connection) |
| Monitor | : Thousands of colors recommended |
| Minimum monitor resolution | : 800 x 600 pixels |
Note:
- USB support is not available under the following environments, even for PCs equipped with a USB port.
Windows 98 upgrade (from Windows 95)
Windows 95
Windows NT 4.0
CONNECTING DIRECTLY TO A COMPUTER BY CABLE (cont.)
- Apple Macintosh
| CPU | : PowerPC |
| OS | : Mac OS 8.6 to 9 (USB)Mac OS 7.6.1 to 9 (serial) |
| Available HD space : 100MB or more |
| RAM | : 32MB or more (8MB or more free memory for the included application) |
| Connectors | : USB portSerial port |
| Monitor | : Thousands of colors recommended |
| Minimum monitor resolution | : 800 x 600 pixels |
QuickTime 4.0 must be installed to play back movies.
Note:
- For USB connection, your Macintosh must have a USB port.
Memo:
- To record or play back sound, a sound card and a microphone are required. To play back a movie, QuickTime 4.0 must be installed.
- Also refer to CAMEDIA Master's on-line manual for details.
Note:
- If you are using a USB cable to make connections, make sure that your personal computer support it. Contact your personal computer maker concerning your personal computer's environment.
● Communications with a personal computer cannot be accomplished with a USB cable alone. Be sure to download images using CAMEDIA Master. - If a USB connection is used, make sure that USB is operating normally on the personal computer. For more information, consult your personal computer's operation manual.
Connecting to your personal computer
Use the appropriate connector according to your computer's specifications.
1 Install CAMEDIA Master on your personal computer beforehand.
- For installation, refer to the CAMEDIA Master installation guide or online manual.
2 Make sure the personal computer and camera are turned off.
3 Connect to the personal computer.
- Connection methods vary according to the type of cable you are using.
- For USB-equipped computers (IBM PC/AT compatible, Apple Macintosh)
Connect the USB cable to the USB port on your computer.

flowchart
graph LR
    A["Computer"] --> B["USB port"]
    B --> C["USB connection cable"]
    C --> D["Camera's USB connector"]
    style A fill:#f9f,stroke:#333
    style D fill:#bbf,stroke:#333
● For serial port-equipped computers (IBM PC/AT compatible)
Connect the RS-232C PC serial cable to the serial port (COM1, COM2, etc.) on your computer.
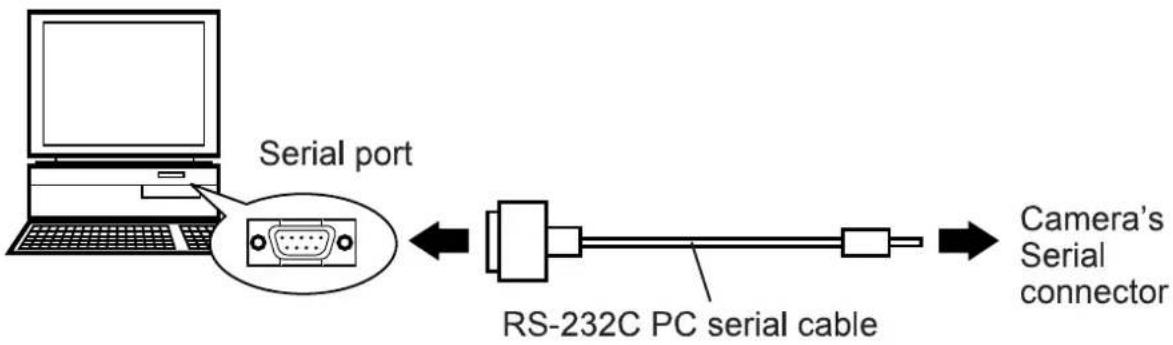
flowchart
graph LR
    A["Laptop"] --> B["Serial port"]
    B --> C["RS-232C PC serial cable"]
    C --> D["Camera's Serial connector"]
CONNECTING DIRECTLY TO A COMPUTER BY CABLE (cont.)
Apple Macintosh
Attach the Mac conversion connector to the computer's printer port or modem port.
Connect the RS-232C serial cable to the Mac conversion connector.

flowchart
graph LR
    A["Computer"] -->|To the modem or printer port| B["Mac conversion connector"]
    B --> C["RS-232C PC serial cable"]
    C --> D["RS-232C"]
    D --> E["To the camera's serial connector (RS-232C)"]
4 Connect the cable to the camera's USB connector or serial jack.
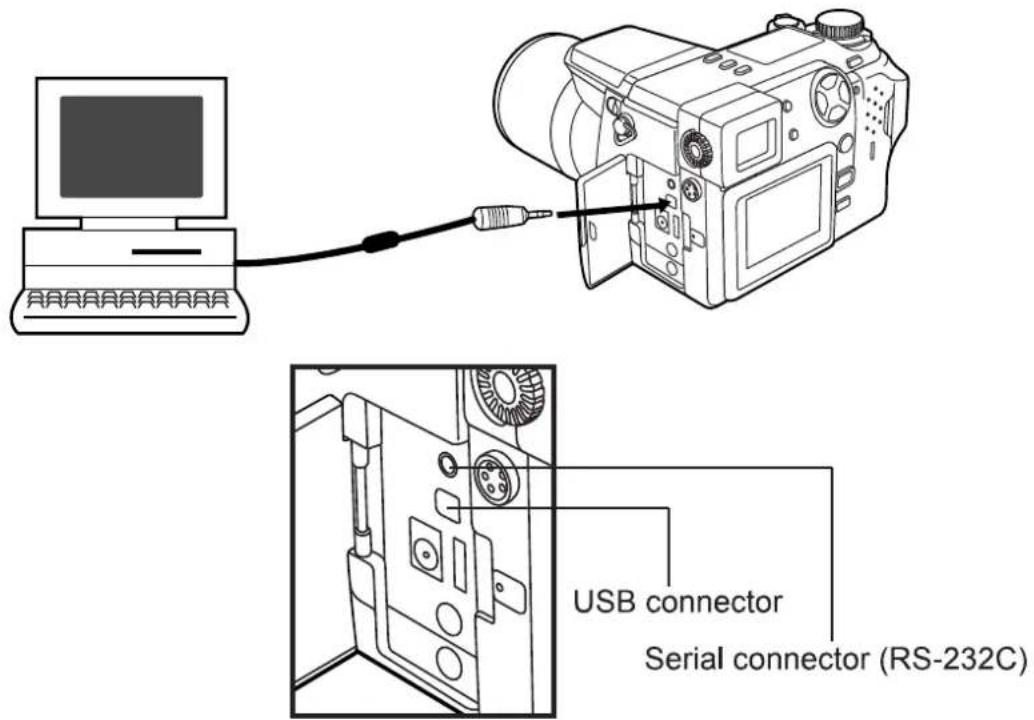
text_image
USB connector Serial connector (RS-232C)- The first time you connect your camera to your personal computer with the USB connector, you will need the CAMEDIA Master CD-ROM to install a file transfer driver. To install the driver, be sure to read the CAMEDIA Master installation guide.
5 Turn on the computer.
6 Set the camera's Mode dial to ▶.
7 Start CAMEDIA Master on the computer.
Note:
- If the camera is connected to the computer with the camera turned on, the camera may not function properly. When connecting to the computer, make sure the camera is turned off.
- When connecting to the computer, the buttons on the camera do not function.
- When the camera is connected to a TV or Personal computer, communication is not possible.
- In order to prevent battery consumption, use the AC adapter (optional).
Saving pictures using CAMEDIA Master
This section explains how to save pictures on your computer with CAMEDIA Master.
You can view pictures stored on a card on the computer and then save them on the computer.
1 Start CAMEDIA Master on the computer.

text_image
CAMEDIA Master 2.02 Click on [My Camera].
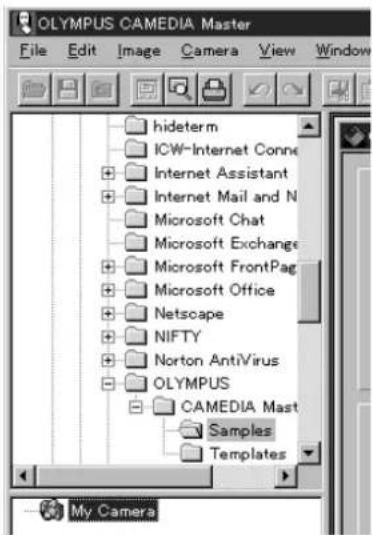
text_image
OLYMPUS CAMEDIA Master File Edit Image Camera View Window hideterm ICW-Internet Conne Internet Assistant Internet Mail and N Microsoft Chat Microsoft Exchange Microsoft FrontPag Microsoft Office Netscape NIFTY Norton AntiVirus OLYMPUS CAMEDIA Mast Samples Templates My Camera3 A thumbnail index of stored images will be displayed. Place the cursor on the desired image and double-click on it. This will open the selected image.
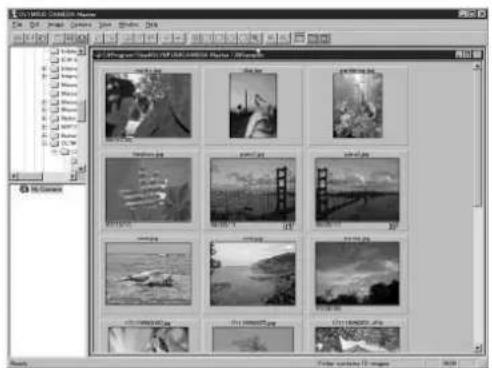
text_image
C:\Program Files\Photo\PAD\ADAMIN\Photo\100%
text_image
1.00000000000000000 File Edit View Tools View Insert Help Add to Add to Add to Add to Add to Add to Add to Add to Add to Add to Add to Add to Add to Add to Add to Add to Add to Add to Add to Add to Add to Add to Add to Add to Add to Add to Add to Add to Add to Add to Add to Add to Add to Add to4 Select [Camera] – [Download All Images] on the menu bar.
- The computer will start transferring images from the camera to the computer.
![OLYMPUS Camedia C-2100 Ultra Zoom - Select [Camera] – [Download All Images] on the menu bar. - 1](/content/2026/05/1106613/images/925c9f38f84e8287d732f802ab688c8d934e8990bdfa93157c7ce00038b3e575.jpg)
text_image
Camera View Window Help Download All Images... Download Selected Images Upload Selected Images Protect Camera Settings...Note:
- You can view images using software such as graphics applications that support JPEG like Paint Shop Pro/Photoshop, Internet browsers like Netscape Communicator/Microsoft Internet Explorer, and CAMEDIA Master (Supplied with the camera). For more details, refer to the application's instruction manual.
- CAMEDIA Master also supports other camera settings (setting/canceling Protect, erasing data, date/time settings and changing other settings). For operation, refer to CAMEDIA Master's on-line manual.
CAMEDIA Master lets you capture, display, process and store pictures on a computer. For operation, refer to CAMEDIA Master's on-line manual.
Making Dark Images Bright
Some images may come out darker than expected. You can try taking pictures again right after shooting, but may often miss the right moment for a good picture. This is where CAMEDIA Master Instant Fix comes in. You can easily brighten images.
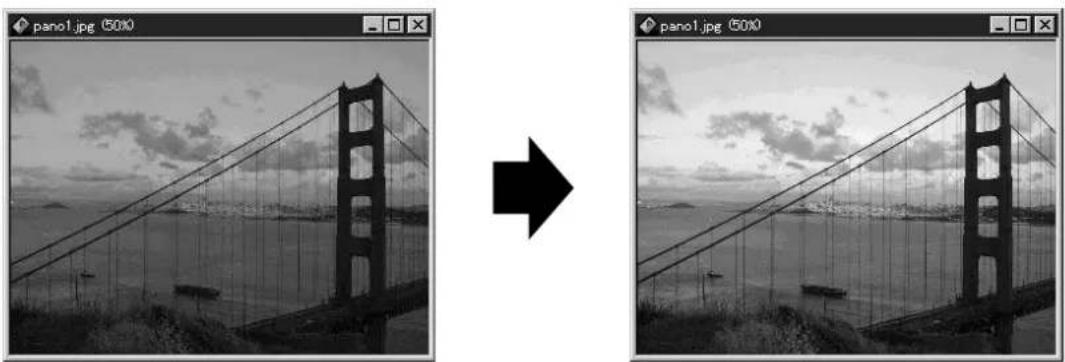
natural_image
Two black-and-white photos showing a suspension bridge over water, one rotated right with an arrow (no text or symbols)Correcting Blurry Images
Backlight sometimes makes the whole image blurry, and an object which stands before the subject may be out-of-focus. Use CAMEDIA Master Sharpen when this happens to sharpen the whole image. However, you should note that it doesn't eliminate image blur completely.
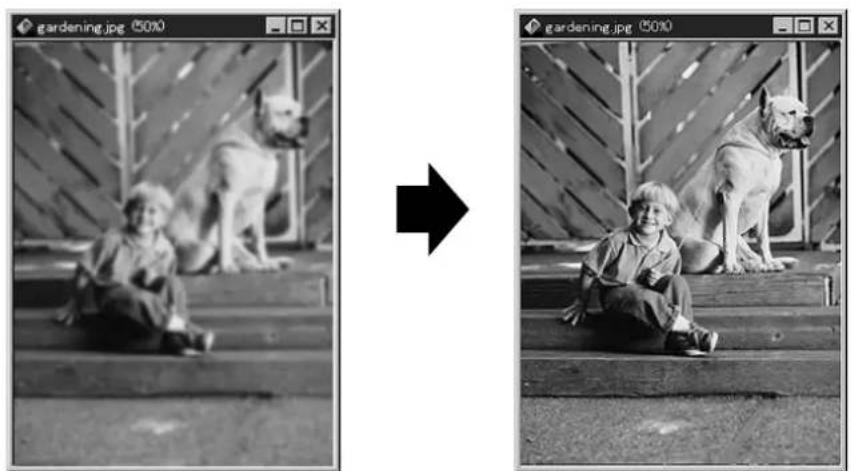
natural_image
Two black-and-white photos showing a child sitting on steps with two dogs, one larger and one smaller, both rotated to the right (no text or symbols)Composing Images with Templates
You can easily compose images with templates in CAMEDIA Master.
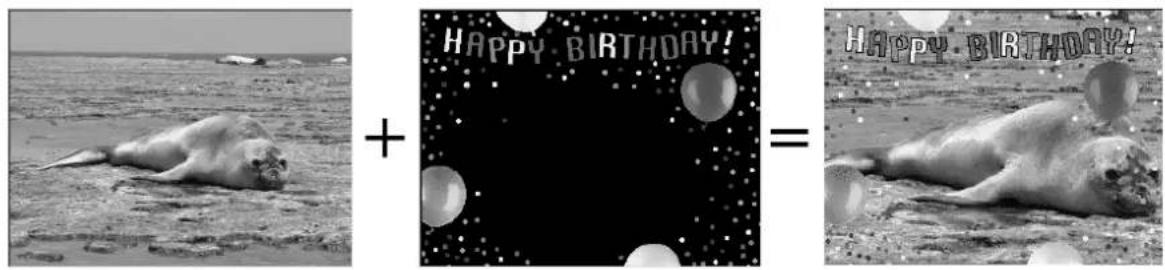
text_image
HAPPY BIRTHDAY! HAPPY BIRTHDAY!
8
MISCELLANEOUS
Operating Problems
| SYMPTOM | ||
| The camera does not work. | ||
| POSSIBLE CAUSES | CORRECTIVE ACTION | REF. PAGE |
| 1 The power is OFF.2 The batteries are loaded incorrectly.3 The batteries are exhausted.4 The batteries are temporarily unable to function.5 Power has shut off to conserve battery consumption.6 It is connected to a personal computer. | 1 Set the Power switch to ON to turn on the power.2 Reload the batteries correctly.3 Replace the batteries with new ones.4 Keep the batteries warm while using the camera.5 Operate the camera as required.6 The camera will not operate while it is connected to a personal computer. | P. 58P. 33P. 33P. 19P. 59P. 187 |
| SYMPTOM | ||
| No picture is taken when the Shutter button is pressed. | ||
| POSSIBLE CAUSES | CORRECTIVE ACTION | REF. PAGE |
| 1The flash has not finished charging.2The card access lamp blinks after shooting in themode.3There is a problem with the card. | 1Remove your finger from the Shutter button and wait until the flash charge mark stops blinking. Take your shot again.2The recorded movie image data is being written to the card. You can start shooting again when the card access lamp stops blinking.3See the Error code chart. | P. 108P. 203 |
| 4 The card is full.5 The batteries ran out.6 Indications disappear on the viewfinder/monitor or the control panel. On the control panel, the battery remaining power indicator will blink.7 The memory gauge is full.8 A write-protect adhesive seal is placed on the card or there is no card in the camera.9 The Mode dial is set to ▶. | 4 Replace the card, delete unwanted pictures or transfer the data to a computer and delete all of the pictures.5 Replace the batteries with new ones.6 Replace the batteries with new ones. (Do not open the Battery compartment cover when the Card access lamp is blinking.)7 Wait until there is room in the memory gauge.8 Insert a new card in the camera.9 Set the mode dial to P, A, S, M, S-Prg or 📋. | P. 40–42P. 78P. 180–189P. 33P. 33P. 69P. 40P. 41P. 44 |
| SYMPTOM | ||
| The date recorded with the image data is wrong. | ||
| POSSIBLE CAUSES | CORRECTIVE ACTION | REF. PAGE |
| 1 The date was not set.2 The camera has been left for approx. 1 week with the batteries removed and the date setting is canceled. | 1 Set the date. It is also possible to set the date via a personal computer using CAMEDIA Master. The clock adjustment is not factory-preset.2 Try setting the date again. | P. 54P. 54 |
| The flash does not fire. | ||
| POSSIBLE CAUSES | CORRECTIVE ACTION | REF. PAGE |
| 1 The flash is pushed down.2 The subject is lighted.3 The drive mode is set toBKT.4 Panorama recording is taking place.5 The Picture effect is set to WHITE BOARD/BLACK BOARD. | 1 Slide the Flash switch to raise the flash.2 Set the flash to Fill-In mode.3 Press the DRIVE button to set to the single-picture mode.4 Stop Panorama recording.5 The flash does not fire in the WHITE BOARD/BLACK BOARD mode. | P. 72P. 108P. 107/108P. 117P. 135P. 137 |
| SYMPTOM | ||
| Pictures you have already taken do not appear on the monitor. | ||
| POSSIBLE CAUSES | CORRECTIVE ACTION | REF. PAGE |
| 1The camera is in the Record Mode.2There is no picture in the card.3There is a problem with the card.4The camera is connected to a TV.5The viewfinder is on but there is no display. | 1Set the Mode dial to ▶.2NO PICTURE appears on the monitor. Record pictures.3See the Error code chart.4The monitor does not function when the camera is connected to a TV.5Press [IMAGE] to switch to the monitor. | P. 44P. 124P. 68–70P. 203P. 204P. 76P. 124 |
| SYMPTOM | ||
| The viewfinder display is not clear. | ||
| POSSIBLE CAUSES | CORRECTIVE ACTION | REF. PAGE |
| 1 The diopter is not adjusted properly.2 The brightness is not adjusted properly. | 1 Adjust the diopter again.2 Adjust the brightness. It is possible to adjust the viewfinder and monitor independently. | P. 64P. 163 |
| The monitor is not clear. | ||
| POSSIBLE CAUSES | CORRECTIVE ACTION | REF. PAGE |
| 1 The brightness is not adjusted properly.2 The monitor is exposed to direct sunlight. | 1 Adjust the brightness.2 Block the sunlight. | P. 163 |
| SYMPTOM | ||
| Image rotate, Image protect, Single-erase, All-frame erase and Card formatting cannot be performed. | ||
| POSSIBLE CAUSES | CORRECTIVE ACTION | REF. PAGE |
| 1A write-protect adhesive seal is affixed to the card. | 1Use the card after peeling off the seal. Do not reuse the write protect seal. | P. 43 |
| SYMPTOM | ||
| When the camera is connected to a computer, an error message appears while data is being transferred to the computer. | ||
| POSSIBLE CAUSES | CORRECTIVE ACTION | REF. PAGE |
| 1 The cable is not plugged in correctly.2 The power is OFF.3 The batteries are exhausted.4 The serial port is not selected correctly. | 1 Connect the cable correctly.2 Turn on the camera, then set the Mode dial to ▶.3 Replace the batteries with new ones or use the optional AC adapter.4 Use the operating system software to make sure the serial port is selected correctly. | P. 182–187P. 187P. 33–38 |
Problems with Images
| SYMPTOM | ||
| The subject's eyes appear red in pictures recorded with the flash. | ||
| POSSIBLE CAUSES | CORRECTIVE ACTION | REF. PAGE |
| 1 The flash is in the Auto-flash mode. | 1 This “red-eye phenomenon” occurs with all cameras when a flash is used. It is caused by light from the flash reflecting off the retina at the back of the eye. Red-eye varies depending on the individual and the shooting conditions such as ambient lighting. Use of the Red-Eye Reducing Pre-Flash mode significantly reduces this phenomenon. | P. 107 |
| SYMPTOM | ||
| The picture is out of focus. | ||
| POSSIBLE CAUSES | CORRECTIVE ACTION | REF. PAGE |
| 1 The camera moved when the shutter button was pressed.2 The AF target mark was not on the subject.3 The lens is dirty.4 The subject was too close.5 The Shutter button was pressed while standing in front of the camera in the Self-timer mode. | 1 Hold the camera correctly, and press the shutter button.2 Position the AF target mark on the subject, or use the focus lock.3 Clean the lens with a soft dry cloth.4 Set the camera to the Macro mode. The shooting distance varies according to the zoom setting.5 Press the Shutter button while looking into the viewfinder, not while standing in front of the camera. Or, use the remote control. | P. 66P. 67P. 67P. 93P. 201P. 83P. 90P. 119–121 |
| 6 The Manual focus was used with the wrong focal range.7 The subject was dark and the AF assist lamp was turned off. | 6 Use the right Manual focus for the distance.7 Set the AF assist lamp to on. | P. 94P. 157 |
| SYMPTOM | ||
| The picture is too bright. | ||
| POSSIBLE CAUSES | CORRECTIVE ACTION | REF. PAGE |
| 1 The flash mode was set to the Fill-in flash mode.2 The subject was excessively illuminated. | 1 Select a flash mode other than the Fill-in flash mode.2 Use spot metering. Adjust the exposure compensation or change the camera position toward the subject. | P. 107P. 99 |
| SYMPTOM | ||
| The picture is too dark. | ||
| POSSIBLE CAUSES | CORRECTIVE ACTION | REF. PAGE |
| 1 The flash was blocked by a finger.2 The subject was out of the working range of the flash.3 The flash mode was set to the Off mode.4 The subject was too small and was backlit.5 The Sequence mode was used. | 1 Hold the camera correctly, keeping your fingers away from the flash.2 Shoot within the flash working range. Or, use an external flash.3 Check the flash mode before shooting.4 Set the flash to Fill-In mode. Or, use the Spot metering mode.5 Higher shutter speeds are used when the Sequence mode is selected which may result in pictures that are darker than usual. | P. 66P. 106P. 112P. 107P. 107P. 100P. 118 |
| The colors of pictures taken indoors look unnatural. | ||
| POSSIBLE CAUSES | CORRECTIVE ACTION | REF. PAGE |
| 1 The lighting fixture(s) affected the picture.2 The subject is mostly dark.3 The white balance setting is wrong. | 1 Set the flash mode to Fill-In.2 Include white in the image or adjust the white balance.3 Adjust the white balance. | P. 107P. 134P. 134 |
| SYMPTOM | ||
| The picture has obscured edge(s). | ||
| POSSIBLE CAUSES | CORRECTIVE ACTION | REF. PAGE |
| 1 The lens was partly blocked by a finger or the strap. | 1 Hold the camera correctly, keeping your fingers and the strap away from the lens. | P. 66 |
After use
Be sure to turn off the power and attach the lens cap to the lens.
Cleaning the camera
1 Set the Power switch to OFF.
2 Remove the batteries (P. 33/34). When using the AC adapter, unplug the AC adapter from the camera and the AC outlet. (P. 37)
3 Exterior.....Wipe gently with a soft cloth. To wipe off heavy dirt, soak the cloth in diluted mild soap and wring it well. Wipe off the camera with the damp cloth and then dry it with a dry cloth. If you have used your camera at the beach, use a cloth dampened with fresh water.
Monitor and viewfinder..... Wipe gently with a soft cloth.
Lens..... Blow dust off the lens with a blower brush (commercially available), then wipe gently with lens cleaning paper. When storing the camera for a long period, attach the lens cap to the lens.
Card..... Wipe gently with a soft cloth.
Note:
- Do not use strong cleaning agents such as benzine or alcohol, or chemically treated cloth.
- Cleaning should be done only after the battery pack has been removed or other power supply units have been disconnected.
- Mold may form on the lens surface if the lens is left dirty.
A variety of capabilities are available when connected to optional equipment.

flowchart
graph TD
    A["TV"] --> B["AC adapter"]
    B --> C["CAMERA"]
    C --> D["Personal computer"]
    D --> E["MO drive"]
    E --> F["Printer (P-400/P-330N)"]
    C --> G["SmartMedia Reader/Writer"]
    G --> H["PC card adapter"]
    H --> I["FlashPath"]
    I --> J["Printer (P-400/P-330N)"]
    C --> K["Conversion lens adapter"]
    K --> L["Remote control"]
    L --> M["External flash Flash bracket"]
    C --> N["Tele Conversion lens Wide conversion lens Macro conversion lens"]
Error codes appear when there is a problem with the camera.
Error codes displayed on the control panel will flash.
| Control panel | Viewfinder/ monitor | Error content | Remedy |
 | CARD COVER OPEN | The card cover is open. | Insert a card and close the cover. |
 | NO CARD | The card is not inserted, or it cannot be recognized. | Insert the card correctly. Insert a different card. |
 | CARD FULL | No more pictures can be taken. | Replace the card or erase unneeded pictures. |
 | WRITE PROTECT | Writing to the card is prohibited. | If you are taking pictures, remove the write-protect adhesive seal. |
 | CARD ERROR | Cannot record, play back or erase pictures in this card. | If the card is dirty, wipe it with a clean tissue and insert it again. Or, format the card. If the problem is still not corrected, this card cannot be used. |
 (No display) (No display) | PICTURE ERROR(Format confirmation screen) | The recorded image cannot be played back with this camera.The card is not formatted. | Load the image using personal computer image processing software. If that cannot be done, the image file is partially damaged.Format the card. |
 | NO PICTURE | There are no pictures in the card, so there is nothing to play back. | Insert a card which contains images. |
 | CARD FULL | There is no empty space in the card, so print data or sound cannot be recorded. | Replace the card or erase unneeded pictures. |
●Photo Printers For Olympus Digital Cameras
● AC Adapter
● Camera Case
● Standard SmartMedia Card (8/16/32/64MB)
● FL-40 external flash
● Flash bracket
● Bracket cable
● FlashPath Floppy Disk Adapter
● PC Card Adapter
NiMH Batteries
● NiMH Battery Charger
●USB SmartMedia Reader/Writer
Visit the Olympus home page (http://www.olympus.com) for the latest information on optional items.
COMPATIBILITY OF THE PICTURE DATA
- Images taken by this camera may not be properly displayed or printed with other Olympus digital cameras.
- Images taken by other Olympus digital cameras may not be properly displayed or printed with this camera.
| Product type | Digital camera (for shooting and displaying) |
| Recording System Still | Digital recording, JPEG (in accordance with Design rule for Camera File system (DCF)), TIFF (non-compression), Digital Print Order Format (DPOF) |
| Sound with still images Movie | Wave format QuickTime Motion JPEG support |
| Memory | 3V (3.3V) SmartMedia 2MB, 4MB, 8MB, 16MB, 32MB, 64MB |
| No. of storable pictures (When an 8 MB card is used) | Record without sound Approx. 1 frame (TIFF: 1600 x 1200) Approx. 5 frames (SHQ) Approx. 16 frames (HQ) Approx. 38 frames (SQ: 1024 x 768 NORMAL) Approx. 82 frames (SQ: 640 x 480 NORMAL) |
| Erase | One-Frame erase / All-Frames erase |
| Image pickup element | 1/2 inch CCD solid-state image pickup 2,110,000 pixels (gross) |
| Recording image | 1600 x 1200 pixels (TIFF/SHQ/HQ) 1280 x 960 pixels (TIFF/SQ) 1024 x 768 pixels (TIFF/SQ) 640 x 480 pixels (TIFF/SQ) |
| White balance | Full Auto TTL (iESP auto), Preset (Daylight, Overcast, Tungsten light, Fluorescent) |
| Lens | Olympus lens 7.0 to 70.0, F2.8 to F3.5, 13 elements in 10 groups (equivalent to 38 to 380 mm lens on 35 mm camera), aspherical glass |
| Photometric system | Digital ESP metering, Center-weighted averaging metering, Spot metering system |
| Exposure control | Program auto exposure, Aperture priority auto exposure, Shutter priority auto exposure, Manual exposure, Night Scene program exposure |
| Aperture | W : F2.8 to 8.0T : F3.5 to 8.0 |
| Shutter speed | Used with mechanical shutter |
| Still | 1/2 to 1/800 sec. (16 to 1/800 sec. with manual setting) |
| Movie | 1/30 to 1/10000 sec. |
| Working range | W: 23.6" to ∞ (No Macro mode)3.9" to 23.6" (Macro mode)T : 6.5 ft to ∞ (No Macro mode)3.25 ft to 6.5 ft (Macro mode) |
| Viewfinder | 0.55" TFT color LCD display, approx. 114000 pixels |
| Monitor | 1.8" TFT color LCD display |
| No. of monitor pixels | Approx. 114,000 pixels |
| On-screen display | Date/Time, Frame number, Protect, Recording mode, Battery check, Picture information, Print-reserve, Menu, AF confirmation mark, Flash stand-by mark, AF target mark, etc. |
| Battery charging time for flash | Approx. 6 sec. (at normal temperature with new batteries) |
| Flash working range | W : Approx. 11.8" to 13 ftT : Approx. 3.25ft to 11 ft |
| Flash modes | Auto-Flash (automatic flash activation in low light and backlight), Red-Eye Reducing Flash, Fill-in Flash (forced activation), Off (no flash) |
| Autofocus | TTL system iESP autofocus, Spot autofocus, Contrast detection system |
| Focusing range | 3.9" to ∞ |
| Effective range of the AF assist lamp | 11.8" to 9.75 ft |
| Self-timer | Electronic Self-timer with 12-sec. delay |
| Outer connector | DC-IN jack, Serial connector (RS-232C), A/V OUT jack, USB connector (USB 1.0 compatible), 5-pin external flash socket, External microphone jack |
| Date and time | Recorded with picture data simultaneously |
| Automatic calendar system | Up to 2030 |
| Power supply for calendar | Built-in lithium battery |
| Operating environment | |
| Temperature | 32 to104°F (operation) |
| -4 to 140°F (storage) | |
| Humidity | 30 to 90% (operation) |
| 10 to 90% (storage) | |
| Power supply | For batteries, use 2 CR-V3 lithium battery packs, or 4 AA NiMH batteries, NiCd batteries, alkaline batteries or lithium batteries. AC adapter (optional) |
| Dimensions | 4-7/16" (W) x 3-1/16" (H) x 5-9/16" (D) |
| Weight | 540g (without batteries/card) |
SPECIFICATIONS ARE SUBJECT TO CHANGE WITHOUT ANY NOTICE OR OBLIGATION ON THE PART OF THE MANUFACTURER.
A
AC adapter 37
AC outlet....37
Adjusting the monitor brightness .....163
AE lock 130, 131
AE memory....130, 133
AF assist lamp 157
AF mode, iESP 96
AF mode, SPOT 96
AF sequential shooting....117, 118
All-frame print reserve 170
Aperture 87
Attaching the strap 32
Auto flash 72
Auto focus....67 — 70
Auto bracket 102
A/V output....76
B
Battery 33—36
Beep 156
Built-in memory 69
C
CAMEDIA Master 188 — 191
Center-weighted averaging metering ....100
Cleaning the camera 201
Close-up display....126
Composing a picture 68,70
Connections to a TV....76
Connections to a computer .....180 — 187
Custom setting 150
D
Data input/output 180 — 187
Date/time settings....54
DCF 2
Digital ESP metering 100
Digital zoom 98
Diopter adjustment 64
Displaying movies 74
Displaying multiple pictures at one time 25, 165
DPOF 168
Drive mode 117 — 121
E
Editing movies 142
Erasing pictures 77, 78
Exposure compensation....99
External flash 112
External microphone 123
F
Fill-in flash (forced activation)....107
1st-CURTAIN 110
Flash....72, 106 — 114
Flash bracket 115
Flash intensity control....109
Flash override....107
FlashPath 181
Focusing 67, 92 — 98
Focus lock 93
Formatting 42
Full-time AF 95
|
Index display 125
Index display of movies .....140, 141
Inserting/ejecting the card .....40, 41
ISO 101
J
JPEG (compression) ......105, 189
M
Macro mode 90
Manual focus 94
Manual mode 89
Menu, Still picture record menu .....48, 49
Menu, Movie picture record menu ....50, 51
Menu, Still picture display menu....52
Menu, Movie picture display menu....53
Metering mode 100
Mode dial, P 44
Mode dial, A 44
Mode dial, S 44
Mode dial, M....44
Mode dial, S-Prg....44
Mode dial, 44
Mode setup menu,
ALL RESET 148 — 151
Mode setup menu, 📄 (sharpness) ....152
Mode setup menu, TIFF....153
Mode setup menu, SQ 154
Mode setup menu, ■) (beep)....148 — 151
Mode setup menu, AF ILLUMINATOR ....157
Mode setup menu, REC VIEW....158
Mode setup menu, SLEEP 159
Mode setup menu, FILE NAME....160 — 162
Mode setup menu, 🖱️ (monitor brightness)....163
Mode setup menu, Ⓤ (date/time settings)....54
Mode setup menu, m/ft.....164
Monitor on/off 65
Multi-metering....132, 133
P
Picture information display ....28
Power on/off 58, 80
Pressing the Shutter button halfway/fully ....67
Print 168 — 178
Print reserve 170
Printer....168
Protection 79
Provided accessories 23
Q
Quick view 73
R
Record mode ....104
Recording movies....70
Red-eye reduction flash ....107
Remaining battery power 60
Remote control....76, 120
Resetting print reserve 178
Rotating and displaying pictures .....138
S
Scene program mode, 82
Scene program mode, 82
Scene program mode, 83
Scene program mode, 84
2nd-CURTAIN 110
Self-timer 119
Sequential shooting .....117, 118
Shutter speed 82 — 89, 101
Single image display 124
Single-picture shooting....117
Sleep mode 159
Slide-show 127
Slow synchronization ....110
SmartMedia 39
SmartMedia Reader/Writer....181
Sound record 122
Specifications 206 — 208
Special effects, BLACK BOARD .....137
Special effects, WHITE BOARD......137
Special effects, SEPIA 137
Special effects, BLACK & WHITE .....137
Spot metering....100
Stabilization system 97
T
Taking a still picture 68
Taking panorama pictures ....135
Telephoto shooting....71
TIFF (non-compression).....104, 105, 153
Transferring pictures to a computer....180 — 189
Trimming print reserve 175
W
White balance, Auto 134
White balance, 📋 (overcast) ......134
White balance, ⚙ (daylight)....134
White balance, ⚙ (tungsten light) .....134
White balance, 崇 (fluorescent) .....134
Wide-angle shooting....71
Z
Zoom 71
OLYMPUS®
OLYMPUS OPTICAL CO., LTD.
San-Ei Building, 22-2, Nishi Shinjuku 1-chome, Shinjuku-ku, Tokyo, Japan.
(Customer support) Tel. 0426-42-7499 Tokyo
http://www.olympus.co.jp
OLYMPUS AMERICA INC.
Two Corporate Center Drive, Melville, NY 11747-3157, U.S.A. Tel. 631-844-5000
(Customer support) Tel. 1-888-553-4448
http://www.olympus.com
OLYMPUS OPTICAL CO. (EUROPA) GMBH.
(Premises/Goods delivery) Wendenstraße 14-16, 20097 Hamburg, Germany. Tel. 040-237730
(Letters) Postfach 10 49 08, 20034 Hamburg, Germany.
http://www.olympus-europa.com
Serial number/Numéro de série/Número de serie
| Digital camera | |
| CD-ROM |
Printed in Japan
1AG6P1P0807—
VT1514-02