Mini Jet-dryer - Kézszárítók Thermex - Ingyenes használati útmutató
Találja meg az eszköz kézikönyvét ingyenesen Mini Jet-dryer Thermex PDF formátumban.

Felhasználói kérdések a következőről Mini Jet-dryer Thermex
0 kérdés erről a készülékről. Válaszolj azokra, amiket ismersz, vagy tedd fel a sajátod.
Tegyél fel egy új kérdést erről a készülékről
Töltse le az útmutatót a következőhöz Kézszárítók PDF formátumban ingyenesen! Találja meg kézikönyvét Mini Jet-dryer - Thermex és vegye vissza elektronikus eszközét a kezébe. Ezen az oldalon közzé van téve az eszköze használatához szükséges összes dokumentum. Mini Jet-dryer márka Thermex.
HASZNÁLATI ÚTMUTATÓ Mini Jet-dryer Thermex
Install Method
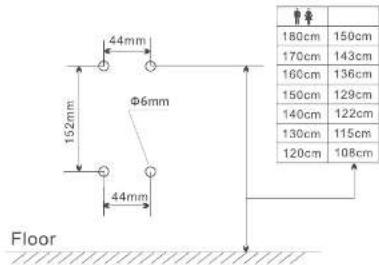
| Drawing the position of mounting holesAccording to the installation position, out the mounting plate with one hand gently looking at the place which the unit will be necessary. Then use the other hand to draw the positions of mounting holes in pencil or draw them directly according to the size | 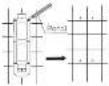 |
| Drilling holes● In accordance with the drawn holes position, drill four holes 6 mm in diameter and press the expansion piece into four holes location. | 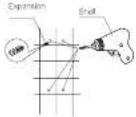 |
| Fixing the mounting platsDirect the installation holes of the installation panel atthe separation pipes and its them with self-threadingcross cables. | 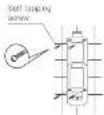 |
| Installing the unit● The mounting plate has undrudent hooks framework for down the unit and the anti-theft screw flakes on unit and mounting plate are aligned | 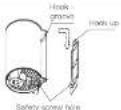 |
| Fixing anti-thrust screws |
| ● Screw and shaft ends in the bolt holes to fix the unit on the mounting plate. |
| ● install the air intake grill in the unit and make sure the grill is looked. |
Test Run
| Steps | Confirm Information | Check & Notice | |
| 1 | Shake the unit gently | The unit is installed firmly without shaking | It will occur shaking and noise when the unit doesn't install firmly. |
| 2 | Confirm the power and voltage | Please use the rated voltage | It will burn out unit or cause human accidents if the power use cannot. |
| 3 | Switch on the power | Close external power supply switch or insert the power plugs | Power socket must be match the unit plug please check the power when the indicator light not bright. |
| 4 | Slid in your hands to drying | High speed wind blow out. | Please confirm whether your hands are for away from the sensor parts if there is no wind blowing out. |
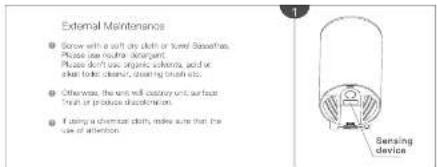
Daily Use and Maintenance
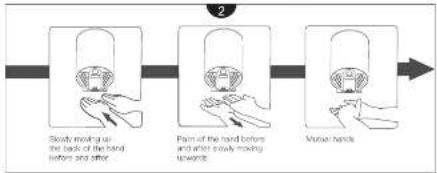
flowchart
graph LR
    A["Steaty moving up the back of the hand before and after"] --> B["Pain of the hand before and after slowly moving upwards"]
    B --> C["Move hand to wrist"]
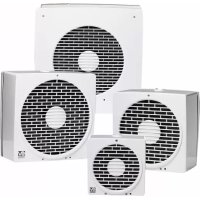
Mini Hand Dryer
User Manual
Specifications
| Dimensions | 103x102x280mm | ||
| N.W. | 3.4kg | ||
| Rated Voltage | AC220-240V | Motor | Brush Motor |
| Phase | Single phase | Sending Distance | 15-30cm |
| Input Power | 1150-1350W | Waterproof | P13 |
| Heating Power | 850-750W | Air Speed | 68 m/s |
WARNING
| Do not let children ranging on the unit. otherwise, this may be run of falling. Do not take the front layer. Otherwise, it may cause electric shock risk. Warning: | |
| Proved | Do not spread water. Otherwise, it may cause electric shock risk. Do not use household where water is electric splashed or in places where it is prone to freezing. Otherwise, this may cause electric shock and unit function. Warning: |
| Don't know water | Do not return and perform unnecessary disseambling. Otherwise, it may cause the electric shock and injury accidents. For their best work is required. If power assistance is over -1/20%, there will be breakdown. If using treated power supply, the electric shock and machine malfunction will happen. If you also designated applicable. If used in combination with other appliances, it may cause external heat in the air outlet. Please must be turn off using maintenance to prevent the risk of electric shock. All their best work is included. If the unit doesn't check or have abnormal conditions, please turn off power to prevent accident. and change electrical circuit and can supply to check and report, or if they need to fix the pliance of electricity leakage and short circuit. Unit must have limited ground connection. Attention when installation. Owned install when the unit are power connected. Warning: |
| Place for a person with transportation | The appliance is not intended for use by personal drinking children with released physical, sensory lack of life extension and knowing a series of they have experience throughout their own supervision or instruction concerning use of the appliances as a person responsible for their safety. If the car is damaged, it must be replaced by the manufacturer's service agent or similar qualified persons in order to avoid a hazard. For additional protection, the installation of a medical or industrial device (ICICI) having a rated electronic condition must not responding DMS to manufacture the electrical circuit supplying the bathroom. Are your installer for advice. This appliance can be used by children regard from 4 years and closed and correct with reduced physical, sensory or mental capabilities of lack of experience and knowledge of that they have given supervision or interaction concerning use of the appliance in a soft way and understand the hazards. Packed. Children shall not play with the appliance. Cleaning and user maintenance shall not be made by children without supervision. |

* Environmental protection Waste electrical products should not be disposed of with household water. Please receive where facilities exist. Check with your local authority or retailer for recycling advice.
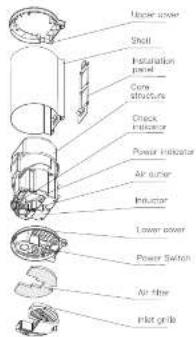
Name of Each Part
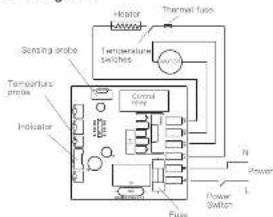
Electrical Diagram
Precautions before Installation
■Do not install in the following places (Otherwise may cause malfunction).
-Place with temperature below 10℃ or over 40℃
- Place directly sprinkled by water
Hase with aferol sunlight, strong light
(1) 2014年1月1日
-Flate with attitude over the range of 0 - 2600cm
■公司2014年第二次临时股东大会
■(18) 6480107 1062003
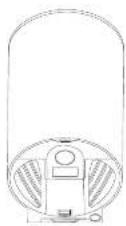
The following picture shows the recommended location.
If there is floor or obstacles below the unit, the distance between unit and floor or obstacles should be at least 400mm.
- Keep the right side of unit away from mirror or wall for the water droplets may splash
put when you dry hands. (The distance should be too thin above.)
Please select flat wall to install this product
•Power cord should be 1.0mm ^2 - 1.5mm ^2