
Precision - Szakállvágó PHILIPS - Ingyenes használati útmutató
Találja meg az eszköz kézikönyvét ingyenesen Precision PHILIPS PDF formátumban.


Felhasználói kérdések a következőről Precision PHILIPS
0 kérdés erről a készülékről. Válaszolj azokra, amiket ismersz, vagy tedd fel a sajátod.
Tegyél fel egy új kérdést erről a készülékről
Töltse le az útmutatót a következőhöz Szakállvágó PDF formátumban ingyenesen! Találja meg kézikönyvét Precision - PHILIPS és vegye vissza elektronikus eszközét a kezébe. Ezen az oldalon közzé van téve az eszköze használatához szükséges összes dokumentum. Precision márka PHILIPS.
HASZNÁLATI ÚTMUTATÓ Precision PHILIPS
PHILIPS
Precision Pen Trimmer

natural_image
Black cylindrical object with a white oval highlight, resembling a stylus or pen (no text or symbols visible)HP6390
Battery Operated
Register your product and get support at www.philips.com/welcome
ENGLISH
IMPORTANT SAFEGUARDS
When using a battery-operated appliance, basic precautions should always be followed, including the following:
Read these instructions before using this appliance.
WARNING
To reduce the risk of burns, fire or injury to persons:
- Do not use while bathing or in a shower.
- Do not place or store appliance where it can fall or be pulled into a tub or sink.
- Close supervision is necessary when this appliance is used by, on, or near children or invalids.
- Use this appliance for its intended household use as described in this manual. Do not use attachments not recommended by Philips Electronics North America Corporation.
- Never operate this appliance if it is not working properly, or if it has been dropped or damaged. For assistance call 1-800-243-7884.
- Keep the appliance away from heated surfaces.
- Never use while sleeping or drowsy.
- Never drop or insert any object into any opening.
- Do not use outdoors or operate where aerosol (spray) products are being used or where oxygen is being administered.
- Never put the appliance in direct sunlight or store at a temperature above 140°F.
- Always check the trimming head before using the appliance. Do not use the appliance if the trimming head is damaged, as injury may occur.
- Always put the protective cap on the Precision Pen Trimmer before storing.
- Always store the appliance in a moisture-free environment.
14.Do not attempt to recharge alkaline, heavy-duty or regular batteries in a nickel-cadmium battery charger. - If appliance will not be used on a regular basis, remove the battery to prevent possible damage due to chemical leakage. If battery does leak, remove it carefully. Do not allow bare skin to touch leaking fluid.
- Dispose of battery properly. Do not incinerate. Battery may explode if overheated. Do not wrap in metal or aluminum foil. Wrap in newspaper before discarding. It is suggested that you contact your local town or city to determine proper battery redemption site(s) in your area.
SAVE THESE INSTRUCTIONS
Registration
Congratulations on your purchase and welcome to Philips!
To fully benefit from the support that Philips offers, register your product at
www.philips.com/welcome.
Put It To the Test & Shaving Tips
Like many new products, your Philips Precision Pen Trimmer may take a little getting used to. If you are using a battery operated hair removal system for the first time, or if you've been using a different brand, your skin may need time to adapt. Give yourself a little time to practice and determine the best motions for the best results.
Throw your scissors away and put your new trimmer to the test. We guarantee precise results or Philips will refund you the full purchase price as long as the request is received within 45 days of purchase.
Before Using
- Use this appliance for its intended household use as described in this manual.
Before using, check trimming head for wear or damage. If the trimming head shows signs of wear or damage, do not use the Precision Pen Trimmer as injury may occur.
Be certain that your skin is clean. If you have sensitive skin, you may wish to apply talcum powder before and/or after use.
It is not necessary to press hard to get a close result. Pressing too hard may cause skin irritation, and the Precision Pen Trimmer will not function properly. In addition, do not use deodorant or alcohol-based lotions immediately before or after using. You may, however, want to use talcum powder. - Clean the Precision Pen Trimmer regularly, for instructions see chapter 'Cleaning'.
Do not use the Precision Pen Trimmer in the shower or bath as it is not water-resistant.
Features
A Eyebrow trimmer attachment with 2 trimming lengths
B Adjustable guide attachment
C Trimming head
D On/off switch
E Battery compartment
Protective cap
Battery operated
Full Two-Year Warranty
Features

Inserting the Battery
Make sure your hands and Precision Pen Trimmer are dry when inserting the battery.
This appliance requires 1 "AAA" 1.5 volt alkaline or carbon zinc battery (not included).
- Keep the appliance at a temperature between 40°F and 100°F.
▶ Do not keep the appliance in direct sunlight.
1 Make sure the Precision Pen Trimmer is in the Off position.
2 Remove the battery compartment by turning and pulling it downwards (fig. 1).
3 Put the battery in the battery compartment as shown, making sure the (+) and (-) markings on the end of the battery are pointing in the right direction (fig. 2).
4 If the batteries are not inserted properly, the appliance will not work.
5 Push the battery compartment cover back onto the Precision Pen Trimmer.
If the appliance will not be used on a regular basis, remove the battery when storing the appliance to prevent possible damage due to chemical leakage
If the battery does leak, remove carefully. Never allow your bare skin to come into contact with the leaking fluid.


natural_image
Simple line drawing of a mechanical component with an arrow indicating direction (no text or symbols)
natural_image
Close-up illustration of a human face with arrows pointing to the nose area, no text or symbols present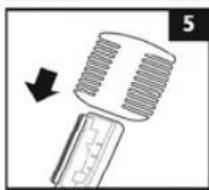
natural_image
Diagram of a mechanical component with a black arrow indicating direction (no text or symbols)
natural_image
Diagram of a mechanical component with a cylindrical shaft and base, showing a directional arrow (no text or symbols)
natural_image
Illustration of a makeup brush applying product to an eye (no text or symbols)
natural_image
Simple line drawing of a device with an arrow indicating direction (no text or symbols)

natural_image
Line drawing of a mechanical component with fins and a handle, no text or symbols present
natural_image
Simple line drawing of a hand holding a water droplet above a rectangular object (no text or symbols)Using the Precision Pen Trimmer
You can use the appliance to shave any unwanted hairs on your face and body.
Test the Precision Pen Trimmer on a small area of your arm or leg. If any sensitivity occurs, discontinue using immediately. Do not use the Precision Pen Trimmer on sensitive or irritated skin.
- Turn appliance off before putting on or taking off attachments or cleaning.
1 Remove the protective cap and switch the Precision Pen Trimmer ON (fig. 3).
2 Place the trimming head gently on the skin and move the appliance slowly over the skin against the direction of the hair growth (fig. 4).
Make sure that the trimming head is in complete contact with the skin.
For optimum hair removal, pull skin taut with one hand while using.
Eyebrow trimmer attachment
1 Put the eyebrow trimmer attachment around the trimming head. There are 2 trimming lengths to choose from:
For trimming hairs 5/64 in/2mm, place the attachment with the shorter slots over the trimming head (fig. 5).
For trimming hairs 5/32 in/4mm, place the attachment with the longer slots over the trimming head (fig. 6).
2 Switch the appliance ON.
3 Place the trimming head with the eyebrow trimmer attachment on the outside of your eyebrow (fig. 7).
4 Move the appliance slowly over your eyebrow in the direction of your nose.
5 Turn appliance OFF when finished.
Adjustable guide attachment
The adjustable guide attachment lets you customize how much of the trimmer is exposed so that you can remove single hairs, or hairs in a small area on your face and body, easily. The adjustable guide can click into three different positions.
1 Put the adjustable guide attachment around the trimming head (fig. 8).
2 Switch the appliance ON.
3 Place the trimming head with the adjustable guide attachment gently on the skin.
4 Move the appliance slowly over the skin against the direction of the hair growth of the single hairs you want to shave.
Make sure that the trimming head with the adjustable guide attachment is in complete contact with the skin.
5 Turn appliance OFF when finished.
Cleaning and Maintenance
▶ Always switch Precision Pen Trimmer off before cleaning.
Do not apply pressure or touch trimming head with hard objects as this may dent or damage trimming head.
▶ Never clean, remove or replace trimming head or attachments while motor is on.
▶ Check the trimming head regularly.
▶ If damage occurs, replace the trimming head.
▶ Never use the appliance if the trimming head is damaged or broken.
After Each Use
▶ Clean the Precision Pen Trimmer every time you have used it.
Do not use any corrosive detergents, scouring pads or cloths, nail polish remover etc. to clean the appliance. Water will cause damage to the appliance.
1 Switch the appliance OFF.
2 Carefully remove the trimming head (fig. 9).
3 Use a small brush to wipe away any hair or dust (fig. 10).
4 Replace the trimming head after cleaning (fig. 11).
Make sure the appliance is still in the off position.
5 Put the protective cap on the Precision Pen Trimmer for storage.
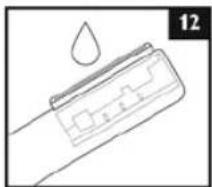
For optimal performance, lubricate the trimming head with a drop of sewing machine oil twice a year (fig. 12).
This appliance has no other user-serviceable parts.
For assistance, call 1-800-243-7884.
ILLUMINATED SMART TWEEZERS DIRECTIONS FOR USE
IMPORTANT SAFEGUARDS
When using a battery-operated appliance, basic precautions should always be followed, including the following:
Read these instructions before using this appliance.
WARNING
To reduce the risk of injury to persons:
- Do not use the Tweezers if they are damaged or broken to avoid injuries.
- Close supervision is necessary when the Tweezers is used by, on, or near children or invalids.
- Use Tweezers for its intended household use as described in this manual. Do not use attachments not recommended by Philips Electronics North America Corporation.
- Always store your Tweezers in a moisture-free environment. Do not put the Tweezers in direct sunlight or store at a temperature exceeding 130°F.
- Keep the Tweezers away from heated surfaces.
- Never operate Tweezers if it is not working properly, if it has been dropped, damaged or submerged in water. For assistance, call 1-800-243-7884.
- Never drop or insert any object into any opening.
- Always store Tweezers in protective storage case.
- Do not use outdoors or operate where aerosol (spray) products are being used or where oxygen is being administered.
- This appliance is for use on human facial hair only. Do not use Tweezers for any other purpose.
- For hygienic reasons, the Tweezers should only be used by one person.
- Do not use Tweezers on irritated skin or skin with varicose veins, rashes, moles (with hairs) or wounds without consulting your doctor.
- Do not attempt to recharge alkaline, heavy-duty or regular batteries in a nickel-cadmium battery charger.
- If Tweezers is not used on a regular basis, remove batteries to prevent possible damage due to chemical leakage. If batteries do leak, remove them carefully. Do not allow bare skin to touch leaking fluid.
- Dispose of batteries properly. Do not incinerate. Batteries may explode if overheated. Do not wrap in metal or aluminum foil. Wrap in newspaper before discarding. It is suggested that you contact your local town or city to determine proper battery redemption site(s) in your area.
SAVE THESE INSTRUCTIONS
Registration
Congratulations on your purchase and welcome to Philips!
To fully benefit from the support that Philips offers, register your product at www.philips.com/welcome.
Using the Smart Tweezers
Your Smart Tweezers with integrated light allows for easy removal of facial hair such as your eyebrows.
1 Clean your eyebrows with skin tonic or alcohol to prevent eyebrow hair from slipping away between the tweezers arms.
2 Use a warm face cloth to soften the skin before tweezing. This makes hair removal easier.
3 Brush your eyebrows in the direction of growth.
4 Use an eye pencil to mark the desired shape of your eyebrows. Remove any hairs outside the marked shape.
5 Remove tweezers from case.
6 Switch on the light by pressing the on/off button once.
7 Pull out each hair in the direction of hair growth.
Note: Always pull out hairs one by one.
Do not use the Smart Tweezers to remove hairs that grow out of moles.
Do not point the light of the Smart Tweezers directly at your or somebody else's eyes.
8 Turn off Smart Tweezers light.
The Smart Tweezers should be cleaned after each use.
1 Make sure Smart Tweezers is turned OFF.
2 Clean tweezers arms by wiping gently with a damp cloth. Allow to air dry.
Cleaning the Smart Tweezers
Storage
For safe storage, put the Smart Tweezers in the supplied case.
Replacing the Batteries
Make sure your hands are dry when removing or inserting batteries.
The Smart Tweezers require 3 Alkaline Button Cell SR41 batteries.
Keep the batteries out of reach of children and pets. They could present a choking hazard.
▶ Dispose used batteries in accordance with local regulations.
1 Hold the Smart Tweezers upside down.
2 Open the battery and light compartment by turning the bottom counter-clockwise with a coin (Fig. 1).
3 Remove the old batteries and dispose properly.
4 Insert the new batteries with the negative side pointing forward into the battery and light compartment (Fig. 2).
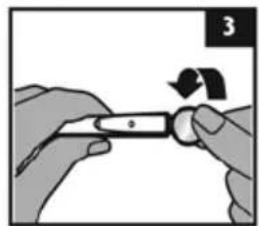
5 Screw the bottom back onto the battery and light compartment by turning clockwise with a coin (Fig. 3).

natural_image
Illustration of hands holding a tool with a curved arrow indicating rotation (no text or symbols)
natural_image
Illustration of hands holding a tool with a circular component and an arrow indicating rotation (no text or symbols)Assistance
For assistance, call toll free:
1-800-243-7884
or visit our website:
www.philips.com/support
Online information is available 24 hours a day, 7 days a week.
Full Two-Year Warranty
Philips Electronics North America Corporation warrants each new Philips Product, Model HP6390 (except cutters) against defects in materials or workmanship for a period of two years from the date of purchase, and agrees to repair or replace any defective product without charge.
IMPORTANT: This warranty does not cover damage resulting from accident, misuse or abuse, lack of reasonable care, the affixing of any attachment not provided with the product or loss of parts or subjecting the product to any but the specified batteries.* Use of unauthorized replacement parts will void this warranty.
PHILIPS ELECTRONICS NORTH AMERICA CORPORATION WILL NOT PAY FOR WARRANTY SERVICE PERFORMED BY A NON-AUTHORIZED REPAIR SERVICE AND WILL NOT REIMBURSE THE CONSUMER FOR DAMAGE RESULTING FROM WARRANTY SERVICE PERFORMED BY A NON-AUTHORIZED REPAIR SERVICE. NO RESPONSIBILITY IS ASSUMED FOR ANY SPECIAL, INCIDENTAL OR CONSEQUENTIAL DAMAGES.
In order to obtain warranty service, simply go to www.philips.com/support or call 1-800-243-7884 for assistance. It is suggested that for your protection you return shipments of product by insured mail, insurance prepaid. Damage occurring during shipment is not covered by this warranty.
NOTE: No other warranty, written or oral, is authorized by Philips Electronics North America Corporation.
This warranty gives you specific legal rights, and you may also have other rights which vary from state to state. Some states do not allow the exclusion or limitation of incidental or consequential damages, so the above exclusion and limitations may not apply to you.
*Read enclosed instructions carefully.
Manufactured for:
Philips Consumer Lifestyle
A Division of Philips Electronics North America Corporation
P.O. Box 10313, Stamford, CT 06904
PHILIPS is a Registered Trademark of Koninklijke Philips Electronics N.V.
© 2012 Philips Electronics North America Corporation.
All Rights Reserved.
PHILIPS
45-DAY MONEY-BACK GUARANTEE
If you are not fully satisfied with your Philips appliance, send the product back and we'll refund you the full purchase price.
The product must be shipped prepaid by insured mail, insurance prepaid, and have the original sales receipt, indicating purchase price and the date of purchase, enclosed. We cannot be responsible for lost mail. The product must be postmarked no later than 45 days after the date of purchase. Philips reserves the right to verify the purchase price of the product and limit refunds not to exceed suggested retail price.
To obtain money-back guarantee return authorization form, call 1-800-243-7884 for assistance. Please allow 4-6 weeks for delivery of check.


- PHILIPS
- Precision Pen Trimmer
- ENGLISH
- IMPORTANT SAFEGUARDS
- WARNING
- To reduce the risk of burns, fire or injury to persons:
- SAVE THESE INSTRUCTIONS
- Registration
- Put It To the Test & Shaving Tips
- Before Using
- Features
- Inserting the Battery
- Using the Precision Pen Trimmer
- Eyebrow trimmer attachment
- Adjustable guide attachment
- Cleaning and Maintenance
- After Each Use
- ILLUMINATED SMART TWEEZERS DIRECTIONS FOR USE
- To reduce the risk of injury to persons:
- Using the Smart Tweezers
- Cleaning the Smart Tweezers
- Storage
- Replacing the Batteries
- Assistance
- Full Two-Year Warranty
- PHILIPS ELECTRONICS NORTH AMERICA CORPORATION WILL NOT PAY FOR WARRANTY SERVICE PERFORMED BY A NON-AUTHORIZED REPAIR SERVICE AND WILL NOT REIMBURSE THE CONSUMER FOR DAMAGE RESULTING FROM WARRANTY SERVICE PERFORMED BY A NON-AUTHORIZED REPAIR SERVICE. NO RESPONSIBILITY IS ASSUMED FOR ANY SPECIAL, INCIDENTAL OR CONSEQUENTIAL DAMAGES.
- 45-DAY MONEY-BACK GUARANTEE
Márka : PHILIPS
Modell : Precision
Kategória : Szakállvágó