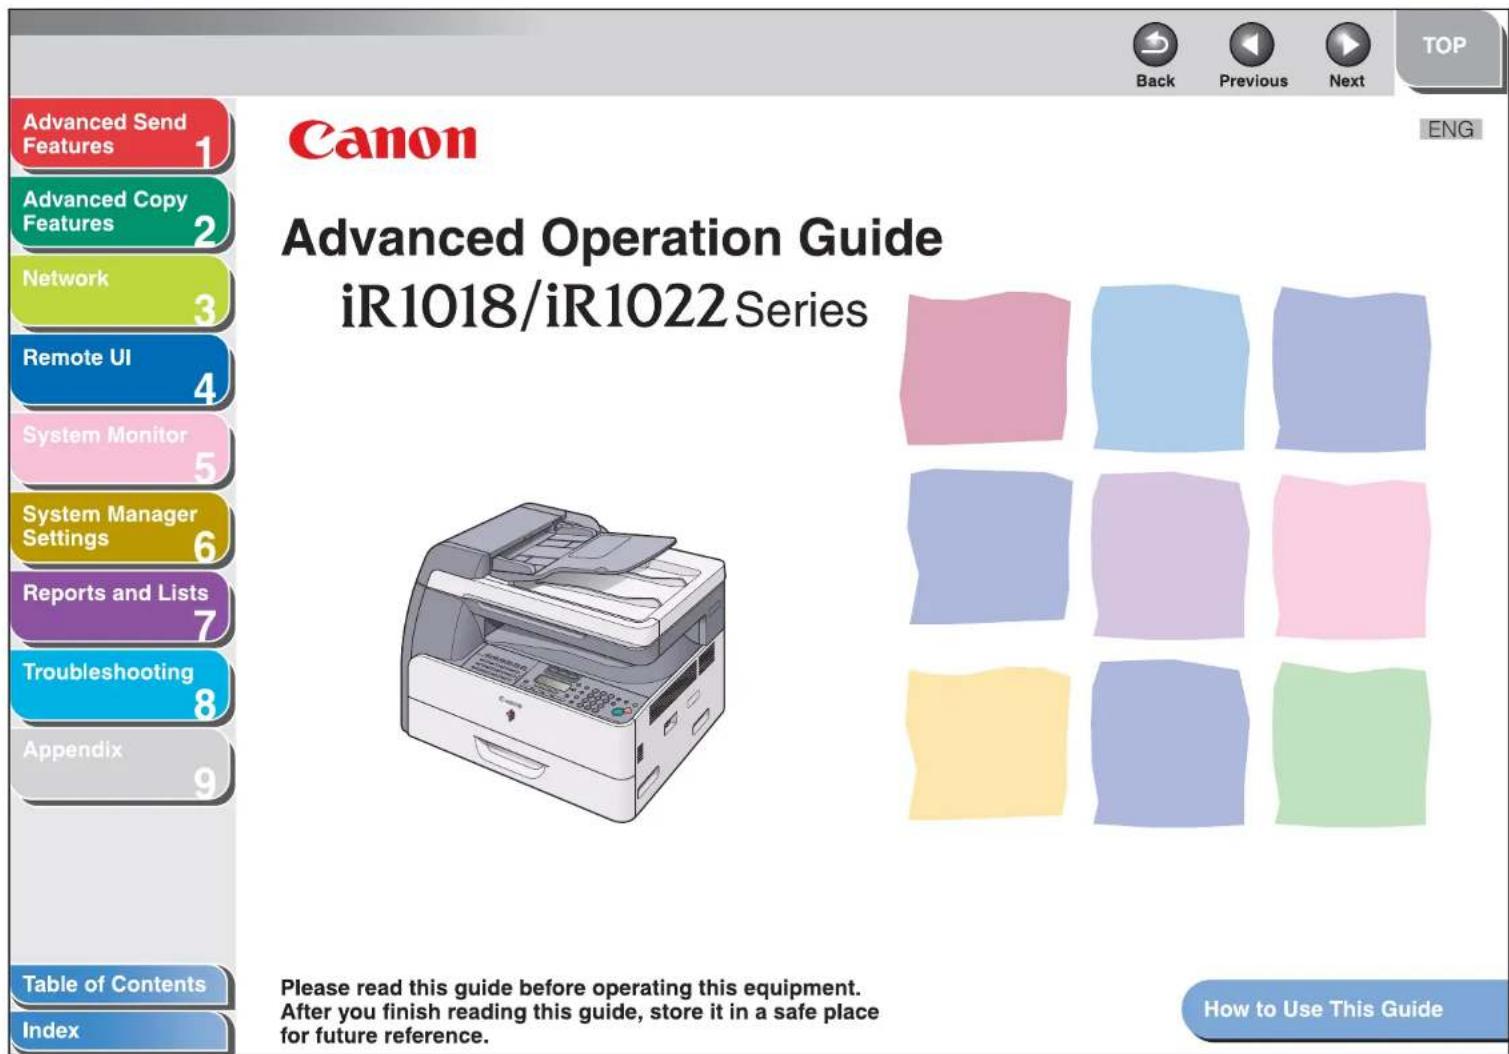
imageRUNNER 1022N - Pisač CANON - Besplatni korisnički priručnik
Pronađite besplatno priručnik za uređaj imageRUNNER 1022N CANON u PDF formatu.

Pitanja korisnika o imageRUNNER 1022N CANON
0 pitanje o ovom uređaju. Odgovorite na one koje znate ili postavite svoje.
Postavi novo pitanje o ovom uređaju
Preuzmite upute za vaš Pisač u PDF formatu besplatno! Pronađite svoj priručnik imageRUNNER 1022N - CANON i uzmite svoju elektroničku napravu natrag u ruke. Na ovoj stranici objavljeni su svi dokumenti potrebni za korištenje vaše naprave. imageRUNNER 1022N marke CANON.
KORISNIČKI PRIRUČNIK imageRUNNER 1022N CANON
flowchart
graph TD
    A["Advanced Send Features"] --> B["Advanced Copy Features"]
    B --> C["Network"]
    C --> D["Remote UI"]
    D --> E["System Monitor"]
    E --> F["System Manager Settings"]
    F --> G["Reports and Lists"]
    G --> H["Troubleshooting"]
    H --> I["Appendix"]
    I --> J["Table of Contents"]
    J --> K["Index"]

    subgraph_FAX_1["Send a fax to multiple recipients (FAX)"]
        L["Broadcasting → p. 1-4"]
    end

    subgraph_FAX_2["Forward received fax documents (FAX)"]
        M["Forwarding Documents → p. 1-19, p. 4-18"]
    end

    subgraph_FAX_3["Send a fax at a specified time (FAX)"]
        N["Delayed Sending → p. 1-5"]
    end

    subgraph_FAX_4["Select a scan mode depending on the type of image"]
        O["Image Quality → Basic Operation Guide"]
    end

    subgraph_FAX_5["Receive faxes in memory without printing out (FAX)"]
        P["Memory Reception → p. 1-17"]
    end

    subgraph_FAX_6["Adjust the density level of scanned images"]
        Q["Density → Basic Operation Guide"]
    end

    subgraph_FAX_7["Sort copies by page order"]
        R["Collate Copying → p. 2-2"]
    end

    subgraph_FAX_8["Make two-sided copies"]
        S["Two-Sided Copy → p. 2-3"]
    end

    A --> B --> C --> D --> E --> F --> G --> H --> I --> J
flowchart
graph TD
    A["Advanced Send Features"] --> B["Erase shadows and lines in copies"]
    C["Advanced Copy Features"] --> D["Frame Erase Copy → p. 2-7"]
    E["Network"] --> D
    F["Remote UI"] --> D
    G["System Monitor"] --> H["Copy two documents on one sheet"]
    I["System Manager Settings"] --> H
    J["Reports and Lists"] --> H
    K["Troubleshooting"] --> L["Restrict the use of the machine with department IDs"]
    M["Appendix"] --> L
    N["Table of Contents"] --> O["Department ID Management → p. 6-4"]
    P["Index"] --> O
    Q["Print a document from a PC"] --> R["Printing → Online Help"]
    S["Access and manage the machine from a PC"] --> T["Remote UI → p. 4-1"]
    U["Specify detailed scanning options to suit various images"] --> V["Scanning → Scanner Driver Guide"]
    W["Send a fax from a PC"] --> X["PC Faxing → Online Help"]
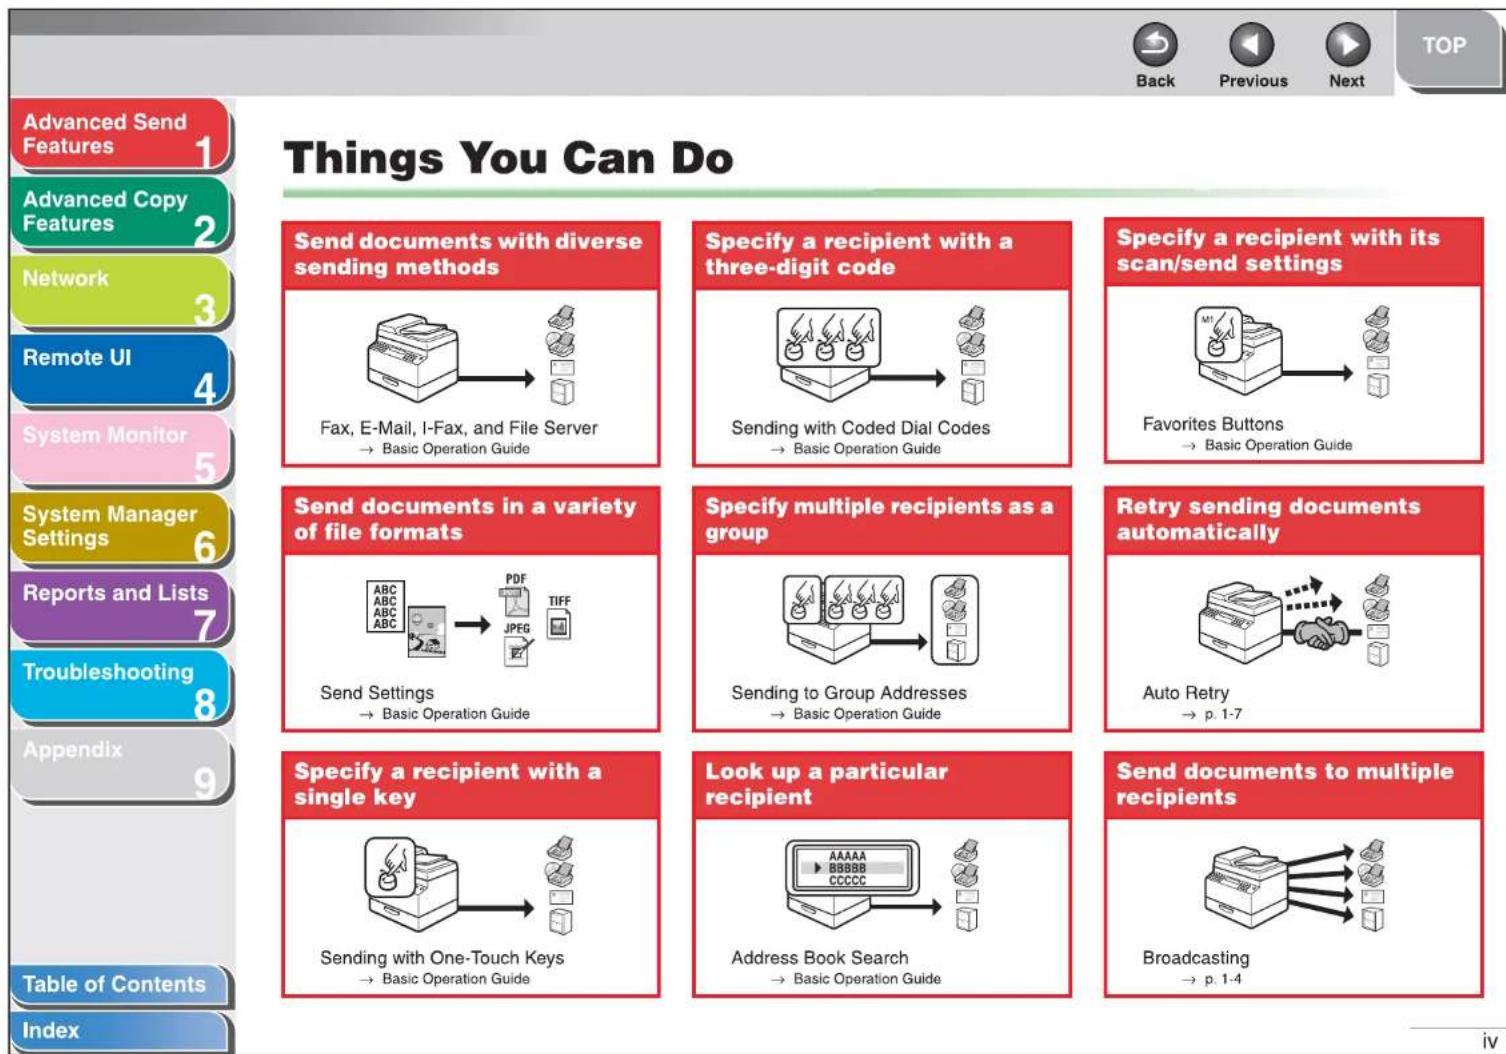
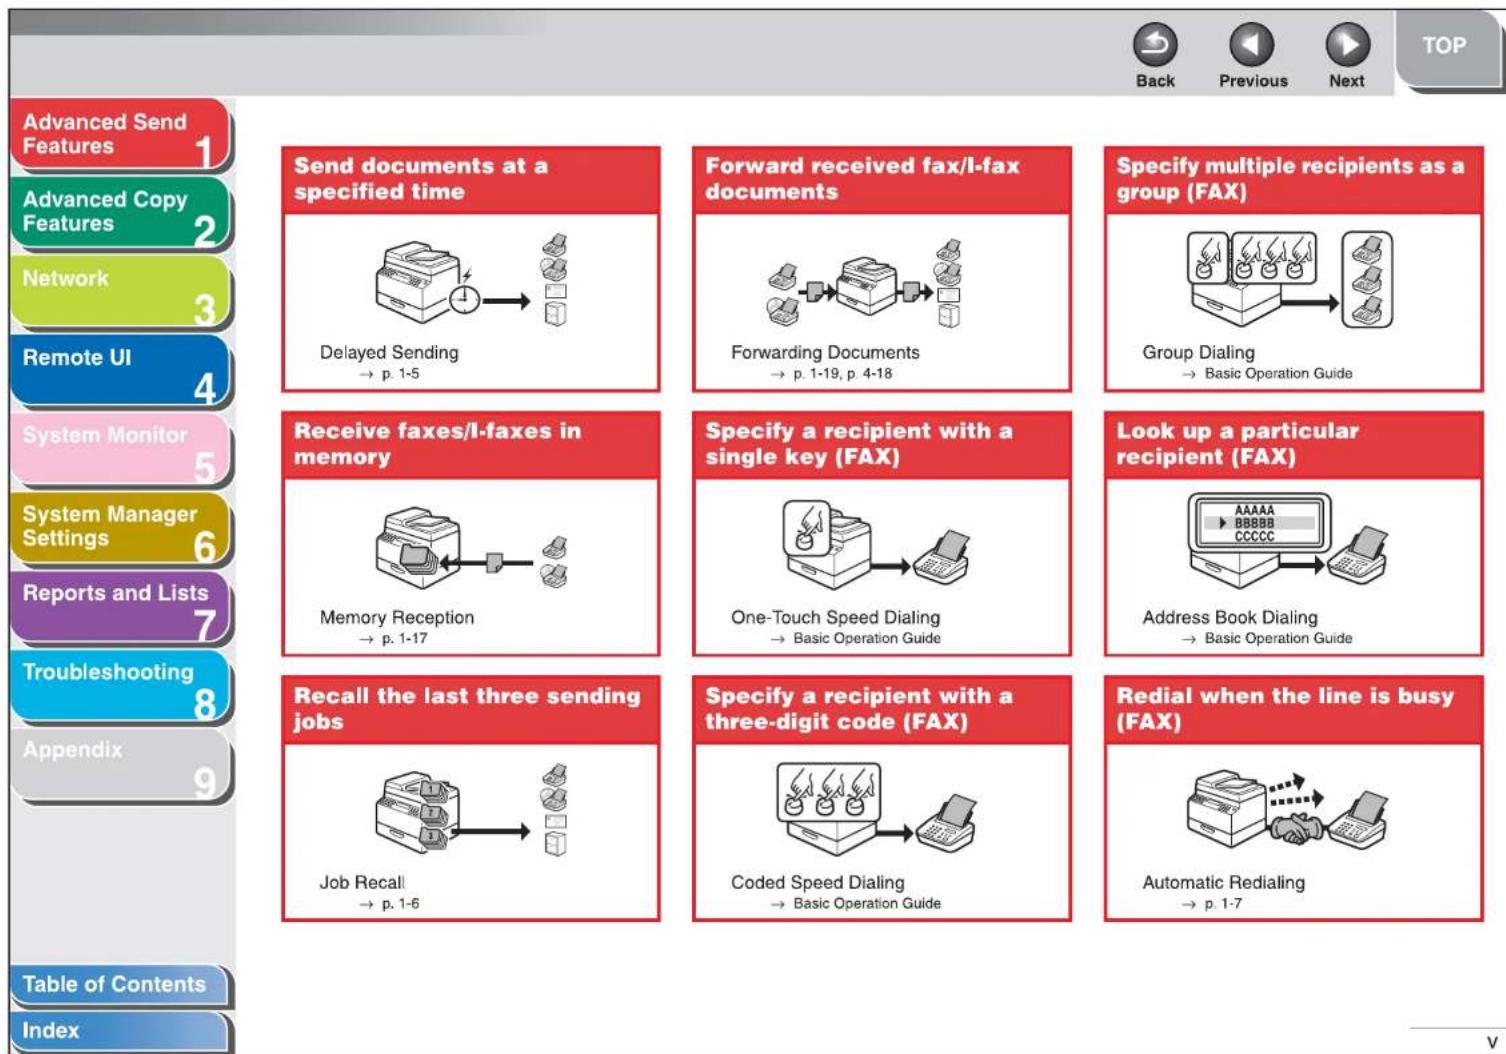
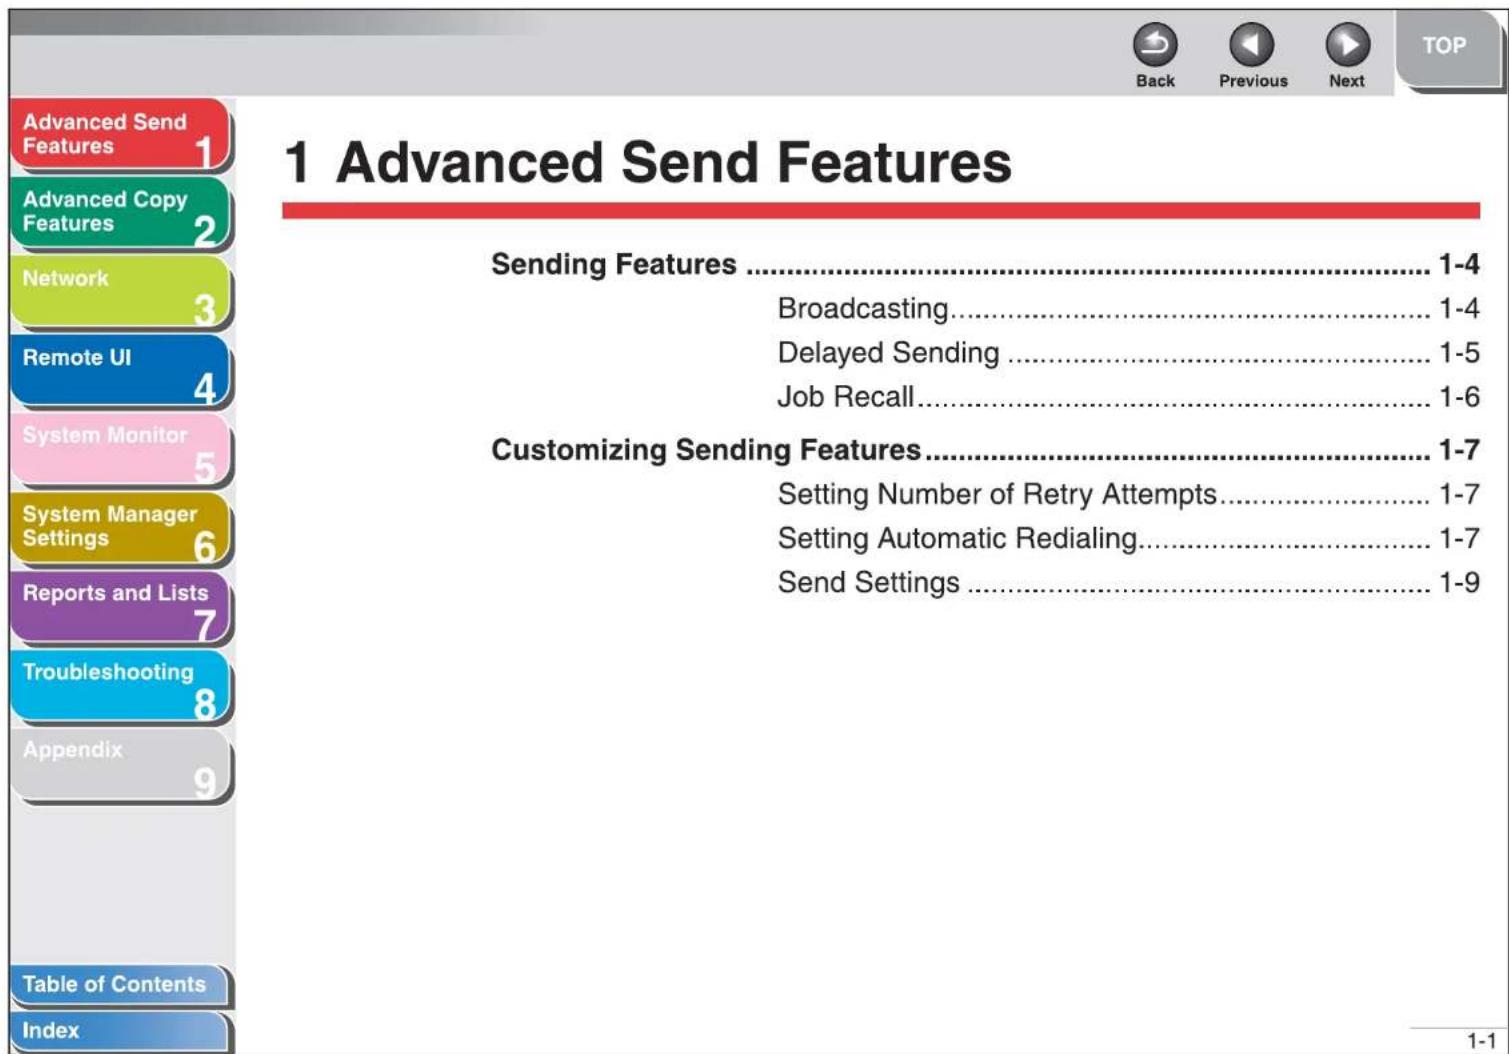
| Advanced Send Features | 1 Advanced Send Features | 1-1 |
| Advanced Copy Features | Sending Features | 1-4 |
| Network | Broadcasting | 1-4 |
| Delayed Sending | 1-5 | |
| Job Recall | 1-6 | |
| Remote UI | Customizing Sending Features | 1-7 |
| System Monitor | Setting Number of Retry Attempts | 1-7 |
| Setting Automatic Redialing | 1-7 | |
| System Manager Settings | Send Settings | 1-9 |
| Reports and Lists | Fax Dialing Features | 1-11 |
| Troubleshooting | Redialing Manually | 1-11 |
| Dialing Through a Switchboard | 1-11 | |
| Switching Temporarily to Tone Dialing | 1-12 | |
| Appendix | Dialing an Overseas Number (With Pauses) | 1-13 |
| Advanced Send Features | 1 | Receiving Features......1-15 |
| Advanced Copy Features | 2 | Setting Receive Mode......1-15 |
| Network | 3 | Memory Reception......1-17 |
| Remote UI | 4 | Forwarding Received Fax/I-Fax Documents......1-19 |
| System Monitor | 5 | Remote Reception......1-19 |
| System Manager Settings | 6 | Printing Received Documents......1-21 |
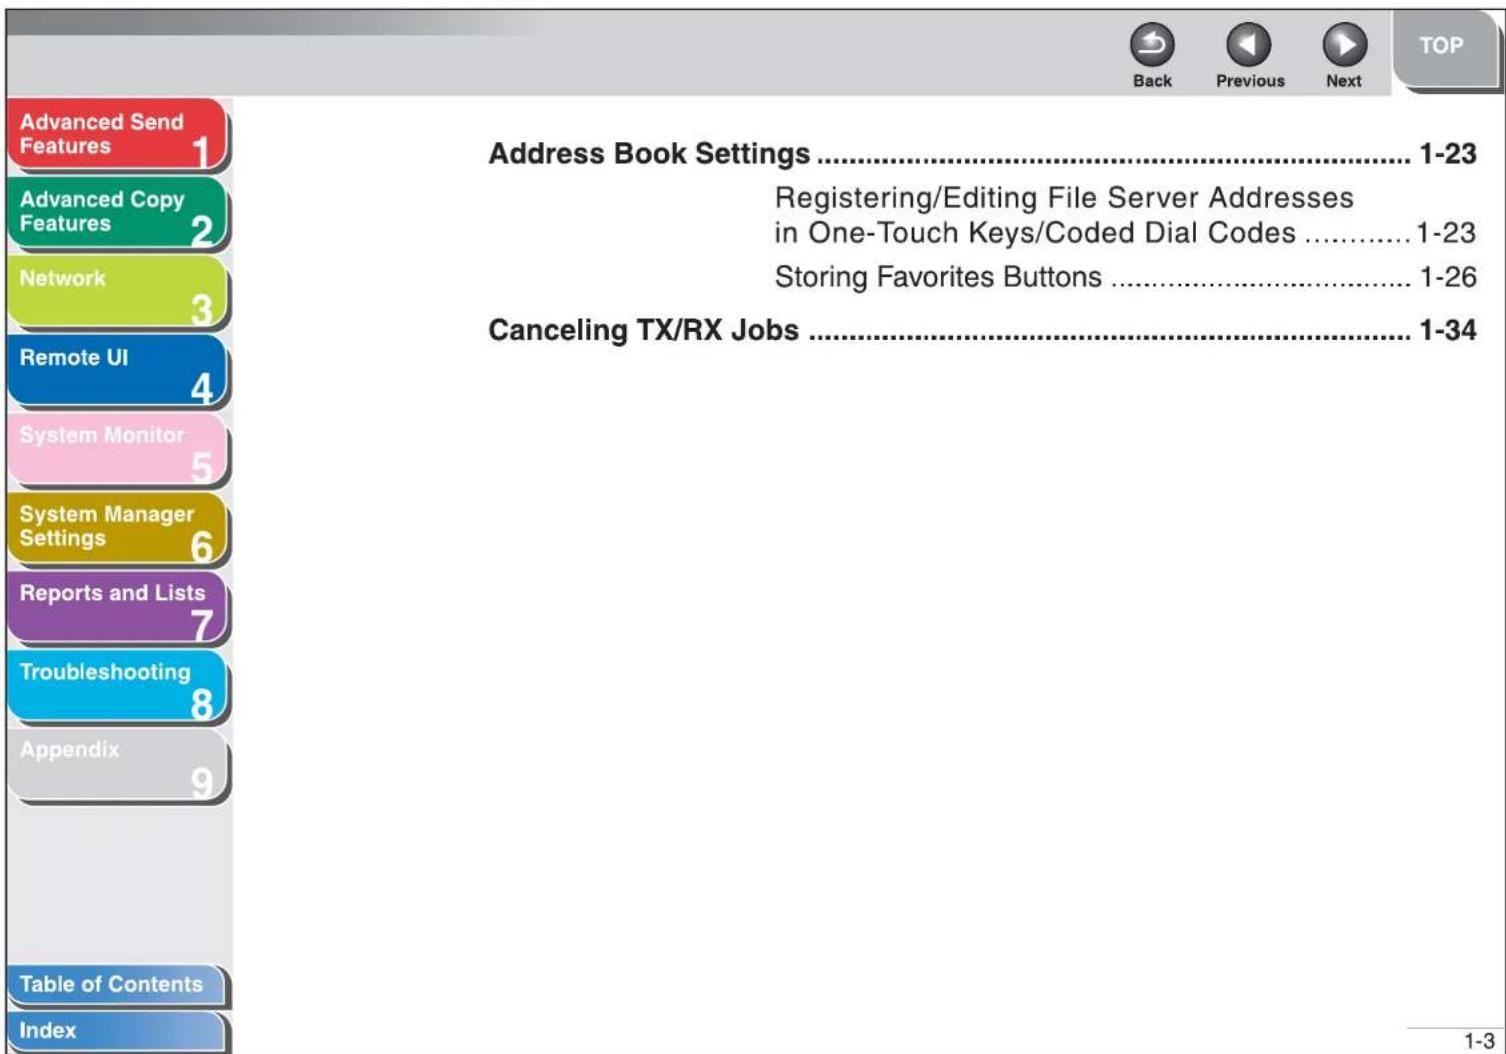
| Reports and Lists | 7 | Address Book Settings......1-23 |
| Troubleshooting | 8 | Registering/Editing File Server Addresses in One-Touch Keys/Coded Dial Codes......1-23 |
| Appendix | 9 | Storing Favorites Buttons......1-26 |
| Table of Contents | Canceling TX/RX Jobs......1-34 | |
| Index |
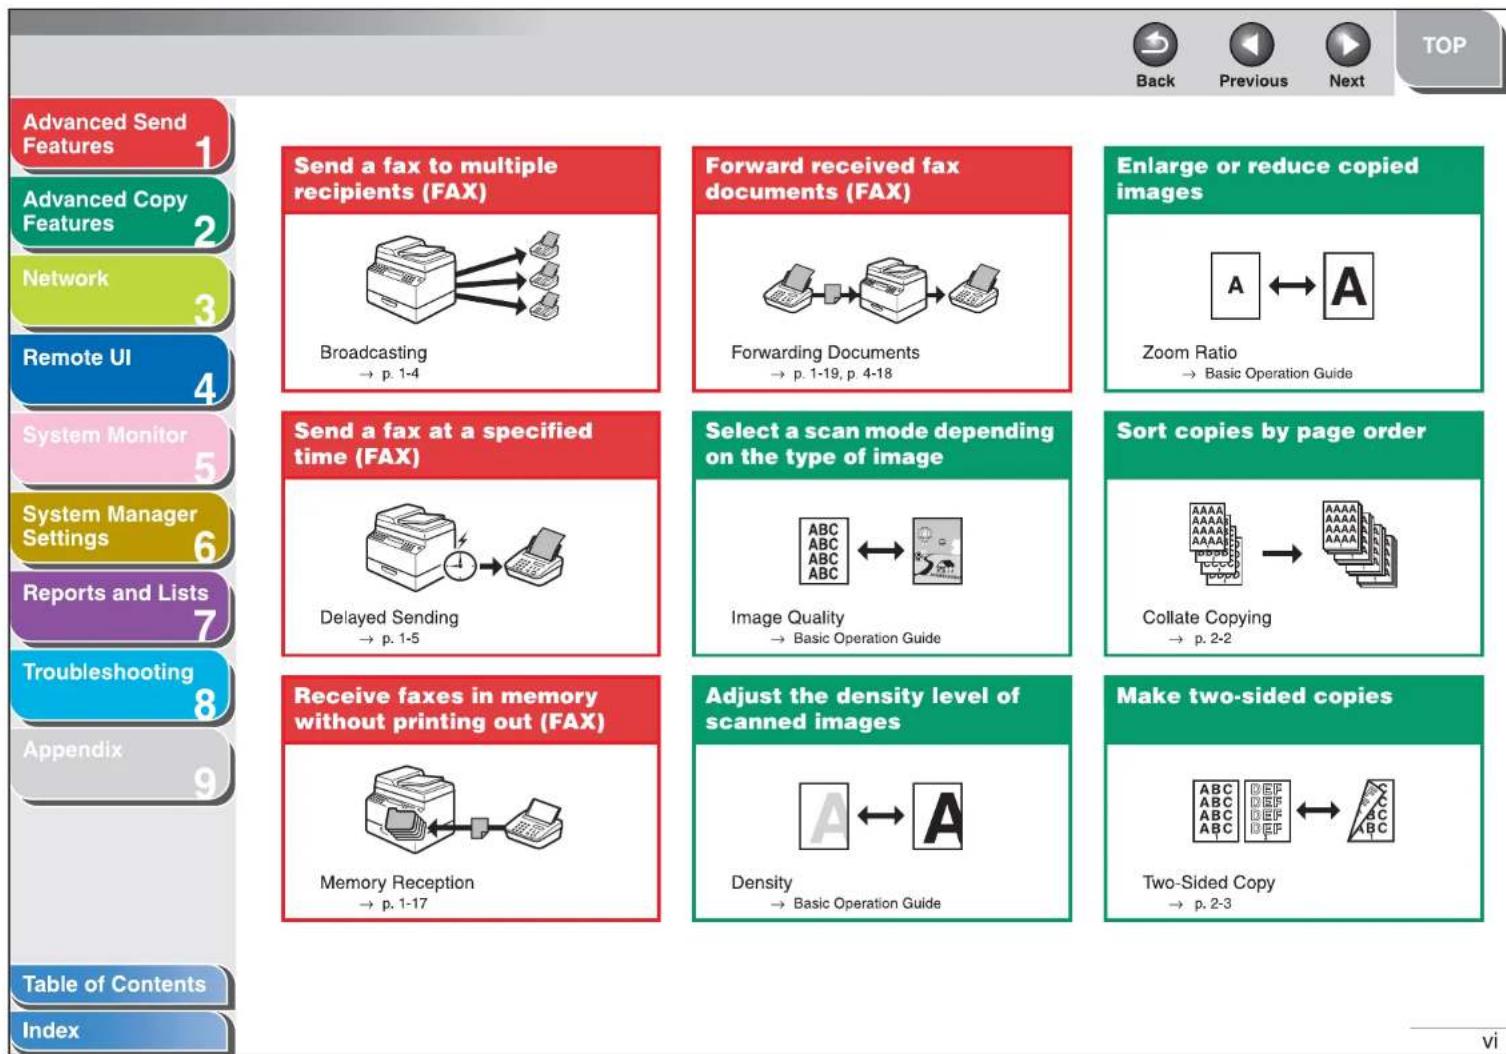
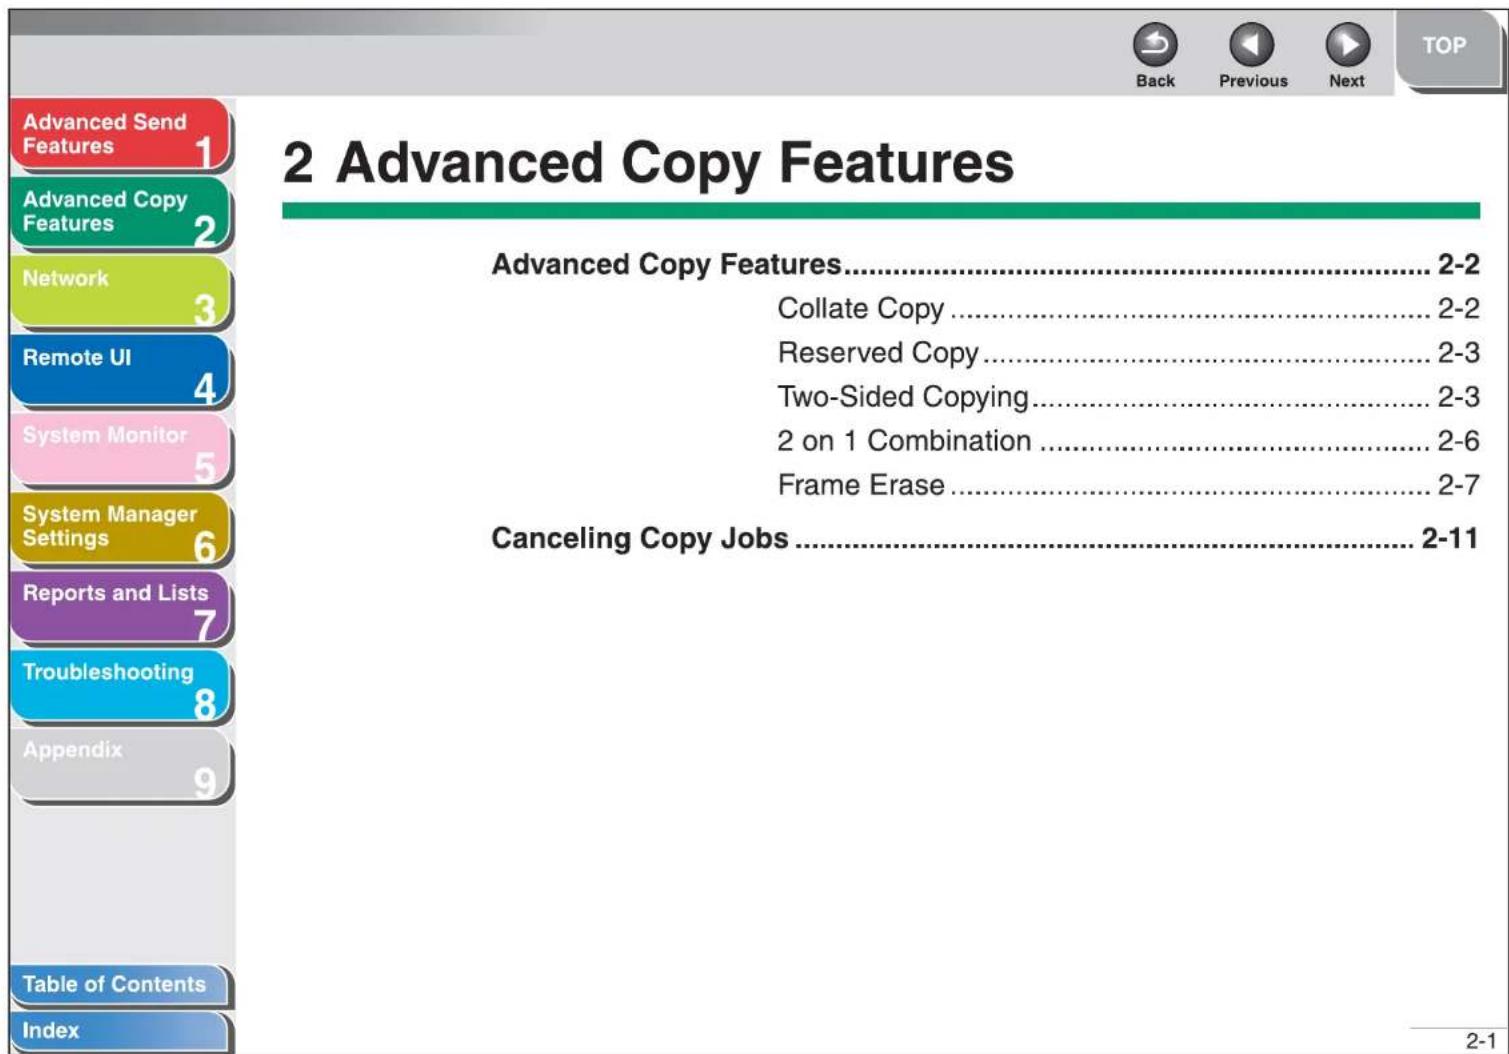
| Advanced Send Features | 1 | 2 Advanced Copy Features | 2-1 |
| Advanced Copy Features | 2 | Advanced Copy Features | 2-2 |
| Network | 3 | Collate Copy | 2-2 |
| Reserved Copy | 2-3 | ||
| Remote UI | 4 | Two-Sided Copying | 2-3 |
| 2 on 1 Combination | 2-6 | ||
| System Monitor | 5 | Frame Erase | 2-7 |
| System Manager Settings | 6 | Canceling Copy Jobs | 2-11 |
| Reports and Lists | 7 | 3 Network | 3-1 |
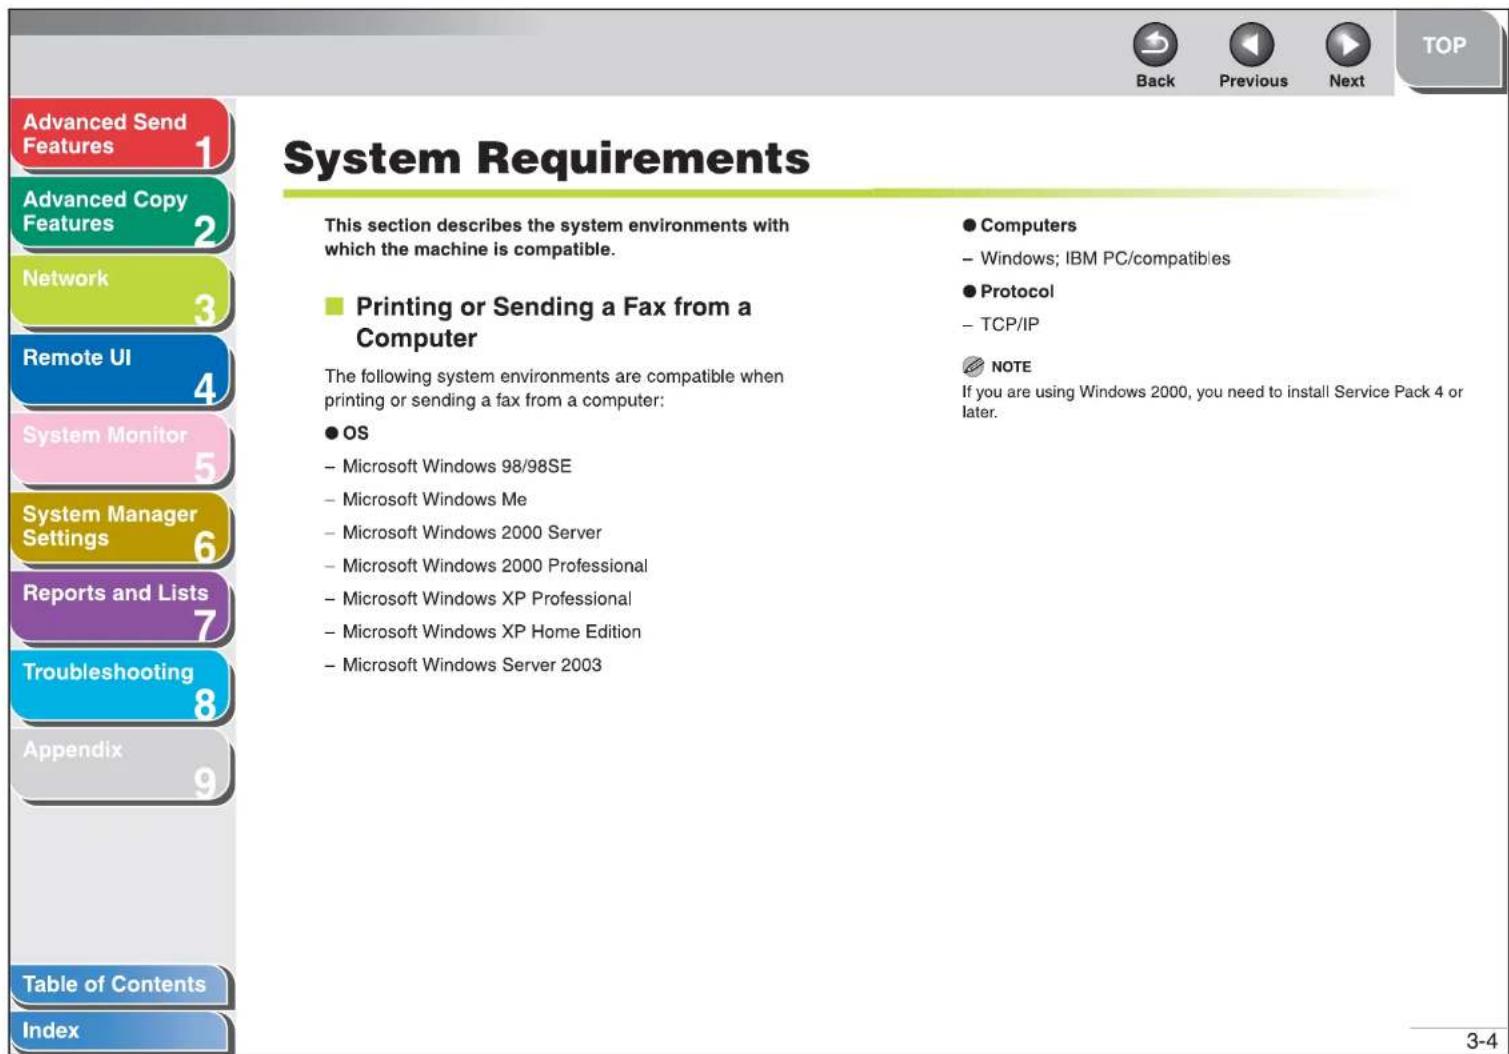
| Troubleshooting | 8 | System Requirements | 3-4 |
| Printing or Sending a Fax from a Computer | 3-4 | ||
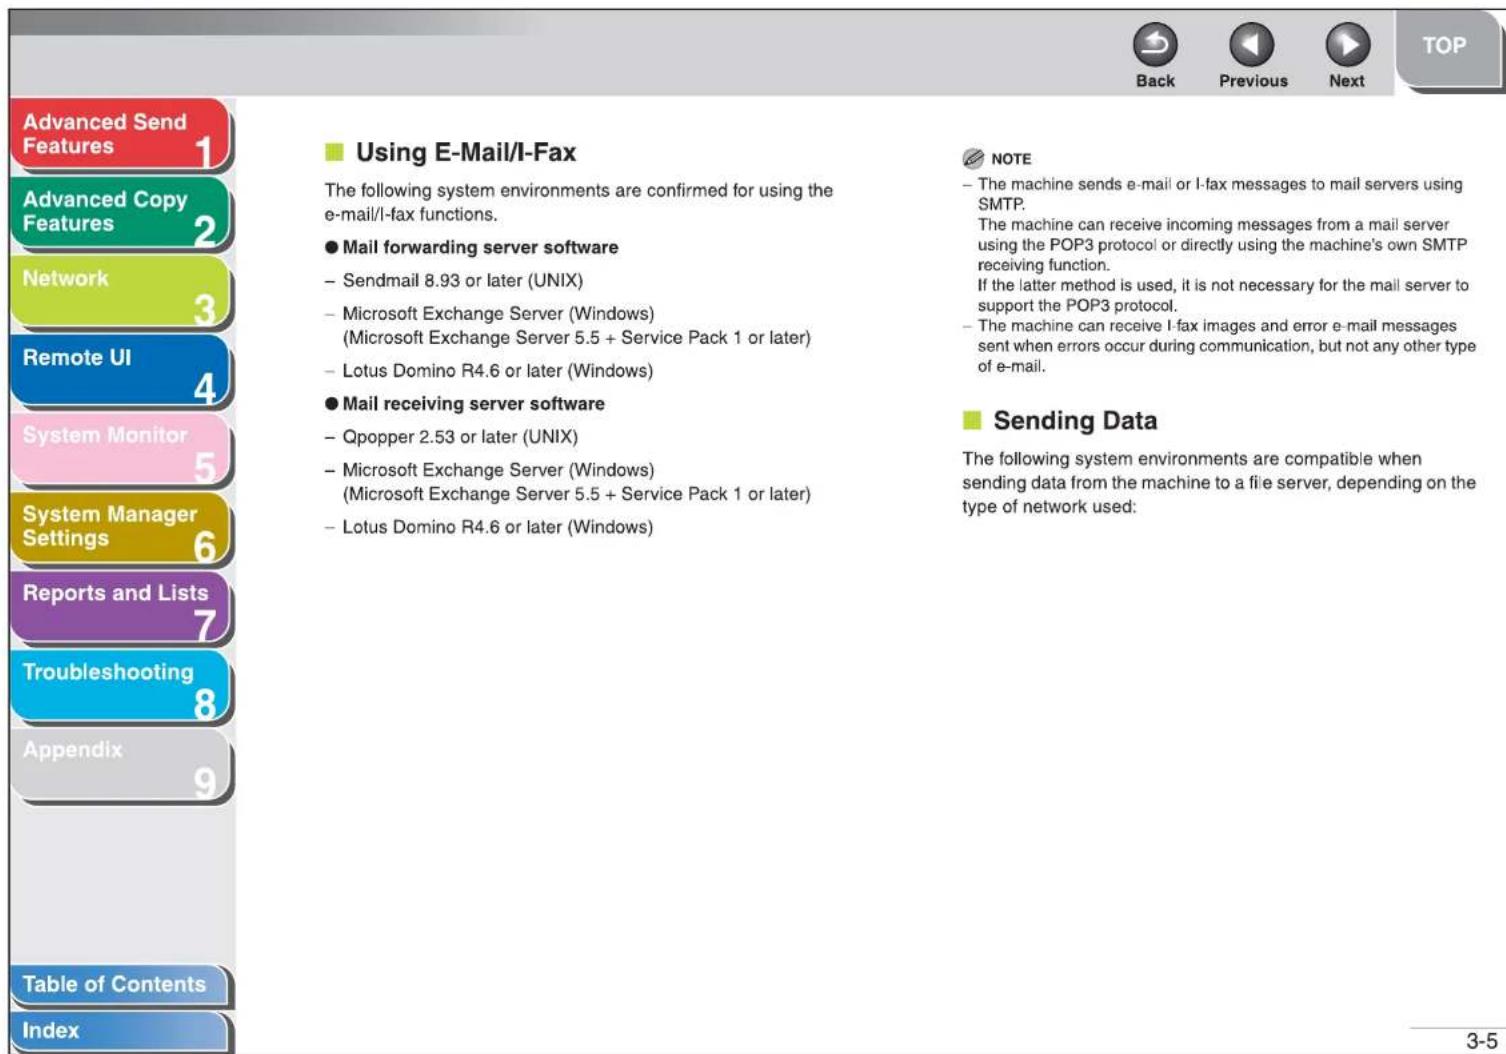
| Using E-Mail/I-Fax | 3-5 | ||
| Appendix | 9 | Sending Data | 3-5 |
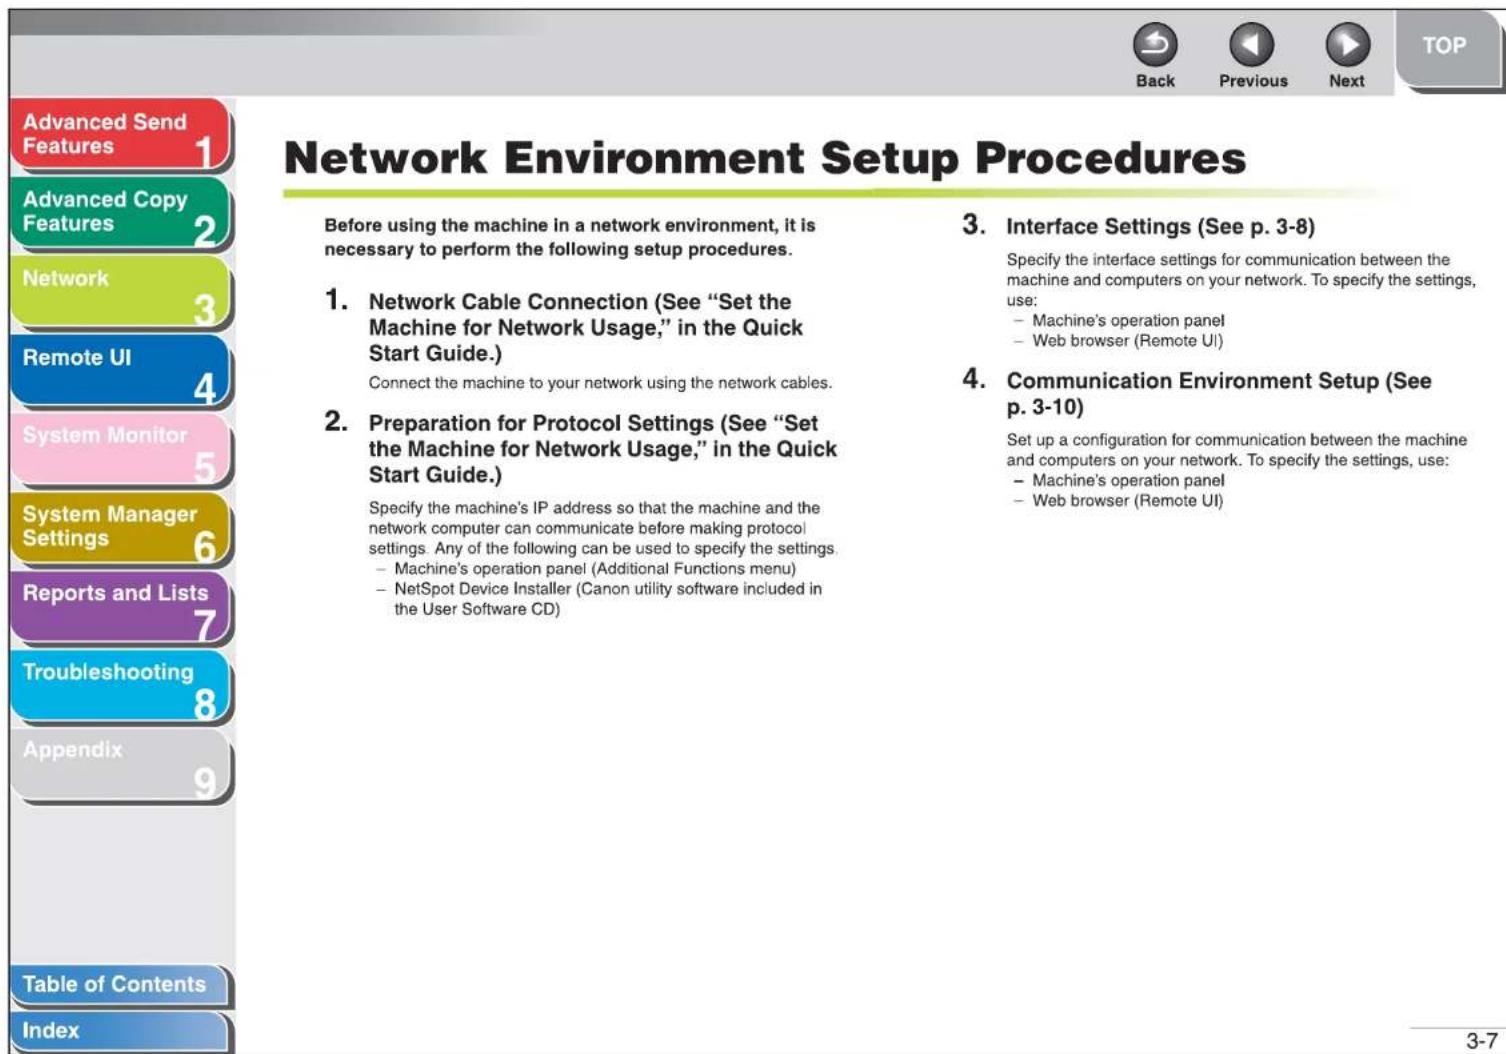
| Advanced Send Features | 1 | Network Environment Setup Procedures | 3-7 |
| Advanced Copy Features | 2 | Interface Settings | 3-8 |
| Network | 3 | Communication Environment Setup | 3-10 |
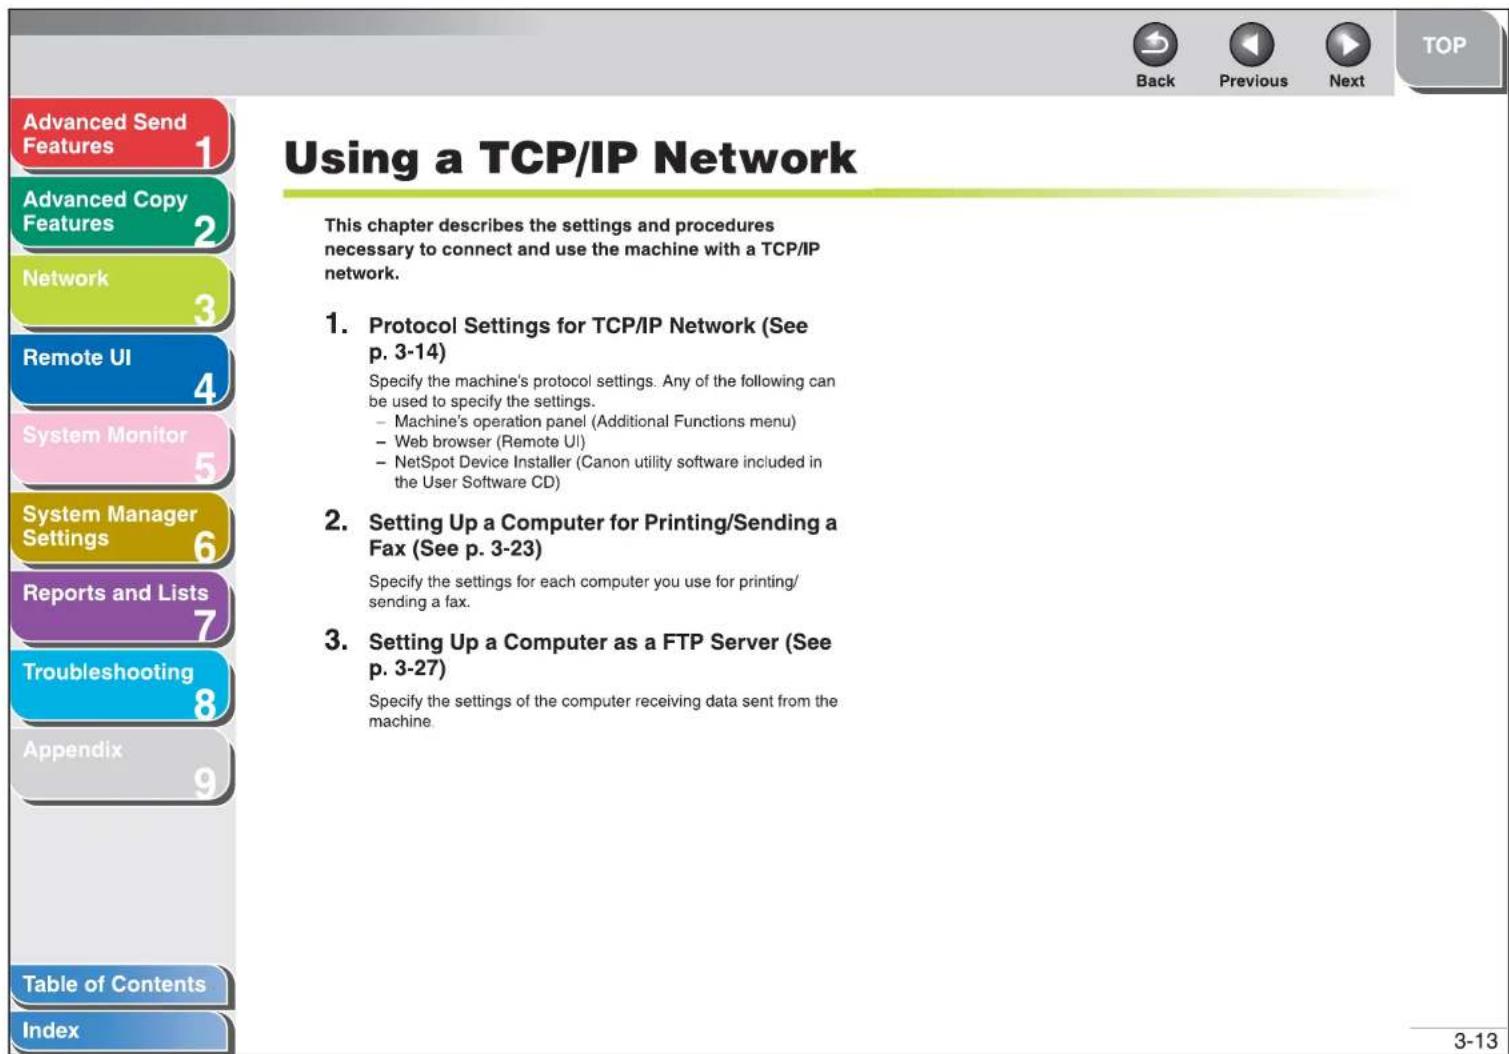
| Remote UI | 4 | Using a TCP/IP Network | 3-13 |
| System Monitor | 5 | Protocol Settings for TCP/IP Network | 3-14 |
| System Manager Settings | 6 | Settings from the Operation Panel of the Machine | 3-14 |
| Reports and Lists | 7 | Setting Up a Computer for Printing/Sending a Fax | 3-23 |
| Troubleshooting | 8 | Machine Connection Method (LPD/Raw) | 3-23 |
| Appendix | 9 | Print Server Settings | 3-26 |
| Table of Contents | Setting Up a Computer as a FTP Server | 3-27 | |
| Index | Using a NetBIOS Network | 3-37 |
| Advanced Send Features | 1 | Protocol Settings for NetBIOS Network......3-38 |
| Advanced Copy Features | 2 | Settings from the Operation Panel of the Machine......3-38 |
| Network | 3 | Setting Up a Computer as a File Server......3-41 |
| Remote UI | 4 | Connecting to a TCP/IP Network......3-41 |
| System Monitor | 5 | Connecting to a NetBIOS Network and Configuring a Shared Folder......3-41 |
| System Manager Settings | 6 | Machine Management......3-52 |
| Reports and Lists | 7 | Machine Management Using Web Browser (Remote UI)......3-52 |
| Troubleshooting | 8 | Machine Management Using NetSpot Device Installer......3-52 |
| Appendix | 9 | Machine Management Using NetSpot Console......3-52 |
| Table of Contents | 4 Remote UI......4-1 | |
| Index | System Requirements......4-3 |
| Back | Previous | Next | TOP | ||
| Advanced Send Features | 1 | Starting the Remote UI | 4-4 | ||
| Advanced Copy Features | 2 | Displaying Device Status and Information | 4-6 | ||
| Network | 3 | Job Management | 4-7 | ||
| Remote UI | 4 | Managing Print Jobs | 4-7 | ||
| System Monitor | 5 | Viewing the Print Log | 4-8 | ||
| System Manager Settings | 6 | Viewing the Activity Log | 4-9 | ||
| Reports and Lists | 7 | Managing the Address Book | 4-10 | ||
| Troubleshooting | 8 | Customizing System Settings | 4-15 | ||
| Appendix | 9 | Customizing System Information | 4-15 | ||
| Table of Contents | Specifying Forwarding Settings | 4-18 | |||
| Index | |||||
| Advanced Send Features | 1 | Managing the Department/User ID......4-25 |
| Advanced Copy Features | 2 | Import/Export Function......4-30 |
| Network | 3 | Saving the Address Book......4-30 |
| Loading an Address Book......4-31 | ||
| Saving User Management Data in Files (Export)......4-33 | ||
| Remote UI | 4 | Loading User Management Data Files (Overwrite/Import)......4-34 |
| System Monitor | 5 | Saving Additional Functions Settings in Files (Export)......4-36 |
| System Manager Settings | 6 | Loading Additional Functions Settings Files (Overwrite/Import)......4-37 |
| Reports and Lists | 7 | |
| Troubleshooting | 8 | Device Custom Settings......4-39 |
| Appendix | 9 | |
| Table of Contents | ||
| Index |
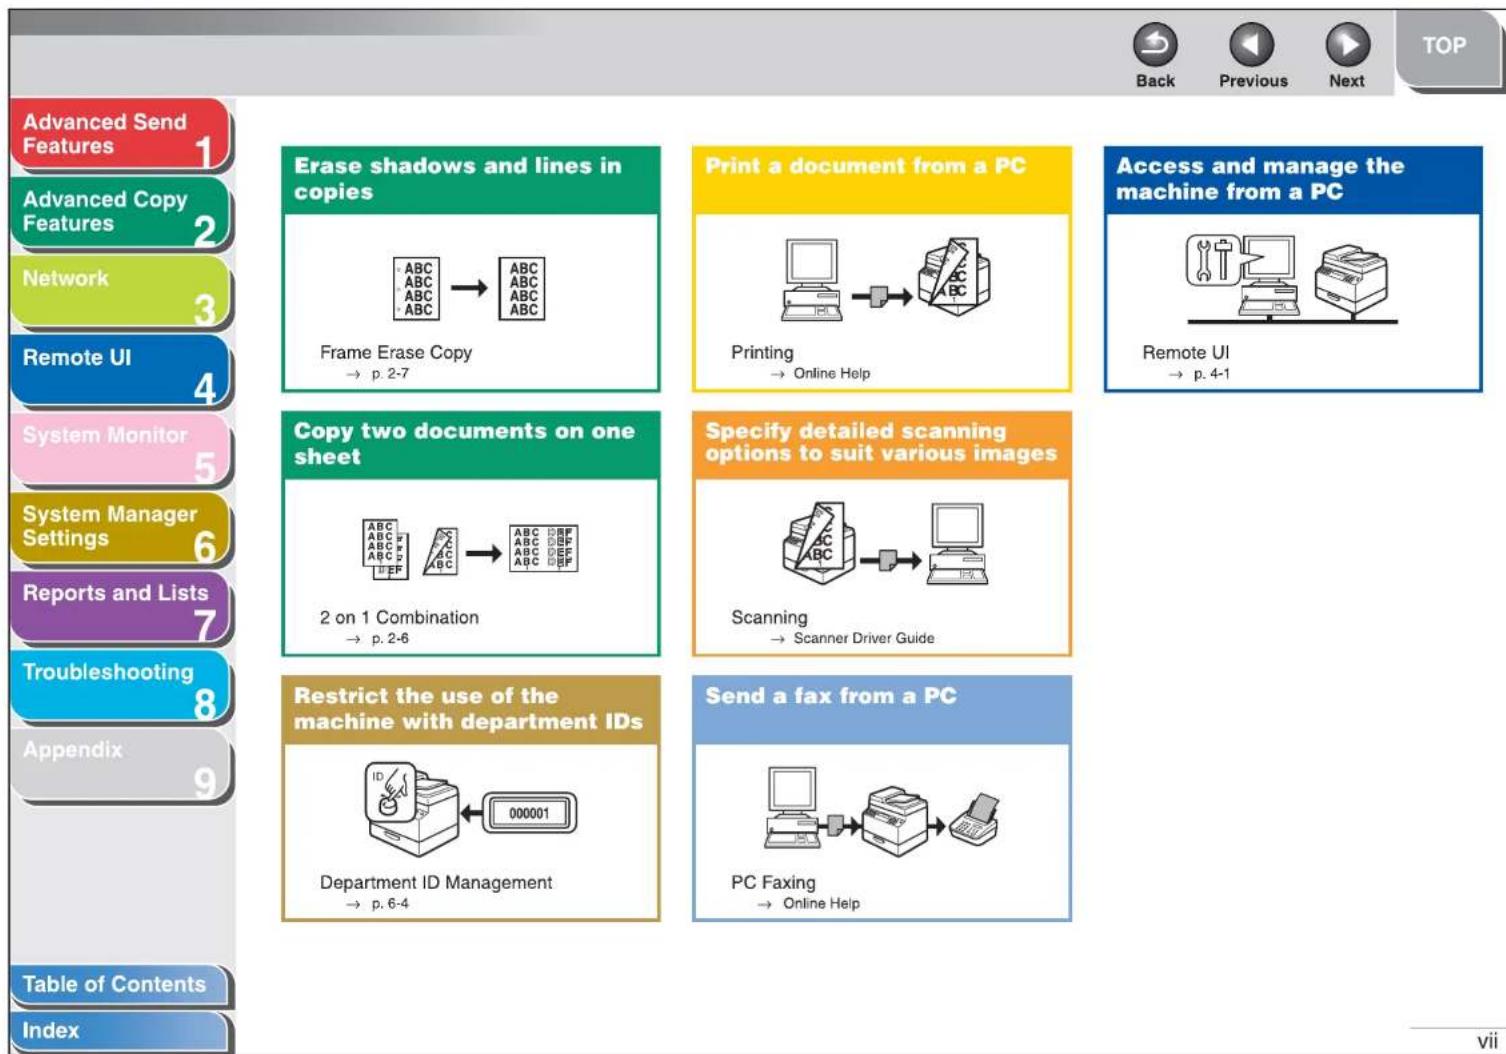
| Advanced Send Features | 1 | Department ID Management | 6-4 |
| Advanced Copy Features | 2 | Registering the Department ID, Password, and Page Limit | 6-4 |
| Network | 3 | Changing the Password and Page Limit | 6-6 |
| Erasing the Department ID and Password | 6-8 | ||
| Remote UI | 4 | Checking Counter Information | 6-9 |
| System Monitor | 5 | Clearing Page Totals | 6-9 |
| System Manager Settings | 6 | Printing Counter Information | 6-10 |
| Reports and Lists | 7 | Accepting Print Jobs with Unknown IDs | 6-11 |
| Troubleshooting | 8 | ||
| Appendix | 9 | ||
| Table of Contents | |||
| Index |
| Back | Previous | Next | TOP | ||
| Advanced Send Features | 1 | Printing Reports Automatically....7-4 | |||
| Advanced Copy Features | 2 | TX REPORT....7-4 | |||
| Network | 3 | RX REPORT....7-5 | |||
| ACTIVITY REPORT....7-6 | |||||
| Remote UI | 4 | 8 Troubleshooting....8-1 | |||
| System Monitor | 5 | General Problems....8-2 | |||
| System Manager Settings | 6 | Paper Feeding Problems....8-4 | |||
| Sending/Receiving Problems....8-6 | |||||
| Sending Problems....8-6 | |||||
| Receiving Problems....8-11 | |||||
| Reports and Lists | 7 | Copying Problems....8-17 | |||
| Troubleshooting | 8 | ||||
| Appendix | 9 | ||||
| Table of Contents | |||||
| Index | |||||
![Advanced Send Features 1 Advanced Copy Features 2 Network 3 Remote UI 4 System Monitor 5 System Manager Settings 6 Reports and Lists 7 Troubleshooting 8 Appendix 9 Table of Contents Index The following symbols are used throughout the manuals for the machine and indicate the warnings, cautions and notes you should keep in mind when using the machine. ⚠ WARNING Indicates a warning that may lead to death or serious injury if not observed. ⚠ CAUTION Explains how to avoid actions that could injure you or damage your machine. NOTE Explains operating restrictions and how to avoid minor difficulties. In addition, this guide uses distinctive notations to identify keys and information in the LCD: - The keys you press appear in square brackets: [Stop]. - Information in the LCD appears in angle brackets: . xxii](/content/2026/05/1103359/images/88c01e11fcb0b83863ed2d5c57669d6d6f310868ea1d62673e861eb033b8b32e.jpg)
bar
| Feature | Value | | --- | --- | | Advanced Send Features | 1 | | Advanced Copy Features | 2 | | Network | 3 | | Remote UI | 4 | | System Monitor | 5 | | System Manager Settings | 6 | | Reports and Lists | 7 | | Troubleshooting | 8 | | Appendix | 9 | Table of Contents Index 1-1 Sending Features .... 1-4 Broadcasting.... 1-4 Delayed Sending.... 1-5 Job Recall.... 1-6 Customizing Sending Features.... 1-7 Setting Number of Retry Attempts.... 1-7 Setting Automatic Redialing.... 1-7 Send Settings.... 1-9| Advanced Send Features | 1 | Fax Dialing Features | 1-11 |
| Advanced Copy Features | 2 | Redialing Manually 1-11 | |
| Network | 3 | Dialing Through a Switchboard 1-11 | |
| Remote UI | 4 | Switching Temporarily to Tone Dialing 1-12 | |
| Dialing an Overseas Number (With Pauses) 1-13 | |||
| System Monitor | 5 | Receiving Features | 1-15 |
| System Manager Settings | 6 | Setting Receive Mode 1-15 | |
| Reports and Lists | 7 | Memory Reception 1-17 | |
| Troubleshooting | 8 | Forwarding Received Fax/I-Fax Documents 1-19 | |
| Appendix | 9 | Remote Reception 1-19 | |
| Printing Received Documents 1-21 | |||
| Table of Contents | |||
| Index |
![Advanced Send Features Advanced Copy Features Network Remote UI System Monitor System Manager Settings Reports and Lists Troubleshooting Appendix Table of Contents Index Sending Features The machine provides the following additional sending features: broadcasting, delayed sending, and job recall. ■ Broadcasting Broadcasting enables you to send the same document to multiple recipients. NOTE - A maximum of 201 destinations can be specified at the same time. (Out of the 201 destinations, a number or address can be specified with the numeric keys.) If you specify a group, which is made up of several destinations, each destination in the group is counted as a separate address. - If you frequently send documents to multiple destinations, it is recommended that you store those destinations as a group. 1. Set documents. 2. Press [SEND]/[FAX]. 3. Press [←−] or [+►] to select the sending method, then press [OK]. - For the iR1022F, skip this step. - If you are specifying destinations registered in Address Book, you can skip this step. 4. Specify the destination. Use the numeric keys, one-touch keys, coded dial codes, favorites buttons, or [Address Book] key to specify destinations. NOTE Only one destination can be specified using the numeric keys.](/content/2026/05/1103359/images/b916cf71fe85e4982983704d4a42b5562242aec39d041d5abe3f9319b2e33403.jpg)
![Advanced Send Features 1 Advanced Copy Features 2 Network 3 Remote UI 4 System Monitor 5 System Manager Settings 6 Reports and Lists 7 Troubleshooting 8 Appendix 9 Table of Contents Index 5. Repeat step 4 to enter all required recipients. NOTE - If you want to enter a fax number or e-mail/l-fax address using the numeric keys in the middle of the procedure, press [SEND], select the sending method, and then enter the number or address. - To check all the specified destinations, press [←-] or [+▶] to scroll the display. (For the iR1022F, press [FAX], then enter the fax number.) - You can enter the send settings by pressing [SEND] and selecting the protocol for which you want to perform send settings. For details, see Chapter 4, "Sending Documents," in the Basic Operation Guide. 6. Press [Start]. When you set the documents on the platen glass, press [←-] or [+▶] to select the document size, then press [Start] for each document. When scanning is complete, press [OK] to start sending. ■ Delayed Sending Delayed sending enables you to start transmission at a specified time. You can store up to 64 delayed sending jobs. 1. Set documents. 2. Press [SEND]/[FAX]. 3. Press [←-] or [+▶] to select a sending method, then press [OK]. - For the iR1022F, skip this step. - if you are specifying destinations registered in Address Book, you can skip this step. 4. Open the one-touch panel. 5. Press [Delayed TX]. 6. Use the numeric keys to enter the time you want to start sending, then press [OK]. - Enter the time in the 24-hour format. - Enter all the numbers, including zeros. Ex. TX TIME SETTING 20:00 7. Specify the destination.](/content/2026/05/1103359/images/cf5f848320cea064c9007fc040a210538e81a68c8b3482250f8607cf9aec1b92.jpg)

Back

Previous

Next
TOP
8. Press [Start].
The document is scanned and stored into memory. It will be sent to the specified destination at the specified time. When you set the documents on the platen glass, press [←-] or [+▶] to select the document size, then press [Start] for each document. When scanning is complete, press [OK] to start sending.
![CANON imageRUNNER 1022N - Press [Start]. - 1](/content/2026/05/1103359/images/4937b5f252e95622bd9cf32e61d59d337498b6ed61147f1161493d4771368475.jpg)
NOTE
- When
- If the document cannot be sent at the time specified for delayed sending due to a temporary power failure (that recovers within an hour), it will be sent at the specified time on the next day.
Job Recall
You can recall the last three destinations, scan settings, and send settings which have been set, and then send your documents.

NOTE
The Job Recall feature is available only for the iR1022i and iR1022iF.
- Set documents.
- Press [SEND].
- Press [Recall]/[Recall/Pause].
- Press [◀-] or [+▶] to select <1 BEFORE>, <2 BEFORE>, or <3 BEFORE>, then press [OK].
-
Confirm that the desired recipient is displayed.
You can change the recalled scan and send settings if necessary. -
Press [Start].
When you set the documents on the platen glass, press [←] or [+▶] to select the document size, then press [Start] for each document. When scanning is complete, press [OK] to start sending.
![Customizing Sending Features ■ Setting Number of Retry Attempts You can set how many times the machine automatically resends data when the data cannot be sent because the receiver is busy sending or receiving, or when an error occurs. 1. Press [Additional Functions]. 2. Press [◀−] or [+▶] to select , then press [OK]. 3. Press [◀−] or [+▶] to select , then press [OK]. 4. Press [◀−] or [+▶] to select , then press [OK]. 5. Press [◀−] or [+▶] to select , then press [OK]. 6. Use [◀−], [+▶], or numeric keys to enter the number of retry attempts (0 to 5 times) the machine will make, then press [OK]. 7. Press [Stop] to return to the standby mode. ■ Setting Automatic Redialing Automatic redialing enables the machine to automatically redial the recipient's fax number if the recipient cannot be reached due to a busy line, or if a sending error occurs. Auto Redial can be turned or . If you set to , you can set how many times the machine redials the number, and the redial interval. 1. Press [Additional Functions]. 2. Press [◀−] or [+▶] to select , then press [OK].](/content/2026/05/1103359/images/089c67a3bb59107366f72c7b869897dda0656e37403ccf8f838140cb3106d834.jpg)
![Advanced Send Features 1 Advanced Copy Features 2 Network 3 Remote UI 4 System Monitor 5 System Manager Settings 6 Reports and Lists 7 Troubleshooting 8 Appendix 9 Table of Contents Index 3. Press [◀−] or [+▶] to select , then press [OK]. 4. Press [◀−] or [+▶] to select , then press [OK]. 5. Press [◀−] or [+▶] to select , then press [OK]. 6. Press [◀−] or [+▶] to select , then press [OK]. 7. Confirm that is displayed, then press [OK]. 8. Use [◀−], [+▶], or numeric keys to enter the number of redials (1 to 10 times) the machine will make, then press [OK]. 9. Confirm that is displayed, then press [OK]. 10. Use [◀−], [+▶], or numeric keys to enter the time (2 to 99 minutes, in one-minute increments) between redials, then press [OK]. 11. Confirm that is displayed, then press [OK]. 12. Press [◀−] or [+▶] to select or , then press [OK]. : Resends all pages if an error occurs during transmission. : Does not redial even if an error occurs during transmission. 13. Press [Stop] to return to the standby mode.](/content/2026/05/1103359/images/a5a8266af1c276bd312ccdc0bcda32f835e66edeac368320c3252a5ee523ccf4.jpg)
![Advanced Send Features Advanced Copy Features Network Remote UI System Monitor System Manager Settings Reports and Lists Troubleshooting Appendix Table of Contents Index Send Settings You can set the document's name, a subject line, message body text, and reply-to address, and e-mail priority common to all sending jobs. The following settings will be effective when sending documents depending on the sending method you select: - E-mail: , , , , - I-fax: , , , - File server (FTP and SMB): , 1. Press [Additional Functions]. 2. Press [◀−] or [++▶] to select , then press [OK]. 3. Confirm that is selected, then press [OK]. 4. Confirm that is selected, then press [OK]. 5. Press [◀−] or [++▶] to select , then press [OK]. 6. Confirm that is displayed, then press [OK]. 7. Use the numeric keys to enter the document's name (up to 24 characters), then press [OK]. 8. Confirm that is displayed, then press [OK]. 9. Use the numeric keys to enter the subject (up to 40 characters), then press [OK]. 10. Confirm that is displayed, then press [OK].](/content/2026/05/1103359/images/0238b92cb2f51b3895e9ca7c49d3c2717e0af15d2536cea165b724189e824325.jpg)
![Advanced Send Features Advanced Copy Features Network Remote UI System Monitor System Manager Settings Reports and Lists Troubleshooting Appendix Table of Contents Index 11. Use the numeric keys to enter the message body text (up to 140 characters), then press [OK]. 12. Confirm that is displayed, then press [OK]. 13. Use the numeric keys to enter the reply-to address (up to 120 characters), then press [OK]. 14. Confirm that is displayed, then press [OK]. 15. Press [◀−] or [+▶] to select the priority (, or ), then press [OK]. 16. Press [Stop] to return to the standby mode.](/content/2026/05/1103359/images/0e6f58c901836dda1b3c8e816652f7cdee0b66064e3a2ca7739145f2883dd107.jpg)
![Advanced Send Features 1 Advanced Copy Features 2 Network 3 Remote UI 4 System Monitor 5 System Manager Settings 6 Reports and Lists 7 Troubleshooting 8 Appendix 9 Table of Contents Index Fax Dialing Features ■ Redialing Manually NOTE The Manual Redialing feature is available only for the iR1022F. 1. Set documents. 2. Press [FAX]. 3. Press [Redial/Pause] to dial the last number you dialed. To cancel manual redialing, press [Reset]. 4. Press [Start]. When you set the documents on the platen glass, use [◀−] or [+▶] to select the document size, then press [Start] for each document. When scanning is complete, press [OK] to start dialing. NOTE When is set to in in in , and if you have specified the destination by any other method than using numeric keys, the machine starts scanning automatically without pressing [Start], after the preset time for this setting is elapsed. ■ Dialing Through a Switchboard If your machine is connected to a PBX, register the [R] key so you can easily access the outside line. Registering the [R] Key 1. Press [Additional Functions]. 2. Press [◀−] or [+▶] to select , then press [OK]. 3. Press [◀−] or [+▶] to select , then press [OK]. 4. Press [◀−] or [+▶] to select , then press [OK]. 5. Press [◀−] or [+▶] to select , then press [OK].](/content/2026/05/1103359/images/2bfd94f614d145e363ea310efe4acd773568b4ceddd3440dc3f8fa3c206d4828.jpg)
![Advanced Send Features Advanced Copy Features Network Remote UI System Monitor System Manager Settings Reports and Lists Troubleshooting Appendix Table of Contents Index 6. Press [◀-] or [+▶] to select , then press [OK]. 7. Press [◀-] or [+▶] to select , then press [OK]. 8. Use the numeric keys to enter the prefix number (up to 20 digits). Ex. PREFIX 9. Press [Recall/Pause]/[Redial/Pause] to enter a pause, then press [OK]. in the fax/telephone number represents a certain amount of pause time, set in the menu. 10. Press [Stop] to return to the standby mode. Dialing using the [R] Key 1. Press [SEND]/[FAX]. 2. Confirm that is displayed, then press [OK]. For the iR1022F, skip this step. 3. Press [R] to access the outside line. 4. Use the numeric keys to enter the fax number. ■ Switching Temporarily to Tone Dialing If your machine is set for pulse dialing, use the procedure below to switch to tone dialing to use information services (e.g., banks, airline reservations, and hotel reservations). NOTE To talk to the other party, you will need to connect the optional handset or an external telephone to the machine. 1. Press [SEND]/[FAX]. 2. Confirm that is displayed, then press [OK]. For the iR1022F, skip this step. 1-12](/content/2026/05/1103359/images/076e486ffd0fdc793b4cbadbb4205da40d0c5586d267941d958ae8e82ee10dbe.jpg)
![Advanced Send Features 1 Advanced Copy Features 2 Network 3 Remote UI 4 System Monitor 5 System Manager Settings 6 Reports and Lists 7 Troubleshooting 8 Appendix 9 Table of Contents Index 3. Press [Hook]. You can also lift the optional handset instead. NOTE Make sure to confirm the dial tone before entering a fax number. If you enter the number before the dial tone can be heard, the call may not be connected, or the wrong number may be dialed. 4. Use the numeric keys to dial the required information service. 5. When the recorded message of the information service answers, press [Tone] to switch to tone dialing. If you pressed [Hook] in step 3, you can pick up the optional handset if you need to talk to the other party. 6. Use the numeric keys to enter the numbers requested by the information service. 7. If you want to receive faxes, press [Start]. If you are using the optional handset or the external telephone, hang up the handset after pressing [Start]. Dialing an Overseas Number (With Pauses) When you dial or register an overseas number, you may need to insert a pause within the number. 1. Set documents. 2. Press [SEND]/[FAX]. 3. Confirm that is displayed, then press [OK]. For the iR1022F, skip this step. 4. Adjust any necessary settings for your documents. 5. Use the numeric keys to dial the international access code. For details on international access codes, contact your local telephone company. 1-13](/content/2026/05/1103359/images/6c59340842d926f757026617c3dfc125297be9b0d0c57bcf078e8e7019b4e30d.jpg)
![Advanced Send Features 1 Advanced Copy Features 2 Network 3 Remote UI 4 System Monitor 5 System Manager Settings 6 Reports and Lists 7 Troubleshooting 8 Appendix 9 Table of Contents Index 6. If necessary, press [Recall/Pause]/[Redial/ Pause] to insert a pause. - The letter is displayed between the numbers. - You can enter successive pauses within the fax number to make the pause time longer. - You can change the length of a pause inserted within the fax number in the menu. The default setting is four second. 7. Use the numeric keys to dial the country code, the area code, and the fax/telephone number of the recipient. 8. Press [Recall/Pause]/[Redial/Pause] to enter a pause at the end of the number. - The letter appears at the end of the fax number. - Pauses entered at the end of fax numbers are always 10 seconds long. 9. Press [Start]. When you set the documents on the platen glass, press [←−] or [+→] to select the document size, then press [Start] for each document. When scanning is complete, press [OK] to start sending. 1-14 Back Previous Next TOP](/content/2026/05/1103359/images/3a77c0adf1cd1c76081dad5230dc6f53bfa5c76d6666d7056d48b5c16228afbd.jpg)
![Advanced Send Features 1 Advanced Copy Features 2 Network 3 Remote UI 4 System Monitor 5 System Manager Settings 6 Reports and Lists 7 Troubleshooting 8 Appendix 9 Table of Contents Index Receiving Features You can set the fax receive mode to suit your needs, set the machine to receive fax/l-fax documents into memory (memory lock), forward received fax/l-fax documents to other machines or file servers, and use the external telephone connected to the machine to receive faxes manually (remote reception). You can also set how the received documents are printed. ■ Setting Receive Mode To determine the right mode for you, see "Set the Machine for Receiving Faxes," in the Quick Start Guide. 1. Press [Additional Functions]. 2. Press [◀-] or [++] to select , then press [OK]. 3. Press [◀-] or [++] to select , then press [OK]. 4. Press [◀-] or [++] to select , then press [OK]. 5. Press [◀-] or [++] to select , then press [OK]. 6. Press [◀-] or [++] to select the desired receive mode, then press [OK]. : Answers all calls as faxes : Switches between fax and voice calls automatically. For optional settings, see "FaxTel: Optional Settings," on p. 1-16. : Receives faxes automatically and records voice messages. : Does not answer any calls. You have to manually receive faxes. NOTE - For or , make sure the optional handset or handset of an external telephone is connected to the machine. - For , make sure is set to so that the external telephone rings when the machine receives a voice call. - For , make sure an answering machine is connected to the machine. 7. Press [Stop] to return to the standby mode.](/content/2026/05/1103359/images/7317d0b27a5017d8d9d39aac16a086411f39136cdb4f5d3bf6d8baaf3062e4ee.jpg)
![Advanced Send Features 1 Advanced Copy Features 2 Network 3 Remote UI 4 System Monitor 5 System Manager Settings 6 Reports and Lists 7 Troubleshooting 8 Appendix 9 Table of Contents Index Manual Reception When you select in , follow the procedure below to receive a fax. 1. When the telephone rings, pick up the optional handset or handset of the external telephone. 2. Confirm that the modem's connecting sound is heard, then press [Start]. When you set the documents on the platen glass, press [←-] or [+→] to select the document size, then press [Start] for each document. When scanning is complete, press [OK] to start sending. 3. Hang up the optional handset or handset of the external telephone. FaxTel: Optional Settings If required, change the optional settings as follows: 1. Press [Additional Functions]. 2. Press [←-] or [+→] to select , then press [OK]. 3. Press [←-] or [+→] to select , then press [OK]. 4. Press [←-] or [+→] to select , then press [OK]. 5. Press [←-] or [+→] to select , then press [OK]. 6. Confirm that is displayed, then press [OK]. 7. Use [←-], [+→], or the numeric keys to specify the period of time (0 to 30 seconds) before the machine starts ringing after receiving a voice call, then press [OK]. If the machine receives a fax, the machine does not ring and switches to the receive mode automatically. 8. Confirm that is displayed, then press [OK].](/content/2026/05/1103359/images/cb7c25b621c12183b253ec7262c8e08cc104be725ce506b0f58fa97ca9d12696.jpg)
![Advanced Send Features 1 Advanced Copy Features 2 Network 3 Remote UI 4 System Monitor 5 System Manager Settings 6 Reports and Lists 7 Troubleshooting 8 Appendix 9 Table of Contents Index 9. Press [◀−] or [+▶] to select the duration (15 to 300 seconds) for the phone to ring, then press [OK]. 10. Confirm that is displayed, then press [OK]. 11. Press [◀−] or [+▶] to select the action the machine will take after the ringing ends, then press [OK]. : Switches to the receive mode. : Disconnects the call. 12. Press [Stop] to return to the standby mode. ■ Memory Reception The machine automatically receives faxes in memory when printing is disabled under certain conditions (e.g., toner or paper has run out). You can also set the machine to store all documents in memory without automatically printing them. 1. Press [Additional Functions]. 2. Press [◀−] or [+▶] to select , then press [OK]. If the System Manager ID and System Password have been set, enter the System Manager ID and System Password using the numeric keys, then press [Log In/Out]. 3. Press [◀−] or [+▶] to select , then press [OK]. 4. Press [◀−] or [+▶] to select , then press [OK]. If the memory lock password has already been set, enter the password, then press [OK]. 5. Press [◀−] or [+▶] to select , then press [OK]. NOTE When you select , the machine starts to print the received documents in memory. 6. Confirm that is displayed, then press [OK]. 1-17](/content/2026/05/1103359/images/16456f2afca1015753f28f75e1169d97ff474b134dd39736722626b279ed41b4.jpg)
![Advanced Send Features Advanced Copy Features Network Remote UI System Monitor System Manager Settings Reports and Lists Troubleshooting Appendix Table of Contents Index 7. Use the numeric keys to enter the memory reception password (up to seven digits), then press [OK]. Ex: PASSWORD 1234567_ 8. Confirm that is displayed, then press [OK]. 9. Press [◀-] or [+▶] to select or , then press [OK]. : Does not print a RX report. : Prints a RX report. NOTE should also be set to so that RX reports are automatically printed when documents are received in memory. For instructions, see "RX REPORT," on p. 7-5. 10. Confirm that is displayed, then press [OK]. If you do not need to set the timer for memory lock, skip to step 16. 11. Press [◀-] or [+▶] to select , then press [OK]. 12. Confirm that is displayed, then press [OK]. 13. Use the numeric keys to enter the start time (in 24-hour format), then press [OK]. Ex: MEM RX START TIME 0:0:00 14. Confirm that is displayed, then press [OK]. 15. Use the numeric keys to enter the end time, then press [OK]. 16. Press [Stop] to return to the standby mode. 1-18](/content/2026/05/1103359/images/7bf2bd3e8c4a6781a24869cc3830fd8ebdcb22c8b8c4a1f70536a9a58161c885.jpg)
![Advanced Send Features 1 Advanced Copy Features 2 Network 3 Remote UI 4 System Monitor 5 System Manager Settings 6 Reports and Lists 7 Troubleshooting 8 Appendix 9 Table of Contents Index Printing All Documents Stored in Memory Perform step 1 to 3 in "Memory Reception," on p. 1-17. Press [◀−] or [++] to select , then press [OK]. Use the numeric keys to enter the memory reception password, then press [OK]. Press [◀−] or [++] to select , then press [OK]. The received documents are printed. Press [Stop] to return to the standby mode. Forwarding Received Fax/I-Fax Documents You can set the machine to forward received fax/I-fax documents to other machines or file servers. If a received document matches the forwarding conditions, it is forwarded to the specified destination. Forwarding settings can be made using the Remote UI. NOTE For instructions on forwarding settings and how to turn ON and OFF the forward mode, see "Specifying Forwarding Settings," on p. 4-18. Remote Reception Remote reception enables you to use an external telephone connected to the machine to receive faxes manually. This can be useful when the machine is not nearby or is being used by someone else. NOTE This function is not available when in is set to .](/content/2026/05/1103359/images/dc589691a5e4d988fb42ce457739c78b94c94357ed05a7c2ecd6603b097947d1.jpg)
![Advanced Send Features 1 Advanced Copy Features 2 Network 3 Remote UI 4 System Monitor 5 System Manager Settings 6 Reports and Lists 7 Troubleshooting 8 Appendix 9 Table of Contents Index Registering Remote Reception ID Follow this procedure if you want to change the default remote reception ID of 25. 1. Press [Additional Functions]. 2. Press [◀-] or [+▶] to select , then press [OK]. 3. Press [◀-] or [+▶] to select , then press [OK]. 4. Press [◀-] or [+▶] to select , then press [OK]. 5. Press [◀-] or [+▶] to select , then press [OK]. 6. Press [◀-] or [+▶] to select , then press [OK]. 7. Press [Clear] twice to delete the default remote reception ID of 25. 8. Use the numeric keys to enter a new remote reception ID (a combination of two characters using 0 to 9, * and #), then press [OK]. 9. Press [Stop] to return to the standby mode. Receiving a Fax Remotely 1. When you receive a call, pick up the external telephone. 2. Use the numeric keys to enter the two-digit remote reception ID to start reception. NOTE If the machine is set for pulse dialing, press [Tone] to switch to tone dialing before pressing the remote reception ID. 3. When the reception is complete, hang up the telephone.](/content/2026/05/1103359/images/9fb4fd42b57c1b6597d3b52917e60b6afddafcd66d715fb4e99990d39e4a9094.jpg)
![Advanced Send Features Advanced Copy Features Network Remote UI System Monitor System Manager Settings Reports and Lists Troubleshooting Appendix Table of Contents Index ■ Printing Received Documents The machine provides the following printing features: two-sided printing and received image reduction. Two-Sided Printing You can print received documents on both sides of the paper. 1. Press [Additional Functions]. 2. Press [◀−] or [+▶] to select , then press [OK]. 3. Press [◀−] or [+▶] to select , then press [OK]. 4. Press [◀−] or [+▶] to select , then press [OK]. 5. Press [◀−] or [+▶] to select , then press [OK]. 6. Press [◀−] or [+▶] to select , then press [OK] 7. Press [Stop] to return to the standby mode. Received Image Reduction You can print received documents in a reduced size. 1. Press [Additional Functions]. 2. Press [◀−] or [+▶] to select , then press [OK]. 3. Press [◀−] or [+▶] to select , then press [OK]. 4. Press [◀−] or [+▶] to select , then press [OK]. 5. Press [◀−] or [+▶] to select , then press [OK]. 6. Press [◀−] or [+▶] to select , then press [OK].](/content/2026/05/1103359/images/30ec7217c238f3c1832c36019111f8c0769af02e4102abbcc12de8d4878248a3.jpg)
![Advanced Send Features Advanced Copy Features Network Remote UI System Monitor System Manager Settings Reports and Lists Troubleshooting Appendix Table of Contents Index 7. Press [◀−] or [+▶] to select or , then press [OK]. If you select , skip to step 11. 8. Press [◀−] or [+▶] to select or , then press [OK]. If you select , adjust the image reduction automatically. Skip to step 10. 9. Press [◀−] or [+▶] to select a preset reduction ratio (97%, 95%, 90%, or 75%), then press [OK]. 10. Confirm that is displayed, then press [OK]. 11. Press [◀−] or [+▶] to select or , then press [OK]. : Reduces the document vertically only. : Reduces the document both horizontally and vertically. 12. Press [Stop] to return to the standby mode. 1-22 Back Previous Next TOP](/content/2026/05/1103359/images/8a23985ed61045edb95c639ce32e1df774dd8b44f2b2079b5f858c8d5175df58.jpg)
![Advanced Send Features 1 Advanced Copy Features 2 Network 3 Remote UI 4 System Monitor 5 System Manager Settings 6 Reports and Lists 7 Troubleshooting 8 Appendix 9 Table of Contents Index Address Book Settings The Address Book is a feature used for storing fax, e-mail, I-fax, and file server destinations. The Address Book is divided into one-touch keys and coded dial codes. You can store up to 23 destinations in one-touch keys, and 177 destinations in coded dial codes, for a total of 200 destinations in the whole Address Book. You can also register multiple destinations of various types in a group address, and assign a one-touch key or coded dial code to this group. Registering a destination in the Address Book saves you the effort of entering that destination's address each time you send a job. NOTE - You can also register a destination in favorites buttons together with a specific combination of scan and send settings. One-touch keys 01 to 04 can be used for this feature. For instructions on registering favorites buttons, see "Storing Favorites Buttons," on p. 1-26. - Destinations stored in the Address Book can be exported to your computer as a file, which can be imported into the machine. For information on exporting the Address Book, see "Import/Export Function," on p. 4-30. ■ Registering/Editing File Server Addresses in One-Touch Keys/Coded Dial Codes To send documents to a file server, the destination must be registered in Address Book. Registering File Server Addresses 1. Press [Additional Functions]. 2. Press [◀─] or [+▶] to select , then press [OK]. 3. Press [◀─] or [+▶] to select or , then press [OK]. 1-23](/content/2026/05/1103359/images/3402ab408438d8ad9746758389ea1c001576b3c474ec69d8188688affee45f7b.jpg)

Back

Previous

Next
TOP
- Press [◀-] or [+▶] to select a one-touch key (01 to 23) or coded dial code (000 to 176) for which you want to register the address, then press [OK].
You can also select a one-touch key or coded dial code by pressing the corresponding one-touch key, or [Coded Dial] followed by the desired three-digit code.
- Press [◀-] or [+▶] to select the server protocol (
or ), then press [OK].
-
Confirm that
is displayed, then press [OK]. -
Use the numeric keys to enter the destination's name (up to 16 characters), then press [OK].
-
Confirm that
is displayed, then press [OK]. - Use the numeric keys to enter the name of the file server on the network (up to 120 characters), then press [OK].
If no DNS server is available, the host name setting should be specified using the IP address of the FTP server.
| HOST NAME :1 | |
| canon01_ |
-
Confirm that
is displayed, then press [OK]. -
Use the numeric keys to specify the folder to which the job is to be sent (up to 120 characters), then press [OK].
-
Confirm that
is displayed, then press [OK].
![Advanced Send Features 1 Advanced Copy Features 2 Network 3 Remote UI 4 System Monitor 5 System Manager Settings 6 Reports and Lists 7 Troubleshooting 8 Appendix 9 Table of Contents Index 13. Use the numeric keys to enter the login name, then press [OK]. You can enter up to 24 characters for the login name. 14. Confirm that is displayed, then press [OK]. 15. Use the numeric keys to enter the password, then press [OK]. You can enter up to 24 characters (14 characters when is selected as the server protocol) for the password. To register another one-touch key or coded dial code, repeat the procedure from step 4. 16. Press [Stop] to return to the standby mode. Editing File Server Addresses NOTE You cannot change the server protocol setting (FTP or SMB) of the destination registered in Address Book. To change the server protocol, cancel the registration once, then register with the correct server protocol again. 1. Press [Additional Functions]. 2. Press [←─] or [+►] to select , then press [OK]. 3. Press [←─] or [+►] to select or , then press [OK]. 4. Press [←─] or [+►] to select a one-touch key (01 to 23) or coded dial code (000 to 176) you want to edit, then press [OK]. You can also select a one-touch key or coded dial code by pressing the corresponding one-touch key, or [Coded Dial] followed by the desired three-digit code. 5. Press [←─] or [+►] to select the item you want to edit, then press [OK]. You can edit , , , , and . 6. Press [←─] repeatedly to go back to the character you want to edit, then press [Clear]. To delete the entire entry, press and hold [Clear]. 1-25](/content/2026/05/1103359/images/5b78f912af326cee578200658eb870bc5647df587940226555393101259c8175.jpg)
![Advanced Send Features Advanced Copy Features Network Remote UI System Monitor System Manager Settings Reports and Lists Troubleshooting Appendix Table of Contents Index 7. Use the numeric keys to enter a new character, then press [OK]. 8. Repeat step 5 to 7 to edit the desired items. 9. Press [Stop] to return to the standby mode. Deleting a File Server Address 1. Press [Additional Functions]. 2. Press [◀─] or [+▶] to select , then press [OK]. 3. Press [◀─] or [+▶] to select or , then press [OK]. 4. Press [◀─] or [+▶] to select a one-touch key (01 to 23) or coded dial code (000 to 176) you want to delete, then press [OK]. You can also select a one-touch key or coded dial code by pressing the corresponding one-touch key, or [Coded Dial] followed by the desired three-digit code. 5. Press [◀─] or [+▶] to select , then press [OK]. 6. Press and hold [Clear] to delete the entire entry, then press [OK]. You can also use [Clear] to delete characters one by one. NOTE If you delete the file server name, the rest of the settings are cleared automatically. 7. Press [Stop] to return to the standby mode. ■ Storing Favorites Buttons You can register a destination together with any possible combination of send settings in a favorites button. One-touch keys 01 to 04 can be registered as favorites buttons. NOTE The Favorites Buttons feature is available only for the iR1022i and iR1022IF. 1-26](/content/2026/05/1103359/images/28210efd2c2f77f711dc3a055d4ef8265834b9ec4e12c1bb5580c73109c72885.jpg)
![Advanced Send Features Advanced Copy Features Network Remote UI System Monitor System Manager Settings Reports and Lists Troubleshooting Appendix Table of Contents Index Registering a Fax Number 1. Press [Additional Functions]. 2. Press [◀-] or [++] to select , then press [OK]. 3. Press [◀-] or [++] to select , then press [OK]. 4. Press [◀-] or [++] to select a one-touch key (01 to 04), then press [OK]. If a one-touch destination is already registered in the desired one-touch key, select another key, or delete the destination first. 5. Press [◀-] or [++] to select , then press [OK]. 6. Confirm that is displayed, then press [OK]. 7. Use the numeric keys to enter the destination's name (up to 16 characters), then press [OK]. 8. Confirm that is displayed, then press [OK]. 9. Use the numeric keys to enter the destination's fax number (up to 120 characters), then press [OK]. 10. Confirm that is displayed, then press [OK]. 11. Press [◀-] or [++] to select the image quality (, , , , or ), then press [OK]. 12. Confirm that is displayed, then press [OK]. 13. Press [◀-] or [++] to select or , then press [OK]. If you do not want to set the optional settings, select , then skip to step 20. If you want to set the options for sending faxes, select . 1-27](/content/2026/05/1103359/images/76f5c0ab58c64ec4419495415e0d6951d0a752113bbaf57a364c22db43c9c28f.jpg)
![Advanced Send Features 1 Advanced Copy Features 2 Network 3 Remote UI 4 System Monitor 5 System Manager Settings 6 Reports and Lists 7 Troubleshooting 8 Appendix 9 Table of Contents Index 14. Confirm that is displayed, then press [OK]. 15. Press [◀−] or [+▶] to select or , then press [OK]. 16. Confirm that is displayed, then press [OK]. 17. Press [◀−] or [+▶] to select the sending speed (33600 bps, 14400 bps, 9600 bps, or 4800 bps), then press [OK]. 18. Confirm that is displayed, then press [OK]. 19. Press [◀−] or [+▶] to select the transmission option (, , , or ), then press [OK]. NOTE If errors occur during international fax transmissions, try the setting from through . 20. Press [Stop] to return to the standby mode. Registering an E-Mail/I-Fax Address 1. Press [Additional Functions]. 2. Press [◀−] or [+▶] to select , then press [OK]. 3. Press [◀−] or [+▶] to select , then press [OK]. 4. Press [◀−] or [+▶] to select a one-touch key (01 to 04), then press [OK]. 5. Press [◀−] or [+▶] to select or , then press [OK]. 6. Confirm that is displayed, then press [OK]. 7. Use the numeric keys to enter the destination's name (up to 16 characters), then press [OK]. 1-28](/content/2026/05/1103359/images/0aef78a8bb4e4a727dd3b4bbfe4d9ba5f54e1dcc159e69381b12a256ffb6fd91.jpg)
![Advanced Send Features 1 Advanced Copy Features 2 Network 3 Remote UI 4 System Monitor 5 System Manager Settings 6 Reports and Lists 7 Troubleshooting 8 Appendix 9 Table of Contents Index 8. Confirm that or is displayed, then press [OK]. 9. Use the numeric keys to enter the destination's address, then press [OK]. If you are registering an I-fax address, skip to step 12. 10. If you are registering an e-mail address, confirm that is displayed, then press [OK]. 11. Press [◀−] or [+▶] to select the file format (, , , or ) , then press [OK]. , : Select for sending images in black-and-white. , : Select for sending color images. 12. Confirm that is displayed, then press [OK]. 13. Press [◀−] or [+▶] to select or , then press [OK]. : Sends multiple images as a single file without dividing them. : Separates multiple images and send them as separate files. NOTE If you have selected as the file format in step 11, multiple images are sent as separate files even if you set to . 14. Confirm that is displayed, then press [OK]. 1-29](/content/2026/05/1103359/images/9f822b3ebbeb3a29169130a3d8f268566796e7437d26a0c80e72cd47a676f447.jpg)

Back

Previous

Next
TOP
15. Press [◀-] or [+▶] to select the resolution, then press [OK].
You can select from <200x200dpi>, <200x400dpi>, <300x300dpi>, <400x400dpi>, <600X600dpi>, <100X100dpi>, <150X150dpi>, and <200x100dpi>.
NOTE
- If you are registering an e-mail address, note the following:
- If you want to send color images in the
format, select <300x300dpi>. Otherwise, the image is sent in black-and-white. - If you want to send color images in the
format, select <100X100dpi>, <150X150dpi>, <200x200dpi>, or <300x300dpi>. Otherwise, the image is sent in black-and-white. - If you have selected
or as the file format in step 11 and <100X100dpi> or <600X600dpi> as the resolution, the image is sent in <200x200dpi> resolution. - If you are registering an I-fax address, the image is sent in <200x200dpi> even if you select <200x400dpi>, <300x300dpi>, <400x400dpi>, <600X600dpi>, <100X100dpi>, or <150X150dpi>.
16. Confirm that is displayed, then press [OK].
17. Press [◀-] or [+▶] to select the original type (, , or ), then press [OK].
NOTE
If you have selected
18. Press [Stop] to return to the standby mode.
Registering a File Server Address
- Press [Additional Functions].
- Press [◀-] or [+▶] to select , then press [OK].
- Press [◀-] or [+▶] to select
, then press [OK]. - Press [◀-] or [+▶] to select a one-touch key (01 to 04), then press [OK].
![Advanced Send Features 1 Advanced Copy Features 2 Network 3 Remote UI 4 System Monitor 5 System Manager Settings 6 Reports and Lists 7 Troubleshooting 8 Appendix 9 Table of Contents Index 5. Press [◀-] or [+▶] to select the server protocol ( or ), then press [OK]. For details on each protocol, see step 5 in "Registering File Server Addresses," on p. 1-23. 6. Confirm that is displayed, then press [OK]. 7. Use the numeric keys to enter the destination's name (up to 16 characters), then press [OK]. 8. Confirm that is displayed, then press [OK]. 9. Use the numeric keys to enter the name of the file server on the network (up to 120 characters), then press [OK]. For instructions on entering the file server name, see step 9 in "Registering File Server Addresses," on p. 1-23. 10. Confirm that is displayed, then press [OK]. 11. Use the numeric keys to enter the file path to the folder to which the job is to be sent (up to 120 characters), then press [OK]. 12. Confirm that is displayed, then press [OK]. 13. Use the numeric keys to enter the login name, then press [OK]. You can enter up to 24 characters for the login name. 14. Confirm that is displayed, then press [OK]. 15. Use the numeric keys to enter the password, then press [OK]. You can enter up to 24 characters (14 characters when is selected as the server protocol) for the password. 16. Confirm that is displayed, then press [OK].](/content/2026/05/1103359/images/db3540dfdb1f30c5179bb90fceaa0f4702d8ad999b7f31d8cfc1e4a3ffbb9ceb.jpg)

Back

Previous

Next
TOP
- Press [◀-] or [+▶] to select the file format (
, , , or ), then press [OK].
-
Confirm that
is displayed, then press [OK]. -
Press [◀-] or [+▶] to select
or , then press [OK].
NOTE
If you have selected
-
Confirm that
is displayed, then press [OK]. -
Press [◀-] or [+▶] to select the resolution, then press [OK].
You can select from <200x200dpi>, <200x400dpi>,
<300x300dpi>, <400x400dpi>, <600X600dpi>, <100X100dpi>, <150X150dpi>, and <200x100dpi>.
NOTE
- If you want to send color images in the
- If you want to send color images in the
- If you have selected
- Confirm that
is displayed, then press [OK].
![Advanced Send Features 1 Advanced Copy Features 2 Network 3 Remote UI 4 System Monitor 5 System Manager Settings 6 Reports and Lists 7 Troubleshooting 8 Appendix 9 Table of Contents Index 23. Press [◀−] or [+▶] to select the original type (, , or ), then press [OK]. NOTE If you have selected as the file format in step 17, the original type is automatically set to . Skip to step 24. 24. Press [Stop] to return to the standby mode.](/content/2026/05/1103359/images/1be6617dd032ef58dbe5ec20526a12b29c2dfeaa2b7d8a6a621b1da5f0a5f7be.jpg)
![Advanced Send Features 1 Advanced Copy Features 2 Network 3 Remote UI 4 System Monitor 5 System Manager Settings 6 Reports and Lists 7 Troubleshooting 8 Appendix 9 Table of Contents Index Cancel TX/RX Jobs Cancel an ongoing job (sending or receiving) as follows. 1. Press [Stop]. 2. When the message appears, press [OK]. ●When scanning using the ADF: STOP KEY PRESSED PRESS OK KEY ●When scanning using the platen glass: STOP KEY PRESSED When the message appears, press [←→] to select . CANCEL DURING TX/RX? < YES NO > NOTE For sending jobs, remove any unscanned documents from the ADF. 1-34](/content/2026/05/1103359/images/98d14a4c0c32b5ab7322445260abed2be6b2009c731c46d2e0c18fb10c5c8ec7.jpg)
![Advanced Send Features 1 Advanced Copy Features 2 Network 3 Remote UI 4 System Monitor 5 System Manager Settings 6 Reports and Lists 7 Troubleshooting 8 Appendix 9 Table of Contents Index Advanced Copy Features ■ Collate Copy You can copy documents collated into sets arranged in page order. This feature can be used together with both "Two-Sided Copying" (see p. 2-3) and "2 on 1 Combination" (see p. 2-6). 1. Set documents. Place the first page on the platen glass if you are not using the ADF. 2. Press [COPY]. NOTE If is set to in in , skip step 3 and 4. 3. Press [Collate]. appears in the LCD. 4. Press [◀−] or [+▶] to select , then press [OK]. 5. Use the numeric keys to enter the desired copy quantity (1 to 99). 6. Press [Start]. When the documents are loaded in the ADF, collate copying starts and no further operation is required. If the document is placed on the platen glass and is displayed in the LCD, press [◀−] or [+▶] to select the original size, then press [OK]. 7. Place the next page of the document on the platen glass, then press [Start]. Repeat this step to scan all pages. The machine prints only one copy of each page. 8. Press [OK]. – The machine prints the remaining sets of copies. – To cancel all settings, press [Reset]. NOTE When scanning multiple page documents, may appear in the LCD and scanning may be canceled. If this happens, press [Stop] to return to the standby mode.](/content/2026/05/1103359/images/2f37205244cedddbc08ad51053d0bfde6fe81d9a469443e9ee55ffb8e5377bb7.jpg)
![Advanced Send Features 1 Advanced Copy Features 2 Network 3 Remote UI 4 System Monitor 5 System Manager Settings 6 Reports and Lists 7 Troubleshooting 8 Appendix 9 Table of Contents Index Reserved Copy You can make copy settings and scan documents even if the machine is currently printing. The scanned documents are processed after the current job is complete. 1. Set documents. 2. Press [COPY]. 3. Set the desired copy mode and quantity (1 to 99), then press [Start]. You can reserve up to 5 copy jobs, with different settings for each job. Two-Sided Copying Two-sided copying enables you to make two-sided copies from one-sided or two-sided documents, or make one-sided copies from two-sided documents. This feature can be used together with both "Collate Copy" (see p. 2-2) and "2 on 1 Combination" (see p. 2-6). 1 to 2-Sided Copying Original Book Type selected Copy Calendar Type selected 2 to 2-Sided Copying Original Book Type selected Copy Calendar Type selected 2-3](/content/2026/05/1103359/images/3400935a30724e060da461b9830203b4142175b78c30bec67b3ce07c5e491d77.jpg)
![Advanced Send Features Advanced Copy Features Network Remote UI System Monitor System Manager Settings Reports and Lists Troubleshooting Appendix Table of Contents Index 2 to 1-Sided Copying Copies Original Book Type selected Calendar Type selected NOTEDepaper used to make two-sided copies must conform to the following specifications: - Paper size: A4 (LGL or LTR loaded on the stack bypass are available as well.) - Paper weight: 64 to 90 g/m² 1 to 2-Sided You can make two-sided copies from one-sided documents. 1. Set documents. 2. Press [COPY]. 3. Press [Two-Sided]. 4. Press [◀−] or [+▶] to select 2-SIDED>, then press [OK]. 5. Press [◀−] or [+▶] to select or , then press [OK]. : The front and back sides of the copy will have the same top-bottom orientation. : The front and back sides of the copy will have opposite top-bottom orientations. 6. Press [Start]. To cancel all settings, press [Reset]. NOTE When you set the document on the platen glass, press [Start] for each document. When scanning is complete, press [OK].](/content/2026/05/1103359/images/aefaef43d53117be3bc876f8459173c6fe36d4275a2c39c67250fb56c95d8fa6.jpg)
![Advanced Send Features Advanced Copy Features Network Remote UI System Monitor System Manager Settings Reports and Lists Troubleshooting Appendix Table of Contents Index 2 to 2-Sided You can make two-sided copies from two-sided documents. 1. Set documents. 2. Press [COPY]. 3. Press [Two-Sided]. 4. Press [◀−] or [+▶] to select 2-SIDED>, then press [OK]. 5. Press [◀−] or [+▶] to select or (for the documents), then press [OK]. : The front and back sides of the document have the same top-bottom orientation. : The front and back sides of the copy will have opposite top-bottom orientations. 6. Press [◀−] or [+▶] to select or (for the copies), then press [OK]. : The front and back sides of the copy will have the same top-bottom orientation. : The front and back sides of the copy will have opposite top-bottom orientations. 7. Press [Start]. To cancel all settings, press [Reset] NOTE When you set the document on the platen glass, press [Start] for each document. When scanning is complete, press [OK]. 2 to 1-Sided You can make one-sided copies from two-sided documents. 1. Set documents. 2. Press [COPY]. 2-5](/content/2026/05/1103359/images/9978b7cec56913a2bec793a41c2dac1fa1cfa3223cc3356cf227a7dd24313670.jpg)
![Advanced Send Features Advanced Copy Features Network Remote UI System Monitor System Manager Settings Reports and Lists Troubleshooting Appendix Table of Contents Index 3. Press [Two-Sided]. 4. Press [◀-] or [+▶] to select 1-SIDED>, then press [OK]. 5. Press [◀-] or [+▶] to select or , then press [OK]. : The front and back sides of the document have the same top-bottom orientation. : The front and back sides of the document have opposite top-bottom orientations. 6. Press [Start]. To cancel all settings, press [Reset]. NOTE When you set the document on the platen glass, press [Start] for each document. When scanning is complete, press [OK]. ■ 2 on 1 Combination 2 on 1 combination automatically reduces two documents to fit on the selected paper size. This feature can be used together with both "Collate Copy" (see p. 2-2) and "Two-Sided Copying" (see p. 2-3). Originals Copy 1. Set documents. 2. Press [COPY]. 3. Press [2 on 1]. 4. Press [◀-] or [+▶] to select , then press [OK]. 2-6](/content/2026/05/1103359/images/eb5dd3ddc3b0505bb2d77a284f837fd123fa08c8670f075152b8603cb0d35e25.jpg)
![Advanced Send Features Advanced Copy Features Network Remote UI System Monitor System Manager Settings Reports and Lists Troubleshooting Appendix Table of Contents Index 5. Press [◀−] or [+▶] to select the size of the document, then press [OK]. 6. Press [◀−] or [+▶] to select the paper size, then press [OK]. 7. Use the numeric keys to enter the desired copy quantity (1 to 99). 8. Press [Start]. To cancel all settings, press [Reset]. NOTE - When you set the document on the platen glass, press [Start] for each document. When scanning is complete, press [OK]. - A maximum of 2 to 3 mm margin will be produced between the two reduced documents in 2 on 1 combination copying. Frame Erase You can erase shadows and lines that appear when copying various types of documents. Original Frame Erase Copying Copy (A4) Original (A5) Original Frame Erase Selected → → Original Frame Erase Not Selected 2-7](/content/2026/05/1103359/images/12c624983ce5741b855ca35625d605a20a3cd2dba8bd140cd7019f1ac9108be7.jpg)
![Advanced Send Features Advanced Copy Features Network Remote UI System Monitor System Manager Settings Reports and Lists Troubleshooting Appendix Table of Contents Index Book Frame Erase Copying Original Book Frame Erase Selected Copy Book Frame Erase Not Selected Copy Binding Hole Frame Erase Copying Original Binding Hole Erase Selected Copy Binding Hole Erase Not Selected Copy Original Frame Erase Original Frame Erase can erase the dark borders and frame lines that appear around the copy when the document is smaller than the selected paper size. 1. Set documents. 2. Press [COPY]. 3. Press [Frame Erase]. 4. Press [◀−] or [+▶] to select , then press [OK]. 5. Press [◀−] or [+▶] to select the size of the document, then press [OK]. 6. Use [◀−], [+▶], or the numeric keys to set the frame erase width for all four borders, then press [OK]. The width ranges 1 to 50 mm. 2-8](/content/2026/05/1103359/images/4c2841d2b4276b1952e140e877bc6639dc2f80733855ee1f21fff54537b88620.jpg)
![Advanced Send Features Advanced Copy Features Network Remote UI System Monitor System Manager Settings Reports and Lists Troubleshooting Appendix Table of Contents Index 7. Use the numeric keys to enter the desired copy quantity (1 to 99). 8. Press [Start]. To cancel all settings, press [Reset]. Book Frame Erase Book frame erase can erase the dark borders, as well as center and contour lines that appear when copying facing pages in a book or bound document onto a single sheet of paper. 1. Set documents. 2. Press [COPY]. 3. Press [Frame Erase]. 4. Press [◀-] or [+▶] to select , then press [OK]. 5. Press [◀-] or [+▶] to select the book size, then press [OK]. 6. Use [◀-], [+▶], or the numeric keys to set the book frame erase width for all four borders, then press [OK]. The book frame erase width ranges 1 to 50 mm. 7. Use [◀-], [+▶], or the numeric keys to set the frame erase width for the center of the book, then press [OK]. The width ranges 1 to 50 mm. 8. Use the numeric keys to enter the desired copy quantity (1 to 99). 9. Press [Start]. To cancel all settings, press [Reset]. Binding Hole Erase Binding hole erase can erase the shadows that appear on copies from binding holes on the documents. 2-9](/content/2026/05/1103359/images/51fd701a884b07ff343d05a88bc2a6c7a56a13cafcdde9a7aeca08212476710a.jpg)
![Advanced Send Features Advanced Copy Features Network Remote UI System Monitor System Manager Settings Reports and Lists Troubleshooting Appendix Table of Contents Index 1. Set documents. 2. Press [COPY]. 3. Press [Frame Erase]. 4. Press [◀-] or [+▶] to select , then press [OK]. 5. Press [◀-] or [+▶] to specify the location of the binding holes (, , , or ), then press [OK]. 6. Use [◀-], [+▶], or the numeric keys to set the binding hole erase width, then press [OK]. The width ranges 3 to 20 mm. 7. Use the numeric keys to enter the desired copy quantity (1 to 99). 8. Press [Start]. To cancel all settings, press [Reset]. The locations of the binding holes to be erased are shown in the illustration below. A: LEFT B: RIGHT C: TOP D: BOTTOM The width ranges 3 to 20 mm. Platen Glass A: LEFT B: RIGHT C: TOP D: BOTTOM 2-10](/content/2026/05/1103359/images/3b1678e4a07bdc6651259f1208da809c7b8af4ae57332df42d195a0af2ae2a7d.jpg)
![Advanced Send Features 1 Advanced Copy Features 2 Network 3 Remote UI 4 System Monitor 5 System Manager Settings 6 Reports and Lists 7 Troubleshooting 8 Appendix 9 Table of Contents Index Canceling Copy Jobs Cancel an ongoing job as follows. 1. Press [Stop]. 2. When the message appears, press [OK]. ●When scanning using the ADF: STOP KEY PRESSED PRESS OK KEY ●When scanning using the platen glass: STOP KEY PRESSED When the message appears, press [←-] to select . CANCEL COPYING? < YES NO > 2-11 Back Previous Next TOP](/content/2026/05/1103359/images/58e91c39cca43f37fec5c606df957ad8a7d0a357d66a21a675016c52bf5bee6b.jpg)
| Advanced Send Features | 1 | Protocol Settings for TCP/IP Network......3-14 |
| Advanced Copy Features | 2 | Settings from the Operation Panel of the Machine......3-14 |
| Network | 3 | Setting Up a Computer for Printing/Sending a Fax......3-23 |
| Remote UI | 4 | Machine Connection Method (LPD/Raw)......3-23 |
| System Monitor | 5 | Print Server Settings......3-26 |
| System Manager Settings | 6 | Setting Up a Computer as a FTP Server......3-27 |
| Reports and Lists | 7 | Using a NetBIOS Network......3-37 |
| Troubleshooting | 8 | Protocol Settings for NetBIOS Network......3-38 |
| Appendix | 9 | Settings from the Operation Panel of the Machine......3-38 |
| Table of Contents | ||
| Index |

![Advanced Send Features 1 Advanced Copy Features 2 Network 3 Remote UI 4 System Monitor 5 System Manager Settings 6 Reports and Lists 7 Troubleshooting 8 Appendix 9 Table of Contents Index Interface Settings Ethernet Driver You can specify the communication method and Ethernet connection type. 1. Press [Additional Functions]. 2. Press [◀─] or [+▶] to select , then press [OK]. If the System Manager ID and System Password have been set, enter the System Manager ID and System Password using the numeric keys, then press [Log In/Out]. 3. Press [◀─] or [+▶] to select , then press [OK]. 4. Press [◀─] or [+▶] to select , then press [OK]. 5. Confirm that is displayed, then press [OK]. 6. Press [◀─] or [+▶] to select the desired detection method, then press [OK]. : Automatically determines the communication mode (Half duplex/Full duplex) and Ethernet type (10Base-T/100Base-TX). Skip to step 11. : You have to manually specify the communication mode and Ethernet type. NOTE If you reconnect the network cable (for example, reconnect the cable to a different Ethernet hub) with the power on, the Auto Detect function will not work even if you set to . (Connect the cable with the power off.) 7. Confirm that is displayed, then press [OK]. 8. Press [◀─] or [+▶] to select the desired communication method, then press [OK]. : Sends and receives alternately. : Sends and receives simultaneously. 3-8](/content/2026/05/1103359/images/86f95cfd663f4602cfadc820711cd505f96eafd8f9e1c1f1f21a12513e8f77c6.jpg)
![Advanced Send Features 1 Advanced Copy Features 2 Network 3 Remote UI 4 System Monitor 5 System Manager Settings 6 Reports and Lists 7 Troubleshooting 8 Appendix 9 Table of Contents Index 9. Confirm that is displayed, then press [OK]. 10. Press [◀−] or [+▶] to select the desired Ethernet connection type, then press [OK]. : Establish a 10Base-T network connection. : Establish a 100Base-TX network connection. 11. Press [Stop] to return to the standby mode. 12. Restart the machine.](/content/2026/05/1103359/images/dff22ccf069fa79a6c6c12e5abcc918695d1ffa8ca5f6479207d7f31cc2fba5f.jpg)
![Advanced Send Features 1 Advanced Copy Features 2 Network 3 Remote UI 4 System Monitor 5 System Manager Settings 6 Reports and Lists 7 Troubleshooting 8 Appendix 9 Table of Contents Index Communication Environment Setup To set up a configuration for communication between the machine and computers on your network, use the following procedure. SNMP SNMP helps monitor the state of the machine and collects information on it. The following two items can be set: : Sets the SNMP community name. You can specify up to two community names. : Enables the computers on the network to access the machine and modify its settings if this item is activated. You can specify this setting for each community separately. 1. Press [Additional Functions]. 2. Press [◀─] or [+▶] to select , then press [OK]. If the System Manager ID and System Password have been set, enter the System Manager ID and System Password using the numeric keys, then press [Log In/Out]. 3. Press [◀─] or [+▶] to select , then press [OK]. 4. Press [◀─] or [+▶] to select , then press [OK]. 5. Confirm that is displayed, then press [OK].](/content/2026/05/1103359/images/d0e170ceec62d12abed47e48ac48fc6a3f236de7767cd504ba426fb7047d54f7.jpg)

Back

Previous

Next
TOP
- Press [◀-] or [+▶] to select
or , then press [OK].
NOTE
- If you want to use a Canon printer driver or utility, select
for both -
You can restrict the IP addresses of computers on which items can be set or browsed. If you restrict the IP addresses, it is not possible to use the Remote UI to set or browse detailed information on computers other than those whose IP addresses are allowed, even if both
-
Confirm that
is displayed, then press [OK]. - Use the numeric keys to enter the desired community name other than "public," then press [OK].
- If you want to specify
, press [OK].
Otherwise, press [+▶], then skip to step 11.
- Use the numeric keys to enter the desired community name, then press [OK].
- Confirm that
is displayed, then press [OK]. - Press [◀-] or [+▶] to select
, then press [OK]. - If you want to specify
, press [OK].
Otherwise, skip to step 15.
- Press [◀-] or [+▶] to select
, then press [OK]. - Press [Stop] to return to the standby mode.
- Restart the machine.
![Advanced Send Features Advanced Copy Features Network Remote UI System Monitor System Manager Settings Reports and Lists Troubleshooting Appendix Table of Contents Index Dedicated Port To set or browse detailed information on the machine with a Canon printer driver or utility, set to . NOTE - If you want to use a Canon printer driver or utility, select for both and . - You can restrict the IP addresses of computers on which items can be set or browsed. If you restrict the IP addresses, it is not possible to use the Remote UI to set or browse detailed information on computers other than those whose IP addresses are allowed, even if both and are . For details, see "Protocol Settings for TCP/IP Network," on p. 3-14. 1. Press [Additional Functions]. 2. Press [◀−] or [+▶] to select , then press [OK]. If the System Manager ID and System Password have been set, enter the System Manager ID and System Password using the numeric keys, then press [Log In/Out]. 3. Press [◀−] or [+▶] to select , then press [OK]. 4. Press [◀−] or [+▶] to select , then press [OK]. 5. Press [◀−] or [+▶] to select or , then press [OK]. : If you want to set or browse detailed information on the machine with a Canon printer driver or utility : If you are not using a Canon printer driver or utility. 6. Press [Stop] to return to the standby mode. 7. Restart the machine.](/content/2026/05/1103359/images/0905ccce43f65249d5603e7932d91b12499bc92e632686d1cc86091395cc42a6.jpg)
![Advanced Send Features Advanced Copy Features Network Remote UI System Monitor System Manager Settings Reports and Lists Troubleshooting Appendix Table of Contents Index Protcol Settings for TCP/IP Network You can specify the machine's protocol settings on the computer using any of the following software. - Machine's operation panel (Additional Functions menu) - Web browser (Remote UI) - NetSpot Console (via a web browser) (Canon utility software) NOTE - For more details about NetSpot Console, see online help or the NetSpot Console readme file. - To specify the protocol settings using NetSpot Console, you must log in as Administrator. For instructions on how to use NetSpot Console, see online help for NetSpot Console. - If you change the IP address etc. on the web browser (Remote UI), the change is not reflected in the setting display. When you check on the machine, you can check by in located in the , or by printing a USER'S DATA LIST. (See Chapter 14, "Machine Settings," in the Basic Operation Guide.) Settings from the Operation Panel of the Machine TCP/IP Settings 1. Press [Additional Functions]. 2. Press [◀−] or [+▶] to select , then press [OK]. If the System Manager ID and System Password have been set, enter the System Manager ID and System Password using the numeric keys, then press [Log In/Out]. 3. Press [◀−] or [+▶] to select , then press [OK]. 4. Confirm that is displayed, then press [OK]. 5. Press [◀−] or [+▶] to select , then press [OK].](/content/2026/05/1103359/images/8e0b849adc0509325ce5fee141d21be5542a3b2690da16aa189980d677e9a51c.jpg)
![Advanced Send Features 1 Advanced Copy Features 2 Network 3 Remote UI 4 System Monitor 5 System Manager Settings 6 Reports and Lists 7 Troubleshooting 8 Appendix 9 Table of Contents Index 6. Confirm that is displayed, then press [OK]. 7. Use the numeric keys to enter the IP address of a primary DNS server, then press [OK]. 8. If you want to specify , press [OK]. Otherwise, press [+→], skip to step 10. 9. Use the numeric keys to enter the IP address of a secondary DNS server, then press [OK]. 10. Confirm that is displayed, then press [OK]. 11. Use the numeric keys to enter the desired host name, then press [OK]. Ex. HOST NAME : a host name 12. Confirm that is displayed, then press [OK]. 13. Use the numeric keys to enter the network domain name, then press [OK]. Ex DOMAIN NAME : a org.company.com 14. Press [Additional Functions] so that in is displayed. 15. Press [←─] or [+▶] to select , then press [OK]. 16. Press [←─] or [+▶] to select or , then press [OK]. : Uses LPD as the print application. : Does not use LPD. 17. Press [←─] or [+▶] to select , then press [OK]. 18. Press [←─] or [+▶] to select or , then press [OK]. : Uses Raw as the print application. : Does not use Raw. 3-15](/content/2026/05/1103359/images/0d8758507deb6fac65201fd9fa3310c37945c65542673b81cf615b8755011783.jpg)
![Advanced Send Features 1 Advanced Copy Features 2 Network 3 Remote UI 4 System Monitor 5 System Manager Settings 6 Reports and Lists 7 Troubleshooting 8 Appendix 9 Table of Contents Index 19. Confirm that is displayed, then press [OK]. 20. Press [◀−] or [+▶] to select , then press [OK]. : Establishes bidirectional communication using Port 9100. : Does not establish bidirectional communication using Port 9100. 21. Press [◀−] or [+▶] to select , then press [OK]. 22. Press [◀−] or [+▶] to select or , then press [OK]. : Disable the PASV mode for FTP. : Enables the PASV mode for FTP. NOTE Whether you use the PASV mode for FTP depends on the network environment you are using and the settings of the file server you are sending to. Before specifying the PASV mode for FTP, consult your network administrator. 23. Press [◀−] or [+▶] to select , then press [OK]. 24. Press [◀−] or [+▶] to select or , then press [OK]. : Disable the FTP extension. : Enables the FTP extension. 25. Press [◀−] or [+▶] to select , then press [OK]. : Uses the Remote UI. : Does not use the Remote UI. 26. Press [◀−] or [+▶] to select , then press [OK]. 27. Press [◀−] or [+▶] to select](/content/2026/05/1103359/images/a76636683236383599a4cb694e013ecd5c1887359216a23d33c19252a886d33b.jpg)
8. Click [Finish].
If the dialog box displays [Additional Port Information Required], follow the instructions on the screen to search again, or click [Standard] → click [Canon Network Printing Device with P9100] from the pull-down list → click [Next].9. Click [Close] to close the [Printer Ports] dialog box.
If you want to use Raw, skip to step 12.10. In the printer properties dialog box, click [Configure Port] → Click [LPR] under [Protocol] → enter a print queue in [Queue Name] under [LPR Settings].
 NOTE
You can specify a print queue in [Queue Name]. The following three print queues are available: - LP: The machine prints according to its spool settings. Normally select this option. - SPOOL: The machine prints only after spooling a print job on the hard disk, regardless of its spool settings. - DIRECT: The machine prints without spooling a print job on the hard disk, regardless of its spool settings.11. Click [OK].
12. Click [Close].
 Back  Previous  Next TOPPrint Server Settings
If Windows 2000/XP/Server 2003 is on your network, the following procedure enables you to set up a print server for more efficient management of network printers. Once a print server is set up, print jobs can be managed by the print server. Also, by setting up an alternate driver for the print server, printer drivers can be installed in each computer via the network.1. Open the printer properties dialog box.
- For Windows 2000, click [Start] on the Windows task bar → [Settings] → [Printers]. - For Windows XP Professional/Server 2003, click [start] on the Windows task bar → [Printers and Faxes]. - For Windows XP Home Edition, click [start] on the Windows task bar → [Control Panel] → [Printers and Other Hardware] → [Printers and Faxes].2. Right-click the icon of the printer you installed → select [Sharing].
3. Select [Share this printer] (Windows 2000: [Shared as]) and enter a share name.
4. If this machine is shared with users running different versions of Windows, click [Additional Drivers].
When the alternate driver is installed, additional windows will open for entering the location of the file containing the printer driver. Follow the instructions in these windows.NOTE
To install the printer driver on another computer, use the [Add Printer Wizard] window for selecting the printer destination → select [Network printer] or [A network printer, or a printer attached to another computer] → select the shared printer for the computer selected in the print server.5. Click [OK].
The shared printer settings are complete.   Back  Previous  Next TOP \- Verification of users for access to FTP servers is done by referencing the local account database Windows 2000 Server/XP Professional/Server 2003 that is used as the FTP server. Therefore, it is not possible to use the account of a domain user registered in Windows 2000 Server/XP Professional/Server 2003 to send data directly from the machine to FTP servers in other domains. - This section describes the procedures for using the default home directory under [Default FTP Site]. To use other settings, enter the FTP site and home directory by referring to the documentation for IIS. - In the following procedures, items displayed on the screen for Windows XP are used; items might differ depending on your operating system.1. Log on to Windows as a member of the group with access rights to the directory to be designated as the FTP site directory.
NOTE
Depending on your environment, the access rights settings for a drive or directory may differ. For details, see the Windows documentation.2. Start IIS.
- For Windows 2000, click [Start] on the Windows taskbar → [Settings] → [Control Panel] → [Administrative Tools] → [Internet Services Manager]. - For Windows XP, click [start] on the Windows taskbar → [Control Panel] → [Performance and Maintenance] → [Administrative Tools] → [Internet Information Services]. - For Windows Server 2003, click [Start] on the Windows taskbar → [Administrative Tools] → [Internet Information Services Manager].3. Enter the FTP site settings.
- For Windows 2000, right-click the [Default FTP Site] icon → click [Properties]. - For Windows XP/Server 2003, double-click the [FTP Sites] icon → right-click the [Default FTP Site] icon → click [Properties].    Back  Previous  Next TOP● For Windows XP/Server 2003:
- Click [start] or [Start] on the Windows taskbar, right-click [My Computer] click [Properties]. - Click the [Computer Name] tab to display the [Computer Name] sheet confirm [Full computer name]. - Click [Cancel] to close the dialog box. 5. Set up the users and passwords for access to the FTP server.
- For Windows 2000, right-click the [My Computer] icon on the desktop → click [Manage] to open the [Computer Management] window. - For Windows XP/Server 2003, click [start] or [Start] on the Windows taskbar, right-click [My Computer] → click [Manage] to open the [Computer Management] window. - Under [System Tools], double-click [Local Users and Groups] → right-click the [Users] folder → click [New User].   Back  Previous  Next TOP \- In the [New User] dialog box, enter the user name in [User name] → enter the password in [Password] → re-enter the password in [Confirm password].  \- Enter a user name not longer than 20 alphanumeric characters, and a password not longer than 24 (14 for Windows 2000) alphanumeric characters. If [User must change password at next logon] is selected, any new users added must change their passwords in order to send data from the machine. (You cannot change the password from the operation panel.) - Confirm the settings → click [Create]. - Close the [Computer Management] window.6. Set a destination address using the operation panel.
- Sample destination setting:
\- Server side settings: [Full computer name]: starfish.organization.company.com Create a directory named "share" in the specified FTP server's directory "\inetpub\ftproot", and then set "share" as the data destination. - The machine's destination settings: The server protocol:1. Specify the NetBIOS settings.
- Right-click the [Network Neighborhood] icon displayed on the desktop → click [Properties]. - In [The following network components are installed], confirm that both [Client for Microsoft Networks] and [File and printer sharing for Microsoft Networks] appear. If these components do not appear, click [Add] to install.  - Click [File and Print Sharing] click [I want to be able to give others access to my files] click [OK]. - To specify the access control method, click the [Access Control] tab → select the level of access control. If you select [User-level access control], specify a domain in which a list of users and groups is saved.      Back  Previous  Next TOP2. Specify the NetBIOS settings.
- For Windows 2000, right-click the [My Network Places] icon on the desktop → click [Properties] to open the [Network and Dial-up Connections] window. - For Windows XP, click [start] on the Windows taskbar → right-click [My Network Places] → click [Properties] to open the [Network Connections] window. - For Windows Server 2003, click [Start] on the Windows taskbar → [Control Panel] → [Network Connections]. - Right-click the [Local Area Connection] icon → click [Properties] to open the [Local Area Connection Properties] dialog box. - Confirm that [Client for Microsoft Networks], [File and Printer Sharing for Microsoft Networks], and [Internet Protocol (TCP/IP)] are all selected. If any of these functions is not selected, select it now.  - Double-click [Internet Protocol (TCP/IP)] to open the [Internet Protocol (TCP/IP) Properties] dialog box → in the [General] sheet, click [Advanced]. - Click the [WINS] tab → in the [WINS] sheet, click [Enable NetBIOS over TCP/IP]. - Click [OK] until all the dialog boxes are closed. - Restart the computer if prompted   Back  Previous  Next TOP4. Set up the users and passwords for access to the shared folder.
- For Windows 2000, right-click the [My Computer] icon on the desktop → click [Manage] to open the [Computer Management] window. - For Windows XP/Server 2003, click [start] or [Start] on the Windows taskbar, right-click [My Computer] → click [Manage] to open the [Computer Management] window. - Under [System Tools], double-click [Local Users and Groups] → right-click the [Users] folder → click [New User].  \- In the [New User] dialog box, enter the user name in [User name] → enter the password in [Password] → re-enter the password in [Confirm password].  - Enter a user name not longer than 20 alphanumeric characters, and a password not longer than 14 alphanumeric characters. If [User must change password at next logon] is selected, any new users added must change their passwords in order to send data from the machine. (You cannot change the password from the operation panel.) - Confirm the settings → click [Create]. - Close the [Computer Management] window.  Back  Previous  Next TOP5. Configure the shared folder.
- Right-click the folder you want to share using Explorer → click [Properties]. - On the [Sharing] sheet, click [Share this folder] enter the share name in [Share name]. 6. Set security.
● To create a shared folder on a FAT or FAT32 format disk (If the [Security] tab is not displayed): \- Click [Permissions] select or add the users or groups to whom you want to give access to the shared folder.  \- Under [Permissions], select both [Change] and [Read] → click [OK].    bar
| Item | Value | | --- | --- | | Advanced Send Features | 1 | | Advanced Copy Features | 2 | | Network | 3 | | Remote UI | 4 | | System Monitor | 5 | | System Manager Settings | 6 | | Reports and Lists | 7 | | Troubleshooting | 8 | | Appendix | 9 | Table of Contents Index 4-1 System Requirements....4-3 Using the Remote UI....4-4 Starting the Remote UI....4-4 Displaying Device Status and Information....4-6 Job Management....4-7 Managing Print Jobs....4-7 Viewing the Print Log....4-8 Viewing the Activity Log....4-9 Managing the Address Book....4-10 Customizing System Settings....4-15 Customizing System Information....4-15| Advanced Send Features | 1 | Specifying Forwarding Settings......4-18 |
| Advanced Copy Features | 2 | Managing the Department/User ID......4-25 |
| Network | 3 | Import/Export Function......4-30 |
| Saving the Address Book......4-30 | ||
| Loading an Address Book......4-31 | ||
| Remote UI | 4 | Saving User Management Data in Files (Export)......4-33 |
| System Monitor | 5 | Loading User Management Data Files(Overwrite/Import)......4-34 |
| System Manager Settings | 6 | Saving Additional Functions Settings in Files (Export)....4-36 |
| Loading Additional Functions Settings Files(Overwrite/Import)......4-37 | ||
| Reports and Lists | 7 | Device Custom Settings......4-39 |
| Troubleshooting | 8 | |
| Appendix | 9 | |
| Table of Contents | ||
| Index |
Displaying Device Status and Information
You can view the current status of the machine and also information about the administrator in charge of the machine, the installation location and various machine settings. 1. Click [Device] → select the item you want to display from the menu that appears under [Device]. | [Status] | Displays the remaining amount of paper in the various paper sources and any error messages. To check details of errors, click [Error Information]. |
| [Information] | Displays information related to the machine, such as the system manager's information and the location of the machine. |
| [Features] | Displays information about the maximum print speed, total and available memory, and number of drawers installed. |
| [Network] | Displays the machine's network settings. When in the Administrator Mode you can specify these settings by clicking [Change]. |
| [Counter Check] | Displays the total number of pages that have been output for printing, copying, and received job printing. |
NOTE
If you are changing the Network Settings, the machine must be restarted to enable the settings. Turn off the main power switch of the machine, wait at least 10 seconds, and turn the power back on.   Back  Previous  Next TOP2. To delete a print job, select the check box next to the job to delete → click ✗.
  NOTE You cannot recover the job once it is deleted.Viewing the Print Log
The Remote UI enables you to view the [Print Log] of print jobs. The [Print Log] shows up to 128 recent print jobs.1. Click [Job Status] → [Print Log] from the menu that appears under [Job Status].
 The [Print Log] appears displaying information about print jobs that have already been processed by the machine.  NOTE If an error occurs during printing, the error code following [NG] appears in [Print Results]. Example: NG (#0816) Cause: The page limit for printing reached the maximum. Remedy: Increase the page limit, or do not set the limit. (See "Managing the Department/User ID," on p. 4-25.)   Back  Previous  Next TOPManaging the Address Book
The Remote UI enables you to view and modify the Address Book data. NOTE
- You can modify the Address Book data only when you are in the Administrator Mode. - You can also access these setting menus from the operation panel of the machine. For details, see Chapter 14, "Machine Settings," in the Basic Operation Guide. 1. Click [Address] → [Favorites Button], [One-touch Speed Dial] or [Coded Dial] from the menu that appears under [Address].  ● To view/change the registered addresses: Click the number or the name to display the current address information.        Back  Previous  Next TOP2. Enter the necessary information → click [OK].
● To protect the Restrict New Addresses:
Click [Restrict Access to Destinations] → specify the necessary fields → click [OK].    Back  Previous  Next TOP● To set the System Manager ID and password:
Click [Register ID and Password] or [Register Password] → specify the necessary fields → click [OK].  When the Department ID Management mode is deactivated, the setting items for the System Manager ID are not displayed.     Back Back |  Previous Previous | [DBCY]Next | TOP | ||||
| Advanced Send Features | 1 | Forwarding Conditions: | [begins with]: | Forwards the document if the Fax Number information begins with the characters entered. | |||
| Advanced Copy Features | 2 | The settings here enable you to specify the forwarding conditions that the received documents must meet in order to be forwarded. The setting items differ depending on the type of the receiving mode: | [ends with]: | Forwards the document if the Fax Number information ends with the characters entered. | |||
| Network | 3 | ||||||
| Remote UI | 4 | Items for Fax: | [contains]: | Forwards the document if the Fax Number information contains the characters entered. | |||
| System Monitor | 5 | [disregarded]: | Disregards the Fax Number information as a forwarding condition. | [does not contain]: | Forwards the document if the Fax Number information does not contain the characters entered. | ||
| System Manager Settings | 6 | [does not exist]: | Forwards the document if the Fax Number information does not exist. | Items for I-Fax: | |||
| Reports and Lists | 7 | [equals]: | Forwards the document if the Fax Number information matches all of the characters entered. | [disregarded]: | Disregards the Destination, From, or Subject information as forwarding conditions. | ||
| Troubleshooting | 8 | [differs from]: | Forwards the document if the Fax Number information differs from the characters entered. | [equals]: | Forwards the document if the From or Subject information matches all of the characters entered. | ||
| Appendix | 9 | ||||||
| Table of Contents | |||||||
| Index | |||||||
 Back Back |  Previous Previous |  Next Next | TOP | ||||
| Advanced Send Features | 1 | [differs from]: | Forwards the document if the Destination, From, or Subject information differs from the characters entered. | Forwarding Destination: | |||
| Advanced Copy Features | 2 | ||||||
| Network | 3 | [begins with]: | Forwards the document if the Destination, From, or Subject information begins with the characters entered. | ||||
| Remote UI | 4 | [ends with]: | Forwards the document if the Destination, From, or Subject information ends with the characters entered. | ||||
| System Monitor | 5 | Forwarding Settings: | |||||
| System Manager Settings | 6 | ||||||
| Reports and Lists | 7 | [contains]: | Forwards the document if the Destination, From, or Subject information contains the characters entered. | ||||
| Troubleshooting | 8 | [does not contain]: | Forwards the document if the Destination, From, or Subject information does not contain the characters entered. | ||||
| Appendix | 9 | ||||||
| Table of Contents | |||||||
| Index | |||||||
 |  |  | TOP | ||||
| Back | Previous | Next | |||||
| Advanced Send Features | 1 | Confirm: | Enter the password again. If the character you enter here is different from the character entered for [Password], an error dialog box appears. | User Type: | Classify the user in two categories [User] (End-User Mode) or [Administrator] (Administrator Mode). | ||
| Advanced Copy Features | 2 | ||||||
| Network | 3 | Department ID: | Enter the Department ID number the user belongs to (seven digits maximum). If the Department ID Management mode is set, be sure to assign the user to a department. Otherwise, the user cannot log on to the machine. | Display Name: | Enter the user name. | ||
| Remote UI | 4 | E-mail Address: | Enter the e-mail address of the user. | ||||
| System Monitor | 5 | Set Password: | Select this check box to set a password for the Department ID. | ● To view/change the registered department/user ID: Click [●] or the user name to display the current department or user information. | |||
| System Manager Settings | 6 | Password: | Enter a number (seven digits maximum). | ||||
| Reports and Lists | 7 | Confirm: | Enter the password again. If the number you enter here is different from the number entered for [Password], an error dialog box appears. | ||||
| Troubleshooting | 8 | ||||||
| Appendix | 9 | ||||||
| Table of Contents | |||||||
| Index | |||||||
2. Click [Start Export].
3. Follow the instructions on the screen to specify the location where you want to save the file.
The file is saved in the specified location.- Loading an Address Book
You can load address books into the machine from saved files.NOTE
- When you register the contents of a new file, the currently registered addresses are overwritten by the new address list. - Do not load the address book when the machine is set for Delayed Sending. - You can register up to 200 addresses in the Address Book. Each address is treated as a separate item. - You cannot import the settings in3. Click [Browse] → select the file to import → click [OK].
  NOTE Do not import any files while the machine is executing other jobs.■ Saving User Management Data in Files (Export)
You can store User Management Data as a file in your computer.  NOTE User type of all exported data is the End-User Mode.1. Click [Add. Func.] → [Import/Export] from the menu that appears under [Add. Func.] → click [User Management Data].
  Back  Previous  Next TOP2. Click [Start Export].
3. Follow the instructions on the screen to specify the location where you want to save the file.
The file is saved in the specified location.- Loading User Management Data Files (Overwrite/Import)
You can load User Management Data into the machine from saved files.  NOTE Imported user data is registered or overwritten as the End-User Mode.1. Click [Add. Func.] → [Import/Export] from the menu that appears under [Add. Func.] → click [User Management Data].
                       bar
| Rank | Item | Value | | ---- | ------------------------ | ----- | | 1 | Advanced Send Features | 1 | | 2 | Advanced Copy Features | 2 | | 3 | Network | 3 | | 4 | Remote UI | 4 | | 5 | System Monitor | 5 | | 6 | System Manager Settings | 6 | | 7 | Reports and Lists | 7 | | 8 | Troubleshooting | 8 | | 9 | Appendix | 9 | | 7-2 | Summary of Reports and Lists | 7-2 | | 7-4 | Printing Reports Automatically | 7-4 | | 7-4 | TX REPORT | 7-4 | | 7-5 | RX REPORT | 7-5 | | 7-6 | ACTIVITY REPORT | 7-6 | Table of Contents | Index | | 7-1 | | |Summary of Reports and Lists
The machine can generate the following reports and lists.| Report/List | Description |
| 1-TOUCH LIST | Lists the recipient addresses registered to all the one-touch keys. |
| 1-TOUCH LIST 2 | Lists the detailed data of [1-TOUCH LIST]. |
| CODED DIAL LIST | Lists the recipient addresses registered to all the coded dial codes. |
| CODED DIAL LIST 2 | Lists the detailed data of [CODED DIAL LIST]. |
| GROUP DIAL LIST | Lists groups registered for group addresses. |
| USER'S DATA LIST | Lists all the current settings and registered sender information. |
| DEPT. INFO LIST | Lists the Department IDs, page totals of scans, prints, and copies that have been processed by each department, and page limits of scans, prints, and copies that can be processed. |
| ACTIVITY REPORT | Shows the last 40 transactions performed by the machine. |
| TX REPORT | Shows the transmission result. Can be set to print automatically. |
| RX REPORT | Shows the reception result. Can be set to print automatically. |
| 8 Troubleshooting | |||
| General Problems | 8-2 | ||
| Paper Feeding Problems | 8-4 | ||
| Sending/Receiving Problems | 8-6 | ||
| Sending Problems | 8-6 | ||
| Receiving Problems | 8-11 | ||
| Copying Problems | 8-17 | ||
| Printing Problems | 8-18 | ||
| Telephone Problems | 8-20 | ||
| Network Problems | 8-22 | ||
| The machine has no power. | The Error indicator comes on. | ||
| Q | Is the power cord plugged in securely? | Q | Does the machine feed paper correctly, or is there paper in the paper drawer or stack bypass? |
| A | Check that the power cord is securely plugged into the machine and into the wall outlet. If the machine is plugged into a power strip, make sure the power strip is plugged in and turned on. | A | Clear the paper jam, or load paper in the paper drawer or stack bypass. (For instructions on clearing paper jam, see Chapter 13, "Troubleshooting," in the Basic Operation Guide. For instructions on loading paper, see "Set Up the Machine," in the Quick Start Guide.) |
| Q | Is the power cord supplying power? | A | If the machine has no paper jam, or paper is loaded in the paper drawer or stack bypass, turn off the machine and wait for more than 10 seconds, then turn it on again. If the problem is fixed, the Alarm indicator will turn off, and the LCD will return to the standby mode. If the Alarm indicator remains flash, unplug the machine, and contact your local authorized Canon dealer. |
| A | Use a different power cord, or test the cord for continuity using a voltmeter. | ||
| Q | Is the main power switch turned on? | ||
| A | Turn on the main power switch. | ||
General Problems
| Advanced Send Features | 1 | |
| Advanced Copy Features | 2 | |
| Network | 3 | |
| Remote UI | 4 | |
| System Monitor | 5 | |
| System Manager Settings | 6 | |
| Reports and Lists | 7 | |
| Troubleshooting | 8 | |
| Appendix | 9 | |
| Table of Contents | ||
| Index |
Paper Feeding Problems
 | Back | Previous |  Next Next | TOP | |||||
| Advanced Send Features | 1 | Q | Is your machine in the fax mode? | Q | Is the machine in the Sleep mode? | |||
| Advanced Copy Features | 2 | A | For the iR1022iF, press [SEND], confirm thatis displayed, then press [OK] to show thefax standby display.For the iR1022F, press [FAX] to show the faxstandby display. | A | The machine does not scan documents if it is in theSleep mode. To take the machine out of the Sleepmode, press [ON/OFF] on the operation panel. | |||
| Network | 3 | |||||||
| Remote UI | 4 | Q | Is the document loaded correctly? | Q | Is the recipient's machine out of paper? | |||
| System Monitor | 5 | A | Make sure the document is correctly loaded. (SeeChapter 2, "Document Handling," in the BasicOperation Guide.) | A | Ask the recipient to make sure paper is loaded inthe machine. | |||
| System Manager Settings | 6 | A | Make sure the left and front covers are fully closed. | Q | Are there other documents being sent frommemory? | |||
| Reports and Lists | 7 | Q | Is the one-touch key or coded dial code youentered registered correctly? | A | Allow time for the documents to finish sending. | |||
| Troubleshooting | 8 | A | Check that the Address Book settings areregistered correctly. (See Chapter 4, "SendingDocuments," in the Basic Operation Guide.) | Q | Has an error occurred during transmission? | |||
| Appendix | 9 | Q | Did you dial the correct number? | A | Check the LCD for an error message. (SeeChapter 13, "Troubleshooting," in the BasicOperation Guide.) | |||
| Table of Contents | A | Check that you have the correct number. | A | Print an Activity Report and check for an error.(See "ACTIVITY REPORT," on p. 7-6.) | ||||
| Index | ||||||||
| Advanced Send Features | 1 | Q | Is the telephone cable connected properly? | Q | Is BUSY/NO SIGNAL shown on the ERROR TX REPORT? | |||
| Advanced Copy Features | 2 | A | Make sure the cable is connected properly. (See "Set Up the Machine," in the Quick Start Guide.) | A | The fax number you dialed is busy. Try sending the document later. | |||
| Network | 3 | Q | Is the telephone line working properly? | A | The recipient's machine is not working. Ask the recipient to check the machine. | |||
| Remote UI | 4 | A | Make sure there is a dial tone when you press [Hook], or when you lift the optional handset or the handset of any external telephone connected to the machine. If there is no dial tone, contact your local telephone company. | Q | Did the recipient's machine answer within 35 seconds (after all automatic redialing attempts)? | |||
| System Monitor | 5 | Q | Is the recipient's machine a G3 fax machine? | A | Ask the recipient to check the machine. For an overseas call, add pauses to the registered number. (See "Dialing an Overseas Number (With Pauses)," on p. 1-13.) | |||
| System Manager Settings | 6 | A | Make sure the recipient's machine is compatible with your machine. | |||||
| Reports and Lists | 7 | Q | Is the Processing/Data indicator lit? | |||||
| Troubleshooting | 8 | A | The external phone is busy. Please wait until the external phone becomes free. | |||||
| Appendix | 9 | |||||||
| Table of Contents | ||||||||
| Index | ||||||||
| Advanced Send Features | 1 | The documents you sent are too light. | Cannot send using Error Correction Mode (ECM). | ||
| Advanced Copy Features | 2 | Q | Is the density set to the<-LT>side? | Q | Does the recipient's machine support ECM? |
| Network | 3 | A | Set the density to the<DK+>side. | A | If the recipient's machine does not support ECM, the document is sent in normal mode without error checking. |
| Remote UI | 4 | Q | Are the scanning components of the machine clean? | ||
| System Monitor | 5 | A | Make sure the scanning components are clean. | Errors occur frequently while sending. | |
| System Manager Settings | 6 | Sending of documents is too slow. | Q | Are the telephone lines in poor condition, or do you have a bad connection? | |
| Reports and Lists | 7 | Q | Is the resolution set to,SUPER FINE>,or<ULTRA FINE>? | A | Check if there is a device nearby that interferes with signal transmission (e.g., microwave oven). |
| Troubleshooting | 8 | A | Setting the resolution to<STANDARD>reduces the sending time. | A | Lower the transmission speed. (See Chapter 14, "Machine Settings," in the Basic Operation Guide.) |
| Appendix | 9 | Q | Is Error Correction Mode (ECM) set to? | ||
| Table of Contents | A | Because ECM corrects errors during a transmission, any problems on the line can mean that the transmission will take extra time. Set ECM to <OFF>. | |||
| Index | |||||
| Advanced Send Features | 1 | Receiving Problems | |||||||
| Advanced Copy Features | 2 | The machine does not receive documents (e-mail, I-fax, or file server). | |||||||
| Network | 3 | Q | Are network settings specified? | ||||||
| Remote UI | 4 | A | Documents cannot be received if the appropriate network settings are not specified. Confirm this with your System Manager. | ||||||
| System Monitor | 5 | Cannot receive a fax automatically. | |||||||
| System Manager Settings | 6 | Q | Is the machine set to receive automatically? | ||||||
| Reports and Lists | 7 | A | For the machine to receive faxes automatically, the receive mode must be set to <FaxTel>, <FaxOnly>, or <AnsMode>. If you have set <AnsMode>, confirm that an answering machine is connected to the machine and that it is turned on with an outgoing message properly recorded. (See "Setting Receive Mode," on p. 1-15.) | ||||||
| Troubleshooting | 8 | ||||||||
| Appendix | 9 | ||||||||
| Table of Contents | |||||||||
| Index | |||||||||
 Back Back | [4282]Previous | Next | TOP | |||||
| Advanced Send Features | 1 | No automatic switching between telephone and fax calls. | Q | Has an error occurred during reception? | ||||
| Advanced Copy Features | 2 | Q | Is the machine set to switch automatically between telephone and fax calls? | A | Check the LCD for an error message. (See Chapter 13, "Troubleshooting," in the Basic Operation Guide.) | |||
| Network | 3 | A | For the machine to switch between fax and telephone calls automatically, the receive mode must be set to <FaxTel> or <AnsMode>. If you have set <AnsMode>, confirm that an answering machine is connected to the machine and that it is turned on with an outgoing message properly recorded. (See "Setting Receive Mode," on p. 1-15.) | A | Print an Activity Report and check for an error. (See "ACTIVITY REPORT," on p. 7-6.) | |||
| Remote UI | 4 | Q | Is paper loaded in the machine? | |||||
| System Monitor | 5 | A | Make sure paper is loaded in the machine. (See "Set Up the Machine," in the Quick Start Guide.) | |||||
| System Manager Settings | 6 | Q | Are documents stored in memory, leaving little or no memory available? | Q | Can the sender's machine send the CNG signal, which tells your machine that the incoming call is a fax call? | |||
| Reports and Lists | 7 | A | Print, send, or delete any documents stored in memory. | A | Some machines cannot send this signal. In such cases, receive the fax manually. | |||
| Troubleshooting | 8 | |||||||
| Appendix | 9 | |||||||
| Table of Contents | ||||||||
| Index | ||||||||
| Cannot receive a document manually. | Print quality is poor. | |||
| Advanced Send Features 1 | Q | Is the machine set to receive manually? | Q | Is the toner low? |
| Advanced Copy Features 2 | A | For the machine to receive faxes manually, the receive mode must be set to <Manual>. (See "Setting Receive Mode," on p. 1-15.) | A | Replace the toner cartridge. (See Chapter 12, "Maintenance," in the Basic Operation Guide.) |
| Network 3 | Q | Is the correct type of paper loaded in the machine? | ||
| Remote UI 4 | A | If you set <MANUAL/AUTO> to <ON> in <RX SETTINGS> located in <FAX SETTINGS> in <TX/RX SETTINGS>, the machine will receive faxes automatically even when the receive mode is set to <Manual>. (See Chapter 14, "Machine Settings," in the Basic Operation Guide.) | A | Make sure you load paper that meets the requirements for use. (See Chapter 3, "Print Media," in the Basic Operation Guide.) |
| System Monitor 5 | Q | Is the sender's machine functioning properly? | ||
| System Manager Settings 6 | Q | Have you disconnected the call by pressing [Start] or dialing the remote reception ID after hanging up? | A | Ask the sender to check that the scanning components of the machine are clean. |
| Reports and Lists 7 | A | Always press [Start] or dial the remote reception ID before hanging up. Otherwise you will disconnect the call. | Q | Is the machine in the toner saver mode? |
| Troubleshooting 8 | A | Set <TONER SAVER MODE> to <OFF> in <COMMON SETTINGS>. (See Chapter 14, "Machine Settings," in the Basic Operation Guide.) | ||
| Appendix 9 | ||||
| Table of Contents | ||||
| Index | ||||
| Advanced Send Features | 1 | Faxes do not print. | Q | Is the correct size of paper loaded in the machine? | |||
| Advanced Copy Features | 2 | Q | Have you removed the plastic seal from the toner cartridge? | A | Make sure you load paper that meets the requirements for use. (See Chapter 3, "Print Media," in the Basic Operation Guide.) | ||
| Network | 3 | A | Make sure you remove the seal from the cartridge. (See "Set Up the Machine," in the Quick Start Guide.) | A | Change <REG. PAPER SIZE> in <COMMON SETTINGS>. (See Chapter 14, "Machine Settings," in the Basic Operation Guide.) | ||
| Remote UI | 4 | Q | Is the toner cartridge installed properly? | ||||
| System Monitor | 5 | A | Make sure the toner cartridge is installed properly. (See "Set Up the Machine," in the Quick Start Guide.) | Received faxes print blotched or unevenly. | |||
| System Manager Settings | 6 | Q | Is the cartridge out of toner? | Q | Are the telephone lines in poor condition, or do you have a bad connection? | ||
| Reports and Lists | 7 | A | Replace the toner cartridge. (See Chapter 12, "Maintenance," in the Basic Operation Guide.) | A | Error Correction Mode (ECM) should eliminate such problems. However, if the telephone lines are in poor condition, you may have to try again. | ||
| Troubleshooting | 8 | ||||||
| Appendix | 9 | ||||||
| Table of Contents | |||||||
| Index | |||||||
| Advanced Send Features | 1 | Q | Is the sender's machine functioning properly? | 8-15 | |||||||||||||||||||||||||||||||||||||||||||||||||||||||||||||||||||||||||||||||||||||||||||||||||||
| Advanced Copy Features | 2 | A | Ask the sender to check that the scanning components of the machine are clean. | ||||||||||||||||||||||||||||||||||||||||||||||||||||||||||||||||||||||||||||||||||||||||||||||||||||
| Network | 3 | Q | Is the toner low? | ||||||||||||||||||||||||||||||||||||||||||||||||||||||||||||||||||||||||||||||||||||||||||||||||||||
| Remote UI | 4 | A | Replace the toner cartridge. (See Chapter 12, "Maintenance," in the Basic Operation Guide.) | ||||||||||||||||||||||||||||||||||||||||||||||||||||||||||||||||||||||||||||||||||||||||||||||||||||
| System Monitor | 5 | Cannot receive using Error Correction Mode (ECM). | |||||||||||||||||||||||||||||||||||||||||||||||||||||||||||||||||||||||||||||||||||||||||||||||||||||
| System Manager Settings | 6 | Q | Does the sender's machine support ECM? | ||||||||||||||||||||||||||||||||||||||||||||||||||||||||||||||||||||||||||||||||||||||||||||||||||||
| A | If the sender's machine does not support ECM, the document is received in normal mode without error checking. | ||||||||||||||||||||||||||||||||||||||||||||||||||||||||||||||||||||||||||||||||||||||||||||||||||||||
| Reports and Lists | 7 | ||||||||||||||||||||||||||||||||||||||||||||||||||||||||||||||||||||||||||||||||||||||||||||||||||||||
| Troubleshooting | 8 | ||||||||||||||||||||||||||||||||||||||||||||||||||||||||||||||||||||||||||||||||||||||||||||||||||||||
| Appendix | 9 | ||||||||||||||||||||||||||||||||||||||||||||||||||||||||||||||||||||||||||||||||||||||||||||||||||||||
| Table of Contents | |||||||||||||||||||||||||||||||||||||||||||||||||||||||||||||||||||||||||||||||||||||||||||||||||||||||
| Index | |||||||||||||||||||||||||||||||||||||||||||||||||||||||||||||||||||||||||||||||||||||||||||||||||||||||
| Advanced Send Features | 1 | |
| Advanced Copy Features | 2 | |
| Network | 3 | |
| Remote UI | 4 | |
| System Monitor | 5 | |
| System Manager Settings | 6 | |
| Reports and Lists | 7 | |
| Troubleshooting | 8 | |
| Appendix | 9 | |
| Table of Contents | ||
| Index |
| Advanced Send Features | 1 | Network Problems | |||
| Advanced Copy Features | 2 | Unable to print from a TCP/IP network. | Q | Is the computer that is printing properly set up? | |
| Network | 3 | Q | Are the machine and cable properly connected? | A | Make sure the proper printer driver is installed.(See "Installing/Uninstalling Software," in the Quick Start Guide.) |
| Remote UI | 4 | A | Check that the machine is connected to the network using the proper cable, then restart the machine. (See "Set the Machine for Network Usage," in the Quick Start Guide.) | A | Make sure the correct machine is set as the output destination for the computer that is printing in [Printers and Faxes] or Print Manager. |
| System Monitor | 5 | Q | Is the TCP/IP network properly set up? | Q | Is the name of the file being printed too long? |
| System Manager Settings | 6 | A | Make sure the IP addresses are properly set up. If the IP addresses are set using DHCP, BOOTP, or RARP, make sure they are operating. | A | Rename the file with a shorter name. Normally LPR (or the Microsoft TCP/IP Printer, if you are using Windows 2000/XP) sends jobs either under the name of the application software used for printing, or the file name. However, a job name longer than 255 bytes cannot be sent to the machine. |
| Reports and Lists | 7 | ||||
| Troubleshooting | 8 | ||||
| Appendix | 9 | ||||
| Table of Contents | |||||
| Index | |||||
Network Problems
| Advanced Send Features | 1 | The printer port name is not displayed in [Print to the following port(s)]. | The machine automatically connects to a destination other than the intended destination via its dial-up access (when a dial-up router is connected to your network). | ||
| Advanced Copy Features | 2 | Q | Are the machine and cable properly connected? | Q | Does the dial-up router send packets via broadcast? |
| Network | 3 | A | Check that the machine is connected to the network using the proper cable, then restart the machine. (See "Set the Machine for Network Usage," in the Quick Start Guide.) | A | If the dial-up router does not have to send packets via broadcast, change the router settings to ensure that it sends packets via a method other than broadcast. If dial-up router has to send packets via broadcast, check that the settings are correct. |
| Remote UI | 4 | Q | Is the computer that is printing properly set up? | Q | Dose the file or mail server's host name or IP address set on the machine exist on the network? |
| System Monitor | 5 | A | Make sure the proper printer driver is installed. (See "Installing/Uninstalling Software," in the Quick Start Guide.) | A | Check that the file or mail server's host name or IP address set on the machine is correct. |
| System Manager Settings | 6 | A | Make sure the correct machine is set as the output destination for the computer that is printing in [Printers and Faxes] or [Printers]. | ||
| Reports and Lists | 7 | ||||
| Troubleshooting | 8 | ||||
| Appendix | 9 | ||||
| Table of Contents | |||||
| Index | |||||
| (ZGST)Back | Previous |  Next Next | TOP | ||||
| Advanced Send Features | 1 | Q | Does the SNMP community name match? | ||||
| Advanced Copy Features | 2 | A | If you use an SNMP community name different from the one stored in the machine to access the machine from a utility, the utility will not detect the machine. In this case, check the SNMP community name. (See "Communication Environment Setup," on p. 3-10.) | ftp> cd/export/share *Move to data destination directory250 CWD command successful ftp> bin *Set data transfer type (binary)200 Type set to I.ftp> put sample.tif *Set transfer file name for verificationftp> by *Cut off server connection221 GoodbyeIf the above are confirmed and file sharing still does not operate normally, consult the network administrator for the environment you are using. | |||
| Network | 3 | ||||||
| Remote UI | 4 | Unable to send data/share files (FTP). | |||||
| System Monitor | 5 | Q | Is the FTP server set correctly? | ||||
| System Manager Settings | 6 | A | Perform the following to check the server status. (For Windows, perform these from the MS-DOS prompt.)- Example using UNIX, where the FTP server has the IP address: 192.168.1.195U:>ftp 192.168.1.195 *Connect to server Connected to 192.168.1.195.220 canmfs FTP server (UNIX(r) System V Release 4.0) ready.User (192.168.1.195:(none)): user_name*User login331 Password required for user_name.Password: *Enter password230 User user_name logged in. | Q | Does the machine's address <LOGIN NAME> setting contains one or more spaces after the user name? | ||
| Reports and Lists | 7 | A | Ensure that the machine's address <LOGIN NAME> setting does not contain spaces after the user name. | ||||
| Troubleshooting | 8 | ||||||
| Appendix | 9 | ||||||
| Table of Contents | |||||||
| Index | |||||||
| Back | Previous | Next | TOP | ||||
| Advanced Send Features | 1 | Q | Was the machine turned OFF while sending data to the FTP server? And when the machine was turned back ON, does it attempted to resend the data? (If a Windows 2000/XP/Server 2003 FTP server is being used.) | Unable to send data/share files (Windows File Sharing). | |||
| Advanced Copy Features | 2 | Q | Are File sharing settings for the shared folder correct? | ||||
| Network | 3 | A | If power to the machine is turned OFF while data is being sent to the FTP server, the FTP server may hold the data in a writing-in-progress state. Therefore, this data cannot be overwritten even when the machine reconnects and sends the same data again. Stop the FTP server temporarily and delete the held data, so it can be sent again. | A | Check the following settings: - On the computer you are using, go into Windows Explorer → double-click [Entire Network] → check that the computer you want to share is listed there. You can also check for the computer as follows: On the [Start] menu, point to [Find] → [Computer] → enter the name of the computer you want to share → check that the computer is on the network. | ||
| Remote UI | 4 | ||||||
| System Monitor | 5 | ||||||
| System Manager Settings | 6 | Q | Is an error message or code displayed on the LCD of the machine? | - If the computer you want to share is listed, double-click its icon to see whether the shared name of the folder you want to share is listed. | |||
| Reports and Lists | 7 | A | After confirming the error message, see Chapter 13, "Troubleshooting," in the Basic Operation Guide and perform the necessary operations according to the error message displayed. | - If the shared name does not appear, see "Setting Up a Computer as a File Server," on p. 3-41, and then check the shared folder settings. | |||
| Troubleshooting | 8 | Q | Is an error message or code displayed on the LCD of the machine? | ||||
| Appendix | 9 | A | After confirming the error message, see Chapter 13, "Troubleshooting," in the Basic Operation Guide and perform the necessary operations according to the error message displayed. | ||||
| Table of Contents | |||||||
| Index | |||||||
B
bps
Bits per second. Refers to the speed with which a fax machine sends and receives data.BOOTP
BOOTStrap Protocol. A protocol that enables a client machine to automatically obtain network setup information from a server over a TCP/IP network. BOOTP enables a client to automatically locate such information as the host name, domain name, and IP address, so that it is not necessary to create these items manually.Broadcasting
Transmitting documents to more than one location (through the machine's memory).Buffer size
The size of a data area, or buffer, shared by devices or programs working at different speeds or with different priorities. The buffer is designed to prevent one device or process from being held up by another. For this to be possible, the buffer must be set up correctly.C
CNG
Calling Tone. This is a signal sent by fax machines to identify the call as an incoming document. When the receiving fax detects this signal, it automatically starts to receive the fax transmission. The majority of fax machines in use today can send and detect CNG signals.Coded Dial Codes
A method to specify a destination registered in Address Book. Press [Coded Dial] and a three-digit code using the numeric keys.Community Name
An identification keyword for SNMP (Simple Network Management Protocol).Cookie
A file left on a user's computer when the user visits a web site. A cookie allows the web site to recognize the user on subsequent visits. Cookies are generally used to enable a user to automatically sign on to certain web sites and to customize the features offered by such sites.Cursor
The underline symbol you see on the LCD when you register numbers and names in the machine.  Back  Previous  Next TOPD
Delayed sending
The ability to send a document at a preset time in the future. You do not have to be in your office to use delayed sending to one or more destinations.DHCP
Dynamic Host Configuration Protocol. A protocol that automatically specifies the network settings of a client on a TCP/IP network. Many of the settings required to set up TCP/IP, which is the standard protocol of the Internet, can be made automatically.DNS
Domain Name System. The system that associates the IP address assigned to a computer with the domain name.DNS server
Domain Name System server. A server which maintains a database that translates the domain names of Internet servers, such as www.w3.org, into Internet Protocol (IP) addresses, such as "18.176.0.26". This enables clients to connect to a server with a host name rather than a numeric IP address.Document
The sheet of paper containing the data that you send to, or receive from a machine.Domain
A management concept that divides large scale networks into groups for identifying individual computers and users. The internet is managed by classifying domains according to geographical location or type (business, organization, educational institution, etc.).dpi
Dots per inch. A machine of measurement for indicating a machine's resolution.E
ECM
Error Correction Mode. The ability of your machine to reduce system and line errors when sending or receiving from another fax with ECM capability. ECM is most effective in areas where the telephone lines are in poor condition or there is frequent interference on the line.Ethernet
An industry-standard local area network (LAN) system for connecting together multiple computers. Data is sent from one computer to another by breaking it into packets, and a packet reaches its destination smoothly without any collision with other packets.  Back  Previous  Next TOPExtension
A telephone connected to the machine that is used in place of the handset. You can use the extension telephone to activate incoming reception of documents manually.F
Favorites Buttons
A method to specify a destination registered in Address Book. You can register a destination together with any possible combination of send settings in a favorites button.FAX/TEL switching
This option allows you to set the machine to automatically detect whether a call is from a fax or telephone. If the call is from another fax, the transmission is automatically received. If the call is from a telephone, the machine rings to let you know, so you can pick up the handset. With this feature, one telephone line can be shared by both the telephone and the fax.File formats
File formats are used to save image data (e.g. JPEG, PDF, TIFF).File server
A personal computer or workstation to which two or more users on client personal computers can gain access via a local area network (LAN) in order to share and use its hard disk drive.FINE
The resolution setting for documents with very small characters and lines.Forwarding
The process of sending a received fax/l-fax document to another destination. For example, if your machine at work receives a document, you can have the machine forward the document to a machine at your home.FQDN
Fully Qualified Domain Name. A full domain name, consisting of its local host name and its domain name. An FQDN is sufficient to ascertain a specific Internet address for any host on the Internet. This (name resolution) process uses DNS (Domain Name System).FTP
File Transfer Protocol. A client-server protocol enabling a user to transfer files on one computer to and from another computer over a TCP/IP network. The File Transfer Protocol also governs the client program with which the user transfers files.  Back  Previous  Next TOPG
G3, Group 3 fax machine
Defined by CCITT/ITU-T. Uses encoding schemes to transmit image data while reducing the amount of data that needs to be transmitted, thus reducing transmission time. G3 fax machines can transmit one page in less than one minute. Encoding schemes for G3 fax machines are Modified Huffman (MH), Modified READ (MR), Modified Modified READ (MMR), and Joint Bi-level Image expert Group (JBIG).Gateway Address
The default address of a network or Web site. It provides a single domain name and point of entry to the site.Group Addresses
A method of specifying destinations that enables you to specify multiple destinations registered in Address Book as a group. This means that you can press just a single one-touch key or coded dial code to specify destinations when sending the same document to many destinations.H
HP-GL/2
A graphics language that allows computer applications to draw graphic images using printers. Images in HP-GL/2 are represented as vector graphics. Vector objects describe an image in terms of geometric shapes, such as lines and polygons, and fills. HP-GL/2 is supported by your Canon machine.HTTP
Hypertext Transfer Protocol. The client-server TCP/IP protocol used on the World Wide Web for the transfer of HTML (Hypertext Markup Language) documents across the Internet.1
I-fax
I-fax (Internet fax) enables you to send and receive a scanned original converted to TIFF (Tagged Image File Format) or PDF (Portable Document Format) image data as an e-mail attachment to/from any I-fax compatible facsimile or personal computer with Internet e-mail functionality.Interface
The connection between two devices that makes it possible for them to communicate with each other. The machine features a USB interface, which makes it compatible with IBM and similar personal computers.Interface cable
The cable used to create the interface between a printer and a computer.Interface port
The machine comes with one USB port, located on the back of the machine. You attach the cable that connects your computer and machine to this port.  Back  Previous  Next TOPInternet Protocol (IP)
The underlying set of networking rules that describes how data is transmitted across the Internet. Internet Protocol allows data from one computer to be split into packets to be sent to another computer with a specific IP address.IP address
Internet Protocol address. A 32-bit numeric address used by IP (internet protocol) to specify a computer on the Internet. The IP address is usually written as four numbers separated by periods. An example is 128.121.4.5.ITU-T
A committee created to set international standards for telecommunications.J
JBIG
Joint Bi-level Image Experts Group. An experts group file specification that defines a standard for compressing (reducing the size of) image files without any loss in image information. Files containing photographic images in Web pages are generally compressed so they can be transferred across the Internet more quickly. JPEG, the format currently used, causes some loss in image data after compression, and so reduces image quality. JBIG compression overcomes this shortcoming.Job Recall
A method to specify the same destination you have specified before. You can recall the destinations, scan settings, and send settings which have been set, and then send your documents.JPEG
Joint Photographic Experts Group. An experts group file specification that defines a standard for compressing (reducing the size of) photographic and photorealistic image files. The image compression method used involves some loss of information, and so reduces image quality. Files containing photographic images in Web pages are generally compressed by using the JPEG format so they can be transferred across the Internet more quickly.L
LAN
Local Area Network. It is a network system formed by linking a server, workstations, and computers, which are all located in the same building or some other relatively limited area.Log in
Entering a password as a means of user authentication to start a computer session or access to a service.LPD
Line Printer Daemon. A daemon is a program that runs, without human intervention, to accomplish a given task. The Line Printer Daemon controls the flow of print jobs to a printer.  Back  Previous  Next TOPLPR
Line Printer Remote. A UNIX command used to print a file via a TCP/IP network.M
MAC address
Media Access Control address. The hardware address of the network adapter of a computer connected to a local area network.Manual receiving
A method of receiving faxes in which you answer all incoming calls using the optional handset or handset of the external telephone. If you hear a slow beep it indicates an incoming fax transmission from another machine. Just press [Start] to receive the incoming fax.Manual redialing
When you use regular dialing, you can redial a number manually simply by pressing [Redial/Pause] on the operation panel. The last number called is the number redialed.Modem
A device that converts (MODulates) digital data for transmission over telephone lines. At the receiving end, this device converts the modulated data (DEModulates) to digital format that the computer understands.N
NetBIOS
Network Basic Input Output System. A program that enables applications on different computers to communicate within a LAN (Local Area Network). NetBIOS is used in Ethernet, Token Ring, and Windows NT/2000/XP networks.NetSpot
Network management software that enables the setup and management of multiple printers connected to a network from one central location. A network manager can monitor conditions of network printers, ascertain online/offline status, error status, the amount of paper in paper drawers, verify information on mounted fonts, and other readings. All the functions that are conventionally conducted through the operation panel of the respective machines can be performed from one location.NetSpot Console
A Web browser based version of NetSpot. It can be used to browse and manage network devices.Numeric keys
The round, numbered keys on the operation panel marked the same as a standard telephone keypad. Press them to perform regular dialing or to specify the e-mail or l-fax addresses not stored in Address Book. You also use the numeric keys to enter characters and numbers during registration, and for entering coded dial codes.  Back  Previous  Next TOP0
One-Touch keys
The numbered keys on the operation panel that may be registered as single or a group of destinations. Once a destination or group of destinations is registered, you press one key to specify the entire number/address or group. They are also used as favorites buttons.OS/2
A family of multitasking operating systems developed by IBM for Intel x86-based computers. OS/2 provides a graphic user interface similar to Windows, as well as a command line interface similar to DOS. Add-ons to OS/2 enable it to run DOS and Windows applications.P
Paper feed
Refers to guiding a sheet of paper into the machine's paper path.Paper feeder
The device in the machine that feeds recording media into the machine for printing copied or sent documents.PASV mode
Passive FTP mode. An alternative mode for initiating FTP connections. In this mode, data transfer is initiated by the FTP client, rather than the FTP server. As corporate firewalls generally reject external data requests from FTP servers, the PASV mode may allow FTP to be used with NAT (Network Address Translation) and with clients behind firewalls, depending on the environment. The PASV mode also ensures that all data flow requests come from inside the network where the client is located.Pause
A timing entry required for registering certain long distance numbers and for dialing out through some telephone systems or switchboards. Pressing [Recall/Pause]/[Redia/Pause] enters a pause between digits of a telephone number.PHOTO
The document setting you use for sending or copying documents with intermediate tones, such as photographs.   Back  Previous  Next TOPRegistering
A process by which you place destination's information (such as the name, fax number, e-mail/l-fax addresses, etc.) in the machine's memory, so that you save time specifying destinations you send documents frequently.Regular dialing
Pressing the individual numeric keys to dial a fax or telephone number.Remote reception ID
The two-digit code that enables you to manually activate fax reception using an external telephone.Remote reception
Activating fax reception by answering an external telephone that is not located near the machine. You need to dial a remote receiving ID number to start remote reception.Remote UI
Remote User Interface (UI) allows you to remotely perform machine functions from a computer connected to the network using web browser software. Many functions that are done physically at the Canon machine's operation panel can be done via software at a networked computer using a web browser, such as Microsoft Internet Explorer.Report
A document printed by the machine and containing information about the documents it has sent or received.Resolution
The density of dots for any given output device. Expressed in terms of dots per inch (dpi). Low resolution causes font characters and graphics to have a jagged appearance. Higher resolution means smoother curves and angles as well as a better match to traditional typeface designs. Resolution values are represented by horizontal data and vertical data, for example, 600 x 600 dpi.RIP (Raster Image Processor)
The hardware and/or software functions of a printer that convert vector graphic descriptions from a computer into raster graphic images that can be printed.Rotary pulse
A telephone dialing system where a dial is rotated to send pulses to the telephone switching system. In pulse dialing, you hear clicks. In touch-tone dialing, the most common dialing system, you hear tones. Rotary pulse dialing requires certain setting adjustments.RX
See Receiving.  Back  Previous  Next TOPS
Scope ID
The Scope ID is a character string value that is appended to the NetBIOS name, and is used for all NetBIOS over TCP/IP communications. It provides a way for a computer to communicate only with others sharing the same Scope ID.Sending
Sending documents is also defined as TX or Transmit. The machine can scan and send documents via fax, e-mail, or I-fax, or send them to a file server.Sending speed
The rate at which faxes are transmitted through the phone line. See also bps (bits per seconds).SMB
Server Message Block. A protocol that provides file and printer sharing over a network for Windows computers.SMTP
Simple Mail Transfer Protocol. A TCP/IP protocol for sending messages from one computer to another on a network.SNMP
Simple Network Management Protocol. The network management protocol of TCP/IP. In SNMP, agents, which can be hardware as well as software, monitor the activity of the various devices on the network and report to the network console workstation.Source Routing
Normally, a host has no control over the route taken by a packet it sends. Source routing is a technique whereby the sender of a packet can specify the route that a packet should take through the network to its destination.Spool
Simultaneous Peripheral Operations On-Line. Spooling means putting jobs in a buffer, which is a special area in memory or on a disk. Because devices access data at different rates, the buffer provides a waiting station where the data can wait until the device for which it is meant is ready to access it.Standby
The mode in which the machine is on and ready to use.Subnet
A portion of a network, which may be a physically independent network segment, that shares a network address with other portions of the network, and is distinguished by a subnet number. For example, all devices with IP addresses that start with 100.100.100 would be part of the same subnet.Subnet Mask
SUBNETwork mask. The method used to determine which subgroup, or subnet, an IP address belongs to on TCP/IP networks, all devices whose IP addresses have the same prefix would belong to the same subnet. Dividing a network into subnets is useful for both security and performance reasons.  Back  Previous  Next TOPSwitching hub
A network connection box to which a number of computers can be connected. The switching hub forwards a data packet from the network to the appropriate computer according to the packet's address. Conventional hubs simply send every packet to every connected computer. Since a switching hub forwards packets only to their intended recipients, it provides greater efficiency.T
TCP/IP
Acronym for Transmission Control Protocol/Internet Protocol. The protocol used to connect to the Internet and to wide-area networks.TIFF
Tagged Image File Format. A file format that saves images as high-density bitmaps, and is suitable for large amounts of image data. The information field (tag) at the start of each image data record indicates the type of data represented.Tone
A key that allows you to temporarily switch to touch-tone from pulse dialing. In some countries, on-line data services may require that you use tone dialing.Tone/pulse setting
The ability to set the machine to match the telephone dialing system your telephone line uses: touch-tone or rotary pulse.Toner
A black, resin coated powder contained in the toner cartridge. The machine applies the toner to the surface of the photosensitive drum inside the machine via an electrophotographic mechanism.Toner saver
The feature that extends cartridge life by reducing toner consumption rate at a slight decrease in print quality.Transmit
See Sending.TX
See Sending.U
URL
Uniform Resource Locator. A standard way of specifying the location of an object, usually a web page, on the Internet. The URL for a web page would look something like this: "http://www.w3.org/default.html". Here, "http:" indicates that a web page is being accessed, "http://www.w3.org" is the address of the server containing the web page, and "default.html" is the file name under which the web page is stored on the server.  | Back | Previous | Next | TOP | ||
| Advanced Send Features | 1 | H | N | Received image reduction 1-21 | |
| Advanced Copy Features | 2 | Handset 1-12, 1-16 | NetBIOS network 3-37 | [Redial/Pause] key 1-13 | |
| Help button 4-5 | Network environment 3-7 | Redialing Manually 1-11 | |||
| Network | 3 | I | O | Remote reception 1-19 | |
| Remote UI | 4 | Import/Export function | One-touch keys 1-23 | Remote reception ID 1-20 | |
| System Monitor | 5 | About the Import/Export function 4-30 Exporting the Additional Functions settings 4-36 Exporting the Address Book 4-30 Exporting the User Management Data 4-33 Importing the Additional Functions settings 4-37 Importing the Address Book 4-31 Importing the User Management Data 4-34 Interface settings 3-8 | Overseas number 1-13 | Remote UI 9-11 Reports and lists 7-1 Reserved copy 2-3 RX REPORT Printing automatically 7-5 | |
| System Manager Settings | 6 | J | Page limit Changing 6-6 Registering 6-4 Page top button 4-5 Password Changing 6-6 Erasing 6-8 Registering 6-4 Printing counter information 6-10 Pulse dialing 1-12 R [R] key Dialing 1-12 Registering 1-11 [Recall] key 1-6 [Recall/Pause] key 1-6, 1-13 Receive mode AnsMode 1-15 FaxOnly 1-15 FaxTel 1-16 Manual 1-16 S Send settings 1-9 Starting Remote UI 4-4 System Manager ID 6-2 System Manager settings 6-2 System monitor 5-2 System Password 6-2 System requirements Network 3-4 Remote UI 4-3 System settings Customizing 4-15 | ||
| Reports and Lists | 7 | ||||
| Troubleshooting | 8 | Job management About the job management 4-7 Print jobs 4-7 | |||
| Appendix | 9 | Job recall 1-6 | |||
| Job Status button 4-5 | |||||
| M | |||||
| Machine | |||||
| Checking status 4-6 | |||||
| Customizing settings 4-39 | |||||
| Machine management 3-52 | |||||
| Manual 1-16 | |||||
| Memory reception 1-17 | |||||
| Table of Contents Index | |||||