HMP7000B - Multimedijski player PHILIPS - Besplatni korisnički priručnik
Pronađite besplatno priručnik za uređaj HMP7000B PHILIPS u PDF formatu.

Pitanja korisnika o HMP7000B PHILIPS
0 pitanje o ovom uređaju. Odgovorite na one koje znate ili postavite svoje.
Postavi novo pitanje o ovom uređaju
Preuzmite upute za vaš Multimedijski player u PDF formatu besplatno! Pronađite svoj priručnik HMP7000B - PHILIPS i uzmite svoju elektroničku napravu natrag u ruke. Na ovoj stranici objavljeni su svi dokumenti potrebni za korištenje vaše naprave. HMP7000B marke PHILIPS.
KORISNIČKI PRIRUČNIK HMP7000B PHILIPS
Register your product and get support at
www.philips.com/welcome
HMP7000
natural_image
Black Philips HD Media Player device with visible branding and ports (no text beyond branding)用户手册 33User manual 3
Trademark notice

HDMI, the HDMI logo, and High-Definition Multimedia Interface are trademarks or registered trademarks of HDMI licensing LLC in the United States and other countries.

Manufactured under license from Dolby Laboratories. Dolby and the double-D symbol are trademarks of Dolby Laboratories.

ABOUT DIVX VIDEO: DivX ^® is a digital video format created by DivX, Inc. This is an official DivX Certified ^® device that plays DivX video. Visit divx.com for more information and software tools to convert your files into DivX video.
ABOUT DIVX VIDEO-ON-DEMAND: This DivX Certified ^® device must be registered in order to play purchased DivX Video-on-Demand (VOD) movies. To obtain your registration code, locate the DivX VOD section in your device setup menu. Go to vod.divx.com for more information on how to complete your registration.
DivX ^® , DivX Certified ^® , DivX Plus ^™ HD and associated logos are registered trademarks of DivX, Inc. and are used under license.
DivX Certified ^® to play DivX ^® and DivX Plus ^™ HD (H.264/MKV) video up to 1080p HD including premium content

Real RMVB logo is a trademark or a registered trademark of RealNetworks, Inc.
Manufactured under license under U.S. Patent #'s: 5,451,942; 5,956,674; 5,974,380; 5,978,762; 6,487,535 & other U.S. and worldwide patents issued & pending. DTS and the Symbol are registered trademarks, & DTS 2.0+Digital Out and the DTS logos are trademarks of DTS, Inc. Product includes software. © DTS, Inc. All Rights Reserved.

DLNA ^® , the DLNA Logo and DLNA CERTIFIED ^® are trademarks, service marks, or certification marks of the Digital Living Network Alliance.

The Wi-Fi CERTIFIED Logo is a certification mark of the Wi-Fi Alliance.
Windows Media and the Windows logo are trademarks, or registered trademarks of Microsoft Corporation in the United States and/or other countries.

Contents
1 Control and play 10
2 Play options 11
Video options 11
Audio option 12
Photo options 12
3 File browsing 13
Browse all files 13
Browse movie files 14
Browse music files 15
Browse photo files 16
4 Manage files 17
Basic operations 17
5 Set up a network 19
Wireless network setup 19
Wired network setup 20
IP address setup 21
6 Play media files from a computer (DLNA) 22
7 Play a 3D media file 23
2D to 3D conversion 23
8 Watch online TV 24
9 Karaoke 25
10 Other setup 26
System 26
Audio 27
Video 27
Network 27
MISC 28
11 EasyLink 29
12 Update software 30
Update software through the Internet 30
Update software through USB 30
13 Troubleshooting 31
14 Specification 32
English

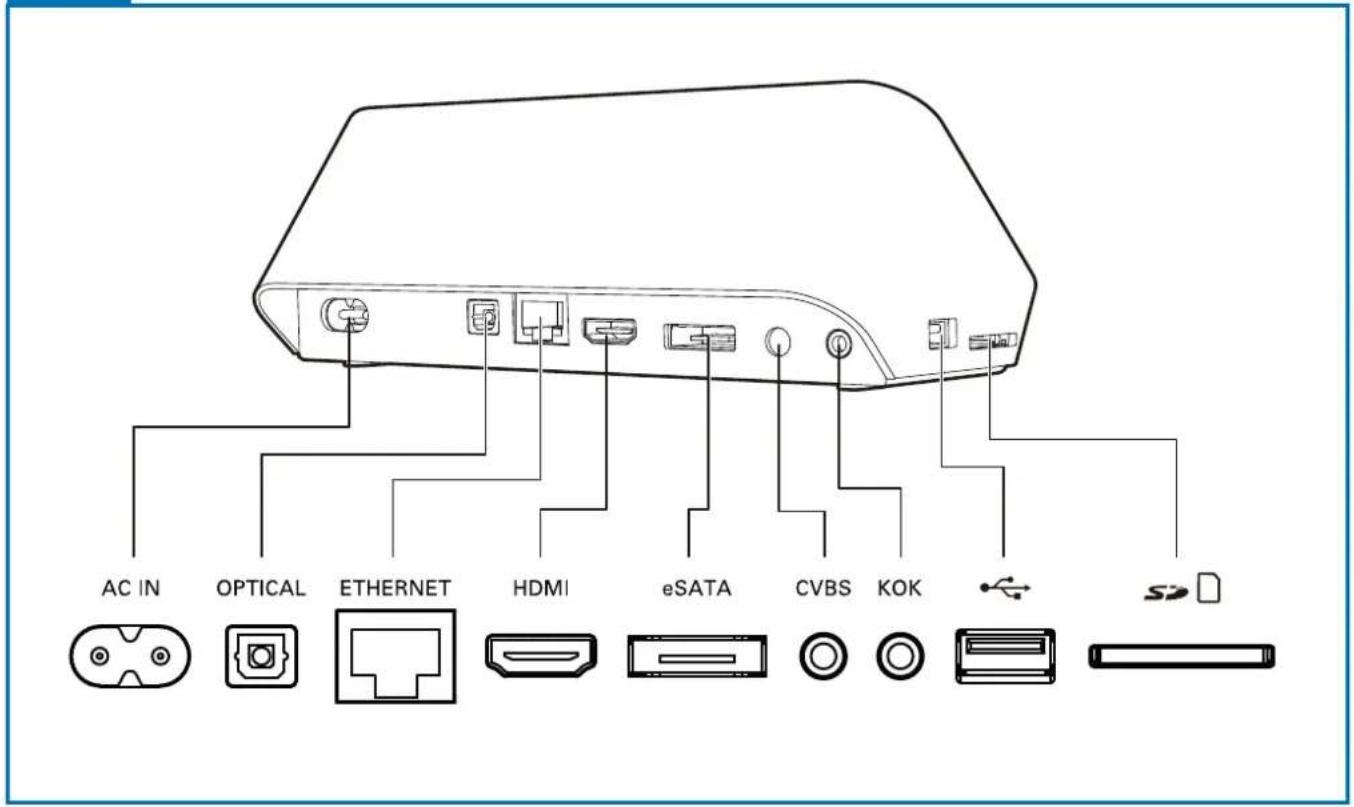
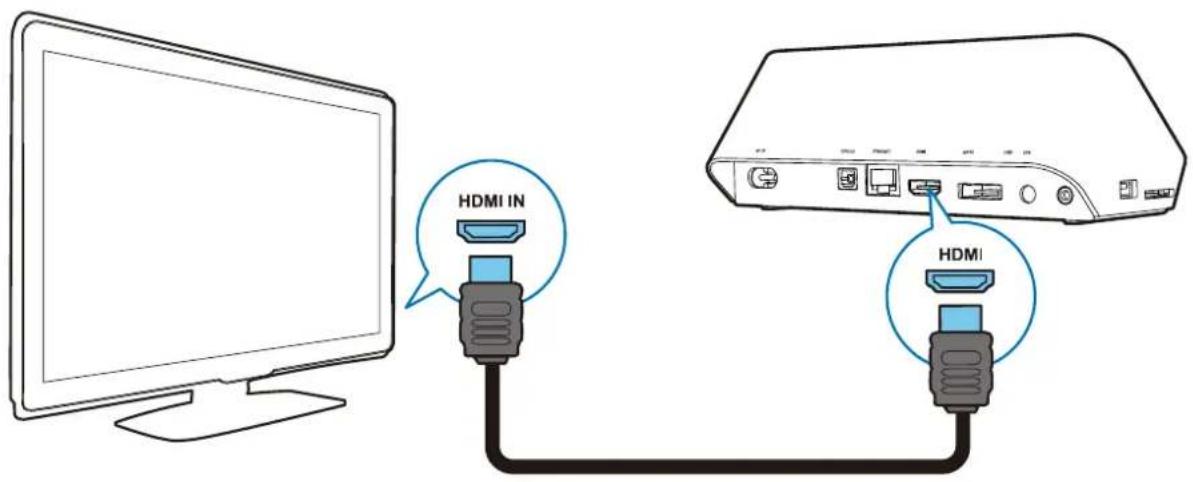
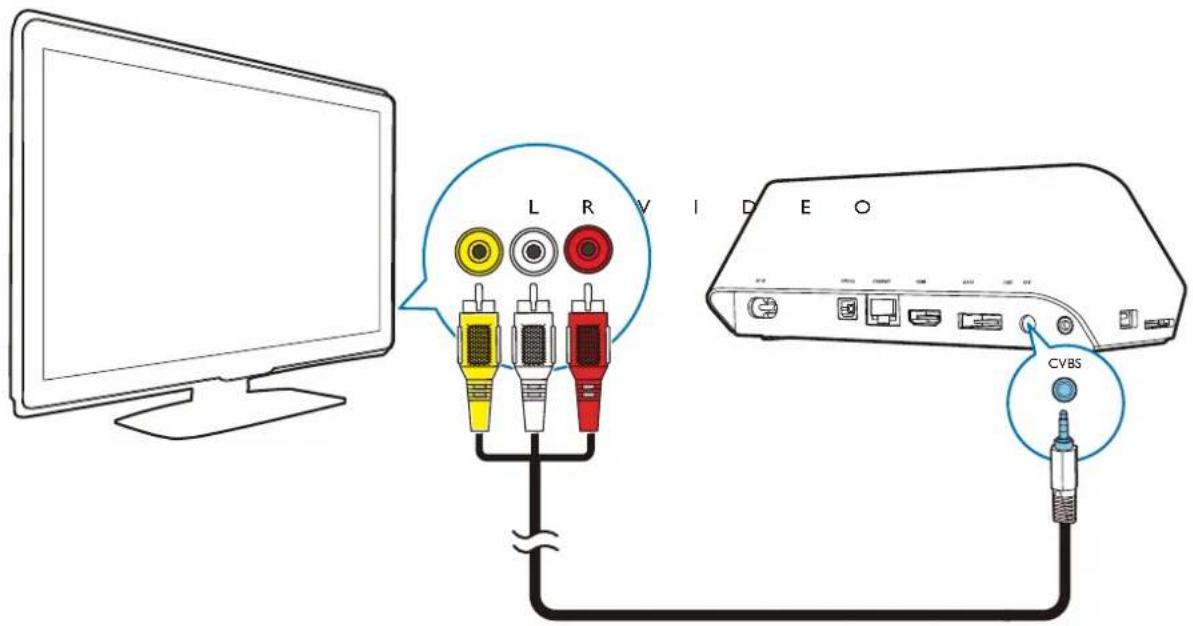
HDMI

TV OUT + AUDIO OUT

natural_image
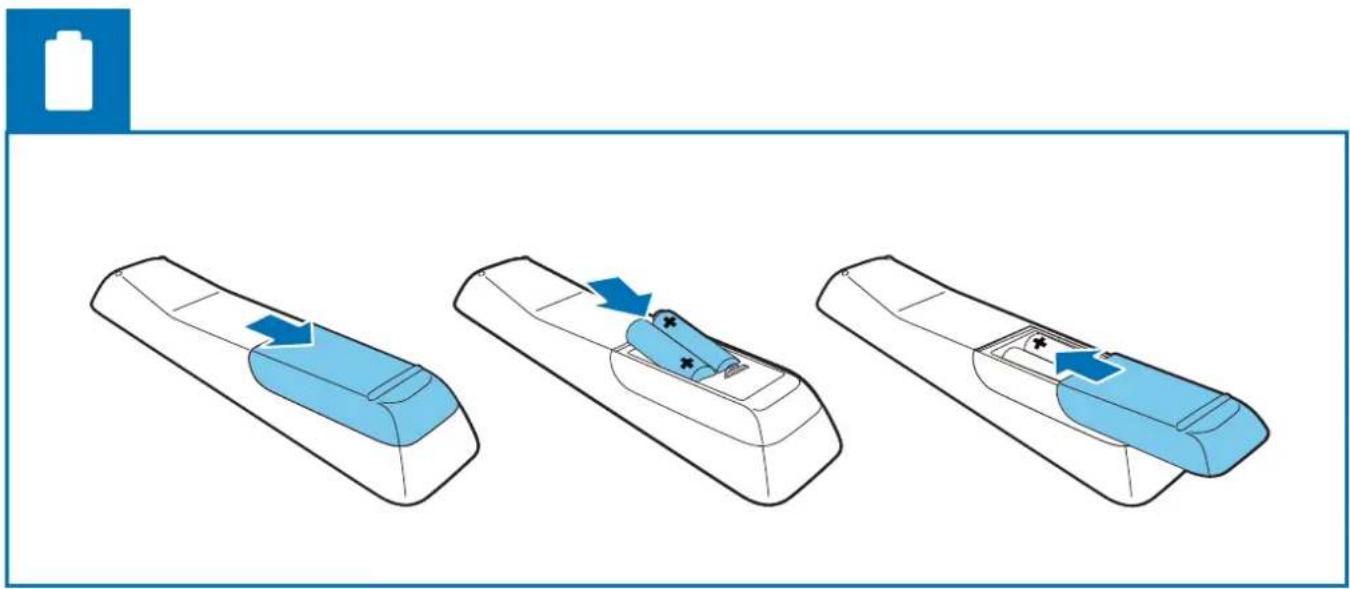
Three-step illustration of a remote control with blue battery and battery plug, showing step-by-step assembly (no text or symbols)
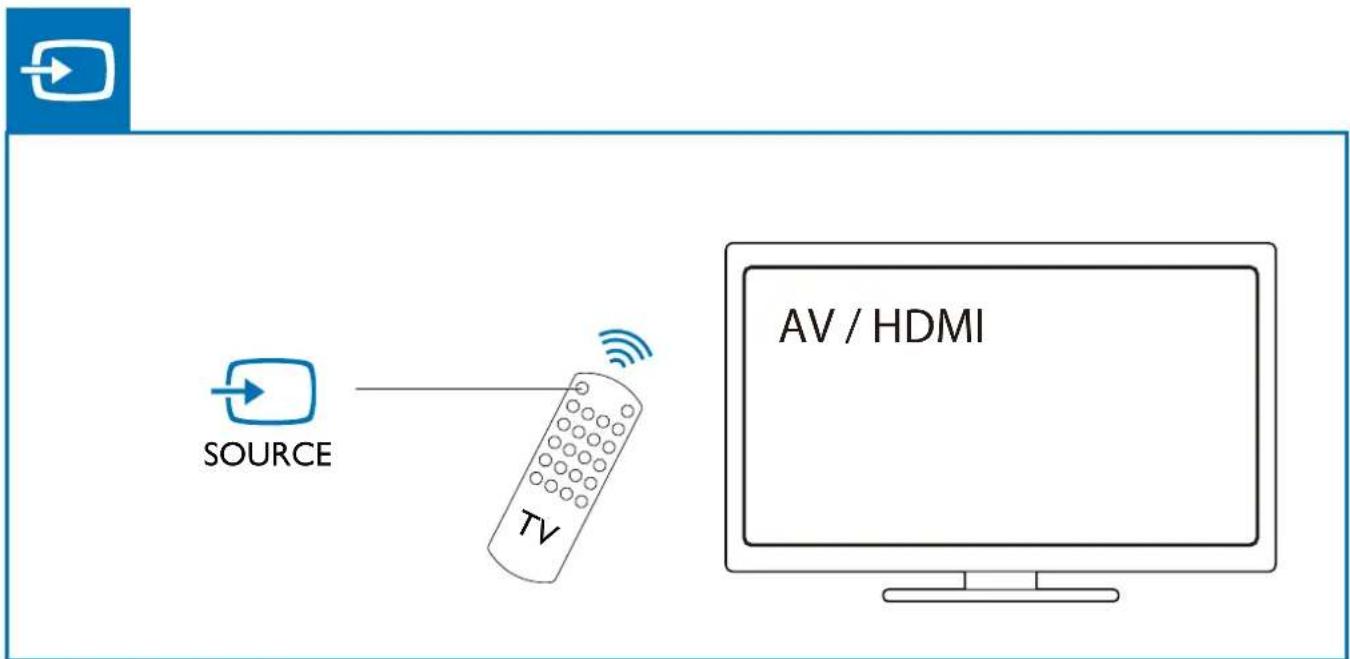
flowchart
graph LR
    A["DATA Source"] --> B["TV"]
    B --> C["AV / HDMI"]

USB
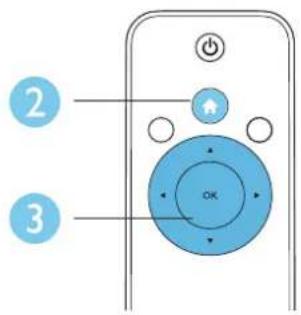


1 Control and play
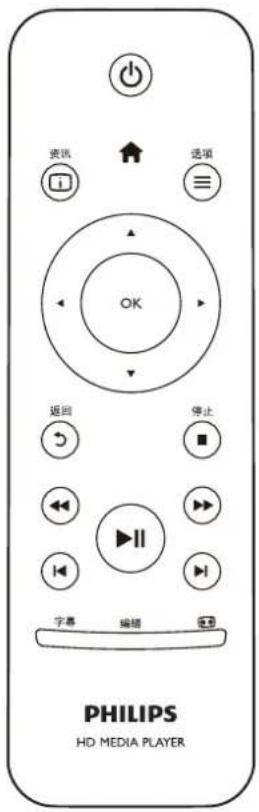
Use your remote control to control the play.
| Function Buttons / Actions | |
| Stop the play. | ■ |
| Pause or resume the play. | ▶II |
| Skip to the previous/ next media file. / | ◀ ▶I |
| Return to the home page. | ↑ |
| Zoom in or out. Press repeatedly. | ◀◀To pan through an enlarged photo, press ▲▼.◀▶ |
| Search backward/forward fast. Press | ◀◀ / ▶peatedly to select a speed. |
| Access subtitle settings. | 字幕 |
| Rotate a photo. Press / . | ▲ ▼ |
| Navigate menus. | ▲▼◀▶ |
| Confirm a selection or entry. | OK |
| Access option menus during play or in the file list. | ≡ |
| Access the file editing menu in the file folder list. | 编辑 |
| Display current playback information. | ◎ |
| Return to the previous menu. | ↘ |

Note
- You can only play DivX videos that were rented or purchased with DivX® registration code in this player. (Refer to "Setup" > "MISC" > [DivX®VOD Code])
- Subtitle files with the following filename extensions (.srt, .smi, .sub, .ssa, .ass, .txt) are supported but not displayed in the file list.
- The subtitle filename has to be the same as the filename of the DivX video (the file extension excluded).
- The DivX video file and the subtitle file must be saved under the same directory.
2 Play options
During play, press to access the option items.
Video options
[Subtitle]: Adjust subtitle settings. Press ◀▶ to select an item and ▲▼ to adjust values. Then press OK to confirm.
[Audio]: Select an audio language.
[Karaoke]: Adjust karaoke-related settings.

Note
• To activate karaoke-related menu options, set [Microphone] (Microphone) to [ON].
[GOTO]: Skip play to the specific time. Press ◀▶ to select an item and ▲▼ to adjust values. Then press OK to confirm.
[Repeat Title]: Repeat the current title.
[Repeat All]: Repeat the movie file.
[Repeat Off]: Turn off a repeat mode.

Note
• To use 3D related functions, connect this player to a 3D TV through an HDMI cable.
[2D]: Restore a video to 2D format.
[3D Simulation] (3D simulation): Convert a 2D video to 3D format.
[3D Side by Side] (3D side by side): Convert a video in side by side format to 3D format.
[3D Top Bottom] (3D top bottom): Convert a video in top and bottom format to 3D format.
[Video Setting]: Adjust the video settings. Press ▲▼to select an item and to adjust values. Then press OK to confirm.
Audio option
[Repeat Off]: Turn off a repeat mode.
[Repeat One]: Repeat the current music file.
[Repeat All]: Repeat all the music flies.
[Shuffle Loop]: Play music files in a random loop.
Photo options
[Slide Timing]: Set a display interval for a slideshow.
[Slide Transition]: Select a transition effect for a slideshow.
[Repeat Off]: Turn off a repeat mode.
[Repeat All]: Repeat all the photo flies.
[Shuffle Loop]: Play photo files in a random loop.
[Background Music]: Select and play a music file during slideshow.

Note
• To use 3D related functions, connect this player to a 3D TV through an HDMI cable.
[2D]: Restore a photo to 2D format.
[3D Auto] (3D Auto): Convert a 2D photo to 3D format.
[3D Side by Side] (3D side by side): Convert a photo in side by side format to 3D format.
[3D Top Bottom] (3D top bottom): Convert a photo in top and bottom format to 3D format.
[Video Setting]: Adjust the video settings.
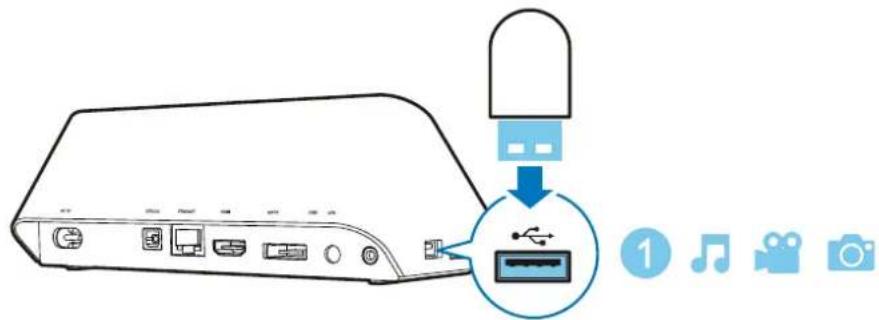
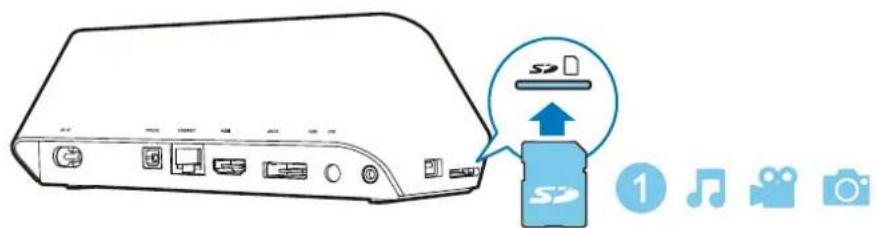
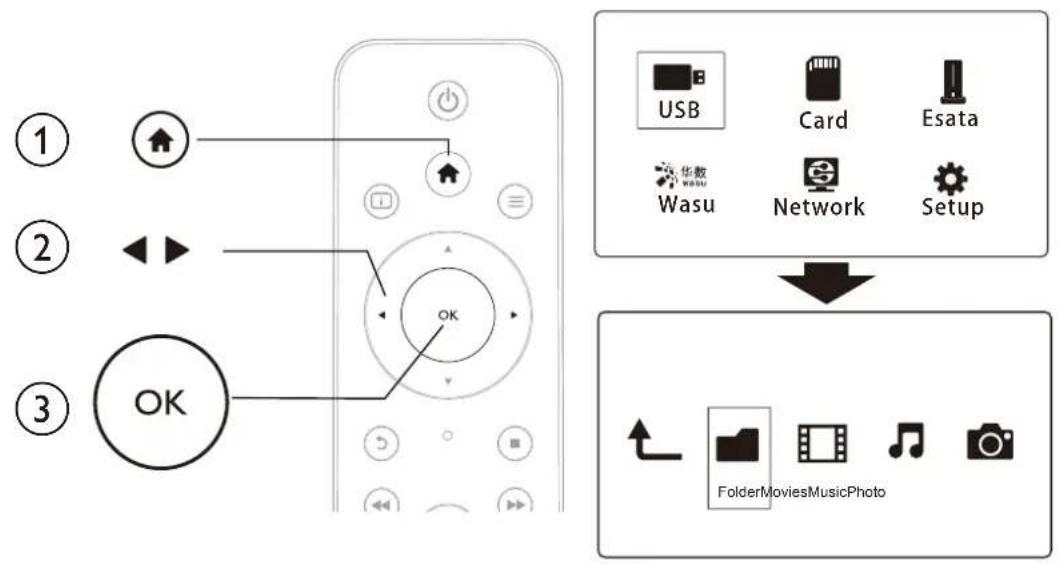
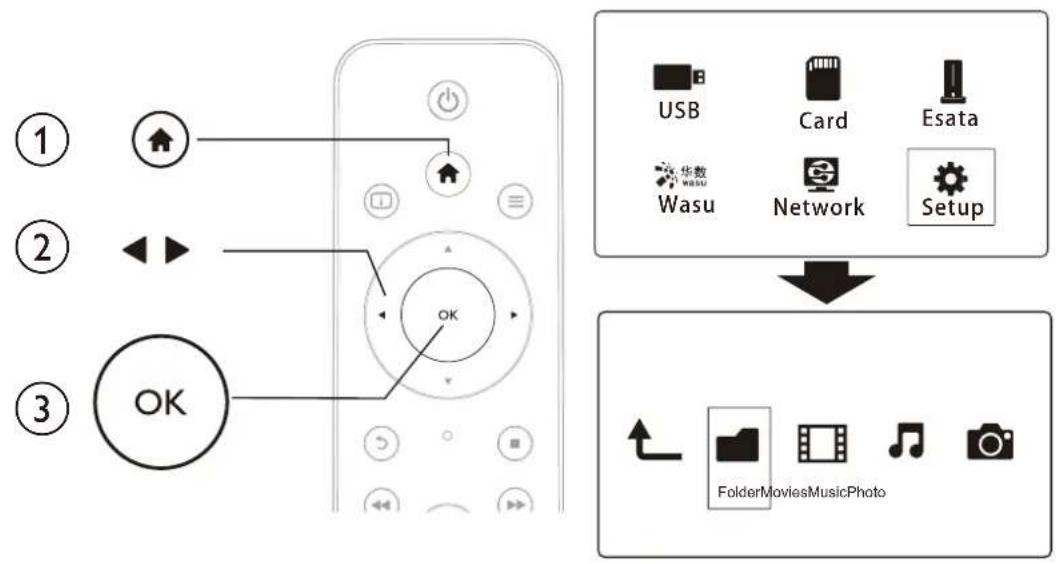
3 File browsing
You can browse media files stored in a USB/SD storage device.

flowchart
graph TD
    A["①"] --> B["USB"]
    C["②"] --> D["Card"]
    E["③"] --> F["Network"]
    G["OK"] --> H["Setup"]
    style A fill:#f9f,stroke:#333
    style C fill:#f9f,stroke:#333
    style E fill:#f9f,stroke:#333
    style G fill:#f9f,stroke:#333
    style B fill:#ccf,stroke:#333
    style D fill:#ccf,stroke:#333
    style F fill:#ccf,stroke:#333
    style H fill:#ccf,stroke:#333
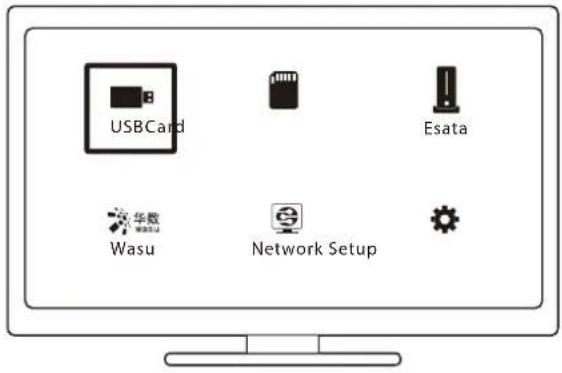
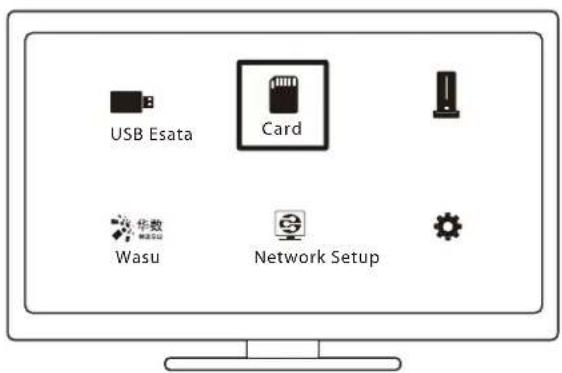
1 Press
2 Select [USB]/ [Card] / [Esata].
3 Select a mode to browse media files.
- [Folder]
• [Movies]
• [Music]
• [Photos]
Browse all files
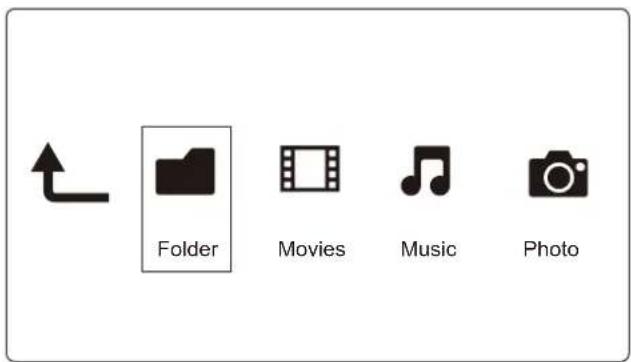
1 Press ◀▶ to select [Folder] and press OK to confirm.
2 Select your USB/SD storage device and press OK.
3 Press ≡ the file browser.
4 Press ▲ to select a mode to view or arrange files.
[Thumbnails]: Display thumbnails of files or folder.
[List]: Display files or folder in a list.
[Preview]: Display files or folders with a preview window.
[All Media] Display all media files.
[Movies]: Display movie files.
[Photos]: Display photo files.
[Music]: Display music files.
Browse movie files

1 Press ◀▶ to select [Movies] and press OK to confirm.
2 Press ≡ the file browser.
3 Press ▲ to select a mode to view or arrange files.
[Search]: Search movie files. Follow on screen instruction to type in key words in the mini keyboard and press ▶■ to start search.
[Thumbnails]: Display thumbnails of movie files.
[List]: Display movie files in a list.
[Preview]: Display files or folders with a preview window.
[All Movies]: Display all movies files.
[Show DVDs]: Display all DVD content files.
[Flash Animation]: Display all flash files.
[Go to Folder]: Go to the folder where the selected file is placed.
[Name]: List movies files in an alphabetical order of their names.
[Size]: List movies files in the ascending order of their sizes.
[Most Viewed]: List most viewed movie files.
[Recently Added]: List recently added movie files.
Browse music files
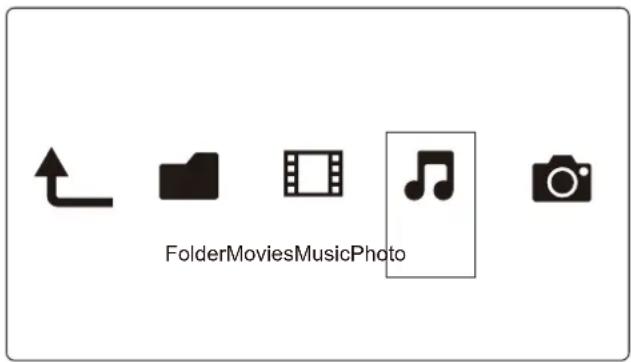
1 Press ◀▶ to select [Music] and press OK to confirm.
2 Press ≡ the file browser.
3 Press ▲ to select a mode to view or arrange files.
[Search]: Search music files. Follow on screen instruction to type in key words in the mini keyboard and press ▶III to start search.
[Thumbnails]: Display thumbnails of music files.
[List]: Display music files in a list.
[Preview]: Display movie files with a preview window.
[Go to Folder]: Go to the folder where the selected file is placed.
[All Songs]: Display all music files.
[Albums]: Display music files by albums.
[Artists]: Display music files by artists.
[Genres]: Sort music files by genres.
[Years]: Sort music files by years.
[Playlists]: Display play lists.
[Recently Played]: List recently played music files.
[Recently Added]: List recently added music files.
[Name]: List music files in an alphabetical order of their names.
Browse photo files
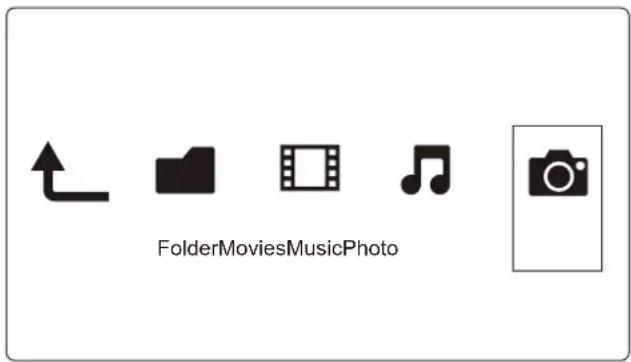
1 Press ◀▶ to select [Photos] and press OK to confirm.
2 Press ≡ the file browser.
3 Press ▲ to select a mode to view or arrange files.
[Search]: Search photo files. Follow on-screen instruction to type in key words in the mini keyboard and press ▶III to start search.
[Thumbnails]: Display thumbnails of photo files or folder.
[List]: Display files or folder in a list.
[Preview]: Display files or folders with a preview window.
[Photo Directory]: Display photo files in the directory mode.
[Leaf FolderView]: Display photo files in the folder mode with a preview of a contained photo.
[Date view]: Sort photo files by date modified.
[All Photos]: Display all photos files.
[Albums]: Sort photo files by albums.
[Name]: List photo files in an alphabetical order of their names.
[Recently Added]: List recently added photo files.
[Recently Played]: List recently played photo files.
4 Manage files
You can manage media files on the storage device.
Basic operations
flowchart
graph TD
    A["OK"] --> B["USB"]
    A --> C["Card"]
    A --> D["Email"]
    A --> E["Network"]
    A --> F["Setup"]
    G["①"] --> H["↑"]
    I["②"] --> J["◀"]
    K["③"] --> L["OK"]
    style A fill:#f9f,stroke:#333
    style B fill:#ccf,stroke:#333
    style C fill:#ccf,stroke:#333
    style D fill:#ccf,stroke:#333
    style E fill:#ccf,stroke:#333
    style F fill:#ccf,stroke:#333
1 Press
2 Select [USB]/ [Card] / [Esata] >[Folder].
3 Select a partition of your USB/SD storage device and press OK.
4 Press ▲ / ▼ to select a file or folder and press [Edit].
→ The file editing menu is displayed.
5 Press ▲ / ▼ to select your operation and press OK to confirm.
[Copy]: Select a destination and press▶II to confirm. → The selected file or folder is copied to the destination.
[Delete]: Select [Yes] and press OK to confirm.
→ The selected file or folder is deleted.
[Move]: Select a destination and press▶II to confirm.
→ The selected file or folder is moved to the destination.
[Rename]
1 Select [Rename] to edit the name in the mini keyboard, and then press ▶II to confirm.
2 Select [OK] and press OK to apply the new name.
[Multiple Select]
1 Press ▲ / ▼ to select a file or folder and press ▶II to add to the list.
2 Press [Edit] when you complete adding files and folders.
3 Select an operation.
[Copy] Select the destination and press to confirm.
[Delete] Select [Yes] and press OK to delete the selected files or folders.
[Move] Select the destination and press ▶II to confirm.
[Save Playlist] • Select [OK] to save a play list.
- Select [Rename] to edit the name in the mini keyboard, and then press▶II to confirm.
[Save Photo Album] • Select [OK] to save a photo album.
- Select [Rename] to edit the name in the mini keyboard, and then press▶II to confirm.
![PHILIPS HMP7000B - [Multiple Select] - 1](/content/2026/05/1099842/images/21ed3fdb989b37efd278dd96ae5d7ea7d15c3e02838a4664fe273eff1cea6c04.jpg)
Note
- Press and hold for two seconds to remove a connected storage device safely.
5 Set up a network
By connecting this player to a computer network and the Internet, you can
- Play photos, music, and video files streamed from your computer.
• Watch online TV programs. - Browse Internet photo albums.
- Update the software of this player through the Internet.
Wireless network setup
What you need A wireless router that is connected to the Internet
1 Connect this player to a computer network or the Internet through a wireless router.
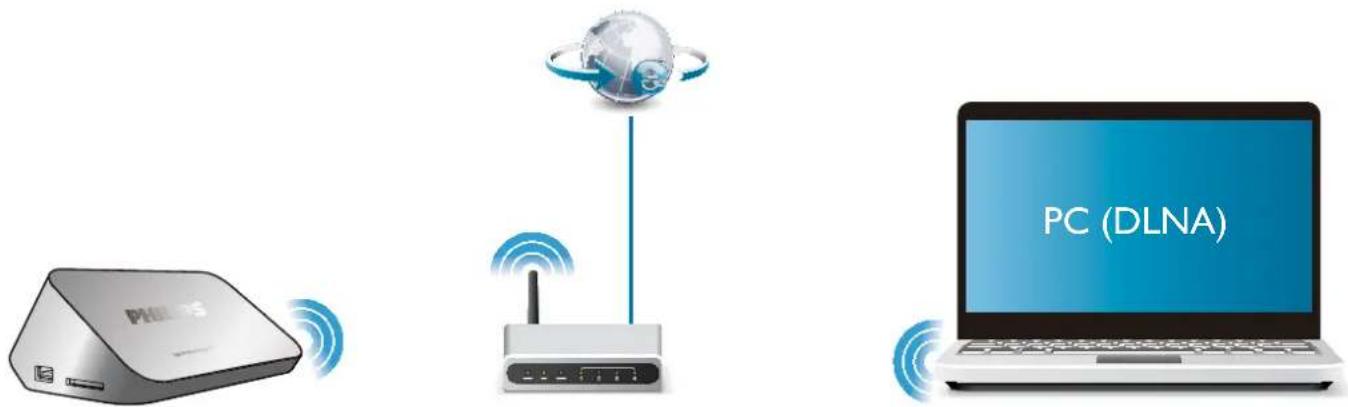
2 Perform the wireless network installation.
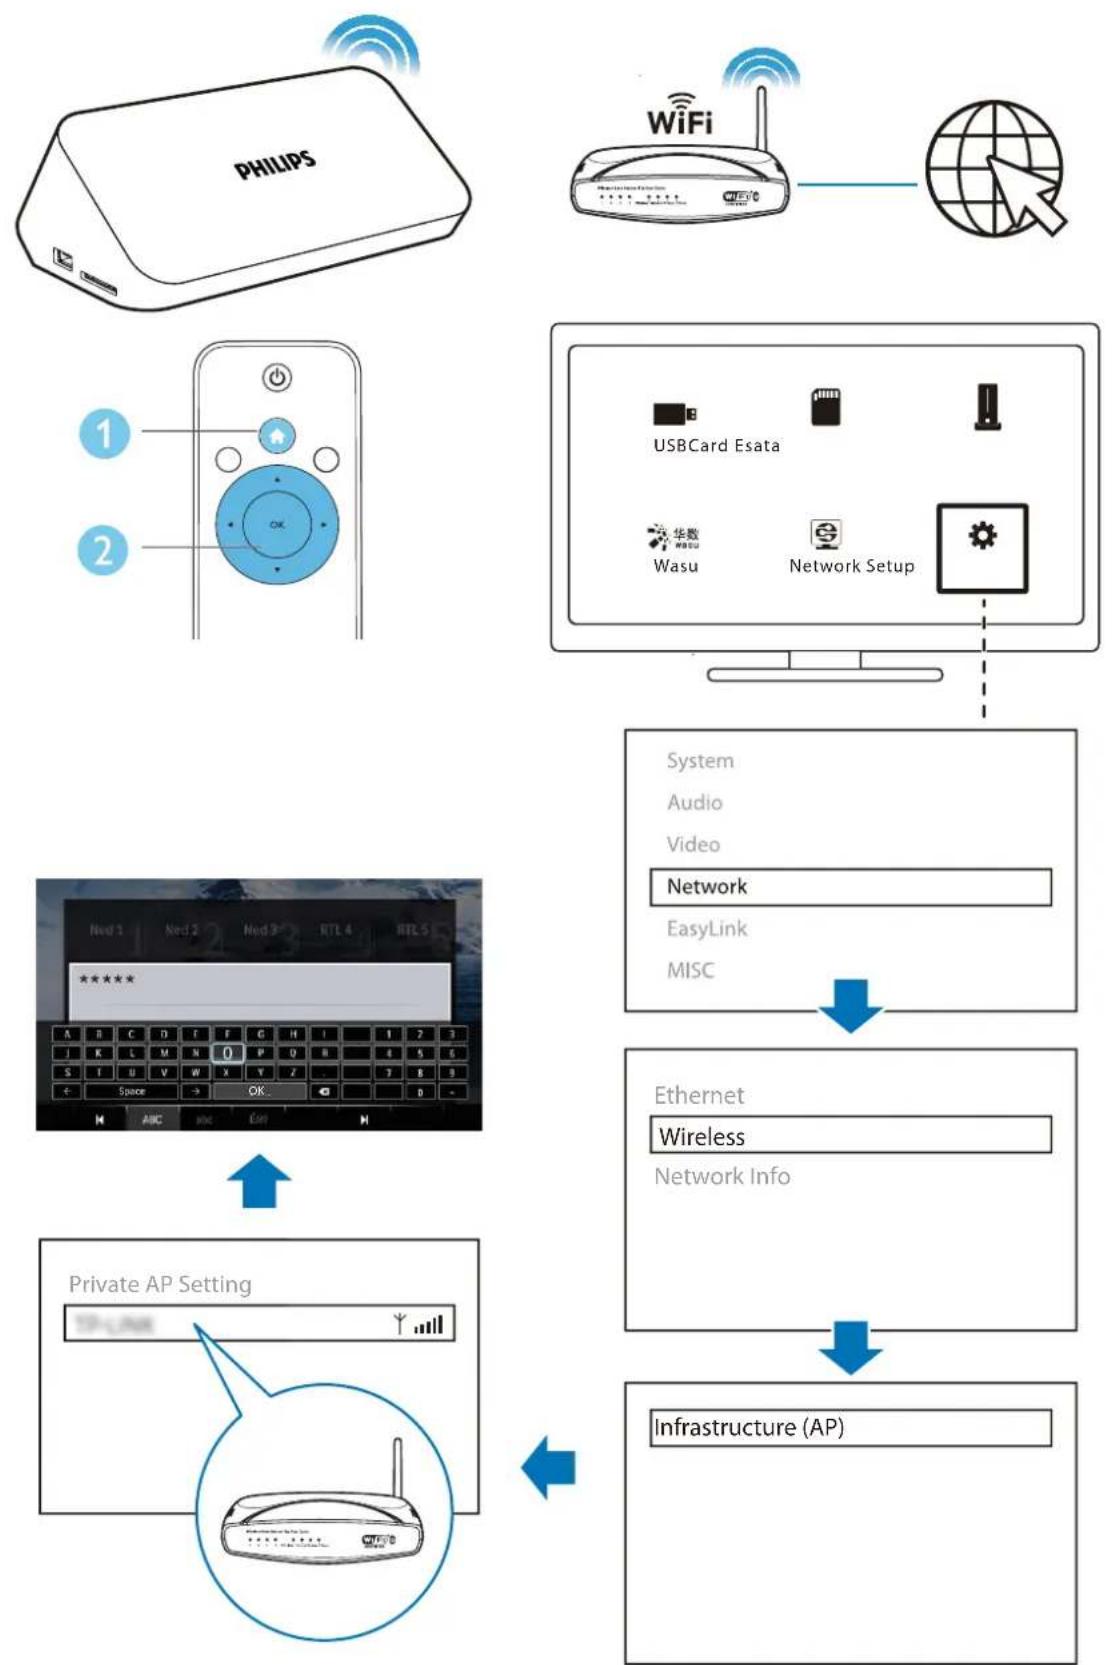
To connect this player to a wireless network,
1 Press
2 Select [Setup] and press OK.
→ The setup menu is displayed.
3 Select [Network]>[Wireless] > [Infrastructure (AP)] and press OK.
A list of available wireless networks is displayed.
4 Select your network from the list and press OK.
5 Select [Standard (WPA,WEP...)] and press OK.
A mini keyboard is displayed.
6 Use ▲▼◀▶ and OK to enter your Wi-Fi Protected Access (WPA) or Wired Equivalent Privacy (WEP) key.
7 Press ▶to confirm.
A connection test is started
→ The status of network connection is displayed after the test is completed.

Note
• To re-scan available wireless networks, press
Wired network setup
What you need A wired router that is connected to the Internet
1 Connect this player to a computer network or the Internet through a wired router.
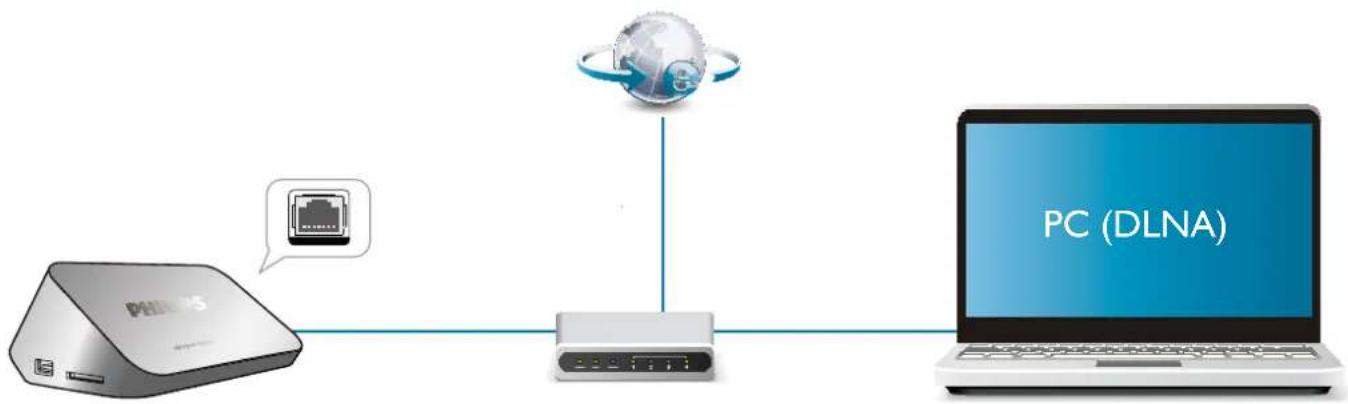
flowchart
graph LR
    A["PC (DLNA)"] --> B["Router"]
    B --> C["Laptop"]
2 Perform the network installation.
To connect this player to a wired network,
1 Press
2 Select [Setup] and press OK.
→ The setup menu is displayed.
3 Select [Network] > [Ethernet] > [DHCP IP (AUTO)] > [DHCP (AUTO)] and press OK.
A dialog box is displayed.
4 Select [Yes] and press OK to save the network settings.
A connection test is started.
The status of network connection is displayed after the test is completed.
5 Press OK to exit.
IP address setup
You can set the IP address manually.
1 Select [Network] >[Ethernet] > [FIX IP (MANUAL)].
→ The IP address table is displayed.
2 Press ◀to select a item and press t▲adjust the value.
3 Press OK when you complete setting the IP address.
→ A dialog box is displayed.
4 Select [Yes] and press OK to save the network settings.
6 Play media files from a computer (DLNA)
With this DLNA-certified player connected to a computer network, you can play video, music, and photo from a computer.

Note
- To browse media files on a PC, make sure that a DLNA media server software (such as Windows Media Player 11 or higher) is installed on the PC.
1 Connect this player to a computer network (see "Set up a network").
2 On the PC, in the software of the DLNA media server (such as Windows Media Player 11 or higher), you need to set:
- Share your media to this player (see "Help" document in the media server software).
- Share files or add files to the library (see "Help" document in the media server software).
1 Press
2 Select [Network], and press OK.
A content browser is displayed.
• To browse shared folders of a PC, select [Shared Folder] and press OK.
• To browse shared media files, select [Shared Media Files] and pressOK.
3 Select a media file, and press OK to play.
- To access the menu of browsing options, press ≡.
- For details, see "Browse all files".
7 Play a 3D media file
Before you start, make sure that:
- the TV is 3D compliant, and is connected to this player through HDMI
- your USB/SD storage device contains 3D media files
- you have 3D glasses compatible with the TV.
1 Select and play a 3D media file.
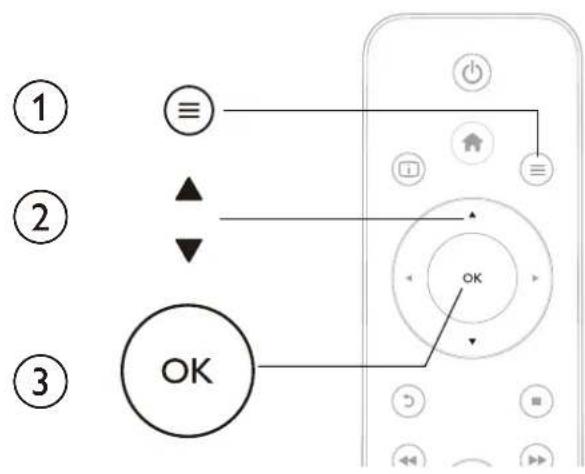
2 Press ≡ → An option menu is displayed.
3 Select a 3D conversion option.
• For 3D media files in side by side format, select [3D Side by Side] (3D side by side).
- For 3D media files in top and bottom format, select [3D Top Bottom] (3D top bottom).
4 Put on the 3D glasses for 3D effects.
• To exit, press ≡ and select [2D].
2D to 3D conversion
You can convert a 2D media file to 3D format and watch it on your 3D TV.
1 Select and play a 2D media file.
2 Press ≡ → An option menu is displayed.
3 Select a 2D conversion option.
- For 3D video files, select [3D Simulation] (3D simulation).
- For 3D photo files, select [3D Auto] (3D auto).
4 Put on the 3D glasses for 3D effects.
• To exit, press ≡ and select [2D].
8 Watch online TV
With this player connected to the Internet, you can access online TV programs.

Note
• Koninklijke Philips Electronics N.V. bears no responsibility for content provided by online TV service providers.
1 Connect this player to the Internet (see "Set up a network").
2 Press
3 Select [Wasu], and press OK.
→ The wasu TV home page is displayed.
4 Follow the on-screen instructions, and use the remote control to browse the TV programs.
Function Button/Action
| Select a service or item. | ▲▼◄► |
| Confirm a selection. | OK |
| Return to a previous page. | ↘ |
| Return to the home page of wasu TV. | ↗ |
9 Karaoke
With this player connected to the Internet, you can sing Karaoke songs.
1 Connect a microphone to this player.
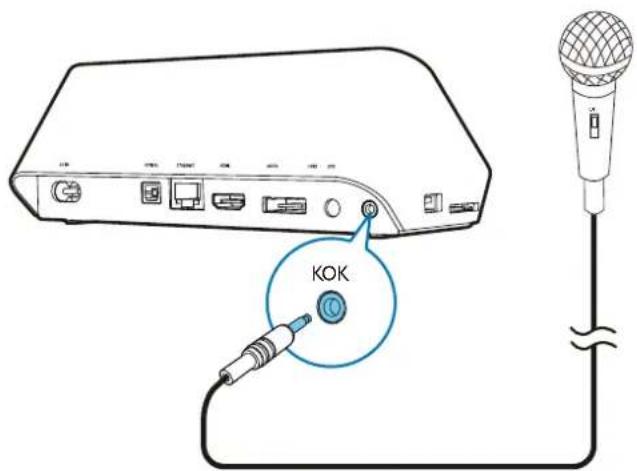
2 Connect this player to the Internet (see "Set up a network").
3 Press
4 Select [Wasu], and press OK.
→ The wasu TV home page is displayed.
5 Select Karaoke on the wasu TV home page.
→ The Karaoke page is displayed.
6 Follow the on-screen instructions, and use the remote control to sing Karaoke songs.
Function Button/Action
| Select a song or item. | ▲▼◄► |
| Confirm a selection. OK | |
| Return to a previous page or to the home page of wasu TV. | ⊃ |
| Access option menus during Karaoke. | ≡ |
10 Other setup
You can change settings of this player in the setup menu.
flowchart
graph TD
    A["①"] --> B["↑"]
    C["②"] --> D["◀"]
    E["③"] --> F["OK"]
    B --> G["↓"]
    D --> H["OK"]
    F --> I["OK"]
    G --> J["USB"]
    G --> K["Card"]
    G --> L["Esata"]
    G --> M["Wasu"]
    G --> N["Network"]
    G --> O["Setup"]
    I --> P["FolderMoviesMusicPhoto"]
1 Press
2 Select [Setup] and press OK to confirm.
→ The setup menu is displayed.
- Press ▲ / ▼ to select a menu item or setting option.
- Press OK to access the lower-level menu.
- Press ➤ to return to the upper-level menu.
System
[Menu Language]: Select a language for on-screen menu.
[Subtitle]: Select a subtitle language for video.
[Screen Saver]: Enable the screen saver in case of inactivity (for example, in pause or stop mode).
[DLNA DMR]: Enable this player to play photos, music, and video files streamed from your computer.
[Device Name]: Change the name of this player.
[Auto Scan]: Scan media files on a storage device automatically.
[Scan Storage]: Start or stop scanning media files on a storage device.
[Resume Play]: Resume playback of a video file from the point where you last stopped.
[Factory Default]: Reset all settings to factory default.
Audio
[Night Mode]: Equalize loud sound and soft sound. If enabled, you can watch movies at a low volume at night.
[HDMI Output]: Select an output sound format when connecting the HDMI jack.
[SPDIF Output]: Select an output sound format when connecting the digital audio jack.
[Karaoke]: Adjust karaoke-related settings.

Note
• To activate karaoke-related menu options, set [Microphone] (Microphone) to [ON].
Video
[Aspect Ratio]: Select display aspect ratio.
[TV System]: Select a video resolution setting that best is supported by your TV. See your TV manual for details.

Note
- If a selected video resolution is not supported with your TV and a blank screen appears, wait for 30 seconds to recover picture display.
- For a composite (CVBS) connection, if no video output is made when you set the video resolution is to an HD resolution (1080p, 1080i, 720p), connect this player to the TV with an HDMI connection to play HD videos.
[Video Zoom]: Zoom in or out video scenes.
[1080P 24Hz]: Use 1080p 24Hz video output mode for video content.

Note
- The video resolution and the frame rate of the video content is 1080p 24Hz.
- Your TV supports the 1080p 24Hz.
- Ensure that you use an HDMI cable to connect this player to your TV.
[Deep Color]: Display colors with more shades and hues when the video content is recorded in Deep Color mode and the TV supports this feature.
[Video Setting]: Adjust the video settings.
Network
[Ethernet]: Configure the IP address of this player.
[Wireless]: Set up a wireless network connection.
[Network Info]: Display the current network status.
MISC
[Version Info]: Display the information about software version of this player.
[DivX® VOD Code]: Display the DivX® registration code and deregistration code.
[Online upgrade]: Select to update software from a network.
[USB upgrade]: Select to update software from USB storage device.
11 EasyLink
This player supports Philips EasyLink which uses the HDMI CEC (Consumer Electronics Control) protocol. You can use a single remote control to control EasyLink compliant devices that are connected through HDMI.
1 Connect the HDMI CEC compliant devices through HDMI, and turn on the HDMI CEC operations on the TV and other connected devices (see the user manual of the TV or other devices for details).
2 Press
3 Select [Setup] > [Easy Link].
4 Select [On] under the options:
- [Easy Link] > [On]
• [One Touch Play] > [On]
• [One Touch Standby] > [On]
• [Auto Power On From TV] > [On]
→ EasyLink function is turned on.
One Touch Play
When you play a file with this player, the connected HDMI CEC TV automatically switches to the HDMI input channel.
One Touch Standby
When you switch a connected device (for example TV) to the standby mode with its own remote control, this player switches to the standby mode automatically.
Auto Power On From TV
When you switch a connected device (for example TV) to this player port with its own remote control and this player is standby mode, this player switches to the power on mode automatically.

Note
• Philips does not guarantee 100% interoperability with all HDMI CEC devices.
12 Update software
Before you update the software of this player, check the current software version:
1 Press
2 Select [Setup] >[MISC] > [Version Info.], and press OK.
Update software through the Internet
1 Connect the player to the Internet (see "Set up a network").
2 Press and select [Setup].
3 Select [MISC] > [Online upgrade].
→ If an upgrade media is detected, you are prompted to start the update.
4 Follow the instructions on the TV screen to update the software.
When the update is complete, this player automatically turns off and on again.
Update software through USB

Note
- Do not turn off the power or remove the USB storage device when the software update is in progress because you might damage this player.
1 Check the latest software version on www.philips.com/support.
- Search for your model and click on "Software and drivers".
2 Download the software to the root directory of a USB storage device.
3 Connect the USB storage device to the (USB) connector on this player.
4 Press
5 Select [Setup] > [MISC] > [USB upgrade].
→ If an upgrade media is detected, you are prompted to start the update.
6 Follow the instructions on the TV screen to update the software.
When the update is complete, this player automatically turns off and on again.
13 Troubleshooting
If you contact Philips, you will be asked for the model and serial number of this player. The model number and serial number are at the bottom of this player. Write the numbers here:
Model No. ____
Serial No. ____
No picture.
• Refer to the TV user manual for how to select the correct video input channel
No sound output from the TV.
- Make sure that the audio cables are connected to the audio input sockets that are grouped with the selected video input sockets.
The contents of the USB storage device cannot be read.
- This player support only USB 2.0 and USB 1.1 storage devices. USB3.0 storage devices are not supported.
• The supported memory size is 1TB maximum.
• Make sure that this player supports these files. (Refer to "Specifications" > "File") - DRM-protected video files that are stored on a USB/SD storage device cannot be played through an analog video connection (for example, composite). You need to use an HDMI connection to play these files.
Some hard disks cannot be supported.
- This player supports hard disks with rating 500 mA or below. Please check if your hard disk rating is above 500 mA.
My router cannot connect this player after this player is powered on.
- Restart your router to connect it to this player.
DivX subtitles are not displayed correctly.
• Make sure that the subtitle filename is the same as the video filename.
• Make sure that the DivX video file and the subtitle file are saved under the same directory.
Some wireless routers cannot be found.
- Press ▲ / ▼ to browse all the wireless routers in range in the wireless network list.
- Press 📄 to rescan all available wireless routers.
The player feels warm.
- When this player is in use for a long period of time, some parts of this player will be heated. This is normal.
14 Specification

Note
- Specification and design are subject to change without notice.
File
- Video: MPEG 1/2/4(MPEG 4 Part 2), H.264, VC-1, H.263, VP6(640 × 480), DivX Plus HD, DivX 3/4/5/6, Xvid, RMVB 8/9, RM, WMV (V9), AVI, TS, M2TS, TP, TRP, ISO, VOB, DAT, MP4, MPG, MOV (MPEG 4, H.264), ASF, FLV(640 × 480), MKV, M4V
- Audio: Dolby digital, AAC, RA, OGG, MKA, MP3, WAV, APE, FLAC, DTS, LPCM, PCM, WMA (V9), IMA/MS ADPCM
• Picture: JPEG, JPG, PNG, TIFF, GIF (unanimated GIF), BMP, TIF, M-JPEG, HD-JPEG
USB storage device
- Compatibility: Hi-Speed USB (2.0)
Subtitle support
- .srt, .sub, .smi, .ssa, .ass, .txt, .psb, .idx+.sub
SD card
- Compatibility: SDHC 2.0 (up to 32 GB)
Video
• Signal system: PAL /NTSC
- Composite video output: 1 Vpp \~ 75 ohm
• HDMI output: 480i, 480p, 576i, 576p, 720p, 1080i, 1080p, 1080p24
Audio
- Analog stereo output
• Signal to noise ratio (1 kHz): > 90 dB (A-weighted)
• Dynamic Range (1 kHz): > 80 dB (A-weighted)
• Frequency response: +/-0.2 dB
• Digital output: Optical
Main Unit
• Dimensions (L × W × H): 178 × 57.5 × 91 mm
- Net Weight: 0.34 Kg
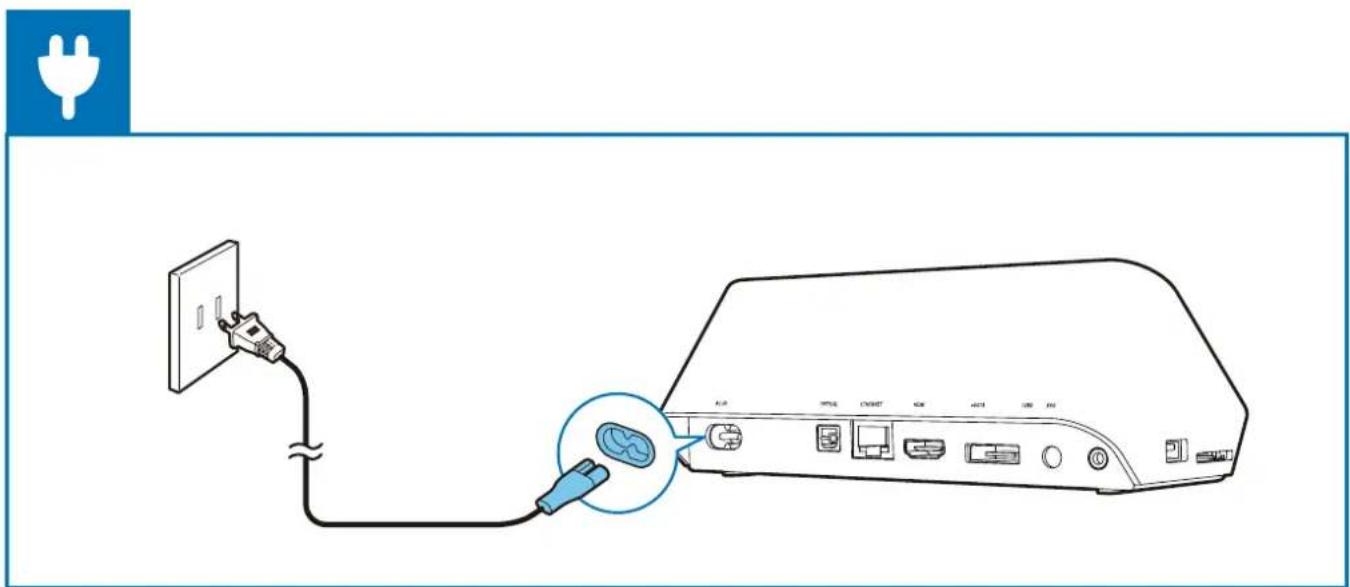
- Input: 100-240V\~50/60Hz, 10W
Power
• Power consumption: < 10 W
• Power consumption in standby mode: < 0.5 W
USB specification
• USB drive current: DC 5V = 500 mA
NOTICE
SOFTWARE END USER LICENSE AGREEMENT
THIS SOFTWARE END USER LICENSE AGREEMENT ("THIS AGREEMENT") IS A LEGAL AND BINDING AGREEMENT BETWEEN YOU (EITHER AN INDIVIDUAL OR ENTITY) AND PHILIPS CONSUMER LIFESTYLE B.V. A DUTCH LIMITED LIABILITY COMPANY, WITH ITS PRINCIPAL OFFICE AT HIGH TECH CAMPUS 37, 5656 AE EINDHOVEN, THE NETHERLANDS AND ITS SUBSIDIARY COMPANIES (INDIVIDUALLY AND COLLECTIVELY "PHILIPS"). THIS AGREEMENT GIVES YOU THE RIGHT TO USE CERTAIN SOFTWARE (THE "SOFTWARE") INCLUDING USER DOCUMENTATION IN ELECTRONIC FORM WHICH MAY HAVE BEEN PROVIDED SEPARATELY OR TOGETHER WITH A PHILIPS PRODUCT (THE "DEVICE") OR A PC. BY DOWNLOADING, INSTALLING OR OTHERWISE USING THE SOFTWARE, YOU ACCEPT AND AGREE TO BE BOUND BY ALL OF THE TERMS AND CONDITIONS OF THIS AGREEMENT. IF YOU DO NOT AGREE TO THESE TERMS AND CONDITIONS, DO NOT DOWNLOAD, INSTALL OR OTHERWISE USE THE SOFTWARE. IF YOU ACQUIRED THE SOFTWARE IN TANGIBLE MEDIA E.G. CD WITHOUT THE OPPORTUNITY TO REVIEW THIS LICENSE AND DO NOT ACCEPT THESE TERMS, YOU MAY RECEIVE A FULL REFUND OF THE AMOUNT, IF ANY, THAT YOU PAID FOR THE SOFTWARE IF YOU RETURN THE SOFTWARE UNUSED WITH PROOF OF PAYMENT WITHIN 30 DAYS FROM THE DATE OF PURCHASE.
- Grant of License. This Agreement grants you a non-exclusive, nontransferable, non-sub licensable license to install and use, on the Device or a PC, as applicable, one (1) copy of the specified version of the Software in object code format as set out in the user documentation solely for your personal use. The Software is "in use" when it is loaded into the temporary or permanent memory (i.e. RAM, hard disk, etc.) of the PC or the Device.
- Ownership. The Software is licensed and not sold to you. This Agreement grants you only the right to use the Software, but you do not acquire any rights, express or implied, in the Software other than those specified in this Agreement. Philips and its licensors retain all right, title, and interest in and to the Software, including all patents, copyrights, trade secrets, and other intellectual property rights incorporated therein. The Software is protected by copyright laws, international treaty provisions, and other intellectual property laws. Therefore, other than as expressly set forth herein, you may not copy the Software without prior written authorization of Philips, except that you may make one (1) copy of the Software for your back-up purposes only. You may not copy any printed materials accompanying the Software, nor print more than one (1) copy of any user documentation provided in electronic form, except that you may make one (1) copy of such printed materials for your back-up purposes only.
-
License Restrictions. Except as provided otherwise herein, you shall not rent, lease, sublicense, sell, assign, loan, or otherwise transfer the Software. You shall not, and you shall not permit any third party, to reverse engineer, decompile, or disassemble the Software, except to the extent that applicable law expressly prohibits the foregoing restriction. You may not remove or destroy any product identification, copyright notices, or other proprietary markings or restrictions from the Software. All titles, trademarks, and copyright and restricted rights notices shall be reproduced on your back up copy of the Software. You may not modify or adapt the Software, merge the Software into another program or create derivative works based upon the Software.
-
Termination of certain functionality. The Software may contain components of certain licensed software including software licensed from Microsoft Corporation ("Microsoft") which implements Microsoft's digital rights management technology for Windows Media. Content providers are using the digital rights management technology for Windows Media ("WM-DRM") to protect the integrity of their content ("Secure Content") so that their intellectual property, including copyright, in such content is not misappropriated. Your Device may also use WM-DRM software to transfer or play Secure Content ("WM-DRM Software"). If the security of such WM-DRM Software is compromised, Microsoft may revoke (either on its own or upon the request of the owners of Secure Content ("Secure Content Owners")) the WM-DRM Software's right to acquire new licenses to copy, store, transfer, display and/or play Secure Content. Revocation does not alter the WM-DRM Software's ability to play unprotected content. A list of revoked WM-DRM Software is sent to your PC and/or your Device whenever you download a license for Secure Content. Microsoft may, in conjunction with such license, also download revocation lists onto your Device on behalf of Secure Content Owners, which may disable your Device's ability to copy, store, display, transfer, and/or play Secure Content. Secure Content Owners may also require you to upgrade some of the WM-DRM components distributed with this Software ("WM-DRM Upgrades") before accessing their content. When you attempt to play Secure Content, WM-DRM Software built by Microsoft will notify you that a WM-DRM Upgrade is required and then ask for your consent before the WM-DRM Upgrade is downloaded. WM-DRM Software built by Philips may do the same. If you decline the upgrade, you will not be able to access Secure Content that requires the WM-DRM Upgrade; however, you will still be able to access unprotected content and Secure Content that does not require the upgrade. WM-DRM features that access the Internet, such as acquiring new licenses and/or performing a required WM-DRM Upgrade, can be switched off. When these features are switched off, you will still be able to play Secure Content if you have a valid license for such content already stored on your Device. However, you will not be able to use certain of the WM-DRM Software features that require Internet access such as the ability to download content that requires the WM-DRM Upgrade. All title and intellectual property rights in and to the Secure Content is the property of the respective Secure Content owners and may be protected by applicable copyright or other intellectual property laws and treaties. This Agreement grants you no rights to use such Secure Content. To summarize, if the Software contains Microsoft WM-DRM components – Secure Content you desire to download, copy, store, display, transfer, and/or play is protected by the Microsoft WM-DRM components of the Software. Microsoft, Secure Content Owners, or Secure Content distributors may deny you access, or restrict your access, to Secure Content even after you have paid for, and/or obtained, it. Neither your consent nor the consent or approval of Philips is necessary for any of them to deny, withhold or otherwise restrict your access to Secure Content. Philips does not guaranty that you will be able to download, copy, store, display, transfer, and/or play Secure Content.
-
Open Source Software. (a) This software may contain components that are subject to open-source terms, as stated in the documentation accompanying the Device. This Agreement does not apply to this software as such. (b) Your license rights under this Agreement do not include any right or license to use, distribute or create derivative works of the Software in any manner that would subject the Software to Open Source Terms. "Open Source Terms" means the terms of any license that directly or indirectly (1) create, or purport to create, obligations for Philips with respect to the Software and/or derivative works thereof; or (2) grant, or purport to grant, to any third party any rights or immunities under intellectual property or proprietary rights in the Software or derivative works thereof.
-
Termination. This Agreement shall be effective upon installation or first use of the Software and shall terminate (i) at the discretion of Philips, due to your failure to comply with any term of this Agreement; or (ii) upon destruction of all copies of the Software and related materials provided to you by Philips hereunder. Philips's rights and your obligations shall survive the termination of this Agreement.
-
Upgrades. Philips may, at its sole option, make upgrades to the Software available by general posting on a website or by any other means or methods. Such upgrades may be made available pursuant to the terms of this Agreement or the release of such upgrades to you may be subject to your acceptance of another agreement.
- Support Services. Philips is not obligated to provide technical or other support ("Support Services") for the Software. If Philips does provide you with Support Services, these will be governed by separate terms to be agreed between you and Philips.
- Limited Software Warranty. Philips provides the Software 'as is' and without any warranty except that the Software will perform substantially in accordance with the documentation accompanying the Software for a period of one year after your first download, installation or use of the Software, whichever occurs first. Philips' entire liability and your exclusive remedy for breach of this warranty shall be, at Philips' option, either (i) return of the price paid by you for the Software (if any); or (b) repair or replacement of the Software that does not meet the warranty set forth herein and that is returned to Philips with a copy of your receipt. This limited warranty shall be void if failure of the Software has resulted from any accident, abuse, misuse or wrongful application. Any replacement Software will be warranted for the remainder of the original warranty period or thirty (30) days, whichever is longer. This limited warranty shall not apply to you if the Software was provided to you free of charge on an evaluation only basis.
- NO OTHER WARRANTIES. EXCEPT AS SET FORTH ABOVE, PHILIPS AND ITS LICENSORS DO NOT WARRANT THAT THE SOFTWARE WILL OPERATE ERROR FREE OR UNINTERRUPTED, OR WILL MEET YOUR REQUIREMENTS. YOU ASSUME ALL RESPONSIBILITIES FOR SELECTION OF THE SOFTWARE TO ACHIEVE YOUR INTENDED RESULTS, AND FOR THE INSTALLATION OF, USE OF, AND RESULTS OBTAINED FROM THE SOFTWARE. TO THE MAXIMUM EXTENT PERMITTED BY APPLICABLE LAW, PHILIPS AND ITS LICENSORS DISCLAIM ALL WARRANTIES AND CONDITIONS, WHETHER EXPRESS OR IMPLIED, INCLUDING BUT NOT LIMITED TO THE IMPLIED WARRANTIES OF MERCHANTABILITY, FITNESS FOR A PARTICULAR PURPOSE, AND ACCURACY OR COMPLETENESS OF RESULTS WITH RESPECT TO THE SOFTWARE AND THE ACCOMPANYING MATERIALS. THERE IS NO WARRANTY AGAINST INFRINGEMENT. PHILIPS DOES NOT WARRANT THAT YOU WILL BE ABLE TO DOWNLOAD, COPY, STORE, DISPLAY, TRANSFER, AND/OR PLAY SECURE CONTENT.
- LIMITATION OF LIABILITY. UNDER NO CIRCUMSTANCES WILL PHILIPS OR ITS LICENSORS BE LIABLE FOR ANY CONSEQUENTIAL, SPECIAL, INDIRECT, INCIDENTAL OR PUNITIVE DAMAGES WHATSOEVER, INCLUDING, WITHOUT LIMITATION, DAMAGES FOR LOSS OF PROFITS OR REVENUES, BUSINESS INTERRUPTION, LOSS OF BUSINESS INFORMATION, LOSS OF DATA, LOSS OF USE OR OTHER PECUNIARY LOSS, EVEN IF PHILIPS OR ITS LICENSORS HAVE BEEN ADVISED OF THE POSSIBILITY OF SUCH DAMAGES. IN NO EVENT SHALL PHILIPS' OR ITS LICENSORS' AGGREGATE LIABILITY FOR DAMAGES ARISING OUT OF THIS AGREEMENT EXCEED THE GREATER OF THE PRICE ACTUALLY PAID BY YOU FOR THE SOFTWARE OR FIVE POUNDS STERLING (5.00).
- Trademarks. Certain of the product and Philips names used in this Agreement, the Software, and the printed user documentation may constitute trademarks of the Philips, its licensors or other third parties. You are not authorized to use any such trademarks.
-
Export Administration. You agree that you will not directly or indirectly, export or re-export the Software to any country for which the United States Export Administration Act, or any similar United States law or regulation requires an export license or other U.S. Government approval, unless the appropriate export license or approval has first been obtained. By downloading or installing the Software you agree to abide by this Export provision.
-
Governing law. This Agreement is governed by the laws of your country of residence, without reference to its conflict of laws principles. Any dispute between you and Philips regarding this Agreement shall be subject to the non-exclusive jurisdiction of the courts of your country of residence.
- General. This Agreement contains the entire agreement between you and Philips and supersedes any prior representation, undertaking or other communication or advertising with respect to the Software and user documentation. If any part of this Agreement is held invalid, the remainder of this Agreement will continue in full force and effect. This Agreement shall not prejudice the statutory rights of any party dealing as a consumer.
EULA-English (UK)
September 2009

Specifications are subject to change without notice
© 2011 Koninklijke Philips Electronics N.V.
All rights reserved.
HMP7000_93_UM_V1.2
