
SHIM 740C X - Oven SCHNEIDER - Free user manual and instructions
Find the device manual for free SHIM 740C X SCHNEIDER in PDF.


| Product Type | Built-in Electric Oven |
| Brand | Schneider |
| Model | SHIM 740C X |
| Energy Source | Electric |
| Oven Type | Multifunction |
| Capacity | 71 liters |
| Dimensions (H x W x D) | 595 x 595 x 550 mm |
| Weight | 35 kg |
| Power Consumption | 3400 W |
| Temperature Range | 50°C - 250°C |
| Number of Functions | 8 (including convection, grill, defrost) |
| Cleaning Type | Pyrolytic |
| Control Type | Electronic touch and rotary |
| Safety Features | Child lock, auto shut-off, cool door |
| Energy Efficiency Class | A+ |
| Warranty | 2 years |
| Installation Type | Built-in under worktop or in column |
| Color | Stainless steel |
| Door Type | Cool touch, triple glazed |
| Interior Light | Yes, halogen |
| Cooling System | Integrated fan cooling |
| Accessories Included | 1 baking tray, 1 wire rack, 1 drip tray |
Frequently Asked Questions - SHIM 740C X SCHNEIDER
User questions about SHIM 740C X SCHNEIDER
0 question about this device. Answer the ones you know or ask your own.
Ask a new question about this device
Download the instructions for your Oven in PDF format for free! Find your manual SHIM 740C X - SCHNEIDER and take your electronic device back in hand. On this page are published all the documents necessary for the use of your device. SHIM 740C X by SCHNEIDER.
USER MANUAL SHIM 740C X SCHNEIDER
natural_image
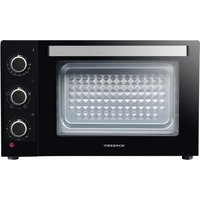
Exterior view of a modern kitchen oven with digital dials and a Schneider logo (no text or symbols on main body)SHIM 740C X
MANUAL DE USUARIO
INSTRUCCIONES DE USO
Sincromotor: 4 Watios
Motor (trasero): 25 Watios
Luz: 15Watios
Dimensiones internas: An 436mm x Al 215mm x F 410mm
natural_image
Technical line drawing of an oven with labeled components and a close-up of the internal structure (no text or symbols present)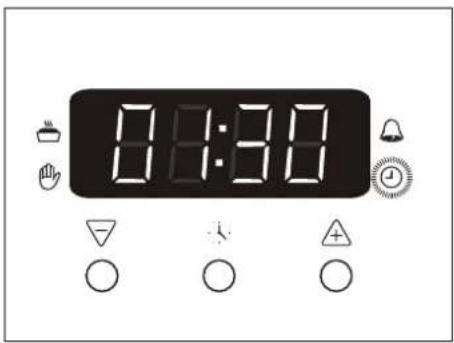
MANTENIMIENTO
LIMPIEZA
natural_image
Diagram of a ladder leaning against a wall with an upward arrow indicating motion (no text or symbols present)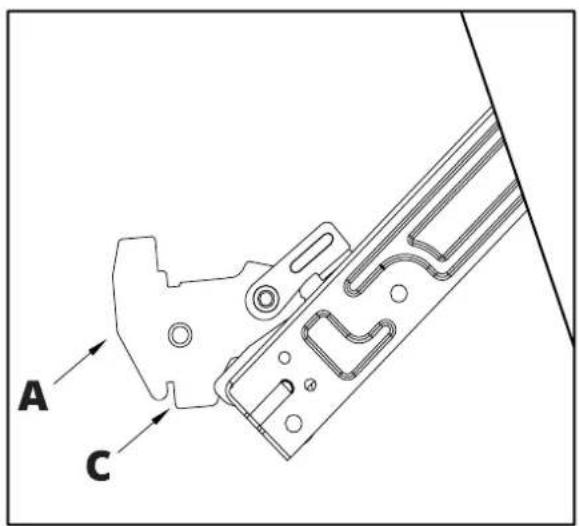
natural_image
Symbol of a trash bin with crossed-out lanes and a blank rectangular base (no text or numbers)Read carefully all the instructions contained in this booklet. It provides you with important information regarding the safe installation, use and maintenance of the appliance as well as useful advice for getting the best out of your oven. Keep this booklet in a safe place for future reference.
After removing the packing, check that the appliance is not damaged in any way.
Be careful not to leave the packing materials (plastic sheeting, expanded polystyrene etc.) where children can get at them, as they can be dangerous.
The oven is an appliance which, for its nature, becomes hot, especially in correspondence of the glass door. It is therefore a good rule that children do not approach the oven when it is functioning, particularly when the grill in used.
IMPORTANT: do not use the oven door handle to move the appliance, such as to remove it from the packaging.
The first time you switch the oven on, acrid smelling smoke may appear. This is caused by the heating of the adhesive used on the insulation panels surrounding the oven. There is nothing unusual about this. If it happens, simply wait until the smoke disappears before putting any food in the oven. Never roast or bake on the oven base.
FOR YOUR OWN SAFETY
This appliance is designed for non-professional, household use and its functions must not be changed.
The electrical system of this appliance may be used safely only when it is correctly connected to an efficient earthing system in compliance with the safety standards currently in effect.
The manufacturer will not be held liable for any damages that might arise out of incorrect installation or improper, incorrect or unreasonable use of the appliance.
The following items are potentially dangerous, and therefore, appropriate measures must be taken to prevent children and the disabled from coming into contact with them:
Controls and the appliance in general;
Packaging (bags, polystyrene, nails, etc.);
The appliance immediately after use of the oven or grill due to the heat generated;
The appliance when no longer in use (potentially dangerous parts must be made safe).
Avoid the following:
Touching the appliance with wet parts of the body;
Using the appliance when barefoot;
Pulling on the appliance or the supply cord to unplug it from the electrical outlet;
Obstructing the ventilation or heat dissipation slots;
Allowing power supply cords for small appliances to come into contact with the hot parts of the appliance;
Exposing the appliance to atmospheric agents (rain, sun);
Using the oven for storage purposes;
Using flammable liquids near the appliance;
Using adaptors, multiple sockets and/or extension cords;
Attempting to install or repair the appliance without the assistance of qualified personnel.
WARNING: Accessible parts will become hot when in use. To avoid burns and scalds children should be kept away.
During use the appliance becomes hot, Care should be taken to avoid touching heating elements inside the oven.
Qualified personnel must be contacted in the following cases:
- Installation (following the manufacture's instructions);
- When in doubt about operating the appliance;
- Replacing the electrical outlet when it is not compatible with the plug for the appliance.
Service Centres authorized by the manufacturer must be contacted in the following cases:
- If in doubt about the soundness of the appliance after removing it from the packaging;
- If the power supply cord has been damaged or needs to be replaced;
- If the appliance breaks down or functions poorly; ask for original spare parts.
It is a good idea to do as the following:
- Only use the appliance to cook food, nothing else;
- Check the soundness of the appliance after it has been unpacked;
- Unplugged the appliance from the electrical mains if it is not functioning properly and before cleaning or performing maintenance;
- When the appliance is not used for an extended period of time, unplugged the appliance and close the gas cock (it present);
- Use cooking gloves to place cookware in the oven or when removing it;
- Always grasp the oven door in the centre because the ends may be hot due to the escape of hot air;
- Make sure that the control knobs are on the "o" setting when the appliance is not in use;
- Unplug the appliance when you decide not to use the appliance any longer.
The manufacturer may not be held responsible for any damage due to: incorrect installation, improper, incorrect and irrational use.
SPECIFICATIONS
The ovens are designed to operate with a monophase alternating current of 220-240V 50Hz. anyway, before the installation of the appliance, we suggest you to check always these specifications on the rating label applied on the outside rear part.
Lower heating element: 1050 Watt
Grill: 1400 Watt
Synchromotor: 4 Watt
Rear heating element: 1600 Watt
Shaded Motor (top): 15 Watt
Shaded Motor (back): 25 Watt
Oven light: 15 Watt
Cavity dimensions: W 436mm x H 215mm x D 410mm | Capacity: 38 litres
ACCESSORIES: Tray, tray handle, small rack, big rack.
INDICATOR LIGHTS
The indicator lights situated above the control panel go on and off when the heating elements are inserted or removed. During the thermostatic functioning of the oven, the neon light remains on until the pre-chosen temperature is reached and when it goes out, this is a sign that the temperature has been reached. When the oven cools, the thermostat determines the re-insertion of the heating elements with consequent re-lighting of the indicator lights. In models the internal oven light, which is always on when any function is in operation, is considered as an operation, is considered as an operating warning light.
INSTALLING THE APPLIANCE
BUILT IN
Important: Unplug your oven before performing installation or maintenance!
Installation should be carried out according to the instructions by a professionally qualified person.
Schneider declines all responsibility for any damage to persons, animals or things due to a wrong installation.
natural_image
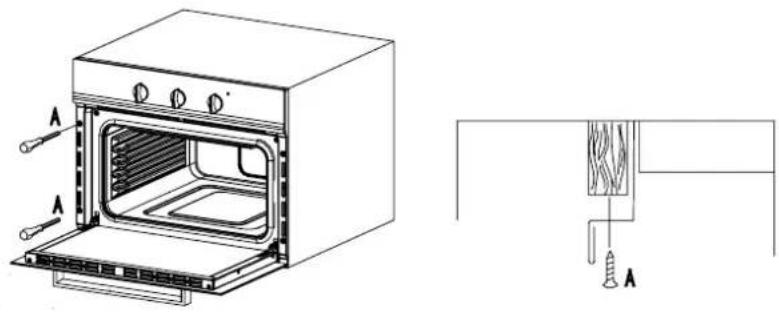
Technical line drawing of an oven with labeled components and a close-up of internal wiring (no text or symbols present)Fit the appliance into its surround (beneath a work-top or above another appliance) by inserting screws into the 4 holes that can be seen in the frame of the oven when the door is open.
For the most efficient air circulation, the oven should be fitted according to the dimensions shown in fig. 2. The rear panel of the cabinet must be removed so that air can circulate freely. The panel to which the oven is fitted should have a gap of at least 70 mm at the rear.
Where ovens are to be matched with hobs, it is essential to follow the instructions contained in the booklet supplied with the other appliance
IMPORTANT:
During use the appliance becomes hot, Care should be taken to avoid touching heating elements inside the oven.
Accessible parts may become hot during use. Young children should be kept away.
Do not use harsh abrasive cleaners or sharp metal scrapers to clean the oven door glass since they can scratch the surface, which may result in shattering of the glass. For a built-in oven to work well the cabinet must be of the right type.
The panels of the adjoining furniture should be heat resistant. Particularly when the adjoining furniture is made of veneered wood, the adhesives should be able to withstand a temperature of 120^ C.
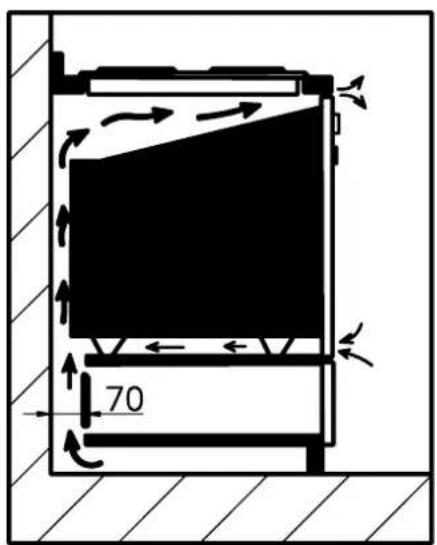
Fig. 2
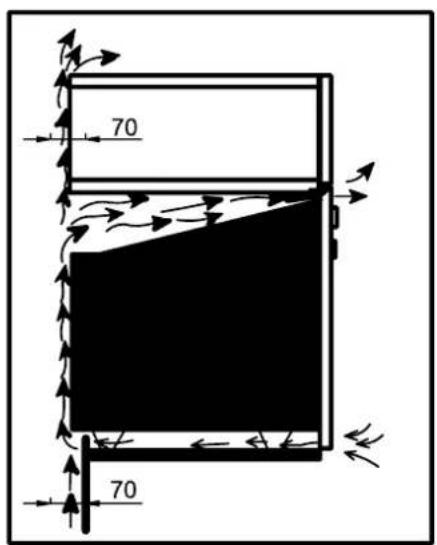
Fig. 3
Plastic materials or adhesive which cannot withstand this temperature will become deformed or unstuck.
To comply with safety regulations, once the appliance has been fitted it should not be possible to make contact with the electrical parts.
All parts which offer protection should be fixed in such a way that they cannot be removed without the use of a tool.
Ensure that the appliance is switched off before replacing the lamp to avoid the possibility of electric shock.
Connection to the mains
THE APPLIANCE MUST BE CONNECTED ACCORDANCE WITH THE RULES CURRENTLY IN FORCE, AND ONLY BY AN AUTHORIZED ELECTRICAL INSTALLER.
WARNING: THIS APPLIANCE MUST BE EARTHED
The earthing cable (yellow/green) must be connected to the screw with the earthing mark (⊕). The mains cable must be connected as shown below. If there is no earthing inlet around contact our technical services.
The earthing inlet must be near the oven. Never use a extension cord. The mains cable should never be in contact the hot parts of the oven.
If the mains cable is damaged contact our technical services for replacement. A damaged cable could damage the appliance.
This product is designed to work at 220-240V. If your installation does not comply with this contact our technical services before installing the appliance.
Schneider cannot be held responsible for any damage to persons or objects due to inobservance of the local current regulations and/or this user manual advises.
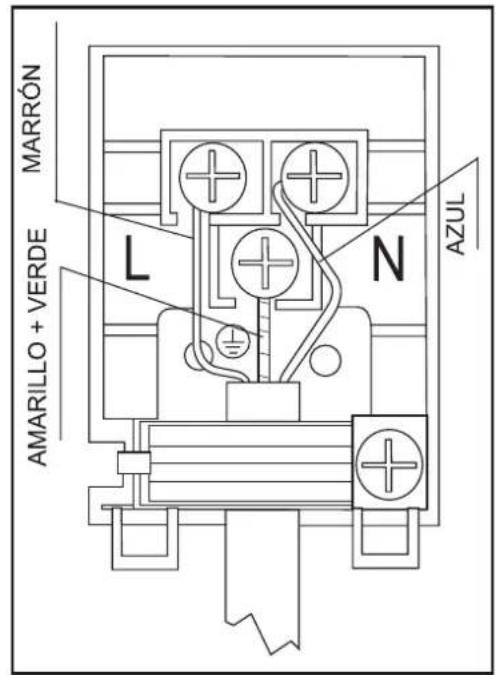
The mains cable does not support temperatures over 50°C. Keep this in mind for installation.
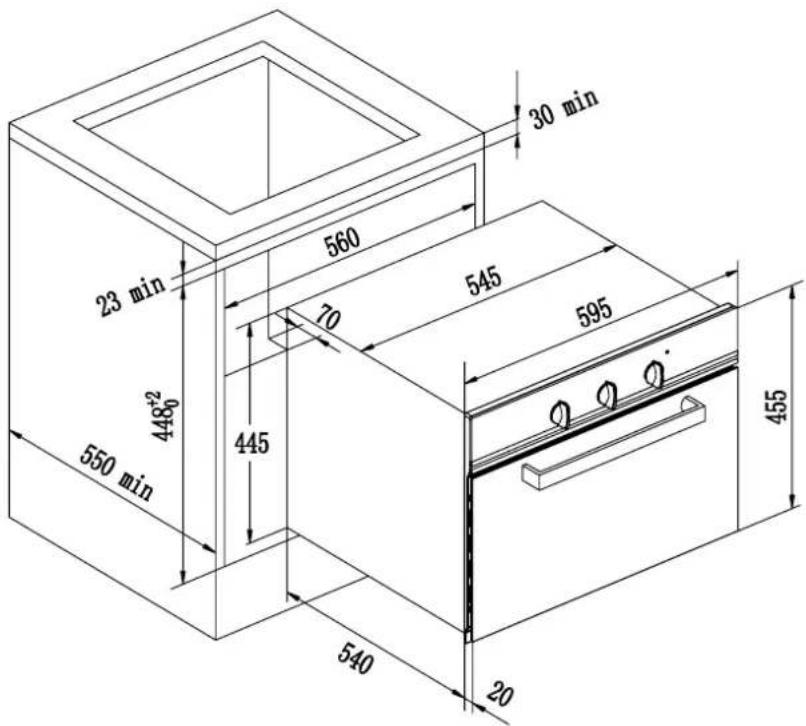
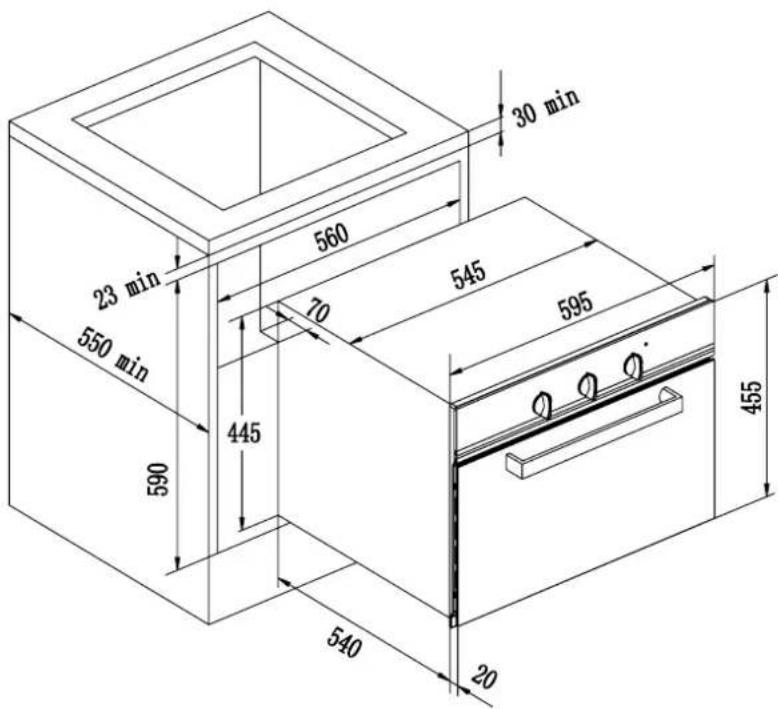
For built in installation take into account the following cabinet and product dimensions:
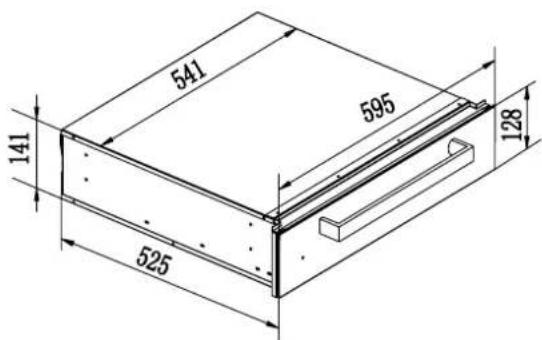
USAGE INSTRUCTIONS
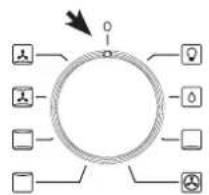
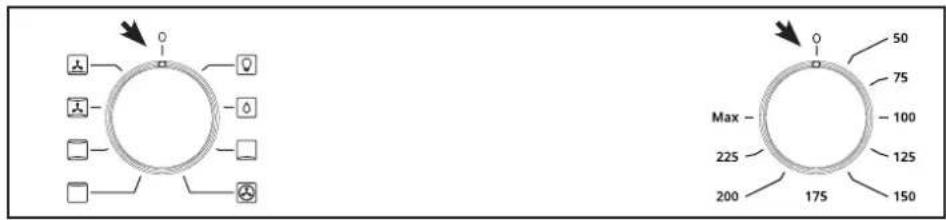
This oven offers the following 7 cooking modes and also "just light" mode. On top of the cooking modes knob you will find the Off position (o).

Lower heating element + Fan
The heat comes from the bottom heater. The fan distributes it evenly. It works between 50°C and 200°C. This is a good option for sterilizing glass jars.

Lower heating element + Upper heating element + Fan
The oven is heated by top and bottom elements and the fan mounted in the back panel helps to distribute heat throughout the oven. Suitable for perfect pastry. No need to blind bake.
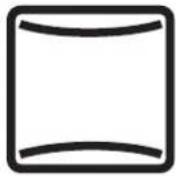
Lower heating element + Upper heating element
Both the lower and upper heating elements operate together. This is the traditional cooking. Very good for roasting joints, Ideal for biscuits, baked apples and crisping food. You obtain very good results when cooking on a shelf. Temperature between 50°C and MAX.

Upper heating element
It is indicated for warming up pre-cooked food when placing the grid on the second shelf from the top, or for defrosting pastry placing the grid on the first shelf from the bottom. Temperature between 50°C and MAX.

Light
Use this option to turn on the inner light without heating functions.

Defrost (Fan)
The air at ambient temperature is distributed inside the oven for defrosting food more quickly and without proteins adulteration.

Lower heating element
This function is particularly indicated for cooking from the bottom, warming up food or sterilizing glass jars. It is also indicated for food requiring long and slow cooking. i.e. casserole. Temperature between 50°C and MAX.

Thermoboost
Both the fan and the rear heating element operate together. The hot air adjustable between 50°C and MAX. is evenly distributed. It is fast and ideal for cooking different types of food (meat, fish...) at the same time without affecting taste. Good for delicate pastry.
CONTROL PANEL
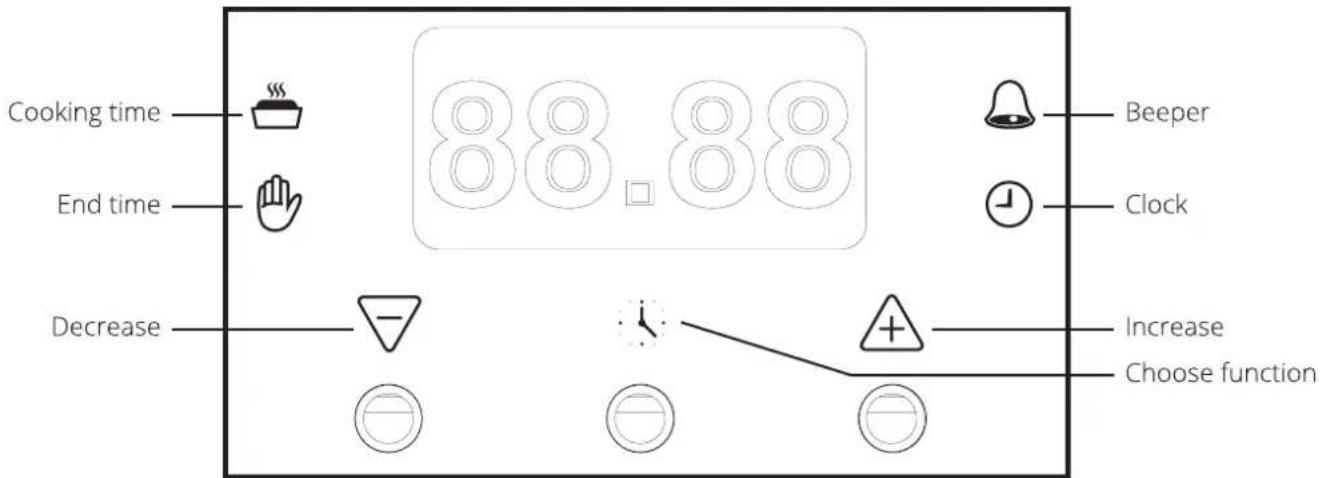
Electronic Timer
Select the desired timer function by pressing until the indicator flashes. Use △ and ▽ to select a time value. To confirm just wait for 5 seconds. You can use different timer functions at the same time. You have to set the current time (clock function) before using the oven.
Time set ⏻ (Clock function)
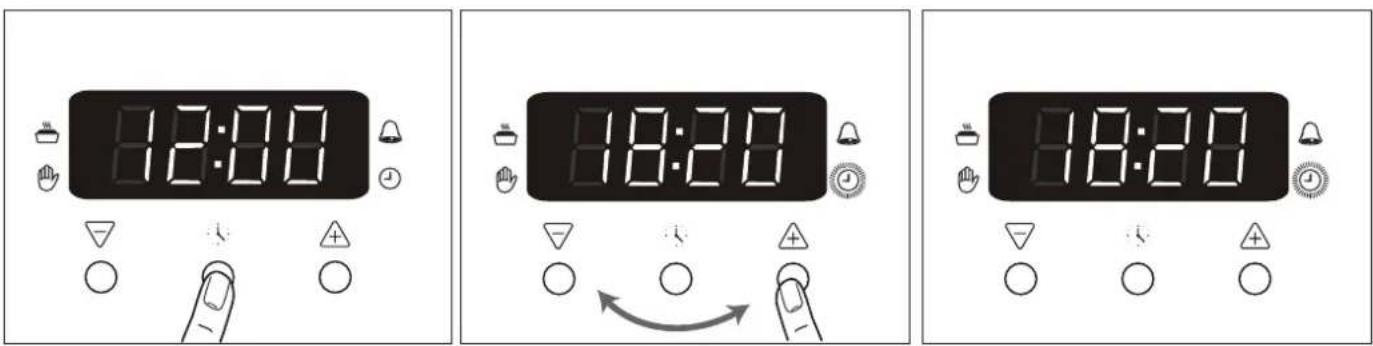
If you just plugged the oven or if there has been a blackout the Ⓕ ("Clock") indicator flashes, indicating that you should set the current time. To do so follow the next steps:
To select the clock function press repeatedly button until indicator flashes. If you have just plugged the oven or there has been a blackout you can skip this step as it already flashes.
Use Ⓐ and ∇ buttons to set the current time. Every time you press it will increase / decrease 1 minute. Long press for fast forward.
When finished wait for 5 seconds to confirm. When the indicator stops flashing you know that the time has been correctly set and you can use the oven if you want.
If the time has been set but you want to modify the setting follow previous instructions, but keep in mind that Cooking time (💡) and End time (💡) should not be active at that moment.
When you are not cooking you can turn off the clock by pressing any 2 buttons at the same time. You can turn it back on the same way. If 🔊, 🚙 or 🌐 are active you cannot turn the screen off.
This clock and all other timer functions are based in a 24h clock format (4pm = 16:00h).
Beeper
If you wish you can set an independent beeper (for example if you want it to beep at half cooking process to check the cake). You can set a beeper at any time whether the oven is working or not. To set the beeper follow these steps:
Press repeatedly button until indicator flashes.
Use Ⓓ and ▼ buttons to set the countdown, up to 2:30h.
Wait for 5 sec. to confirm. 🔒 indicator stops flashing. You can see the countdown on screen.
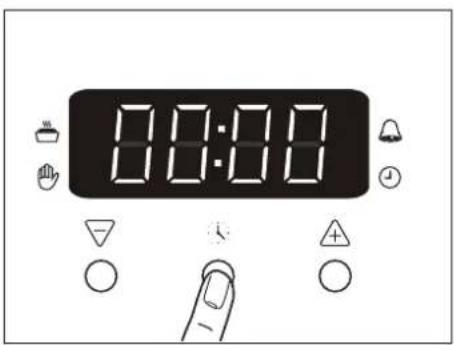
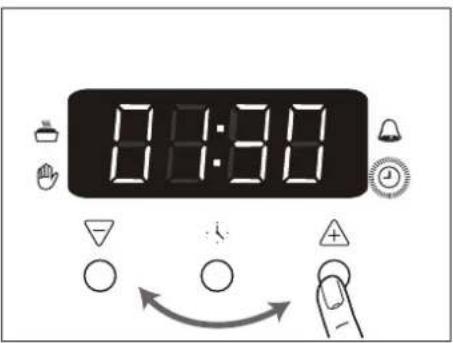
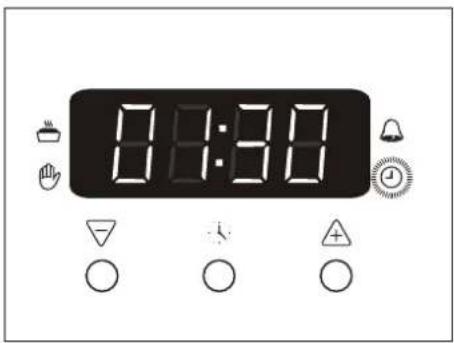
When the time has elapsed, the function indicator flashes and an acoustic signal sounds for 2 minutes. Press any button to switch off the signal.
Cooking Time
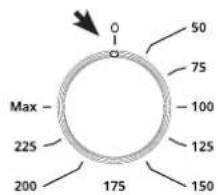
If you wish you can preset a cooking time (30 minutes for example). Using the aside knobs you can set temperature and cooking mode either before or after setting a Cooking time. Following the next steps:
Press repeatedly button until indicator flashes.
Use Ⓓ and ▽ buttons to set your desired cooking time.
Wait for 5 seconds to confirm until 📁 indicator stops flashing.
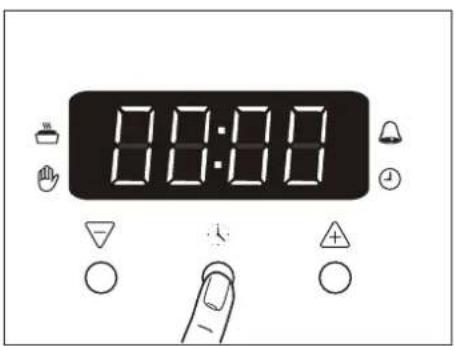
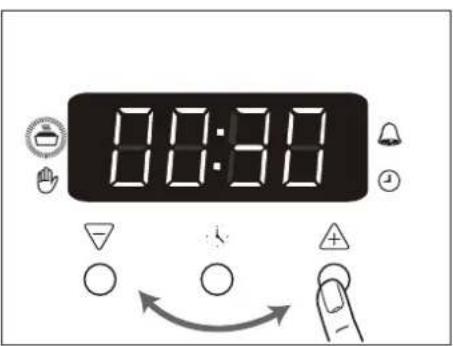
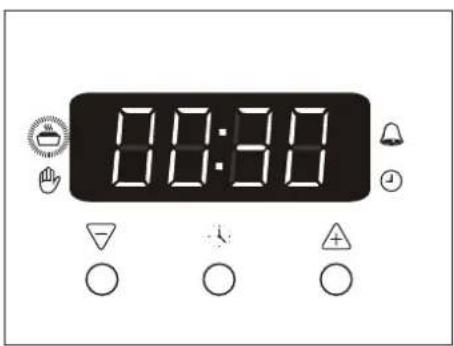
When the time has elapsed, the function indicator flashes and an acoustic signal sounds for 2 minutes. Press any button to switch off the signal.
When the cooking program ends make sure you switch off both aside knobs (temperature and cooking mode knobs). Put them in - "0" - position.
flowchart
graph TD
    A["Input"] --> B((Process))
    C["Input"] --> B
    D["Input"] --> B
    E["Input"] --> B
    F["Input"] --> B
    G["Input"] --> B
    H["Input"] --> B
    I["Input"] --> B
    J["Input"] --> B
    K["Input"] --> B
    L["Input"] --> B
    M["Input"] --> B
    N["Input"] --> B
    O["Input"] --> B
    P["Input"] --> B
    Q["Input"] --> B
    R["Input"] --> B
    S["Input"] --> B
    T["Input"] --> B
    U["Input"] --> B
    V["Input"] --> B
    W["Input"] --> B
    X["Input"] --> B
    Y["Input"] --> B
    Z["Input"] --> B
    AA["Input"] --> B
    AB["Input"] --> B
    AC["Input"] --> B
    AD["Input"] --> B
    AE["Input"] --> B
    AF["Input"] --> B
    AG["Input"] --> B
    AH["Input"] --> B
    AI["Input"] --> B
    AJ["Input"] --> B
    AK["Input"] --> B
    AL["Input"] --> B
    AM["Input"] --> B
    AN["Input"] --> B
    AO["Input"] --> B
    AP["Input"] --> B
    AQ["Input"] --> B
    AR["Input"] --> B
    AS["Input"] --> B
    AT["Input"] --> B
    AU["Input"] --> B
    AV["Input"] --> B
    AW["Input"] --> B
    AX["Input"] --> B
    AY["Output"]
    AZ["Load"]
    BA["Reset"]
    BB["Pulse"]
    BC["Dots"]
    BD["Lift"]
    BE["Spike"]
    BF["Grip"]
    BG["Balance"]
Cooking end time
Instead of presetting a cooking time (for example 20 minutes) you can set and end time (such as 9:20h). Using the knobs you can set temperature and cooking mode either before or after setting an end time. To set an end time follow the next steps:
Press repeatedly button until indicator flashes.
Use Ⓓ and ▽ buttons to set your end time.
Wait for 5 seconds to confirm until ⚙ indicator stops flashing.
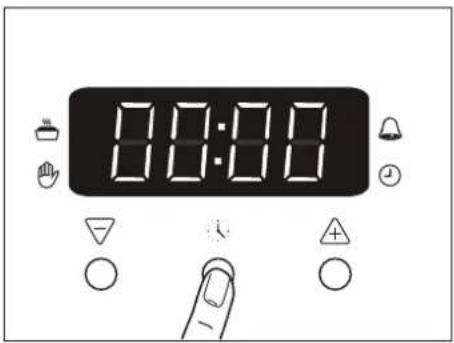
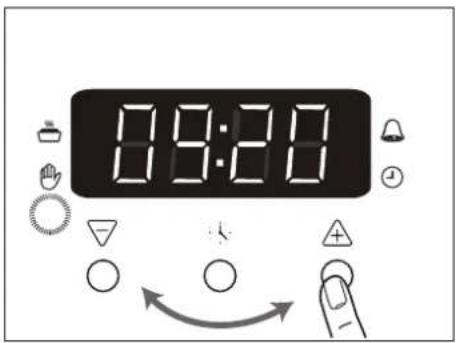
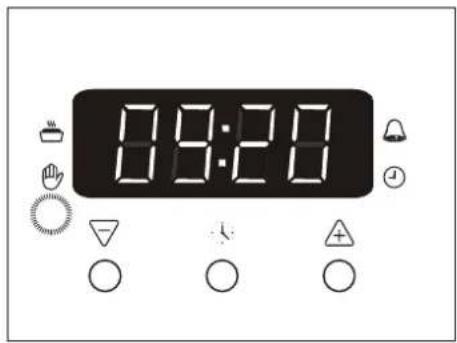
When the time has elapsed, the function indicator flashes and an acoustic signal sounds for 2 minutes. Press any button to switch off the signal.
Delay start (Programmer) /
For example it is 06:00h and you want your oven to start cooking in 4 hours time (at 10:00h) for 20 minutes. Follow the next steps:
Press repeatedly button until indicator flashes.
Use Ⓓ and ▼ buttons to set 20 minutes.
Wait for 5 seconds to confirm until 📁 indicator stops flashing.
Press repeatedly button until indicator flashes.
Use △ and ▽ buttons to set 10:20h (06:00h current time + 4h delay + 20 minutes cooking).
Wait for 5 seconds to confirm until ⏻ indicator stops flashing.
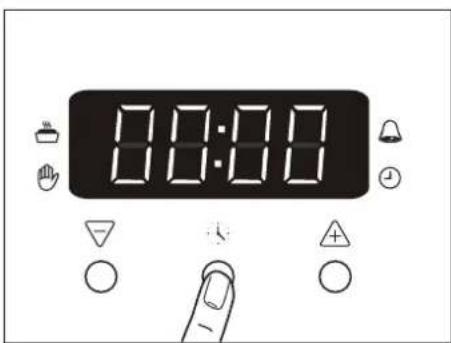
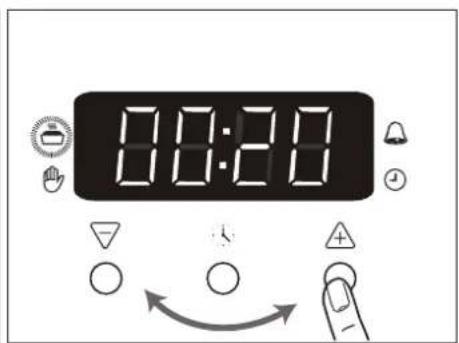
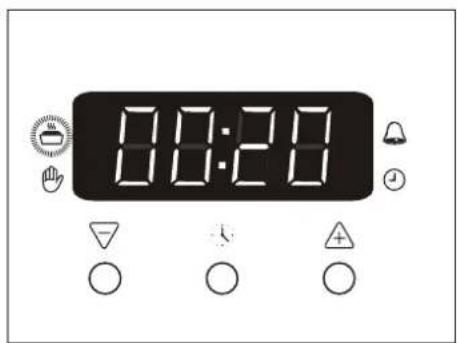
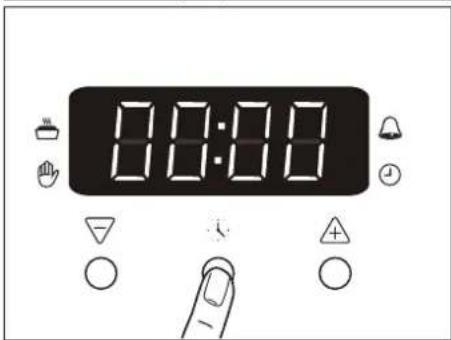
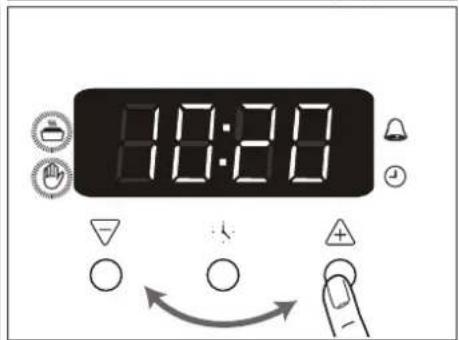
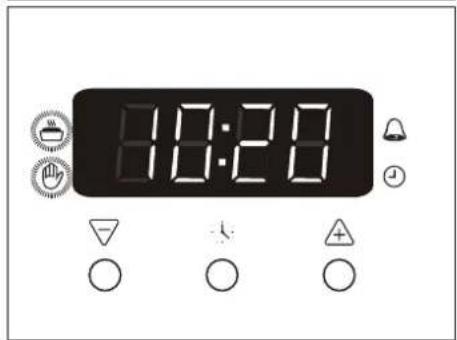
When the time has elapsed, the function indicator flashes and an acoustic signal sounds for 2 minutes. Press any button to switch off the signal.
Using the aside knobs you can set temperature and cooking mode either before or after setting a Cooking time and End time.
When the cooking program ends make sure you switch off both aside knobs (temperature and cooking mode knobs). Put them in - "0" - position.
MAINTENANCE
CLEANING
Unplug the appliance before performing any maintenance.
Clean your oven frequently, keeping always in mind the following:
Do not uses steam equipment to clean the appliance.
To protect against the risk of electrical shock, do not immerse the unit, cord or plug in water or other liquid or sprinkle water to clean the appliance.
Don't clean the appliance when it still hot! The inside and external surface of the oven should preferably be cleaned by damp cloth when it is cooled down.
Wash all accessories in hot sudsy water or in a dishwasher, wipe dry with a paper or cloth towel.
If you use your oven for an extended period of time, condensation may form. Dry it using a soft cloth.
Clear the glass door using damp cloth and dry it with a soft cloth. Do not use harsh abrasive cleaners or sharp metal scrapers to clean the oven door glass since they can scratch the surface, which may result in shattering of the glass.
There is a rubber seal surrounding the oven opening which guarantees its perfect functioning. Check the condition of this seal on a regular basis. If necessary, clean it and avoid using abrasive products or objects to do so. Should it become damaged, please contact your nearest After-sales Service Centre. We recommend you avoid using the oven until it has been repaired.
Never line the oven bottom with aluminium foil, as the consequent accumulation of heat could compromise the cooking and even damage the enamel.
This appliance is for household use only, don't use it outdoors.
REPLACING THE LAMP
To replace the oven inner lamp follow the next steps:
• Ubplighte even;
- Udscrew with the glass cover at all of the lamp holder;
• Ublscrewthealamp;
• Repalae et it with a number the halamp with the following characteristics:
High-temperature resistant (300°C);
Voltage: 220-2240V;
Power: 15W;
Socket type: E14;
• Remount the glass cover;
• Plugrintheoven;
- Set current time as previously explained.
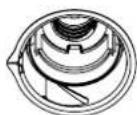
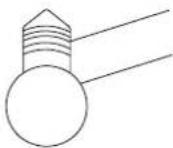
E14 lamp
Stands 300°C
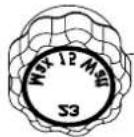
Glass cover
USEFUL NOTES FOR COOKING
Sometimes cooking results might differ from expected. There are many factors that influence the cooking results, but keep in mind your last cooking and check below advises to make improvements the next time you cook the same food:
| COOKING RESULTS CAUSE POSSIBLE SOLUTIONS | POSSIBLE SOLUTIONS | |
| The upper crust is dark and the lower part too pale | Not enough heat from the bottom - Use the natural conversion position- Use deeper cake tins- Lower the temperature- Put the cake on a lower shelf | |
| The lower part is dark and the upper crust too pale | Excessive heat from the bottom - Use the natural conversion position- Use lower side tins- Lower the temperature- Put the cake on a higher shelf | |
| The outside is too cooked and the inside not cooked enough | Too high temperature - Lower the temperature and increase the cooking time | |
| The outside is too dry even though of the right colour. | Too low temperature - Increase the temperature and reduce the cooking time. | |
DISASSEMBLING / ASSEMBLING THE DOOR
To make it easier to clean the inside of your oven, the oven door can be removed. Follow the next steps:
-
Open the door completely.
-
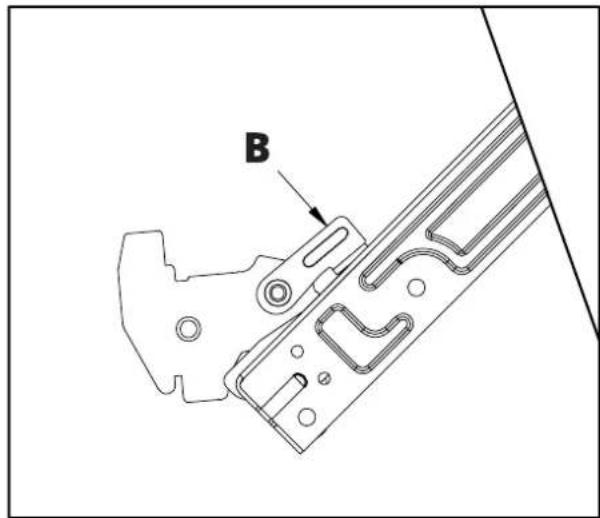
Lift the 2 levers "B":
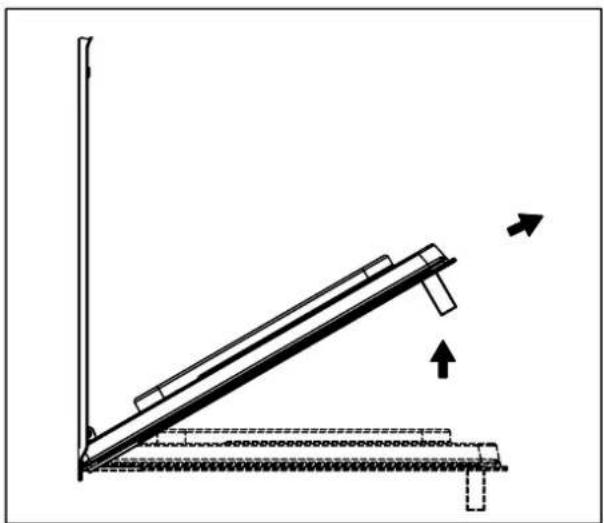
Shut the door slightly, and then you can lift it out by pulling out the hooks "A":
natural_image
Diagram of a ladder leaning against a wall, with an arrow indicating upward motion (no text or symbols present)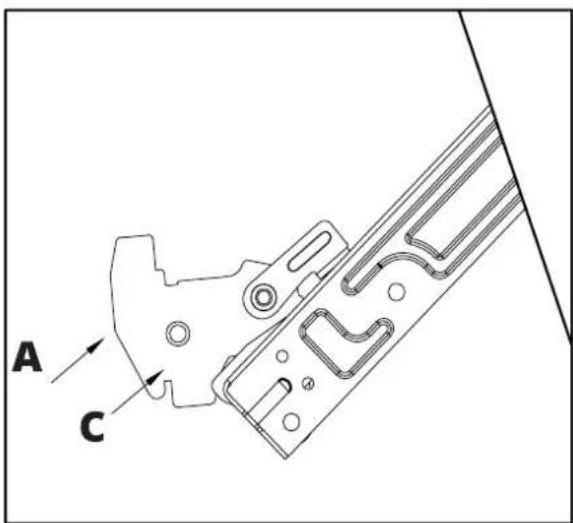
To reassemble the door insert the two hooks "A" into the slots with the door in a vertical position, ensuring that seat "C" is hooked perfectly onto the edge of the slot (move the oven door backwards and forward slightly).
At last open the oven door fully, unhook the 2 levers "B" downwards and then shut the door again.
Warranty
The following information is just for your reference and you should always refer to warranty card attached. The warranty of this appliance is in compliance with current Spanish regulations.
In order to make effective the official warranty of this device a buying proof will be requested (generally an invoice), so we recommend you to keep it during the whole product life.
Occasionally, for product repairing, it might be necessary to take the product to our offices by courier. The courier company cannot be held responsible for product transportation damages if the oven is not perfectly packed. Therefore we advise you to keep the original packaging during the whole product life.
Any inadequate use of the oven, any contravention of this user manual contravention or nay product handling, repairing or dismantle by unauthorised people will void the official warranty.
PRODUCT DISPOSAL
natural_image
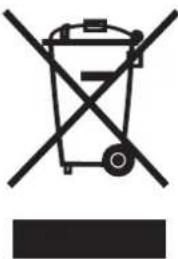
Symbol of a trash bin with no visible text or labelsThis marking indicates that this product should not be disposed with other household wastes throughout the EU. To prevent possible harm to the environment or human health from uncontrolled waste disposal, recycle it responsibly to promote the sustainable reuse of material resources. To return your used device, please use the local return and collection systems or contact the retailer where the product was purchased. They can take this product for environmental safe recycling.
All informations contained in this user manual are subject to change without any prior notice. All images are only for reference.
Schneider España de I. S.A., C/ Verano 18-20, Torrejón de Ardoz, Madrid. Made in P.R.C.
www.schneiderespana.es

SCHNEIDER
- SHIM 740C X
- MANUAL DE USUARIO
- INSTRUCCIONES DE USO
- MANTENIMIENTO
- LIMPIEZA
- FOR YOUR OWN SAFETY
- SPECIFICATIONS
- INDICATOR LIGHTS
- INSTALLING THE APPLIANCE
- BUILT IN
- IMPORTANT:
- Connection to the mains
- USAGE INSTRUCTIONS
- Lower heating element + Fan
- Lower heating element + Upper heating element + Fan
- Lower heating element + Upper heating element
- Upper heating element
- Light
- Defrost (Fan)
- Lower heating element
- Thermoboost
- CONTROL PANEL
- Electronic Timer
- Time set ⏻ (Clock function)
- Beeper
- Cooking Time
- Cooking end time
- Delay start (Programmer) /
- MAINTENANCE
- CLEANING
- REPLACING THE LAMP
- USEFUL NOTES FOR COOKING
- DISASSEMBLING / ASSEMBLING THE DOOR
- Warranty
- PRODUCT DISPOSAL
- SCHNEIDER
Brand : SCHNEIDER
Model : SHIM 740C X
Category : Oven