
FPSTHS2611-013 - Hand blender OSTER - Free user manual and instructions
Find the device manual for free FPSTHS2611-013 OSTER in PDF.


| Product Type | Hand Blender (Immersion Blender) |
| Model | FPSTHS2611-013 |
| Power | 300 Watts |
| Speed Settings | 2 speeds + turbo boost |
| Attachments Included | Blending shaft, whisk attachment, 20 oz blending cup |
| Motor Housing Material | Stainless steel and plastic |
| Shaft Material | Stainless steel |
| Cord Length | 4.9 ft (1.5 m) |
| Weight | 1.6 lbs (0.73 kg) |
| Dimensions (Height x Width x Depth) | 14.6 x 3.5 x 3.5 in (37 x 9 x 9 cm) |
| BPA Free | Yes (blending cup and attachments) |
| Dishwasher Safe Parts | Blending shaft, whisk, and cup (top rack) |
| Ergonomic Handle | Yes, soft grip |
| Voltage | 120 V, 60 Hz |
| Warranty | Limited 1-year warranty |
| Safety Features | Automatic shut-off, cool-touch housing |
| Blending Capacity | Up to 20 oz (600 ml) with included cup |
| Cleaning | Rinse shaft under running water; attachments dishwasher safe |
| Repairability | Replaceable shaft and attachments; professional service recommended for motor |
Frequently Asked Questions - FPSTHS2611-013 OSTER
User questions about FPSTHS2611-013 OSTER
0 question about this device. Answer the ones you know or ask your own.
Ask a new question about this device
Download the instructions for your Hand blender in PDF format for free! Find your manual FPSTHS2611-013 - OSTER and take your electronic device back in hand. On this page are published all the documents necessary for the use of your device. FPSTHS2611-013 by OSTER.
USER MANUAL FPSTHS2611-013 OSTER
natural_image
Illustration of two kitchen electricizers with a hand mixer, no text or symbols presentMODELOS/MODELS
2610 & FPSTHS2611
PLEASE READ ALL INSTRUCTIONS BEFORE USING THIS APPLIANCE
MANUAL DE INSTRUÇÕES
natural_image
Line drawing of a mechanical device with directional arrows indicating movement or force (no text or symbols)(figura 2).
natural_image
Line drawing of a hand mixer with control knob and handle (no text or symbols)(figura 3)
ESPAÑOL-4
COMO LEVANTAR O BAJAR LA BATIDORA
natural_image
Line drawing of a device with directional arrows indicating rotation or movement (no text or symbols)(figura 4)
COMO COLOCAR O SACAR EL TAZON PARA MEZCLAR
natural_image
Technical line drawing of a circular mechanical component with concentric rings and mounting holes (no text or symbols)(figura 5)
USO DE SU BATIDORA DE MANO Y PEDESTAL
When using electrical appliances, basic safety precautions should always be followed, including the following:
- READ ALL INSTRUCTIONS BEFORE USE.
- To protect against risk of electrical shock, DO NOT put hand/stand mixer in water or other liquid. This may cause personal injury and/or damage to the product.
- To disconnect, turn off controls and unplug from outlet.
- Unplug from outlet while not in use, before putting on or taking off parts and before cleaning.
- Avoid contact with moving parts. Keep hands, hair, clothing, as well as spatulas and other utensils away from beaters during operation to reduce the risk of injury to persons and/or damage to the hand/stand mixer.
- DO NOT operate hand/stand mixer with a damaged cord or plug, after the appliance malfunctions, or if it is dropped or damaged in any manner. Return appliance to the nearest Authorized Oster® Service Center for examination, repair or electrical or mechanical adjustment.
- The use of attachments not recommended or sold by manufacturer may cause fire, electrical shock or injury.
- DO NOT let cord hang over edge of table or countertop.
- DO NOT let cord touch hot surfaces, including a stove.
- DO NOT use outdoors or for commercial purposes.
- Remove beaters/dough hooks from hand/stand mixer before washing them.
- DO NOT place hand/stand mixer on or near a hot burner or in a heated oven.
- DO NOT use hand/stand mixer for other than intended use.
- DO NOT leave hand/stand mixer unattended while it is operating.
- Maximum running time for product is 5 continuous minutes.
- This appliance is not intended for use by persons (including children) with reduced physical, sensory or mental capabilities, or lack of experience and knowledge, unless they have been given supervision or instruction concerning use of the appliance by a person responsible for their safety. Children should be supervised to ensure that they do not play with the appliance.
- Close supervision is necessary when any appliance is used by or near children, or incapacitated individuals.
- The instructions shall state that appliances are not intended to be operated by means of an external timer or separate remote-control system.
THIS UNIT IS FOR HOUSEHOLD USE ONLY.
SAVE THESE INSTRUCTIONS
POWER CORD SPECIAL INSTRUCTIONS
A short power-supply cord is provided to reduce the risk resulting from becoming entangled in or tripping over a longer cord. An extension cord may be used if care is exercised in its use. If an extension cord is used, the electrical rating of he cord must be at least as great as the electrical rating of the appliance. The extension cord should be arranged so that it will not drape over the countertop or tabletop where it can be pulled on by children or tripped over unintentionally.
WELCOME
Congratulations on your purchase of an OSTER® Hand Mixer! To learn more about OSTER® products, please visit us at www.oster.com.
DESCRIPTION OF THE APPLIANCE
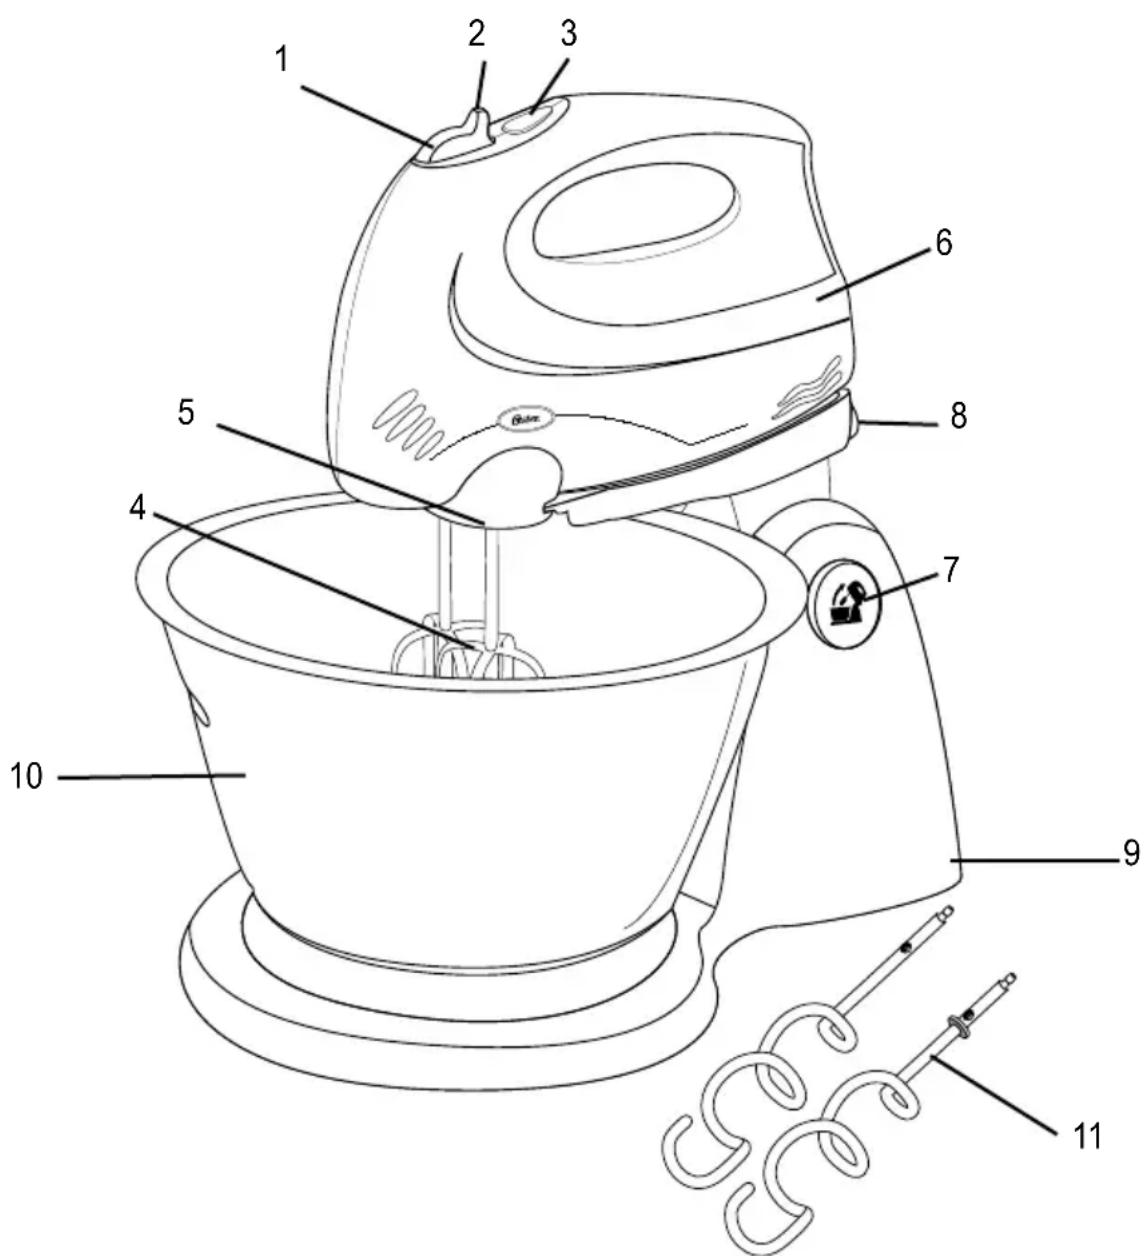
- On/Off Speed Control – Beater Eject Button
- Thumb Tab
- Burst of Power Button
- Beaters
- Large Drive Hole
- Mixer
- Raise/ Lower Button
- Lock & Release Latch
- Mixer Stand
- Mixing Bowl
- Dough Hooks
LEARNING YOUR HAND/STAND MIXER
You can use the Mixer to mix and knead. The Mixer can be easily removed from the stand in a moment and used as a standard Hand Mixer.
PREPARING FOR USE
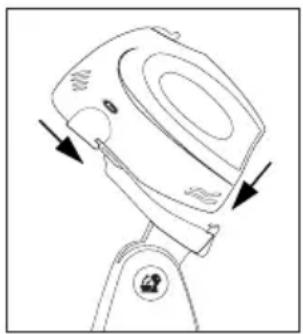
Placing and securing the Mixer to the stand (figure 2).
natural_image
Line drawing of a mechanical device with directional arrows indicating movement or force (no text or symbols)(figure 2)
Before placing and securing the Mixer to the stand, switch unit off "O" and unplug from the electrical outlet. Place the grooves located in the bottom of the Hand Mixer (see figure 2) onto the tips of the holding base of the stand. Then push the back of the Hand Mixer down until it locks into place with a click sound. To remove it, push the lower end of the Lock & Release Latch and lift the Hand Mixer up then forward.
INSERTING/ EJECTING BEATERS & DOUGH HOOKS
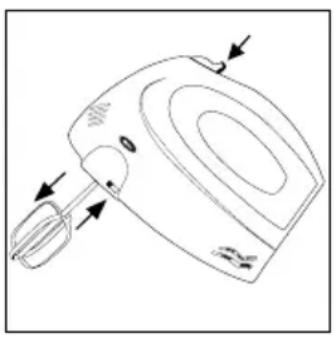
Before releasing the Beaters or Dough Hooks, switch off the Mixer and remove the plug from the electrical outlet. Push the Beaters or Dough Hooks into the slots located under of the mixer, until they click into place. The two Dough Hooks have different plug shapes and must be pushed into the correct slots. Inserting the wrong way would lead the dough to “move” upwards. One of the Dough Hooks has an additional small ring near the collar on the shaft. This Dough Hook will only fit in the slot for which it is intended. To remove the accessories, hold firmly with one hand, while pressing the Beater Ejector Button (figure 3).
natural_image
Line drawing of a hand mixer with directional arrows indicating motion (no text or symbols)(figure 3)
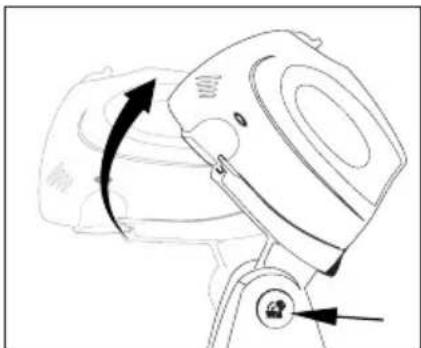
Ensure the Mixer is switched off before raising/ lowering. Press the Raise/ Low Button (figure 4) and lift the Mixer up or lower it until it clicks in place. This will facilitate removal of Beaters as well the Bowl.
natural_image
Line drawing of a mechanical device with directional arrows indicating rotation or movement (no text or symbols)(figure 4)
PLACING/ REMOVING THE MIXING BOWL
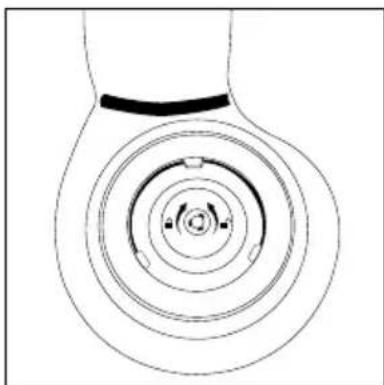
Place the Mixing Bowl on the rotating plate of the Stand (figure 5) and latch in place by gently turning it clockwise. To remove it, turn it counterclockwise to unlatch. It may be necessary to hold the base to prevent it from rotating. The off-center position of the Mixer makes it easy to add ingredients while the Mixer is in operation.
natural_image
Pure technical diagram of a circular component with concentric rings and central slots (no text or symbols)(figure 5)
USING YOUR HAND/STAND MIXER
Before using your Hand/Stand Mixer for the first time, wash the Beaters, Dough Hooks and Bowl in hot/soapy water, or the dishwasher. Rinse and dry. Be sure the speed controls are in the "0" position and the unit is unplugged from an electrical outlet. Plug cord into an electrical outlet. Insert Beaters as indicated above.
MIXING WITH THE STAND MIXER
The On/ Off Speed is used to switch the Mixer on and control the Mixer speed. For every speed selected, the Burst of Power Feature Button can be pressed and held when the appliance is in operation to achieve the maximum power within the selected speed. You can add ingredients to the bowl while mixing or switch it off, raise the mixer and then add the ingredients. Once you are done adding the ingredients, lower the mixer and start the mixing process again until you reach the desired consistency.
NOTE: The Mixer must not be run continuously for more than 5 minutes at a time. After this time, allow it to cool for at least 5 minutes before re-using.
MIXING WITH THE HAND MIXER
Remove Mixer from the stand, please refer to the instructions on the section "PLACING/ REMOVING THE MIXING BOWL". Turn mixer on and refer to speed guide for the correct setting. Slowly guide mixer around sides and through center of bowl, going in the same direction. Be careful not to overbeat the mixture. Overbeating tends to make some mixtures tough. Whenever scraping of the bowl is required, stop the mixer and scrape sides and bottom of bowl with a rubber spatula as needed. Turn speed control to the off position "O" and rest mixer on its heel rest while adding ingredients. Be sure to position beaters over mixing bowl so any dripping will fall back into mixing bowl. When mixing is complete, set the control to "1", and raise beaters slowly from batter to clean off clinging food. Be sure to unit to "0" before raising beaters completely out of mixing bowl.
BURST OF POWER FEATURE
The BURST OF POWER feature allows for an added boost to the selected speed setting at the press of the button. During especially heavy mixing tasks, press the button to drive through the mixture with ease. Once the button is released, the mixer will return to the original speed setting.
EJECTING BEATERS
Be sure the control is in the off "0" position and cord is removed from electrical outlet. Scrape off any excess batter with a rubber spatula. Grasp the stems of the beaters with your hand and press the beater eject button. Beaters will release into your hand.
SPEED GUIDE FOR HAND/STAND MIXER
SPEED MIXING TASKS
| 12 Stir | Use when stirring liquid ingredients or when mixing dry and liquid ingredients together alternately in a recipe. Use when preparing any of the ready-prepared or packaged instant puddings. | |
| 3 Mix | Use when a recipe calls for combining ingredients together. Use for quick breads or muffins that require a brisk action, just enough to blend. | |
| 4 Blend | Use when preparing cake mixes or for directions calling for medium speed. Use to cream butter and sugar together. | |
| 5 Beat | Use when preparing a frosting from a recipe or package.Use when whipping cream for desserts. | |
| 6 Whip | Use to mash potatoes to develop a light and fluffy texture.Use when whipping egg whites. | |
| Burst of Power | During especially heavy mixing tasks, press the button to drive through the mixture with ease. | |
CARING FOR YOUR MIXER
CLEANING
Wash the beaters, dough hooks and mixing bowl before and after every use. The beaters and dough hooks may be washed in a dishwasher. After removing cord from electrical outlet, clean mixer head with a damp cloth and wipe dry. DO NOT IM-MERSE MIXER IN WATER. This may cause electrical shock, injury or damage to the product. Avoid the use of abrasive cleaners that will damage the finish of your mixer.
STORAGE
Store the Hand/Stand Mixer on in a clean, dry location such as a cabinet or shelf. Store beaters and dough hooks in a drawer.
MAINTENANCE
The motor of your mixer has been carefully lubricated at the factory and does not require any additional lubricant. Other than the recommended cleaning, no further user maintenance should be necessary. If for any reason your hand mixer should require repairs, do not try to fix it yourself. Send it to the nearest Authorized Oster® Appliance Service Center.
natural_image
Line drawing of a mechanical device with directional arrows indicating movement or force (no text or symbols)(figura 2)
natural_image
Line drawing of a hand mixer with directional arrows indicating motion (no text or symbols)(figura 3)
LEVANTANDO/ ABAIXANDO A BATEDEIRA
natural_image
Line drawing of a device with directional arrows indicating rotation or movement (no text or symbols)(figura 4)
COLOCANDO/REMOVENDO A VASILHA PARA MISTURAR
natural_image
Pure technical diagram of concentric circular components without any text, numbers, or symbols(figura 5)
XXX where X is any number between 0 and 9 or any letter between A and Z.
© 2013 Sunbeam Products, Inc. All rights reserved. Distributed by Sunbeam Latin America, LLC, 5200 Blue Lagoon Drive, Suite 470, Miami, FL 33126. One year limited warranty – please see insert for details.
Impreso en China Printed in China Impresso na China
- COMO LEVANTAR O BAJAR LA BATIDORA
- COMO COLOCAR O SACAR EL TAZON PARA MEZCLAR
- USO DE SU BATIDORA DE MANO Y PEDESTAL
- SAVE THESE INSTRUCTIONS
- POWER CORD SPECIAL INSTRUCTIONS
- WELCOME
- DESCRIPTION OF THE APPLIANCE
- LEARNING YOUR HAND/STAND MIXER
- PREPARING FOR USE
- INSERTING/ EJECTING BEATERS & DOUGH HOOKS
- PLACING/ REMOVING THE MIXING BOWL
- USING YOUR HAND/STAND MIXER
- MIXING WITH THE STAND MIXER
- MIXING WITH THE HAND MIXER
- BURST OF POWER FEATURE
- EJECTING BEATERS
- SPEED GUIDE FOR HAND/STAND MIXER
- CARING FOR YOUR MIXER
- CLEANING
- STORAGE
- MAINTENANCE
- LEVANTANDO/ ABAIXANDO A BATEDEIRA
- COLOCANDO/REMOVENDO A VASILHA PARA MISTURAR
Brand : OSTER
Model : FPSTHS2611-013
Category : Hand blender