
HD-5210 - Webcam HP - Free user manual and instructions
Find the device manual for free HD-5210 HP in PDF.


| Product Type | Webcam |
| Model | HD-5210 |
| Brand | HP |
| Dimensions (approx.) | 70 x 30 x 30 mm |
| Weight (approx.) | 100 g |
| Power Supply | USB 2.0 (powered via USB port) |
| Sensor | CMOS, up to 720p HD |
| Resolution | 1280 x 720 pixels (720p) |
| Frame Rate | 30 fps |
| Focus Type | Fixed focus |
| Microphone | Built-in monaural microphone |
| Field of View | 70 degrees |
| Mounting | Clip-on monitor or tripod |
| Cable Length | 1.5 meters |
| Compatibility | Windows, macOS, Chrome OS |
| Main Functions | Video calling, streaming, recording, photo capture |
| Care and Cleaning | Wipe lens with dry microfiber cloth; keep away from moisture |
| Safety Precautions | Avoid liquid contact; do not disassemble; use only with USB ports |
| Spare Parts and Repairability | Not user-serviceable; contact HP support for repairs |
| General Information | Includes privacy shutter and tripod mount |
Frequently Asked Questions - HD-5210 HP
User questions about HD-5210 HP
0 question about this device. Answer the ones you know or ask your own.
Ask a new question about this device
Download the instructions for your Webcam in PDF format for free! Find your manual HD-5210 - HP and take your electronic device back in hand. On this page are published all the documents necessary for the use of your device. HD-5210 by HP.
USER MANUAL HD-5210 HP
© Copyright 2011 Hewlett-Packard Development Company, L.P.
The information contained herein is subject to change without notice.
The only warranties for HP products and services are set forth in the express warranty statements accompanying such products and services. Nothing herein should be construed as constituting an additional warranty. HP shall not be liable for technical or editorial errors or omissions contained herein.
Product Registration
Registration is quick, easy and offers: e-mail updates containing notifications about product enhancements, the most recent support alerts, and driver updates specific to the product(s) you own.
For faster help, be sure to register your recently purchased product at HTTPS://REGISTER.HP.COM
Table of Contents
Webcam Overview ....1
Software Overview 2
System Requirements....2
Quality and Performance....3
Using the HP Webcam Control Center ....4
Starting a Video Chat ....5
Recording a Video....7
Taking a Picture....8
Managing Videos and Pictures....9
Uploading a Picture or a Video....10
Applying Effects to a Video or Picture 11
Using Masques 12
Using Fun Frame 13
Editing a Video 14
Advanced Editing 14
Using Your Webcam as a Video Monitor 15
Adjusting Webcam Settings....16
Adjusting Additional Webcam Settings 17
Troubleshooting....18
Webcam Overview
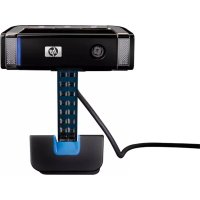
Congratulations on purchasing the HP Webcam HD 5210. Your webcam includes the following features:

1 Snapshot button
5 Adjustable clip/stand
2 HP Instant Chat button
6 Product label
3 Video Record button
7 USB connector
4 Integrated microphone
Please refer to the product label for the HP product number and serial number. This is useful information if you ever need to contact technical support.
Software Overview
The CD that comes with your webcam includes the following software:
■ Webcam drivers. Enables your webcam to operate with optimum performance. ■ Video Chat Quick Launch. Helps you set up your chat application to communicate with your webcam. ■ ArcSoft Magic-i™ Visual Effects. Enables you to apply special effects to your video chats when used in conjunction with your instant messaging (IM) application.
■ ArcSoft WebCam Companion®. Enables you to record and edit videos, take snapshots, use your webcam as a video monitor, and apply a variety of special effects including masks and frames.
■ ArcSoft ShowBiz®. Enables you to edit your videos and combine them with other video clips, transitions, and effects.
■ HP Webcam Control Center. Enables you to access all of your webcam functions from a single location on your desktop.
The software on this CD is not available via web download. In North America and Europe, a replacement CD can be ordered on the web at www.hp.com/support.
System Requirements
To use your webcam with the included software, your PC must meet the following minimum system requirements:
For 1920x1080 (1080p) preview, capture, edit, and playback in WebCam Companion/Magic-i Visual Effects/ShowBiz: Windows XP (SP2 or SP3), Windows Vista (32-bit or 64-bit), or Windows 7 (32-bit or 64-bit); Intel Core i5 750 2.66 GHz or equivalent AMD CPU; 400 MB free hard drive space required for program installation; 2 GB DDR RAM or above; VGA card with 64 MB or more; 16-bit color display at 1024x768 with DirectX 3D support; DirectX 9.0 or above; USB 2.0 high speed.
For 1280x720 (720p) preview, capture, edit, and playback in WebCam Companion/Magic-i Visual Effects/ShowBiz:
Windows XP (SP2 or SP3), Windows Vista (32-bit or 64-bit), or Windows 7 (32-bit or 64-bit);
Intel Core 2 Quad 2.33 GHz or equivalent AMD CPU;
400 MB free hard drive space required for program installation; 2 GB DDR RAM or above; VGA card with 64 MB or more; 16-bit color display at 1024x768 with DirectX 3D support; DirectX 9.0 or above; USB 2.0 high speed.
For 640x480 (VGA) preview, capture, edit, and playback in WebCam Companion/Magic-i Visual Effects/ShowBiz:
Windows XP (SP2 or SP3), Windows Vista (32-bit or 64-bit), or Windows 7 (32-bit or 64-bit); Intel Pentium IV Hyper-Threading 3.0 GHz or equivalent AMD CPU; 400 MB free hard drive space required for program installation; 1 GB DDR RAM or above; 16-bit color display at 1024x768 with DirectX 3D support; DirectX 9.0 or above; USB 2.0 high speed.
Quality and Performance
Image quality and video performance are impacted by the following factors:
The amount of light on the subject; the webcam resolution setting; the performance of the PC; the bandwidth of the internet connection, especially for chat.
If you are experiencing slow or choppy video or washed out color, try adding a small lamp to the area that will not be visible in the frame. This will light the viewing area of the webcam and help provide more lifelike video and more accurate color.
Using the HP Webcam Control Center
All of the software utilities included with your HP Webcam can be accessed through the HP Webcam Control Center. Simply double-click the icon on your desktop to open the control center. From the Features tab, you can click an icon to select one of the following features:
Start a Video Chat – allows you to add live video to popular instant messaging applications; Record Video – allows you to record and share video; Take a Photo – allows you to capture and share still photos; Monitor – allows you to set the webcam to record video whenever the camera detects motion or a face; Webcam Gallery – displays all photos and videos you have captured and allows you to edit and share them; Webcam Settings – allows you to change settings in order to optimize the webcam's functionality.
The Applications tab provides direct access to each of the ArcSoft applications. The Help & Support tab links you to your User's Guide, Online Support, and the HP online store.

Starting a Video Chat
You can add live video to the most popular instant messaging (IM) applications (ISP connection required):
AOL Instant Messenger (AIM)
Google Video Chat
Skype
Windows Live Messenger
Yahoo! Messenger
If there is not a link to your preferred chat application, you can either click Browse to find the application's .exe file on your computer, or add the URL to a web application and then click
Go to.
1 To start a video chat, do either of the following:
Press the HP Instant Chat button on your webcam.

Double-click the HP Webcam Control Center icon on the Windows desktop, and then click Video Chat.
2 Select the instant messaging (IM) application you want to use. 3 If prompted, follow the on-screen instructions to install and set up the IM application. 4 Follow the video chat steps in the IM application's documentation.
NOTE: The Video Chat Quick Launch utility appears only during initial setup. The next time you press the HP Instant Chat button, the selected IM application will open automatically.
To select a different IM application after initial setup, double-click the HP Webcam
Control Center

icon on your desktop, and then click Video Chat

5 (Optional) Select the effects you want to apply:

Turn face tracking on and off.
• To track one face, click Single. - To track more than one face, click Single to select the first face, and then click Next to select the next face.
● To find the best angle for a group image, click Multiple.

Zoom in and out, or pan around the image.

Add fun house effects to your video.

Add a picture frame to the face on the screen.

Decorate your video with a theme.

Adopt a different persona by selecting an avatar.

Make your video brighter and sharper.

Combine your face with a masque template.
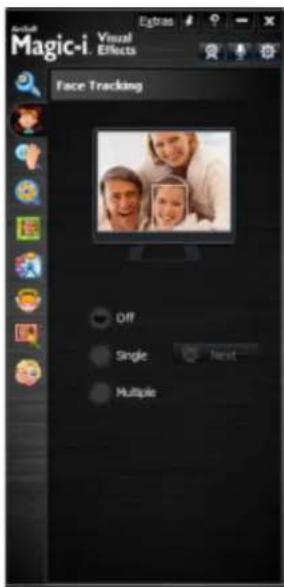
TIP: You can also open ArcSoft Magic-i Visual Effects by double-clicking ArcSoft Magic-i Visual Effects in the Windows System Tray.
To learn more about using effects in your chats, click Help in the upper-right corner of the ArcSoft Magic-i Visual Effects window.
Recording a Video
1 Do either of the following to open ArcSoft WebCam Companion and enter capture mode:
■ Press the Video Record button on your webcam.
■ Double-click the HP Webcam Control Center icon on the Windows desktop, and then click Record Video.
2 (Optional) Click Full Screen to record in full-screen mode.
3 (Optional) Click the resolution list below the icons in the upper-right corner, and select the resolution setting you want to use for the recording. The default setting is 1280x720 (HD 720p), which provides optimum performance in most environments.
NOTE: Higher resolutions and/or poor lighting may slow down the frame rate and make the video jerky. For more information on resolution issues, see "Troubleshooting."
4 Press the Video Record button or click Record Video to begin recording.
5 Press the Video Record button again or click Stop Recording to stop recording and save the video to your PC.
6 If you're recording in full-screen mode, click the Exit icon on the right side of the screen to return to partial-screen mode.
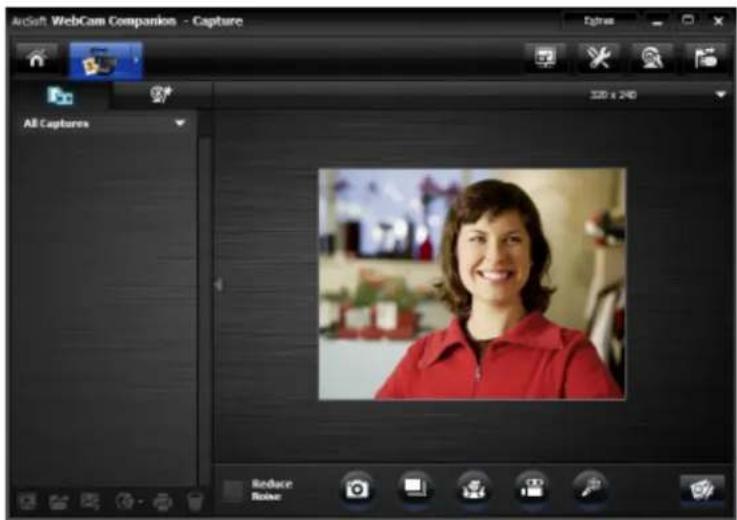
To learn more about using ArcSoft WebCam Companion, click Extras and select Application Help.
Taking a Picture
1 Do either of the following to open ArcSoft WebCam Companion and enter capture mode:
■ Press the Snapshot button on your webcam.
Double-click HP Webcam Control Center on the Windows desktop, and then click Take a Photo.
2 Use capture mode to take either a single picture or a series of pictures:
To take a single picture, press the Snapshot button again or click Take Picture.
To take a series of pictures, click Burst.
3 To edit, print, and share your pictures, hover over the Capture icon to expand the menu, and click the Edit icon to enter edit mode.
To learn more about taking pictures with ArcSoft WebCam Companion, click Extras and select Application Help.

Managing Videos and Pictures
After you capture a video or take a picture, you can use the icons in the lower-left corner of the Capture screen to manage your pictures and videos. Click any of the following icons:
Preview a picture or video. Locate a picture or video on your PC hard drive. Send a picture or video as an e-mail attachment. Upload a picture or video to YouTube, Flickr, Twitter, or Facebook. Print the pictures you selected. Delete the selected picture or video.
To learn more about using ArcSoft WebCam Companion, click Extras and select Application Help.

Uploading a Picture or a Video
After you take a picture or record a video, follow these steps to post it on YouTube, Flickr, Twitter, or Facebook:
1 If you are in capture mode in ArcSoft WebCam Companion:
- Click the Captures icon to display your pictures and videos. Click the picture or video you want to upload.
- Click the Upload icon and select either YouTube, Flickr, Twitter, or Facebook.
2 If you are in edit mode in ArcSoft WebCam Companion:
Click the picture or video you want to upload. Use the buttons at the top right of the page to select either Facebook, Twitter, Flickr, or YouTube.
3 Log into your account.
4 Follow the on-screen instructions to post the picture or video.
TIP: If ArcSoft WebCam Companion is closed, you can open it directly in edit mode.
Simply double-click the HP Webcam Control Center icon on the Windows
desktop, and then click Webcam Gallery
Applying Effects to a Video or Picture
Many of the ArcSoft Magic-i Visual Effects features are integrated into ArcSoft WebCam Companion, so that you can continue to enjoy the effects you use in your video chats while you capture videos and take pictures.
1 Double-click the HP Webcam Control Center icon on the Windows desktop.
2 Click either Record Video or Take a Photo.
3 Click the Effects tab.
4 Click any of the icons in the lower-left corner to apply an effect.
5 To turn off all effects, click No Effect.
To learn more about using effects in your chats, see "Using the HP Webcam Control Center."

Using Masques
1 Double-click the HP Webcam Control Center icon on the Windows desktop, and then click Take a Photo. 2 Hover over the Capture icon to expand the menu, and click the Masque icon. 3 Select the masque you want to use. 4 (Optional) Click the icons above the preview image to adjust the image. 5 Press the Snapshot button again or click Take Picture to take the picture. To learn more about using masques, click Extras and select Application Help.
Using Fun Frame
1 Double-click the HP Webcam Control Center icon on the Windows desktop, and then click Take a Photo.
2 Hover over the Capture icon to expand the menu, and then click the Fun Frame icon.
3 (Optional) Click Customize, click Select Layout and select a layout, select the frames you want to use, and then click OK.
4 Do either of the following:
■ Press the Snapshot button or click Take Picture to take the picture.
- Click Start auto-snapshot with pose detection to let the software detect a pose and take the picture. To adjust the pose sensitivity, drag the slider above the picture frame.

Editing a Video
1 Double-click the HP Webcam Control Center icon on the Windows desktop, and then click Webcam Gallery.
2 Click the video you want to edit. To learn about specific editing functions, click Extras and select Application Help.

Advanced Editing
1 Hover over the Capture icon to expand the menu, and then click the Advanced Editing icon.
2 Click the video you want to edit, and then drag and drop it into the Storyboard. To learn about specific editing functions in ArcSoft ShowBiz, click Options and select Help.
Using Your Webcam as a Video Monitor
With the Monitor feature, you can use your webcam as a security camera. If the webcam detects motion or a face, it records the activity on your PC hard drive. Additionally, you can set the Monitor feature to send a snapshot by e-mail or post a snapshot on an FTP site if it detects activity.
1 Double-click the HP Webcam Control Center icon on the Windows desktop.
2 Click Monitor

3 Click Start Monitor to begin monitoring.
4 Click Stop Monitor to finish monitoring and save the video to your PC.
You can also specify motion regions for the application to focus on. Click the Enable Rectangle Motion Detection icon, and then click and drag to draw a rectangle around the area you want the motion detector to work within.
To learn more about using ArcSoft WebCam Companion, click Extras and select Application Help.
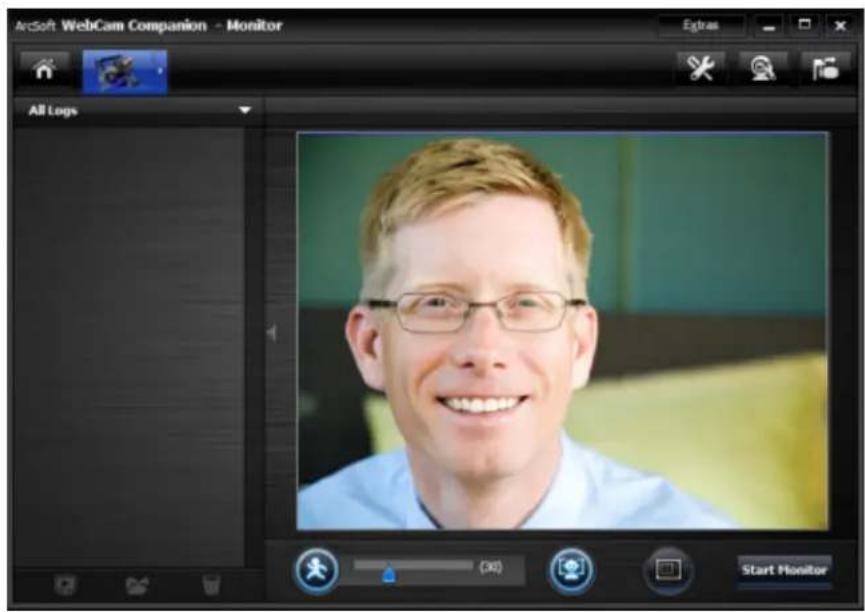
TIP: You can disable either the motion detection or face detection feature, but you cannot turn them both off.
Adjusting Webcam Settings
You can adjust most of your webcam's settings in ArcSoft WebCam Companion.
1 Double-click the HP Webcam
Control Center icon on the Windows desktop, and then click
Webcam Settings

2 Click the WebCam Settings
icon near the top right corner of the screen, and then click Advanced.
3 On the Video Proc Amp tab do either of the following:
■To manually adjust a setting, drag the slider for that setting.
■To let the webcam auto-detect a setting, place a check in the Auto check box to the right of that setting.
4 Click the Camera Control tab and do any of the following:
■To manually adjust the focus, remove the check from the Auto Focus check box, and then drag the Focus slider.
■To manually adjust the exposure, remove the check from the Auto Exposure check box and then drag the Exposure slider.


5 Click OK.
NOTE: To restore the factory settings, click Default.
To learn about customizing the Capture, Monitor, Fun Frame, and Masque settings in ArcSoft WebCam Companion, click Extras and select Application Help.
Adjusting Additional Webcam Settings
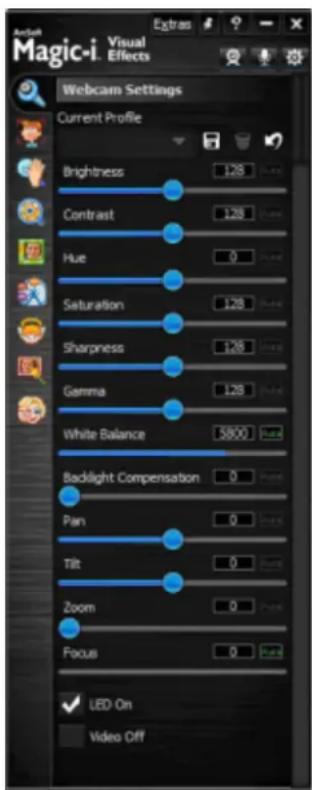
You can change additional webcam settings in ArcSoft Magic-i Visual Effects.
1 If it is open, close the ArcSoft WebCam Companion window. 2 Double-click ArcSoft Magic-i Visual Effects in the Windows System Tray. 3 On the Webcam Settings tab, do any of the following:
- Click System Setting, click the Private tab, click Load Image, and then select an image to replace the webcam video when you want privacy during a chat.
- Click Private 🔒 to replace the webcam video with the image you selected in System Settings. When you're done with the chat, click Private 📄 again to reveal the video so that your webcam is ready to use the next time you want to use it.
- Click Mute Microphone 🎨 to turn off the webcam microphone during a chat. When you're done with the chat, click Mute Microphone 🎨 again to turn the microphone back on so that your webcam is ready to use the next time you want to use it. ■ Remove the check from the LED On check box to turn off the status LED on the front of your webcam. Place a check in the Video Off check box to disable the webcam video during a chat. A blank screen replaces the video. When you're done with the chat, remove the check to enable the video feature, so that your webcam is ready to use the next time you want to use it. Drag the slider for the individual settings. To see additional settings, drag the scroll bar on the right side of the ArcSoft Magic-i Visual Effects window.
- Click Current Profile, enter a name, and then click Save to store the current settings in a user profile.
To learn more about customizing webcam settings in ArcSoft Magic-i Visual Effects, click Help ↑ the upper-right corner.
Troubleshooting
| Problem Solution | |
| The video is jerky | Many factors affect video quality, including lighting, PC processor speed and memory, and Internet connection speed. If the video is jerky, you need to choose a lower resolution setting.1 Double-click the HP Webcam Control Centericon on the Windows desktop.2 Click either Record Videoor Take a Photo.3 Click the resolution list below the icons in the upper-right corner, and select a lower resolution setting. |
| There are lines interfering with the image | Right-click the Button Managericon in the Windows System Tray and select the appropriate setting for your location:60Hz or 50Hz. The interfering lines should disappear. |
| I don’t want to use ArcSoft Magic-i Visual Effects with my IM application | Close ArcSoft Magic-i Visual Effects. |
| My webcam isn’t connected to my IM application | Double-click the HP Webcam Control Centericon on the Windows desktop, and then click Video Chat. If you have multiple IM applications and you already set up all of your IM applications, select a different video device in your IM application. See your IM documentation for details. |
| I want to turn off the autofocus feature | 1 Double-click the HP Webcam Control Centericon on the Windows desktop, and then click Webcam Settings2 Click Advanced...3 Click the Camera Control tab.4 Remove the check from the Auto Focus check box.5 Drag the Focus slider to manually adjust the focus.6 Click OK or Apply. |
Problem Solution
The webcam buttons are not working properly
- Look in the Windows System Tray for the HP Button Manager icon. If you don't see the HP Button Manager icon, then open the Start menu and click HP Button Manager to restart the application.
■On Windows XP computers, check to see if the USB Video Device application and ArcSoft WebCam Companion are both running. If so, close both of these applications, and then press the Snapshot button. To avoid this problem in the future, do not open the USB Video Device in My Computer. Instead, use the ArcSoft applications that came with your webcam.
I hear an echo or feedback in the speakers
On Windows XP computers (Classic view):
1 Click Start > Control Panel > Sounds and Audio Devices. 2 Click the Audio tab. 3 Under Sound playback, click Volume, and drag the Master Volume slider to adjust the speaker volume. 4 Under Sound recording, click Volume, and drag the Microphone slider to adjust the microphone volume.
On Windows Vista computers (Classic view) or Windows 7 computers (Large icons or Small icons view):
1 Open the Start menu and then click Control Panel > Sound. 2 Click the Playback tab. 3 Select the Speaker you are using and then click Properties. 4 Click the Levels tab and drag the sliders to adjust the output level. 5 Click the Recording tab. 6 Select the Microphone you are using and then click Properties. 7 Click the Levels tab and drag the sliders to adjust the input level.
The webcam audio is not synchronized with the webcam video
From the Video Capture screen, select the resolution list in the upper-right corner, and set the video resolution to 640x480 to synchronize the video and audio. After synchronizing the audio and video, try increasing the resolution to the next level. If the problem recurs, go back to the previous resolution setting.
| Problem Solution | |
| I am having trouble using the webcam with Skype | 1 Check for updates to make sure you installed the latest version of Skype.2 Check the microphone setting in Audio Settings and the webcam setting in Video Settings. They should be set to USB Video Device (Windows XP) or HP Webcam HD 5210 (LR374AA) (Windows Vista or Windows 7). |
| I see a blank screen with static when I run Skype | After you place the call, make sure the video device is set to USB Video Device (Windows XP) or HP Webcam HD 5210 (LR374AA) (Windows Vista or Windows 7). |
| The webcam microphone does not work with Skype | 1 On the menu bar, select Call > Audio Settings.2 Make sure the microphone device is set to USB Video Device (Windows XP) or HP Webcam HD 5210 (LR374AA) (Windows Vista or Windows 7).3 Drag the Microphone Volume slider towards High to increase the volume level.4 Click Save. Retry your call. |
| I have more than one USB Video Device option. Which one should I use? | You have more than one video device connected to your PC. Try selecting each option and then attempt to use your webcam. If the webcam works, you found the right option. If the webcam doesn’t work, try another option until you find the one associated with your webcam. |
Still need help? Please refer to the warranty that came with your webcam for support phone numbers and Web site information.


- PRODUCT REGISTRATION
- TABLE OF CONTENTS
- WEBCAM OVERVIEW
- SOFTWARE OVERVIEW
- SYSTEM REQUIREMENTS
- QUALITY AND PERFORMANCE
- USING THE HP WEBCAM CONTROL CENTER
- STARTING A VIDEO CHAT
- GO TO
- RECORDING A VIDEO
- TAKING A PICTURE
- MANAGING VIDEOS AND PICTURES
- UPLOADING A PICTURE OR A VIDEO
- APPLYING EFFECTS TO A VIDEO OR PICTURE
- USING MASQUES
- USING FUN FRAME
- EDITING A VIDEO
- ADVANCED EDITING
- USING YOUR WEBCAM AS A VIDEO MONITOR
- ADJUSTING WEBCAM SETTINGS
- ADJUSTING ADDITIONAL WEBCAM SETTINGS
- TROUBLESHOOTING
- PROBLEM SOLUTION
- ON WINDOWS XP COMPUTERS (CLASSIC VIEW)
- ON WINDOWS VISTA COMPUTERS (CLASSIC VIEW) OR WINDOWS 7 COMPUTERS (LARGE ICONS OR SMALL ICONS VIEW)
Brand : HP
Model : HD-5210
Category : Webcam