
RC117 - Radio AUDIOVOX - Free user manual and instructions
Find the device manual for free RC117 AUDIOVOX in PDF.


| Product Type | Portable AM/FM Radio |
| Brand | Audiovox |
| Model | RC117 |
| Dimensions (approx.) | 7.5 x 4.5 x 2.5 inches |
| Weight | 1.2 lbs (0.54 kg) |
| Power Source | 2 x AA batteries (not included) or AC adapter (DC 3V) |
| Battery Life | Approximately 30 hours with alkaline batteries |
| Radio Bands | AM (520-1710 kHz), FM (88-108 MHz) |
| Tuning Method | Analog dial with thumbwheel |
| Speaker | 2.5-inch dynamic speaker |
| Output Power | 0.5 W RMS |
| Headphone Jack | 3.5mm stereo jack |
| Antenna | Built-in ferrite bar for AM, telescopic whip for FM |
| Controls | On/Off volume knob, tuning wheel, band selector switch |
| Indicators | Power LED (when AC adapter used) |
| Body Material | Plastic casing |
| Color | Black with silver accents |
| Included Accessories | Instruction manual |
| Safety Features | Battery compartment polarity markings, low battery indication (sound distortion) |
| Maintenance | Clean with dry cloth; avoid moisture |
| Spare Parts/Accessories | AC adapter (optional), earphones (not included) |
| Repairability | Battery terminals accessible; no user-serviceable parts inside |
Frequently Asked Questions - RC117 AUDIOVOX
User questions about RC117 AUDIOVOX
0 question about this device. Answer the ones you know or ask your own.
Ask a new question about this device
Download the instructions for your Radio in PDF format for free! Find your manual RC117 - AUDIOVOX and take your electronic device back in hand. On this page are published all the documents necessary for the use of your device. RC117 by AUDIOVOX.
USER MANUAL RC117 AUDIOVOX
v2.0 (1.0.2.0) (EN/F/E)
RCA
user manual
Product registration
Thank you for purchasing an RCA product. We pride ourselves on the quality and reliability of all our electronic products but if you ever need service or have a question, our customer service staff stands ready to help. Contact us at www.rcaaudiovideo.com. PURCHASE REGISTRATION: Registering On-line will allow us to contact you in the unlikely event a safety notification is required under the Federal Consumer Safety Act. Register Online at: WWW.RCAAUDIOVIDEO.COM. Click on Product Registration and Fill Out the Brief Questionnaire.
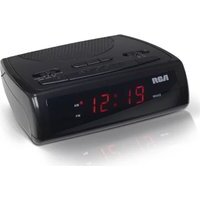
RC117

natural_image
Front view line drawing of a rectangular electronic device with a central screen and base (no text or symbols)IMPORTANT SAFETY INSTRUCTIONS
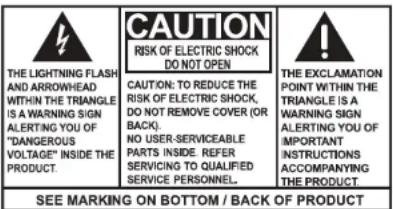
WARNING: TO PREVENT FIRE OR ELECTRICAL SHOCK HAZARD, DO NOT EXPOSE THIS PRODUCT TO RAIN OR MOISTURE.
Some of the following information may not apply to your particular product; however, as with any electronic product, precautions should be observed during handling and use.
- Read these instructions.
- Keep these instructions.
- Heed all warnings.
- Follow all instructions.
- Do not use this apparatus near water.
• Clean only with dry cloth. - Do not block any ventilation openings. Install in accordance with the manufacturer's instruction
- Do not install near any heat sources such as radiators, heat registers, stoves, or other apparatus (including amplifiers) that produce heat.
- Do not defeat the safety purpose of the polarized or grounding-type plug. A polarized plug has two blades with one wider than the other. A grounding type plug has two blades and a third grounding prong. The wide blade or the third prong is provided for your safety. If the provided plug does not fit into your outlet, consult an electrician for replacement of the obsolete outlet.
- Protect the power cord from being walked on or pinched particularly at plugs, convenience receptacles, and the point where they exit from the apparatus.
- Only use attachments/accessories specified by the manufacturer.
- Use only with the cart, stand, tripod, bracket, or table specified by the manufacturer, or sold with the apparatus. When a cart is used, use caution when moving the cart/ apparatus combination to avoid injury from tip-over.
- Unplug this apparatus during lightning storms or when

Portable Cart Warning
PLEASE READ AND SAVE THIS FOR FUTURE REFERENCE
unused for long periods of time.
- Refer all servicing to qualified service personnel. Servicing is required when the apparatus has been damaged in any way, such as power-supply cord or plug is damaged, liquid has been spilled or objects have fallen into the apparatus, the apparatus has been exposed to rain or moisture, does not operate normally, or has been dropped.
ADDITIONAL SAFETY INFORMATION
- The AC/DC adapter supplied with this product is intended to be correctly oriented in a vertical or floor mount position.
- Do not use unauthorized chargers or power adapters. Use only chargers or power adapters that came with your product or that is listed in the user's guide.
- Apparatus shall not be exposed to dripping or splashing and no objects filled with liquids, such as vases, shall be placed on the apparatus.
- Always leave sufficient space around the product for ventilation. Do not place product in or on a bed, rug, in a bookcase or cabinet that may prevent air flow through vent openings.
- Do not place lighted candles, cigarettes, cigars, etc. on the product.
- Care should be taken so that objects do not fall into the product.
- Do not attempt to disassemble the cabinet. This product does not contain customer serviceable components.
- The marking information is located at the bottom of apparatus.
- To be completely disconnect the power input, the AC/DC adaptor of apparatus shall be disconnected from the mains.
- AC/DC adaptor is a disconnect device. The AC/DC adaptor should not be obstructed OR should be easily accessed during intended use.
- The ventilation should not be impeded by covering the ventilation openings with items such as newspaper, table-cloths, curtains etc.
- No naked flame sources such as lighted candled should be placed on the apparatus.
- Attention should be drawn to the environmental aspects of battery disposal.
• The use of apparatus in moderate climates.
Electrical power information
AC/DC adaptor:
Input: AC 120 - 240 V \~ 50/60 Hz
Output: DC 5.0 V @ 3.0 A
FCC Information
Note: This equipment has been tested and found to comply with the limits for a Class B digital device, pursuant to Part 15 of FCC Rules. These limits are designed to provide reasonable protection against harmful interference in a residential installation. This equipment generates, uses, and can radiate radio frequency energy and, if not installed and used in accordance with the instructions, may cause harmful interference to radio communications.
However, there is no guarantee that interference will not occur in a particular installation. If this equipment does cause harmful interference to radio or television reception, which can be determined by turning the equipment off and on, the user is encouraged to try to correct the interference by one or more of the following measures:
• Reorient or relocate the receiving antenna.
- Increase the separation between the equipment and receiver.
- Connect the equipment into an outlet on a circuit different from that to which the receiver is connected.
- Consult the dealer or an experienced radio/TV technician for help.
Changes or modifications not expressly approved by Audiovox could void the user's authority to operate the equipment.
This Class B digital apparatus complies with Canadian ICES-003.
Plugging in for power
- Connect the supplied power adaptor to the unit's Power jack, and connect the other end to a convenient wall outlet.
- Once connected with power, the clock fl ashes. Refer to the Clock section for instructions on properly setting the Clock.
General controls

Top view (when cover is removed)
2.1 A - To charge your cell phones or tablet via the USB connectors
AUX IN – Auxiliary input jack
Rear view
DC 5V - Plug in for power
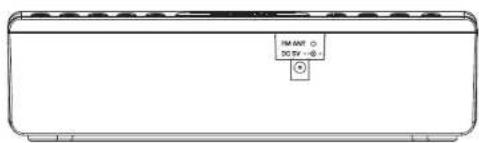
General controls
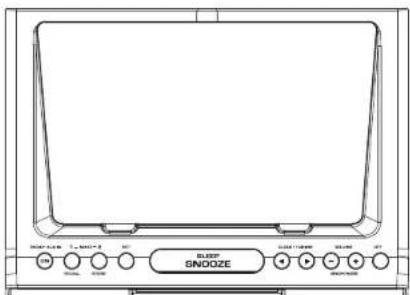
Top view
RADIO • AUX IN/ON – Turn on the radio; switch to AUX mode
WAKE 1/RECALL – Set Wake 1; recall a stored radio station
WAKE 2/STORE – Set Wake 2; store a radio station
SET – Enter Wake 1/Wake 2 setting mode and clock setting mode
SNOOZE/SLEEP - Turn off the wake function momentarily (9 minutes); turn off the current sleep timer; activate sleep function
CLOCK • TUNING ◀/▶ – Adjust clock time; select radio frequencies
-VOLUME+/ BRIGHTNESS - Adjust volume; adjust or turn off display brightness
OFF - Turn the unit off
Clock
Setting clock manually
- Press SET three times until appears to enter the clock setting mode.
- Press CLOCK • TUNING ◀/▶ to set the time.
- Press and hold to decrease or increase the time value quickly.
- The clock is in 12 hour format. The AM/PM indicator appears to show AM/PM time.
- Press SET to confirm and exit clock setting mode. The ⏻ will disappear after exiting the clock setting mode.
Radio
Turning on/off the Radio
In clock mode, press the RADIO • AUX IN to turn on the radio. Press OFF to turn off the radio.
Tuning the radio
Press CLOCK • TUNING ◀/▶ to adjust the radio frequency. Press and hold CLOCK • TUNING ◀/▶ for two seconds to automatically search for the next available station.
Built-in AFC
The Built In Automatic Frequency Control (AFC) helps to reduce drift on FM reception and keeps the radio locked in on the FM station to which it is tuned.
This unit is equipped with an FM antenna at the back. Uncoil the antenna to its full length for best reception. Tape the end of the antenna onto the wall if possible to improve reception.
Station presets
To store a station as preset:
-
Tune to a radio station
-
Press STORE.
- Preset location shows on the display.
- Press CLOCK • TUNING ◀/▶ to select a desired preset location (P1 - P10).
- Press STORE to confirm.
- You can save up to 10 preset stations.
Radio
To recall a preset station:
- In radio mode, press RECALL.
- The existing preset station number shows on the display.
- Press CLOCK • TUNING ◀ /▶ to select a desired preset station.
Wake function
Setting wake time
This unit allows 2 wake times to be set.
1. Press SET once to set WAKE 1.
2. After pressing SET once to enter WAKE 1 setting mode, WAKE 1 icon (or) will flash.
3. Press CLOCK • TUNING ◀/▶ to set the wake time.
- Press and hold to decrease or increase the time value quickly.
4. To confirm this wake time, press the SET button repeatedly until icons on the display are no longer flashing AND the icon for the desired WAKE 1 or WAKE 2 is continuously lit.
5. Press SET twice to set WAKE 2. Follow step 2 to step 4 to set WAKE 2.
Selecting wake source
You may choose radio or alarm as your wake up source.
- Press WAKE 1 to select wake source:
- Wake 1 by alarm
- Wake 1 by radio (You will wake up to your most recently tuned radio station.)
• After setting WAKE 1, press WAKE 2 to select wake source for WAKE 2.
Tune to a valid desired FM station before you select wake to FM Radio.

Wake to alarm
The unit is equipped with GRAD-U-WAKE. The alarm volume will increase gradually to its maximum in about 30 to 45 seconds.
Wake to radio
To set wake radio station:
- Select desired station.
- Adjust the volume by -VOLUME+.
After setting the radio station and volume, press OFF before proceeding to set your WAKE times and sources as described above.

Wake function
Checking wake time
Press SET once to check the set wake time for WAKE 1. Press SET twice to check the set wake time for WAKE 2.
Ways to turn off alarm
- To silence the wake function momentarily, press SNOOZE/SLEEP. The alarm or radio will be on again when the snooze period (9 minutes) is over. (see SmartSnooze™ section for more info)
- To turn off the alarm, press OFF. The wake alarm or radio will activate again the next day.
- To disable the wake function completely, press WAKE 1 or WAKE 2 repeatedly until no wake mode icon shows on the display.
SmartSnooze™
- This operation allows extra sleep time when the alarm sounds. The alarm can be turned off temporarily by pressing SNOOZE/SLEEP or any one of the SmartSnooze™ buttons until the snooze period is over
- SmartSnooze TM buttons include: RADIO • AUX IN/ON, SNOOZE/SLEEP, CLOCK • TUNING ↑, WAKE 1/RECALL, WAKE 2/STORE, -VOLUME+/BRIGHTNESS and SET.
- Snooze function may be used repeatedly for up to 1 hour. After this, the alarm will turn off until the next alarm conditions are met.
Sleep function
In sleep mode, the unit will turn off automatically after a specified time (up to 90 minutes).
- Press SNOOZE/SLEEP repeatedly to cycle through the available durations for Sleep Mode (90min, 60min, 30min, 15min or OFF. The sleep time is default to OFF). The maximum time is 90 minutes. Note that the radio will automatically turn on when initiating SLEEP mode, and it will stay on for the duration of the selected Sleep time.
- To view remaining time in sleep mode, press SNOOZE/SLEEP.
- To cancel the sleep function, press OFF or press SNOOZE/SLEEP repeatedly to select OFF.
Auxiliary source
- Remove the cover from the top panel.
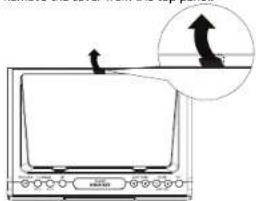
- Connect your auxiliary source (e.g. mp3 player) to the AUX input jack with an audio cable (not included).
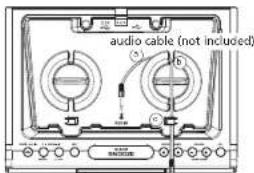
your mp3 player
3 a. Wrap the cable around the winder.
b. Route it through the openings of the winder. c. Fit the cable into the clip slot so that your auxiliary source can rest on the cover.
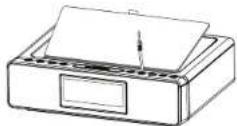
-
Turn on your auxiliary source.
-
In clock mode, press the RADIO • AUX IN twice to switch to listen to auxiliary source. The AUX indicator will be displayed. Press the RADIO • AUX IN again to switch back to listen to the radio.
Brightness control
With the RADIO or AUX turned OFF, press BRIGHTNESS to adjust or turn off the brightness of the display.
USB charging
-
Remove the cover from the top panel. Connect your cell phones, smart phones or even a tablet to the 2.1A USB port to start charging.
-
a. Wrap the cable around the winder. b. Route it through the openings of the winder. c. Fit the cable into the clip slot so that your auxiliary source can rest on the cover.

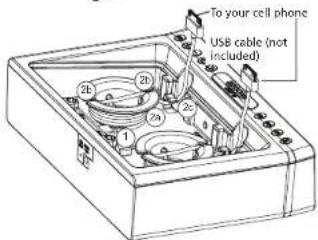
USB charging
- The 2.1A port is generally used for charging tablets, but this port may also be used for charging mobile phones. However, some tablets may charge more optimally using the other port.
- You may use both charging ports at the same time.
- Charging function may not be supported for all phones or electronic devices.
- Charging function is always enabled as long as the Clock Radio AC power is applied.

Warranty information
12 Month Limited Warranty Applies to RCA Clock Radios
AUDIOVOX ACCESSORIES CORP. (The Company) warrants to the original retail purchaser of this product that should this product or any part thereof, under normal use and conditions, be proven defective in material or workmanship within 12 months from the date of original purchase, such defect(s) will be repaired or replaced with reconditioned product (at the Company's option) without charge for parts and repair labor.
To obtain repair or replacement within the terms of this Warranty, the product is to be delivered with proof of warranty coverage (e.g. dated bill of sale), specification of defect(s), transportation prepaid, to the Company at the address shown below.
This Warranty does not extend to the elimination of externally generated static or noise, to correction of antenna problems, loss/interruptions of broadfast or internet service, to costs incurred for installation, removal or reinstallation of product, to corruptions caused by computer viruses, soware or other malware, to loss of media, files, data or content, or to damage to tapes, discs, removable memory devices or cards, speakers, accessories, computers, computer peripherals, other media players, home networks or vehicle electrical systems.
This Warranty does not apply to any product or part thereof, which, in the opinion of the Company, has suffered or been damaged through alteration, improper installation, mishandling, misuse, neglect, accident, or by removal or defacement of the factory serial number/bar code label(s). THE EXTENT OF THE COMPANY'S LIABILITY UNDER THIS WARRANTY IS LIMITED TO THE REPAIR OR REPLACEMENT PROVIDED ABOVE AND, IN NO EVENT, SHALL THE COMPANY'S LIABILITY EXCEED THE PURCHASE PRICE PAID BY PURCHASER FOR THE PRODUCT.
Warranty information
This Warranty is in lieu of all other express warranties or liabilities. ANY IMPLIED WARRANTIES, INCLUDING ANY IMPLIED WARRANTY OF MERCHANTABILITY SHALL BE LIMITED TO THE DURATION OF THIS WRITTEN WARRANTY. ANY ACTION FOR BREACH OF ANY WARRANTY HEREUNDER INCLUDING ANY IMPLIED WARRANTY OF MERCHANTABILITY MUST BE BROUGHT WITHIN A PERIOD OF 24 MONTHS. ANY IMPLICATION IS NOT AVAILABLE IN WHOLE OF THE COMPANY SHALL THE COMPANY BE LIABLE FOR ANY CONSEQUENTIAL OR INCIDENTAL DAMAGES FOR BREACH OF THIS OR ANY OTHER WARRANTY. No person or representative is authorized to assume for the Company any liability other than expressed herein in connection with the sale of this product.
Some states do not allow limitations on how long an implied warranty lasts or the exclusion or limitation of incidental or consequential damage so the above limitations or exclusions may not apply to you. This Warranty gives you specific legal rights and you may also have other rights which vary from state to state.
Recommendations before returning your product for a warranty claim:
- Properly pack your unit. Include any remotes, memory cards, cables, etc. which were originally provided with the product. However DO NOT return any removable batteries, even if batteries were included with the original purchase. We recommend using the original carton and packing materials. Ship to the address shown below.
- Note that product will be returned with factory default settings. Consumer will be responsible to restore any personal preference settings.
Audiovox Electronics Corp. Attn: Service Department. 150 Marcus Blvd. Hauppauge N.Y. 11788
1-800-645-4994
For Canada Customers, please ship to: Audiovox Return Centre
do Genco 6685 Kennedy Road, Unit43, Door 16, Mississuaga, Ontario L5T 3A5

- RCA
- Product registration
- IMPORTANT SAFETY INSTRUCTIONS
- WARNING: TO PREVENT FIRE OR ELECTRICAL SHOCK HAZARD, DO NOT EXPOSE THIS PRODUCT TO RAIN OR MOISTURE.
- ADDITIONAL SAFETY INFORMATION
- FCC Information
- Plugging in for power
- General controls
- Top view (when cover is removed)
- Rear view
- Top view
- Clock
- Setting clock manually
- Radio
- Turning on/off the Radio
- Tuning the radio
- Built-in AFC
- Station presets
- To store a station as preset:
- To recall a preset station:
- Wake function
- Setting wake time
- Selecting wake source
- Wake to alarm
- Wake to radio
- To set wake radio station:
- Checking wake time
- Ways to turn off alarm
- SmartSnooze™
- Sleep function
- Auxiliary source
- Brightness control
- USB charging
- Warranty information
- Month Limited Warranty Applies to RCA Clock Radios
Brand : AUDIOVOX
Model : RC117
Category : Radio