AVXSXDH3 - Radio AUDIOVOX - Free user manual and instructions
Find the device manual for free AVXSXDH3 AUDIOVOX in PDF.

User questions about AVXSXDH3 AUDIOVOX
0 question about this device. Answer the ones you know or ask your own.
Ask a new question about this device
Download the instructions for your Radio in PDF format for free! Find your manual AVXSXDH3 - AUDIOVOX and take your electronic device back in hand. On this page are published all the documents necessary for the use of your device. AVXSXDH3 by AUDIOVOX.
USER MANUAL AVXSXDH3 AUDIOVOX
Dock & Play Home Kit

text_image
DH3
natural_image
Simple gray house icon with chimney and door (no text or symbols)Table of Contents
Compatibility....3
Introduction. 4
Safety and Care Information......5
What's in the Box? 6
Home Dock Color-Coded Connections 7
Remote Control Functions 8
Remote Control Battery Replacement 9
Home Installation ....10
Step 1: Insert the Radio Dock Adapter Into the Dock .....10
Step 2: Connect the Home Dock and Dock the Radio....13
Step 3: Place and Aim the Indoor/Outdoor Home Antenna....15
Step 4: Connect the Home Dock to a Stereo System or Powered Speakers .....19
Troubleshooting 22
Product Specifications 25
Patent Information 26
Environmental Information 26
Patent and Environmental Information 26
FCC Statement 27
Copyrights and Trademarks.... 28
Indoor/Outdoor Home Antenna Template....29
Compatibility
This Home Kit is compatible with the following Dock & Play Radios:
SiriusXM:
- Onyx Plus
- Edge
XM:
- Onyx
- Onyx EZ
- XpressRCi
- XpressRC
- XpressR
Sirius:
- Sportster 5
- Starmate 8, 5, 4, 3
- Stratus 7, 6, 5
- Stratus
Introduction
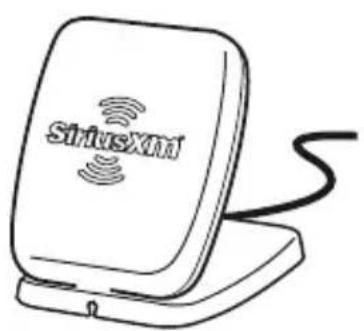
Thank you for purchasing the SiriusXM Dock & Play Home Kit!
The Home Kit lets you play your compatible XM or SiriusXM Dock & Play Radio through your home stereo system or powered speakers.
- There is no need for a second subscription. Just connect this Home Kit to a stereo system or set of powered speakers - and then simply move your Radio from any location to your home or office.
- This Home Kit works with a set of powered speakers or any stereo system with audio input jacks.
And for the latest information about this and other SiriusXM products and accessories, visit www.siriusxm.com or your favorite retailer.
Please read the entire User Guide before installing your Home Kit!
Introduction
Safety and Care Information

IMPORTANT! Self installation instructions and tips are provided for your convenience. It is your responsibility to determine if you have the knowledge, skills, and physical ability required to properly perform an installation. SiriusXM shall have no liability for damage or injury resulting from the installation or use of any SiriusXM or third party products. SiriusXM product warranties do not cover the installation, removal or reinstallation of any product.
- Do not expose to extreme temperatures (above 140^ or below -4^ , or above 60^ or below -20^ ).
- Do not expose to moisture. Do not use device near or in water. Do not touch the device with wet hands.
- Do not let any foreign matter spill into device.
- Do not store in dusty areas.
- Do not expose to chemicals such as benzene and thinners. Do not use liquid or aerosol cleaners. Clean with a soft damp cloth only.
- Do not expose to direct sunlight for a prolonged period of time, and do not expose to fire, flame, or other heat sources.
- Do not try to disassemble and/or repair the device yourself.
- Do not drop your device or subject it to severe impact.
- Do not place heavy objects on device.
- Do not subject device to excessive pressure.
WARNING!
- Opening the case may result in electric shock.
- Make sure that you insert the Home Power Adapter's plug all the way into the outlet.
- This product contains chemicals known to the State of California to cause cancer and birth defects or other reproductive harm.
Introduction
What's in the Box?
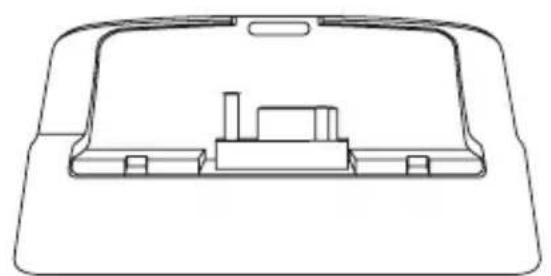
natural_image
Technical line drawing of a mechanical component or housing (no text or symbols)Home Dock
natural_image
Simple line drawing of a rectangular object with two side compartments and a top handle (no text or symbols)XM & SiriusXM Radio Dock Adapter
natural_image
Simple line drawing of a rectangular object with two vertical slots, resembling a tray or holder (no text or symbols)Sirius Radio Dock Adapter
text_image
SiriusXM1Indoor/Outdoor Home Antenna
natural_image
Line drawing of a wall-mounted electrical plug connected to a cord (no text or symbols)Home Power Adapter
natural_image
Coiled black-and-white cable with two terminal plugs (no text or symbols visible)Stereo Audio Cable
text_image
PULLRemote Control
Introduction
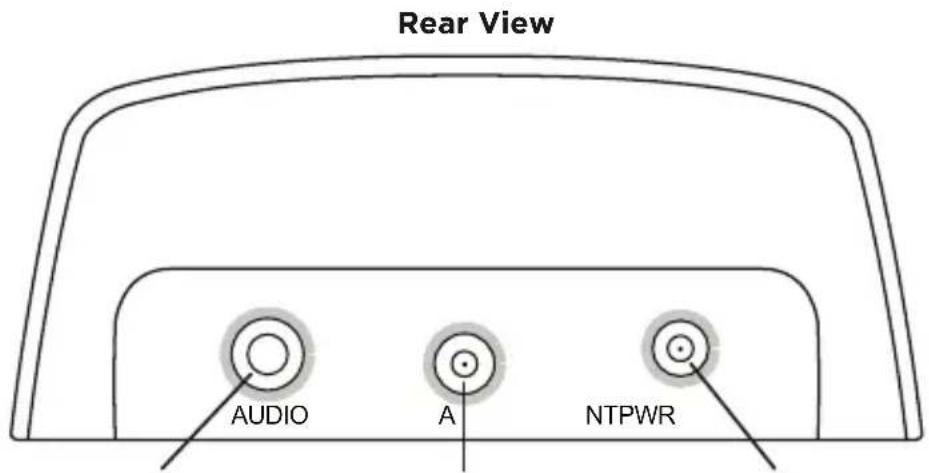
Home Dock Color-Coded Connections
The color-coded Home Dock makes it simple to connect the cables to the appropriate connectors at the rear of the dock.
text_image
Rear View AUDIO A NTPWRAUDIO (Green)
Connection for
stereo system or
powered speakers.
ANT (Silver)
Connection for
the Indoor/
Outdoor Home
Antenna.
POWER (Red)
Connection for
Home Power
Adapter.
Introduction
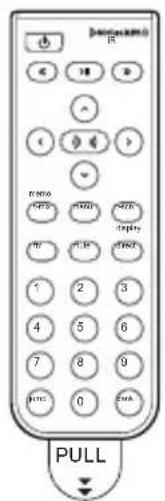
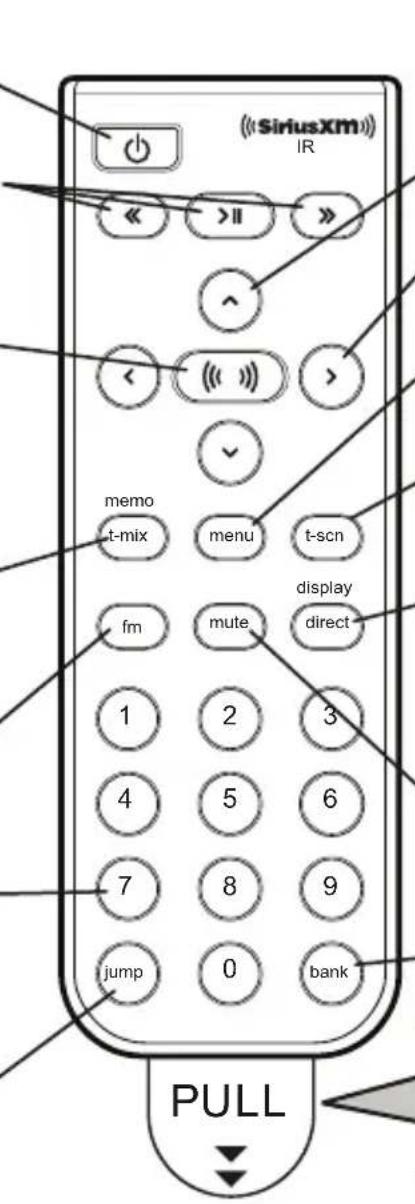
Remote Control Functions
Power Button
Press to turn Radio on and off.
Pause and Replay Buttons
For Radios which have these features, pause, rewind, and replay live radio and smart favorite channels.
Select Button
When in a menu or list, press to confirm selection of highlighted item; for SiriusXM Radios which have these features, when in TuneMix or TuneScan, press to end TuneMix/Scan and continue playing the currently tuned channel; for some Sirius Radios, press to directly enter a channel number.
TuneMix/Memo Button
For SiriusXM Radios which have this feature, press to begin TuneMix; for Sirius Radios which have this feature, press to save artists or songs.
FM Button
For Radios which have this feature, press to access and cycle through FM presets. (Vehicle Dock only).
Number Buttons
Press to tune to a stored favorite channel; for Radios which have this feature, also used to enter a channel number and directly tune to that channel.
Jump Button
For Radios which have these features, directly access traffic and weather of the chosen city; access the previous channel or a favorite channel.
text_image
((SiriusXM)) IR << >>> << >>> << >>> < (<< >) memo t-mix menu t-scn display fm mute direct 1 2 3 4 5 6 7 8 9 jump 0 bank PULLArrow Buttons Up/Down
Press to preview and tune to channels through the channel lineup; also press to scroll through lists and highlight menu items.
Arrow Buttons Left/Right
Press to search for channels by category.
Menu Button
Press to access advanced features and configuration options.
TuneScan Button
* For SiriusXM Radios which have this feature, press to begin TuneScan.
Direct/Display Button
For XM and SiriusXM Radios which have this feature, press to directly enter a channel number; for Sirius Radios which have this feature, press to customize the way you view content on the display.
Mute Button
- Press to silence the audio. Press again to hear to the audio.
Bank Button
For Radios which have this feature, press to switch between favorite channel banks or bands.
IMPORTANT!
Pull tab and remove before using Remote Control.
Introduction
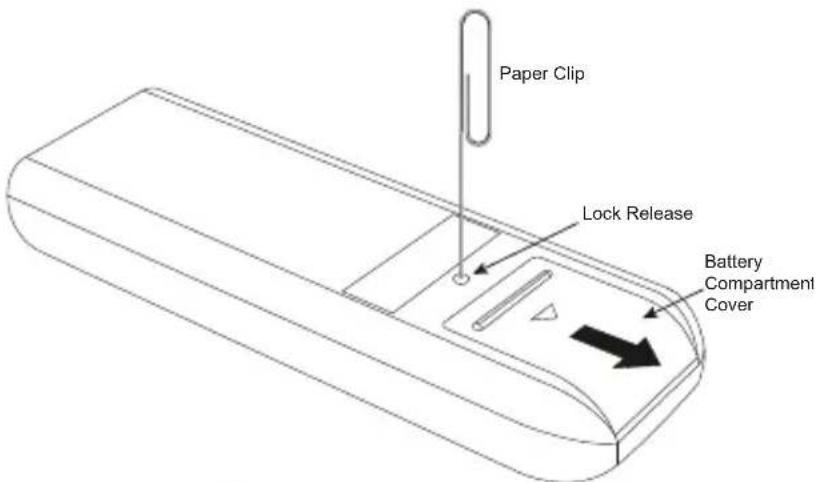
Remote Control Battery Replacement
The Remote Control has a child resistant battery compartment which requires a pointed object to open the battery compartment. A paper clip is recommended, as shown.
To Replace the Battery:
- Press the paper clip or other object into the lock release opening on the Remote Control, and slide the battery compartment cover off of the Remote Control.
- Slide the battery out of the battery compartment.
- Replace with a new battery. Observe the correct orientation of the battery; the + positive side of the battery should be facing up.
- Replace the battery compartment cover.
text_image
Paper Clip Lock Release Battery Compartment Cover
text_image
BatteryHome Installation
There are several steps to setting up your Home Kit. Follow these steps for an easy installation.
Step 1: Insert the Radio Dock Adapter Into the Dock
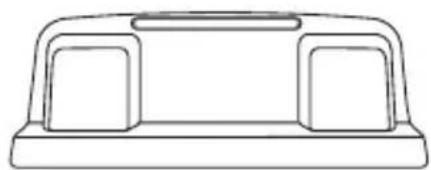
You'll need to insert the Radio Dock Adapter that is compatible with your Radio into the Home Dock.
- Locate the Radio Dock Adapter that is compatible with your Radio.
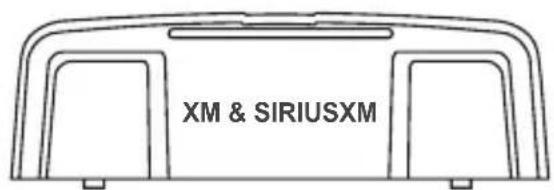
If you have an XM or SiriusXM Radio: If your Radio is branded as XM* or SiriusXM*, select the Radio Dock Adapter marked XM & SIRIUSXM on the back of the adapter.
text_image
XM & SIRIUSXM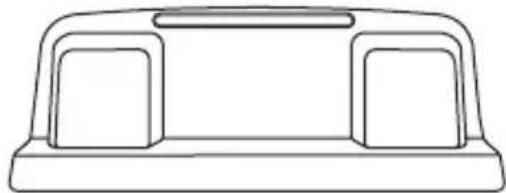
natural_image
Simple line drawing of a rectangular object with two side panels and a top handle (no text or symbols)Front View Correct OrientationBack View
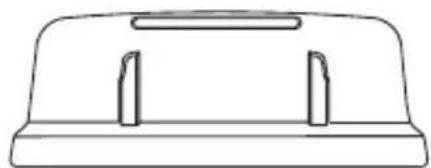
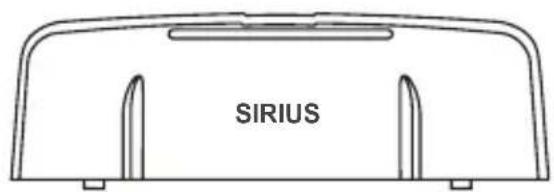
If you have a Sirius Radio: If your Radio is branded as Sirius*, select the Radio Dock Adapter that is marked SIRIUS on the back of the adapter.
text_image
SIRIUS
natural_image
Simple line drawing of a mechanical component with two side slots (no text or symbols)Front View Correct OrientationBack View
*If you are unsure whether your Radio is an XM, SiriusXM, or Sirius Radio, check the label on the back of the Radio. If the label on your Radio says XM Radio ID or Radio ID, and has an 8-digit alphanumeric number, it is an XM or SiriusXM Radio. If the label on your Radio says Sirius ID, SID, or ESN, and has a 12-digit numeric number, it is a Sirius Radio.
Home Installation
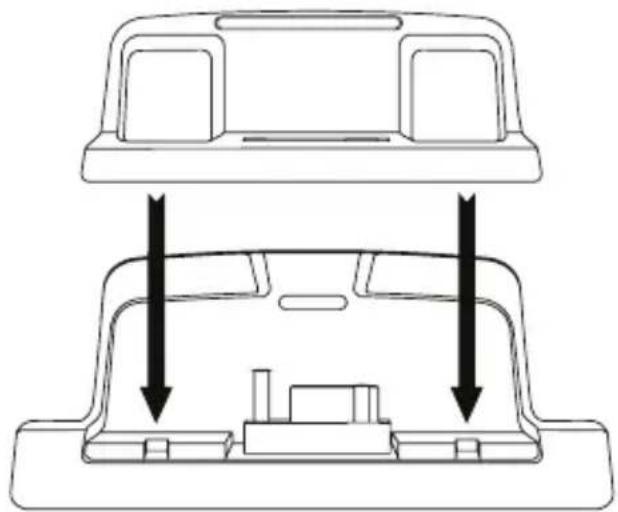
- Orient and place the Radio Dock Adapter that you selected into the Home Dock. Be sure the adapter is centered, and is seated all the way down into the dock.
natural_image
Technical line drawing of a car interior showing top and front views with arrows indicating movement or force (no text or symbols)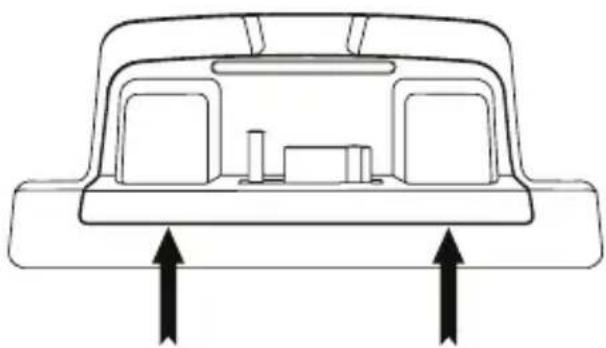
natural_image
Diagram of a car interior showing two compartments with upward arrows indicating movement or force (no text or symbols)- Once the adapter is seated correctly in the Home Dock, gently press the top of the adapter against the dock with your finger until it clicks into place. The Radio Dock Adapter is now installed.
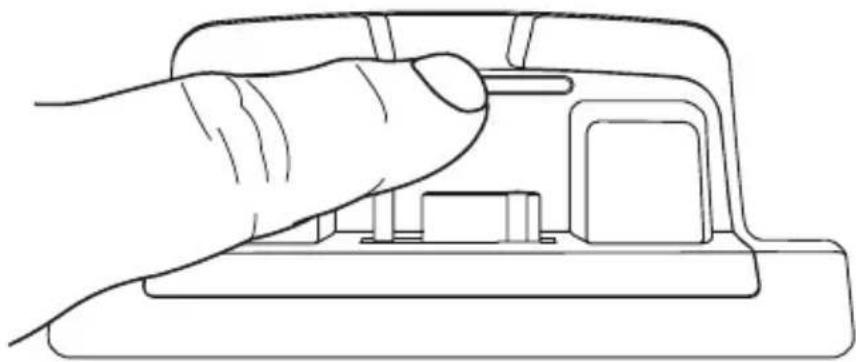
natural_image
Line drawing of a hand pressing a button on a device (no text or symbols)Home Installation
Should it become necessary to remove the Radio Dock Adapter from the Home Dock, use your fingernail to gently press down on the top of the adapter, and then use a long thin object such as a paper clip, a screw driver or something similar to pry the adapter away until it releases from the dock. Then lift the adapter up and out of the dock.
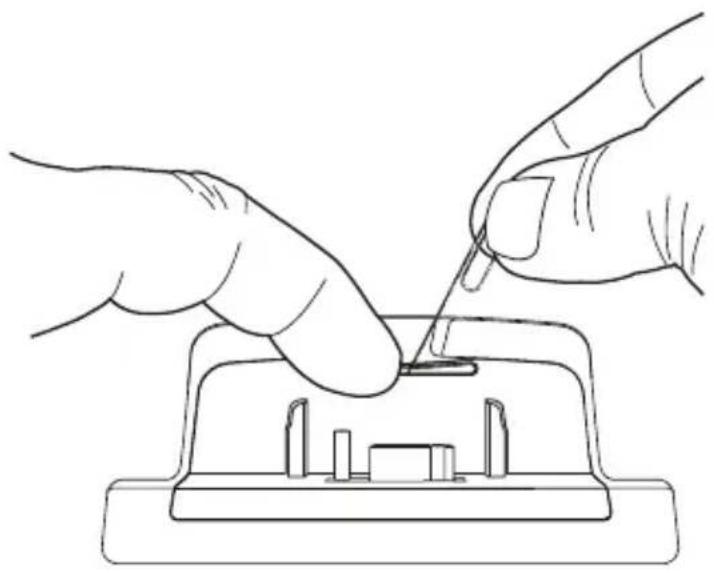
natural_image
Line drawing of two hands using a tool to adjust or install a component on an electrical outlet (no text or symbols)Home Installation
Step 2: Connect the Home Dock and Dock the Radio
When installing the Home Dock in your home, choose a location in close proximity to your stereo system or powered speakers, and also where the cable from the Indoor/Outdoor Home Antenna can reach the Home Dock. The location should be easily accessible and provide good visibility of the display, but should not be located where it will be in direct sunlight, which will affect the visibility of the display screen.
A. Connect the Indoor/Outdoor Home Antenna
Once you have selected a location for the dock, connect the antenna to the silver ANT connector at the rear of the Home Dock.
We will work on the location and aiming of the antenna in the next step.
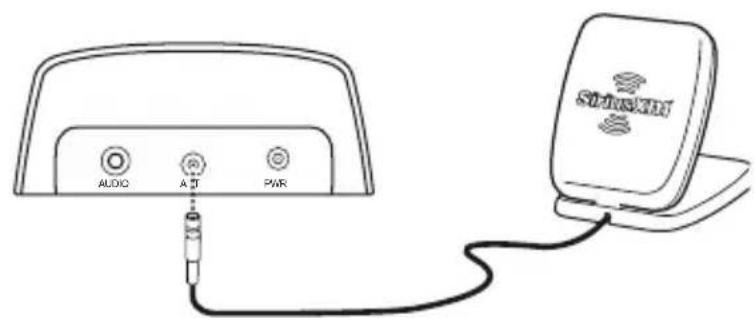
text_image
AUDIO A PWR SUNEXHHome Installation
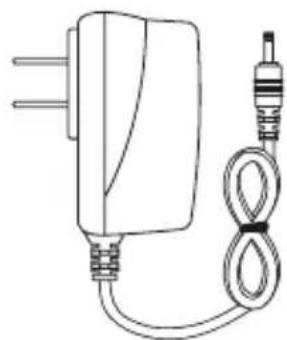
B. Connect the Home Power Adapter
Connect the Home Power Adapter to the red Power connector at the rear of the Home Dock, and plug it into a wall outlet.

text_image
AUDIO ANT P-PRC. Dock Your Radio
Insert your Radio into the Home Dock as shown, and turn the Radio On by pressing the Power button.

NOTE: Your Radio may be a different model than the Radio shown here.
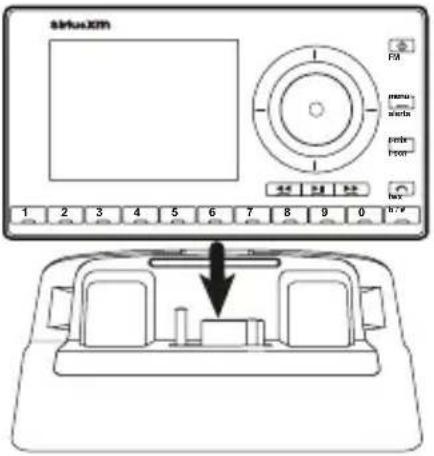
text_image
VirtualXM FM menu start power from 控制 1 2 3 4 5 6 7 8 9 0 h:v h: vHome Installation
Step 3: Place and Aim the Indoor/Outdoor Home Antenna
To begin, try experimenting with the Indoor/Outdoor Home Antenna to get a feel for the reception in your location. In major metropolitan areas, you might find that you get great reception in several locations without worrying too much about aim and placement. If 2 or 3 vertical bars of signal strength are being displayed, continue with step 4 on page 19.
If there is not at least two bars of signal strength displayed, refer to your Radio's User Guide (go to www.siriusxm.com/guides) for instructions on accessing the Signal Indicator, Signal, or Antenna Aiming screen of your Radio, to see a visual indication of signal strength. Move the antenna around the room or from room to room. Aim it from different windows. If you find a location where you are receiving good Satellite or Terrestrial signal strength (or both), exit the Signal Indicator, Signal, or Antenna Aiming screen. Continue with step 4 on page 19.

text_image
1 SIRIUSXM PREVIEW 866-635-2349 siriusxm.com bA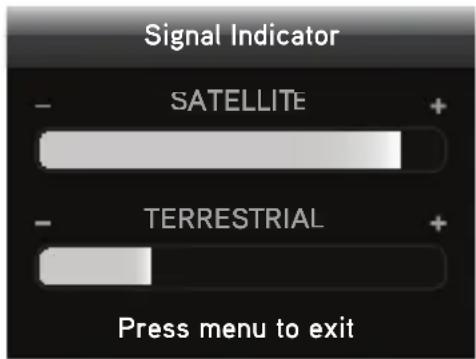
text_image
Signal Indicator - SATELLITE + - TERRESTRIAL + Press menu to exit*The screens shown above are representative and may differ from the screens displayed on your Radio.
If you are unable to find a location where you are receiving good Satellite or Terrestrial signal strength, try some of the suggestions which follow.
Home Installation
Other Indoor/Outdoor Home Antenna Installation Suggestions
Try moving the Indoor/Outdoor Home Antenna closer to a window, ideally one that is facing due south.
Not sure which way is south? Think about where the sun rises (in the east) and sets (in the west). Then stand so that east is to your left and you'll be facing south. Is there a window in the direction you're facing? Move the antenna closer to the window.

TIP! Still not sure which way is south or where to place your Indoor/Outdoor Home Antenna? Look up your location on an online mapping website that offers satellite views of street addresses where you can easily see which way is south, and what window may offer an unobstructed view of the sky.
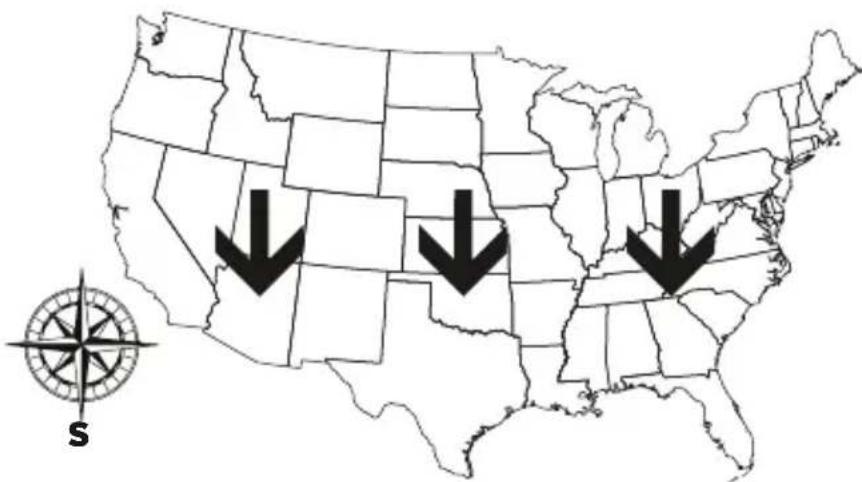
Another easy method is to start at any window, then work from window to window in a simple pattern to find the window that gives the best signal strength. Note that the antenna must also have an unobstructed
view, with no trees or buildings blocking its aim. If the antenna is aimed through a window, be aware that blinds, screens, or any other non-glass elements such as thermal insulation can sometimes cause reception issues. If this is the case, you may want to use another window or place the antenna outside of the window.
text_image
Map of the United States with three black downward arrows and a compass rose labeled 'S' in the corner.Home Installation
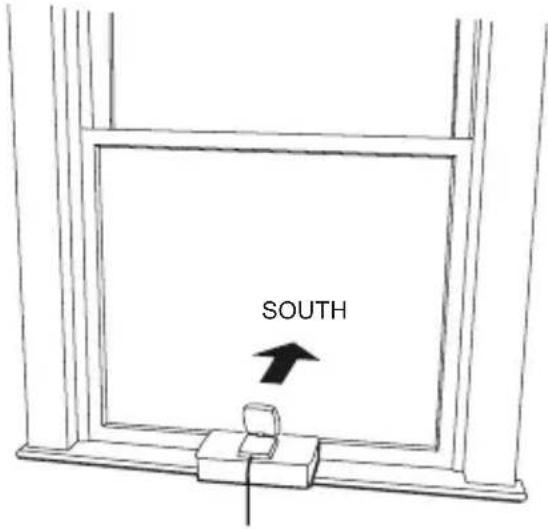
If you find a window that gives you good signal strength, you can place the antenna on the windowsill. The antenna may need to be placed on something to raise it above the level of the window frame.
If you don't have a window where you receive a consistent signal, or placing the antenna in a window is not a practical solution for you, BETTER reception can be achieved by placing the antenna outside on a window ledge, porch, table, or patio. The location you choose should provide the antenna with a clear view of the southern sky.
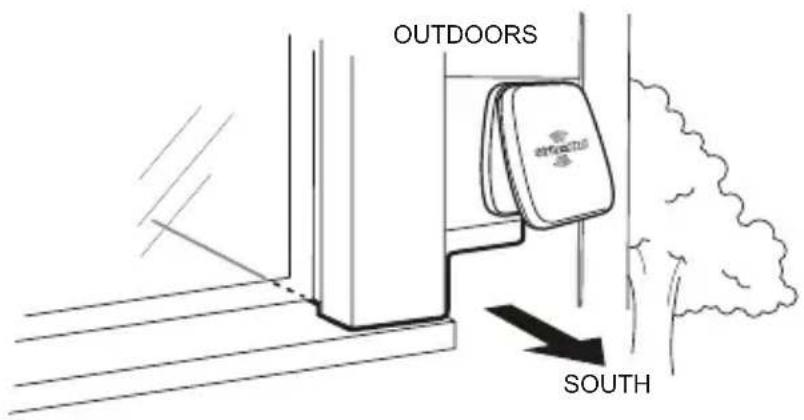
If none of the previous solutions work for you, then the BEST reception can be achieved by mounting the antenna outdoors, with a clear view of the southern sky.
Note that you will want to consider any potential hazards when you choose the mounting location, and possibly consider professional installation. Sirius XM Radio Inc. is not liable for any damages.
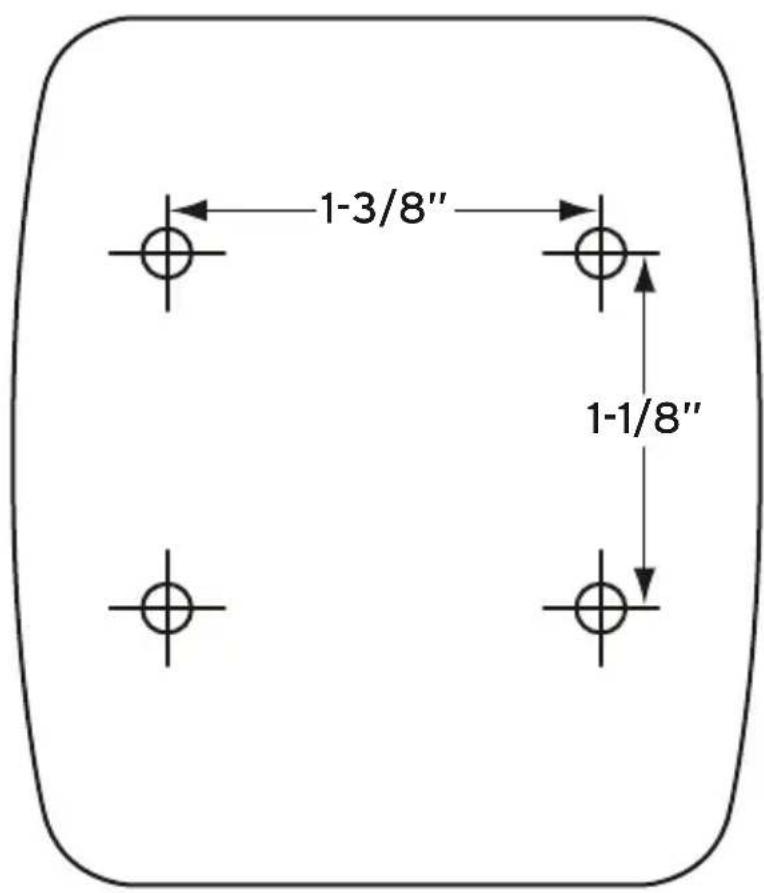
To mount the antenna, you will need four screws (not included)
text_image
SOUTH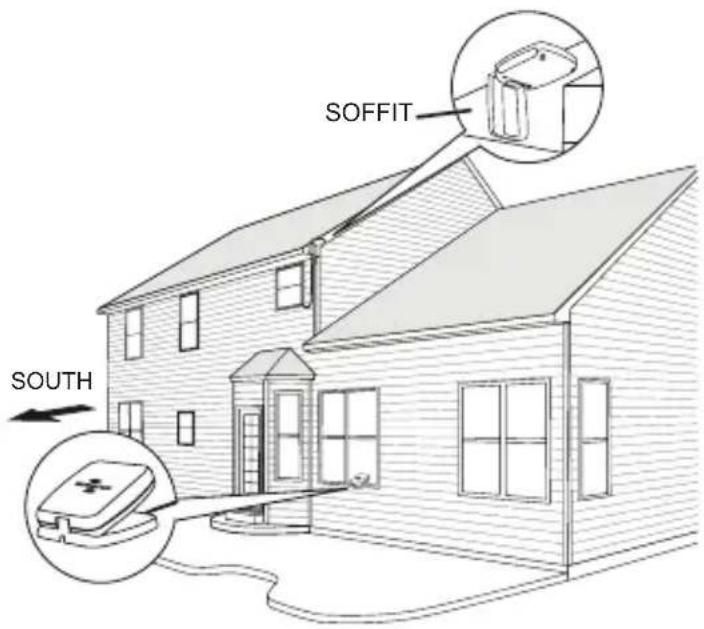
text_image
SOFFIT SOUTHHome Installation
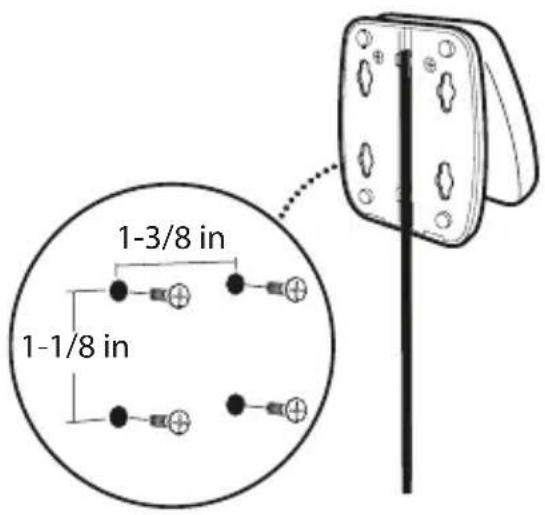
with a 1/4" head (e.g., an M3 screw), and that are suitable for the material onto which you are affixing the antenna, (e.g., wood, metal, etc.). The screws should be spaced 1-3/8" apart horizontally and 1-1/8" vertically. Refer to the template on "Indoor/Outdoor Home Antenna Template" on page 29.
text_image
OUTDOORS SOUTHOnce you have found a suitable location for the antenna, route the antenna cable to the Home Dock. Be sure you avoid any obstructions that could crimp, kink, or twist the cable. Use protective grommets wherever rough openings are encountered. If the antenna is installed outdoors, route the cable from the antenna location to the interior of the home, working the cable through the basement, under a window sill, etc., and make adjustments to take up cable slack as necessary.
text_image
1-3/8 in 1-1/8 in
TIP! If your Indoor/Outdoor Home Antenna's cable isn't long enough, visit www.siriusxm.com/accessories, or your favorite retailer, and consider a 50 ft. Home Antenna Extension Cable or a Wireless Home Signal Repeater.
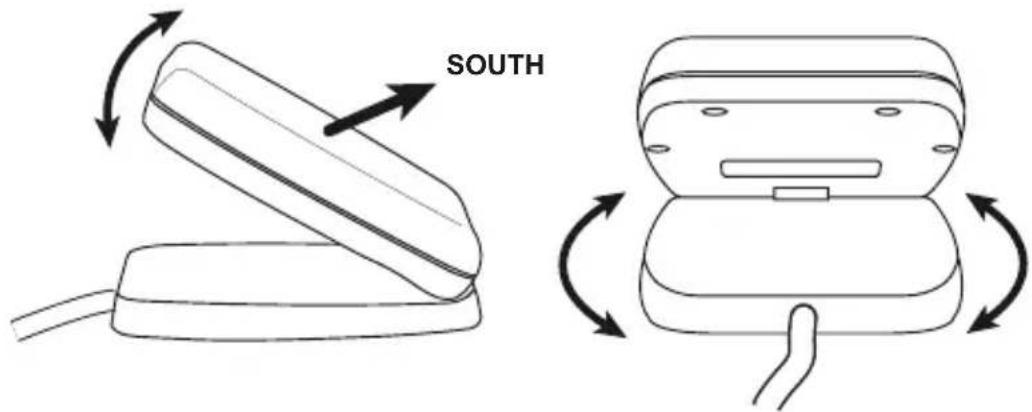
Verify that the antenna is pointed south, and that the antenna's view of the sky is not blocked by a tree, a building, a bridge, or anything else. Try various
Home Installation
locations until you find one where you are receiving a good signal.
The Indoor/Outdoor Home Antenna's reception can also be tweaked by opening or closing the antenna clamshell, and turning the antenna. While observing the signal strength, make small adjustments to the angle of tilt of the clamshell until the highest possible signal strength is achieved. If you have not wall-mounted the antenna, turn the antenna slightly to the right or left and observe if the signal strength increases. For each tweak, allow a few seconds in each position to determine if the signal strength increases.
text_image
SOUTHStep 4: Connect the Home Dock to a Stereo System or Powered Speakers
The Home Dock can be connected to your stereo system, or to a set of powered speakers. If you are connecting to a stereo system, see the following section. If you are connecting to a set of powered speakers, see “To Connect the Home Dock to Your Powered Speakers” on page 21.
To Connect the Home Dock to Your Stereo System
The Home Dock can be connected to your stereo system through the Aux
Home Installation
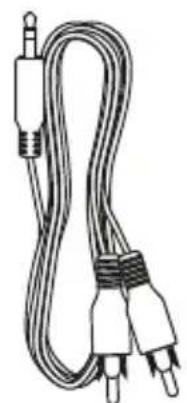
In or Line In connection of your stereo system, using the provided Stereo Audio Cable.
- Take the provided Stereo Audio Cable and connect the single 1/8" (3.5 mm) connector to the green AUDIO connector at the rear of the Home Dock.
- Connect the white left and red right Stereo Audio Cable connectors ("L" and "R" are also on each respective tip) to any available input other than PHONO on your stereo system. (If your stereo's inputs are marked red and black, simply connect the white plug to the black input.)
- Turn the stereo system On, and make sure you select the correct input on your stereo system for the Aux In or Line In connection.
- If you have connected everything correctly, and you are receiving signal, you should hear the SiriusXM audio.
- The audio level of your Radio can also be adjusted, if necessary. Refer to your Radio's User Guide (go to www.siriusxm.com/guides) for instructions on how to adjust the audio level. The installation is complete.

text_image
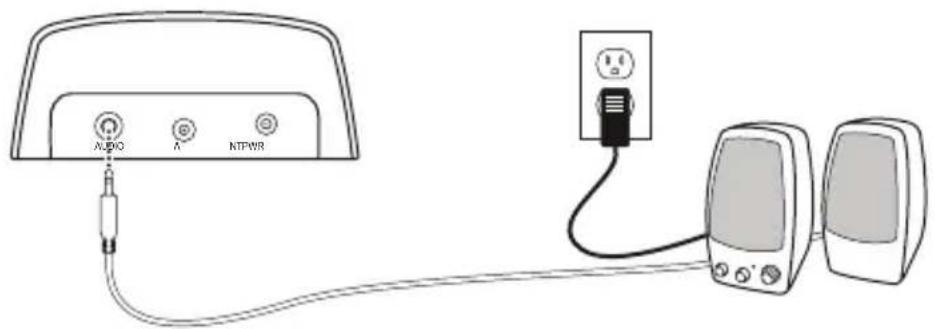
AUX IN MODE AUDIO ANT PWRTo Connect the Home Dock to Your Powered Speakers
The Home Dock can be connected directly to a set of powered speakers.
- Connect the 1/8" (3.5 mm) connector from the powered speakers to the green AUDIO connector at the rear of the Home Dock.
- Plug the powered speakers into an AC outlet.
- Turn On the powered speakers.
- If you have connected everything correctly, and you are receiving signal, you should hear the SiriusXM audio.
- The audio level of your Radio can also be adjusted, if necessary. Refer to your Radio's User Guide (go to www.siriusxm.com/guides) for instructions on how to adjust the audio level. The installation is complete.
text_image
AUDIO NTPWRTroubleshooting
Your Home Kit has been designed and built to be trouble-free, but if you experience a problem, try this:
- Check that all connections are firm and secure.
- Make sure you have connected the Home Dock as described in this User Guide. Verify that the AC power outlet is working.
| If you see this on the screen: Try this: | |
| No Signal or No Satellite Signal or Acquiring Signal | ·Move the antenna to a south-facing window. Not sure which way is south? Think about where the sun rises (in the east) and sets (in the west). Then stand so that east is to your left and you'll be facing south. Is there a window in the direction you're facing? ·You may need to find a better location for the antenna. Refer to “Step 3: Place and Aim the Indoor/Outdoor Home Antenna” on page 15. |
| Check Antenna Connection or Check Antenna or Antenna | ·Make sure that the Indoor/Outdoor Home Antenna cable is firmly and securely plugged into the Home Dock. Make sure the cable is not bent or broken. ·Turn the Radio off, then on, to reset this message. ·If the message persists, most likely the Indoor/Outdoor Home Antenna cable has been damaged. Replace the antenna. |
| Channel Off Air or Channel Unavailable | ·The channel you've selected is not currently broadcasting. Tune to another channel. |
| Loading ·Your Radio is acquiring | audio or program information. This message usually goes away in a few seconds. |
Troubleshooting
| If you see this on the screen: Try this: | |
| — • No program information, such as artist name,song title, or channel exists. | |
| If this happens: | |
| You do not receive all the channels to which you subscribed | • If you have not yet activated your service, refer to the Activation or Subscribe section in the User Guide which accompanied your Radio (go to www.siriusxm.com/guides).• Go to www.siriusxm.com/refresh and follow the directions to refresh your Radio.• Call 1-866-635-2349 for further assistance. |
| No audio • Check all cables between your Radio and your stereo system or powered speakers for a firm and secure connection.• Ensure you have selected the proper input source on your stereo system, or try another source.• Increase the audio level of the Radio. Refer to the User Guide which accompanied your Radio for instructions (go to www.siriusxm.com/guides). | |
| Audio sounds too soft • Raise the volume of your stereo system or powered speakers, or increase the audio level of your Radio until the sound quality improves. Refer to the User Guide which accompanied your Radio for instructions (go to www.siriusxm.com/guides). | |
| No song title or artist name is displayed | • The information may not be available or updates may be in progress. |
Troubleshooting
| If this happens: Try this: | |
| Traffic and Weather channels sound different from other channels | These channels use a different audio technology than other channels so they often sound different from other channels. |
| The Radio shuts off unexpectedly | If your Radio has these features, check these:- If Sleep Timer is set, the Radio will turn off after the selected length of time in a Home Dock. Set Sleep Timer to Off.- If Delayed Power is set, the Radio will turn off after the selected length of time in the Home Dock. Set Delayed Power to Off. |
| The demo is playing • Your Indoor | /Outdoor Home Antenna is not connected or you are not receiving the signal. Check that the Indoor/Outdoor Home Antenna is connected properly and is not obstructed. |
System
Power Requirements: 110 V AC, 200 mA (max)
Operating Temperature: -4^ to +140^ ( -20^ to +60^ )
Audio Output: 1.5 V
rms (max)
Home Dock
Dimensions: 4.1 in (W) X 1.8 in (H) X 1.7 in (D)
105 mm (W) X 45 mm (H) X 44 mm (D)
Weight (without adapter): 1.8 oz (50 g)
Weight (with adapter): 1.9 oz (54 g)
Audio Connector: 1/8 in (3.5 mm) female
Antenna Connector: SMB male
Remote Control
Dimensions: 1.6 in (W) x 4.7 in (H) x 0.63 in (D)
41 mm (W) × 120 mm (H) × 64 mm (D)
Weight: 2.1 oz (60 g)
Battery: CR2032 (3 V)
Home Power Adapter
Input: 100-240 V AC, 50-60 Hz, 0.2 A
Output: 5.0 V DC, 1.0 A
Indoor/Outdoor Home Antenna
Type: SiriusXM Indoor/Outdoor
Connector: SMB female
Cable Length: Approximately 20 ft (6.1 m)
Stereo Audio Cable
Connectors: 1/8 in (3.5 mm) stereo male to RCA left & right
Cable Length: Approximately 5.9 ft (180 cm)
Patent and Environmental Information
Patent Information
It is prohibited to, and you agree that you will not, copy, decompile, disassemble, reverse engineer, hack, manipulate, or otherwise access and/or make available any technology incorporated in this product. The music, talk, news, entertainment, data, and other content on the Services are protected by copyright and other intellectual property laws and all ownership rights remain with the respective content and data service providers. You are prohibited from any export of the content and/or data (or derivative thereof) except in compliance with applicable export laws, rules and regulations. The user of this or any other software contained in a SiriusXM Radio is explicitly prohibited from attempting to copy, decompile, reverse engineer, hack, manipulate or disassemble the object code, or in any other way convert the object code into human-readable form.
Environmental Information
Follow local guidelines for waste disposal when discarding packaging and electronic appliances.
FCC Statement
The user is cautioned that changes or modifications not expressly approved by Sirius XM Radio Inc. can void the user's authority to operate this device.
This device complies with Part 15 of the FCC Rules. Operation is subject to the following two conditions:
- This device may not cause harmful interference.
- This device must accept any interference received, including interference that may cause undesired operation.
This equipment has been tested and found to comply with the limits for a Class B digital device, pursuant to Part 15 of the FCC Rules. These limits are designed to provide reasonable protection against harmful interference in a residential installation.
This equipment generates, uses, and can radiate radio frequency energy and, if not installed and used in accordance with the installation instructions, may cause harmful interference to radio communications. However, there is no guarantee that interference will not occur in a particular installation. If this equipment does cause harmful interference to radio or television reception, which can be determined by turning the equipment off and on, the user is encouraged to try to correct the interference by one or more of the following measures:
• Reorient or relocate the receiving antenna of the affected receiver.
- Increase the separation between the SiriusXM equipment and the affected receiver.
- Connect the SiriusXM equipment into an outlet on a circuit different from that to which the affected receiver is connected.
- Consult the dealer or an experienced radio/TV technician for help.
WARNING! The FCC and FAA have not certified Satellite Radio Receiver use in any aircraft (neither portable nor permanent installation). Therefore, Sirius XM Radio Inc. cannot support this type of application or installation.
Copyrights and Trademarks
© 2014 Sirius XM Radio Inc. “Sirius”, “XM” and all related marks and logos are trademarks of Sirius XM Radio Inc. and its subsidiaries. “BBC” and “Radio One” are trademarks of the British Broadcasting Corporation and are used under license. BBC logo © BBC 1996. Radio 1 logo © BBC 2001. Cosmopolitan® is a registered trademark of Hearst Communications, Inc. Elvis Radio logo © EPE Reg. U.S. Pat & TM off. IndyCar (and Design) are registered trademarks of Brickyard Trademarks, Inc., used with permission. Major League Baseball trademarks and copyrights are used with permission of Major League Baseball Properties, Inc. Visit the official website at MLB.com. Games subject to availability and change and may not include all spring training games. All rights reserved. NASCAR® is a registered trademark of the National Association for Stock Car Auto Racing, Inc. The NBA identifications are the intellectual property of NBA Properties, Inc. and the respective NBA member teams. © 2014 NBA Properties, Inc. © 2014 NFL Properties LLC. All NFL-related trademarks are trademarks of the National Football League. NHL and the NHL Shield are registered trademarks of the National Hockey League. © NHL 2014. All NHL logos and marks and NHL team logos and marks depicted herein are the property of the NHL and the respective teams and may not be reproduced without the prior written consent of NHL Enterprises, L.P. The Home Ice© channel is a registered trademark of XM Satellite Radio Inc. The Swinger Golfer logo is a registered trademark of PGA TOUR, Inc. Visit www.siriusxm.com/channellineup for updates. All programming/channel lineup/XM service subject to change or preemption. All other marks and logos are the property of their respective owners. All rights reserved.
IMPORTANT NOTICE: REQUIRED SUBSCRIPTION
Hardware and subscription sold separately, and activation fee required. Other fees and taxes may apply. Subscriptions governed by SiriusXM Customer Agreement; see www.siriusxm.com. Prices and programming are subject to change. Service automatically renews into the subscription Package you choose (which may differ from the Package which arrived with the Radio), for additional periods of the same length, and automatically bills at the then current rates, after any complimentary trial or promotional period ends, until you call us at 1-866-635-2349 to cancel. XM U.S. Satellite service available only to those at least 18 years of age in the 48 contiguous USA and DC, while SiriusXM Internet Radio is available throughout our satellite area and also AK, HI and PR.
Indoor/Outdoor Home Antenna Template
text_image
1-3/8" 1-1/8"Sirius XM Radio Inc.
1221 Avenue of the Americas
New York, NY 10020
1.866.635.2349
siriusxm.com
© 2014 Sirius XM Radio Inc.
SXDH3 141119a