ED 850 S - Tumble dryer Equator - Free user manual and instructions
Find the device manual for free ED 850 S Equator in PDF.


| Product Type | Tumble Dryer (Compact, Vented) |
| Model | ED 850 S |
| Drying Capacity | 13 lbs (5.9 kg) |
| Voltage | 120 V, 60 Hz |
| Product Dimensions (H x W x D) | 27.5 x 23.6 x 21.5 in (69.9 x 59.9 x 54.6 cm) |
| Net Weight | 55 lbs (24.9 kg) |
| Color | White |
| Dry Functions | Sensor Dry, Time Dry, Anti-Wrinkle, Sleep Mode |
| Sensor Dry | Automatically adjusts drying time based on moisture/humidity |
| Time Dry | Preset hot/warm/cool cycles: 200-120 min (hot), 120-20 min (warm), 20-0 min (cool), 80-0 min (air only) |
| Sleep Mode | Runs cool air for 150 min then hot air for 120 min (total 270 min) |
| Anti-Wrinkle | Refreshes clothes with warm air (knob between 40-60 min) |
| Installation Options | Freestanding, Built-In, Wall Mount (bracket not included) |
| Wall Mountable | Yes (requires hanging hooks and spacers, not included with dryer) |
| Built-In Clearances | Min 2" sides, 3" front/rear, 4" from walls; vertical clearance 52" |
| Exhaust Duct Diameter | 4" (10.2 cm) – Canada; 4" (10 cm) – USA |
| Max Duct Length (Flexible Metal) | 8 ft (2.4 m) |
| Filter Types | Lint Filter (plastic) + Exhaust Filter (paper) in Exhaust Vent Shroud; Air Intake Filter (paper) under intake cover |
| Lint Filter Cleaning | After every use: pull out assembly, separate, brush/vacuum lint |
| Air Intake Filter Cleaning | Periodically: remove cover, clean filter with soft brush |
| Warranty | 1 year parts and labor (USA/Canada); 90 days commercial use |
| Replacement Parts | Feet (85047), Inlet Filter (85050), Inlet Filter Cover (85051), Exhaust Vent Shroud (85057), Lint Filter (85058), Exhaust Filter (85059) |
Frequently Asked Questions - ED 850 S Equator
User questions about ED 850 S Equator
0 question about this device. Answer the ones you know or ask your own.
Ask a new question about this device
Download the instructions for your Tumble dryer in PDF format for free! Find your manual ED 850 S - Equator and take your electronic device back in hand. On this page are published all the documents necessary for the use of your device. ED 850 S by Equator.
USER MANUAL ED 850 S Equator
natural_image
Line drawing of a washing machine with circular vent and control panel (no text or symbols)OWNER'S MANUAL
Please read the instructions carefully and keep for future reference. Information may be updated from time to time so please refer to the manual online for the latest version of the manual.
WARRANTY INFORMATION
Your appliance is protected by this warranty under normal, personal, family or household use for 1 Year Parts & Labor and limited commercial use (90 days) in USA and Canada.
WARRANTY
Consolidated Brands undertakes to the consumer/owner to repair or, at our option, to replace any part of this product which proves to be defective in workmanship or material under normal personal, family or household use in USA and Canada, for a period of one years parts & labor from the date of original purchase. For commercial use, the product is warranted for a period of 90 days.
During this period, we will provide all labor and parts necessary to correct such defect, free of charge, if the appliance has been installed and operated in accordance with the written instructions provided with the appliance. Ready access to the appliance, for service, is the responsibility of the consumer/owner. If unit installed in closet or cabinet, it should be removed for access by service technician. If this cannot be done, then there will be extra charge.
We may require return of products or parts to our warranty department for which the shipping charges are to be incurred by the consumer. If a return or replacement is required, allow 3-4 weeks to process. If unit is located more than 25 miles there will be a trip charge. If unit is in remote area more than 75 miles, customer will need to take the product to the technician's workshop.
Replacement unit will be delivered with curb side delivery only. If Unit is installed in a 5th wheel RV, in a location behind the axle it won't be covered under warranty.
All repairs or replacements are warranted only for the remainder of the original warranty period. Charges may incur if warranty coverage is not applicable. Service would be provided from Monday to Friday between normal business hours.
GENERAL
Since it is the responsibility of the consumer/owner to establish the warranty period by verifying the original purchase date, Consolidated Brands recommends that a receipt, delivery slip or some other appropriate payment record be kept for that purpose. This warranty gives you specific legal rights, and you may also have other rights which vary from State to State.
You can register your warranty by either of following methods:
- Scan the QR Code
- Online at: ApplianceDesk.com/Warranty
WARRANTY SERVICE
QR Code

- Open Smart Phone
- Open Camera
- Scan QR Code
- Click the Link
This warranty is given by
Consolidated Brands
10222 Georgibelle Drive, Suite 200,
Houston, TX 77043-5249
QUESTIONS / SERVICE
In no event shall Consolidated Brands be liable for incidental or consequential damages or for damages resulting from external causes such as abuse, operation misuse, neglect, alterations, normal wear and tear, incorrect voltage or acts of God. This warranty does not cover service calls which involve defective workmanship, damage due to other products while combined use with this product or materials covered by this warranty. Accordingly, diagnosis and repair costs for a service call which involves defective workmanship or materials will be the responsibility of the consumer-owner.
Most work is covered. The defining factor is has the machine malfunctioned (Consolidated Brands is responsible) or has the customer omitted or done something to cause malfunction (customer is responsible).
THE FOLLOWING WORK ARE NOT COVERED UNDER WARRANTY:
Installation
- Non-removal of shipping bolts, causing vibration / internal damage.
- Non-adjustment of feet to level machine, causing vibration / internal damage.
- Non-removal of exhaust vent plate at the back while using Venting Dry mode, causing excess heat and resulting in damage to internal components.
- Using incorrect length of venting i.e. more than 10 feet unless used with a booster fan.
- Not conforming to minimum space requirements for built-in installation, causing excess heat and resulting in damage to internal components.
- Installation in a corrosive environment.
- Incorrect water pressure i.e below 7.25 psi or above 145 psi
- Incorrect water inlet hose installation (use only factory supplied hoses with metric threads on the L shaped side to fit water valve)
Maintenance
- Non-cleaning of coin trap for debris, causing the unit to not drain out water and resulting in drain pump malfunction.
- Non-cleaning of vent fan & exhaust hose for lint, causing the unit to not dry properly.
- Improper maintenance (such as, but not limited to, scale build-up, freeze damage, or vent blockage).
Damage
- Breakage of cosmetic parts e.g., door handle, knob.
Other
- Accident, abuse or misuse.
- Using solvents to clean the machine or wash clothes, causing damage.
- Misapplication of this product e.g., use in a non household/commercial environment.
- Any other cause not due to defects in materials or workmanship.
- Problems or damage due to fires, flooding, electrical surges, freezing or any acts of God.
- Any damage caused by poor water quality.
- Operating the appliance with anything other than potable water at all times.
- Force majeure.
Warranty Limitations
- If a unit is located more than 25 miles away, there will be a trip charge.
- If a unit is in a remote area more than 75 miles away, the machine should be taken to the technician's workshop.
- If the unit is installed in a 5th wheel RV, in a location behind the axle, it will not be covered under warranty.
- All repairs or replacements are warranted only for the remainder of the original warranty period.
- If a return or replacement is required, allow 3-4 weeks to process.
- Replacement units will be delivered with curbside delivery only.
- We may require the return of products or parts to our warranty department for which the shipping charges are to be pre-paid by the consumer / owner.
- Charges may be incurred if warranty coverage is not applicable.
- Service would be provided from Monday to Friday between normal business hours.
GENERAL
Since it is the responsibility of the consumer / owner to establish the warranty period by verifying the original purchase date, Consolidated Brands recommends that a receipt, delivery slip or some other appropriate payment record be kept for that purpose. This warranty gives you specific legal rights, and you may also have other rights which vary from state to state.
All rights reserved. Manual subject to change without notice.
California Proposition 65
WARNING: This product contains chemical known to the State of California to cause cancer and birth defects or other reproductive harm.
Congratulations on your new Compact Dryer!
In addition to its contemporary design, this is a highly sophisticated engineered product that will give you many years of satisfaction.
Here are some of the best reasons for buying your Dryer:
- Easy to use
- Variable heat levels
- Wall mount option
- Built-In installation
- Options for Sensor and Time Dry programs
Safety
In order to reduce the risk of fire, electric shock, and/or injury, please follow safety precautions. Read all instructions carefully and save for future reference.
- Use the appliance indoors. It is not intended to be used outdoors.
- Ensure that open flame sources, such as candles are not placed on top of the dryer.
- Do not place items in the dryer that are soiled with flammable liquids, oils and other chemicals. These items should be washed thoroughly before placing them in the dryer.
- Ensure fabric softeners or products to eliminate static are not used inside the dryer, unless recommended by manufacturers of these products.
- Do not dry items containing rubber, plastic or similar materials.
- Ensure the dryer and electrical cord are not placed near heat sources, such as radiators, heaters, air ducts or in direct sunlight.
- Ensure vents and ventilation openings are not blocked.
- Ensure the power cord is not bent or twisted, and not exposed in an area where is could be a tripping hazard.
- Do not use the dryer if the cord is damaged.
- To disconnect the dryer, press the power button to turn it off, then grasp the plug of the power cored firmly and pull straight out of the outlet.
- Do not open the dryer and reach into the drum while it is rotating.
- Ensure the dryer is not overloaded.
- Do not tamper with controls.
- Perform regular maintenance and cleaning of lint filter after each use. Ensure periodic cleaning of exhaust duct is done by a qualified technician.
- Check that foreign objects are not in the drum.
- This appliance is not intended for use by persons, including children, with reduced physical, sensory or mental capabilities, or lack of experience and knowledge, unless they have been given supervision or instruction concerning use of the appliance by a person responsible for their safety.
Do not allow children or pets to play on or in the appliance. Close supervision is needed when the appliance is used near children and pets.
Safe Disposal
Before discarding the dryer, please remove the door to prevent child entrapment.
Placement
- Do not place or store the dryer where it will be exposed to the weather.
- Place the dryer in dry ventilated area, away from heat and direct sunlight.
- Place the dryer on a flat, smooth surface. Do not place on carpet or uneven surfaces.
- Ensure there is adequate ventilation around the dryer, leaving at least 4 inches (10 cm) space between the dryer and the adjacent walls.
- Keep the exhaust vent opening and surrounding areas free of obstructions and build-up of lint and debris.
The dryer comes with feet that need to be attached to ensure stability.
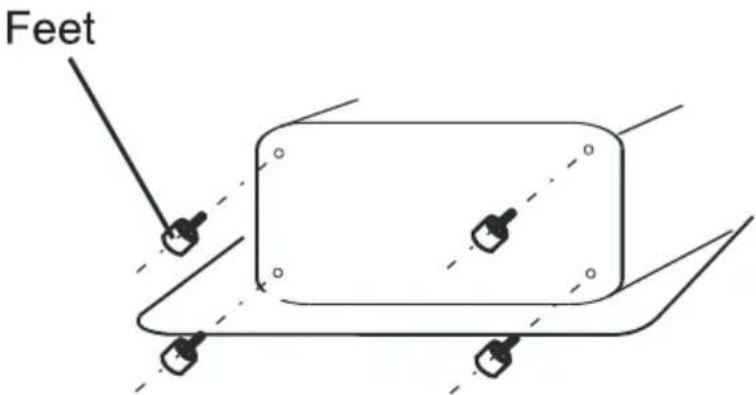
If the dryer is rack mounted, a secure bracket is required to ensure stability and prevent vibration. At least 2 inches (5 cm) between the dryer and walls is required. (The bracket is not included).
Installation
The dryer must be installed and serviced by a qualified technician.
Install the dryer according to manufacturer's instructions and local codes.
- The dryer must be properly grounded. Do not modify the plug.
- Do not install the dryer in a tight-fitting cabinet. Ensure there is adequate ventilation space all around the dryer (please see detailed installation instructions).
- Do not use flexible plastic venting materials which may collapse. Use only vent hoses that are approved by the manufacturer.
- In Canada and the United States, only those foil-type flexible ducts, if any, specifically identified for use with the appliance by the manufacturer shall be used and that comply with the outline for the Clothes Dryer Transition Duct, subject to 2158A, shall be used.
- In Canada, the exhaust duct shall be 4" (10.2 cm) in diameter. In the United States, the exhaust duct shall be 4" (10 cm) in diameter.
- The total length of flexible metal duct shall not exceed 8 feet (2.4 m).
- The duct shall not be assembled with screws or other fastening means that extend into the duct and catch lint.
- The appliance shall no be exhausted into a chimney, wall, ceiling, attic, crawl space, or a concealed space of a building.
Built-In, Recessed, Closet and Alcove Installation
The Dryer may be installed in a built-in, recessed area, closet or alcove.
- Minimum clearance between dryer cabinet and adjacent walls are: 2" either side and 3" front and rear.
- Minimum vertical space from floor to overhead cabinets, etc. is 52" (132 cm).
- Closet door must be louvered or otherwise ventilated and must contain a minimum of 60 sq.in. of open area equally distributed. If closet contains both a washer and a dryer, doors must contain a minimum of 120 sq.in. of open area equally distributed.
- No other fuel-burning appliance shall be installed in the same closet with the dryer.
• Additional clearances for wall, door and floor moulding may be required.
Cutout Dimensions
Cutout Height - 28.5 inches
Cutout Width - 27.5 inches
Cutout Depth - 27.5 inches
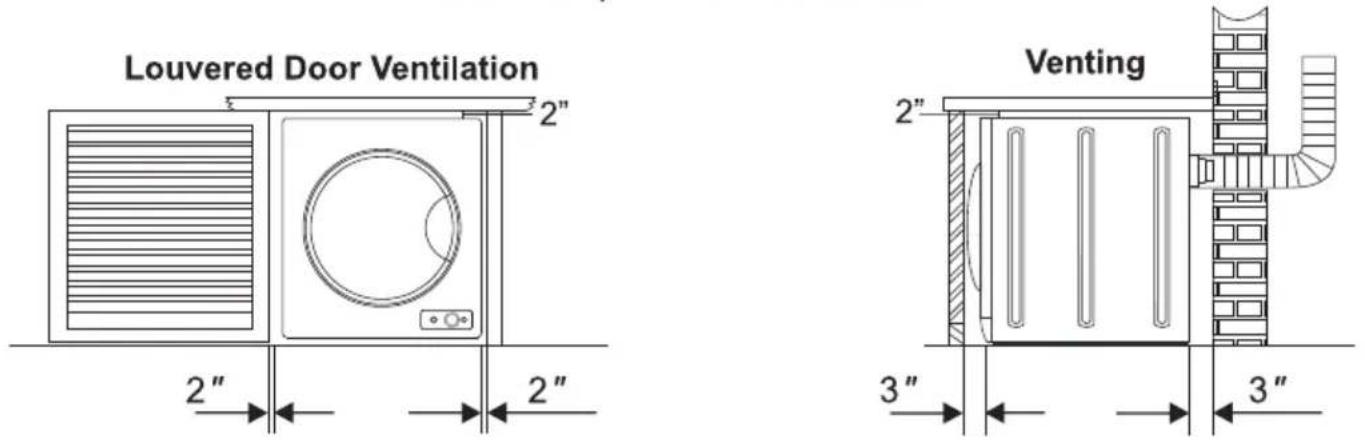
Additional space is needed when an external exhaust elbow is used.
NOTE: If a door is installed that potentially encloses the unit while running, the door must allow for a minimum of 20 square inches of free air movement. There must also be a 1" additional space in front of the unit to the closed door and 1" from back of the unit to the wall. Additional spacing should be considered for easy installation, servicing, and compliance with all applicable local, state, and federal codes.
Wall Mounting Instructions
-
Determine and mark the dryer position on the wall. This dryer is not suitable to be placed directly on top of a washing machine.
-
A minimum 2 in (50 mm) is needed between the top of dryer and the ceiling for ease of installation.
- If mounting on top of a washing machine, allow sufficient room to open the lid of the washer.
| Tools required | ||
| Tools and parts required for plaster/wood | Drill and 3 mm bit | 1 |
| Phillips head screw driver | 1 | |
| Wood screws 12X 50 mm wood plank screws | 4 | |
You will need a helper to lift the dryer onto the wall.
Wall Mounting Kit includes:
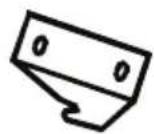
Hanging Hook (Top) (2)
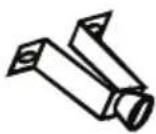
Spacer (Bottom) (2)
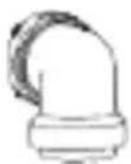
Exhaust Connector

12 mm long screws (4)

25 mm long screws (4)
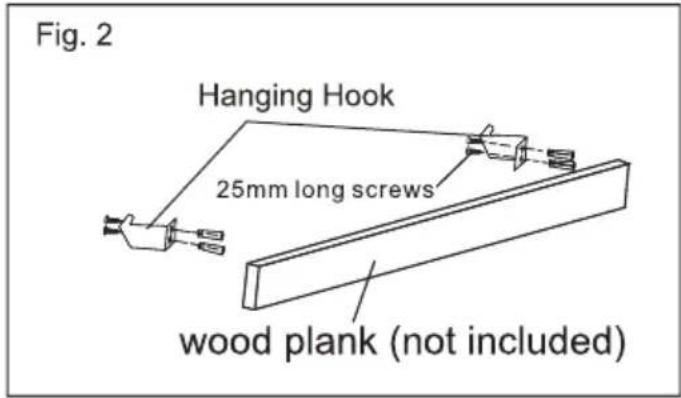
- Fix the wall hanging hooks (2 supplied) to the wall securely (eg. into the stud). Fit a wood plank between the studs to mount the brackets onto if the stud position is too wide.
- To install the hanging hook to wood plank, start at Fig. 2
- Align hanging hooks and fasten screws tightly.
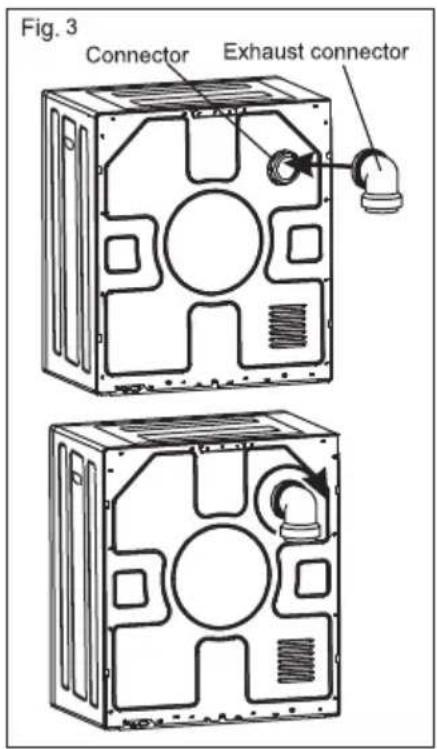
- Please adjust the exhaust connector direction, then match the exhaust connector onto the connector. Please refer to Fig. 3.
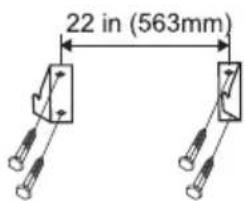
Fig. 1
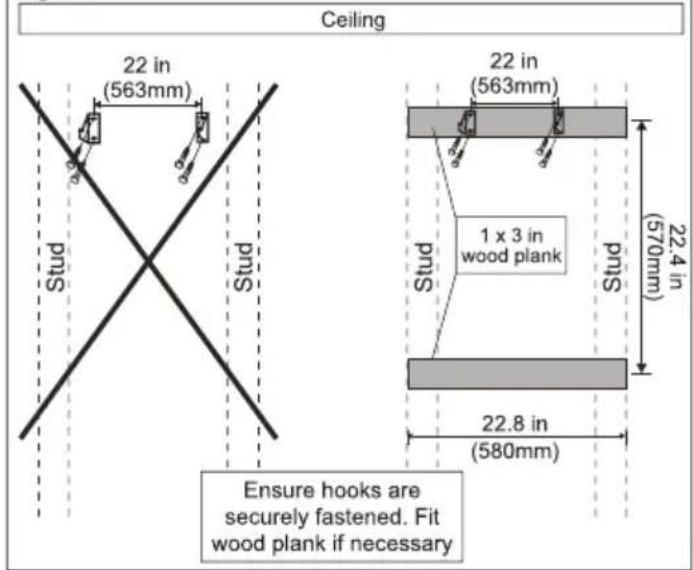
- Turn the exhaust connector clockwise, until it inserts into the connector's groove.
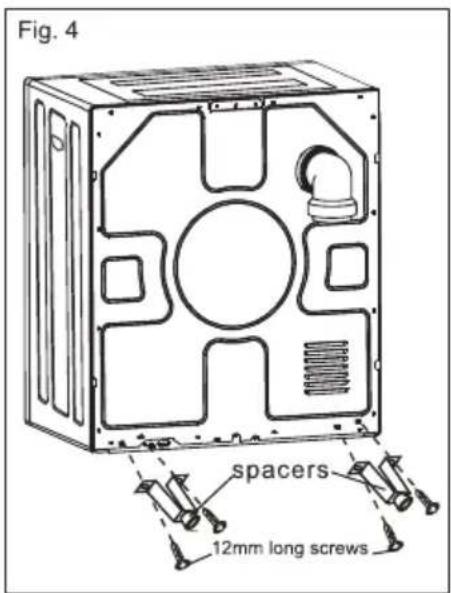
- Using 4x12 mm screws (provided), fix the 2 spacers as per Fig. 4.
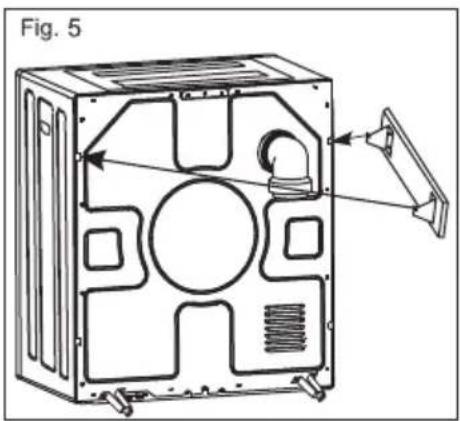
- With assistance, mount the dryer on wall hooks. See Fig. 5.
PARTS AND FEATURES
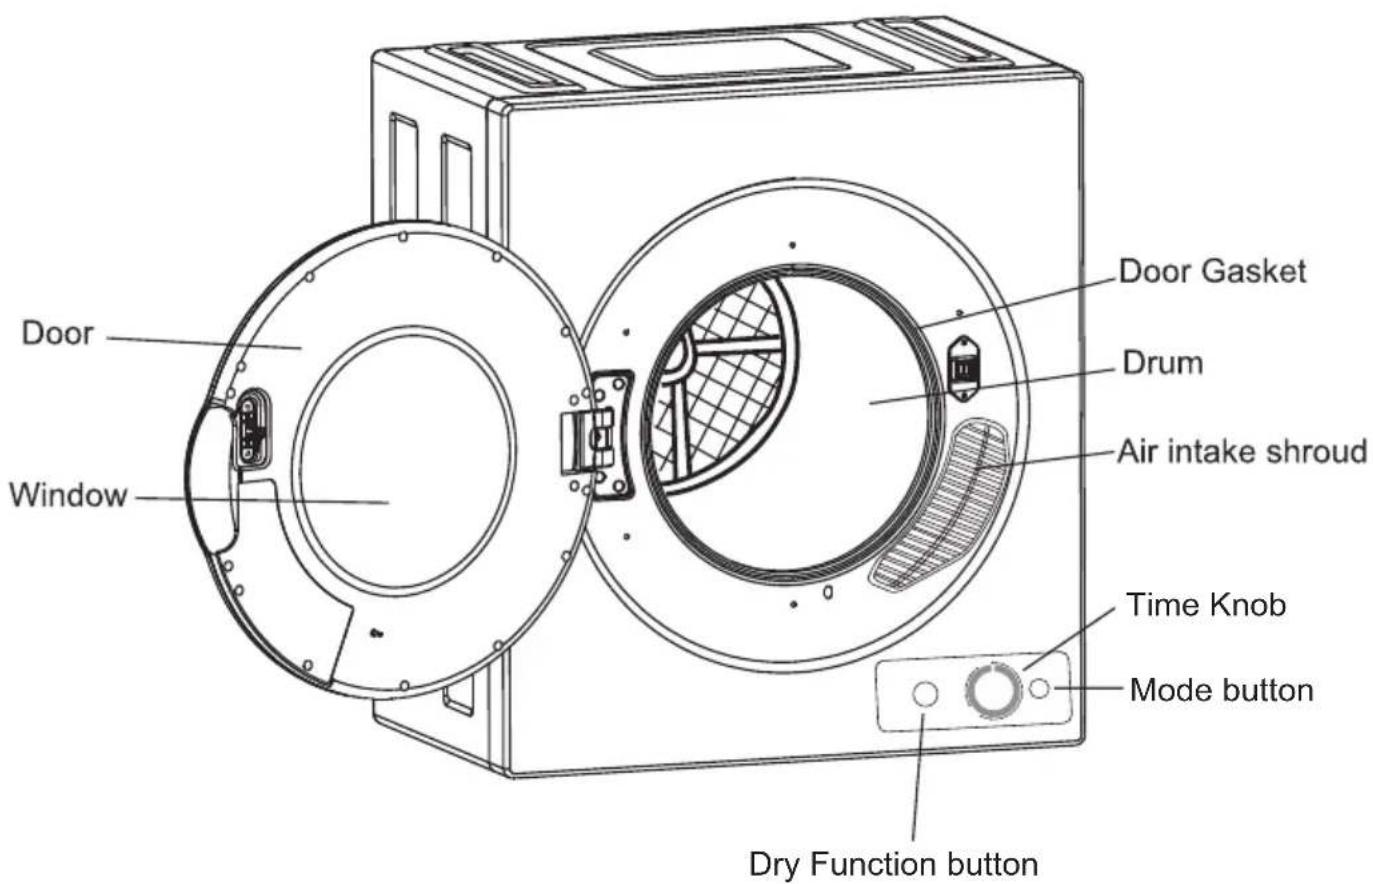
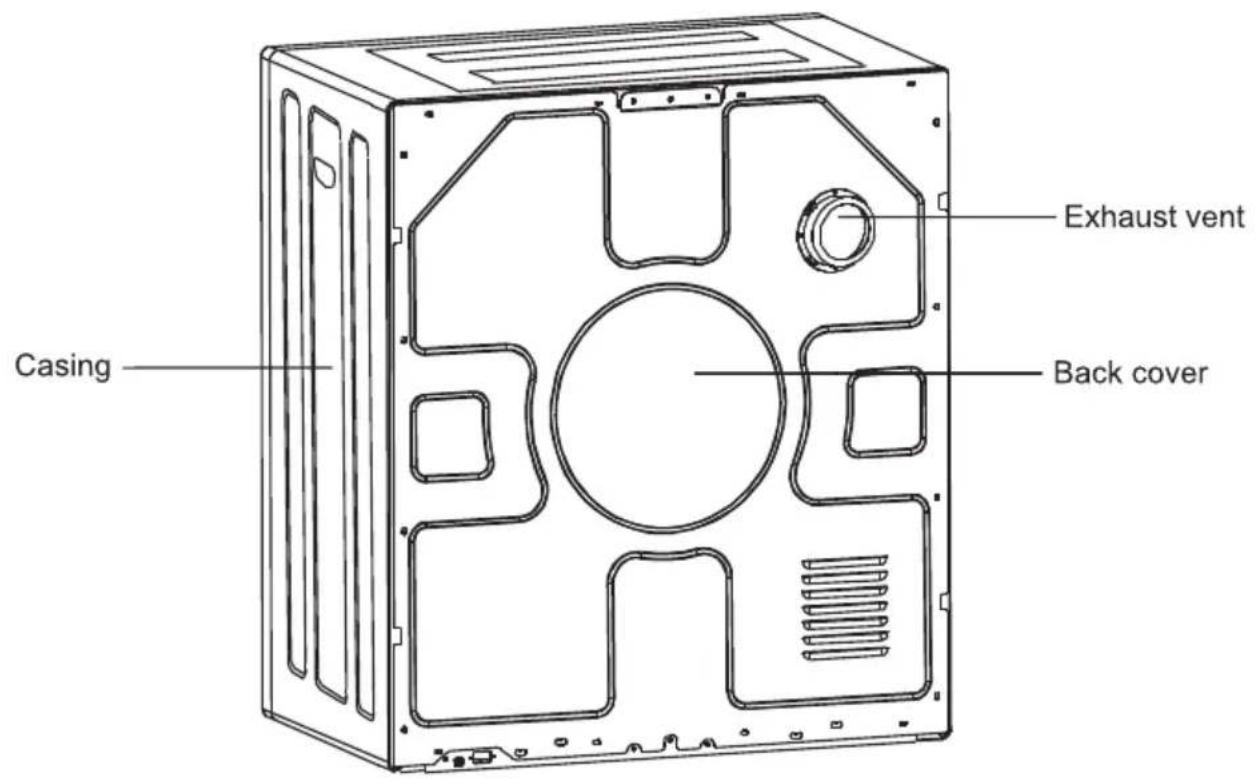
Control Panel Functions
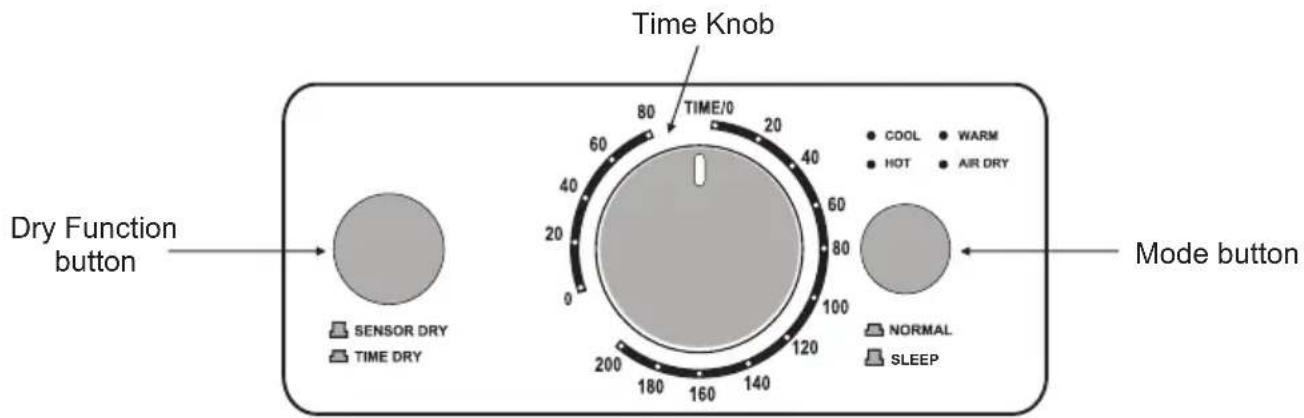
Control Panel
The Control Panel has a Dry Function button on the left, a Mode button on the right and a Time Knob in the middle. The Dryer can be operated in NORMAL Mode or SLEEP Mode.
Normal Mode
The Normal mode operates in conjunction with the dry functions.
- Select Sensor Dry or Time Dry. For Sensor Dry leave the Dry Function button out. For Time Dry press the Dry Function button in.
- Press the Mode button to select NORMAL mode.
- Turn the Time Knob to select the number of minutes to dry. The off position is 0. The dryer will start when the Time Knob is turned to the desired dry cycle.
Dry Functions
Time Dry TIME DRY
The Time Dry function operates when the Dry Function button is pressed down. Turn the Time Knob clockwise to the desired time setting. Preset levels of heat correspond to the following time ranges:
- Red zone – Hot air blows from 200 to 120 minutes. Use for large or heavy loads.
- Orange zone - Warm air blows from 120 to 20 minutes. Use for normal loads.
- Blue zone - Cool air blows from 20 to 0 minutes. Use for delicate loads or to refresh.
- Green zone - Air blows from 80 to 0 minutes. Use for delicate loads or to refresh.
Sensor Dry
SENSOR DRY
The Sensor Dry function operates when the Dry Function button is up (not pressed down). Turn the Time Knob clockwise to 200. When the time reaches the 120-minute mark, the moisture and humidity levels are measured by the sensor and the drying time is automatically adjusted to stop hot air blowing once the clothes are dry. During the remaining time in the cycle, cool air blows until the cycle ends at 0.
Anti-Wrinkle
To refresh the load, turn the Time Knob between 40 - 60 minutes.
Warm air will blow into the drum and refresh the clothes and thereby prevent wrinkles.
Sleep Mode
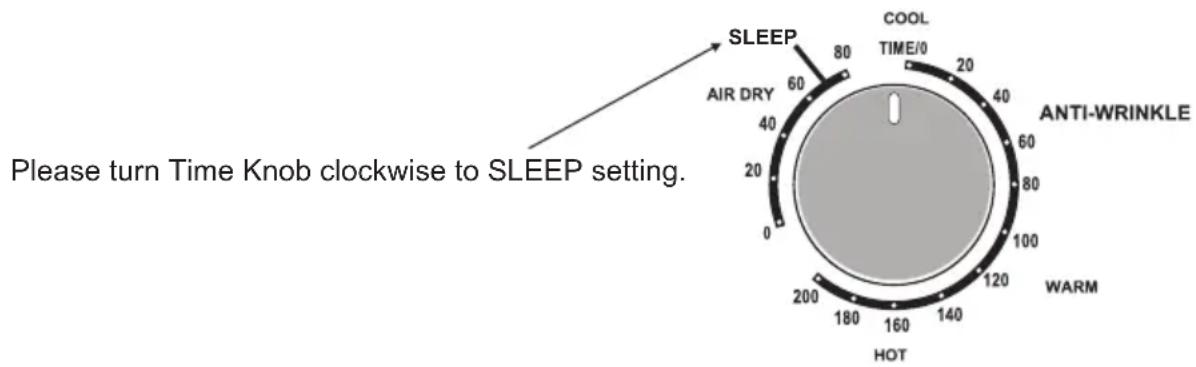
When the SLEEP mode is selected, the dryer automatically operates for a duration of 270 minutes (4 and a half hours). Cool air will blow into the drum for the first 150 minutes (2 and a half hours). Then hot air will blow for the next 120 minutes (2 hours). Once you load your clothes into the drum and close the door, turn the Time Knob as shown in the diagram – on the left upper side of the Time Knob, between 60 and 80. The dryer will start.
Before using the Dryer, please check the inside of the drum to ensure that children or pets have not climbed into the appliance.
Maintenance
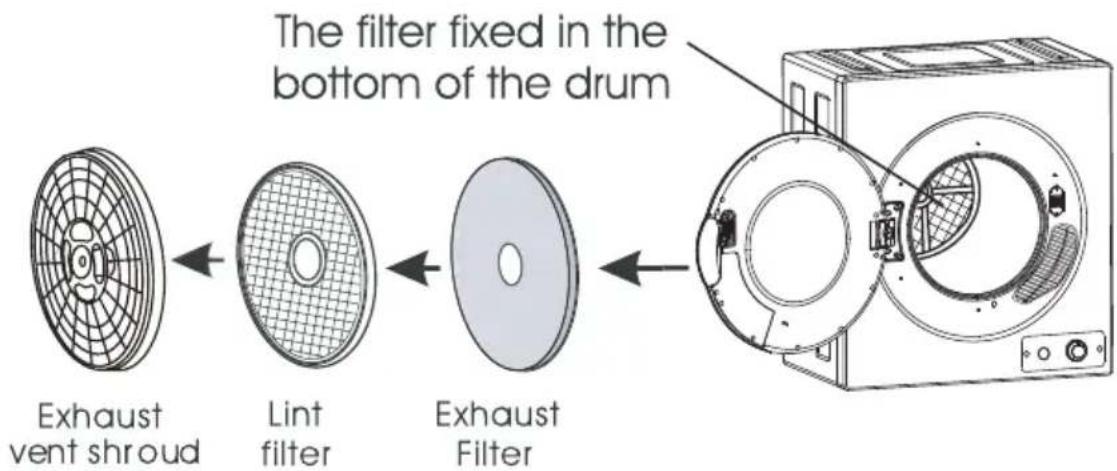
Please unplug the power cord prior to any cleaning. The Lint Filter must be in place whenever drying. It must be cleaned before each use. The Filter assembly is located at the back of the drum.
1. Removing the Filters
Remove by pulling outwards, with fingers inserted into the four holes around the Exhaust Vent shroud. The Filter is in 3 parts: Exhaust Vent Shroud, Lint Filter and Exhaust Filter. (as shown in Figure 1).
flowchart
graph LR
    A["Exhaust vent shroud"] --> B["Lint filter"]
    B --> C["Exhaust Filter"]
    C --> D["The filter fixed in the bottom of the drum"]
Figure 1
2. Cleaning the Filters
Separate Exhaust Vent Shroud, Lint Filter and Exhaust Filter. Clean the lint on the Lint Filter and Exhaust Filter with a soft brush or vacuum cleaner (as shown in figure 2). Do not damage the filters.
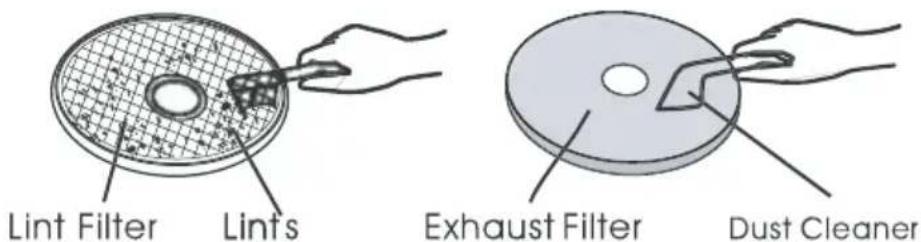
Figure 2
3. Re-installing the Filters
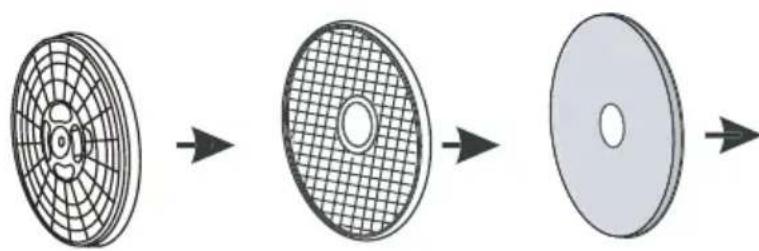
After cleaning, assemble in the sequence of Exhaust filter-Lint Filter - Exhaust Vent Shroud. Align the recesses in the center with the projection in the center of the drum. Ensure that it is firmly inserted (as shown in Figure 3).
natural_image
Three-step diagram showing a circular component being cut into a grid-patterned, circular cross-section, and finally into a blank circular plate (no text or symbols)Figure 3
Cleaning the Air Intake Filter
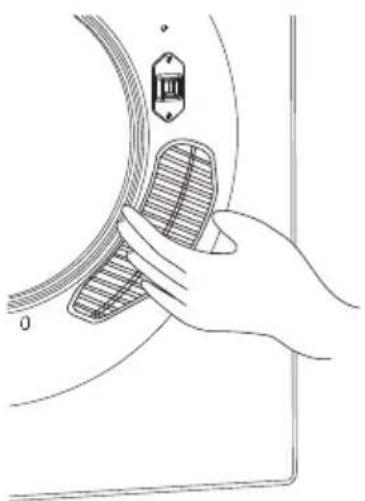
The Filter should be cleaned occasionally. Remove by holding and pulling out the upper and lower ends of the Air Intake Shroud. Slightly push upwards with your thumb until the latch hook disconnects, then remove gently. Remove the Filter inside and clean it with a soft brush. Reassemble and install as before.
natural_image
Illustration of a hand holding a device with a grid-patterned component, no text or symbols present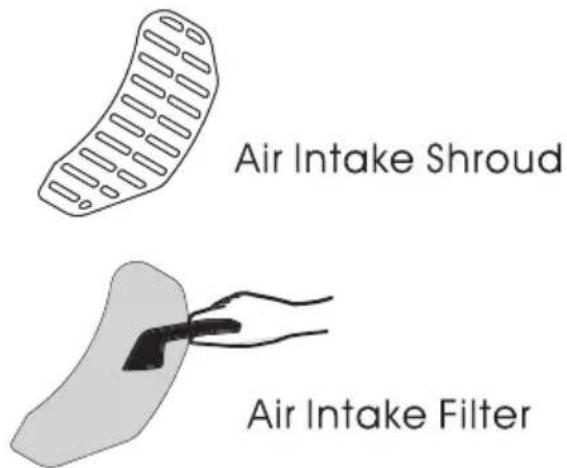
Cleaning
Do not wash directly with water.
Do not use thinner, gasoline or alcohol.
Do not use any type of spray cleaner when cleaning the interior. If dryer drum becomes stained, clean the drum with a damp cloth. Remove any residue before drying the next load. Clean cabinet with mild soap and water. Do not use harsh or abrasive cleaners, as this could damage the dryer.
Drying Tips
- Shake out and load items in the dryer one at a time to ensure even drying.
- Do not overload to ensure adequate air flow to dry clothes.
- Some items may need to be turned inside out to prevent damage to buttons, etc.
- Fasten buckles and straps to prevent metal from banging on the inside of the drum.
- Check pockets for coins and loose items.
- Place small or delicate items in a mesh bag.
- Check labels to ensure that clothing can be dried in a dryer.
Technical Specifications
| Model | ED 850 S |
| Drying Capacity | 13 lbs |
| Color | White |
| Voltage | 120V - 60Hz |
| Net Weight | 55 lbs |
| Product Dimensions (HxWxD) inch | 27.5 x 23.6 x 21.5 |
Please dispose off this appliance in accordance with local regulations.
Troubleshooting
In most cases, when your Dryer fails to work, the problems arising can be easily solved without having to call for a technician. Before calling for assistance, always check these points.
| Problem | Possible Cause | What to do |
| Timer knob does not rotate | Is the power cord inserted firmly?Is the door closed? | Insert the power cord firmly.Close the door. |
| Drum does not turn | Is the door closed?Is the power cord inserted?Does the electrical socket have power? | Close the door.Insert the power cord firmly.Check the power cord socket. |
| Hot air is not blowing out | Is the drying program set on Air Dry? | Set the dry program for Hot or Warm. |
| The laundry is not throughly dried | Are the front and back filters clogged?Is there too much laundry in the dryer?Have items been added while the dryer is in operation?Has the laundry become twisted while drying?Has the dryer been placed in a poorly ventilated area? | Clean the filter.Reduce the amount of clothes in the dryer.Dry items again.Untwist the items and dry as needed.Place the dryer in a well-vented area.Use Hot program and increase dry time. |
| Dryer does not start | Is there a power failure?Is the power cord inserted firmly?Is the door closed?Has the Timer knob been turned clockwise to select a drying program? | Try again when there is power.Insert the power cord firmly.Close the door.Turn the Timer knob to select a dry program and time. |
Dryer replaceable parts can be ordered online:
| Part Position | Part Number | Part Name |
| 47 | 85047 | Feet (set of 4) |
| 50 | 85050 | Inlet Filter (Air Intake Filter) – Paper |
| 51 | 85051 | Inlet Filter Cover (Air Intake Shroud) – Plastic |
| 57 | 85057 | Exhaust Vent Shroud – Plastic |
| 58 | 85058 | Lint Filter – Plastic |
| 59 | 85059 | Exhaust Filter - Paper |
NOTE: Consistent with our continuing product development policy, improvements may have been made which render the contents of this package slightly different to that shown.
- OWNER'S MANUAL
- WARRANTY INFORMATION
- Your appliance is protected by this warranty under normal, personal, family or household use for 1 Year Parts & Labor and limited commercial use (90 days) in USA and Canada.
- WARRANTY
- GENERAL
- THE FOLLOWING WORK ARE NOT COVERED UNDER WARRANTY:
- Installation
- Maintenance
- Damage
- Other
- Warranty Limitations
- California Proposition 65
- Congratulations on your new Compact Dryer!
- Safety
- Safe Disposal
- Placement
- The dryer must be installed and serviced by a qualified technician.
- Built-In, Recessed, Closet and Alcove Installation
- Cutout Dimensions
- Wall Mounting Instructions
- You will need a helper to lift the dryer onto the wall.
- PARTS AND FEATURES
- Control Panel Functions
- Control Panel
- Normal Mode
- Dry Functions
- Time Dry TIME DRY
- Sensor Dry
- Anti-Wrinkle
- Sleep Mode
- Removing the Filters
- Cleaning the Filters
- Re-installing the Filters
- Cleaning the Air Intake Filter
- Cleaning
- Drying Tips
- Troubleshooting
Brand : Equator
Model : ED 850 S
Category : Tumble dryer