ED880 - Tumble drier Equator - Free user manual and instructions
Find the device manual for free ED880 Equator in PDF.


| Product Type | Vented Tumble Dryer |
| Model | ED880 |
| Brand | Equator |
| Dimensions (Width x Height x Depth) | 23.6" x 33.5" x 25.2" (60 x 85 x 64 cm) |
| Depth with Door Open 90° | 41.9" (106.4 cm) |
| Weight | 79 lbs (36 kg) |
| Heater Rating | 2400W |
| Power Consumption (No Heat) | 280W |
| Power Consumption (Heating) | 2950W |
| Electrical Requirements | 240V, 30A, individual branch circuit |
| Drying Cycles | Normal, Heavy, ECO, Delicate, Shoes, Allergen (131°F), Sanitize (165°F), Refresh 12' |
| Temperature Options | High, Medium, Air (no heat) |
| Dry Level Options | Extra, More, Less, Damp |
| Special Functions | Allergen Cycle (131°F), Sanitize Cycle (165°F), Sensor Dry, Time Dry up to 1 hour, Delay Start (1-24 hrs), Child Lock, Chime |
| Display | Estimated time remaining, selected options, clean lint filter reminder |
| Lint Filter | Removable, clean before each load; clean filter reminder indicator |
| Door | Reversible (left or right opening) |
| Exhaust Duct Diameter | 4" (10.2 cm) |
| Maximum Exhaust Length (Rigid Metal, 0 elbows) | 80 ft (24.4 m) |
| Installation Clearances | 2" sides, 3" rear, 52" min vertical space; closet door must have 60 sq in open area |
| Warranty | 1 year parts and labor (USA and Canada) |
| Certifications | ETL Listed (US and Canada) |
| Accessories (sold separately) | Pedestal, Stacking Kit, Exhaust Elbow, Drying Rack |
| User Manual | Available in PDF on notice-facile.com |
Frequently Asked Questions - ED880 Equator
User questions about ED880 Equator
0 question about this device. Answer the ones you know or ask your own.
Ask a new question about this device
Download the instructions for your Tumble drier in PDF format for free! Find your manual ED880 - Equator and take your electronic device back in hand. On this page are published all the documents necessary for the use of your device. ED880 by Equator.
USER MANUAL ED880 Equator
IMPORTANT SAFETY INSTRUCTIONS....4
WARRANTY INFORMATION 6
INTRODUCING YOUR DRYER ....7
OPERATING INSTRUCTIONS....11
MAINTENANCE 13
INSTALLATION INSTRUCTIONS - SAFETY 14
INSTALLATION INSTRUCTIONS - VENTILATION 16
INSTALLATION INSTRUCTIONS - ELECTRICAL 20
INSTALLATION INSTRUCTIONS - DOOR REVERSAL 24
TROUBLESHOOTING 25

CAUTION

RISK OF ELECTRIC SHOCK DO NOT OPEN
CAUTION: TO REDUCE THE RISK OF ELECTRIC SHOCK, DO NOT REMOVE COVER (OR BACK). NO USER SERVICABLE PARTS INSIDE. REFER SERVICING TO QUALIFIED SERVICE PROFESSIONALS.
The model number and the serial number are on the label affixed to the back of the unit. These numbers are also available on the front of the cabinet behind the door.
You should note the model and serial numbers of this unit in the space provided. Retain this booklet as a permanent record of your purchase to aid in identification in the event of theft.
MODEL# SERIAL#
SAVE THESE INSTRUCTIONS
Your safety and that of your children
Your clothes dryer has been built in compliance with safety regulations, to protect you and your family.
WARNING
For your safety, the information in this manual must be followed to minimized the risk of fire or explosion, electric shock, or to prevent property damage, injury to persons, or death.
WARNING
To reduce the risk of fire, electric shock, or injury to persons who using this appliance, follow basic precautions, including the following:
- Read all instructions before using this appliance.
- Before use, the dryer must be properly installed as described in this manual.
-
Do not dry the articles that have been previously cleaned in, washed in, or spotted with gasoline, dry-cleaning solvents, other flammable or explosive substances, as they emit vapors that could ignite or explode.
-
Risk of Suffocation and Injury from Entrapment: Do not allow children to play on or in the appliance. Close supervision of children is necessary when the appliance is used near children.
-
Before the appliance is removed from service or discarded, remove the door to the drying compartment.
-
Do not reach into the appliance if the tub or drum is moving.
-
Do not install or store this appliance where it will be exposed to the weather.
-
Do not repair or replace any part of the appliance or attempt any servicing unless specifically recommended in the user-maintenance instructions or in published user-repair instructions that you understand and have skills to carry out.
-
Do not tamper with controls.
-
Do not use fabric softeners or products to reduce static unless recommended by the manufactures of the fabric softener product.
-
Do not use heat to dry articles containing foam rubber or similarly textured rubber-like materials.
-
Keep the exhaust opening and adjacent surrounding areas free from accumulation of lint, dust, and dirt.
-
Do not place items exposed to cooking oils in your
dryer. Item contaminated with cooking oils may contribute to a chemical reaction that could cause a load to catch fire.
-
To reduce the risk of fire due to contaminated loads, the final part of a tumble dryer cycle occurs without heat (cool down period). Avoid stopping a tumble dryer before the end of the drying cycle unless all items are quickly removed and spread out so that the heat is dissipated.
-
Risk of fire: Do not install a booster fan in the exhaust duct.
-
WARNING - To reduce the risk of fire, do not dry articles containing foam rubber, or similarly textured rubber-like materials.
-
CAUTION - Risk of fire. a clothes dryer produces combustible lint, the dryer must be connected to an exhaust to the outdoors. Regularly inspect the outdoor exhaust opening and remove any accumulation of lint around the out door exhaust opening and in the surrounding area.
-
Always check the inside of the dryer for foreign objects.
-
Clean lint filter before or after each load.
-
Do not store plastic, paper, or clothing that may burn or melt on top of the dryer during operation.
-
Unplug the appliance or turn off the circuit breaker before servicing. Pressing the Power button DOES NOT disconnect power.
-
The interior of the appliance and exhaust duct should be cleaned periodically by qualified service personnel.
-
Do not use replacement parts that have not been recommended by the manufacturer (e.g. parts made at home using a 3D printer).
-
Connect to individual branch-circuit. Connect this appliance to a properly grounded outlet only, see installation instructions.
Your appliance is protected by this warranty under normal, personal, family or household use for One (1) year Parts & Labor and limited commercial use (90 days), in USA and Canada.
WARRANTY
Consolidated Brands undertakes to the consumer-owner to repair or, at our option, to replace any part of this product which proves to be defective in workmanship or material under normal personal, family or household use, in USA and Canada, for a period of one year from the date of original purchase. During this period, we will provide all labor and parts necessary to correct such defect, free of charge, if the appliance has been assembled and operated in accordance with the written instruction with the appliance.
EXCLUSIONS
In no event shall Consolidated Brands be liable for incidental or consequential damages or for damages resulting from external causes such as abuse, misuse, incorrect voltage or acts of GOD. This warranty does not cover service calls which do not involve defective workmanship or materials covered by this warranty. Accordingly, diagnosis and repair costs for a service call which does not involve defective workmanship or materials will be the responsibility of the consumer-owner.
GENERAL
Since it is responsibility of the consumer-owner to establish the warranty period by verifying the original purchase date, Consolidated Brands recommends that a receipt, delivery slip or some other appropriate payment record be kept for the purpose. This warranty gives you specific legal rights, and you may also have other rights which vary from State to State.
Specifically, the following work is not covered under warranty and does not constitute warranty work:
Installation - e.g. insufficient clearance around dryer Maintenance - e.g. failure to clean lint filter Mishandling - e.g. breakage of door
Most work is covered. The defining factor is, has the machine malfunctioned (Consolidated Brands is responsible) or has the customer omitted or done something to cause the appliance to malfunction (customer is responsible). Some States do not allow the exclusion or limitation of incidental or consequential damages, so the above limitation or exclusion may not apply to you.
California Proposition 65
WARNING: This product contains chemical known to the State of California to cause cancer and birth defects or other reproductive harm.
All rights reserved. Manual subject to change without notice.
THIS LIMITED WARRANTY DOES NOT COVER:
- Service trips to deliver, pick up, or install or repair the product; instruction to the customer on operation of the product; repair or replacement of fuses or correction of wiring or plumbing, or correction of unauthorized repairs/installation.
- Failure of the product to perform during power failures and interruptions or inadequate electrical service.
- Damage resulting from operating the Product in a corrosive atmosphere or contrary to the instructions outlined in the product's owner's manual.
- Damage to the product caused by accidents, pests and vermin, lightning, wind, fire, foods, or acts of GOD.
- Damage or failure caused by unauthorized modification or alteration, or if it is used for other than the intended purpose, or any water leakage where the unit was not properly installed.
- Damage or failure caused by incorrect electrical current, voltage, or plumbing codes, commercial or industrial use, or use of accessories, components, or consumable cleaning products that are not approved by EQUATOR.
- Damage caused by transportation and handling, including scratches, dents, chips, and/or other damage to the finish of your product.
- Damage or missing items to any display, open box, discounted, or refurbished product.
- Products with original serial numbers that have been removed, altered, or cannot be readily determined. Model and Serial numbers, along with original retail sales receipt, are required for warranty validation.
- Increases in utility costs and additional utility expenses.
- Repairs when your product is used in other than normal and usual household use (e.g. commercial use, in offices and recreational facilities) or contrary to the instructions outlined in the owner's manual.
• Costs associated with removal of your product from your home for repairs. - The removal and reinstallation if it is installed in an inaccessible location or is not installed in accordance with instructions of this manual.
- Not conforming to minimum space requirements for installation, causing excess heat and resulting in damage to internal components.
- Damage resulting from misuse, abuse, improper installation, repair, or maintenance.
You can register your warranty by either of the following methods:
- Scan the QR Code
- Online at: ApplianceDesk.com/Warranty
QR Code

- Open Smart Phone
- Open Camera
- Scan QR Code
- Click the Link
WARRANTY SERVICE
This warranty is given by:
Consolidated Brands
10222 Georgibelle Drive, Suite 200,
Houston, TX 77043-5249
Customer Service: Appliance Desk
Phone / Text: 1-800-776-3538
Email: Service@ApplianceDesk.com
Web: www.ApplianceDesk.com
Business hours: 9:00 am to 5:00 pm weekdays
SAVE THESE INSTRUCTIONS
Dryer Specifications
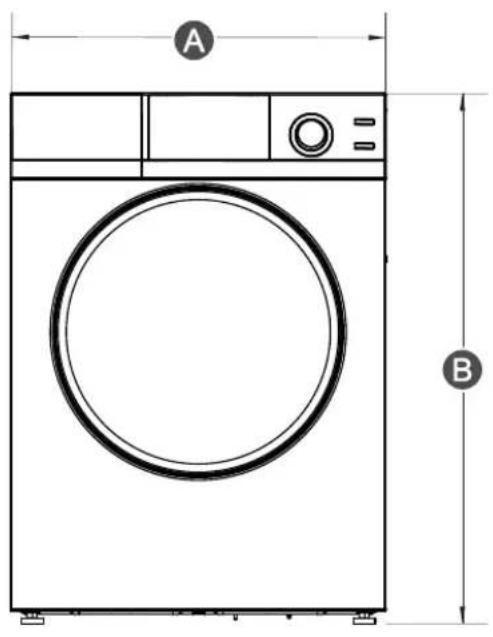
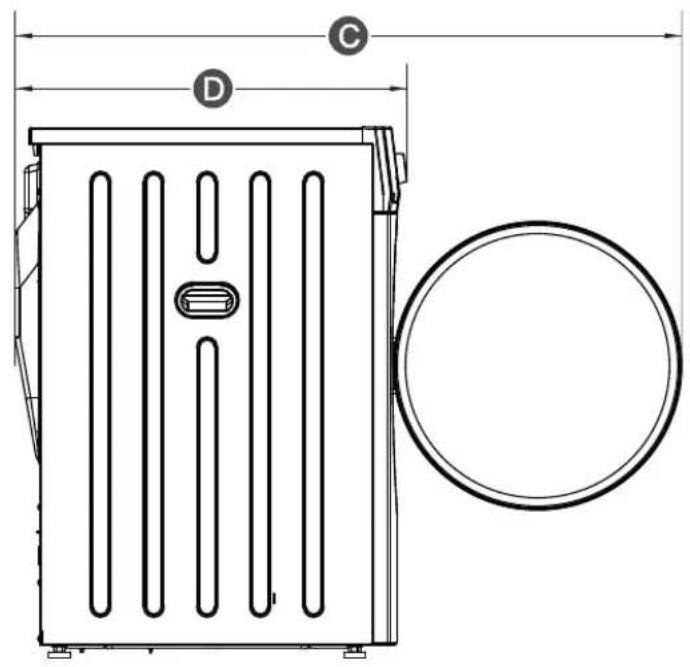
| TYPE | VENTED DRYER | |||
| DIMENSIONS | Div | Inches(cm) | Div | Inches(cm) |
| A. Width | 23.6"(60) | C. Depth with door open 90° | 41.9"(106.4) | |
| B. Height | 33.5"(85) | D. Depth | 25.2"(64) | |
| WEIGHT | 79 lbs (36 kg) | |||
| HEATER RATING | 2400W | |||
| POWER CONSUMPTION | NO HEAT | 280W | ||
| HEATING | 2950W | |||

Intertek
4007606
US N° 4007606 CANADA
The ETL Listed Mark is the legal equivalent to the UL and CSA Listed Marks
Parts
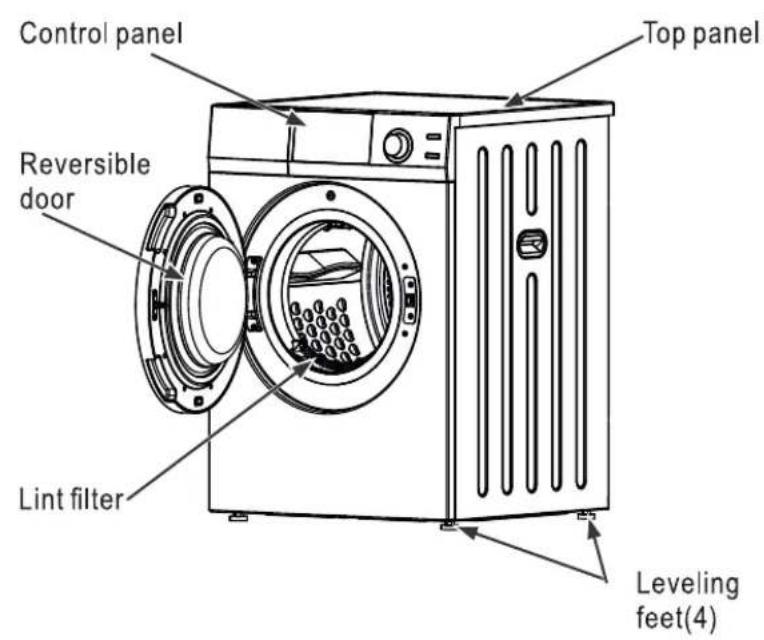
Accessories
natural_image
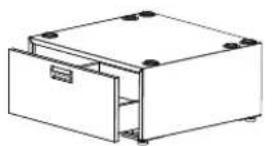
Technical line drawing of a rectangular electronic enclosure or housing unit with mounting holes (no text or symbols)Pedestal (Sold separately)
natural_image
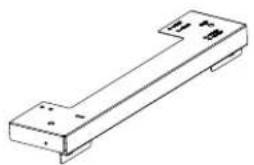
Isometric line drawing of a mechanical part with two protrusions and a central body (no text or symbols)Stacking kit (Sold separately)
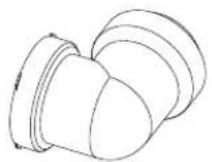
Exhaust elbow
NOTE:
- For your safety and for extended product life, use only authorized components. The manufacture is not responsible for product malfunction or accidents caused by the use of separately purchased unauthorized components or parts.
- The images in this manual may be different from the actual components and accessories, and are subject to change by the manufacture without prior notice for product improvement purpose.
Control Panel Overview
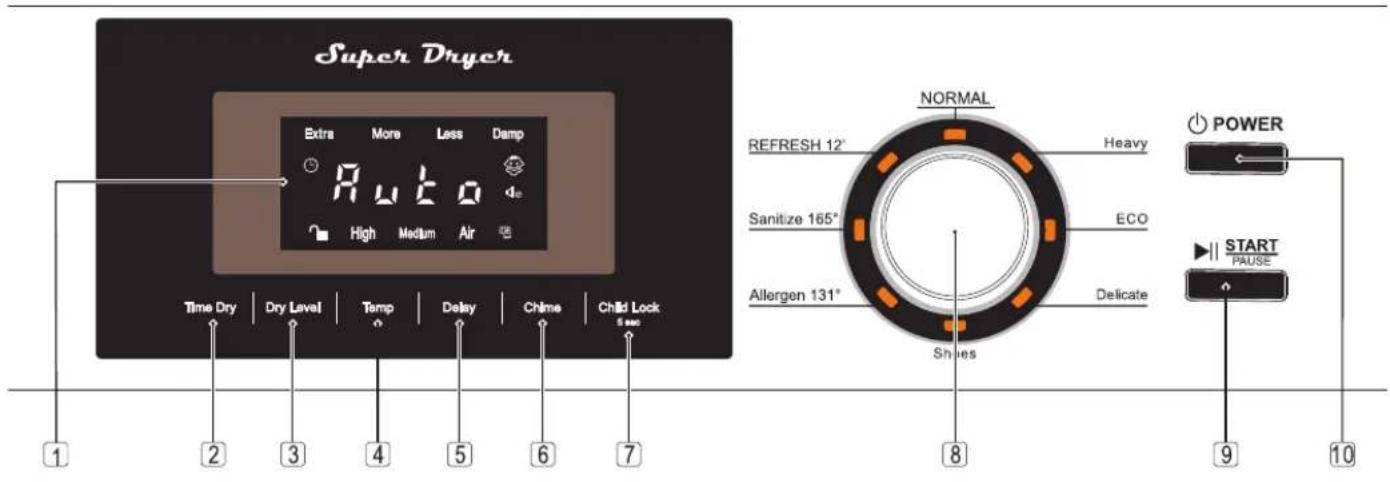
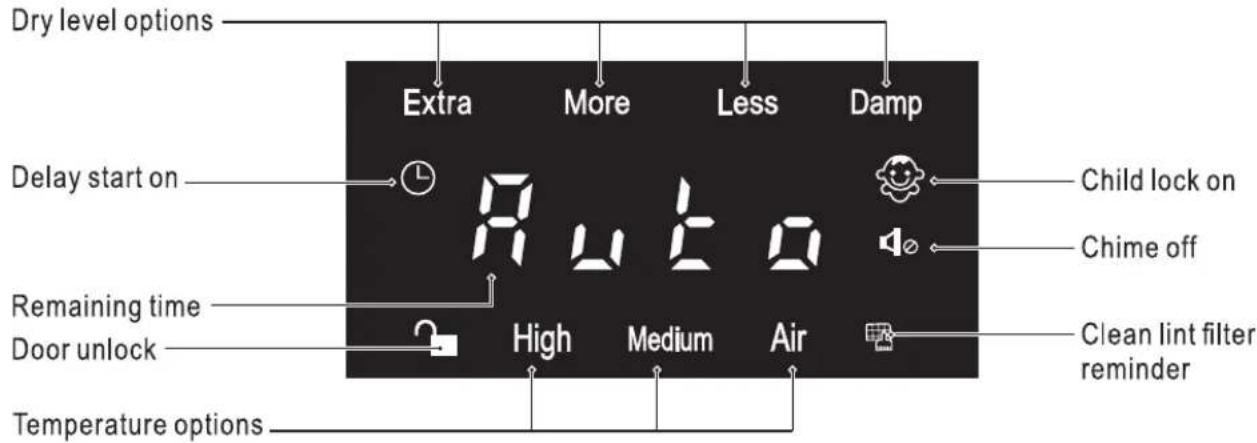
| 1 Display Screen | The Display Screen shows the estimated time remaining in the dry cycle. It also illuminates options that are selected for: Dry Level, Temperature (heat level), Delay start, Chime, Child Lock and Clean Filter Reminder. |
| 2 Time Dry | Press Time Dry to select the minutes to run the dry cycle. |
| 3 Dry Level | Press Dry Level to select how much you want the clothes to dry. Press repeatedly to select from: Extra, More, Less or Damp. |
| 4 Temp | Press Temp to select the heat level for drying clothes. Press repeatedly to select from: High, Medium or Air. |
| 5 Delay | Press Delay to start the dry cycle at a later time. Select from 1 to 24 hours. |
| 6 Chime | Press Chime to turn the end of cycle chime sound on or off. |
| 7 Child Lock | The Child Lock function prevents children from playing with the buttons on the control panel. Press and hold Child Lock for 5 seconds to set or release the Child Lock. |
| 8 Dry Cycle Dial | To select a dry cycle, rotate the Dry Cycle Dial to the desired cycle: Normal, Heavy, ECO, Delicate, Shoes, Allergen, Sanitize and Refresh 12'. |
| 9 Start/Pause Button | Press the Start/Pause button to start, pause, or restart the dry cycle. |
| 10 Power Button | Press the Power button once to turn the dryer on. Press it again to turn it off. |
Display
OPERATING INSTRUCTIONS
WARNING
WARNING-To reduce the risk of fire, electric shock, or injury, please read the IMPORTANT SAFETY INSTRUCTIONS and follow basic precautions:
- Empty pockets of items
- Do not dry clothes with residues of oil or flammable substances
- Follow clothing manufacturer's care labels.
Operating the Dryer
Before Starting the Dry Cycle
Load clothes loosely into the dryer, ensuring that the clothes have enough room to tumble and to let the air circulate through the clothes. Filling the dryer with too many clothes will require more time to dry and may cause wrinkle in the clothing.
Ensure that lint has been removed from the filter for efficient drying.
The Clean Lint Filter Reminder icon will flash on the display screen.
Power On
Close the door firmly and press the Power button to turn on the dryer. If the door is not closed properly, the door unlock icon will appear on the Display Screen.
The LED will illuminate on the Display Screen and on the Dry Cycle Dial.
The default setting is for NORMAL dry cycle, "More" Dry Level, "Medium" Temp and 2 hours dry time.
Select a Dry Cycle
If the default NORMAL dry cycle is desired, the cycle can be started. If an alternate cycle is desired, rotate the Dry Cycle Dial in either direction to any of the other cycles: Heavy, ECO, Delicate, Shoes, Allergen131°, Sanitize165°.
The indicator light by the cycle name will illuminate. Each of the cycles has pre-set dry times, dry levels and temperatures, based on sensor drying. Sensor dry cycles monitor the moisture in the clothes and shut the dryer off automatically when the selected dry level is reached.
Note: The time shown remaining on the display screen may increase or decrease during the dry cycle as the sensor dry function monitors for moisture in the clothes and adjusts the time.
Refresh
Refresh 12' is a time dry cycle which tumbles the clothes for a short time while blowing hot air into the drum. This reduces wrinkles and refreshes the clothes. Use this cycle after the drying is completed and before taking clothes out of the dryer. This is optional.
Select Dry Level and Temperature
After the dry cycle is selected, you have the option to change the Dry Level and the Temperature.
- Press Dry Level to select how much you want the clothes to dry. Press repeatedly to select from: Extra, More, Less or Damp. The selection will illuminate on the display screen.
- Press Temp to select the heat level for drying clothes. Press repeatedly to select from: High, Medium or Air. The selection will illuminate on the display screen.
Note: Some dry cycles do not allow these settings to be changed. For example, Allergen and Sanitize only use High heat.
Options
In addition to selecting the dry level and temperature, you can also select options on the Control Panel for Delay, Chime and Child Lock.
- Press Delay to start the dry cycle at a later time. Select from 1 to 24 hours. Each time you press increases the time in one-hour increments.
- Press Chime to turn the end of cycle chime sound on or off. An indicator light will illuminate on the Display Screen to show if the Chime is on or off.
- The Child Lock function prevents children from playing with the buttons on the control panel. Press and hold Child Lock for 5 seconds to set or release the Child Lock. An indicator light will illuminate on the display screen to show that the Child Lock is set. Once Child Lock is set, no button except for the Power button will function until the Child Lock has been released.
Time Dry
If you want to set a specific time for drying (not using sensor dry cycles) press Time Dry to select the minutes to run the dry cycle. Repeated pressing of Time Dry increases the time in 10-minute increments up to one hour.
Start the cycle
After dry cycle and options have been selected, Press the START/PAUSE button to start the cycle. The cycle can be paused at any time either by opening the door, or by pressing the START/PAUSE button.
End of the cycle
When the cycle is completed, "End" will be displayed on the screen and the chime will sound if it has been set. Open the dryer door and remove the clothes from the dryer. It is recommended that clothes be removed from the dryer when the cycle ends and the clothes are still warm. Folding them right away will reduce wrinkles.
If clothes have been sitting in the dryer for a while after the cycle has ended, the Refresh 12' cycle can be run for a quick refresh of the clothes.
Dry Cycle Guide
| Cycle | Fabric type | Dry level (Default) | Temperature (Default Heat) | Sensor Dry Pre-set Time |
| NORMAL | Mixed cottons | More | Medium | 2 hrs |
| Heavy | Towels, jeans | Extra | High | 2 hrs 30 mins |
| ECO | Mixed cottons | More | Medium | 1 hr 40 mins |
| Delicate | Silk, Wool | Damp | Air | 2 hrs |
| Shoes | Shoes | More | Medium | 2 hrs |
| Allergen 131° | Sheets | Extra | High | 2 hrs 15 mins |
| Sanitize 165° | Mixed Cottons | Extra | High | 2 hrs 30 mins |
| Refresh 12' | Mixed and Heavy | Medium | 12 mins |
Note: For Allergen, Sanitize and Delicate cycles, the Dry Level and Temperature cannot be changed from the default settings.
Allergen Function
The Allergen cycle heats the air to 131°F to remove allergens from clothes. This Sensor Dry cycle is pre-set to High heat temperature and Extra Dry level and runs for 2 hours and 15 minutes. Turn the Dry Cycle Dial to Allergen and press the Start/Pause button.
Clothes that have already been dried in another dry cycle (except delicate cycle), can be additionally run in the Allergen cycle. Press Time Dry and select the minutes to dry, then turn the Dry Cycle Dial to Allergen and press the Start/Pause button.
Sanitize Function
The Sanitize cycle heats the air to 165°F to remove germs from clothes. This Sensor Dry cycle is pre-set to High heat temperature and Extra Dry level and runs for 2 hours and 30 minutes. Turn the Dry Cycle Dial to Sanitize and press the Start/Pause button.
Clothes that have already been dried in another dry cycle (except delicate cycle), can be additionally run in the Sanitize cycle. Press Time Dry and select the minutes to dry, then turn the Dry Cycle Dial to Sanitize and press the Start/Pause button.
Drying Rack (Optional)
The Drying Rack can be used to dry items such as delicates and shoes.
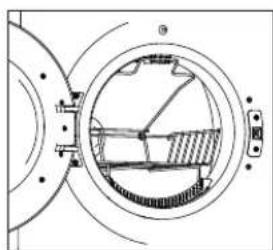
Install the Drying Rack by placing the front lip on top of the lint filter.
Place items to be dried flat on the rack, leaving enough space for air circulation.
Lower the top bar onto the rack to hold the items in place.
Note: The drying rack is sold separately.
natural_image
Technical diagram of a mechanical assembly with concentric circles and internal components (no text or labels)WARNING
To reduce the risk of electric shock, disconnect this dryer from the power supply before attempting any user maintenance other than cleaning the lint trap. Pressing the POWER button does not disconnect this appliance from the power supply.
CONTROL PANEL
Clean with a soft, damp cloth. Do not use abrasive substances.
Do not spray cleaners directly on the panel.
The control panel finish may be damaged by some laundry pre-treatment soil and stain remover products.
Apply such products away from your dryer and wipe up any spills or over spray immediately.
TUMBLER
Remove any stains such as crayon, ink, or fabric dye(from new items such as towels or jeans) with an all purpose cleaner.
Tumble old towels or rags to remove any excess stain or cleaning substance.
Once these steps are followed, stains my still be visible, but should not transfer to subsequent loads.
STAINLESS STEEL DRUM
To clean the stainless steel drum, use a damp cloth with a mild, non-abrasive cleaner suitable for stainless steel surfaces.
Remove the cleaner residue and dry with a clean cloth.
DRYER EXTERIOR
Clean with a soft, damp cloth. Do not use abrasive substances.
Protect the surface from sharp objects as they may scratch or damage the finish.
Do not place any heavy or sharp objects or a detergent box on the dryer. Keep them on the purchased pedestal or in a separated storage box.
LINT FILTER
Clean the lint filter before each dry cycle.
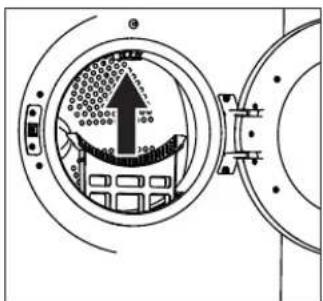
Pull the lint filter straight up. Moisten your fingers and remove the captured lint. Once clean, slide the filter back into its position.
Have a qualified technician vacuum the lint from the dryer once a year.
NEVER operate the dryer without its lint filter in place.
NEVER operate the dryer with a wet lint filter.
Before beginning
NOTE
The WARNING and IMPORTANT instructions appearing in this manual are not meant to cover all possible conditions and situations that may occur. It must be understood that common sense and being careful are factors that CAN NOT be built into the appliance. These factors MUST BE supplied by the persons installing, maintaining, or operating the dryer.
WARNING
WARNING - Risk of Fire. Read these instructions completely and carefully.
- Install the clothes dryer according to the manufacturer's instructions and local codes.
- Clothes dryer installation must be performed by a qualified installer.
- This dryer must be exhausted to the outdoors.
- Before the old dryer is removed from service or discarded, remove the dryer door.
- Do not allow children on or in the appliance. Close supervision of children is necessary when the appliance is used near children.
- Proper installation is the responsibility of the installer.
- Product failure due to improper installation is not covered under the Warranty.
- Install the dryer where the temperature is above 50^ F for satisfactory operation of the dryer control system.
- Remove and discard existing plastic or metal foil duct and replace with UL-listed duct.
Handling
Please handle the appliance carefully and use appropriate means while lifting and moving the dryer, so that it does not get damaged. Do not drag the machine to your floor and, or, to the other machine. Do not hold on protruding parts when lifting.
Disposing of the packing
The shipping package has protected your new machine on its way to your home. All packaging materials are non-pulluting and recyclable. Please contribute to a better environment by disposing of packing material in an environmentally conscious manner.
DANGER
Keep children away from the shipping carton and packing components. Danger suffocation from plastic foil and folding cartons.
Disposing of your old appliance
Old appliances are not worthless trash! Valuable raw material can be recycled from old appliances. To prevent children from locking themselves in the appliance, disable the door locking or remove the door.
CAUTION
California Proposition 65
WARNING: This product contains chemicals known to the State of California to cause cancer and birth defects or other reproductive harm.
INSTALLATION INSTRUCTIONS - SAFETY
WARNING
WARNING - Risk of Fire.
Clothes dryer installation must be performed by a qualified installer.
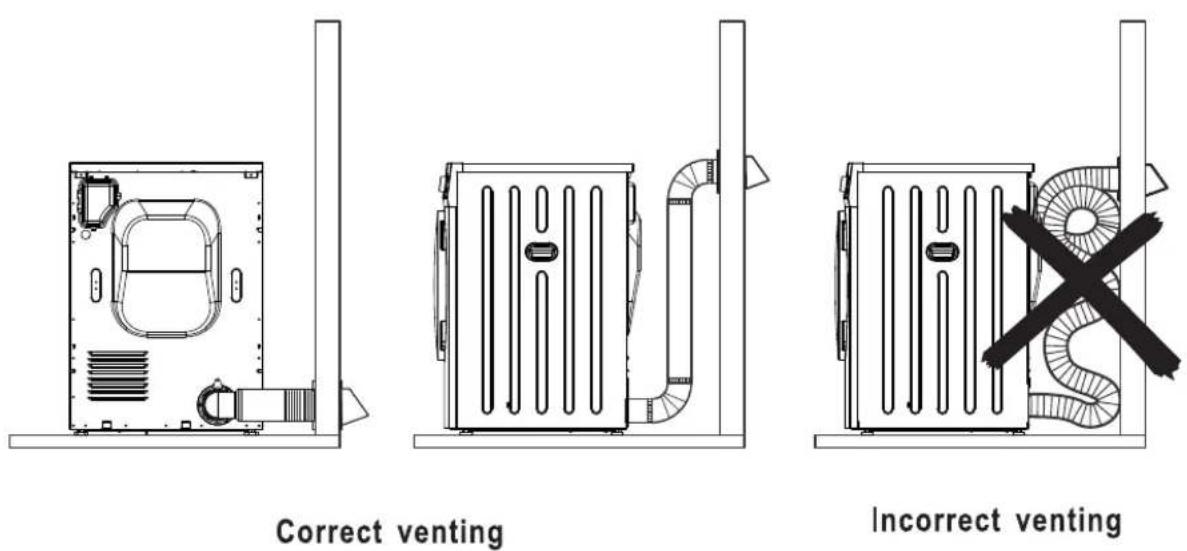
Do not install a clothes dryer with flexible venting materials. If flexible metal (foil type) duct is installed, it must be of a specific type identified by the appliance manufacture as suitable for use with clothes dryer. Flexible venting materials are known of collapse, be easily crushed, and trap lint. These conditions will obstruct clothes dryer airflow and increase the risk of fire.
To reduce the risk of severe injury of death, follow all installation instructions.
Save these instructions.
NOTE
For proper installation, we recommend you hire a professional. To install:
- Gather all the required tools and parts before starting the installation.
- Read and follow the instructions provided with any of the tools.
NOTE
a) That the appliance shall not be exhausted into a chimney, a wall, a ceiling, or a concealed space of a building;
b) That only rigid or flexible metal duct shall be used for exhausting.
c) In Canada, that only those foil-type flexible duct, if any, specifically identified for use with the appliance by the manufacturer shall be used. In the United States, that only those foil-type flexible duct, if any, specifically identified for use with appliance by the manufacturer and that comply with the UL 2158A, shall be used.
d) In Canada, that the exhaust duct shall be 102mm in diameter. In the United States, the required exhaust duct diameter shall be 100 mm.
e) That the duct shall not be assembled with screws or other fastening means that extend into the duct and catch lint.
NOTE: Exhausting refers to removal of moist air from the drying compartment to the environment through an opening in the appliance housing.
Installation Location Requirement
WARNING
THIS MACHINE MUST BE EXHAUSTED OUTDOORS. THIS IS TO PREVENT LARGE AMOUNTS OF LINT AND MOISTURE FROM ACCUMULATING AND TO MAINTAIN DRYING EFFICIENCY.
Built-in, Recessed, Closet and Alcove Installation
- The dryer MUST be vented to the outdoors.
- The dryer may be installed in a built-in, recessed area, closet or alcove.
- The installation spacing is in inches and is the minimum acceptable.
- Other installations must use the minimum dimensions indicated.
a) Minimum clearances between the dryer cabinet and adjacent wall are: 2" either side and 3" front and rear. b) Minimum vertical space from floor to overhead cabinets, etc. is 52" (132cm). - The rear of the dryer should face a wall.
- Consideration must be given to provide adequate clearance for installation and service.
- Closet doors must be louvered or otherwise ventilated and have at least 60 square inches of open area. If the closet contains both a washer and a dryer, door must contain a minimum of 120 square inches of open area.
- No other fuel-burning appliance shall be installed in the same closet with the dryer.
NOTE: If a door is installed that potentially encloses the unit while running, the door must allow for a minimum of 20 square inches of free air movement. There must also be a 1" additional spacing should be considered for easy installation, servicing and compliance with space in front of the unit to the closed door and 1" from the lack of the unit to the wall.
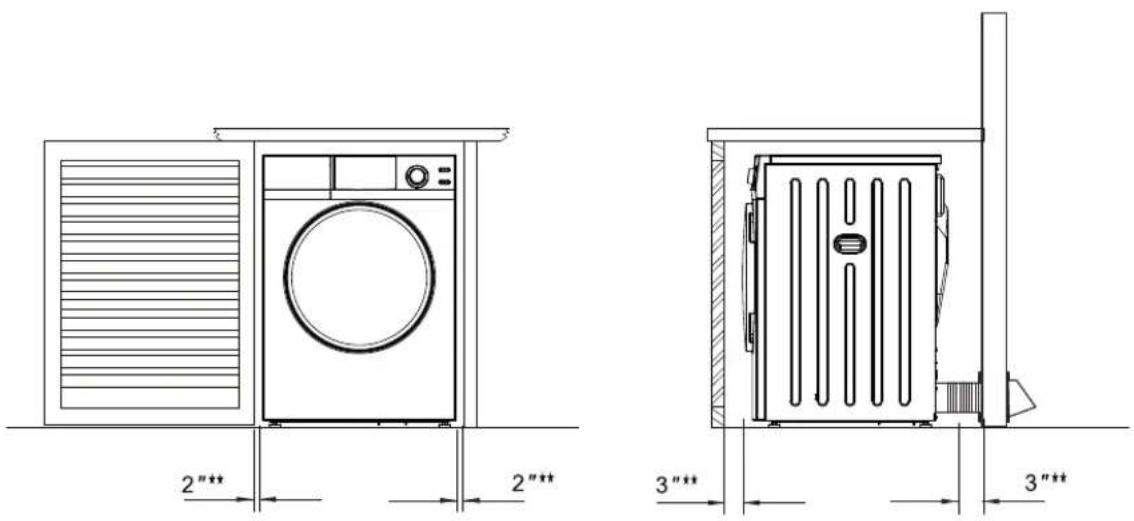
Minimum clearance other than alcove or closet installation
- Minimum clearance between the dryer cabinet and adjacent walls or other surfaces is: 2" clearance both sides and 3" rear.
- The rear of the dryer should face a wall.
- Consideration must be given to provide adequate clearance for installation and service.
Mobile home installation
- The dryer must be exhausted to the outdoors with the termination securely fastened to the mobile home structure.
- The exhaust MUST NOT be terminated beneath the mobile home or manufactured home.
- Provisions must be made for the introduction of outside air into the dryer. The free air opening shall not be less than 25 square inches.
- The exhaust duct material MUST BE METAL.
- The vent duct MUST NOT be connected to any other duct, vent or chimney.
- The dryer must be attached to the floor following instructions available from the dealer.
- Installation must comply with the current CAN/CSA Z240MH series Mobile Home Installation Codes.
- DO NOT use sheet metal screws or other fastening devices which extend into the interior of the exhaust vent.
Level the Dryer
- Follow the installation requirement to install the dryer.
- Move your dryer to an appropriate location. Consider installing the dryer and washer side-by-side, to allow access to electrical, and exhaust connections.
- Set your dryer back in an upright position.
- To ensure that the dryer provides optimal drying result, it must be leveled. To reduce the vibration, noise and unwanted movement, the floor must be a perfectly level, solid surface.
- Adjust the leveling feet only as much as necessary to level the dryer. Extending the leveling feet more than necessary can cause the dryer to vibrate.
Fasten the lock nuts of 4-leveling feet against the bottom floor after the dryer is leveled.
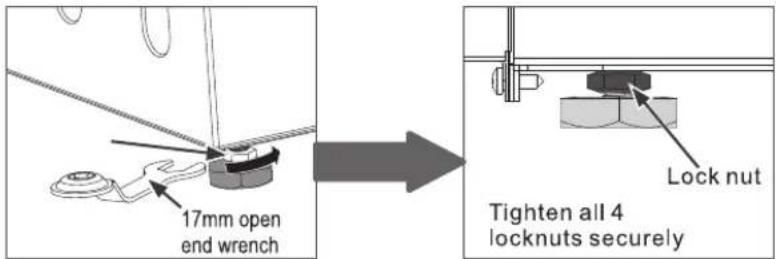
ADA Compliance
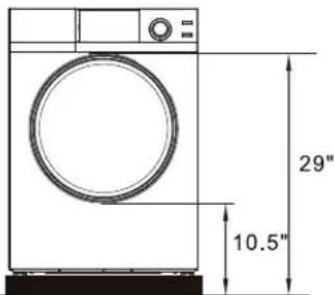
1.5" Platform
Use 1.5" height platform to make the machine ADA compliant.
Exhaust System Connections
WARNING
This dryer MUST be vented to the outdoors.
Use only 4" (10.2 cm) rigid metal duct for the home exhaust duct.
Use only 4" (10.2 cm) rigid metal, UL-listed flexible metal, or UL-listed metal foil dryer transition duct to connect the dryer to the home exhaust.
Do not use flexible duct inside the dryer.
Do not exhaust into a chimney, kitchen exhaust, gas vent, wall, ceiling, attic, crawl space, or concealed space of a building. The combination of lint and grease could create a fire hazard or damages.
Do not install a screen in or over the exhaust duct.
Do not install a booster fan in the exhaust duct.
Do not use duct longer that specified in the exhaust length table.
Provide an access for inspection and cleaning the exhaust system at least once year.
Failure to follow these instructions can result in death or fire.
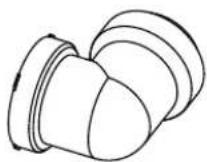
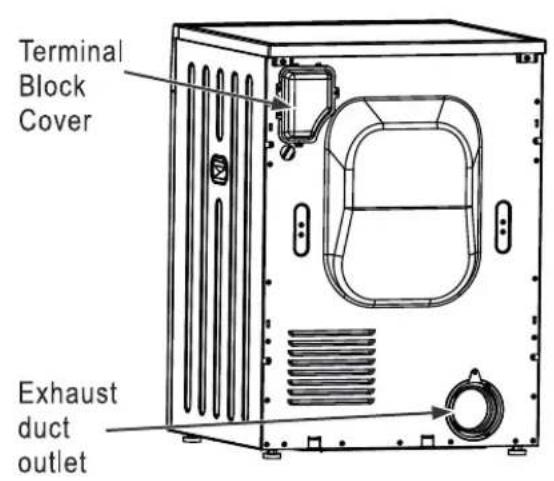
This Dryer Vent Elbow attachment is included with your Dryer. Attach it to the Exhaust Duct outlet at the back of your Dryer.
Exhaust system check list hood or wall cap
Terminate in a manner to prevent back drain or entry of birds or other wildlife.
Termination should present minimum resistance to the exhaust air flow and should require little or not maintenance to prevent clogging.
Wall caps must be installed at least 12" (30 cm) above ground level or any other obstruction with the opening pointed down.
If roof vents or louvered plenums are used, they must be equivalent to a 4" (10.2 cm) dampened wall cap in regard to resistance to air flow. Prevention of back drafts and regular maintenance are required to prevent clogging.
Separation of turns
Separate all turns by at least 3 ft. (1 m) of straight duct, including distance between last turn and dampened wall cap. If two turns must be closer than 3 ft. (1 m) deduct 10 ft. (3 m) from the maximum length.
Turn other than 90^
One turn of 45^ or less may be ignored.
Two 45° turns should be treated as one 90°.
Each turn over 45^ should be treated as one 90^ .
Deduct 10 ft. (3 m) for each additional elbow. It is not recommended to use more than three 90° elbows.
Sealing of joints
All joints should be tight to avoid leaks. The male end of each section of duct must point away from the dryer.
Do not assemble the duct work with fasteners that extend into the duct. They will serve as a collection point for lint.
Duct joints can be made air and moisture-tight by wrapping the overlapped joints with duct tape.
Ductwork
Routing and connecting ductwork.
Ductwork and fittings are NOT included and must be purchased separately.
The exhaust duct run should be as short as possible.
Use as few elbow joints as possible.
The male end of each section of exhaust duct must point away from the dryer.
Insulate ductwork that runs through unheated areas in order to reduce condensation and lint buildup on duct surfaces.
Incorrect or inadequate exhaust systems are not covered by the dryer warranty.
Insulation
Ductwork which runs through an unheated area or is near an air conditioning duct, should be insulated to reduce condensation and lint build up and be sloped down toward outdoors.
Note: Never install screen inside exhaust duct.
| EXHAUST LENGTH | Wall Cap Type | |||
| Recommended | Use only for short-run installation | |||
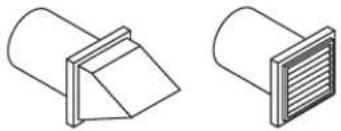 4" (10.2cm) 4" (10.2cm) | 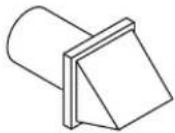 2.5" (6.4cm) 2.5" (6.4cm) | |||
| No. of 90° elbows | Rigid | Metallic Flexible | Rigid | Metallic Flexible |
| 0 | 24.4 m (80 ft.) | 12.5 m (41 ft.) | 22.6m (74 ft.) | 10.1 m (33 ft.) |
| 1 | 20.7 m (68 ft.) | 11.3 m (37 ft.) | 18.9 m (62 ft.) | 8.8 m (29 ft.) |
| 2 | 17.4 m (57 ft.) | 10.1 m (33 ft.) | 15.5 m (51 ft.) | 7.6 m (25 ft.) |
| 3 | 14.3 m (47 ft.) | 8.8 m (29 ft.) | 12.5 m (41 ft.) | 6.4 m (21 ft.) |
Do not use non-metallic flexible duct.
Electrical Connections
NOTE
- Wiring diagram is located on the back of the dryer.
WARNING
- Improper connection of the equipment grounding conductor can result in a risk of electric shock. Check with a qualified electrician or serviceman if you are in doubt as to whether your dryer is properly grounded.
- To prevent unnecessary risk of fire, electric shock, or personal injury, all wiring and grounding must be done in accordance with local codes.
- It is your responsibility to provide adequate electrical services for your dryer.
Before operating or testing, follow all grounding instructions in the Grounding section.
An individual branch (or separate) circuit serving only your dryer is recommended. DO NOT USE AN EXTENSION CORD.
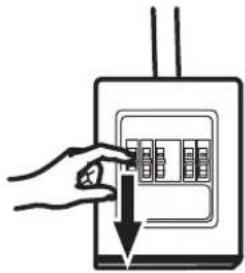
Before making the electrical connection, turn off the circuit breaker(s), or remove the dryer's circuit fuse(s) at the electrical box. Be sure the dryer cord is unplugged from the outlet. NEVER LEAVE THE ACCESS COVER OFF THE TERMINAL BLOCK.
WARNING
- Disconnect power supply before servicing.
- Replace all parts and panels before operating.
- Failure to do so can result in death or electric shock.
natural_image
Hand placing a button into an electrical panel with a downward arrow (no text or symbols)For electrical connections using a power cord:
⚠ WARNING
- Use a new UL-listed 240V 30 amp dryer power supply cord with closed ring terminals o spade terminals with upturned ends.
- Use a UL-listed strain relief.
- Disconnect power before making electrical connections.
- Failure to do so can result in death, fire or electrical shock.
Grounding instructions
For a grounded, cord-connected dryer: This dryer must be grounded. In the event of malfunction or breakdown, the grounding will reduce the risk of electric shock by providing a path of least resistance for the electrical current. This dryer uses a cord having an equipment-grounding conductor and a grounding plug. The plug must be plugged into an appropriate outlet that is properly installed and grounded in accordance with all local codes and ordinances.
⚠ WARNING
Improper connection of the equipment-grounding conductor can result in a risk of electrical shock. Check with a qualified electrician, or service representative or personnel, if you are in doubt as to whether the appliance is properly grounded. DO NOT modify the plug provided with the appliance: if it will not fit the outlet, have a proper outlet installed by a qualified electrician.
SAVE THESE INSTRUCTIONS
For direct wire connections:
WARNING
- Use AWG 10 copper wire.
- Connect to a 30 A minimum individual branch circuit, fused at 30 A maximum.
- Use a UL-listed strain relief.
- Disconnect power before making electrical connections.
- Failure to do so can result in death, fire or electrical shock.
Grounding instructions:
For a permanently connected dryer: This dryer must be connected to a grounded metal, permanent wiring system, or an equipment-grounding conductor must be run with the circuit conductors and connected to the equipment-grounding terminal on the appliance.
WARNING
Improper connection of the equipment-grounding conductor can result in a risk of electrical shock. Check with a qualified electrician, or service representative or personnel, if you are in doubt as to whether the appliance is properly grounded.
SAVE THESE INSTRUCTIONS
WARNING
TO PREVENT ELECTRIC SHOCK, DISCONNECT POWER BEFORE SERVICING.
This dryer should be connected to an individual branch circuit with AWG 10 copper wire minimum through a 30 amp fuse or circuit breaker. DO NOT fuse neutral.
Use copper conductors only.
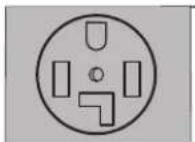
4-Wire Receptacle (NEMA Type 14-30R)
Use the instructions in this section if your home has a 4-wire receptacle (NEMA type 14-30R) and you will be using a UL listed, 120/240 volt minimum, 30 amp, dryer power supply cord.
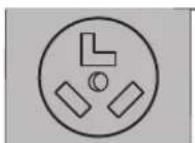
3-Wire Receptacle (NEMA Type 10-30R)
Use the instructions in this section if your home has a 3-wire receptacle (NEMA type 10-30R) and you will be using a UL listed, 120/240 volt minimum, 30 amp, dryer power supply cord.
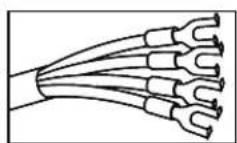
Spade terminals with upturned ends
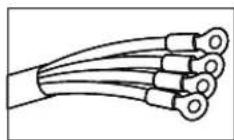
Ring terminals
Connecting Dryer Using 4-Wire Connection (Must be Used For Mobile Home Installation).
NOTE: Since January 1, 1996, the National Electrical Code requires that new constructions use a 4-wire connection to an electric dryer. A 4-wire cord must also be used where local codes do not permit grounding through the neutral. 3-wire connection is NOT for use on new construction.
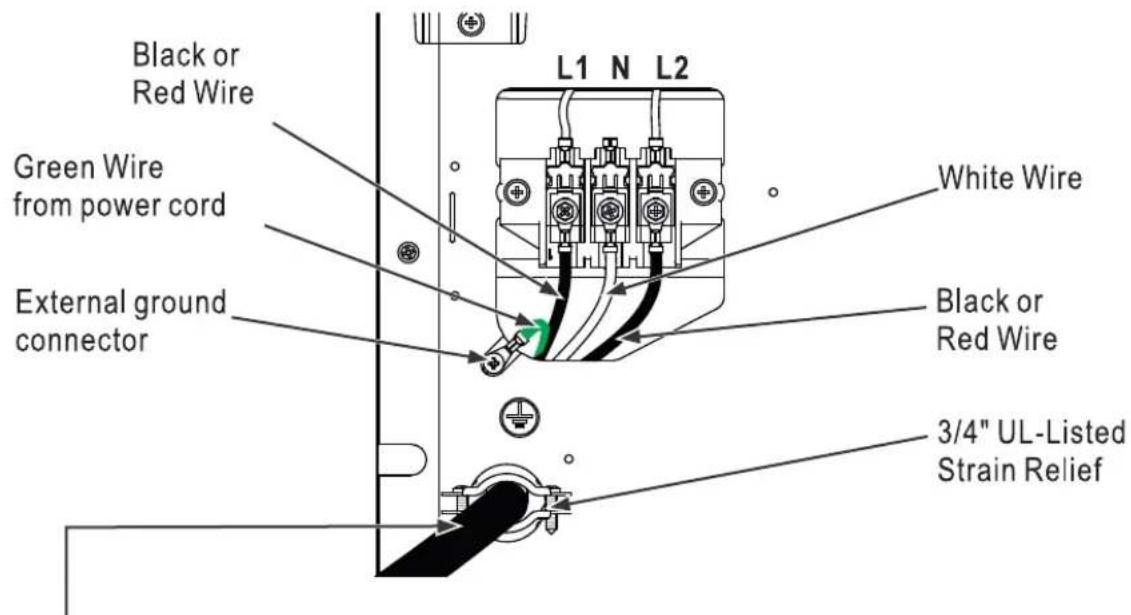
4-10 AWG minimum copper conductors or 120/240 V 30A power supply cord kit marked for use with dryers and provided with closed loop or spade terminals with upturned ends (not supplied).
- Turn off the circuit breaker(s) (30 amp) or remove the dryer's circuit fuse at the electrical box.
- Be sure the dryer cord is unplugged from the wall receptacle.
- Remove the power cord cover located at the upper back.
- Install 3/4 in. UL-listed strain relief to power cord entry hole. Bring power cord through the strain relief.
- Remove the external ground connector's screw and connect the ground wire from the power cord to this screw.
- Connect power cord as follows:
A. Connect the 2 hot wires to the outer screws of the terminal block (marked L1 and L2).
B. Connect the neutral (white) wire to the center screw of the terminal block (marked N). - Attach ground wire of power cord with the ground screw (hole above strain relief bracket).
Tighten all terminal block screws (3) securely. - Properly secure the power cord to the strain relief.
- Reinstall the cover with the hold-down screws.
NEVER LEAVE THE ACCESS COVER OFF OF THE TERMINAL BLOCK.
Connecting Dryer Using 3-Wire Connection
If required, by local codes, install external ground (not provided) to grounded metal, or other established ground determined by a qualified electrician.
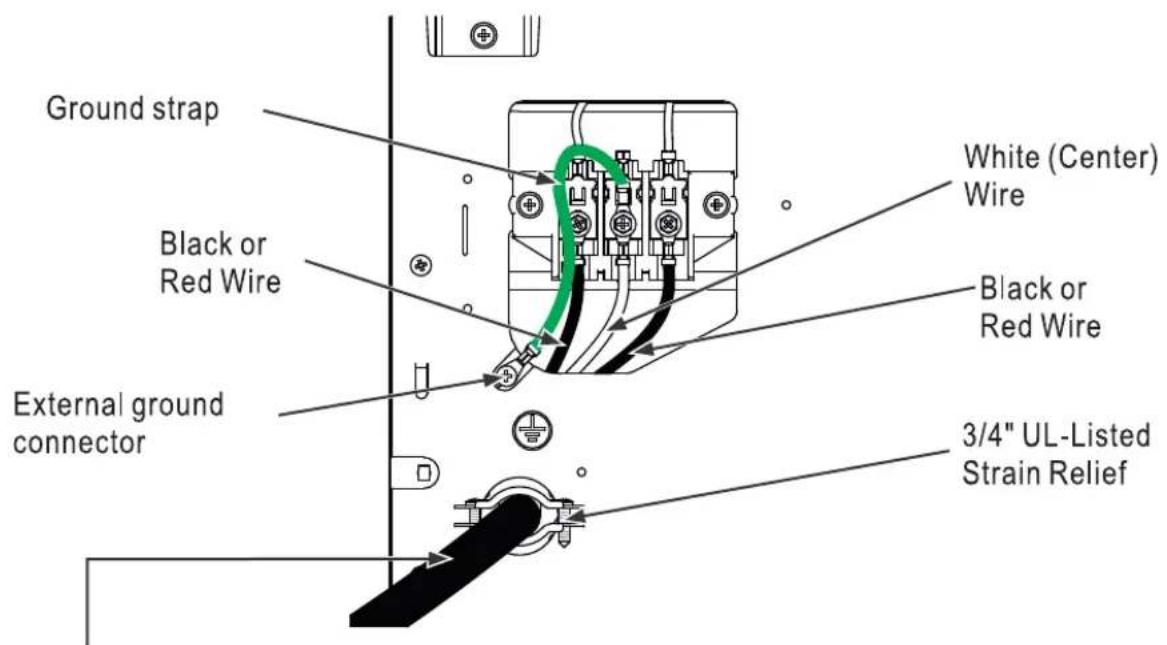
3-10 AWG minimum copper conductors or 120/240 V 30A power supply cord kit marked for use with dryers and provided with closed loop or spade terminals with upturned ends (not supplied).
3-wire Connection
Not for use in Canada.
DO NOT use for Mobile Home Installations.
NOT for use on new construction.
NOT for use on recreational vehicles.
NOT for use in areas where local codes prohibit grounding through the neutral conduction.
- Turn off the circuit breaker(s) (30 amp) or remove the dryer's circuit fuse at the electrical box.
- Be sure the dryer cord is unplugged from the wall receptacle.
- Remove the power cord cover located at the upper back.
- Install 3/4-in. UL-listed strain relief to power cord entry hole. Bring power cord through strain relief.
- Connect power cord as follows:
A. Connect the 2 hot wires to the outer screws of the terminal block (marked L1 and L2).
B. Connect the neutral (white, or center) wire to the center screw of the terminal block (marked N).
- Be sure the ground strap is connected to the external ground connector's screw on cabinet rear.
Tighten all terminal block screws (3) securely.
-
Properly secure power cord to strain relief.
-
Reinstall the cover with the hold-down screws.
NEVER LEAVE THE ACCESS COVER OFF OF THE TERMINAL BLOCK.
Reversing the Door Swing (Optional)
NOTE
- Before you start, unplug your dryer from its electrical outlet.
- Handle any parts carefully to avoid scratching the surface.
- This dryer must be exhausted to the outdoors.
- Do not move the dryer when service until door swing reversal completed.
- These steps are for changing the hinge and door assembly from left side to the right side. If you ever want to switch them back to the left side, follow these instructions and reverse all references to the left and right.
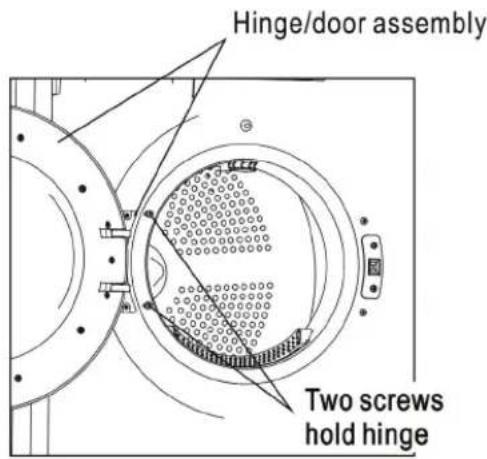
Step 1. Open the door. Remove the two screws holding the hinge/door assembly to the cabinet. Carefully set them aside.
Step 2. Remove the two screws holding the strike plate, and the other two screws above and under the strike plate.
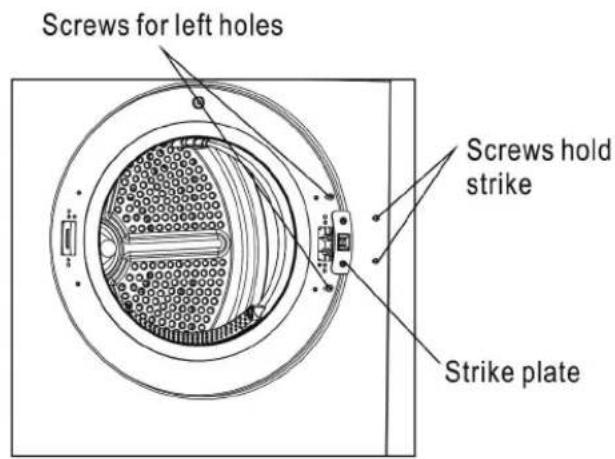
Step 3. Rotate the strike plate, then re-install it on the opposite side. And screw the other two screws into the holes left after remove the hinge/door assembly.
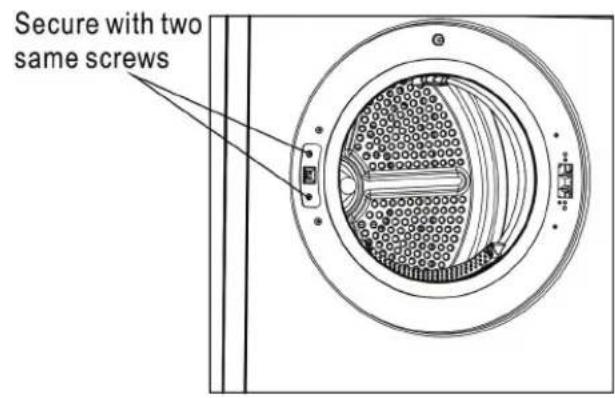
Step 4. Rotate and replace the hinge/door assembly on the opposite side, secure them using the same screws.
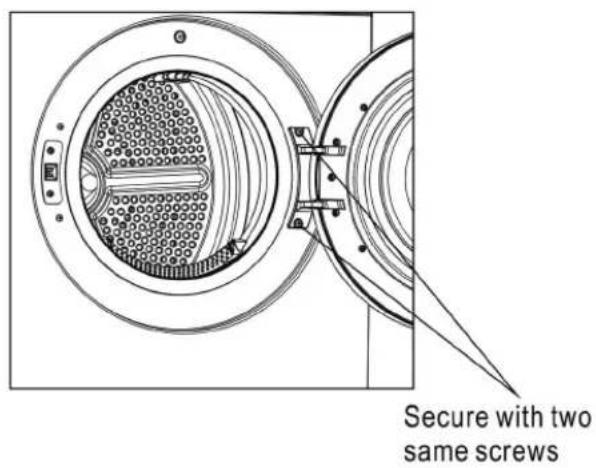
Before Call for Service
Your dryer is equipped with an automatic error-monitoring system to detect and diagnose problems at an early stage. If your dryer does not function properly or does not function at all, check the following before you call for service.
| Problem | Possible Causes | Solutions |
| Dryer will not turn on | - Power cord is not properly plugged in.- House fuse is blown, circuit breaker has tripped, or power outage has occurred. | - Make sure that the plug is plugged securely into a grounded outlet matching the dryer's rating card.- Reset circuit breaker or replace fuse. Do not increase fuse capacity. If the problem is circuit overload, have it corrected by a qualified electrician. |
| Dryer shakes or make noise | -Some shaking/noise is normal.- Dryer may be sitting unevenly. | Move the dryer to an even floor space, of adjust the leveling legs as necessary until it is even. |
| Clothes take too long to dry | Improper or obstructed duct | - Check the Installation Instructions to make sure the dryer venting is correct.- Make sure duct is clean, free of kinks and unobstructed.- Check to see if outside wall cap operates easily. |
| Improper sorting | Separate heavy items from lightweight items (generally, a well-sorted washer load is a well-sorted dryer load). | |
| Large loads of heavy fabrics (like beach towels) | Large, heavy fabrics contain more moisture and take longer to dry. Separate large, heavy fabrics into smaller loads to speed drying time. | |
| Controls improperly set | Match the settings to the clothes to dry. | |
| Lint filter is full | Clean the filter before every load. | |
| Blown fuses or tripped circuit breaker | Replace fuses or reset circuit breakers. Since most dryers use 2 fuses/breakers, ensure both are operating. | |
| Overloading/combining loadsDry a small load | Do not put more than one wash load in the dryer at a time.Add a few items to ensure proper tumbling if to dry only one or two item. | |
| The dry level was chosen, but load is still damp | Load consists of a mixture of heavy and light fabrics | When combining heavy and light fabrics in a load, select Extra dry level. |
| Lint filter is blocked | Check and clean the lint filter. | |
| Dry sensor is dirty | Clean the sensor with a moist cloth. | |
| Control button(s) not responding | Child lock activated | This is normal, press the button for 5 seconds to release. |
| The option is incompatible with the adsirved dry cycle. | This is normal, select the right options to your dry cycle. | |
| Remaining time jumped to a lower or a greater number | The estimated time may change when dry a smaller, or bigger load than normal load. | This is normal. |
| Dryer doesn't heat | Fuse is blown/circuit breaker is tripped | Check the fuse/circuit breaker, and replace fuse or reset breaker. |
| Glow at the rear of the drum | Heaters are behind the drum | This is normal. The blow of the heaters may be visible at the rear of the drum in dry cycle. |
| Clothes are still wet and dryer shut off after a short time | The door was opened before the end of dry cycle, then the load was removed, and a new wet clothes were loaded without selecting a new cycle | A new dry cycle must be selected for each new load. |
| Small load | When drying less, choose Quick Dry or Time Dry. | |
| Load was already dry except for collars and waistbands | Choose Quick Dry or Time Dry to dry damp collars and waistbands. In the future, when drying a load with collars and waistbands, choose Extra. | |
| Clothes are wrinkled | Over drying | Select a shorter drying time.Remove items while they still hold a slight amount of moisture. Select a Damp setting. |
| Items sit in dryer after cycle ends | Remove items when cycle ends and fold or hang immediately. | |
| Overloading | Separate large loads into smaller ones. | |
| Clothes shrink | Some fabrics will naturally shrink when washed. Others can be safely washed, but will shrink in the dryer. | To avoid shrinkage, follow garment care labels exactly. Some items may be pressed back into shape after drying. If you are concerned about shrinkage in a particular item, do not machine wash or tumble dry it. |
| Greasy spots on clothes | Improper use of fabric softener | Follow directions on fabric softener package. |
| Drying dirty items with clean ones | Use your dryer to dry only clean items. Dirty items can stain clean items and the dryer. | |
| Clothes were not completely clean | Sometimes stains which cannot be seen when the clothes are wet appear after drying. Use proper washing programs before drying. | |
| Lint on clothes | Lint filter is full | Clean lint screen before each load. |
| Improper sorting | Sort lint producers (like chenille) from lint collectors (like corduroy). | |
| Static electricity can attract lint | See suggestions in this section under Static occurs. | |
| Overloading | Separate large loads into smaller ones. | |
| Paper, tissue, etc., left in pockets | Empty all pockets before laundering clothes. | |
| Static occurs | No fabric softener was used | Try a fabric softener. |
| Over drying | Try a fabric softener.Select Damp dry level. | |
| Synthetics, permanent press and blends can cause static | Try a fabric softener. |
Information Codes
Information codes may be displayed to help you understand better what is wrong with your dryer
| Error Codes | Meaning | Solutions |
| E-1 | Door is open | Close the door well. |
| Door switch failure | - Check the wiring connections between door switch and the Electronic Module.- Replace a new door switch. | |
| E-2 | Dry sensor failure | - Check the wiring connections between dry sensor and the Electronic Module.- Replace a new dry sensor. |
| E-5 | Dry heating failure | - Clean the lint filter at exhaust outlet.- Push down the button of thermostat. |
| E-7 | Drum not rotate | - Belt is fallen off.- Belt is broken. |
All rights reserved
* The appearance and specifications may be varied without notice to improve the units quality.
* Specifications subject to change by manufacturer.
- CAUTION
- RISK OF ELECTRIC SHOCK DO NOT OPEN
- SAVE THESE INSTRUCTIONS
- Your safety and that of your children
- WARNING
- WARRANTY
- EXCLUSIONS
- GENERAL
- THIS LIMITED WARRANTY DOES NOT COVER:
- WARRANTY SERVICE
- NOTE:
- Control Panel Overview
- Display
- OPERATING INSTRUCTIONS
- Operating the Dryer
- Before Starting the Dry Cycle
- Power On
- Select a Dry Cycle
- Refresh
- Select Dry Level and Temperature
- Options
- Time Dry
- Start the cycle
- End of the cycle
- Allergen Function
- Sanitize Function
- Drying Rack (Optional)
- CONTROL PANEL
- TUMBLER
- STAINLESS STEEL DRUM
- DRYER EXTERIOR
- LINT FILTER
- Before beginning
- NOTE
- WARNING - Risk of Fire. Read these instructions completely and carefully.
- Handling
- Disposing of the packing
- DANGER
- Disposing of your old appliance
- California Proposition 65
- INSTALLATION INSTRUCTIONS - SAFETY
- WARNING - Risk of Fire.
- Installation Location Requirement
- THIS MACHINE MUST BE EXHAUSTED OUTDOORS. THIS IS TO PREVENT LARGE AMOUNTS OF LINT AND MOISTURE FROM ACCUMULATING AND TO MAINTAIN DRYING EFFICIENCY.
- Built-in, Recessed, Closet and Alcove Installation
- Minimum clearance other than alcove or closet installation
- Mobile home installation
- Level the Dryer
- ADA Compliance
- Exhaust System Connections
- This Dryer Vent Elbow attachment is included with your Dryer. Attach it to the Exhaust Duct outlet at the back of your Dryer.
- Exhaust system check list hood or wall cap
- Separation of turns
- Turn other than 90°
- Sealing of joints
- Ductwork
- Routing and connecting ductwork.
- Insulation
- Electrical Connections
- For electrical connections using a power cord:
- ⚠ WARNING
- Grounding instructions
- For direct wire connections:
- Grounding instructions:
- 4-Wire Receptacle (NEMA Type 14-30R)
- 3-Wire Receptacle (NEMA Type 10-30R)
- Connecting Dryer Using 3-Wire Connection
- 3-wire Connection
- Tighten all terminal block screws (3) securely.
- Reversing the Door Swing (Optional)
- Before Call for Service
- Information Codes
- All rights reserved
Brand : Equator
Model : ED880
Category : Tumble drier