KASMNVRWF4A - Security Camera Kogan - Free user manual and instructions
Find the device manual for free KASMNVRWF4A Kogan in PDF.


| Product Type | Wireless Security Camera |
| Brand | Kogan |
| Model | KASMNVRWF4A |
| Dimensions | 110 x 60 x 60 mm (without mount) |
| Weight | 250 g (camera only) |
| Power Supply | DC 5V 1A via micro USB cable (included) |
| Video Resolution | 1080p Full HD (1920x1080 pixels) |
| Field of View | 120° diagonal |
| Night Vision | Infrared LEDs up to 10 meters |
| Motion Detection | Passive infrared (PIR) sensor |
| Audio | Two-way audio with built-in microphone and speaker |
| Connectivity | 2.4 GHz Wi-Fi (802.11 b/g/n) |
| Storage | MicroSD card up to 128 GB (not included) or cloud subscription |
| Weather Resistance | IP65 rated for outdoor use |
| Mounting | Wall mount bracket included, adjustable tilt and swivel |
| Compatible Apps | Kogan Smarter Home app (iOS 10+ / Android 5+) |
| Package Contents | Camera, mounting bracket, screws, USB cable, power adapter, manual |
| Maintenance | Clean lens with soft dry cloth; avoid harsh chemicals |
| Safety Features | Overheating protection, fire-resistant casing |
| Spare Parts Availability | Mounting bracket and USB cable available via Kogan support |
| Repairability | Professional repair recommended; no user-serviceable parts |
| General Information | Use only supplied power adapter; operate between -10°C and 50°C |
Frequently Asked Questions - KASMNVRWF4A Kogan
User questions about KASMNVRWF4A Kogan
0 question about this device. Answer the ones you know or ask your own.
Ask a new question about this device
Download the instructions for your Security Camera in PDF format for free! Find your manual KASMNVRWF4A - Kogan and take your electronic device back in hand. On this page are published all the documents necessary for the use of your device. KASMNVRWF4A by Kogan.
USER MANUAL KASMNVRWF4A Kogan
natural_image
Exterior view of a network security camera system with four mounted sensors and a brand-branded base (no text or symbols visible)KOGAN SMARTERHOME™ 4 CHANNEL AI NVR SECURITY CAMERA SYSTEM
WITH 4 X 3MP CAMERAS (1TB, WIFI)
KASMNVRWF4A
Components 3
Overview 4
Installation 6
Connect to SmarterHome™ App 9
Google Home Control 12
Amazon Alexa Control 15
Functions 18
Notes 35
COMPONENTS
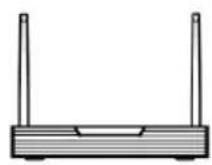
NVR
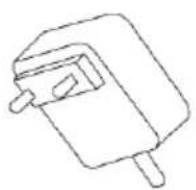
NVR power adapter
natural_image
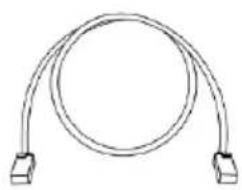
Simple line drawing of a broadband cable with two connectors (no text or symbols)Network cable
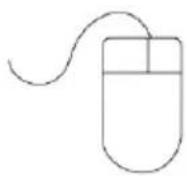
Mouse
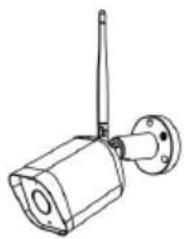
natural_image
Line drawing of a surveillance camera with antenna and mounted sensor (no text or symbols)Camera (x4)
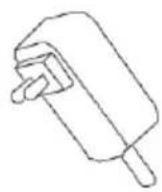
Camera power adapter (x4)
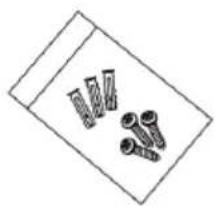
natural_image
Simple line drawing of a tray with four bolts (no text or symbols)Camera hardware kit (x4)
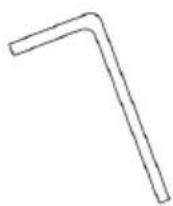
Allen key

2.5inch HDD screws (x4)
User guide
NVR
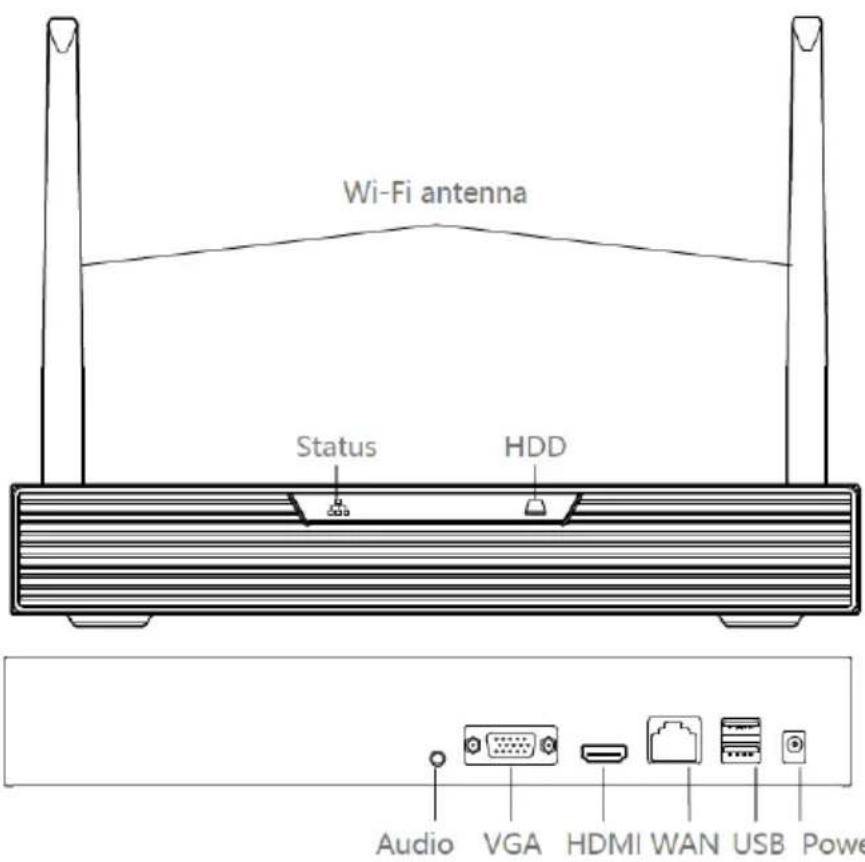
| Status indicator | Sold red: NVR is starting up.Solid blue: NVR is operational.Flashing red: NVR is offline.Flashing blue: NVR is upgrading. |
| HDD indicator | Flashing blue: data is being read or written. |
| Audio port | Connect speakers or earphones to hear sound. |
| VGA port | VGA video output port. |
| HDMI port | High definition video output port. |
| WAN port | Ethernet port. |
| USB port | Connect a mouse or USB to the NVR. |
| Power port | DC 12V/2A. |
| Wi-Fi antenna | Transmit data with the cameras. It is recommended to put the antenna up for the best signal. |
Camera
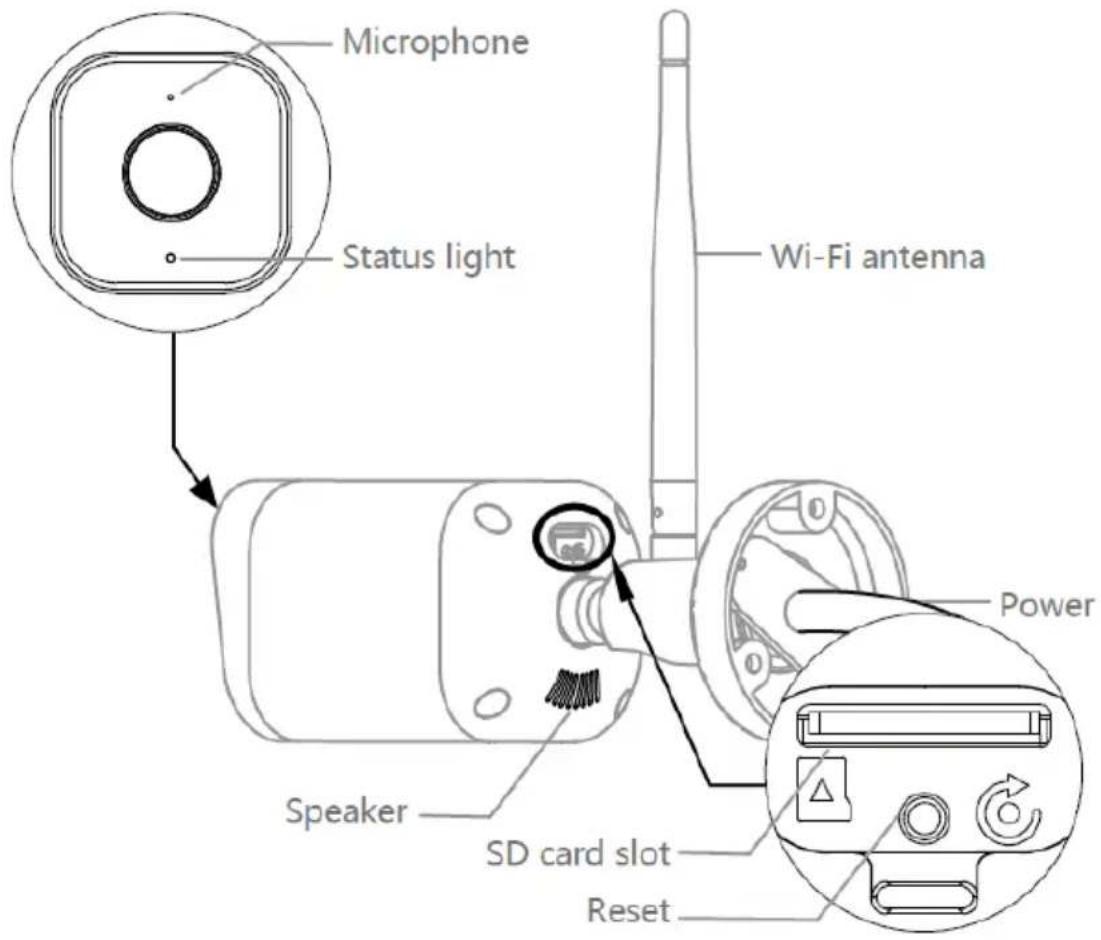
| Power | DC 12V/1A. |
| Status light | Flashing red light: waiting for network connection.Solid blue light: camera is operational.Solid red light: network malfunction. |
| Microphone | Capture sound for your video. |
| Speaker | Play sound from the camera. |
| SD card slot | Insert a local SD card (max storage 128G). |
| Reset | Press and hold for 5 seconds to reset the camera. |
| Wi-Fi antenna | Transmit data with the NVR. |
INSTALLATION
Install the cameras
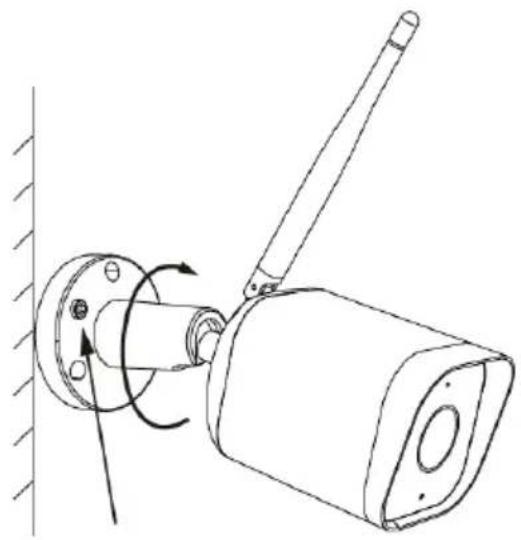
- Attach the camera to your chosen surface using the supplied camera hardware kit. If you are unsure as to what hardware is required for your chosen surface, consult a qualified trade professional.
- Connect the camera to power using the provided camera power adapted.
- Adjust the camera angle to a suitable view.
- Tighten the adjustment screw to secure the camera in place.
- Repeat steps 1-4 for each camera.
natural_image
Technical line drawing of a mechanical assembly with rotating components (no text or symbols)Notes:
• The NVR can connect to up to 4 cameras.
- The recommended installation height for indoors is 2.5 meters or higher and for outdoors is 3 meters or higher.
- It is suggested to install cameras at entrances, windows, fences, or other areas prone to incidents.
- Ensure there are no obstructions in front of the camera.
- When installing the camera outdoors, ensure that waterproof measures are taken for the power interface.
Connect the NVR to a monitor
natural_image
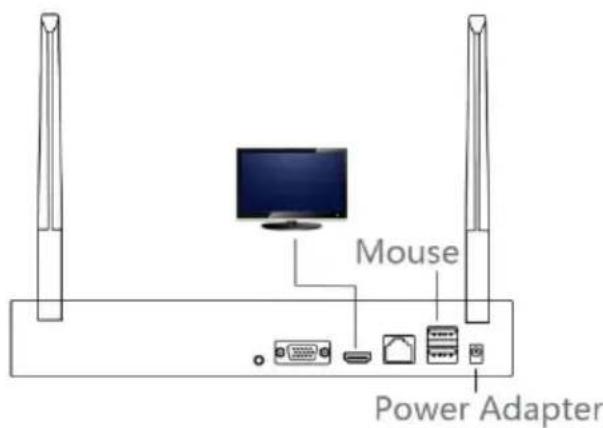
Line drawing of a surveillance camera with antenna and mounted lens (no text or symbols)- Connect the NVR to an electrical outlet using the NVR power adapter.
- Connect the NVR to a monitor using a VGA or HDMI cord (not provided).
- Connect the provided mouse to the USB port on the NVR.
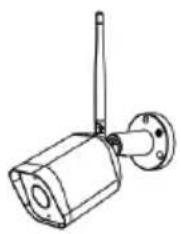
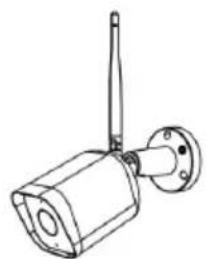
- Power on the cameras. They will connect to the NVR automatically.
- For first use, follow the on screen instructions to set up password.
Notes:
- Connect the power adapter to the electrical outlet before connecting it to the power port on the NVR.
- To prevent electric shock and protect the camera, connect the adapter to a grounded wall outlet.
Connect the NVR to the router
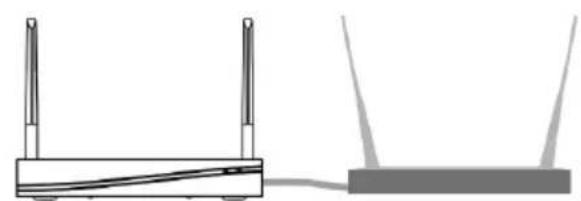
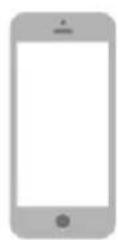
Connect the NVR to your Wi-Fi router using the provided network cable. Ensure your phone and the NVR are connected to the same network.
natural_image
Line drawing of a surveillance camera with antenna and mounted sensor (no text or symbols)
natural_image
Diagram showing two wireless devices connected by a cable, one with two antennas and the other a network device (no text or symbols present)
Replace the hard drive
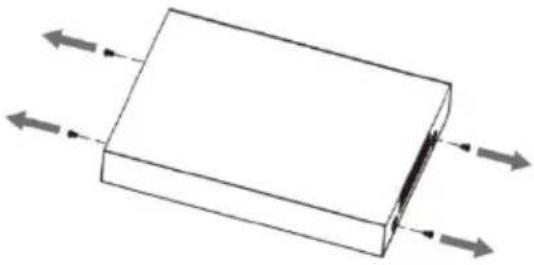
- Remove the screws from the sides of the NVR.
natural_image
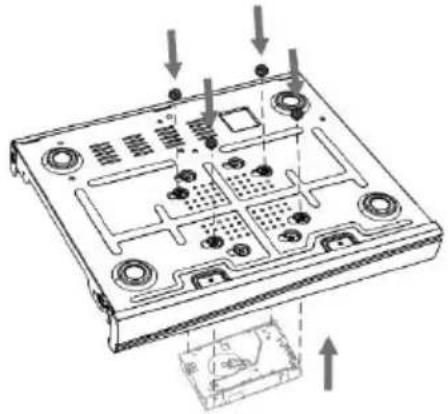
Simple 3D diagram of a rectangular block with bidirectional arrows indicating force or flow (no text or symbols)- Secure the new hard drive (not provided) to the NVR using the 2.5 inch HDD screws (x4) or the 3.5 inch HDD screws (x4).
natural_image
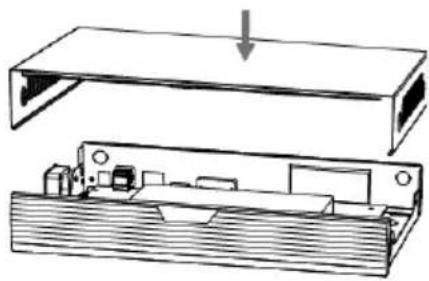
Technical line drawing of a computer chassis with mounting holes and internal components (no text or symbols)- Replace the NVR cover.
natural_image
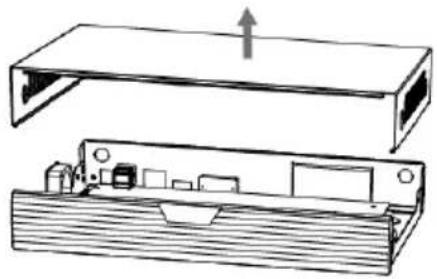
Technical line drawing of a mechanical assembly with an upper panel and lower panel (no text or symbols)- Remove the NVR cover and hard drive.
natural_image
Technical line drawing of a mechanical assembly with an open panel and internal components (no text or symbols)- Connect the NVR to the hard drive using the HDD power/data cables.
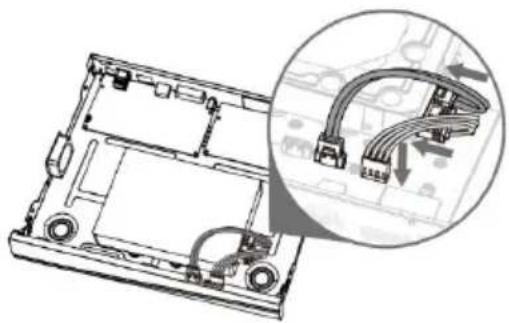
natural_image
Technical line drawing of a device casing with connectors and internal wiring, showing a magnified inset of cable routing (no text or symbols)- Replace the screws on the sides of the NVR.
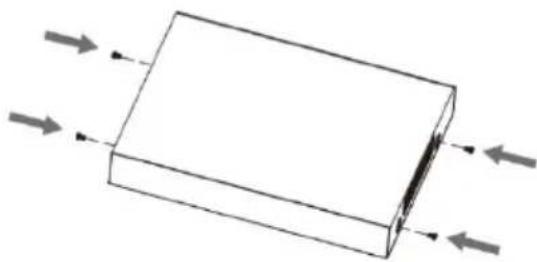
natural_image
Simple 3D diagram of a rectangular block with directional arrows indicating flow or force (no text or symbols)CONNECT TO SMARTERHOME™ APP
Install App
Download the "Kogan SmarterHome" app from the Play Store (Android) or App Store (iOS).
Play Store (Android)
App Store (iOS)
To register:
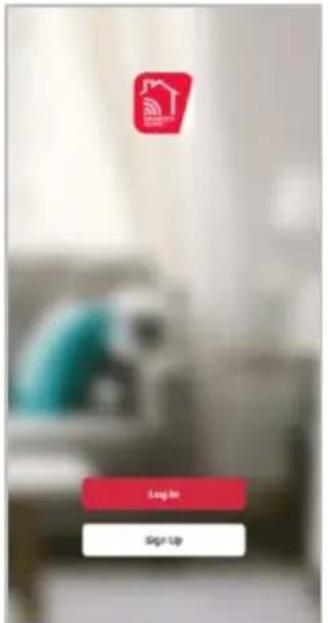
- If you already have a SmarterHome account, select 'Log In'. To register a new account, select 'Sign Up'.
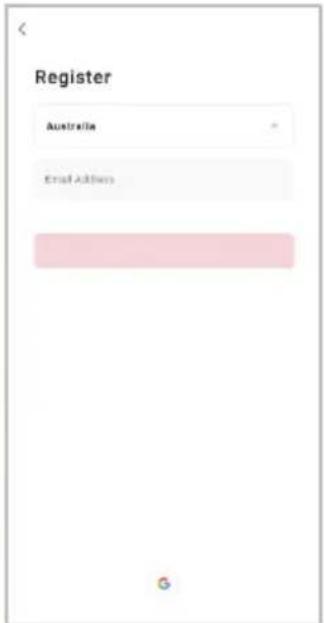
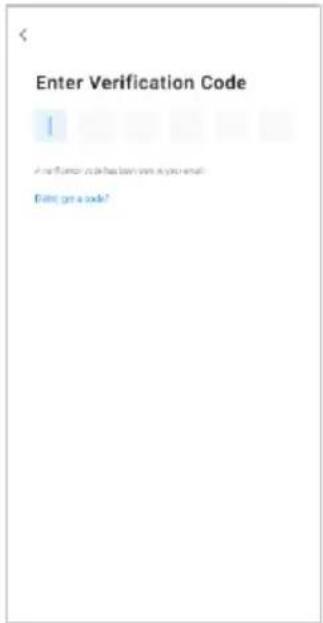
- The system will automatically recognise your country. If needed, you can manually select your country from the drop-down box. Enter your email address and tap 'Get Verification Code' to continue.
- A 6-digit code will be sent to the submitted email address. Enter this code before the one-minute timer expires.
- Continue to the next page and complete your SmarterHome profile.
Set device in pairing mode
When the device is first turned on, it may automatically enter pairing mode (the status indicator on the cameras will be rapidly flashing red).
If not automatically in pairing mode when powered on, you can manually set the device in pairing mode by pressing and holding the reset button on one of the cameras for 5 seconds until the status indicator is rapidly flashing red.
Add device through network
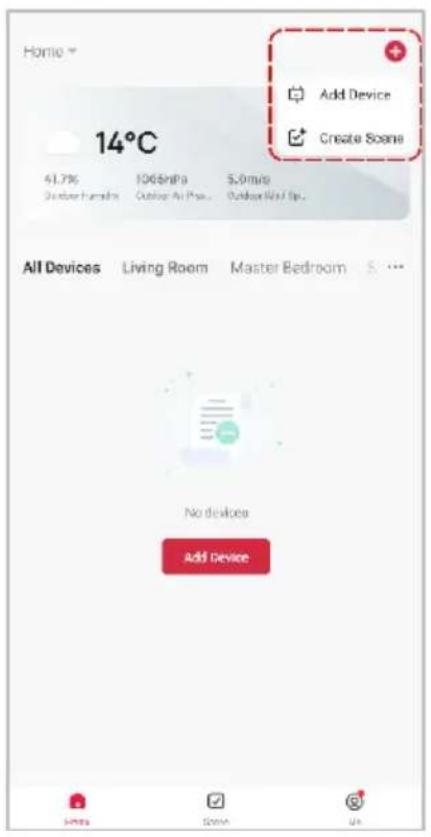
- Once registered, tap "Add Device" on the app's home page, or the "+" in the upper right corner, to add a new device through the network.
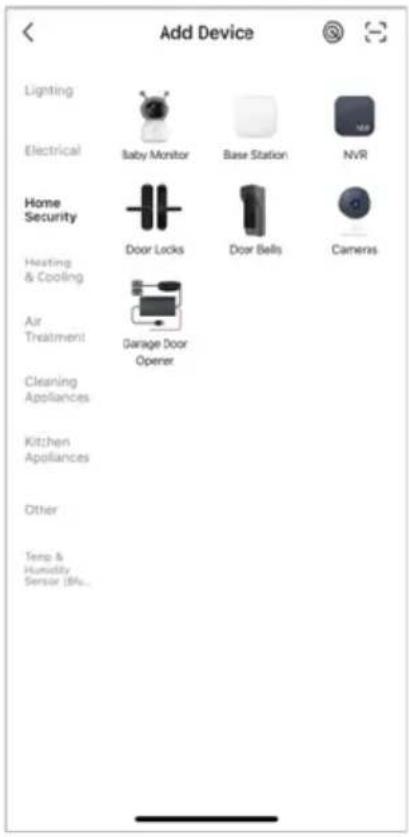
- Select the product type from the list of options in the app (Home Security > NVR).
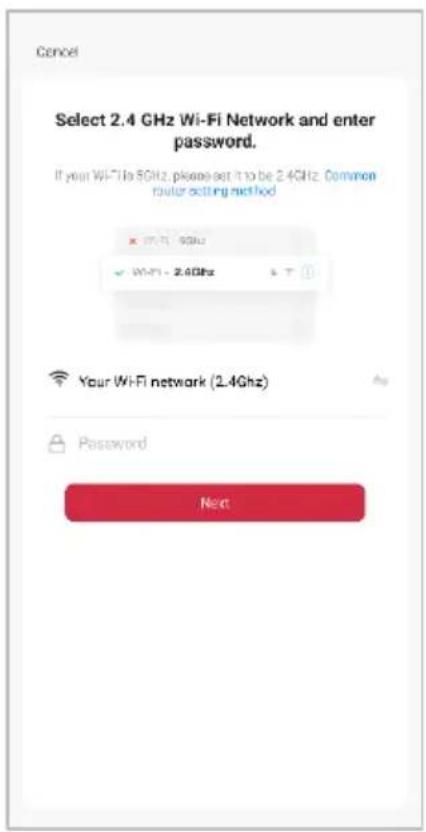
- Enter your Wi-Fi details. It is important that your SmarterHome™ device and the app are connected to the same Wi-Fi network during setup.
Notes:
- The device and the app have to use the same Wi-Fi network.
• The device is only compatible with 2.4Ghz networks. -
Depending on the product, Steps 3 and 4 may be in opposite order.
-
Ensure that the device is in pairing mode with the status indicator on the cameras rapidly flashing red and tap "Confirm light is rapidly flashing".
- The device will commence the pairing process and connect to the app. Ensure your WiFi router, mobile phone, and the SmarterHome™ device are kept close until connection is complete.
- After successfully being added, you will have the option to rename the device and assign it to a location. It will now be listed on the app's home page. Tap the device listing to enter its control page.
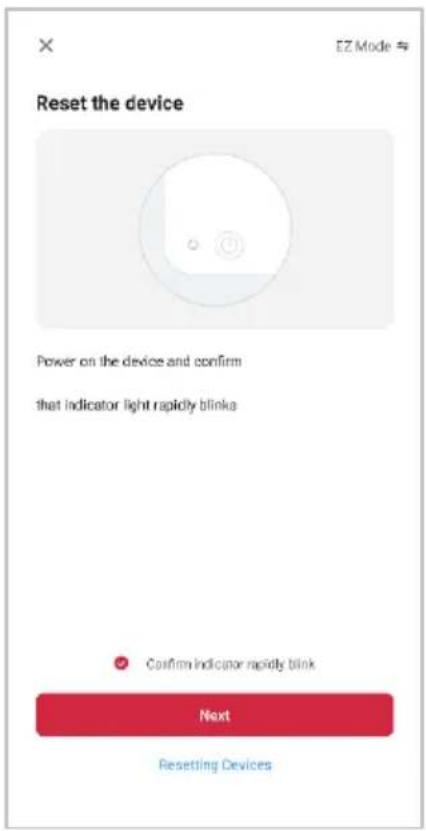
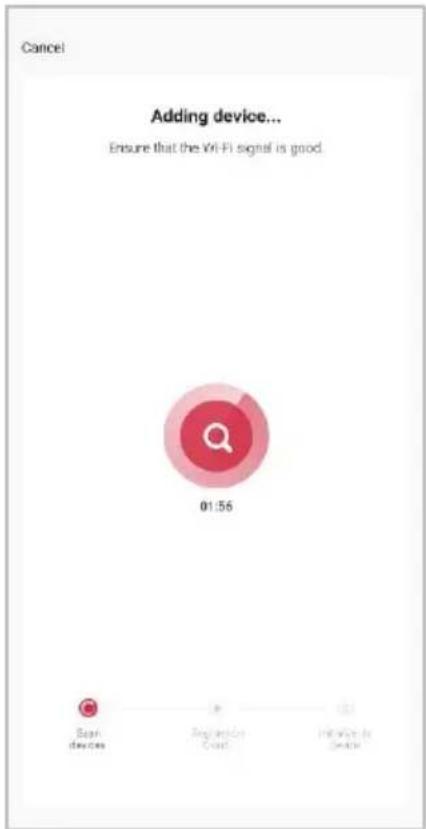
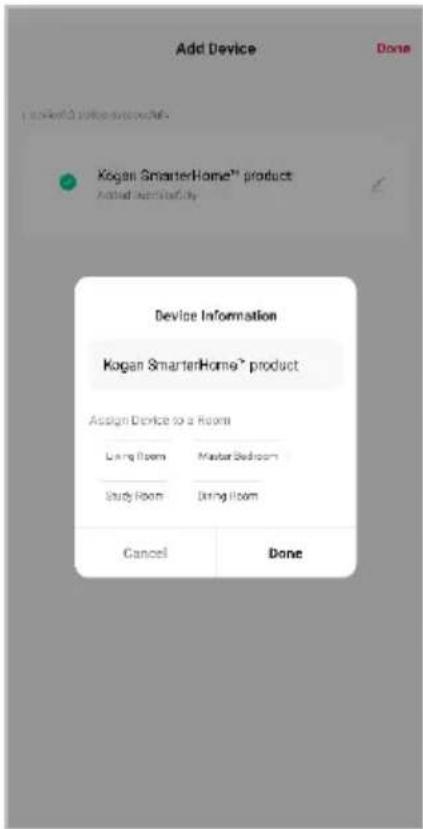
Note:
Once connected, you can select Create Scene from the “+” in the upper right corner (or from the Scene tab) to group connected SmarterHome™ products and automate their functions.
GOOGLE HOME CONTROL
Note:
You will need to have set up a Google Home account prior to linking your Kogan SmarterHome™ device.
Adding "SmarterHome" to the Google Home app
- From the home page of the Google Home app, select the "+" icon (top left corner, see arrow in the below screenshot) to access the 'Add and manage' page.
- Select 'Set up device', then select the 'Works with Google' option.
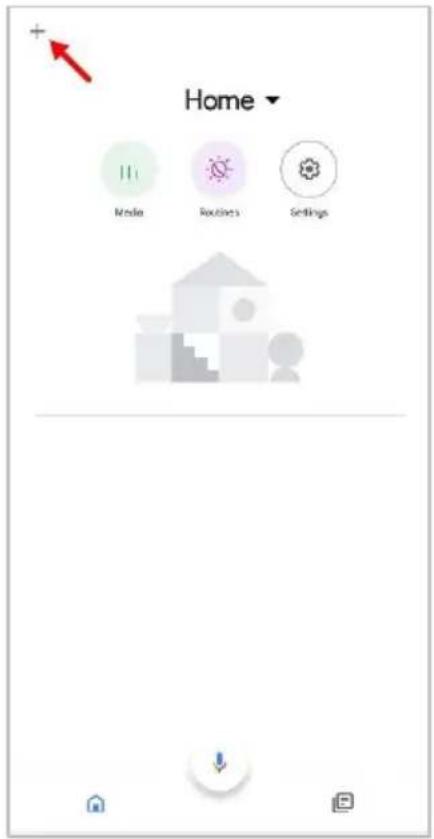
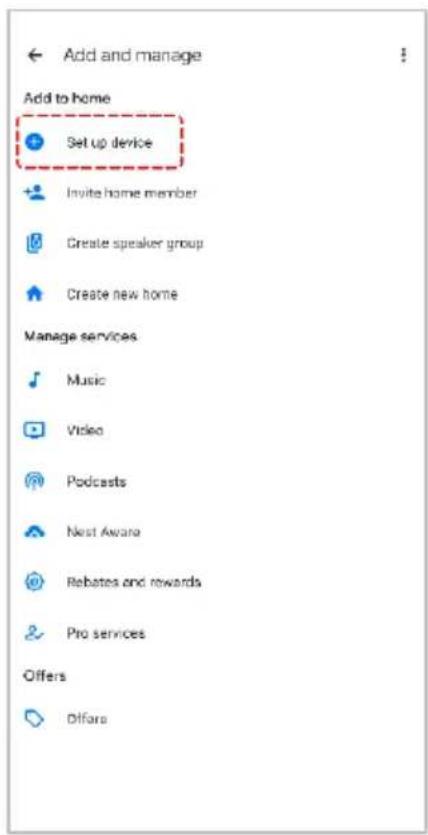
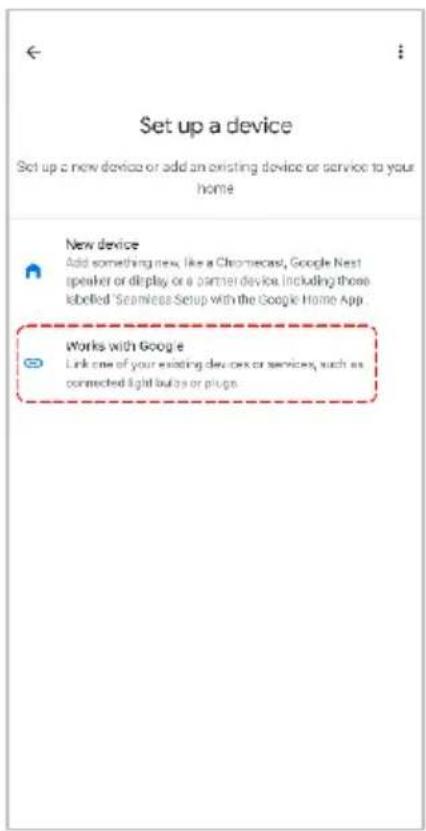
- Select the search bar and type 'Smarter Home' to locate the Kogan SmarterHome™ service.
- From here, you will be prompted to sign into your SmarterHome™ account using either your email or mobile phone number, depending on which method you used to register your account.
- Select "Kogan SmarterHome™" from the app options.
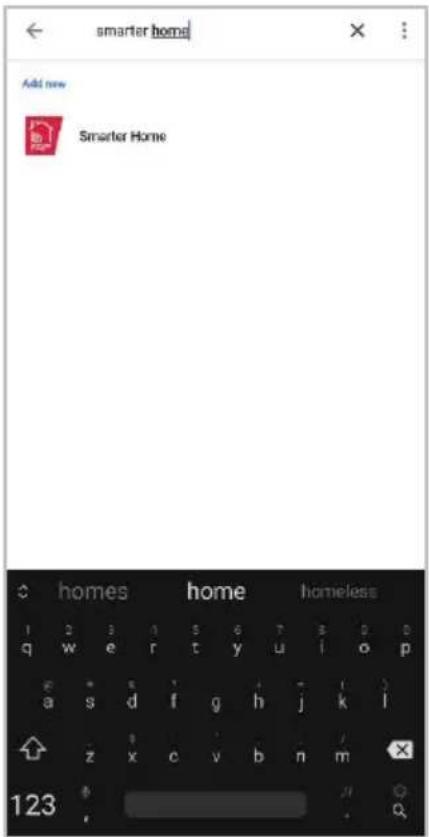
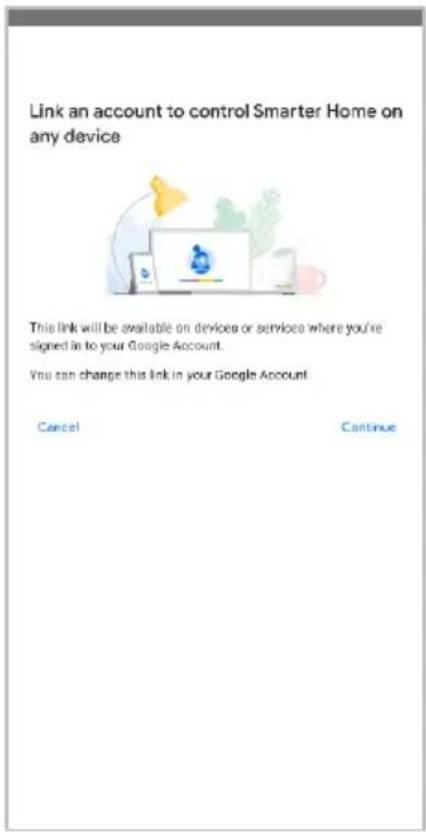
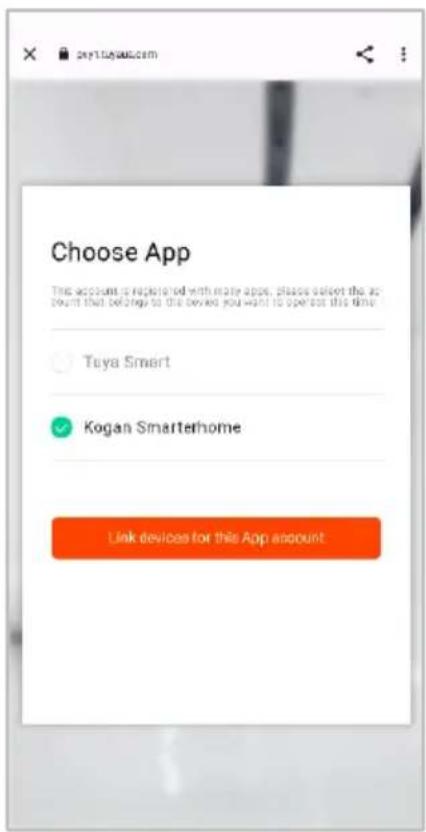
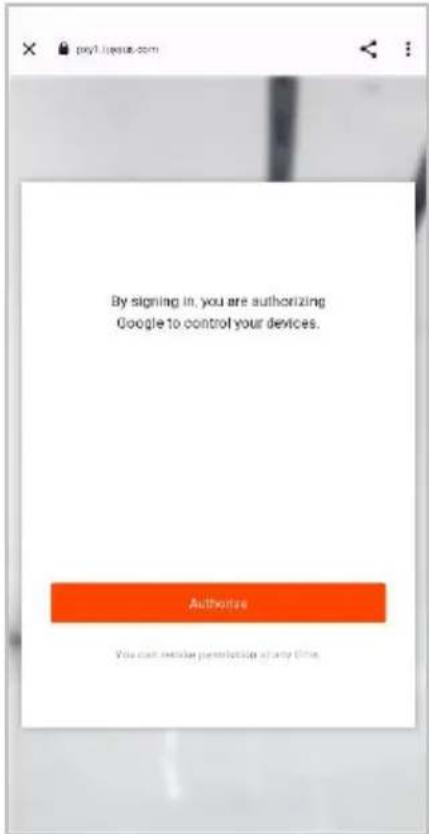
- Tap 'Authorise' to grant Google permission to access the SmarterHome™ app and your devices.
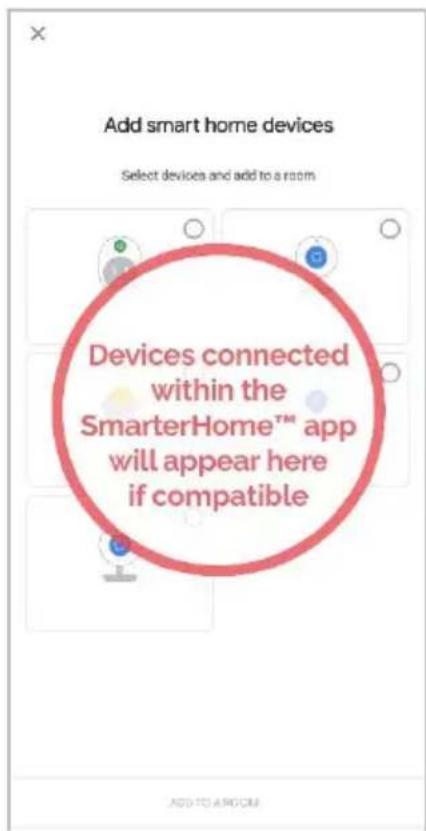
- Once connected, the app will display any compatible devices linked to your SmarterHome™ account. From here you can assign them to rooms and set up any routines. Tap on any of the devices to view a list of available commands.
Note:
Please note that Google Home can only control the base/core functions of any compatible SmarterHome™ devices. To make full use of this product's smart functionality, please use the Kogan SmarterHome™ app.
AMAZON ALEXA CONTROL
Notes:
You will need to have set up an Alexa account prior to linking your Kogan SmarterHome™ device.
Adding "SmarterHome" to the Alexa app
- From the home page of the Alexa app, select the “≡” icon in the bottom-right and select “Skills & Games” from the sidebar.
- Select the search bar and type 'Smarter Home' to locate the Kogan SmarterHome™ skill.
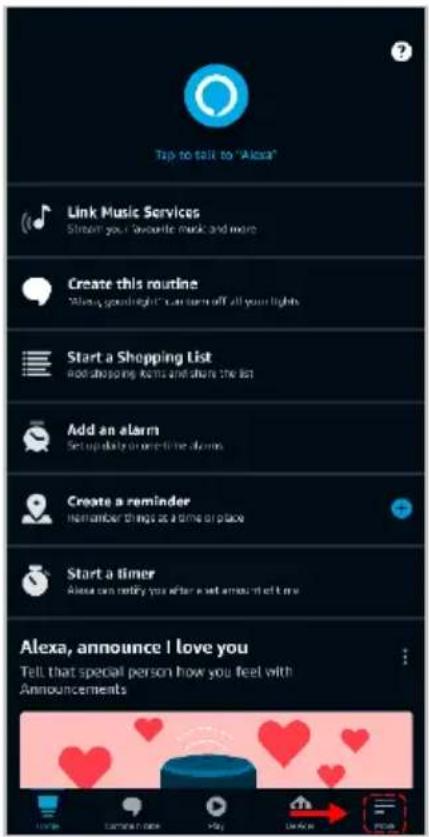
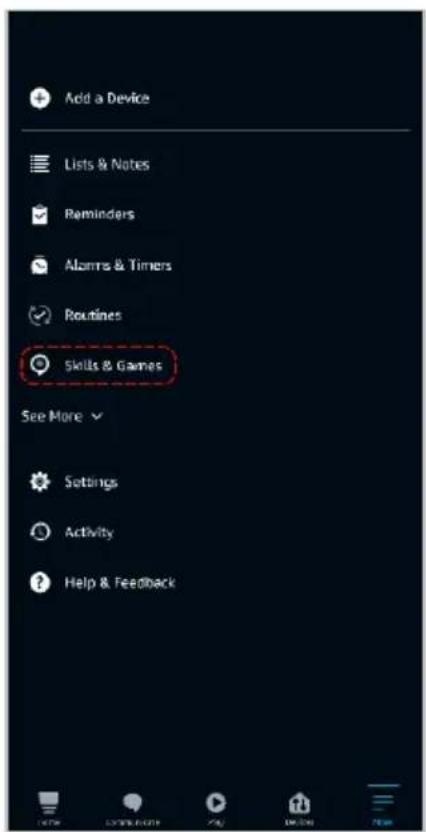
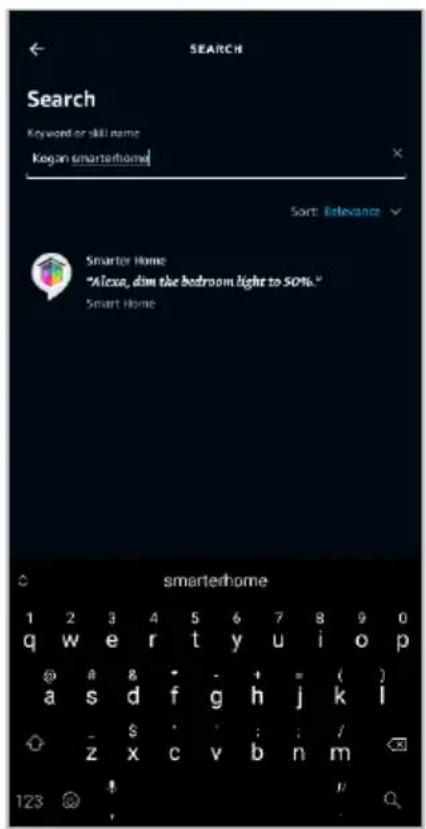
- Tap 'Enable to Use' to add the Kogan SmarterHome™ skill to Alexa.
- From here, you will be prompted to sign into your SmarterHome™ account using either your email or mobile phone number, depending on which method you used to register your account.
- Select "Kogan SmarterHome™" from the app options.
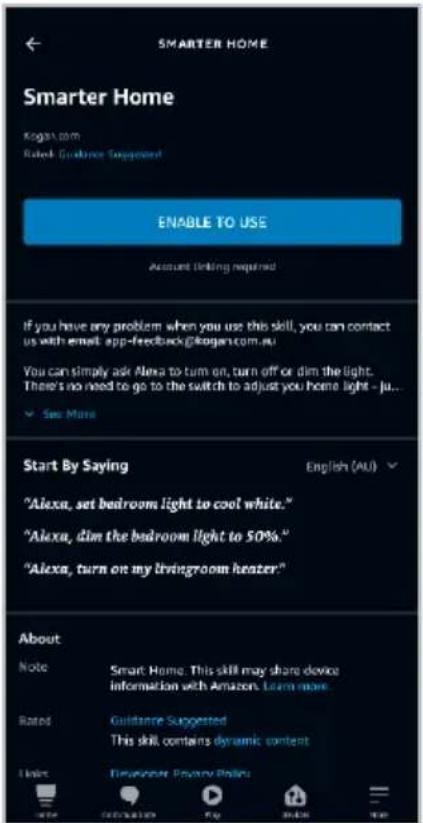
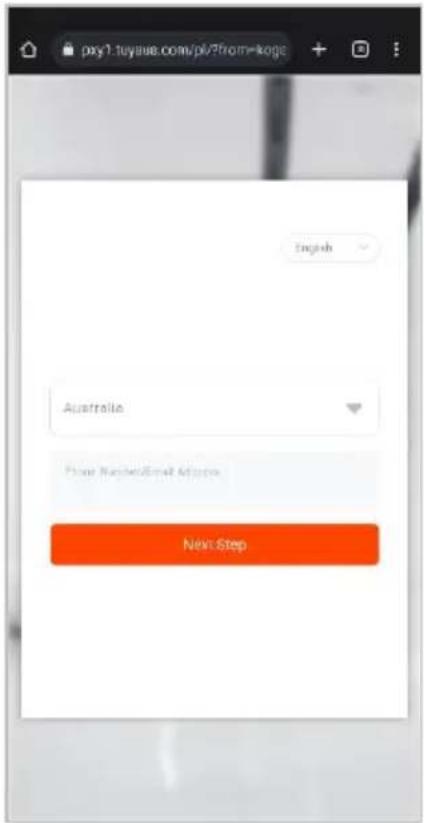
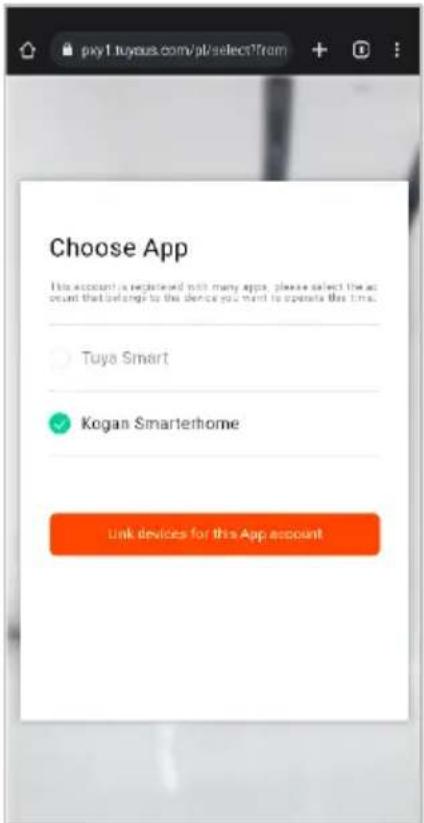
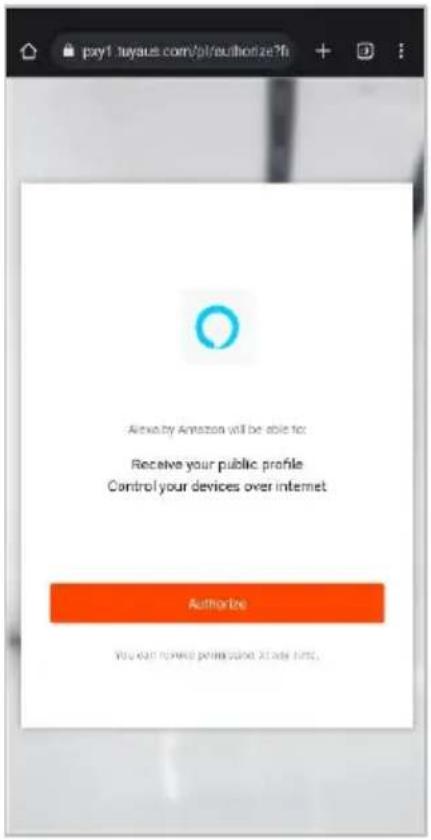
- Tap 'Authorise' to grant Alexa permission to access the SmarterHome™ app and your devices.
- Once connected, the app will perform a search and display the devices linked to your SmarterHome™ account. When your devices have successfully connected to the Alexa app, you will be able to control your Kogan SmarterHome™ devices via Alexa's voice commands.
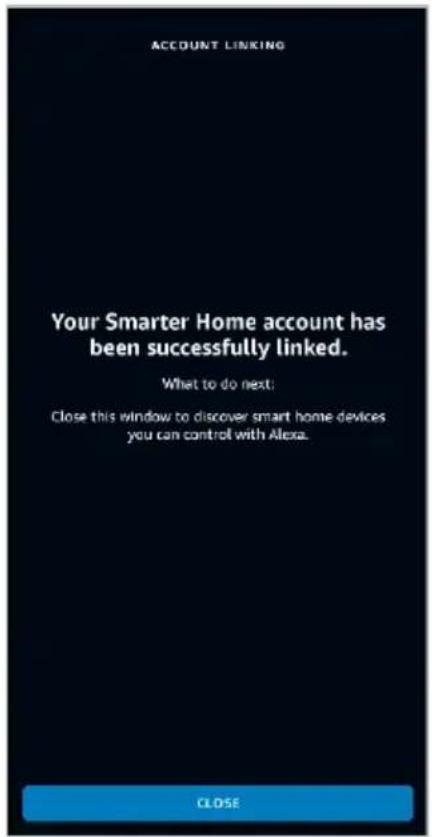
Note:
Please note that Alexa can only control the base/core functions of any compatible SmarterHome™ devices. To make full use of this product's smart functionality, please use the Kogan SmarterHome™ app.
FUNCTIONS
Preview
Live view:
To open live view:
- Drag the camera name from the channel list to the display screen, or
- Click the camera name on the channel list and click the preview icon next to the camera name.
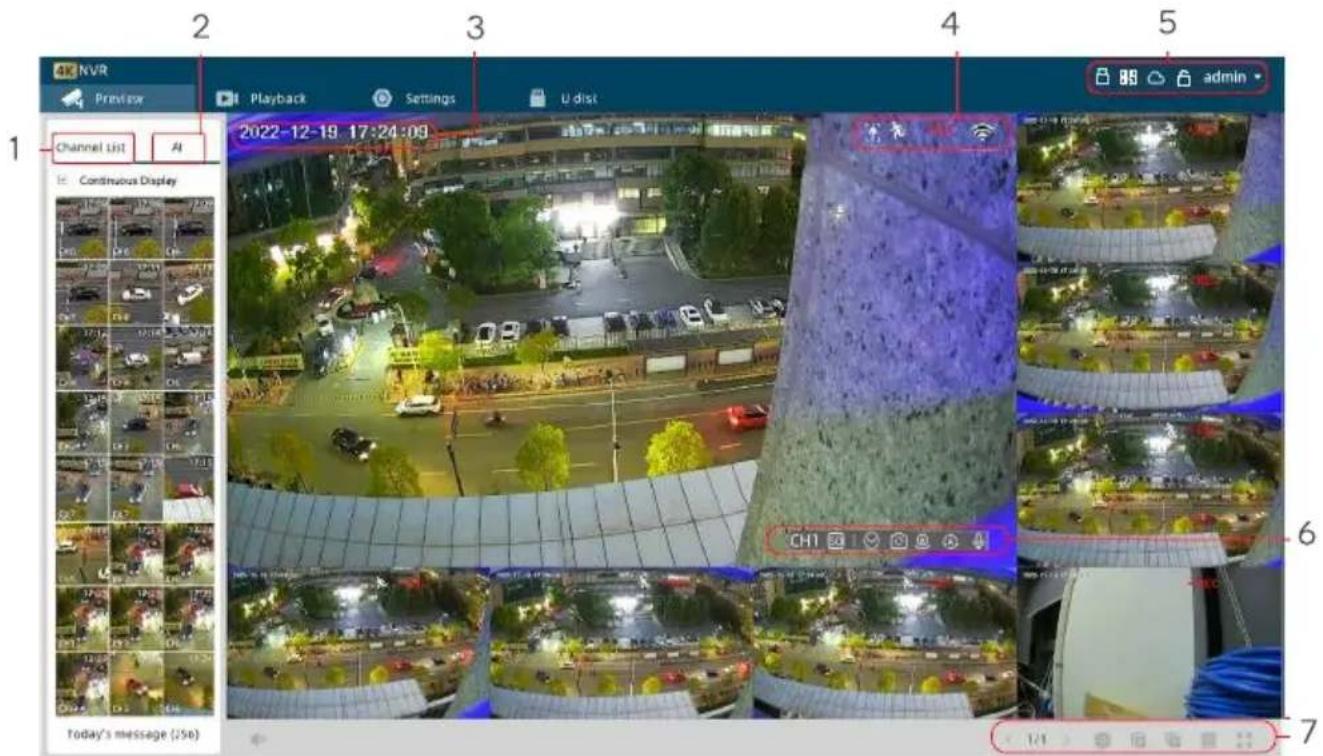
1 Channel list of connected cameras
2 Alarm records of AI detection
3 Current date and time
4 Selected camera status bar
5 NVR status bar
6 Selected camera navigation bar
7 Preview navigation bar
Alarm records of AI detection:

Preview
Channel List
AI

Continuous Display
Today's message (256)
Enable the AI function:
The AI function must be enabled to record alarms. To enable the AI function, go to Settings → Camera Settings → AI.
Alarm image:
Capture the thumbnail, channel number and time of the detected object.
Continuous display:
The number of thumbnails retained and displayed on the AI sidebar is restricted. When the sidebar is full, older thumbnails will be hidden as new ones are recorded and displayed. If 'Continuous Display' is enabled, all thumbnails will be retained. If 'Continuous Display' is disabled, the thumbnails will be deleted when they disappear from the sidebar.
Today's message:
See how many alarms have been detected for the day.
Selected camera status bar:


•REC

 | AI detection has been triggered. The icon will change according to if a person, vehicle, pet or package is detected. |
 | Motion has been detected. |
 | The camera is recording. |
 | Wi-Fi signal strength. |
NVR status bar:


admin

 | USB inserted. | |
 | Scan the QR code with the camera to add. | |
 | NVR cloud status.The NVR is not connected to the app or is offline after being added.The NVR is connected to the app and is operational. | |
 | Click to manually lock the NVR. The password will be required to enter the NVR. | |
 | Click the drop down arrow to view the NVR account. | |
Selected camera navigation bar:

| CH1 | Channel number of the selected camera. | |
 | The resolution of the current camera screen.1-4 screens: all screens in SD.6-8 screens: the first large screen in HD and all others in 360P.9 screens: all screens in 360P. | |
 | Turn privacy mode on/off (if the camera supports privacy mode). | |
 | Flip the screen. | |
 | Turn corridor mode on/off (if the camera supports corridor mode). 4-split screens and 7-split screens support corridor mode. | |
 | Adjust the PTZ angle (if the camera supports the PTZ function). | |
 | Switch between day and night modes. | |
 | Turn the microphone on or off. | |
Preview view navigation bar:


 | Adjust the volume or turn the sound on/off. | |
 | Display different camera screens. | |
 | Switch previews every 10 seconds. | |
 | Open the previews of all cameras. | |
 | Close the previews of all cameras. | |
 | Split the camera screens. | |
 | Display the selected camera at full screen. | |
Playback
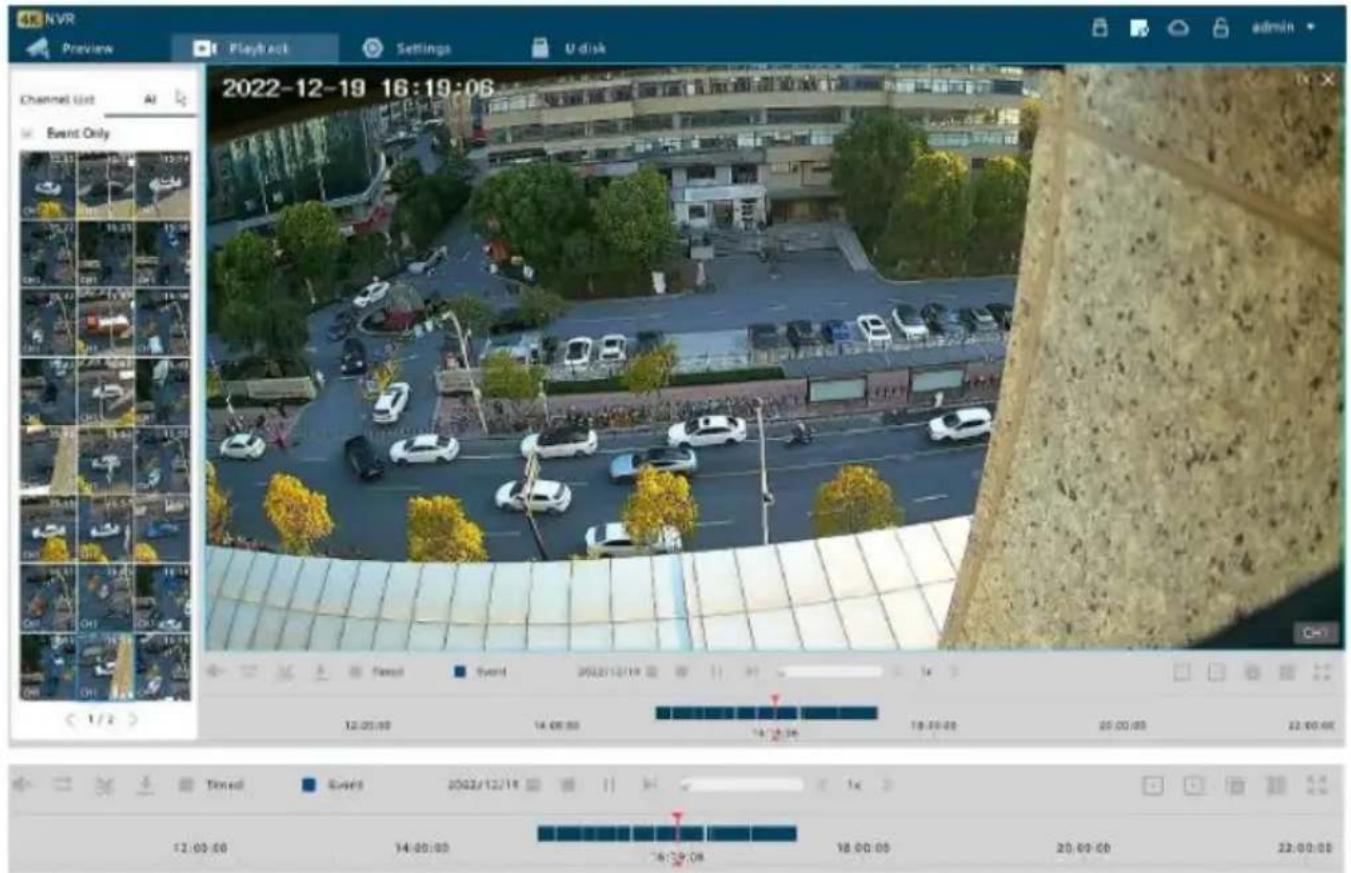
 | Adjust the volume or turn the sound on/off. | |
 | Turn on synchronous playback (all screens play videos of the same time period). | |
 | Drag the clip box to adjust the video length and click to clip the video. | |
 | Download the clipped video in MP4 format (insert a USB first). | |
 Timed Event Timed Event | Recording types. | |
| [TX7A] 21/03/29 | Select the date of the recording you want to view. | |
 | Pause/play playback. | |
| [TYOC] | Drag to adjust the video speed.Click to increase the video speed.Click to decrease the video speed. | |
 | Drag to control the time bar of recordings.Click to zoom out of the progress bar.Click to zoom in on the progress bar. | |
 | Close playbacks of all cameras. | |
 | Split the camera screens. | |
 | Display the selected camera at full screen. | |
Playbacks of AI detection
Channel List
AI
Event Only
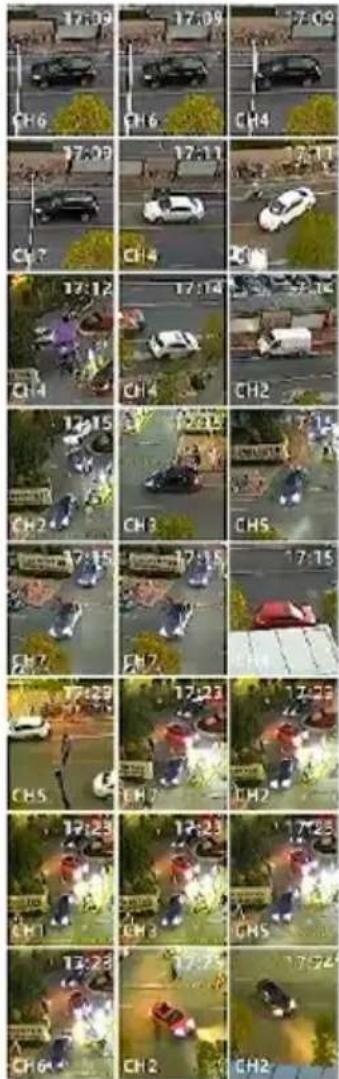
<1/3>
Enable the AI function:
The AI function must be enabled to record alarms. To enable the AI function, go to Settings → Camera Settings → AI.
Alarm image:
Capture the thumbnail, channel number and time of the detected object.
Event Only:
If 'Event Only' is enabled, only the captured event will be played. If 'Event Only' is disabled, the regular recordings will also play.
<1/3>:
Page 1 in a total of 3.
Reset the NVR password
- When logging in, click 'Forgot password?'.
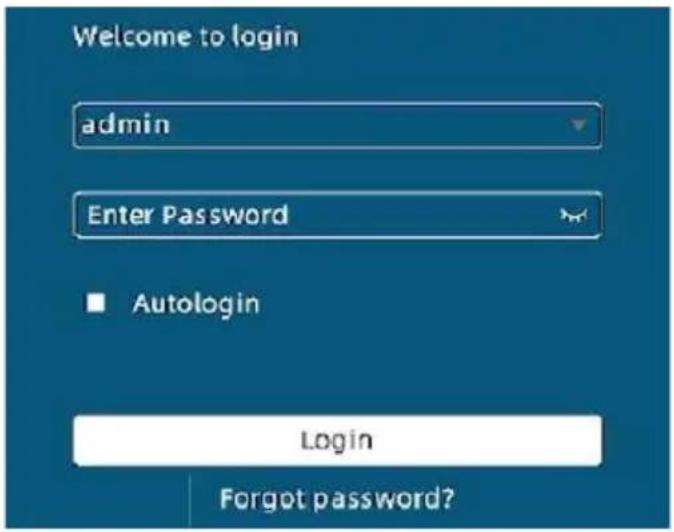
- Enter the service number (same as the serial number) of the NVR and then enter the new password. The service number will be located on the NVR, often at the bottom.
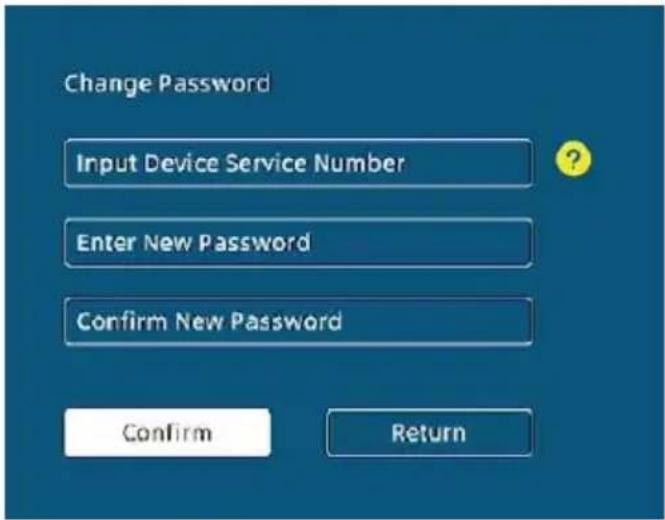
- Click 'Confirm' to save.
Settings
General and Time Settings:
- Language: Click the down arrow and select the desired language.
- Resolution: Click the down arrow and select the desired resolution.
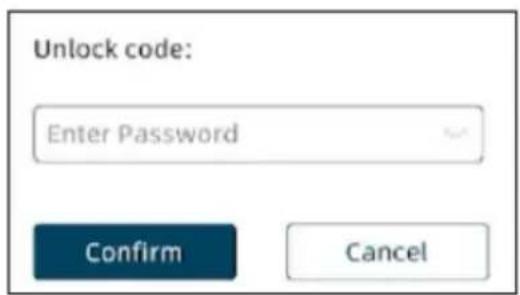
- Auto Logout: Click the down arrow and select an auto locking time. The device NVR will automatically lock if there is no operation within the selected time period. The password will be required to unlock the NVR.
- Time Settings:
- Click the down arrows to manually select the time zone and date format.
Turn on 'Time Sync' to automatically sync the time zone and date format.
General
Language
English

Resolution
1920×1080

Auto Logout
Never

Name
NVR

Display Signal

Boot Wizard

Sound

Autologin

Time Settings
Time Zone
(GMT+08:00) Beijing

Date Style
year/month/day

Time Style
@24 hours
12 hours
Time Sync

System Date
2023/6/17

System Time
15:14:14

Network:
- Connection Mode: Select Static IP or Dynamic IP according to the network environment.
• Channel: Select a Wi-Fi channel. - Tryb Ad-hoc: Select 'Auto' to make the Wi-Fi steadier and manually cascade the cameras.
- Anti-jamming: Ensure the secure operation of the network by preventing interference or deliberate disruptions, such as jamming attacks.
Network
Connection Mode
Dynamic IP
IP Protocol Type
IPV4
IP Address
Subnet Mask
Default Gateway

Preferred DNS server

Alternate DNS server

Save
Upgrade
Channel
Tryb Ad-hoc
anti-ja mming
Auto
Auto


Network Topology
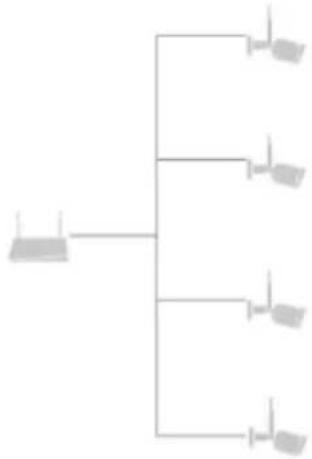
flowchart
graph TD
    A["Top Node"] --> B["Terminal 1"]
    A --> C["Terminal 2"]
    A --> D["Terminal 3"]
    A --> E["Terminal 4"]
Storage:
- Record:
- Constant mode: When the hard drive is full, it will start to overwrite the stored recordings from the first frame.
- All day mode: Set an expiry date for stored footage. Recordings that exceed the expiration time will be automatically deleted.
- Disk: View the hard drive usage and format.
IP Camera:
- Adding a camera:
o Manually: Click 'Add' and enter the camera information.
- QR code: Click the 📄 icon in the top right corner of the screen, scan the QR code with the camera and follow the on-screen prompts.
- Search for an online device: Click Q Device Online to search for online devices on the same network. Click the desired camera, click 'Add' and enter a username and password.
- Modify camera: Click 📊 to modify the camera name, address, protocol, port, username or password.
- Delete camera: Select the camera and click × Delete or 📋 to delete the camera.
- Upgrade camera: Insert a USB with the latest firmware into the NVR USB port and click the 🔊 icon to upgrade.
Camera Add
+ Add
× Delete
Refresh
Q Device Online
Name
Protocol IP
Model
Neat status
Rec Status
Firmware
Migration
Night
Operation
□ camera1
mean
表决结果:通过A股一票B股
购回资金来源:
Online
No.
5.2.2
Open
Close
证:
分 否
Note:
Deleted cameras can be re-added by resetting the camera and re-adding it through the QR code or search for an online device method.
Camera Settings:
- Camera: select a camera channel, main bitrate and video encoding format.
Note:
The following settings of motion detection, person detection and light mode are only for the selected camera channel. Select the corresponding channel to adjust these settings for other cameras.
- Motion detection: Enable/disable the function, select the sensitivity and alarm type, set up a defence time and draw a defence area. Click 'Apply' to save.
- AI detection: Enable/disable the function, select detection type, draw detection area, select sensitivity and alarm type, and set up defence time. Click 'Apply' to save.
- Sound detection: Enable/disable the function, select the sensitivity and alarm type and set up a defence time.
• Light: Select light mode if your cameras support this function. - Alert Linkage: When the AI detection and motion detection alarms are triggered, both a sound and light alarm will play.
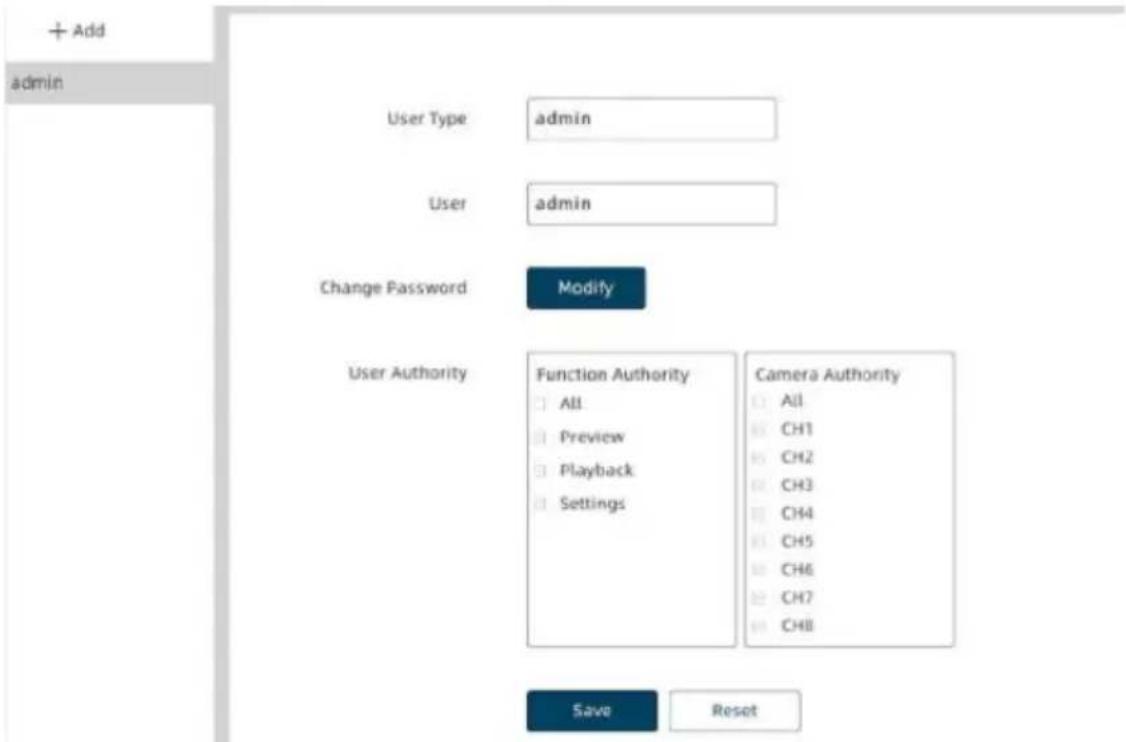
User:
Add or delete users and assign user authorities.
Default:
- Auto reboot time.
- Restore to default settings (all parameters except channel settings are restored).
- Restore to factory settings (restore all parameters to default settings).

Defaults
Restore Defaults
Factory Defaults
System Upgrade:
• View device information.
- Upgrade NVR: Insert a USB with the latest firmware into the NVR USB port. Click 'Check Upgrade' and follow the prompts.
Australian Eastern Daylight Savings Time (AEDT) Function
The AEDT function will automatically turn on if there are AEDT rules in your region.
AEDT is the practice of moving the clocks forward one hour from Standard Time during the summer months and changing them back again in the fall.
Display of playback progress bar:
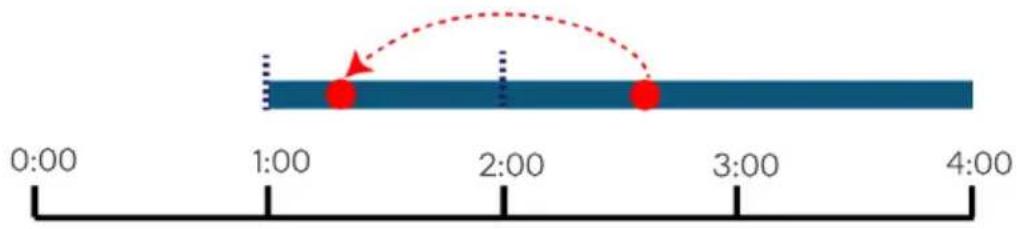
- When AEDT starts, there will be one less hour in the day (2:00 becomes 3:00) and one hour will be missing from the progress bar, but the footage from that hour is not lost.

bar
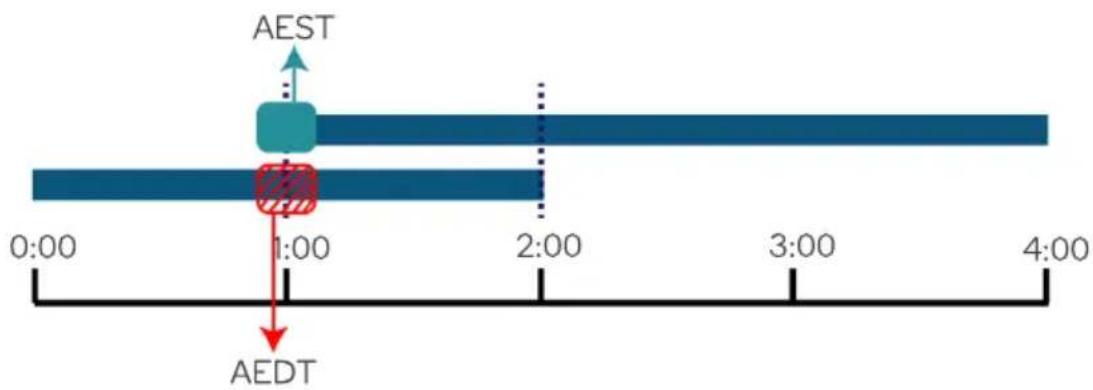
| Time | Value | |---|---| | 0:00 | 1 | | 1:00 | 2 | | 2:00 | 3 | | 3:00 | 4 | | 4:00 | 5 |- When AEDT ends, an hour is repeated, so there is an extra hour in the day (2:00 becomes 1:00). The progress bar is displayed as usual; however, the repeated hour will record twice (1:00 to 2:00 in AEDT and AEST).
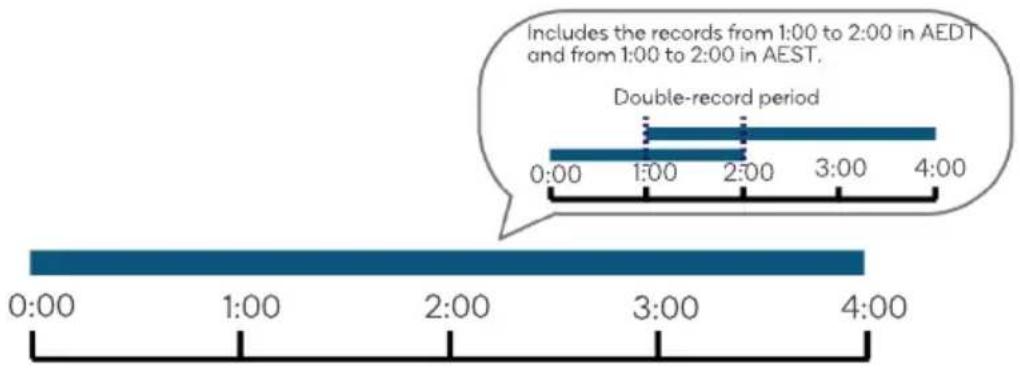
line
| Time | Record Type | | :--- | :--- | | 0:00 | Records from 1:00 to 2:00 in AEDT | | 1:00 | Records from 1:00 to 2:00 in AEST | | 2:00 | Records from 1:00 to 2:00 in AEST | | 3:00 | Records from 1:00 to 2:00 in AEST | | 4:00 | Records from 1:00 to 2:00 in AEST |Viewing the playback of the double-record period:
When viewing the playback of AEDT, if you click to view the double-record period, the record of AEDT will be played.
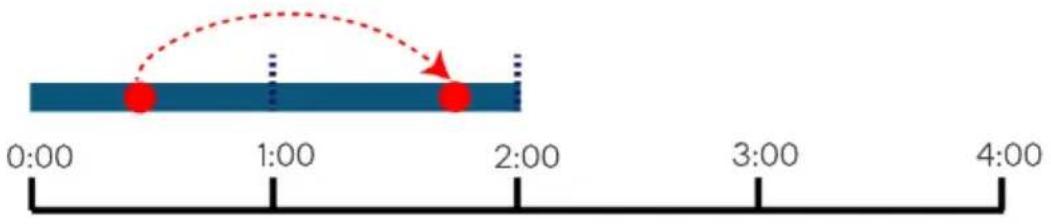
When viewing the playback of AEST, if you click to view the double-record period, the record of AEST will be played.
Video clipping of playback (double-record period):
If you view the playback of AEDT and clip the video earlier than 2:00, the clipped video will be in AEDT.
If you view the playback of AEST and clip the video later than 1:00, the clipped video will be in AEST.
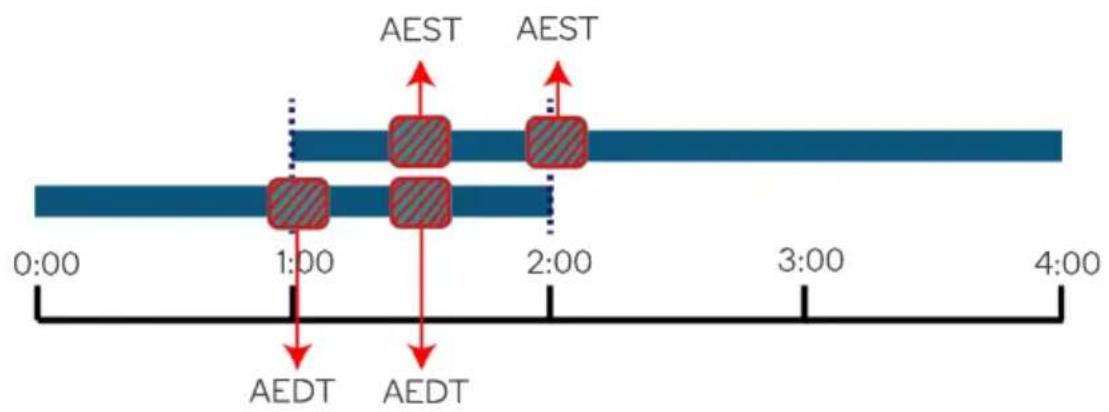
flowchart
graph LR
    A["0:00"] --> B["1:00"]
    B --> C["AEST"]
    C --> D["2:00"]
    D --> E["3:00"]
    E --> F["4:00"]
    G["AEDT"] --> B
    H["AEDT"] --> D
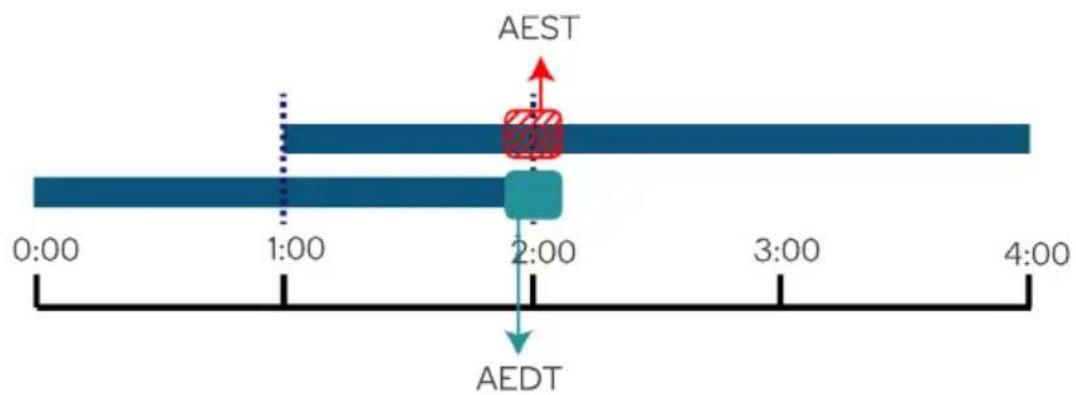
If you view the playback of AEDT and clip the video around 2:00 (across the 2 on the progress bar), the clipped video before 2:00 will be in AEDT and the clipped video after 2:00 will be in AEST.
If you view the playback of AEST and clip the video around 1:00 (across the 2 on the progress bar), the clipped video after 1:00 will be in AEST and the clipped video before 1:00 will be in AEDT.
NOTES
Need more information?
We hope that this user guide has given you the assistance needed for a simple set-up.
For the most up-to-date guide for your product, as well as any additional assistance you may require, head online to help.kogan.com
kogan.com
- KOGAN SMARTERHOME™ 4 CHANNEL AI NVR SECURITY CAMERA SYSTEM
- COMPONENTS
- Camera
- INSTALLATION
- Install the cameras
- Notes:
- Connect the NVR to a monitor
- Connect the NVR to the router
- Replace the hard drive
- CONNECT TO SMARTERHOME™ APP
- Install App
- To register:
- Set device in pairing mode
- Add device through network
- Note:
- GOOGLE HOME CONTROL
- Adding "SmarterHome" to the Google Home app
- AMAZON ALEXA CONTROL
- Adding "SmarterHome" to the Alexa app
- FUNCTIONS
- Preview
- Live view:
- Alarm records of AI detection:
- Enable the AI function:
- Alarm image:
- Continuous display:
- Today's message:
- Selected camera status bar:
- NVR status bar:
- Selected camera navigation bar:
- Preview view navigation bar:
- Playbacks of AI detection
- Event Only:
- Reset the NVR password
- Settings
- General and Time Settings:
- Network:
- Storage:
- IP Camera:
- Camera Settings:
- User:
- Default:
- System Upgrade:
- Australian Eastern Daylight Savings Time (AEDT) Function
- Display of playback progress bar:
- Viewing the playback of the double-record period:
- Video clipping of playback (double-record period):
- NOTES
- Need more information?
Brand : Kogan
Model : KASMNVRWF4A
Category : Security Camera