
I-ONIX FW810S - Audio Equipment LEXICON - Free user manual and instructions
Find the device manual for free I-ONIX FW810S LEXICON in PDF.


| Product Type | FireWire Audio Interface |
| Model | I-ONIX FW810S |
| Brand | Lexicon |
| Channels | 8 Inputs / 8 Outputs |
| Sample Rate | Up to 96 kHz |
| Bit Depth | 24-bit |
| Mic Preamps | 8 with Phantom Power |
| Input Connectors | 8 XLR/TRS Combo, 2 RCA, S/PDIF In |
| Output Connectors | 8 TRS, 2 RCA, S/PDIF Out |
| Headphone Output | 1 Stereo TRS |
| MIDI I/O | 5-pin DIN In/Out |
| Computer Connectivity | FireWire 400 (IEEE 1394a) |
| Power Supply | External 12V DC Adapter |
| Dimensions (W x D x H) | 480 x 230 x 44 mm (1U Rackmount) |
| Weight | 3.2 kg |
| Main Features | Lexicon Effects, Zero-Latency Monitoring, USB 2.0 Compatible (via adapter) |
| Included Software | Cubase LE, Lexicon Pantheon Reverb |
| Operating System Compatibility | Windows XP/Vista/7, Mac OS X 10.4+ |
| Maintenance | Keep dry, clean with soft cloth |
| Safety | Use only supplied power adapter, do not expose to liquids |
| Spare Parts | Power supply, FireWire cable available |
| Reparability | Service by authorized technician |
| Certifications | FCC, CE, RoHS |
Frequently Asked Questions - I-ONIX FW810S LEXICON
User questions about I-ONIX FW810S LEXICON
0 question about this device. Answer the ones you know or ask your own.
Ask a new question about this device
Download the instructions for your Audio Equipment in PDF format for free! Find your manual I-ONIX FW810S - LEXICON and take your electronic device back in hand. On this page are published all the documents necessary for the use of your device. I-ONIX FW810S by LEXICON.
USER MANUAL I-ONIX FW810S LEXICON
natural_image
Exterior view of a lexicon audio amplifier console (no visible text or symbols on body)IMPORTANT SAFETY INSTRUCTIONS

WARNING: TO REDUCE THE RISK OF FIRE OR ELECTRIC SHOCK DO NOT EXPOSE THIS EQUIPMENT TO RAIN OR MOISTURE
The symbols shown above are internationally accepted symbols that warn of potential hazards with electrical products. The lightning flash with arrowpoint in an equilateral triangle means that there are dangerous voltages present within the unit. The exclamation point in an equilateral triangle indicates that it is necessary for the user to refer to the owner's manual.
These symbols warn that there are no user serviceable parts inside the unit. Do not open the unit. Do not attempt to service the unit yourself. Refer all servicing to qualified personnel. Opening the chassis for any reason will void the manufacturer's warranty. Do not get the unit wet. If liquid is spilled on the unit, shut it off immediately and take it to a dealer for service. Disconnect the unit during storms to prevent damage.
SafetY InStructlOnS
NOTICE FOR CUSTOMERS IF YOUR UNIT IS EQUIPPED WITH A POWER CORD.
WARNING: THIS APPLIANCE SHALL BE CONNECTED TO A MAINS SOCKET OUTLET WITH A PROTECTIVE EARTHING CONNECTION.
The cores in the mains lead are coloured in accordance with the following code:
GREEN and YELLOW - Earth BLUE - Neutral BROWN - Live
As colours of the cores in the mains lead of this appliance may not correspond with the coloured markings identifying the terminals in your plug, proceed as follows:
- The core which is coloured green and yellow must be connected to the terminal in the plug marked with the letter E, or with the earth symbol, or coloured green, or green and yellow.
- The core which is coloured blue must be connected to the terminal marked N or coloured block.
- The core which is coloured brown must be connected to the terminal marked L or coloured red.
This equipment may require the use of a different line cord, attachment plug, or both, depending on the available power source at installation. If the attachment plug needs to be changed, refer servicing to qualified service personnel who should refer to the table below. The green/yellow wire shall be connected directly to the units chassis.
| CONDUCTOR | WIRE COLOR | ||
| Normal Alt | |||
| L LIVE | BROWN BLACK | ||
| N NEUTRAL BLUE WHITE | |||
| E EARTH GND GREEN/YEL GREEN | |||
WARNING: If the ground is defeated, certain fault conditions in the unit or in the system to which it is connected can result in full line voltage between chassis and earth ground. Severe injury or death can then result if the chassis and earth ground are touched simultaneously.
WARNING FOR YOUR PROTECTION PLEASE READ THE FOLLOWING:
KEEP THESE INSTRUCTIONS
HEED ALL WARNINGS
FOLLOW ALL INSTRUCTIONS
THE APPARATUS SHALL NOT BE EXPOSED TO DRIPPING OR SPLASHING LIQUID AND NO OBJECT FILLED WITHI LIQUID, SUCH AS VASES, SHALL BE PLACED ON THE APPARATUS.
CLEAN ONLY WITH A DRY CLOTH.
DO NOT BLOCK ANY OF THE VENTILATION OPENINGS. INSTALL IN ACCORDANCE WITH THE MANUFACTURER'S INSTRUCTIONS.
DO NOT INSTALL NEAR ANY HEAT SOURCES SUCH AS RADIATORS, HEAT REGISTERS, STOVES, OR OTHER APPARATUS (INCLUDING AMPLIFIERS) THAT PRODUCE HEAT.
ONLY USE ATTACHMENTS/ACCESSORIES SPECIFIED BY THE MANUFACTURER.
UNPLUG THIS APPARATUS DURING LIGHTNING STORMS OR WHEN UNUSED FOR LONG PERIODS OF TIME.
Do not defeat the safety purpose of the polarized or grounding-type plug. A polarized plug has two blades with one wider than the other. A grounding type plug has two blades and a third grounding prong. The wide blade or third prong are provided for your safety. If the provided plug does not fit your outlet, consult an electrician for replacement of the obsolete outlet.
Protect the power cord from being walked on or pinched particularly at plugs, convenience receptacles, and the point where they exit from the apparatus.
Use only with the cart stand, tripod bracket, or table specified by the manufacture, or sold with the apparatus. When a cart is used, use caution when moving the cart/apparatus combination to avoid injury from tip-over.

Refer all servicing to to qualified service personnel. Servicing is required when the apparatus has been damaged in any way, such as power-supply cord or plug is damaged, liquid has been spilled or objects have fallen into the apparatus, the apparatus has been exposed to rain or moisture, does not operate normally, or has been dropped.
POWER ON/OFF SWITCH: The Power switch used in this piece of equipment DOES NOT break the connection from the mains.
MAINS DISCONNECT: The plug shall remain readily operable. For rack-mount or installation where plug is not accessible, an all-pole mains switch with a contact separation of at least 3 mm in each pole shall be incorporated into the electrical installation of the rack or building.
FOR UNITS EQUIPPED WITH EXTERNALLY ACCESSIBLE FUSE RECEPTACLE: Replace fuse with same type and rating only.
MULTIPLE-INPUT VOLTAGE: This equipment may require the use of a different line cord, attachment plug, or both, depending on the available power source at installation. Connect this equipment only to the power source indicated on the equipment rear panel. To reduce the risk of fire or electric shock, refer servicing to qualified service personnel or equivalent.
IMPORTANT SAFETY INSTRUCTIONS
DecLaratlOn Of cOnfOrMltY
Manufacturer's Name: Lexicon Manufacturer's Address: 8760 S. Sandy Parkway Sandy, Utah 84070, USA
declares that the product:
Product name: I •ONIX FW810s
Note: Product name may be suffixed by the letters EU.
Product option: None
conforms to the following Product Specifications:
Safety: IEC 60065-01 + Amd. 1
EMC: EN 55013 (2001+A1) EN 55020 (1998)
Supplementary Information:
The product herewith complies with the requirements of the Low Voltage Directive 2006/95/EC and the EMC Directive 2004/108/EC.
Vice President of Engineering 8760 S. Sandy Parkway
Sandy, Utah 84070, USA
Date: October 24, 2008
European Contact: Your local Lexicon Sales and Service Office or
Harman Music Group 8760 South Sandy Parkway
Sandy, Utah 84070, USA
Ph: (801) 566-8800
Fax: (801) 566-7005
eElectrOMaGnetlc cOMPatIBILItY
This unit conforms to the Product Specifications noted on the Declaration of Conformity. Operation is subject to the following two conditions:
• this device may not cause harmful interference, and
- this device must accept any interference received, including interference that may cause undesired operation.
Operation of this unit within significant electromagnetic fields should be avoided.
• use only shielded interconnecting cables.
U.K. MAINS PLUG WARNING
A molded mains plug that has been cut off from the cord us unsafe. Discard the mains plug at a suitable disposal facility. NEVER UNDER ANY CIRCUMSTANCES SHOULD YOU INSERT A DAMAGED OR CUT MAINS PLUG INTO A 13 AMP POWER SOCKET. Do not use the mains plug without the fuse cover in place. Replaceant fuse covers can be obtained from your local retailer. Replacement fuses are 13 amps and MUST be ASTA approved to BS1362.

If you want to dispose this product, do not mix it with general household waste. There is a separate collection system for used electronic products in accordance with legislation that requires proper treatment, recovery and recycling.
Private household in the 25 member states of the EU, in Switzerland and Norway may return their used electronic products free of charge to designated collection facilities or to a retailer (if you purchase a similar new one).
For Countries not mentioned above, please contact your local authorities for a correct method of disposal. By doing so you will ensure that your disposed product undergoes the necessary treatment, recovery and recycling and thus prevent potential negative effects on the environment and human health.
Service Info
If you require technical support, contact Lexicon® Professional Customer Service. Be prepared to accurately describe the problem. Know the serial number of your unit, found on a sticker attached to the bottom of the I-ONIX FW810S. If you have not already taken the time to fill out your warranty registration card and send it in, please do so now.
Before you return a product to the factory for service, we recommend you refer to the manual. Make sure you have correctly followed installation steps and operation procedures. If you are still unable to solve a problem, contact our Customer Service Department at (801) 568-7660 for consultation. If you need to return a product to the factory for service, you MUST contact Customer Service to obtain a Return Authorization Number. No returned products will be accepted at the factory without a Return Authorization Number. Please refer to the Warranty information on the following page, which extends to the first end-user. After expiration of the warranty, a reasonable charge will be made for parts, labor, and packing if you choose to use the factory service facility. In all cases, you are responsible for transportation charges to the factory. Lexicon Professional will pay return shipping if the unit is still under warranty.
Use the original packing material if it is available. Mark the package with the name of the shipper and with these words in red: DELICATE INSTRUMENT, FRAGILE! Insure the package properly. Ship prepaid, not collect. Do not ship parcel post.
Warranty
This warranty is valid only for the original purchaser and only in the United States.
The warranty registration card that accompanies this product must be mailed (or 1. online registration must be completed at www.lexiconpro.com) within 30 days after purchase date to validate this warranty. Proof-of-purchase is considered to be the burden of the consumer.
Lexicon Professional warrants this product, when bought and used solely within 2. the U.S., to be free from defects in materials and workmanship under normal use and service.
Lexicon Professional's liability under this warranty is limited to repairing or, 3. at our discretion, replacing defective materials that show evidence of defect, provided the product is returned to Lexicon Professional WITH RETURN
AUTHORIZATION from the factory, where all parts and labor will be covered up to a period of 1 year. A Return Authorization number must be obtained from Lexicon Professional by telephone. The company shall not be liable for any consequential damage as a result of the product's use in any circuit or assembly.
Lexicon Professional reserves the right to make changes in design or make addi-4. tions to or improvements upon this product without incurring any obligation to install the same additions or improvements on products previously manufactured.
The foregoing is in lieu of all other warranties, expressed or implied, and Lexicon 5. Professional neither assumes nor authorizes any person to assume on its behalf any obligation or liability in connection with the sale of this product. In no event shall Lexicon Professional or its dealers be liable for special or consequential damages or from any delay in the performance of this warranty due to causes beyond its control.
Table of Contents
INTRODUCTION .... 1
Features 1
Unpacking the Ionix FW810S.... 2
The following items are included: 2
System Requirements 2
FRONT PANEL 3
REAR PANEL 5
CONNECTING THE I-ONIX FW810S 7
Microphones 7
Line Level Sources 7
Instruments 7
Computer/Digital Audio Workstation (DAW) 7
Headphones 7
Monitor Speakers 7
Example Rear Panel Connections 8
Example Rear Panel Connections 8
THE I-ONIX FW810S MIXER - OVERVIEW 9
Installation 9
The Mixer - Input 1-8 Strips 10
Monitor Reverbs ......11
The Mixer - Balanced Out (Aux Out) Controls ......12
The Mixer - Master Faders 12
Channel Strip Dynamics 13
Channel Strip Dynamics - Gate 14
Channel Strip Dynamics – Compressor ....14
Channel Strip Dynamics - Limiter 15
Channel Strip Dynamics - Gain Fader 16
EQ 16
File Menu....17
Ionix FW810S Control Panel 18
SPECIFICATIONS 19
Introduction
Congratulations and thank you for purchasing the Lexicon ^® I-ONIX FW810S!
With a wealth of features – including dbx ^® high-voltage, ultra low noise mic pre's, Pantheon II reverbs, and a powerful hardware mixing board with dbx dynamics and hardware monitor reverb – the Lexicon I•ONIX FW810S is more than just an 10-in, 12-out FireWire ^TM audio interface. It's a pro recording studio contained in a single rack unit.
The high-voltage, ultra low noise dbx mic pre's on every channel provide optimal timbre and tonality on every track. And the newly updated Pantheon II plug-in provides smooth, lush Lexicon reverbs for creating ideal sonic spaces.
With built-in dbx Type IV ^TM conversion, your digital recordings will preserve their dynamic range even when levels get too high. They'll acquire that forgiving, oversaturated quality once only found on big analog recorders. conversion actually gives you more headroom, capturing subtle details in higher level signals instead of hard clipping them.
Plus, the Lexicon I•ONIX FW810S adds a powerful hardware Mixer with integrated dbx dynamics (compresser, gate, limiter, EQ) to your digital audio workstation. The Mixer's true-to-life interface design feels familiar from the second you start it, making it easy to adjust levels, route signals through 10 inputs and 12 outputs, and apply and preview reverbs and dynamics. And the I•ONIX FW810S does the processing, so you can mix and fine tune your recordings in real time with zero latency. You can even save and load snapshots of mixer settings. Create up to five unique monitor mixes or mix 7.1 surround projects. Or assign the I•ONIX FW810S to start up with a snapshot.
With so many powerful and useful recording studio tools, it's more than just a FireWire interface. It's the Lexicon I•ONIX FW810S.
Features
dbx high-voltage, ultra low noise mic pre's on all 8 channels •
dbx dynamics (compressor, limiter, gate, EQ) on all 8 channels •
6 analog combi-jack inputs on the rear panel for mic/line inputs •
2 front panel combi-jacks accept mic, line, or instrument signals •
Type IV conversion feature emulates tape saturation at high levels •
Zero latency hardware mixer with dbx dynamics and hardware monitor • reverb
44.1 to 96KHz sample rates, 24 bit processing •
8 analog TRS outputs (7.1 surround capable) and stereo main (control • room) outs
Stereo S/PDIF digital I/O •
MIDI In and Out •
FireWire 400 connection to DAW •
Software suite includes Steinberg's Cubase LE 4, Toontrack EZ • Drummer lite, and Lexicon® Pantheon II reverb plug-in
Unpacking the Ionix FW810S
The Ionix FW810S is shipped in one carton, containing the Ionix FW810S unit and a software DVD for Windows ^® and Macintosh ^® systems. After unpacking, save all the packaging materials in case you ever have to ship the unit. Thoroughly inspect the Ionix FW810S and packing materials for signs of damage. Report any shipment damage to the carrier that delivered the product or dealer from whom you purchased the product at once.
the FOLLOWInG IteMS are IncLuDeD:
Ionix FW810S•
Installer DVD containing FireWire™ drivers, the FW810S Mixer software, the Lexicon Pantheon II reverb plug-in, Cubase LE 4 Recording Software, and ToonTrack EZ Drummer Lite for Mac® and Windows® FireWire Connector Cable
This Owner's Manual •
Lexicon Professional warranty registration•
NOTE: The full Cubase LE 4 manual and the FW810S Tutorial are located on the software DVD.
System Requirements
Powerful software for audio recording requires a powerful computer with the right operating system software, processor and memory. Most computers currently sold already meet these requirements, or can be upgraded to be compatible with the Lexicon I-ONIX FW810S. As with all such systems, adding more RAM than the minimum will allow you to do more processing and improve performance.
Windows® Vista, XP
Multicore system•
1GB RAM (Recommended)•
Display Resolution 1024 x 768 pixels•
• DVD-ROM drive
• Internet access required for software license activation
Mac®
- Intel ^ Multicore system
• 1 GB RAM (Recommended)
• OS X Version 10.4.9 or higher
Display Resolution 1024 x 768 pixels•
• DVD-ROM drive
• Internet access required for software license activation
Note: Adobe Reader is required to view the pdf documents on the DVD.
Front Panel

1. INPUTS 1 AND 2 (MIC/INST 1 AND MIC/INST 2)
These balanced inputs accept XLR or 1/4" connectors, and support mic, line, and instrument level sources (including guitars).
2. INSTRUMENT BUTTON/LED
Press when an instrument level source (such as a guitar) is connected to the corresponding input (1 or 2). The button illuminates when activated.
3. +48V BUTTON/LED
Each of these buttons enables the phantom power to the corresponding inputs pairs. Dynamic microphones do not require phantom power to operate, but are not harmed by it. Most condenser microphones do require phantom power to operate. If you are unsure about the phantom power requirements for your microphone, consult your microphone's documentation or contact the manufacturer. This switch should be OFF if you are connecting any line-level source to the Mic/Inst or Mic Pre jacks.
4. DYNAMICS LEDS AND INPUT LEVEL LEDS
The top three rows indicate what dynamics are active for each input. The bottom three rows indicate signal presence (green) and level (yellow and red) for each input.
5. FIREWIRE™ LED
Indicates when a FireWire ^TM connection is present.
6. POWER LED
Indicates when the I-ONIX FW810S is turned on.
7. GAIN KNOBS 1 AND 2
These knobs adjust the input gain levels for Mic/Inst 1 and Mic/Inst 2.
8. GAIN KNOBS 3 - 8
These knobs adjust the input gain levels for Mic Pre 3 - 8 (the inputs located on the back panel).
9. HEADPHONE OUTPUT JACK
Connect headphones here.
10. HEADPHONE LEVEL KNOB
Adjust headphone output signal level here.
11. MAIN OUTPUTS LEVEL KNOB
Adjust the main output signal level here.
Rear Panel

1. POWER SWITCH
Turn the I-ONIX FW810S on or off here.
2. POWER JACK
Standard 3-pin IEC power connector. 100-240V, 50-60Hz automatic switching to correct voltage range.
3. MIDI IN AND OUT
The MIDI jacks provide MIDI input and MIDI output to and from your computer. Connect your MIDI keyboards, sound modules, and external controllers here.
4. S/PDIF IN AND OUT
The S/PDIF in and out ports are unbalanced phono (RCA) connectors that transmit and receive either a 16-bit or 24-bit two-channel audio stream. S/PDIF ports may be found on many professional and consumer CD and digital audio recorders. It is recommended to use 75-Ohm coaxial cable for S/PDIF transfers and keep the cable length to a maximum of 10 meters to minimize interference and data dropout.
5. FIREWIRE™ PORTS
Connect FireWire ^TM cables here. Either port can be used, with the other acting as Thru.
Note: When daisy chaining devices, connect other I-ONIX FW810S units only. Do not connect other FireWire devices to the I-ONIX FW810S.
6. BALANCED OUTS 1-8
These outputs support balanced TRS or unbalanced TS 14 ” connections. These outputs can be connected to a mixing board, power amplifier, powered studio monitors, recorder, or another line level input.
7. MAIN OUTPUTS
These outputs support balanced TRS or unbalanced TS 14 ” connections. These outputs can be connected to a mixing board, power amplifier, powered studio monitors, recorder, or another line level input.
8. MIC/LINE INPUTS 3-8
These balanced inputs accept XLR or 1/4" connectors, and support mic and line level sources.
Connecting the I-ONIX FW810S
For a step-by-step example project, refer to the FW810S Tutorial.pdf file located on the DVD.
Microphones
Plug an XLR cable directly from a microphone into the desired Mic/Inst or Mic Pre input on the FW810S front or rear panel. If you connect a microphone to a front panel input, make sure the Instrument button/LED above the corresponding Gain knob is not lit. For example, if a microphone is connected to Mic/Inst 1, then the Instrument button/LED above the Gain 1 knob should not be lit.
If your microphone requires phantom power, first make sure the microphone is connected, then press the +48V button/LED above that input pair's Gain knob. If your mics don't need phantom power, it is best to leave it off.
Note: Some microphones can be damaged by +48V phantom power. Consult your microphone's documentation before enabling +48V phantom power.
Line Level Sources
Line level sources include keyboards, drum machines, CD players, and external microphone preamps and effects. Plug a 1/4" TS (unbalanced) or TRS (balanced) cable directly from the line level source into the desired Mic/Inst or Mic Pre input on the FW810S front or real panel.
If you connect a line level source to a front panel input, make sure the Instrument button/LED above the corresponding Gain knob is not lit. For example, if a line level source is connected to Mic/Inst 1, then the Instrument button/LED above the Gain 1 knob should not be lit.
Instruments
Front panel Mic/Inst jacks accept signals from instruments like electric guitars and basses. Plug a standard 1/4" TS (instrument) cable directly from the instrument into one of the Mic/Inst input jacks on the front panel of FW810S. Press the Instrument button/LED above the corresponding Gain knob (Gain 1 for Mic/Inst 1, Gain 2 for Mic/Inst 2).
Computer/Digital Audio Workstation (DAW)
Connect your computer's FireWire™ port to the FireWire port on the I-ONIX FW810S rear panel using a standard FireWire cable (included).
Headphones
Connect headphones to the Headphone jack located on the front panel. The Headphone jack accepts an 1/4" TRS connector. Adjust headphone volume with the Headphone Level knob.
Monitor Speakers
Using 14 " cables, connect the L/R Main Output jacks on the rear panel to the appropriate inputs on your mixer, power amp, or powered monitors. Adjust the output volume with the Output Level knob. Additional monitor mixes may be created on outputs 1-8 using the integrated hardware digital mixer.
Example Front Panel Connections

Example Rear Panel Connections
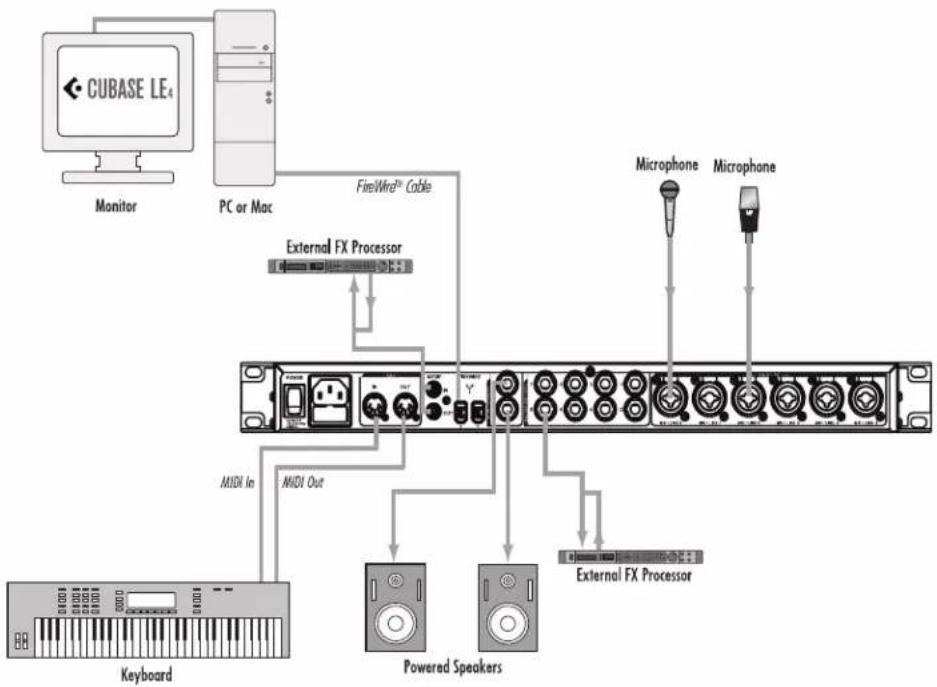
flowchart
graph TD
    A["CUBASE LE4"] --> B["Monitor"]
    B --> C["PC or Mac"]
    C --> D["FireWire Cable"]
    D --> E["External FX Processor"]
    E --> F["MIDI In"]
    E --> G["MIDI Out"]
    F --> H["Keyboard"]
    G --> I["Powered Speakers"]
    H --> J["External FX Processor"]
    I --> J
    K["Microphone"] --> L["Microphone"]
    style A fill:#f9f,stroke:#333
    style B fill:#ccf,stroke:#333
    style C fill:#cfc,stroke:#333
    style D fill:#fcc,stroke:#333
    style E fill:#ffc,stroke:#333
    style F fill:#cff,stroke:#333
    style G fill:#ffc,stroke:#333
    style H fill:#cfc,stroke:#333
    style I fill:#cfc,stroke:#333
    style J fill:#cfc,stroke:#333
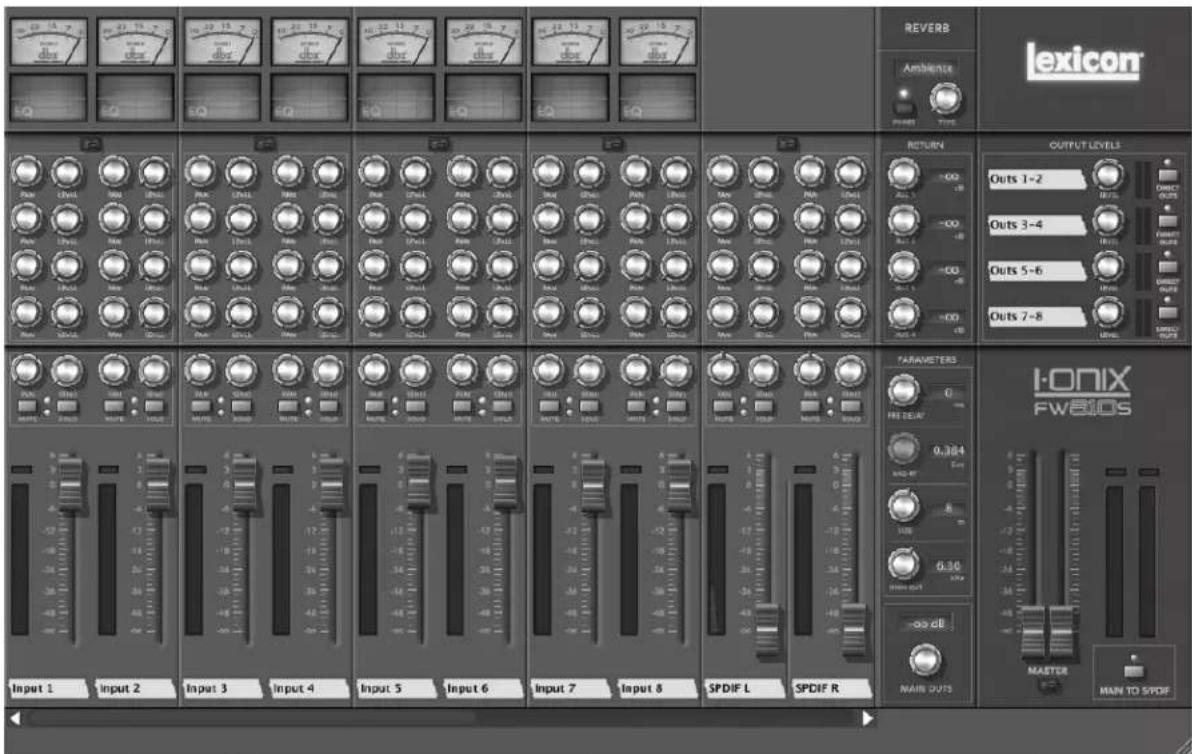
The I-ONIX FW810S includes a powerful hardware Mixer with a software control panel and built-in EQ, dynamics, and monitor reverbs. When open, the Mixer controls the I-ONIX FW810S hardware. The controls are described in more detail on the following pages, and a step-by-step example project can be found in the FW810S Tutorial.pdf file located on the DVD.
To turn a knob in the mixer, click and hold on a knob and move the cursor up to increase or down to decrease the parameter's value. To move a fader, click and hold on the fader and move the cursor up or down to move the fader up or down.
To return a knob to its default position, double click the knob. Ctrl-click to fine adjust.
Installation
Insert the DVD into your DVD-ROM drive.1.
The Installer should start automatically. Follow the on-screen instruc-2.tions to install the software you wish to use. The Mixer is included with the Drivers and Control Software.
Note: You must install the I-ONIX FW810S Drivers and Control Software to use the FW810S.
If the Installer doesn't start automatically, you can start it manually by opening the appropriate file on the DVD:
For Mac: Open Me
For Windows: InstallationMenu.exe
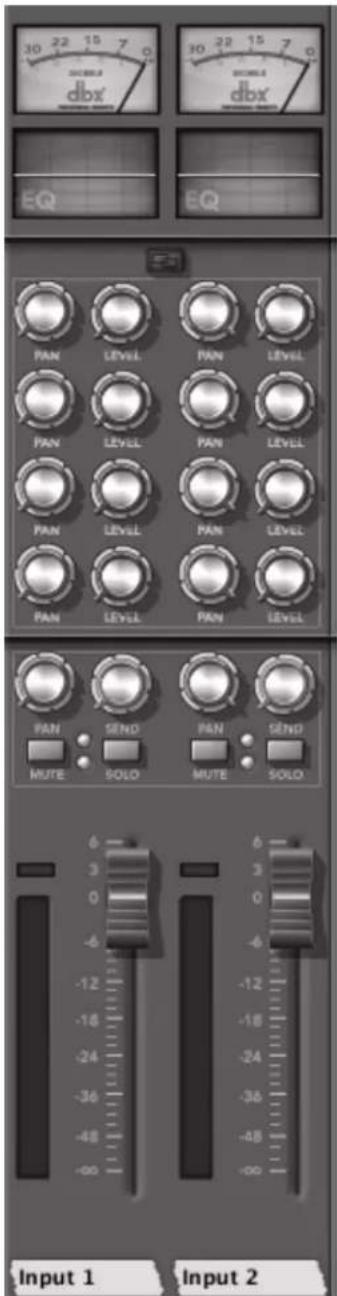
The Mixer - Input 1-8 Strips
Gain Reduction Meter/Button

Indicates the amount of gain reduction being applied. Click to open or close the Dynamics Control Panel (described on page 13).
EQ Indicator/Button

Shows the EQ line for the corresponding channel. Click to open or close the EQ (described on page 16).
Stereo button

Links two adjacent channels together in stereo. When linked, each strip's controls function as a pair; when you turn one strip's Level knob, for example, the other strip's Level knob automatically moves as well.
Pan
Positions the audio in the stereo field. The top four Pan knobs control their corresponding Aux pairs. The bottom Pan knob controls the Main outs.
Level
Adjusts the loudness of the signal for stereo aux bus outs 1&2, 3&4, 5&6, and 7&8.
Send
Sends the channel's signal to the monitor reverb (described on page 11).
Mute button
Silences the signal in the main mix for the selected channel (the aux and reverb levels are unaffected by this mute button).
Solo button
Silences all channels except this one. Note that multiple channels can be "soloed" simultaneously.
Pre-Fader Input Level Meter
Indicates the signal level for this channel.
Fader
Attenuates or adds gain to the signal in the main mix.
Label (Scribble Strip)
Double-click to enter a name for the channel here.
Monitor Reverbs
The Mixer includes monitor reverb feature (also known as a "courtesy" reverb) which can be applied to and mixed in with signals passing through the Mixer. The result can be heard through the Main outs as well as through the Aux outs.
Power button
Turns the reverb effect on or off.
Type knob
Selects the desired reverb: Ambience, Chamber, SmallHall, LargeHall, Room, SmallPlate, LargePlate, VocalHall, or VocalPlate.
Return knobs - Aux 1 through Aux 4
Adjusts the amount of reverb heard in the corresponding Aux out pair (when the reverb is turned on). For example, the Aux 1 Return knob increases or decreases the amount of reverb heard in Balanced Outs 1 and 2.
Parameters
These adjust various aspects of the reverb. Use the parameters to fine-tune reverbs to meet your needs.
Pre-Delay
This is a delay that's added to the diffused signal before it enters the main part of the reverb. For all intents, it may be considered as delay that is added to the reverberated signal. It is used to temporally separate the reverb from the dry signal.
Mid-RT
MidRT is the mid frequency reverb time. As such, it is one of the primary controls affecting the length of the reverb tail. At low values, it models a space with absorbent walls—a signal won't bounce many times before it dissipates. At high values, the walls are flat and extremely reflective. A signal lives a long time before dying away.
Size
Room Size corresponds roughly to the length of the longest wall of a rectangular room. When the room size is small, the “walls” of this space are closer together and the resultant reflection density increases. When the room size is large, that density decreases.
High-Cut
This parameter is a low-pass filter in the recirculating part of the reverb. It represents a frequency above which the tail dies away more quickly.
Main Outs
Adjusts the amount of reverb heard in the main outputs.


The Mixer - Balanced Out (Aux Out) Controls
These controls correlate to Balanced Outs 1-8 (located on the back panel). Outs 1-2 control Balanced Outs 1 and 2, Outs 3-4 control Balanced outs 3 and 4, and so on.
Labels (Scribble Strips)
Double-click to assign a name to an aux pair.
Level knobs
Adjusts the aux pair master signal level.
Meters
Indicate aux pair signal level.
Direct Outs buttons
Enable the DAW playback streams to go directly out the corresponding outputs. For example, when Direct Out is on for Outs 1-2, only playback 1-2 will be heard on Outs 1-2.
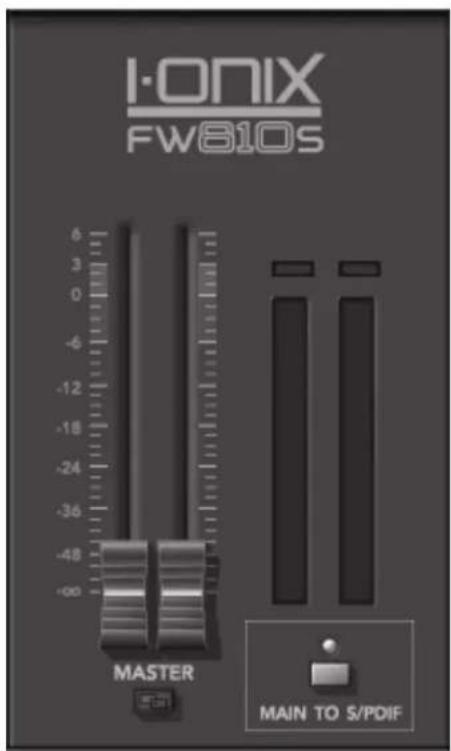
The Mixer - Master Faders
Meters
Indicate post-fader signal level.
Master faders
Attenuate or add gain to the main signal.
Stereo button
Links the two master faders together so their settings are always the same.
Main to S/PDIF button
Controls what signal is streamed out the SPDIF jack. When lit (on), the main mix is mirrored on the SPDIF jack. When not lit (off), the DAW SPDIF Out stream is sent to the SPDIF jack.
Channel Strip Dynamics
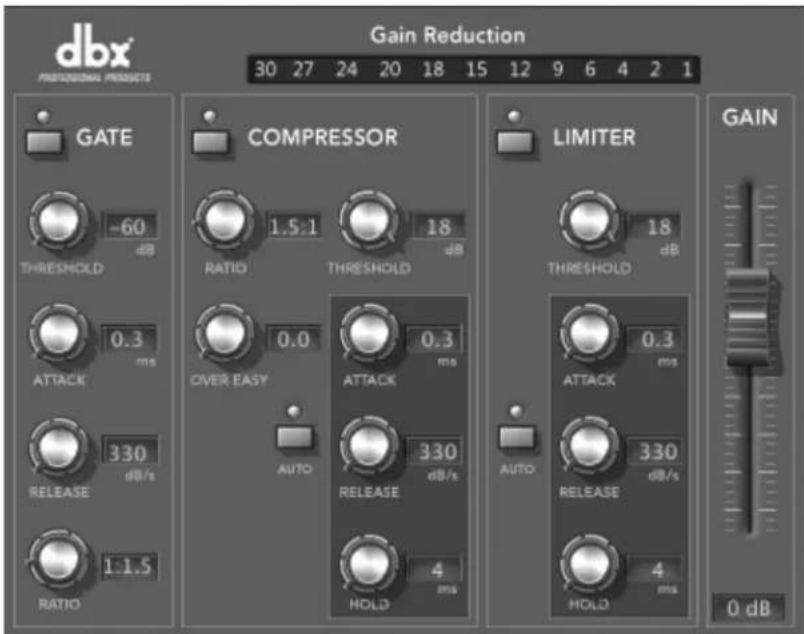
Inputs 1-8 in the Mixer feature Channel Strip Dynamics, including a gate, compressor, limiter, and a gain fader. To open the Channel Strip Dynamics, click the Gain Reduction meter/button at the top of the channel's "strip" in the Mixer.
The gate, compressor, limiter, and gain fader are described in detail on the following pages.
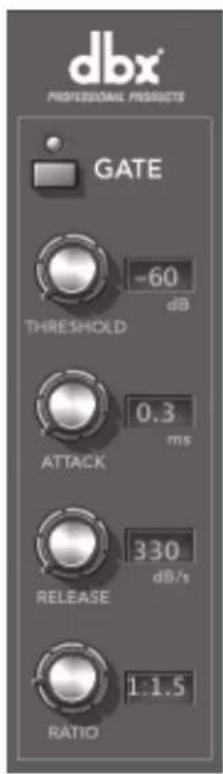

Channel Strip Dynamics – Gate
On/Off button
Turns the Gate on or off.
Threshold knob
Sets the Threshold level. If there is any signal above the Threshold, the Gate is Open, while a signal that is lower than the Threshold is attenuated. Beware of setting the Threshold too high as it can cut off the tail end of signals as they fade out (the sustain of a guitar note, a held piano chord, a reverb tail, etc.). The Threshold is adjustable between -60 and 18 dB.
Attack knob
The Attack parameter sets the speed at which the Gate opens once the Threshold has been crossed. It is recommended that very fast attack times be used to catch the fronts of transient signals. The Attack parameter is adjustable between 0.1 to 200 mSec.
Release knob
The Release sets the rate at which the gate “closes” or attenuates once the end of the Hold time is reached. Release can be adjusted between 350 and 5 dB/Sec.
Ratio knob
This control determines how much the signal will be attenuated once it drops below the Threshold. This ratio works opposite from that of the compressor or limiter. If a Ratio of 1:4 is selected, a signal that is 1dB below the threshold will be reduced in gain so that it becomes 4dB below the threshold. The Ratio is adjustable between 1:1 and 1:100.
Channel Strip Dynamics – Compressor
On/Off button
Turns the Compressor on or off.
Ratio knob
The Ratio is the rate at which the signal is reduced once the threshold is crossed. A 2:1 ratio means that if the incoming signal is 2dB over the threshold, the unit will compress the signal, and output a signal that only goes 1dB over the threshold. Setting the Ratio at Inf:1 makes the compressor act as a limiter. The range of the Ratio parameter is from 1:1 to 100:1.
Over Easy knob
OverEasy is a characteristic of dbx® Compressors and is essentially a “soft-knee” function that occurs at about the compression threshold. On analog dbx Compressors, OverEasy could only be turned on or off, but in the digital domain this parameter can have a range. This parameter can be adjusted between 0 and 10 where 0 corresponds to no OverEasy, and 10 corresponds to a very wide soft-knee region. To match the response of the classic dbx 160, an OverEasy of 6 is recommended.
Threshold knob
The Threshold is the signal level at which the unit begins to compress the signal. If the level is set to -10 dBFS, then any signal larger than -10 dBFS is compressed, and any signal that has a level that is lower than -10dBFS is
not. For most signals the most natural sound is achieved when most of the signal content remains just below the Threshold and only the peaks cross the Threshold. The range of the Threshold fader is -60 to +18dBFS.
Auto button
Auto mode dynamically sets the Attack, Hold, and Release parameters in real time, based on the incoming signal. This switch turns the Auto mode on and off.
Attack knob
The Attack parameter sets how quickly the compressor starts to compress the signal after it passes the threshold. The Attack can range between 0.1 mSec to 200 mSec. The Attack time is dynamically set while in Auto mode.
Release knob
The Release parameter is the rate at which the Compressor comes out of compression once the signal is back below the threshold and the Hold time has elapsed. Release is measured in dB per second. For example, if Release is set to 5 dB/Sec, and the signal has 10dB of gain reduction, the release time is 2 Seconds. The Release range is from 350 dB/Sec to 5 dB/Sec. The Release rate is dynamically set while in Auto mode.
Hold knob
The Hold parameter is the time the I-ONIX FW810S remains in compression after the signal has dropped back below the threshold. Hold is adjustable between 0 to 500 mSec and is dynamically set while in Auto mode.
Channel Strip Dynamics – Limiter
On/Off button
Turns the Limiter on or off.
Threshold knob
The Threshold is the signal level at which the unit begins to limit the signal. If the level is set to -10 dBFS, then any signal larger than -10 dBFS is reduced in gain. The range of the Threshold fader is -60 to +18dBFS.
Auto button
This button turns Auto mode for the Limiter on and off. Auto mode dynamically sets the Limiter Attack and Release based on the input signal.
Attack knob
The Attack parameter sets how quickly the Limiter starts to reduce the gain of the signal after it passes the Threshold. The Attack can range between 0.1 mSec and 200 mSec. The Attack time is dynamically set while in Auto mode.
Release knob
The Release parameter is the rate at which the Limiter comes out of gain reduction once the signal is back below the threshold and the Hold time has elapsed. Release is measured in dB per second. For example, if Release is set to 5 dB/Sec, and the signal has 10dB of gain reduction, the release time is 2 Seconds. The Release range is from 350 dB/Sec to 5 dB/Sec. The Release rate is dynamically set while in Auto mode.


Hold knob
The Hold parameter is the time the I-ONIX FW810S continues to reduce gain after the signal has dropped back below the threshold. Hold is adjustable between 0 and 500 mSec and is dynamically set while in Auto mode.
Channel Strip Dynamics – Gain Fader
This boosts or cuts the signal's gain level, and is adjustable between 20 and -30 dB. This is a digital trim designed to be used to compensate for the gain or reduction created by the Dynamics or EQ.
For example, if your compressor or limiter settings are reducing your signal level, you could increase the Gain fader to bring the level back up. Conversely, if your EQ settings are pushing levels into clipping territory, you could decrease the gain fader to lower the level.
EQ

Inputs 1-8 in the Mixer feature a parametric EQ where you can cut or boost selected frequency bands. You can edit parameters with the control knobs (described below), or you can click and drag the anchor points in the EQ's display (shown above). To open or close the EQ for a specific channel, click the EQ indicator/button just below the Gain Reduction meter/button for that channel.
Note: To return to flat, set all knobs to 12 o'clock (double-click a knob to return it to 12 o'clock).
Lo Shelf - top knob (-12 dB to 12 dB)
Sets the overall gain of the low shelf frequency.
Lo Shelf - bottom knob (40 Hz to 320 KHz)
Selects the frequency of the low shelf.
Lo Mid - top knob (-12 dB to 12 dB)
Sets the overall gain of the low mid frequency.
Lo Mid - middle knob (160 Hz to 1280 Hz)
Selects the frequency of the low mid.
Lo Mid - bottom knob (.5 to 4.0)
Sets the "Q" or width of the band.
Hi Mid - top knob (-12 dB to 12 dB)
Sets the overall gain of the high mid frequency.
Hi Mid - middle knob (640 Hz to 5120 Hz)
Selects the frequency of the high mid.
Hi Mid - bottom knob (.5 to 4.0)
Sets the "Q" or width of the band.
Hi Shelf - top knob (-12 dB to 12 dB)
Sets the overall gain of the high shelf frequency.
Hi Shelf - bottom knob (2500 Hz to 20 KHz)
Selects the frequency of the high shelf.
On/Off button
Turns the EQ on or off.
File Menu
The File menu lets you save and load snapshots. Snapshots are files (with the extension .mix) that contain settings for the Dynamics, EQ, Aux buses, pans, reverb, and levels.
Open Snapshot
Opens a previously saved snapshot.
Save Snapshot
Saves the current settings as a snapshot. If the snapshot already has been saved and named, this command will overwrite the existing snapshot.
Save Snapshot As
Saves the current settings as a snapshot and prompts you for a file name.
Load Power-On Defaults
Applies the stored power-on defaults (settings) to the I-ONIX FW810S unit.
Store Power-On Defaults
Saves the current snapshot settings and applies them to the I-ONIX FW810S unit each time it is turned on. You can use this to make a custom snapshot, save it as the default, and use the FW810S as a stand-alone digital mixer without a computer.
Quit
Closes the Mixer.
| Open Snapshot | ⌘O |
| Save Snapshot | ⌘S |
| Save Snapshot As... | |
| Load Power-On DefaultsStore Power-On Defaults | |
| Quit | ⌘Q |

Control Panel - Windows
Ionix FW810S Control Panel
If you're using a Mac ^® , you can set the Sample Rate (44.1 kHz, 48kHz, 88.2kHz, or 96kHz) and the Sync Source (Internal or SPDIF) using the Audio MIDI Setup application (located in Applications/Utilities) and your DAW.
In Windows ^® , you can adjust these settings via the Driver Control Panel, accessed through the Start menu. In addition to the Sample Rate and Sync Source parameters, the Driver Control Panel in Windows includes a Buffer Size setting, which controls the size of audio buffers used to stream audio between the FW810S and your computer. Larger settings give you additional latency and stability. If you experience pops and clicks in the audio, try larger buffer settings.
Specifications
Microphone Inputs: Female XLR Pin 2 Hot
Input Impedance: 3kΩ balanced
Phantom Power: +48 Volts
Maximum gain: +55 dB
E.I.N. (at max gain): -127 dB @ 55dB gain typical (150Ω source) -130 dB @ 55dB gain typical A-weighted (150Ω source)
Maximum Input Level: +8 dBu
Frequency Response: +/-1.5 dB, 20Hz - 20kHz
THD+N: <0.02%, 20Hz - 20kHz
<0.002%, 1kHz, -6 dBu
Line Inputs: 1/4" TRS balanced or unbalanced
Input Impedance: 20kΩ balanced, 13kΩ unbalanced
Maximum Input Level: +22 dBu
Frequency Response: +/-1.5 dB, 20Hz - 20kHz
THD+N: <0.02%, 20Hz - 20kHz
<0.002%, 1kHz, +18 dBu
Instrument Input: 1/4" TS unbalanced
Input Impedance: 500kΩ
Maximum Input Level: +10 dBu
Frequency Response: +/-2.5 dB, 20Hz - 20kHz
THD+N: <0.08%, 1kHz, +4 dBu
Line Outputs: 1/4" TRS balanced or unbalanced
Level: +20 dBu maximum
Impedance: 32Ω Balanced, 16Ω Unbalanced
Headphone Output: 1/4" stereo jack 250mΩ per channel at 50Ω
MIDI Interface: 5 pin DIN connectors for MIDI in and MIDI out
Sample Rate: 44.1, 48, 88.2, or 96 kHz (determined by computer application)
Dynamic Range: A/D (24 Bit) 110 dB typical, A-weighted, 20Hz - 20kHz
D/A (24 Bit) 110 dB typical, A-weighted, 20Hz - 20kHz
A/D/A (24 Bit) 108 dB typical, A-weighted, 20Hz - 20kHz
Power Requirements: 100 - 240 VAC, 50/60 Hz, 30 Watts
Dimensions: 19"W x 1.7"H x 10.5"D
Weight: 7.7 lbs.
Lexicon engineers are constantly working to improve the quality of our products. Specifications are therefore subject to change without notice.

Harman Music Group
8760 South Sandy Parkway | Sandy, Utah 84070
U.S.A.
Phone: (801)-568-7660 | Fax: (801)-568-7662
I-ONIX FW810S
Questions or comments?
Email us at: customer@lexiconpro.com
or visit us online at www.lexiconpro.com

- IMPORTANT SAFETY INSTRUCTIONS
- SafetY InStructlOnS
- WARNING FOR YOUR PROTECTION PLEASE READ THE FOLLOWING:
- DecLaratlOn Of cOnfOrMltY
- eElectrOMaGnetlc cOMPatIBILItY
- U.K. MAINS PLUG WARNING
- Service Info
- Warranty
- Table of Contents
- INTRODUCTION .... 1
- FRONT PANEL 3
- REAR PANEL 5
- CONNECTING THE I-ONIX FW810S 7
- THE I-ONIX FW810S MIXER - OVERVIEW 9
- SPECIFICATIONS 19
- Introduction
- Features
- Unpacking the Ionix FW810S
- the FOLLOWInG IteMS are IncLuDeD:
- System Requirements
- Windows® Vista, XP
- Mac®
- Front Panel
- INPUTS 1 AND 2 (MIC/INST 1 AND MIC/INST 2)
- INSTRUMENT BUTTON/LED
- +48V BUTTON/LED
- DYNAMICS LEDS AND INPUT LEVEL LEDS
- FIREWIRE™ LED
- POWER LED
- GAIN KNOBS 1 AND 2
- GAIN KNOBS 3 - 8
- HEADPHONE OUTPUT JACK
- HEADPHONE LEVEL KNOB
- MAIN OUTPUTS LEVEL KNOB
- Rear Panel
- POWER SWITCH
- POWER JACK
- MIDI IN AND OUT
- S/PDIF IN AND OUT
- FIREWIRE™ PORTS
- BALANCED OUTS 1-8
- MAIN OUTPUTS
- MIC/LINE INPUTS 3-8
- Connecting the I-ONIX FW810S
- Microphones
- Line Level Sources
- Instruments
- Computer/Digital Audio Workstation (DAW)
- Headphones
- Monitor Speakers
- Installation
- The Mixer - Input 1-8 Strips
- Pan
- Level
- Send
- Mute button
- Solo button
- Pre-Fader Input Level Meter
- Fader
- Label (Scribble Strip)
- Monitor Reverbs
- Power button
- Type knob
- Return knobs - Aux 1 through Aux 4
- Parameters
- Pre-Delay
- Mid-RT
- Size
- High-Cut
- Main Outs
- The Mixer - Balanced Out (Aux Out) Controls
- Labels (Scribble Strips)
- Level knobs
- Meters
- Direct Outs buttons
- The Mixer - Master Faders
- Master faders
- Stereo button
- Main to S/PDIF button
- Channel Strip Dynamics
- Channel Strip Dynamics – Gate
- Channel Strip Dynamics – Compressor
- Auto button
- Attack knob
- Release knob
- Hold knob
- Channel Strip Dynamics – Limiter
- On/Off button
- Threshold knob
- Channel Strip Dynamics – Gain Fader
- EQ
- File Menu
- Open Snapshot
- Save Snapshot
- Save Snapshot As
- Load Power-On Defaults
- Store Power-On Defaults
- Quit
- Ionix FW810S Control Panel
- Specifications
Brand : LEXICON
Model : I-ONIX FW810S
Category : Audio Equipment