
DN168125XB - Refrigerator BEKO - Free user manual and instructions
Find the device manual for free DN168125XB BEKO in PDF.


| Product Type | Refrigerator |
| Brand | Beko |
| Model | DN168125XB |
| Total Net Capacity | 280 L |
| Fridge Net Capacity | 200 L |
| Freezer Net Capacity | 80 L |
| Energy Class | A+ |
| Annual Energy Consumption | 250 kWh |
| Climate Class | SN-ST |
| Noise Level | 42 dB |
| Dimensions (H x W x D) | 1770 x 560 x 545 mm |
| Weight | 55 kg |
| Power Supply | 220-240 V, 50 Hz |
| Refrigerant | R600a |
| Functions | Frost Free, LED Lighting, Reversible Doors, Adjustable Shelves |
| Maintenance & Cleaning | Clean condenser annually; defrost freezer manually |
| Safety | Do not store flammable materials; keep ventilation openings clear |
| Spare Parts & Repairability | Spare parts available through Beko service centers |
| General Information | Includes 1-year warranty; user manual available online |
Frequently Asked Questions - DN168125XB BEKO
User questions about DN168125XB BEKO
0 question about this device. Answer the ones you know or ask your own.
Ask a new question about this device
Download the instructions for your Refrigerator in PDF format for free! Find your manual DN168125XB - BEKO and take your electronic device back in hand. On this page are published all the documents necessary for the use of your device. DN168125XB by BEKO.
USER MANUAL DN168125XB BEKO
natural_image
Simple line drawing of a pear and a carrot (no text or symbols)DN161220-DN162220X-DN162220-DN168125XB
Please read this user manual first!
Dear Customer,
We hope that your product, which has been produced in modern plants and checked under the most meticulous quality control procedures, will provide you an effective service.
Therefore, read this entire user manual carefully before using the product and keep it as a reference. If you handover the product to someone else, give the user manual as well.
The user manual will help you use the product in a fast and safe way.
- Read the manual before installing and operating the product.
• Make sure you read the safety instructions.
- Keep the manual in an easily accessible place as you may need it later.
- Read the other documents given with the product.
Remember that this user manual is also applicable for several other models. Differences between models will be identified in the manual.
Explanation of symbols
Throughout this user manual the following symbols are used:
i Important information or useful tips.
⚠ Warning against dangerous conditions for life and property.
⚠ Warning against electric voltage.
1 Your Refrigerator 3
2 Important Safety Warnings 4
Intended use ....4
General safety 4
For products with a 8
water dispenser; 8
Child safety 9
Compliance with WEEE Directive and Disposing of the Waste Product: .....9
Package information ......9
HC warning ......9
Things to be done for energy saving 10
Recommendations for the fresh food compartment ....10
3 Installation 11
Points to be paid attention to when the relocation of the refrigerator .....11
Electrical connection .....11
Disposing of the packaging .....12
Disposing of your old refrigerator .....12
Placing and Installation .....12
Adjusting the legs 13
Changing the illumination lamp .....13
Door Open Warning 13
4 Preparation 14
5 Using your refrigerator 15
Indicator panel 15
Indicator panel 17
Temperature setting button .....26
Setting the temperature of your refrigerator 26
Dual cooling system ......26
Recommendations for preservation of frozen food ....27
Defrosting 27
Placing the food 27
Deep-freeze information .....28
Egg section ......28
Description and cleaning of odor filter 29
Water Dispenser 30
Blue light 32
Sliding storage container ....32
Rotary storage container ....33
Auto Icematic 34
Icematic and ice storage container ..35
Making ice 36
Humidity-controlled crisper (Ever Fresh) 36
Ice-cream machine ....38
6 Maintenance and cleaning 40
Protection of plastic surfaces .....40
7Troubleshooting 41
1 Your Refrigerator

- Door shelves of the freezer compartment
- Temperature setting indicator
- Egg section
- Water dispenser filling tank
- Water dispenser reservoir
- Door shelves of fridge compartment
- Sliding and rotary storage containers
- Blue light
- Adjustable legs
- Crisper
- Crisper cover
- Breakfast compartment
- Bottle shelf
Figures in this user manual are schematic and may not correspond exactly to you product. If the subject parts are not included in the product you have purchased, then it is valid for other models.
- Odor filter
- Glass shelves of fridge compartment
- Illumination glass
- Impeller
- Automatic Icematic water tank
- Icebox
- Ice storage container
- Freezer compartment glass shelf
- Ice-cream making machine / Quick Freeze compartment
- Freezer compartment
- Fridge compartment
\*optional
2 Important Safety Warnings
Please review the following information. Failure to observe this information may cause injuries or material damage. Otherwise, all warranty and reliability commitments will become invalid.
The service life of your product is 10 years. During this period, original spare parts will be available to operate the product properly.
Intended use
This product is intended to be used
• indoors and in closed areas such as homes;
- in closed working environments such as stores and offices;
- in closed accommodation areas such as farm houses, hotels, pensions.
- It should not be used outdoors.
General safety
- When you want to dispose/scrap the product, we recommend you to consult the authorized service in order to learn the required information and authorized bodies.
- Consult your authorized service for all your questions and problems related to the refrigerator. Do not intervene or let someone intervene to the refrigerator without notifying the authorised services.
- For products with a freezer compartment; Do not eat cone ice cream and ice cubes immediately after you take them out of the freezer compartment! (This may cause frostbite in your mouth.)
- For products with a freezer compartment; Do not put bottled and canned liquid beverages in the freezer compartment.
Otherwise, these may burst.
- Do not touch frozen food by hand; they may stick to your hand.
- Unplug your refrigerator before cleaning or defrosting.
- Vapor and vaporized cleaning materials should never be used in cleaning and defrosting processes of your refrigerator. In such cases, the vapor may get in contact with the electrical parts and cause short circuit or electric shock.
- Never use the parts on your refrigerator such as the door as a means of support or step.
- Do not use electrical devices inside the refrigerator.
- Do not damage the parts, where the refrigerant is circulating, with drilling or cutting tools. The refrigerant that might blow out when the gas channels of the evaporator, pipe extensions or surface coatings are punctured
causes skin irritations and eye injuries.
- Do not cover or block the ventilation holes on your refrigerator with any material.
- Electrical devices must be repaired by only authorised persons. Repairs performed by incompetent persons create a risk for the user.
- In case of any failure or during a maintenance or repair work, disconnect your refrigerator’s mains supply by either turning off the relevant fuse or unplugging your appliance.
- Do not pull by the cable when pulling off the plug.
- Ensure highly alcoholic beverages are stored securely with the lid fastened and placed upright.
- Never store spray cans containing flammable and explosive substances in the refrigerator.
- Do not use mechanical devices or other
means to accelerate the defrosting process, other than those recommended by the manufacturer.
- This product is not intended to be used by persons with physical, sensory or mental disorders or unlearned or inexperienced people (including children) unless they are attended by a person who will be responsible for their safety or who will instruct them accordingly for use of the product
- Do not operate a damaged refrigerator. Consult with the service agent if you have any concerns.
- Electrical safety of your refrigerator shall be guaranteed only if the earth system in your house complies with standards.
- Exposing the product to rain, snow, sun and wind is dangerous with respect to electrical safety.
- Contact authorized service when there is a power cable damage to avoid danger.
- Never plug the refrigerator into the wall outlet during installation. Otherwise, risk of death or serious injury may arise.
- This refrigerator is intended for only storing food items. It must not be used for any other purpose.
- Label of technical specifications is located on the left wall inside the refrigerator.
- Never connect your refrigerator to electricity-saving systems; they may damage the refrigerator.
- If there is a blue light on the refrigerator, do not look at the blue light with optical tools.
- For manually controlled refrigerators, wait for at least 5 minutes to start the refrigerator after power failure.
- This operation manual should be handed in to the new owner of the product when it is given to others.
- Avoid causing damage on power cable when transporting the refrigerator. Bending cable may cause fire. Never place heavy objects on power cable. Do not touch the plug with wet hands when plugging the product

natural_image
Diagram showing a device with a lightning bolt and wiring, no text or symbols present- Do not plug the refrigerator if the wall outlet is loose.
• Water should not be sprayed on inner or outer parts of the product for safety purposes. - Do not spray substances containing inflammable gases such as propane gas near the refrigerator
to avoid fire and explosion risk.
- Never place containers filled with water on top of the refrigerator; in the event of spillages, this may cause electric shock or fire.
- Do not overload the refrigerator with food. If overloaded, the food items may fall down and hurt you and damage refrigerator when you open the door.
- Never place objects on top of the refrigerator; otherwise, these objects may fall down when you open or close the refrigerator's door.
- As they require a precise temperature, vaccines, heat-sensitive medicine and scientific materials and etc. should not be kept in the refrigerator.
- If not to be used for a long time, refrigerator should be unplugged. es A possible problem in power cable may cause fire.
- The plug's tip should be cleaned regularly with a dry cloth; otherwise, it may cause fire.
- Refrigerator may move if adjustable legs are not properly secured on the floor. Properly securing adjustable legs on the floor can prevent the refrigerator to move.
- When carrying the refrigerator, do not hold it from door handle. Otherwise, it may be snapped.
- When you have to place your product next to another refrigerator or freezer, the distance between devices should be at least 8cm. Otherwise, adjacent side walls may be humidified.
- The product shall never be used while the compartment which is located at the top or back of your product and in which electronic boards are available (electronic board box cover) (1) is open.

natural_image
Technical line drawing of a mechanical assembly with a base plate and housing (no text or symbols)
natural_image
Simple line drawing of a rectangular frame with a numbered label '1' on the left side (no other text or symbols)For products with a water dispenser;
Pressure for cold water inlet shall be maximum 90 psi (6.2 bar). If your water pressure exceeds 80 psi (5.5 bar), use a pressure limiting valve in your mains system. If you do not know how to check your water pressure, ask for the help of a professional plumber.
- If there is risk of water hammer effect in your installation, always use a water hammer prevention equipment in your installation.
Consult Professional plumbers is you are not sure that there is no water hammer effect in your installation.
- Do not install on the hot water inlet. Take precautions against of the risk of freezing of the hoses. Water temperature operating interval shall be 33^ F ( 0.6^ C) minimum and 100^ F ( 38^ C) maximum.
• Use only potable water.
Child safety
- If the door has a lock, the key should be kept away from reach of children.
• Children must be supervised to prevent them from tampering with the product.
Compliance with WEEE Directive and Disposing of the Waste Product:

natural_image
Pure electrical circuit lines without any symbolsThis product complies with EU WEEE Directive (2012/19/EU). This product bears a classification symbol for waste electrical and electronic equipment (WEEE).
This product has been manufactured with high quality parts and materials which can be reused and are suitable for recycling. Therefore, do not dispose the product with normal domestic waste at the end of its service life. Take it to a collection point for the recycling of electrical and electronic equipment. Please consult your local authorities to learn the nearest collection point. Help protect the environment and natural resources by recycling used products. For children's safety, cut the power cable and break the locking mechanism of the door, if any, so that it will be non-functional before disposing of the product.
Package information
Packaging materials of the product are manufactured from recyclable materials in accordance with our National Environment Regulations. Do not dispose of the packaging materials together with the domestic or other wastes. Take them to the packaging material collection points designated by the local authorities.
Do not forget...
Any recycled substance is an indispensable matter for nature and our national asset wealth.
If you want to contribute to the re-evaluation of the packaging materials, you can consult to your environmentalist organizations or the municipalities where you are located.
HC warning
If your product's cooling system contains R600a:
This gas is flammable. Therefore, pay attention to not damaging the cooling system and piping during usage and transportation. In the event of damage, keep your product away from potential fire sources that can cause the product catch a fire and ventilate the room in which the unit is placed.
Recommendations for the fresh food compartment
\*optional
Do not allow the food to touch the temperature sensor in fresh food compartment. To allow the fresh food compartment keep its ideal storage temperature, sensor must not be hindered by food.
Do not place hot foods in the product.
Ignore this warning if your product's cooling system contains R134a.
Type of gas used in the product is stated in the type label which is on the left wall inside the refrigerator.
Never throw the product in fire for disposal.
Things to be done for energy saving
- Do not leave the doors of your refrigerator open for a long time.
- Do not put hot food or drinks in your refrigerator.
- Do not overload your refrigerator so that the air circulation inside of it is not prevented.
- Do not install your refrigerator under direct sunlight or near heat emitting appliances such as ovens, dishwashers or radiators. Keep your refrigerator at least 30cm away from heat emitting sources and at least 5cm from electrical ovens.
- Pay attention to keep your food in closed containers.
- For products with a freezer compartment; You can store maximum amount of food items in the freezer when you remove the shelf or drawer of the freezer. Energy consumption value stated for your refrigerator has been determined by removing freezer shelf or drawer and under maximum load. There is no harm to use a shelf or drawer according to the shapes and size of food to be frozen.
- Thawing frozen food in fridge compartment will both provide energy saving and preserve the food quality.
3 Installation
In case the information which are given in the user manual are not taken into account, manufacturer will not assume any liability for this.
Points to be paid attention to when the relocation of the refrigerator
- Your refrigerator should be unplugged. Before transportation of your refrigerator, it should be emptied and cleaned.
- Before it is re-packaged, shelves, accessories, crisper, etc. inside your refrigerator should be fixed with adhesive tape and secured against impacts. Package should be bound with a thick tape or sound ropes and the transportation rules on the package should be strictly observed.
- Original packaging and foam materials should be kept for future transportations or moving.
Before you start the refrigerator, Check the following before you start to use your refrigerator:
-
Attach 2 plastic wedges as illustrated below. Plastic wedges are intended to keep the distance which will ensure the air circulation between your refrigerator and the wall. (The picture is drawn up as a representation and it is not identical with your product.)
-
Clean the interior of the refrigerator as recommended in the "Maintenance and cleaning" section.
-
Connect the plug of the refrigerator to the wall socket. When the fridge door is opened, fridge internal lamp will turn on.

natural_image
Technical line drawing of a computer monitor rear panel showing vented seating and mounting points (no text or symbols)
natural_image
Illustration of a hand using a screwdriver to adjust or install a computer socket (no text or symbols visible)-
When the compressor starts to operate, a sound will be heard. The liquid and gases sealed within the refrigeration system may also give rise to noise, even if the compressor is not running and this is quite normal.
-
Front edges of the refrigerator may feel warm. This is normal. These areas are designed to be warm to avoid condensation.
Electrical connection
Connect your product to a grounded socket which is being protected by a fuse with the appropriate capacity.
Important:
The connection must be in compliance with national regulations.
- The power plug must be easily accessible after installation.
-
Electrical safety of your refrigerator shall be guaranteed only if the earth system in your house complies with standards.
-
The voltage stated on the label located at left inner side of your product should be equal to your network voltage.
- Extension cables and multi plugs must not be used for connection.
A damaged power cable must be replaced by a qualified electrician.
⚠️ Product must not be operated before it is repaired! There is the risk of electric shock!
Disposing of the packaging
The packing materials may be dangerous for children. Keep the packing materials out of the reach of children or dispose of them by classifying them in accordance with the waste instructions stated by your local authorities. Do not throw away with regular house waste, throw away on packaging pick up spots designated by the local authorities.
The packing of your refrigerator is produced from recyclable materials.
Disposing of your old refrigerator
Dispose of your old refrigerator without giving any harm to the environment.
- You may consult your authorized dealer or waste collection center of your municipality about the disposal of your refrigerator.
Before disposing of your refrigerator, cut out the electric plug and, if there are any locks on the door, make them inoperable in order to protect children against any danger.
Placing and Installation
⚠️ If the entrance door of the room where the refrigerator will be installed is not wide enough for the refrigerator to pass through, then call the authorized service to have them remove the doors of your refrigerator and pass it sideways through the door.
- Install your refrigerator to a place that allows ease of use.
- Keep your refrigerator away from heat sources, humid places and direct sunlight.
- Do not place your product on the materials such as rug or carpet.
- Place your refrigerator on an even floor surface to prevent jolts.
- Your product requires adequate air circulation to function efficiently. If the product will be placed in an alcove, remember to leave at least 5 cm clearance between the product and the ceiling, rear wall and the side walls.
- If the product will be placed in an alcove, remember to leave at least 5 cm clearance between the product and the ceiling, rear wall and the side walls. Check if the rear wall clearance protection component is present at its location (if provided with the product). If the component is not available, or if it is lost or fallen, position the product so that at least 5 cm clearance shall be left between the rear surface of the product and the wall of the room. The clearance at the rear is important for efficient operation of the product.
Adjusting the legs
If your refrigerator is unbalanced;
You can balance your refrigerator by turning its front legs as illustrated in the figure. The corner where the leg exists is lowered when you turn in the direction of black arrow and raised when you turn in the opposite direction. Taking help from someone to slightly lift the refrigerator will facilitate this process.

natural_image
Diagram showing a rectangular structure with upward and downward arrows indicating motion or force directions, surrounded by curved arrows (no text or symbols)Changing the illumination lamp
To change the Bulb/LED used for illumination of your refrigerator, call your AuthorisedService.
The lamp(s) used in this appliance is not suitable for household room illumination. The intended purpose of this lamp is to assist the user to place foodstuffs in the refrigerator/freezer in a safe and comfortable way. The lamps used in this appliance have to withstand extreme physical conditions such as temperatures below -20 °C.
(only chest and upright freezer)
Door Open Warning
\*May not be available in all models
An audio warning signal will be given when the door of your product is left open for at least 1 minute. This warning will be muted when the door is closed or any of the display buttons (if any) are pressed.
4 Preparation
- Your cooler/freezer should be installed at least 30 cm away from heat sources such as hobs, ovens, central heater and stoves and at least 5 cm away from electrical ovens and should not be located under direct sunlight.
- Please make sure that the interior of your cooler/freezer is cleaned thoroughly.
- If two coolers are to be installed side by side, there should be at least 2 cm distance between them.
- When you operate your cooler/freezer for the first time, please observe the following instructions during the initial six hours.
- Its door should not be opened frequently.
- It must be operated empty without placing any food in it.
- Do not unplug your cooler/freezer. If a power failure occurs out of your control, please see the warnings in the “Recommended solutions for the problems” section.
- The baskets/drawers that are provided with the chill compartment must always be in use for low energy consumption and for better storage conditions.
- Food contact with the temperature sensor in the freezer compartment may increase energy consumption of the appliance. Thus any contact with the sensor(s) must be avoided.
- This product has been designed to function at ambient temperatures up to 43 °C (90 SDgrF). Even if the ambient temperature falls to -15 °C, frozen food in the freezer does not thaw thanks to its Advanced Electronic Temperature Control System. For the first installation, the product should NOT be placed under
low ambient temperatures. This is because the freezer cannot go down to standard operation temperature. When reaching continuous operation, the product can be moved to another place. Thus, later you can place your product in the garage or an unheated room without the concern of causing frozen food to get rotten. However, it is likely that above mentioned low temperatures may cause the freezing of the food in the fridge compartment; thus, please consume the food items in the fridge in a controlled way as needed. When ambient temperature goes back to normal, you may change button setting according to your need.
If the ambient temperature is below 0^ C, the food in fridge compartment will freeze. Therefore, we recommend not using the fridge compartment in such low ambient temperatures. You may continue to use the freezer compartment as usual.
- In some models, the instrument panel automatically turns off 5 minutes after the door has closed. It will be reactivated when the door has opened or pressed on any key.
- Due to temperature change as a result of opening/closing the product door during operation, condensation on the door/body shelves and the glass containers is normal.
5 Using your refrigerator
Indicator panel
Indicator panels may vary depending on the model of your product.
Audial and visual functions of the indicator panel will assist in using the product.

- Cooler compartment indicator
- Error status indicator
- Temperature indicator
- Vacation function button
- Temperature adjustment button
- Compartment selection button
- Cooler compartment indicator
- Economy mode indicator
- Vacation function indicator
*optional
Figures in this user manual are schematic and may not correspond exactly to you product. If the subject parts are not included in the product you have purchased, then it is valid for other models.
1. Cooler compartment indicator
The cooler compartment light will turn on when adjusting the cooler compartment temperature.
2. Error status indicator
This sensor will activate if the refrigerator is not cooling adequately or in case of sensor fault. When this indicator is active, the freezer compartment temperature indicator will display "E" and the cooler compartment temperature indicator will display "1, 2, 3..." etc. numbers.
The numbers on the indicator serve to inform the service personnel about the fault. (!)
3. Temperature indicator
Indicates the temperature of the freezer and cooler compartments.
4. Vacation function button
To activate this function, press and hold the Vacation button for 3 seconds. When the Vacation function is active, the cooler compartment temperature indicator displays the inscription "-" and no cooling process will be active in the cooling compartment.
This function is not suitable to keep food in the cooler compartment. Other compartments will remain cooled with the respective temperature set for each compartment.
Push the vacation function button again to cancel this function. (###)
5. Temperature adjustment button
Respective compartment's temperature varies in -24°C..... -18°C and 8°C...1°C ranges.
6. Compartment selection button
Use the refrigerator compartment selection button to toggle between the cooler and freezer compartments.☐)
7. Cooler compartment indicator
The freezer compartment light will turn on when adjusting the cooler compartment temperature.
8. Economy mode indicator
Indicates the refrigerator is running on energy-saving mode. This indicator will be active when the temperature in the freezer compartment is set to -18^ . (⑧)
9. Vacation function indicator
Indicates the vacation function is active.(
Indicator panel
Indicator panels may vary depending on the model of your product.
Audial and visual functions of the indicator panel will assist in using the product.

- Freezer Compartment Temperature Setting Indicator
- Freezer Compartment Temperature Setting Button
- Fridge Compartment Temperature Setting Indicator
- Fridge Compartment Temperature Setting Button
- Economy Mode Indicator
- Ionizer Indicator
- Error Status Indicator
*optional
Figures in this user manual are schematic and may not correspond exactly to you product. If the subject parts are not included in the product you have purchased, then it is valid for other models.
1. Freezer Compartment Temperature Setting Indicator
Indicates the temperature set for freezer compartment.
2. Freezer Compartment Temperature Setting Button
Press this button to set the temperature of the freezer compartment to -18, -20, -22, -24, -18... respectively. Press this button to set the desired temperature for the freezer compartment.
3. Fridge Compartment Temperature Setting Indicator
Indicates the temperature set for Fridge compartment.
4. Fridge Compartment Temperature Setting Button
Press this button to set the temperature of the fridge compartment to 8, 6, 4, 2, 8... respectively. Press this button to set the desired temperature for the fridge compartment.
5. Economy Mode Indicator
Indicates that the refrigerator is running in energy-efficient mode.
6- Ionizer Indicator
Indicator light lights up continuously. This light indicates that your refrigerator is protected against the bacteria.
7. Error Status Indicator
If your refrigerator does not cool adequately or if there is a sensor failure, this indicator will be activated. When this indicator is active, Freezer Compartment Temperature indicator will display "e" and Fridge Compartment Temperature Indicator will display numbers such as "1,2,3...". These numbers on the indicator provide information about the error to the service personnel.

- Cooler temperature adjustment button
- Keypad lock button
- Freezer compartment temperature adjustment button
- Error status indicator
- Keypad lock indicator
- Eco extra function indicator
- Eco extra / vacation button
- Vacation function indicator
-
Icematic closed indicator (*In some models)
-
Economic use indicator
- Fast freeze function indicator
- Fast freeze function button/Icematic turn on-off button
- Freezer compartment temperature indicator
- Rapid cooling function
- Cooler compartment temperature indicator
- Rapid cooling function indicator
Figures in this user manual are schematic and may not correspond exactly to you product. If the subject parts are not included in the product you have purchased, then it is valid for other models.
1. Cooler temperature adjustment button
By pressing this button, the cooler compartment temperature can be set to 8, 7,6,5,4,3,2, 8.. in order. Press this button to set the cooler compartment temperature to the desired setting.(☐)
- Keypad lock button
Upon pressing this button (3 sec) the keypad lock function activates and keypad lock indicator turns on.
When this button is pressed again (3 sec) keypad lock function is deactivated. (☐)
- Freezer compartment temperature adjustment button
By pressing this button, the freezer compartment temperature can be set at -18,-19,-20,-21,-22,-23,-24,-18... Press this button to set the freezer compartment
temperature to the desired setting.(☐)
4. Error status indicator
This sensor will activate if the product is not cooling adequately or in case of sensor fault.
When this indicator is activated, the freezer compartment temperature indicator will display "E" and the cooler compartment temperature indicator will display "1, 2, 3..." etc. numbers. The numbers on the indicator serve to inform the service personnel about the fault. (⚠️)
When you put a hot food into the freezer compartment or leave the door open for a long duration, an exclamation mark can light up on the indicator for some time. This is not a malfunction, this warning disappears when the food cools down.
5. Keypad lock indicator
You may also use this function to prevent changing the product's temperature settings. To activate, press the cooler compartment temperature adjustment button and freezer compartment temperature adjustment button together for 3 seconds.(8)
6. Eco extra function indicator
It shows that eco extra function is activated.
When this function is active, the times you use the product the least are automatically sensed and energy saving cooling is activated at these hours. (2)
Economic use indicator also lights up during energy saving cooling.
Press the related button to cancel the function.
7. Eco extra / vacation button
Eco extra function is activated when you press this button for a short time. Vacation function is activated upon pressing the button for a long time (3 sec.) The selected function is cancelled upon pressing the button again.( )
8. Vacation function indicator
Indicates the vacation function is active. When this function is active, "-" is displayed on the cooler compartment temperature indicator and cooler compartment does not perform. Other compartments are cooled down according to the adjusted temperature value.(*)
Press the related button to cancel the function.
9. Icematic closed indicator
Shows whether the icematic is running or not. If it is on, the icematic is not working.
To restart the icematic, keep the icematic turn on-off button pressed for 3 seconds. (

Receiving water from the water tank will stop when this function is selected. But the previously-made ice in the icematic can be taken.
10. Economic use indicator
Indicates the refrigerator is running on energy-saving mode. When the freezer compartment temperature is set as -18 or energy saving cooling is active through Eco-Extra function, this indicator lights up. (e)
Economic use indicator will turn off when rapid cooling or rapid freezing function is selected.
11. Fast freeze function indicator
It flashes with animation to indicate that rapid freezing function is active. (*)
12. Fast freeze function button/Icematic turn on-off button
16. Rapid cooling function indicator
It flashes with animation to indicate that
Press this button to activate or deactivate rapid freezing function. When you activate the function, freezer compartment will cool to value lower than the set temperature. (✗)
Keep pressed for approximately 3 seconds to turn the icematic on or off. (✗)
erapid cooling function is active.(

Sabbath Mode:\*optional
^a Press the Fast freeze Button for 3 seconds to activate or deactivate the Sabbath Mode. When Sabbath Mode is activated, the display, alarm, door opening or light buttons will not function.
Use the rapid freezing function when you want to freeze the food you place in the freezer compartment rapidly. If you want to freeze large amounts of fresh food, activate the function before you place the foods into the product.
Rapid freezing function automatically cancels after 4 hours or when freezer compartment reaches adequate temperature, unless it is cancelled.
This function is not recalled after a power outage.
13. Freezer compartment temperature indicator
It displays the temperature that the freezer compartment is set to.
14. Rapid cooling function
The button has two functions. Press and release to activate or deactivate rapid cooling function. The Rapid cooling indicator will turn off and return to normal setting.
Use the rapid cooling function when you want to cool the food you place in the cooler compartment rapidly. If you want to cool large amounts of fresh food, activate the function before you place the foods into the product.
Rapid cooling function automatically cancels after 8 hours or when cooler compartment reaches adequate temperature, unless it is cancelled.
If you keep pressing the rapid cooling button repeatedly with short intervals, electrical current protection activates and compressor does not activate right away.

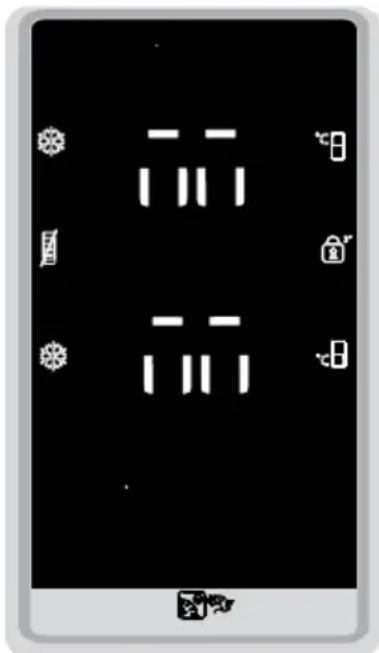
This function is not recalled after a power outage.
15. Cooler compartment temperature indicator
It displays the temperature that the cooler compartment is set to.
If the user does not deactivate the
Sabbath mode, the refrigerator will automatically cancel it in 76 hours.
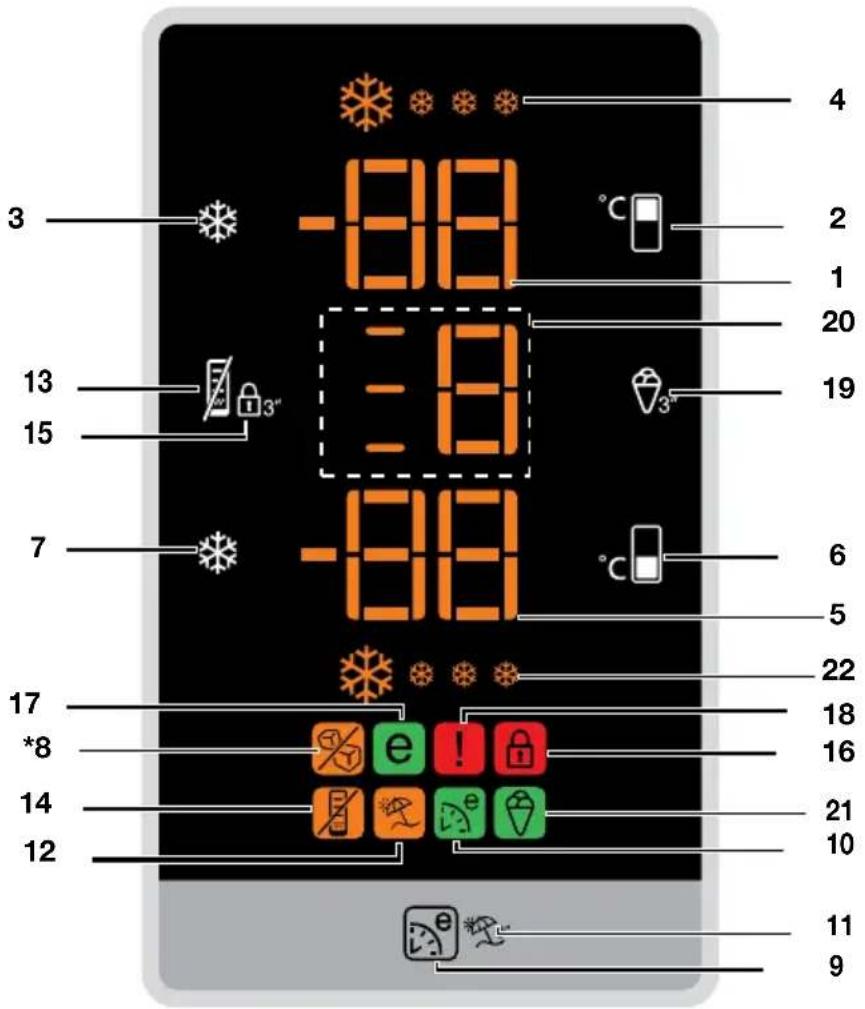
- Freezer Compartment Temperature Setting Indicator
- Freezer Compartment Temperature Setting Function
- Quick Freeze Function Button Icematic On-Off Button (3")
- Quick Freeze Function Indicator
- Fridge Compartment Temperature Setting Indicator
- Fridge Compartment Temperature Setting Function
- Quick Fridge Function Button
- Icematic Off Indicator (*in some models)
-
Eco-Fuzzy (Special Economic Usage) Function
-
Eco-Fuzzy (Special Economic Usage) Indicator
- Vacation Function
- Vacation Function Indicator
- Energy Efficiency Function
- Energy Efficiency Indicator
- Key Lock Function
- Key Lock indicator
- Economic Usage Indicator
- High Temperature/Error Warning Indicator
- Ice Cream Mode Selection Function
- Ice Cream Mode Selection Indicator
- Ice Cream Indicator
- Quick Fridge Indicator
i Figures in this user manual are schematic and may not correspond exactly to you product. If the subject parts are not included in the product you have purchased, then it is valid for other models.
1. Freezer Compartment Temperature Indicator
Indicates the temperature set for Freezer Compartment.
2.Freezer Compartment Temperature Setting Function
This function allows you to set the temperature of freezer compartment. Press this button to set the temperature of the freezer compartment to -18, -19, -20, -21, -22, -23 and -24, respectively.
3. Quick Freeze Function Button Icematic On-Off Button (3")
Quick Freeze indicator is illuminated when the Quick Freeze function is active. To cancel this function, press Quick Freeze button again. Quick Freeze indicator will turn off and return to its normal settings. If you do not cancel it, Quick Freeze will cancel itself automatically after 4 hours or when the freezer compartment reaches the required temperature. If you want to freeze large amounts of fresh food, press the Quick Freeze button before putting the food into the freezer compartment. If you press the Quick Freeze button repeatedly with short intervals, the electronic circuit protection will be activated and the compressor will not start up immediately. This function is not recalled when power restores after a power failure!
4. Quick Freeze Function Indicator
This symbol flashes in an animated style when the Quick Freeze function is active.
5. Fridge Compartment Temperature Setting Indicator
Indicates the temperature set for the Fridge Compartment.
6. Fridge Compartment Temperature Setting Function
function allows you to set the fridge compartment's temperature. Press this button to set the temperature of the fridge compartment to 8, 7, 6, 5, 4, 3, 2 degrees, respectively.
7. Quick Fridge Function Button
When you press the Quick Fridge button, the temperature of the compartment will be colder than the adjusted values. This function can be used for food required to be cooled down rapidly in the fridge compartment. If you want to cool large amounts of fresh food, it is recommended to activate this function before putting the food into the fridge. Quick Fridge indicator is illuminated when the Quick Fridge function is active. To cancel this function, press Quick Fridge button again. Quick Fridge indicator will turn off and return to its normal settings. If you do not cancel it, Quick Fridge function will cancel itself automatically after 2 hours or when the fridge compartment reaches the required temperature.
This function is not recalled when power restores after a power failure.
8. Icematic Off Indicator
Icematic will not run when the indicator of this function is active.
To activate the ice off function, you need to press and hold the quick freeze button for 3 seconds.
9. Eco-Fuzzy (Special Economic Usage) Function
When you press Eco-Fuzzy button, Eco Fuzzy Function will be activated and Eco-Fuzzy Indicator will illuminate. Refrigerator will start operating in the most economic mode at least 6 hours later and the economic usage indicator will turn on when the function is active. To deactivate the Eco Fuzzy function, You need to press on the Eco-Fuzzy button again.
10. Eco-Fuzzy (Special Economic Usage) Indicator
This symbol illuminates when the Eco-Fuzzy Function is active.
11. Vacation Function
Press and hold Eco Fuzzy button for 3 seconds to activate Vacation Function and illuminate Vacation Indicator. The cooling of Fridge Compartment is stopped and temperature of Fridge Compartment is fixed to 15 degrees to prevent bad odors. When this function is active, Fridge Compartment Temperature Indicator will not display the temperature. To deactivate Vacation Function, press and hold Eco-Fuzzy button for 3 seconds.
12. Vacation Function Indicator
This indicator illuminates when Vacation Function is active.
13. Energy Saving Function
When you press Energy Efficiency button, Energy Efficiency Function will be activated and Energy Efficiency Indicator will illuminate. When Energy Efficiency Function is active, all indicators, except for Energy Efficiency Indicator, will turn off. This function will be deactivated when any button is pressed or door is opened; display indicators will return normal settings and Energy Efficiency Indicator will stay illuminated. If you do not press any button or open the door within 5 minutes when Energy Efficiency Indicator is still illuminated, Energy Efficiency Function will be activated again and display indicators will turn off. If you press Energy Efficiency button when the function is not active but the indicator is still illuminated, this will deactivate Energy Efficiency function and turn off Energy Efficiency Indicator.
14. Energy Saving Indicator
This indicator illuminates when Energy Efficiency Function is selected.
15. Key Lock Function
When you press and hold Key Lock button for 3 seconds, Key Lock Function will be activated and Key Lock Indicator will illuminate. No button will operate when this function is active. Press and hold Key Lock button for 3 seconds again to deactivate this function.
16. Key Lock Indicator
This indicator will illuminate when Key Lock Function is active.
17. Economic Usage Indicator
Economic Usage Indicator turns on when the Freezer Compartment is set to -18^ C. When Quick Freeze or Quick Fridge is selected, Economic Usage Indicator will not illuminate.
18. High Temperature/Error Warning Indicator
This light illuminates during high temperature failures and error warnings.
19. Ice Cream Mode Selection Function
When the Ice Cream button is pressed for 3 seconds; it will flash.
If this button is not pressed again in 30 seconds, display will return to its previous view, Ice Cream mode selection indicators will turn off.
With every short press of the Ice Cream button, the number will increase by one.
When the Ice Cream button is pressed again for 3 seconds, Ice Cream symbol on the display will turn on again. Thus, Ice Cream mode is selected and the number will turn on solid while the symbols on the left side will illuminate with animations.
When the Ice Cream process is completed, the symbols start to flash and an audio warning is given. All Ice Cream symbols will turn off after this 5-minute warning.
Just press the Ice Cream button briefly to terminate the audio warning; Ice Cream buttons will turn off too.
If the Ice Cream button is pressed briefly when the Ice Cream process is in progress, no change will take place on the display.
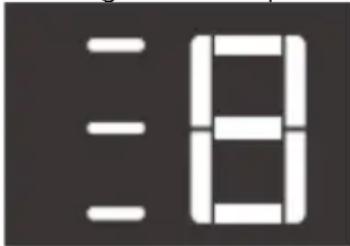
When the Ice Cream Function is active, if a power cut occurs and then power is resumed again, Ice Cream process will be maintained from where it is interrupted.
If the Ice Cream function is tried to be activated when the freezer compartment is at a temperature higher than -10 °C, 'E' and the warning symbol on the display will flash for 30 seconds. If the user presses the Ice Cream function selection button briefly (for 3 seconds), display will return to its normal Ice Cream view, Ice Cream symbol and warning symbol will turn off.
20. Ice Cream Mode Selection Function
It shows the set Ice Cream mode.
21. Ice Cream Indicator
It turns on when the Ice Cream mode is activated.
22. Quick Fridge Indicator
This symbol flashes in an animated style when the Quick Fridge function is active.
\*Optional

Temperature setting button
Temperature Setting button allows you to make the temperature setting of your refrigerator.
Setting the temperature of your refrigerator
The overall temperature setting of your refrigerator is made by means of the temperature setting button on the right wall of the fridge compartment. This button has 5 different temperature setting position. Select the position suitable to your needs.
Level number 1 shows when the fridge is at its hottest and the max position shows its coldest setting.
Dual cooling system
Your refrigerator is equipped with two separate cooling systems to cool the fresh food compartment and freezer compartment. Thus, air in the fresh food compartment and freezer compartment do not get mixed. Thanks to these two separate cooling systems, cooling speed is much higher than other refrigerators. Odors in the compartments do not get mixed. Also additional power saving is provided since the automatic defrosting is performed individually.
- Hot food must cool down to the room temperature before putting them in the refrigerator.
• The foodstuff that you want to freeze must be fresh and in good quality.
- Foodstuff must be divided into portions according to the family's daily or meal based consumption needs.
- Foodstuff must be packaged in an airtight manner to prevent them from drying even if they are going to be kept for a short time.
- Materials to be used for packagings must be resistant to cold and humidity and they must be airtight. The packaging material of the food must be at a sufficient thickness and durability. Otherwise the food hardened due to freezing may puncture the packaging. It is important for the packaging to be closed securely for safe storage of the food.
Figures in this user manual are schematic and may not correspond exactly to you product. If the subject parts are not included in the product you have purchased, then it is valid for other models.
- Frozen food must be used immediately after they are thawed and they should never be re-frozen.
-
Please observe the following instructions to obtain the best results.
-
If the fridge has a quick freeze function, activate the quick freeze function when you want to freeze the food.
-
Do not freeze too large quantities of food at one time. The quality of the food is best preserved when it is frozen right through to the core as quickly as possible.
- Take special care not to mix already frozen food and fresh food.
- Make sure raw foods are not in contact with cooked foods in the fridge.
| Freezer Compartment Setting | Fridge Compartment Setting | Remarks |
| -18°C 4°C This is the normal recommended setting. | ||
| -20, -22 or -24°C | 4°C | These settings are recommended when the ambient temperature exceeds 30°C. |
| Quick Freeze 4°C | Use when you wish to freeze your food in a short time. If is recommended to be used to maintain the quality of meat and fish products. | |
| -18°C or colder 2°C | If you think that your fridge compartment is not cold enough because of the hot conditions or frequent opening and closing of the door. | |
| -18°C or colder Quick Fridge | You can use it when your fridge compartment is overloaded or if you wish to cool down your food rapidly. It is recommended that you activate the quick freeze function 4-8 hours before placing the food. | |
Recommendations for preservation of frozen food
- Pre-packed commercially frozen food should be stored in accordance with the frozen food manufacturer's instructions in a frozen food storage compartment.
-
To ensure that the high quality supplied by the frozen food manufacturer and the food retailer is maintained, following points should be noted:
-
Put packages in the freezer as quickly as possible after purchase.
-
Ensure that contents of the package are labeled and dated.
-
Do not exceed "Use By", "Best Before" dates on the packaging.
Defrosting
The freezer compartment defrosts automatically.
Placing the food
| Freezer compartment shelves | Various frozen food such as meat, fish, ice cream, vegetables and etc. |
| Egg section | Egg |
| Fridge compartment shelves | Food in pans, covered plates and closed containers |
| Door shelves of fridge compartment | Small and packaged food and drinks (such as milk, fruit juice and beer) |
| Crisper Vegetables and fruits | |
| Freshzone compartment | Delicatessen products (cheese, butter, salami and etc.) |
Deep-freeze information
Food must be frozen as rapidly as possible when they are put in the freezer in order to keep them in good quality.
It is possible to preserve the food for a long time only at -18^ C or lower temperatures.
You can keep the freshness of food for many months (at -18^ C or lower temperatures in the deep freeze).
WARNING!
- Foodstuff must be divided into portions according to the family's daily or meal based consumption needs.
- Foodstuff must be packaged in an airtight manner to prevent them from drying even if they are going to be kept for a short time.
Materials necessary for packaging:
• Cold resistant adhesive tape
- Self-adhesive label
- Rubber rings
- Pen
Materials to be used for packaging the foodstuff must be tear-proof and resistant to cold, humidity, dour, oils and acids.
Foodstuff to be frozen should not be allowed to come in contact with the previously frozen items to prevent their partial thawing. Thawed out food must be consumed and must not be frozen again.
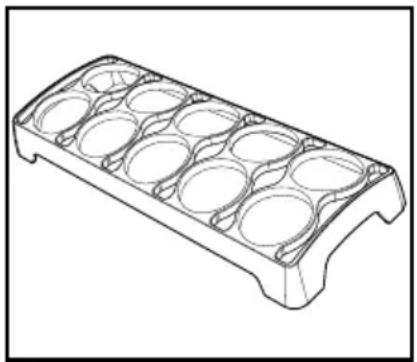
Egg section
You can place the egg section in any of the door shelves. If it is going to be placed in the body, the lower shelves are recommended due them being cooler.
Never store eggs in the freezer compartment.
Avoid direct contact between eggs and other foods.
natural_image
Technical line drawing of a mechanical component with multiple circular cavities (no text or symbols)Description and cleaning of odor filter
\*May not be available in all models
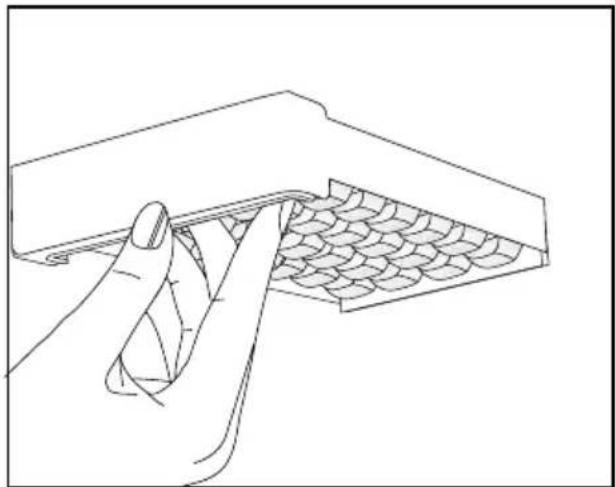
Odor filter prevents unpleasant odor build-up in your refrigerator.
Pull the cover into which the odor filter is installed downwards from the front section and remove as illustrated. Leave the filter under sunlight for one day. Filter will be cleaned during this time. Install the filter

Breakfast Compartment
Because products such as fish, red meat, chicken mean, and dairy products such as cheese, yoghurt and milk need to be kept in an ambient a few degrees cooler than the fridge compartment, it is recommended to store these goods in the breakfast compartment. It is not recommended to place fruit and vegetables in the breakfast compartment. Especially tomatoes, eggplants, zucchini, cucumbers and lemons are sensitive to the cold. They should not be stored in the breakfast compartment.
You can increase the inner volume of your refrigerator by removing the breakfast compartment.
- Pull the compartment towards yourself until it rests and stops against the stopper.
- Lift the front section and pull towards yourself to remove the compartment from its seating.

natural_image
Line drawing of a hand opening a refrigerator with a rack and ventilation grilles (no text or symbols)Water Dispenser
\*optional
Water dispenser is a very useful feature based on reaching cold water without opening the door of your refrigerator. As you will not have to open your refrigerator door frequently, you will have saved energy.
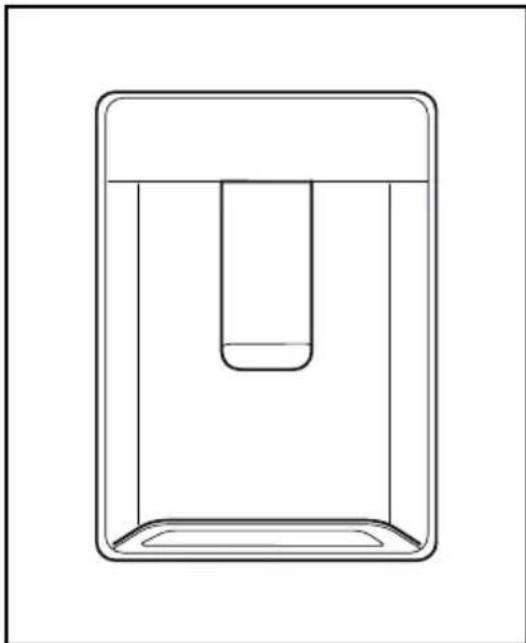
natural_image
Simple line drawing of a rectangular container with a U-shaped tube inside (no text or symbols)Using the water dispenser
Push the arm of the water dispenser with your glass. The dispenser will cease operating once you release the arm.
When operating the water dispenser, maximum flow can be obtained by pressing the arm fully. Please remember that the amount of flow from the dispenser is subject to the degree you press the arm.
As the level of the water in your glass/container rises, slightly lessen the pressure on the arm to prevent the overspill. If you slightly press the arm, the water will drip; this is quite normal and not a failure.
Filling the water dispenser's tank
Water tank filling reservoir is located inside the door rack. You can open the reservoir cover and fill it with potable water. And then, close the lid.

natural_image
Line drawing of a refrigerator interior showing front and side compartments (no text or symbols)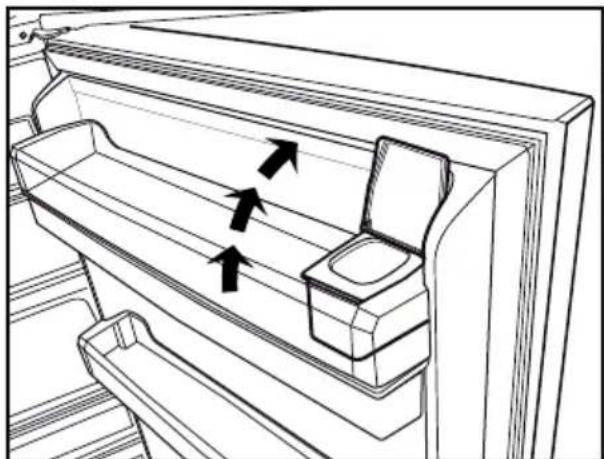
natural_image
Line drawing of a refrigerator interior showing drawer, sink, and door (no text or symbols)Warning!
- Do not fill the water tank with any liquid other than water, such as fruit juices, milk, carbonated beverages or alcoholic drinks which are not suitable to use in the water dispenser. Water dispenser will be irreparably damaged if these kinds of liquids are used. Warranty does not cover such usages. Some chemical substances and additives contained in these kinds of drinks/liquids may damage the water tank and its materials.
• Use clean drinking water only.
- Capacity of the water tank is 3 liters; do not overfill.
- Push the arm of the water dispenser with a rigid glass. If you are using disposable plastic glasses, push the arm with your fingers from behind the glass.
Cleaning the water tank
- Remove the water filling reservoir inside the door rack.
- Remove the door rack by holding from both sides.
- Grab the water tank from both sides and remove it with an angle of 45^ C.
- Clean the water tank by removing its lid.
Important:
Components of the water tank and water dispenser should not be washed in dishwasher.
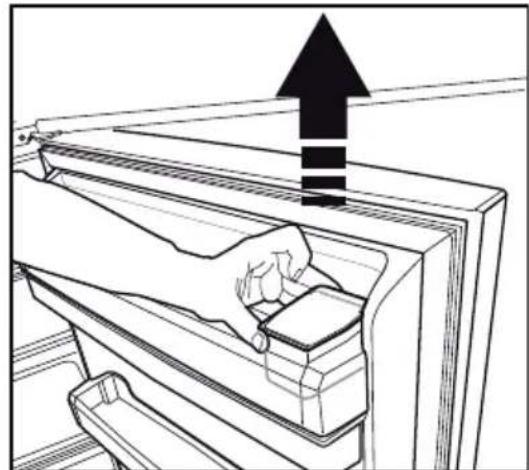
natural_image
Line drawing of a hand cleaning or removing a refrigerator with an upward arrow (no text or symbols)
natural_image
Line drawing of hands installing or adjusting a refrigerator door panel with an upward arrow (no text or symbols)

natural_image
Line drawing of a hand holding a metal bracket with a pull-up arrow and plus symbol (no text or labels)Water tray
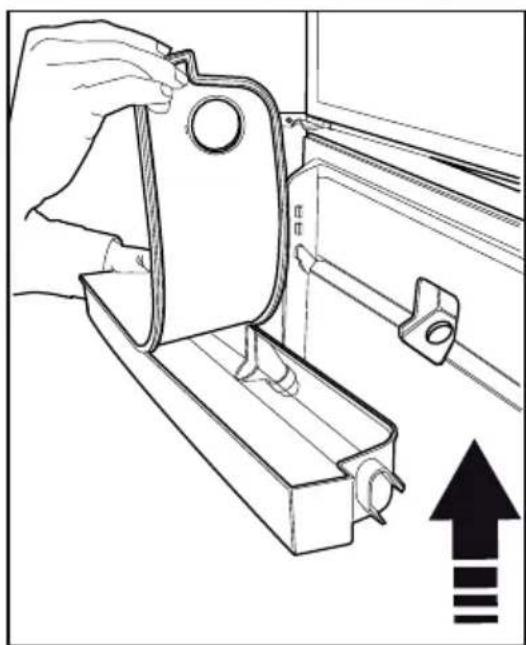
Water that dripped while using the water dispenser accumulates in the spillage tray.
Take out the plastic strainer as shown in the figure.
With a clean and dry cloth, remove the water that has accumulated.
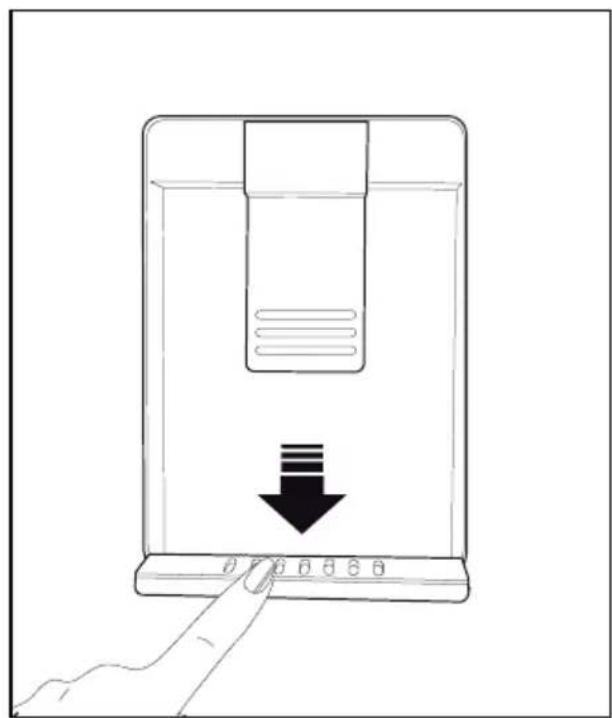
natural_image
Line drawing of a device with a hand pressing a button and a downward arrow indicating action (no text or symbols)Blue light
\*May not be available in all models
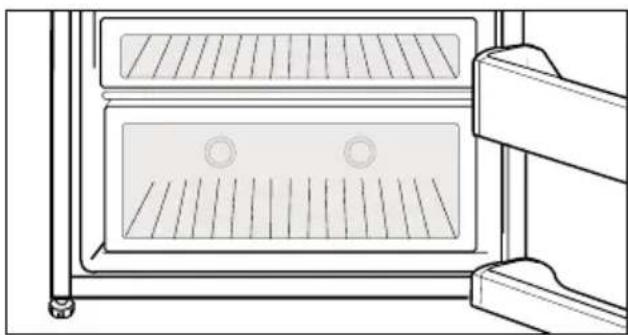
Foodstuff stored in the crispers that are enlightened with a blue light continue their photosynthesis by means of the wavelength effect of blue light and thus, preserve their freshness and increase their vitamin content.
natural_image
Line drawing of a double oven with ventilation grilles and mounting brackets (no text or symbols)Sliding storage container
\*optional
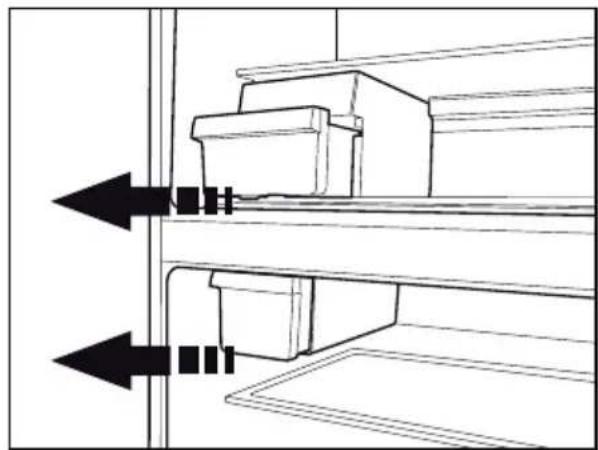
This accessory is designed to increase the usage volume of the door shelves. It allows you to easily place the tall bottles, jars and tins to the lower bottle shelf thanks to its ability to move right or left.
(The illustrated figure is only an example and does not match exactly with your product.)

natural_image
Diagram of a mechanical component with arrows indicating force or movement, no visible text or symbolsRotary storage container
(in some models)
Sliding body shelf can be moved to left or right in order to allow you place the tall bottles, jars or boxes to the lower shelf (Fig. 1)
You can reach the food that you have placed into the shelf by grabbing and turning it from its right edge (Fig.2).
When you want to load or remove it to clean, turn it by 90 degrees, raise it up and pull towards yourself (Fig. 3-4).

Auto Icematic
\*optional
The Auto Icematic allows you to make ice in the fridge easily. Remove the water tank in the fridge compartment, fill it wilt water and install it back to obtain ice from the Icematic.
First ice cubes will be ready in approximately 2 hours in the Icematic drawer located in the freezer compartment.
If you fill the water tank completely, you will be able to obtain approximately 60-70 ice cubes.
Change the water in water tank if it has waited around 2-3 weeks.
Note: For the products having automatic Icematic, sound may be heard during ice pouring. This sound is normal and does not signal any error.
natural_image
Technical line drawing of a mechanical assembly with two arrows indicating direction (no text or symbols)
natural_image
Line drawing of a hand inserting a device into a box (no text or symbols)Icematic and ice storage container
\*May not be available in all models Using the Icematic
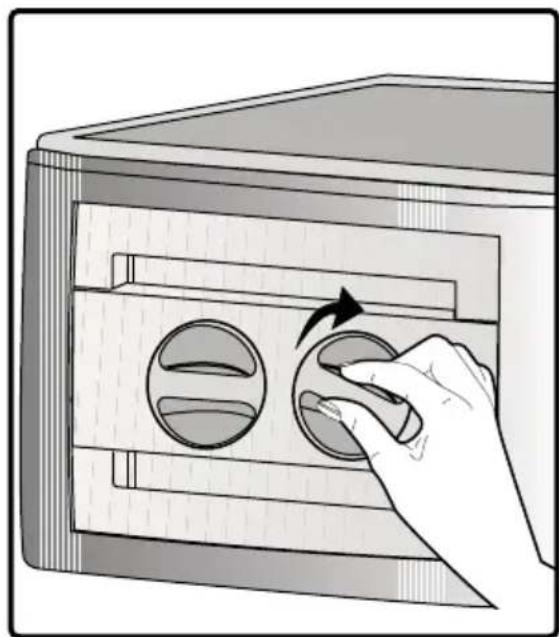
Fill the Icematic with water and place it into its seat. Your ice will be ready approximately in two hours. Do not remove the Icematic from its seating to take ice.
Turn the knobs on the ice reservoirs clockwise by 90 degrees.
Ice cubes in the reservoirs will fall down into the ice storage container below.
You may take out the ice storage container and serve the ice cubes.
If you wish, you may keep the ice cubes in the ice storage container.
Ice storage container
Ice storage container is only intended for accumulating the ice cubes. Do not put water in it. Otherwise, it will break.
natural_image
Illustration of a hand operating a circular switch inside a rectangular appliance (no text or symbols visible)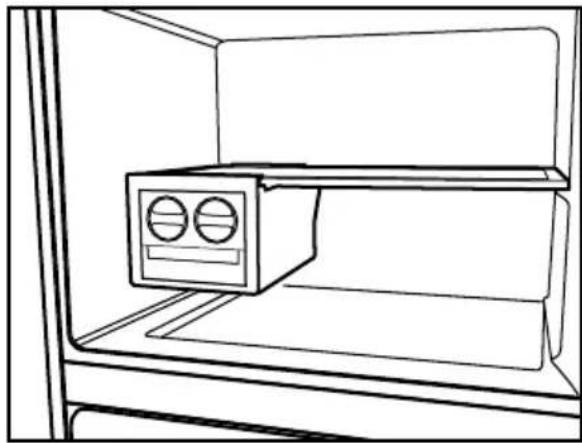
natural_image
Line drawing of an open refrigerator with a mounted air conditioner unit (no text or symbols)
natural_image
Illustration of a hand opening a microwave oven with two arrows indicating airflow direction (no text or symbols)
natural_image
Line drawing of a hand operating a device with two double-headed arrows indicating bidirectional motion (no text or symbols)Making ice
\*optional
Fill the ice container with water and place it into the freezer compartment. Your ice will be ready approximately in two hours.
You can remove the ice in the ice container by removing it from the freezer and twisting it.
natural_image
Line drawing of a hand inserting a spring into a grid-patterned object (no text or symbols)Humidity-controlled crisper (Ever Fresh)
\*optional
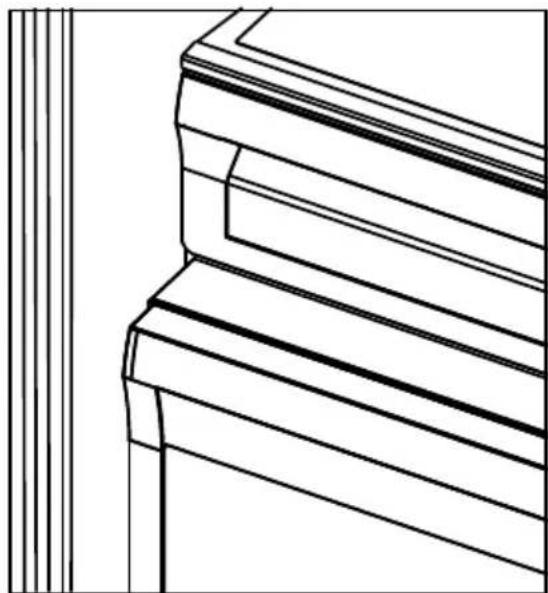
Humidity rates of the vegetables and fruit are kept under control with the feature of humidity-controlled crisper and the food is ensured to stay fresh for longer.
Never leave the vegetables inside the crisper in their bags. If the vegetables are left inside their bags, this will cause them to decompose in a short period of time. When a high level of humidity is set, your vegetables keep their humidity content and can be preserved for a reasonable period of time without needing to leave them inside their bags. In case contacting with other vegetables is not preferred for hygiene concerns, use a perforated paper, foam and other similar packaging materials instead of a bag.
While the vegetables are being placed, specific gravity of the vegetables should be taken into consideration. Heavy and hard vegetables should be put at the bottom of the crisper and the lightweight and soft vegetables should be placed over.
natural_image
Architectural line drawing of a staircase with horizontal beams and vertical ribs (no text or symbols)Do not place together the pear, apricot, peach, etc. and apple in particular which have a high level of generation of ethylene gas in the same crisper with the other vegetables and fruit. The ethylene gas which is emitted by these fruit may cause the other fruit to ripen faster and decompose in a shorter time.
Do not take the crisper main body out of the refrigerator apart from the drawers unless you have to, and call for technical service if necessary. Before removing the crisper main body from its place, wipe and clean it with a wet piece of cloth.
Ice-cream machine
\*optional
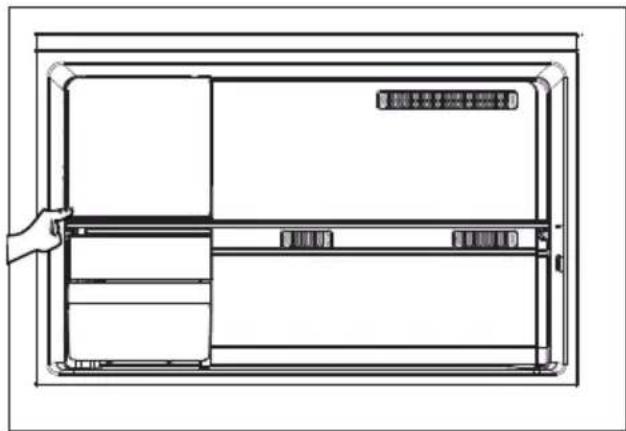
- Open the freezer compartment of the refrigerator,
- Push and release open the cover of the ice-cream making compartment in the freezer compartment,
natural_image
Technical line drawing of a rectangular appliance with internal compartments and a hand adjusting the front panel (no text or symbols)- Place the fresh freeze tray inside the base cover and slide it into the highest shelf inside the compartment,

natural_image
Technical line drawing of a refrigerator interior showing shelves, doors, and storage compartments (no text or labels)- Take the ice-cream mix which is cooled to room temperature to the ice-cream making container,

natural_image
Line drawing of a coffee cup on a tray (no text or symbols)- The ice-cream mix which will be placed in the ice cream boxes must not exceed the amount stated in the ice cream recipes. If more ice cream mix is placed in the boxes than indicated in the recipe, it will overflow.
- Place the container into the housing at the bottom of the compartment towards the left side.
- Turn the container to the right side and lock it into its place.

natural_image
Two identical diagrams showing a mug inside a transparent chamber, each with bidirectional arrows indicating movement or rotation (no text or symbols)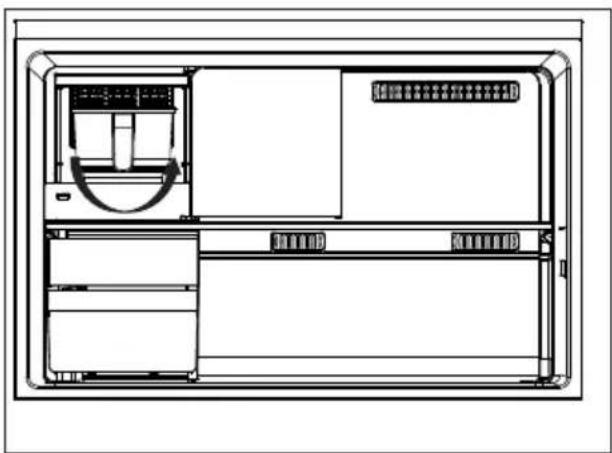
natural_image
Technical line drawing of a multi-chamber HVAC unit with internal compartments and control panel (no text or labels)- Close the cover of the ice-making compartment, push and release to lock it.
- Close the door of the freezer compartment.
You can determine the ice cream mode from the ice cream recipe book.
i Set the ice cream mode depending on the ice cream type from the display on the door.
Do not wash the ice cream making container in the dishwasher.
During the ice cream making process, the fridge, depending on the current working conditions, will work with a slight noise for a while.
6 Maintenance and cleaning
⚠️ Never use gasoline, benzene or similar substances for cleaning purposes.
⚠️ We recommend that you unplug the appliance before cleaning.
⚠️ Never use any sharp abrasive instrument, soap, household cleaner, detergent and wax polish for cleaning.
Use lukewarm water to clean the cabinet of your refrigerator and wipe it dry.
Use a damp cloth wrung out in a solution of one teaspoon of bicarbonate of soda to one pint of water to clean the interior and wipe it dry.
⚠️ Make sure that no water enters the lamp housing and other electrical items.
⚠️ If your refrigerator is not going to be used for a long period of time, unplug the power cable, remove all food, clean it and leave the door ajar.
Check door seals regularly to ensure they are clean and free from food particles.
⚠️ To remove door racks, remove all the contents and then simply push the door rack upwards from the base.
⚠️Never use cleaning agents or water that contain chlorine to clean the outer surfaces and chromium coated parts of the product. Chlorine causes corrosion on such metal surfaces.
Do not use sharp, abrasive tools, soap, household cleaning agents, detergents, kerosene, fuel oil, varnish etc. to prevent removal and deformation of the prints on the plastic part. Use lukewarm water and a soft cloth for cleaning and then wipe it dry.
Protection of plastic surfaces
Do not put the liquid oils or oil-cooked meals in your refrigerator in unsealed containers as they damage the plastic surfaces of your refrigerator. In case of spilling or smearing oil on the plastic surfaces, clean and rinse the relevant part of the surface at once with warm water.
7 Troubleshooting
Check this list before contacting the service. Doing so will save you time and money. This list includes frequent complaints that are not related to faulty workmanship or materials.
Certain features mentioned herein may not apply to your product.
The refrigerator is not working.
- The power plug is not fully settled. >>> Plug it in to settle completely into the socket.
- The fuse connected to the socket powering the product or the main fuse is blown. >>> Check the fuses.
Condensation on the side wall of the cooler compartment (MULTI ZONE, COOL, CONTROL and FLEXI ZONE).
- The door is opened too frequently >>> Take care not to open the product's door too frequently.
- The environment is too humid. >>> Do not install the product in humid environments.
- Foods containing liquids are kept in unsealed holders. >>> Keep the foods containing liquids in sealed holders.
- The product's door is left open. >>> Do not keep the product's door open for long periods.
- The thermostat is set to too low temperature. >>> Set the thermostat to appropriate temperature.
Compressor is not working.
- In case of sudden power failure or pulling the power plug off and putting back on, the gas pressure in the product's cooling system is not balanced, which triggers the compressor thermic safeguard. The product will restart after approximately 6 minutes. If the product does not restart after this period, contact the service.
- Defrosting is active. >>> This is normal for a fully-automatic defrosting product. The defrosting is carried out periodically.
- The product is not plugged in. >>> Make sure the power cord is plugged in.
- The temperature setting is incorrect. >>> Select the appropriate temperature setting.
- The power is out. >>> The product will continue to operate normally once the power is restored.
The refrigerator's operating noise is increasing while in use.
- The product's operating performance may vary depending on the ambient temperature variations. This is normal and not a malfunction.
The refrigerator runs too often or for too long.
- The new product may be larger than the previous one. Larger products will run for longer periods.
-
The room temperature may be high. >>> The product will normally run for long periods in higher room temperature.
-
The product may have been recently plugged in or a new food item is placed inside. >>> The product will take longer to reach the set temperature when recently plugged in or a new food item is placed inside. This is normal.
- Large quantities of hot food may have been recently placed into the product. >>> Do not place hot food into the product.
- The doors were opened frequently or kept open for long periods. >>> The warm air moving inside will cause the product to run longer. Do not open the doors too frequently.
- The freezer or cooler door may be ajar. >>> Check that the doors are fully closed.
- The product may be set to temperature too low. >>> Set the temperature to a higher degree and wait for the product to reach the adjusted temperature.
- The cooler or freezer door washer may be dirty, worn out, broken or not properly settled. >>> Clean or replace the washer. Damaged / torn door washer will cause the product to run for longer periods to preserve the current temperature.
The freezer temperature is very low, but the cooler temperature is adequate.
- The freezer compartment temperature is set to a very low degree. >>> Set the freezer compartment temperature to a higher degree and check again.
The cooler temperature is very low, but the freezer temperature is adequate.
- The cooler compartment temperature is set to a very low degree. >>> Set the freezer compartment temperature to a higher degree and check again.
The food items kept in cooler compartment drawers are frozen.
- The cooler compartment temperature is set to a very low degree. >>> Set the freezer compartment temperature to a higher degree and check again.
The temperature in the cooler or the freezer is too high.
- The cooler compartment temperature is set to a very high degree. >>> Temperature setting of the cooler compartment has an effect on the temperature in the freezer compartment. Wait until the temperature of relevant parts reach the sufficient level by changing the temperature of cooler or freezer compartments.
- The doors were opened frequently or kept open for long periods. >>> Do not open the doors too frequently.
• The door may be ajar. >>> Fully close the door. - The product may have been recently plugged in or a new food item is placed inside. >>> This is normal. The product will take longer to reach the set temperature when recently plugged in or a new food item is placed inside.
- Large quantities of hot food may have been recently placed into the product. >>> Do not place hot food into the product.
Shaking or noise.
- The ground is not level or durable. >>> If the product is shaking when moved slowly, adjust the stands to balance the product. Also make sure the ground is sufficiently durable to bear the product.
- Any items placed on the product may cause noise. >>> Remove any items placed on the product.
The product is making noise of liquid flowing, spraying etc.
- The product's operating principles involve liquid and gas flows. >>> This is normal and not a malfunction.
There is sound of wind blowing coming from the product.
- The product uses a fan for the cooling process. This is normal and not a malfunction.
There is condensation on the product's internal walls.
- Hot or humid weather will increase icing and condensation. This is normal and not a malfunction.
- The doors were opened frequently or kept open for long periods. >>> Do not open the doors too frequently; if open, close the door.
• The door may be ajar. >>> Fully close the door.
There is condensation on the product's exterior or between the doors.
- The ambient weather may be humid, this is quite normal in humid weather. >>> The condensation will dissipate when the humidity is reduced.
The interior smells bad.
- The product is not cleaned regularly. >>> Clean the interior regularly using sponge, warm water and carbonated water.
- Certain holders and packaging materials may cause odour. >>> Use holders and packaging materials without free of odour.
- The foods were placed in unsealed holders. >>> Keep the foods in sealed holders. Micro-organisms may spread out of unsealed food items and cause malodour. Remove any expired or spoilt foods from the product.
The door is not closing.
- Food packages may be blocking the door. >>> Relocate any items blocking the doors.
- The product is not standing in full upright position on the ground. >>> Adjust the stands to balance the product.
- The ground is not level or durable. >>> Make sure the ground is level and sufficiently durable to bear the product.
The vegetable bin is jammed.
- The food items may be in contact with the upper section of the drawer. >>> Reorganize the food items in the drawer.
If The Surface Of The Product Is Hot.
- High temperatures may be observed between the two doors, on the side panels and at the rear grill while the product is operating. This is normal and does not require service maintenance! Be careful when touching these areas.
WARNING:
If the problem persists after following the instructions in this section, contact your vendor or an Authorised Service. Do not try to repair the product.
תְרָה בְּרִ.
15.
תְאָהִיַעֹתְרָה.
תְּוֹן.
18
תְקַרָה בְּרָה
תְקַרָה בְּוֹת.
הַרְּוֹתָאִי 20
natural_image
Diagram of a refrigerator interior with a lightning bolt and cable, no text or symbols presentnatural_image
Technical line drawing of a mechanical component with a labeled part (1), no text or symbols present.
natural_image
Technical diagram of a computer monitor rear panel with mounting holes and ventilation slots (no text or labels)
natural_image
Illustration of a hand using a screwdriver to adjust or install a component, with an arrow indicating direction (no text or symbols present)natural_image
Diagram showing a beam supported at both ends with curved arrows indicating rotational motion (no text or symbols)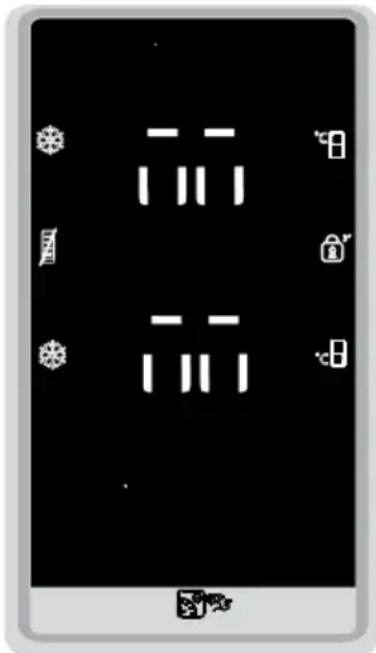
,הכלה 3הכלההוּרָהוּרָהוּרָהוּרָהוּרָהוּרָהוּרָהוּרָהוּרָהוּרָהוּרָהוּרָהוּרָהוּרָהוּרָה
natural_image
Line drawing of a hand placing a component into a storage rack (no text or symbols)
natural_image
Line drawing of a hand holding an electronic device with a grid and buttons (no text or symbols)
natural_image
Line drawing of a hand holding a handheld electronic device with a screwdriver (no text or symbols)בְרָה אַעֹת
•
natural_image
Technical line drawing of a mechanical component with multiple circular cavities (no text or symbols)תַלְרָה (אַלְרָה)
natural_image
Line drawing of an oven with ventilation grilles and a side shelf (no text or symbols)הכלהה
natural_image
Diagram of a mechanical component with arrows indicating force or movement, no visible text or symbolsתְרָה בַרִי אַעֹ
natural_image
Line drawing of a hand placing a rectangular object into a refrigerator (no text or symbols)
natural_image
Line drawing of an open refrigerator with a mounted air conditioner unit (no text or symbols)
natural_image
Line drawing of a hand opening a microwave oven with two arrows indicating direction (no text or symbols)
natural_image
Illustration of a hand operating a microwave oven with two double-headed arrows indicating bidirectional motion (no text or symbols)natural_image
Illustration of a hand operating a rotary switch inside a microwave oven (no text or symbols visible)תְקַרָה בְּרָה
natural_image
Line drawing of a hand inserting a spring into a grid-patterned object (no text or symbols)natural_image
Architectural line drawing of a staircase with vertical ribs (no text or symbols)תְבָרִי (אַלְהָה)
(ת'בּר
\*
natural_image
Two identical diagrams showing a mug inside a transparent enclosure, each with a red bidirectional arrow indicating rotation or movement (no text or symbols)
natural_image
Technical line drawing of an electrical enclosure or rack unit with internal components and no visible text or symbolsnatural_image
Line drawing of a multi-level refrigerator cabinet with shelves and doors (no text or symbols)natural_image
Line drawing of a coffee cup on a tray (no text or symbols)
natural_image
Technical line drawing of a refrigerator interior showing front and side views with directional arrows indicating movement (no text or symbols)natural_image
Simple line drawing of a rectangular container with a U-shaped tube inside (no text or symbols)תְרָה בַרִי אַעֹשָׁ
natural_image
Line drawing of a hand cleaning a refrigerator with an upward arrow indicating motion (no text or symbols)
natural_image
Line drawing of hands installing or adjusting a door panel with an upward arrow (no text or symbols)
natural_image
Line drawing of a hand holding a metal bracket with a pull rod, next to an upward arrow (no text or symbols)•
•
natural_image
Technical line drawing of a mechanical assembly with exploded view (no text or symbols)תְקָרִי אַעֹ
natural_image
Line drawing of a hand pressing down on a device with a downward arrow indicating compression or disassembly (no text or symbols)- Please read this user manual first!
- The user manual will help you use the product in a fast and safe way.
- Explanation of symbols
- Throughout this user manual the following symbols are used:
- Your Refrigerator 3
- Important Safety Warnings 4
- Installation 11
- Preparation 14
- Using your refrigerator 15
- Maintenance and cleaning 40
- 7Troubleshooting 41
- Your Refrigerator
- \*optional
- Important Safety Warnings
- Intended use
- General safety
- For products with a water dispenser;
- Child safety
- Compliance with WEEE Directive and Disposing of the Waste Product:
- Package information
- Do not forget...
- HC warning
- If your product's cooling system contains R600a:
- Recommendations for the fresh food compartment
- Ignore this warning if your product's cooling system contains R134a.
- Things to be done for energy saving
- Installation
- Points to be paid attention to when the relocation of the refrigerator
- Electrical connection
- Important:
- Disposing of the packaging
- Disposing of your old refrigerator
- Placing and Installation
- Adjusting the legs
- Changing the illumination lamp
- Door Open Warning
- \*May not be available in all models
- Preparation
- Using your refrigerator
- Indicator panel
- Cooler compartment indicator
- Error status indicator
- Temperature indicator
- Vacation function button
- Temperature adjustment button
- Compartment selection button
- Cooler compartment indicator
- Economy mode indicator
- Vacation function indicator
- Freezer Compartment Temperature Setting Indicator
- Freezer Compartment Temperature Setting Button
- Fridge Compartment Temperature Setting Indicator
- Fridge Compartment Temperature Setting Button
- Economy Mode Indicator
- 6- Ionizer Indicator
- Error Status Indicator
- Cooler temperature adjustment button
- Error status indicator
- Keypad lock indicator
- Eco extra function indicator
- Eco extra / vacation button
- Vacation function indicator
- Icematic closed indicator
- Economic use indicator
- Fast freeze function indicator
- Fast freeze function button/Icematic turn on-off button
- Rapid cooling function indicator
- Sabbath Mode:\*optional
- Freezer compartment temperature indicator
- Rapid cooling function
- Cooler compartment temperature indicator
- Freezer Compartment Temperature Indicator
- 2.Freezer Compartment Temperature Setting Function
- Quick Freeze Function Button Icematic On-Off Button (3")
- Quick Freeze Function Indicator
- Fridge Compartment Temperature Setting Indicator
- Fridge Compartment Temperature Setting Function
- Quick Fridge Function Button
- Icematic Off Indicator
- Eco-Fuzzy (Special Economic Usage) Function
- Eco-Fuzzy (Special Economic Usage) Indicator
- Vacation Function
- Vacation Function Indicator
- Energy Saving Function
- Energy Saving Indicator
- Key Lock Function
- Key Lock Indicator
- Economic Usage Indicator
- High Temperature/Error Warning Indicator
- Ice Cream Mode Selection Function
- Ice Cream Mode Selection Function
- Ice Cream Indicator
- Quick Fridge Indicator
- Temperature setting button
- Setting the temperature of your refrigerator
- Dual cooling system
- Recommendations for preservation of frozen food
- Defrosting
- Placing the food
- Deep-freeze information
- WARNING!
- Egg section
- Description and cleaning of odor filter
- Breakfast Compartment
- Water Dispenser
- Using the water dispenser
- Filling the water dispenser's tank
- Cleaning the water tank
- Water tray
- Blue light
- Sliding storage container
- Rotary storage container
- (in some models)
- Auto Icematic
- Icematic and ice storage container
- \*May not be available in all models Using the Icematic
- Ice storage container
- Making ice
- Humidity-controlled crisper (Ever Fresh)
- Ice-cream machine
- Maintenance and cleaning
- Protection of plastic surfaces
- Troubleshooting
- The refrigerator is not working.
- Condensation on the side wall of the cooler compartment (MULTI ZONE, COOL, CONTROL and FLEXI ZONE).
- Compressor is not working.
- The refrigerator's operating noise is increasing while in use.
- The refrigerator runs too often or for too long.
- The freezer temperature is very low, but the cooler temperature is adequate.
- The cooler temperature is very low, but the freezer temperature is adequate.
- The food items kept in cooler compartment drawers are frozen.
- The temperature in the cooler or the freezer is too high.
- Shaking or noise.
- The product is making noise of liquid flowing, spraying etc.
- There is sound of wind blowing coming from the product.
- There is condensation on the product's internal walls.
- There is condensation on the product's exterior or between the doors.
- The interior smells bad.
- The door is not closing.
- The vegetable bin is jammed.
- If The Surface Of The Product Is Hot.
- WARNING:
- בְרָה אַעֹת
- תַלְרָה (אַלְרָה)
- הכלהה
- תְרָה בַרִי אַעֹ
- תְקַרָה בְּרָה
- תְבָרִי (אַלְהָה)
- (ת'בּר
- \*
- תְרָה בַרִי אַעֹשָׁ
Brand : BEKO
Model : DN168125XB
Category : Refrigerator