
Texture Select Pro BLSTTS-CB2-000 - Blender OSTER - Free user manual and instructions
Find the device manual for free Texture Select Pro BLSTTS-CB2-000 OSTER in PDF.


| Product Type | Blender |
| Brand | Oster |
| Model | Texture Select Pro BLSTTS-CB2-000 |
| Motor Power | 1000 Watts |
| Blade Material | Stainless Steel |
| Jar Capacity | 48 oz (6 cups) |
| Jar Material | BPA-free Tritan Plastic |
| Number of Speeds | 8 speed settings plus Pulse |
| Preset Programs | 4 texture presets (Smooth, Puree, Chop, Ice Crush) |
| Control Type | Touch Button + Dial |
| Dimensions (H x W x D) | 15.5 x 7.5 x 7.5 inches |
| Weight | 6.8 lbs |
| Power Supply | 120V, 60Hz (USA/Canada) |
| Cord Length | 3 feet |
| Dishwasher Safe Parts | Jar, lid, and blade assembly (top rack) |
| Safety Features | Safety lock mechanism, non-slip feet |
| Warranty | 2-year limited warranty |
| Spare Parts Availability | Replacement jars, blades, and lids sold separately |
| Repairability | User-replaceable blade assembly; motor service by authorized center |
| Country of Origin | China |
| Included Accessories | 48 oz blending jar, recipe book |
Frequently Asked Questions - Texture Select Pro BLSTTS-CB2-000 OSTER
User questions about Texture Select Pro BLSTTS-CB2-000 OSTER
0 question about this device. Answer the ones you know or ask your own.
Ask a new question about this device
Download the instructions for your Blender in PDF format for free! Find your manual Texture Select Pro BLSTTS-CB2-000 - OSTER and take your electronic device back in hand. On this page are published all the documents necessary for the use of your device. Texture Select Pro BLSTTS-CB2-000 by OSTER.
USER MANUAL Texture Select Pro BLSTTS-CB2-000 OSTER
natural_image
Oster blender with clear glass body and control panel (no visible text or symbols on device)Visit us at Oster.com
U.S.: 1-800-334-0759
P.N. 2102867
IMPORTANT SAFEGUARDS
When using electrical appliances, basic safety precautions should always be followed to reduce the risk of fire, electric shock, and/or injury to persons including the following:
-
Read all instructions before using this product.
-
To protect against electric shock, do not place or immerse cord, plugs, or appliance in water or other liquid.
-
This appliance is not to be used by children or by persons with reduced physical, sensory or mental capabilities. Keep the appliance and its cord out of reach of children.
-
Close supervision is necessary when any appliance is used near children. Children should not play with the appliance.
-
Never leave appliance unattended when in use.
-
Unplug from outlet when not in use, before putting on or taking off parts and before cleaning. Allow to cool before putting on or taking off parts, and before cleaning. To disconnect, turn any control to OIT, then unplug power cord from outlet. Do not disconnect by pulling on cord.
-
Flashing light indicates ready to operate (models with stand-by mode). Avoid any contact with blades or moveable parts.
-
Do not operate any appliance with a damaged cord or plug or after the appliance malfunctions, or has been damaged in any manner. Do not attempt to replace or splice a damaged cord. Return appliance to the manufacturer (see warranty) for examination, repair or adjustment.
-
For appliances with markings on plug blade: This appliance has important markings on the plug blade. The attachment plug or entire cordset (if plug is molded onto cord) is not suitable for replacement. If damaged, the appliance shall be replaced.
-
The use of attachments, including canning jars, not recommended or sold by the manufacturer may cause fire, electric shock or injury.
-
Do not use outdoors or for commercial purposes.
-
Do not let cord hang over edge of table or counter, or touch hot surfaces, including the stove.
-
Keep hands and utensils out of container to reduce the risk of injury to persons or damage to the blender.
-
Never add to container while appliance is operating.
-
Container must be properly in place before operating appliance.
-
Blades are sharp. Handle carefully, especially when removing the blades from the container, emptying the container and during cleaning.
-
To reduce the risk of injury, never place cutter-assembly blades on base without jar properly attached.
-
Always hold container while operating the appliance. If the container should turn when the motor is turned ON, switch appliance OFF immediately and tighten the container in the threaded bottom.
-
Always wait until all moving parts have stopped before removing the container.
-
Do not blend carbonated, hot or boiling liquids and ingredients, as this may create pressure buildup. Only blend non-carbonated liquids and ingredients that are at room temperature or cooler. If the container is warm to the touch, allow to cool before opening.
-
Do not use appliance for other than intended use. Misuse can cause injuries. Always use appliance on a dry, stable, level surface. Never fill beyond the MAX fill line.
-
Do not use the blender for longer than 3 minutes at a time to avoid heat and pressure buildup. Allow to cool for 1 minute between cycles.
For appliances with food chopper attachments:

-
Keep hands and utensils away from the cutting blade while chopping food to reduce the risk of severe injury to persons or damage to the food chopper. A scraper may be used but only when the food chopper is not running.
-
To reduce the risk of injury, never place cutting blade on base without first putting container properly in place.
2.5. Be certain cover is securely locked in place before operating appliance.
- Do not attempt to defeat the cover interlock mechanism.
SAVE THESE INSTRUCTIONS
North American models with polarized plugs:
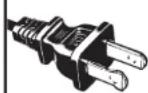
POLARIZED PLUG
This appliance has a polarized plug (one blade is wider than the other). As a safety feature to reduce the risk of electrical shock, this pPlug is intended to fit in a polarized outlet only one way. If the PLUG does not fit fully in the outlet, reverse the plug. If it still does not fit, contact a qualified electrician. Do not attempt
to defeat this safety feature or modify the plug in any way. If the plug hits loosely into the AC outlet or if the AC outlet feels warm do not use that outlet.
Power Cord Instructions:
A short power-supply cord or detachable power-supply cord is provided to reduce risks resulting from becoming entangled in or tripping over a longer cord. Longer detachable power-supply cords or extension cords are available and may be used if care is exercised in their use. If a long detachable power-supply cord or extension cord is used on short-cord models:
a. The marked electrical rating of the detachable power-supply cord or extension cord should be at least as great as the electrical rating of the appliance;
b. When the product is of the grounded type, the extension cord shall be a grounding type 3-wire cord; and
c. The longer cord should be arranged so that it will not drape over the counter top or table top where it can be pulled on by children or tripped over unintentionally.
Do not pull, twist or otherwise abuse the power cord.
Do not wrap the power cord around the main body of the blender during or after use.

Table of Contents
Welcome 5
Learning About Your Product....6
Using Your Product....7
Caring for Your Product....10
Blending Tips 11
Frequently Asked Questions....11
Food Processor Accessory (Select Models Only).... 12
Assembling and Using Your Food Processor 13
Processing Tips.... 15
Food Processing Chart 16
Blend-N-Go® Cup Accessory (Select Models Only)....17
Using Your Blend-N-Go ^® Cup With Your Oster Texture Select Blender ....18
Recipes 19
Limited Warranty....21
Welcome
Congratulations on your new Oster Texture Select Blender. Your Oster Texture Select blender will allow you to create delicious smoothies, milkshakes, salsas and much more at the touch of a button! If you have any comments, questions or inquiries about this product, please call 1-800-334-0759. Your product includes the following features and benefits:
- Texture options to choose the consistency of your blended foods/drinks.
- Advanced 6-Point Blade System which provides a wide range of food processing & blending options.
- Powerful Dual Direction Motor which cyles through forward & backward at varying speeds to deliver optimal results for your most popular food creations!
- Manual Controls give you the flexibility to operate the blender for various needs.
- Extra Wide Blade design allows food to fall easily to the bottom of the jar, for more efficient blending!
Time to Make it Fresh!


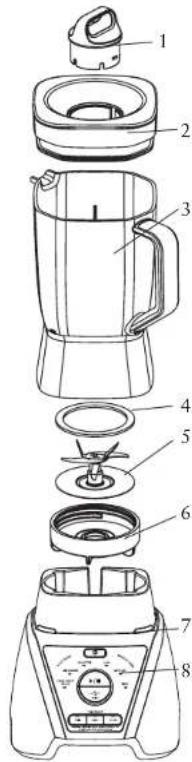
Learning About The Oster Texture Select Blender With 6 Cup Glass Jar
- Filler Cap / 2 Ounce Measuring Cup: – Allows you to add ingredients during use. Also allows you to open to allow steam to escape when blending hot foods.
- Jar lid - Seals the blender jar.
- Jar - 6-cup Dishwasher Safe Boroclass glass jar withstands Thermal shock.
Glass Jar Blade Assembly – With locking feature to secure blade assembly to threaded jar bottom. Seals the jar to the blade for leak-proof operation.
-
Sealing Ring :
-
Blade – Creates a forward and reverse action when the Programmed Settings are in use.
- Threaded Jar Bottom With Locking Lever - Advanced design for simple assembly to jar.
- Motor Base – Holds the jar securely. Contains a powerful, reversible, variable speed motor.
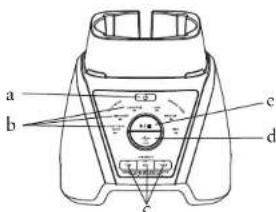
- Control Panel
a. Power Button (On/Off button) - Turns the product On and Off.
b. Pre-Programmed Settings: Use for flawless results at the touch of a button. Select the desired setting and watch the Oster Texture Select blender cycle through the program, spinning the blade forward and backwards for expert results at the touch of a button. Unit will stop after running through the cycle.
Select From:
Smoothie
Food Chop / Salsa
Milkshakes
c.TextureSettings - Use to select for your desired consistency
Thin
Medium
Thick
d. Pulse button – Press to pulse and release to stop.
e. Start/StopButton – Press to start/stop any cycle or manual control setting.
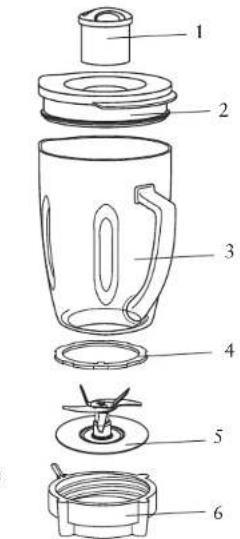
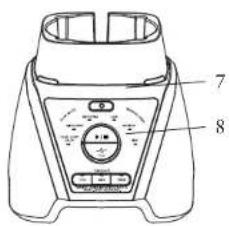

Learning About The Oster Texture Select Blender With 8 Cup Plastic Tritan™ Jar
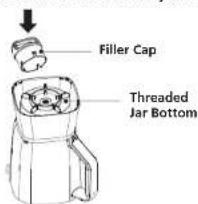
- Filler Cap – Allows you to add ingredients during use. Also, allows you to open to allow steam to escape when blending hot foods. In addition, it can be used as a tool to remove or tighten the threaded jar bottom.
- Jar lid - Seals the blender jar.
- Jar-8-Cup Break Resistant BPA-Free Tritan ^TM Plastic.
- Sealing Ring – Seals the jar to the blade for leak-proof operation.
- Blade – Creates a forward and reverse action when the Programmed settings are in use or when the Reverse Blend button is pressed.
- Threaded Jar Bottom
- Motor Base – Holds the jar securely. Contains a powerful, reversible, variable speed motor.
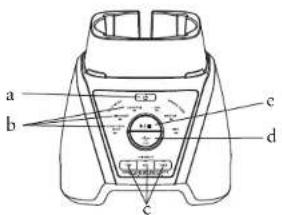
- Control Panel
a. Power Button (On/Off button) – Turns the product On and Off.
b. Pre-Programmed Settings: Use for flawless results at the touch of a button. Select the desired setting and watch the Oster Texture Select blender cycle through the program, spinning the blade forward and backwards for expert results at the touch of a button. Unit will shut after running through the cycle. Select From:
Smoothie
Food Chop / Salsa
Milkshakes
c. Texture Settings – Use to select for your desired consistency
Thin
Medium
Thick
d. Pulse button - Press to pulse and release to stop.
c. Start/Stop Button - Press to start/stop any cycle or manual control setting.
Using The Oster Texture Select Blender
Before you use the product for the first time, separate the lid, filler cap and blade from the jar. Wash in warm, soapy water, or top rack in the dishwasher. Rinse and dry well.
⚠ WARNING: Blade is sharp. Handle with care.

6 Cup glass Jar Assembly

Locking Sealing Ring

Blade

Threaded Jar Bottom with locking lever
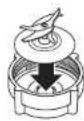
Fig1
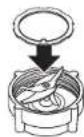
Fig2
- Place Blade into Threaded Jar Bottom (Fig.1).
-
Place sealing ring over blade assembly. Carefully press and tuck sealing ring into locking groove (Fig2).
-
Ensure the locking sealing ring is fully and evenly tucked in place and holding the blade assembly to the threaded jar bottom. For correct assembly see (Fig3).

Incorrect Correct!

Fig3
-
Install the Integrated Blade Assembly onto the Jar. Turn clockwise to tighten. Be sure the Integrated Blade Assembly is tightened to the jar before using. NOTE: For proper installation onto Blender Motor base, make sure locking lever rotates past the anti-rotation tabs on the Blender jar or smoothie cup. See (Fig4). CAUTION: If Locking Lever is damaged or missing, do not operate blender, and contact Customer Service for a replacement.
-
Put the ingredients into the jar.
-
Secure the lid and filler cap.
-
Place the jar onto the base.
-
Plug the power cord into a standard household 120/127-volt, 60 hz. AC outlet. You are now ready to start. ALWAYS PLACE HAND ON CONTAINER COVER WHILE OPERATING BLENDER.

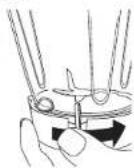
Fig4
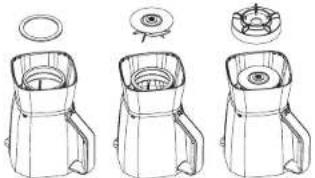
8 Cup Tritan™ Jar Assembly
natural_image
Line drawing of three types of blender machines with different internal components and top view indicators (no text or symbols)Note: The filler cap can be used as a tool to tighten or remove the threaded jar bottom.
-
Install the sealing ring over the blade.
-
Turn the jar upside down and place it on a flat and stable surface.
-
Turn the blade with sealing ring upside down and place into the bottom of the jar.
-
Install the threaded jar bottom over the blade assembly. Turn clockwise to tighten. Be sure the threaded jar bottom is tightened to the jar before using.
-
Put the ingredients into the jar.
-
Secure the lid and filler cap.
-
Slide the jar onto the base.
-
Plug the power cord into a standard household 120/127-volt, 60 hz. AC outlet.

You are now ready to start.
Using the Pre-Programmed and Texture Settings
- Press the ON/OFF power button to turn the product on. The power light will blink, indicating the product is active and ready to use. The light will stay on when the motor is running.
- Select by rotating the dial for the desired Pre-Programmed Setting:
- Smoothie
- Food Chop/Salsa
- Milkshakes
- To change your selection, press Stop followed by selecting another Pre-programmed setting Smoothie, Food Chop/Salsa, or Milkshake.
- Once pre-programmed selection is made, choose your desired texture. The default texture is medium but can be changed to thin or thick dependent on your preference by pressing the texture button.
- Press the Start button for the blending process to begin.
- Once the program is finished the product automatically stops. Please note: You may press the "Stop" button to cancel the program at any time.
- Press the ON/OFF power button to turn the product off. This product is pre-programmed to turn off automatically if not used for a period of several minutes. All lights will turn off when the unit automatically powers down.
Using the Manual Controls
The Manual Controls include:
Low
Med
High
Pulse
Start/Stop
Use these controls for personal recipes or to continue blending after a Programmed Setting is finished.
- Press the ON/OFF power button to turn the product on. The power light will blink, meaning the product is active and ready to use. The light will stay on when the motor is running.
- Put the ingredients into the jar.
- Secure the lid and the filler cap.
Using High
- Turn the dial to the "High" setting to run the product at a high speed.
- Press the "Start" button to begin blending.
- Press the "Stop" button to cancel the blending at any time.
- Press the ON/OFF power button to turn the product off.
Using the Medium
- Turn the dial to the "Medium" setting to run the product at a medium speed.
- Press the "Start" button to begin blending.
- Press the "Stop" button to cancel the blending at any time.
- Press the ON/OFF power button to turn the product off.

Using the Low
- Turn the dial to the "Low" setting to run the product at a low speed.
- Press the "Start" button to begin blending.
- Press the "Stop" button to cancel the blending at any time.
- Press the ON/OFF power button to turn the product off.
Using the Pulse
- Verify that the blue light is blinking. This indicates that the blender is turned on.
- Press and release the "Pulse" button.
- Release the pulse button to stop.
- Press the ON/OFF power button to turn the product off.
Use pulse button to crush ice or chop food.
Caring for Your Product
After Use
- Press the OFF button and unplug blender. Lift the jar straight up from the base, remove the lid and empty the jar.
- If necessary, use a rubber spatula to scrape foods away from the sides of the jar.
Cleaning
⚠ WARNING: Blades are sharp. Handle carefully.
CAREFULLY release the blade from the bottom of the jar by turning the threaded jar bottom counterclockwise. The jar lid, filler cap and blade are
dishwasher safe. Use the top rack of the dishwasher for the jar lid, filler cap, and blade. Place sealing ring into bottom basket of dishwasher.
You can also wash the parts in warm, soapy water. Rinse well and dry. Wipe the base with a soft, damp cloth to clean. Never submerge the blender base in a liquid.

Check the parts as you put them back together.
TIP: Run blender with soapy water for 20-30 seconds at Low or Medium Speed for cleaning without disassembly. Follow with clean water rinse.
Storing
Reassemble the blender for storage. Leave the lid open a gap so no odors are retained.
NOTICE: Never put the jar, or any other parts, in a microwave oven. Never store foods or drinks in the jar.
Servicing
This appliance has no user serviceable parts. Any servicing beyond the cleaning described in the Cleaning section should be performed by an authorized service representative only.
If repairs are needed, send your appliance only to an authorized OSTER ^® Appliance Service Center. Replacement parts are available on www.oster.com.
10
Blending Tips
Liquids
Put liquids into the jar first, unless the recipe says otherwise. Add more liquid if ingredients are not blending properly.
Using the Filler Cap
Do not remove the lid while in use. Instead, open the filler cap to add smaller ingredients.
Ice Crushing
Without Liquid: use pulse button until you achieve desired results.
With Liquid: Add desired amount of ice cubes and water until ice floats. Blend on High until you achieve desired results then strain off water.
Working with Hot Foods or Liquids
WARNING: When you work with HOT FOODS, remove the filler cap to vent steam. Tilt the lid away from you partially covering the opening. Keep hands and other exposed skin away from the lid opening to prevent possible burns.
WARNING: When you work with HOT LIQUIDS, remove the filler cap and start at a low speed, and then gradually increase to a faster speed. Do not add liquid over the 4 cup (1L) level. Always keep hands away from steam. Also, never blend boiling liquids.
Ingredient Quantities
Use only the amount of food suggested in the recipes. If you want greater amounts, prepare in batches. Using larger amounts may overload and strain the motor. You might also get different results.
Frequently Asked Questions
Why doesn't the blender turn on?
- Make sure the base is plugged in an active power receptacle.
- Verify blinking blue light is active after pushing on/off button.
How can I prevent liquids from leaking out?
Check to see that the sealing ring is correctly assembled in between the blade and the jar.
11
Food Processor Accessory (Select Models Only)
Food Pusher – Use to safely push ingredients into Slicing/Shredding Disk.
Cover - The feed tube allows the addition of ingredients while processing.
Slicing/Shredding Disk – Specially designed for slicing and shredding.
⚠ WARNING: The blade is very sharp, handle carefully.
Blade Shaft – For use with Slicing/ Shredding Disk.
S Blade – Specially designed for chopping and mincing. Grasp the plastic Center Hub when handling the Blade. CAUTION: The blade is very sharp. Handle carefully.
Bowl - 5-cup capacity allows for fast processing of hard-to-chop foods.
Adaptor – Transfers the power of your Motor Base to the Food Processor Accessory.
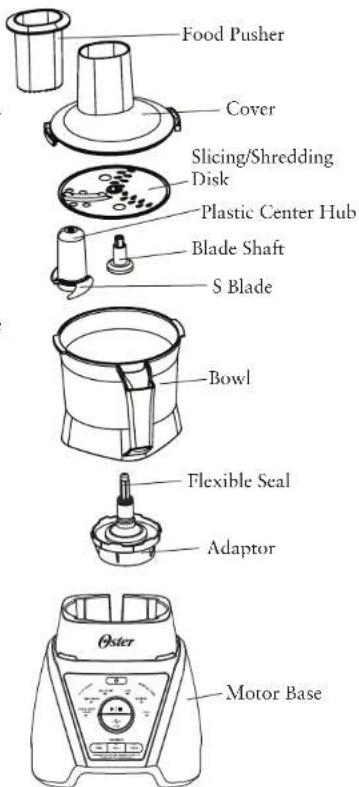
Before Using for the First Time – After unpacking, disassemble unit before using for the first time.
Wash all parts (except Adaptor) in warm, soapy water.
Rinse and dry immediately.
CAUTION: DO NOT IMMERSE ADAPTOR IN ANY LIQUID.
12
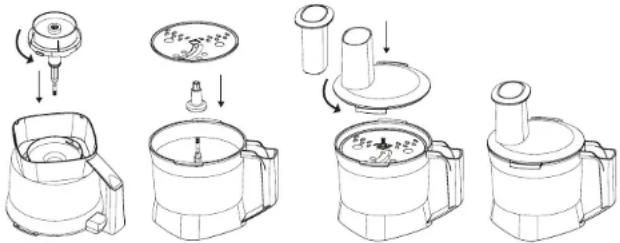
Assembling and Using Your Food Processor
- Before assembly, make sure Adaptor is operating correctly. Unplug Motor Base during assembly.
- Place Adaptor in bowl and turn counterclockwise to lock.
- Place Bowl with Adaptor on Motor Base.
Chop or Mince
- Hold S Blade by the plastic Center Hub and place over post of Bowl. CAUTION: Blade is very sharp, handle carefully. Rotate the S Blade to make certain it is seated on the post as far as it will go. Always place S blade in Food Processor before adding ingredients.
- Place food in Processing Bowl. Food to be processed should always be cut into 1-inch (2.5 cm) pieces.
- Using alignment marks on the lid, place cover on bowl and press down firmly while turning counterclockwise to lock.
DO NOT OPERATE UNIT UNLESS COMPLETELY ASSEMBLED
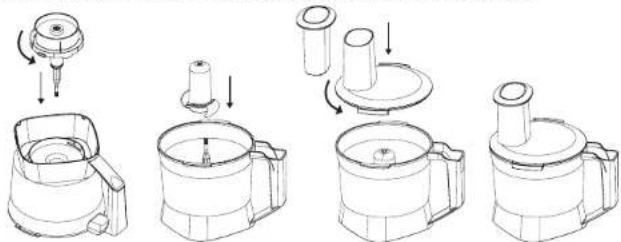
- Turn unit "ON." (Select Pulse, Low, or Med setting on the Motor Base.) ALWAYS HOLD FOOD PROCESSOR FIRMLY WITH ONE HAND WHEN STARTING UNIT AND WHEN PROCESSING. Process until desired results are achieved by running the unit continuously or Fast Pulsing. Fast Pulsing is the technique used to control the size of the food being processed with the Food Processor Accessory. Press and release the Pulse button very quickly. Refer to Processing Chart for proper techniques and end results.
NOTE: Only the "Food Chop/Salsa" Pre-Programmed setting is functional when Food Processor is attached.
Slice or Shred
- Place Blade Shaft over post. Place Slicing/Shredding Disk over Blade Shaft with the blade of your choice facing up. CAUTION: Blade is very sharp, handle carefully.
- Using alignment marks on the lid, place cover on bowl and press down firmly while turning counterclockwise to lock.
- Load the feed tube with ingredients before turning the Food Processor "ON".
13
- Rest the Food Pusher in the feed tube. Turn unit "ON". (Select medium speed setting.) While holding the Food Pusher with one hand and the feed tube in the other, push gently down on the Food Pusher. Always use the Food Pusher to yield more evenly sliced or shredded foods. - NEVER USE YOUR FINGERS. When finished, turn the unit "OFF".
NOTE: Med - High Manual settings are recommended for slicing and shredding.
flowchart
graph TD
    A["Raw Material Inspection"] --> B["Add into a component"]
    B --> C["Close-up of a bowl with contents"]
    C --> D["Add into a component with contents"]
    D --> E["Product Assembly"]
    E --> F["Final Product"]
How To Disassemble
- Turn unit "OFF" and unplug Motor Base.
- Always wait for the S Blade or Slicing/Shredding Disk to stop spinning.
- Remove Food Processor Accessory from Motor Base.
- Turn Cover clockwise to remove from Bowl.
- Remove S Blade or Disk carefully. Be careful not to let Blade or Disk fall out of the container. The cutting edges are very sharp. Scrape any remaining food from the Blade and Processing Bowl.
- Unlock Bowl from Adaptor by turning Bowl clockwise.
Cleaning
Unplug Motor Base Before Cleaning.
WARNING: Do Not Immerse Adaptor in Water. Always Remove Adaptor from processor Bowl before cleaning.
WARNING: Keep S Blade and Disk out of the reach of children. Store the S Blade and Disk in the Bowl or in a convenient, safe location when not in use. This Blade and Disk should be treated with the same caution as a sharp knife.
Remove stains caused by processing large amounts of carrots or similar vegetables with baking soda. Rinse stained parts in water and sprinkle with baking soda. Rub with a soft, damp cloth. Rinse and dry. Do not use abrasive cleaners on any parts.
Maintenance
This unit is designed with a safety interlock. The interlock requires that the Cover be in place before the blade will rotate. (The interlock does not control operation of the Motor.) To ensure that the interlock is operating correctly, hold the Adaptor and rotate the Drive Shaft several turns. The metal Star Drive on
14
the bottom of the Adaptor should NOT turn. If it does turn, DO NOT USE. Return the unit to an authorized service facility for repair. DO NOT USE THE INTERLOCK FEATURE AS A SUBSTITUTE for turning the power unit "OFF" and unplugging the power unit before disassembling and cleaning. Never put S Blade on Adaptor without Processor Bowl. Do not operate if the flexible seal is damaged or missing. The safety interlock could become jammed.
Processing Tips
- Cut all fruits and vegetables, cooked meats, fish, seafoods and cheeses into pieces 1 inch or smaller.
- Always hold hand firmly on the Cover when starting and running Motor.
- Do not process hot liquids or frozen foods.
- Do not process whole spices (except peppercorns) such as nutmeg or cinnamon. They may cause damage to the surface of the Processor Bowl.
- Process the hardest foods first, using only a few Fast Pulses to begin chopping. Add more delicate foods and continue to process using the Fast Pulse technique. The harder foods will continue to be chopped along with the softer foods.
- Processing of Parmesan cheese, dried dates or other extremely hard foods is not recommended. If a knife cannot easily pierce the food, it should NOT be processed in the Food Processor Accessory.
- The Food Processor Accessory is not designed to whip cream, whip egg whites or process dough. Use a standard mixer for those tasks.
- If liquid leaks from Cover, there is too much liquid in the recipe. Adjust the liquid level to prevent leakage.
- The temperature of cheese will affect how it processes. Cheese for spreads should be at room temperature for a smooth, creamy texture. "Grated" cheese should be refrigerator cold.
- Large, harder pieces of food can be processed with several Fast Pulses to coarsely chop. Then process continuously for a fine texture.
Only the “Food Chop/Salsa” Pre-Programmed setting is functional when Food processor is attached.
To Convert a Recipe
- Total the amount of dry and liquid ingredients. If the total exceeds 5 cups, decide if the recipe can be made easily in batches. Do not attempt to process large recipes.
- If total is under 1 cup (250 ml), process dry ingredients or the most finely chopped foods first.
- Then add remaining ingredients and combine with several Fast Pulses to mix together.
15
Food Processing Chart
| Food Cutting Blade Processing Method | ||
| Vegetables (chopped) - Celery, Potatoes, Onions, Carrots, Cucumbers, Zucchini, Squash, etc. | S-Blade Pulse to | desired size |
| Fruits (chopped) - Apples, Mangos, Pineapple, Papayas, Tomatoes, Chiles, Cranberries, olives (pitted) etc. | S-Blade Pulse to | desired size |
| Peppers (chopped) - green, red or orange, jalepenos | S-Blade Pulse to | desired size |
| Roots (chopped) - Garlic, Ginger Root, Turnips, etc. | S-Blade Pulse to | desired size |
| Nuts (chopped) - Almonds, Peanuts, Pecans, Walnuts, etc. | S-Blade Pulse to | desired size |
| Herbs, stems removed (chopped) - Parsley, Cilantro, Basil, Orcano, Rosemary, Marjoram, etc. | S-Blade Pulse to | desired size |
| Vegetables (sliced) - Celery, Potatoes, Carrots, Cucumbers, Zucchini, Squash, etc. | Slicing Disk Medium Speed | |
| Vegetables (shredded) - Carrots, Potatoes, Zucchini, Squash, etc. | Shredding Disk Medium Speed | |
| Cheese (chopped) - Mozzarella, Cheddar, Swiss, etc. | S-Blade Pulse to | desired size |
| Cheese (shredded) - Mozzarella, Cheddar, Swiss, etc. | Shredding Disk Medium Speed | |
| Crumbs - Cracker, Graham Cracker, Bread (dried) | S-Blade Medium Speed | |
| Eggs, hard-boiled (chopped) S-Blade Medium Speed | ||
| Meats, raw or cooked (chopped) S-Blade Medium Speed | ||
Blend-N-Go® Smoothie Cup Accessory (Select Models Only)
NOTE: For proper installation onto Blender Motor base, make sure locking lever rotates past the anti-rotation tabs on the smoothie cup.
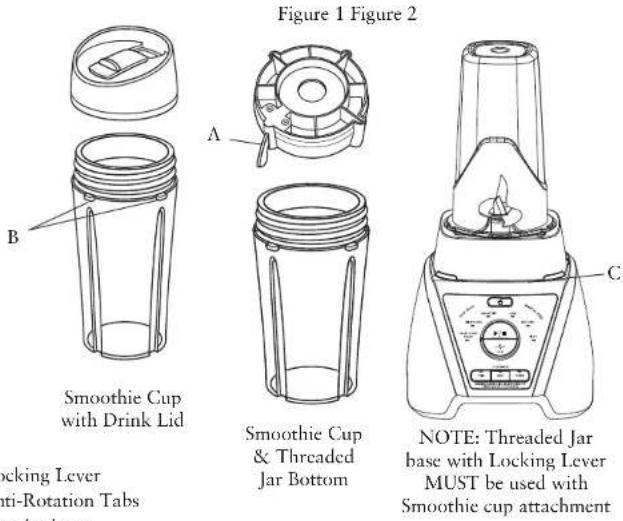
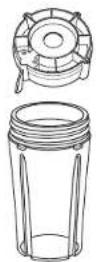
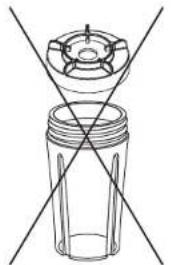
NOTE: Blend-N-Go® Smoothie cup attachment is only compatible with threaded jar bottom with locking lever, See Images below
natural_image
Diagram of a mechanical component with intersecting diagonal lines indicating alignment or crossed sections (no text or symbols)Image BImage A
To purchase Blending accessories visit OsterBlending.com
Using Your Blend-N-Go® Cup With Your Oster Texture Select Blender
Before washing ensure the blender is off and unplugged. Wash all components except blender base with soapy water with a soft sponge and a bottle brush. Do not use abrasive cleansers or sponges for cleaning. Rinse well and dry. Parts are also dishwasher safe. Do not blend hot liquids.
Place desired ingredients into smoothie cup according to the following order: Liquids, fresh ingredients, frozen fruit, ice, yogurt and ice cream.
(Cut all firm fruits, vegetables and other foods into pieces no larger than 1/2-inch (1.25 cm) by 2 inches (5.0 cm).
- Place Blade into Threaded Jar Bottom or adapter.
- Place sealing ring over blade assembly. Carefully press and tuck sealing ring into locking groove. (See page 7 for more detailed instructions for blade assembly)
- Place blade assembly into cup. (See Figure 1 on Page 17)
- Be sure the Integrated Blade Assembly is tightened to the jar before using.
- Place cup assembly onto Blender base. (See Figure 2 on Page 17)
- Hold cup in position. Operate Blender according to the instructions in your Blender User Manual. Blend until desired consistency.
- Place lid on cup and turn clockwise to tighten.
Enjoy your blended drink!
Recipes
Honey-Vanilla Blast
Makes 1 serving
1 cup fat free milk 1 cup (8 oz.) fat free vanilla yogurt
14 cup protein powder 3 chunks frozen banana, about 1 medium
2 Tbsp. honey
-
In jar, place ingredients in order given above.
-
Cover jar with lid. Press "On / Off" button, then select Smoothie.
-
Select desired consistency -- Thin, Medium or Thick.
-
Press the Start/Stop button.
-
Pour into tall glass to serve.
Very Berry Smoothie
Makes 1 serving
1 cup orange juice 12 cup vanilla low fat yogurt
1 cup frozen mixed berries 2 frozen banana chunks, about 1 small
2 Tbsp. Agave
-
In jar, place ingredients in order given above.
-
Cover jar with lid. Press "On / Off" button, then select Smoothie.
-
Select desired consistency -- Thin, Medium or Thick.
-
Press the Start/Stop button.
-
Pour into tall glass to serve.
Ficry Red Salsa Recipe
Makes 3 cups
2 large garlic cloves
1 can (15 oz.) whole tomatoes, drained
1 medium onion, cut into 14 (4 pieces)
12 cup cilantro leaves
1-4 jalapeno peppers, quartered
12 -1 tsp. sugar
Salt to taste
1 Tbsp. lime juice
1 can (15 oz each) whole tomatoes, drained
Tortilla chips for serving
-
In jar, place ingredients, except tortilla chips, in order given above. (Note: Place one can of tomatoes in after garlic cloves and second can after rest of ingredients are added. Also, place onion in middle of jar to avoid blockage.)
-
Cover jar with lid. Press "On / Off" button, then select Food Chop/Salsa.
-
Select desired consistency -- Thin, Medium or Thick.
-
Press the Start/Stop button.
-
Pour into bowl; serve with tortilla chips.
Peachy Applesauce
Makes 1 ¼ cups
1 large apple, pared, cored and quartered
1 large peach, pitted, peeled and quartered (If out of season, use 2 canned peach halves.)
2 Tbsp. water
-
In small saucepan, cook fruits in water 5-8 minutes or until very tender.
-
In jar, place fruits and liquid.
-
Cover jar with lid. Press "On/Off" button, then press "Pulse" button 3 or 4 times until smooth.
-
Remove from jar; place in covered containers.
-
Chill or freeze at once.
Peachy Green Smoothie
Makes: 2 servings
1 banana 1 peach, stone removed
½ avocado 1 cup Greek yogurt
1 cup ice 1 cup baby spinach
12 cup coconut water 1 tablespoon honey or agave
12 teaspoon vanilla extract
-
Place all ingredients into the blender jug. Secure the lid.
-
Blend on HIGH speed until all of the ingredients are blended, or use the Frozen Smoothies button function.
-
Pour into a tall glass. Serve.
Banana Chai Thick Shake
Makes: 3 servings
4 frozen bananas 3 cups skim milk or coconut water
1 cup ice 12 teaspoon ground cinnamon
½ teaspoon ground turmeric ¼ teaspoon ground cardamom
14 teaspoon ground ginger 12 teaspoon ground star anise Pinch sea salt
-
Place all ingredients into the blender jug. Secure the lid.
-
Blend on HIGH speed until all of the ingredients are blended, or use the Smoothie and texture settings.
-
Pour into a tall glass. Serve.
3 Year Satisfaction Guarantee
Sunbeam Products, Inc. ("Sunbeam") or if In Canada, Newell Brands Canada ULC ("NBC") warrants that for a period of three (3) years from the date of initial retail purchase, this product will be free from defects in material and workmanship, when used in accordance with the instructions provided.
Sunbeam (or NBC), at its option, will repair or replace this product or any component of the product found to be defective during the warranty period.
Replacement will be made with a new or remanufactured product or component. If the product is no longer available, replacement may be made with a similar product of equal or greater value. This is your exclusive warranty. Do NOT attempt to repair or adjust any electrical or mechanical functions on this product. Doing so will void this warranty.
This warranty is valid for the original retail purchaser from the date of initial retail purchase and is not transferable. Keep the original sales receipt. Proof of purchase is required to obtain warranty performance. Sunbeam (or NBC) dealers, service centers, or retail stores selling Sunbeam (or NBC) products do not have the right to alter, modify or any way change the terms and conditions of this warranty.
This warranty does not cover normal wear of parts or damage resulting from any of the following: negligent use or misuse of the product, use on improper voltage or current, use contrary to the operating instructions, disassembly, repair or alteration by anyone other than Sunbeam (or NBC) or an authorized Sunbeam (or NBC) service center. Further, the warranty does not cover: Acts of God, such as fire, flood, hurricanes and tornadoes.
What are the limits on Sunbeam's (or NBC's) Liability?
Sunbeam (or NBC) shall not be liable for any incidental or consequential damages caused by the breach of any express, implied or statutory warranty or condition. Except to the extent prohibited by applicable law, any implied warranty or condition of merchantability or fitness for a particular purpose is limited in duration to the duration of the above warranty. Sunbeam (or NBC) disclaims all other warranties, conditions or representations, express, implied, statutory or otherwise. Sunbeam (or NBC) shall not be liable for any damages of any kind resulting from the purchase, use or misuse of, or inability to use the product including incidental, special, consequential or similar damages or loss of profits, or for any breach of contract, fundamental or otherwise, or for any claim brought against purchaser by any other party. Some provinces, states or jurisdictions do not allow the exclusion or limitation of incidental or consequential damages or limitations on how long an implied warranty lasts, so the above limitations or exclusion may not apply to you. This warranty gives you specific legal rights, and you may also have other rights that vary from province to province, state to state or jurisdiction to jurisdiction.
How to Obtain Warranty Service
In the U.S.A.
If you have any question regarding this warranty or would like to obtain warranty service, please call 1-800-334-0759 and a convenient service center address will be provided to you.
In Canada
If you have any question regarding this warranty or would like to obtain warranty service, please call 1-800-667-8623 and a convenient service center address will be provided to you.
In the U.S.A., this warranty is offered by Sunbeam Products, Inc. located in Boca Raton, Florida 33431. In Canada, this warranty is offered by Newell Brands Canada ULC, located at 20B Hereford Street, Brampton, Ontario L6Y OM1. If you have any other problem or claim in connection with this product, please write our Consumer Service Department.
PLEASE DO NOT RETURN THIS PRODUCT TO ANY OF THESE ADDRESSES OR TO THE PLACE OF PURCHASE.
natural_image
Line drawings of a kitchen mixer with five sequential steps showing the process from top to bottom (no text or labels)natural_image
Cross-sectional diagram of a mechanical component with no visible text or symbolsImagen BImagen A
Made in Mexico © 2019 Sunbeam Products, Inc. Product Of: Sunbeam Products, Inc. 2381 NW Executive Center Drive Boca Raton, FL 33431. Imported into Canada by: Newell Industries Canada Inc. 20B Hereford Street Brampton, Ontario L6Y0M1.
www.oster.com U.S.: 1-800-334-0759 www.oster.ca CA: 1-800-667-8623
Hecho en Mexico © 2019 Sunbeam Products, Inc. Producto de: Sunbeam Products, Inc. 2381 NW Executive Center Drive Boca Raton, FL 33431. Importado al Canadá por: Newell Industries Canada Inc. 20B Hereford Street Brampton, Ontario L6Y0M1.
www.oster.com EE.UU.: 1-800-334-0759 www.oster.ca CA: 1-800-667-8623
Printed in Mexico
Texture Select Pro Series_19ESM1
GCDS-OST552465-JC
- IMPORTANT SAFEGUARDS
- SAVE THESE INSTRUCTIONS
- North American models with polarized plugs:
- POLARIZED PLUG
- Power Cord Instructions:
- Table of Contents
- Welcome
- Learning About The Oster Texture Select Blender With 6 Cup Glass Jar
- Learning About The Oster Texture Select Blender With 8 Cup Plastic Tritan™ Jar
- Using The Oster Texture Select Blender
- Cup glass Jar Assembly
- Cup Tritan™ Jar Assembly
- Using the Pre-Programmed and Texture Settings
- Using the Manual Controls
- Using High
- Using the Medium
- Using the Low
- Using the Pulse
- Caring for Your Product
- After Use
- Cleaning
- Storing
- Servicing
- Blending Tips
- Liquids
- Using the Filler Cap
- Ice Crushing
- Working with Hot Foods or Liquids
- Ingredient Quantities
- Frequently Asked Questions
- Food Processor Accessory (Select Models Only)
- Assembling and Using Your Food Processor
- Chop or Mince
- Slice or Shred
- How To Disassemble
- Maintenance
- Processing Tips
- To Convert a Recipe
- Blend-N-Go® Smoothie Cup Accessory (Select Models Only)
- Using Your Blend-N-Go® Cup With Your Oster Texture Select Blender
- Recipes
- Honey-Vanilla Blast
- Very Berry Smoothie
- Ficry Red Salsa Recipe
- Peachy Applesauce
- Peachy Green Smoothie
- Banana Chai Thick Shake
- Year Satisfaction Guarantee
- What are the limits on Sunbeam's (or NBC's) Liability?
- How to Obtain Warranty Service
Brand : OSTER
Model : Texture Select Pro BLSTTS-CB2-000
Category : Blender