
GVC150RD - Vacuum Cleaner GEMINI - Free user manual and instructions
Find the device manual for free GVC150RD GEMINI in PDF.


| Product Type | Stick Vacuum Cleaner |
| Model | GVC150RD |
| Brand | Gemini |
| Voltage | DC 22.2V |
| Output Power | 150W (Main unit), 15W (LED floor brush), 12W (Motorized bed brush) |
| Battery Type | Lithium-ion (dedicated, not user-replaceable) |
| Charging Time | Approx. 4 - 5 hours |
| Run Time (Low Speed) | Approx. 30 minutes |
| Run Time (High Speed) | Approx. 17 minutes |
| Product Dimensions (Stick with LED floor brush) | 1060 (H) x 235 (W) x 160 (D) mm |
| Weight | Not specified (estimated ~2.5 kg) |
| Dust Container Capacity | Not specified (estimated ~0.5 L) |
| Filtration System | Washable filter with stainless steel filter cover |
| Accessories Included | 2-in-1 crevice tool, narrow nozzle, motorized bed brush, wall hanger |
| Floor Brush | LED floor brush with rotating roller |
| Speed Settings | Low and High (cycle through: Low, High, Stop) |
| Battery Indicator | 3-stage LED indicator on main unit (charging/full/low) |
| Safety Features | Automatic shut-off when brush is stuck; overheat protection; child safety warnings |
| Maintenance | Empty dust container; wash filter and roller brush; air-dry completely before reuse |
| Repairability | Contact qualified electrician; do not open battery; replacement parts via customer service |
| Intended Use | Household only; dry vacuuming; not for liquids, hot ashes, or toner |
Frequently Asked Questions - GVC150RD GEMINI
User questions about GVC150RD GEMINI
0 question about this device. Answer the ones you know or ask your own.
Ask a new question about this device
Download the instructions for your Vacuum Cleaner in PDF format for free! Find your manual GVC150RD - GEMINI and take your electronic device back in hand. On this page are published all the documents necessary for the use of your device. GVC150RD by GEMINI.
USER MANUAL GVC150RD GEMINI
Please read and retain for future reference.
SAFETY INSTRUCTION - GENERAL
- Use this appliance solely in accordance with these instructions.
- This appliance is for household use only, not for commercial purpose.
- Remove all packaging material from the appliance before use.
- This appliance shall not be used by children of 0 to 8-year old.
- This appliance can be used by children older than 8-year old and persons with reduced physical, sensory or mental capabilities or lack of experience and knowledge, but only if they have been given supervision or instruction concerning use of the appliance in safe way and understand the hazards involved.
• Children should be supervised to ensure that they do not play with the appliance. - Cleaning and maintenance must not be done by children.
- Have any repairs carried out solely by a qualified electrician. Never try to repair the appliance yourself.
- Do not handle the plug or appliance with wet hands.
- Do not immerse the main body in water.
• Children shall not play with the appliance. - Do not leave the appliance unattended when connected to the mains supply.
- Keep hair, loose clothing, fingers and all parts of the body away from openings of the appliance.
- Only use the attachments/accessories supplied with the product.
SAFETY INSTRUCTION - ELECTRICITY AND HEAT
- Verify that the mains voltage is the same as that indicated on the rating plate on the appliance before use.
- Make sure that you always use a grounded wall socket to connect the appliance.
• Always remove the plug from the wall socket when the appliance is not in use. - Remove the plug from the wall socket by pulling the plug, not the power cord.
- Make sure that the appliance, the power cord and plug do not make contact with water.
- Make sure that the appliance, the power cord and plug do not make contact with hot surface, such as a hot hob or naked flame.
- Check the appliance's power cord regularly to make sure it is not damaged. Do not use the appliance if the power cord is damaged. If the power cord is damaged, it must be replaced by an electrical technician or a person with similar qualification, in order to avoid any hazards.
- Never use the appliance in the vicinity of flammable material.
SAFETY INSTRUCTION - DURING OPERATION
- Make sure your hands are dry before touching the appliance, power cord or plug.
- Do not pick up the appliance if it falls into water. Remove the plug from the socket immediately. Do not use the appliance again.
- Never immerse the appliance, the power cord or the plug in water or any liquid.
- Clean the appliance thoroughly after every use (Please refer to “Cleaning and Storage” section.)
- The appliance can not aspirating an aqueous solution that may contain foaming detergent.
- Do not dismantle the vacuum cleaner while the motor is still operating.
- Never use the vacuum cleaner without the filter.
- Always keep the openings clean and prevent dust or dirt from blocking the air passage. Do not put any objects into openings. Do not use with any opening blocked until the obstacles removed.
- Never use the vacuum cleaner to suck up explosive, flammable or combustible liquids nor anything that may be still burning such as cigarette butts or ash/cinders. Never vacuum up toxic materials, organic solvents or acids.
- Never vacuum up solid, sharp or piercing objects that may damage the filter.
- Do not clean any parts in a dishwasher.
- When configuring a rotating brush, do not touch any part of the rotating brush during use, otherwise it may cause mechanical damage.
- Do not suck water or other liquids, especially carpet cleaning solution, internal moisture or water may lead to short circuit of electrical appliances;
- Do not suck laser printer, copier internal use of toner, color powder, etc., otherwise it may lead to fire or explosion;
- Do not suck a large number of gypsum, cement and large pieces of paper, etc., These objects may clog the filter, must be cleaned up in a timely manner;
- This product cannot suck toner, lead powder on the battery, cannot be used in dangerous places or industrial production sites, so that non-flooring, ordinary ground, carpet special dust cause damage to the product, and even explode. This product can only suck dry garbage, must not be used to suck liquid;
- Under extreme use and temperature conditions, the battery may occur leakage, if the skin is uncarefully to be stained with leaking battery fluid, please rinse immediately with water, such as the eyes to get liquid, in addition to rinsing with water, please immediately to the hospital to check treatment;
- This product is equipped with a dedicated lithium battery and charger, please do not replace the battery by yourself or use other chargers to avoid damage to the product and cause other hazards. This charger is only suitable for this product, do not use it to charge other battery packs so as not to cause danger.
PRODUCT OVERVIEW
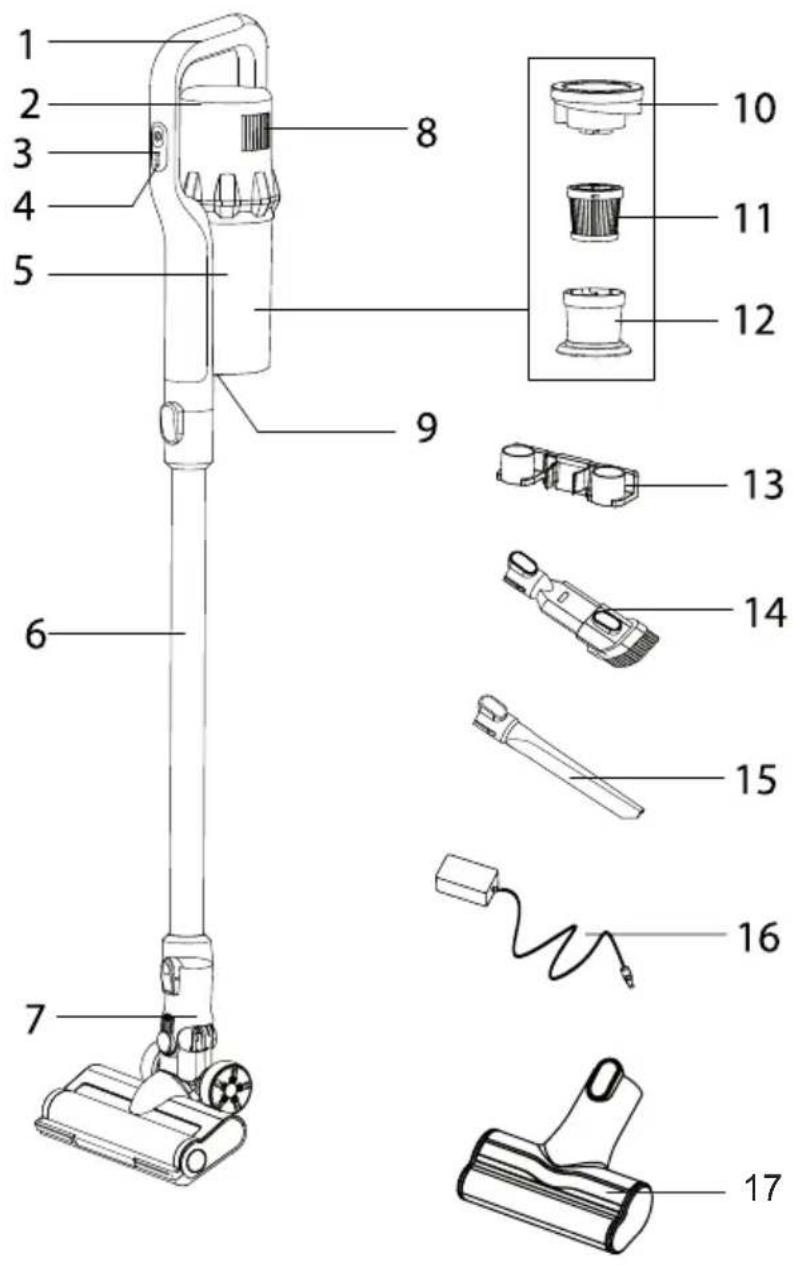
- Handle
- Main Unit
- Speed mode button
- Battery level and charging indicator
- Dust container
- Aluminium tube
- LED floor brush
- Air outlet
-
Dust container releasing button
-
Dust container cover
- Filter
- Stainless Steel filter cover
- Wall hanger
- 2-in-1 crevice tool
- Narrow nozzle
- BS plug
- Motorized bed brush
CHARGING
Before using your vacuum cleaner for the first time, allow the battery to charge for approx. 4 - 5 hours.
Important note: Please note the vacuum cleaner can not start operation during charging
- When the vacuum cleaner is in use, the indicator light can display the battery power status in real time. When the last light starts to flash, it indicates that the power of the machine is low.
natural_image
Line drawing of a mechanical tool or connector (no text or symbols)- The vacuum cleaner is equipped with a special adapter, connect the adapter to the socket, the charging indicator lights cyclically light in turn to show that the machine is charging. When three indicator lights are on, the battery power is full.
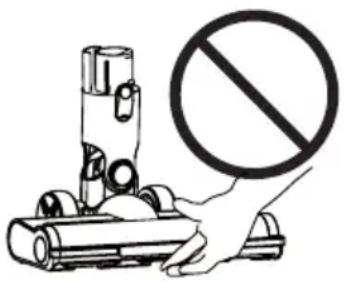
Warning: Electric brush contains moving parts! In order to avoid personal injury, do not touch the brush roller when the vacuum cleaner is running, such as touching the rotating roller may cause cuts, injuries or other injuries, for vacuum cleaner maintenance, please turn off the machine first, if use with children nearby please pay attention to safety
After fully charging, long press the power on/off button “ ⏻” to start operation, the vacuum cleaner will work under low speed at the beginning, and can short press the button once to change at the high speed. Press one more time to stop operation. (Low-High-Stop, as a cycle)
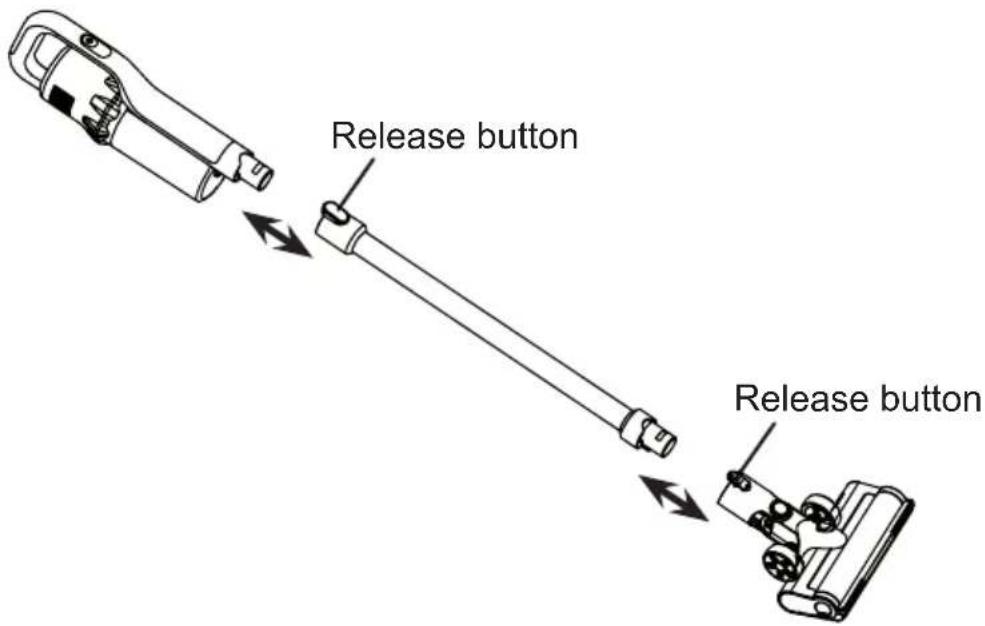
Assemble and Dis-assemble Handheld with aluminum tube
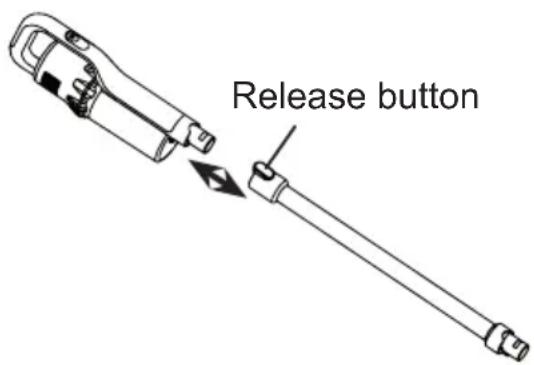
- Assemble: Insert the end of the tube into the main handheld unit, after hearing the click sound, then the tube installed in place.
- Dis-assemble: Use one hand to hold the tube, press the release button on the main handheld unit and remove the tube outwards.
Assemble and Dis-assemble the LED floor brush / Aluminium tube
- Assemble: Insert the end of the LED floor brush into the tube, after hearing the click sound, then LED floor brush installed in place.
- Dis-assemble: Use one hand to hold the LED floor brush, press the release button on the tube and remove the LED floor brush outwards.
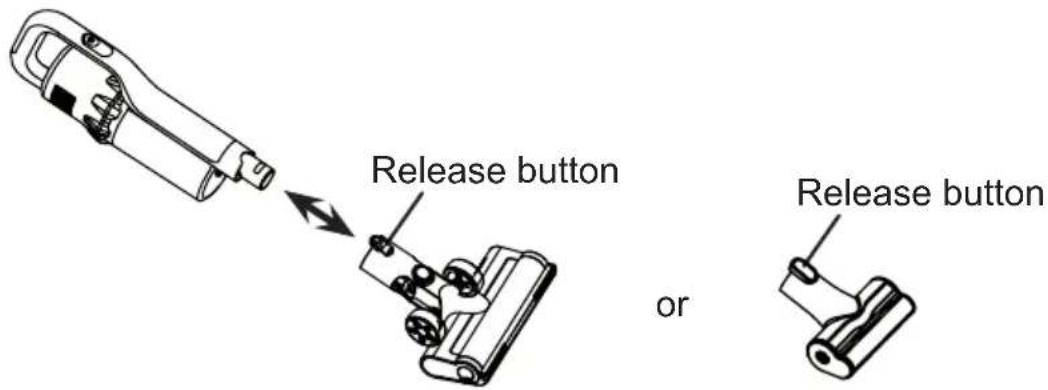
LED floor brush/ motorized bed brush and the main handheld unit
- Assemble: Insert the end of the LED floor brush/ motorized bed brush into the main handheld unit, after hearing the click sound, then LED floor brush/ motorized bed brush installed in place.
- Dis-assemble: Use one hand to hold the LED floor brush/ motorized bed brush, press the release button on the main handheld unit and remove the LED floor brush/ motorized bed brush outwards.
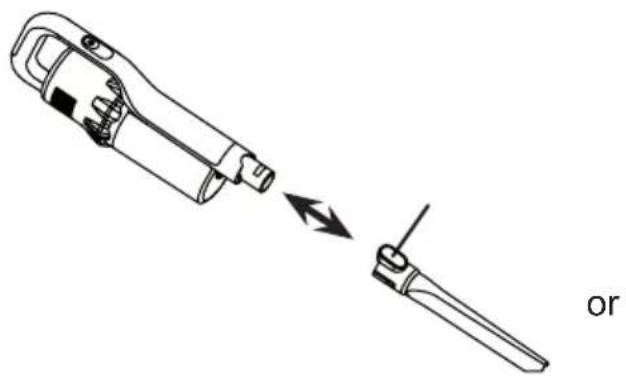
ACCESSORIES
2-in-1 Crevice tool / narrow nozzle assemble with handheld unit
- A: A crevice tool with a narrow nozzle, which you can use to clean window frames and crevices, etc.
- B: Push upwards the cleaning brush of 2-in-1 crevice tool, you can use to clean delicate or irregular surfaces, furniture, venetian blinds, etc.
natural_image
Technical line drawing of a mechanical tool or device with an arrow indicating transformation (no text or symbols present)A
Release button Release button
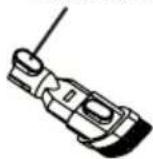
B
CLEANING AND STORAGE
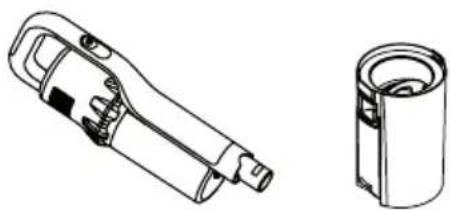
Emptying the dust container
- Check that the appliance is switched off before cleaning any parts.
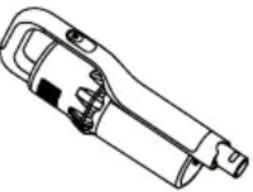
- Press the dust cover release button at the front of the dust container, and unfasten the dust container from the main handheld unit.
• Empty the dust container. - If necessary, rinse the dust container with water gently, let it air-dry completely before reassemble.
natural_image
Technical line drawings of two mechanical components: a handle and a cylindrical housing (no text or symbols)NOTE: The filter can become blocked after some time and can thereby reduce the suction power. It is therefore important that the above mentioned filter determine to replace.
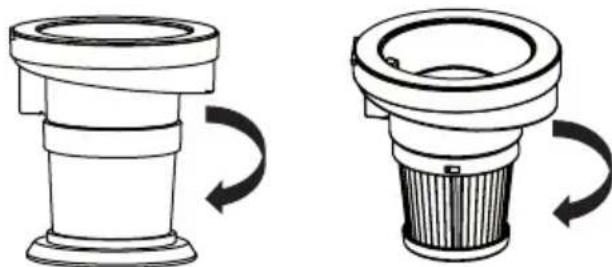
Cleaning or replacing the filter
The filters can become blocked after some time and can thereby reduce the suction power. It is therefore important that the above mentioned filter determine to replace.
- Take out the filter and filter cover, remove the dust container from the machine, then take out the filter assembly, after that rotate the filter cover counterclockwise to remove it from the assembly, and then rotate the filter counterclockwise to remove it.
natural_image
Diagram showing two types of mechanical components with rotational arrows indicating motion (no text or symbols)NOTE: Water could penetrate into the appliance if the filters are not thoroughly dry. This can result in electrical damage, poor suction performance and smelly during operation.
Warm reminds: Do not place the filter, filter cover in the wet place. The washed filter should be dried naturally. Do not expose the filter or speed up the blow dry with hair dryer, which may damage the filter and shorten its service life.
Clean the LED floor brush
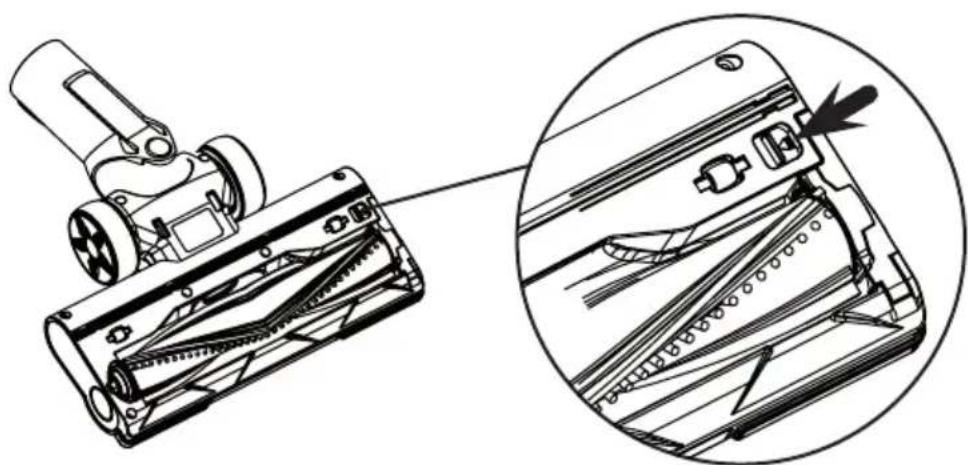
- The Motorized floor brush can be possibly blocked by big objects or rape around by hair or long thread. It need to be clean the rolling brush timely.
- Press the roller brush release button on the bottom side of the LED floor brush and toggle backward, then the lock buckle will automatically bounce.
natural_image
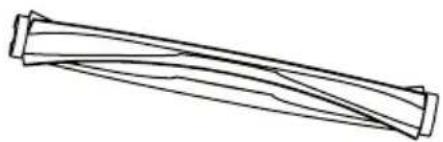
Technical line drawing of a mechanical device with an inset close-up showing internal components (no text or symbols)- Remove the hairs or dust around the roll brush, rinse the roll brush with water gently, let it air-dry completely before reassemble.
natural_image
Simple line drawing of a twisted cylindrical object with no text or symbols• After cleaned, install the rolling brush inside the motorized floor brush. Make sure the rolling brush is proper seat in position. Slide the sliding switch to lock position.
Clean the motorized bed brush
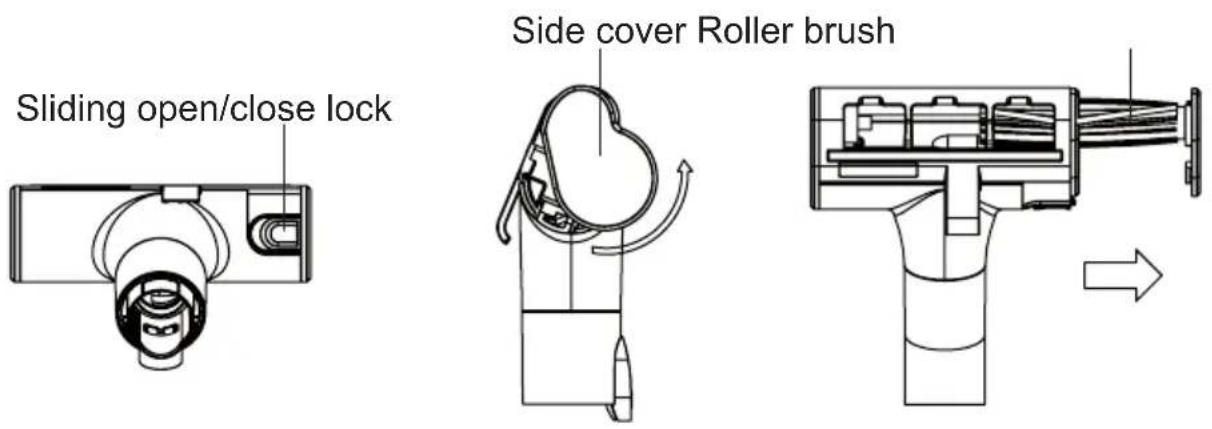
- Push the sliding open/close lock to the unlock position, push the side cover backward at the same time, and take out the roller brush from the bed brush.
- Remove the hairs or dust around the roll brush, rinse the roll brush with water gently, let it air-dry completely before reassemble.
- After cleaned, install the rolling brush inside the motorized bed brush. Align the end of the roller brush with the inner buckle of the side cover, make sure the rolling brush is proper seat in position, and push the side cover back to the locked position.
NOTE: All accessories must dry thoroughly before installing into the appliance.
Storage with Wall mount hanger
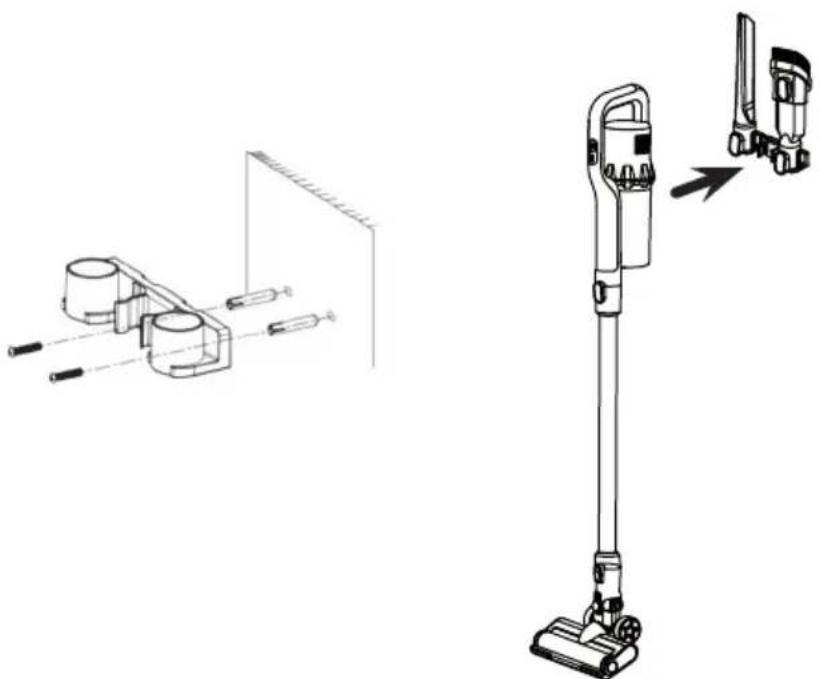
- After cleaning, you can store your appliance on the wall mount hanger. Position the wall mount hanger against the wall and mark the points at which the fastening screws are to be inserted. Using a drill, drill the holes for the screws, insert the plastic anchor provided, then hang the wall mount hanger on the screws, and tighten the screws up to their full extent.
natural_image
Technical line drawing of a vacuum cleaner with attached components and a close-up view of its base (no text or symbols)TROUBLESHOOTING
Warning: Please turn off the vacuum cleaner before maintenance, otherwise it may cause electric shock or other personal injury.
| PROBLEM POSSIBLE CAUSES SOLUTION | ||
| Vacuum cleaner does not run | 1. The battery is exhausted2. The used charger is not original. | 1. Charge the battery accordingly to he instructions2. Make sure that the charger matches the model you are using |
| The sound of the machine is abnormal | The dust cup is full of garbage, or the airduct is blocked | Take out the dust cup and clean up the garbage or blockage |
| The suction power is weakened | 1. The dust cup is full2. The filter needs to be cleaned3. Need to replace a new filter4. The connection of tubes , or the 2-in-1 crevice tool or other accessories with handheld vacuum cleaner are not installed in place5. The suction nozzle is blocked and the pipe is blocked6. The battery power is low. | 1. Clean the dust cup2. Clean the filter according to the instructions on the manual3. Contact customer service to purchase a replacement filter4. Follow the instructions to reinstall5. Clean the nozzle and tube6. Charge the battery according to the instructions; |
| The LED floor brush does not work | 1. The brush roller is stuck or entangled by the hairs or strings, and the machine stop automatically and is protected2. The installation method of the roller brush is incorrect3. The motor runs, but the roller brush does not rotate4. The connection among the long connecting tube and the LED floor brush with the main unit is not installed in place | 1. Clean the LED floor brush according to the instructions, and then restart the vacuum cleaner;2. Reinstall the roller brush according to the instructions on the user manual3. If the conveyor belt is broken, contact the after-sales maintenance center for repair4. Reinstall the long connecting tube, the LED floor brush and the main unit according to the instructions |
| Dust spurts out when using | 1. Filter is not installed2. The installation position of the filter is incorrect3. The filter is damaged and needs to be replaced | 1. Check whether the filter has been installed correctly according to the instructions2. Install the filter correctly according to the instructions3. Contact customer service to purchase a replacement filter |
| Vacuum cleaner stops working automatically | 1. Battery pack is running out of power2. Clogging of the suction nozzle and blockage in the pipe cause the overheating of the main unit3. Filter blockage | 1. Charge the battery as instructed2. Clean the suction port and tube and cool the main unit to normal temperature and restart3. Clean the filter, dust cup, filter cover according to the instructions |
PRODUCT SPECIFICATIONS
Model no.: GVC150RD
Voltage: DC 22.2V
Output power: 150W Main unit
15W LED floor brush
12W Motorized bed brush
Charging time: Approx. 4 - 5 hours
Two Speed of run time: About 17 mins (High) / 30 mins (Low)
Product Dimension (mm):
Stick Vac with LED floor brush: 1060(H) x 235(W) x 160(D) mm
*The final product specification may be varied according to a different lot of material and actual input voltage power of the usage area.
natural_image
Line drawing of a mechanical tool or device with no visible text or symbols安裝及使用說明
natural_image
Technical line drawing of a mechanical component with two views: top shows cylindrical housing, bottom shows cylindrical housing (no text or symbols)natural_image
Two mechanical components with curved arrows indicating rotation, no text or symbols presentnatural_image
Technical line drawing of a mechanical device with an inset close-up showing internal components (no text or symbols)natural_image
Simple line drawing of a cylindrical object with two rectangular ends, no text or symbols present.natural_image
Technical line drawing of a vacuum cleaner with attached components and a close-up view of its base (no text or symbols)疑難排解
購買日期 Date of Purchase:
單據編號 Invoice No.:
The product specifications may be changed without prior notice.
Please contact customer service for details if necessary.
說明書內容以英文版本為準
If there is any inconsistency or ambiguity
between the English version and the Chinese version,
the English version shall prevail.
保養登記
Warranty Registration

於網上登記新產品保養
Register your product online
www.dchtoolbox.com
小電維修服務 - 自攜點
Repair Service - Collection Points


Gilman
since 1841

DCHToolBox
大昌行電器維修中心
4/F, DCH Building, 20 Kai Cheung Road, Kowloon Bay, Hong Kong
客戶服務熱線 Customer Service Hotline: (852) 8210 8210
- Please read and retain for future reference.
- SAFETY INSTRUCTION - GENERAL
- SAFETY INSTRUCTION - ELECTRICITY AND HEAT
- SAFETY INSTRUCTION - DURING OPERATION
- PRODUCT OVERVIEW
- CHARGING
- Important note: Please note the vacuum cleaner can not start operation during charging
- Assemble and Dis-assemble Handheld with aluminum tube
- Assemble and Dis-assemble the LED floor brush / Aluminium tube
- LED floor brush/ motorized bed brush and the main handheld unit
- ACCESSORIES
- 2-in-1 Crevice tool / narrow nozzle assemble with handheld unit
- CLEANING AND STORAGE
- Emptying the dust container
- Cleaning or replacing the filter
- Clean the LED floor brush
- Clean the motorized bed brush
- Storage with Wall mount hanger
- TROUBLESHOOTING
- PRODUCT SPECIFICATIONS
- 安裝及使用說明
- 疑難排解
- 說明書內容以英文版本為準
Brand : GEMINI
Model : GVC150RD
Category : Vacuum Cleaner