BVX420 - Leaf blower Baumr-AG - Free user manual and instructions
Find the device manual for free BVX420 Baumr-AG in PDF.


| Product Type | Leaf Blower / Vacuum (2-in-1) |
| Brand | Baumr-AG |
| Model | BVX420 |
| Engine Type | 4-stroke, single cylinder |
| Engine Displacement | 25 cc |
| Power Output | 0.6 kW |
| Fuel Type | Unleaded petrol (91 RON or better) |
| Fuel Tank Capacity | 400 ml |
| Engine Oil Type | SAE 10W-40, grade SH |
| Engine Oil Capacity | 60 ml |
| Weight | Approx. 5.5 kg (assembled) |
| Dimensions | Approx. 90 x 30 x 30 cm (assembled as blower) |
| Convertible | Yes – switch between blower and vacuum mode |
| Speed Control | Variable throttle trigger and locking throttle control |
| Starting System | Recoil starter with primer bulb and choke |
| Safety Features | ON/OFF switch, spark arrestor, automatic throttle return |
| Maintenance Interval | Oil change every 24 hours; air filter cleaning every 10 hours |
| Included Accessories | Blow tube, vacuum tube, collection bag, spark plug tool, screwdriver |
| Warranty | See manufacturer’s terms; void if operated without oil |
Frequently Asked Questions - BVX420 Baumr-AG
User questions about BVX420 Baumr-AG
0 question about this device. Answer the ones you know or ask your own.
Ask a new question about this device
Download the instructions for your Leaf blower in PDF format for free! Find your manual BVX420 - Baumr-AG and take your electronic device back in hand. On this page are published all the documents necessary for the use of your device. BVX420 by Baumr-AG.
USER MANUAL BVX420 Baumr-AG
[Revision 7.0 May 2022]
READ THIS MANUAL CAREFULLY BEFORE USE – FAILURE TO DO SO MAY RESULT IN INJURY, PROPERTY DAMAGE AND MAY VOID WARRANTY. • KEEP THIS MANUAL FOR FUTURE REFERENCE. • Products covered by this manual may vary in appearance, assembly, inclusions, specifications, description, and packaging.
The product is NOT supplied with engine oil, although traces of oil from the manufacturing process may be present. It is essential to add adequate engine oil of the correct type to the engine before use. Failure to add engine oil will void the product warranty.
Table of Contents
Quick-Start Guide ....4
Safety....5
Parts Identification....6
Set-Up....7
Connecting and Disconnecting Tubes....7
Assembling as a Blower 8
Assembling as a Vacuum 8
Fuel, Engine Oil and Lubrication....9
Operation 10
Starting and Stopping the Engine 10
Starting the Engine....10
Stopping the Engine 10
Using the Throttle 11
Operating as a Blower 11
Operating as a Vacuum....11
Emptying the Collection Bag....12
Maintenance ....13
Engine Oil....13
Air Filter....14
Spark Plug....14
Engine Idle Speed 15
Cleaning and Storage....15
Troubleshooting....16
Technical Specifications....17
Quick-Start Guide

For safe operation, always comply strictly with the safety rules and recommendations that are available in the user manual.
Use the following instruction for starting the engine for the first time.
1

Unscrew oil filler cap and check oil level. Before first use add 60ml 10W-40 engine oil. Screw cap back on.
2

Check fuel level. If required, unscrew fuel filler cap and add unleaded petrol. Screw cap back on.
3
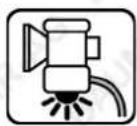
Press and release fuel primer bulb several times until fuel is visible in bulb and fuel feed tube.
4

Place ON/OFF switch in "ON" (I) position.
5

Place choke in "COLD" position.
6
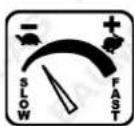
Place throttle lock near slow position.
7
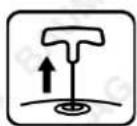
Gently pull the starter cord until you feel tension on it, then rapidly pull it until engine starts and allow engine to warm up.
8
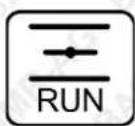
Move choke to "RUN" position. If the engine stalls, move to "COLD" and restart (7) and allow to warm up.
9
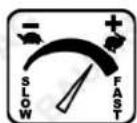
Place throttle lock at desired running speed or use throttle trigger.
10

When finished, place ON/OFF switch in "OFF" (O) position.
Safety

If used correctly, the BVX420 is a powerful, high performance tool. If used improperly or without due precaution, it may represent a hazard. For safe operation, always comply strictly with the safety rules that follow, as well as those found throughout this manual.

natural_image
Four blue circular icons with white human and headset symbols, no text or numbers present- Do not use the machine without complete understanding of the operating instructions, safety precautions and risks. Keep this manual on hand and refer to it before each use.
- Inspect the unit before use. Replace any missing or damaged parts. Do not operate the unit with damaged parts. Use only original equipment manufacturer (OEM) replacement parts. Use of unauthorised parts or accessories could lead to injury, damage to the unit, and void any warranty.
- Check for fuel leaks and ensure that the throttle mechanism returns automatically to the idle position when released. Make sure all fasteners are in place and secure. Do not operate the unit with loose or malfunctioning parts.
- The machine must only be used by adults in good physical condition, with knowledge of the operating instructions.
• Use the machine for its intended purpose only.
- Inspect the work area before starting the unit. Remove all debris and hard or sharp objects such as glass, wire etc.
- Do not allow other people/animals to be within the operating range of the machine. As a minimum, keep all people/animals at least 15m (50') away. Note that there still may be a risk to bystanders from thrown objects. Bystanders should be encouraged to wear eye protection.
- Do not operate the machine if you are tired or under the effects of alcohol and/or drugs.
- Never wear scarves, bracelets or anything else which could get caught up in the machine.
- Wear close-fitting safety clothing, including long pants, long sleeve shirt, protective non-slip safety shoes, gloves, eye and ear protection and dust mask.
- Operate the machine in well-ventilated and adequately lit areas only. Avoid combustible atmospheres or closed environments.
- Always work in a safe, balanced and firm-footed position and do not over-reach. Grip the machine firmly by the handles and keep all parts of the body away from moving parts and the engine exhaust.
- Do not operate the machine upside-down (fuel filler facing the ground).
- Do not touch the engine or exhaust. These parts get extremely hot from operation, even after the unit is turned off.
- If the machine jams, release the throttle and stop the engine immediately.
- Allow the machine to cool before performing any maintenance activities or storing the unit.
- Recommendations for operation:
- Do not operate the engine faster than required.
- Do not continuously operate the machine for more than one hour at a time.
• Always use the complete and correct blow/vacuum attachments.
- When used in vacuum mode, frequently check the collection bag and empty it when full.
- If rubbish to be blown/vacuumed is stuck together, it may be necessary to break it up before using the machine on it.
- Do not operate the machine near open windows.
- Be aware of machine noise and be considerate of others – operate the machine during reasonable times of day.
- Clean the machine after each use – see Cleaning and Storage. To reduce the risk of fire, keep the engine and exhaust free from grass, leaves, excessive grease or carbon build-up.
- Fill the fuel tank (unleaded fuel only) in a well-ventilated area, away from sources of heat and with the engine off. Never smoke while filling. Never remove the fuel cap when the engine is running. If fuel spills over while filling, move the machine at least 3m away before continuing. Any fuel on the machine should be removed or allowed to evaporate before starting the engine.
- Fill the engine oil reservoir in a well-ventilated area, away from sources of heat and with the engine off. Never smoke while filling. Never remove the oil cap when the engine is running. Do not overfill. If oil spills over while filling, move the machine at least 3m away before continuing. Any oil on the machine should be removed before starting the engine.
- Never carry out maintenance while the engine is running. Do not attempt servicing or repairs that are not part of routine maintenance. Always follow the manufacturer's instructions for maintenance operations. All services, other than the operations shown in the manual, should be performed by qualified personnel.
- Never use a damaged, modified, or improperly repaired/assembled machine. Do not remove, modify or deactivate any of the machine safety devices.
• D o not test the spark plug near the spark plug hole.
• Never use fuel for cleaning the machine.
- Do not douse or spray the unit with water or any liquid.
- If the machine is no longer usable, dispose of it in an environmentally responsible manner.
- Store the machine upright in a dry place and with the fuel tank empty.
Parts Identification
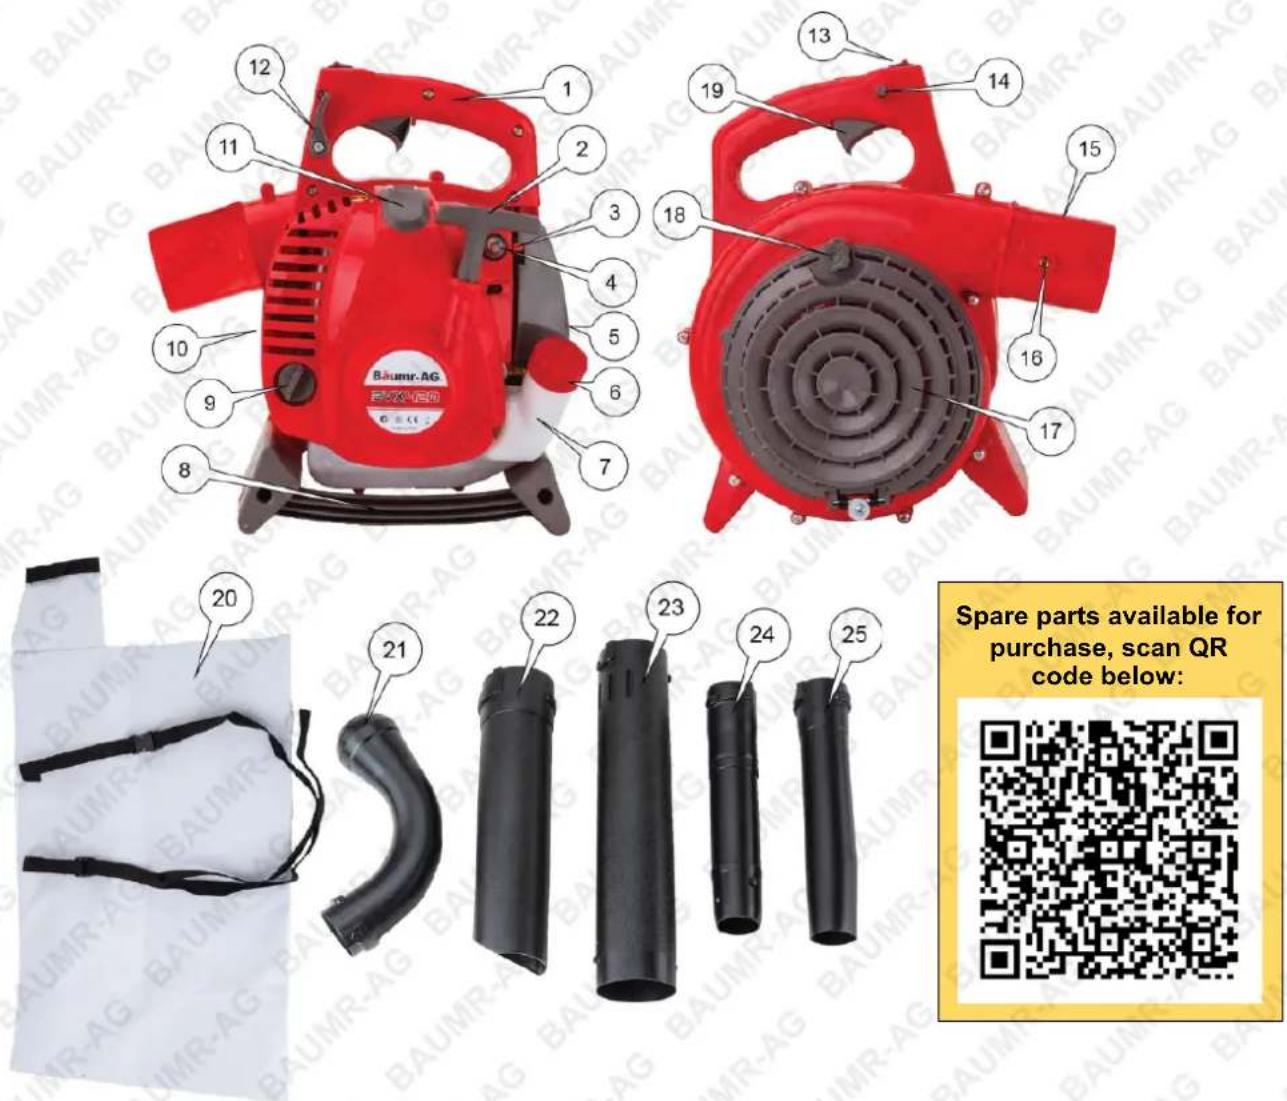
| No. | Name | No. | Name | No. | Name |
| 1 | Handle | 11 | Spark Plug Cover | 21 | Collector Bag Tube |
| 2 | Starter Cord | 12 | Locking Throttle Control | 22 | Vacuum Nozzle |
| 3 | Choke | 13 | ON/OFF Switch | 23 | Vacuum Tube |
| 4 | Fuel Primer Bulb | 14 | Cold-Start Throttle Button | 24 | Blow Tube |
| 5 | Air Filter Cover | 15 | Nozzle | 25 | Blow Nozzle |
| 6 | Fuel Cap | 16 | Tube Locking Screw | Tools | |
| 7 | Fuel Tank | 17 | Impellor Cover | 1 x Phillips head screwdriver / spark plug spanner. | |
| 8 | Handle (Vacuum mode) | 18 | Impellor Cover Screw | ||
| 9 | Oil Filler Cap | 19 | Throttle Control | ||
| 10 | Exhaust | 20 | Collector Bag | ||
Set-Up
The BVX420 can be assembled as either a blower or vacuum, as required.

Ensure that the engine is not running during assembly or disassembly.
Connecting and Disconnecting Tubes
Connecting Tubes
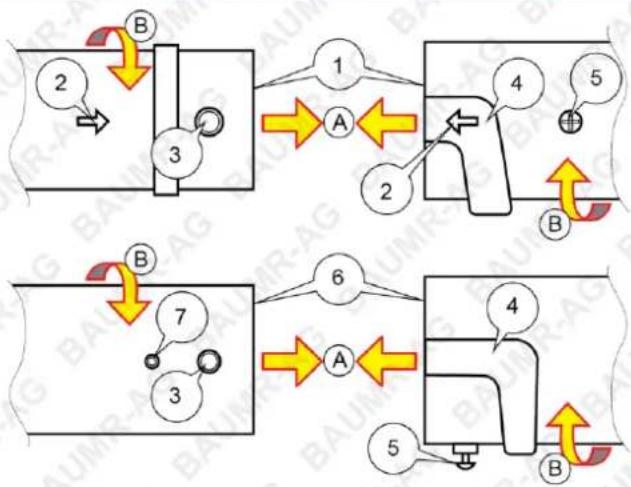
Refer to Figures 1 and 2. The blow/vacuum tubes and main unit connect using "bayonet" style fittings. To connect the tubes:
- For the main unit, use the Phillips head screwdriver to remove (rotate left) the locking screw (Figure 1, 16).
Note: The locking screws mounted to the tubes do not need to be unscrewed or removed – they can be pushed out from inside the tube.
- For the blower and collector bag tubes (1), align the arrows (2).
For the vacuum tubes (6), align the locating pin (3) and threaded insert (7) on one tube, with the channel (4) on the opposing tube. Ensure the locking screw (5) is facing down.
-
Push the tubes together (A) – the locating pin (3) should enter the channel (4).
-
When the locating pin is fully inserted, twist the tubes in direction B until the parts "click" into place.
-
For connection to the main unit, insert the locking screw (Figure 1, 16) and rotate right until firm (do not over-tighten).
For the tube locking screw (5), rotate right until firm (do not over-tighten).
Note: The vacuum tube (Figure 1, 23) does not use a locking screw for connecting to the main unit. • The vacuum tubes do not have alignment arrows.
flowchart
graph TD
    A["1"] --> B["2"]
    B --> C["3"]
    C --> D["4"]
    D --> E["5"]
    E --> F["6"]
    F --> G["7"]
    G --> H["8"]
    H --> I["9"]
    I --> J["10"]
    J --> K["11"]
    K --> L["12"]
    L --> M["13"]
    M --> N["14"]
    N --> O["15"]
    O --> P["16"]
    P --> Q["17"]
    Q --> R["18"]
    R --> S["19"]
    S --> T["20"]
    T --> U["21"]
    U --> V["22"]
    V --> W["23"]
    W --> X["24"]
    X --> Y["25"]
    Y --> Z["26"]
    Z --> AA["27"]
    AA --> AB["28"]
    AB --> AC["29"]
    AC --> AD["30"]
Figure 2
Disconnecting Tubes
Refer to Figure 2. To disconnect the tubes:
- For the main unit, use the Phillips head screwdriver to remove (rotate left) the locking screw (Figure 1, 16).
Note: The locking screws mounted to the tubes do not need to be removed completely – they can be unscrewed and pulled up from outside the tube.
- Twist the tubes in direction C, then pull the tubes apart.
Assembling as a Blower
Refer to Figures 1, 2 and 3 (see Connecting Tubes).
- Connect the blow nozzle (Figure 1, 25) to the blow tube (24).
- Connect the blow tube (24) to the main unit (X).
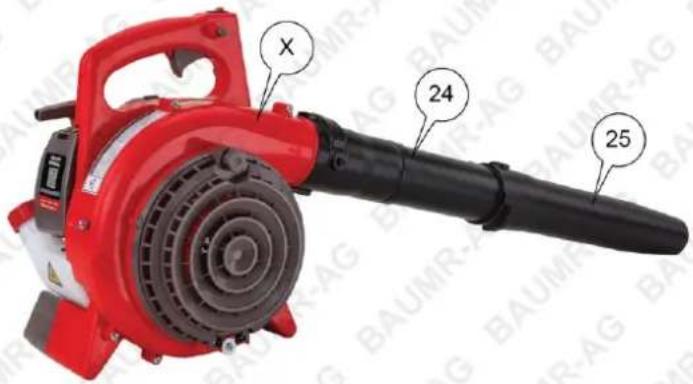
Figure 3
Assembling as a Vacuum
Refer to Figures 1, 2, 4 and 5.
- Loosen the impeller cover screw (Figure 1, 18) by rotating it to the left.
- Swing the impellor cover (17) down and connect the vacuum tube (23) to the main unit (X) (see Connecting Tubes).
Note: The vacuum tube (23) does not have alignment arrows or use a locking screw on the end where it connects to the main unit (X). • When installing the vacuum tube, align and connect it so that the ridges in the tube are facing down.
- Connect the vacuum nozzle (22) to the vacuum tube (23).
- Connect the collector bag tube (21) to the main unit (X).
- Place the small opening of the collector bag (20) over the end of the collector bag tube (21). Secure the bag to the tube using the Velcro strap. Adjust the shoulder strap as necessary
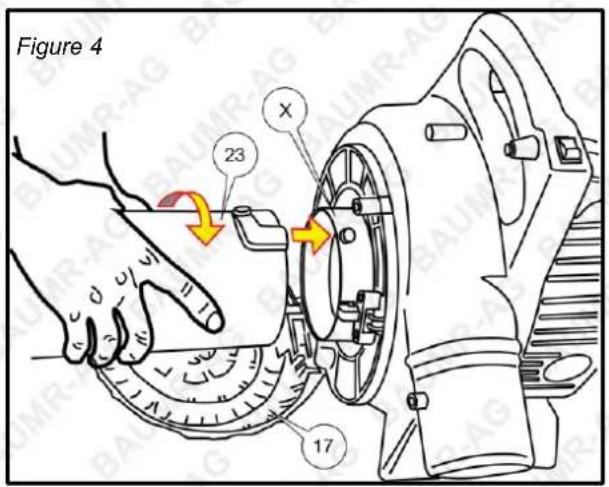
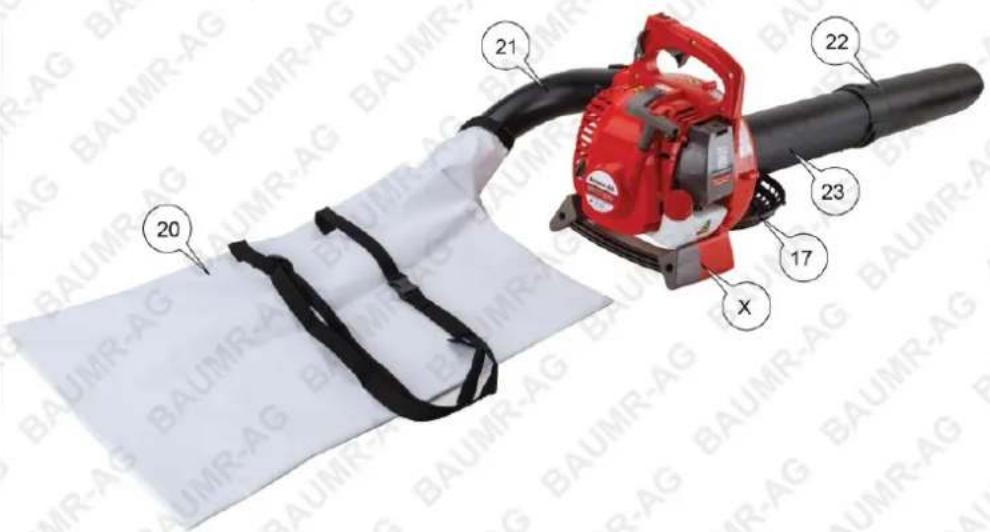
Figure 5
Fuel, Engine Oil and Lubrication

Use the recommended fuel and oil types only. The fuel type to be used is controlled by local regulations and must be followed.
• Use 91 RON or better unleaded petrol only.
• Use SAE 10W-40 automotive engine oil, grade SH.
• Store all fuel and oils in approved containers.
• Always re-fuel in a well-ventilated area, away from sources of heat and with the engine turned off.
- Before unscrewing the fuel tank cap, position the machine on a solid, flat surface so that it cannot fall over. Slowly open the fuel cap to allow any excess pressure to escape before removing completely.
Engine Oil Maintenance

The machine is not supplied with engine oil. You must fill the engine with suitable, unused engine oil before starting the machine first time. Failure to do so will result in severe engine damage.
• Before first use, fill the engine with 60ml of suitable engine oil.
- Perform the first engine oil change after the first 6 hours of use. Subsequently, change the oil after each 24 hours of use. See the Maintenance section for instructions.
• Always check the engine oil level before using the machine.
Operation

Follow the following safety warnings for blower/vacuum operations:
• Always keep the area to be cleaned free from wires, stones, debris, tin cans and other obstacles.
- Do not use the machine to pick up damp material, water or liquid, glass, stones, metal, embers, burning or hot material, or material contaminated with flammables or explosives.
• Do not suck in flammable, toxic or explosive fumes.
- Do not use the vacuum mode without the collector bag in place.
- Do not operate the machine upside-down (fuel filler facing the ground).
- Keep bystanders and animals at least 15m away from the working area.
- Do not manually insert objects into the blower/vacuum tube.
- Do not place hands or fingers in vacuum or exhaust opening.
- Hold the machine firmly in both hands when working with it.
• The machine must not be used by anyone under the age of 16.
• The unit may smoke if it is not held vertically, i.e. it will smoke if tilted to the side.
Starting and Stopping the Engine

Place the unit firmly on the ground or sturdy work surface. Make sure all bystanders are a minimum of 15m (50') away. Do not attempt to start near pilot lights or any open flame. Do not smoke.
Starting the Engine
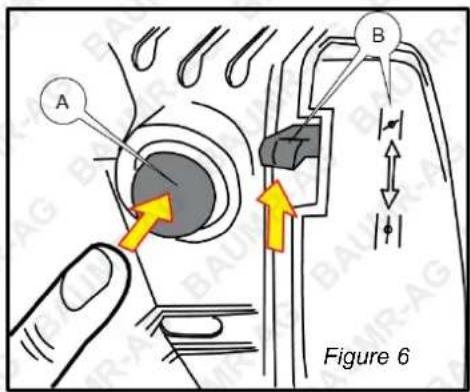
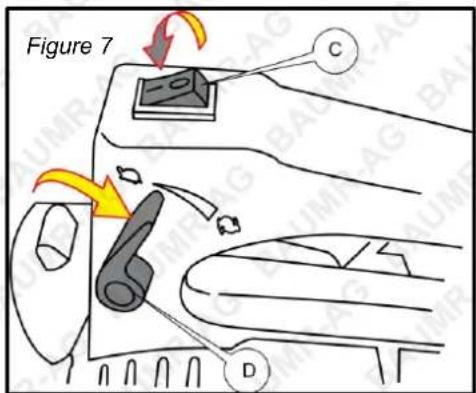
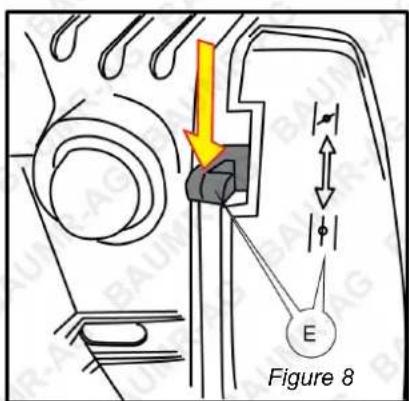
Refer to Figures 6, 7 and 8. To start the engine from cold:
- Check the engine oil level (see Checking Engine Oil Level).
- Press the primer bulb (A) several times to fill the carburettor. Fuel should be visible in the primer bulb.
- Place the choke (B) in the "COLD" position.
- Place the ON/OFF switch (C) to the "ON" ("I") position.
- Place the locking throttle control (D) just off the "SLOW" position.
Note: As an alternative to using the locking throttle control (step 5), use the cold-start throttle button (Figure 1, 14). To do so:
a. Place the locking throttle control completely in the "SLOW" position.
b. Pull the throttle control trigger fully in toward the handle and hold it there (see Using the Throttle).
c. Press the cold-start throttle button in and hold it there.
d. Release the throttle control trigger. The cold-start throttle button should remain in the "in" position.
-
Rapidly pull the starter cord out approximately 50cm. Once pulled, allow the cord to gently return to its original position. Repeat until the engine starts.
-
Once started, allow the engine to warm up before use. This may take 30 to 60 seconds. After warm up, place the choke in the "RUN" position.
To start the engine when already warm it should not be necessary to place the choke in the "COLD" position.
Stopping the Engine
-
Release the throttle control trigger or return the locking throttle control to the (see Using the Throttle).
-
Place the ON/OFF switch in the "OFF" ("O") position.
Using the Throttle
The throttle is used to adjust the engine speed, which in turns controls blower/vacuum air speed. The throttle has two methods of adjustment:
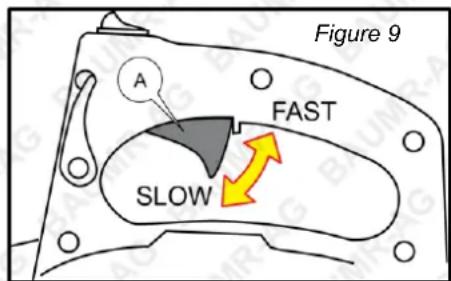
- Refer to Figure 9. Using the throttle control trigger (A), which you adjust using finger pressure. It has a return spring, which automatically closes the throttle as pressure on the trigger is reduced. When the throttle control trigger is pulled in towards the handle, the engine speed increases. When the throttle is allowed to move away from the handle, the engine speed reduces.
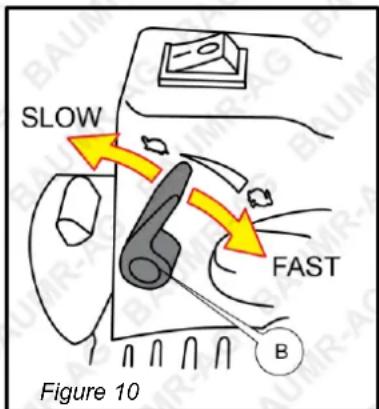
• Refer to Figure 10. Using the locking throttle control (B), which remains in the set position until changed. This is
convenient for operating the machine at a constant throttle. To use, rotate the locking throttle control to the desired engine speed. When rotated fully toward "SLOW", the engine will idle. When rotated fully toward "FAST", the engine will run at maximum speed.
Operating as a Blower
natural_image
Person operating a red-handled hair blower with black buttons, no visible text or symbolsFigure 11

Understand and follow all safety warnings before using the machine.
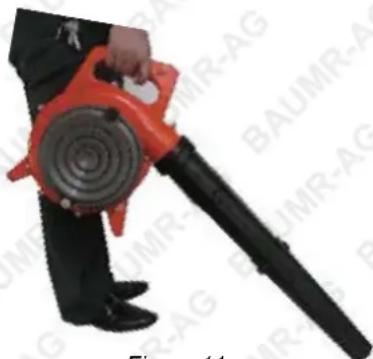
Refer to Figure 11.
- Assemble the machine as a "blower".
- Start the engine.
- Direct the blower nozzle as required.
- Operate the throttle as required.
Operating as a Vacuum

Understand and follow all safety warnings before using the machine.
Refer to Figure 12.
- Assemble the machine as a "vacuum".
- Start the engine.
- Place the collection bag strap over the shoulder and adjust it as required.
- Hold the unit using both handles, as shown, and direct the vacuum nozzle in the required direction.
- Operate the throttle as required.
Emptying the Collection Bag
- Stop the engine.
- Disconnect the collection bag from the machine.
- Unzip the collection bag and empty its contents.

natural_image
Person in blue uniform and white lab coat holding a red and black chain-linking device (no visible text or symbols)Figure 12
Maintenance
The following procedures should be performed as and when necessary. Often, a reduction in machine performance indicates that one or more maintenance procedures is required – refer to the Troubleshooting section for additional information.

All maintenance activities should be performed in a safe and clean environment. The engine should be cold and the fuel tank empty before commencing any maintenance procedure.
Engine Oil

Never start the engine without adequate engine oil in it. Failure to do so will result in severe engine damage. Always check the oil level before using the machine.
The BVX420 features a four-stroke petrol engine. Four-stroke engines require engine oil in the crankcase for lubrication of internal components. Severe or irreparable damage may occur if the engine is allowed to run without engine oil. The engine oil level requires regular maintenance.
Note: Engine oil capacity is 60ml. The recommended oil type is 10W-40, grade SH.
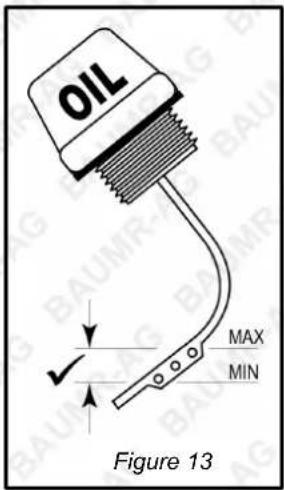
Checking Engine Oil Level
Refer to Figures 1 and 13:
- Place the machine in an upright position on a flat and level surface.
- Clean the machine around the oil filler so that no dirt or other material enters the engine when the cap is removed.
- Remove the oil filler cap (Figure 1, 9) (rotate left) until fully unscrewed. Wipe the oil level indicator clean with a piece of cloth or paper.
- Re-insert the oil filler cap (rotate right) until fully screwed in.
- Unscrew and remove the oil filler cap. Inspect the oil level indicator and ensure that the oil level is between the "MIN" and "MAX" indicators. If the oil level is low (below or close to "MIN"), add additional oil of the correct type until the correct level is reached. If the oil level is high (above "MAX"), drain some oil until the correct level is reached.
Changing Engine Oil

Perform the first engine oil change after the first 6 hours of use. Subsequently, change the oil after each 24 hours of use.

It is recommended that the engine be warm, but not hot, when performing oil changes. When the oil is warm it drains faster. • Always dispose of used oil in an environmentally responsible manner and according to regulations.
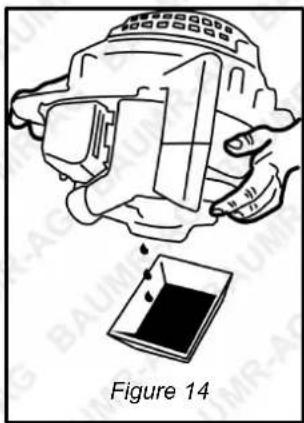
Refer to Figures 1 and 14.
- Clean the machine around the oil filler so that no dirt or other material enters the engine when the cap is removed.
-
Remove the oil filler cap (Figure 1, 9) (rotate left) until fully unscrewed. Wipe the oil level indicator clean with a piece of cloth or paper.
-
Turn the machine over so that the oil filler is facing down and allow the oil to drain from the oil filler. Drain the oil into a suitable container. Allow several minutes for the oil to drain completely.
-
Turn the machine over so that the oil filler is facing up and pour 60ml of suitable engine oil into the machine through the oil filler.
-
Re-insert the oil filler cap (rotate right) until fully screwed in.
-
Place the machine in an upright position on a flat and level surface.
-
Unscrew and remove the oil filler cap. Inspect the oil level indicator and ensure that the oil level is between the "MIN" and "MAX" indicators. If the oil level is low (below or close to "MIN"), add additional oil of the correct type until the correct level is reached. If the oil level is high (above "MAX"), drain some oil until the correct level is reached.
Air Filter
The air filter is used to prevent dirt and other particles from possibly entering the engine and causing internal damage to it. The air filter requires cleaning at least every 10 hours of use.

Operating the machine without a functional air filter may cause severe engine damage and will void any warranty.

A dirty or oil saturated air filter will restrict air flow. This is often mistaken for an out of adjustment carburettor. Check the condition of the air filter before adjusting the engine idle speed. • If the air filter is damaged (torn, broken, disintegrating), replace it.
Cleaning the Air Filter
Refer to Figures 1, 15 and 16.
- Place the machine in an upright position on a flat and level surface.
- Press the tab (A) on the air filter cover (Figure 1, 15) to unlock it, then swing it down (B) to open.
- Remove the air filter (C) from the housing.
- Wash the filter material in warm water and mild detergent.
- Rinse the filter well and allow it to dry.
- Place a few drops of clean engine oil on the filter then squeeze it a few times to spread the oil through the filter material and remove any excess oil.
- Place the air filter back in the housing and swing the air filter cover back into position until it "clicks" closed.
Replacing the Air Filter
Follow the procedure for cleaning the air filter, however, ignore steps 4 and 5.
Spark Plug
The spark plug is used to ignite the air/fuel mixture inside the engine, causing the engine to run. The spark plug has electrodes on one end and an electrical terminal on the other. The spark plug requires regular maintenance.

If the spark plug is damaged (cracked insulator, broken or eroded electrodes etc), replace it.
Removing the Spark Plug
Refer to Figures 1, 17 and 18.
- Place the machine in an upright position on a flat and level surface.
- Press the tab (A) on the spark plug cover (Figure 1, 11) to unlock it, then pull it from the main unit.
- Pull the electrical lead (B) from the terminal on top of the spark plug.
- Clean the area around the spark plug so that no dirt or other material can enter the engine when the spark plug is removed.
- Use the spark plug tool to remove the spark plug (rotate left).
To re-install the spark plug:
- Place the spark plug in its hole and screw it in (rotate right) until "finger tight".
- Use the spark plug tool to tighten the spark plug approximately one quarter turn (do not over-tighten).
- Place the electrical lead over the spark plug terminal and push it down so that it connects firmly with the terminal.
- Re-install the spark plug cover and ensure that it "clicks" into position.
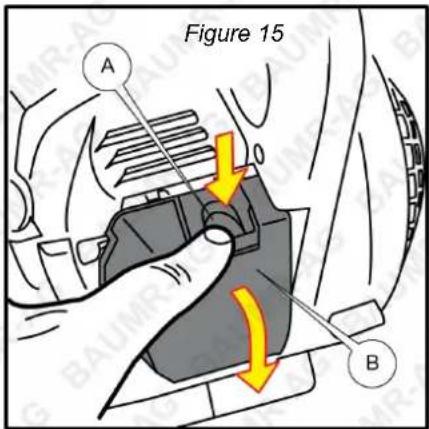
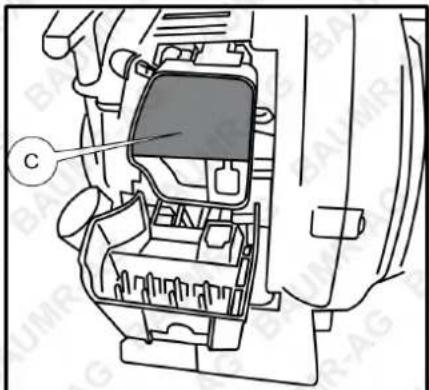
Figure 16
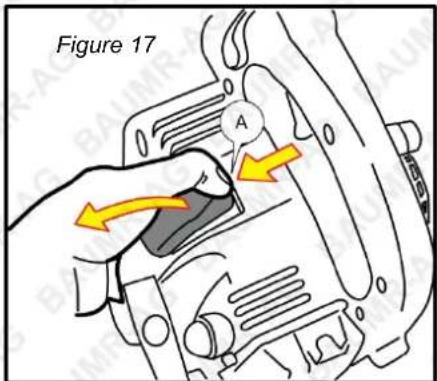
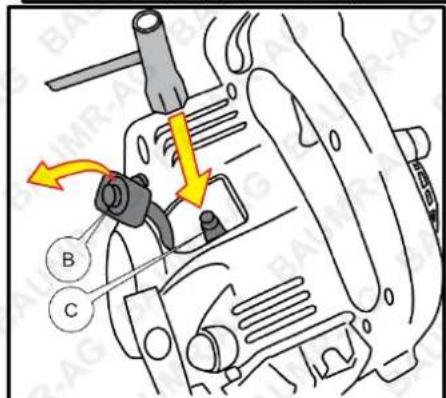
Figure 18
Cleaning and Checking Spark Plug Gap
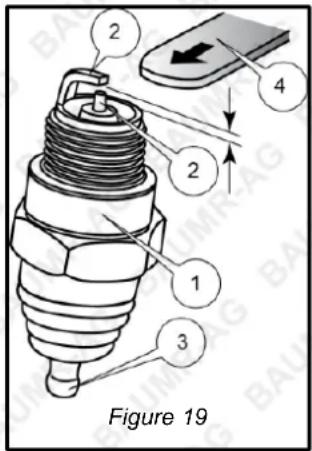
Refer to Figure 19. The spark plug (1) should be checked and cleaned, if required, after every 20 hours of use.
- Remove any carbon deposits on the spark plug electrodes (2) with a wire brush.
- Clean the spark plug threads and the electrical terminal (3) on the top.
To check and adjust the spark plug "gap":
- Clean the spark plug.
- Use "feeler" or "thickness" gauges (4) to measure the existing gap. The gauge must drag a little when being slid between the electrodes (2) – this means the measurement is fairly accurate.
- Adjust the gap so that it is 0.5mm. If the gap needs to be reduced, gently tap the electrode as required. If the gap needs to be increased, use pliers to gently pull the electrode as required.
- Measure the gap again and ensure it is within the specified range before re-installing the spark plug.
Engine Idle Speed
Engine idle speed (engine speed when the throttle is not being used) is adjustable. The idle speed does not require adjustment unless the engine will not idle normally - by either not running smoothly, stopping, or running faster than necessary.

Before adjusting idle speed, ensure that the air filter is clean, the spark plug is the correct fuel is being used and there is enough engine oil. • Incorrect idle speed adjustment may lead to engine damage - it is recommended that idle speed be adjusted by an authorised technician.
Adjusting Engine Idle Speed
Refer to Figures 1 and 20.
- Start the engine and allow it to warm up (you may have to use the throttle if the engine stops when left to idle).
- Place the machine in an upright position on a flat and level surface.
- Access the adjustment screw through the hole (A) beneath the fuel primer bulb (Figure 1, 4).
- Insert the Phillips head screwdriver and engage the screw (it may be necessary to stop the engine to do this).
- Perform the adjustment according to the following points. If the engine is:
- Idling faster than necessary, rotate the adjustment screw to the left.
- Slowing and stopping when left to idle, rotate the adjustment screw to the right.
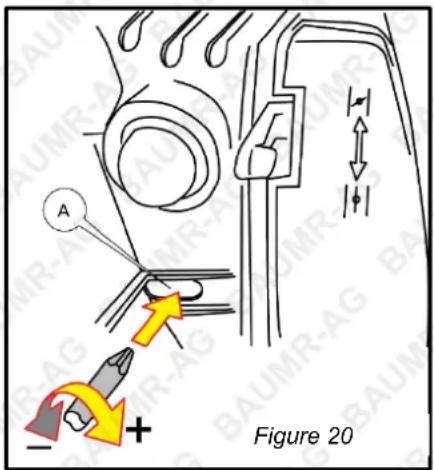

Rotate the adjustment screw no more than 1/8 of a turn each time. After each adjustment, start the engine and check whether or not the idle is normal.
Cleaning and Storage
Cleaning
- Use a suitable brush to clean the unit. Do not use strong detergents - cleaners that contain citrus oils such as lemon and solvents such as kerosene can damage plastic components. Wipe off any moisture with a soft cloth.
- Empty the vacuum bag. Turn it inside out and shake out all debris. Hand wash the vacuum bag annually with soapy water and allow to air dry.
Storage
• Empty the fuel tank and allow the machine to cool before storing it.
- Clean the unit after each use.
• Store the unit in a dry, well-ventilated area and out of the reach of children.
Long Term Storage
If the unit is to be stored for an extended period, use the following procedure.
- Prepare the unit as normal for storage.
- Start the engine and allow it to run until it stalls. This ensures that all the fuel has been drained from the carburettor.
- Allow the engine to cool. Remove the spark plug and put 30ml of clean engine oil into the cylinder. Pull the starter rope slowly to distribute the oil. Reinstall the spark plug.
Troubleshooting
The following information may assist in identifying a problem and rectifying it.
Note: Some procedures listed here may need to be performed by a qualified service technician.
Difficulty starting the engine (particularly when cold).
| Possible Fault | Action |
| Spark plug is “wet” with fuel or moisture | Remove the spark plug and ensure that it is dry before re-inserting it. |
| Spark plug is faulty – no spark produced | Replace the spark plug. |
| Engine “flooded” with fuel | Place choke in “RUN” position. Leave ON/OFF switch in “OFF” position. Pull the starter cord several times to assist clearing excess fuel from engine before attempting to start engine. |
| Not enough or too much engine oil in crankcase | Check oil level and ensure that level is at or just below “MAX” indicator. |
Engine starts but does not idle.
| Possible Fault | Action |
| Blocked air filter | Check and clean air filter. |
| ↓ | |
| Idle speed requires adjustment | Adjust idle speed until engine runs smoothly and at a reasonable speed when idling. |
Difficulty restarting the engine after use or engine stops suddenly during use.
| Possible Fault | Action |
| No fuel | Check fuel level and ensure adequate fuel is available. |
| Carbon build-up on spark plug | Remove the spark plug and clean carbon from electrodes before re-inserting it. |
| Carburettor blocked | Clean the carburettor. |
Reduced engine speed/power during use.
| Possible Fault | Action |
| Blocked air filter | Check and clean air filter. |
| Carbon build-up in engine and/or entry to exhaust silencer | Remove engine cylinder head and clean carbon from it. For the exhaust silencer, remove it and clean any carbon deposits from the exhaust entry port. |
| Carbon build-up on spark plug | Remove the spark plug and clean carbon from electrodes before re-inserting it. |
| Carburettor blocked | Clean the carburettor. |
Reduced vacuum suction.
| Possible Fault Action | |
| Collection bag full | Empty collection bag and ensure there are no blockages in the connection pipe. |
| Blocked tubing/airway | Remove vacuum tubes and clear any obstacles. Check impellor and clear any obstructions. |
Reduced blow air speed.
| Possible Fault Action | |
| Blocked tubing/airway | Remove the blower tubes and clear any obstacles. Check the impeller and clear any obstructions. |
Technical Specifications
| Engine Type | 4-stroke, single cylinder |
| Engine Capacity 25cc | |
| Fuel Type | Unleaded 91 RON or better |
| Fuel Tank Capacity 400ml | |
| Engine Power Output 0.6kW | |
| Engine Oil Type | SAE 10W-40 automotive engine oil, grade SH |
| Engine Oil Capacity 60ml |

Some experts believe that the incorrect or prolonged use of almost any product may lead to serious injury or death. To help reduce your risk, refer to the information below. For more information, see www.datastreamserver.com/safety
- Consult all documentation, packaging and product labelling before use. Note that some products feature documentation available online. It is recommended to print and retain the documentation.
- Before each use, check the product for loose/broken/damaged/missing parts, wear or leaks (if applicable). Never use a product with loose/broken/damaged/missing parts, wear or leaks.
- Products must be inspected and serviced (if applicable) by a qualified technician every 6 months. This is based on average residential use by persons of average size and strength, and on a property of average metropolitan size. Use beyond these recommendations may require more frequent inspections/servicing.
- Ensure that all users of the product have completed a suitable industry recognised training course before being allowed access to the product.
-
If this product has been purchased in error after considering the information presented here, contact the retailer directly for details of their returns policy, if required.
-
The product has been supplied by a general merchandise retailer that may not be familiar with your specific application or description of application. Be sure to attain third-party approval from a qualified specialist for your application before use, regardless of any assurances from the retailer or its representatives.
- This product is not intended for use where fail-safe operation is required. As with any product (for example, automobile, computer, toaster), there is the possibility of technical issues that may require the repair or replacement of parts, or the product itself. If the possibility of such failure and the associated time it may take to rectify could in any way inconvenience the user, business or employee, or financially affect the user, business or employee, then the product is not suitable for your requirements. This product is not intended for use where incorrect operation or a failure of any kind, including but not limited to, a condition requiring product return, replacement, parts replacement or service by a technician may cause financial loss, loss of employee time or an inconvenience requiring compensation.
Bäumr-AG®
.com.au
©2022 Baumr-AG. All rights reserved. No part of this document, including descriptive content, concepts, ideas, diagrams or images may be reproduced or transmitted in any form or by any means, electronic or mechanical, including photocopying, scanning or recording, or any information storage and retrieval system, without express permission or consent from the publisher.
- Table of Contents
- Quick-Start Guide ....4
- Safety....5
- Parts Identification....6
- Set-Up....7
- Operation 10
- Maintenance ....13
- Cleaning and Storage....15
- Troubleshooting....16
- Technical Specifications....17
- Quick-Start Guide
- 1
- 2
- 3
- 4
- 5
- 6
- 7
- 8
- 9
- 10
- Safety
- Set-Up
- Connecting and Disconnecting Tubes
- Connecting Tubes
- Disconnecting Tubes
- Assembling as a Blower
- Assembling as a Vacuum
- Fuel, Engine Oil and Lubrication
- Engine Oil Maintenance
- Operation
- Starting and Stopping the Engine
- Starting the Engine
- Stopping the Engine
- Using the Throttle
- Refer to Figure 11.
- Operating as a Vacuum
- Refer to Figure 12.
- Emptying the Collection Bag
- Maintenance
- Engine Oil
- Checking Engine Oil Level
- Changing Engine Oil
- Air Filter
- Cleaning the Air Filter
- Replacing the Air Filter
- Spark Plug
- Removing the Spark Plug
- Cleaning and Checking Spark Plug Gap
- Engine Idle Speed
- Adjusting Engine Idle Speed
- Cleaning and Storage
- Cleaning
- Storage
- Long Term Storage
- Troubleshooting
- Some experts believe that the incorrect or prolonged use of almost any product may lead to serious injury or death. To help reduce your risk, refer to the information below. For more information, see www.datastreamserver.com/safety
- Bäumr-AG®
Brand : Baumr-AG
Model : BVX420
Category : Leaf blower