
H-DVB03T2 - Digital decoder HYUNDAI - Free user manual and instructions
Find the device manual for free H-DVB03T2 HYUNDAI in PDF.


| Product Type | Digital Decoder (Set-top box) |
| Brand | Hyundai |
| Model | H-DVB03T2 |
| Dimensions (approx.) | 150 x 100 x 30 mm |
| Weight (approx.) | 300 g |
| Power Supply | 5V DC, 1A (via USB or external adapter) |
| Power Consumption | < 5 W |
| TV Standard | DVB-T2/T, DVB-S2/S, DVB-C |
| Video Resolution | Full HD 1080p |
| Video Outputs | HDMI, Composite (AV) |
| Audio Outputs | HDMI, Optical, Analog (RCA) |
| Connectivity | USB 2.0 (for media playback and PVR), Ethernet, Wi-Fi (built-in optional) |
| Media Playback | USB: MP4, AVI, MKV, MP3, JPEG |
| PVR Function | Yes (via USB storage) |
| Electronic Program Guide (EPG) | Yes |
| Parental Control | Yes |
| Remote Control | Infrared, included |
| Maintenance | Keep clean and dry; avoid dust and moisture |
| Cleaning | Wipe with a soft, dry cloth; do not use liquids |
| Safety | Place on a flat surface with ventilation; do not cover vents |
| Spare Parts Availability | Remote control, power adapter available via service center |
| Repairability | Designed for professional service only; no user-serviceable parts |
Frequently Asked Questions - H-DVB03T2 HYUNDAI
User questions about H-DVB03T2 HYUNDAI
0 question about this device. Answer the ones you know or ask your own.
Ask a new question about this device
Download the instructions for your Digital decoder in PDF format for free! Find your manual H-DVB03T2 - HYUNDAI and take your electronic device back in hand. On this page are published all the documents necessary for the use of your device. H-DVB03T2 by HYUNDAI.
USER MANUAL H-DVB03T2 HYUNDAI

natural_image
Two glossy spheres with reflections, no text or symbols presentMULTIMEDIA PLAYER WITH DVB-T2 RECEIVER
Thank you for purchasing our product. For safety, it is strongly recommended to read this manual carefully before connecting, operating and/or adjusting the product and keep the manual for reference in the future.
Table of contents 2
Before you start 3
Important safeguards 3
Utilization of the product 3
Connection 4
Connection.... 4
Operation 5
Control elements 5
Front panel 5
Rear panel 5
Remote controller 6
Changing the battery 6
General operation 7
OSD operation.... 8
Main Menu 8
Media Player 8
Edit Channel 9
Installation 10
System Setup 10
Tools 12
USB information 12
General information 13
Troubleshooting.... 13
Accessories 13
Supported formats.... 14
Specifications 14
Important safeguards
- To prevent risk of fire or electric shock, avoid merging the unit into the water or under conditions of high humidity.
- Switch off the device from the socket, if you're not going to use it for a long time.
- Do not place objects on the device.
- Place the unit in a dry and ventilated area. Eliminate proximity to heaters, do not expose to sunlight, mechanical vibration, humidity and dusty environment.
- It is possible to use a small amount of neutral detergent to clean the device.
- Never use abrasive materials or organic substances (alcohol, gasoline, etc.) to clean the device.
- For repair and maintenance contact only authorized service centers.
- Before connecting the device to the mains, please make sure the network cable can be easily disabled at any time.
- Unplug from the mains and from the cable television antenna, unless you intend to use it for a long time, or before a thunderstorm. Do not touch the unit, power cord and antenna cable during a thunderstorm!
- Before you turn on the device, please check the reliability of its connection to the power supply and other devices.
- This unit can not receive television signals during the movement of the vehicle.
- After prolonged exposure to cold, before turning on leave the device for 1 hour at a room temperature.
Before using this product, carefully read the manual. After you read, save it for future use. If necessary, contact your local dealer for service.
All the illustrations in this manual are schematic images, which may differ from actual objects.
Utilization of the product
If you want to dispose of this product, do not mix it with general household waste. There is a separate collection system for used electronic products in accordance with legislation that requires proper treatment, recovery and recycling.
Please contact your local authorities for the correct method of disposal. By doing so, you will ensure that your disposed product undergoes the necessary treatment, recovery and recycling and thus prevent potential negative effects on the environment and human health.
Connection
Antenna input
- Connect an external DVB-T antenna (cable) connector to the antenna RF IN.
The signal in the block cable antenna can fail to contain DVB-T/T2 signal due to the carrier frequency altered by the cable network operator.
RF output
- Connect the RF output jack to an antenna cable to bypass the digital signal to other devices.
HDMI-out
- If your TV has an HDMI video output, connect it to an HDMI output of this unit using a special HDMI cable (not included).
Coaxial output
- Connect the coaxial digital audio output to the input of an amplifier to transmit the audio signal to the amplifier using a special coaxial cable (not included).
Stereo audio output
- Connect the left (white) and right (red) terminal of the stereo audio output to the corresponding audio inputs on your TV using the supplied RCA-type cable.
Composite video (CVBS) output
- Connect the yellow video output to the composite video input on your TV using the included RCA cable for transmitting the composite video signal.
Component video output
- Connect the component video output to component video input on your TV using a special cable (not supplied) to send component video signal.
Controllers
Front panel
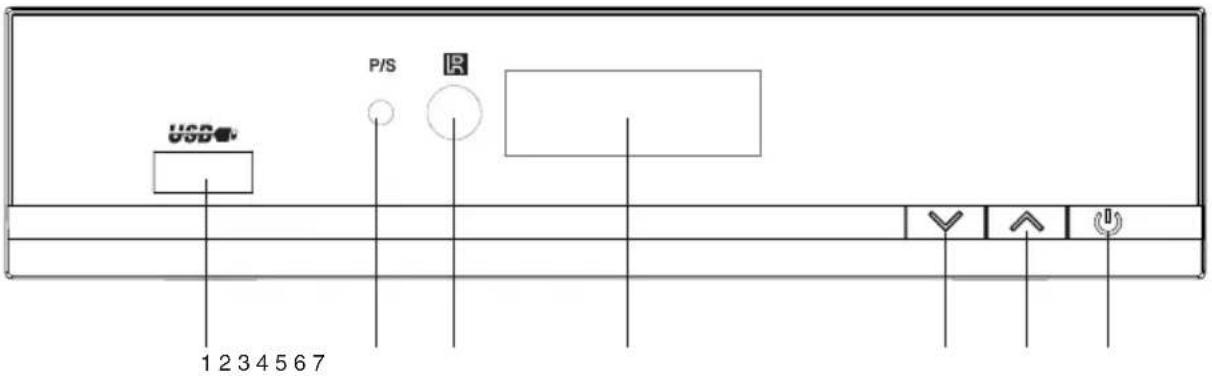
- USB port
- Power/Standby indicator
- IR sensor
- Display
- CH-button
- CH+ button
- Power/Standby button
Rear panel

- RF out
- RF in
- Digital coaxial output
- HDMI port
- AV (RCA) output
- Component output (YPbPr)
- AC in
Remote controller
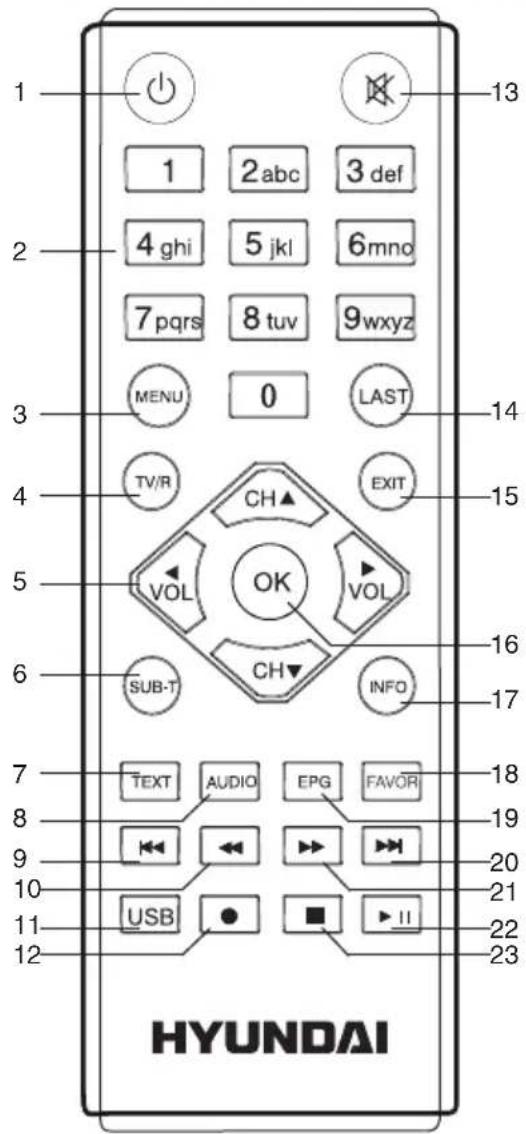
-
STANDBY button
-
Numeric buttons
-
MENU button
-
TV/R button
-
Navigation buttons
-
SUB-T button
-
TEXT button
-
AUDIO button
-
PREV button
-
REW button
-
USB button
-
REC button
-
MUTE button
-
LAST button
-
EXIT button
-
OK button
-
INFO button
-
FAVOR button
-
EPG button
-
NEXT button
-
FF button
-
PLAY/PAUSE button
-
STOP button
Changing the battery
- Remove the battery compartment cover on the back of the RC.
- Insert two AAA batteries into the battery compartment making sure that the correct polarity is observed.
-
Install the cover back.
-
The RC should be pointed at remote sensor within 8 meters and within 30 degrees at the left or the right side.
• Take the battery out of the RC if it is not used for a long time. - Do not mix new and used batteries or different types of batteries. Weak batteries can leak and severely damage the RC.
- Do not expose the RC to shock, liquids, and do not place it in an area with high humidity.
General operations
STANDBY
When this unit is connected to the mains, it goes into operation mode. When the unit is running, press STANDBY button to turn the device into sleep mode. In sleep mode, press STANDBY button on the remote or press and hold this button on the panel to turn the device from sleep mode.
INFO
When viewing a TV channel, press this button to display/hide the menu pages containing various information about the current channel (frequency, reception level etc.).
EPG
Press EPG button to display the menu of the electronic TV guide (Electronic Program Guide), which displays the schedule of programs for a certain period of time for each available channel. Using this function, you can easily find programs you are interested in. Use UP/DOWN cursor buttons to select the desired TV program. Use LEFT/RIGHT cursor buttons to switch pages of the interactive program guide.

EPG-information cannot work if the e is not provided by operator.
AUDIO
Press AUDIO to select the audio language or audio channel, if this choice is supported by the current channel.
CH+/CH-
Press these buttons to select the previous or next channel.
Navigation
Press these buttons to navigate through the various menus.
OK
Press this button to confirm the selection options in the menu.
VOL-/VOL+
Press these buttons to adjust the sound volume level.
Numeric buttons
Press number buttons to enter the channel number you want or other numbers (such as passwords, play time, etc.).
REWIND/FAST FORWARD
When playing a media file, press these buttons for fast forward (FF) or backward playback (REW).
PAUSE
When playing a media file, press this button to set the playback to pause.
PLAY
Click this button to start playing a media file.
Red/Green/Yellow/Cyan buttons
Press the colored buttons to perform various operations in the edit menu of channels, teletext recording.
MUTE
Press this button to enable/disable the sound.
TEXT
Press this button to enable or disable the Teletext (Teletext is not supported by some TV channels).
LAST
Press this button to return to the last viewed channel.
RECORDING
When a USB drive is connected to this unit, while watching TV channels press REC to start recording video from the channel to USB. Press STOP button to stop recording.
SUBTITLE
Click the SUB-T button to select subtitle language, if this choice is supported by the current channel.
TV/RADIO
Press TV/R button to switch between TV and radio.
PREV/NEXT
When playing a media file, press these buttons to select previous/next file.
STOP
When playing a media file, press this button to stop playback.
USB
Press this button to enter the USB setup interface.
OSD operation
- Press MENU button to enter the setting menu displayed on the screen.
- Press LEFT/RIGHT cursor buttons on the RC to select setting page.
- Press OK button on the RC to go to the parameter list.
- Press UP/DOWN cursor buttons on the RC to select a parameter to adjust.
- Press LEFT/RIGHT cursor buttons on the RC to adjust the selected parameter.
- Press MENU button to return to the previous menu page. Press EXIT button on the RC to quit the menu.
Some menu items may be in grey color, in this case they are not adjustable. Pictures of OSD menu are for reference only; they may differ from the real screens.
Main menu
Press the MENU button on the RC to browse the main menu.
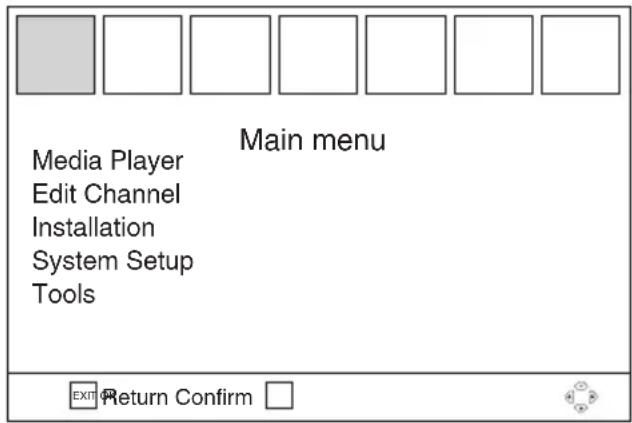
Media Player

- PVR:
Rename: Press RED button to rename the chosen item.
Lock: Press GREEN button to lock the chosen item.
Delete: Press YELLOW button to delete the chosen item.
Switch: Press numeric button 5 to switch between submenus of Media Player
- Video:
Edit: Press BLUE button to edit the chosen item. In this submenu, press RED button to rename, press GREEN button to copy, press YELLOW button to delete and press BLUE
button to open a new folder.
Switch: Press numeric button 5 to switch between submenus of Media Player.
Sort: Press numeric button 6 to sort channels.
Play mode: Press numeric button 8 to select play mode: Single/All/Random
- Music:
Play List: Press numeric button 1 to display play list.
FAV: Press numeric button 2 to set the chosen songs in Favorites.
FAV ALL: Press numeric button 3 to set all songs in Favorites.
Edit: Press numeric button 4 to edit. In this submenu, press RED button to rename, press GREEN button to copy, press YELLOW button to delete and press BLUE button to open a new folder.
Switch: Press numeric button 5 to switch between submenus of Media Player.
Sort: Press numeric button 6 to sort channels.
Repeat: Press numeric button 7 to choose play mode: Single repeated/All/Random
- Image:
Play List: Press RED button to display play list.
FAV: Press GREEN button to set the chosen images in Favorites.
FAV ALL: Press YELLOW button to set all images in Favorites.
Edit: Press BLUE button to edit. In this submenu, press RED button to rename, press GREEN button to copy, press YELLOW button to delete and press BLUE button to open a new folder.
Switch: Press numeric button 5 to switch between submenus of Media Player.
Sort: Press numeric button 6 to sort channels.
Setup: Press numeric button 7 to enter playback setting.
MultiView: Press numeric button 8 to display multi images.
Edit Channel
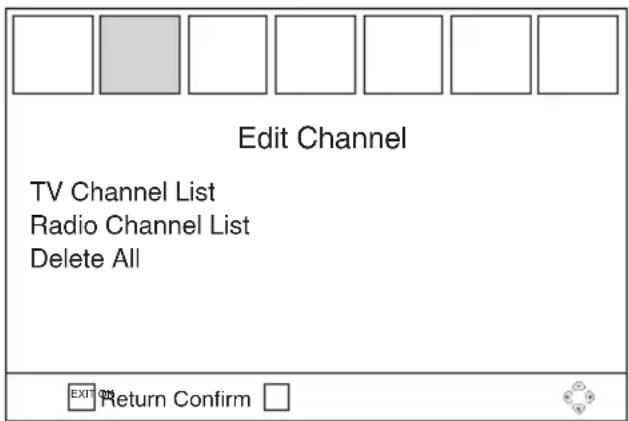
• TV Channel List:
Open TV Channel List. To the left is the list of all TV channels or free channels, to the right is a window for previewing the selected channel, and at the bottom is the navigation guide for all operations such as:
Choose Channel: Use CH▲▼buttons to select channels and press OK button to start watching.
Lock: Press RED button to lock the current channel.
Skip: Press GREEN button to set the current channel to be skipped when browsing channels.
Move: Use CH/▼ buttons to reorder the channel list.
Edit: Press BLUE button to enter in edit interface. Press RED button to sort channels in different orders. Press GREEN button to edit current channel. Press BLUE button to delete the current channel.
• Radio Channel List:
The radio channels are edited in the same manner.
- Delete All:
Press OK button to delete all TV and Radio channels. Follow the instructions on the screen.
Installation

• DVBT Channel Scan:
Scan Mode: By Channel/By Frequency
Scan Band: VHF/UHF
Channel No.: Only available in "By channel" mode.
Frequency: Only available in "By Frequency" mode.
Bandwidth: 6MHZ/7MHZ/8MHZ
Search: Press OK button to start search. Press EXIT button to quit and system will automatically save the found channels.
Signal Intensity: Indication bar of the intensity of signal.
Signal Quality: Indication bar of the quality of signal
- DVBT Auto Scan:
Country: Italy/Poland/Russia/Singapore/Spain/Sweden/Taiwan/United Kingdom/Iran/Argentina/Austria/China/Denmark/Finland/France/Germany/Hong-Kong FTA Only: Yes/No
Search: Press OK button to start search. Press EXIT button to quit and system will automatically save the found channels
• LCN:
In LCN on mode, the system will automatically list the channels in the same order as in the signal stream; in LCN off mode, the system will list the channels in an ascending order according to the channel numbers. Press OK to toggle the LCN mode
on or off.
System Setup

- Language:
OSD Language: Choose the language of the on-screen display (OSD).
First Audio: Select the first audio language.
Second Audio: Select the second audio language.
Teletext: Choose the teletext language.
- TV system:
Video Resolution: Select the video resolution
Aspect Mode: Auto/4:3 PS/4:3 LB/16:9
RF System: PAL-DK/PAL-BG/PAL-L
RF Channel: 21-69
TV Format: CVBS/YPbPr
- Display Setting:
Brightness/Contrast/Saturation/Hue: 0-100
Sharpness: 0-10
- Local Time Setting:
Region: Choose your local region
GMT Usage: User Define, By Region, or Off.
GMT Offset: Within the range of UTC+00:00-00:30.
Summer Time: ON/OFF
Date: Use navigation buttons to move cursor and numeric button to input date.
Time: Use navigation buttons to move cursor and numeric button to input time

Please note:
- The “GMT Offset” will be available only when “User Define” is selected in “GMT Usage” mode.
- The “Summer Time” will be available only when “By Region” is selected in “GMT Usage” mode.
- The "Date" and "Time" will be available only when "Off" is selected in "GMT Usage" mode.
- Timer Setting:
You can set up to 8 timers.
Timer Mode: Off/Once/Daily
Timer Service: Channel/Record
Wakeup Channel: Setup the channel for waking up.
Wakeup Date: Setup timer date. Use navigation buttons to move cursor and numeric button to input date.
On Time: Setup time for timer to wake up. Use navigation and numeric buttons to input time.
Duration: Setup the duration of the timer. Use navigation and numeric buttons to input time.
PS Record
- Parental Lock:
Default password is "0000".
Menu Lock: On/Off.
Channel Lock: Off / On
Rate Lock: Off/Age 10/Age 12/Age 14/Age 16/Age 18
New Password: Input new password with numeric buttons.
Confirm Password: Confirm new password with numeric buttons
- OSD Setting:
OSD Timeout: 1-10 seconds
OSD Transparency: Off/10%/20%/30%/40%
- Favorite:
Press OK button to edit favorite channels.
- MultiView Setting:
3x3 pictures/4+1 pictures
• PVR Storage Information:
View the information about the storage used for recording.
Volume/Total size/Free size/Rec size/TMS size/File size/File system
- PVR Setting:
Timeshift: ON/OFF
Jump: 30 sec/1 min/5 min/10 min/30 min
Timeshift to Record: ON/OFF
PS Record: ON/OFF

How to record a real-time TV program
- Connect a USB storage device to the receiver.
- Turn on the "Time Shift" mode.
- Press PAUSE button to stop the TV program and the receiver will start recording as much as the USB device capacity is. Press PLAY button to continue watching from when you stopped.
- Use REW and FF buttons to rewind or fast forward the recorded program. There are 5 speeds: x2, x4, x8, x16 and x32.
- Press INFO twice to enter the HDD Record List interface, choose any item on the list and press OK to watch in full screen.
- The recorded program will be erased automatically once you switch to a different channel.
- Other:
Tuner Power: ON/OFF
Channel Play Type: All/Free/Shuffled
Auto Standby: ON/OFF
Loop Through (RF Output): ON/OFF
Tools

natural_image
Six empty rectangular boxes arranged horizontally, with one box highlighted in gray (no text or symbols)Tools
Information
Factory Setting
Othello
Sudoku
Upgrade by USB
Remove USB device safely

Return Confirm


- Information:
Select this option to view the information on the device.
- Factory Setting:
Select this option to return to factory default settings. The default password is "0000". This step must be done at the initial launch or after a system upgrade. Please operate according to instructions on screen.
- Othello
- Sudoku
- Upgrade by USB:
Upgrade Mode: All Code/Main Code/
Radioback/Defaultdb
Upgrade File: Select the proper upgrade file with an ".abs" extension.
Start: Start upgrading
- Remove USB device safely:
Select this option to safely remove a USB storage device.

The screen menu of your unit can be changed without prior notice and hence differ from the menu represented in this Manual.
USB information
USB file systems supported: NTFS, FAT, FAT32. 2.0 USB version is supported. For correct and satisfactory operation, licensed USB devices of famous brands should be used with this unit; avoid using USB devices of unknown brands. Maximum supported capacity is 2 TB.
According to the USB 1.1/2.0 Standard, usage of a USB device with power current consumption exceeding 500 mA is not recommended without supplementary power supply. Failure to use supplementary power for connected USB drives with power consumption exceeding this value as well as defective USB drives may cause mechanical or thermal changes of elements of this unit as well as failure of internal elements of the USB port. Such damages are not warrantee cases.
Warning: usage of external USB drives containing BIN files in the root directory may cause malfunction of the unit or damage to the software.
Troubleshooting
Below is a table describing simple measures that can help you eliminate most problems likely to emerge when this unit is in use. If below measures do not help, turn to a service center or to the nearest dealer.
| Trouble Reason Solution | ||
| Standby indicator is not on | The unit is not connected to the power supply mains.The power cable is poorly connected. | Check the connection to mains.Check the cable. |
| No signal | The antenna is not connected.The antenna is damaged/not positioned.Out of signal reception area. | Check if the antenna cable is connected.Position the antenna.Turn to the service provider. |
| No image | Wrong signal source is selected on your TV. | Select the correct input signal source. |
| No sound | The audio cable is poorly connected or not connectedThe sound is muted or its volume set to minimum.The audio track is not supported. | Connect the audio cable properly.Increase the sound volume.Select another sound track. |
| No response from the RC | The unit is switched off.Wrong angle of RC usage or the front panel if the unit is shielded.The batteries in RC are exhausted. | Start the unit.Use the RC at a correct angle or uncover the front panel of the unit.Change the batteries in the RC. |
Accessories
- Player 1 pc
- Remote controller 1 pc
- Battery 2 pcs
- Audio video RCA cable 1 pc
- Consumer information 1 pc
- Warranty card 1 pc
- Instruction manual 1 pc
Supported formats
| Container Extension Video codec | Audio codec | ||
| AVI *.avi H2 | 64, MPEG1/2, MPEG4 | G4 | MP1/2, MP3, WMA, AC3, LPCM, ADPCM, AAC |
| MPG | *.mpg, *.mpeg, *.vob, *.dat | MPEG1/2 MP1/2, AC3 | |
| TS *.ts, *.trp | *.tp H264, MPEG1/2 MP1/2, AC3, AAC | ||
| MKV *.mkv | H264, MPEG1/2, MPEG4 | G4 | MP1/2, MP3, WMA, AC3, LPCM, ADPCM, AAC |
| MP4 *.mp4 | H264, MPEG1/2, MPEG4 | G4 | MP1/2, MP3, WMA, AC3, LPCM, ADPCM, AAC |
| MOV *.mov | H264, MPEG1/2, MPEG4 | G4 | MP1/2, MP3, WMA, AC3, LPCM, ADPCM, AAC |
| ASF | *.asf | H264, MPEG1/2, MPEG4 | MP1/2, MP3, WMA, AC3, LPCM, ADPCM, AAC |
| FLV | *.flv | H264, MPEG1/2, MPEG4 | MP1/2, MP3, WMA, AC3, LPCM, ADPCM, AAC |
| 3GP | *.3gp | H264, MPEG4 | AMR-NB, AAC-LC. |
Specifications
| Frequency range | 174-230 MHz (VHF) |
| 470-862 MHz (UHF) | |
| Digital radio | + |
| PVR | + |
| Time Shift | + |
| Russian and English OSD | + |
| EPG | + |
| Signal level | -25-82 dBm |
| Input stream | up to 45.5 Mb/sec |
| Video resolution | 480i/480p/576i/576p/ 720p/1080i/1080p |
| Video outputs | Antenna/Composite (CVBS)/HDMI/Component |
| Audio outputs | Stereo/Digital coaxial |
| Inputs | Antenna/USB |
| Operation voltage | 5V, 2A |
| Maximum power consumption | 8 W |
| Electric shock protection class | II |
| Storage temperature range | ~20°-60°C |
| Operation temperature range | ~0°-45°C |
| Unit dimensions | 155 x 38 x 98 mm |
Warning: Specifications may be subject to change without notice for improvement.
natural_image
Six empty rectangular boxes arranged horizontally, with one box highlighted in gray (no text or symbols)Настройка системы
Язык
Система ТВ
Настройка экрана
natural_image
Six empty rectangular boxes arranged horizontally, with one box highlighted in gray (no text or symbols)Инструменты
Информация
Заводские настройки
Отелло
Судоку
Обновление по USB

- Table of contents 2
- Before you start 3
- Connection 4
- Operation 5
- General information 13
- Important safeguards
- Utilization of the product
- Connection
- Antenna input
- RF output
- HDMI-out
- Coaxial output
- Stereo audio output
- Composite video (CVBS) output
- Component video output
- Controllers
- Changing the battery
- General operations
- STANDBY
- INFO
- EPG
- AUDIO
- CH+/CH-
- Navigation
- OK
- VOL-/VOL+
- Numeric buttons
- REWIND/FAST FORWARD
- PAUSE
- PLAY
- Red/Green/Yellow/Cyan buttons
- MUTE
- TEXT
- LAST
- RECORDING
- SUBTITLE
- TV/RADIO
- PREV/NEXT
- STOP
- USB
- OSD operation
- Main menu
- - PVR:
- - Video:
- - Music:
- - Image:
- • TV Channel List:
- • Radio Channel List:
- - Delete All:
- • DVBT Channel Scan:
- - DVBT Auto Scan:
- • LCN:
- - Language:
- - TV system:
- - Display Setting:
- - Local Time Setting:
- Please note:
- - Timer Setting:
- - Parental Lock:
- - OSD Setting:
- - Favorite:
- - MultiView Setting:
- • PVR Storage Information:
- - PVR Setting:
- How to record a real-time TV program
- - Other:
- Tools
- - Information:
- - Factory Setting:
- USB information
- Troubleshooting
- Accessories
- Инструменты
Brand : HYUNDAI
Model : H-DVB03T2
Category : Digital decoder