T1 - SLR camera CANON - Free user manual and instructions
Find the device manual for free T1 CANON in PDF.

| Product Type | Digital SLR Camera |
| Brand | Canon |
| Model | EOS T1 |
| Sensor | APS-C CMOS 12.2 MP |
| Image Processor | DIGIC IV |
| ISO Sensitivity | 100-6400 (expandable to 12800) |
| Lens Mount | Canon EF/EF-S |
| Display | 3.0-inch LCD, 230,000 dots |
| Viewfinder | Pentamirror, 95% coverage |
| Shutter Speed | 1/4000 s to 30 s, Bulb |
| Shooting Modes | Auto, Program, Shutter Priority, Aperture Priority, Manual, Scene |
| Video Recording | Full HD 1080p at 30 fps |
| Storage | SD/SDHC/SDXC card |
| Power Supply | Rechargeable battery LP-E10, 7.4 V, 860 mAh |
| Dimensions (W x H x D) | 129.6 x 99.7 x 77.9 mm |
| Weight | Approx. 495 g (with battery and card) |
| Connections | USB 2.0, mini HDMI, AV output |
| Main Features | 9-point autofocus, image stabilization, creative modes, in-camera retouching |
| Care and Cleaning | Clean the body with a soft, dry cloth. For the sensor, use a blower or a dedicated cleaning kit. |
| Safety | Do not expose to water, avoid shocks, use a suitable carrying bag. |
| Spare Parts and Repairability | Battery, charger, strap, body cap available. Repair by Canon authorized center. |
| General Information | User manual available in French. Manufacturer warranty 2 years. |
Frequently Asked Questions - T1 CANON
User questions about T1 CANON
0 question about this device. Answer the ones you know or ask your own.
Ask a new question about this device
Download the instructions for your SLR camera in PDF format for free! Find your manual T1 - CANON and take your electronic device back in hand. On this page are published all the documents necessary for the use of your device. T1 by CANON.
USER MANUAL T1 CANON
Fiery JDF Connector Workflow Collaboration Installation Manual for Trueflow Suite Edition
Contents
Preface....3
Displays Used in This Manual....3
Trademarks....3
Copyright....3
- Installation of JDF Connector....4
1-1. Installing JDF Connector software....4
1-2. Selecting Language....6
1-3. Start of Installation Wizard....6
1-4. Selecting Install Component....7
1-5. License Agreement....7
1-6. Selecting detailed Setup....8
1-7. Start of Installation 8
- Registering New Fiery Server....10
2-1. Registering Fiery Server....10
2-2. Login Setting 12
2-3. JDF Device ID Setting 12
2-4. Auto Submit Setting....13
2-5. Media Setting....13
2-6. Checking connection to Fiery Server....15
- Changing/Deleting Connection Setting of Fiery Server....17
3-1. Changing settings of registered Fiery Server....17
3-2. Deleting Fiery Server 17
- Setting up print options in Command WorkStation....18
4-1. Installing Command WorkStation....18
4-2. Operation on Command WorkStation....18
- Hot Folders....30
- Trouble Shooting....30
Preface
Thank you for purchasing this Canon product. Please read this manual thoroughly before operating the product in order to familiarize yourself with its capabilities, and to make the most of its many functions. After reading this manual, store it in a safe place for future reference.
Displays Used in This Manual
Unless otherwise noted, the screen shots used in this manual show the imagePRESS C7000VP and imagePRESS Server A3100 connected to the Trueflow Suite Edition.
Differences across the copier/printer to which the product is connected are noted wherever appropriate.
Functions that are unavailable due to a particular combination of accessories and optional equipment are not displayed on the web browser. Therefore, screen shots of computer operation screens used in this manual may differ from the ones you actually see, depending on the model or options that come with your machine.
Trademarks
Other product and company names herein may be the trademarks of their respective owners.
Copyright
Copyright 2008 by Canon Inc. All rights reserved.
No part of this publication may be reproduced or transmitted in any form or by any means, electronic or mechanical, including photocopying and recording, or by any information storage or retrieval system without the prior written permission of Canon Inc.
1. Installation of JDF Connector
1-1. Installing JDF Connector software
Install the JDF Connector software using "EFI Fiery JDF Connector SOFTWARE & DOCUMENTATION V1.6" CD in the media pack that accompany with imagePRESS Server.
The following table lists the minimum system requirements.
| CANON | SCREEN | ||||
| Host Machine | PS Controller | Fiery JDF Connector | EFI Hot Folder | Hot Folder Input | FJC Input |
| imagePRESS C7000VP | imgaePRESS Server A3000/A2000 | v1.5.2SP1 | 2.2041 | V501.TF101 | V501.TF101 |
| imgaePRESS Server A3000/A2000 | v1.5.2SP1 | 2.2041 | V501.TF101 | V501.TF101 | |
| imgaePRESS Server A3100/A2100 | v1.6 | 2.4011 | V501.TF103 | V501.TF103 | |
| imagePRESS C6000VP | imgaePRESS Server A3100/A2100/A1100 | v1.6 | 2.4011 | V501.TF103 | V501.TF103 |
| imagePRESS C6000 | imgaePRESS Server A3100/A2100/A1100 | v1.6 | 2.4011 | V501.TF101 | V501.TF101 |
| imagePRESS C1 | imgaePRESS Server Q1/T1 | N/A | 2.2041 | V501.TF101 | N/A |
The following shows the table of function combination applicable with the respective JDF connector version.
| Function | JDF Connector FJC1.5.2SP1 | JDF Connector FJJC1.6 | Trueflow | Check with CWS |
| 1-sided/2-sided print | OK | OK | OK | OK |
| Staple setting | OK | OK | N/A | OK |
| Punch setting | OK | OK | N/A | OK |
| Saddle stitching | OK | OK | N/A | OK |
| Paper cassette setting | OK | OK | N/A | OK |
| Paper description setting | OK | OK | N/A | OK |
| Delivery slot setting | OK | OK | N/A | OK |
| Delivery surface setting | OK | OK | N/A | OK |
| Color mode setting | OK | OK | N/A | OK |
| Number of copy sets setting | OK | OK | OK | OK |
| Collate | OK | OK | OK | OK |
| Shift sort per specified No. of copy sets | OK | OK | N/A | OK |
| Print No. of copy sets | OK | OK | N/A | OK |
| BOX&Hold | OK | OK | N/A | OK |
| Trimming (on one side) | OK | OK | N/A | OK |
| Tandem delivery | OK | OK | N/A | OK |
| Screening | OK | OK | OK | OK |
| Printing tab on tab paper | OK | OK | N/A | OK |
1-2. Selecting Language
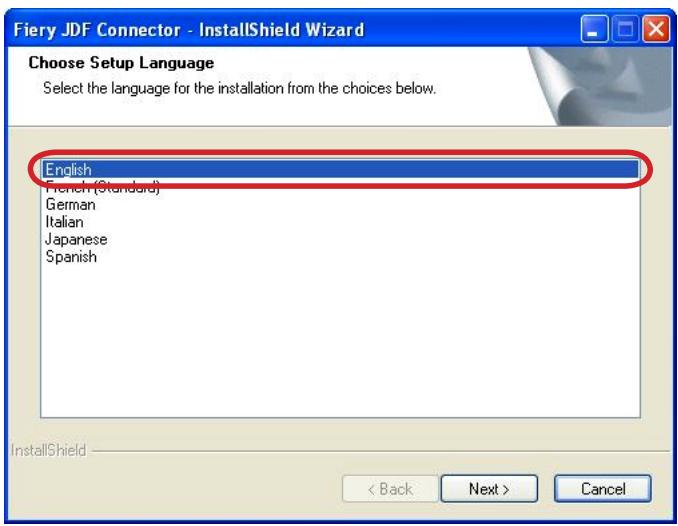
Click "jdf connector-setup.exe" in the CD.
When starting Installer, the screen displays the dialog box for language selection. The displayed language on UI changes according to the language selected (the function is the same).
The language selected here can be switched later by changing the setting on Client UI (the Client PC needs to be restarted after changing the setting).
text_image
Fiery JDF Connector - InstallShield Wizard Choose Setup Language Select the language for the installation from the choices below. English French (Standard) German Italian Japanese Spanish InstallShield < Back Next > Cancel1-3. Start of Installation Wizard
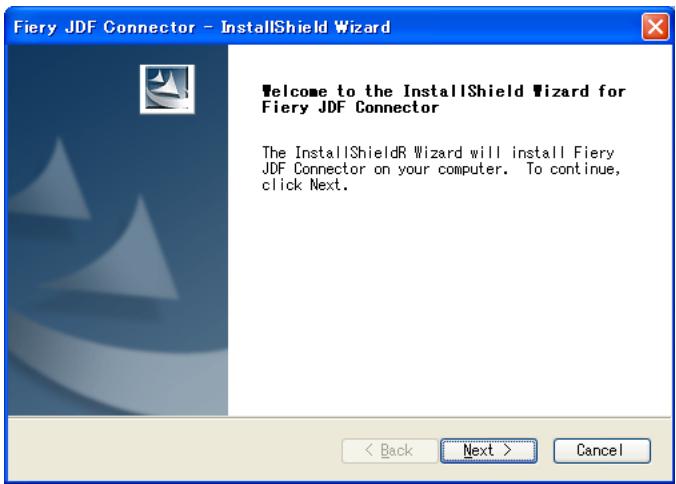
Click Next to proceed.
text_image
Fiery JDF Connector - InstallShield Wizard Welcome to the InstallShield Wizard for Fiery JDF Connector The InstallShieldR Wizard will install Fiery JDF Connector on your computer. To continue, click Next.1-4.
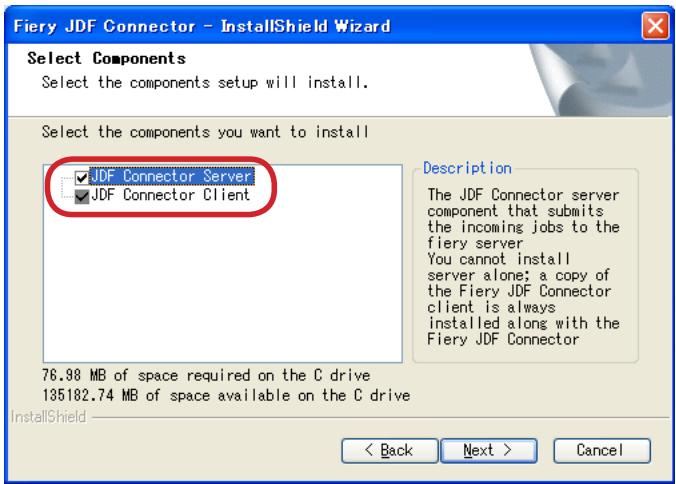
Selecting Install Component
Default setting installs JDF Connector Client only.
In the case of installing JDF Connector Server, select the checkbox for JDF Connector Server.
If there is no connectable JDF Connector Server, both JDF Connector Server and JDF Connector Client need to be installed.
(*In the case of installing Client only, see the later description)
text_image
Fiery JDF Connector - InstallShield Wizard Select Components Select the components setup will install. Select the components you want to install JDF Connector Server JDF Connector Client Description The JDF Connector server component that submits the incoming jobs to the fiery server You cannot install server alone; a copy of the Fiery JDF Connector client is always installed along with the Fiery JDF Connector 76.98 MB of space required on the C drive 135182.74 MB of space available on the C drive InstallShield < Back Next > Cancel1-5.
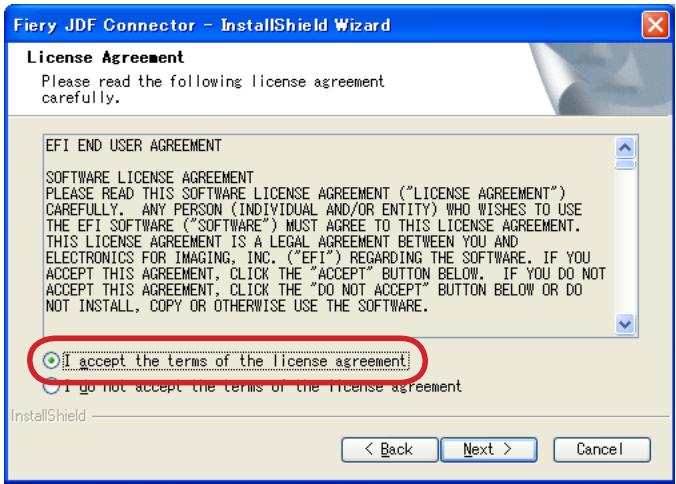
License Agreement
After checking the License description, select "I accept the terms of the license agreement" if you agree the terms, and then click Next to proceed.
text_image
Fiery JDF Connector - InstallShield Wizard License Agreement Please read the following license agreement carefully. EFI END USER AGREEMENT SOFTWARE LICENSE AGREEMENT PLEASE READ THIS SOFTWARE LICENSE AGREEMENT ("LICENSE AGREEMENT") CAREFULLY, ANY PERSON (INDIVIDUAL AND/OR ENTITY) WHO WISHES TO USE THE EFI SOFTWARE ("SOFTWARE") MUST AGREE TO THIS LICENSE AGREEMENT. THIS LICENSE AGREEMENT IS A LEGAL AGREEMENT BETWEEN YOU AND ELECTRONICS FOR IMAGING, INC. ("EFI") REGARDING THE SOFTWARE. IF YOU ACCEPT THIS AGREEMENT, CLICK THE "ACCEPT" BUTTON BELOW. IF YOU DO NOT ACCEPT THIS AGREEMENT, CLICK THE "DO NOT ACCEPT" BUTTON BELOW OR DO NOT INSTALL, COPY OR OTHERWISE USE THE SOFTWARE. I accept the terms of the license agreement I do not accept the terms of the license agreement InstallShield < Back Next > Cancel1-6.
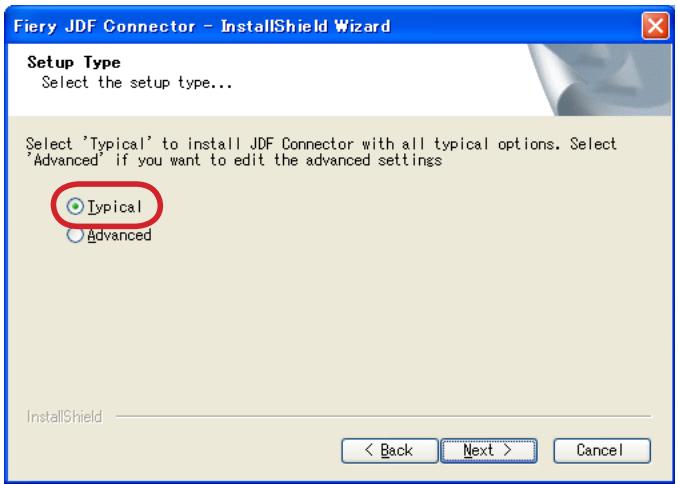
Selecting detailed Setup
In the case of customizing Installation destination of the program or File location of the database, select "Advanced".
Items to be set in "Advanced" can be modified on JDF Connector UI, too.
We recommend selecting Typical because the setting customization is not required when installing both the Server and the Client on the same PC.
text_image
Fiery JDF Connector - InstallShield Wizard Setup Type Select the setup type... Select 'Typical' to install JDF Connector with all typical options. Select 'Advanced' if you want to edit the advanced settings Typical Advanced InstallShield < Back Next > Cancel1-7.
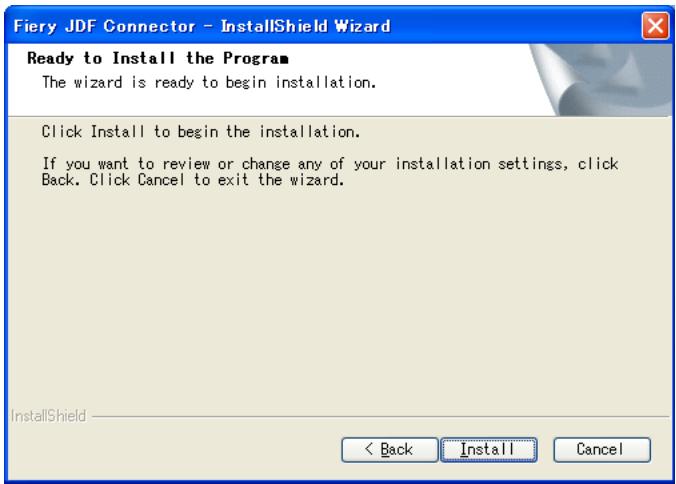
Start of Installation
If there is no change in the setting so far, click Install to start installation.
text_image
Fiery JDF Connector - InstallShield Wizard Ready to Install the Program The wizard is ready to begin installation. Click Install to begin the installation. If you want to review or change any of your installation settings, click Back. Click Cancel to exit the wizard. InstallShield < Back Install CancelRestart the system after installation is completed.
Installation work is complete now.
* In the case of installing JDF Connector Client only
In the case of installing JDF Connector Client to connect to existing JDF Connector Server, clear the checkbox for Server in Select Components dialog box to perform installation in step "1-4. Selecting Install Component".
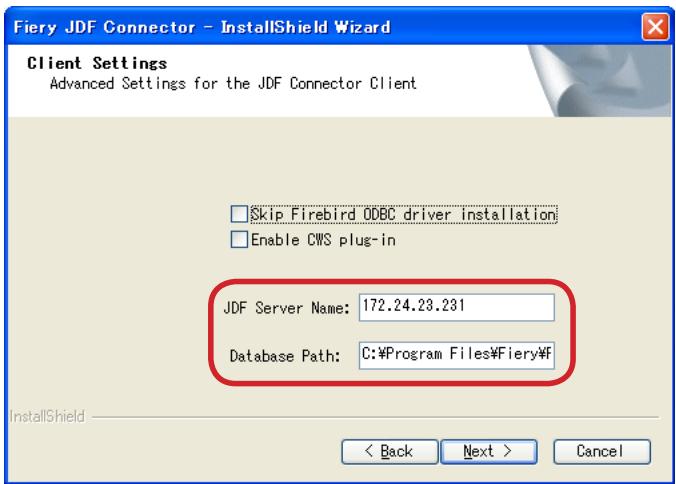
Select "Advanced" in step "1-6. Selecting detailed Setup".

text_image
Fiery JDF Connector - InstallShield Wizard Setup Type Select the setup type... Select 'Typical' to install JDF Connector with all typical options. Select 'Advanced' if you want to edit the advanced settings Typical Advanced InstallShield < Back Next > CancelIn Client Settings dialog box, specify the IP address of JDF Connector Server to connect in JDF Server Name field.
Also specify Database Path in which the database was simultaneously installed with Server. Be sure to specify the absolute path of JDFCONNECTOR.GDB file in Server PC. (To check the database, after starting Client on Server-installed PC, see the displayed dialog box by selecting the following: Configure → JDF Connector Server).
text_image
Fiery JDF Connector - InstallShield Wizard Client Settings Advanced Settings for the JDF Connector Client Skip Firebird ODBC driver installation Enable CWS plug-in JDF Server Name: 172.24.23.231 Database Path: C:\Program Files\Fiery\f InstallShield < Back Next > CancelThe Server to connect can be specified on UI after starting Client.
Specify Server in the dialog box to be displayed by selecting the following: Configure → JDF Connector Server.
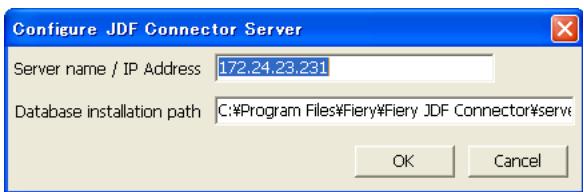
text_image
Configure JDF Connector Server Server name / IP Address 172.24.23.231 Database installation path C:\Program Files\Fiery\Fiery JDF Connector\serv OK Cancel2. Registering New Fiery Server
2-1. Registering Fiery Server
Select the following to start JDF Connector Client: Start Menu → Programs → Fiery → Fiery JDF Connector Client
On Client UI, select the following to make connection setting with Fiery Server: Configure > Printer Devices.
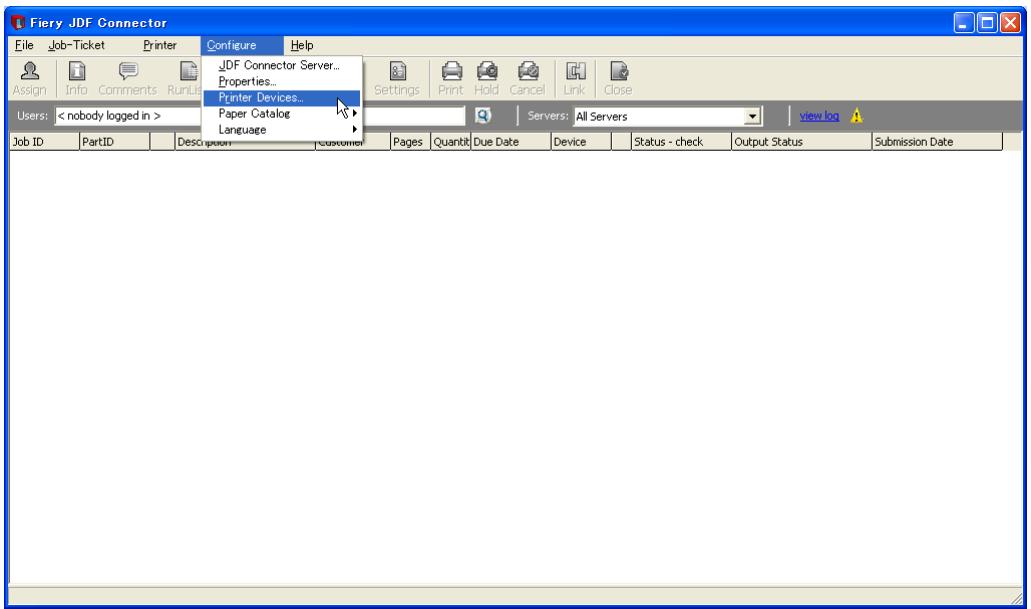
text_image
Fiery JDF Connector File Job-Ticket Printer Configure Help Assign Info Comments RunUp JDF Connector Server... Properties... Printer Devices... Paper Catalog Language Settings Print Hold Cancel Link Close Users: < nobody logged in > Servers: All Servers view log Job ID PartID Description Customer Pages Quant Due Date Device Status - check Output Status Submission DateConfigure Printer Devices dialog box is displayed. Click New (as this is a new entry).
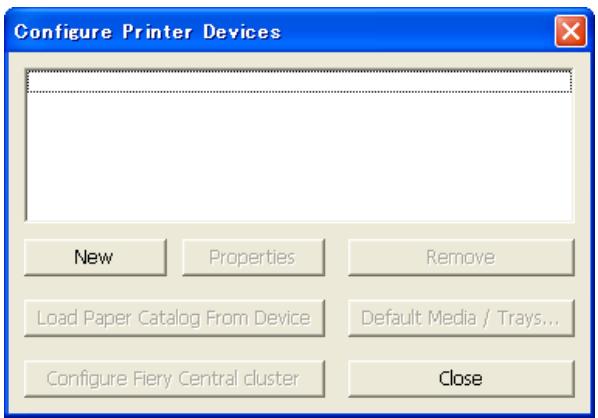
text_image
Configure Printer Devices New Properties Remove Load Paper Catalog From Device Default Media / Trays... Configure Fiery Central cluster CloseAvailable Servers dialog box is displayed. Specify Fiery Server to connect.
Once Auto Search tab is open, the system automatically starts searching to display a list of connectable Fiery Servers. Select the server to connect and click Add.
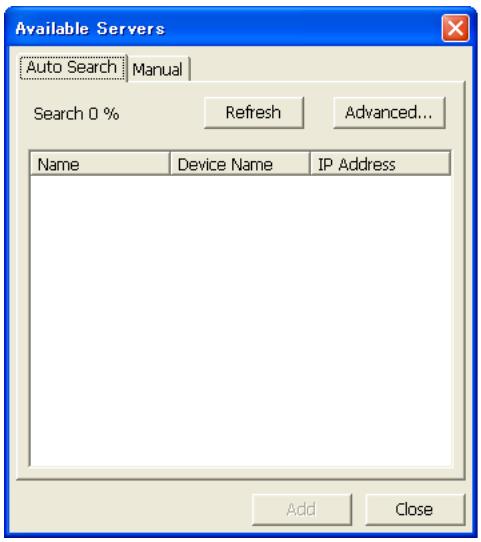
text_image
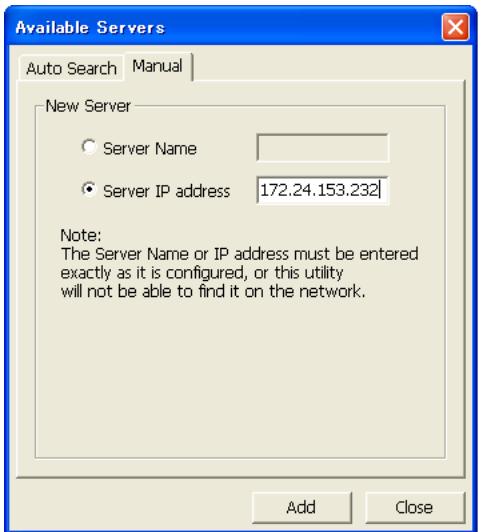
Available Servers Auto Search Manual Search 0 % Refresh Advanced... Name Device Name IP Address Add CloseIf connectable Server is not found in AutoSearch, Server can be specified manually with Manual tab. Select Manual tab to enter IP address of Fiery Server in Server IP address field.
text_image
Available Servers Auto Search Manual New Server ○ Server Name ● Server IP address 172.24.153.232 Note: The Server Name or IP address must be entered exactly as it is configured, or this utility will not be able to find it on the network. Add Close2-2. Login Setting
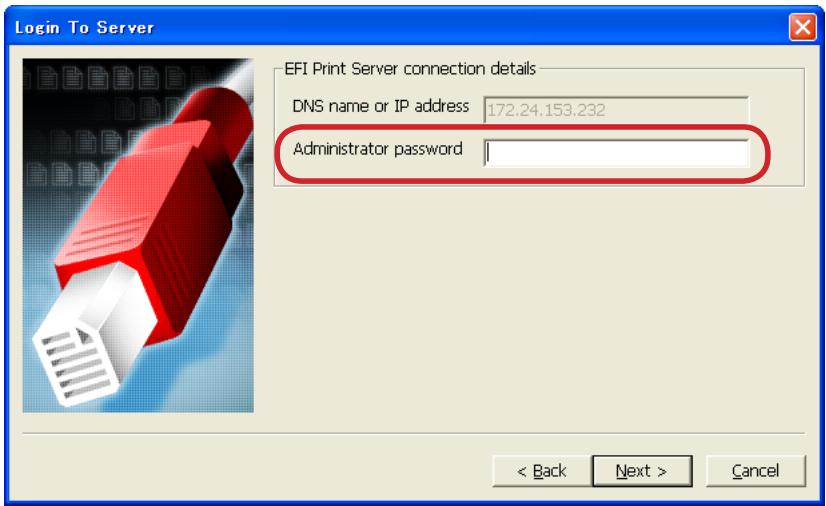
After succeeding in connecting to the specified Fiery Server, make Login setting to Server in Login To Server dialog box.
If System Administrator's login password is set in Fiery server, specify the System Administrator's password in "Administrator password" field.
Click Next.
text_image
Login To Server EFI Print Server connection details DNS name or IP address 172.24.153.232 Administrator password < Back Next > Cancel2-3. JDF Device ID Setting
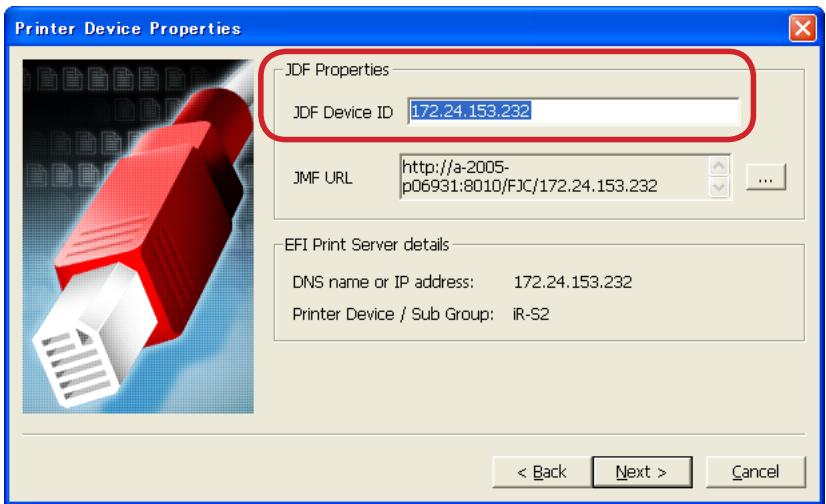
Printer Device Properties dialog box is displayed.
JDF Device ID to be set here determines JMF URL that is the destination when sending JDF job from JDF-generated application.
Click Next. (No need to change the setting although User can change JDF Device ID into any characters).
text_image
Printer Device Properties JDF Properties JDF Device ID 172.24.153.232 JMF URL http://a-2005- p06931:8010/FJC/172.24.153.232 EFI Print Server details DNS name or IP address: 172.24.153.232 Printer Device / Sub Group: IR-S2 < Back Next > Cancel2-4. Auto Submit Setting
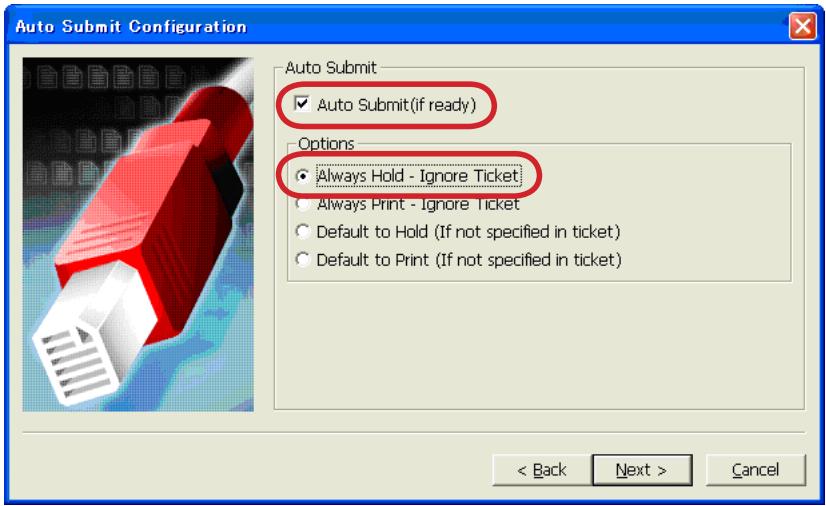
Auto Submit Configuration dialog box is displayed. This dialog box specifies the operation when JDF Connector Client receives job.
We recommend selecting Auto Submit (if ready) and Always Hold-Ignore Ticket for Options to execute printing unless specified to Hold in JMF setting when receiving job.
text_image
Auto Submit Configuration Auto Submit ✓ Auto Submit(if ready) Options ● Always Hold - Ignore Ticket ● Always Print - Ignore Ticket ○ Default to Hold (If not specified in ticket) ○ Default to Print (If not specified in ticket) < Back Next > Cancel2-5. Media Setting
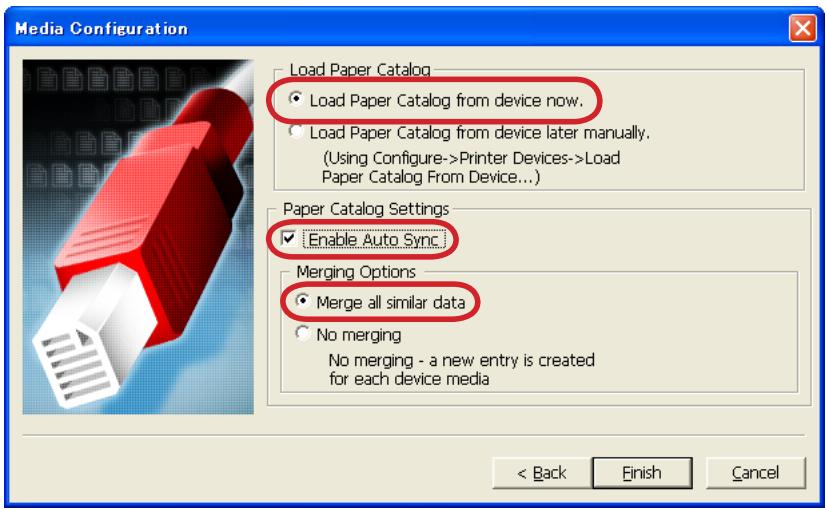
Media Configuration dialog box is displayed.
This dialog box makes settings to perform synchronization in media setting: between Paper Catalog of JDF Connector (referencing is available by selecting the following on Client PC: Configure → Paper Catalog → Browse) and Paper Catalog of Fiery Server.
We recommend selecting "Load Paper catalog from device now" to perform synchronization when initially connecting to Fiery Server.
We also recommend selecting Enable Auto Sync in Paper Catalog Setting and “Merge all similar data” in Merging Option to continue to perform automatic synchronization and prevent repeated registration of the same media from multiple Fiery Servers.
Click Finish to complete the settings.
text_image
Media Configuration Load Paper Catalog Load Paper Catalog from device now. Load Paper Catalog from device later manually. (Using Configure->Printer Devices->Load Paper Catalog From Device...) Paper Catalog Settings Enable Auto Sync Merging Options Merge all similar data No merging No merging - a new entry is created for each device media < Back Finish CancelIn the case of selecting "Load Paper catalog from device now", loading of Paper Catalog is started after the setting is complete.
text_image
Load Paper Catalog From Device Loading Paper Catalog From Device... OKThe following message dialog box is displayed when loading is succeeded.
text_image
Load Paper Catalog From Device Successfully loaded Paper Catalog from device. OK2-6.
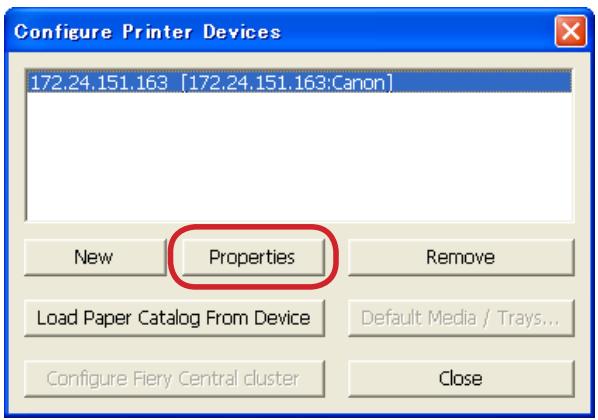
Checking connection to Fiery Server
When checking connection after making settings, click Configure and then Printer Devices. Select printer to be checked and click Properties.
text_image
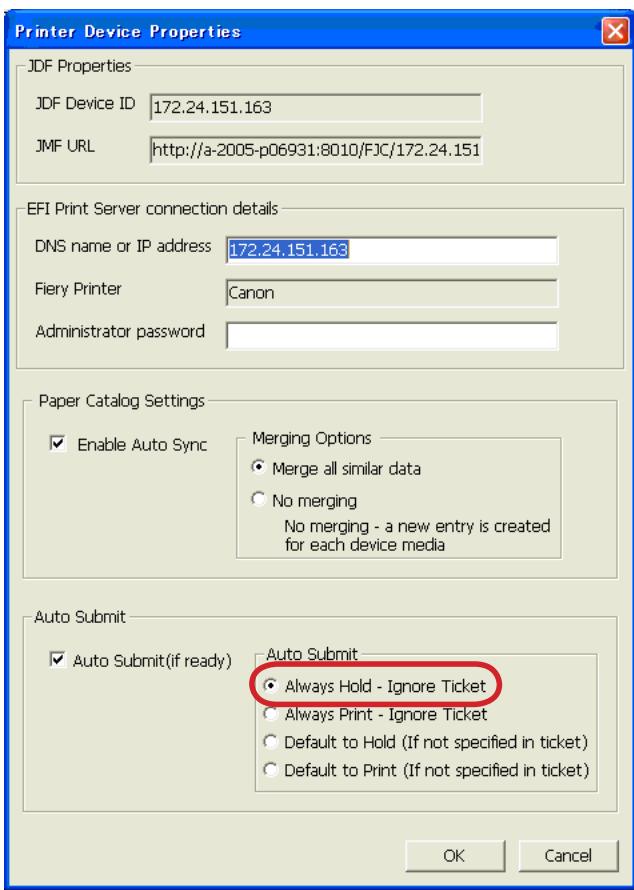
Configure Printer Devices 172.24.151.163 [172.24.151.163:Canon] New Properties Remove Load Paper Catalog From Device Default Media / Trays... Configure Fiery Central cluster CloseThe description set in Printer Device Properties dialog box is displayed. Click OK to connect to the specified Fiery Server.
text_image
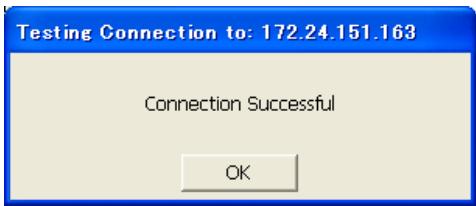
Printer Device Properties JDF Properties JDF Device ID 172.24.151.163 JMF URL http://a-2005-p06931:8010/FJC/172.24.151 EFI Print Server connection details DNS name or IP address 172.24.151.163 Fiery Printer Canon Administrator password Paper Catalog Settings Enable Auto Sync Merging Options Merge all similar data No merging No merging - a new entry is created for each device media Auto Submit Auto Submit(if ready) Auto Submit Always Hold - Ignore Ticket Always Print - Ignore Ticket Default to Hold (If not specified in ticket) Default to Print (If not specified in ticket) OK CancelThe following dialog box is displayed when connection is succeeded.
text_image
Testing Connection to: 172.24.151.163 Connection Successful OKChecking connection is complete now.
3. Changing/Deleting Connection Setting of Fiery Server
3-1. Changing settings of registered Fiery Server
In the case of changing settings of registered Fiery Server, it is not available on Client UI to change any settings other than those relate to Administrator password and Paper catalog. Thus, to change setting items other than those relate to Administrator password and Paper catalog, we recommend deleting registered Fiery Server once to newly register it again.
3-2. Deleting Fiery Server
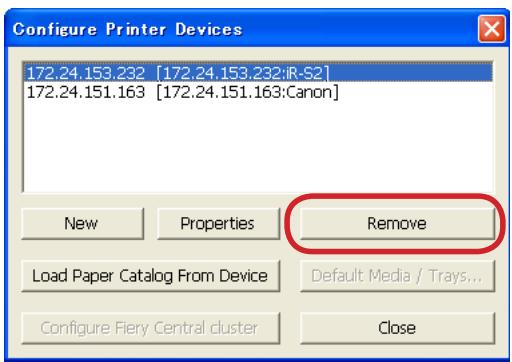
Delete Fiery Server in Printer Devices dialog box by selecting the following: Configure → Printer Devices.
text_image
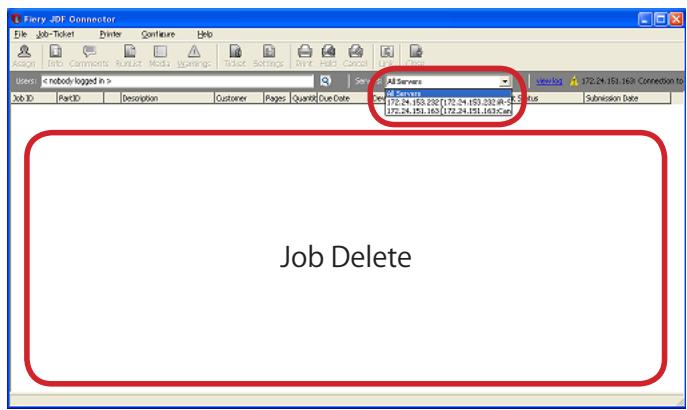
Configure Printer Devices 172.24.153.232 [172.24.153.232:iR-S2] 172.24.151.163 [172.24.151.163:Canon] New Properties Remove Load Paper Catalog From Device Default Media / Trays... Configure Fiery Central cluster CloseWhen deleting registered Server, all jobs from Fiery Server need to be deleted by Client. Display Fiery jobs (to delete) from the Server on Client UI to delete them before deleting registered Server.
text_image
Ferry JDF Connector File Job-Ticket Employee Configure Help Design Info Comments Runjust Media Warnings Ticket Settings Print Hold Cancel Help Close User:The following message dialog box is displayed if there remain Server jobs (to delete) when deleting registration.

text_image
EFI Fiery JDF Connector All jobs for the printer device must be closed (or deleted) before the selected device can be removed. OK4. Setting up print options in Command WorkStation
4-1. Installing Command WorkStation
Install Command WorkStation, Windows Editions on a Microsoft computer that has a network to the imagePRESS Server. To install Command WorkStation, see "Utilities pdf" in "User Documentation"CD.
4-2. Operation on Command WorkStation
The job sent via JDF Connector will be stored in a Hold queue on Command WorkStation. On Command WorkStation, you can change/specify print options, use Impose to apply imposition layouts to your job, or access to Paper Catalog database. For more information about using Command WorkStation, Impose, and Paper Catalog, see "Utilities.pdf" in the User Documentation CD or Command WorkStation Help.
The following describes additional information of imagePRESS Server print options you should note when specifying print options.
Spot Color Matching
The Spot Color Matching print option should be enabled.
When the option is enabled, the imagePRESS Server uses a built-in table to generate the closest CMYK matches of spot colors your copier can produce.
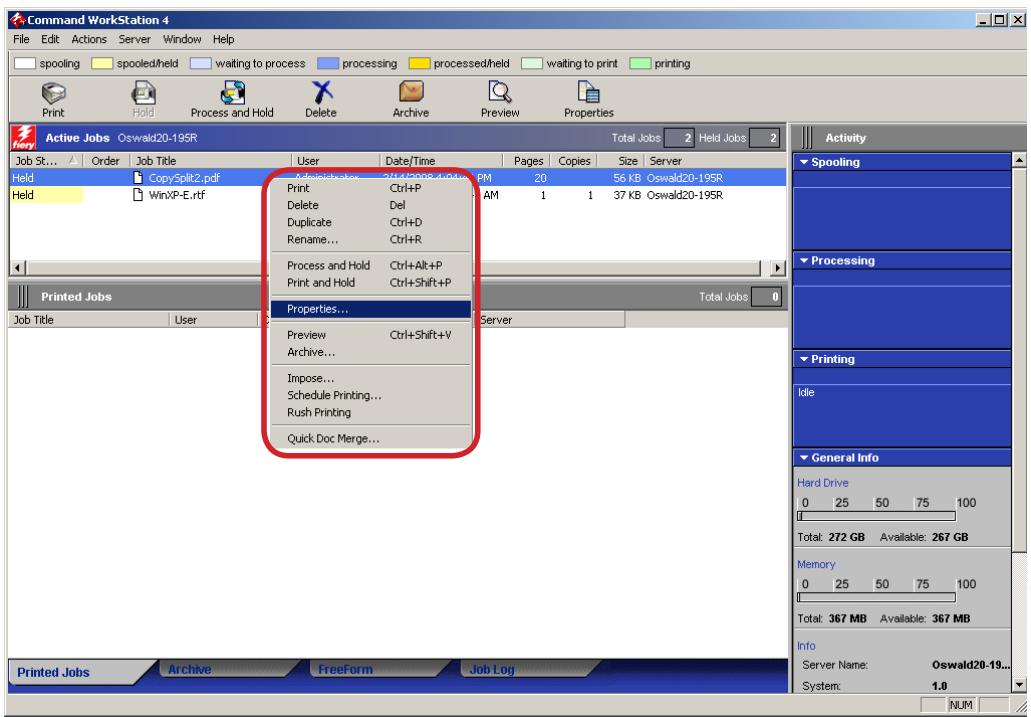
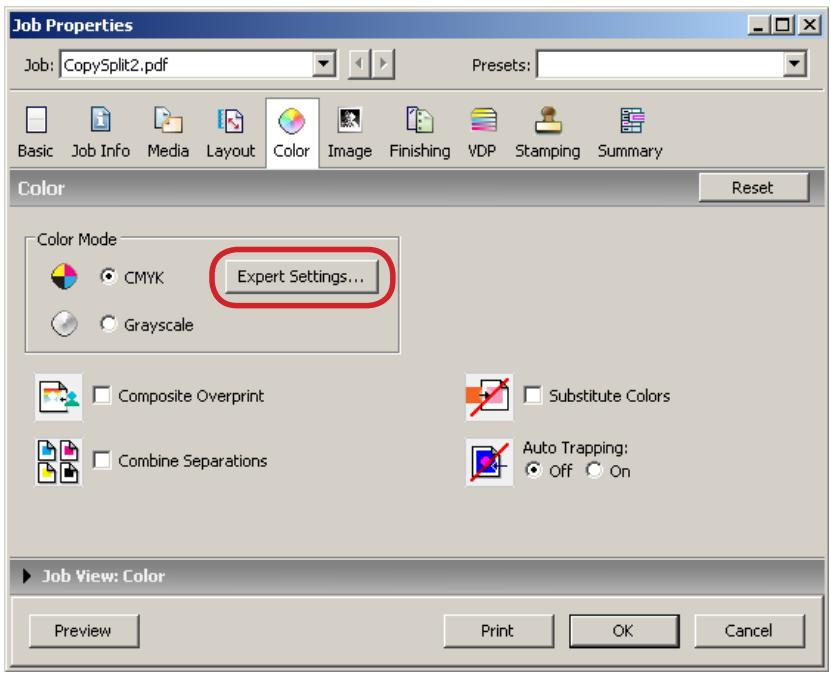
1. Right-click the job that you want to change print option, and then select Properties.
text_image
Command WorkStation 4 File Edit Actions Server Window Help spooling spooled/held waiting to process processing processed/held waiting to print printing Print Hold Process and Hold Delete Archive Preview Properties Active Jobs Oswald20-195R Total Jobs Held Jobs Job St... Order Job Title User Date/Time Pages Copies Size Server Held CopySplit2.pdf Administrator Ctrl+P 20 56 KB Oswald20-195R Held WinXP-E.rtf Print Ctrl+P AM 1 1 37 KB Oswald20-195R Process and Hold Ctrl+Alt+P Print and Hold Ctrl+Shift+P Total Jobs Printed Jobs Job Title User Server Properties... Preview Ctrl+Shift+V Archive... Impose... Schedule Printing... Rush Printing Quick Doc Merge... Printed Jobs Archive Freeform Job Log Activity Spooling Processing Printing Idle General Info Hard Drive 0 25 50 75 100 Total: 272 GB Available: 267 GB Memory 0 25 50 75 100 Total: 367 MB Available: 367 MB Info Server Name: Oswald20-19... System: 1.0 NUM2. The Job Properties dialog box appears.
Click Expert Settings button in Color tab.

text_image
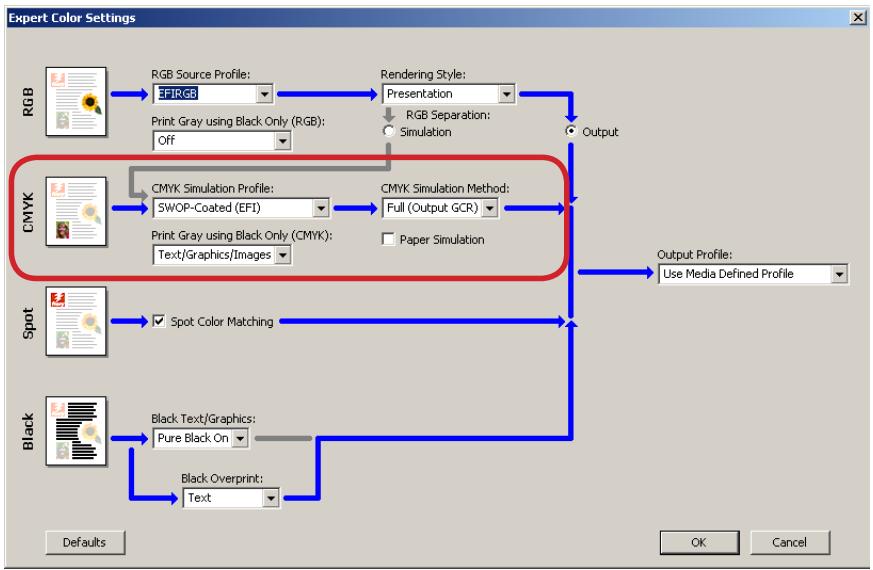
Job Properties Job: CopySplit2.pdf Presets: Basic Job Info Media Layout Color Image Finishing VDP Stamping Summary Color Reset Color Mode CMYK Expert Settings... Grayscale Composite Overprint Substitute Colors Combine Separations Auto Trapping: Off On Job View: Color Preview Print OK Cancel3. The Expert Color Settings dialog box appears.
Confirm that a check box for Spot Color Matching is checked.

flowchart
graph TD
    A["RGB Source Profile: EF/RGB"] --> B["Rendering Style: Presentation"]
    B --> C["Output"]
    D["CMYK Simulation Profile: SWOP-Coated (EFI)"] --> E["CMYK Simulation Method: Full (Output GCR)"]
    E --> F["Output Profile: Use Media Defined Profile"]
    G["Spot Color Matching"] --> H["Spot Color Matching"]
    I["Black Text/ Graphics: Pure Black On"] --> J["Black Overprint: Text"]
    K["Black Image"] --> L["Black Overprint: Text"]
[NOTE]
The default setting in imagePRESS Server is ON.
4. Click OK, and then click OK to close the Job Properties dialog box.
■ Composite Overprint
The Composite Overprint print option is disabled in jobs sent via JDF connector or Hot Folders even the option is correctly set. In this case, overwrite the print option from Command WorkStation to get correct print result. Follow the following procedures to set the option.
1. Right-click the job that you want to change print option, and then select Properties.

text_image
Command WorkStation 4 File Edit Actions Server Window Help spooling spooled/held waiting to process processing processed/held waiting to print printing Print Hold Process and Hold Delete Archive Preview Properties Active Jobs Oswald20-195R Total Jobs Held Jobs Job St... Order Job Title User Date/Time Pages Copies Size Server Held CopySplit2.pdf Administrator Ctrl+P 20 56 KB Oswald20-195R Held WinXP-E.rtf Print Ctrl+P AM 1 1 37 KB Oswald20-195R Process and Hold Ctrl+Alt+P Print and Hold Ctrl+Shift+P Properties... Preview Ctrl+Shift+V Archive... Impose... Schedule Printing... Rush Printing Quick Doc Merge... Printed Jobs Total Jobs Job Title User Server Activity Spooling Processing Printing Idle General Info Hard Drive 0 25 50 75 100 Total: 272 GB Available: 267 GB Memory 0 25 50 75 100 Total: 367 MB Available: 367 MB Info Server Name: Oswald20-19... System: 1.0 Printed Jobs Archive Freeform Job Log NUM2. The Job Properties dialog box appears.
Check the check box of Composite Overprint in Color tab.
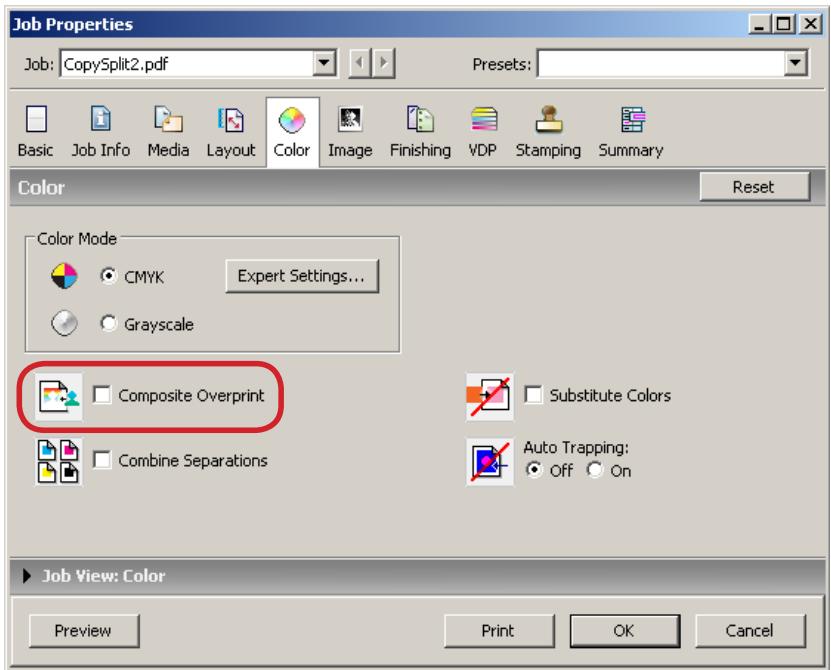
text_image
Job Properties Job: CopySplit2.pdf Presets: Basic Job Info Media Layout Color Image Finishing VDP Stamping Summary Color Reset Color Mode CMYK Expert Settings... Grayscale Composite Overprint Substitute Colors Combine Separations Auto Trapping: Off On Job View: Color Preview Print OK Cancel3. Click OK.
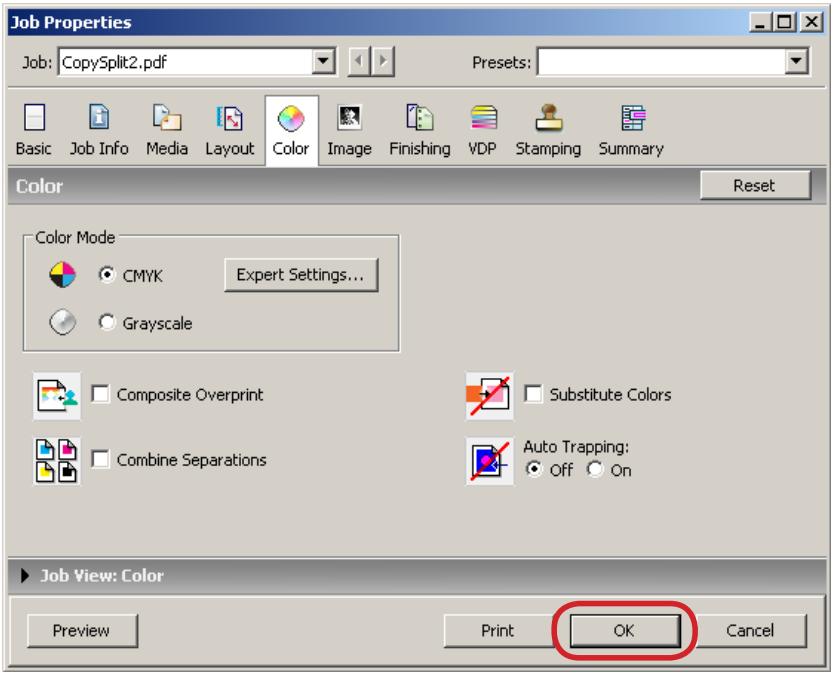
text_image
Job Properties Job: CopySplit2.pdf Presets: Basic Job Info Media Layout Color Image Finishing VDP Stamping Summary Color Reset Color Mode CMYK Expert Settings... Grayscale Composite Overprint Substitute Colors Combine Separations Auto Trapping: Off On Job View: Color Preview Print OK Cancel■ Embedded ICC profile data printing
No special setting is required to print Embedded ICC profile data from imagePRESS Server.
CMYK Simulation Profile
The CMYK Simulation Profile print option allows you to print press proofs or simulations. This setting specifies the offset press standard or other color printing device that you want to simulate. This option affects CMYK data only.
To specify the profile, follow the following procedures.
1. Right-click the job that you want to change print option, and then select Properties.
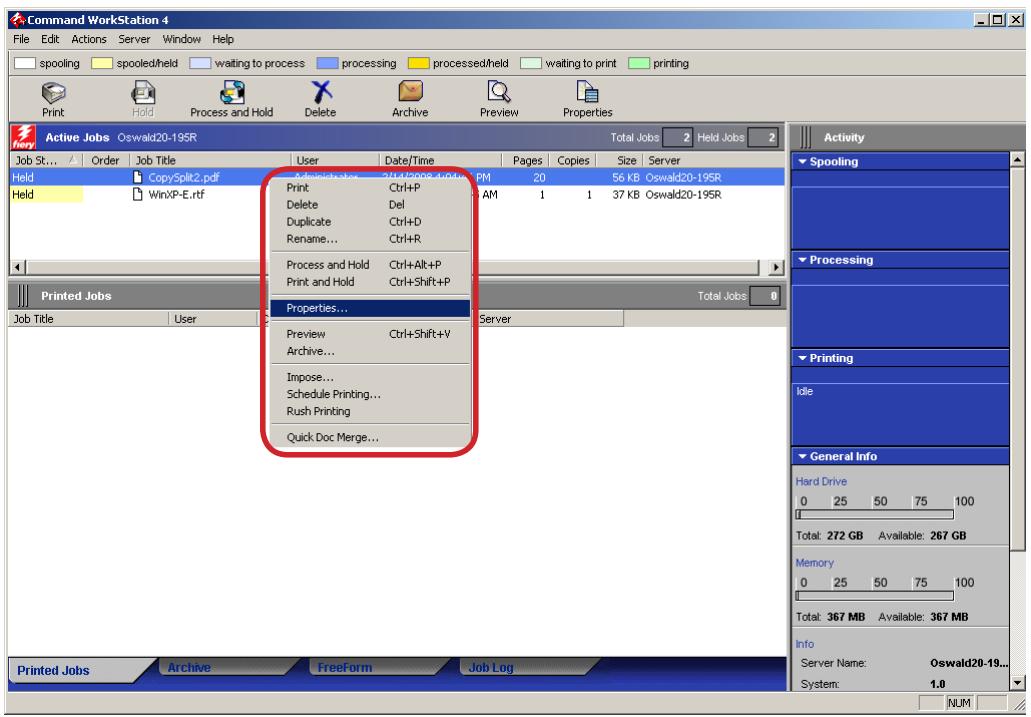
text_image
Command WorkStation 4 File Edit Actions Server Window Help spooling spooled/held waiting to process processing processed/held waiting to print printing Print Hold Process and Hold Delete Archive Preview Properties Active Jobs Oswald20-195R Total Jobs Held Jobs Job St... Order Job Title User Date/Time Pages Copies Size Server Held CopySplit2.pdf Adminicatior 2714/2008-1-01pm PM 20 56 KB Oswald20-195R Held WinXP-E.rtf Print Ctrl+P Del AM 1 1 37 KB Oswald20-195R Process and Hold Ctrl+Alt+P Print and Hold Ctrl+Shift+P Properties... Preview Ctrl+Shift+V Archive... Impose... Schedule Printing... Rush Printing Quick Doc Merge... Printed Jobs Total Jobs Job Title User Server Activity Spooling Processing Printing Idle General Info Hard Drive 0 25 50 75 100 Total: 272 GB Available: 267 GB Memory 0 25 50 75 100 Total: 367 MB Available: 367 MB Info Server Name: Oswald20-19... System: 1.0 Printed Jobs Archive Freeform Job Log NUM2. The Job Properties dialog box appears.
Check the check box of Composite Overprint in Color tab.
text_image
Job Properties Job: CopySplit2.pdf Presets: Basic Job Info Media Layout Color Image Finishing VDP Stamping Summary Color Reset Color Mode CMYK Expert Settings... Grayscale Composite Overprint Substitute Colors Combine Separations Auto Trapping: Off On Job View: Color Preview Print OK Cancel3. The Expert Color Settings dialog box appears.
Specify an appropriate profile from each pull-down menu.
flowchart
graph TD
    A["RGB Source Profile: EFIRGB"] --> B["Rendering Style: Presentation"]
    B --> C["Output"]
    D["CMYK Simulation Profile: SWOP-Coated (EFI)"] --> E["CMYK Simulation Method: Full (Output GCR)"]
    F["Spot Image"] --> G["Spot Color Matching"]
    H["Black Text/ Graphics: Pure Black On"] --> I["Black Overprint: Text"]
    J["Black Overprint"] --> K["Output Profile: Use Media Defined Profile"]
- Click OK, and then click OK to close the Job Properties dialog box.
Output Profile
You can specify the output profile to reflect a particular color space for the current job. To specify Output Profile, follow the following procedures.
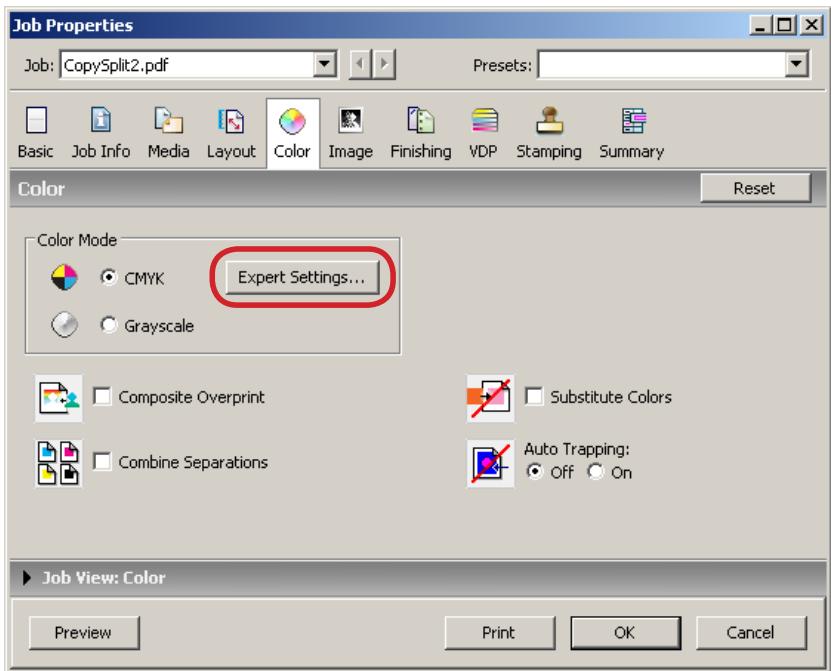
1. Right-click the job that you want to change print option, and then select Properties.

text_image
Command WorkStation 4 File Edit Actions Server Window Help spooling spooled/held waiting to process processing processed/held waiting to print printing Print Hold Process and Hold Delete Archive Preview Properties Active Jobs Oswald20-195R Total Jobs Held Jobs Job St... Order Job Title User Date/Time Pages Copies Size Server Held CopySplit2.pdf Print Ctrl+P 5 PM 20 56 KB Oswald20-195R Held WinXP-E.rtf Delete Del 3 AM 1 1 37 KB Oswald20-195R Process and Hold Ctrl+Alt+P Print and Hold Ctrl+Shift+P Properties... Preview Ctrl+Shift+V Archive... Impose... Schedule Printing... Rush Printing Quick Doc Merge... Printed Jobs Total Jobs 0 Job Title User Server Activity Spooling Processing Printing Idle General Info Hard Drive 0 25 50 75 100 Total: 272 GB Available: 267 GB Memory 0 25 50 75 100 Total: 367 MB Available: 367 MB Info Server Name: Oswald20-19... System: 1.0 Printed Jobs Archive FreeForm Job Log NUM2. The Job Properties dialog box appears.
Check the check box of Composite Overprint in Color tab.
text_image
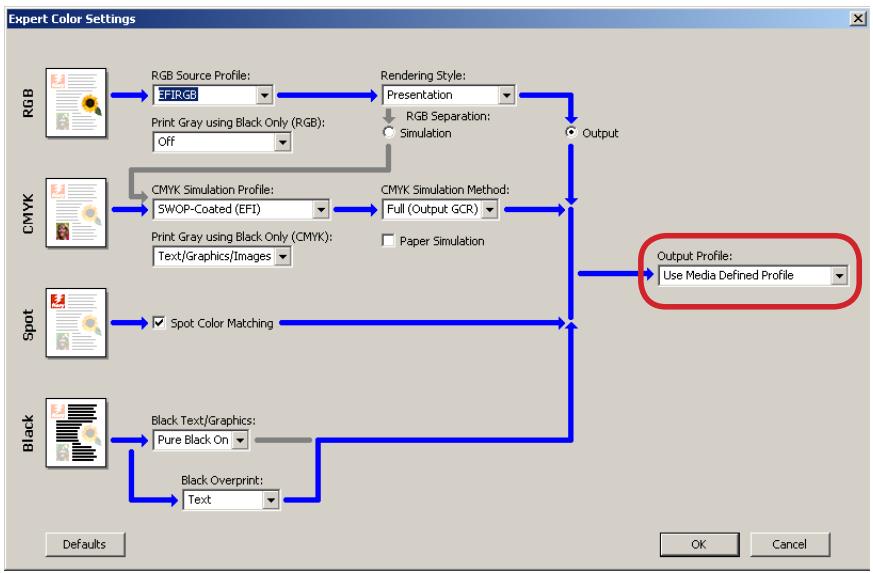
Job Properties Job: CopySplit2.pdf Presets: Basic Job Info Media Layout Color Image Finishing VDP Stamping Summary Color Reset Color Mode CMYK Expert Settings... Grayscale Composite Overprint Substitute Colors Combine Separations Auto Trapping: Off On Job View: Color Preview Print OK Cancel3. The Expert Color Settings dialog box appears.
Select an appropriate profile from the pull-down menu list.
flowchart
graph TD
    A["RGB Source Profile: EFIRGB"] --> B["Rendering Style: Presentation"]
    B --> C["Output"]
    D["CMYK Simulation Profile: SWOP-Coated (EFI)"] --> E["CMYK Simulation Method: Full (Output GCR)"]
    E --> F["Output Profile: Use Media Defined Profile"]
    G["Spot Image"] --> H["Spot Color Matching"]
    I["Black Text/ Graphics: Pure Black On"] --> J["Black Overprint: Text"]
    K["Black Image"] --> L["Black Text/ Graphics"]
    M["Black Image"] --> N["Black Overprint: Text"]
- Click OK, and then click OK to close the Job Properties dialog box.
■ Output Intent (CMYK Profile)
You cannot change the Output Intent (CMYK Profile) in the imagePRESS Server.
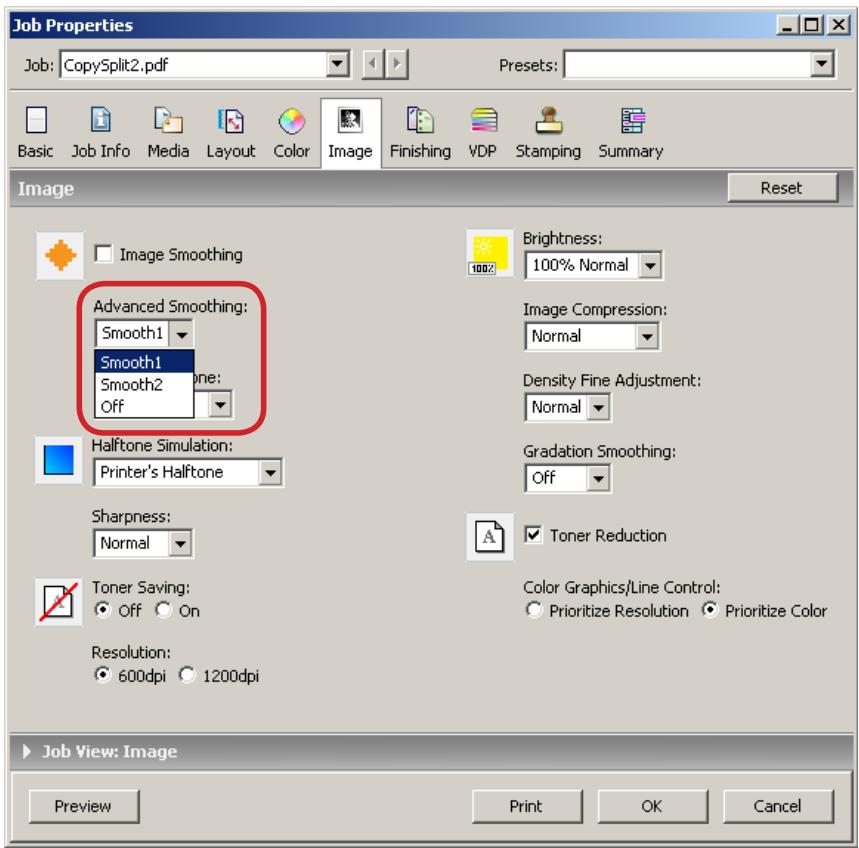
■ Advanced Smoothing
When the Advanced Smoothing print option is set to Smooth 1 or Smooth 2, text data may be recognized and process as image data in imagePRESS Server. In this case, specify Off to disable the option.
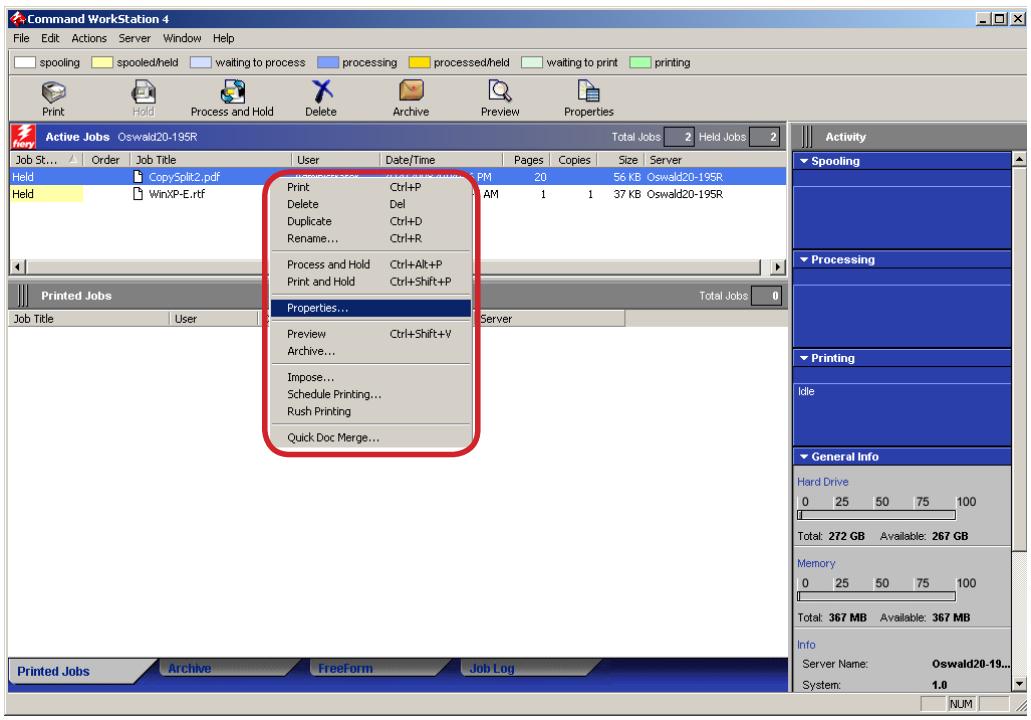
1. Right-click the job that you want to change print option, and then select Properties.
text_image
Command WorkStation 4 File Edit Actions Server Window Help spooling spooled/held waiting to process processing processed/held waiting to print printing Print Hold Process and Hold Delete Archive Preview Properties Active Jobs Oswald20-195R Total Jobs Held Jobs Job St... Order Job Title User Date/Time Pages Copies Size Server Held CopySplit2.pdf Print Ctrl+P PM 20 56 KB Oswald20-195R Held WinXP-E.rtf Delete Del AM 1 1 37 KB Oswald20-195R Process and Hold Ctrl+Alt+P Print and Hold Ctrl+Shift+P Properties... Preview Ctrl+Shift+V Archive... Impose... Schedule Printing... Rush Printing Quick Doc Merge... Printed Jobs Total Jobs 0 Job Title User Server Activity Spooling Processing Printing Idle General Info Hard Drive 0 25 50 75 100 Total: 272 GB Available: 267 GB Memory 0 25 50 75 100 Total: 367 MB Available: 367 MB Info Server Name: Oswald20-19... System: 1.0 Printed Jobs Archive Freeform Job Log NUM2. The Job Properties dialog box appears.
Select Off from the Advanced Smoothing pull-down menu list in Color tab.
text_image
Job Properties Job: CopySplit2.pdf Presets: Basic Job Info Media Layout Color Image Finishing VDP Stamping Summary Image Reset Image Smoothing Advanced Smoothing: Smooth1 Smooth1 Smooth2 Off Brightness: 100% Normal Image Compression: Normal Density Fine Adjustment: Normal Halftone Simulation: Printer's Halftone Gradation Smoothing: Off Sharpness: Normal Toner Reduction Toner Saving: Off On Color Graphics/Line Control: Prioritize Resolution Prioritize Color Resolution: 600dpi 1200dpi Job View: Image Preview Print OK Cancel3. Click OK.
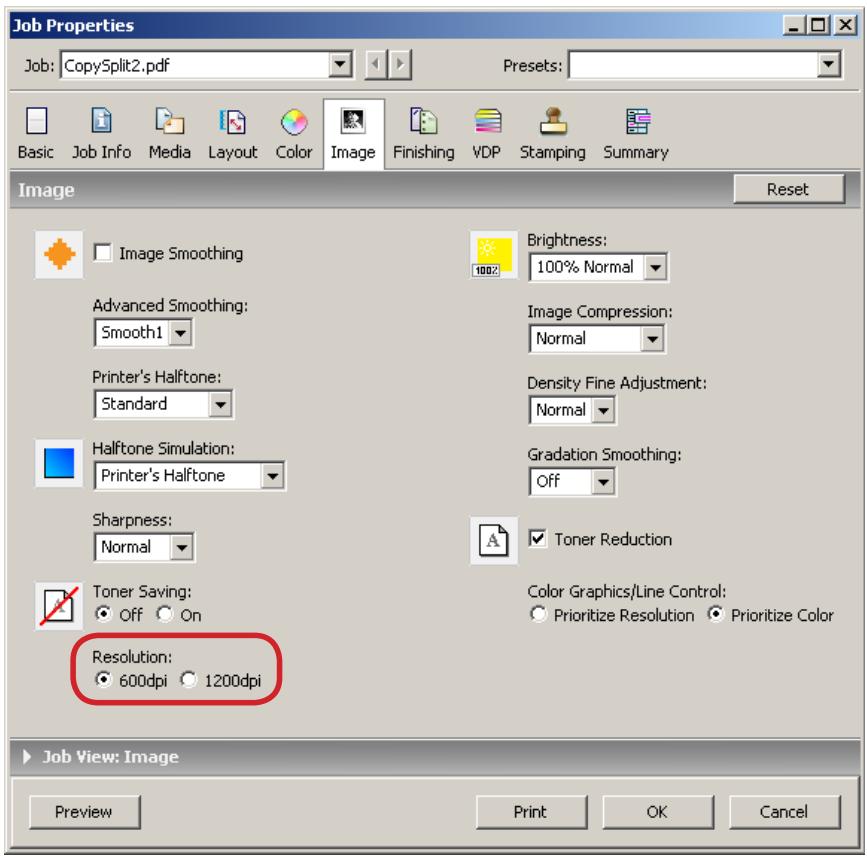
Resolution
You can specify the resolution of the printed job.
To specify Resolution print option, follow the following procedures.
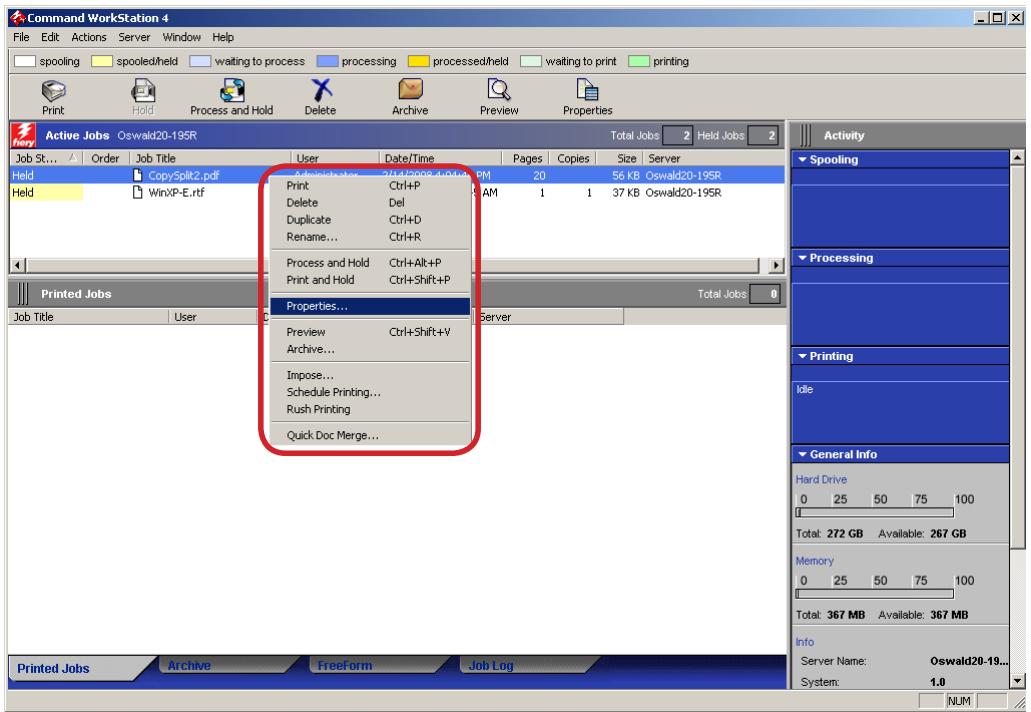
1. Right-click the job that you want to change print option, and then select Properties.
text_image
Command WorkStation 4 File Edit Actions Server Window Help spooling spooled/held waiting to process processing processed/held waiting to print printing Print Hold Process and Hold Delete Archive Preview Properties Active Jobs Oswald20-195R Total Jobs Held Jobs Job St... Order Job Title User Date/Time Pages Copies Size Server Held CopySplit2.pdf Print Ctrl+P 56 KB Oswald20-195R Held WinXP-E.rtf AM 1 37 KB Oswald20-195R Printed Jobs Total Jobs Job Title User Server Properties... Preview Ctrl+Shift+V Archive... Impose... Schedule Printing... Rush Printing Quick Doc Merge... Spooling Processing Printing Idle General Info Hard Drive 0 25 50 75 100 Total: 272 GB Available: 267 GB Memory 0 25 50 75 100 Total: 367 MB Available: 367 MB Info Server Name: Oswald20-19... System: 1.0 Printed Jobs Archive FreeForm Job Log NUM2. The Job Properties dialog box appears.
Select 600dpi in Resolution.
text_image
Job Properties Job: CopySplit2.pdf Presets: Basic Job Info Media Layout Color Image Finishing VDP Stamping Summary Image Reset Image Smoothing Brightness: 100% Normal Advanced Smoothing: Smooth1 Image Compression: Normal Printer's Halftone: Standard Density Fine Adjustment: Normal Halftone Simulation: Printer's Halftone Gradation Smoothing: Off Sharpness: Normal Toner Reduction Toner Saving: Off On Color Graphics/Line Control: Prioritize Resolution Prioritize Color Resolution: 600dpi 1200dpi Job View: Image Preview Print OK Cancel3. Click OK.
5. Hot Folders
Complete instructions on how to user the Hot Folders features are provided in "Utilities.pdf" in the User Documentation CD and Hot Folders Help.
6. Trouble Shooting
1. Object is not rendered
In a printed image, if there are cases that a partial image is not rendered, an unnecessary line is added, an object is missing, or a line is not drawn. In such cases, one of the following reasons may be the cause. Follow the instruction below to remove the cause of problem.
A) Check the unsent (original) PDF file if the same problem can be seen. If you see the same problem, please make corrections on the original PDF file data.
B) Check the job processed at the True Flow system if the same problem can be seen. If you see the same problem, please contact the True Flow system engineer.
If you still have trouble, please contact the Canon service personnel.
2. The printed image shows moiré pattern
If overlaps of continuous images cause a new image patter (moiré), one of following reasons may be the cause. Follow the instruction below to remove the cause of problem.
A) Check the unsent (original) PDF file if the same problem can be seen. If you see the same problem, please make corrections on the original PDF file data.
B) Check the job processed at the True Flow system if the same problem can be seen. If you see the same problem, please contact the True Flow system engineer.
C) If the job file has no problem, change the Halftone print option setting and print the job.
If you still have trouble, please contact the Canon service personnel.
3. The print outcome of spot color does not meet the expectation
If the spot color comes out differently from the expected outcome, one of the following reasons can be the cause. Follow the instructions below to remove the cause of problem.
A) Check the unsent (original) PDF file if the same problem can be seen. If you see the same problem, please make corrections on the original PDF file data.
B) Check the job processed at the True Flow system if the same problem can be seen. If you see the same problem, please contact the True Flow system engineer.
C) If the job file has no problem, go to the Command WorkStation to see if the print option settings are done properly. To check the settings, follow the instructions below.
- From the Command WorkStation menu, select "Server", then Color Management. "ColorWise Pro Tools" dialog will open.
- Click "Color Setup" and confirm if the checkbox of "Spot Color Matching" is checked. If not, check the checkbox.
D) Check if the job operator activated the "Composite Overprint" print option setting from the Command WorkStation job properties window. See "Composite Overprint" on P.18 for more details about "Composite Overprint" settings.
E) Print out a Spot Color sample data and see if the spot color feature is properly working.
If you do not have trouble after conducting the C-E checkpoints, contact the True Flow system engineer. If you still have trouble after conducting C-E checkpoints, contact the Canon service personnel.
4. The same colored text and image/graphics are rendered different in color tone
If the printed texts, graphics, and image data are rendered in different color tone when the same color is specified, one of the following reasons can be the cause. Follow the instructions shown below to remove the cause of problem.
A) Check the unsent (original) PDF file if the same problem can be seen. If you see the same problem, please make corrections on the original PDF file data.
B) Check the job processed at the True Flow system if the same problem can be seen. If you see the same problem, please contact the True Flow system engineer.
C) If you find no problem with the original data file, confirm or change the Halftone simulation print option setting and re-print the job.
If you still have trouble, please contact the Canon service personnel.
5. The black texts or lines becomes blurred
One of the following reasons can be the cause. Follow the instructions below to remove the cause of problem.
A) Check the unsent (original) PDF file if the same problem can be seen. If you see the same problem, please make corrections on the original PDF file data.
B) Check the job processed at the True Flow system if the same problem can be seen. If you see the same problem, please contact the True Flow system engineer.
C) If the job file has no problem, go to the Command WorkStation to see if the print option settings are done properly. To check the settings, follow the instructions below.
- From the Command WorkStation menu, right-click the job and select "Properties". The Job Property dialog will open.
- In the Color icon, click "Expert Setting" button. The Expert Setting dialog box will open.
- Check if "Print gray as black" is activated. If not, activate the option and re-print the job.
If you still have trouble, please contact the Canon service personnel.
6. Unnatural shade shows on the image containing black color data
One of the following reasons can be the cause. Follow the instructions below to remove the cause of problem.
A) Check the unsent (original) PDF file if the same problem can be seen. If you see the same problem, please make corrections on the original PDF file data.
B) Check the job processed at the True Flow system if the same problem can be seen. If you see the same problem, please contact the True Flow system engineer.
C) If the job file has no problem, go to the Command WorkStation to see if the print option settings are done properly. To check the settings, follow the instructions below.
- From the Command WorkStation menu, right-click the job and select "Properties". The Job Property dialog will open.
- In the Color icon, click "Expert Setting" button. The Expert Setting dialog box will open.
- If Print gray as black print option is set to "Text/Graphic/Image", change it to "Text/Graphic" or "Off" and re-print the job.
If you still have trouble, please contact the Canon service personnel.
7. Printed in different font type/Text layout is broken/Texts are not printed
When the text is rendered in the different font, the text layout is broken, or the texts are not printed, one of the following reasons may be the cause. Follow the instructions below to remove the cause of problem.
A) Check the unsent (original) PDF file if the same problem can be seen. If you see the same problem, please make corrections on the original PDF file data.
B) Check the job processed at the True Flow system if the same problem can be seen. If you see the same problem, please contact the True Flow system engineer.
If you still have trouble, please contact the Canon service personnel.
8. Incorrect number of copies are printed
A following reason can be the cause. Follow the instruction below to remove the cause of problem.
A) Check from the "JDF Job Definitions" dialog box of JDF Connector software if the correct number of copies is specified.
If you still have trouble, please contact the Canon service personnel.
9. Cannot change the Duplex print option setting
A following reason can be the cause. Follow the instruction below to remove the cause of problem.
A) From Command WorkStation, right-click the job and select "Property". When "Property" dialog opens, confirm the "Duplex" print option setting on the Layout. If the option is not set properly, contact the True Flow system engineer.
If you still have trouble, please contact the Canon service personnel.
10. "Copies" print option cannot be set
A following reason can be the cause. Follow the instruction below to remove the cause of problem.
A) From Command WorkStation, right-click the job and select "Property". When "Property" dialog opens, confirm the "Copies" print option setting on the Job Info. If the option is not set properly, contact the True Flow system engineer.
If you still have trouble, please contact the Canon service personnel.
11. The size specified for double-page spreads does not come out properly
One of the following reasons can be the cause. Follow the instruction below to remove the cause of problem.
A) Check the unsent (original) PDF file if the same problem can be seen. If you see the same problem, please make corrections on the original PDF file data.
B) Check the job processed at the True Flow system if the same problem can be seen. If you see the same problem, please contact the True Flow system engineer.
If you still have trouble, please contact the Canon service personnel.
12. The binding side for double-page spreads does not come out properly
One of the following reasons can be the cause. Follow the instruction below to remove the cause of problem.
A) Check the unsent (original) PDF file if the same problem can be seen. If you see the same problem, please make corrections on the original PDF file data.
B) Check the job processed at the True Flow system if the same problem can be seen. If you see the same problem, please contact the True Flow system engineer.
If you still have trouble, please contact the Canon service personnel.
13. Cannot specify the correct paper when specifying the paper cassette
One of the following reasons can be the cause. Follow the instruction below to remove the cause of problem.
A) Confirm if the correct paper cassette is attached to the copier machine.
B) From the Command WorkStation, right-click the job and select "Properties". In the job property dialog, check the "Paper Source" print option. If the incorrect paper source is specified, please contact the True Flow system engineer.
If you still have trouble, please contact the Canon service personnel.
14. Cannot specify the paper type from Paper Catalog
One of the following reasons can be the cause. Follow the instruction below to remove the cause of problem.
A) Confirm if the specified paper type is correctly registered on the copier machine.
B) Confirm if the paper information registered on the copier machine and the one registered on the imagePRESS Server Paper Catalog is identical.
C) Confirm if the paper information registered on the imagePRESS Server Paper Catalog and the one registered on the JDF Connector is identical.
D) From the Command WorkStation, right-click the job and select "Properties". In the job property dialog, check the "Paper Catalog" print option if the correct paper type is specified. If the incorrect paper source is specified, please contact the True Flow system engineer.
If you still have trouble, please contact the Canon service personnel.
15. Cannot register the imagePRESS Server on the JDF Connector
One of the following reasons can be the cause. Follow the instruction below to remove the cause of problem.
A) Select "Configure Printer Device" from the JDF Connector menu. Click "New" after "Configure Printer Device" dialog window appears. After "Available Servers" dialog window appears, click "Refresh" in the "Auto Search" tab, and search for imagePRESS Server.
B) If you cannot find the imagePRESS Server using A) method, select "Manual" tab in the "Available Servers" dialog window, and specify Server Name or IP Address of the imagePRESS Server to search the server.
C) If you still cannot find the imagePRESS Server A) nor B) method, ping the imagePRESS Server to ensure that the host computer you are trying to reach is actually operating. If you cannot ping your host, check that the network set up is physically connected. In addition, if you could ping the host, check if the router protocol set up has been properly done.
16. Cannot reach the JDF Connector Server from a JDF Connector Client
One of the following reasons can be the cause. Follow the instruction below to remove the cause of problem.
A) Select "Configure Printer Device" from the JDF Connector menu. Confirm if "Server name/IP Address" is correctly specified. Also confirm if the path to the database is correctly specified.
17. Cannot send the job to Hold Queue on the JDF Connector
The following reasons can be the cause. Follow the instruction below to remove the cause of problem.
A) Select "Configure Printer Device" from the JDF Connector menu. The Printer Device Properties dialog window appears when you click "Properties". In the Device Properties dialog window, confirm if "Auto Submit" option is correctly specified.