
SWADS-DC835P - Doorbell SWANN - Free user manual and instructions
Find the device manual for free SWADS-DC835P SWANN in PDF.


| Product Type | Wireless Video Doorbell |
| Brand | Swann |
| Model | SWADS-DC835P |
| Video Resolution | 1080p Full HD |
| Field of View | 180° diagonal |
| Night Vision | Up to 8 meters (infrared) |
| Audio | Two-way audio with noise reduction |
| Power Source | Rechargeable battery (2200mAh) or wired (8-24V AC/DC) |
| Connectivity | Wi-Fi 2.4 GHz 802.11 b/g/n |
| Mobile App | Swann Security app (iOS/Android) |
| Motion Detection | PIR sensor with adjustable sensitivity |
| Smart Home Integration | Amazon Alexa, Google Assistant (limited) |
| Dimensions | 5.1 x 2.8 x 1.2 inches (130 x 71 x 30 mm) |
| Weight | 0.5 lbs (227 g) including battery |
| Weather Resistance | IP54 (dust and splash proof) |
| Storage | Cloud recording (subscription) or local microSD (up to 128GB) |
| Chime Compatibility | Existing mechanical or digital chime (requires bypass module) |
| Package Contents | Doorbell unit, chime module, mounting bracket, screws, anchor, USB charging cable, manual |
| Maintenance | Wipe with soft dry cloth; charge battery every 2-3 months |
| Security | Encrypted video transmission, privacy zones |
| Repairability | Battery user-replaceable; other repairs require professional service |
| Warranty | 1 year limited |
Frequently Asked Questions - SWADS-DC835P SWANN
User questions about SWADS-DC835P SWANN
0 question about this device. Answer the ones you know or ask your own.
Ask a new question about this device
Download the instructions for your Doorbell in PDF format for free! Find your manual SWADS-DC835P - SWANN and take your electronic device back in hand. On this page are published all the documents necessary for the use of your device. SWADS-DC835P by SWANN.
USER MANUAL SWADS-DC835P SWANN
Thank you for choosing the Wireless Door Chime from Swann. Please take a moment to familiarize yourself with the components of the door chime alert system.
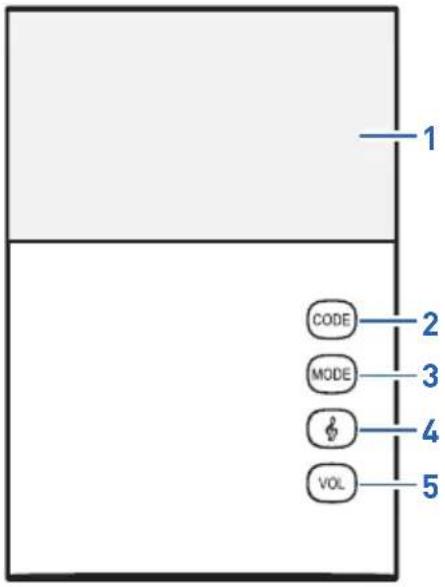
Chime Speaker
1 LED Indicator
2 CODE Button
3 MODE Button
4 Ⓤ (Chime Select) Button
5 VOL (Volume) Button
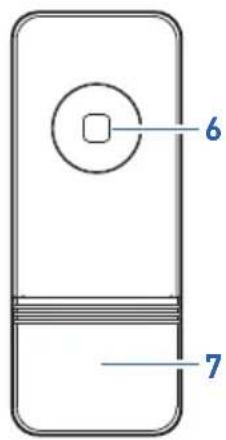
Doorbell
6 Button
7 Nameplate
INSTALLING THE DOORBELL
The Doorbell is powered by a "CR2032" battery which comes preinstalled.
To activate the battery:
- Insert a small flat-head screwdriver into the small notch at the base of the Doorbell and lift slightly to remove the rear cover.
- Pull the battery tab from underneath the "CR2032" battery.
- Replace the rear cover. Make sure the rubber weather seal is in place.
WARNING: The Doorbell unit contains a coin/button cell battery. If the coin/button cell battery is swallowed, it can cause severe internal burns in just 2 hours and can lead to death. If the battery compartment does not close securely, stop using the product and keep it away from children. If you think the battery might have been swallowed or placed inside any part of the body, seek immediate medical attention.
INSTALLING THE CHIME SPEAKER
No wiring is necessary. Just plug the Chime Speaker into an easily accessible power point and switch the power point on. The Chime Speaker, upon receiving power, automatically goes into pairing mode for 10 seconds as indicated by the LED glowing solid red. Simply press the Doorbell button within this period to pair the Doorbell with the Chime Speaker. You will hear the default chime played as confirmation.
CHIME SELECTION & PAIRING
You can assign a different chime to be played for the Doorbell. Follow the steps below:
- Press the button repeatedly on the Chime Speaker to cycle through the available sounds. Stop when you hear something you like.
- Press and hold the CODE button on the Chime Speaker for 3 seconds. The Chime Speaker goes into pairing mode, indicated by the LED glowing solid red.
- Within 10 seconds, press the Doorbell button. The Chime Speaker responds with the selected sound as confirmation. If pairing is not completed within 10 seconds, the Chime Speaker double-beeps. In this case, you will need to start over from step 2.
Tip: Additional Chime Speaker and Doorbell units can be set up using the same method as above. A Chime Speaker can support a maximum of 5 Doorbells at any one time. Additional Doorbells are available for purchase separately.
ADJUSTING THE VOLUME
The volume of the Chime Speaker is adjustable, if necessary. Simply press the VOL button until the desired volume level is obtained.
CHIME SPEAKER MODES
Press the MODE button to set the Chime Speaker to one of the following modes:
| After pressing the Mode button... Chime Speaker will... | |
| Chime Speaker beeps and LED flashes Activate both sound and LED indicator | |
| Chime Speaker beeps Activate sound only | |
| Chime Speaker LED flashes Activate LED indicator only | |
RESETTING THE CHIME SPEAKER
To remove all pairing information from the Chime Speaker and start again, press and hold the button on the Chime Speaker for 5 seconds until the LED glows solid red.
MOUNTING THE DOORBELL
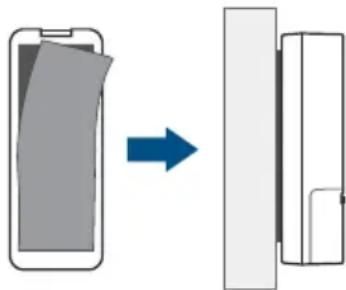
The Doorbell can be mounted by sticking it to a wall using the included double-sided adhesive tape. The operating distance between the Chime Speaker and Doorbell is up to 50m/165ft but the range may vary depending on local conditions.
Note: The Doorbell is not suitable for mounting on metal surfaces and UPVC doorframes as these materials will interfere with the Doorbell's ability to communicate with the Chime Speaker.
natural_image
Diagram showing a battery being transferred to a rectangular device (no text or symbols present)Technical Support
All Countries E-mail: tech@swann.com
Telephone Helpdesk
USA 1800 627 2799
AUSTRALIA 1800 788 210
NEW ZEALAND 0800 479 266
UK 0808 168 9031
Limited Warranty Terms & Conditions
Swann Communications warrants this product against defects in workmanship and material for a period of one (1) year from its original purchase date. You must present your receipt as proof of date of purchase for warranty validation. Any unit which proves defective during the stated period will be repaired without charge for parts or labour or replaced at the sole discretion of Swann. The end user is responsible for all freight charges incurred to send the product to Swann's repair centres. The end user is responsible for all shipping costs incurred when shipping from and to any country other than the country of origin.
The warranty does not cover any incidental, accidental or consequential damages arising from the use of or the inability to use this product. Any costs associated with the fitting or removal of this product by a tradesman or other person or any other costs associated with its use are the responsibility of the end user. This warranty applies to the original purchaser of the product only and is not transferable to any third party. Unauthorized end user or third party modifications to any component or evidence of misuse or abuse of the device will render all warranties void.
By law some countries do not allow limitations on certain exclusions in this warranty. Where applicable by local laws, regulations and legal rights will take precedence.
For Australia: Our goods come with guarantees which cannot be excluded under Australian Consumer Law. You are entitled to a replacement or refund for a major failure and for compensation for any other reasonably foreseeable loss or damage. You are also entitled to have the goods repaired or replaced if the goods fail to be of acceptable quality and the failure does not amount to major failure.
Battery Safety Information
Replace batteries at the same time. Do not mix new and old batteries or battery types (for example, alkaline and lithium batteries). Keep batteries out of reach of children. Dispose of used batteries promptly in accordance with local regulations.
FCC Notice
This equipment has been tested and found to comply with the limits for Class B digital device, pursuant to part 15 of the FCC Rules. These limits are designed to provide reasonable protection against harmful interference in a residential installation. This equipment generates, uses and can radiate radio frequency energy and, if not installed and used in accordance with the instructions, may cause harmful interference to radio communications. However, there is no guarantee that interference will not occur in a particular installation. If this equipment does cause harmful interference to radio or television reception, which can be determined by turning the equipment off and on, the user is encouraged to try to correct the interference by one or more of the following measures:
• Reorient or relocate the receiving antenna
- Increase the separation between the equipment and the receiver
- Connect the equipment into an outlet on a circuit different from that to which the receiver is connected
- Consult the dealer or an experienced radio/TV technician for help
WARNING: Modifications not approved by the party responsible for compliance could void user's authority to operate the equipment.

Tell us what you think!
We are constantly working to improve the quality of our documentation, and we would appreciate your feedback. You can give us your feedback by clicking here to complete a short survey.
- INSTALLING THE DOORBELL
- INSTALLING THE CHIME SPEAKER
- CHIME SELECTION & PAIRING
- ADJUSTING THE VOLUME
- CHIME SPEAKER MODES
- RESETTING THE CHIME SPEAKER
- MOUNTING THE DOORBELL
- Technical Support
- Telephone Helpdesk
- Limited Warranty Terms & Conditions
- Battery Safety Information
- FCC Notice
- Tell us what you think!
Brand : SWANN
Model : SWADS-DC835P
Category : Doorbell