
47LG60FR - Television LG - Free user manual and instructions
Find the device manual for free 47LG60FR LG in PDF.


| Product Type | LCD Television |
| Model | 47LG60FR |
| Display Size (Diagonal) | 47 inches (119 cm) |
| Resolution | 1920 x 1080 (Full HD) |
| Aspect Ratio | 16:9 |
| Brightness | 500 cd/m² |
| Contrast Ratio | 50,000:1 (Dynamic) |
| Response Time | 5 ms |
| Viewing Angle | 178° / 178° |
| Dimensions (with Stand) | 1128 x 775 x 305 mm |
| Dimensions (without Stand) | 1128 x 715 x 99 mm |
| Weight (with Stand) | 26.5 kg |
| Power Consumption (Typical) | 200 W |
| Standby Power | < 1 W |
| Inputs | HDMI x2, Component Video, Composite Video, VGA, USB, RF |
| Tuner | ATSC / NTSC |
| Audio Output | 10W x 2 Speakers, Optical Digital Audio Out |
| VESA Mount Pattern | 400 x 400 mm |
| Remote Control | Included |
| Additional Features | 100Hz TruMotion, Intelligent Sensor, Clear Voice |
| Cleaning & Maintenance | Wipe with soft dry cloth; do not use harsh chemicals |
| Safety | Do not place near heat sources; ensure ventilation; use only supplied stand/wall mount |
| Repairability & Spare Parts | Contact LG service center for spare parts; some parts user-accessible |
Frequently Asked Questions - 47LG60FR LG
User questions about 47LG60FR LG
0 question about this device. Answer the ones you know or ask your own.
Ask a new question about this device
Download the instructions for your Television in PDF format for free! Find your manual 47LG60FR - LG and take your electronic device back in hand. On this page are published all the documents necessary for the use of your device. 47LG60FR by LG.
USER MANUAL 47LG60FR LG
TV LCD | TV PLASMA BUKU PANDUAN
| MODEL TV LCD | MODEL TV PLASMA |
| 32LG6*** | 50PG3*** |
| 37LG6*** | 42PG6*** |
| 42LG6*** | 50PG6*** |
| 47LG6*** | 60PG6*** |
| 42LG7*** | 50PG7*** |
| 47LG7*** | 60PG7*** |
| 52LG7*** | |
| 32LG8*** | |
| 42LG8*** |
Remote Kontrol

Kain Pembersih
natural_image
Illustration of a coiled cable with connectors and a connector, labeled 'pasanglah men' (no other text or symbols)pasanglah mendekati stop kontak
Model TV LCD
hanya 32/37/42/47/52LG6***

Pemasangan HD Receiver 19
Pemasangan DVD 22
Pemasangan VCR 25
Metode ISM (Image Sticking Minimization) .....79
Daya Rendah Mode Picture 80
Pengaturan Ulang Pabrik 81
MENGONTROL SUARA DAN BAHASA
Auto Volume Leveler 82
Pengaturan Suara - Mode Sound 83
Pengaturan Suara - Mode User 84
Balance(Keseimbangan) 85
Pengaturan On/Off Speaker TV 86
natural_image
Diagram of a mechanical component with motion arrows indicating rotation and movement (no text or symbols)Model TV LCD
natural_image
Top-down view of a computer monitor with a stand and ventilation slots (no text or symbols visible)natural_image
Isometric line drawing of a mechanical component or housing with internal compartments (no text or symbols)natural_image
Technical line drawing of a laptop chassis showing internal compartments and battery pack (no text or symbols)natural_image
Technical illustration of a mechanical component with an inset close-up showing internal components (no text or symbols)natural_image
Line drawing of a flatbed rectangular object with a central triangular element, placed on a textured base (no text or symbols)natural_image
Technical illustration of a mechanical component with an inset close-up showing a curved bracket and a blade (no text or symbols)natural_image
Technical diagram of a mechanical assembly with two screws inserted, showing internal components and mounting holes (no text or labels)natural_image
Isometric line drawing of a rectangular electronic component with a central square and internal slot (no text or symbols)natural_image
Diagram showing a mechanical assembly with a fan and internal components, including a magnified inset of a component detail (no text or symbols present)natural_image
3D mechanical component diagram showing a screw inserted into a housing, with a magnified inset highlighting the screw detail (no text or symbols present)natural_image
Illustration of a computer monitor with a magnified inset showing internal components (no text or symbols)natural_image
Diagram showing a mechanical component with an arrow pointing to a detail, and a magnified inset highlighting a small component (no text or symbols present)natural_image
Illustration of a flat-screen TV with cable and connectors, no text or symbols presentnatural_image
Interior view of a flat-screen TV with visible sound waves and connectors (no text or symbols)natural_image
Diagram showing two electronic devices with labeled components and a magnified inset of their close-up views (no text or symbols present)natural_image
Illustration of a flat-screen TV with multiple screens and a small screen, no text or symbols presentnatural_image
Illustration of a TV setup with an inset showing cable routing and a magnified view of the device (no text or symbols present)! CATATAN
natural_image
Technical illustration of a monitor with cable routing and a magnified inset showing cable routing details (no text or symbols)42/47/52LG7\*\*, 32/42LG8\*\*\*
natural_image
Illustration of a flat-screen TV with visible sound waves and cable routing (no text or symbols)natural_image
Illustration of a flat-screen monitor with cable routing and a magnified inset showing internal components (no text or symbols)PENDAHULUAN
PASANG HATI-HATI AGAR TV TIDAK TERJATUH
natural_image
Diagram of a vertical screen mounted on a base, with a vertical line labeled '3' to the right (no text or symbols on the screen itself)natural_image
Interior view of a room with a large TV mounted on a cabinet, no visible text or symbols
PENDAHULUAN

flowchart
graph LR
    A["Antenna"] -->|UHF| B["Penguat Sinyal"]
    A -->|VHF| B
    B --> C["Antenna IN"]
Model TV LCD
mode RGB-PC
| Resolusi | Frekuensi Horisontal(kHz) | Frekuensi Vertikal(Hz) |
| 640x350 | 31.468 | 70.09 |
| 720x400 | 31.469 | 70.09 |
| 640x480 | 31.469 | 59.94 |
| 800x600 | 37.879 | 60.317 |
| 1024x768 | 48.363 | 60.004 |
| 1280x768 | 47.776 | 59.87 |
| 1360x768 | 47.720 | 59.799 |
| 1366x768 | 47.760 | |
| 1280x1024 | 63.668 | 59.895 |
| 1920x1080 | 66.587 | 59.934 |
hanya 42/47LG6***, 42/47/52LG7***
mode HDMI-DTV
| Resolusi | Frekuensi Horisontal(kHz) | Frekuensi Vertikal(Hz) |
| 720x480 | 31.47 59.9431.50 60.00 | |
| 720x576 | 31.25 50.00 | |
| 1280x720 | 44.96 59.9445.00 60.0037.50 50.00 | |
| 1920x1080i | 33.72 59.9433.75 60.0028.125 50.00 | |
| 1920x1080p | 67.43267.56056.2502733.75 | 59.94502430 |
1
2

34
Manual Config. (hanya mode RGB [PC]) Pengaturan Phase, Clock, Position pada layar
1

2

3 5
1
2

34
Initializing
1

2

34
MENONTON TV / KONTROL PROGRAM
FUNGSI TOMBOL REMOTE KONTROL
MENU Setup

MENU Picture
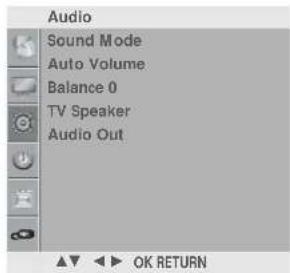
MENU Audio


MENU USB


MENU Option

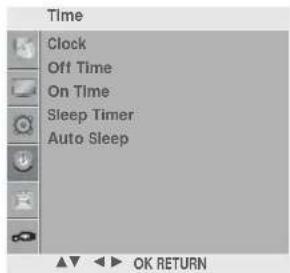
MENU Time
! CATATAN
I: PAL I/II (U.K. / Ireland / Hong Kong / South Africa)
DK: PAL D/K, SECAM D/K (East Europe / China / Africa / CIS)
M : (USA / Korea / Philippines)
1

2

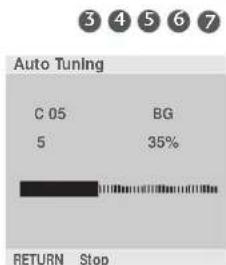
8
MENONTON TV / KONTROL PROGRAM
PEMROGRAMAN MANUAL
1
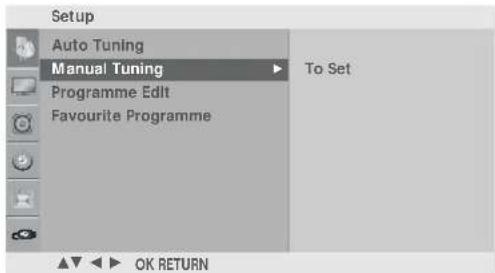
2


MENYEMPURNAKAN PENERIMAAN
1

2

3 5
MENONTON TV / KONTROL PROGRAM
MEMBERI NAMA PADA STASIUN TV
1
2
3 5 6
BOOSTER
①

2

34
MENONTON TV / KONTROL PROGRAM
PERUBAHAN PROGRAM
1
②

3
PROGRAM FAVORIT
1
2 45
MENONTON TV / KONTROL PROGRAM
MELIHAT TABEL PROGRAM
Power off all devices
flowchart
graph TD
    A["Off Cinema"] --> B["Game Sport"]
    B --> A
1

23
! CATATAN
▶ pada mode USB, tombol P ▲ / ∇(P ∧/∨), ∠+/- pada TV digunakan untuk navigasi (atas/bawah/kiri/kanan).
natural_image
Black and white photo of a butterfly perched on a leaf, with no visible text or symbols in the main image area.12
V
natural_image
Black and white photo of a butterfly with visible wing pattern (no text or symbols)3
4 5 6

7 8
! CATATAN
1 2 3

flowchart
graph LR
    A["Mode PIP"] --> B["Mode DW1"]
    B --> C["Mode DW2"]
    D["PIP Off"] --> A
    D --> B
    D --> C
natural_image
Close-up of a round stone ball on a textured surface, no visible text or symbols- Original
natural_image
Close-up of a smooth, round object with a label 'Original' visible (no other text or symbols)• 4:3
natural_image
Close-up of a round stone ball on a textured surface (no visible text or symbols)• 14:9
natural_image
Close-up of a round, smooth stone ball on a textured surface (no text or symbols visible)- Zoom1
natural_image
Close-up of a spherical object with a 'Zoom1' label, no other text or symbols visible- Zoom2
natural_image
Close-up of a spherical object with smooth surfaces, labeled 'ZoomZ' and '▲▼' (no other text or symbols visible)- Just Scan
1

23
Mengatur Warna Otomatis (Warm/Medium/Cool)
1

23
MENGONTROL GAMBAR
MENGATUR GAMBAR MANUAL
Mode Picture - User Option
1
23


Pengaturan Warna - User Option
①

2 3
MENGONTROL GAMBAR
XD - TEKNOLOGI PERBAIKAN GAMBAR
12
LANJUTAN (ADVANCE) - GAMMA
1

23

4
MENGONTROL GAMBAR
LANJUTAN (ADVANCE) - MODE FILM/REAL CINEMA
23

4
MENGONTROL GAMBAR
EYE CARE (HANYA MODEL TV LCD)
1

23
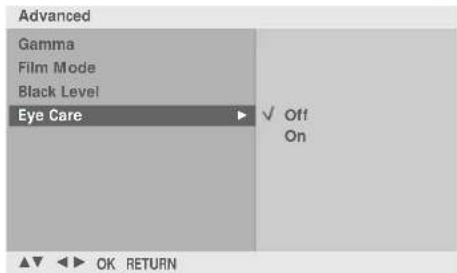
4
LANJUTAN (ADVANCE) - TRUMOTION
( hanya 42/47/52LG7***)
23

4
MENGONTROL GAMBAR
23
DEMO TRUMOTION (hanya 42/47/52LG7\*\*\* )
4
(hanya 42/47/52LG7***)

4
METODE ISM (IMAGE STICKING MINIMIZATION) (HANYA MODEL TV PLASMA)
DAYA RENDAH MODE PICTURE
(HANYA MODEL TV PLASMA)
1

23
PENGATURAN SUARA - MODE SOUND
1
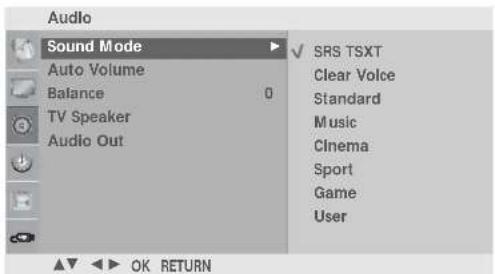
23
1

2 3 4
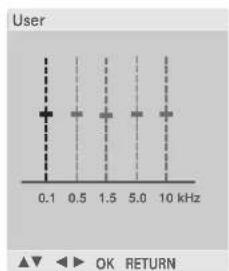
bar
User | Frequency (kHz) | OK | RETURN | | :--- | :--- | :--- | | 0.1 | ▼ | ▼ | | 0.5 | ▼ | ▼ | | 1.5 | ▼ | ▼ | | 5.0 | ▼ | ▼ | | 10 | ▼ | ▼ |5
BALANCE (KESEIMBANGAN)
1

23
MENGONTROL SUARA DAN BAHASA
PENGATURAN ON/OFF SPEAKER TV
1

23
PEMILIHAN AUDIO OUT
1

23
MENGONTROL SUARA DAN BAHASA
I/II
Penerimaan Stereo/Dual
| Kode (Hexa) | Fungsi | Catatan | Kode (Hexa) | Fungsi | Catatan |
| 0B INPUT | Tombol R/C | 09 MUTE | Tombol R/C | ||
| 08 | POWER | Tombol R/C (Power On/Off) | 53 LIST | Tombol R/C | |
| 60 PIP | Tombol R/C | 10 ~ 19 | Tombol angka | 0 ~ 9 Tombol R/C | |
| 43 MENU | Tombol R/C | 1E | FAV | Tombol R/C | |
| 5B RETURN | Tombol R/C | 1A Q.VIEW | Tombol R/C | ||
| 07 Tombol R/C | 20 TEXT | Tombol R/C | |||
| 06 Tombol R/C | B0 SIZE | Tombol R/C | |||
| 40 Tombol R/C | 8F INDEX | Tombol R/C | |||
| 41Tombol R/C | B1 TIME | Tombol R/C | |||
| 44 OK | Tombol R/C | BD | REVEAL | Tombol R/C | |
| 72 MERAH | Tombol R/C | 8E | HOLD | Tombol R/C | |
| 71 HIJAU | Tombol R/C | BA UPDATE | Tombol R/C | ||
| 63 KUNING | Tombol R/C | 7E | SIMPLINK | Tombol R/C | |
| 61 BIRU | Tombol R/C | B1 | ■ Stop | Tombol R/C | |
| 02 | + | Tombol R/C | B0 | ► Play | Tombol R/C |
| 03 | - Tombol R/C | BA | II Pause | Tombol R/C | |
| 00 | P ^ | Tombol R/C | 8F | ◀◀ Rew | Tombol R/C |
| 01 | P √ | Tombol R/C | 8E | ▶▶ FF | Tombol R/C |
| 30 AV MODE | Tombol R/C | 45 Q.MENU | Tombol R/C | ||
| 7C | XSTUDIO | Tombol R/C | BD | ●(Record) | Tombol R/C |
KONTROL EKSTERNAL RS-232C
(HANYA MODEL TV PLASMA)
Data Min: 00 \~ Maks: 64
Lihat 'Pemetaan data riil 1'. halaman 112.
Pernyataan [k][ ][Set ID][ ][OK/NG][Data][x]
Data 02: DW1 Data 03: DW2
Pernyataan[n][ ][Set ID][ ][OK/NG][Data][x]
14. Posisi PIP (Perintah : k q)
Data Min: 00 \~ Maks: 64
Lihat 'Pemetaan data riil 1'. halaman 112.
Pernyataan [t][ ][Set ID][ ][OK/NG][Data][x]
1166.. Suhu Warna (Perintah : k u)
Data 00: Medium 01: Cool 02: Warm 03: User
Pernyataan [u][ ][Set ID][ ][OK/NG][Data][x]
Data Min: 00 \~ Maks: 3C
Lihat 'Pemetaan data riil 2'. halaman 112.
Pernyataan[v][ ][Set ID][ ][ OK/NG][Data][x]
18. Pengaturan Warna Hijau (Perintah : k w)
Data Min: 00 \~ Maks: 3C
Lihat 'Pemetaan data riil 2', halaman 112.
Pernyataan [w][ ][Set ID][ ][OK/NG][Data][x]
19. Pengaturan Warna Biru (Perintah : k \$)
Data Min: 00 \~ Maks: 3C
Lihat 'Pemetaan data riil 2'. halaman 112
Pernyataan[\$][ ][Set ID][ ][ OK/NG][Data][x]
LAMPIRAN
20. Kondisi Abnormal (Perintah : k z)
| 7 | 6 | 5 | 4 | 3 | 2 | 1 | 0 | Fungsi |
| 0 | 0 | 0 | 1 | Inversion | ||||
| 0 | 0 | 1 | 0 | Orbiter | ||||
| 0 | 1 | 0 | 0 | White wash | ||||
| 1 | 0 | 0 | 0 | Normal | ||||
| x | x | x | x | Reserved |
LCD TV | PLASMA TV OWNER'S MANUAL
LCD TV MODELS PLASMA TV MODELS
| 32LG6*** | 50PG3*** |
| 37LG6*** | 42PG6*** |
| 42LG6*** | 50PG6*** |
| 47LG6*** | 60PG6*** |
| 42LG7*** | 50PG7*** |
| 47LG7*** | 60PG7*** |
| 52LG7*** | |
| 32LG8*** | |
| 42LG8*** |
Please read this manual carefully before operating your set. Retain it for future reference.
Record model number and serial number of the set.
Refer to the label on the back cover and quote this information.
To your dealer when requiring service.
ACCESSORIES
Ensure that the following accessories are included with your TV.
If an accessory is missing, please contact the dealer where you purchased the product.
■ Image shown may differ from your TV.
Owner's Manual

Batteries
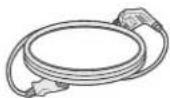
Power Cord

natural_image
Illustration of a remote control with no visible text or symbols on the device itselfRemote Control

Polishing Cloth
Polishing cloth for use on the screen
This feature is not available for all models.
*Lightly wipe any stains or fingerprints on the surface of the TV with the polishing cloth.
Do not use excessive force. This may cause scratching or discolouration.
PLASMA TV models
Cable management clip
(except 50PG3***)
(only 50/60PG6***, (only 50PG3**) 50/60PG7***


Cable Holder
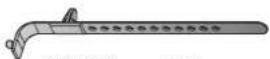
42PG6***: 1EA 50PG3***: 2EA only
(only 42PG6*** )

4-bolts for stand assembly Refer to p. 10

protection cover (Refer to p.10)
or

Only 50PG3***, 50/60PG7***

Ferrite Core
Only 50PG3***, 50/60PG7***
Use of ferrite core
Ferrite core can be used to reduce the electromagnetic wave when connecting the power cord.
The closer the location of the ferrite core to the power plug, the better it is.

natural_image
Illustration of a coiled cable with connectors and a connector attached (no text or symbols)Install the power plug closely.
LCD TV models
Only 32/37/42/47/52LG6**

Cable management clip (Refer to p.15)

Protection cover (Refer to p.12)
(only 32/37LG6***)

32LG6***: 3EA 37LG6***: 4EA

4EA
(only 42LG6*** )

2EA

1EA

4EA
bolts for stand assembly (Refer to p. 11)
Only 42/47/52LG7***, 32/42LG8***
(42LG7***, 32/42LG8*** only)


Bolts for stand assembly (Refer to p.12)

Protection cover (Refer to p.12)
(32LG8*** only)

1-screw for stand fixing (Refer to p.9)
CONTENTS
ACCESSORIES....1
PREPARATION
Front Panel Controls.... 4
Back Panel Information 7
Attaching the TV to a desk 9
Stand Installation.... 10
Back Cover for Wire Arrangement.... 13
Please set it up carefully so the product does not fall over. 16
Desktop Pedestal Installation 17
Wall Mount: Horizontal installation.... 17
Antenna Connection.... 18
EXTERNAL EQUIPMENT SETUP
HD Receiver Setup ....19
DVD Setup 22
VCR Setup.... 25
Other A/V Source Setup 28
External Stereo.... 29
AV Output Setup 30
PC Setup 31
- Screen Setup for PC Mode....34
WATCHING TV / PROGRAMME CONTROL
Remote Control Key Functions....38
Turning on the TV.... 40
Programme Selection 40
Volume Adjustment....40
Quick Menu.... 41
On Screen Menus Selection and Adjustment .....42
Auto Programme Tuning.... 43
Manual Programme Tuning.... 44
Fine Tuning 45
Assigning a Station Name....46
Booster....47
Programme Edit 48
Favourite Programme.... 49
Selecting the Programme List.... 50
* SIMPLINK 51
Key lock.... 53
AV Mode....54
TO USE THE USB DEVICE
When connecting the USB device....55
Photo List....56
Music List....58
Movie List 60
Divx Registration Code 62
PICTURE CONTROL
Watching PIP(Picture-in-Picture) 63
Picture Size (Aspect Ratio) Control....64
Preset Picture Settings
- Picture Mode-Preset....66
- Auto Colour Tone Control(Cool/Medium/Warm)67
Manual Picture Adjustment
- Picture Mode-User Option......68
- Colour Tone - User Option....69
XD - Picture Improvement Technology....70
Advanced - Gamma....71
Advanced - Film Mode/Real Cinema....72
Advanced - Black(Darkness) Level....73
Eye Care 74
Advanced-TruMotion 75
Picture Reset....76
TruMotion Demo 77
Power Indicator....78
Image Sticking Minimization(ISM) Method......79
Power Saving Picture Mode 80
Factory Reset 81
SOUND & LANGUAGE CONTROL
Auto Volume Leveler....82
Preset Sound Settings - Sound Mode ....83
Sound Setting Adjustment - User Mode ....84
Balance....85
TV Speakers On/Off Setup 86
Selecting Audio Out 87
I/II
- Stereo/Dual Reception.... 88
- NICAM Reception 89
- Speaker Sound Output Selection.... 89
On-Screen Menu Language Selection.... 90
TIME SETTING
Clock Setup....91
Auto On/Off Timer Setting 92
Sleep Timer Setting....93
Auto Shut-off Setting 94
TELETEXT
Switch On/Off 95
SIMPLE Text....95
TOP Text 96
FASTEXT....96
Special Teletext Functions....97
APPENDIX
Troubleshooting....98
Maintenance ....100
Product Specifications ....101
Programming the Remote Control 103
IR Codes 105
External Control Through RS-232C 107
PREPARATION
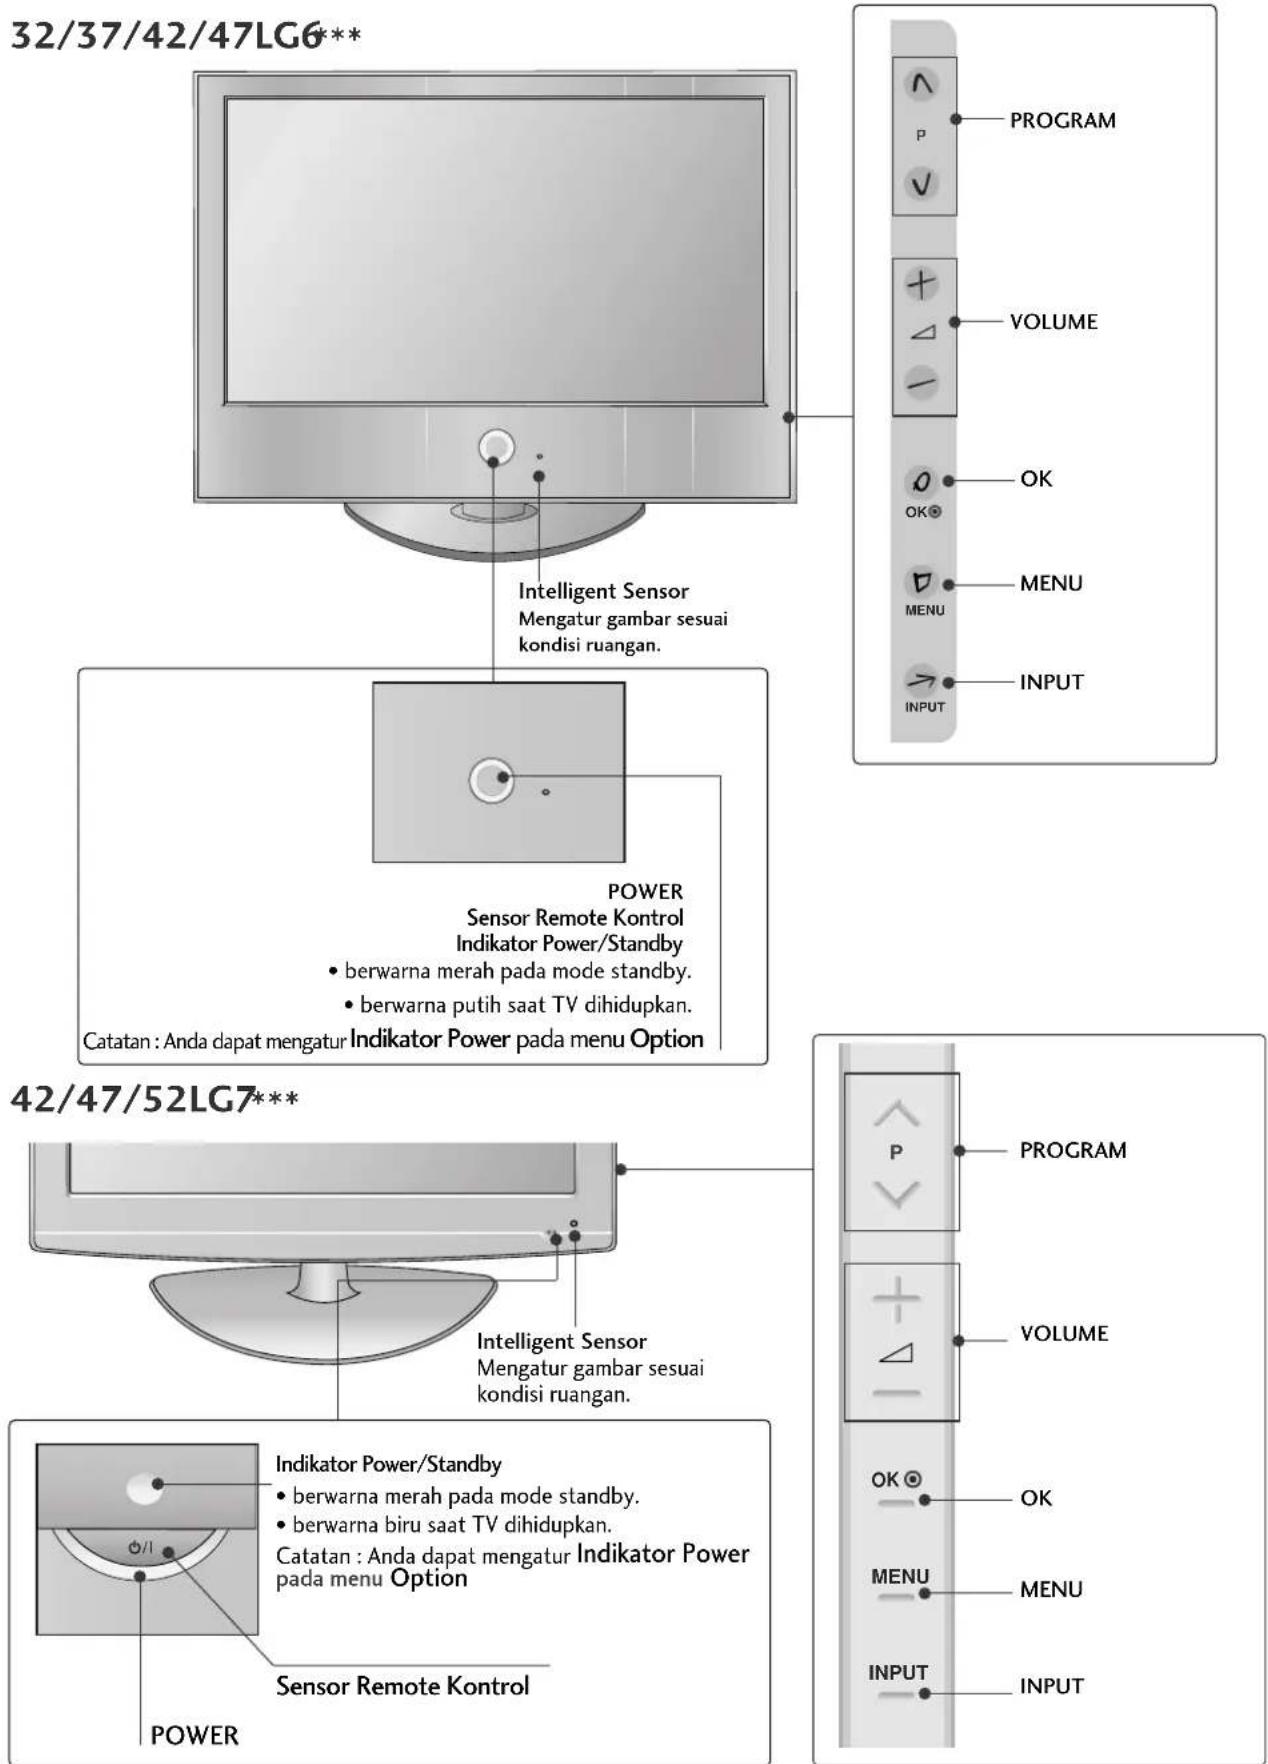
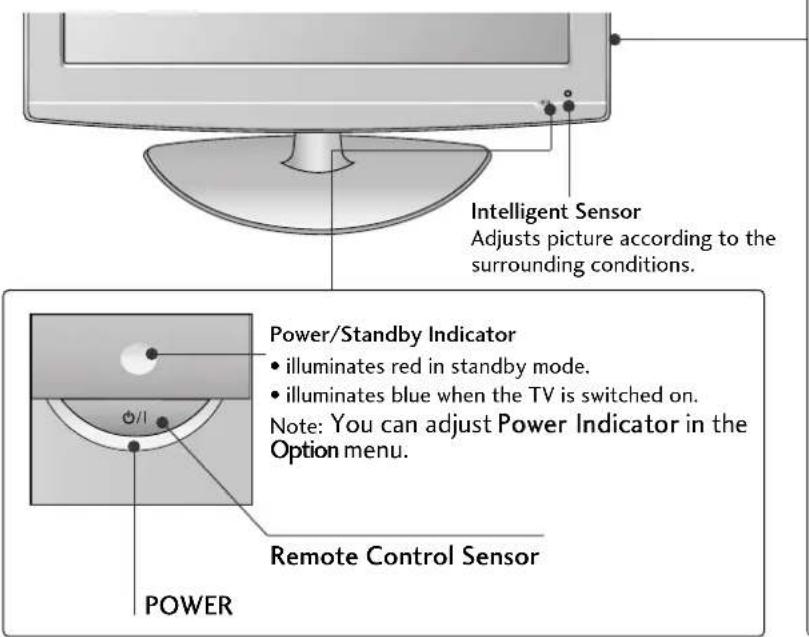
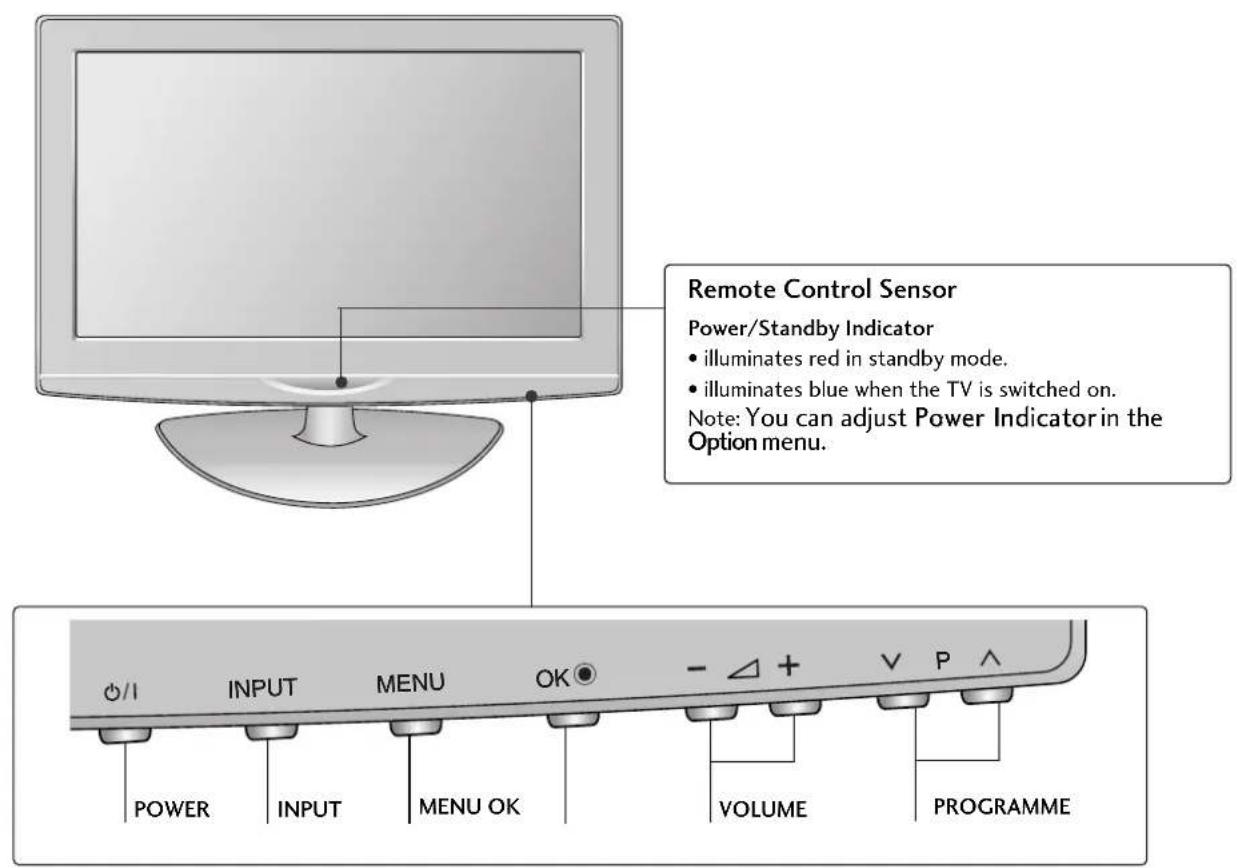
FRONT PANEL CONTROLS
■ This is a simplified representation of the front panel. Image shown may differ from your TV.
If your product has a protection film attached, remove the film and then wipe the product with a polishing cloth.
Plasma TV Models

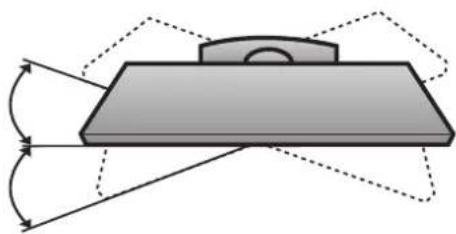
Swivel Stand
This feature is not available for all models.
After installing the TV, you can adjust the TV set manually to the left or right direction by 20 degrees to suit your viewing position.
natural_image
Diagram of a mechanical component with motion arrows indicating rotation and movement (no text or symbols)LCD TV Models
32/37/42/47LG6**

42/47/52LG7***

BACK PANEL INFORMATION
This is a simplified representation of the back panel. Image shown may differ from your TV.
Plasma TV Models

① HDMI Input
Connect a HDMI signal to HDMI IN.
Or DVI(VIDEO)signal to HDMI/DVI port with DVI to HDMI cable.
② RGB/Audio Input
Connect the monitor output from a PC to the appropriate input port.
3 Audio/Video Input (AV IN 1)
Connect audio/video output from an external device to these jacks.
4 AV Output
Connect second TV or monitor to the AV OUT socket on the TV.
Variable Audio Output
Connect an external amplifier or add a subwoofer to your surround sound system.
5 Component Input
Connect a component video/audio device to these jacks.
6 Antenna Input
Connect RF antenna to this jack.
⑦ Power Cord Socket
This TV operates on an AC power. The voltage is indicated on the Specifications page. Never attempt to operate the TV on DC power.
8 RS-232C Input(CONTROL) Port
Connect the serial port of the control devices to the RS-232C jack.
(This feature is not available for all models.)
PREPARATION
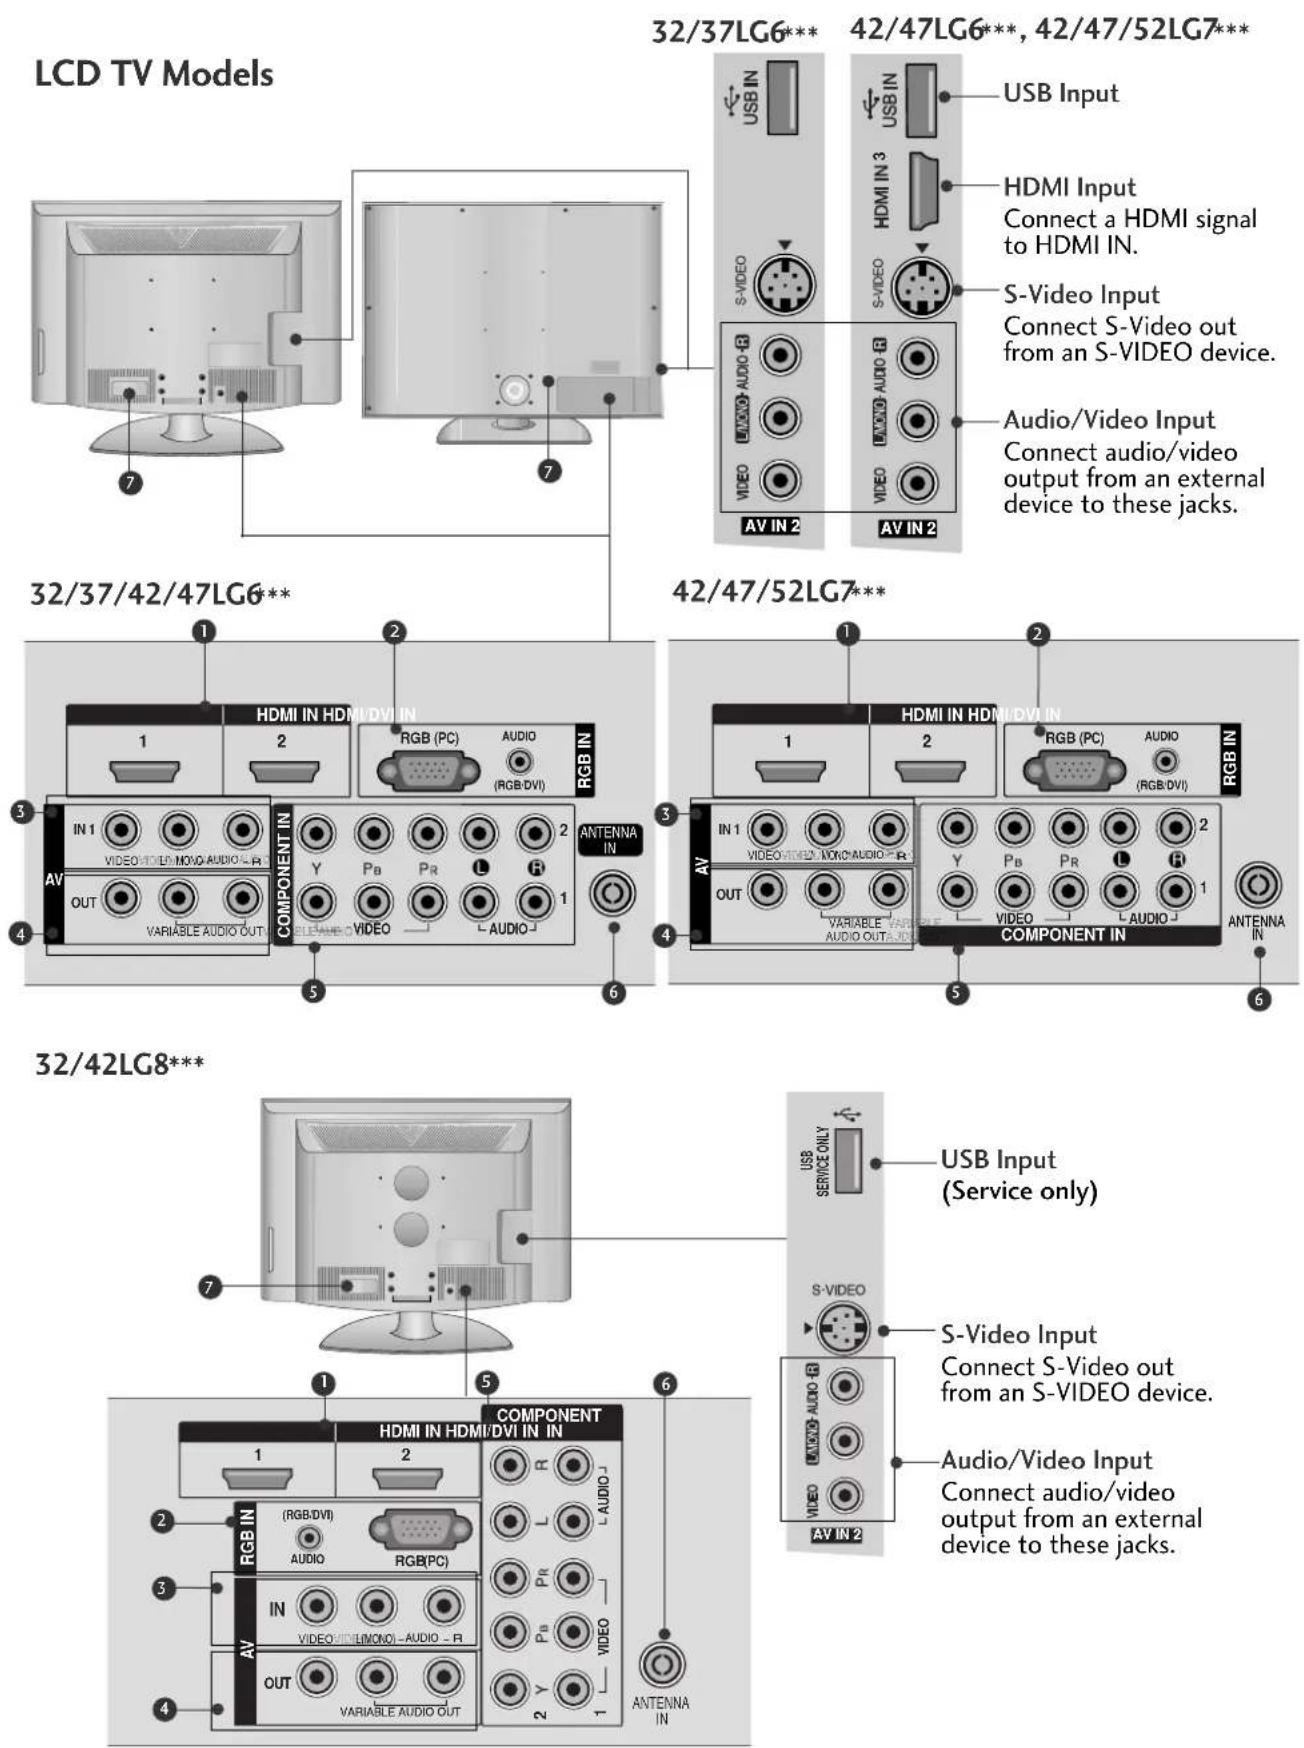
① HDMI Input
Connect a HDMI signal to HDMI IN.
Or DVI(VIDEO)signal to HDMI/DVI port with DVI to HDMI cable.
(HDMI IN 3 is available for 42/47LG6***, 42/47/52LG7**)
② RGB/Audio Input
Connect the monitor output from a PC to the appropriate input port.
3 Audio/Video Input
Connect audio/video output from an external device to these jacks.
4 AV Output
Connect second TV or monitor to the AV OUT socket on the TV.
Variable Audio Output
Connect an external amplifier or add a subwoofer to your surround sound system.
⑤ Component Input
Connect a component video/audio device to these jacks.
6 Antenna Input
Connect RF antenna to this jack.
⑦ Power Cord Socket
This TV operates on an AC power. The voltage is indicated on the Specifications page. Never attempt to operate the TV on DC power.
ATTACHING THE TV TO A DESK (Only 32LG8\*\*)
The TV must be attached to desk so it cannot be pulled in a forward/backward direction, potentially causing injury or damaging the product. Use only an attached screw.

natural_image
Top-down view of a computer monitor with a stand and ventilation slots (no text or symbols visible)1-Screw
(provided as parts of the product)

! WARNING
To prevent TV from falling over, the TV should be securely attached to the floor/wall per installation instructions. Tipping, shaking, or rocking the machine may cause injury.
PREPARATION
STAND INSTALLATION
■ Image shown may differ from your TV.
When assembling the desk type stand, check whether the bolt is fully tightened.
(If not tightened fully, the product can tilt forward after the product installation.) If you tighten the bolt with excessive force, the bolt can deviate from abrasion of the tightening part of the bolt.
only 42PG6\*\*\*
1 Carefully place the TV screen side down on a cushioned surface to protect the screen from damage.

natural_image
Technical line drawing of a mechanical component with no visible text or symbols② Assemble the TV as shown.

natural_image
Technical illustration of a mechanical component with an inset close-up showing a detail view (no text or symbols)3 Fix the 4 bolts securely using the holes in the back of the TV.

natural_image
Technical line drawing of a laptop chassis with internal compartments and a pen inserted (no text or symbols)Not Using the Desk-type Stand
■ Image shown may differ from your TV.
When installing the wall-mounted unit, use the protection cover for desk-type stand installation. Insert the PROTECTION COVER into the TV until clicking sound.

only 32/37/42LG6\*\*\*
1 Carefully place the TV screen side down on a cushioned surface to protect the screen from damage.

natural_image
Line drawing of a rectangular electronic device with a screen and internal components, placed on a textured base (no text or symbols)2 Assemble the parts of the Stand Body with Cover Base of the TV.


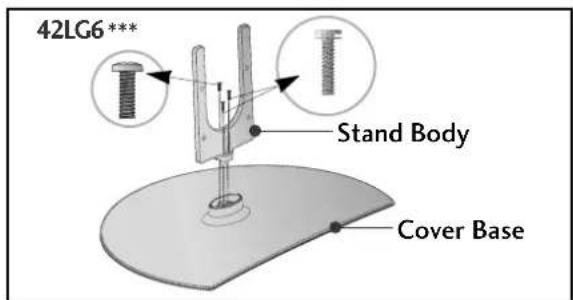
3 Assemble the TV as shown.

natural_image
Diagram showing a mechanical component with an arrow indicating direction, no text or symbols present4 Fix the 4 bolts securely using the holes in the back of the TV.

natural_image
Technical diagram of a mechanical assembly with two screws inserted, showing internal components and mounting holes (no text or labels)only 42LG7 ***, 32/42LG8***
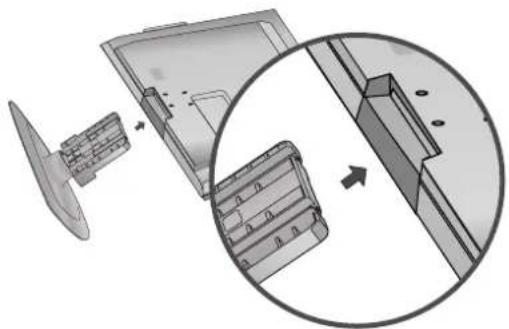
1 Carefully place the TV screen side down on a cushioned surface to protect the screen from damage.

natural_image
Isometric line drawing of a rectangular electronic component with a central square and internal slot (no text or symbols)2 Assemble the parts of the Stand Body with the Cover Base of the TV.

3 Assemble the TV as shown.
natural_image
Diagram showing a mechanical assembly with a fan and internal components, including a magnified inset of a component detail (no text or symbols present)4 Fix the 4 bolts securely using the holes in the back of the TV.

natural_image
3D mechanical component diagram showing a screw inserted into a housing, with a magnified inset highlighting the screw detail (no text or symbols present)Not Using the Desk-type Stand
When installing the wall-mounted unit, use the protection cover for desk-type stand installation.
■ Image shown may differ from your TV.
32/37/42/47LG6**

natural_image
Illustration of a computer monitor with an inset showing a mouse inside a device (no text or symbols present)After removing the protection paper from the protection cover, adhere it to the TV as shown.
42/47/52LG7***, 32/42LG8***

natural_image
Diagram showing a mechanical component with an inset close-up of its internal structure (no text or symbols)Insert the PROTECTION COVER into the TV until clicking sound.
BACK COVER FOR WIRE ARRANGEMENT
■ Image shown may differ from your TV.
42PG6\*\*\*
1 Connect the cables as necessary.
To connect additional equipment, see the External Equipment Setup section.

natural_image
Interior view of a flat-screen TV with visible sound waves and audio equipment (no text or symbols)2 Install the CABLE MANAGEMENT CLIP as shown.

1 Connect the cables as necessary.
To connect additional equipment, see the External Equipment Setup section.

natural_image
Interior view of a flat-screen TV with visible sound waves and connectors (no text or symbols)2 Install the CABLE MANAGEMENT CLIP as shown.
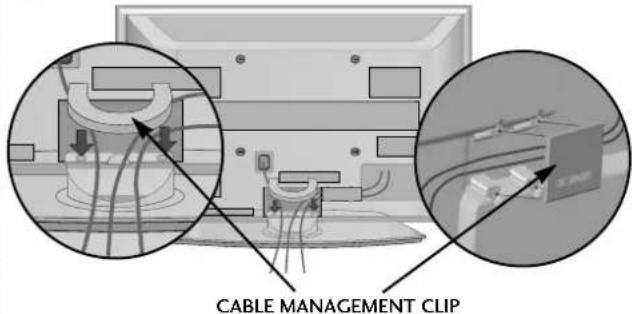
How to remove the cable management clip
Hold the CABLE MANAGEMENT CLIP with both hands and pull it upward.
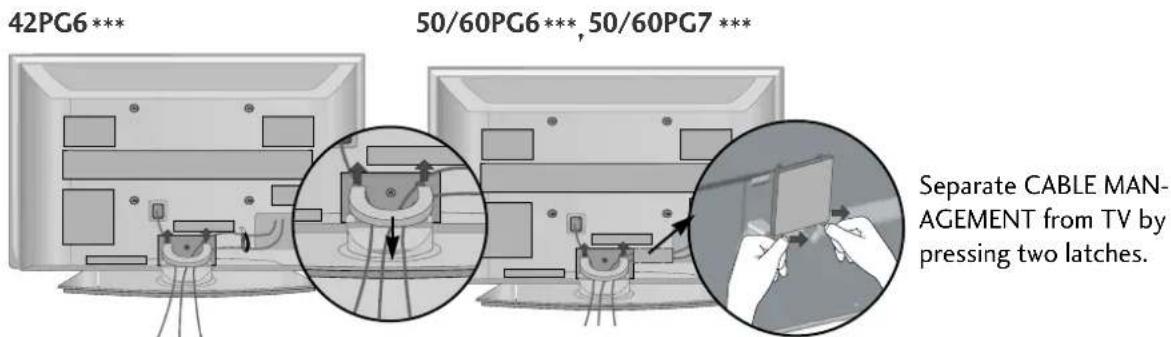
* For the 42PG6*** model, press the center of the CABLE MANAGEMENT CLIP and then lift up it.
NOTE
▶ Do not use the CABLE MANAGEMENT CLIP to lift the TV.
- If the TV is dropped, you may be injured or the TV may be damaged.
PREPARATION
■ Image shown may differ from your TV.
50PG3\*\*\*
1 Connect the cables as necessary. To connect additional equipment, see the EXTERNAL EQUIPMENT SETUP section.

natural_image
Illustration of a flat-screen TV with multiple screens and a small screen, no text or symbols present2 Install the CABLE MANAGEMENT CLIP as shown. If your TV has the CABLE HOLDER, install it as shown and bundle the cables.
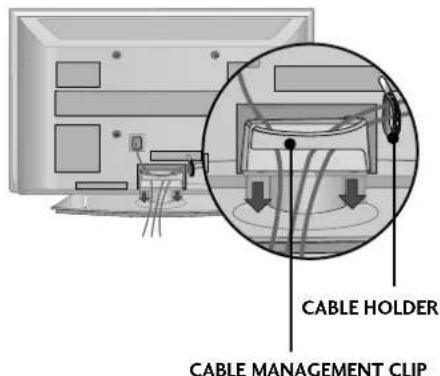
How to remove the cable management clip
Hold the CABLE MANAGEMENT CLIP with both hands and pull it upward.

natural_image
Illustration of a TV setup with an inset showing cable routing and a magnified view of the device (no text or symbols present)NOTE
▶ Do not use the CABLE MANAGEMENT CLIP to lift the TV. - If the TV is dropped, you may be injured or the TV may be damaged.
32/37/42/47LG6\*\*
1 Align the hole with the tab on the CABLE MANAGEMENT CLIP.
Turn the CABLE MANAGEMENT CLIP as shown.
Note: This cable management can be broken by excessive pressure.

2 Connect the cables as necessary.
To connect additional equipment, see the External Equipment Setup section.

natural_image
Technical illustration of a monitor with cable routing and a magnified inset showing cable routing details (no text or symbols)42/47/52LG7\*\*, 32/42LG8\*\*\*
1 Connect the cables as necessary.
To connect additional equipment, see the External Equipment Setup section of the manual.

natural_image
Illustration of a flat-screen TV with visible rear, front, and back views showing internal components (no text or symbols)2 Open the CABLE MANAGEMENT CLIP as shown and manage the cables.

3 Fit the CABLE MANAGEMENT CLIP as shown.

natural_image
Illustration of a flat-screen monitor with cable routing and a magnified inset showing internal wiring (no text or symbols)PLEASE SET IT UP CAREFULLY SO THE PRODUCT DOES NOT FALL OVER.
- You should purchase necessary components to fix the TV to the wall on the market.
■ Position the TV close to the wall to avoid the possibility of it falling when pushed.
The instructions shown below are a safer way to set up the TV, which is to fix it to the wall, avoiding the possibility of it falling forwards if pulled. This will prevent the TV from falling forward and causing injury. This will also prevent the TV from damage. Ensure that children do not climb or hang from the TV.


flowchart
graph TD
    A["1"] --> B["Node 1"]
    C["2"] --> D["Node 2"]
    style A fill:#f9f,stroke:#333
    style C fill:#f9f,stroke:#333
    style D fill:#f9f,stroke:#333
1 Use the eye-bolts or TV brackets/bolts to fix the product to the wall as shown in the picture. (If your TV has bolts in the eyebolts, loosen then bolts.)
* Insert the eye-bolts or TV brackets/bolts and tighten them securely in the upper holes.
2 Secure the wall brackets with bolts to the wall. Ensure that both brackets are even.

natural_image
Diagram of a vertical monitor with a side-mounted screen and a numbered label '3' (no text or symbols on the device itself)3 Use a strong cord to secure the TV. Secure the cord in such a way that it becomes taught when the TV is in position.
NOTE
▶ When moving the TV undo the cords first.
▶ Use a platform or cabinet string and large enough to support the size and weight of the TV.
▶ To use the TV safely make sure that the height of the bracket on the wall and on the TV is the same.
■ The TV can be installed in various ways such as on a wall, or on a desktop etc.
■ The TV is designed to be mounted horizontally.
EARTHING
Ensure that you connect the earth wire to prevent possible electric shock. If grounding methods are not possible, have a qualified electrician install a separate circuit breaker. Do not try to earth the TV by connecting it to telephone wires, lightening rods or gas pipes.
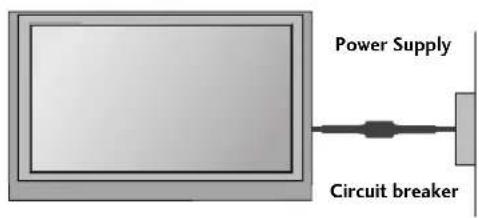
DESKTOP PEDESTAL INSTALLATION
For adequate ventilation allow a clearance of 4" (10cm) all around the TV.

WALL MOUNT: HORIZONTAL INSTALLATION
For adequate ventilation allow a clearance of 4" (10cm) all around the TV. We recommend that you use a wall mounting bracket of LG brand when mounting the TV to a wall.

natural_image
Interior view of a room with a large TV mounted on a cabinet, no visible text or symbols
PREPARATION
■ To prevent damage do not connect to the mains outlet until all connections are made between the devices.
ANTENNA CONNECTION
■ For optimum picture quality, adjust antenna direction.
■ An antenna cable and converter are not supplied.
■ For optimum picture quality, adjust antenna direction.
■ An antenna cable and converter are not supplied.
- For optimum picture quality, adjust antenna direction.
- An antenna cable and converter are not supplied.
- For optimum picture quality, adjust antenna direction.
- An antenna cable and converter are not supplied.
- For optimum picture quality, adjust antenna direction.
- An antenna cable and converter are not supplied.
- For optimum picture quality, adjust antenna direction.
- An antenna cable and converter are not supplied.
■ For optimum picture quality, adjust antenna direction.
■ An antenna cable and converter are not supplied.
- For optimum picture quality, adjust antenna direction.
- An antenna cable and converter are not supplied.
- For optimum picture quality, adjust antenna direction.
- An antenna cable and converter are not supplied.
- For optimum picture quality, adjust antenna direction.
- An antenna cable and converter are not supplied.
- For optimum picture quality, adjust antenna direction.
- An antenna cable and converter are not supplied.
■ For optimum picture quality, adjust antenna direction.
■ An antenna cable and converter are not supplied.
■ For optimum picture quality, adjust antenna direction.
■ An antenna cable and converter are not supplied.
- For optimum picture quality, adjust antenna direction.
- An antenna cable and converter are not supplied.
■ For optimum picture quality, adjust antenna direction.
■ An antenna cable and converter are not supplied.
■ For optimum picture quality, adjust antenna direction.
■ For optimum picture quality, adjust antenna direction.
■ An antenna cable and converter are not supplied.
■ For optimum picture quality, adjust antenna direction.
■ An antenna cable and converter are not supplied.
■ For optimum picture quality, adjust antenna direction.
■ An antenna cable and converter are not supplied.
EXTERNAL EQUIPMENT SETUP
■ To avoid damaging any equipment, never plug in any power cords until you have finished connecting all equipment.
This section on EXTERNAL EQUIPMENT SETUP mainly uses diagrams for the 42/50/60PG6*** models.
■ Image shown may differ from your TV.
HD RECEIVER SETUP
Connecting with a component cable
1 Connect the video outputs (Y, PB, PR) of the digital TV top box to the COMPONENT IN VIDEO jacks on the TV.
2 Connect the audio output of the digital set-top box to the COMPONENT IN AUDIO jacks on the TV.
3 Turn on the digital set-top box.
(Refer to the owner's manual for the digital set-top box.)
4 Select Component1 input source using the INPUT button on the remote control.
If connected to COMPONENT IN 2, select Component2 input source.

flowchart
graph TD
    A["COMPONENT IN"] --> B["1"]
    A --> C["2"]
    D["Y"] --> E["Component 1"]
    F["Pa"] --> G["Component 1"]
    H["L"] --> I["Component 1"]
    J["R"] --> K["Component 1"]
    E --> L["Output Y"]
    G --> M["Output Pa"]
    I --> N["Output L"]
    K --> O["Output R"]
| Signal | Component | HDMI1/DVI, HDMI2, HDMI3(except 32/37LG6***, 32/42LG8***) |
| 480i/576i | Yes | No |
| 480p/576p | Yes | Yes |
| 720p/1080i | Yes | Yes |
| 1080p | Yes(50Hz, 60Hz only) | Yes(24Hz, 30Hz, 50Hz, 60Hz) |
EXTERNAL EQUIPMENT SETUP
Connecting a set-top box with an HDMI cable
1 Connect the HDMI output of the digital set-top box to the HDMI/DVI IN 1, HDMI IN 2 or HDMI IN 3 (except 32/37LG6***, 32/42LG8***) jack on the TV.
2 Select HDMI1/DVI, HDMI2 or HDMI3(except 32/37LG6***, 32/42LG8***) input source using the INPUT button on the remote control.
3 Turn on the digital set-top box.
(Refer to the owner's manual for the digital set-top box.)
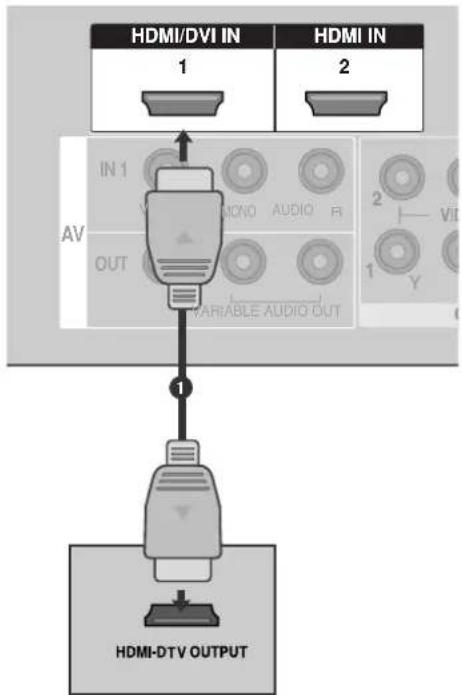
flowchart
graph TD
    A["HDMI/DVI IN"] -->|1| B["AV"]
    C["HDMI IN"] -->|2| B
    B --> D["Variable Audio Out"]
    D --> E["HDMI-DTV OUTPUT"]
NOTE
▶ TV can receive the video and audio signal simultaneously with using a HDMI cable.
If the digital set-top box supports Auto HDMI function, the output resolution of the source device will be automatically TV to 1280x720p.
If the digital set-top box player does not support Auto HDMI, you need to TV the output resolution appropriately.
To get the best picture quality, adjust the output resolution of the source device to 1280x720p. (42/47LG6***, 42/47/52LG7***, 50PG3***, 50/60PG7*** : 1920x1080i/1080p)
Connecting with a HDMI to DVI cable
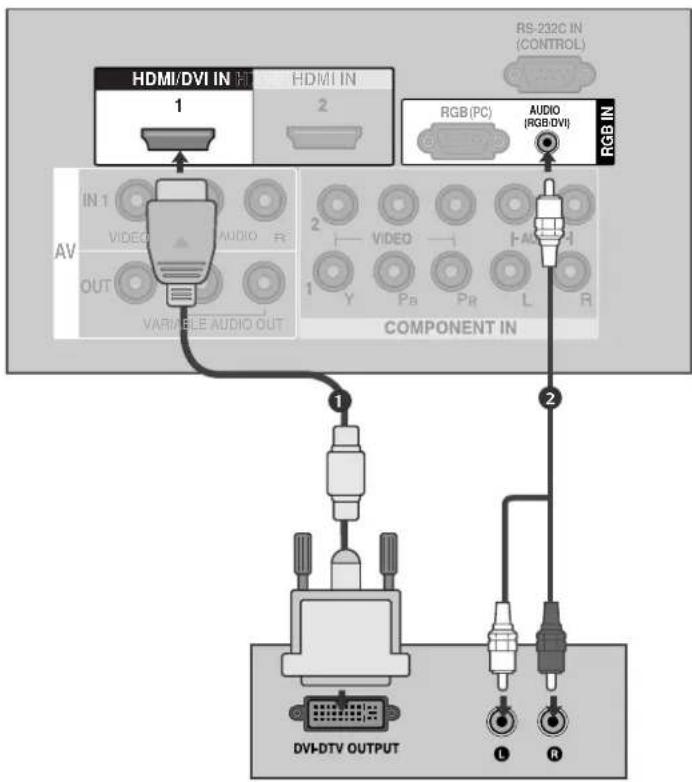
1 Connect the DVI output of the digital set-top box to the HDMI/DVI IN 1 jack on the TV.
2 Connect the audio output of the digital set-top box to the AUDIO(RGB/DVI) jack on the TV.
3 Turn on the digital set-top box. (Refer to the owner's manual for the digital set-top box.)
4 Select HDMI1/DVI input source using the INPUT button on the remote control.
NOTE
HDMI2, HDMI3(except 32/37LG6***, 32/42LG8***) source does not support DVI source.
If the set-top box has a DVI output and no HDMI output, a separated audio connection is necessary.
If the set-top box does not support Auto DVI, you need to set the output resolution appropriately.
EXTERNAL EQUIPMENT SETUP
DVD SETUP
Connecting with a component cable
1 Connect the video outputs (Y, PB, PR) of the DVD to the COMPONENT IN VIDEO jacks on the TV.
2 Connect the audio outputs of the DVD to the COMPONENT IN AUDIO jacks on the TV.
3 Turn on the DVD player, insert a DVD.
4 Select Component1 input source using the INPUT button on the remote control.
If connected to COMPONENT IN 2, select Component 2 input source.
5 Refer to the DVD player's manual for operating instructions.

flowchart
graph TD
    A["COMPONENT IN"] --> B["1"]
    A --> C["2"]
    B --> D["Y"]
    B --> E["Pb"]
    B --> F["Pb"]
    C --> G["L"]
    C --> H["R"]
    D --> I["Y"]
    E --> J["Pb"]
    F --> K["L"]
    G --> L["R"]
Component Input ports
To achieve better picture quality, connect a DVD player to the component input ports as shown below.
| Component ports on the TV | Y | P_B | P_R |
| Video output portson DVD player | Y | P_B | P_R |
| Y | B-Y | R-Y | |
| Y | Cb | Cr | |
| Y | Pb | Pr | |
Connecting with a S-Video cable
1 Connect the S-VIDEO output of the DVD to the S-VIDEO input on the TV.
2 Connect the audio outputs of the DVD to the AUDIO input jacks on the TV.
3 Turn on the DVD player, insert a DVD.
4 Select AV2 input source using the INPUT button on the remote control.
5 Refer to the DVD player's manual for operating instructions.

EXTERNAL EQUIPMENT SETUP
Connecting with a HDMI cable
1 Connect the HDMI output of the DVD to the HDMI/DVI IN 1, HDMI IN 2 or HDMI IN 3 (except 32/37LG6***, 32/42LG8***) jack on the TV.
2 Select HDMI1/DVI, HDMI2 or HDMI3(except 32/37LG6 ***, 32/42LG8***) input source using the INPUT button on the remote control.
3 Refer to the DVD player's manual for operating instructions.
NOTE
The TV can receive video and audio signals simultaneously when using a HDMI cable.
If the DVD player supports Auto HDMI function, the output resolution of the source device will be automatically TV to 1280x720p.
If the DVD player does not support Auto HDMI, you must TV the output resolution appropriately.
To get the best picture quality, adjust the output resolution of the source device to 1280x720p. (42/47LG6***, 42/47/52LG7***, 50PG3***, 50/60PG7*** : 1920x1080i/1080p)

flowchart
graph TD
    A["HDMI/DVI IN 1"] --> B["AV"]
    C["HDMI IN 2"] --> B
    B --> D["VIDEO VIDE OUT"]
    B --> E["VIDEO R AUDIO R"]
    B --> F["VIDEO COMI"]
    D --> G["VIDEO OUT"]
    E --> H["VIDEO COMI"]
    F --> I["VIDEO COMI"]
    G --> J["VIDEO OUT"]
    H --> K["VIDEO COMI"]
    I --> L["VIDEO OUT"]
VCR SETUP
■ To avoid picture noise (interference), allow adequate distance between the VCR and TV.
■ Typically a frozen still picture from a VCR. If 4:3 picture format is used for an extended period the fixed images on the sides of the screen may remain visible.
Connecting with a RF cable

1 Connect the ANT OUT socket of the VCR to the ANTENNA IN socket on the TV.
2 Connect the antenna cable to the ANT IN socket of the VCR.
3 Press the PLAY button on the VCR and match the appropriate programme between the TV and VCR for viewing.
EXTERNAL EQUIPMENT SETUP
Connecting with a RCA cable

1 Connect the AUDIO/VIDEO jacks between TV and VCR. Match the jack colours (Video = yellow, Audio Left = white, and Audio Right = red)
2 Insert a video tape into the VCR and press PLAY on the VCR. (Refer to the VCR owner's manual.)
3 Select AV1 input source using the INPUT button on the remote control. If connected to AV IN 2, select AV2 input source.
NOTE
If you have a mono VCR, connect the audio cable from the VCR to the AUDIO L/MONO jack of the TV.
Connecting with a S-Video cable
1 Connect the S-VIDEO output of the VCR to the S-VIDEO input on the TV. The picture quality is improved; compared to normal composite (RCA cable) input.
2 Connect the audio outputs of the VCR to the AUDIO input jacks on the TV.
3 Insert a video tape into the VCR and press PLAY on the VCR. (Refer to the VCR owner's manual.)
4 Select AV2 input source using the INPUT button on the remote control.
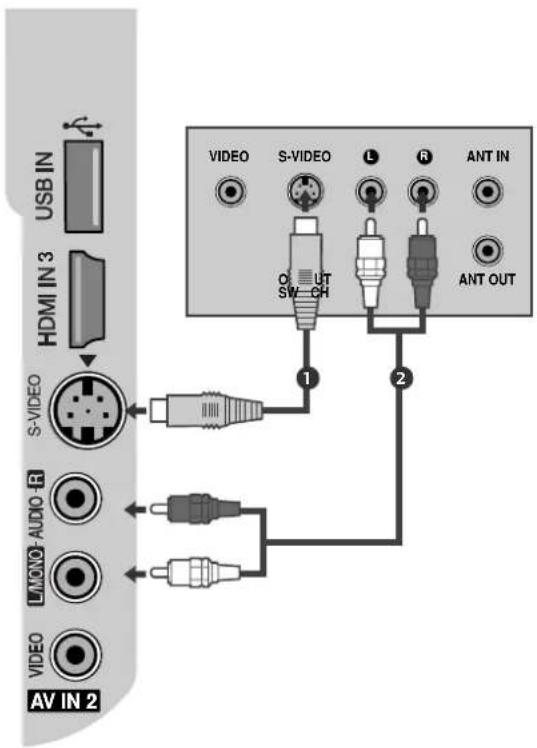
NOTE
If both S-VIDEO and VIDEO sockets have been connected to the S-VHS VCR simultaneously, only the S-VIDEO can be received.
EXTERNAL EQUIPMENT SETUP
OTHER A/V SOURCE SETUP

flowchart
graph TD
    A["USB IN"] --> B["S-VIDEO"]
    C["HDMI IN 3"] --> B
    D["AV IN 2"] --> E["VIDEO"]
    F["Camcorder"] --> G["VIDEO Game Set"]
    H["Video Game Set"] --> I["VIDEO"]
    J["1"] --> K["1"]
1 Connect the AUDIO/VIDEO jacks between TV and external equipment. Match the jack colours. (Video = yellow, Audio Left = white, and Audio Right = red)
2 Select AV2 input source using the INPUT button on the remote control. If connected to AV IN 1, select AV1 input source.
3 Operate the corresponding external equipment. Refer to external equipment operating guide.
EXTERNAL STEREO SETUP
Use to connected either an external amplifier, or add a sub-woofer to your surround sound system.
1 Connect the input jack of the stereo amplifier to the VARIABLE AUDIO OUT jacks on the TV.
2 Set up your speakers through your analog stereo amplifier, according to the instructions provided with the amplifier.
NOTE
When connecting with external audio equipments, such as amplifiers or speakers, please turn the TV speakers off. (p.86)
▶ Select Variable Out in Audio menu to connect the VARIABLE AUDIO OUT jacks.(▶ p.87)

EXTERNAL EQUIPMENT SETUP
AV OUTPUT SETUP
The TV has a special signal output capability which allows you to hook up the second TV or monitor.
1 Connect the second TV or monitor to the TV's AV OUT jacks.
2 See the Operating Manual of the second TV or monitor for further details regarding that device's input settings.
NOTE
▶ Component, RGB, HDMI input sources cannot be used for AV out.
We recommend to use the AV OUT jacks for VCR recording.

PC SETUP
This TV provides Plug and Play capability, meaning that the PC adjusts automatically to the TV's settings.
Connecting with a D-sub 15 pin cable

1 Connect the RGB output of the PC to the RGB(PP) Cjack on the TV.
2 Connect the PC audio output to the AUDIO(RGB/DVI) jack on the TV.
3 Turn on the PC and the TV.
4 Select RGB PC input source using the INPUT button on the remote control.
EXTERNAL EQUIPMENT SETUP
NOTE
To enjoy vivid picture and sound, connect the PC to the TV.
Avoid keeping a fixed image on the TV's screen for prolonged periods of time. The fixed image may become permanently imprinted on the screen; use a screen saver when possible.
Connect the PC to the RGB (PC) port of the TV; change the resolution output of PC accordingly.
There may be interference relating to resolution, vertical pattern, contrast or brightness in PC mode. Change the PC mode to another resolution or change the refresh rate to another rate or adjust the brightness and contrast on the menu until the picture is clear. If the refresh rate of the PC graphic card can not be changed, change the PC graphic card or consult the manufacturer of the PC graphic card.
The synchronization input waveform for Horizontal and Vertical frequencies are separate.
If the resolution of PC is over SXGA, there will be no picture on the TV.(only HD Models)
Connect the audio cable from the PC to the Audio input on the TV.(Audio cables are not included with the TV).
If you use too long an RGB-PC cable, there may be interference on the screen. We recommend using under 5m of the cable. This provides the best picture quality.
Supported Display Resolution
Plasma TV models
RGB-PC mode
| Resolution | Horizontal Vertical Frequency(kHz) | Frequency(Hz) |
| 640x350 | 31.468 | 70.09 |
| 720x400 | 31.469 | 70.09 |
| 640x480 | 31.469 | 59.94 |
| 800x600 | 37.879 | 60.317 |
| 1024x768 | 48.363 | 60.004 |
| 1280x768 | 47.776 | 59.87 |
| 1360x768 | 47.720 | 59.799 |
| 1366x768 | 47.7 | 60 |
| 1280x1024 | 63.668 | 59.895 |
| 1920x1080 | 66.587 | 59.934 |
HDMI-DTV mode
| Resolution | Horizontal Vertical Frequency(kHz) | Frequency(Hz) |
| 720x480 | 31.47 59.94 | |
| 31.50 60.00 | ||
| 720x576 | 31.25 50.00 | |
| 1280x720 | 44.96 59.94 | |
| 45.00 60.00 | ||
| 37.50 50.00 | ||
| 1920x1080i | 33.72 59.94 | |
| 33.75 60.00 | ||
| 28.125 50.00 | ||
| 1920x1080p | 67.432 59.94 | |
| 67.5 | 60 | |
| 56.250 | 50 | |
| 27 | 24 | |
| 33.75 | 30 |
LCD TV models
RGB-PC mode
| Resolution | Horizontal Vertical | |
| Frequency(kHz) | Frequency(Hz) | |
| 640x350 | 31.468 | 70.09 |
| 720x400 | 31.469 | 70.09 |
| 640x480 | 31.469 | 59.94 |
| 800x600 | 37.879 | 60.317 |
| 1024x768 | 48.363 | 60.004 |
| 1280x768 | 47.776 | 59.87 |
| 1360x768 | 47.720 | 59.799 |
| 1366x768 | 47.7 | 60 |
| 1280x1024 | 63.668 | 59.895 |
| 1920x1080 | 66.587 | 59.934 |
Only 42/47LG6***, 42/47/52LG7***
HDMI-DTV mode
| Resolution | Horizontal Vertical | |
| Frequency(kHz) | Frequency(Hz) | |
| 720x480 | 31.47 59.94 | |
| 31.50 60.00 | ||
| 720x576 | 31.25 50.00 | |
| 1280x720 | 44.96 59.94 | |
| 45.00 60.00 | ||
| 37.50 50.00 | ||
| 1920x1080i | 33.72 59.94 | |
| 33.75 60.00 | ||
| 28.125 50.00 | ||
| 1920x1080p | 67.432 | 59.94 |
| 67.5 | 60 | |
| 56.250 | 50 | |
| 27 | 24 | |
| 33.75 | 30 | |
EXTERNAL EQUIPMENT SETUP
Screen Setup for PC mode
Auto Configure (RGB [PC] mode only)
Automatically adjusts picture position and minimizes image instability. After adjustment, if the image is still not correct, your TV is functioning properly but needs further adjustment.
Auto configure
This function is for automatic adjustment of the screen position, clock, and phase. The displayed image will be unstable for a few seconds while the auto configuration is in progress.
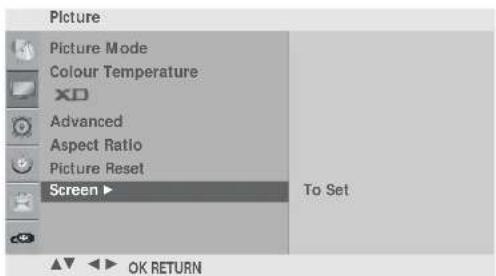
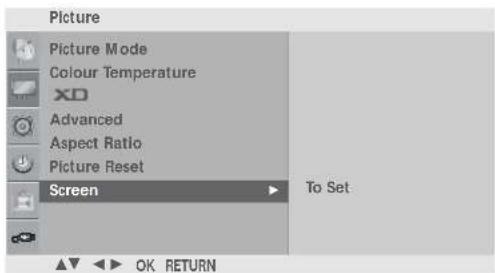
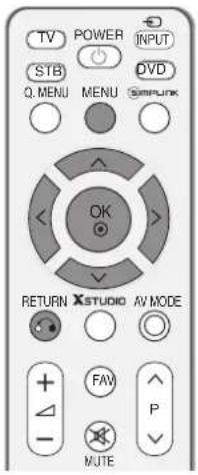
1 Press the MENU button and then use ^/√ button to select the Picture menu.
2 Press the button and then use ^ // ∨ button to select Screen.
3 Press the button and then use ^/√ button to select Auto Config.
4 Press the button to start Auto Config.
- When Auto config. has finished, OK will be shown on screen.
- If the position of the image is still not correct, try Auto adjustment again.
- If picture needs to be adjusted again after Auto adjustment in RGB (PC), you can adjust the Manual Config..
5 Press the MENU button to return to normal TV viewing. Press the RETURN button to move to the previous menu screen.

1

2
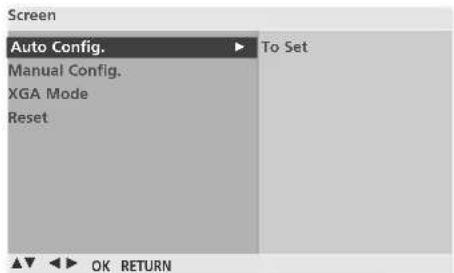
34
Manual Config. (RGB [PC] mode only)
- Adjustment for screen Phase, Clock, Position
If the picture is not clear after auto adjustment and especially if characters are still trembling, adjust the picture phase manually.
It's not available to use Phase, Clock function in
COMPONENT (480i/480p/576i/576p/720p/1080i/1080p),
HDMI (480p/576p/720p/1080i/1080p).
Clock This function is to minimize any vertical bars or stripes visible on the screen background the horizontal screen size will also change.
Phase This function allows you to remove any horizontal noise and clear or sharpen the image of characters.
1 Press the MENU button and then use ^/√ button to select the Picture menu.
2 Press the > button and then use ^/√ button to select Screen.
3 Press the > button and then use ^/√ button to select Manual Config..
4 Press the > button and then use ^/√ button to select Phase, Clock, H-Position or V-Position.
5 Press the < //> button to make appropriate adjustments.
6 Press the MENU button to return to normal TV viewing. Press the RETURN button to move to the previous menu screen.
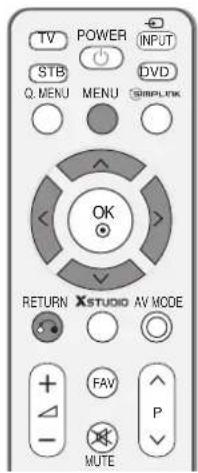

1

2
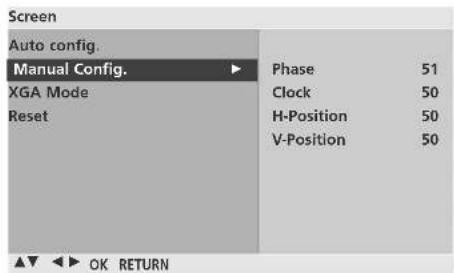
3 4 5
EXTERNAL EQUIPMENT SETUP
Selecting XGA mode (except 42PG6\*\*\*)
To view a normal picture, match the resolution of RGB mode and selection of XGA mode.
This function works in the following mode: RGB[PC] mode.

1 Press the MENU button and then use ^/√ button to select the Picture menu.
2 Press the button and then use ∧/∨ button to select Screen.
3 Press the button and then use ∧/√ button to select XGA Mode.
4 Press the button and then use ∧/∨ button to select the desired XGA resolution.
5 Press the MENU button to return to normal TV viewing. Press the RETURN button to move to the previous menu screen.

1

2

34
Initializing
(Reset to original factory settings)
This function operates in current mode.
To initialize the adjusted value

1 Press the MENU button and then use ^/√ button to select the Picture menu.
2 Press the button and then use ^/√ button to select Screen.
3 Press the button and then use ^/√ button to select Reset.
4 Press the button.
5 Press the MENU button to return to normal TV viewing. Press the RETURN button to move to the previous menu screen.
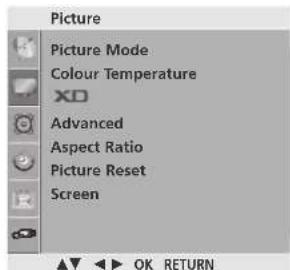
1

2

34
WATCHING TV / PROGRAMME CONTROL
REMOTE CONTROL KEY FUNCTIONS
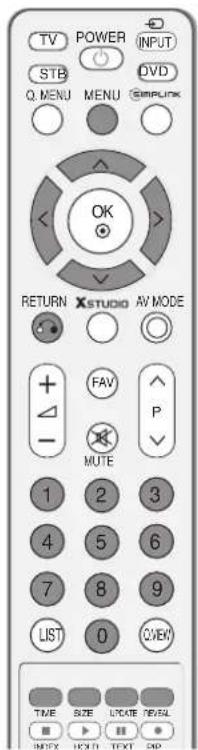
When using the remote control, aim it at the remote control sensor on the TV.


WATCHING TV / PROGRAMME CONTROL
TURNING ON THE TV
When your TV is turned on, you will be able to use its features.
1 Firstly, connect the power cord correctly.
At this stage, the TV switches to standby mode.
In standby mode to turn TV on, press the ,∅/| INPUT, P ▲ / ▼( or P ∧ / ∨) button on the TV or press the POWER, TTVINPUT, P ∧ / ∨, NUMBER(0\~9) buttons on the remote control and the TV will switch on.
Installation Guide
If the OSD (On Screen Display) is displayed on the screen after turning on the TV, you can adjust the Language, Location, Auto Tuning.
Note:
a. It will automatically disappear after approx. 40 seconds unless a button is pressed.
b. "In-Store" mode is only for shop display and not for general customer use.
c. "Home" mode is the optimal setting for home environments, and is the TV's default mode.
d. "In-Store" mode is the optimal setting for store environments. If a user modifies image quality data, "In-Store" mode initializes the product to the image quality set by us after a certain period of time.
e. The mode (Home, In-Store) can be changed by executing Factory Reset in the Option menu.
PROGRAMME SELECTION
1 Press the P ∧/∨ or NUMBER buttons to select a programme number.
VOLUME ADJUSTMENT
1 Press the △ +/- button to adjust the volume.
2 If you wish to switch the sound off, press the MUTE button.
3 You can cancel the Mute function by pressing the MUTE or △+/-button.
QUICK MENU
Your TV's OSD (On Screen Display) may differ slightly from that shown in this manual.
Q.Menu (Quick Menu) is a menu of features which users might use frequently.
- Aspect Ratio: Selects your desired picture format.
For Zoom Setting, select 14:9, Zoom1 and Zoom2 in Ratio Menu. After completing Zoom Setting, the display goes back to Q.Menu. - Power Saving (only Plasma TV Models): Adjusts screen brightness to reduce the power consumption of the set.
- Backlight (only LCD TV Models): Adjusts screen brightness. It returns to the default settings brightness by changing mode source.
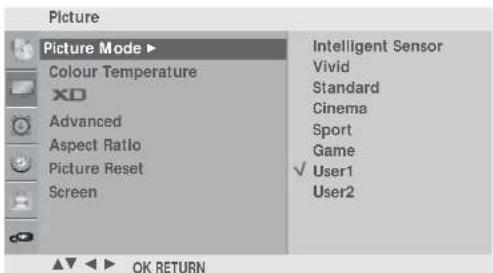
• Picture Mode: Selects your desired Picture Mode. - Sound Mode: It is a feature to automatically set the sound combination which it deems the best for the images being watched. Selects your desired Sound Mode.
- Multi Audio : Selects the sound output.
- Programme Edit : Adjusts the stored programmes by delete, copy, move or skip.
- Sleep Timer: Selects the sleep timer.

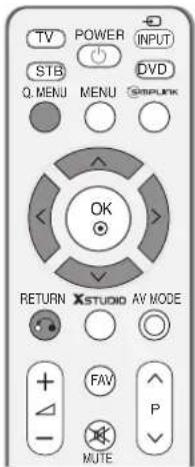
1 Press the Q.MENU button and then ^/^ button to display each menu.
2 Press the < //> button to select your desired Source.
3 Press the Q.MENU button to return to normal TV viewing.
WATCHING TV / PROGRAMME CONTROL
ON SCREEN MENUS SELECTION AND ADJUSTMENT
Your TV's OSD (On Screen Display) may differ slightly from that shown in this manual.
1 Press the MENU button and then ^/√ button to display each menu.
2 Press the button and then ^/√ button to select a menu item.
3 Change the setting of an item in the sub or pull-down menu with <//> button. You can move to a higher level menu by pressing the OO &KMENU button.

Setup MENU


Picture MENU
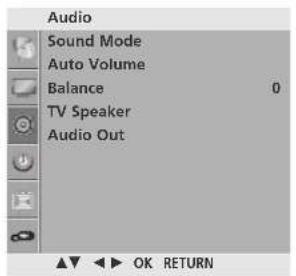
Audio MENU

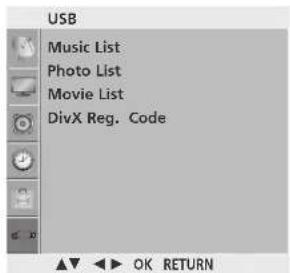
USB MENU


Option MENU

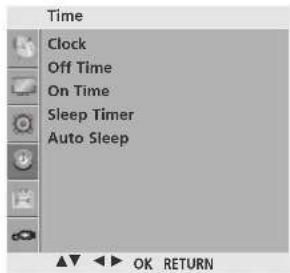
Time MENU
NOTE
a. The OSD (On Screen Display) function enables you to adjust the screen status conveniently since it provides graphical presentation.
b. In this manual, the OSD (On Screen Display) may be different from your TV's because it is just example to help the TV operation.
c. In the teletext mode and USB mode, menus are not displayed.
AUTO PROGRAMME TUNING
Up to 100 TV stations can be stored by programme numbers (0 to 99). Once you have preset the stations, you will be able to use the P ^/√ or NUMBER buttons to scan the stations you have programmed. Stations can be tuned using automatic or manual modes.
All stations which can be received are stored by this method. It is recommended that you use Auto tuning during installation of this TV.
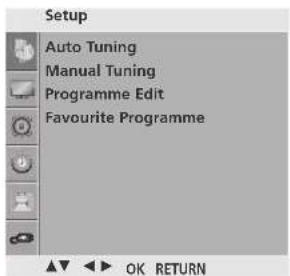
1 Press the MENU button and then ^/√ button to select the Setup menu.
2 Press the button and then ^/√ button to select Auto Tuning.
3 Press the button and then ^/√ button to select System.
4 Press the ^/√ button to select a TV system menu; BG: PAL B/G, SECAM B/G (Europe / East Europe / Asia / New Zealand / M.East / Africa / Australia)
I : PAL I/II (U.K. / Ireland / Hong Kong / South Africa)
DK: PAL D/K, SECAM D/K (East Europe / China / Africa / CIS)
M : (USA / Korea / Philippines)
5 Press the ^/√ button to select Storage From.
6 Press the < //> button or NUMBER buttons to select the initial programme number. If you use NUMBER buttons, any number under 10 is entered with a numeric '0' in front of it, i.e.'05' for 5.
7 Press the ^ // ∨ button to select Search.
8 Press the button to begin auto tuning.
All receivable stations are stored.
To stop auto tuning, press the RETURN button.
When auto tuning is complete, the Programme edit menu appears on the screen. See the Programme edit section to edit the stored programme.
9 Press the MENU button to return to normal TV viewing. Press the RETURN button to move to the previous menu screen.


1

2
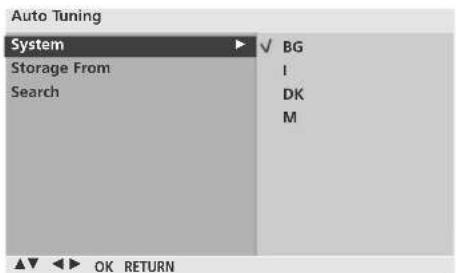
34567
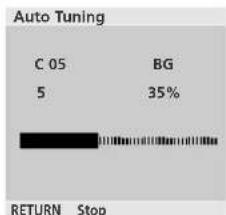
8
WATCHING TV / PROGRAMME CONTROL
MANUAL PROGRAMME TUNING
Manual programme lets you manually tune and arrange the stations in whatever order you desire.
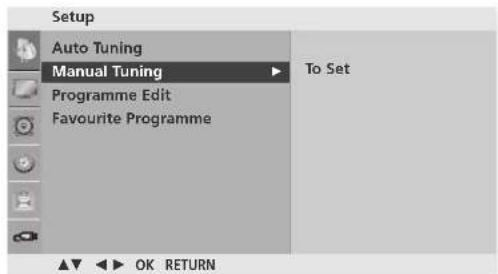
1 Press the MENU button and then ^/√ button to select the Setup menu.
2 Press the button and then ∧ ∥ ∨ button to select Manual Tuning.
3 Press the > button and then ^ // ∨ button to select Storage.
4 Press the <//> button or NUMBER buttons to select the desired programme number (0 to 99). If you use NUMBER buttons, any number under 10 is entered with a numeric '0' in front of it, i.e. '05' for 5.
5 Press the ^/√ button to selectSystem.
6 Press the ^/√ button to select a TV system menu; BG: PAL B/G, SECAM B/G (Europe / East Europe / Asia / New Zealand / M.East / Africa / Australia) I : PAL I/II (U.K. / Ireland / Hong Kong / South Africa) DK: PAL D/K, SECAM D/K (East Europe / China / Africa / CIS) M : (USA / Korea / Philippines)
7 Press the ^/√ button to selectBand.
8 Press the > button and then ^ // ∨ button to select V/UHF or Cable.
9 Press the ^/√ button to selectChannel.
10 You can select the desired programme number with the < //> button or NUMBER buttons. If possible, select the programme number directly with the number buttons. Any number under 10 is entered with a numeric '0' in front of it, i.e. '05' for 5.
11 Press the ^/√ button to selectSearch.
12 Press the <//> button to commence searching. If a station is found the search will stop.
13 Press the OK button to store it.
14 To store another station, repeat steps 3 to 1 3.
15 Press the MENU button to return to normal TV viewing. Press the RETURN button to move to the previous menu screen.
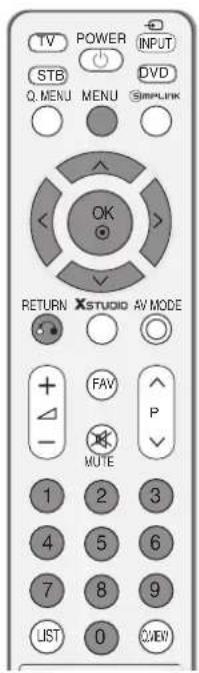

1

2


FINE TUNING
Normally fine tuning is only necessary if reception is poor.

1 Press the MENU button and then ^ // ∨ button to select the Setup menu.
2 Press the button and then ∧/∨ button to select Manual Tuning.
3 Press the button and then ^/√ button to select Fine.
4 Press the button and then < //> button to fine tune for the best picture and sound.
5 Press the OK button to store it.
6 Press the MENU button to return to normal TV viewing. Press the RETURN button to move to the previous menu screen.

1
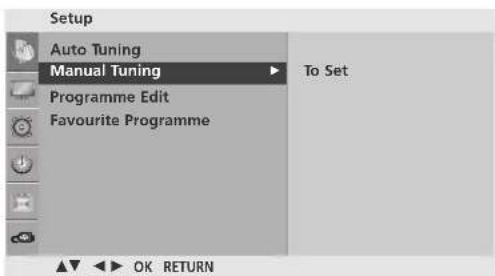
2

345
WATCHING TV / PROGRAMME CONTROL
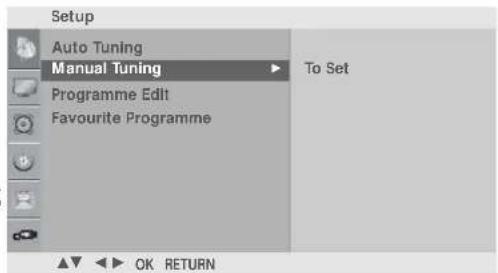
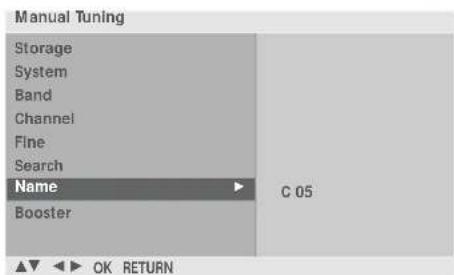
ASSIGNING A STATION NAME
You can assign a station name up to five characters to each programme number.

1 Press the MENU button and then ^/√ button to select the Setup menu.
2 Press the button and then ∧/∨ button to select Manual Tuning.
3 Press the button and then ^/√ button to select Name.
4 Press the button and then ^/√ button. You can use a blank, +, -, the number 0 to 9 and the alphabet A to Z.
5 Press the <//> button to select the position and make your choice of the second character, and so on.
6 Press the OK button to store it.
7 Press the MENU button to return to normal TV viewing. Press the RETURN button to move to the previous menu screen.

1

2

3456
BOOSTER
In some models, Booster is an optional function. Only a set with Booster can perform this function.
If reception is poor, select Booster to On. When the signal is strong, select "OFF".

1 Press the MENU button and then ^/√ button to select the SETUP menu.
2 Press the button and then ∧/∨ button to select Manual Tuning.
3 Press the button and then use ∧/∨ button to select Booster.
4 Press the button and then use <//> button to select O nor Off.
5 Press the MENU button to return to normal TV viewing. Press the RETURN button to move to the previous menu screen.
①
2

34
WATCHING TV / PROGRAMME CONTROL
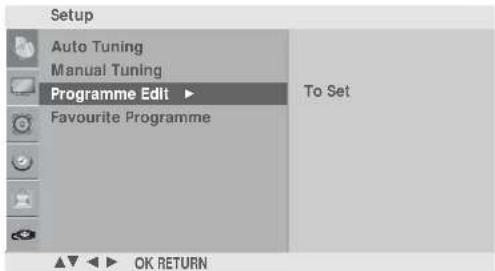
PROGRAMME EDIT
This function enables you to delete or skip stored programmes. Also you can move some stations to other programme numbers or copy a blank station data into the selected programme number.
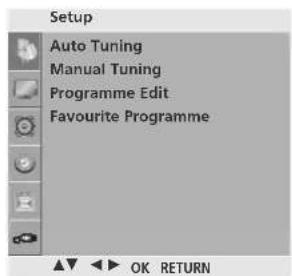
1 Press the MENU button and then ^/√ button to select the Setup menu.
2 Press the button and then ^/√ button to select Programme Edit.
3 Press the > button to display the Programme edit menu.
■Deleting a programme
- Select a programme to be deleted with the ^/√/ < / > button.
- Press the RED button twice.
The selected programme is deleted, all the following programmes are shifted up one position.
■ Copying a programme
- Select a programme to be copied with the ^/√/<</> button.
- Press the GREEN button.
All the following programmes are shifted down one position.
■ Moving a programme
- Select a programme to be moved with the ∧/∨/</> button.
- Press the YELLOW button.
- Move the programme to the desired programme number with the ^/√/ < / > button.
- Press the YELLOW button again to release this function.
■ Skipping a programme number
- Select a programme number to be skipped with the ^/√ // ↗ button.
- Press the BLUE button. The skipped programme turns to blue.
- Press the BLUE button again to release the skipped programme.
When a programme number is skipped it means that you will be unable to select it using the ^/√ button during normal TV viewing. If you wish to select the skipped programme, directly enter the programme number with the NUMBER buttons or select it in the programme edit or table menu.
4 Press the MENU button to return to normal TV viewing. Press the RETURN button to move to the previous menu screen.
1

2

3
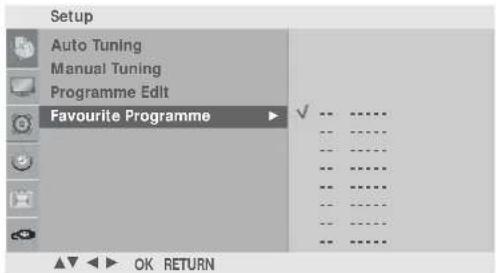
FAVOURITE PROGRAMME
This function lets you select your favourite programmes directly.
Repeatedly press the FAV button to select stored favourite programmes.
1 Press the MENU button and then ∧/∨ button to select the Setup menu.
2 Press the > button and then ^/√ button to select Favourite Programme.
3 Press the > button.
4 Press the ^/√ button to select - - - - - .
5 Select a desired programme with the < / > button or NUMBER buttons. Any number under 10 is entered with a numeric '0' in front of it, i.e.'0 5' for 5.
6 To store another programme, repeat steps 4 to 5. You can store up to 8 programmes.
7 Press the MENU button to return to normal TV viewing. Press the RETURN button to move to the previous menu screen.


1

2 3 4 5
WATCHING TV / PROGRAMME CONTROL
SELECTING THE PROGRAMME LIST
You can check which programmes are stored in the memory by displaying the programme list.
■ Displaying programme list
Press the LIST button to display the Programme list menu.
The programme list appears on the screen.
One programme list contains ten programmes as shown.

NOTE
a. You may find some blue programmes. They have been set up to be skipped by auto programming or in the programme edit mode.
b. Some programmes with the channel number shown in the programme list indicate there is no station name assigned.
■ Selecting a programme in the programme list
Select a programme with the ^/∨/<</> button.
Then press the OK button. The TV switches to the chosen programme number.
■ Paging through a programme list
There are 10 programme table pages in which contain 100 programmes. Pressing the ^/√/ < / > button repeatedly turns the pages.
Press the LIST button to return to normal TV viewing.

Programme List
| 0 | C | 03 | 5 | S | 69 |
| 1 | BLN | 03 | 6 | S | 17 |
| 2 | C | 12 | 7 | S | 22 |
| 3 | S | 66 | 8 | C | 09 |
| 4 | S | 67 | 9 | C | 11 |
SIMPLINK
This function operates only with devices with the SIMPLINK logo. Please check the SIMPLINK logo.
The product might not function properly when using it with other products with HDMI-CEC function.
This allows you to control and play other AV devices connected to the display through HDMI cable without additional cables and settings.
If you do not require the SIMPLINK menu, select "Off".
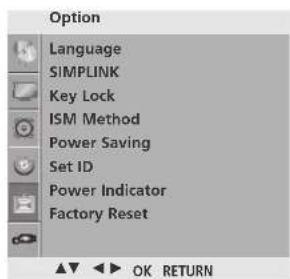
1 Press the MENU button and then ^/√ button to select the Option menu.
2 Press the > button and then ^/√ button to select SIMPLINK.
3 Press the > button and then ^/√ button to select On or Off.
4 Press the MENU button to return to normal TV viewing. Press the RETURN button to move to the previous menu screen.


1

23
WATCHING TV / PROGRAMME CONTROL
SIMPLINK Functions
Disc playback
Control connected AV devices by pressing the ∧/∨/<</>, OK, ▶, ■, ll, ◀◀ and ▶▶ buttons.
(The ● button does not provide such functions)
Direct Play
After connecting AV devices to the TV, you can directly control the devices and play media without additional settings.
Select AV device
Enables you to select one of the AV devices connected to the TV and operate it.
Power off all devices
When you switch off the TV, all connected devices are turned off.
Switch audio-out
Offers an easy way to switch audio-out.
* A device, which is connected to the TV through a HDMI cable but does not support SIMPLINK, does not provide this function.
SIMPLINK Menu
Press the ^/√/ < / > button and then OK button to select the desired SIMPLINK source.
1 TV viewing : Switch to the previous TV programme regardless of the current mode.
2 DISC playback : Select and play discs. When multiple discs are available, the titles of the discs are conveniently displayed at the bottom of the screen.
3 VCR playback : Control the connected VCR.
4 HDD Recordings playback : Control recordings stored in HDD.
5 Audio Out to Home theater/Audio Out to TV
:: Select Home theater or TV speaker for Audio Out.
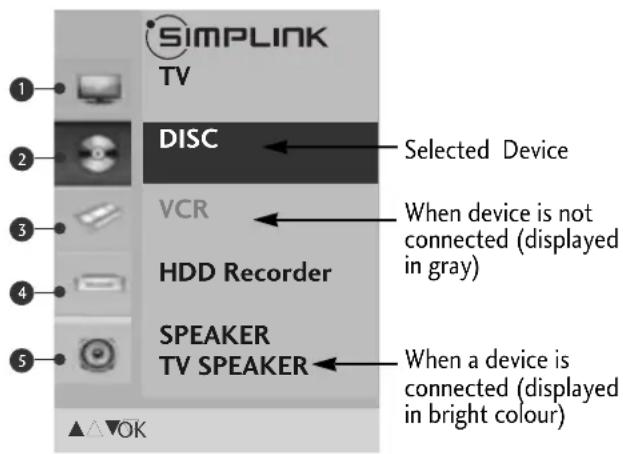
NOTE
Connect the HDMI/DVI IN or HDMI IN terminal of the TV to the rear terminal and Side terminal (HDMI terminal) of the SIMPLINK device with the HDMI cable.
▶ After connecting the HDMI terminal for the home theatre with SIMPLINK function using the above method, connect the VARIABLE AUDIO OUT terminal on the back of the TV to the VARIABLE AUDIO IN terminal on the back of the SIMPLINK device with the VARIABLE AUDIO OUT cable.
▶ When operating an external device with SIMPLINK, press the TV button from the MODE button on the remote control.
▶ When you switch the Input source using the INPUT button on the remote control, you can stop the operation of a device controlled by SIMPLINK.
When you select or operate a media device with home theatre function, the speaker automatically switches to home theatre speaker (HT speaker).
KEY LOCK
The TV can be set so that the remote control is needed to control it.
This feature can be used to prevent unauthorized viewing.
This TV is programmed to remember which option it was last set to even if you turn the TV off.

1 Press the MENU button and then ^/√ button to select the Option menu.
2 Press the > button and then ^/√ button to select Key Lock.
3 Press the > button and then ^/√ button to select On or Off.
4 Press the MENU button to return to normal TV viewing. Press the RETURN button to move to the previous menu screen.
1

23
NOTE
▶ In Key Lock 'On', if the TV is turned off, press the ⏻ / I, INPUT, P ▲ / ▼ (or P ∧/ ∨) button on the TV or POWER, INPUT, TV, P ∧/ ∨ or NUMBER buttons on the remote control.
▶ With the Key Lock On, the display 'Key Lock On' appears on the screen if any button on the front panel is pressed while viewing the TV.
WATCHING TV / PROGRAMME CONTROL
AV MODE
You can select the optimal images and sounds when connecting AV devices to external input.

flowchart
graph TD
    A["Off Cinema"] --> B["Game Sport"]
    B --> A
1 Press the AV MODE button repeatedly to select the desired source.
- If you select Cinema Mode in AV mode, Cinema mode will be selected both for Picture Mode and Sound Mode in PICTURE menu and AUDIO menu respectively.
- If you select "Off" in AV mode, the picture and image which you initially set will be selected.
2 Press the RETURN button to return to normal TV viewing.

TO USE THE USB DEVICE
When connecting the USB device
When you connect a USB device, this screen is displayed, automatically.
In USB device, you can not add a new folder or delete the existing folder.
1 Connect the USB device to the USB IN jacks on the side of TV.
2 Press the KSTUDIO
3 Press the < / > button to select the desired item.
4 Press the OK button.

Manufactured under license from Dolby Laboratories. "Dolby" and the double-D symbol are trademarks of Dolby Laboratories.
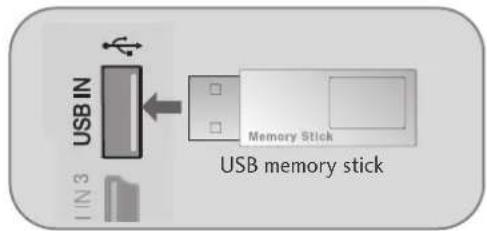
①
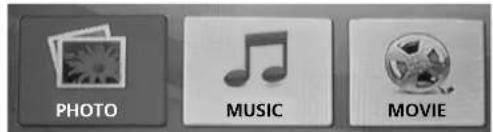
23
NOTE
▶ In USB mode, PP▲ / ▼( or PP^ / √ ), ∠+/- buttons on the TV are used to navigate (up/down/left/right).
Precautions when using the USB device
▶ Only a USB storage device is recognizable. Digital camera and mobile phone are not supported.
▶ If the USB storage device is connected through a USB hub, the device is not recognizable.
▶ A USB storage device using an automatic recognition programme may not be recognized.
▶ A USB storage device which uses its own driver may not be recognized.
▶ In case of a card reader, up to one memory cards are concurrently recognizable.
The recognition speed of a USB storage device may depend on each device.
▶ Please do not turn off the TV or unplug the USB device when the connected USB storage device is working. When such device is suddenly separated or unplugged, the stored files or the USB storage device may be damaged.
▶ Please do not connect the USB storage device which was artificially maneuvered on the PC. The device may cause the product to malfunction or fail to be played. Never forget to use only a USB storage device which has normal music files or image files.
▶ Please use only a USB storage device which was formatted as a FAT32 file system provided with the Windows operating system. In case of a storage device formatted as a different utility programme which is not supported by Windows, it may not be recognized.
▶ Please connect power to a USB storage device which requires an external power supply. If not, the device may not be recognized.
▶ Please connect a USB storage device with cable is offered by USB maker. If connected with cable is not offered by USB maker or an excessively long cable, the device may not be recognized.
▶ Some USB storage devices may not be supported or operated smoothly.
▶ If the name of a folder or file is too long, it will not be displayed or recognized.
▶ File alignment method is based on storage order in USB storage device.
▶ Please backup the important file because a data of USB device may be damaged. Data management is consumer's responsibility and in consequence the manufactures does not cover the product bearing data damage.
▶ If the quantity of folders and files is over 1,000, it will not be displayed or recognized about exceeded files and folders.
It is supported for only primary partition. If there is an extended partition, it is not displayed or recognized.
TO USE THE USB DEVICE
PHOTO LIST
It is available to playback only the photo file(*.jpg) in the USB device.
The On Screen Display may be different from your set. Images are an example to assist with the TV operation.
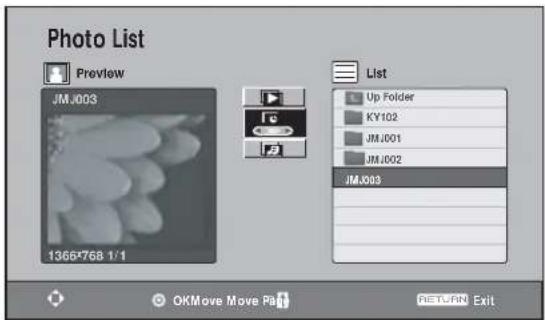
Screen Components
① Slide show the selected item.
② Set the time interval of the slide show.
3 Listen to music while viewing photos in full size.
4 Moves to upper level file
5 Corresponding buttons on the remote control

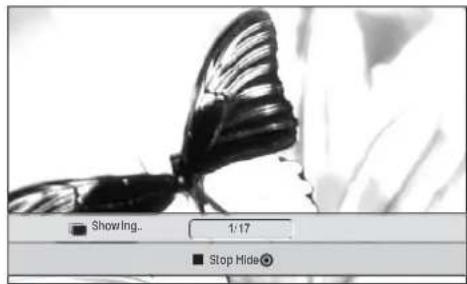
Set up the menu in Full-Sized Screen
You can change the settings to display photos stored on a USB device, on a full-sized screen. Detailed operations are available on full-sized photo view screen.
1 Use the ^/√ button to select the desired photos.
2 Press the OOKor > button.
3 The selected photo is displayed in full size and show up the menu.
90° 90° (Rotate) : Rotate photos.
Prev : Display the previous photo viewing.
▶ Next : Display the next photo viewing.
Stop : Stop the viewing the photos.
Hide : Hide the menu on the full-sized screen.
■ To see the menu again on the full-sized screen, press OK button.
4 Press RETURN button to return to TV viewing or press
XSTUDIO button to return to the X-STUDIO menu.
■ If JPEG Viewing is operated, it should be pressed the
XSTUDIO button after pressing the STOP button.

natural_image
Black and white close-up of a butterfly perched on a flower, with no visible text or symbols.The aspect ratio of a photo may change the size of the photo displayed on the screen in full size.
\* Viewing the Slide show
1 Use the ^/√ button to select the desired photos.
2 Press the button to select
3 Press the OK button.
Stop : Stop the viewing the slide show.
Hide : Hide the menu on the full-sized screen.
■ To see the menu again on the full-sized screen, press OK button.
4 Press the button to select
5 Use < //> button to control the time interval of the slide show.
6 Press the OK button to store it.
7 Press the button to select
8 Press the OK button to listen to music(BGM) while viewing photos in full size.
Set the music device and album in Option.
■ You should memorize FAV list to operate this function in MUSIC LIST.
9 Press RETURN button to return to TV viewing or press X Studio to return to the X-STUDIO menu.
If Slideshow/BMG function is operated, it should be pressed the XSTUDIO button after pressing the STOP button.
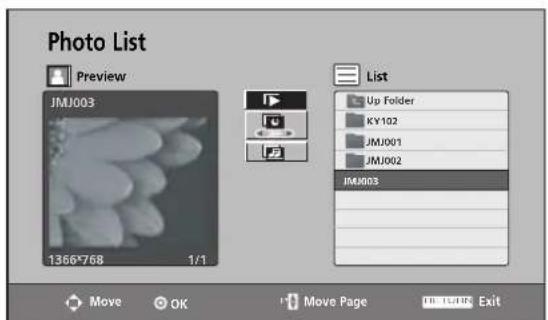
12

3

456

78
NOTE
If it is Progressive JPEG format, some photos may be not decoded.
If you do not press any button for 4 hours during the Slide show and BGM(Back Ground Music), it will be stopped.
If the width of resolution is over 4800, it is not supported.
When loading, some buttons may not work.
TO USE THE USB DEVICE
MUSIC LIST
Purchased music files(*.MP3) may contain copyright restrictions. Playback of these files may not be supported by this model.
Music file on your USB device can be played by this unit.
The On Screen Display may be different from your set. Images are an example to assist with the TV operation.
Screen Components
① Moves to upper level file
② Delete All : Delete all music in music list.
■ It is not possible to delete only one music in music list.
③ Corresponding buttons on the remote control

1 a. If you want to listen to music, use the ^/√ button to select music.
b. Press the O OK button to play the music.
c. All music in selected folder is played, repeatedly.
2 a. If you want to listen to several music in sequence, use the ^/√ button to select music.
b. Press FAV button and then use OK button to make music list.
■ When FAV button is pressed, 📄 is displayed and then it is possible to edit music list.
c. To make music list, repeat steps a to b.
d. Press button and then use music in music list. OK button to play
e. Up to 30 files are stored.
3 Press RETURN button to return to TV viewing or press XSTUDIO button to return to the X-STUDIO menu.
If MP3 playing is operated, it should be pressed the XSTUDIO button after pressing the STOP button.
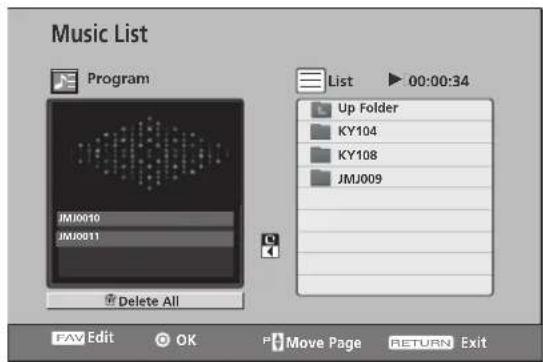
If you don't press any button for a while during the playing, the play information box (as shown in the below) will float as a screen saver.
The 'Screen Saver'?
Screen saver is to prevent screen pixel damage due to an fixed image remaining on the screen for a extended period of time.
■ If you press O, K, RETURN buttons, screen saver is stopped.

NOTE
When music is playing, is displayed in Back of the music title.
A music downloaded from a paid service with copyright protection does not start but displays inappropriate information in playtime.
The ◀◀ ▶▶▶buttons on the remote control are not available in this mode.
▶ Customer should note that permission is required in order to download MP3 files form the internet, Our company has no right to guarantee such permission, Permission should always be sought from the copyright owner.
When loading, some buttons may not work.
▶ MP3 files are supported as follows.
Sampling Frequency : 32 \~ 48kHz
Bit rate : 32 \~ 320kbps
TO USE THE USB DEVICE
MOVIE LIST
The movie list is activated once USB is detected. It is used when playing movie files on TV.
Displays the movies in the USB folder and supports Play.
Allows playback of all movies in the folder and user desired files.
Editing such as delete and add is not allowed.
It is a movie list that displays folder information and Divx file.
Screen Components
① Moves to upper level file
② Corresponding buttons on the remote control

1 Use the button to select the desired movie titles.
2 Press the OK button to play the movie and show up the menu.
| ON | OFF | ||
| Control | Language | Position | Sync ARC |
| ▲ To Set | ● Hide | ||
▶ Control : Turns the subtitle display on and off during movie play.
Language : Changes the Language Group of the subtitle during movie play.
▶ Position : Changes the position of the subtitle either up or down during movie play.
Sync : Adjusts the time synchronisation of the subtitle from -5 secs \~ +5 secs by steps of 1 secs during movie play.
▶ ARC : Adjusts the picture formats ; 4:3 or 16:9
■ To see the menu again on the full-sized screen, press OK button.
3 Press RETURN button to return to TV viewing or press X-studio return to the X-STUDIO menu.
If movie playing is operated, it should be pressed the ☑ after pressing the STOP button.
NOTE
If you do not press any button for 10 minutes during Pause state, it will be stopped.
When loading, some buttons may not work.
DivX Audio Language & Subtitle Language
▶ When DivX is playing, if you press the O○ Kutton and then select language, this message is displayed.
| Subtitle Language Group | ◀ Latin 1 ▶ | |
| Subtitle Language | ◀ O/O ▶ | |
| Audio Language | Dolby D | ◀ O/O ▶ |
Press the ∧/∨/ < / > button to select the desired option.
Supports up to Mpeg, Mp3, PCM, Dolby D file.
TO USE THE USB DEVICE
DIVX REGISTRATION CODE
Confirm the DivX registration code number of the TV. Using the registration number, movies can be rented or purchased at www.divx.com/vod. With a DivX registration code from other TV, playback of rented or purchased DivX file is not allowed. (Only DivX files matched with the registration code of the purchased TV are playable.)
1 Press the MENU button and then use ^/√ button to select the USB menu.
2 Press the button and then use ^/√ button to select DivX Reg. Code.
3 Press the > button to start DivX Reg. Code.

4 Press the RETURN button to return to normal TV viewing.

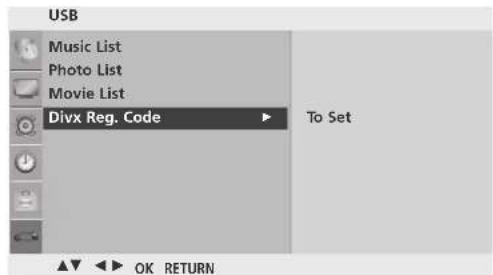
1 2 3

• Official DivX® Certified Product
- "Plays all versions of DivX® video (including DivX® 6) with standard playback of DivX® media files"
- "DivX Certified products: "DivX, DivX Certified, and associated logos are trademarks of DivX, Inc. and are used under license."
NOTE
▶ Movie files are supported as follows.
Resolution : under 720x480(720x576) WxH pixels.
Frame rate : under 30 frames/sec
Video Codec : MP 43, DIVX_3_11, DIVX_4_12, DIVX_5_0, XVID, MP4S, RMP4, MP4V, _3IVX.
PICTURE CONTROL
WATCHING PIP(PICTURE-IN-PICTURE)
PIP lets you view 2 different inputs (sources) on your TV screen at the same time.
One source will be large, and the other source will show a smaller inset image.
PIP function is available in the Component, RGB, HDMI mode.
(For FHD models, it can support TV, AV1, AV2 mode.)

Watching PIP/Double Window
Press the PIP button and then press the ^/√/<</> button to change the PIP options as shown below.

flowchart
graph LR
    A["PIP Mode"] --> B["DW1 Mode"]
    B --> C["DW2 Mode"]
    D["PIP Off"] --> A
    E["PIP Off"] --> B
    F["PIP Off"] --> C
Programme Selection for Sub Picture
Press the PIP button and then press the ^/ ∨/ < / > button to select a programme for the sub picture. The selected programme number is displayed just below the programme number of main picture.
Input Source Selection for Sub Picture
Press the PIP button and then press the ^/√/ < / > button to select the PIP Input source for the sub picture. (Sub picture can be selected only TV, AV1, AV2)
Sub Picture Size Adjustment (PIP mode only)
Press the PIP button and then press the ^/√/<</> button to adjust the sub picture size.
Moving the Sub Picture (PIP mode only)
Press the PIP button and then press the ^/√/<</> button to adjust the sub picture position.
PICTURE CONTROL
PICTURE SIZE (ASPECT RATIO)CONTROL
You can watch the screen in various picture formats; 16:9, Original, 4:3, 14:9, Zoom1/2 and Just Scan.
Just Scan works in the following mode: Component (720p/1080i/1080p), HDMI (720p/1080i/1080p)
If a fixed image is displayed on the screen for a long time, that fixed image may become imprinted on the screen and remain visible.
You can adjust the enlarge proportion using ^ ∨ button.
This function works in the following signal.
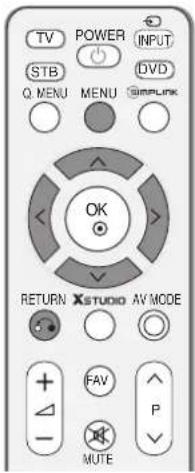
1 You can adjust Aspect Ratio in the Picture menu.
• 16:9
The following selection will allow you to adjust the picture horizontally, in linear proportion, to fill the entire screen(useful for viewing 4:3 formatted DVDs).

natural_image
Close-up of round balls on a textured surface (no text or symbols visible)• Original
When your TV receives a wide screen signal it will automatically change to the picture format to be broadcast.

natural_image
Close-up of a smooth, round object with a labeled 'Original' text overlay (no other visible text or symbols)• 4:3
The following selection will allow you to view a picture with an original 4:3 aspect ration, grey bars will appear on both the left and right hand of the screen.

natural_image
Close-up of a round, dome-shaped object with a label '4:5' on its surface (no other text or symbols visible)• 14:9
You can view a picture format of 14:9 or a general TV programme in the 14:9 mode. The 14:9 screen is viewed in the same way as in 4:3, but is magnified to the left and right.

natural_image
Close-up of a round, smooth object with a dark top and light rim, possibly a ball or abstract sphere (no text or symbols visible)- Zoom1
The following selection will allow you to view the picture without any alteration, while filling the entire screen. However, the top and bottom of the picture will be cropped.

natural_image
Close-up of a round, dome-shaped object with no visible text or symbols- Zoom2
Choose Zoom 2 when you wish the picture to be altered, both horizontally extended and vertically cropped. The picture adopting a compromise between alteration and screen coverage.

natural_image
Close-up of a spherical object with no visible text or symbols, labeled 'Zoom2' and '▲▼' (no other readable text)- Just Scan
Following Selection will lead to you view the picture of best quality without loss of original picture in high resolution image.

NOTE
▶ You can only select 4:3, 16:9 (Wide) in Component, HDMI, RGB(PC) mode.
▶ In HDMI/Component (over 720p) mode, Just Scan is available.
PICTURE CONTROL
PRESET PICTURE SETTINGS
Picture Mode-Preset
Picture Mode adjusts the TV for the best picture appearance. Select the preset value in the Picture Mode menu based on the programme category.
Intelligent Sensor(Only LCD TV models), Vivid, Standard, Cinema, Sport and Game are programmed for optimum picture reproduction at the factory and cannot be changed.
When the Intelligent Sensor function is on, the most suitable picture is automatically adjusted according to the surrounding conditions.(Only LCD TV models)
1 Press the MENU button and then ^/√ button to select the Picture menu.
2 Press the button and then ^/√ button to select Picture Mode.
3 Press the > button and then ^ // ∨ button to select Intelligent Sensor(Only LCD TV models), Vivid, Standard, Cinema, Sport, Game, User1 or User2.
4 Press the MENU button to return to normal TV viewing. Press the RETURN button to move to the previous menu screen.


1
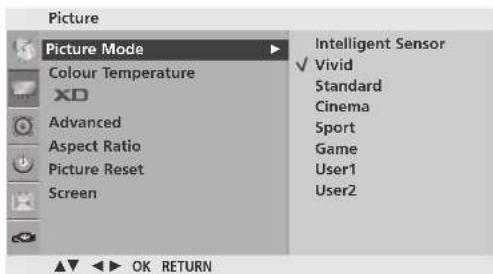
23
Auto Colour Tone Control(Cool/Medium/Warm)
To initialize values (reset to default settings), select the Cool option.
Choose one of three automatic colour adjustments. Set to warm to enhance hotter colours such as red, or set to cool to see less intense colours with more blue.
This menu is activated after selecting "User1" or "User2" in the Picture Mode.
1 Press the MENU button and then ∧/∨ button to select the Picture menu.
2 Press the button and then / button to select Colour Temperature.
3 Press the button and then ^/√ button to select either Cool, Medium, Warm or User.
4 Press the MENU button to return to normal TV viewing. Press the RETURN button to move to the previous menu screen.

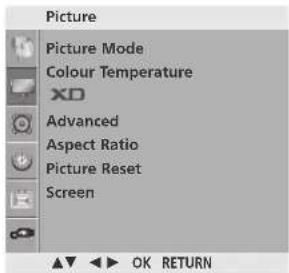
1

23
PICTURE CONTROL
MANUAL PICTURE ADJUSTMENT
Picture Mode-User Option
| Backlight | To control the brightness of the screen, adjust the brightness of LCD panel. |
| Contrast | Adjusts the difference between light and dark levels in the picture. |
| Brightness | Increases or decreases the amount of white in the picture. |
| Colour | Adjusts intensity of all colours. |
| Sharpness | Adjusts the level of crispness in the edges between the light and dark areas of the pictureThe lower the level, the softer the image. |
| Tint | Adjusts the balance between red and green levels. |
1 Press the MENU button and then ^ // ∨ button to select the Picture menu.
2 Press the button and then ^/√ button to select Picture Mode.
3 Press the button and then ^/√ button to select User1 or User2.
4 Press the button and then ^/√ button to select the desired picture option (Backlight(Only LCD TV modes), Contrast, Brightness, Colour, Sharpness and Tint).
5 Press the < //> button to make appropriate adjustments.
6 Press the MENU button to return to normal TV viewing. Press the RETURN button to move to the previous menu screen.
NOTE
▶ You cannot adjust colour, sharpness and tint in the RGB-PC mode.
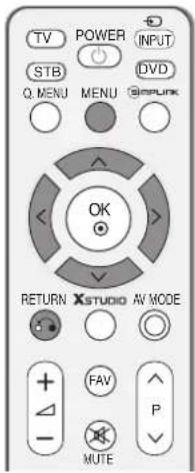

1

23
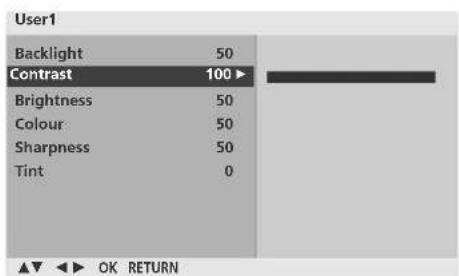

Colour Tone - User Option
To adjust red, green, blue to any colour temperature you prefer.
This menu is activated after selecting "User1" or "User2" in the Picture Mode.

1 Press the MENU button and then ^/√ button to select the Picture menu.
2 Press the button and then //√ button to select Colour Temperature.
3 Press the > button and then ^/√ button to select User.
4 Press the > button and then ^ // ∨ button to select Red, Green or Blue.
5 Press the < //> button to make appropriate adjustments.
6 Press the MENU button to return to normal TV viewing. Press the RETURN button to move to the previous menu screen.
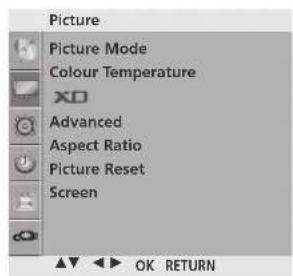
①

23
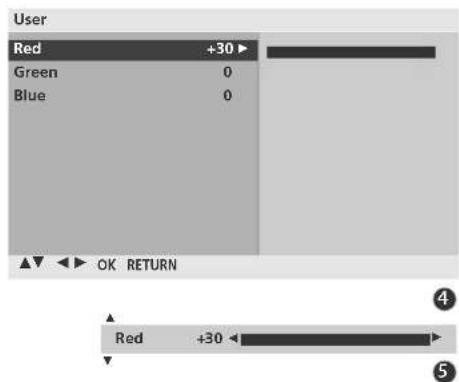
PICTURE CONTROL
XD - PICTURE IMPROVEMENT TECHNOLOGY
XD is LG electronic's unique picture improving technology to display a real HD source through an advanced digital signal processing algorithm.
It is not possible to use this function in RGB-PC mode.
1 Press the MENU button and then ^ // ∨ button to select the Picture menu.
2 Press the button and then ^/√ button to select XX DD
3 Press the button and then ^/√ button to select Auto or Manual.
4 Press the MENU button to return to normal TV viewing.
Press the RETURN button to move to the previous menu screen.
\* Manual Selection
This menu is activated after selecting the User1 or User2 of Picture Mode.
1 Press the > button and then ^ // ∨ button to select X×D Contrast, XD Colour or XD NR.
2 Press the > button and then ^/√ button to select Off, Low or High.
Select Off, Low, High, Adaptive.(only XD NR)
3 Press the MENU button to return to normal TV viewing. Press the RETURN button to move to the previous menu screen.
■ XD Contrast : Optimises the contract automatically according to the brightness of the reflection.
■ XD Colour : Adjusts the colour of the reflection automatically to reproduce as close as possible to natural colours.
■ XD NR : Removes interference up to the point where it does not damage the original picture.

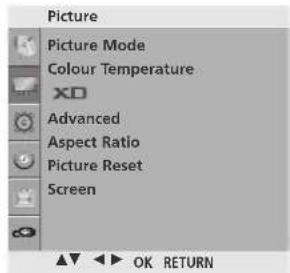
1

23

12
ADVANCED - GAMMA
High gamma values display whitish images and low gamma values display high contrast images.
It is not possible to use this function in RGB-PC mode.

1 Press the MENU button and then ^/√ button to select the Picture menu.
2 Press the button and then ^/√ button to select Advanced.
3 Press the button and then ∧/√ button to select Gamma.
4 Press the button and then ^/√ button to select Low, Medium or High.
5 Press the MENU button to return to normal TV viewing. Press the RETURN button to move to the previous menu screen.

1

23

4
PICTURE CONTROL
ADVANCED - FILM MODE/REAL CINEMA
To set the TV up for the best picture quality for viewing films.
This feature operates only in Analog TV, AV, S-video and Component 480i/576i mode.(Film Mode only)
In HDMI mode(1080p 24Hz). (42/47/52LG7*** only)
| Screen | TruMotion | Real Cinema |
| 5:5 Pull-Down | Off | On |


1 Press the MENU button and then ^ // ∨ button to select the Picture menu.
2 Press the button and then ^ // ∨ button to select Advanced.
3 Press the > button and then ^/√ button to select Film Mode or Real Cinema(42/47/52LG7*** only).
4 Press the button and then ^ // ∨ button to select On or Off.
5 Press the MENU button to return to normal TV viewing. Press the RETURN button to move to the previous menu screen.

23

4
(42/47/52LG7*** only)
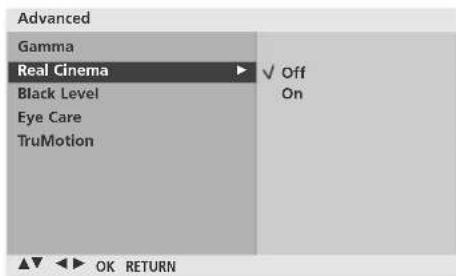
4
When you view a film this function adjust the TV to best picture quality. Adjusting the contrast and the brightness of the screen using the black level of the screen.
This function works in the following mode:
RF(NTSC-M), AV, S-Video(NTSC-M, NTSC 4.43), COMPONENT or HDMI.

1 Press the MENU button and then ^/√ button to select the Picture menu.
2 Press the button and then ^ //▼ button to select Advanced.
3 Press the button and then ∧ ∥ ∨ button to select Black Level.
4 Press the button and then ∧/∨ button to select Low or High.
■ Low : The reflection of the screen gets darker.
■High : The reflection of the screen gets brighter.
5 Press the MENU button to return to normal TV viewing. Press the RETURN button to move to the previous menu screen.
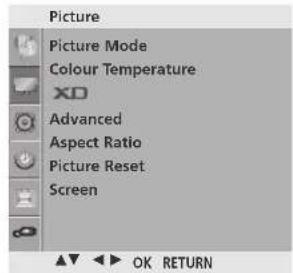
1

23

4
PICTURE CONTROL
EYE CARE (ONLY LCD TV MODELS)
It helps you adjust brightness when the screen is too bright to prevent dazzling.
When selecting Picture Mode(Standard, Sport, Game, User1 and User2), you can operate this function.

1 Press the MENU button and then ^/√ button to select the Picture menu.
2 Press the button and then ^/√ button to select Advanced.
3 Press the button and then ^/√ button to select Eye Care.
4 Press the button and then ^/√ button to select On or Off.
5 Press the MENU button to return to normal TV viewing.
Press the RETURN button to move to the previous menu screen.

1
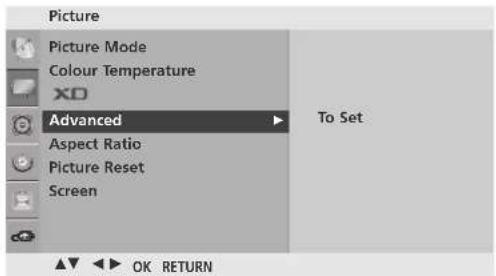
23
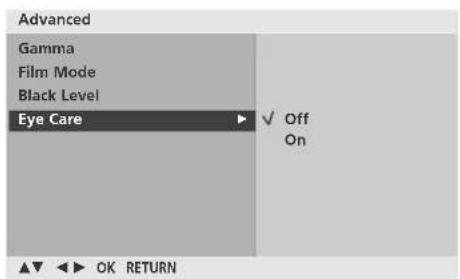
4
(42/47/52LG7*** only)
It is used for the best picture quality without any motion blur or judder when you enter a quick image or Film Source.
This feature is disable in RGB-PC, HDMI-PC mode.

1 Press the MENU button and then ^/√ button to select the Picture menu.
2 Press the button and then ^/√ button to select Advanced.
3 Press the > button and then ^ // ∨ button to select TruMotion.
4 Press the < //> button to select Off, Low or High.
■ Low : Provides smooth picture movement. Use this setting for standard use.
■ High : Provides smoother picture movement.
■ Off : Use this setting when "High" and "Low" setting result in noise.
5 Press the MENU button to return to normal TV viewing. Press the RETURN button to move to the previous menu screen.
- If you enable "TruMotion", noise may appear on the screen.
- If this occurs, set "TruMotion" to "Off".

1

23

4
PICTURE CONTROL
PICTURE RESET
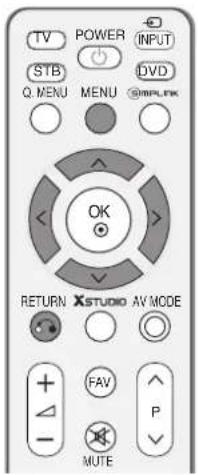
Returns to the default factory setting for Picture Mode, Colour Temperature, XD, Advanced, Aspect Ratio.
1 Press the MENU button and then ^/√ button to select the Picture menu.
2 Press the button and then ^/√ button to select Picture Reset.
3 Press the button to initialize the adjusted value.
4 Press the MENU button to return to normal TV viewing.
Press the RETURN button to move to the previous menu screen.

1

23
TRUMOTION DEMO (42/47/52LG7\*\*\* only)
Use it to see the difference between TruMotion Demo on and TruMotion Demo off.
It's not available to use this function in RGB/HDMI-PC mode.
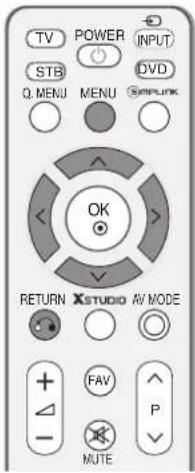
1 Press the MENU button and then ∧/∨ button to select the Picture menu.
2 Press the button and then ^/√ button to select TruMotion Demo.
3 Press the > button to begin TruMotion Demo.
4 To stop TruMotion Demo, press the MENU button.
- TruMotion Demo
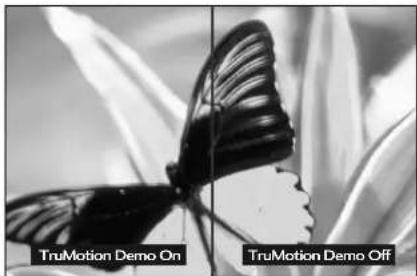
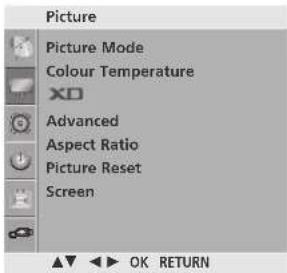
1

23
PICTURE CONTROL
POWER INDICATOR (ONLY LCD TV MODELS)
It helps you adjust the brightness of moving LED and sound when power is turned on.
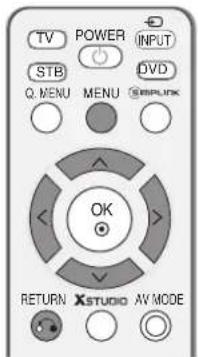

1
1 Press the MENU button and then ∧/∨ button to select the Option menu.
2 Press the button and then ∧/∨ button to select Power Indicator.
3 Press the button and then ^ //▼ button to select Startup Sound(Only 32/37/42/47LG6**, 32/42LG8**), Standby Light, Power Light or Demo Mode(Only 32/37/42/47LG6**, 32/42LG8**).
4 Press the button and then ^/√ button to select your desired Source.
5 Press the MENU button to return to normal TV viewing. Press the RETURN button to move to the previous menu screen.
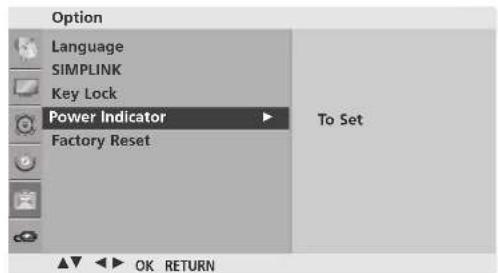
23
(Only 32/37/42/47LG6**, 32/42LG8***)
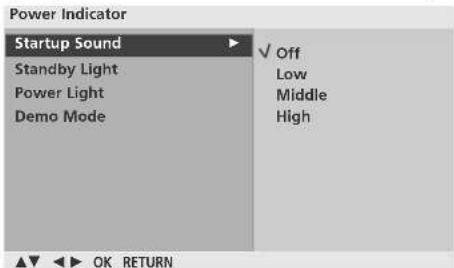
4
(Only 42/47/52LG7***)

4
IMAGE STICKING MINIMIZATION(ISM)METHOD (ONLY PLASMA TV MODELS)
A frozen or still picture from a PC/Video game displayed on the screen for prolonged periods will result in a ghost image remaining even when you change the image. Avoid allowing a fixed image to remain on the screen for prolonged periods.
White Wash
White wash removes permanent images from the screen. Note: An excessive permanent image may be impossible to clear entirely with White Wash.
Orbiter
Orbiter may help prevent ghost images. However, it is best not to allow any fixed image to remain on the screen. To avoid a permanent image on the screen, the screen will move every 2 minutes.
Inversion
This function inverts the panel colour of the screen. The panel colour is automatically inverted every 30 minutes.
1 Press the MENU button and then ∧/∨ button to select the Option menu.
2 Press the button and then ∧/√ button to select ISM Method.
3 Press the button and then ^ // ∨ button to select either Normal, White Wash, Orbiter or Inversion. If you do not need this function, set Normal.
4 Press the MENU button to return to normal TV viewing. Press the RETURN button to move to the previous menu screen.

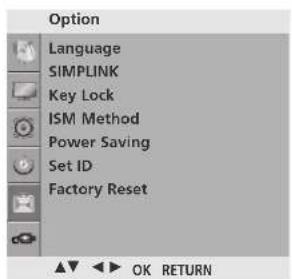
1

23
PICTURE CONTROL
POWER SAVING PICTURE MODE (ONLY PLASMA TV MODELS)
This function allows you to reduce the power consumption of the TV.
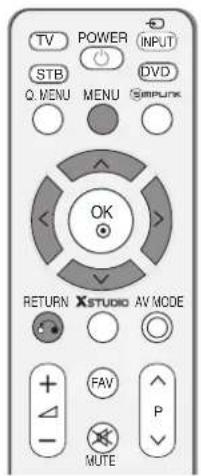
1 Press the MENU button and then ^/√ button to select the Option menu.
2 Press the button and then ^/^ button to select Power Saving.
3 Press the button and then ^ //^ button to select power levels.
4 Press the MENU button to return to normal TV viewing. Press the RETURN button to move to the previous menu screen.

1

23
FACTORY RESET
Use to quickly reset all the menu options to their original factory preset values.
This function deletes all TV programmes.
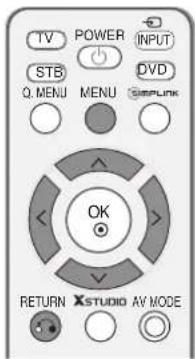
1 Press the MENU button and then ^/√ button to select the Option menu.
2 Press the button and then ^/√ button to select Factory Reset.
3 Press the button and then < //> button to select YES or NNOO
4 Press the MENU button to return to normal TV viewing. Press the RETURN button to move to the previous menu screen.
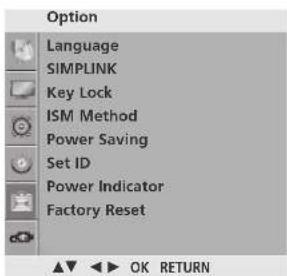
1

2

3
SOUND & LANGUAGE CONTROL
AUTO VOLUME LEVELER
Auto Volume automatically remains on the same level of volume if you change programmes.

1 Press the MENU button and then ^ // ∨ button to select the Audio menu.
2 Press the > button and then ^/√ button to select Auto Volume.
3 Press the > button and then ^/√ button to selectOn or Off.
4 Press the MENU button to return to normal TV viewing. Press the RETURN button to move to the previous menu screen.

1

23
You can select your preferred sound setting; SRS TSXT, Clear Voice, Standard, Music, Cinema, Sport or Game and you can also adjust the frequency of the equalizer.
Sound Mode lets you enjoy the best sound without any Special adjustment as the TV sets the appropriate sound options based on the programme content.
SRS TSXT, Clear Voice, Standard, Music, Cinema, Sport and Game are preset for optimum sound quality at the factory and are not adjustable.

1 Press the MENU button and then ^/√ button to select the Audio menu.
2 Press the > button and then ^/√ button to select Sound Mode.
3 Press the > button and then ^/√ button to select SRS TSXT, Clear Voice, Standard, Music, Cinema, Sport, Game or User.
4 Press the MENU button to return to normal TV viewing. Press the RETURN button to move to the previous menu screen.

1

23
SRS(●) is a trademark of SRS Labs, Inc.
TruSurround XT technology is incorporated under license from SRS Labs, Inc.
SOUND & LANGUAGE CONTROL
SOUND SETTING ADJUSTMENT -USER MODE
Adjusting the audio equalizer.
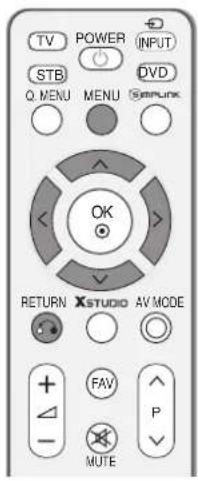
1 Press the MENU button and then ^/√ button to select the Audio menu.
2 Press the button and then ^/√ button to select Sound Mode.
3 Press the > button and then ^ // ∨ button to select User.
4 Press the > button.
5 Select a frequency band by pressing the <//> button. Set the desired sound level with the ^/√ button.
6 Press the MENU button to return to normal TV viewing. Press the RETURN button to move to the previous menu screen.

1

234

bar
User | Frequency | OK RETURN | |---|---| | 0.1 | ▲ | | 0.5 | ◀ | | 1.5 | ▲ | | 5.0 | ▲ | | 10 kHz | ◀ |5
BALANCE
You can adjust the sound balance of the speakers to the preferred levels.

1 Press the MENU button and then ^/√ button to select the Audio menu.
2 Press the button and then ^//√ button to select Balance.
3 Press the button and then < //> button to make desired adjustment.
4 Press the MENU button to return to normal TV viewing. Press the RETURN button to move to the previous menu screen.

1
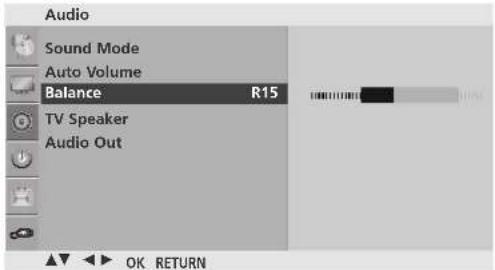
23
SOUND & LANGUAGE CONTROL
TV SPEAKERS ON/OFF SETUP
You can adjust the internal speaker status.
In TV, AV, COMPONENT, RGB[PC] and HDMI mode, internal speaker audio can be operational even though there is no video signal.
If you wish to use an external hi-fi system, turn off the TV internal speakers.

1 Press the MENU button and then ^/√ button to select the Audio menu.
2 Press the button and then ^/√ button to select TV Speaker.
3 Press the button and then ∧/∨ button to select On or Off.
4 Press the MENU button to return to normal TV viewing. Press the RETURN button to move to the previous menu screen.

1
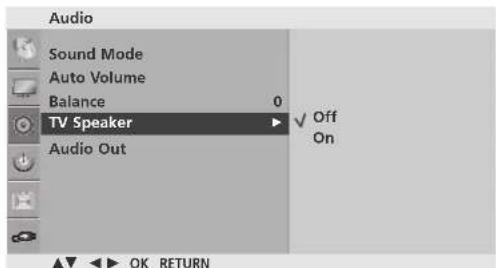
23
SELECTING AUDIO OUT
Select Monitor Out or Variable out to connect the audio outputs.

1 Press the MENU button and then ^/√ button to select the Audio menu.
2 Press the > button and then ^/√ button to select Audio Out.
3 Press the > button and then ^/√ button to select Monitor Out or Variable out.
4 Press the MENU button to return to normal TV viewing. Press the RETURN button to move to the previous menu screen.

1

23
SOUND & LANGUAGE CONTROL
I/II
Stereo/Dual Reception
When a programme is selected, the sound information for the station appears with the programme number and station name.
1 Press the Q.MENU button and then ^/√ button to select the Multi Audio menu.
2 Press the < //> button to select the sound output.
| Broadcast | On Screen Display |
| Mono | MONO |
| Stereo | STEREO |
| Dual | DUAL I, DUAL II, DUAL I+II |
■ Mono sound selection
If the stereo signal is weak in stereo reception, you can switch to mono. In mono reception, the clarity of sound is improved. To switch back to stereo.
■Language selection for dual language broadcast
If a programme can be received in two languages (dual language), you can switch to DUAL I, DUAL II or DUAL I+II.
DUAL I Sends the primary broadcast language to the loudspeakers.
DUAL II Sends the secondary broadcast language to the loudspeakers.
DUAL I+II Sends a separate language to each loudspeaker.
NICAM Reception
If the TV is equipped with a receiver for NICAM reception, high quality NICAM (Near Instantaneous Companding Audio Multiplex) digital sound can be received.
Sound output can be selected according to the type of broadcast received.
1 When NICAM mono is received, you can select NICAM MONO or FM MONO.
2 When NICAM stereo is received, you can select NICAM STEREO or FM MONO. If the stereo signal is weak, switch to FM MONO.
3 When NICAM dual is received, you can select NICAM DUAL I, NICAM DUAL II or NICAM DUAL I+II or FM MONO.
Speaker Sound Output Selection
In AV, Component, RGB and HDMI mode, you can select output sound for the left and right loud-speakers.
Select the sound output.
L+R: Audio signal from audio L input is sent to the left loudspeaker and audio signal from audio R input is sent to the right loudspeaker.
L+L: Audio signal from audio L input is sent to left and right loudspeakers.
R+R: Audio signal from audio R input is sent to left and right loudspeakers.
SOUND & LANGUAGE CONTROL
ON-SCREEN MENU LANGUAGE SELECTION
The menus can be shown on the screen in the selected language. First select your language.
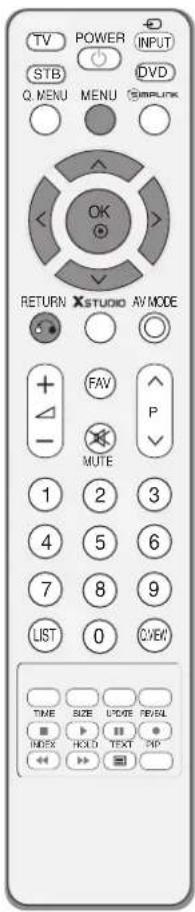
1 Press the MENU button and then use ^/√ button to select the Option menu.
2 Press the > button and then use ^/√ button to select Language.
3 Press the > button and then use ^/√/<< /> button to select your desired language.
4 Press the OK button
5 Press the MENU button to return to normal TV viewing. Press the RETURN button to move to the previous menu screen.
TIME SETTING
CLOCK SETUP
You must set the time correctly before using on/off timer function.
If current time setting is erased by a power failure or the TV is unplugged, reset the clock.

1 Press the MENU button and then ^ // ∨ button to select the Time menu.
2 Press the button and then ^/√ button to select Clock.
3 Press the > button and then ^/√ button to set the hour.
4 Press the button and then ∧/√ button to set the minute.
5 Press the MENU button to return to normal TV viewing. Press the RETURN button to move to the previous menu screen.
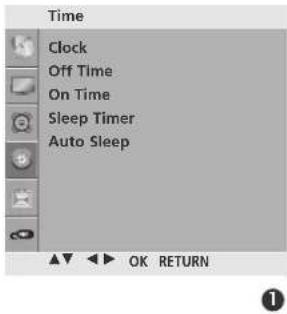
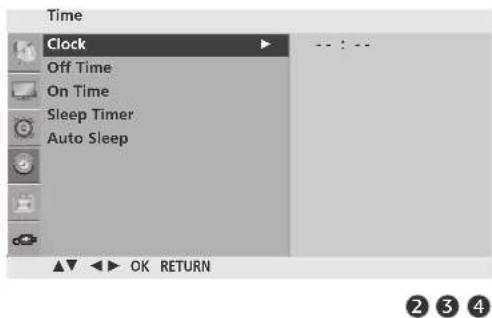
TIME SETTING
AUTO ON/OFF TIMER SETTING
The Off time function automatically switches the TV to standby at a preset time.
Two hours after the TV is switched on by the on time function it will automatically switch back to standby mode unless a button has been pressed.
Once the on time/off time is set, these functions operate daily at the preset time.
The Off time function overrides the On timer function if both are set to the same time.
The TV must be in standby mode for the On timer to work.
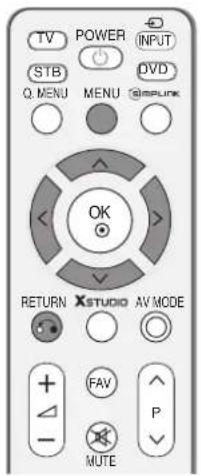
1 Press the MENU button and then ^/√ button to select the Time menu.
2 Press the button and then ^/√ button to select O©Off Time.
- To cancel O/O/Off Time function, select Off.
3 Press the > button and then ^/√ button to set the hour.
4 Press the button and then ^ // ∨ button to set the minutes.
5 For On Time function only
- Programme: Press the > button and then ^/√ button to select the programme.
- Volume: Press the > button and then ^ // ∨ button to adjust volume level at switch-on.
6 Press the MENU button to return to normal TV viewing. Press the RETURN button to move to the previous menu screen.

1

234

2345
SLEEP TIMER SETTING
You do not have to remember to switch the TV off before you go to sleep. The sleep timer automatically switches the TV to standby after the preset time has elapsed.
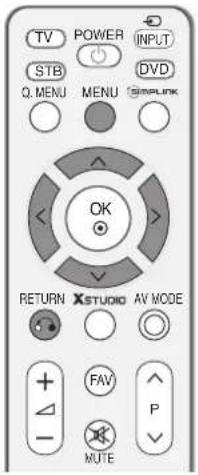
1 Press the MENU button and then ^/√ button to select the Time menu.
2 Press the > button and then ^/√ button to select Sleep Timer.
3 Press the > button and then ^/√ button to set the minute.
4 Press the MENU button to return to normal TV viewing. Press the RETURN button to move to the previous menu screen.

1
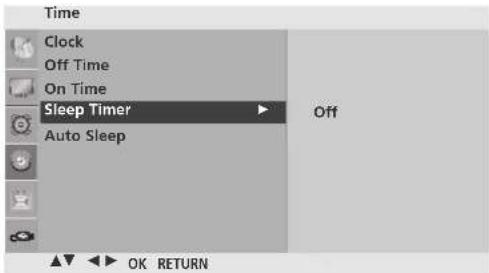
234

NOTE
▶ When you switch the TV off, the TV releases the preset sleep time.
TIME SETTING
AUTO SHUT-OFF SETTING
If the TV set is switched on and there is no input signal, it will switch off automatically after 10 minutes.
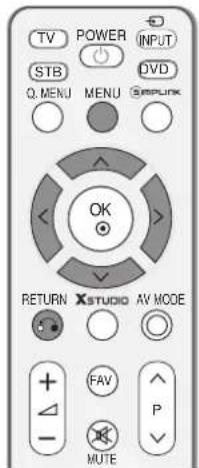
1 Press the MENU button and then ^/√ button to select the Time menu.
2 Press the button and then ^/^ button to select Auto Sleep.
3 Press the > button and then ^ // button to select OOn Off.
4 Press the MENU button to return to normal TV viewing. Press the RETURN button to move to the previous menu screen.
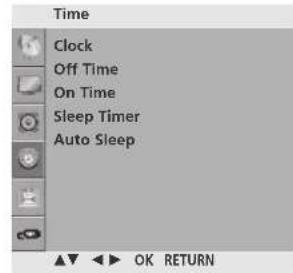
1

23
TELETEXT
This feature is not available in all countries.
Teletext is a free service broadcast by most TV stations which gives up-to-the-minute information on news, weather, television programmes, share prices and many other topics.
The teletext decoder of this TV can support the SIMPLE, TOP and FASTEXT systems. SIMPLE (standard teletext) consists of a number of pages which are selected by directly entering the corresponding page number. TOP and FASTEXT are more modern methods allowing quick and easy selection of teletext information.
SWITCH ON/OFF
Press the TEXT button to switch to teletext. The initial page or last page viewed appears on the screen.
Two page numbers, TV station name, date and time are displayed on the screen headline. The first page number indicates your selection, while the second shows the current page displayed.
Press the TEXT or RETURN button to switch off teletext. The previous mode reappears.
SIMPLE TEXT
Page selection
① Enter the desired page number as a three digit number with the NUMBER buttons. If during selection you press a wrong number, you must complete the three digit number and then re-enter the correct page number.
2 The PP^/√ button can be used to select the preceding or following page.
TELETEXT
TOP TEXT
The user guide displays four fields-red, green, yellow and blue at the bottom of the screen. The yellow field denotes the next group and the blue field indicates the next block.
■ Block / group / page selection
① With the blue button you can progress from block to block.
② Use the yellow button to proceed to the next group with automatic overflow to the next block.
3 With the green button you can proceed to the next existing page with automatic overflow to the next group. Alternatively the PButton can be used.
4 The red button return to the previous selection. Alternatively the P √ button can be used.
■ Direct page selection
As with SIMPLE teletext mode, you can select a page by entering it as a three digit number using the NUMBER buttons in TOP mode.
FASTEXT
The teletext pages are colour coded along the bottom of the screen and are selected by pressing the corresponding coloured button.
Page selection
① Press the button to select the index page.
② You can select the pages which are colour coded along the bottom line with corresponding coloured buttons.
③ As with SIMPLE teletext mode, you can select a page by entering its three digit page number with the NUMBER buttons in FASTEXT mode.
4 The P^/√ button can be used to select the preceding or following page.
SPECIAL TELETEXT FUNCTIONS

TIME
When viewing a TV programme, press this button to display the time at the top right hand corner of the screen. Press this button again to remove the display. In the teletext mode, press this button to select a sub page number. The sub page number is displayed at the bottom of the screen. To hold or change the sub page, press the RED/GREEN, P^^/√ or NUMBER buttons.
Press again to exit this function.

\$IZE
Selects double height text.
Press this button to enlarge the top half of the page.
Press this button again to enlarge the bottom half of the page.
Press this button again to return to the normal display.

UPDATE
Displays the TV picture on the screen while waiting for a new teletext page. The display will appear at the top left hand corner of the screen. When the updated page is available then display will change to the page number. Press this button again to view the updated teletext page.

REVEAL
Press this button to display concealed information, such as solutions to riddles or puzzles.
Press this button again to remove the information from the display.

INDEX
Select the each index page.

HOLD
Stops the automatic page change which will occur if a teletext page consists of 2 or more sub pages. The number of sub pages and the sub page displayed is, usually, shown on the screen below the time. When this button is pressed the stop symbol is displayed at the top left-hand corner of the screen and the automatic page change is inactive. To continue press this button again.
APPENDIX
TROUBLESHOOTING
| The TV does not operate properly | |
| The remote control does not work | Check to see if there is any object between the TV and the remote control causing an obstruction.Are batteries installed with correct polarity (+ to +, - to -)?Correct remote operating mode set: TV, STB etc.?Install new batteries. |
| Power is suddenly turned off | Is the sleep time set?Check the power control settings. Has the Power supply been interrupted.Is Auto sleep activated on this station. |
| The video function does not work. | |
| No picture & No sound | Check whether the TV is switched on.Try another channel. The problem may be with the broadcast.Is the power cord inserted correctly into the mains?Check your antenna direction and/or location.Test the mains outlet by plugging another TV into the same outlet. |
| Picture appears slowly after switching on | This is normal, the image is muted during the TV startup process. Please contact your service center, if the picture has not appeared after five minutes. |
| No or poor colour or poor picture | Adjust Colour in menu option.Allow a sufficient distance between the TV and the VCR.Try another channel. The problem may be with the broadcast.Are the video cables installed properly?Activate any function to restore the brightness of the picture. |
| Horizontal/vertical bars or picture shaking | Check for local interference such as an electrical appliance or power tool. |
| Poor reception on some channels | Station or cable channel experiencing problems, tune to another station.Station signal is weak, reposition the antenna to receive weaker stations.Check for sources of possible interference. |
| Lines or streaks in pictures | Check antenna (Change the position of the antenna). |
| No picture when connecting HDMI | Check HDMI cable over version 1.3.If the HDMI cables don’t support HDMI version 1.3, it can cause flickers or no screen display. In this case use the latest cables that support HDMI version 1.3. |
| The audio function does not work. | |
| Picture OK & No sound | Press the ∠+/- (or Volume) button.Sound muted? Press MUTE button.Try another channel. The problem may be with the broadcast.Are the audio cables installed properly? |
| No output from one of the speakers | Adjust Balance in menu option. |
| Unusual sound from inside the TV | A change in ambient humidity or temperature may result in an unusual noise when the TV is switched on or off and does not indicate a fault with the TV. |
| No sound when connecting HDMI or USB | Check HDMI cable over version 1.3.Check USB cable over version 2.0.*This feature is not available for all models. |
| There is a problem in PC mode. (Only PC mode applied) | |
| The signal is out of range. | ■ Adjust resolution, horizontal frequency, or vertical frequency.■ Check the input source. |
| Vertical bar or stripe on background & Horizontal Noise & Incorrect position | ■ Use Auto configure or adjust clock, phase, or H/V position. |
| Screen colour is unstable or single colour | ■ Check the signal cable.■ Reinstall the PC video card. |
APPENDIX
MAINTENANCE
Early malfunctions can be prevented. Careful and regular cleaning can prolong the life of your new TV. Caution: Be sure to switch the power off and unplug the power cord before you begin any cleaning.
Cleaning the Screen
A good way to keep the dust off your screen for a while is to wet a soft cloth in a mixture of lukewarm water and a little fabric softener or dish washing detergent. Wring the cloth until it's almost dry, and then use it to wipe the screen.
2 Ensure there is no excess water on the screen. Allow any water or dampness to evaporate before switching on.
Cleaning the Cabinet
■ To remove dirt or dust, wipe the cabinet with a soft, dry, lint-free cloth.
■ Do not to use a wet cloth.
Extended Absence
CAUTION
If you expect to leave your TV dormant for prolonged periods (such as a holiday), unplug the power cord to protect against possible damage from lightning or power surges.
PRODUCT SPECIFICATIONS
| MODELS | 42PG6*** | 50PG6*** | 60PG6*** | |
| 42PG60UR-TA42PG61UR-TA | 50PG60UR-TA50PG61UR-TA | 60PG60UR-TA60PG61UR-TA | ||
| Dimensions(Width x Height x Depth) | with stand | 1044.4 x 735.4 x 308.0 mm41.1x 28.9 x 12.1 inches | 1235.6 x 849.3 x 364.1 mm48.6 x 33.4x 14.3inches | 1455 x 985 x 414 mm57.3 x 38.8 x 16.3 inches |
| without stand | 1044.4 x 680.6 x 79.6 mm41.1 x 26.7 x 3.1 inches | 1235.6 x 792.8 x 79.6 mm48.6x 31.2 x 3.1 inches | 1455 x 924.8 x 84.1 mm57.3x 36.4 x 3.3 inches | |
| Weight | with stand | 28 kg / 61.7 lbs | 43.65 kg / 96.2 lbs | 59.2 kg / 130.5 lbs |
| without stand | 25 kg / 55.1 lbs | 39.7kg / 87.5lbs | 51.7 kg / 114 lbs | |
| Power requirement | AC100-240V~ 50/60Hz | AC100-240V~ 50/60Hz | AC100-240V~ 50/60Hz | |
| MODELS | 50PG3*** | 50PG7*** | 60PG7*** | |
| 50PG30FR-TD | 50PG70FR-TB | 60PG70FR-TB60PG70FR-TA | ||
| Dimensions(Width x Height x Depth) | with stand | 1232 x 850 x 363.6 mm48.5 x 33.5x 14.3inches | 1235.6 x 849.3 x 364.1 mm48.6 x 33.4x 14.3inches | 1455 x 985 x 414 mm57.3 x 38.8 x 16.3 inches |
| without stand | 1232 x 793 x 84 mm48.5x 31.2 x 3.3 inches | 1235.6 x 792.8 x 79.6 mm48.6x 31.2 x 3.1 inches | 1455 x 924.8 x 84.1 mm57.3x 36.4 x 3.3 inches | |
| Weight | with stand | 42.3 kg / 93.3 lbs | 45.65 kg / 100.6 lbs | 62.4 kg / 137.6 lbs |
| without stand | 38.3kg / 84.4lbs | 41.7kg / 91.9lbs | 54.9 kg / 121 lbs | |
| Power requirement | AC100-240V~ 50/60Hz | AC100-240V~ 50/60Hz | AC100-240V~ 50/60Hz | |
| Television SystemProgram CoverageExternal Antenna Impedance | PAL/SECAM B/G/D/K, PAL I/II, NTSC-MVHF: NZ1~E21, UHF: E21 ~ E69, CATV: S1 ~ S20, HYPER: S21 ~ S4775Ω | |||
| Environment condition | Operating Temperature | 0 ~ 40°C / 32 ~ 104°FLess than 80% | ||
| Operating Humidity | ||||
| Storage Temperature | -20 ~ 60°C / -4 ~ 140°FLess than 85% | |||
| Storage Humidity | ||||
The specifications shown above may be changed without prior notice for quality improvement.
APPENDIX
| MODELS | 32LG6*** | 37LG6*** | 42LG6*** | 47LG6*** | |||
| 32LG60UR-TA | 37LG60UR-TA | 42LG60FR-TA | 47LG60FR-TA | ||||
| Dimensions (Width x Height x Depth) | with stand | 805.6 x 626 x 333 mm31.7 x 24.6 x 13.1 inches | 929 x 706.9x 374.7mm36.6x 27.8 x 14.8 inches | 1037.8 x 794.6 x 379.5 mm40.9x 31.3 x 14.9 inches | 1152.8 x 868.6 x 434.5 mm45.4 x 34.2 x 17.1 inches | ||
| without stand | 805.6x 587.4x 96.2mm31.7 x 23.1 x 3.7 inches | 929 x 665x 98.7 mm36.6x 26.2 x 3.9 inches | 1037.8x 747x 80.8mm40.9 x 29.4 x 3.2 inches | 1152.8 x 820.8 x 79 mm45.4 x 32.3x 3.1 inches | |||
| Weight | with stand | 14.4 kg / 31.7 lbs | 18.1 kg / 39.9 lbs | 21.4 kg / 47.2 lbs | 32.8 kg / 72.3 lbs | ||
| without stand | 12.2 kg / 26.9 lbs | 21.2 kg / 46.7 lbs | 20.4 kg / 45 lbs | 27.2 kg / 60 lbs | |||
| Power requirement | AC100-240V~ 50/60Hz | AC100-240V~ 50/60Hz | AC100-240V~ 50/60Hz | AC100-240V~ 50/60Hz | |||
| MODELS | 42LG7*** | 47LG7*** | 52LG7*** | ||||
| 42LG70YR-TA | 47LG70YR-TA | 52LG70YR-TA | |||||
| Dimensions (Width x Height x Depth) | with stand | 1026.2 x 734.0 x 293.4 mm40.4 x 28.8 x 11.5 inches | 1140.4 x 820.1 x 342.9 mm44.8 x 32.2 x 13.5 inches | 1284.4 x 898.6 x 342.9 mm50.5 x 35.3 x 13.5 inches | |||
| without stand | 1026.2 x 687.9 x 111.8 mm40.4 x 27.0 x 4.4 inches | 1140.4 x 764.8 x 129.0 mm44.8 x 30.1 x 5.0 inches | 1284.4 x 844.6 x 129.5 mm50.5 x 33.2 x 5.0 inches | ||||
| Weight | with stand | 21.7 kg / 47.8 lbs | 30.1 kg / 66.3 lbs | 39.9 kg / 87.9 lbs | |||
| without stand | 19.1 kg / 42.1 lbs | 25.4 kg / 55.9 lbs | 35.2kg / 77.6lbs | ||||
| Power requirement | AC100-240V~ 50/60Hz | AC100-240V~ 50/60Hz | AC100-240V~ 50/60Hz | ||||
| MODELS | 32LG8*** | 42LG8*** | 47LG75** | ||||
| 32LG80UR-TA | 42LG80UR-TA | 47LG75QR-TA | |||||
| Dimensions (Width x Height x Depth) | with stand | 830 x 648.9 x 232 mm23.7 x 25.5 x 9.1 inches | 1063 x 722.2 x 293.3 mm41.9x 28.4 x 11.5 inches | 1140.4 x 820.1 x 342.9 mm44.8 x 32.2 x 13.5 inches | |||
| without stand | 830x 581x 232mm23.7 x 22.9 x 9.1 inches | 1063x 649x 99mm41.9 x 25.6 x 3.9 inches | 1140.4 x 764.8 x 129.0 mm44.8 x 30.1 x 5.0 inches | ||||
| Weight | with stand | 13.79 kg / 30.4 lbs | 26.9 kg / 59.3 lbs | 30.1 kg / 66.3 lbs | |||
| without stand | 11 kg / 24.2 lbs | 24.24 kg / 53.4 lbs | 25.4 kg / 55.9 lbs | ||||
| Power requirement | AC100-240V~ 50/60Hz | AC100-240V~ 50/60Hz | AC100-240V~ 50/60Hz | ||||
| Television System Program Coverage External Antenna Impedance | PAL/SECAM B/G/D/K, PAL I/II, NTSC-MVHF: NZ1~E21, UHF: E21 ~ E69, CATV: S1 ~ S20, HYPER: S21 ~ S4775Ω | ||||||
| Environment condition | Operating Temperature Operating Humidity | 0 ~ 40°C / 32 ~ 104°FLess than 80% | |||||
| Storage Temperature Storage Humidity | -20 ~ 60°C / -4 ~ 140°FLess than 85% | ||||||
■ The specifications shown above may be changed without prior notice for quality improvement.
PROGRAMMING THE REMOTE CONTROL
The remote control is a multi brand or universal remote. It can be programmed to operate most remote controlled devices from other manufacturers.
Note that the remote control may not control all models from other brands.
Programming a code into a remote mode
1 Testing your remote control.
To find out whether your remote control can operate other components without programming, turn on a component such as a STB and press the corresponding mode button (such as a DVD or STB) on the remote control, while pointing at the component. Test the POWER and P^/√ buttons to see if the component responds correctly. If the component does not operate correctly, the remote control requires programming to operate the device.
2 Switch on the component to be programmed, then press the corresponding mode button (such as a DVD or STB) on the remote control. The remote control button of the desired device is illuminated.
3 Press the MENU and MUTE buttons simultaneously, the remote control is ready to be programmed with the code.
4 Enter a code number using the number buttons on the remote control. Programming code numbers for the corresponding component can be found on the following pages. If the code is correct, the device will turn off.
5 Press the MENU button to store the code.
6 Test the remote control functions to see if the component responds correctly. If not, repeat from step 2.
Programming code
(This feature is not available for all models.)
DVD
| Brand Codes Brand Codes Brand Codes | ||||||
| APEX DIGITAL 022 | MITSUBISHI | 002 | RCA | 005 006 | ||
| DENON 020 014 | NAD | 023 | SAMSUNG | 011 015 | ||
| GE 005 006 | ONKYO | 008 017 | SONY | 007 | ||
| HARMAN KARDON 027 | PANASONIC | 003 009 | THOMPSON | 005 006 | ||
| JVC | 012 | PHILIPS | 013 | TOSHIBA | 019 008 | |
| LG | 001 010 016 025 | PIONEER | 004 026 | YAMAHA | 009 018 | |
| MAGNAVOX | 013 | PROCEED | 021 | ZENITH 010 016 025 | ||
| MARANTZ | 024 | PROSCAN | 005 006 | |||
HDSTB
| Brand Codes Brand Codes Brand Codes | |||||||||||||
| ALPHASTAR DSR 123 | HOUSTON TRACKER | 033 | 037 | 039 | 051 | REALISTIC | 043 | 074 | |||||
| AMPLICA | 050 | 057 | 104 | SAMSUNG | 123 | ||||||||
| Astro Philips(ML) | 159 | HUGHES | 068 | SATELLITE SERVICE CO | 028 | 035 | 047 | ||||||
| Astro Thompson(ML) | 160 | Humax(SL) | 158 | 085 | |||||||||
| Astro Nokia(ML) | 161 | JANIEL | 060 | 147 | Samart(TH) | 156 | |||||||
| BIRDVIEW 051 | 126 | 129 | JERROLD | 061 | SCIENTIFIC ATLANTA | 032 | 138 | ||||||
| CHANNEL MASTER | 013 | 014 | 015 | 018 | KATHREIN | 108 | SONY | 103 | |||||
| 036 | 055 | LEGEND | 057 | STARCAST | 041 | ||||||||
| CHAPARRAL | 008 | 009 | 012 | 077 | LG | 001 | SUPER GUIDE | 020 | 124 | 125 | |||
| CITOH | 054 | LUTRON | 132 | TEECOM | 023 | 026 | 075 | ||||||
| CURTIS MATHES | 050 | 145 | LUXOR | 062 | 144 | 088 | 090 | 107 | |||||
| DRAKE | 005 | 006 | 007 | 010 | MACOM | 010 | 059 | 063 | 064 | 137 | |||
| 011 | 052 | 112 | 116 | 065 | TOSHIBA | 002 | 127 | ||||||
| 141 | MEMOREX | 057 | True Vision(TH) | 155 | |||||||||
| DX ANTENNA | 024 | 046 | 056 | 076 | NEXTWAVE | 028 | 124 | 125 | UBC(TH) | 153 | |||
| ECHOSTAR | 038 | 040 | 057 | 058 | NORSAT | 069 | 070 | UBC/SAMART(TH) | 154 | ||||
| 093 | 094 | 095 | 096 | PACE SKY SATELLITE | 143 | UNIDEN | 016 | 025 | 042 | ||||
| 097 | 098 | 099 | 100 | PANASONIC | 060 | 142 | 044 | 045 | 048 | ||||
| 122 | PANSAT | 121 | 078 | 079 | 080 | ||||||||
| ELECTRO HOME 089 | PERSONAL CABLE | 117 | 10 | 135 | 136 | ||||||||
| EUROPLUS | 114 | PHILIPS | 071 | VIEWSTAR | 115 | ||||||||
| FUJITSU | 017 | 021 | 022 | 027 | PICO | 105 | VTC(VN) | 162 | |||||
| 133 | 134 | PRESIDENT | 019 | 102 | WINEGARD | 128 | 146 | ||||||
| GENERAL INSTRUMENT | 003 | 004 | 016 | 029 | PRIMESTAR | 030 | 110 | 111 | ZENITH | 081 | 082 | 083 | |
| 031 | 059 | 101 | PROSAT | 072 | 091 | 120 | |||||||
| HITACHI | 139 | 140 | PSI(TH) | 157 | |||||||||
| RCA | 066 | 106 | |||||||||||
IR CODES
1. How to Connect
■ Connect your wired remote control to the Remote Control port on the TV.
2. Remote Control IR Codes
■ Output waveform
Single pulse, modulated with 37.917KHz signal at 455KHz

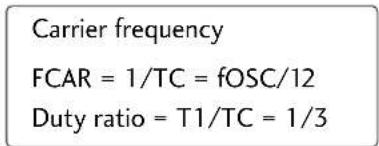
■ Configuration of frame
1st frame

flowchart
graph LR
    A["Lead code"] --> B["Low custom code"]
    B --> C["High custom code"]
    C --> D["Data code"]
    D --> E["Data code"]
    style A fill:#f9f,stroke:#333
    style B fill:#ccf,stroke:#333
    style C fill:#cfc,stroke:#333
    style D fill:#fcc,stroke:#333
    style E fill:#ffc,stroke:#333
Repeat frame

Lead code

- Repeat code

Bit description

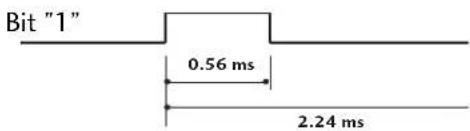
■ Frame interval: Tf
The waveform is transmitted as long as a key is depressed.

APPENDIX
| Code (Hexa) | Function Note | Code (Hexa) | Function Note |
| 0B INPUT R/C Button | 09 MUTE | R/C Button | |
| 08 POWER R/C Button (Power On/Off) | 53 LIST | R/C Button | |
| 60 PIP R/C Button | 10 ~ 19 | Number Key 0 ~ 9 R/C Button | |
| 43 MENU R/C Button | 1E | FAV R/C Button | |
| 5B RETURN R/C Button | 1A Q.VIEW R/C Button | ||
| 07 R/C Button | 20 TEXT | R/C Button | |
| 06 R/C Button | B0 SIZE | R/C Button | |
| 40 R/C Button | 8F | INDEX R/C Button | |
| 41 R/C Button | B1 TIME | R/C Button | |
| 44 OK R/C Button | BD | REVEAL R/C Button | |
| 72 RED | R/C Button | 8E | HOLD R/C Button |
| 71 GREEN | R/C Button | BA | UPDATE R/C Button |
| 63 YELLOW | R/C Button | 7E | SIMPLINK R/C Button |
| 61 BLUE | R/C Button | B1 | ■ Stop R/C Button |
| 02 + | R/C Button | B0 | ► Play R/C Button |
| 03 | - R/C Button | BA | II Pause R/C Button |
| 00 | P ∧ R/C Button | 8F | ◀◀ Rew R/C Button |
| 01 | P ∨ R/C Button | 8E | ►▶ FF R/C Button |
| 30 AV MODE | R/C Button | 45 Q.MENU | R/C Button |
| 7C | XSTUDIO R/C Button | BD | ●(Record) R/C Button |
EXTERNAL CONTROL THROUGH RS-232C
(ONLY PLASMA TV MODELS)
Connect the RS-232C input jack to an external control device (such as a computer or an A/V control system) and control the TV's functions externally.
Connect the serial port of the control device to the RS-232C jack on the TV back panel.
RS-232C connection cables are not supplied with the TV.
RS-232C Setup
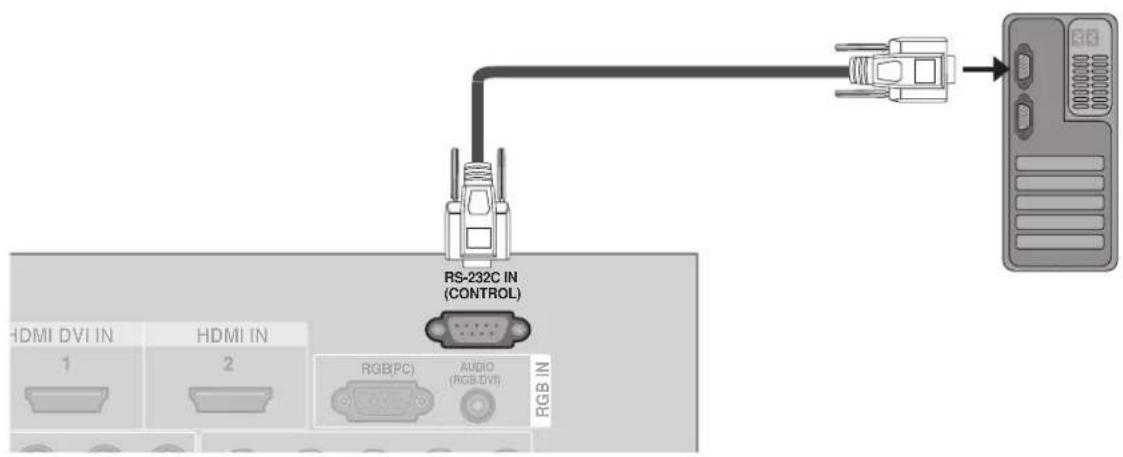
Type of Connector; D-Sub 9-Pin Male
No. Pin Name
1 No connection
2 RXD (Receive data)
3 TXD (Transmit data)
4 DTR (DTE side ready)
5 GND
6 DSR (DCE side ready)
7 RTS (Ready to send)
8 CTS (Clear to send)
9 No Connection
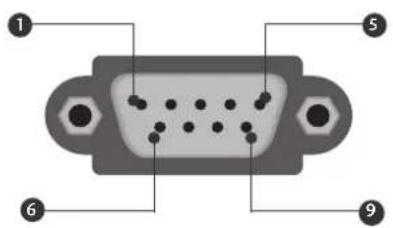
APPENDIX
RS-232C Configurations

line
7-Wire Configurations (Standard RS-232C cable) | Configuration | PC | TV | | :--- | :--- | :--- | | RXD 2 3 TXD | ● | ● | | TXD 3 2 RXD | ● | ● | | GND 5 5 GND | ● | ● | | DTR 4 6 DSR | ● | ● | | DSR 6 4 DTR | ● | ● | | RTS 7 8 CTS | ● | ● | | CTS 8 7 | ● | ● | | D-Sub 9 | D-Sub 9 | D-Sub 9 |
Set ID (Only Plasma TV models)
Use this function to specify a set ID number. Refer to 'Real Data Mapping'1. See page p.112.
1 Press the MENU button and then use ^/√ button to select the OPTION menu.
2 Press the > button and then use ^/√ button to select Set ID.
3 Press the > button and then use < / > button to adjust Set ID to choose the desired TV ID number.
• The adjustment range of SET ID is 1\~99.
4 Press the MENU button to return to normal TV viewing. Press the RETURN button to move to the previous menu screen.
Communication Parameters
■ Baud rate : 9600 bps (UART)
■ Data length : 8 bits
■ Parity : None
■ Stop bit : 1 bit
■ Communication code : ASCII code
■ Use a crossed (reverse) cable.

1

23
Command Reference List
| COMMAND1 | COMMAND2 | DATA (Hexadecimal) | COMMAND1 | COMMAND2 | DATA (Hexadecimal) | ||
| 01. Power | k | a | 00 ~ 01 | 15. Balance | k | t | 00 ~ 64 |
| 02. Aspect Ratio | k | c | Refer to p.110 | 16. Colour Temperature | k | u | 00 ~ 03 |
| 03. Screen Mute | k | d | 00 ~ 01 | 17. Red Adjustment | k | v | 00 ~ 3C |
| 04. Volume Mute | k | e | 00 ~ 01 | 18. Green Adjustment | k | w | 00 ~ 3C |
| 05. Volume Control | k | f | 00 ~ 64 | 19. Blue Adjustment | k | $ | 00 ~ 3C |
| 06. Contrast | k | g | 00 ~ 64 | 20. Abnormal Status | k | z | FF |
| 07. Brightness | k | h | 00 ~ 64 | 21. ISM Method | j | p | Refer to p.112 |
| 08. Colour | k | i | 00 ~ 64 | 22. Power Saving | j | q | 00 ~ 04 |
| 09. Tint | k | j | 00 ~ 64 | 23. Auto Configure | j | u | 01 |
| 10. Sharpness | k | k | 00 ~ 64 | 24. Equalize | j | v | Refer to p.112 |
| 11. OSD Select | k | l | 00 ~ 01 | 25. Tune Command | m | a | Refer to p.113 |
| 12. Remote Control Lock /Key Lock Mode | k | m | 00 ~ 01 | 26. Channel Skip | m | b | 00 ~ 01 |
| 27. Key | m | c | Key Code | ||||
| 13. PIP/DW | k | n | 00 ~ 03 | 28. Input select (Main) | x | b | Refer to p.113 |
| 14. PIP Position | k | q | 00 ~ 03 | 29. Input select(PIP) | x | y | Refer to p.113 |
Transmission / Receiving Protocol
Transmission
[Command1][Command2][ ][Set ID][ ][Data][Cr]
[Command 1]: First command to control the set.(j,k,m or x)
[Command 2]: Second command to control the set.
[Set ID] : You can adjust the set ID to choose desired TV ID number in Setup menu. Adjustment range is 1 \~ 99. When selecting Set ID '0', every connected TV is controlled. Set ID is indicated as decimal (1 \~ 99) on menu and as Hexa decimal (0x0 \~ 0x63) on transmission/receiving protocol.
[DATA] : To transmit command data. Transmit 'FF' data to read status of command.
[Cr] : Carriage Return ASCII code '0x0D'
[ ] : ASCII code 'space (0x20)'
OK Acknowledgement
[Command2][ ][Set ID][ ][OK][Data][x]
The TV transmits ACK (acknowledgement) based on this format when receiving normal data. At this time, if the data is data read mode, it indicates present status data. If the data is data write mode, it returns the data of the PC computer.
Error Acknowledgement
[Command2][ ][Set ID][ ][NG][Data][x]
TV transmits ACK(acknowledgement) based on this format when receiving abnormal data form non-viable functions or communication errors.
[Command 2]: use as command.
[Set ID]: use the small character, if set ID is 10, TV will send the '0', 'a'
[Data]: use the small character, if data is 0xab, TV will send the 'a', 'b'.
[NG]: use the large character.
APPENDIX
01. Power (Command: k a)
To control Power On/Off of the TV.
Transmission [k][a][ ][Set ID][ ][Data][Cr]
Data 00 : Power Off Data 01 : Power On
Acknowledgement [a][ ][ Set ID][ ][ OK/NG][Data][x]
To show Power On/Off.
Transmission [k][a][ ][Set ID][ ][FF][Cr]
Acknowledgement [a][ ][Set ID][ ][OK/NG][Data][x]
* If there is the time delay between command and ack message during power on sequence, It should be described like "Note: In this model, TV will send the Acknowledge after power on processing completion. There might be a time delay between command and acknowledge."
02. Aspect Ratio (Command: k c) (Main picture size)
To adjust the screen format. (Main picture format)
You can adjust the screen format using the Aspect Ratio in the Picture menu.
Transmission [k][c][ ][Set ID][ ][Data][Cr]
Data 01: Normal screen (4:3) Data 06: Original
Data 02: Wide screen (16:9) Data 07: 14:9
Data 04: Zoom1 Data 09: Just Scan
Data 05: Zoom2
Acknowledgement [c][ ][Set ID][ ][OK/NG][Data][x]
* Using the RGB-PC, Component or HDMI input, you select either 16:9 or 4:3 screen aspect ratio.
* In HDMI/Component (over 720p) mode, Just Scan is available.
03. Screen Mute (Command: k d)
To select screen mute on/off.
Transmission [k][d][ ] [Set ID][ ] [Data][Cr]
Data 00 : Screen mute off (Picture on)
Data 01 : Screen mute on (Picture off)
Acknowledgement [d][ ][Set ID][ ][OK/NG][Data][x]
04. Volume Mute (Command: k e)
To control volume mute on/off.
You can also adjust mute using the MUTE button on remote control.
Transmission [k][e][ ][Set ID][ ][Data][Cr]
Data 00 : Volume mute on (Volume off)
Data 01 : Volume mute off (Volume on)
Acknowledgement [e][ ][Set ID][ ][OK/NG][Data][x]
05. Volume Control (Command: k f)
To adjust volume.
You can also adjust volume with the volume buttons on remote control.
Transmission [k][f][ ][Set ID][ ][Data][Cr]
Acknowledgement [f][ ][Set ID][ ][OK/NG][Data][x]
06. Contrast (Command: k g)
To adjust screen contrast.
You can also adjust contrast in the Picture menu.
Transmission [k][g][ ][Set ID][ ][Data][Cr]
Acknowledgement [g][ ][Set ID][ ][OK][Data][x]
07. Brightness (Command: k h)
To adjust screen brightness.
You can also adjust brightness in the Picture menu.
Transmission [k][h][ ][Set ID][ ][Data][Cr]
Acknowledgement [h][ ][Set ID][ ][OK/NG][Data][x]
08. Colour (Command: k i)
To adjust the screen colour.
You can also adjust colour in the Picture menu.
Transmission [k][i][ ][Set ID][ ][Data][Cr]
Acknowledgement [i][ ][Set ID][ ][OK/NG][Data][x]
09. Tint (Command: k j)
To adjust the screen tint.
You can also adjust tint in the Picture menu.
Transmission [k][j][ ][Set ID][ ][Data][Cr]
Data Red: 00 \~ Green: 64
Refer to 'Real data mapping 1'. See page 112.
Acknowledgement [j][ ][Set ID][ ][OK/NG][Data][x]
- Sharpness (Command: k k)
To adjust the screen sharpness.
You can also adjust sharpness in the Picture menu.
Transmission [k][k][ ][Set ID][ ][Data][Cr]
Data Min: 00 \~ Max: 64
Refer to 'Real data mapping 1'. See page 112.
Acknowledgement [k][ ][Set ID][ ][OK/NG][Data][x]
- OSD Select (Command: k I)
To select OSD (On Screen Display) on/off when controlling remotely.
Transmission[k][l][ ] [Set ID][ ] [Data][Cr]
Data 00: OSD off
Data 01: OSD on
Acknowledgement [I][ ][Set ID][ ][OK][Data][x]
- Remote Control Lock/Key Lock Mode (Command: k m)
To lock the remote control and the front panel controls on the set.
Transmission[k][m][ ][Set ID][ ][Data][Cr]
Data 00: Lock off
Data 01: Lock on
Acknowledgement[m][ ][Set ID][ ][ OK/NG][Data][x]
- PIP / DW (Command: k n)
To control the PIP (Picture In picture)/DW.
You can also control the PIP/DW using the PIP button on the remote control or in the PIP/DW menu.
Transmission[k][n][ ][Set ID][ ][Data][Cr]
Data 00:PIP/DW off
Data 01: PIP
Data 02: DW1
Data 03: DW2
Acknowledgement[n][ ][Set ID][ ][OK/NG][Data][x]
- PIP Position (Command: k q)
To select sub picture position for PIP.
You can also adjust the sub picture position using
PIP button on the remote control or in the PIP/DW menu.
Transmission[k][q][ ][Set ID][ ][Data][Cr]
Data 00: Right down on screen
Data 01: Left down on screen
Data 02: Left up on screen
Data 03: Right up on screen
Acknowledgement [q][ ][Set ID][ ][OK/NG][Data][x]
- Balance (Command: k t)
To adjust balance.
You can also adjust balance in the Audio menu.
Transmission [k][t][ ][Set ID][ ][Data][Cr]
Data Min: 00 \~ Max: 64
Refer to 'Real data mapping 1'. See page 112.
Acknowledgement [t][ ][Set ID][ ][OK/NG][Data][x]
- Colour Temperature (Command: k u)
To adjust colour temperature.
You can also adjust Colour Temperature in the Picture menu.
Transmission [k][u][ ][Set ID][ ][Data][Cr]
Data 00: Medium 01: Cool 02: Warm 03: User
Acknowledgement [u][ ][Set ID][ ][OK/NG][Data][x]
- Red Adjustment (Command: k v)
To adjust red in colour temperature.
Transmission [k][v][ ][Set ID][ ][Data][Cr]
Data Min: 00 \~ Max: 3C
Refer to 'Real data mapping 2'. See page 112.
Acknowledgement[v][ ][Set ID][ ][ OK/NG][Data][x]
- Green Adjustment (Command: k w)
To adjust green in colour temperature.
Transmission [k][w][ ][Set ID][ ][Data][Cr]
Data Min: 00 \~ Max: 3C
Refer to 'Real data mapping 2'. See page 112.
Acknowledgement [w][ ][Set ID][ ][OK/NG][Data][x]
- Blue Adjustment (Command: k \$)
To adjust blue in colour temperature.
Transmission [k][\$][ ][Set ID][ ][Data][Cr]
Data Min: 00 \~ Max: 3C
Refer to 'Real data mapping 2'. See page 112.
Acknowledgement[\$][ ][Set ID][ ][ OK/NG][Data][x]
APPENDIX
20. Abnormal State (Command: k z)
To recognize an abnormal state.
Transmission [k][z][ ][Set ID][ ][FF][ ][Cr]
Data FF: Read
Acknowledgement [z][ ][Set ID][ ][OK/NG][Data][x]
Data 00: Normal (Power on and signal exist)
Data 01: No signal (Power on)
Data 02: Turn the TV off by remote control
Data 03: Turn the TV off by sleep time function
Data 04: Turn the TV off by RS-232C function
Data 05: 5V down
Data 06: AC down
Data 07: Turn the TV off by Fan Alarm function (option)
Data 08: Turn the TV off by Off time function
Data 09: Turn the TV off by Auto off function
Data a: Turn the TV off by AV board detection.
* This function is "read only".
21. ISM Method (Command: j p)
To avoid having a fixed image remain on screen.
Transmission [j][p][ ][Set ID][ ][Data][Cr]

| 7 | 6 | 5 | 4 | 3 | 2 | 1 | 0 | Function |
| 0 | 0 | 0 | 1 | Inversion | ||||
| 0 | 0 | 1 | 0 | Orbiter | ||||
| 0 | 1 | 0 | 0 | White wash | ||||
| 1 | 0 | 0 | 0 | Normal | ||||
| x | x | x | x | Reserved |
*More two kinds of function can not be set at a time.
Acknowledgement [p][ ][Set ID][ ][OK/NG][Data][x]
22. Low Power(Power Saving) (Command: j q)
To reduce the power consumption of the TV.
Transmission [j][q][ ][Set ID][ ][Data][ ][Cr]
Data Min: 00 \~ Max: 04
(*transmit by Hexadecimal code)
Acknowledgement [q][ ][Set ID][ ][OK/NG][Data][x]
23. Auto Configure (Command: j u)
To adjust picture position and minimize image shaking automatically. It works only in RGB (PC) mode.
Transmission [j][u][ ][Set ID][ ][Data][Cr]
Data 01: To set
Acknowledgement [u][ ][Set ID][ ][OK/NG][Data][x]
24. Equalize(Command: j v)
▶ To adjust equalize.
Transmission [j][v][ ][Set ID][ ][Data][Cr]

| 7 | 6 | 5 | Frequency | 4 | 3 | 2 | 1 | 0 | Step |
| 0 | 0 | 0 | 1'st Band | 0 | 0 | 0 | 0 | 0 | 0(decimal) |
| 0 | 0 | 1 | 2'nd Band | 0 | 0 | 0 | 0 | 1 | 1(decimal) |
| 0 | 1 | 0 | 3'rd Band | 0 | 0 | 0 | 1 | 0 | 2(decimal) |
| 0 | 1 | 1 | 4'th Band | ... | |||||
| 1 | 0 | 0 | 5'th Band | ||||||
| 1 | 0 | 1 | 6'th Band | ||||||
| 1 | 1 | 0 | 7'th Band | 1 | 1 | 1 | 1 | 0 | 30(decimal) |
| 1 | 1 | 1 | 8'th Band | 1 | 1 | 1 | 1 | 1 | 31(decimal) |
Acknowledgement [v][ ][Set ID][ ][OK/NG][Data][x]
**Real data mapping 1
00 : Step 0
•
A:Step 10
•
F : Step 15
10:Step 16
• • •
64:Step 100
:
6E:Step110
•
73:Step 115
74:Step116
...
C7: Step 199
• • •
FE:Step254
FF:Step255
*Real data mapping 2
00: -30
01: -29
02: -28
[Unreadable]
1E: 0
•
28: +10
•
3A: +28
3B:+29
3C:+30
[Unreadable]
4E: N/A
4F: N/A
50: N/A
25. Tune Command (Command: m a)
Tune Channel to following Physical/major/minor number
Transmission [m][a][ ][Set ID][ ][Data0][ ][Data1]
[ ][Data2][Cr]
Data 0: Min: 00H \~ Max: 63H
(* transmit by Hexadecimal code)
Data 1: Don't care
Data 2: 0 : Main
1:Sub
Acknowledgement [a][ ][Set ID][ ][OK][Data0][Data1][x]
[a][ ][Set ID][ ][NG][Data0][x]
26. Channel Skip(Command: m b)
▶ To set skip status for the current Programme.
Transmission [m][b][ ][Set ID][ ][Data][Cr]
To select input source for TV.
Transmission [x][b][ ][Set ID][ ][Data][Cr]
Data: Structure
MSB
LSB
| 0 | 0 | 0 | 0 | 0 | 0 | 0 | 0 |
| External Input | Input Number | ||||||
| External Input | Data | |||
| 0 | 0 | 0 | 1 | Analog |
| 0 | 0 | 1 | 0 | AV |
| 0 | 1 | 0 | 0 | Component |
| 0 | 1 | 1 | 0 | RGB-PC |
| 1 | 0 | 0 | 1 | HDMI |
| Input Number | Data | |||
| 0 | 0 | 0 | 0 | Input1 |
| 0 | 0 | 0 | 1 | Input2 |
| 0 | 0 | 1 | 0 | Input3 |
| 0 | 0 | 1 | 1 | Input4 |
Acknowledgement [b][ ][Set ID][ ][OK/NG][Data][x]
29. Input select (Command: x y)
To adjust input source for sub picture in PIP mode
Transmission [x][y][ ][Set ID][ ][Data][Cr]
Data: Structure
MSB
LSB
| 0 | 0 | 0 | 0 | 0 | 0 | 0 | 0 |
| External Input | Input Number | ||||||
| External Input | Data | |||
| 0 | 0 | 0 | 1 | Analog |
| 0 | 0 | 1 | 0 | AV |
| Input Number | Data | |||
| 0 | 0 | 0 | 0 | Input1 |
| 0 | 0 | 0 | 1 | Input2 |
| 0 | 0 | 1 | 0 | Input3 |
| 0 | 0 | 1 | 1 | Input4 |
Acknowledgement [y][ ][Set ID][ ][OK/NG][Data][x]
LG Electronics Inc.
- TV LCD | TV PLASMA BUKU PANDUAN
- Model TV LCD
- MENGONTROL SUARA DAN BAHASA
- ! CATATAN
- 42/47/52LG7\*\*, 32/42LG8\*\*\*
- PENDAHULUAN
- PASANG HATI-HATI AGAR TV TIDAK TERJATUH
- Manual Config. (hanya mode RGB [PC]) Pengaturan Phase, Clock, Position pada layar
- Initializing
- MENONTON TV / KONTROL PROGRAM
- FUNGSI TOMBOL REMOTE KONTROL
- PEMROGRAMAN MANUAL
- MENYEMPURNAKAN PENERIMAAN
- MEMBERI NAMA PADA STASIUN TV
- BOOSTER
- PERUBAHAN PROGRAM
- PROGRAM FAVORIT
- MELIHAT TABEL PROGRAM
- - Zoom1
- - Zoom2
- - Just Scan
- Mengatur Warna Otomatis (Warm/Medium/Cool)
- MENGONTROL GAMBAR
- MENGATUR GAMBAR MANUAL
- Mode Picture - User Option
- Pengaturan Warna - User Option
- XD - TEKNOLOGI PERBAIKAN GAMBAR
- LANJUTAN (ADVANCE) - GAMMA
- LANJUTAN (ADVANCE) - MODE FILM/REAL CINEMA
- EYE CARE (HANYA MODEL TV LCD)
- LANJUTAN (ADVANCE) - TRUMOTION
- DEMO TRUMOTION (hanya 42/47/52LG7\*\*\* )
- METODE ISM (IMAGE STICKING MINIMIZATION) (HANYA MODEL TV PLASMA)
- DAYA RENDAH MODE PICTURE
- (HANYA MODEL TV PLASMA)
- PENGATURAN SUARA - MODE SOUND
- BALANCE (KESEIMBANGAN)
- PENGATURAN ON/OFF SPEAKER TV
- PEMILIHAN AUDIO OUT
- Penerimaan Stereo/Dual
- KONTROL EKSTERNAL RS-232C
- Posisi PIP (Perintah : k q)
- 1166.. Suhu Warna (Perintah : k u)
- Pengaturan Warna Hijau (Perintah : k w)
- Pengaturan Warna Biru (Perintah : k \$)
- LAMPIRAN
- Kondisi Abnormal (Perintah : k z)
- LCD TV | PLASMA TV OWNER'S MANUAL
- ACCESSORIES
- PLASMA TV models
- Use of ferrite core
- LCD TV models
- CONTENTS
- PREPARATION
- EXTERNAL EQUIPMENT SETUP
- WATCHING TV / PROGRAMME CONTROL
- TO USE THE USB DEVICE
- PICTURE CONTROL
- SOUND & LANGUAGE CONTROL
- TIME SETTING
- TELETEXT
- APPENDIX
- FRONT PANEL CONTROLS
- Swivel Stand
- BACK PANEL INFORMATION
- ATTACHING THE TV TO A DESK (Only 32LG8\*\*)
- ! WARNING
- STAND INSTALLATION
- only 42PG6\*\*\*
- Not Using the Desk-type Stand
- only 32/37/42LG6\*\*\*
- BACK COVER FOR WIRE ARRANGEMENT
- 42PG6\*\*\*
- How to remove the cable management clip
- NOTE
- 50PG3\*\*\*
- 32/37/42/47LG6\*\*
- Align the hole with the tab on the CABLE MANAGEMENT CLIP.
- Connect the cables as necessary.
- Connect the cables as necessary.
- Open the CABLE MANAGEMENT CLIP as shown and manage the cables.
- Fit the CABLE MANAGEMENT CLIP as shown.
- PLEASE SET IT UP CAREFULLY SO THE PRODUCT DOES NOT FALL OVER.
- EARTHING
- DESKTOP PEDESTAL INSTALLATION
- WALL MOUNT: HORIZONTAL INSTALLATION
- ANTENNA CONNECTION
- HD RECEIVER SETUP
- Connecting with a component cable
- Connecting a set-top box with an HDMI cable
- Connecting with a HDMI to DVI cable
- DVD SETUP
- Component Input ports
- Connecting with a S-Video cable
- Connecting with a HDMI cable
- VCR SETUP
- Connecting with a RCA cable
- OTHER A/V SOURCE SETUP
- EXTERNAL STEREO SETUP
- AV OUTPUT SETUP
- PC SETUP
- Connecting with a D-sub 15 pin cable
- Supported Display Resolution
- Screen Setup for PC mode
- Auto Configure (RGB [PC] mode only)
- Auto configure
- Manual Config. (RGB [PC] mode only)
- - Adjustment for screen Phase, Clock, Position
- Selecting XGA mode (except 42PG6\*\*\*)
- (Reset to original factory settings)
- REMOTE CONTROL KEY FUNCTIONS
- TURNING ON THE TV
- Installation Guide
- Note:
- PROGRAMME SELECTION
- VOLUME ADJUSTMENT
- QUICK MENU
- ON SCREEN MENUS SELECTION AND ADJUSTMENT
- AUTO PROGRAMME TUNING
- MANUAL PROGRAMME TUNING
- FINE TUNING
- ASSIGNING A STATION NAME
- PROGRAMME EDIT
- ■Deleting a programme
- ■ Copying a programme
- ■ Moving a programme
- ■ Skipping a programme number
- FAVOURITE PROGRAMME
- SELECTING THE PROGRAMME LIST
- SIMPLINK
- SIMPLINK Functions
- SIMPLINK Menu
- KEY LOCK
- AV MODE
- When connecting the USB device
- Precautions when using the USB device
- PHOTO LIST
- Screen Components
- Set up the menu in Full-Sized Screen
- \* Viewing the Slide show
- MUSIC LIST
- MOVIE LIST
- DivX Audio Language & Subtitle Language
- DIVX REGISTRATION CODE
- WATCHING PIP(PICTURE-IN-PICTURE)
- Watching PIP/Double Window
- Programme Selection for Sub Picture
- Input Source Selection for Sub Picture
- Sub Picture Size Adjustment (PIP mode only)
- Moving the Sub Picture (PIP mode only)
- PICTURE SIZE (ASPECT RATIO)CONTROL
- You can adjust Aspect Ratio in the Picture menu.
- PRESET PICTURE SETTINGS
- Picture Mode-Preset
- Auto Colour Tone Control(Cool/Medium/Warm)
- MANUAL PICTURE ADJUSTMENT
- Picture Mode-User Option
- Colour Tone - User Option
- XD - PICTURE IMPROVEMENT TECHNOLOGY
- \* Manual Selection
- ADVANCED - GAMMA
- ADVANCED - FILM MODE/REAL CINEMA
- EYE CARE (ONLY LCD TV MODELS)
- PICTURE RESET
- TRUMOTION DEMO (42/47/52LG7\*\*\* only)
- POWER INDICATOR (ONLY LCD TV MODELS)
- IMAGE STICKING MINIMIZATION(ISM)METHOD (ONLY PLASMA TV MODELS)
- White Wash
- Orbiter
- Inversion
- POWER SAVING PICTURE MODE (ONLY PLASMA TV MODELS)
- FACTORY RESET
- AUTO VOLUME LEVELER
- SOUND SETTING ADJUSTMENT -USER MODE
- BALANCE
- TV SPEAKERS ON/OFF SETUP
- SELECTING AUDIO OUT
- Stereo/Dual Reception
- NICAM Reception
- Speaker Sound Output Selection
- ON-SCREEN MENU LANGUAGE SELECTION
- CLOCK SETUP
- AUTO ON/OFF TIMER SETTING
- SLEEP TIMER SETTING
- AUTO SHUT-OFF SETTING
- SWITCH ON/OFF
- SIMPLE TEXT
- Page selection
- TOP TEXT
- ■ Block / group / page selection
- ■ Direct page selection
- FASTEXT
- SPECIAL TELETEXT FUNCTIONS
- TIME
- \$IZE
- UPDATE
- REVEAL
- INDEX
- HOLD
- TROUBLESHOOTING
- MAINTENANCE
- Cleaning the Screen
- Cleaning the Cabinet
- Extended Absence
- CAUTION
- PROGRAMMING THE REMOTE CONTROL
- Programming a code into a remote mode
- Programming code
- IR CODES
- How to Connect
- Remote Control IR Codes
- ■ Output waveform
- ■ Configuration of frame
- Lead code
- - Repeat code
- Bit description
- ■ Frame interval: Tf
- EXTERNAL CONTROL THROUGH RS-232C
- (ONLY PLASMA TV MODELS)
- Type of Connector; D-Sub 9-Pin Male
- No. Pin Name
- Set ID (Only Plasma TV models)
- Communication Parameters
- Transmission / Receiving Protocol
- Transmission
- OK Acknowledgement
- Error Acknowledgement
- Power (Command: k a)
- Aspect Ratio (Command: k c) (Main picture size)
- Screen Mute (Command: k d)
- Volume Mute (Command: k e)
- Volume Control (Command: k f)
- Contrast (Command: k g)
- Brightness (Command: k h)
- Colour (Command: k i)
- Tint (Command: k j)
- Abnormal State (Command: k z)
- ISM Method (Command: j p)
- Low Power(Power Saving) (Command: j q)
- Auto Configure (Command: j u)
- Equalize(Command: j v)
- Tune Command (Command: m a)
- Channel Skip(Command: m b)
- Input select (Command: x y)
- LG Electronics Inc.
Brand : LG
Model : 47LG60FR
Category : Television