
Game Broadcaster HD - Capture card AVERMEDIA - Free user manual and instructions
Find the device manual for free Game Broadcaster HD AVERMEDIA in PDF.


| Product Type | Capture Card |
| Brand | AVerMedia |
| Model | Game Broadcaster HD |
| Connectivity | HDMI Input and Output, USB 3.0 (Type-A) |
| Maximum Resolution | 1080p at 60 fps (Full HD) |
| Dimensions | 120 mm x 70 mm x 20 mm |
| Weight | 100 g |
| Power Supply | Bus-powered via USB (5V, 0.9A) |
| Audio | HDMI audio passthrough, stereo |
| Software Support | AVerMedia RECentral, OBS Studio, XSplit, Streamlabs |
| Compatibility | Windows 7/8/10/11, macOS 10.10+ |
| Main Functions | Live streaming, recording, passthrough, HDMI loop-out |
| Maintenance | Keep in dry environment; clean with soft cloth; avoid dust |
| Safety | Do not expose to liquids; avoid static discharge; use only provided cable |
| Spare Parts & Repairability | Not user-serviceable; contact AVerMedia support for repairs |
| Included Accessories | USB cable, Quick Start Guide, LED indicator |
Frequently Asked Questions - Game Broadcaster HD AVERMEDIA
User questions about Game Broadcaster HD AVERMEDIA
0 question about this device. Answer the ones you know or ask your own.
Ask a new question about this device
Download the instructions for your Capture card in PDF format for free! Find your manual Game Broadcaster HD - AVERMEDIA and take your electronic device back in hand. On this page are published all the documents necessary for the use of your device. Game Broadcaster HD by AVERMEDIA.
USER MANUAL Game Broadcaster HD AVERMEDIA
All the screen shots in this documentation are only example images. The images may vary depending on the product and software version. Information presented in this documentation has been carefully checked for reliability; however, no responsibility is assumed for inaccuracies. The information contained in this documentation is subject to change without notice.
Copyright
©2011 by AVerMedia Technologies, Inc. All rights reserved.
No part of this document may be reproduced or transmitted in any form, or by any means without the prior written permission of AVerMedia Technologies Inc. AVerMedia Technologies Inc. reserves the right to modify its models, including their characteristics, specifications, accessories and any other information stated herein without notice. The official printout of any information shall prevail should there be any discrepancy between the information contained herein and the information contained in that printout.
"AVerMedia" is a trademark (or registered trademark) of AVerMedia Technologies, Inc. Apple, the Apple logo, iPod, iPhone, and Apple TV are trademarks of Apple Inc., registered in the U.S. and other countries. iPad is a trademark of Apple Inc. Other trademarks used herein for description purpose only belong to each of their companies.
International Headquarters
Address No.135, Jian 1st Rd., Zhonghe Dist., New Taipei City 23585, Taiwan (R.O.C.)
Website www.avermedia.com
Telephone 886-2-2226-3630
MCS-1.7.9
201112
Table of Contents
Chapter 1 Introduction....5
1.1Device Introduction ......6
1.2System Requirements ....7
1.3Activating AVer MediaCenter 3D....7
1.4Overview of AVer MediaCenter 3D....8
AVer MediaCenter 3D Console....8
Control Buttons On Title Bar 9
Control Buttons On Playback Window Control Panel 9
Navigation Tree.... 10
1.5Running AVer MediaCenter 3D for the First Time....11
Chapter 2 Getting Started ....13
2.1 Capture 14
Capture in Live 15
Operations of TimeShift.... 16
Operations of Recorded Files.... 17
Using Schedule Recording.... 18
2.2Capture in 3D ....20
Recording a 3D Content....20
Playing a Recorded 3D Content....22
2.3.Video 24
Playing Video Files 24
2.4 Music 25
Adding Music to your Playlist 25
Playing Music 26
2.5Pictures ......27
Viewing the Captured Images 27
Playing Slide Show 27
Chapter 3 Advanced Operations ...... 28
3.1 General Settings ......29
Configure Recording.... 29
Configure Snapshot.... 30
More Options 31
3.2Capture Settings 32
Configure Input Source 32
Video Standards 33
Closed Caption.... 33
3.3Video Settings....34
Picture-in-Picture(PIP) / Picture-by-Picture(PBP) Display 34
3.4Pictures Settings....35
3.5 About ....36
Appendix 37
Hot Keys 38
Glossary 39
Chapter 1 Introduction
Thanks for purchasing Game Broadcaster HD. This high quality capture card is especially designed for professional players with high standards towards image/video quality.
Game Broadcaster HD also comes with a powerful application AVer MediaCenter 3D, allowing you to capture high resolution images, record HD video clips, create your own slideshows with both the captured and images of other sources, and even create your own music library for both audio and video luxury.
Each function of AVer MediaCenter 3D goes further with detailed options for a more professional taste. There is no more need to compromise yourself with all fixed default settings using a capture card.
This Chapter will guide you through the essential information of AVer MediaCenter 3D. Please read this chapter before using AVer MediaCenter 3D.
Device Introduction ......6
System Requirement....7
Activating AVer MediaCenter ....7
Overview of AVer MediaCenter....8
Running AVer MediaCenter for the First Time 11
1.1 Device Introduction
What is video capture card and what can it do?
Video capture cards are a class of video capture devices designed to plug directly into expansion slots in personal computers and servers.
A video capture card product typically includes a driver to get the device going and a bundled software to bring out the best features of it. The bundled software usually further processes the video for specific purposes. The functions of the video capture cards vary from one another. Some are used to capture base band analog composite video, S-Video, some are equipped with tuners, RF-modulated video, some others are specialized cards that support digital video via digital video delivery standards including Serial Digital Interface (SDI) and some, with the emerging hi-tech HDMI standard becoming more popular, support both standard definition (SD) and high definition (HD) variants, and this Game Broadcaster HD you just purchased belongs to the last model.
| Product Name | Game Broadcaster HD |
| Model No. | C127 |
| Supported Signal Sources | Input Signal: VGA (D-sub); HDMI |
1.2 System Requirements
System requirements are described in details below. Before using AVer MediaCenter 3D, please verify that your PC meets the requirements below.
| SD VideoCapturing(MPEG-2Format) | HD VideoReal-timeCapturing(MPEG-2Format) | HD Video Real-timeCapturing (H.264 Format) | 3D Content Capturing | |
| CPU | Intel® CoreTM 2Duo ProcessorE4300 1.8GHzAMD AthlonTM64x2 Dual Core2.0GHz | Intel® CoreTM 2Duo 2.4GHzAMD AthlonTM 64x2Dual Core 2.8 GHz | Intel® CoreTM 2 i5 750 or AMD equivalent | Intel® CoreTM 2 Duo or AMDAthlonTM X2 or above |
| VGA Card | VGA card with support for DirectX 9.0or above. | VGA card* with 512M memory supports DirectX 9.0 or above. For HD Input Source, standalone graphics card is recommended for HD video capturing. | ||
| RAM | 512MB RAM or above | 1G RAM or above | 1 GB or above | |
| OS | Windows® XP SP2 / Windows® VistaTM / Windows® 7 | Windows® VistaTM or Windows 732/64 bit | ||
| *Anaglyph, polarized, and shutter display modes are all supported. To watch 3DTV or videos without any hardware upgrade, choose anaglyph display mode. To get the best 3D effect, we strongly recommend to use NVIDIA® 3D VisionTM Kit, 3D-supported graphics card (NVIDIA® GeForce® GT 240 recommended or above) and 3D-ready display. | ||||
1.3 Activating AVer MediaCenter 3D
To launch AVer MediaCenter 3D, double-click shortcut

on desktop, or go to Start ->
Programs -> AVerMedia. If AVer MediaCenter 3D is launched, double-click AVer Quick “ ” icon on the lower right of the system tray.
1.4 Overview of AVer MediaCenter 3D
The functions of AVer MediaCenter 3D are categorized into five buttons on the main menu, including "Capture", "Video", "Music", "Pictures" and "Settings". This section briefly introduces main menu, sub menus and initial setups. For more information on advanced operations, please refer to contents from Chapter 2.

AVer MediaCenter 3D Console

Description
① Title bar: Control over AVerMedia Console
② Main function menu: Capture, Video, Music, Images, Settings
③ Playback window: Display of the selected source/ file
4 Playback window control panel: Control over the Playback window
⑤ System time display: indication of current time

Control Buttons On Title Bar

Click To ...

Go back to the main menu

Go back to a previous level

Bring out the user's manual

Minimize AVerMedia Console to system tray

Restore AVerMedia Console to previous size

Exit AVerMedia Console

Control Buttons On Playback Window Control Panel

Click To ...


Switch from real-time video to TimeShift mode. / Pause the playback temporarily.

Stop playback, recording, TimeShift, etc.

Play the selected file.

Record the current program.

Play the previous/next file on the playlist.


Move backward or skip forward in intervals.

Capture a single image or a sequence of images.

Enable the PIP function.

Switch to different aspect ratios.

Mute/ Unmute the audio volume.

Increase or decrease the audio Volume.

This is an overview of the operations under each main function. For specific operation of each function, please refer to the table of contents and go to its according page.
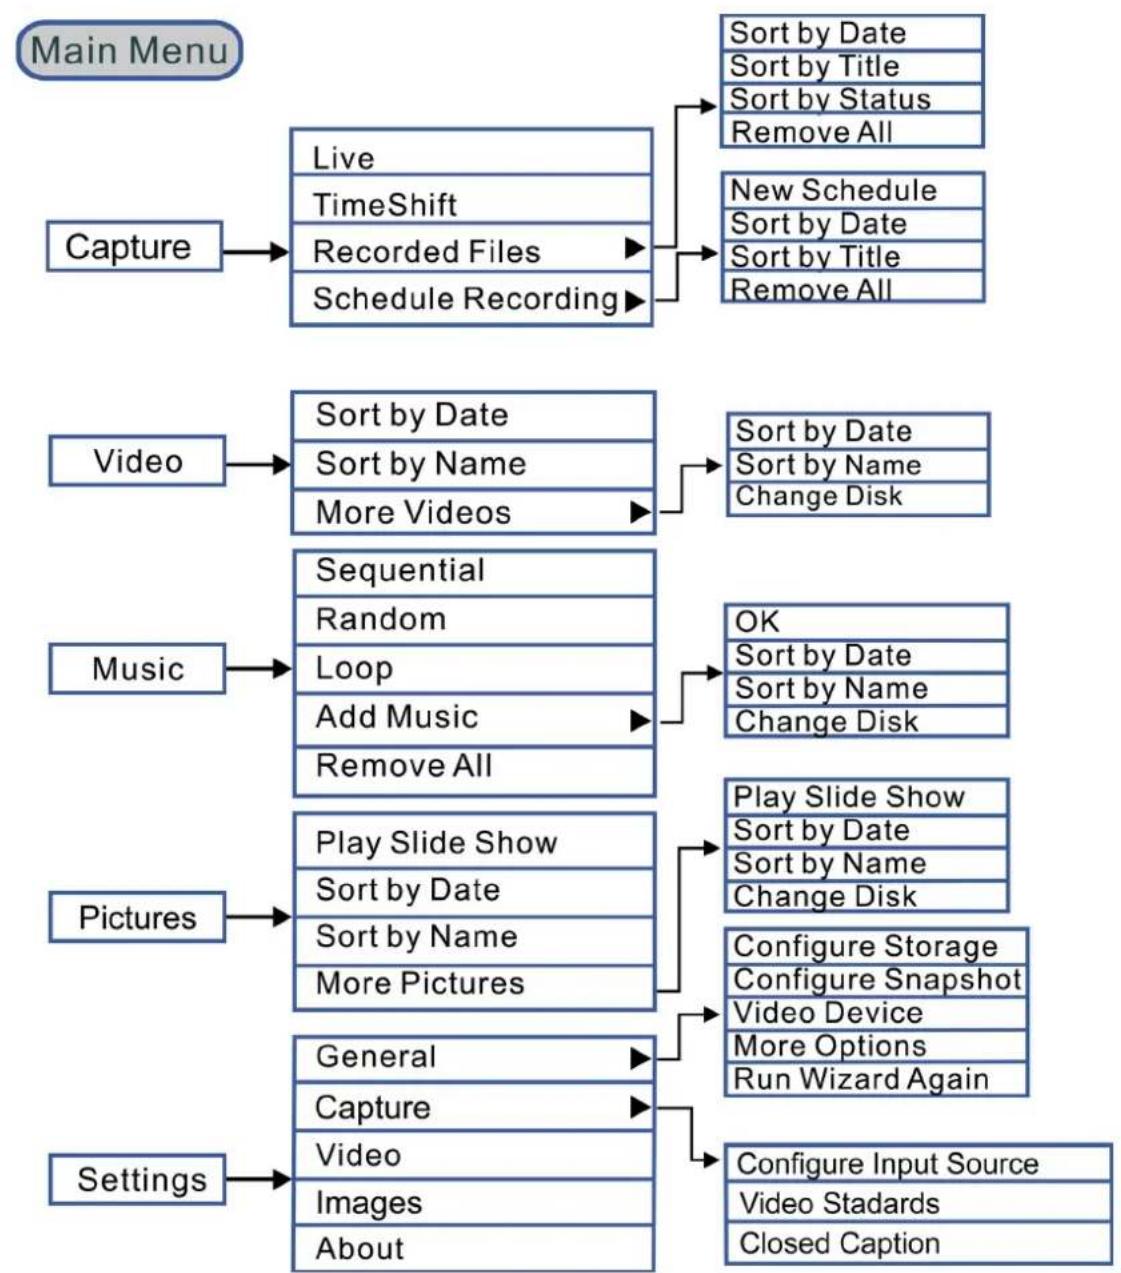
flowchart
graph TD
    A["Main Menu"] --> B["Capture"]
    B --> C["Live"]
    B --> D["TimeShift"]
    B --> E["Recorded Files"]
    B --> F["Schedule Recording"]
    C --> G["Sort by Date"]
    C --> H["Sort by Title"]
    C --> I["Sort by Status"]
    C --> J["Remove All"]
    D --> K["New Schedule"]
    D --> L["Sort by Date"]
    D --> M["Sort by Title"]
    D --> N["Remove All"]
    E --> O["Video"]
    O --> P["Sort by Date"]
    O --> Q["Sort by Name"]
    O --> R["More Videos"]
    P --> S["Sort by Date"]
    P --> T["Sort by Name"]
    P --> U["Change Disk"]
    V["Music"] --> W["Sequential"]
    V --> X["Random"]
    V --> Y["Loop"]
    V --> Z["Add Music"]
    V --> AA["Remove All"]
    W --> AB["OK"]
    W --> AC["Sort by Date"]
    W --> AD["Sort by Name"]
    W --> AE["Change Disk"]
    V --> AF["Pictures"]
    AF --> AG["Play Slide Show"]
    AF --> AH["Sort by Date"]
    AF --> AI["Sort by Name"]
    AF --> AJ["More Pictures"]
    AG --> AK["Play Slide Show"]
    AG --> AL["Sort by Date"]
    AG --> AM["Sort by Name"]
    AG --> AN["Change Disk"]
    AH --> AO["Configure Storage"]
    AH --> AP["Configure Snapshot"]
    AH --> AQ["Video Device"]
    AH --> AR["More Options"]
    AH --> AS["Run Wizard Again"]
    AF --> AT["Settings"]
    AT --> AU["General"]
    AT --> AV["Capture"]
    AT --> AW["Video"]
    AT --> AX["Images"]
    AT --> AY["About"]
    AU --> AZ["Configure Input Source"]
    AU --> BA["Video Stadards"]
    AU --> BB["Closed Caption"]
1.5 Running AVer MediaCenter 3D for the First Time
When you run the AVer MediaCenter 3D for the first time, the Setup Wizard will automatically pop up and take you through all the necessary steps for a complete setup.
- When Setup Wizard dialog box appears, click Yes.

- Select C127 AVerMedia PCIe Capture Device under Primary device drop-down menu and click Next to continue.
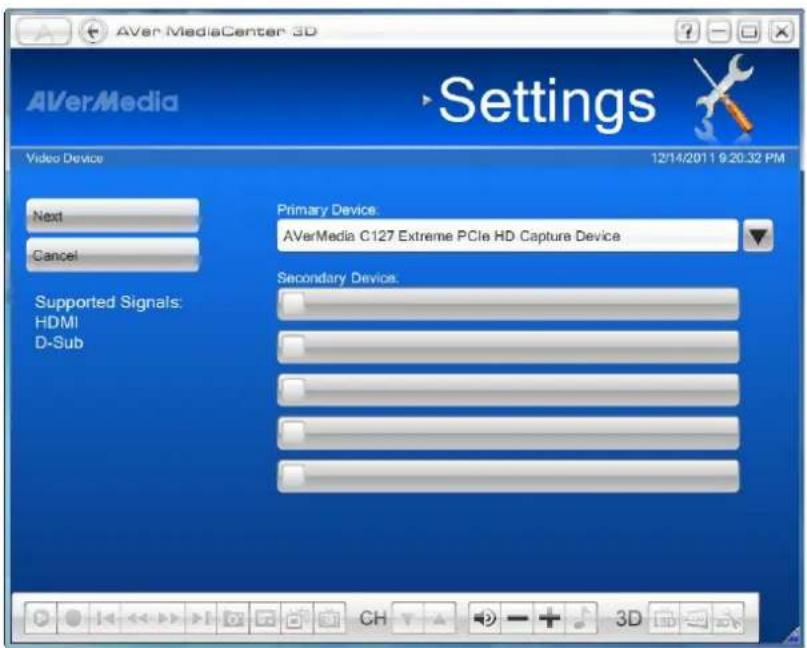
- Select from the dropdown menu of Country according to the place you use this device, and click Save.

- The wizard will guide you through to complete the setups for the available signals. Click Next to continue or click Skip to ignore the setups.
- Click Finish to complete the initial settings or click Next to set up other devices if any.
Note: To re-configure all the settings, go to
"Settings"→ "General"→
"Run Wizard Again."

Chapter 2 Getting Started
This Chapter includes descriptions of the five main functions on AVer MediaCenter 3D main menu. Each basic operation is followed by more detailed information on sub menu under each function.
Before using the AVer MediaCenter 3D, it is highly recommended to read through the contents of this chapter.
Capture....14
Capture in 3D ....20
Video....23
Music .... 24
Pictures .....26
2.1 Capture
You can capture a high quality still image, a sequence of continuous images, or record a video clip when watching videos either from live or previously recorded sources or playing games in AVer MediaCenter 3D.

Basic Operations
- Select a video source from the left menu and then the desired input signal source from the dropdown menu on the upper right.
- Click to capture a still image or to record a clip of video during the video playback. The captured/ recorded files are saved under Recorded Files.
Note
To set up for audio input capture, please go to Settings -> Capture -> Configure Input Source -> Configure Audio Source, find the desired audio input source and click Save. The option Default shown in the drop-down list represents your system sound card.
Live video refers to any available current video source ready for playback. This can refer to any supported signal coming from the connected device, such as a DVD player or a video gaming device.
Note : Video source setup is supposed to be completed when running AVer MediaCenter 3D for the first time. If not, please go to Settings -> General for reconfiguration.

-
Select an input source from the dropdown menu on top of the main playback window.
-
Click ▶ on the control panel to start TimeShift function.
-
Click ☐ to get a still image or ☐ to start recording a clip of video. Click ☐ again to stop the recording. The captured images/ video clips are saved in Recorded Files.
Note
-
To find the captured/ recorded files, click Recorded File button on the left.
-
To change the storage location of the captured/ recorded files, go to Settings -> General -> Configure Storage.
The TimeShift function performs background recording of a video playback, and allows you return to any part of the recorded program. At the same time, the live program continues to be recorded and played back so you won't miss any part of the show. You can also advance forward to skip commercials or rewind to replay scenes again.

natural_image
Landscape photo of a wooden cabin surrounded by green grass and trees under a blue sky (no visible text or symbols)- Select an input source from the dropdown list on the right. When the playback starts, click TimeShift on the left menu.
- Click ☑ on the control panel. Both the background recording time and the current-show time are shown on the upper-right of the main playback window.
- Click to move backward in fixed intervals until reaching the part where you left off.
- Click ▶ to move forward in fixed intervals to the desired part.
Note
The application will create a temporarily recorded file when the TimeShift function is on for an ongoing video. This file will be removed when you select ☐.
All the recorded files are listed with recording time and date. Reorganize the files with the menu on the left.
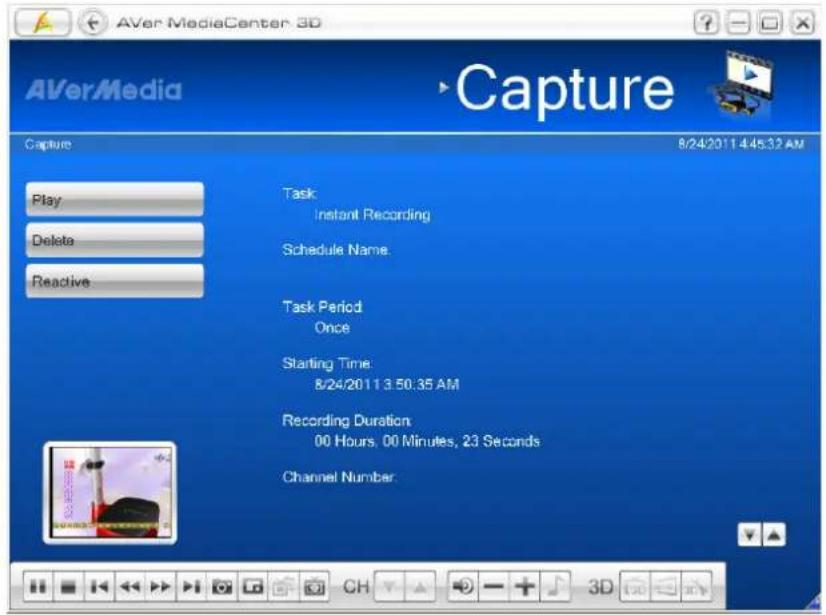
- Go to Capture -> Recorded Files.
- Reorganize the recorded files by checking the options provided on the left menu.
- Select the desired file from the list and then click .Play on the control panel to start playback.
The TimeShift function performs background recording of a program, and lets you return to any part of the recorded program.
- Go to Capture -> Schedule Recording.
- Click New Schedule to go to detail setting window.

- Edit a name for the schedule, and select the desired option from the dropdown menu under Task and After Recording Mode.
Click Save on the left menu to save your settings and click ▼ to bring up the next edit window.

- Select the desired signal Source under Source.
-
Check the desired recurrent frequency and enter the date of the program for the schedule. Click Save on the left menu to save your settings and click ▼ to bring up the next edit window.
-
Enter the airing time of the program to be recorded.
- Select the file format for the program to be recorded.
- Enter the duration of the program to be recorded.


-
Check Split file Size if the file size of the program to be recorded is estimated to be over the capacity of one DVD. This is useful if you want to burn the file onto DVD disks.
-
Click to change the default destination folder for recorded files.

2.2 Capture in 3D
Recording a 3D Content
To record a 3D content
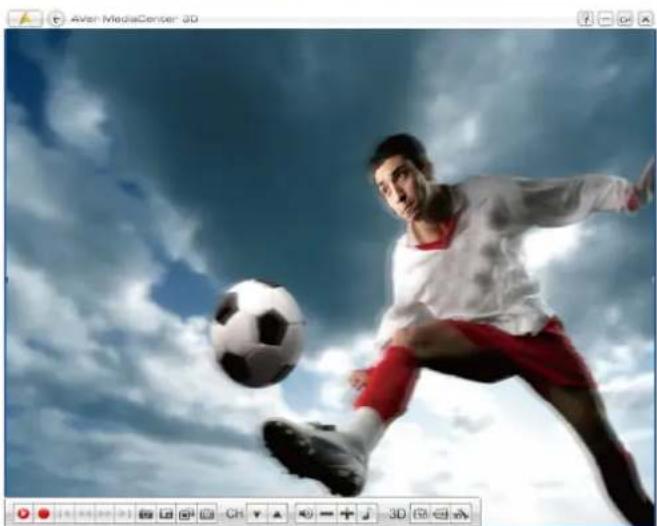
- If the screen hasn't gone into 3D watching full screen mode, click on the control bar at the lower right of the screen and select Record to start.

natural_image
Action photo of a soccer player kicking a ball against a cloudy sky (no text or symbols visible)- To end 3D recording, double click on the screen, press Esc key on your keyboard.
Note:
-
The screen goes into full screen mode after you start recording.
-
Please DO NOT exit full screen mode during 3D video recording or the recording will be stopped.
- Any system messages will end 3D video recording or 3DTV viewing.

Playing a Recorded 3D Content
- Select Capture → Recorded Files.
- All the recorded files are listed here.
- You can view those file by date, title or status.
- Select the desired file.
- If you want to delete all recorded files, click Remove All → Yes.

OR,
- Select Video.
- You may see some recorded video files are listed on the right hand section of the screen. Or you can select More Videos to choose other folders.
- Select the file you want.

- Click 3D on the control bar at the lower right of the screen and the 3D Setting dialogue box appears.

- Select 3D Red/Cyan, Micro-polarized 3D, or NVIDIA® 3D Vision™ from the Display Mode drop-down menu according to your 3D watching equipments and click OK to confirm and go back to AVer MediaCenter 3D main TV screen.

- Click on the control bar at the lower right of the screen to start. Now you can put on the 3D glasses and enjoy the vivid 3D program.
natural_image
Action photo of a soccer player kicking a ball against a cloudy sky (no text or symbols visible)- To end 3D watching, double click on the screen, press Esc key on your keyboard, or use the Back key on the remote control.
2.3 Video
You can watch video files besides the recorded files in Video.
Playing Video Files
- Go to "Video".
- The video files recorded by AVer MediaCenter 3D are listed on the right. Double click to start playing the selected file. Use the main playback window control panel to control the playback.

- To find more videos, click Change Disk on the left menu, all available disks on your PC are shown in thumbnail icons on the right.
- Click on the icon to locate where other video files are.

2.4 Music
You can add, delete, and reorganize your music files and create your own library for enjoyment in Music.
Adding Music to your Playlist
- Go to "Music" → "Add Music" and then the desired folder of music files.
- Select the tracks you wish to add to the playlist.
-
Select OK to go back to the previous level.
-
The selected files are added to the blanks on the right of the window.
- Click / to reorder the playback sequence.
- Click to remove one track or select Remove All to delete all tracks in the playlist.


To play music:
- Go to "Music".
- Check Sequential to play tracks in order or Random for shuffle playback.
- Check Loop for repeat playback.

- Click to start playing music.
- Click on the following buttons to control your playback.

Advance the playback.

Rewind the playback.

Play the next track.

Play the previous track

Freeze the playback.

End the playback

2.5 Pictures
Images allows you not only to view captured images/ pictures but create and playback a slide show.
Viewing the Captured Images
- Go to "Pictures".
- The captured images are displayed in matrix on the right of the window.
- Click on the thumbnails to view the images in full screen.
- Click More Pictures to locate the folder of the desired pictures and add them to the Images.

Note: You can view thumbnails and enjoy live music at the same time
Playing Slide Show
- Go to "Pictures".
- Click Play Slide Show to start a slide show.
- To stop the slide show and go back to the previous page, click on Title Bar.

natural_image
Landscape photo of a rustic wooden house surrounded by greenery and trees under a blue sky (no visible text or symbols)Chapter 3
Advanced Operations
Beyond basic usage, what else you can do with AVer MediaCenter 3D in this chapter; we take you to the next level and explain the advanced features of this application.
General Settings 28
Capture Settings....31
Video Settings....33
Images Settings 34
About....35
3.1 General Settings
In General Settings, you can change the destination folder for recorded files, edit recording time and file size, assign the number of image you want to capture, and reset the Windows power options, etc.
Configure Recording
- Go to "Settings" → "General" → "Configure Storage".
- Click to locate a preferable folder for recorded files as desired.
- Click to go back to the previous level or Click Change Disk on the left menu to relocate from hard drives.
- Click OK to confirm the selection.
- Enter the desired length of recording time, or the recording continues until the hard drive of recording storage folder reaches its maximum capacity.
- AVer MediaCenter 3D allows you to divide the recorded files in segments for burning onto CD (650 MB) and DVD (4096 MB). Check Split File Size and select the appropriate video file size from the drop-down menu so that CD/ DVD burning doesn't fail due to over-sized files. Or you can click Customize to assign the file size you want.
- Click Save to save the settings or click Cancel to abort without saving. To change back to factory default settings, click Default.


Configure Snapshot
- Go to "Settings" → "General" → "Configure Snapshot".
- Click to locate a preferable folder for captured images.
- Enter the desired number of images to be captured, the interval between each image taken, and the format of the captured image to be saved.


More Options
- Go to "Settings" → "General" → "More Options".
- Select the language for the application.
- Click Save to confirm the selection.

3.2 Capture Settings
Configure Input Source
HD signal sources usually refer to any video system of higher resolution than standard-definition (SD) video, and most commonly indicates resolutions of 1,280×720 pixels (720p) or 1,920×1,080 pixels (1080i/1080p). HD signals sources usually come from digital TV systems, set-top boxes, the optical disc delivery system such as upconvert DVD players, HD DVD players, and Blu-ray Disc players, the video tape format D-VHS or latest video game stations, connected by component connectors or HDMI cables.
- Go to "Settings" → "Capture" → "Configure Input Source".
- Select Configure Recording.
- Select the desired format for the recorded file from the dropdown menu.

- Click Edit to bring out an Edit page.
- Click ▼ to select an option from the dropdown menu, and use + / to adjust the values for HD recording sizes, rate and audio quality.


Video Standards
In Video Standards, you can change the settings that were made when you first ran the AVerMedia Center. Click to select from the dropdown menu and then Save to confirm your changes.
-
Go to "Settings" → "Capture" → "Video Standards".
-
Click to select the desired options from the dropdown menu for from
Country/Region to HD Input Source.


Closed Caption
The "closed" in Closed Caption means that only those who choose to decode or activate this function can see the captions of the audio script on the programs, and sometimes non-audio descriptions or information of the programs are included as well. This function is initially designed for the hard of hearing, and then extended its service for people whose first language is not the spoken language, for most of the time it refers to English.
-
Go to "Settings" → "Capture" → "Closed Caption".
-
Click to select the desired closed captioning channels from the dropdown menu.

3.3 Video Settings
Picture-in-Picture(PIP) / Picture-by-Picture(PBP) Display
With the PIP/PBP feature, you are able to playback recorded video files, and at the same time, watch video.
-
Go to "Video" → "More Videos".
-
Select the desired file, or select to locate the desired video files.

- When playing the video file, click

on the control panel to enable the PIP function.
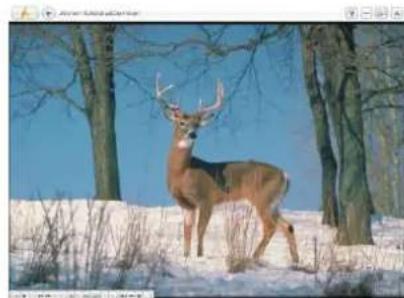
natural_image
A white deer standing in a snowy forest with bare trees and clear blue sky (no text or symbols visible)(Full Screen
Mode)
- Click to switch between Full
screen mode, PIP mode and PBP mode (as shown on the right).
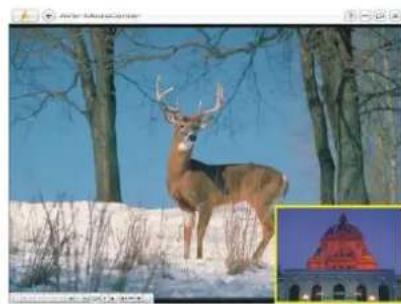
natural_image
Winter scene with a white deer standing in snow, bare trees, and a red dome structure in the background (no visible text or symbols)(PIP Mode)
-
By default, the selected recorded video is displayed on the main screen, and the live video source is on the PIP/PBP screen.
-
To switch and listen to the sound of either video, click on the arrow buttons to switch between the PIP/PBP screens.

natural_image
Two side-by-side photos: one of a deer in winter snow, the other of a historic temple with red roof (no visible text or symbols)(PBP Mode)
- In PIP mode, to change the size of the PIP screen, click 📋 to shrink the image or click 📋 to enlarge the image.
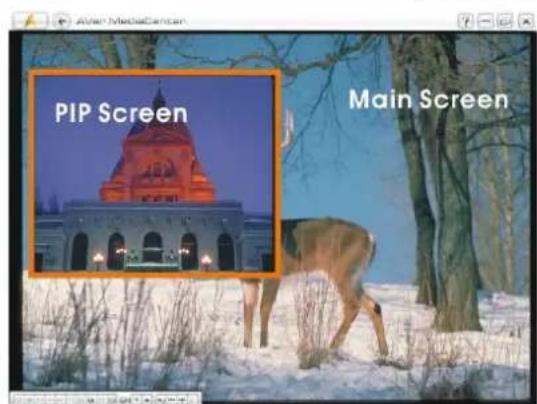
- To exit the PIP-sizing mode, click

3.4 Pictures Settings
In Images settings, you can set up the playback details for the captured images, or even add in other images of your previous collection to edit your own slide show.
- Go to "Settings" → "Pictures".
- From Play Settings dropdown menu, select Sequential to play a slide show in order or Random for shuffle playback.
- Enter a number under Interval Time for each image to be shown.
-
Select the transition effect between image shift under Transition Effect.
-
Click to locate a preferable folder for recorded files as desired.
- During the location of a desired folder for the recorded files, click 📊 to go back to the previous level or Click Change Disk on the left menu to relocate from hard drives.
-
Click OK to confirm the selection.
-
Check Including Sub-Folder Pictures to create a slide show with all the pictures in the current folder and its subfolder.
- Check Hide window on slide show mode to view pictures without frames.
- Click Save to confirm your settings or click Cancel to abort without saving. Click Default on the left menu to restore to factory default settings.


3.5 About
AVer MediaCenter 3D provides a convenient tool, allowing users to access to our customer after sale service via AVerMedia's website easily.
- Go to "Settings" → "About".
- Connect to the Internet and then click Product Information to access the product information webpage. Or Click Technical Support to connect to our technical support webpage.
- Please leave the information on your product model and driver version on the webpage for us to solve your problems more efficiently.
![AVerMediaCenter 3D AVerMedia Settings About 12/15/2011 11:58:47 PM Product Information Technical Support AVer MediaCenter 3D Product Version: 1.7.9 Beta [Build: 11101804] AVerMedia C127 Extreme PCIe HD Capture Device Driver Version: 1.50.0.9 AVerMedia Technologies, Inc. Copyright (c) 2000-2011](/content/2026/05/995517/images/8b33b000dbd25edc9b734499a638f4ee4d05ccd9772f3923eba1504c240acf10.jpg)
Appendix
More tips and explanations are included in this chapter.
Hot Keys 37
Glossary 38
| Hot Keys Description | |
| Up/Down/Left/Right arrow | Move up, down, left or right to select the desired item. |
| Tab | Move to next item. |
| Space | Confirm the selected tracks or folders when under the main menu -Music. |
| F1 | Open the user manual. |
| F8 | Turn off / on the sound. |
| F9 | Volume Down |
| F10 | Volume Up |
| Back | Back to previous page |
| Ctrl + A | Choose between available audio modes. |
| Ctrl + Shift + A | Change aspect ratio |
| Ctrl + D | Display the OSD. |
| Ctrl + E | A shortcut to your main menu-- "Video". |
| Ctrl + Shift + F | Skip forward in intervals. |
| Ctrl + I | A shortcut to your main menu-- "Images" |
| Ctrl + M | A shortcut to your main menu-- "Music" |
| Ctrl + N | Capture an image or a continuous sequence of images. |
| Ctrl + Shift + N | Play next file in the playlist. |
| Ctrl + O | View the recorded file list. |
| Ctrl + P | Freeze the playback temporarily. |
| Ctrl + Shift + P | Play the selected file. |
| Ctrl + S | Stop the playback, recording, TimeShift, etc. |
| Ctrl + Shift + S | Enable the TimeShift function. |
| Ctrl + T | A shortcut to your main menu-- "Capture" |
| Ctrl + Shift + T | Show Video programs in full screen. |
| Alt + Home | Go to the main page of AVer MediaCenter 3D |
| Ctrl + R | Record the current program. |
| Ctrl + Shift + R | Play previous file in the playlist. |
| Alt + T | View Teletext information. |
| Alt + B | Jump to the Blue Teletext page. |
| Alt + G | Jump to the Green Teletext page. |
| Alt + R | Jump to the Red Teletext page. |
| Alt + Y | Jump to the Yellow Teletext page. |
| Alt + Shift + S | Set the time to put your computer into Stand By/Hibernate mode, exit the application or turn off the computer. |
| Alt + S | Turn on/off the PIP-sizing function. |
| Alt + P | Turn on/off the PIP-positioning function. |
| Alt + M | Activate the Picture in Picture function (PIP). |
| Ctrl + Shift + C | Switch between available signal sources. |
AVI
AVI is the most common video file format for playback on the computer. It can be saved in uncompressed form if you want high quality video, or compressed using any of the available codecs if you want to minimize the file size.
Aspect Ratio
Aspect ratio indicates the ratio of the width of an image to its height. The two most common aspect ratio of home video is 4:3 and 16:9.
DVD
When you choose this format, the recorded video file will be saved in MPEG-2 format that is compliant with DVD standards. Standard DVD frame size and frame rate are 720 x 480 pixels at 29.97 fps for NTSC and 720 x 576 at 25 fps for PAL.
H.264
Videos compressed using MPEG-4 standard are two or three times more efficient than MPEG-2. This format can be applied to a wide variety of applications or networks and systems like HD-DVD, Digital TV, Broadcast and Streaming applications.
Hibernate
Hibernation is a state in which your computer shuts down to save power but first saves everything in memory on your hard disk.
iPod
A video format base on H.264 standard but has smaller video bit rate. It's an iPod-compatible format.
MPEG-2
Videos compressed using MPEG-2 have extremely high quality pictures and full CD-quality sound. Choose MPEG-2 format for video files that are intended for DVD-ROM playback on a computer or if you want broadcast quality videos.
PIP (Picture in Picture)
PIP allows you to view two or more video sources at the same time wherein the small inset screens overlaid on the main screen.
PBP (Picture by Picture)
PBP allows you to view two or more video sources side by side on a display so that all channels are visible.
Stand By
Stand By is a state in which your monitor and hard disks turn off, so that your computer uses less power.
www.avermedia.com

- Copyright
- International Headquarters
- Table of Contents
- Chapter 1 Introduction....5
- Chapter 2 Getting Started ....13
- Chapter 3 Advanced Operations ...... 28
- Appendix 37
- Chapter 1 Introduction
- Device Introduction
- System Requirements
- Activating AVer MediaCenter 3D
- Overview of AVer MediaCenter 3D
- AVer MediaCenter 3D Console
- Description
- Control Buttons On Title Bar
- Click To ...
- Control Buttons On Playback Window Control Panel
- Running AVer MediaCenter 3D for the First Time
- Chapter 2 Getting Started
- Capture
- Basic Operations
- Note
- Capture in 3D
- Recording a 3D Content
- Note:
- Playing a Recorded 3D Content
- Video
- Playing Video Files
- Music
- Adding Music to your Playlist
- Pictures
- Viewing the Captured Images
- Playing Slide Show
- Chapter 3
- Advanced Operations
- General Settings
- Configure Recording
- Configure Snapshot
- More Options
- Capture Settings
- Configure Input Source
- Video Standards
- Closed Caption
- Video Settings
- Picture-in-Picture(PIP) / Picture-by-Picture(PBP) Display
- Pictures Settings
- About
- Appendix
- AVI
- Aspect Ratio
- DVD
- H.264
- Hibernate
- iPod
- MPEG-2
- PIP (Picture in Picture)
- PBP (Picture by Picture)
- Stand By
Brand : AVERMEDIA
Model : Game Broadcaster HD
Category : Capture card